Serenity BDD is an open-source library that aims to make the idea of living documentation a reality. Serenity BDD helps you write cleaner and more maintainable automated acceptance and regression tests faster. Serenity also uses the test results to produce illustrated, narrative reports that document and describe what your application does and how it works. Serenity tells you not only what tests have been executed, but more importantly, what requirements have been tested
BDD is a set of practices that helps to reduce the rework caused by misunderstanding or vague requirements, narrow the communication gaps between the development team, testing team, and customers, and promote continuous communication among them. Cucumber is one such open-source tool, which supports Behaviour Driven Development(BDD). In simple words, Cucumber can be defined as a testing framework, driven by plain English. It serves as documentation, automated tests, and a development aid – all in one.
Cucumber Introduction, Installation, and Configuration
Serenity BDD is an open-source library that aims to make the idea of living documentation a reality.
Serenity BDD helps you write cleaner and more maintainable automated acceptance and regression tests faster. Serenity also uses the test results to produce illustrated, narrative reports that document and describe what your application does and how it works. Serenity tells you not only what tests have been executed, but more importantly, what requirements have been tested.
What is SpringBoot Application?
Spring Boot is an open-source micro framework that provides Java developers with a platform to get started with an auto-configurable production-grade Spring application.
Comes with embedded HTTP servers like Tomcat orJetty to test web applications.
Adds many plugins that developers can use to work with embedded and in-memory databases easily. Spring allows you to easily connect with database and queue services like Oracle, PostgreSQL, MySQL, MongoDB, Redis, Solr, ElasticSearch, Rabbit MQ, and others.
Prerequisite
Serenity seamlessly supports Cucumber 6 and Cucumber 7. However, this flexibility requires a little tweaking in the build dependencies. For the Maven project, you need to do the following:
Add serenity-cucumber dependency
Add Springboottest dependency to start up an application context to be used in a test.
Add Junit-Vintage dependency as it is needed for spring boot application of version 2.4 and above with JUnit4.
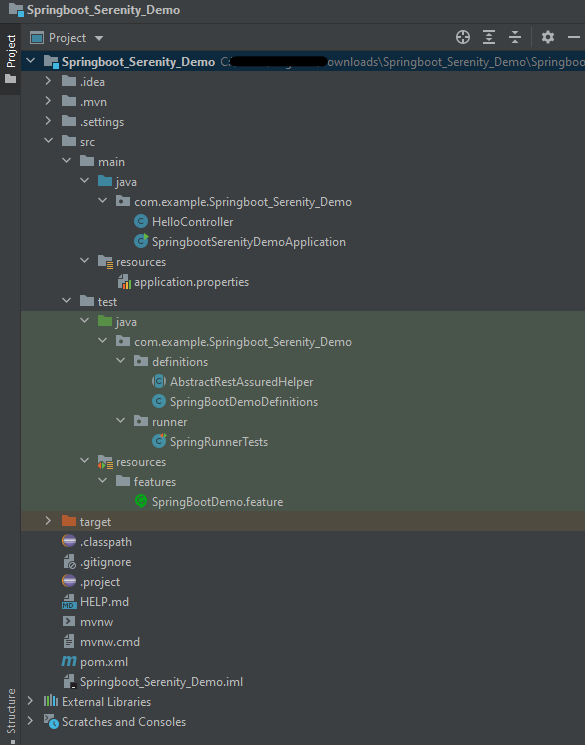
Project Directory Structure
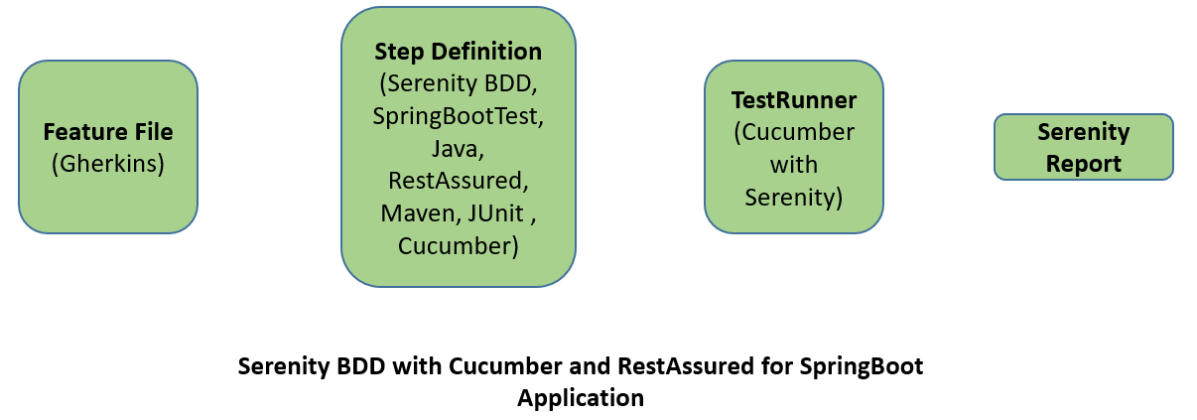
Relationship between SpringBoot, Serenity BDD, Cucumber and Rest Assured
Implementation Steps
Create a source folder – src/test/resources to create test scenarios in the Feature file
AddSpringBoot, Serenity, Cucumber,and JUnit4 dependencies to the project
Create a feature file under src/test/resources
Create the StepDefinition and Helper classes.
Create a Serenity Runner class in the src/test/java directory
Run the tests from JUnit
Run the tests from Command Line
Serenity Report Generation
CucumberReport Generation
Step 1 – Create a source folder – src/test/resources
Right-click on the test directory and select New->Directory and select resources (Maven Source Directories). Create a source folder – src/test/resources to create test scenarios in the Feature file
Step 2 – Add SpringBoot, Serenity, Cucumber, and JUnit4 dependencies to the project
We have added SpringBootTest, Serenity, Cucumber, JUnit4, and JUnit Vintage.
Step 3 – Create a feature file under src/test/resources
Below is an example of a feature file which shows a sample test scenario.
Feature: SpringBoot Request

@ReceiveCorrectResponse

   Scenario Outline: Send a valid Request to get correct response
    Given I send a request to the URL "<url>"
    Then the response will return "<response>"

   Examples:
   | url             | response                   |
   | /               | Hello World, Spring Boot!  |
   | /qaautomation   | Hello QA Automation!       |
The test class mentioned below (AbstractRestAssuredHelper) contains integration tests for the spring boot rest controller mentioned. This test class:
uses @SpringBootTest annotation which loads the actual application context.
uses WebEnvironment.RANDOM_PORT to create and run the application at some random server port.
@LocalServerPort gets the reference of the port where the server has started. It helps in building the actual request URIs to mimic real client interactions.
Step 4 – Create the StepDefinition and Helper classes
Below is the code of the StepDefinition and Helper class. These classes are created in the src/test/java directory.
This class sends the request and receives a response after performing the GET operation. Here, the validation of the response also takes place by asserting the expected and actual response
To use Rest-assured, Serenity provides the class SerenityRest
import org.junit.Assert;
import io.cucumber.java.en.Given;
import io.cucumber.java.en.Then;
import io.restassured.response.Response;
import net.serenitybdd.rest.SerenityRest;
import net.thucydides.core.annotations.Steps;

public class SpringBootDemoDefinitions {

	@Steps
    AbstractRestAssuredHelper helper;
    private Response response;

    @Given("I send a request to the URL {string}")
    public void iSendARequest(String endpoint) throws Exception  {
         response = helper.getAnonymousRequest().contentType("application/json")
                    .header("Content-Type", "application/json").when().get(endpoint);
    }

    @Then("the response will return {string}")
    public void extractResponse(String Expected ) {
          SerenityRest.restAssuredThat(response -> response.statusCode(200));
          String Actual = response.asString();
          Assert.assertEquals(Expected, Actual);
    }
}
Step 5 – Create a Serenity Runner class in the src/test/java directory
We cannot run a Feature file on its own in cucumber-based framework. We need to create a Java class that will run the Feature File. It is the starting point for JUnit to start executing the tests. TestRunner class is created under src/ test/java. When you run the tests with serenity, you use the CucumberWithSerenitytest runner. If the feature files are not in the same package as the test runner class, you also need to use the @CucumberOptionsclass to provide the root directory where the feature files can be found.
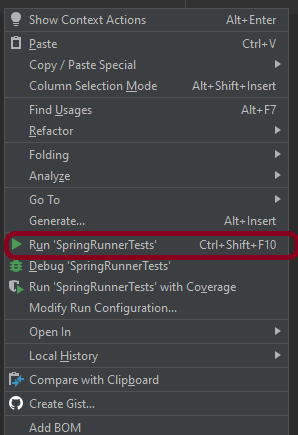
You can run the tests from SpringRunnerTests class. Right-click on the class and select Run ‘SpringRunnerTests’.
Step 7 – Run the tests from Command Line
Run the tests from the command line by using the below command
mvn clean verify
The output of the above program is
The test execution status is shown below:
Step 8 – Serenity Report Generation
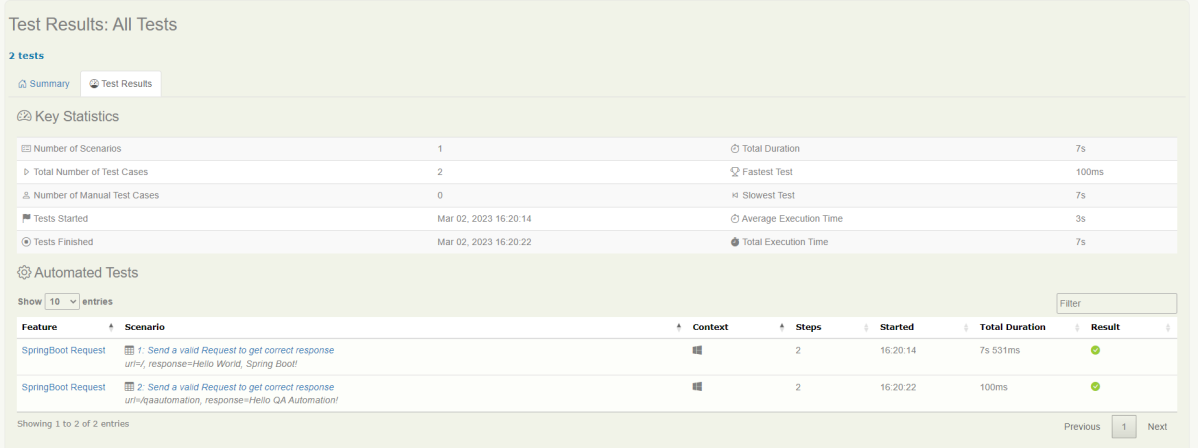
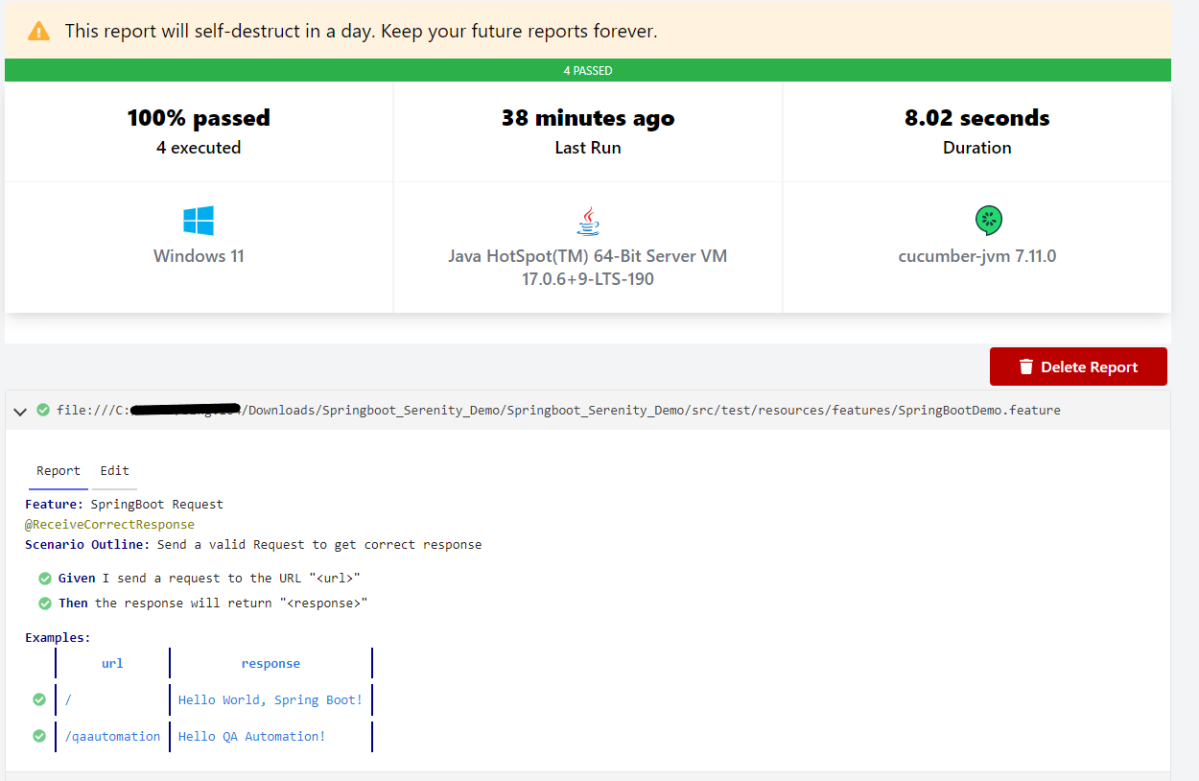
By default, the test report generated by Serenity is placed under target/site/serenity/index.html. Below is the sample Serenity Report.
Go to the Test Results tab and we can see all the test scenarios.
Step 9 – CucumberReport Generation
Cucumber Report can be generated by adding publish=true in SpringRunnerTests as shown in the above example. Click on the link provided in the execution status.
Cucumber is not an API automation tool, but it works well with other API automation tools.
There are 2 most commonly used Automation Tools for JVM to test API – Rest-Assured and Karate. In this tutorial, I will use RestAssured with Cucumber and JUnit4 for API Testing.
REST Assured is a Java library that provides a domain-specific language (DSL) for writing powerful, maintainable tests for RESTful APIs. REST Assured can be used easily in combination with existing unit testing frameworks, such as JUnit and TestNG. Rest assured, no matter how complex the JSON structures are, Rest Assured has methods to retrieve data from almost every part of the request and response.
What is Cucumber?
Cucumber is one such open-source tool, which supports Behaviour Driven Development(BDD). In simple words, Cucumber can be defined as a testing framework, driven by plain English. It serves as documentation, automated tests, and development aid – all in one.
Each scenario is a set of steps that the Cucumber must complete. Cucumber validates the software’s compliance with the specification and generates a report indicating success or failure for each scenario.
The cucumber must adhere to some basic syntax rules known as Gherkin in order to comprehend the scenarios.
In this tutorial, I will explain creating a framework for the testing of Rest API in Cucumber BDD.
This framework consists of:
Cucumber – 7.18.0
Java 17
JUnit – 4.13.2
Maven – 3.9.6
Rest Assured – 5.4.0
Maven Compiler – 3.13.0
Project Structure
Implementation Steps
Step 1 – Download and Install Java
Cucumber and Rest-Assured need Java to be installed on the system to run the tests. Click here to know How to install Java.
Step 2 – Download and setup Eclipse IDE on the system
The Eclipse IDE (integrated development environment) provides strong support for Java developers. Click here to know How to install Eclipse.
Step 3 – Setup Maven
To build a test framework, we need to add several dependencies to the project. Click here to know How to install Maven.
Step 4 – Create a new Maven Project
File -> New Project-> Maven-> Maven project-> Next -> Enter Group ID & Artifact ID -> Finish
Step 5 – Install the Cucumber Eclipse plugin for the Eclipse project(Eclipse Only)
The Cucumber plugin is an Eclipse plugin that allows eclipse to understand the Gherkin syntax. Cucumber Eclipse Plugin highlights the keywords present in Feature File. To install Cucumber Eclipse Plugin, please refer to this tutorial – How to install Cucumber Eclipse Plugin.
Step 6 – Create source folder src/test/resources
Create source folder src/test/resources to create test scenarios in the Feature file.
A new Maven Project is created with 2 folders – src/main/java and src/test/java. To create test scenarios, we need a new source folder called – src/test/resources. To create this folder, right-click on your maven project ->select New ->Java and then Source Folder.
Mention the source folder name as src/test/resources and click the Next button. This will create a source folder under your new Maven project as shown in the below image.
Step 7 – Add Rest-Assured and Cucumber dependencies to the project
You should place rest-assured before the JUnit dependency declaration in your pom.xml / build.gradle to make sure that the correct version of Hamcrest is used. REST Assured includes JsonPath and XmlPath as transitive dependencies.
The compiler plugin is used to compile the source code of a Maven project. This plugin has two goals, which are already bound to specific phases of the default lifecycle:
Step 9 – Create a feature file under src/test/resources
Create a folder with name features. Now, create the feature file in this folder. The feature file should be saved with extension .feature. This feature file contains the test scenarios created to test the application. The Test Scenarios are written in Gherkins language in the format of Given, When, Then, And, But.
Below is an example of a Test Scenario where we are using the GET method to get the information from the API.
Feature: Validation of get method

  @GetUserDetails
  Scenario Outline: Send a valid Request to get user details

    Given I send a request to the URL to get user details
    Then the response will return status <statusCode> and id <id> and email "<employee_email>" and first name "<employee_firstname>" and last name "<employee_lastname>"

    Examples:
    | statusCode | id  | employee_email          | employee_firstname | employee_lastname |
    | 200        | 2   | janet.weaver@reqres.in  | Janet              | Weaver            |
Step 10 – Create the Step Definition class or Glue Code for the Test Scenario
StepDefinition acts as an intermediate to your runner and feature file. It stores the mapping between each step of the scenario in the Feature file. So when you run the scenario, it will scan the step definition file to check the matched glue or test code.
import io.cucumber.java.en.Given;
import io.cucumber.java.en.Then;
import io.restassured.http.ContentType;
import io.restassured.response.ValidatableResponse;

import static io.restassured.RestAssured.given;
import static org.hamcrest.Matchers.equalTo;

public class APIDemoDefinitions {
    private ValidatableResponse validatableResponse;
    private String endpoint = "https://reqres.in/api/users/2";

    @Given("I send a request to the URL to get user details")
    public void sendRequest(){
        validatableResponse = given().contentType(ContentType.JSON)
                .when().get(endpoint).then();

        System.out.println("Response :"+validatableResponse.extract().asPrettyString());
    }

    @Then("the response will return status {int} and id {int} and email {string} and first name {string} and last name {string}")
    public void verifyStatus(int expectedStatusCode, int expectedId, String expectedEmail, String expectedFirstName, String expectedLastName){

        validatableResponse.assertThat().statusCode(expectedStatusCode);

        validatableResponse.assertThat().body("data.id",equalTo(expectedId));

        validatableResponse.assertThat().body("data.email",equalTo(expectedEmail));

        validatableResponse.assertThat().body("data.first_name",equalTo(expectedFirstName));

        validatableResponse.assertThat().body("data.last_name",equalTo(expectedLastName));

    }
}
In order to use REST assured effectively it’s recommended to statically import methods from the following classes:
There is another way to perform these assertions. We can use multiple body assertions together.
@Then("the response will return status {int} and id {int} and email {string} and first name {string} and last name {string}")
    public void verifyStatus(int expectedStatusCode, int expectedId, String expectedEmail, String expectedFirstName, String expectedLastName){

   validatableResponse.assertThat().statusCode(expectedStatusCode).body("data.id",equalTo(expectedId)).and()
                .body("data.email",equalTo(expectedEmail)).body("data.first_name",equalTo(expectedFirstName))
                .body("data.last_name",equalTo(expectedLastName));
Step 11 – Create a JUnit Cucumber Runner class
A runner will help us to run the feature file and act as an interlink between the feature file and StepDefinition Class.
import io.cucumber.junit.Cucumber;
import io.cucumber.junit.CucumberOptions;
import org.junit.runner.RunWith;

@RunWith(Cucumber.class)
@CucumberOptions(features= {"src/test/resources"}, glue= {"com.example.stepdefinitions"})
public class CucumberRunnerTests {
}
Note:- The name of the Runner class should end with Test otherwise we can’t run the tests using Command-Line.
Step 12 – Run the tests from JUnit
You can execute the test script by right-clicking on TestRunner class -> Run As JUnit (Eclipse).
You can execute the test script by right-clicking on TestRunner class -> Run CucumberRunnerTests (IntelliJ).
Step 13 – Run the tests from the Command Line
Run the below command in the command prompt to run the tests and to get the test execution report.
mvn clean test
The output of the above program is
Step 14 – Cucumber Report Generation
To get Cucumber Test Reports, add cucumber.properties under src/test/resources and add the below instruction in the file.
cucumber.publish.enabled=true
We are done! Congratulations on making it through this tutorial and hope you found it useful! Happy Learning!!
JUnit 4 has a feature called parameterized tests. Parameterized test means to execute the test multiple times with different sets of test data. This eliminates the redundancy of the code. This helps the developers to save time by eliminating the need to copy the code multiple times. Parameterizing tests can increase code coverage and provide confidence that the code is working as expected. These are the steps that need to be followed to create a parameterized test.
Annotate test class with @RunWith(Parameterized.class).
Create an instance variable for each “column” of test data.
It has a single constructor that contains the test data.
Create a public static method annotated with @Parameters that returns a Collection of Objects (as Array) as test data set.
Create your test case(s) using the instance variables as the source of the test data.
The test case will be invoked once for each row of data.
There are multiple ways to parameterize a test. They are the following:
Parameterized Test with Constructor
Parameterized Test with Parameter Annotation
Parameterized Test using CSV File
Let us see parameterized tests in action.
1. Parameterized Test with Constructor
Steps to create a Parameterized JUnit test
1. Create a parameterized test class
Annotate your test class using @runWith(Parameterized.class).
Declaring the variable ‘num1’, ‘num2’, ‘num3’ as private and type as int.
@RunWith(value = Parameterized.class)
public class ParameterizedTest {

    private int num1;
    private int num2;
    private int num3;
2. Create a constructor
Create a constructor that stores the test data. It stores 3 variables.
    public ParameterizedTest(int num1, int num2, int num3) {
        this.num1 = num1;
        this.num2 = num2;
        this.num3 = num3;
    }
3. Create a static method that generates and returns test data.
Creating a two-dimensional array (providing input parameters for multiplication). Using the asList method, we convert the data into a List type. Since the return type of method input is the collection.
Using @Parameters annotation to create a set of input data to run our test.
The static method identified by @Parameters annotation returns a Collection, where each entry in the Collection will be the input data for one iteration of the test.
The complete code is shown below:
import org.junit.Test;
import org.junit.runner.RunWith;
import org.junit.runners.Parameterized;
import java.util.Arrays;
import java.util.Collection;
import static org.junit.Assert.assertEquals;
@RunWith(value = Parameterized.class)
public class ParameterizedTest {
private int num1;
private int num2;
private int num3;
public ParameterizedTest(int num1, int num2, int num3) {
this.num1 = num1;
this.num2 = num2;
this.num3 = num3;
}
    @Parameterized.Parameters(name = "{index}: multiply({0}*{1}) = {2}")
    public static Collection<Object[]> data() {
        return Arrays.asList(new Object[][]{
                {1, 1, 1},
                {2, 2, 4},
                {8, 2, 16},
                {4, 5, 20},
                {5, 5, 25}
        });
    }
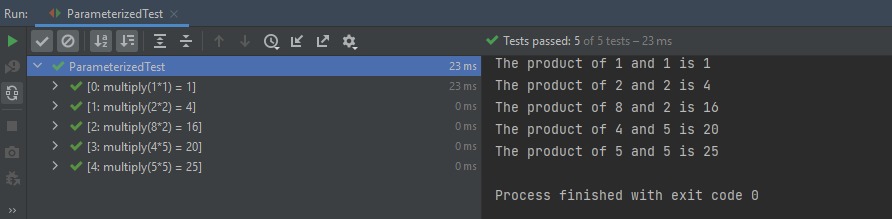
@Test
public void multiplication() {
System.out.println("The product of "+num1+" and "+num2+" is "+num3);
assertEquals((num1*num2), num3);
}
}
The output of the above program is
2. Parameterized Test with Parameter Annotation
It is also possible to inject data values directly into fields without needing a constructor using the@Parameter annotation.
import org.junit.Test;
import org.junit.runner.RunWith;
import org.junit.runners.Parameterized;
import java.util.Arrays;
import java.util.Collection;
import static org.junit.Assert.assertEquals;
@RunWith(value = Parameterized.class)
public class ParameterizedTest1 {
@Parameterized.Parameter(value = 0)
public int num1;
@Parameterized.Parameter(value = 1)
public int num2;
@Parameterized.Parameter(value = 2)
public int num3;
@Parameterized.Parameters(name = "{index}: multiply({0}*{1}) = {2}")
public static Collection<Object[]> data() {
return Arrays.asList(new Object[][]{
{1, 1, 1},
{2, 2, 4},
{8, 2, 16},
{4, 5, 20},
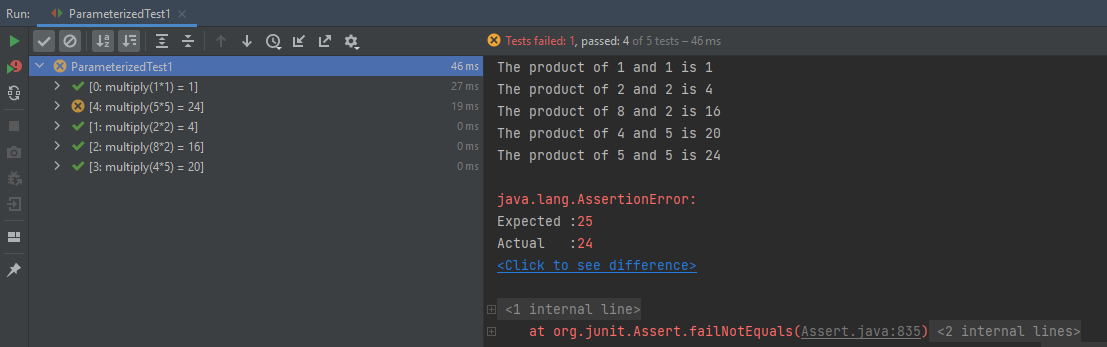
{5, 5, 24}
});
}
@Test
public void multiplication() {
System.out.println("The product of "+num1+" and "+num2+" is "+num3);
assertEquals((num1*num2), num3);
}
}
The output of the above program is
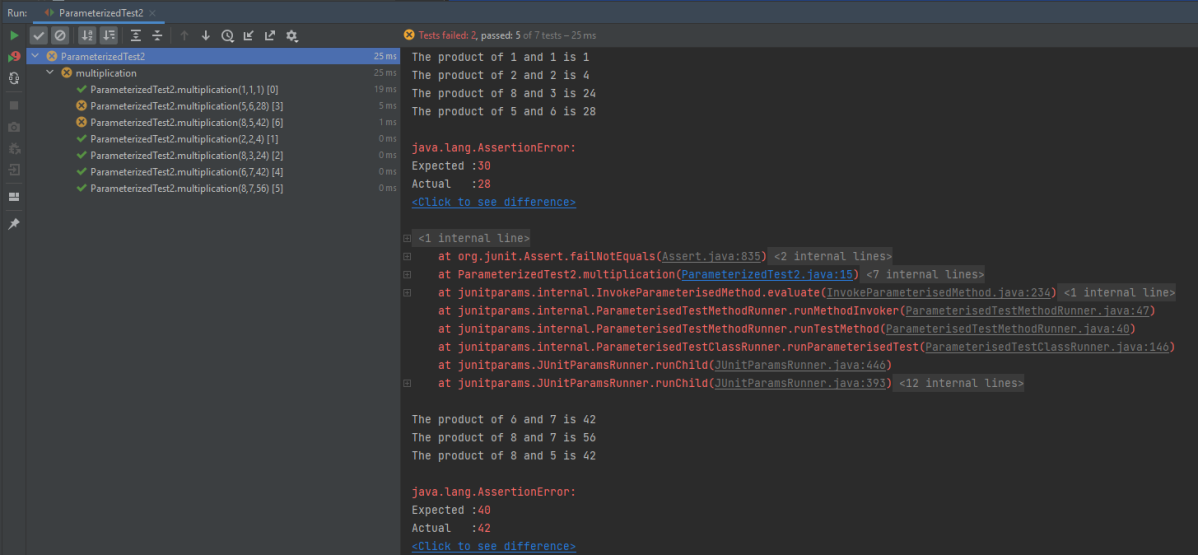
3. Parameterized Test using CSV File
We can use an external CSV file to load the test data. This helps if the number of possible test cases is quite significant, or if test cases are frequently changed. The changes can be done without affecting the test code.
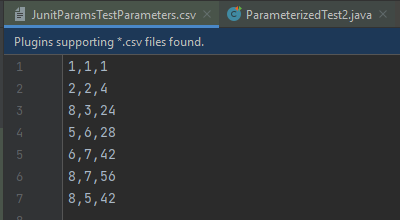
To start with, add a JUnitParams dependency to POM.xml
Let’s say that we have a CSV file with test parameters as JunitParamsTestParameters.csv:
Now let’s look at how this file can be used to load test parametersin the test method:
import junitparams.JUnitParamsRunner;
import org.junit.Test;
import org.junit.runner.RunWith;
import junitparams.FileParameters;
import static org.junit.Assert.assertEquals;

@RunWith(JUnitParamsRunner.class)
public class ParameterizedTest2 {

    @Test
    @FileParameters("src/test/resources/JunitParamsTestParameters.csv")
    public void multiplication(int num1, int num2, int num3) {
        System.out.println("The product of "+num1+" and "+num2+" is "+num3);
        assertEquals((num1*num2), num3);
    }
}
The output of the above program is
The parameterized test enables us to execute the same test over and over again using different values.
Important annotations to be used during parameterization
@RunWith
@Parameters
Congratulations. We are done. I hope this tutorial is helpful to you. Happy Learning!!
Rest–Assuredis a Java-based library that is used to test RESTful Web Services. REST-assured was designed to simplify the testing and validation of REST APIs. It takes influence from testing techniques used in dynamic languages such as Ruby and Groovy.
In this tutorial we will discuss to create a JUnit project using IntelliJ. We will be at first creating a simple Java Project and will add JUnit5 as well as create a Maven Project, then we will add a basic Class and a JUnitTest for it.
Step 2 – Right click on the project and select Open Module Settings.
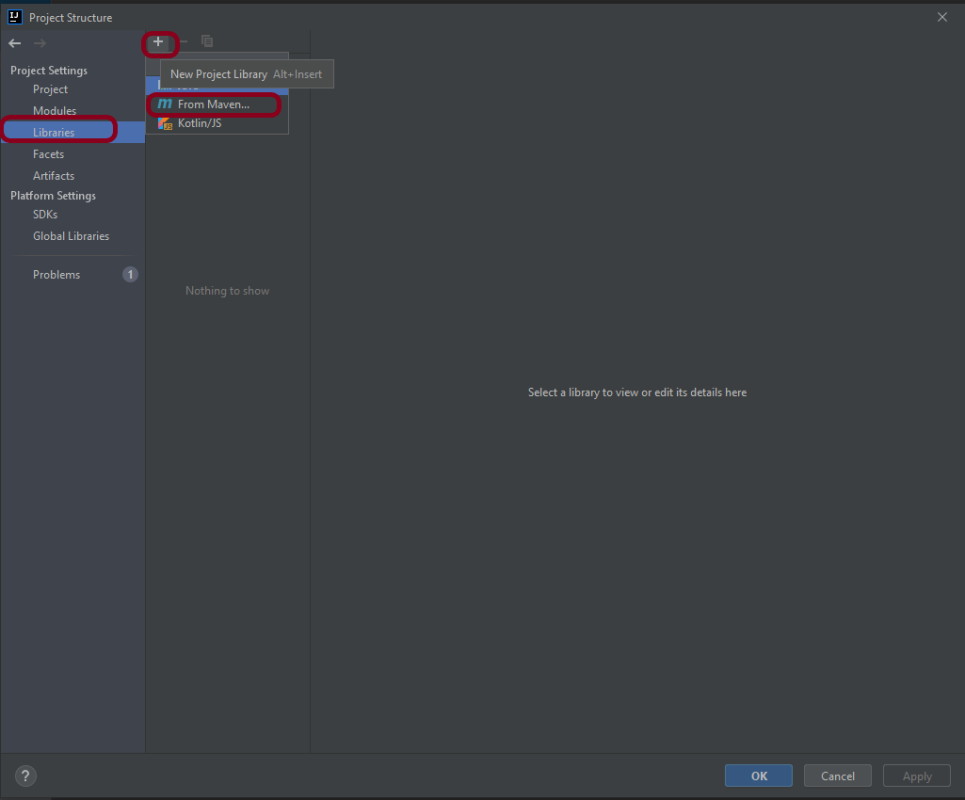
Step 3 – Go to the “Libraries” group, click the little plus (look up), and choose “From Maven…” option.
Step 4 – Search for “junit” — something like “junit:junit-4.13“. Click the “OK“ button.
Step 5– A new dialog will appear to confirm that “junit:junit:4.13.2” will be added to the module. Click the “OK“ button.
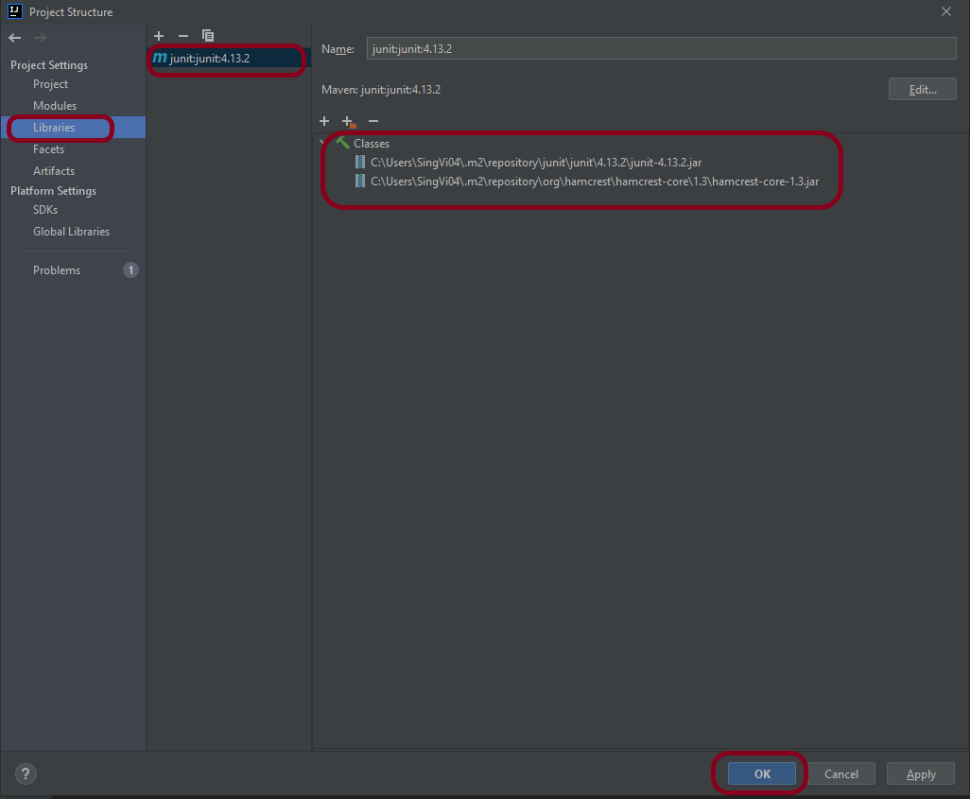
Step 6 – This screens shows that junit:junit:4.13.2 is added to the Libraries. It contains the highlighted classes – junit-4.13.2.jar and hamcrest-core-1.3.jar. Click the “OK” button.
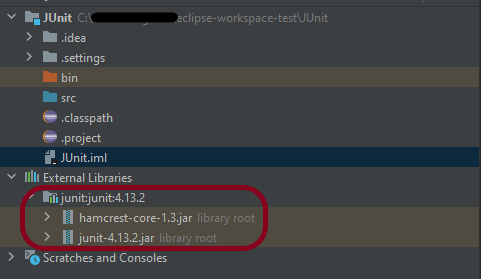
Step 7– This image shows that the Junit is added to the External Libraries.
Step 8– Create a Java Class – JUnit4Test under src and create a JUnit test to verify that it is installed properly.
import org.junit.Assert;
import org.junit.Test;

public class JUnit4Test {

    @Test
    public void Test() {

        String str1 = "Happy";
        String str2 = new String("Happy");
        Assert.assertEquals("String1 and String 2 are equal",str1, str2);

    }
}
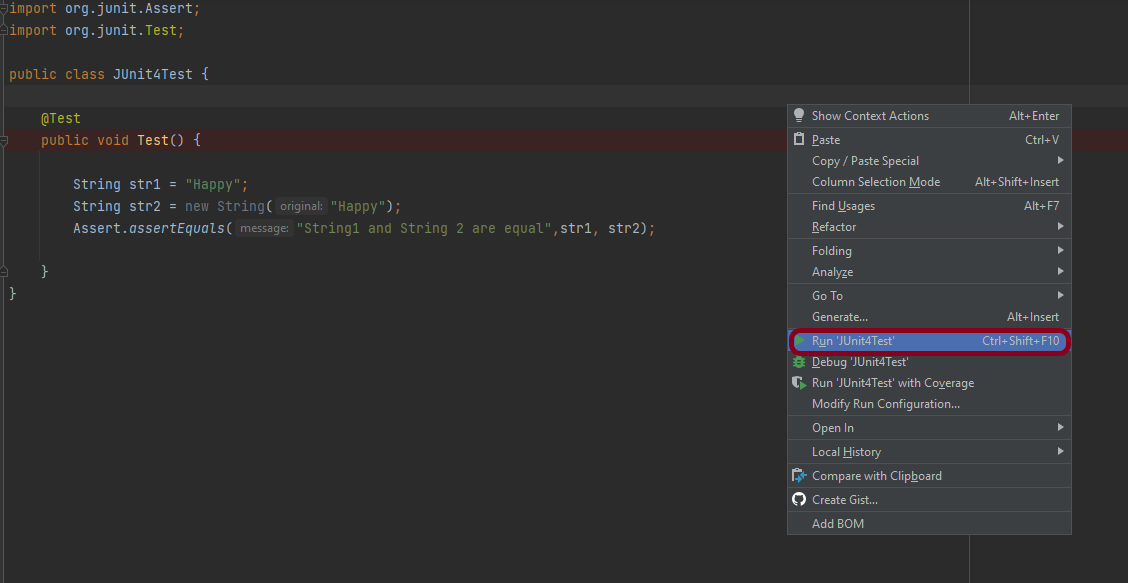
Step 9– There are many ways to run the test. One of the way is to Right-Click and select Run JUnit4Test
The successful execution of the test shows that the JUnit is configured properly.
Create a Maven Project
Add Junit dependency to the POM.xml and build the project.
Now we need to apply the changes in the build script. Press Ctrl+Shift+O or click Load Maven Changes in the notification that appears in the top-right corner of the editor.
Create a Java Class – JUnit4Test under src/test/javaand create a JUnit test to verify that it is installed properly.
import org.junit.Test;
import static org.junit.Assert.assertArrayEquals;

public class JUnitMavenTest {

    @Test
    public void Test() {

        String[] expected = {"happy","days","summer","spring"};
        String[] actual = {"happy","days","summer","spring"};

        assertArrayEquals("Expected and Actual Arrays are not equal",expected,actual);

    }
}
The output of the above program is
Similarly, to add JUnit5 we can add below mentioned dependencies to the POM.xml.
JUnit is an open source Unit Testing Framework for JAVA. JUnit is a simple framework to write repeatable tests. It is an instance of the xUnit architecture for unit testing frameworks.
Spring Boot 3.0.4 requires Java 17 and is compatible with and including Java 19. Spring Framework 6.0.6 or above is also required.
Explicit build support is provided for the following build tools:
Maven – 3.5+
Gradle – 7.x (7.5 or later) and 8.x
This framework consists of
SpringBoot Starter Parent – 3.1.0
Serenity – 3.6.12
Serenity Cucumber – 3.6.12
Serenity JUnit4 – 3.6.12
Serenity Rest Assured – 3.6.12
Spring
Java 17
Gradle – 7.6.1
What is SpringBoot Application?
Spring Boot is an open-source micro-framework that provides Java developers with a platform to get started with an auto-configurable production-grade Spring application.
Comes with embedded HTTP servers like Tomcat orJetty to test web applications.
Adds many plugins that developers can use to work with embedded and in-memory databases easily. Spring allows you to easily connect with database and queue services like Oracle, PostgreSQL, MySQL, MongoDB, Redis, Solr, ElasticSearch, Rabbit MQ, and others.
What is RestController?
HTTP requests are handled by a controller in Spring’s approach to building RESTful web services. The @RestController annotation identifies these components, and the HelloController shown below (from src/main/java/com/example/springboot_demo/HelloController.java) handles GET requests for / and /qaautomation by returning a new instance of the Greeting class. Spring RestController takes care of mapping request data to the request-defined handles method.
import org.springframework.web.bind.annotation.GetMapping;
import org.springframework.web.bind.annotation.RestController;

@RestController
public class HelloController {

    @GetMapping(path="/")
    String hello() {
        return "Hello World, Spring Boot!";
    }


    @GetMapping(path="/qaautomation")
    String qaautomation() {
        return "Hello QA Automation!";
    }

}
Project Directory Structure
Implementation Steps
Create a source folder – src/test/resources to create properties file
AddSpringBootTest,Rest Assured, and JUnit4 dependencies to the project
Create a feature file in src/test/resources
Create the StepDefinition and Helper classes.
Create a Serenity Runner class in the src/test/java directory
Create an application.properties file in src/test/resources
Create a serenity.properties at the root level of the project
Run the tests from Command Line
Serenity Report Generation
CucumberReport Generation
Step 1 – Create a source folder – src/test/resources to create test scenarios in the Feature file
Right-click on the test directory and select New->Directory and select resources (Maven Source Directories).
Step 2 – Add SpringBootTest,Rest Assured, and other dependencies to the project
We have added SpringBootTest, SpringBoot Web, Tomcat, Spring Web, Rest Assured, and JUnit4 dependencies to the build.gradle.
plugins {
	id 'java'
	id 'org.springframework.boot' version '3.1.0-SNAPSHOT'
	id 'io.spring.dependency-management' version '1.1.0'
	id "net.serenity-bdd.serenity-gradle-plugin" version "3.6.7"
}

group = 'com.example'
version = '0.0.1-SNAPSHOT'
sourceCompatibility = '17'

repositories {
	mavenCentral()
	maven { url 'https://repo.spring.io/milestone' }
	maven { url 'https://repo.spring.io/snapshot' }
}


dependencies {

	implementation 'org.springframework.boot:spring-boot-starter'
	implementation 'org.springframework.boot:spring-boot-starter-web'
	implementation 'org.springframework.boot:spring-boot-starter-tomcat'
	implementation 'org.springframework:spring-web'

	testImplementation 'org.springframework.boot:spring-boot-starter-test'
	testImplementation 'net.serenity-bdd:serenity-core:3.6.12'
	testImplementation 'net.serenity-bdd:serenity-cucumber:3.6.12'
	testImplementation 'net.serenity-bdd:serenity-rest-assured:3.6.12'
	testImplementation 'net.serenity-bdd:serenity-spring:3.6.12'
	testImplementation 'net.serenity-bdd:serenity-junit:3.6.12'
	testImplementation 'org.junit.vintage:junit-vintage-engine'

}

tasks.named('test') {
	useJUnit() {}
	testLogging {
		showStandardStreams = true
	}
	systemProperties System.getProperties()
}

gradle.startParameter.continueOnFailure = true

test.finalizedBy(aggregate)
Step 3 – Create a feature file in src/test/resources
Below is an example of a feature file that shows a sample test scenario. Feature file should end with .feature. It contains the test scenarios in the form of simple English using the terms Given, When, Then, And.
Feature: SpringBoot Request

@ReceiveCorrectResponse

   Scenario Outline: Send a valid Request to get correct response
    Given I send a request to the URL "<url>"
    Then the response will return "<response>"

   Examples:
   | url             | response                   |
   | /               | Hello World, Spring Boot!  |
   | /qaautomation   | Hello QA Automation!       |
Step 4 – Create the StepDefinition and Helper classes.
Below is the code of the StepDefinition and Helper class. These classes are created in the src/test/java directory.
uses @SpringBootTest annotation which loads the actual application context.
uses WebEnvironment.RANDOM_PORT to create and run the application at some random server port.
@LocalServerPort gets the reference of the port where the server has started. It helps in building the actual request URIs to mimic real client interactions.
This class sends the request and receives a response after performing the GET operation. Here, the validation of the response also takes place by asserting the expected and actual response
import io.cucumber.java.en.Given;
import io.cucumber.java.en.Then;
import io.restassured.response.Response;
import net.serenitybdd.rest.SerenityRest;
import net.thucydides.core.annotations.Steps;
import org.junit.Assert;

public class SpringBootDemoDefinitions {

	@Steps
    AbstractRestAssuredHelper helper;
    private Response response;

    @Given("I send a request to the URL {string}")
    public void iSendARequest(String endpoint) throws Exception  {
         response = helper.getAnonymousRequest()
                    .header("Content-Type", "application/json").when().get(endpoint);
    }

    @Then("the response will return {string}")
    public void extractResponse(String Expected ) {
          SerenityRest.restAssuredThat(response -> response.statusCode(200));
          String Actual = response.asString();
          System.out.println("Result :"+Actual);
          Assert.assertEquals(Expected, Actual);
    }
}
Step 5 – Create a Serenity Runner class in the src/test/java directory
We cannot run a Feature file on its own in cucumber-based framework. We need to create a Java class that will run the Feature File. It is the starting point for JUnit to start executing the tests. TestRunner class is created under src/test/java. When you run the tests with serenity, you use the CucumberWithSerenitytest runner.
spring.profiles.active – property to specify which profiles are active. The default profile is always active. server.port – By default, the embedded server starts on port 8080. Now the server will start on port 8090 server.servlet.context-path – the context path in Spring Boot can be changed by setting a property, server.servlet.context-path.
Step 7 – Create a serenity.properties at the root level of the project
serenity.project.name = Testing of Gradle SpringBoot Application with Serenity and JUnit4 Demo
Step 8 – Run the tests from Command Line
Run the tests from the command line by using the below command
gradle clean test
The output of the above program is
This image shows that the profile name is “dev”. Application is started on port – “54462” and the context path is “/demo”.
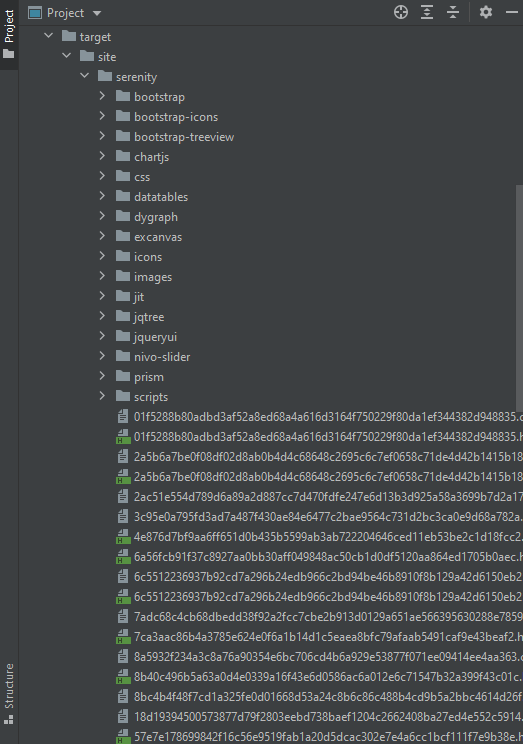
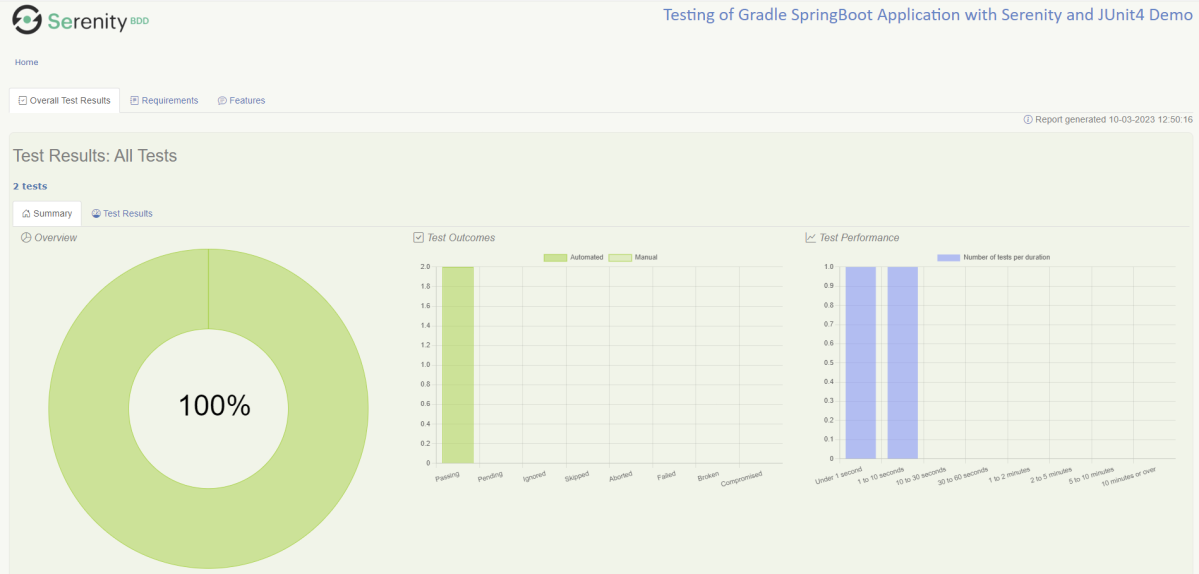
Step 9 – Serenity Report Generation
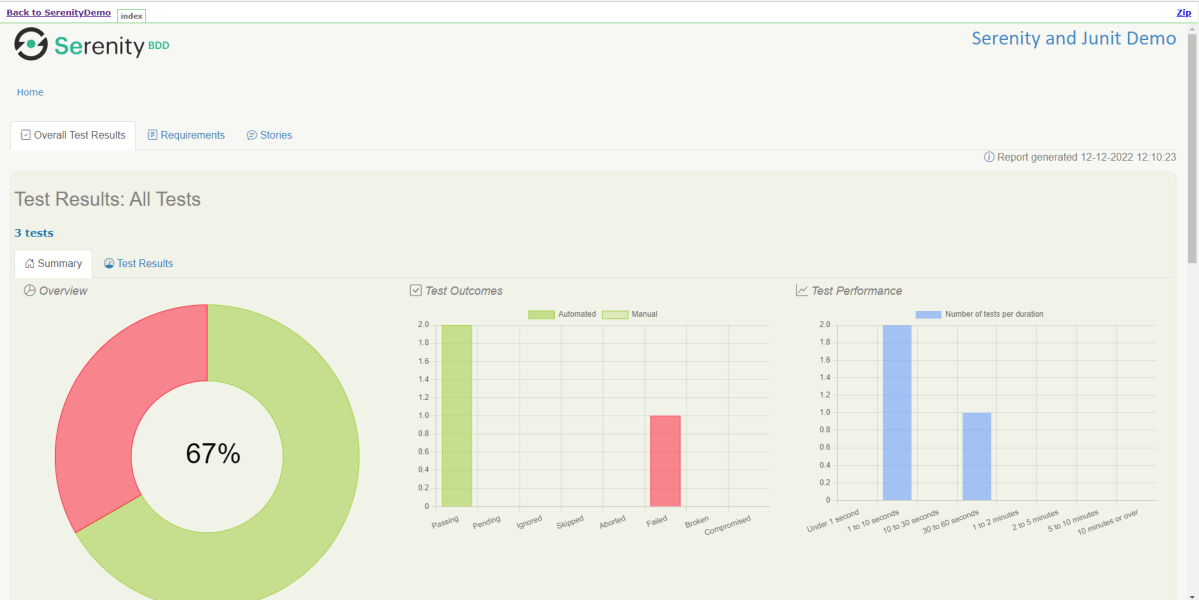
By default, the test report generated by Serenity is placed under target/site/serenity/index.html. Below is the sample Serenity Report.
Below is the sample Serenity Report.
Step 10 – CucumberReport Generation
A Cucumber Report can be generated by adding publish=true in SpringRunnerTests as shown in the above example. Click on the link provided in the execution status.
Cucumber Report
Congratulations on making it through this tutorial and hope you found it useful! Happy Learning!! Cheers!!
To generate Serenity Report in Jenkins, we need to download HTML Publisher. Please refer to this tutorial to install the plugin – How to install Plugins in Jenkins
Implementation Steps
Step 1: Create a new project using the Maven project plugin
Give the Name of the project.
Click on the Maven project.
Click on the OK button.
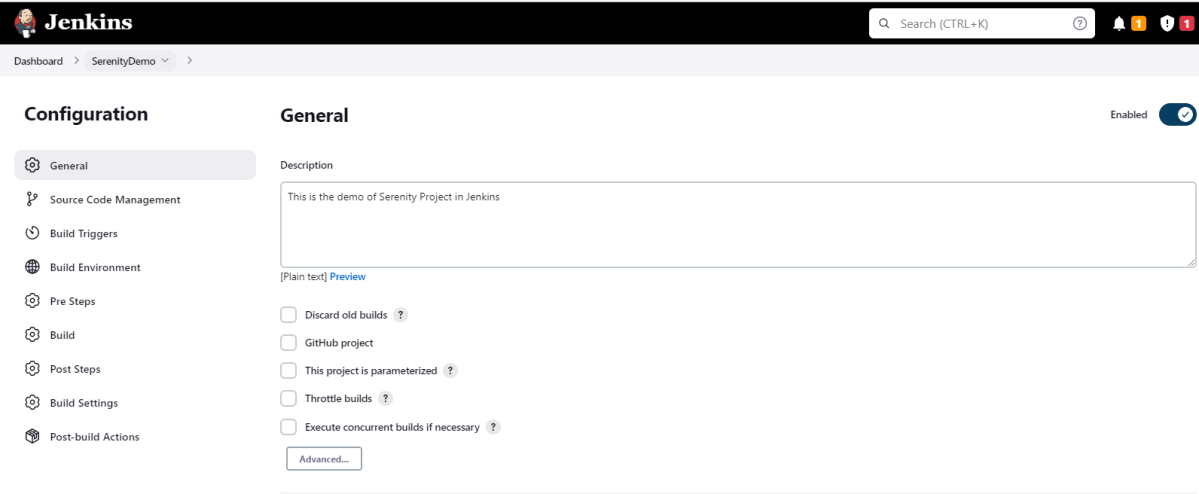
In the General section, enter the project description in the Description box.
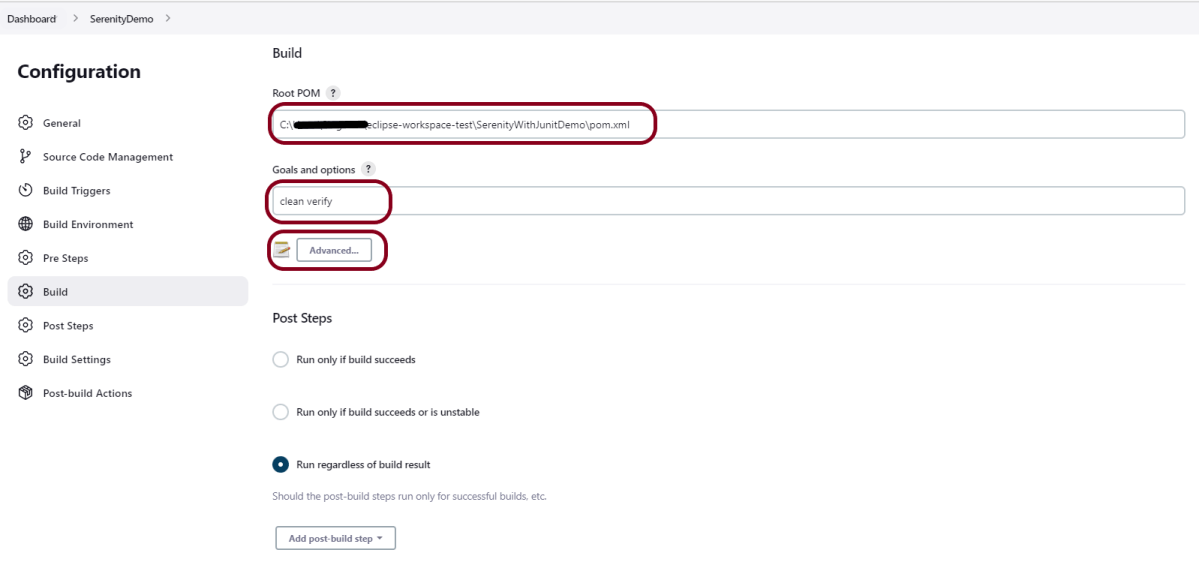
Step 2: Build Management
Go to the Build section of the new job.
In the Root POM textbox, enter the full path to pom.xml
In the Goals and options section, enter “clean test“
Click on the Advanced button.
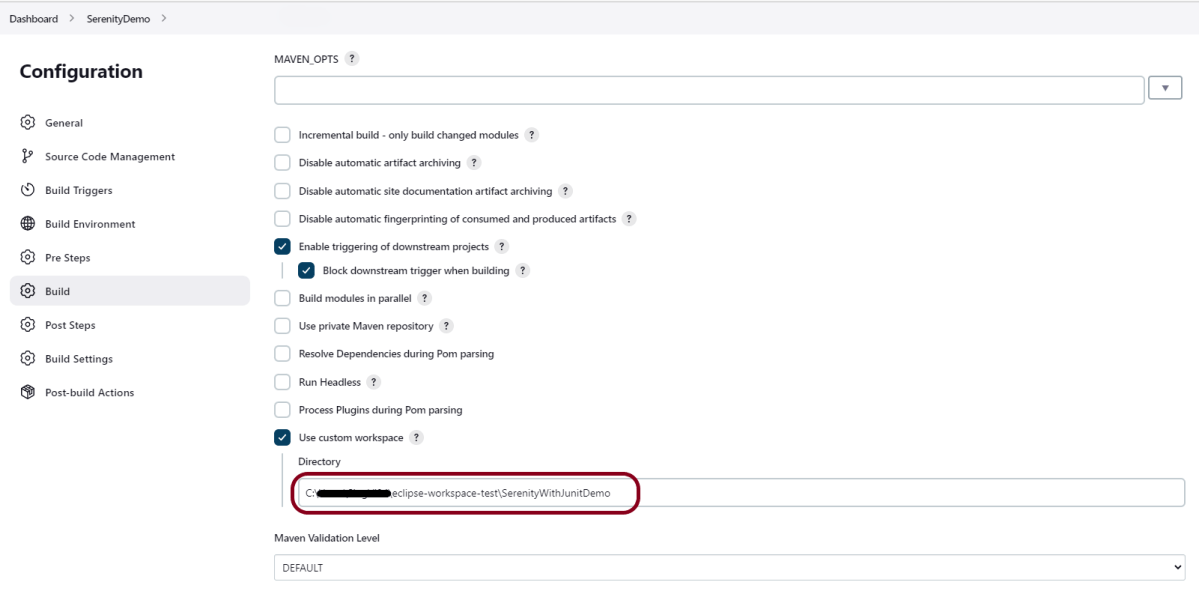
Step 3: Select custom workspace
Mention the full path of the project in the directory.
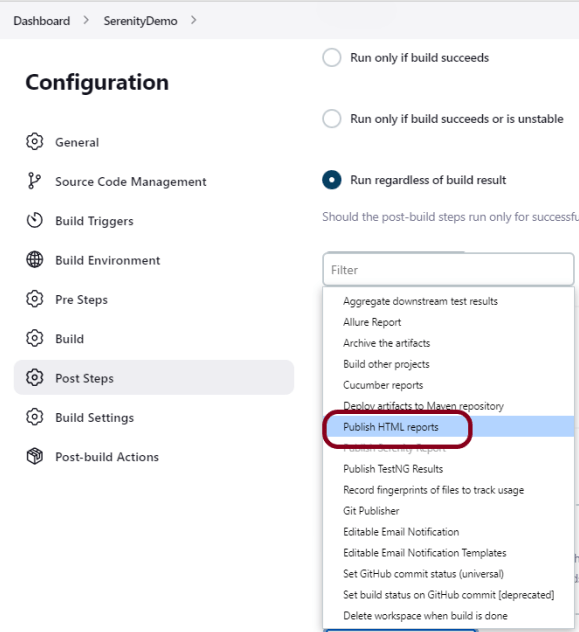
Step 4: Select “Publish HTML Reports” from “Post Build Actions”
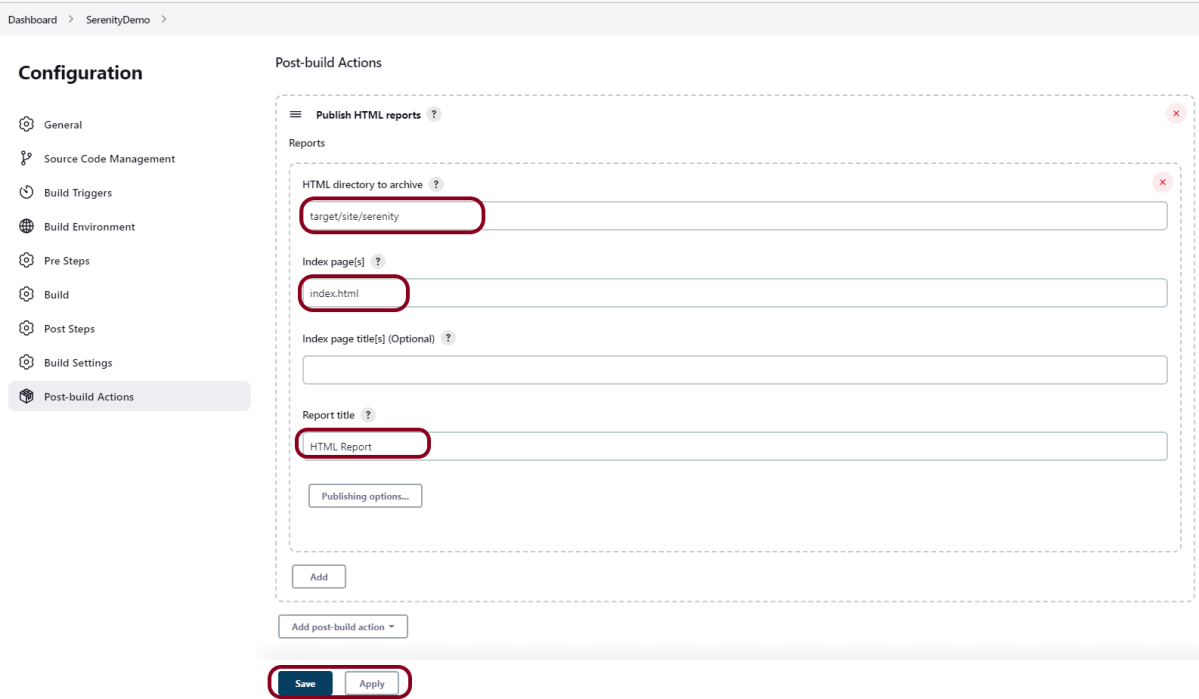
Select “Publish HTML reports“.
HTML directory to archive – target/site/serenity
Index page[s] – Index.html
Report title – HTML Report
Click on the Apply and Save buttons.
We have created a new Maven project “SerenityDemo” with the configuration to run the Serenity Tests and also to generate a Serenity Report after execution using Jenkins.
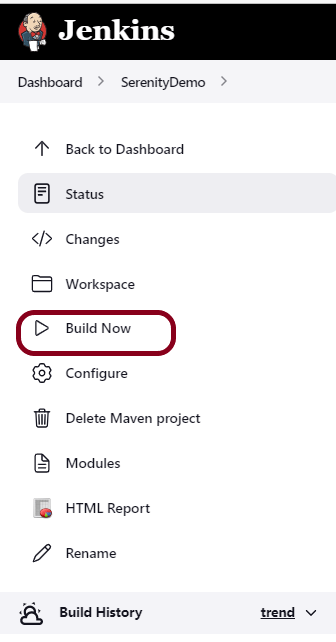
Step 5: Execute the tests
Let’s execute it now by clicking on the “Build Now” button.
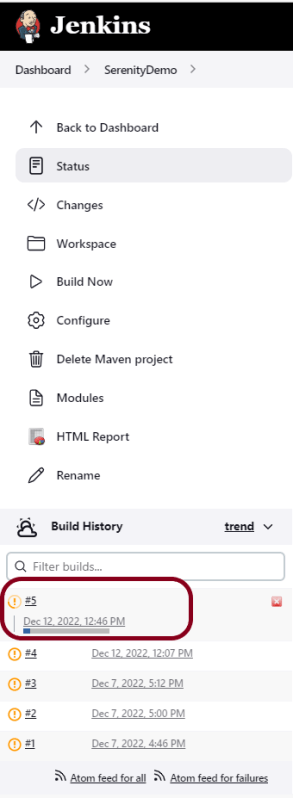
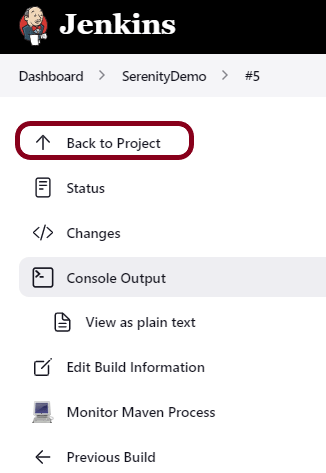
Right-click on Build Number (here in my case it is #5) and click on Console Output to see the result.
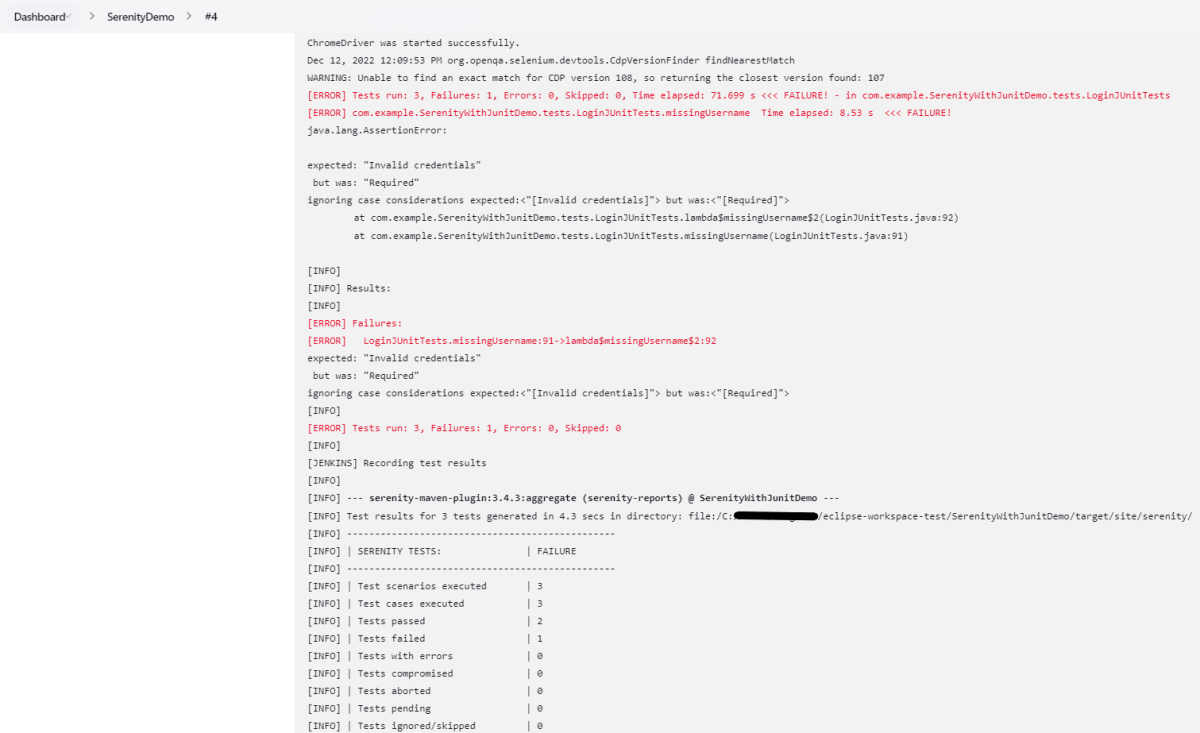
Below is the execution summary of the tests.
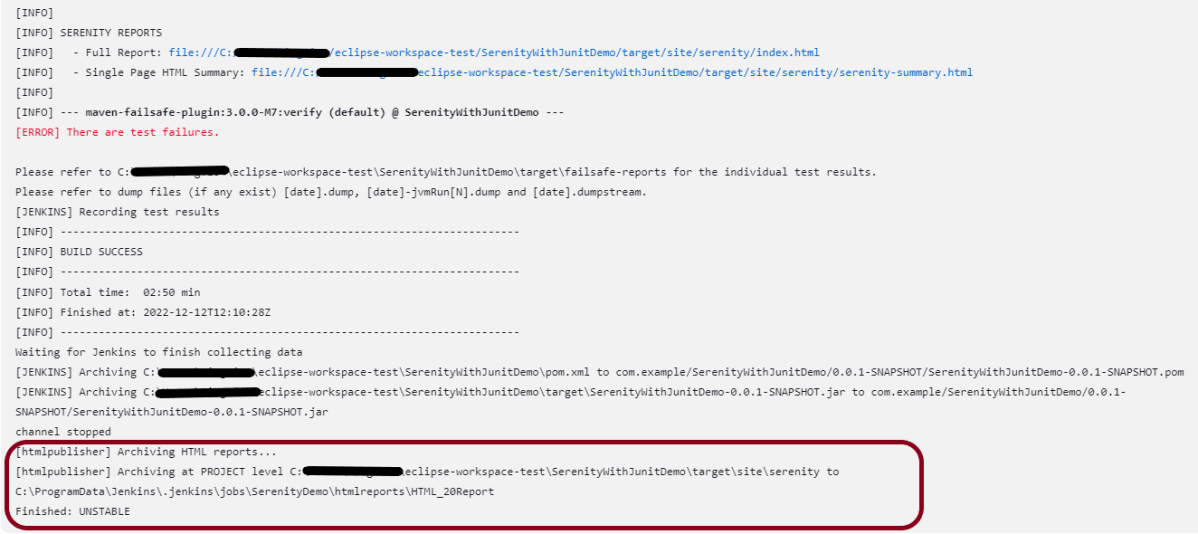
We can see below that the Serenity Reports are generated.
Once the execution is completed, click on “Back to Project“.
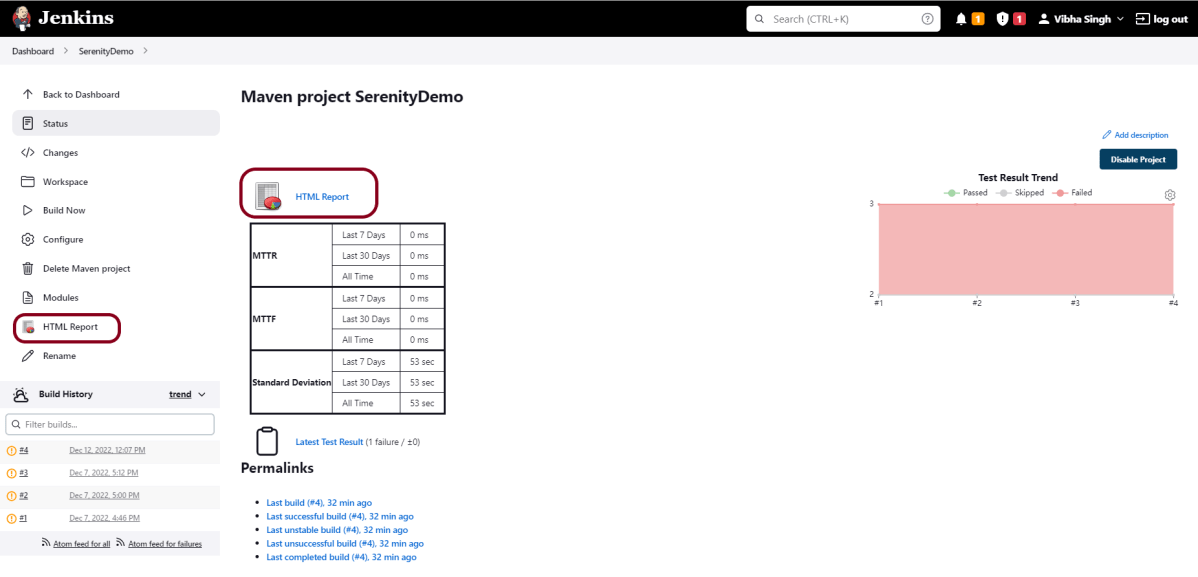
Step 6: Serenity Report
We could see a link to view ‘HTML Reports’. Click on the HTML Reports. It displays the Index.html Report of Serenity.
Serenity Report is in HTML format. So, we need to install HTML Publisher Plugin to view the Serenity Reports. Please refer to this tutorial to download and install the HTML Plugin in Jenkins – How to generate HTML Reports in Jenkins.
The Serenity Report looks like as shown below:
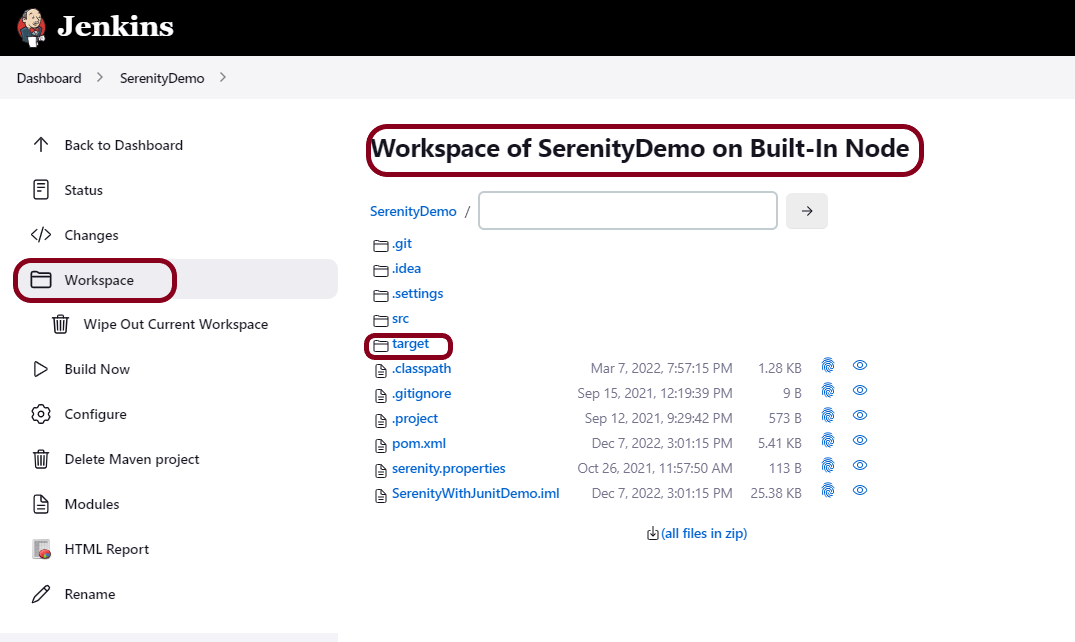
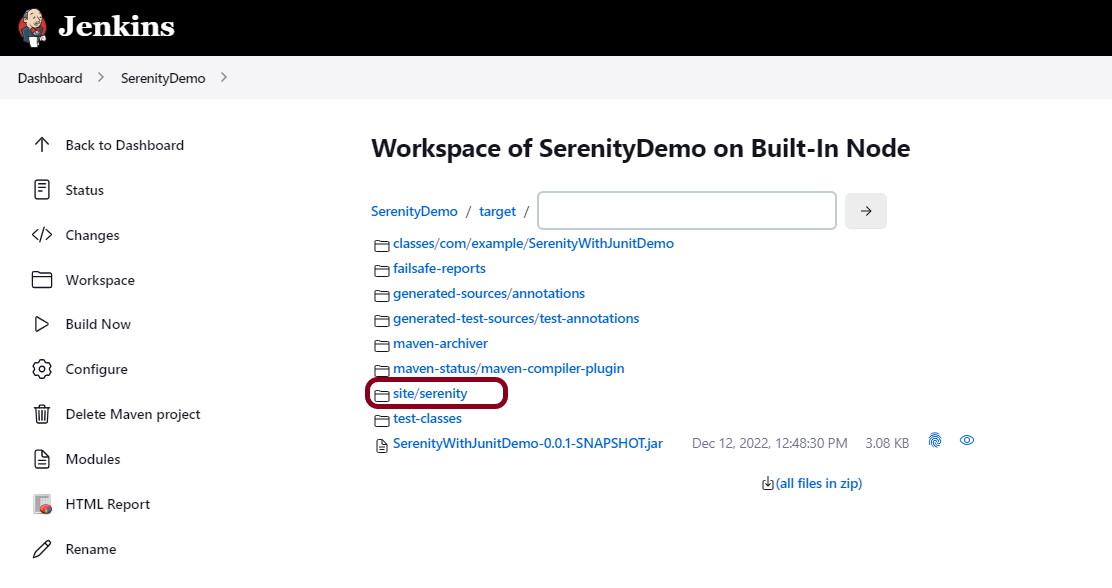
How to find the path of reports in Jenkins?
After running successfully, go to the job and click on the “Workspace” link. As soon as we click on the above-mentioned link, we will be inside this directory. Now click on the “target” link.
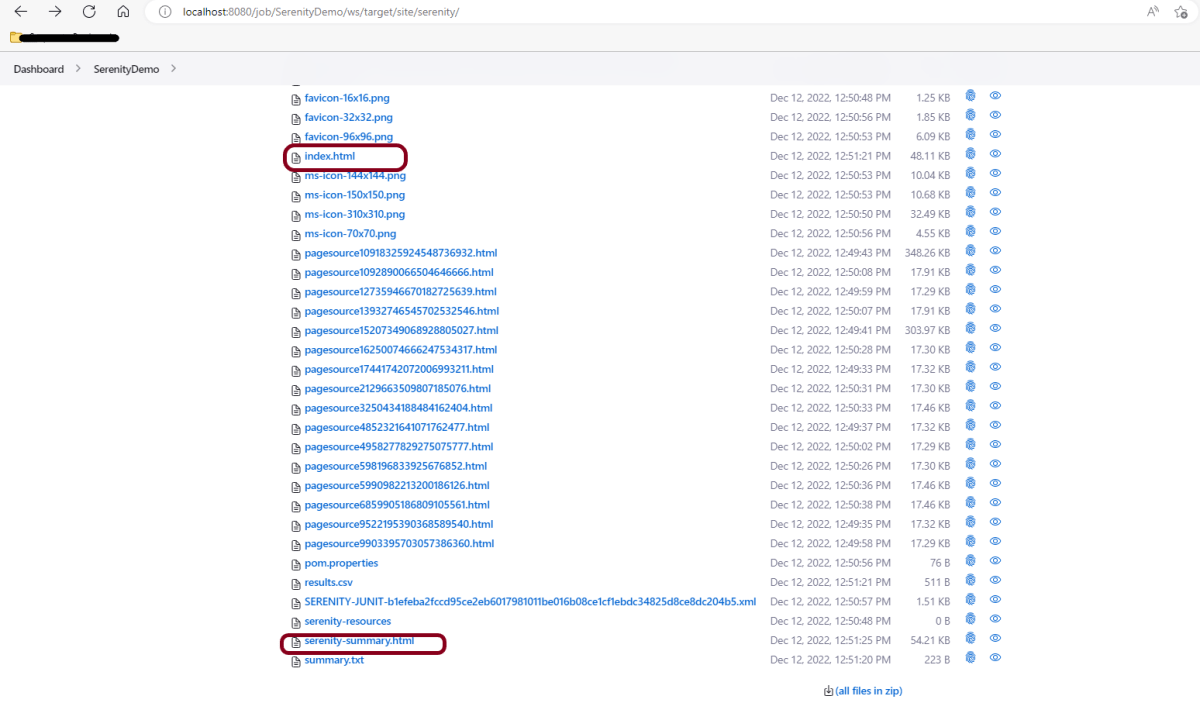
As soon as we click on the above-mentioned link, we will be inside this directory. Now click on the “site/serenity” link.
As soon as we click on the above-mentioned link, we will be inside this directory. Now we can see all the reports of Serenity.
This way, we could run Serenity tests and generate Serenity Reports using Jenkins.
Congratulations on making it through this tutorial and hope you found it useful! Happy Learning!! Cheers!!