Last Updated On
In the previous tutorial, I explained the Testing of Web Application using Serenity BDD with Cucumber5 and JUnit4. In this tutorial, I’ll explain how to generate a Serenity Report for a web application using Serenity BDD with Cucumber6 and JUnit4.
Serenity BDD produces great test reports that act as Living Documentation for the product.
Table of Contents
- Prerequisite
- Dependency List
- Implementation Steps
- Update the Properties section in Maven pom.xml
- Add Serenity, Serenity Cucumber, and JUnit dependencies to POM.xml
- Update the Build Section of pom.xml
- Create a Feature file
- Create the Step Definition class or Glue Code
- Create a Serenity-Cucumber Runner class
- Create serenity.conf file under src/test/resources
- Create serenity.properties file at the root of the project
- Run the tests through the command line which generates Serenity Report
- Serenity Report
Prerequisite
- Java 11 installed
- Maven installed
- Eclipse or IntelliJ installed
Dependency List:
- Java 17
- Maven – 3.9.6
- Serenity – 4.0.30
- Serenity Cucumber – 4.0.30
- JUnit – 4.13.2
- Maven Surefire Plugin – 3.2.3
- Maven Failsafe Plugin – 3.2.3
- Maven Compiler Plugin – 3.12.1
Implementation Steps
Step 1 – Update the Properties section in Maven pom.xml
 <properties>
    <project.build.sourceEncoding>UTF-8</project.build.sourceEncoding>
    <serenity.version>4.0.30</serenity.version>
    <junit.version>4.13.2</junit.version>
    <maven.compiler.plugin.version>3.12.1</maven.compiler.plugin.version>
    <maven.surefire.plugin.version>3.2.3</maven.surefire.plugin.version>
    <maven.failsafe.plugin.version>3.2.3</maven.failsafe.plugin.version>
    <maven.compiler.source.version>17</maven.compiler.source.version>
    <maven.compiler.target.version>17</maven.compiler.target.version>
    <tags></tags>
    <parallel.tests></parallel.tests>
    <webdriver.base.url></webdriver.base.url>
 </properties>
Step 2 – Add Serenity, Serenity Cucumber, and JUnit dependencies to POM.xml
<dependencies>
    <dependency>
      <groupId>net.serenity-bdd</groupId>
      <artifactId>serenity-core</artifactId>
      <version>${serenity.version}</version>
      <scope>test</scope>
    </dependency>

    <dependency>
      <groupId>net.serenity-bdd</groupId>
      <artifactId>serenity-junit</artifactId>
      <version>${serenity.version}</version>
      <scope>test</scope>
    </dependency>

    <dependency>
      <groupId>net.serenity-bdd</groupId>
      <artifactId>serenity-screenplay-webdriver</artifactId>
      <version>${serenity.version}</version>
      <scope>test</scope>
    </dependency>

    <dependency>
      <groupId>net.serenity-bdd</groupId>
      <artifactId>serenity-cucumber</artifactId>
      <version>${serenity.version}</version>
      <scope>test</scope>
    </dependency>

    <dependency>
      <groupId>junit</groupId>
      <artifactId>junit</artifactId>
      <version>${junit.version}</version>
      <scope>test</scope>
    </dependency>

  </dependencies>
Step 3 – Update the Build Section of pom.xml
<project xmlns="http://maven.apache.org/POM/4.0.0" xmlns:xsi="http://www.w3.org/2001/XMLSchema-instance"
  xsi:schemaLocation="http://maven.apache.org/POM/4.0.0 http://maven.apache.org/xsd/maven-4.0.0.xsd">
  <modelVersion>4.0.0</modelVersion>

  <groupId>com.example</groupId>
  <artifactId>SerenityCucumberJunit4Demo</artifactId>
  <version>1.0-SNAPSHOT</version>
  <packaging>jar</packaging>

  <name>SerenityCucumberJunit4Demo</name>
  <url>http://maven.apache.org</url>

  <properties>
    <project.build.sourceEncoding>UTF-8</project.build.sourceEncoding>
    <serenity.version>4.0.30</serenity.version>
    <junit.version>4.13.2</junit.version>
    <maven.compiler.plugin.version>3.12.1</maven.compiler.plugin.version>
    <maven.surefire.plugin.version>3.2.3</maven.surefire.plugin.version>
    <maven.failsafe.plugin.version>3.2.3</maven.failsafe.plugin.version>
    <maven.compiler.source.version>17</maven.compiler.source.version>
    <maven.compiler.target.version>17</maven.compiler.target.version>
    <tags></tags>
    <parallel.tests></parallel.tests>
    <webdriver.base.url></webdriver.base.url>
  </properties>

  <dependencies>
    <dependency>
      <groupId>net.serenity-bdd</groupId>
      <artifactId>serenity-core</artifactId>
      <version>${serenity.version}</version>
      <scope>test</scope>
    </dependency>

    <dependency>
      <groupId>net.serenity-bdd</groupId>
      <artifactId>serenity-junit</artifactId>
      <version>${serenity.version}</version>
      <scope>test</scope>
    </dependency>

    <dependency>
      <groupId>net.serenity-bdd</groupId>
      <artifactId>serenity-screenplay-webdriver</artifactId>
      <version>${serenity.version}</version>
      <scope>test</scope>
    </dependency>

    <dependency>
      <groupId>net.serenity-bdd</groupId>
      <artifactId>serenity-cucumber</artifactId>
      <version>${serenity.version}</version>
      <scope>test</scope>
    </dependency>

    <dependency>
      <groupId>junit</groupId>
      <artifactId>junit</artifactId>
      <version>${junit.version}</version>
      <scope>test</scope>
    </dependency>

  </dependencies>
  <build>
    <plugins>
      <plugin>
        <groupId>org.apache.maven.plugins</groupId>
        <artifactId>maven-surefire-plugin</artifactId>
        <version>${maven.surefire.plugin.version}</version>

        <configuration>
          <skip>false</skip>
        </configuration>
      </plugin>

      <plugin>
        <artifactId>maven-failsafe-plugin</artifactId>
        <version>${maven.failsafe.plugin.version}</version>
        <configuration>
          <includes>
            <include>**/Test*.java</include>
          </includes>
          <systemPropertyVariables>
            <webdriver.base.url>${webdriver.base.url}</webdriver.base.url>
          </systemPropertyVariables>
          <parallel>classes</parallel>
          <threadCount>${parallel.tests}</threadCount>
          <forkCount>${parallel.tests}</forkCount>
        </configuration>
        <executions>
          <execution>
            <goals>
              <goal>integration-test</goal>
              <goal>verify</goal>
            </goals>
          </execution>
        </executions>
      </plugin>

      <plugin>
        <groupId>org.apache.maven.plugins</groupId>
        <artifactId>maven-compiler-plugin</artifactId>
        <version>${maven.compiler.plugin.version}</version>
        <configuration>
          <source>${maven.compiler.source.version}</source>
          <target>${maven.compiler.target.version}</target>
        </configuration>
      </plugin>

      <plugin>
        <groupId>net.serenity-bdd.maven.plugins</groupId>
        <artifactId>serenity-maven-plugin</artifactId>
        <version>${serenity.version}</version>
        <dependencies>
          <dependency>
            <groupId>net.serenity-bdd</groupId>
            <artifactId>serenity-single-page-report</artifactId>
            <version>${serenity.version}</version>
          </dependency>
        </dependencies>
        <configuration>
          <tags>${tags}</tags>
          <reports>single-page-html</reports>
        </configuration>
        <executions>
          <execution>
            <id>serenity-reports</id>
            <phase>post-integration-test</phase>
            <goals>
              <goal>aggregate</goal>
            </goals>
          </execution>
        </executions>
      </plugin>
    </plugins>
  </build>
</project>
Step 4 – Create a Feature file
Feature file should be saved as an extension of .feature. Add the test scenarios in this feature file. I have added sample test scenarios. The test scenarios are written in Gherkins language. A feature file is created under src/test/resources.
Feature: Login to HRM

   @ValidCredentials
   Scenario: Login with valid credentials

    Given User is on Home page
    When User enters username as "Admin"
    And User enters password as "admin123"
    Then User should be able to login successfully

    @InValidCredentials
    Scenario Outline: Login with invalid credentials

    Given User is on Home page
    When User enters username as '<username>'
    And User enters password as '<password>'
    Then User should be able to see error message '<errorMessage>'

   Examples:
    |username  |password  |errorMessage                    |
    |admin     |admin     |Invalid credentials             |
    |          |admin123  |Username cannot be empty        |
    |Admin     |          |Password cannot be empty        |
    |          |          |Username cannot be empty        |

   @ForgetPassword
   Scenario: Verify Forget Password Functionality

    Given User is on Home page
    When User clicks on Forgot your password link
    Then User should be able to see new page which contains Reset Password button
Step 5 – Create the Step Definition class or Glue Code
Create a StepDefinition class for LoginPage.feature.
package com.example.definitions;

import com.example.steps.StepDashboardPage;
import com.example.steps.StepForgetPasswordPage;
import com.example.steps.StepLoginPage;
import io.cucumber.java.en.Given;
import io.cucumber.java.en.Then;
import io.cucumber.java.en.When;
import net.serenitybdd.annotations.Steps;
import org.junit.Assert;

import static org.junit.Assert.assertTrue;

public class LoginPageDefinitions {

    @Steps
    StepLoginPage loginPage;

    @Steps
    StepDashboardPage dashPage;

    @Steps
    StepForgetPasswordPage forgetpasswordPage;

    @Given("User is on Home page")
    public void openApplication() {
        loginPage.open();
        System.out.println("Page is opened");
    }

    @When("User enters username as {string}")
    public void enterUsername(String userName) {
        System.out.println("Enter Username");
        loginPage.inputUserName(userName);
    }

    @When("User enters password as {string}")
    public void enterPassword(String passWord) {
        loginPage.inputPassword(passWord);

        loginPage.clickLogin();
    }

    @Then("User should be able to login successfully")
    public void clickOnLoginButton() {
        dashPage.loginVerify();
    }

    @Then("User should be able to see error message {string}")
    public void unsuccessfulLogin(String expectedErrorMessage)  {

        String actualErrorMessage = loginPage.errorMessage();
        Assert.assertEquals(expectedErrorMessage, actualErrorMessage);
    }

    @When("User clicks on Forgot your password link")
    public void clickForgetPasswordLink() {
        loginPage.clickForgetPasswordLink();
    }

    @Then("User should be able to see new page which contains Reset Password button")
    public void verifyForgetPasswordPage() {

        assertTrue(forgetpasswordPage.ForgetPasswordPage());
    }

}
Serenity Step Libraries integrate smoothly into Cucumber Step Definition files; all you need to do is to annotate a step library variable with the @Steps annotation. Methods that represent a business task or action (inputUserName()), and that will appear in the reports as a separate step, is annotated with the @Step annotation. Other methods, such as loginVerify(), query the state of the application and are used in assert statements.
Here, I have created 3 StepClasses – StepLoginPage, StepDashboardPage, and StepForgetPasswordPage
StepLoginPage
package com.example.steps;

import net.serenitybdd.annotations.Step;
import net.serenitybdd.core.pages.PageObject;
import net.serenitybdd.core.pages.WebElementFacade;
import org.openqa.selenium.support.FindBy;

public class StepLoginPage extends PageObject {

    @FindBy(name = "username")
    WebElementFacade username;

    @FindBy(name = "password")
    WebElementFacade password;

    @FindBy(xpath = "//*[@id='app']/div[1]/div/div[1]/div/div[2]/div[2]/form/div[3]/button")
    WebElementFacade submitButton;

    @FindBy(xpath = "//*[@id='app']/div[1]/div/div[1]/div/div[2]/div[2]/div/div[1]/div[1]/p")
    WebElementFacade errorMessage;

    @FindBy(xpath = "//*[@id='app']/div[1]/div/div[1]/div/div[2]/div[2]/form/div[4]/p")
    WebElementFacade linkText;

    @Step("Enter Username")
    public void inputUserName(String userName) {
        username.sendKeys((userName));
    }

    @Step("Enter Password")
    public void inputPassword(String passWord) {
        password.sendKeys((passWord));
    }

    @Step("Click Submit Button")
    public void clickLogin() {
        submitButton.click();
    }

    @Step("Error Message on unsuccessful login")
    public String errorMessage() {
        String actualErrorMessage = errorMessage.getText();
        return actualErrorMessage;
    }

    @Step("Click Forget Password Link")
    public void clickForgetPasswordLink() {
        linkText.click();

        System.out.println("Clicked on Forgot Password Link");
    }

}
StepDashboardPage
package com.example.steps;

import net.serenitybdd.core.pages.PageObject;
import net.serenitybdd.core.pages.WebElementFacade;
import org.junit.Assert;
import org.openqa.selenium.support.FindBy;

public class StepDashboardPage extends PageObject {

    @FindBy(xpath = "//*[@id='app']/div[1]/div[1]/header/div[1]/div[1]/span/h6")
    WebElementFacade dashboardText;

    public void loginVerify() {

        String dashboardTitle = dashboardText.getText();
        Assert.assertTrue(dashboardTitle.contains("Dashboard"));
    }
}
StepForgetPasswordPage
package com.example.steps;

import net.serenitybdd.annotations.Step;
import net.serenitybdd.core.pages.PageObject;
import net.serenitybdd.core.pages.WebElementFacade;
import org.openqa.selenium.support.FindBy;

public class StepForgetPasswordPage extends PageObject {

    @FindBy(xpath = "//*[@id='app']/div[1]/div[1]/div/form/h6")
    WebElementFacade forgetLink;

    @Step("Verify Forget Password Page ")
    public boolean ForgetPasswordPage() {
        Boolean resetPasswordButton = forgetLink.isDisplayed();

        return resetPasswordButton;
    }
}
Step 6 – Create a Serenity-Cucumber Runner class
We cannot run a Feature file on its own in a cucumber-based framework. We need to create a Java class, which will run the Feature File. It is the starting point for JUnit to start executing the tests. TestRunner class creates under src/ test/java. When you run the tests with serenity, you use the CucumberWithSerenity test runner. If the feature files are not in the same package as the test runner class, you also need to use the @CucumberOptions class to provide the root directory where the feature files are found.
import org.junit.runner.RunWith;

import io.cucumber.junit.CucumberOptions;
import net.serenitybdd.cucumber.CucumberWithSerenity;

@RunWith(CucumberWithSerenity.class)
@CucumberOptions(plugin = {}, features = "src/test/resources/features/LoginPage.feature", glue = "com.example.definitions")

public class SerenityRunnerTests {

}
Step 7 – Create serenity.conf file under src/test/resources
Serenity.conf file is used to specify various features like the type of webdriver used, various test environments, run tests in headless mode, and many more options.
webdriver.driver. – This tells Serenity which browser to use for the test execution. You can configure this in several locations – serenity.properties or serenity.conf. Here, I have provided this information in serenity.conf
We can also configure the webdriver.base.url property for different environments in the serenity.conf configuration file, in the src/test/resources directory. Below is an example of the same.
headless.mode = false

environments {
  chrome {
    webdriver {
      driver = chrome
      autodownload = true
      capabilities {
        browserName = "chrome"
        acceptInsecureCerts = true
        "goog:chromeOptions" {
          args = ["test-type", "ignore-certificate-errors", "--window-size=1920,1080",
            "incognito", "disable-infobars", "disable-gpu", "disable-default-apps", "disable-popup-blocking"]
        }
      }
    }
  }
  edge {
    webdriver {
      capabilities {
        browserName = "MicrosoftEdge"
        "ms:edgeOptions" {
          args = ["test-type", "ignore-certificate-errors","--window-size=1920,1080",
            "incognito", "disable-infobars", "disable-gpu", "disable-default-apps", "disable-popup-blocking"]
        }
      }
    }
  }
  firefox {
    webdriver {
      capabilities {
        browserName = "firefox"
        pageLoadStrategy = "normal"
        acceptInsecureCerts = true
        unhandledPromptBehavior = "dismiss"
        strictFileInteractability = true

        "moz:firefoxOptions" {
          args = ["--window-size=1920,1080"],
          prefs {
            "javascript.options.showInConsole": false
          },
          log {"level": "info"},
        }
      }
    }
  }
}

#
# Define drivers for different platforms. Serenity will automatically pick the correct driver for the current platform
#

environments {
  default {
    webdriver.base.url = "https://opensource-demo.orangehrmlive.com/"
  }
  dev {
    webdriver.base.url = "https://opensource-demo.orangehrmlive.com/dev"
  }
  staging {
    webdriver.base.url = "https://opensource-demo.orangehrmlive.com/staging"
  }
  prod {
    webdriver.base.url = "https://opensource-demo.orangehrmlive.com/prod"
  }
}
Once the environment section is present in your serenity.conf file, you can use the environment system property to use the properties for a given environment. For example, the following would cause the staging URLs to be used:
mvn clean verify -Denvironment=staging
The default environment will be used if no other value is provided. In our example, I will not provide any environment, so it will pick the default environment.
Step 8 – Create serenity.properties file at the root of the project
serenity.project.name = Serenity and Cucumber Report Demo
Step 9 – Run the tests through the command line which generates Serenity Report
Open the command line and go to the location where pom.xml of the project is present and type the below command.
mvn clean verify -Denvironment=firefox
I have provided the location of the Firefox driver through the command line. I believe this is the best way to run the test. We can hard-code the path in the test code or in serenity.conf file. If you don’t want to pass the location of webdriver through the command line, then mention the details of webdriver in serenity.conf and just use the below command for execution.
mvn clean verify

Below is the image of the execution status.

This also provides the location of the serenity report as highlighted in the above image.
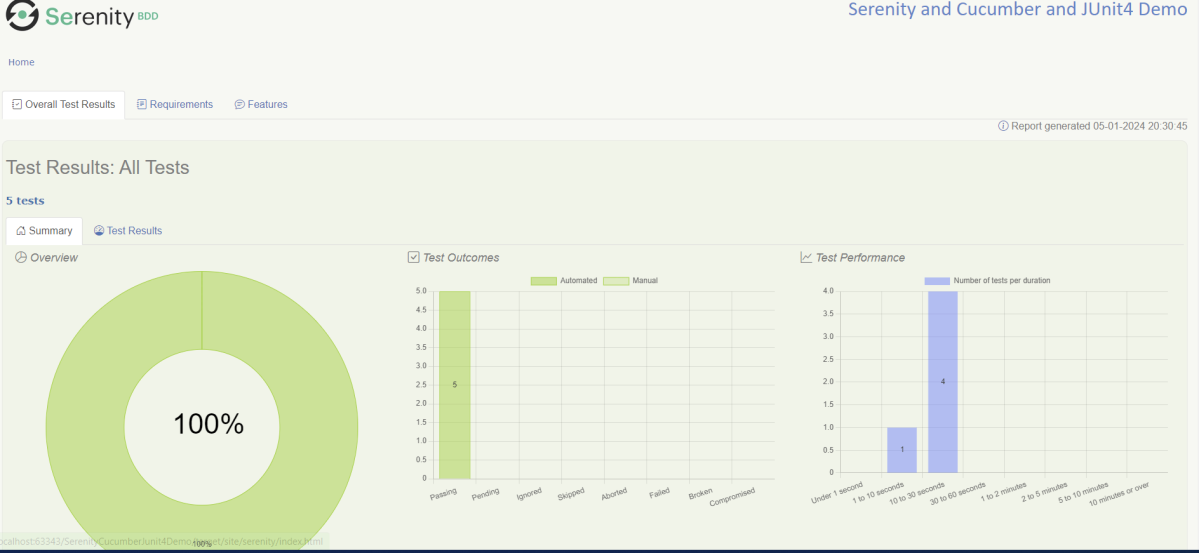
Serenity Report

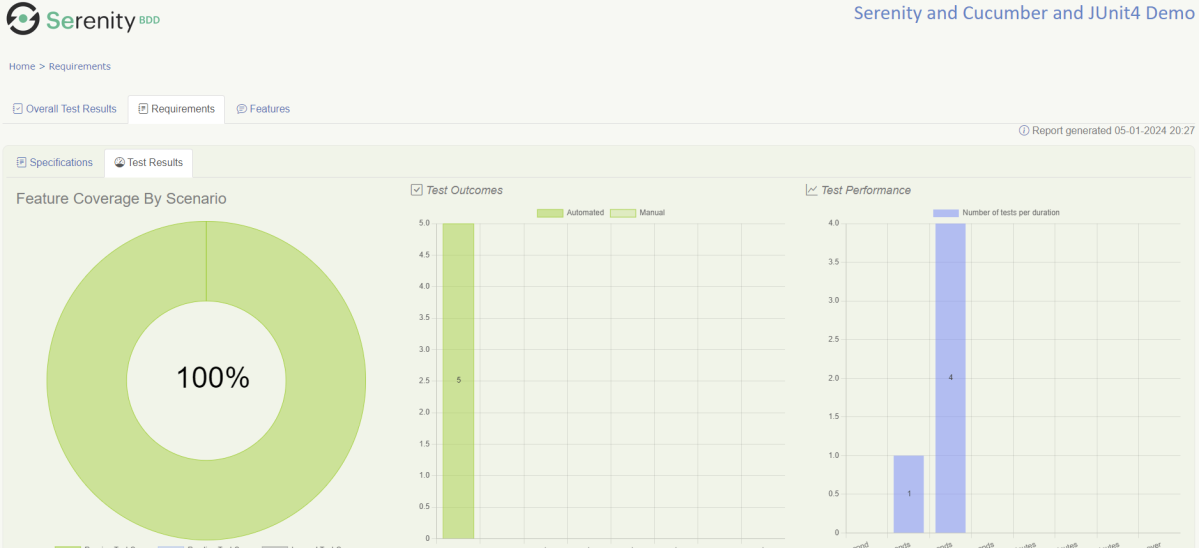
Requirement View
In Serenity, requirements are organized in a hierarchy. We can get an idea of the full directory structure (in src/test/features directory) for the project.

The Test Results tab (shown below) tells you about the acceptance tests that were executed for this set of requirements.
Test Results
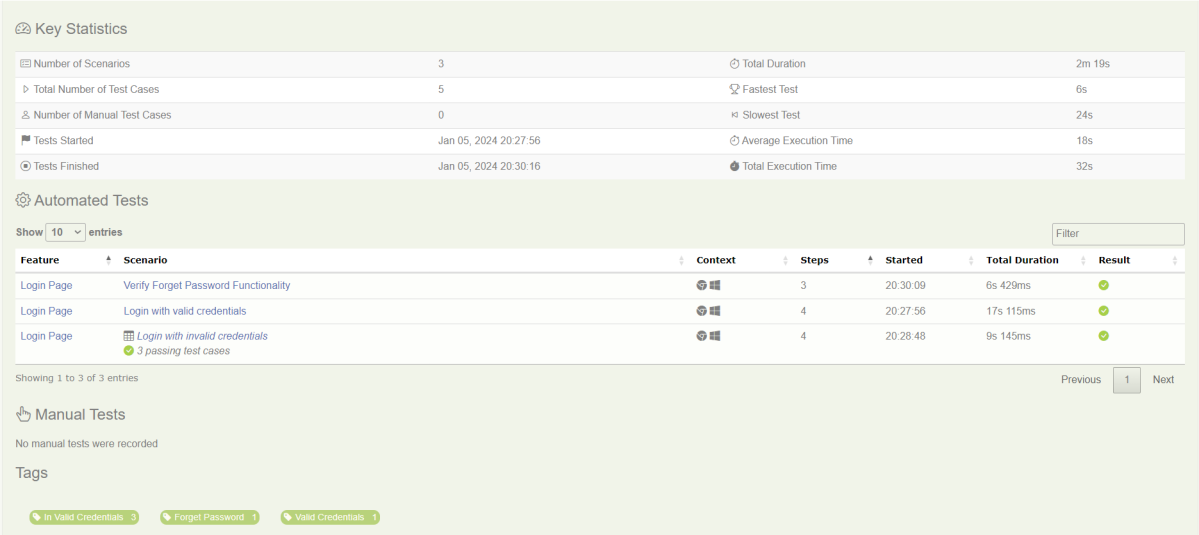
At the bottom of the Test Results tab, you will find the actual test results – the list of all the tests, automated and manual, that were executed for this requirement.

Feature
This provides the detail of all the Test Scenarios present in a Feature File.

Below is an example of a Scenario Outline in the Report. It shows all the examples mentioned in the feature file.

This screen shows the test steps and screenshots of each step.

We are done! Congratulations on making it through this tutorial and hope you found it useful! Happy Learning!!
The complete code can be found on GitHub – vibssingh/SerenityCucumberJUnit4_Demo.

Hi, I am trying to do same to take screenshot only for failed step but it will take the screenshot only for first step and attach to the report but for remaining failed step it will not attach the screenshot to the report. Please help.
project link: https://github.com/ak270296/Serenity-bdd
LikeLike
Try to use both properties in serenity.properties file
serenity.take.screenshots=FOR_FAILURES
serenity.take.screenshots.for.each.step=true
LikeLike
Not working
LikeLike