The previous tutorial explained the generation of Allure Report for Selenium and JUnit4 in a Maven Project. This tutorial explains the generation of Allure Report for Selenium and JUnit4 in a Gradle project.
Pre-Requisite:
- Java 11 installed
- Gradle installed
- Eclipse or IntelliJ installed
- Allure installed
- Environment variables JAVA_HOME , GRADLE_HOME and ALLURE_HOME correctly configured
This framework consists of:
- Selenium – 4.4.0
- Java 11
- JUnit – 4.13.2
- Gradle – 7.5.1
- Allure Report – 2.11.0
- Allure JUnit4 – 2.19.0
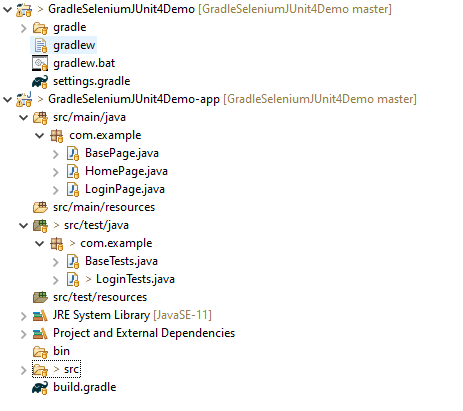
Project Structure
Implementation Steps
- Add Selenium, JUnit4 and Allure-JUnit4 dependencies in build.gradle
- Create Pages and Test Code for the pages
- Execute the Tests through Command Line
- Generate Allure Report
There is another tutorial that explain the steps to create a Gradle Project with JUnit4 – please refer to this tutorial – How to create Gradle project with Selenium and JUnit4
Step 1 – Add Selenium, JUnit4, and Allure-JUnit4 dependencies in build.gradle
plugins {
    // Apply the application plugin to add support for building a CLI application in Java.
    id 'application'
    id 'io.qameta.allure' version '2.11.0'
}

repositories {
    // Use Maven Central for resolving dependencies.
    mavenCentral()
}

java {
    sourceCompatibility = 11
    targetCompatibility = 11
}

dependencies {
    // Use JUnit test framework.
    testImplementation 'junit:junit:4.13.2'

    // This dependency is used by the application.
    implementation 'com.google.guava:guava:30.1.1-jre'
    implementation 'org.seleniumhq.selenium:selenium-java:4.4.0'
    implementation 'io.github.bonigarcia:webdrivermanager:5.3.0'
    implementation 'io.qameta.allure:allure-junit4:2.19.0'
}

application {
    // Define the main class for the application.
    mainClass = 'com.example.App'
}

test {
    useJUnit {
    }

    testLogging {
        events "passed", "skipped", "failed"
        showStandardStreams = true
    }

    systemProperties System.properties
}
Step 2 – Create Pages and Test Code for the pages
Below is the sample project which uses Selenium and TestNG which is used to generate an Allure Report.
We have used PageFactory model to build the tests. I have created a package named pages and created the page classes in that folder. Page class contains the locators of each web element present on that particular page along with the methods of performing actions using these web elements.
This is the BaseClass that contains the PageFactory.initElements. The initElements is a static method of PageFactory class that is used to initialize all the web elements located by @FindBy annotation.
import org.openqa.selenium.WebDriver;
import org.openqa.selenium.support.PageFactory;

public class BasePage {

      public WebDriver driver;

      public BasePage(WebDriver driver) {
          this.driver = driver;
          PageFactory.initElements(driver,this);
    }

}
Below is the code for LoginPage and HomePage.
LoginPage
import org.openqa.selenium.WebDriver;
import org.openqa.selenium.WebElement;
import org.openqa.selenium.support.FindBy;

public class LoginPage extends BasePage{

    public LoginPage(WebDriver driver) {
         super(driver);

    }

    @FindBy(name = "username")
    public WebElement userName;

    @FindBy(name = "password")
    public WebElement password;

    @FindBy(xpath = "//*[@id='app']/div[1]/div/div[1]/div/div[2]/div[2]/form/div[1]/div/span")
    public WebElement missingUsernameErrorMessage;

    @FindBy(xpath = "//*[@id='app']/div[1]/div/div[1]/div/div[2]/div[2]/form/div[1]/div/span")
    public WebElement missingPasswordErrorMessage;

    @FindBy(xpath = "//*[@id='app']/div[1]/div/div[1]/div/div[2]/div[2]/form/div[3]/button")
    public WebElement login;

    @FindBy(xpath = "//*[@id='app']/div[1]/div/div[1]/div/div[2]/div[2]/div/div[1]/div[1]/p")
    public  WebElement errorMessage;

   // Get the error message when password is blank
    public String getMissingPasswordText() {
        return missingPasswordErrorMessage.getText();
    }

   // Get the error message when username is blank
   public String getMissingUsernameText() {
        return missingUsernameErrorMessage.getText();
    }

    // Get the Error Message
    public String getErrorMessage() {
        return errorMessage.getText();
    }

    public void login(String strUserName, String strPassword) {

        userName.sendKeys(strUserName);
        password.sendKeys(strPassword);
        login.click();
    }

}
HomePage
import org.openqa.selenium.WebDriver;
import org.openqa.selenium.WebElement;
import org.openqa.selenium.support.FindBy;

public class HomePage extends BasePage {

    public HomePage(WebDriver driver) {
        super(driver);

    }

     @FindBy(xpath = "//*[@id='app']/div[1]/div[2]/div[2]/div/div[1]/div[1]/div[1]/h5")
      public  WebElement homePageUserName;

      // Get the User name from Home Page
        public String getHomePageText() {
           return homePageUserName.getText();
   }

}
Here, we have BaseTests Class also which contains the common methods needed by other test pages.
import java.time.Duration;
import org.junit.After;
import org.junit.Before;
import org.openqa.selenium.WebDriver;
import org.openqa.selenium.chrome.ChromeDriver;
import io.github.bonigarcia.wdm.WebDriverManager;
import io.qameta.allure.Step;

public class BaseTests {

	public WebDriver driver;
	public final static int TIMEOUT = 10;


	@Before
    @Step("Start the application")
    public void setup() {
    	WebDriverManager.chromedriver().setup();
	    driver = new ChromeDriver();
	    driver.manage().window().maximize();
	    driver.get("https://opensource-demo.orangehrmlive.com/");
	    driver.manage().timeouts().implicitlyWait(Duration.ofSeconds(TIMEOUT));

    }

    @Step("Stop the application")
    @After
    public void tearDown() {
        driver.quit();
    }
}
LoginTests
import org.junit.Assert;
import org.junit.Ignore;
import org.junit.Test;
import io.qameta.allure.Description;
import io.qameta.allure.Severity;
import io.qameta.allure.SeverityLevel;

public class LoginTests extends BaseTests{

	@Severity(SeverityLevel.NORMAL)
    @Test
	@Description("Test Description : Login Test with invalid credentials")
    public void invalidCredentials() {

	    LoginPage objLoginPage = new LoginPage(driver);
    	objLoginPage.login("Admin", "admin123$$");

    	// Verify Error Message
    	 Assert.assertEquals("Invalid credentials",objLoginPage.getErrorMessage());

    }

	@Severity(SeverityLevel.BLOCKER)
    @Test
	@Description("Test Description : Login Test with valid credentials")
    public void gotoHomePage() {

	    LoginPage objLoginPage = new LoginPage(driver);
    	objLoginPage.login("Admin", "admin123");

    	HomePage objHomePage = new HomePage(driver);

    	// Verify Home Page
    	 Assert.assertEquals("Employee Information",objHomePage.getHomePageText());

    }

	@Severity(SeverityLevel.NORMAL)
    @Test
	@Description("Test Description : Login Test with missing username")
    public void missingUsername() {

	    LoginPage objLoginPage = new LoginPage(driver);
    	objLoginPage.login("", "admin123");

    	// Verify Error Message
   	     Assert.assertEquals("Invalid credentials",objLoginPage.getMissingUsernameText());


    }

	@Severity(SeverityLevel.NORMAL)
    @Test @Ignore
	@Description("Test Description : Login Test with missing password")
    public void missingPassword() {

	    LoginPage objLoginPage = new LoginPage(driver);
    	objLoginPage.login("admin", "");

    	// Verify Error Message
   	     Assert.assertEquals("Invalid credentials",objLoginPage.getMissingPasswordText());

    }

}
Step 3 – Execute the Tests through Command Line
Note:- As you can see my project has two parts – app and GradleSeleniumJUnit4Demo.
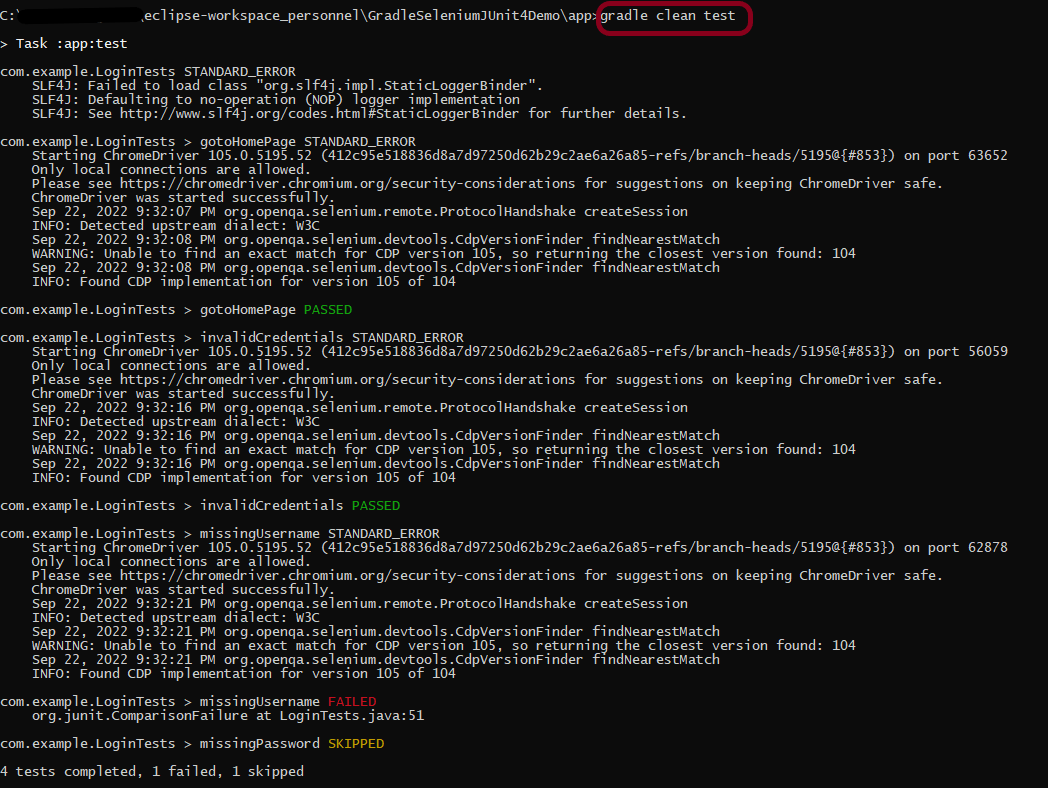
Go to the app project and run the tests, using the below command
gradle clean test
The output of the test execution is
Step 4 – Generate the Allure Report
Once the test execution is finished, a folder named allure-results will be generated in the build folder.
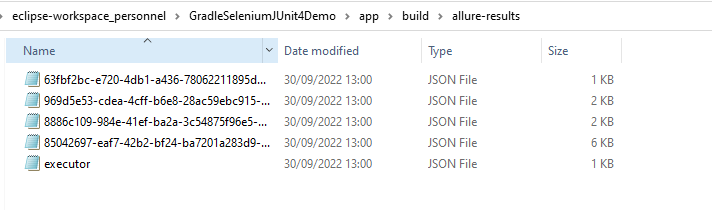
To generate Allure Report, use the below command
allure serve build/allure-results

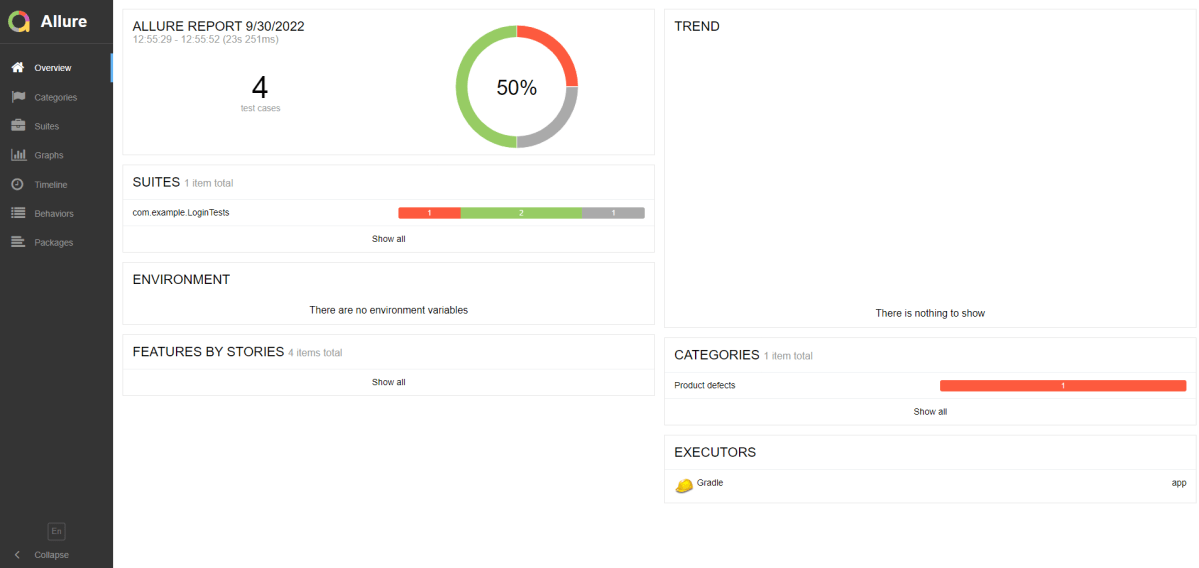
This will generate the beautiful Allure Test Report as shown below.
Allure Report Dashboard
The overview page hosts several default widgets representing basic characteristics of your project and test environment.
- Statistics – overall report statistics.
- Launches – if this report represents several test launches, statistics per launch will be shown here.
- Behaviors – information on results aggregated according to stories and features.
- Executors – information on test executors that were used to run the tests.
- History Trend – if tests accumulated some historical data, its trend will be calculated and shown on the graph.
- Environment – information on the test environment.
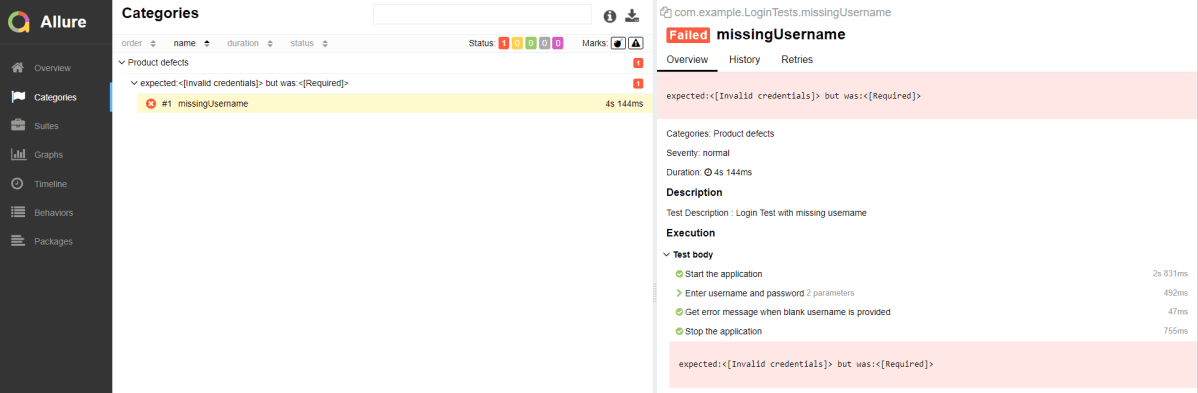
Categories in Allure Report
Categories tab gives you the way to create custom defects classification to apply for test results. There are two categories of defects – Product Defects (failed tests) and Test Defects (broken tests).
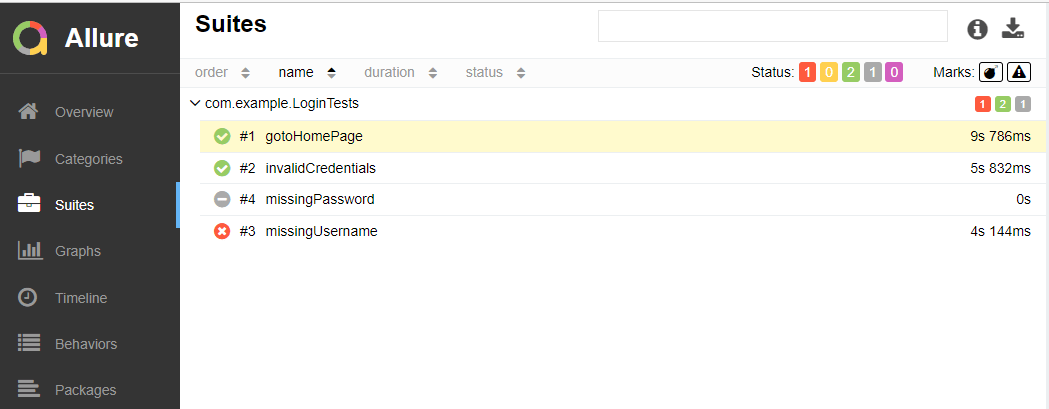
Suites in Allure Report
On the Suites tab a standard structural representation of executed tests, grouped by suites and classes can be found.
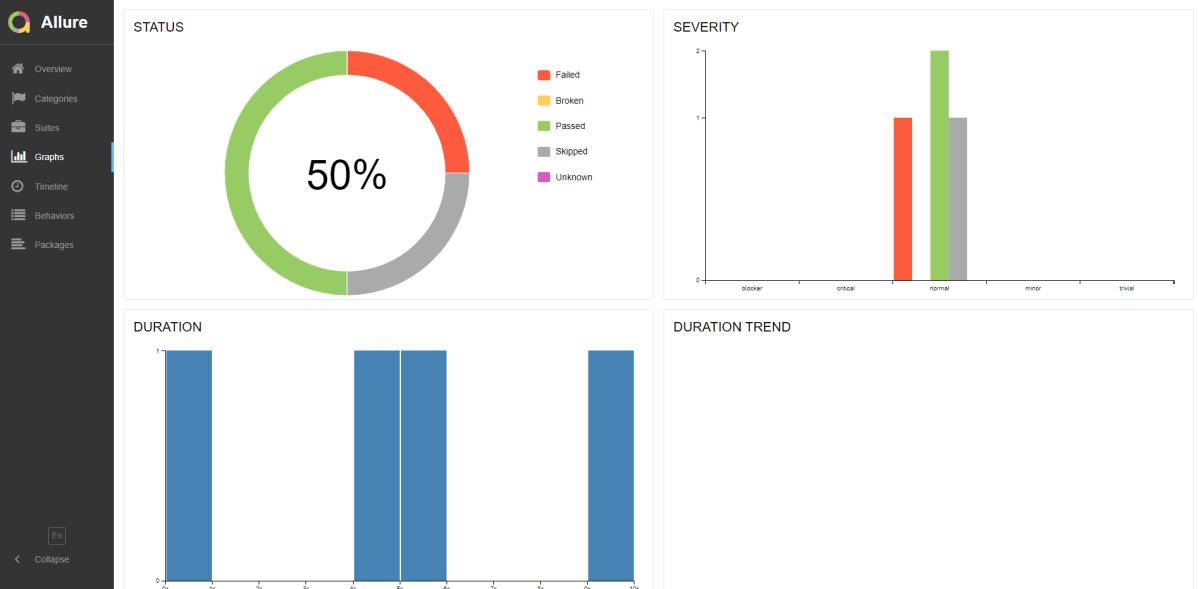
Graphs in Allure Report
Graphs allow you to see different statistics collected from the test data: statuses breakdown or severity and duration diagrams.
Timeline in Allure Report
Timeline tab visualizes retrospective of tests execution, allure adaptors collect precise timings of tests, and here on this tab they are arranged accordingly to their sequential or parallel timing structure.

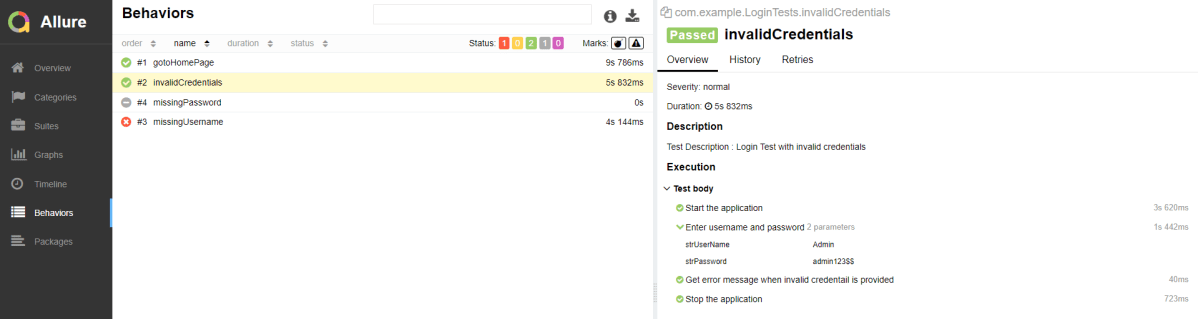
Behaviors of Allure Report
This tab groups test results according to Epic, Feature and Story tags.
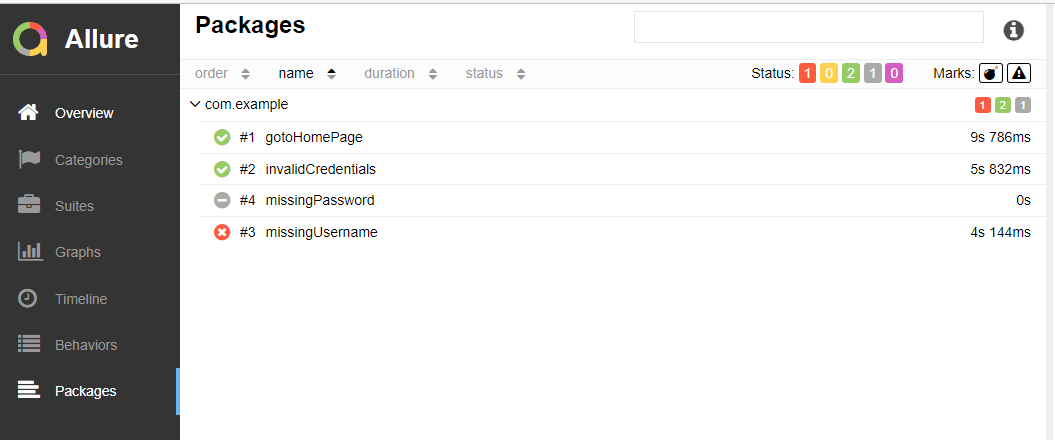
Packages in Allure Report
Packages tab represents a tree-like layout of test results, grouped by different packages.
Congratulations on making it through this tutorial and hope you found it useful! Happy Learning!! Cheers!!
