Spring Boot makes it easy to create stand-alone, production-grade Spring based Applications that you can “just run”. We take an opinionated view of the Spring platform and third-party libraries, so you can get started with minimum fuss. Most Spring Boot applications need minimal Spring configuration.
Spring Boot is an open-source micro framework maintained by a company called Pivotal. It provides Java developers with a platform to get started with an auto-configurable production-grade Spring application. With it, developers can get started quickly without losing time on preparing and configuring their Spring application.
What is Cucumber?
A cucumber is a software tool that supports behavior-driven development (BDD). Cucumber can be defined as a testing framework, driven by plain English. It serves as documentation, automated tests, and development aid – all in one.
Dependency List
Springboot – 2.5.2
Cucumber – 6.10.4
Java 11
JUnit – 4.13.2
Maven – 3.8.1
RestAssured – 4.3.3
JUnit Vintage Engine (To run the tests through command line)
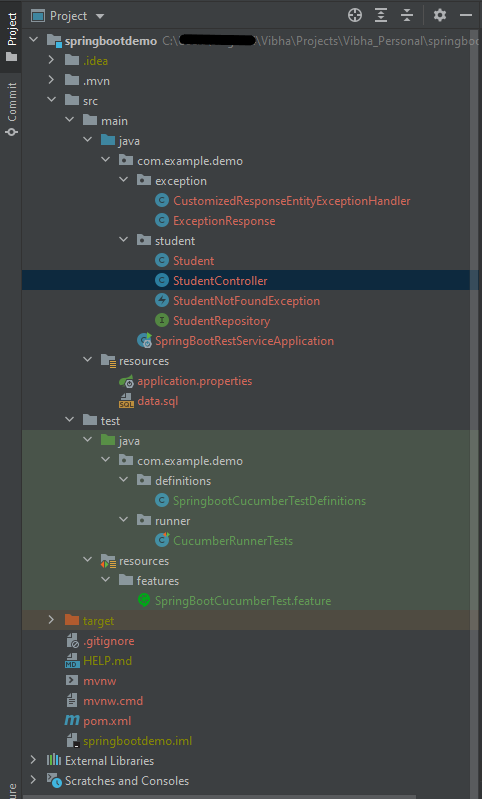
Below is the structure of a SpringBoot application project.
Below are various Java classes present in a SpringBoot REST Application.
SpringBootRestServiceApplication.java – The Spring Boot Application class is generated with Spring Initializer. This class acts as the launching point for the application.
pom.xml – This contains all the dependencies needed to build this project.
Student.java – This is JPA Entity for Student class
StudentRepository.java – This is JPA Repository for Student. This is created using Spring Data JpaRepository.
StudentController.java – Spring Rest Controller exposing all services on the student resource.
CustomizedExceptionHandler.java – This implements global exception handling and customizes the responses based on the exception type.
ErrorDetails.java – Response Bean to use when exceptions are thrown from API.
StudentNotFoundException.java – Exception thrown from resources when the student is not found.
data.sql – Data is loaded from data.sql into the Student table. Spring Boot would execute this script after the tables are created from the entities.
application.properties – Spring Boot automatically loads the application.properties whenever it starts up. You can de-reference values from the property file in the Java code through the environment.
We need the below files to create a SpringBoot Application.
Student.java
import javax.persistence.Entity;
import javax.persistence.GeneratedValue;
import javax.persistence.Id;
import javax.validation.constraints.NotBlank;
import javax.validation.constraints.NotNull;
import javax.validation.constraints.Size;

@Entity
public class Student {
    @Id
    @GeneratedValue
    private Long id;

    @NotNull
    @Size(min = 4, message = "Name should have atleast 4 characters")
    private String name;

    @NotBlank(message = "passportNumber is mandatory")
    private String passportNumber;

    public Student() {
        super();
    }

    public Student(Long id, String name, String passportNumber) {
        super();
        this.id = id;
        this.name = name;
        this.passportNumber = passportNumber;
    }

    public Long getId() {
        return id;
    }

    public void setId(Long id) {
        this.id = id;
    }

    public String getName() {
        return name;
    }

    public void setName(String name) {
        this.name = name;
    }

    public String getPassportNumber() {
        return passportNumber;
    }

    public void setPassportNumber(String passportNumber) {
        this.passportNumber = passportNumber;
    }
}
import org.springframework.boot.SpringApplication;
import org.springframework.boot.autoconfigure.SpringBootApplication;

@SpringBootApplication
public class SpringBootRestServiceApplication {

    public static void main(String[] args) {

        SpringApplication.run(SpringBootRestServiceApplication.class, args);
    }

}
application.properties
spring.jpa.defer-datasource-initialization=true
data.sql
insert into student values(10001,'Annie', 'E1234567');
insert into student values(10002,'John', 'A1234568');
insert into student values(10003,'David','C1232268');
Test Automation Framework Implementation
Step 1 – Add SpringbootTest, Rest-Assured, and Cucumber dependencies to the project
To Test a SpringBoot Application, we are using SpringBoot Test, JUnit, Cucumber, and Rest Assured. Below mentioned dependencies are added in POM.xml
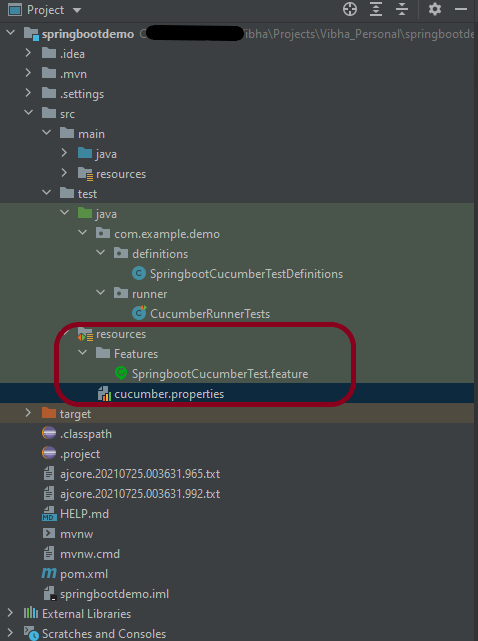
Step 2 – Create a directory src/test/resources and create a feature file under src/test/resources
By default, the Maven project has src/test/java directory only. Create a new directory under src/test with the name of resources. Create a folder name as Features within src/test/resources directory.
Create a feature file to test the Springboot application.
Below is a sample feature file.
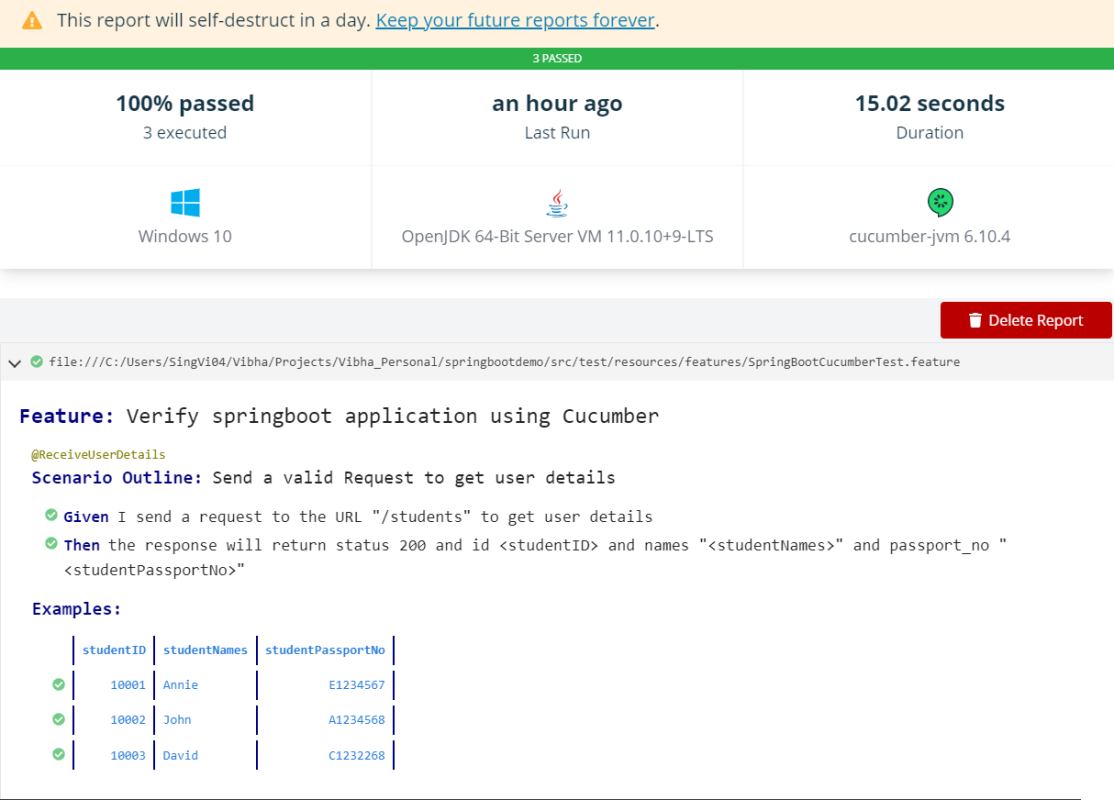
Feature: Verify springboot application using Cucumber

@ReceiveUserDetails
Scenario Outline: Send a valid Request to get user details
Given I send a request to the URL "/students" to get user details
Then the response will return status 200 and id <studentID> and names "<studentNames>" and passport_no "<studentPassportNo>"

Examples:
|studentID    |studentNames  |studentPassportNo|
|10001        |Annie         |E1234567         |
|10002        |John          |A1234568         |
|10003        |David         |C1232268         |
Step 3 – Create the Step Definition class or Glue Code for the Test Scenariounder src/test/java
The corresponding step definition file of the above feature file is shown below.
import io.cucumber.java.en.Given;
import io.cucumber.java.en.Then;
import io.cucumber.spring.CucumberContextConfiguration;
import io.restassured.RestAssured;
import io.restassured.http.ContentType;
import io.restassured.response.ValidatableResponse;
import io.restassured.specification.RequestSpecification;
import org.springframework.boot.test.context.SpringBootTest;
import org.springframework.boot.web.server.LocalServerPort;
import static io.restassured.RestAssured.given;
import static org.hamcrest.Matchers.*;
@CucumberContextConfiguration
@SpringBootTest(webEnvironment = SpringBootTest.WebEnvironment.RANDOM_PORT)
public class SpringbootCucumberTestDefinitions {
private final static String BASE_URI = "http://localhost";
@LocalServerPort
private int port;
private ValidatableResponse validatableResponse;
private void configureRestAssured() {
RestAssured.baseURI = BASE_URI;
RestAssured.port = port;
}
protected RequestSpecification requestSpecification() {
configureRestAssured();
return given();
}
@Given("I send a request to the URL {string} to get user details")
public void iSendARequest(String endpoint) throws Throwable {
validatableResponse = requestSpecification().contentType(ContentType.JSON)
.when().get(endpoint).then();
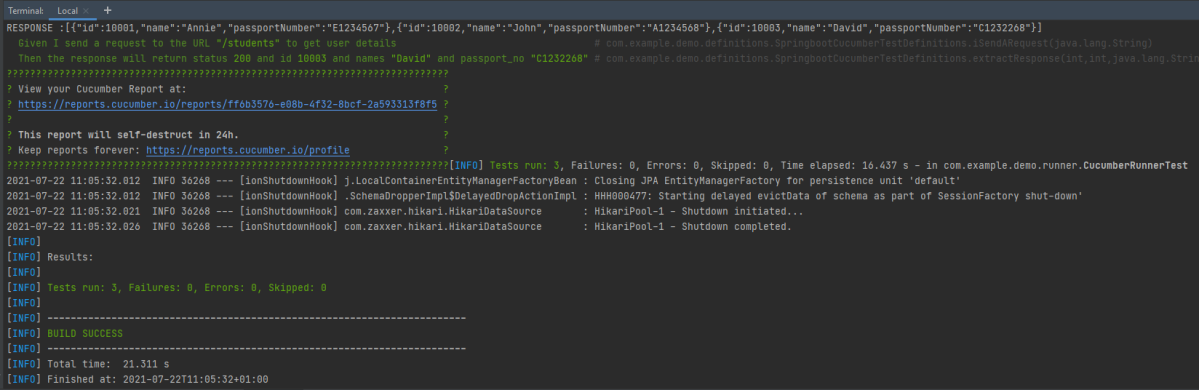
System.out.println("RESPONSE :"+validatableResponse.extract().asString());
}
@Then("the response will return status {int} and id {int} and names {string} and passport_no {string}")
public void extractResponse(int status, int id, String studentName,String passportNo) {
validatableResponse.assertThat().statusCode(equalTo(status))
.body("id",hasItem(id)).body(containsString(studentName))
.body(containsString(passportNo));
}
}
The @CucumberContextConfiguration annotation tells Cucumber to use this class as the test context configuration for Spring. It is imported from:-
With the @SpringBootTest annotation, Spring Boot provides a convenient way to start up an application context to be used in a test. It is imported from package:-
By default, @SpringBootTest does not start the webEnvironment to refine further how your tests run. It has several options: MOCK(default), RANDOM_PORT, DEFINED_PORT, NONE.
RANDOM_PORT loads a WebServerApplicationContext and provides a real web environment. The embedded server is started and listens on a random port. LocalServerPort is imported from package:-
The assertions are imported from the Hamcrest package:-
import static org.hamcrest.Matchers.*;
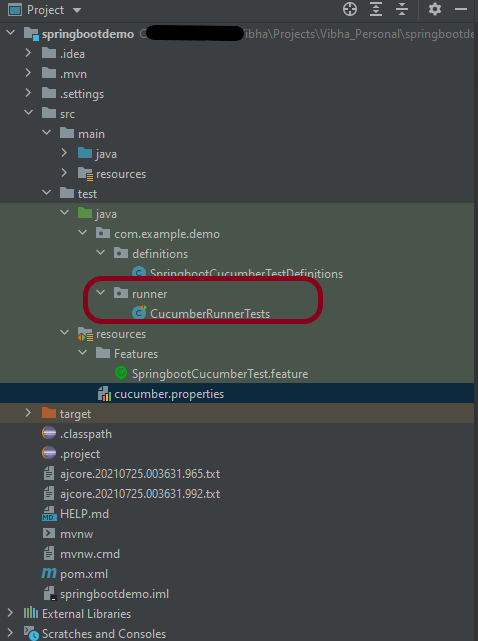
Step 4 – Create a Cucumber Runner classunder src/test/java
A runner will help us to run the feature file and act as an interlink between the feature file and StepDefinition Class. To know more about Runner, refer to this link. The TestRunner should be created within the directory src/test/java.
import org.junit.runner.RunWith;
import io.cucumber.junit.Cucumber;
import io.cucumber.junit.CucumberOptions;

@RunWith(Cucumber.class)
@CucumberOptions(plugin = "pretty", features = {"src/test/resources/Features"}, glue = { "com.example.demo.definitions"})

public class CucumberRunnerTests {
}
The @CucumberOptionsannotation is responsible for pointing to the right feature package, configuring the plugin for a better reporting of tests in the console output, and specifying the package where extra glue classes may be found. We use it to load configurations and classes that are shared between tests.
Step 5 – Run the tests from JUnit
You can execute the test script by right-clicking onTestRunner class -> Run As JUnit in Eclipse.
In case you are using IntelliJ, select “Run CucumberRunnerTests“.
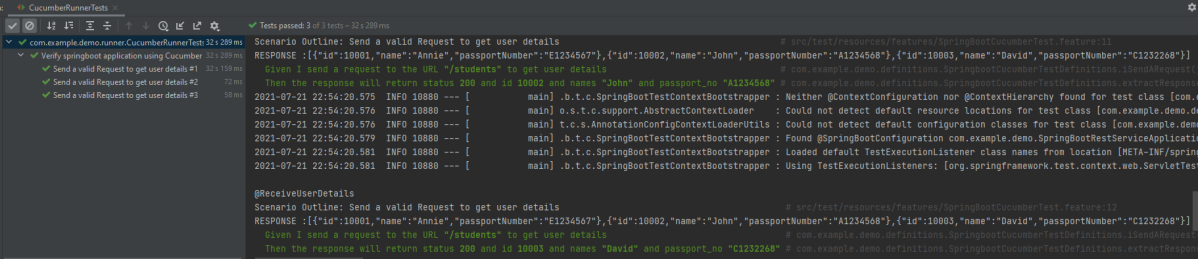
SpringBootTest creates an application context containing all the objects we need for the Integration Testing It, starts the embedded server, creates a web environment, and then enables methods to do Integration testing.
The output of the above program is
Step 6 – Run the tests from the Command Line
To run the tests from the command line, we need to add junit-vintage-engine dependency. Starting with Spring Boot 2.4, JUnit 5’s vintage engine has been removed from the spring-boot-starter-test. If we still want to write tests using JUnit 4, we need to add the following Maven dependency:
To get Cucumber Test Reports, add cucumber.properties under src/test/resources and add the below instruction in the file. To know more about Cucumber Report Service, refer to this tutorial.
cucumber.publish.enabled=true
Below is the image of the report generated after the completion of the execution. This report can be saved on GitHub for future use.
That’s it! Congratulations on making it through this tutorial and hope you found it useful! Happy Learning!!
Serenity BDD is an open-source library that aims to make the idea of living documentation a reality.
Serenity BDD helps you write cleaner and more maintainable automated acceptance and regression tests faster. Serenity also uses the test results to produce illustrated, narrative reports that document and describe what your application does and how it works. Serenity tells you not only what tests have been executed, but more importantly, what requirements have been tested.
What is SpringBoot Application?
Spring Boot is an open-source micro framework that provides Java developers with a platform to get started with an auto-configurable production-grade Spring application.
Comes with embedded HTTP servers like Tomcat orJetty to test web applications.
Adds many plugins that developers can use to work with embedded and in-memory databases easily. Spring allows you to easily connect with database and queue services like Oracle, PostgreSQL, MySQL, MongoDB, Redis, Solr, ElasticSearch, Rabbit MQ, and others.
Prerequisite
Serenity seamlessly supports Cucumber 6 and Cucumber 7. However, this flexibility requires a little tweaking in the build dependencies. For the Maven project, you need to do the following:
Add serenity-cucumber dependency
Add Springboottest dependency to start up an application context to be used in a test.
Add Junit-Vintage dependency as it is needed for spring boot application of version 2.4 and above with JUnit4.
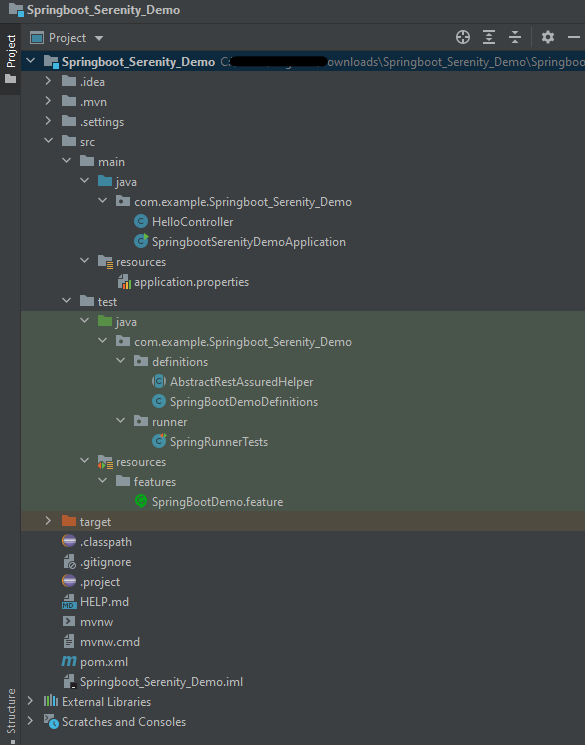
Project Directory Structure
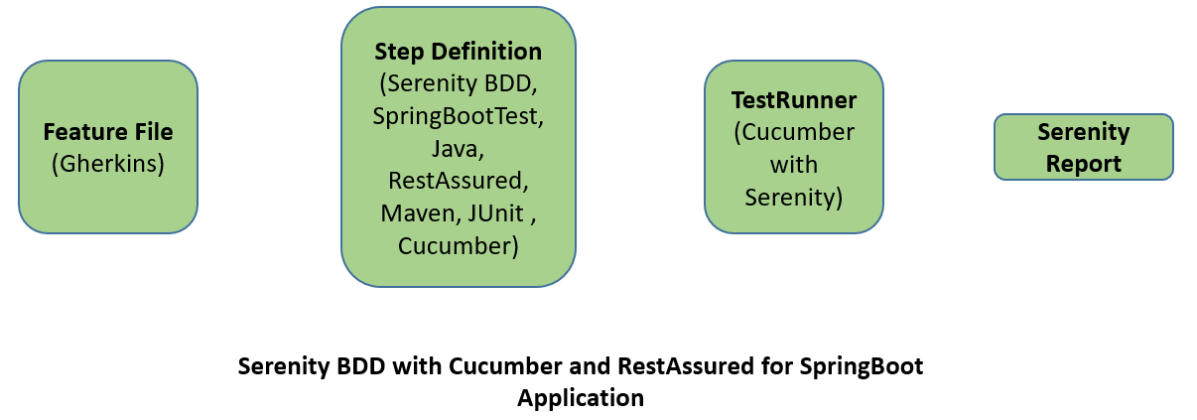
Relationship between SpringBoot, Serenity BDD, Cucumber and Rest Assured
Implementation Steps
Create a source folder – src/test/resources to create test scenarios in the Feature file
AddSpringBoot, Serenity, Cucumber,and JUnit4 dependencies to the project
Create a feature file under src/test/resources
Create the StepDefinition and Helper classes.
Create a Serenity Runner class in the src/test/java directory
Run the tests from JUnit
Run the tests from Command Line
Serenity Report Generation
CucumberReport Generation
Step 1 – Create a source folder – src/test/resources
Right-click on the test directory and select New->Directory and select resources (Maven Source Directories). Create a source folder – src/test/resources to create test scenarios in the Feature file
Step 2 – Add SpringBoot, Serenity, Cucumber, and JUnit4 dependencies to the project
We have added SpringBootTest, Serenity, Cucumber, JUnit4, and JUnit Vintage.
Step 3 – Create a feature file under src/test/resources
Below is an example of a feature file which shows a sample test scenario.
Feature: SpringBoot Request
@ReceiveCorrectResponse
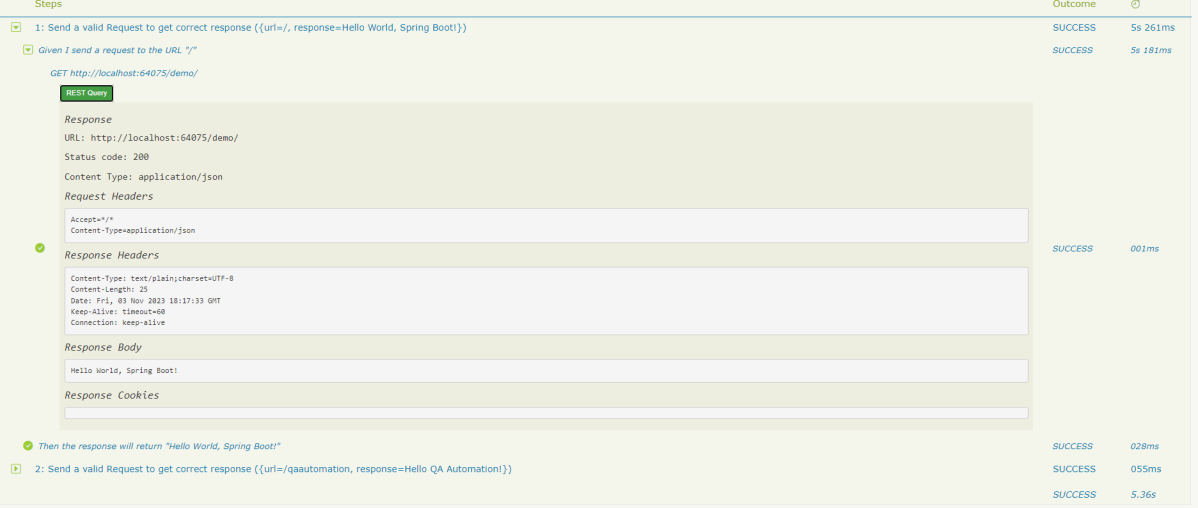
Scenario Outline: Send a valid Request to get correct response
Given I send a request to the URL "<url>"
Then the response will return "<response>"
Examples:
| url | response |
| / | Hello World, Spring Boot! |
| /qaautomation | Hello QA Automation! |
The test class mentioned below (AbstractRestAssuredHelper) contains integration tests for the spring boot rest controller mentioned. This test class:
uses @SpringBootTest annotation which loads the actual application context.
uses WebEnvironment.RANDOM_PORT to create and run the application at some random server port.
@LocalServerPort gets the reference of the port where the server has started. It helps in building the actual request URIs to mimic real client interactions.
Step 4 – Create the StepDefinition and Helper classes
Below is the code of the StepDefinition and Helper class. These classes are created in the src/test/java directory.
This class sends the request and receives a response after performing the GET operation. Here, the validation of the response also takes place by asserting the expected and actual response
To use Rest-assured, Serenity provides the class SerenityRest
import org.junit.Assert;
import io.cucumber.java.en.Given;
import io.cucumber.java.en.Then;
import io.restassured.response.Response;
import net.serenitybdd.rest.SerenityRest;
import net.thucydides.core.annotations.Steps;

public class SpringBootDemoDefinitions {

	@Steps
    AbstractRestAssuredHelper helper;
    private Response response;

    @Given("I send a request to the URL {string}")
    public void iSendARequest(String endpoint) throws Exception  {
         response = helper.getAnonymousRequest().contentType("application/json")
                    .header("Content-Type", "application/json").when().get(endpoint);
    }

    @Then("the response will return {string}")
    public void extractResponse(String Expected ) {
          SerenityRest.restAssuredThat(response -> response.statusCode(200));
          String Actual = response.asString();
          Assert.assertEquals(Expected, Actual);
    }
}
Step 5 – Create a Serenity Runner class in the src/test/java directory
We cannot run a Feature file on its own in cucumber-based framework. We need to create a Java class that will run the Feature File. It is the starting point for JUnit to start executing the tests. TestRunner class is created under src/ test/java. When you run the tests with serenity, you use the CucumberWithSerenitytest runner. If the feature files are not in the same package as the test runner class, you also need to use the @CucumberOptionsclass to provide the root directory where the feature files can be found.
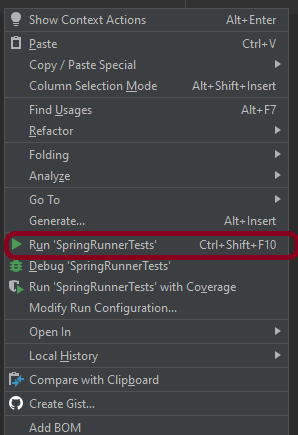
You can run the tests from SpringRunnerTests class. Right-click on the class and select Run ‘SpringRunnerTests’.
Step 7 – Run the tests from Command Line
Run the tests from the command line by using the below command
mvn clean verify
The output of the above program is
The test execution status is shown below:
Step 8 – Serenity Report Generation
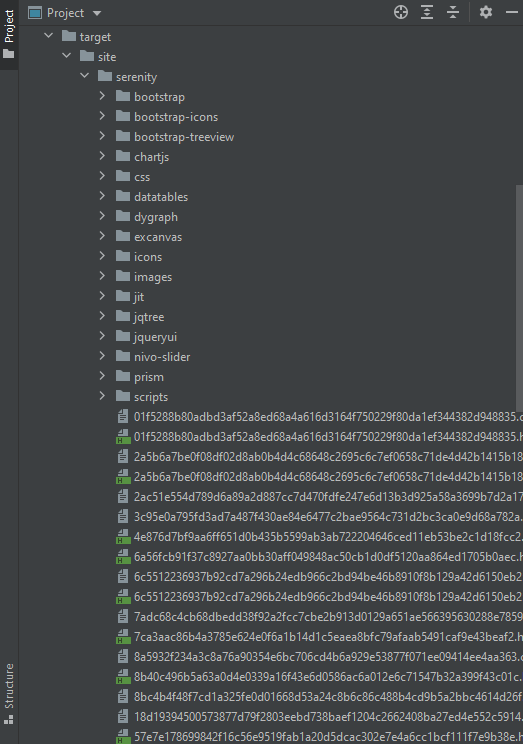
By default, the test report generated by Serenity is placed under target/site/serenity/index.html. Below is the sample Serenity Report.
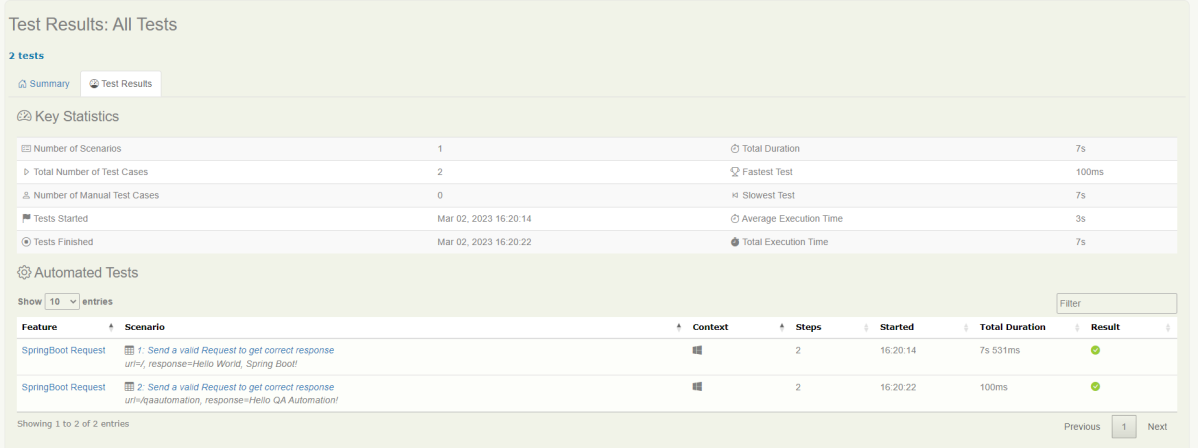
Go to the Test Results tab and we can see all the test scenarios.
Step 9 – CucumberReport Generation
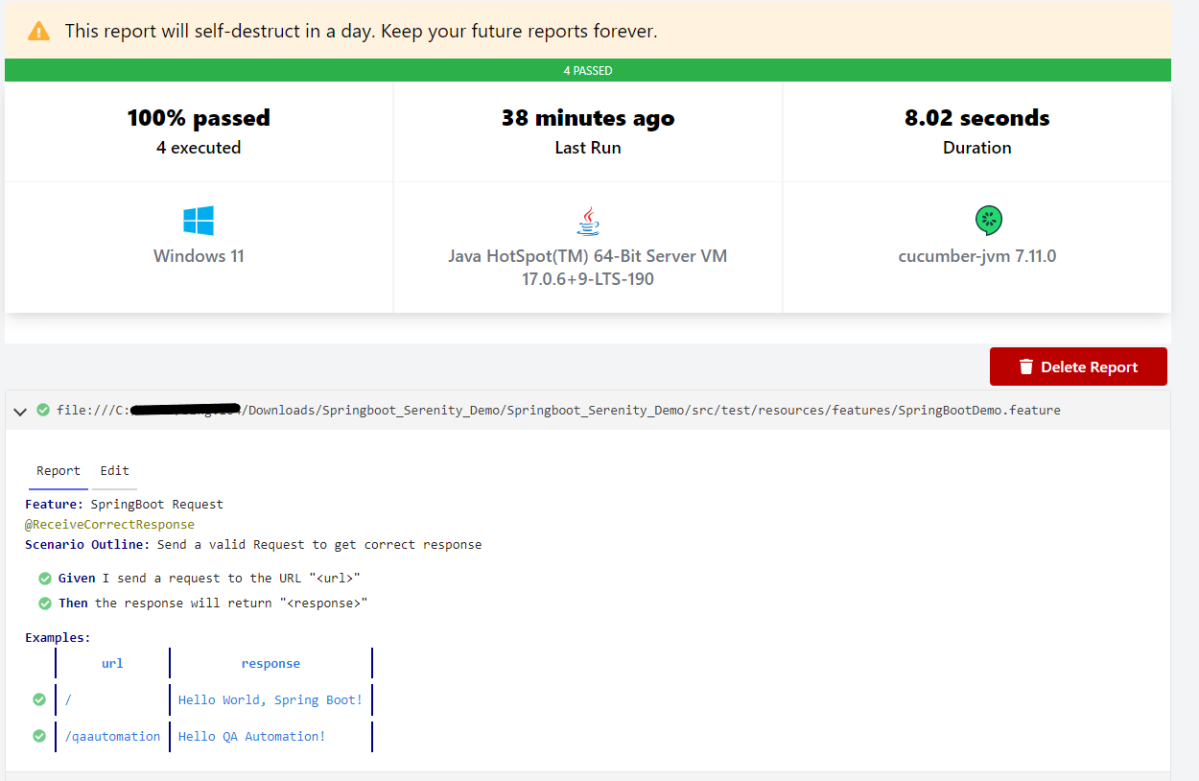
Cucumber Report can be generated by adding publish=true in SpringRunnerTests as shown in the above example. Click on the link provided in the execution status.
Spring Boot 3.0.4 requires Java 17 and is compatible with and including Java 19. Spring Framework 6.0.6 or above is also required.
Explicit build support is provided for the following build tools:
Maven – 3.5+
Gradle – 7.x (7.5 or later) and 8.x
Dependency List
SpringBoot Starter Parent – 3.1.0
Rest Assured – 5.3.0
Java 17
Maven – 3.8.6
What is SpringBoot Application?
Spring Boot is an open-source micro-framework that provides Java developers with a platform to get started with an auto-configurable production-grade Spring application.
Comes with embedded HTTP servers like Tomcat orJetty to test web applications.
Adds many plugins that developers can use to work with embedded and in-memory databases easily. Spring allows you to easily connect with database and queue services like Oracle, PostgreSQL, MySQL, MongoDB, Redis, Solr, ElasticSearch, Rabbit MQ, and others.
Project Directory Structure
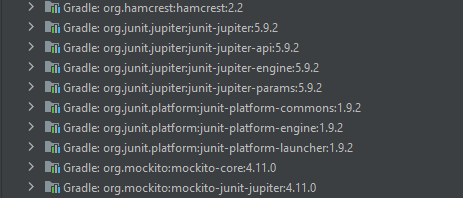
SpringBoot – 3.1.0-SNAPSHOT contains the JUnit 5 dependencies in it as shown in the below image. So, we don’t need to add them explicitly to the build.gradle.
Implementation Steps
Step 1 – Create a source folder – src/test/resources
Create a source folder – src/test/resources to create test scenarios in the Feature file.
Right-click on the test directory, select New->Directory and select resources (Maven Source Directories).
Step 2 – Add SpringBoot, and JUnit5 dependencies to the project
We have added SpringBootTest, and JUnit5 dependencies to pom.xml.
uses @SpringBootTest annotation which loads the actual application context.
uses WebEnvironment.RANDOM_PORT to create and run the application at some random server port.
@LocalServerPort gets the reference of the port where the server has started. It helps in building the actual request URIs to mimic real client interactions.
Below is the code of the Test class. These classes are created in the src/test/java directory.
import io.restassured.response.ValidatableResponse;
import org.junit.jupiter.api.Assertions;
import org.junit.jupiter.api.Test;
import org.springframework.beans.factory.annotation.Value;
import org.springframework.boot.test.context.SpringBootTest;
import org.springframework.boot.test.web.server.LocalServerPort;
import static io.restassured.RestAssured.given;

@SpringBootTest(webEnvironment = SpringBootTest.WebEnvironment.RANDOM_PORT)
public class SpringBootDemoTests {

    private final static String BASE_URI = "http://localhost:";

    @LocalServerPort
    private int port;

    @Value("${server.servlet.context-path}")
    private String basePath;

    private ValidatableResponse response;

    @Test
    public void verifyController1() throws Exception  {
         response = given().contentType("application/json")
                    .header("Content-Type", "application/json")
                 .when().get(BASE_URI + port + basePath+ "/").then().statusCode(200);

         String Actual = response.extract().asString();
          System.out.println("Result :"+Actual);
          Assertions.assertEquals("Hello World, Spring Boot!", Actual);
    }

    @Test
    public void verifyController2() throws Exception  {
        response = given().contentType("application/json")
                .header("Content-Type", "application/json")
                .when().get(BASE_URI + port + basePath+ "/qaautomation").then().statusCode(200);

        String Actual = response.extract().asString();
        System.out.println("Result :"+Actual);
        Assertions.assertEquals("Hello QA Automation!", Actual);
    }
}
This class sends the request and receives a response after performing the GET operation. Here, the validation of the response also takes place by asserting the expected and actual response
Step 4 – Create an application.properties file in src/test/resources
Application.properties is created under src/test/java.
spring.profiles.active – property to specify which profiles are active. The default profile is always active. server.port – By default, the embedded server starts on port 8080. Now the server will start on port 8089 server.servlet.context-path – the context path in Spring Boot can be changed by setting a property, server.servlet.context-path.
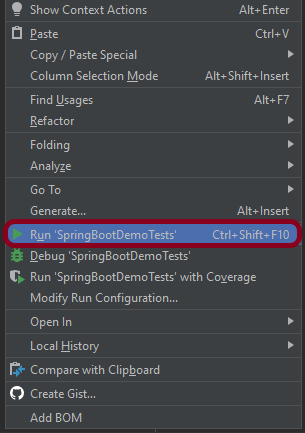
Step 5 – Run the tests from JUnit5
Right-click on the Test class and select Run ‘SpringBootDemoTests’.
The output of the above program is
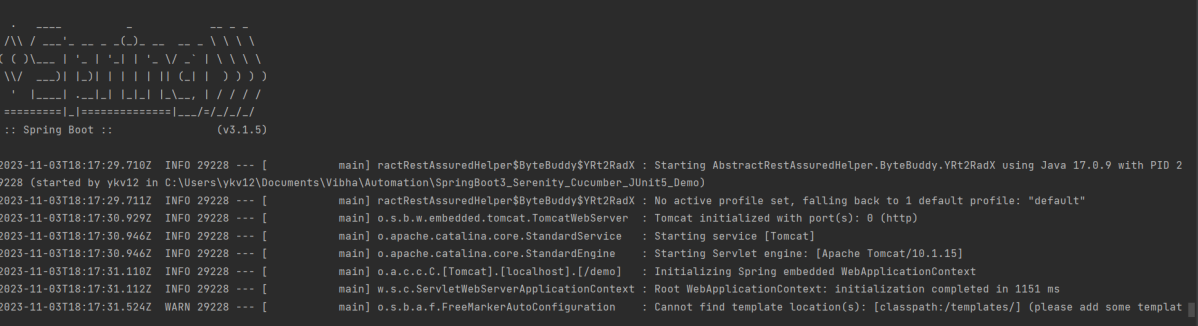
Below is the execution log.
This image shows that the profile name is “test”. Application is started on port – “64733” and the context path is “/demo”.
Step 6 – Run the tests from the Command Line
Run the tests from the command line by using the below command
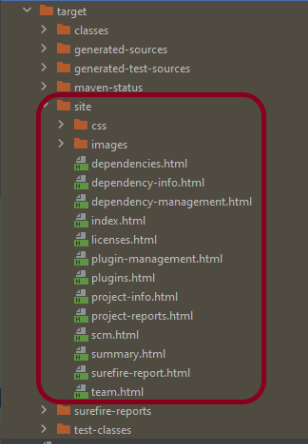
mvn clean test site
The output of the above program is
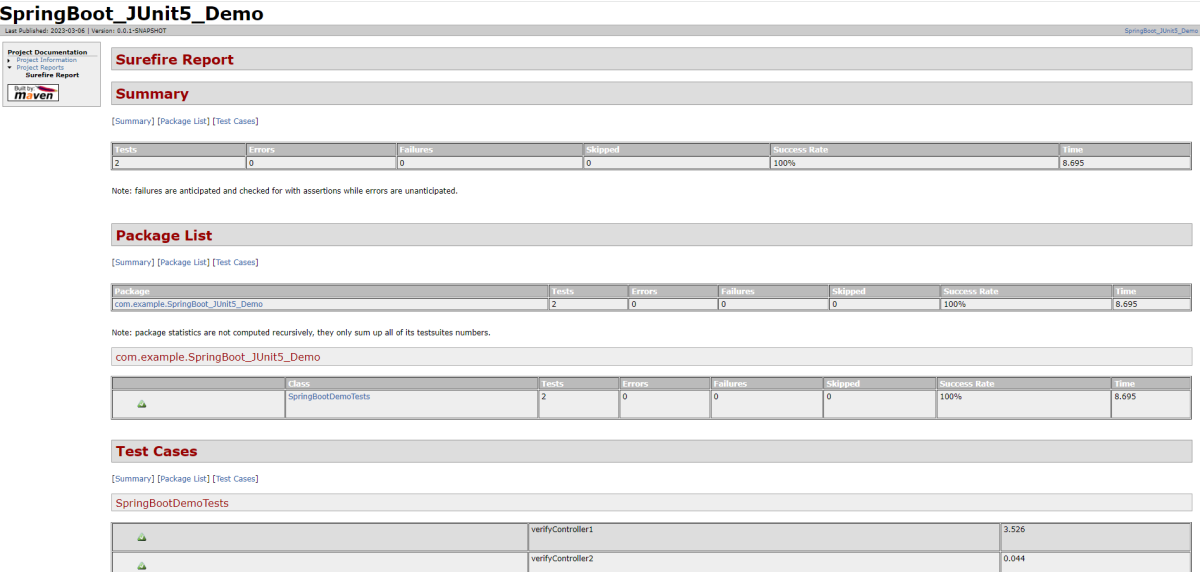
Step 7 – Surefire Report Generation
The test report generated by JUnit is placed under target/site/index.html.
Below is the sample Surefire Report.
Congratulations on making it through this tutorial and hope you found it useful! Happy Learning!! Cheers!!
In the previous tutorial, I explained about Integration Testing of Springboot with Cucumber and JUnit4. In this tutorial, I will explain the Testing of the SpringBoot Application in BDD format using Serenity Bdd and Cucumber and JUnit5.
Serenity BDD is an open-source library that aims to make the idea of living documentation a reality.
Serenity BDD helps you write cleaner and more maintainable automated acceptance and regression tests faster. Serenity also uses the test results to produce illustrated, narrative reports that document and describe what your application does and how it works. Serenity tells you not only what tests have been executed, but more importantly, what requirements have been tested.
What is SpringBoot Application?
Spring Boot is an open-source micro framework that provides Java developers with a platform to get started with an auto-configurable production-grade Spring application.
Comes with embedded HTTP servers like Tomcat orJettyto test web applications.
Adds many plugins that developers can use to work with embedded and in-memory databases easily. Spring allows you to easily connect with database and queue services like Oracle, PostgreSQL, MySQL, MongoDB, Redis, Solr, ElasticSearch, Rabbit MQ, and others.
Dependency List
SpringBoot Starter Parent – 3.1.5
Serenity – 4.0.18
Serenity Cucumber – 4.0.18
Serenity Rest Assured – 4.0.18
Cucumber – 7.14.0
Java 17
JUnit Platform – 1.10.0
Maven – 3.8.6
Project Directory Structure
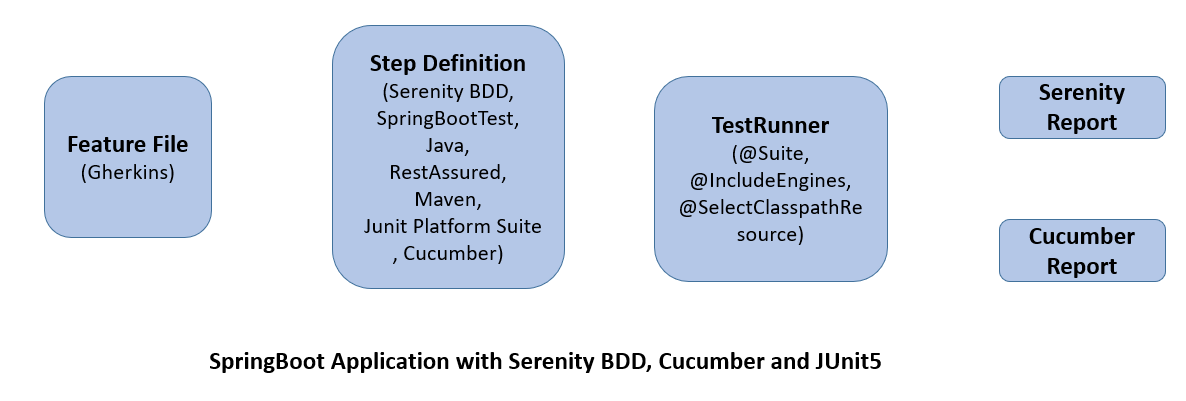
Relationship between SpringBoot, Serenity BDD, Cucumber, and JUnit5
What is RestController?
HTTP requests are handled by a controller in Spring’s approach to building RESTful web services. The @RestController annotation identifies these components, and the GreetingController shown below (from src/main/java/com/example/springboot_demo/HelloController.java) handles GET requests for / and /qaautomation by returning a new instance of the Greeting class. Spring RestController takes care of mapping request data to the request-defined handles method.
import org.springframework.web.bind.annotation.GetMapping;
import org.springframework.web.bind.annotation.RestController;

@RestController
public class HelloController {

    @GetMapping(path="/")
    String hello() {
        return "Hello World, Spring Boot!";
    }


    @GetMapping(path="/qaautomation")
    String qaautomation() {
        return "Hello QA Automation!";
    }

}
Implementation Steps
Step 1 – Create a source folder – src/test/resources
Create a source folder – src/test/resources to create test scenarios in the Feature file.
Right-click on the test directory select New->Directory and select resources (Maven Source Directories).
Step 2 – Add SpringBoot, Serenity, Cucumber, and JUnit5 dependencies to the project
We have added SpringBootTest, Serenity, Cucumber, JUnit5, Cucumber Junit Platform Engine, and many more.
Step 3 – Create a feature file under src/test/resources
Below is an example of a feature file that shows a sample test scenario.
Feature: SpringBoot Request

@ReceiveCorrectResponse

   Scenario Outline: Send a valid Request to get correct response
    Given I send a request to the URL "<url>"
    Then the response will return "<response>"

   Examples:
   | url                       | response                             |
   | /                          | Hello World, Spring Boot!  |
   | /qaautomation   | Hello QA Automation!        |
The test class mentioned below (AbstractRestAssuredHelper) contains integration tests for the spring boot rest controller mentioned. This test class:
uses @SpringBootTest annotation which loads the actual application context.
uses WebEnvironment.RANDOM_PORT to create and run the application at some random server port.
@LocalServerPort gets the reference of the port where the server has started. It helps in building the actual request URIs to mimic real client interactions.
Step 4 – Create the StepDefinition and Helper classes
Below is the code of the StepDefinition and Helper class. These classes are created in the src/test/java directory.
This class sends the request and receives a response after performing the GET operation. Here, the validation of the response also takes place by asserting the expected and actual response
To use Rest-assured, Serenity provides the class SerenityRest
import io.cucumber.java.en.Given;
import io.cucumber.java.en.Then;
import io.restassured.response.Response;
import net.serenitybdd.rest.SerenityRest;
import net.thucydides.core.annotations.Steps;
import org.junit.jupiter.api.Assertions;

public class SpringBootDemoDefinitions {

	@Steps
    AbstractRestAssuredHelper helper;
    private Response response;

    @Given("I send a request to the URL {string}")
    public void iSendARequest(String endpoint) throws Exception  {
         response = helper.getAnonymousRequest().contentType("application/json")
                    .header("Content-Type", "application/json").when().get(endpoint);
    }

    @Then("the response will return {string}")
    public void extractResponse(String Expected ) {
          SerenityRest.restAssuredThat(response -> response.statusCode(200));
          String Actual = response.asString();
          System.out.println("Result :"+Actual);
          Assertions.assertEquals(Expected, Actual);
    }
}
Step 5 – Create a Serenity Runner class in the src/test/java directory
We cannot run a Feature file on its own in a cucumber-based framework. We need to create a Java class that will run the Feature File. It is the starting point for JUnit to start executing the tests. TestRunner class is created under src/ test/java.
import org.junit.platform.suite.api.ConfigurationParameter;
import org.junit.platform.suite.api.IncludeEngines;
import org.junit.platform.suite.api.SelectClasspathResource;
import org.junit.platform.suite.api.Suite;
import static io.cucumber.junit.platform.engine.Constants.GLUE_PROPERTY_NAME;
import static io.cucumber.junit.platform.engine.Constants.PLUGIN_PROPERTY_NAME;

@Suite
@IncludeEngines("cucumber")
@SelectClasspathResource("com.example")
@SelectClasspathResource("/features")
@ConfigurationParameter(key = GLUE_PROPERTY_NAME, value = "com.example.definitions")
@ConfigurationParameter(key = PLUGIN_PROPERTY_NAME, value = "io.cucumber.core.plugin.SerenityReporterParallel,pretty,timeline:build/test-results/timeline")
public class SpringRunnerTests {
}
@Suite – annotation from JUnit 5 to make this class a run configuration for the test suite. @IncludeEngines(“cucumber”) – tells JUnit 5 to use the Cucumber test engine to run features. @SelectClasspathResource(“/features”) – to change the location of your feature files (if you do not add this annotation classpath of the current class will be used). @ConfigurationParameter(key = GLUE_PROPERTY_NAME, value = “com.example.SpringBoot_Demo.definitions”) – this annotation specifies the path to steps definitions (java classes).
Step 6 – Run the tests from JUnit5
You can run the tests from SpringRunnerTests class. Right-click on the class and select Run ‘SpringRunnerTests’.
The output of the above program is
Step 7 – Run the tests from the Command Line
Run the tests from the command line by using the below command
mvn clean verify
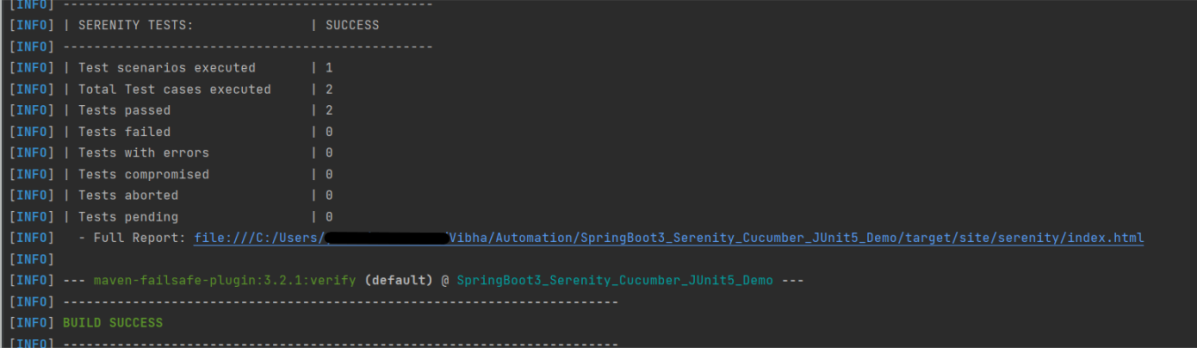
The output of the above program is
The test execution status is shown below:
Step 8 – Serenity Report Generation
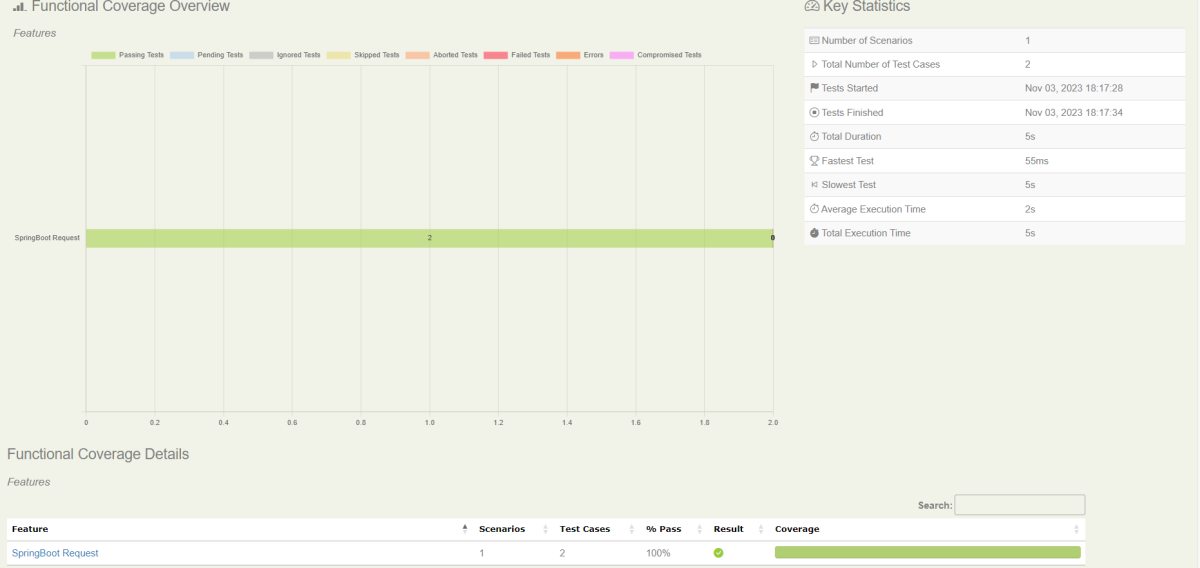
By default, the test report generated by Serenity is placed under target/site/serenity/index.html. Below is the sample Serenity Report.
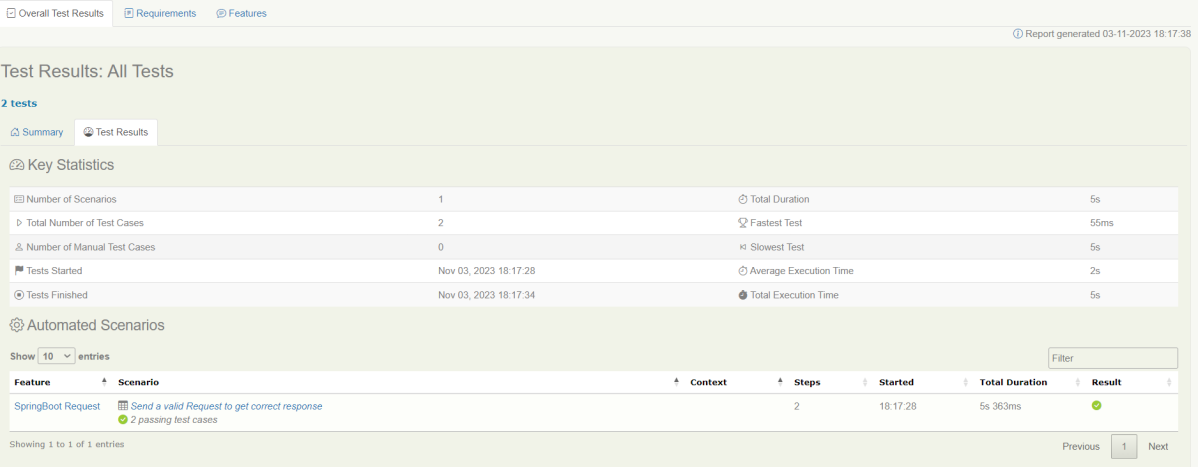
Go to the Test Results tab and we can see all the test scenarios.
Step 9 – Cucumber Report Generation
Cucumber Report can be generated by adding publish=true in SpringRunnerTests as shown in the above example. Click on the link provided in the execution status.
Spring Boot 3.0.4 requires Java 17 and is compatible with and including Java 19. Spring Framework 6.0.6 or above is also required.
Explicit build support is provided for the following build tools:
Maven – 3.5+
Gradle – 7.x (7.5 or later) and 8.x
This framework consists of
SpringBoot Starter Parent – 3.1.0
Serenity Rest Assured – 3.6.12
Spring
Java 17
Gradle – 7.6.1
JUnit Jupiter API – 5.9.2
JUnit Jupiter Engine – 5.9.2
Serenity JUnit5 – 3.6.12
What is SpringBoot Application?
Spring Boot is an open-source micro-framework that provides Java developers with a platform to get started with an auto-configurable production-grade Spring application.
Comes with embedded HTTP servers like Tomcat orJetty to test web applications.
Adds many plugins that developers can use to work with embedded and in-memory databases easily. Spring allows you to easily connect with database and queue services like Oracle, PostgreSQL, MySQL, MongoDB, Redis, Solr, ElasticSearch, Rabbit MQ, and others.
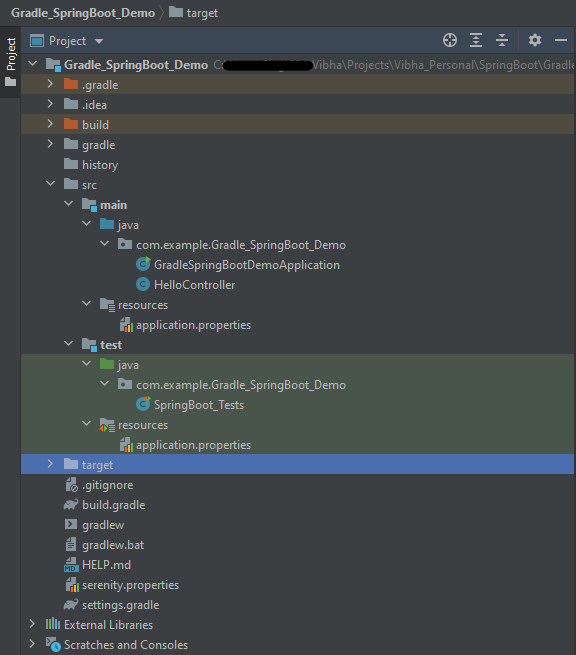
Project Directory Structure
Implementation Steps
Create a source folder – src/test/resources to create properties file
AddSpringBootTest, SerenityRest Assured, and Serenity-JUnit5 dependencies to the project
Create the Test classes.
Create an application.properties file in src/test/resources
Run the tests from JUnit5
Run the tests from Command Line
Serenity Report Generation
Step 1 – Create a source folder – src/test/resources to create test scenarios in the Feature file
Right-click on the test directory and select New->Directory and select resources (Maven Source Directories).
Step 2 – Add SpringBootTest,Rest Assured, and allure dependencies to the project
We have added SpringBootTest, SpringBoot Web, Tomcat, Spring Web, Rest Assured, and Serenity-JUnit5 dependencies to the build.gradle.
plugins {
	id 'java'
	id 'org.springframework.boot' version '3.1.0-SNAPSHOT'
	id 'io.spring.dependency-management' version '1.1.0'
	id 'net.serenity-bdd.serenity-gradle-plugin' version '3.6.7'
}

group = 'com.example'
version = '0.0.1-SNAPSHOT'
sourceCompatibility = '17'

repositories {
	mavenCentral()
	maven { url 'https://repo.spring.io/milestone' }
	maven { url 'https://repo.spring.io/snapshot' }
}

dependencies {

	implementation 'org.springframework.boot:spring-boot-starter'
	implementation 'org.springframework.boot:spring-boot-starter-web'
	implementation 'org.springframework.boot:spring-boot-starter-tomcat'
	implementation 'org.springframework:spring-web'

	testImplementation 'org.springframework.boot:spring-boot-starter-test'
	testImplementation 'net.serenity-bdd:serenity-junit5:3.6.12'
	testImplementation 'org.junit.jupiter:junit-jupiter-api:5.9.2'
	testImplementation 'org.junit.jupiter:junit-jupiter-engine:5.9.2'
	testImplementation 'net.serenity-bdd:serenity-core:3.6.12'
	testImplementation 'net.serenity-bdd:serenity-rest-assured:3.6.12'
	testImplementation 'net.serenity-bdd:serenity-spring:3.6.12'
}

tasks.named('test') {
	useJUnitPlatform() {}
	testLogging {
		showStandardStreams = true
	}
	systemProperties System.getProperties()
}

gradle.startParameter.continueOnFailure = true

test.finalizedBy(aggregate)
Step 3 – Create the Test classes
uses @SpringBootTest annotation which loads the actual application context.
uses WebEnvironment.RANDOM_PORT to create and run the application at some random server port.
@LocalServerPort gets the reference of the port where the server has started. It helps in building the actual request URIs to mimic real client interactions.
Below is the Test Class, created in the src/test/java directory.
import io.restassured.response.ValidatableResponse;
import net.serenitybdd.junit5.SerenityJUnit5Extension;
import org.junit.jupiter.api.Assertions;
import org.junit.jupiter.api.Test;
import org.junit.jupiter.api.extension.ExtendWith;
import org.springframework.beans.factory.annotation.Value;
import org.springframework.boot.test.context.SpringBootTest;
import org.springframework.boot.test.web.server.LocalServerPort;
import static io.restassured.RestAssured.given;

@ExtendWith(SerenityJUnit5Extension.class)
@SpringBootTest(webEnvironment = SpringBootTest.WebEnvironment.RANDOM_PORT)
public class SpringBootDemoDefinitions {

    private final static String BASE_URI = "http://localhost:";

    @LocalServerPort
    private int port;

    @Value("${server.servlet.context-path}")
    private String basePath;

   private ValidatableResponse response;

    @Test
    public void verifyController1() throws Exception  {
        response = given().contentType("application/json")
                .header("Content-Type", "application/json")
                .when().get(BASE_URI + port + basePath+ "/").then().statusCode(200);

        String Actual = response.extract().asString();
        System.out.println("Result :"+Actual);
        Assertions.assertEquals("Hello World, Spring Boot!", Actual);
    }

    @Test
    public void verifyController2() throws Exception  {
        response = given().contentType("application/json")
                .header("Content-Type", "application/json")
                .when().get(BASE_URI + port + basePath+ "/qaautomation").then().statusCode(200);

        String Actual = response.extract().asString();
        System.out.println("Result :"+Actual);
        Assertions.assertEquals("Hello QA Automation!", Actual);
    }
}
This class sends the request and receives a response after performing the GET operation. Here, the validation of the response also takes place by asserting the expected and actual response
Step 4 – Create an application.properties file in src/test/resources
Application.properties is created under src/ test/java.
spring.profiles.active – property to specify which profiles are active. The default profile is always active. server.port – By default, the embedded server starts on port 8080. Now the server will start on port 8090 server.servlet.context-path – the context path in Spring Boot can be changed by setting a property, server.servlet.context-path.
Step 5 – Run the tests from JUnit5
Right-click on the Test class and select Run ‘SpringBoot_Tests’.
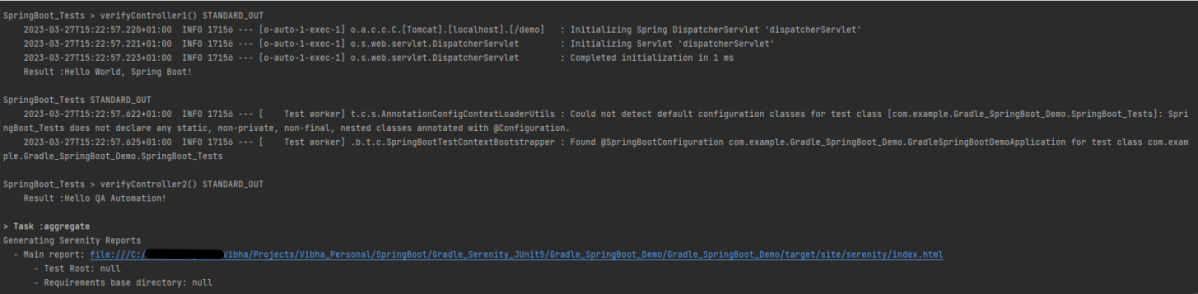
The output of the above program is
This image shows that the profile name is “test”. Application is started on port – “65221” and the context path is “/demo”.
Step 6 – Run the tests from Command Line
Run the tests from the command line by using the below command
gradle clean test
The output of the above program is
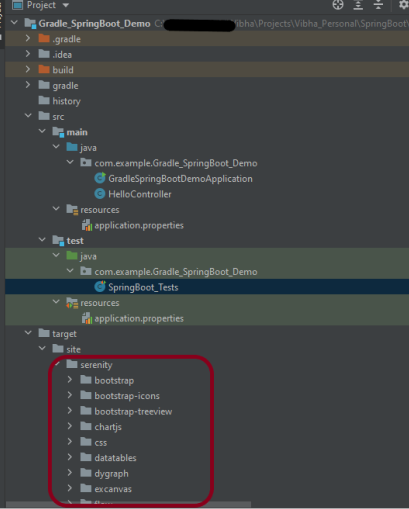
Step 7 – Serenity Report Generation
The best part about Serenity is the report generation by it. The Reports contain all possible type of information, you can think of with minimal extra effort. There is multiple types of reports are generated. We are interested in index.html .
Below is the new Serenity Report.
We are done! Congratulations on making it through this tutorial and hope you found it useful! Happy Learning!!
Spring Boot is an open-source micro-framework that provides Java developers with a platform to get started with an auto-configurable production-grade Spring application.
Comes with embedded HTTP servers like Tomcat orJetty to test web applications.
Adds many plugins that developers can use to work with embedded and in-memory databases easily. Spring allows you to easily connect with database and queue services like Oracle, PostgreSQL, MySQL, MongoDB, Redis, Solr, ElasticSearch, Rabbit MQ, and others.
Project Directory Structure
What is RestController?
HTTP requests are handled by a controller in Spring’s approach to building RESTful web services. The @RestController annotation identifies these components, and the GreetingController shown below (from src/main/java/com/example/springboot_demo/HelloController.java) handles GET requests for / and /qaautomation by returning a new instance of the Greeting class. Spring RestController takes care of mapping request data to the request-defined handles method.
import org.springframework.web.bind.annotation.GetMapping;
import org.springframework.web.bind.annotation.RestController;

@RestController
public class HelloController {

    @GetMapping(path="/")
    String hello() {
        return "Hello World, Spring Boot!";
    }


    @GetMapping(path="/qaautomation")
    String qaautomation() {
        return "Hello QA Automation!";
    }

}
Implementation Steps
Create a source folder – src/test/resources to create properties file
AddSpringBootTest, Serenity and JUnit5 dependencies to the project
Create the Test and Helper classes.
Create an application.properties file in src/test/resources
Create serenity.properties at the root of the project
Run the tests from JUnit5
Run the tests from Command Line
Serenity Report Generation
Step 1 – Create a source folder – src/test/resources to create test scenarios in the Feature file
Right-click on the test directory and select New->Directory and select resources (Maven Source Directories).
Step 2 – Add SpringBootTest, Serenity, and JUnit5 dependencies to the project
We have added SpringBootTest, Serenity, Rest Assured, and JUnit5 dependencies to pom.xml.
uses @SpringBootTest annotation which loads the actual application context.
uses WebEnvironment.RANDOM_PORT to create and run the application at some random server port.
@LocalServerPort gets the reference of the port where the server has started. It helps in building the actual request URIs to mimic real client interactions.
Below is the code of the StepDefinition and Helper class. These classes are created in the src/test/java directory.
This class sends the request and receives a response after performing the GET operation. Here, the validation of the response also takes place by asserting the expected and actual response
Step 4 – Create an application.properties file in src/test/resources
Application.properties is created under src/test/resources for the test profile. If you want to run the SpringBootApplication from DEV profile, then create application.properties file in src/main/resources.
spring.profiles.active – property to specify which profiles are active. The default profile is always active. server.port – By default, the embedded server starts on port 8080. Now the server will start on port 8090 server.servlet.context-path – the context path in Spring Boot can be changed by setting a property, server.servlet.context-path.
Step 5 – Create serenity.properties at the root of the project
serenity.project.name = Testing of SpringBoot Application with Serenity and JUnit5 Demo
Step 6 – Run the tests from JUnit5
Right-click on the Test class and select Run ‘SpringBootDemoApplicationTests’.
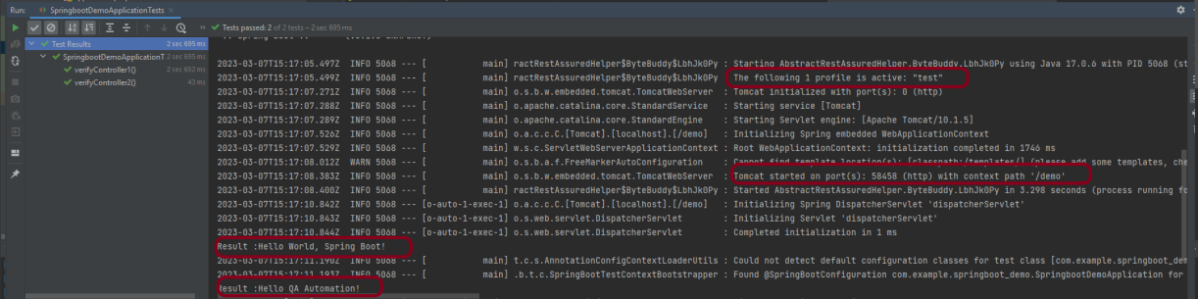
The output of the above program is
This image shows that the profile name is “test”. Application is started on port – “58458” and the context path is “/demo”.
Step 7 – Run the tests from Command Line
Run the tests from the command line by using the below command
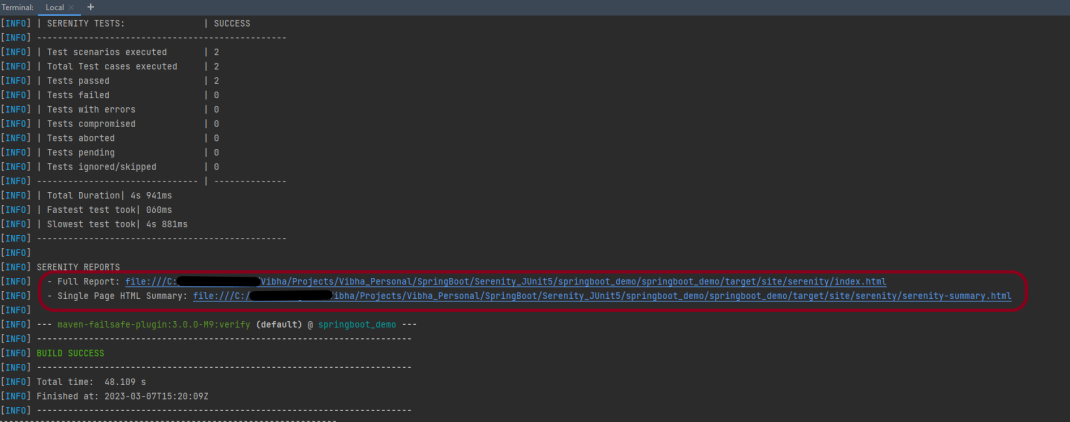
mvn clean verify
The output of the above program is
Step 8 – Serenity Report Generation
The serenity test reports are generated under target/site/serenity.
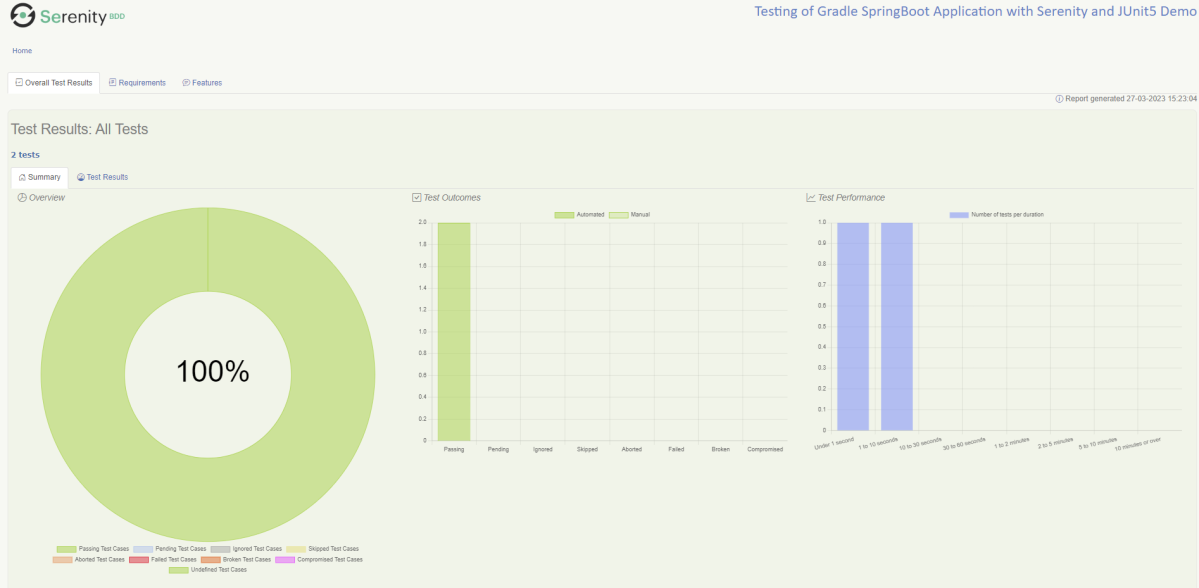
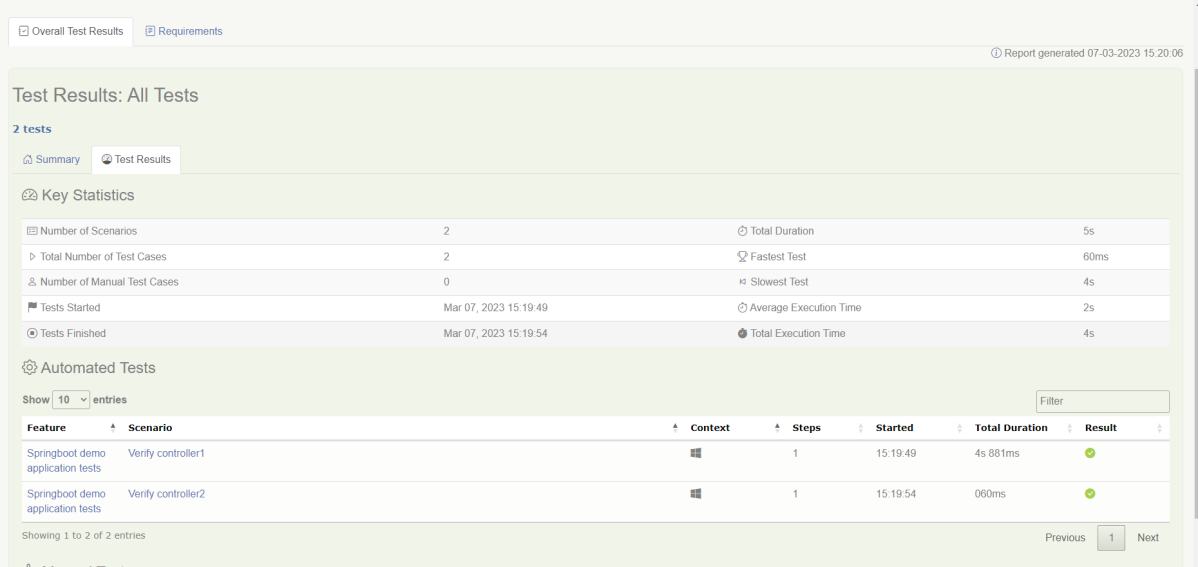
Below is the sample Index.html Report.
Go to Test Results, present at the top left of the index.html page.
Spring Boot 3.0.4 requires Java 17 and is compatible with and including Java 19. Spring Framework 6.0.6 or above is also required.
Explicit build support is provided for the following build tools:
Maven – 3.5+
Gradle – 7.x (7.5 or later) and 8.x
This framework consists of
SpringBoot Starter Parent – 3.1.0
Serenity – 3.6.12
Serenity Cucumber – 3.6.12
Serenity JUnit4 – 3.6.12
Serenity Rest Assured – 3.6.12
Spring
Java 17
Gradle – 7.6.1
What is SpringBoot Application?
Spring Boot is an open-source micro-framework that provides Java developers with a platform to get started with an auto-configurable production-grade Spring application.
Comes with embedded HTTP servers like Tomcat orJetty to test web applications.
Adds many plugins that developers can use to work with embedded and in-memory databases easily. Spring allows you to easily connect with database and queue services like Oracle, PostgreSQL, MySQL, MongoDB, Redis, Solr, ElasticSearch, Rabbit MQ, and others.
What is RestController?
HTTP requests are handled by a controller in Spring’s approach to building RESTful web services. The @RestController annotation identifies these components, and the HelloController shown below (from src/main/java/com/example/springboot_demo/HelloController.java) handles GET requests for / and /qaautomation by returning a new instance of the Greeting class. Spring RestController takes care of mapping request data to the request-defined handles method.
import org.springframework.web.bind.annotation.GetMapping;
import org.springframework.web.bind.annotation.RestController;

@RestController
public class HelloController {

    @GetMapping(path="/")
    String hello() {
        return "Hello World, Spring Boot!";
    }


    @GetMapping(path="/qaautomation")
    String qaautomation() {
        return "Hello QA Automation!";
    }

}
Project Directory Structure
Implementation Steps
Create a source folder – src/test/resources to create properties file
AddSpringBootTest,Rest Assured, and JUnit4 dependencies to the project
Create a feature file in src/test/resources
Create the StepDefinition and Helper classes.
Create a Serenity Runner class in the src/test/java directory
Create an application.properties file in src/test/resources
Create a serenity.properties at the root level of the project
Run the tests from Command Line
Serenity Report Generation
CucumberReport Generation
Step 1 – Create a source folder – src/test/resources to create test scenarios in the Feature file
Right-click on the test directory and select New->Directory and select resources (Maven Source Directories).
Step 2 – Add SpringBootTest,Rest Assured, and other dependencies to the project
We have added SpringBootTest, SpringBoot Web, Tomcat, Spring Web, Rest Assured, and JUnit4 dependencies to the build.gradle.
plugins {
	id 'java'
	id 'org.springframework.boot' version '3.1.0-SNAPSHOT'
	id 'io.spring.dependency-management' version '1.1.0'
	id "net.serenity-bdd.serenity-gradle-plugin" version "3.6.7"
}

group = 'com.example'
version = '0.0.1-SNAPSHOT'
sourceCompatibility = '17'

repositories {
	mavenCentral()
	maven { url 'https://repo.spring.io/milestone' }
	maven { url 'https://repo.spring.io/snapshot' }
}


dependencies {

	implementation 'org.springframework.boot:spring-boot-starter'
	implementation 'org.springframework.boot:spring-boot-starter-web'
	implementation 'org.springframework.boot:spring-boot-starter-tomcat'
	implementation 'org.springframework:spring-web'

	testImplementation 'org.springframework.boot:spring-boot-starter-test'
	testImplementation 'net.serenity-bdd:serenity-core:3.6.12'
	testImplementation 'net.serenity-bdd:serenity-cucumber:3.6.12'
	testImplementation 'net.serenity-bdd:serenity-rest-assured:3.6.12'
	testImplementation 'net.serenity-bdd:serenity-spring:3.6.12'
	testImplementation 'net.serenity-bdd:serenity-junit:3.6.12'
	testImplementation 'org.junit.vintage:junit-vintage-engine'

}

tasks.named('test') {
	useJUnit() {}
	testLogging {
		showStandardStreams = true
	}
	systemProperties System.getProperties()
}

gradle.startParameter.continueOnFailure = true

test.finalizedBy(aggregate)
Step 3 – Create a feature file in src/test/resources
Below is an example of a feature file that shows a sample test scenario. Feature file should end with .feature. It contains the test scenarios in the form of simple English using the terms Given, When, Then, And.
Feature: SpringBoot Request

@ReceiveCorrectResponse

   Scenario Outline: Send a valid Request to get correct response
    Given I send a request to the URL "<url>"
    Then the response will return "<response>"

   Examples:
   | url             | response                   |
   | /               | Hello World, Spring Boot!  |
   | /qaautomation   | Hello QA Automation!       |
Step 4 – Create the StepDefinition and Helper classes.
Below is the code of the StepDefinition and Helper class. These classes are created in the src/test/java directory.
uses @SpringBootTest annotation which loads the actual application context.
uses WebEnvironment.RANDOM_PORT to create and run the application at some random server port.
@LocalServerPort gets the reference of the port where the server has started. It helps in building the actual request URIs to mimic real client interactions.
This class sends the request and receives a response after performing the GET operation. Here, the validation of the response also takes place by asserting the expected and actual response
import io.cucumber.java.en.Given;
import io.cucumber.java.en.Then;
import io.restassured.response.Response;
import net.serenitybdd.rest.SerenityRest;
import net.thucydides.core.annotations.Steps;
import org.junit.Assert;

public class SpringBootDemoDefinitions {

	@Steps
    AbstractRestAssuredHelper helper;
    private Response response;

    @Given("I send a request to the URL {string}")
    public void iSendARequest(String endpoint) throws Exception  {
         response = helper.getAnonymousRequest()
                    .header("Content-Type", "application/json").when().get(endpoint);
    }

    @Then("the response will return {string}")
    public void extractResponse(String Expected ) {
          SerenityRest.restAssuredThat(response -> response.statusCode(200));
          String Actual = response.asString();
          System.out.println("Result :"+Actual);
          Assert.assertEquals(Expected, Actual);
    }
}
Step 5 – Create a Serenity Runner class in the src/test/java directory
We cannot run a Feature file on its own in cucumber-based framework. We need to create a Java class that will run the Feature File. It is the starting point for JUnit to start executing the tests. TestRunner class is created under src/test/java. When you run the tests with serenity, you use the CucumberWithSerenitytest runner.
spring.profiles.active – property to specify which profiles are active. The default profile is always active. server.port – By default, the embedded server starts on port 8080. Now the server will start on port 8090 server.servlet.context-path – the context path in Spring Boot can be changed by setting a property, server.servlet.context-path.
Step 7 – Create a serenity.properties at the root level of the project
serenity.project.name = Testing of Gradle SpringBoot Application with Serenity and JUnit4 Demo
Step 8 – Run the tests from Command Line
Run the tests from the command line by using the below command
gradle clean test
The output of the above program is
This image shows that the profile name is “dev”. Application is started on port – “54462” and the context path is “/demo”.
Step 9 – Serenity Report Generation
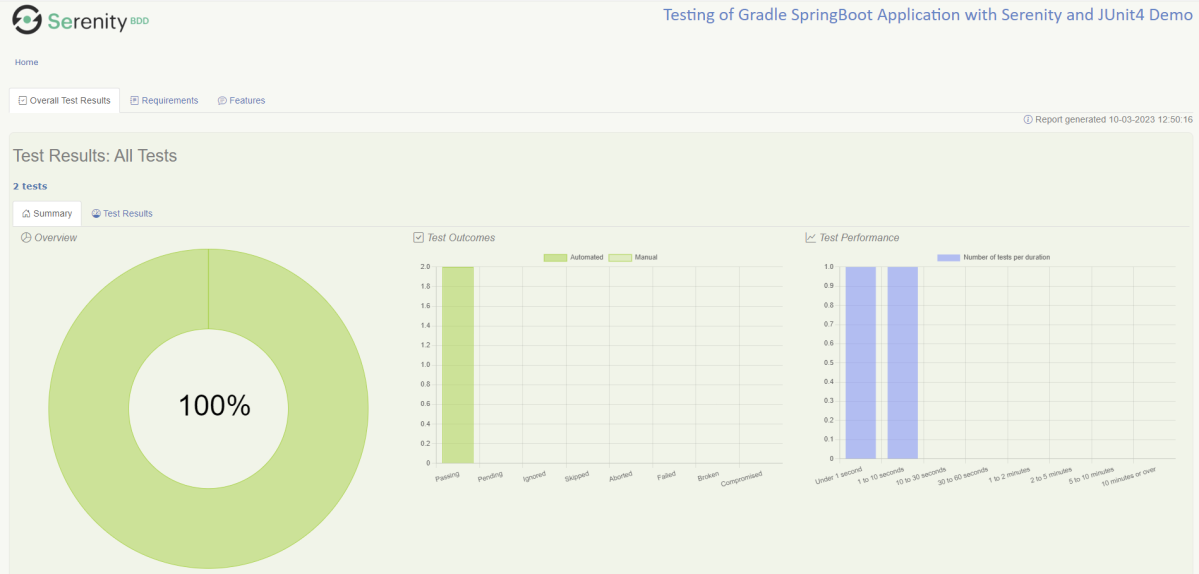
By default, the test report generated by Serenity is placed under target/site/serenity/index.html. Below is the sample Serenity Report.
Below is the sample Serenity Report.
Step 10 – CucumberReport Generation
A Cucumber Report can be generated by adding publish=true in SpringRunnerTests as shown in the above example. Click on the link provided in the execution status.
Cucumber Report
Congratulations on making it through this tutorial and hope you found it useful! Happy Learning!! Cheers!!
In the previous tutorial, I explained about Integration Testing of SpringBoot Application with Serenity BDD, Cucumber and JUnit4. This one provides a comprehensive tutorial on integration testing of a SpringBoot application using SpringBoot Test and TestNG. It covers essential topics like SpringBoot application, RestController, prerequisites, dependency list, project directory structure, and detailed test implementation steps.
Spring Boot is an open-source micro-framework that provides Java developers with a platform to get started with an auto-configurable production-grade Spring application.
Comes with embedded HTTP servers like Tomcat orJetty to test web applications.
Adds many plugins that developers can use to work with embedded and in-memory databases easily. Spring allows you to easily connect with database and queue services like Oracle, PostgreSQL, MySQL, MongoDB, Redis, Solr, ElasticSearch, Rabbit MQ, and others.
What is RestController?
HTTP requests are handled by a controller in Spring’s approach to building RESTful web services. The @RestController annotation identifies these components, and the GreetingController shown below (from src/main/java/com/example/HelloController.java) handles GET requests for / and /qaautomation by returning a new instance of the Greeting class. Spring RestController takes care of mapping request data to the request-defined handles method.
import org.springframework.web.bind.annotation.GetMapping;
import org.springframework.web.bind.annotation.RestController;

@RestController
public class HelloController {

    @GetMapping(path="/")
    String hello() {
        return "Hello World, Spring Boot!";
    }


    @GetMapping(path="/qaautomation")
    String qaautomation() {
        return "Hello QA Automation!";
    }

}
In this tutorial, I will explain the IntegrationTesting of the SpringBoot Application using SpringBoot Test and TestNG.
Prerequisite
Spring Boot 3.0.4 requires Java 17 and is compatible with and including Java 19. Spring Framework 6.0.6 or above is also required.
Explicit build support is provided for the following build tools:
Maven – 3.5+
Gradle – 7.x (7.5 or later) and 8.x
Dependency List
SpringBoot Starter Parent – 3.2.5
TestNG – 7.10.2
Rest Assured – 5.4.0
Java 17
Maven – 3.9.6
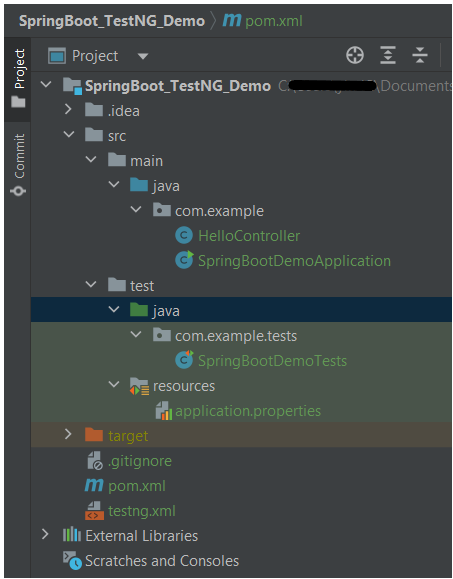
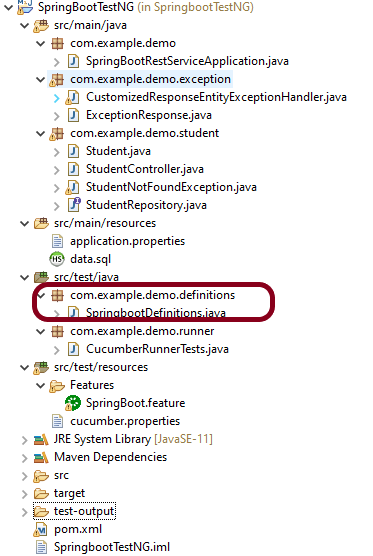
Project Directory Structure
Test Implementation Steps
Step 1 – Create a source folder – src/test/resources
Create a source folder – src/test/resources to properties file in it.
Right-click on the test directory and select New->Directory and select resources (Maven Source Directories).
Step 2 – Add dependencies to the project
We have added SpringBootTest, SpringBoot Tomcat, SpringBoot Web, Spring Web, Rest Assured, and TestNG dependencies to the pom.xml.
uses @SpringBootTest annotation which loads the actual application context.
uses WebEnvironment.RANDOM_PORT to create and run the application at some random server port.
@LocalServerPort gets the reference of the port where the server has started. It helps in building the actual request URIs to mimic real client interactions.
Below is the code of the sample Test class. These classes are created in the src/test/java directory.
import io.restassured.response.ValidatableResponse;
import org.springframework.beans.factory.annotation.Value;
import org.springframework.boot.test.context.SpringBootTest;
import org.springframework.boot.test.web.server.LocalServerPort;
import org.springframework.test.context.testng.AbstractTestNGSpringContextTests;
import org.testng.Assert;
import org.testng.annotations.Test;
import static io.restassured.RestAssured.given;

@SpringBootTest(webEnvironment = SpringBootTest.WebEnvironment.RANDOM_PORT)
public class SpringBootDemoTests extends AbstractTestNGSpringContextTests {

    private final static String BASE_URI = "http://localhost:";

    @LocalServerPort
    private int port;

    @Value("${server.servlet.context-path}")
    private String basePath;

    private ValidatableResponse response;

    @Test
    public void verifyController1()  {
         response = given().contentType("application/json")
                    .header("Content-Type", "application/json")
                 .when().get(BASE_URI + port + basePath + "/").then().statusCode(200);

         String Actual = response.extract().asString();
          System.out.println("Result :"+Actual);
          Assert.assertEquals("Hello World, Spring Boot!", Actual);
    }

    @Test
    public void verifyController2()   {
        response = given().contentType("application/json")
                .header("Content-Type", "application/json")
                .when().get(BASE_URI + port + basePath + "/qaautomation").then().statusCode(200);

        String Actual = response.extract().asString();
        System.out.println("Result :"+Actual);
        Assert.assertEquals("Hello QA Automation!", Actual);
    }
}
The AbstractTestNGSpringContextTests is an abstract base class having the ApplicationContext supported in the testNG explicitly.
This class sends the request and receives a response after performing the GET operation. Here, the validation of the response also takes place by asserting the expected and actual response.
Step 4 – Create an application.properties file in src/test/resources
Application.properties is created under src/ test/java.
spring.profiles.active – property to specify which profiles are active. The default profile is always active. server.port – By default, the embedded server starts on port 8080. Now the server will start on port 8089 server.servlet.context-path – the context path in Spring Boot can be changed by setting a property, server.servlet.context-path.
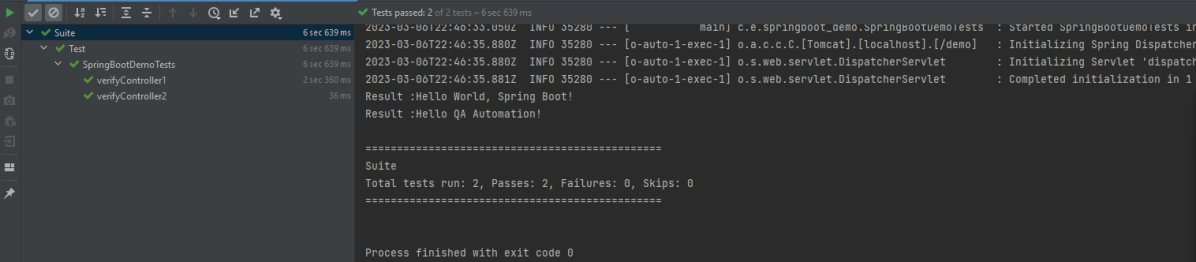
Step 5 – Run the tests from Test Class
Right-click on the Test class and select Run ‘SpringBootDemoTests’.
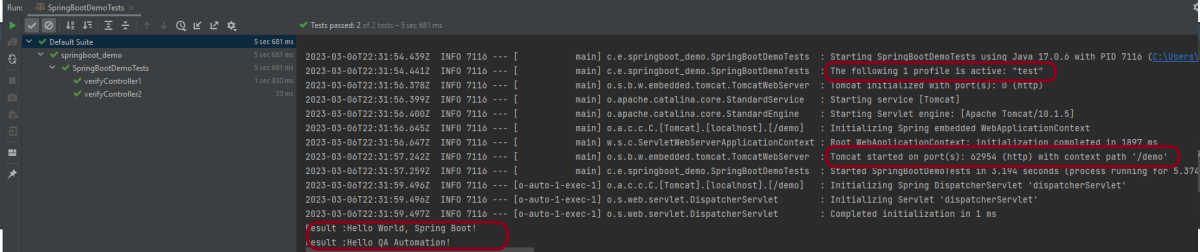
The output of the above program is
This image shows that the profile name is “test”. Application is started on port – “62954” and the context path is “/demo”.
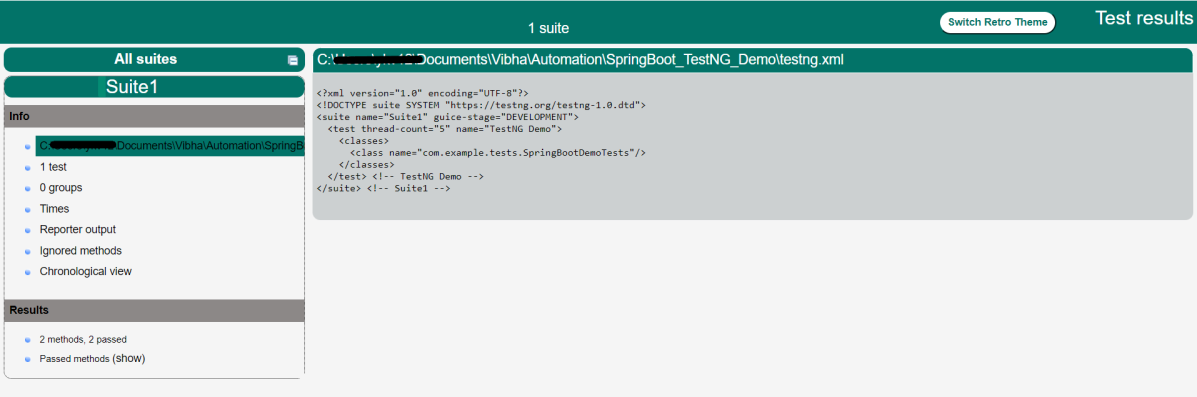
Step 6 – Run the tests from testng.xml
First, we need to create a testng.xml at the root of the project.
<?xml version = "1.0"encoding = "UTF-8"?>
<!DOCTYPE suite SYSTEM "http://testng.org/testng-1.0.dtd">
<suite name = "Suite1">
    <test name = "TestNG Demo">
        <classes>
            <class name = "com.example.tests.SpringBootDemoTests"/>
        </classes>
    </test>
</suite>
Right-click on testng.xml and select Run ‘…\testng.xml’.
The output of the above program is
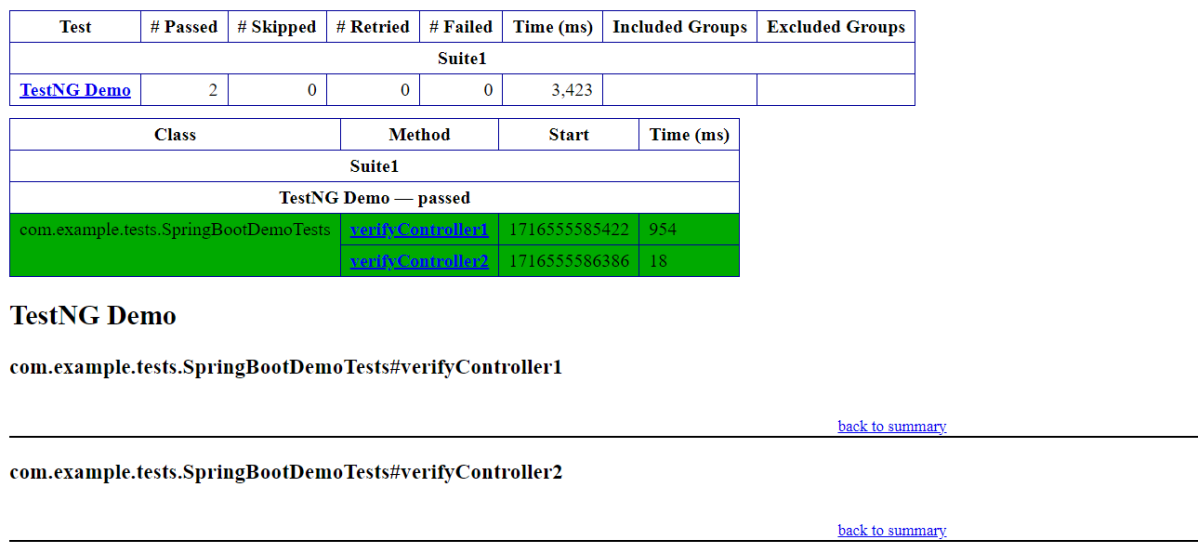
Step 7 – TestNG Report Generation
The test report generated by TestNG is placed under test-output/index.html.
Index.html
TestNG produces an “index.html” report, and it resides under the test-output folder. The below image shows index.html report. This report contains a high-level summary of the tests.
Emailable-Report.html
Test-Output folder also contains Emailable-Report.html. Open “emailable-report.html“, as this is an HTML report open it with the browser. The below image shows emailable-report.html.
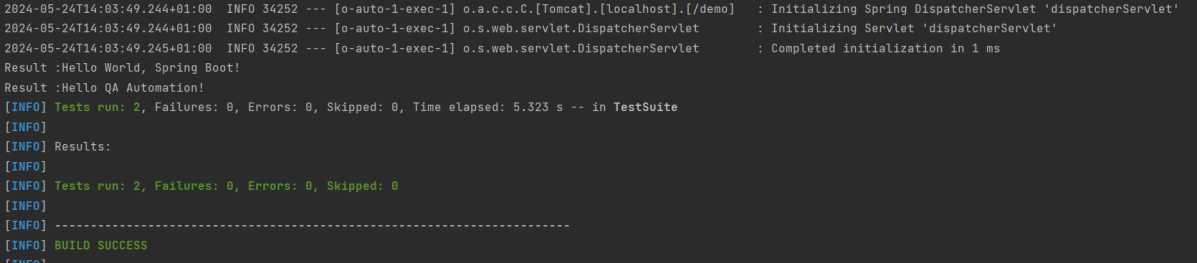
Step 8 – Run the tests through Maven Command Line
Starting from SpringBoot 3.1.0 version, we need to add the below dependency to the surefire plugin to run the tests through Maven Command Line.
In this tutorial, I am going to build an automation framework to test theSpringboot application with Cucumber, Rest Assured, and TestNG.
What is Springboot?
Spring Boot is an open-source micro-framework maintained by a company called Pivotal. It provides Java developers with a platform to get started with an auto-configurable production-grade Spring application. With it, developers can get started quickly without losing time on preparing and configuring their Spring application.
What is Cucumber?
Cucumber is a software tool that supports behavior-driven development (BDD). Cucumber can be defined as a testing framework, driven by plain English. It serves as documentation, automated tests, and development aid – all in one.
This framework consists of:
Springboot – 2.5.2
Cucumber – 7.3.4
Java 11
TestNG – 7.3.4
Maven – 3.8.1
RestAssured – 5.1.1
Steps to setup Cucumber Test Automation Framework for API Testing using Rest-Assured
Add SpringbootTest, Rest-Assured, JUnit, and Cucumber dependencies to the project
Create a source folder src/test/resources and create a feature file under src/test/resources
Create the Step Definition class or Glue Code for the Test Scenario under the src/test/java directory
Create a Cucumber Runner class under the src/test/java directory
Run the tests from Cucumber Test Runner
Run the tests from Command Line
Run the tests from TestNG
Generation of TestNG Reports
Cucumber Report Generation
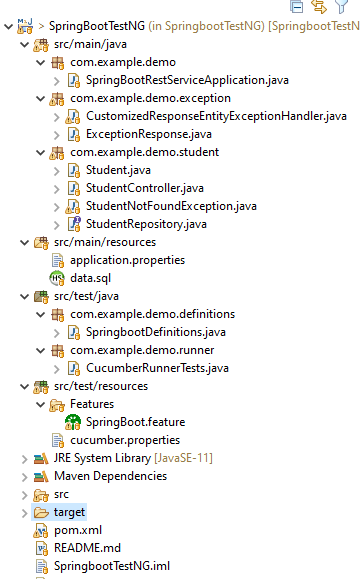
Below is the structure of a SpringBoot application project
We need the below files to create a SpringBoot Application.
SpringBootRestServiceApplication.java
The Spring Boot Application class is generated with Spring Initializer. This class acts as the launching point for the application.
import org.springframework.boot.SpringApplication;
import org.springframework.boot.autoconfigure.SpringBootApplication;

@SpringBootApplication
public class SpringBootRestServiceApplication {

    public static void main(String[] args) {

        SpringApplication.run(SpringBootRestServiceApplication.class, args);
    }
}
Student.java
This is JPA Entity for Student class
import javax.persistence.Entity;
import javax.persistence.GeneratedValue;
import javax.persistence.Id;
import javax.validation.constraints.NotBlank;
import javax.validation.constraints.NotNull;
import javax.validation.constraints.Size;

@Entity
public class Student {
    @Id
    @GeneratedValue
    private Long id;

    @NotNull
    @Size(min = 4, message = "Name should have atleast 4 characters")
    private String name;

    @NotBlank(message = "passportNumber is mandatory")
    private String passportNumber;

    public Student() {
        super();
    }

    public Student(Long id, String name, String passportNumber) {
        super();
        this.id = id;
        this.name = name;
        this.passportNumber = passportNumber;
    }

    public Long getId() {
        return id;
    }

    public void setId(Long id) {
        this.id = id;
    }

    public String getName() {
        return name;
    }

    public void setName(String name) {
        this.name = name;
    }

    public String getPassportNumber() {
        return passportNumber;
    }

    public void setPassportNumber(String passportNumber) {
        this.passportNumber = passportNumber;
    }
}
StudentRepository.java
This is JPA Repository for Student. This is created using Spring Data JpaRepository.
Spring Boot automatically loads the application.properties whenever it starts up. You can de-reference values from the property file in the java code through the environment.
spring.jpa.defer-datasource-initialization=true
data.sql
Data is loaded from data.sql into the Student table. Spring Boot would execute this script after the tables are created from the entities.
insert into student values(10001,'Annie', 'E1234567');
insert into student values(20001,'John', 'A1234568');
insert into student values(30001,'David','C1232268');
insert into student values(40001,'Amy','D213458');
Test Automation Framework Implementation
Step 1 – Add SpringbootTest, Cucumber, Rest-Assured, and TestNG dependencies to the project (Maven project)
Step 2 – Create a source folder src/test/resources and create a feature file under src/test/resources
By default, the Maven project has an src/test/java directory only. Create a new Source Folder under src/test with the name of resources. Create a folder name as Features within the src/test/resources directory.
Create a feature file to test the Springboot application. Below is a sample feature file.
Feature: Verify springboot application using Cucumber and TestNG

  @ReceiveUserDetails
  Scenario Outline: Send a valid Request to get user details
    Given I send a request to the URL "/students" to get user details
    Then The response will return status 200
    And The response contains id <studentID> and names "<studentNames>" and passport_no "<studentPassportNo>"

    Examples:
      |studentID    |studentNames  |studentPassportNo|
      |10001        |Annie         |E1234567         |
      |20001        |John          |A1234568         |
      |30001        |David         |C1232268         |
      |40001        |Amy           |D213458          |


  @CreateUser
  Scenario: Send a valid Request to create a user
    Given I send a request to the URL "/students" to create a user with name "Annie" and passportNo "E1234567"
    Then The response will return status 201
    And Resend the request to the URL "/students" and the response returned contains name "Annie" and passport_no "E1234567"
Step 3 – Create the Step Definition class or Glue Code for the Test Scenario under src/test/java
The corresponding step definition file of the above feature file is shown below.
import static io.restassured.RestAssured.given;
import static org.hamcrest.Matchers.containsString;
import static org.hamcrest.Matchers.equalTo;
import static org.hamcrest.Matchers.hasItem;
import org.json.JSONObject;
import org.springframework.boot.test.context.SpringBootTest;
import org.springframework.boot.web.server.LocalServerPort;
import io.cucumber.java.en.Given;
import io.cucumber.java.en.Then;
import io.cucumber.spring.CucumberContextConfiguration;
import io.restassured.RestAssured;
import io.restassured.http.ContentType;
import io.restassured.response.ValidatableResponse;
import io.restassured.specification.RequestSpecification;

@CucumberContextConfiguration
@SpringBootTest(webEnvironment = SpringBootTest.WebEnvironment.RANDOM_PORT)
public class SpringbootDefinitions {

	private final static String BASE_URI = "http://localhost";

	@LocalServerPort
	private int port;

	private ValidatableResponse validatableResponse, validatableResponse1;

	private void configureRestAssured() {
		RestAssured.baseURI = BASE_URI;
		RestAssured.port = port;
	}

	protected RequestSpecification requestSpecification() {
		configureRestAssured();
		return given();
	}

	@Given("I send a request to the URL {string} to get user details")
	public void getStudentDetails(String endpoint) throws Throwable {
		validatableResponse = requestSpecification().contentType(ContentType.JSON).when().get(endpoint).then();
		System.out.println("RESPONSE :" + validatableResponse.extract().asString());
	}

	@Given("I send a request to the URL {string} to create a user with name {string} and passportNo {string}")
	public void createStudent(String endpoint, String studentName, String studentPassportNumber) throws Throwable {

		JSONObject student = new JSONObject();
		student.put("name", studentName);
		student.put("passportNumber", studentPassportNumber);

		validatableResponse = requestSpecification().contentType(ContentType.JSON).body(student.toString()).when()
				.post(endpoint).then();
		System.out.println("RESPONSE :" + validatableResponse.extract().asString());
	}

	@Then("The response will return status {int}")
	public void verifyStatusCodeResponse(int status) {
		validatableResponse.assertThat().statusCode(equalTo(status));

	}

	@Then("The response contains id {int} and names {string} and passport_no {string}")
	public void verifyResponse(int id, String studentName, String passportNo) {
		validatableResponse.assertThat().body("id", hasItem(id)).body(containsString(studentName))
				.body(containsString(passportNo));

	}

	@Then("Resend the request to the URL {string} and the response returned contains name {string} and passport_no {string}")
	public void verifyNewStudent(String endpoint, String studentName, String passportNo) {

		validatableResponse1 = requestSpecification().contentType(ContentType.JSON).when().get(endpoint).then();
		System.out.println("RESPONSE :" + validatableResponse1.extract().asString());
		validatableResponse1.assertThat().body(containsString(studentName)).body(containsString(passportNo));

	}
}
To make Cucumber aware of your test configuration you can annotate a configuration class on your glue path with @CucumberContextConfiguration and with one of the following annotations: @ContextConfiguration, @ContextHierarchy, or @BootstrapWith.It is imported from:
By default, @SpringBootTest does not start the webEnvironment to refine further how your tests run. It has several options: MOCK(default), RANDOM_PORT, DEFINED_PORT, NONE.
RANDOM_PORT loads a WebServerApplicationContext and provides a real web environment. The embedded server is started and listens on a random port. LocalServerPort is imported from the package:
Step 4 – Create a Cucumber TestNG Runner class under src/test/java
A runner will help us to run the feature file and acts as an interlink between the feature file and StepDefinition Class. The TestRunner should be created within the directory src/test/java.
import io.cucumber.testng.AbstractTestNGCucumberTests;
import io.cucumber.testng.CucumberOptions;

@CucumberOptions(features = {"src/test/resources/Features"}, glue = {"com.example.demo.definitions"})
public class CucumberRunnerTests extends AbstractTestNGCucumberTests {

}
The @CucumberOptions annotation is responsible for pointing to the right feature package, configuring the plugin for a better reporting of tests in the console output, and specifying the package where extra glue classes may be found. We use it to load configuration and classes that are shared between tests.
Step 5 – Run the tests from Cucumber Test Runner
You can execute the test script by right-clicking onTestRunner class -> Run As TestNG in Eclipse.
In case you are using IntelliJ, select “Run CucumberRunnerTests“.
SpringBootTest creates an application context containing all the objects we need for the Integration Testing It, starts the embedded server, creates a web environment, and then enables methods to do Integration testing.
Step 6 – Run the tests from Command Line
Use the below command to run the tests through the command line.
mvn clean test
Step 7 – Run the tests from TestNG
Create a testng.xml in the project as shown below:
<?xml version="1.0" encoding="UTF-8"?>
<!DOCTYPE suite SYSTEM "https://testng.org/testng-1.0.dtd">
<suite name = "Suite1">
  <test name = "SpringBoot Cucumber TestNG Demo">
    <classes>
          <class name = "com.example.demo.runner.CucumberRunnerTests"/>
     </classes>
   </test>
</suite>
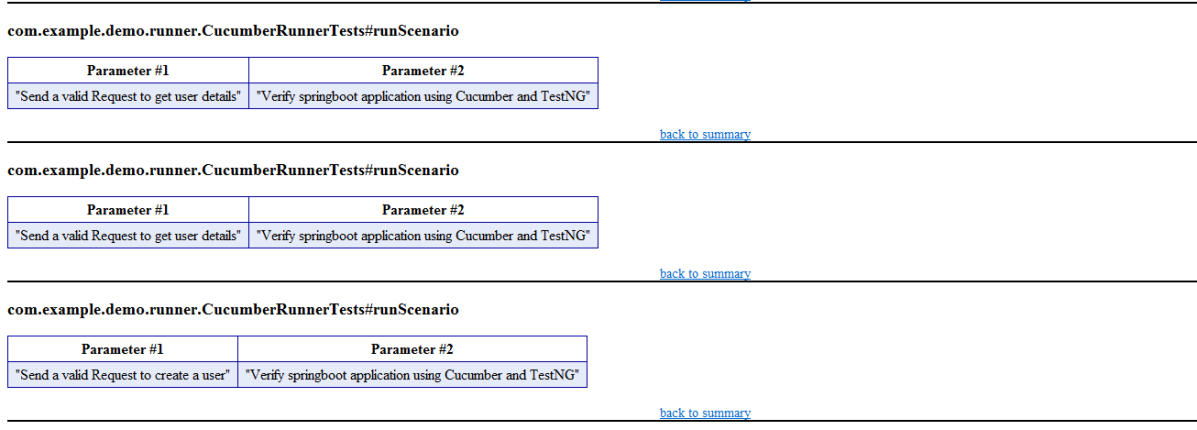
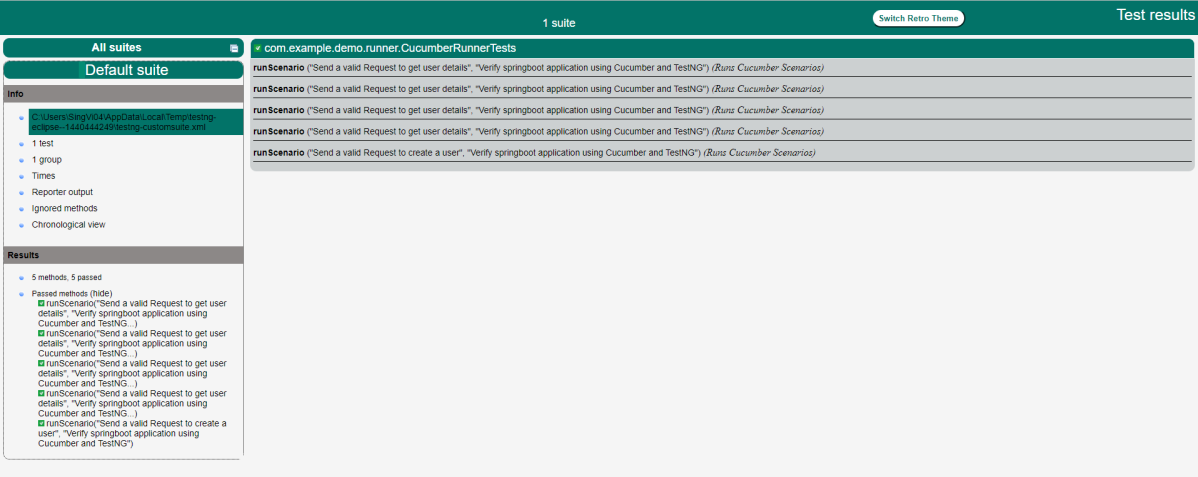
Step 8 – Generation of TestNG Reports
TestNG generates various types of reports underthe test-output folder like emailable-report.html, index.html, testng-results.xml.
We are interested in the “emailable-report.html” report. Open “emailable-report.html”, as this is an HTML report, and open it with the browser. The below image shows emailable-report.html.
TestNG also produce “index.html” report, and it resides under test-output folder. The below image shows index.html report.
Step 9 – Cucumber Report Generation
Add cucumber.properties under src/test/resources and add the below instruction in the file.
cucumber.publish.enabled=true
The link to the Cucumber Report is present in the execution status.
Below is the image of the Cucumber Report generated using the Cucumber Service.
Complete Source Code: Refer to GitHub for the source code.
Congratulations!! We are able to build a test framework to test the SpringBoot application using Cucumber, Rest Assured, and TestNG.