Borders often serve as important visual cues, such as indicating focus states, hover effects, or validation results (e.g., turning red for an error). Borders can change dynamically based on interactions (e.g., clicking a button will change its border color). Ensuring these responses occur as expected is key in testing interactive web elements.
To find the border color of web element in Selenium (Java), use the getCssValue method. We will use the `getCssValue` to extract properties like `border-color`.
org.openqa.selenium.support.Color.
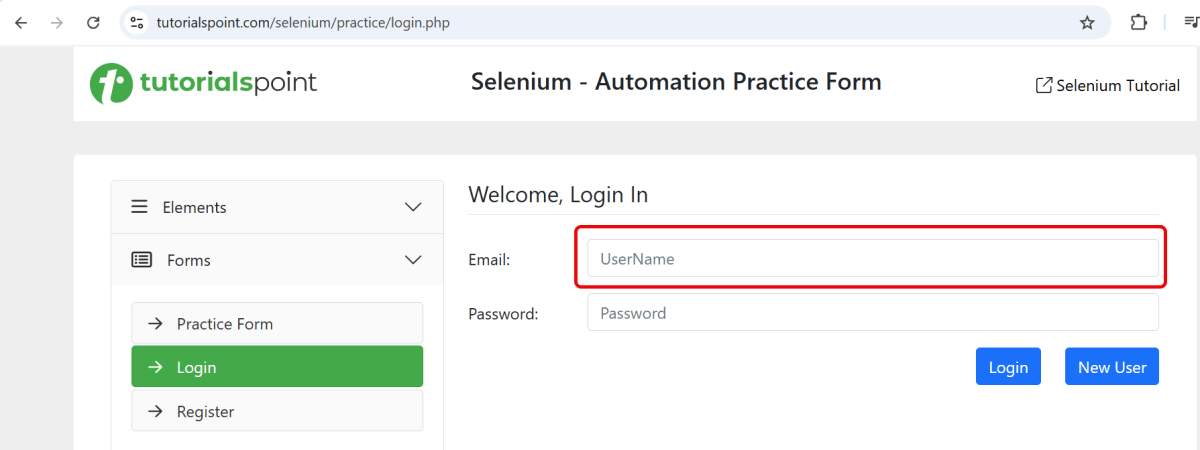
In the below example, we want to find the border color of the highlighted text.
Below is the Selenium program that find the border color of a web element.
import org.openqa.selenium.By;
import org.openqa.selenium.WebDriver;
import org.openqa.selenium.WebElement;
import org.openqa.selenium.chrome.ChromeDriver;
import org.openqa.selenium.chrome.ChromeOptions;
import org.openqa.selenium.support.Color;
import java.time.Duration;
public class Border_Example {
public static void main(String args[]) {
ChromeOptions chromeOptions = new ChromeOptions();
WebDriver driver = new ChromeDriver(chromeOptions);
driver.manage().timeouts().implicitlyWait(Duration.ofSeconds(10));
driver.manage().window().maximize();
try {
driver.get("https://www.tutorialspoint.com/selenium/practice/login.php");
// identify the element
WebElement nameBox = driver.findElement(By.xpath("//*[@id='email']"));
// get element border color in rgb format
String nameBoxBorderColor = nameBox.getCssValue("border-color");
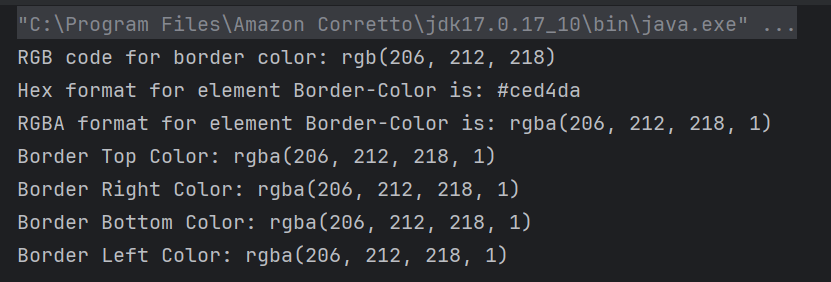
System.out.println("RGB code for border color: " + nameBoxBorderColor);
// convert rgb to hex using Color class
String hexColor = Color.fromString(nameBoxBorderColor).asHex();
System.out.println("Hex format for element Border-Color is: " + hexColor);
// convert rgb to rgba using Color class
String rgbaColor = Color.fromString(nameBoxBorderColor).asRgba();
System.out.println("RGBA format for element Border-Color is: " + rgbaColor);
// Retrieve the border color value for each side
String borderTopColor = nameBox.getCssValue("border-top-color");
String borderRightColor = nameBox.getCssValue("border-right-color");
String borderBottomColor = nameBox.getCssValue("border-bottom-color");
String borderLeftColor = nameBox.getCssValue("border-left-color");
// Print the retrieved border colors
System.out.println("Border Top Color: " + borderTopColor);
System.out.println("Border Right Color: " + borderRightColor);
System.out.println("Border Bottom Color: " + borderBottomColor);
System.out.println("Border Left Color: " + borderLeftColor);
} finally {
// Closing browser
driver.quit();
}
}
}
The output of the above program is
Explanation:
1. Set Up Chrome Options and WebDriver
ChromeOptionsis created. A ChromeDriverobject driveris created to control the Chrome browser. implicitlyWaitis set to 10 seconds to wait for elements to be present before throwing an exception. The browser window is maximized for better visibility during the test.
ChromeOptions chromeOptions = new ChromeOptions();
WebDriver driver = new ChromeDriver(chromeOptions);
driver.manage().timeouts().implicitlyWait(Duration.ofSeconds(10));
driver.manage().window().maximize();
2. Navigate to the Webpage
The get() method of driveris used to navigate to the specified URL.
The getCssValue method retrieves the border color of the element in RGB format.
 // get element border color in rgb format
String nameBoxBorderColor = nameBox.getCssValue("border-color");
System.out.println("RGB code for border color: " + nameBoxBorderColor);
5. Convert Color Formats
RGB to Hex:Color.fromString(rgbaColor).asHex() converts the RGB color to hexadecimal format. RGB to RGBA:Color.fromString(rgbaColor).asRgba() converts the RGB color to RGBA format for additional representation.
// convert rgb to hex using Color class
String hexColor = Color.fromString(nameBoxBorderColor).asHex();
System.out.println("Hex format for element Border-Color is: " + hexColor);

// convert rgb to rgba using Color class
String rgbaColor = Color.fromString(nameBoxBorderColor).asRgba();
System.out.println("RGBA format for element Border-Color is: " + rgbaColor);
6. Retrieve border color of each side
Use getCssValue to retrieve each part of the border color to determine the color on each side.
The finallyblock ensures that the browser is closed irrespective of whether the test passes or fails, using driver.quit()to close all browser windows and end the session.
// Close the browser
driver.quit();
Summary:
Initialize a WebDriver and direct it to interact with your target webpage.
Identify the desired web element using suitable locators.
Retrieve and print out the CSS values for border color using getCssValue with attribute “border-color”.
Use getCssValue to retrieve each part of the border color. This helps determine the color on each side. Use attributes “border-right-color”, “border-bottom-color”, “border-top-color” and “border-left-color”.
That’s it! Congratulations on making it through this tutorial and hope you found it useful! Happy Learning!!
This article delves into the essential concepts and features of DW Testing.
1. What is a Data Warehouse?
a) A system for real-time transaction management b) A system used for reporting and data analysis c) A system for software build and management d) A repository of unstructured data
Answer 1
b) A system used for reporting and data analysis
A data warehouse is a central repository of integrated data from multiple sources, primarily used for reporting and analysis.
2. What is Data Warehouse Testing primarily focused on?
a) Unit testing b) Testing real-time transactional systems c) Validation of ETL processes, data accuracy, and reports d) Component integration testing
Answer 2
c) Validation of ETL processes, data accuracy, and reports
Data Warehouse Testing ensures that the ETL processes correctly extract, transform, and load data, and that the reports generated are accurate.
3. Which is NOT a common type of testing in data warehouses?
a) Performance testing b) Compatibility testing c) Data integrity testing d) Security testing
Answer 3
b) Compatibility testing
Compatibility testing is more applicable to software applications, while data warehouse testing focuses on data integrity, performance, transformation validation, and security.
4. What is the difference between OLAP and OLTP?
a) OLAP is used for real-time transactions; OLTP is for analytics b) OLAP is for batch processing; OLTP is for reporting c) OLAP is for analytics and decision-making; OLTP is for everyday transactions d) OLAP is faster than OLTP in all scenarios
Answer 4
c) OLAP is for analytics and decision-making; OLTP is for everyday transactions
OLAP (Online Analytical Processing) is used for analytical queries, whereas OLTP (Online Transaction Processing) is used for managing daily operational data.
5. Which of the following tools is NOT commonly used for data warehouse testing?
a) Informatica b) Selenium c) QuerySurge d) Talend
Answer 5
b) Selenium
Selenium is a tool for automating web applications, not for data warehouse testing. Tools like Informatica and QuerySurge are used for ETL testing.
6. What is the purpose of the “Staging Area” in a data warehouse?
a) To directly load data into the data warehouse b) To temporarily hold raw data before transformation c) To execute all final reports d) To generate data schemas
Answer 6
b) To temporarily hold raw data before transformation
The staging area temporarily stores raw data for cleansing and transformation before it is loaded into the data warehouse.
7. What is schema validation in data warehouse testing?
a) Checking data types, constraints, and database structures b) Validating network configurations c) Writing test cases for staging data d) Testing only numerical fields in the database
Answer 7
a) Checking data types, constraints, and database structures
Schema validation ensures that table structures, column data types, keys, and constraints in the target match the expected definitions.
8. What type of testing ensures data transformations are correctly implemented?
a) Functional testing b) End-to-end testing c) Transformation testing d) Unit testing
Answer 8
c) Transformation testing
Transformation testing verifies that data transformations within the ETL process are implemented according to the specified logic.
9. What do surrogate keys represent in a data warehouse?
a) Primary keys in operational systems b) Natural keys used in dimensional modeling c) A unique identifier for each row in dimension tables d) Numeric keys for storing metadata information
Answer 9
c) A unique identifier for each row in dimension tables
Surrogate keys are system-generated unique identifiers used in dimension tables to avoid dependence on natural keys from source systems.
10. Which approach to testing is most suitable for verifying extracted data is loaded accurately?
a) Black-box testing b) End-to-end testing c) Source-to-target testing d) Performance testing
Answer 10
c) Source-to-target testing
Source-to-target testing compares source data to the data loaded in the target to verify correctness and completeness.
11. What is Dimensional Data Modeling designed for?
a) Optimizing transactional processing b) Structuring data for analytical querying c) Designing web applications d) Creating security policies
Answer 11
b) Structuring data for analytical querying
Dimensional modeling structures data in a star or snowflake schema for easier querying and analysis.
12. What is a Star Schema?
a) A type of database index b) A relational database structure with fact tables and dimension tables c) A new data warehouse testing tool d) A subset of SQL commands
Answer 12
b) A relational database structure with fact tables and dimension tables
A Star Schema organizes data into a central fact table surrounded by related dimension tables in a star-like structure.
13. Which of the following tests measures the performance of the ETL process?
Choose one option
a) Latency testing b) Performance testing c) Security testing d) Concurrency testing
Answer 13
b) Performance testing
Performance testing evaluates whether the ETL process can handle large data volumes within acceptable time limits.
14.What is an Incremental Load in ETL testing?
a) Full data load every time b) Adding only new or changed data to the data warehouse c) Deleting previous data before loading d) Rewriting the entire data source
Answer 14
b) Adding only new or changed data to the data warehouse
Incremental load updates the target with new or updated records without reloading the entire dataset.
15. What does SCD stand for in Data Warehousing?
Choose one option
a) Slowly Changing Data b) Source Count Data c) Slowly Changing Dimension d) Structured Configuration Design
Answer 15
c) Slowly Changing Dimension
SCD refers to how data warehouse systems handle changes in dimension data over time.
16. Which is NOT among common challenges in data warehouse testing?
Choose one option
a) Testing large data volumes b) Complex SQL queries c) Real-time transaction testing d) Testing incremental loads
Answer 16
c) Real-time transaction testing
Data warehouses are not typically tested for real-time transactions, as they are designed for analytical processing.
17. What is Referential Integrity Testing in a data warehouse?
a) Testing index performance b) Ensuring foreign key relationships between tables are valid c) Testing report formatting d) Testing ETL tool configurations
Answer 17
b) Ensuring foreign key relationships between tables are valid
Referential integrity testing verifies relationships between primary and foreign keys in the data warehouse schema.
18. During data warehouse testing, what tool is commonly used for handling huge datasets?
a) Selenium b) Hadoop c) Excel d) Tableau
Answer 18
b) Hadoop
Hadoop aids in managing and processing large-scale data for testing, especially when dealing with big data scenarios.
19. What is Drill-Down Testing in reports?
a) Testing only summary data b) Validating hierarchical data in reports c) Testing database indexes d) Evaluating star schemas
Answer 19
b) Validating hierarchical data in reports
Drill-down testing ensures report hierarchies (e.g., year, month, week) provide accurate data at lower levels when expanded.
20. What does ‘Metadata’ represent in a Data Warehouse?
Choose one option
a) The actual data in the fact tables. b) Data about the data, defining its structure and meaning. c) The BI report definitions. d) The server configurations.
Answer 20
b) Data about the data, defining its structure and meaning
We would love to hear from you! Please leave your comments and share your scores in the section below
This blog post features 20 multiple-choice questions that explore advance concepts of CI/CD.
1. Which pattern best isolates pipeline failures caused by a single team’s changes while allowing other teams to continue deploying?
a) Trunk-based development only b) Monorepo with centralized pipeline c) Per-repo pipelines with dependency gating d) Global pipeline that serially builds all projects
Answer 1
c) Per-repo pipelines with dependency gating
Per-repo pipelines with dependency gating allow individual teams to run and fail their own pipelines; dependency gating prevents downstream breakage while other teams remain unaffected. Monorepo or centralized pipelines can create cross-team coupling and large blast radius.
2. What is blue-green deployment?
a) Using colorful terminals b) Running two production environments (blue & green) and switching traffic from old to new to enable quick rollback c) Deploying only on weekends d) Merging branches manually
Answer 2
b) Running two production environments (blue & green) and switching traffic from old to new to enable quick rollback
Blue-green allows near-instant rollback by switching back to the old environment if issues arise.
3. What is pipeline orchestration?
a) Writing scripts b) Coordinating multiple pipeline stages/jobs c) Monitoring servers d) Code review
Answer 3
b) Coordinating multiple pipeline stages/jobs
Pipeline orchestration is about managing how different parts of a pipeline work together.
4. What does “immutability” of deployment artifacts mean?
a) Artifacts can be changed after deployment b) Artifacts are versioned and never altered; updates use new versions c) Artifacts are not stored d) Artifacts are randomly modified
Answer 4
b) Artifacts are versioned and never altered; updates use new versions
Immutable artifacts improve reproducibility and simplify rollbacks and auditing.
5. What is a monorepo challenge in CI/CD?
a) Too many repos b) Slow pipelines due to shared code c) No version control d) No tests
Answer 5
b) Slow pipelines due to shared code.
In a monorepo (a single repository containing many projects or services), all code lives together. A small change in one part of the repo can trigger builds/tests across many projects
6. What role do linters and static analysis play in CI?
a) They are unrelated to CI b) They automatically check code quality and catch common issues before runtime c) They replace unit tests d) They slow down everything with no benefit
Answer 6
b) They automatically check code quality and catch common issues before runtime
Linters/static analysis help enforce standards and catch bugs early in the CI pipeline.
7. Which CI/CD metric best indicates how quickly a team can deliver changes to production?
a) Mean time to detect (MTTd) b) Mean time to recovery (MTTR) c) Lead time for changes d) Change failure rate
Answer 7
c) Lead time for changes
Lead time for changes measures the time from code committed to code successfully running in production, indicating delivery speed.
8. In a GitOps-based CD approach, what is the single source of truth for the desired system state?
a) The running cluster state b) A centralized database of deployments c) The Git repository containing manifests/configs d) CI server build logs
Answer 8
c) The Git repository containing manifests/configs
GitOps uses Git as the source of truth for declarative system state; the cluster reconciles to match Git.
9. What is the main security risk of storing secrets directly in pipeline YAML files in a CI system?
a) They get compressed and become unreadable b) Secrets can leak via logs, code reviews, or repository access c) CI will encrypt them by default d) No risk if the pipeline is private
Answer 9
b) Secrets can leak via logs, code reviews, or repository access
Storing secrets in YAML can expose them through logs, VCS history, or access control lapses. Use secret managers or encrypted variable stores.
10. When designing pipeline agents (runners) at scale, which strategy improves security and reliability?
a) Use a single shared privileged runner for all jobs b) Use ephemeral, least-privilege runners that boot per job and run in isolated environments c) Use permanent runners with root access to improve speed d) Allow developers to run arbitrary system services on runners
Answer 10
b) Use ephemeral, least-privilege runners that boot per job and run in isolated environments
Ephemeral, least-privilege runners reduce attack surface and avoid state leakage between jobs; isolation improves reliability and reproducibility.
11. In pipelines, why are “shift-left” security practices recommended?
Choose one option
a) They defer security to production b) They integrate security checks earlier, catching issues sooner and reducing cost of fixes c) They replace code reviews d) They focus only on runtime security
Answer 11
b) They integrate security checks earlier, catching issues sooner and reducing cost of fixes
Shift-left integrates security (SAST, dependency scanning) early in the development lifecycle to catch vulnerabilities earlier when remediation is cheaper.
12. Which practice helps prevent configuration drift between dev/staging/prod?
a) Manual configuration changes via SSH in each environment b) Store configuration declaratively (in Iac) and apply via automated pipelines with drift detection c) Only document config differences in a wiki d) Use different tools in each environment for flexibility
Answer 12
b) Store configuration declaratively (in Iac) and apply via automated pipelines with drift detection
Declarative configuration plus automated application and drift detection ensures environments remain consistent.
13. Which rollout method is best when the new version requires a schema migration that is backwards-incompatible?
a) Immediate switch to new version across all nodes b) Use a multi-step deployment with backward-compatible migration, feature flags, and careful DB migration plan (expand-then-contract) c) Skip DB migration and let the app handle it d) Disable monitoring during migration
Answer 13
b) Use a multi-step deployment with backward-compatible migration, feature flags, and careful DB migration plan (expand-then-contract).
Expand-then-contract migrations and feature flags avoid downtime and ensure both old and new code can function, enabling safe transitions.
14. Which is the best way to manage secret injection into containerized workloads at runtime?
a) Bake secrets into container images b) Integrate runtime secret providers (e.g., secrets mounted via a secure secrets manager with short-lived credentials) c) Put secrets in plain environment variables in CI logs d) Commit secrets to the repo in an encrypted file without automated retrieval
Answer 14
b) Integrate runtime secret providers (e.g., secrets mounted via a secure secrets manager with short-lived credentials)
Runtime retrieval via a secrets manager with short-lived credentials minimizes exposure and avoids baking secrets into images or repos.
15. Which metric best measures the reliability of the release process?
a) Number of commits per day b) Change failure rate (percentage of deployments causing production incidents) c) Average build time only d) Code churn
Answer 15
b) Change failure rate (percentage of deployments causing production incidents)
Change failure rate indicates how often deployments lead to failures requiring remediation, reflecting release reliability.
16. What is the best pattern to ensure database schema migrations are rolled forward safely across multiple instances?
a) Run migration on a single instance and rely on replication only b) Use rolling migrations that coordinate schema changes with backward-compatible code, and apply migrations in a way that supports both versions (expand-then-contract) c) Apply migrations only when traffic is zero d) Make destructive changes directly in production without testing
Answer 16
b) Use rolling migrations that coordinate schema changes with backward-compatible code, and apply migrations in a way that supports both versions (expand-then-contract)
Coordinated rolling migrations with backward compatibility reduce downtime and service disruption.
17. Which of the following is true about feature flags in CI/CD?
a) They always replace the need for testing b) They can decouple deployment from release and allow targeted rollouts and safe rollbacks when used with proper lifecycle management c) They remove the need for version control d) They are only useful for UI changes
Answer 17
b) They can decouple deployment from release and allow targeted rollouts and safe rollbacks when used with proper lifecycle management
Feature flags let teams deploy code without exposing features to all users, enabling controlled experiments and quick rollbacks.
18. In multi-cloud CD deployments, which capability ensures consistent delivery across providers?
a) Using distinct CI/CD tools per cloud without abstraction b) Declarative IaC that targets cloud-agnostic layers or provider-specific modules with a consistent pipeline orchestrator and artifact promotion model c) Manually executing cloud CLIs per provider d) Only deploying to one cloud and failing the others
Answer 18
b) Declarative IaC that targets cloud-agnostic layers or provider-specific modules with a consistent pipeline orchestrator and artifact promotion model
19. What is a Docker Registry?
a) A network router b) A local storage system c) A virtual machine host d) A repository for storing and sharing Docker images
Answer 19
d) A repository for storing and sharing Docker images
A Docker Registry is a storage system where you can store, share, and retrieve Docker images. Docker Hub is a popular example.
20. What is the primary purpose of the Docker Engine?
Choose one option
a) To provide a graphical visualization of containers b) To build and run containers c) To manage databases inside containers d) To interface with Kubernetes
Answer 20
b) To build and run containers
We would love to hear from you! Please leave your comments and share your scores in the section below
This blog post features 20 multiple-choice questions that explore Intermediate level of concepts of CI/CD.
1. What is the significance of automated testing in CI/CD?
a) Eliminates debugging entirely b) Detects integration errors early and ensures code quality c) Encourages manual testing d) Increases deployment delays
Answer 1
b) Detects integration errors early and ensures code quality
Automated testing is crucial to validate changes before moving to later pipeline stages, reducing risk.
2. What is a CI runner/agent?
a) A developer b) A server that executes pipeline jobs c) A container registry d) A monitoring tool
Answer 2
b) A server that executes pipeline jobs
CI runner/agent performs tasks specified in the pipeline by running commands/scripts on a server or machine.
3. Which term describes a rollback mechanism in CI/CD?
a) Error tracking b) Change management c) Failure recovery d) Code gating
Answer 3
c) Failure recovery
4. What is a rollback strategy?
a) A method to revert to a previous working release when the current one fails b) A test type c) A logging tool d) A way to speed up builds a) A method to revert to a previous working release when the current one fails
Answer 4
a) A method to revert to a previous working release when the current one fails
Rollbacks minimize downtime and restore a known-good state after faulty deployments.
5. What is the purpose of dependency management in CI/CD pipelines?
a) To boost the performance of the pipeline b) To ensure correct versions of libraries and packages are used c) To bypass security during testing d) To prevent team collaboration issues
Answer 5
b) To ensure correct versions of libraries and packages are used
6. What happens when a pipeline stage fails?
a) The pipeline continues to the next stage b) The pipeline stops and prevents progression c) The issue is automatically fixed d) It triggers production deployment
Answer 6
b) The pipeline stops and prevents progression
7. What is the role of Docker in CI/CD?
a) Create virtual machines b) Build and manage containers for consistent environments c) Debug pipelines d) Eliminate code review
Answer 7
b) Build and manage containers for consistent environments
Docker containers isolate dependencies and environment settings, ensuring consistent behavior across environments.
8. Which programming language is most commonly used for Jenkins pipelines?
a) JavaScript b) Python c) Groovy d) SQL
Answer 8
a) Groovy
Jenkins pipelines are written using Groovy-based declarative or scripted syntax.
9. Why is YAML used for in CI/CD pipelines?
a) Storing database schemas b) Writing configuration files c) Managing Docker containers d) Debugging logs
Answer 9
b) Writing configuration files
10. What is an advantage of CI/CD pipelines using cloud-based services?
a) Scalability b) Reduced setup time c) Cost-efficiency for small teams d) All of the above
Answer 10
d) All of the above
11. What is Canary Deployment in CI/CD?
a) Deploying to all users simultaneously b) Gradually deploying new releases to subsets of users c) Reverting to a previous version d) Skipping feature tests before deployment
Answer 11
b) Gradually deploying new releases to subsets of users
Canary Deployment reduces risk by exposing updates to a small group first.
12. What does “pipeline as code” mean?
a) Keeping pipeline steps in the CI server GUI only b) Defining pipeline configuration in version-controlled files (e.g., YAML, Jenkinsfile) c) Writing pipelines in binary d) No pipelines at all
Answer 12
b) Defining pipeline configuration in version-controlled files (e.g., YAML, Jenkinsfile)
Pipeline-as-code stores pipeline definitions with source code, enabling versioning and reviews
13. What does “Fail Fast” mean in CI/CD?
a) Continuing despite errors b) Stopping at the first sign of failure to address it immediately c) Running pipelines asynchronously d) Testing quickly using manual methods
Answer 13
b) Stopping at the first sign of failure to address it immediately
14. What is “Infrastructure as Code” in the context of CI/CD?
a) Using code to define software infrastructure setups b) Writing deployment instructions in Python c) Optimizing CI pipeline speeds d) Debugging virtual machines
Answer 14
a) Using code to define software infrastructure setups
IaC manages resources like servers and networks using code, ensuring replicability and automation.
15. What does “Shift Left” mean in the CI/CD process?
a) Addressing problems later in the cycle b) Integrating testing earlier in the development process c) Speeding up deployments d) Decreasing code quality checks
Answer 15
b) Integrating testing earlier in the development process
16. What is feature branching?
a) Deploying features directly to production b) Creating a branch per feature to develop independently c) Removing branches d) Automatically merging everything to main
Answer 16
b) Creating a branch per feature to develop independently
Feature branches isolate work; CI encourages frequent merges or short-lived branches to limit drift
17. What is the benefit of implementing feature flags in CI/CD?
a) Allowing incremental feature releases without redeploying b) Reducing redundancy in pipelines c) Enhancing compilation speed d) Preventing security breaches
Answer 17
a) Allowing incremental feature releases without redeploying
18. How does static code analysis help in CI/CD pipelines?
a) Identifies potential problems before runtime b) Automates compilation c) Creates automated deployment scripts d) Deploys directly to production
Answer 18
a) Identifies potential problems before runtime
19. What does a successful CI build usually produce?
a) Debugging logs b) An artifact or deployable package c) A testing URL d) A list of failed components
Answer 19
b) An artifact or deployable package
20. Why do we use caching in pipelines?
a) Improve security b) Speed up builds c) Increase failures d) Reduce tests
Answer 20
b) Speed up builds
Caching in pipelines (like CI/CD pipelines) stores previously downloaded or generated files—such as dependencies, compiled code, or build artifacts—so they don’t have to be recreated every time the pipeline runs.
We would love to hear from you! Please leave your comments and share your scores in the section below
This article delves into the essential concepts and features of CI/CD.
1. What does CI stand for?
a) Continuous Integration b) Code Inspection c) Continuous Improvement d) Configuration Integration
Answer 1
a) Continuous Integration
CI stands for Continuous Integration in CI/CD
2. What does CD stand for in CI/CD?
a) Continuous Delivery b) Continuous Deployment c) Both A and B d) Continuous Development
Answer 2
c) Both A and B
3. What is the difference between Continuous Delivery and Continuous Deployment?
a) Continuous Delivery involves testing only while Continuous Deployment skips testing b) Continuous Deployment goes one step further by automating releases to production c) Continuous Delivery is faster d) There is no difference
Answer 3
b) Continuous Deployment goes one step further by automating releases to production
4. What is Continuous Integration (CI)?
a) Merging code changes less frequently b) Automatically building and testing code with every change c) Only integrating code after deployment d) Debugging code after production release
Answer 4
b) Automatically building and testing code with every change
Continuous Integration involves frequently integrating code changes into a shared repository and automating builds and tests to detect issues early.
5. What is the main goal of Continuous Deployment (CD)?
a) Automatically deploying tested code to production b) Writing deployment scripts manually c) Delaying code releases until complete testing d) Revisiting code changes after deployment
Answer 5
a) Automatically deploying tested code to production
Continuous Deployment refers to automating the release pipeline to deploy code changes directly to production once testing is successful.
6. What tool is commonly used for CI/CD pipelines?
a) Jenkins b) Microsoft Excel c) IntelliJ IDEA d) Photoshop
Answer 6
a) Jenkins
Jenkins is a widely-used tool for automating CI/CD processes with flexible pipelines.
7. What is a pipeline in CI/CD?
a) A network connection between servers b) A series of automated tasks for building, testing, and deploying code c) A manual checklist for deployment d) A file containing configuration settings
Answer 7
b) A series of automated tasks for building, testing, and deploying code.
A CI/CD pipeline automates the entire lifecycle, from code integration to deployment.
8. What is version control in the context of CI/CD?
a) Tracking deployment errors b) Managing changes to source code over time c) Debugging production code d) Scaling pipeline performance
Answer 8
b) Managing changes to source code over time
Version control systems like Git help developers track changes, collaborate effectively, and integrate code frequently.
9. Why are automated tests crucial in CI/CD pipelines?
a) They save time by eliminating manual testing b) They can identify code quality issues immediately c) They ensure that changes do not break existing functionality d) All of the above
Answer 9
d) All of the above
10. What is the main purpose of unit tests in CI/CD?
a) Test user interfaces b) Validate individual components of the code c) Test system performance under stress d) Ensure browser compatibility
Answer 10
b) Validate individual components of the code
11. What is version control in CI/CD?
a) Tracking deployment failures b) A system to manage changes to source code over time c) A method of scaling applications d) Reviewing team member’s work manually
Answer 11
b) A system to manage changes to source code over time
12. What is Git often used for in CI/CD?
a) Writing scripts b) Containerization c) Version control and collaboration d) Performance testing
Answer 12
c) Version control and collaboration
13. What is “artifact management” in CI/CD?
Choose one option
a) Debugging failed builds b) Storing deployable binaries or files for later use c) Reducing deployment risk d) Automating version control
Answer 13
b) Storing deployable binaries or files for later use
Artifact management ensures that outputs (e.g., built binaries) are preserved and available for consistency and traceability.
14. Which of the following is a cloud-based CI/CD tool?
Choose one option
a) GitHub Actions b) IntelliJ IDEA c) Blender d) Visual Studio Code
Answer 14
a) GitHub Actions
GitHub Actions provides built-in support for CI/CD hosted on GitHub’s cloud infrastructure.
15. Which practice helps detect integration problems earlier?
Choose one option
a) Integrate once per quarter b) Merge frequently and run automated tests on each merge c) Keep features in private forks forever d) Only run tests before major releases
Answer 15
b) Merge frequently and run automated tests on each merge
Frequent merges with automated tests reduce integration risk and surface conflicts sooner.
16. What is an artifact in CI/CD?
Choose one option
a) A bug report b) A build output (e.g., binary, jar, container image) produced by the pipeline c) A test failure d) A commit message
Answer 16
b) A build output (e.g., binary, jar, container image) produced by the pipeline
Artifacts are versioned build outputs stored for deployment or distribution.
17. Why use an artifact repository (e.g., Nexus, Artifactory)?
a) To store test scripts only b) To store and manage built artifacts reliably, with versioning and access control c) To replace version control d) To host CI servers
Answer 17
b) To store and manage built artifacts reliably, with versioning and access control
Artifact repos centralize build outputs and support dependency management and reproducibility.
18. Which of these is a common trigger for CI pipelines?
a) A code commit or push to the repository b) A power outage c) Opening the IDE d) Editing local files only
Answer 18
a) A code commit or push to the repository
Commits/pushes and pull requests commonly trigger CI pipelines via webhooks.
19. What is a build failure in CI usually an indicator of?
a) A harmless warning b) A compile error, failing tests, or misconfigured pipeline that needs attention c) Successful release d) Improved performance
Answer 19
b) A compile error, failing tests, or misconfigured pipeline that needs attention
Build failures indicate problems that prevent successful integration and must be fixed.
20. Which of the following is a good first step when adopting CI/CD for a project?
Choose one option
a) Rewrite the entire codebase b) Start by automating the build and unit tests and run them on commits c) Disable version control d) Deploy without tests immediately
Answer 20
b) Start by automating the build and unit tests and run them on commits
Automating builds and tests provides immediate value and is a foundational step for CI/CD adoption.
We would love to hear from you! Please leave your comments and share your scores in the section below
Query parameters are a way to pass information to an API flexibly and simply. They are added to the end of the API endpoint URL as a series of key-value pairs. To append query params to the end of a URL, a ‘?’ Is added followed immediately by a query parameter.
Handling HTTP query parameters in Playwright typically involves setting up your request with the desired parameters before navigating to a URL. Playwright provides methods to easily construct and use URLs with query parameters.
The following prerequisites are required to be installed on the machine to begin with a smooth setup and installation.
Java 11 or higher
IntelliJ IDE or any other IDE to create a project
Maven
Dependency List
Playwright – 1.57.0
Java 17
Maven – 3.9.6
TestNG – 7.11.0
Maven Compiler Plugin – 3.15.0
Maven Surefire Plugin – 3.5.4
Implementation Steps
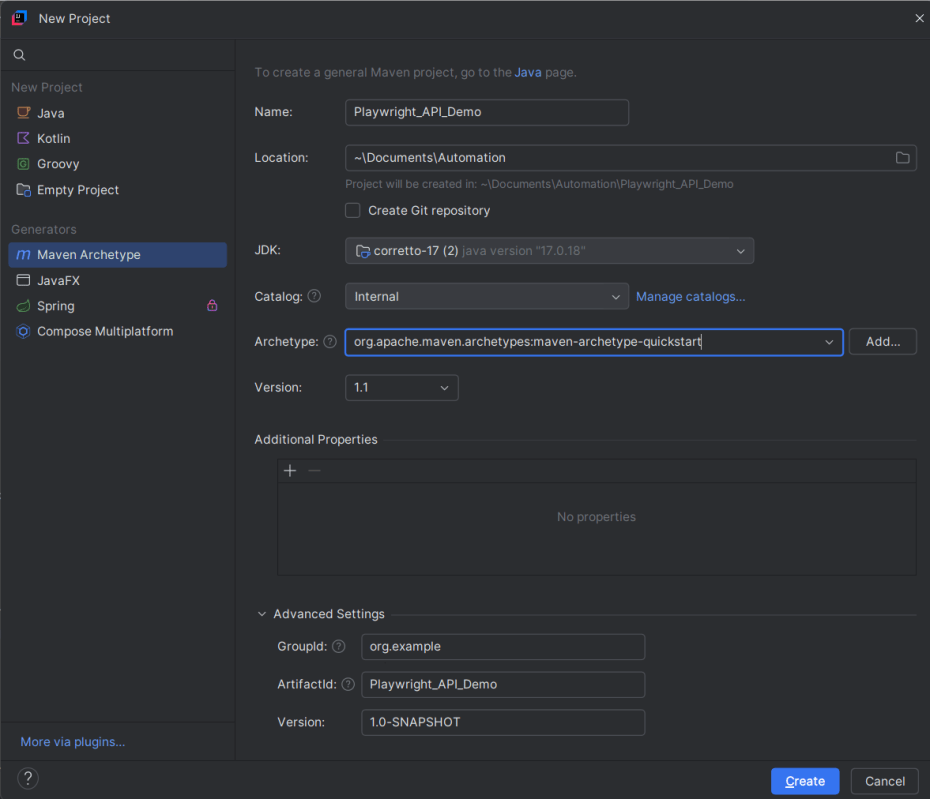
1. Create a new Maven Project
The first step in setup is to create a new Maven project. I will be using IntelliJ in this tutorial. The following steps need to be followed to create a new Maven project :
Open IntelliJ, Navigate to File >> New >> Project
2. In the New Project window, enter the following details:
Name of the Project – Playwright_API_Demo
Location/path where the project needs to be saved – Documents/Playwright (my location)
Select JDK version — I am using JDK 17
Archetype — Search for quickstart and select maven-archetype-quickstartfrom the results
Click on the Create button to create the project.
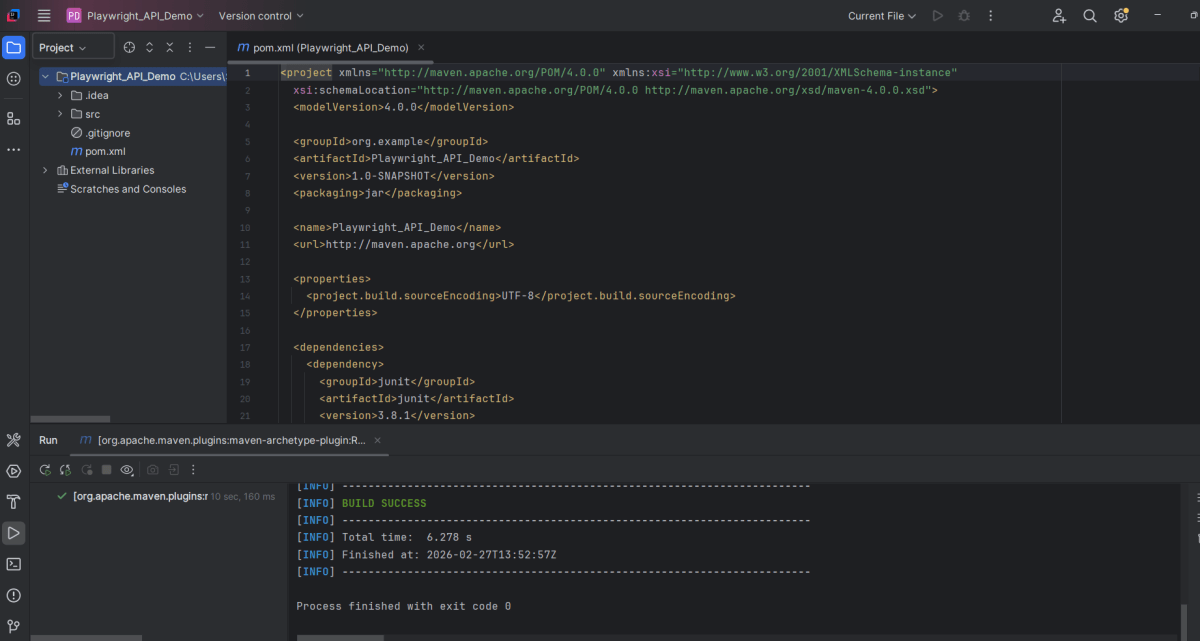
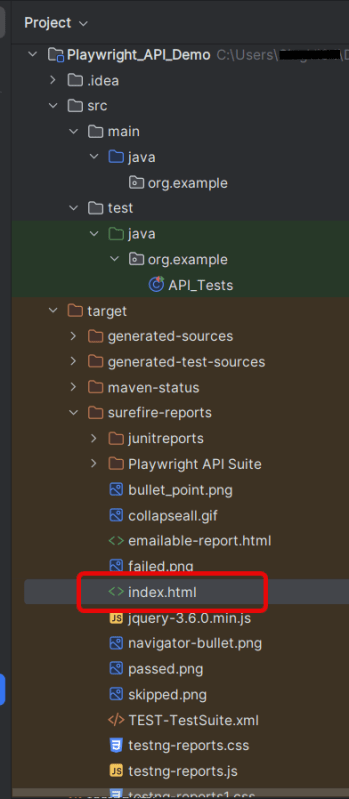
This will create a project as shown below in the IntelliJ.
2. Setup Playwright with Java and TestNG
Add the Playwright and TestNG dependencies to the pom.xml. The latest dependency can be found from here.
After adding the dependency, refresh the project. We can see that the Playwright jar files are downloaded in External Libraries.
3. Create API tests
Create Setup Methods
@BeforeMethod: This annotation indicates that `setUp()` will run before each test method, ensuring that the Playwright environment and API request context are properly initialized.
createAPIRequestContext(): Sets up the API request context with a base URL (`https://jsonplaceholder.typicode.com`) and common headers (like “Accept: application/json”) that will be used for all requests.
`@AfterMethod`: Ensures that resources are properly disposed of after every test method execution by calling `request.dispose()` and `playwright.close()`. This avoids resource leaks and ensures clean execution for subsequent tests.
  @AfterMethod
    void tearDown() {
        if (request != null) {
            request.dispose();
        }
        if (playwright != null) {
            playwright.close();
        }
    }
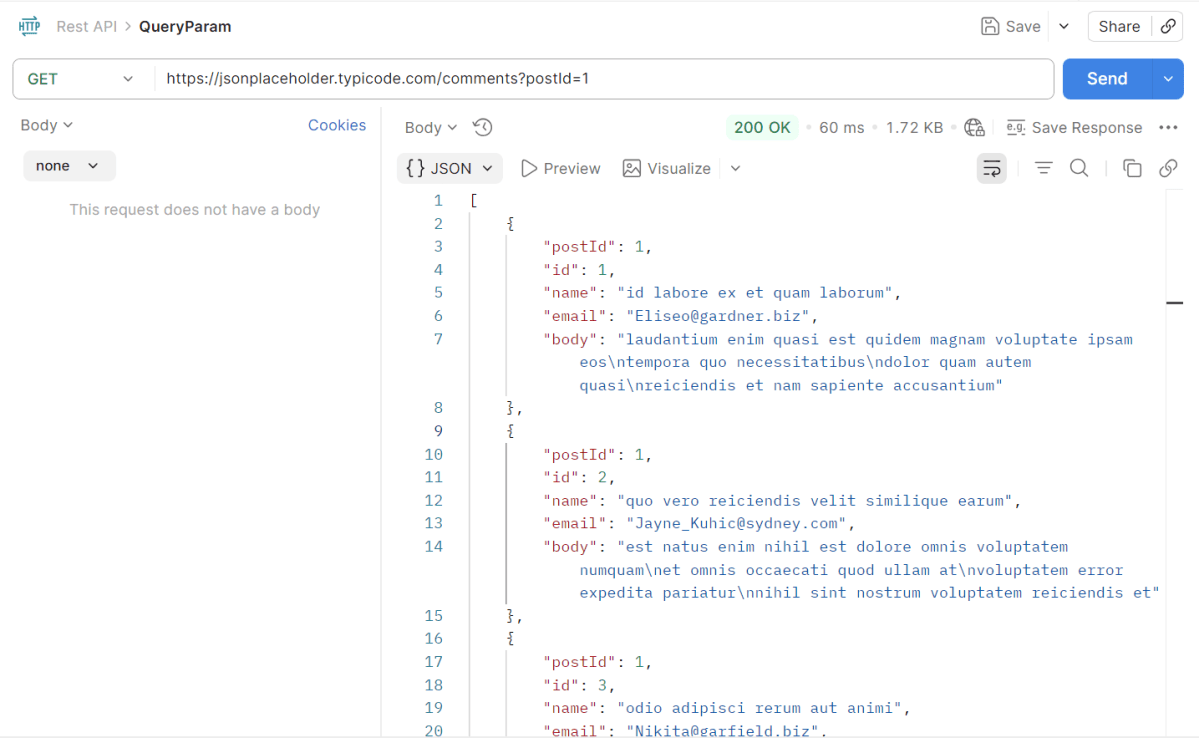
Query Parameter
The corresponding API Test in Playwright Framework.
 @Test
    public void getCommentsByPostId() {

        // GET /comments?postId=1
        APIResponse response = request.get("/comments",
                RequestOptions.create().setQueryParam("postId", "1"));

        Assert.assertEquals(response.status(), 200, "Expected 200 for GET /comments?postId=1");

        String body = response.text();
        System.out.println("GET Response: " + body);

        Gson gson = new Gson();
        JsonObject[] posts = gson.fromJson(body, JsonObject[].class);

        Assert.assertTrue(posts.length > 0, "Expected at least one post for postId=1");
        Assert.assertEquals(posts[0].get("postId").getAsInt(), 1, "Expected postId=1 in first result");
        Assert.assertEquals(posts[0].get("id").getAsInt(), 1, "Expected id=1 in first result");
        Assert.assertEquals(posts[0].get("email").getAsString(), "Eliseo@gardner.biz", "Expected email is incorrect for first result" + posts[0].get("email").getAsString());
    }
Explanation
1.Sending an API GET Request
Sends an HTTP GET request to the `/comments` endpoint with a query parameter `postId` set to `“1”`.
Verifies that the response status code is 200 (OK).
Assert.assertEquals(response.status(), 200, "Expected 200 for GET /comments?postId=1");
3. Read the response body
Prints the entire response content to the console for debugging or logging.
String body = response.text();
System.out.println("GET Response: " + body);
4. Parsing the JSON Response
Parses the response body into an array of `JsonObject`. This assumes the API returns a JSON array of objects, each representing a comment.
Gson gson = new Gson();
JsonObject[] posts = gson.fromJson(body, JsonObject[].class);
5. Validate the Response data
Checks that there is at least one comment in the response, indicating the API return is not empty.
Assert.assertTrue(posts.length > 0, "Expected at least one post for postId=1");
Verifies that the `postId` in the first comment object is `1`.
Verifies that the `id` in the first comment object is `1`.
Verifies that the `email` in the first comment object is `Eliseo@gardner.biz`.
Assert.assertEquals(posts[0].get("postId").getAsInt(), 1, "Expected postId=1 in first result");
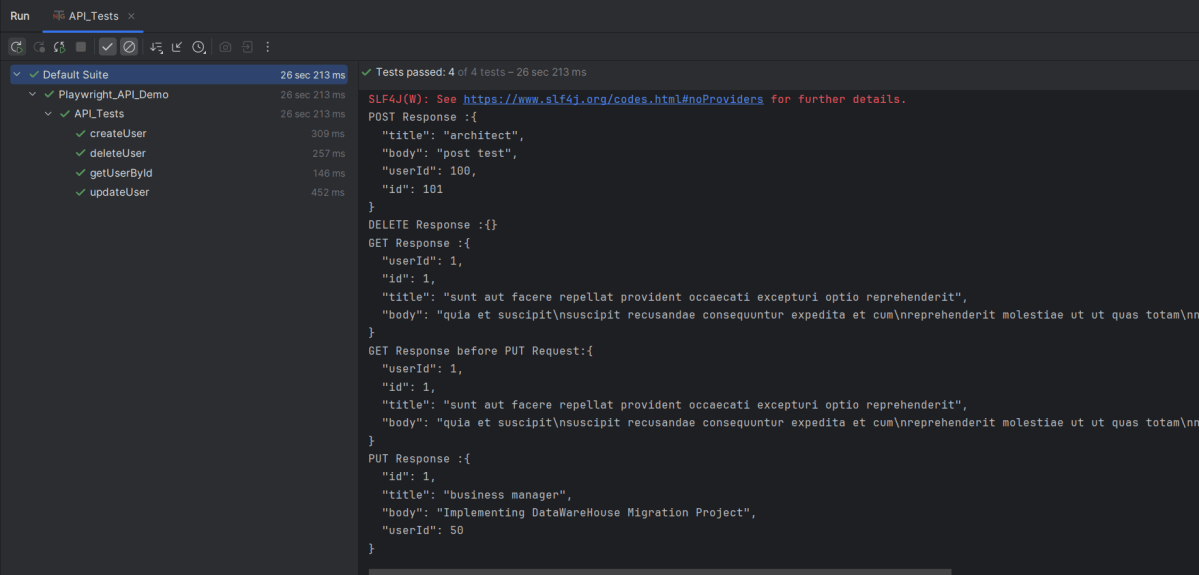
4. Test Execution through IntelliJ
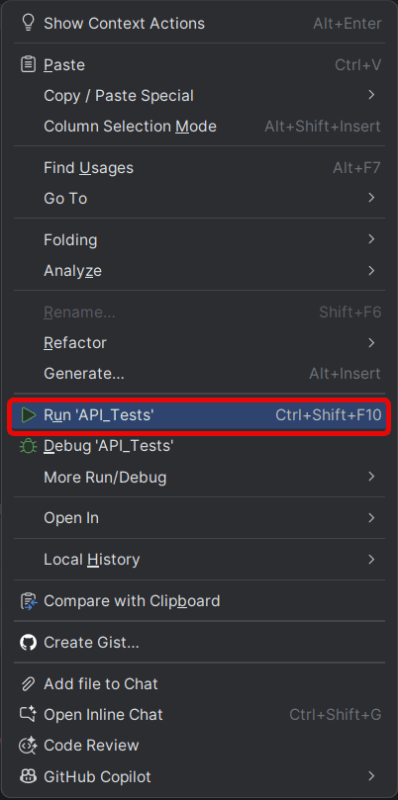
Go to the Test class and right-click and select Run ‘API_Tests’. The tests will run as IntelliJ tests.
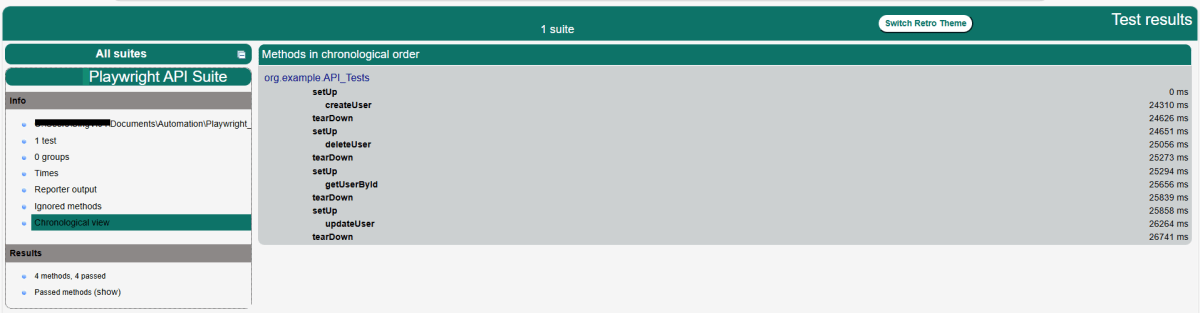
Below is the test execution result.
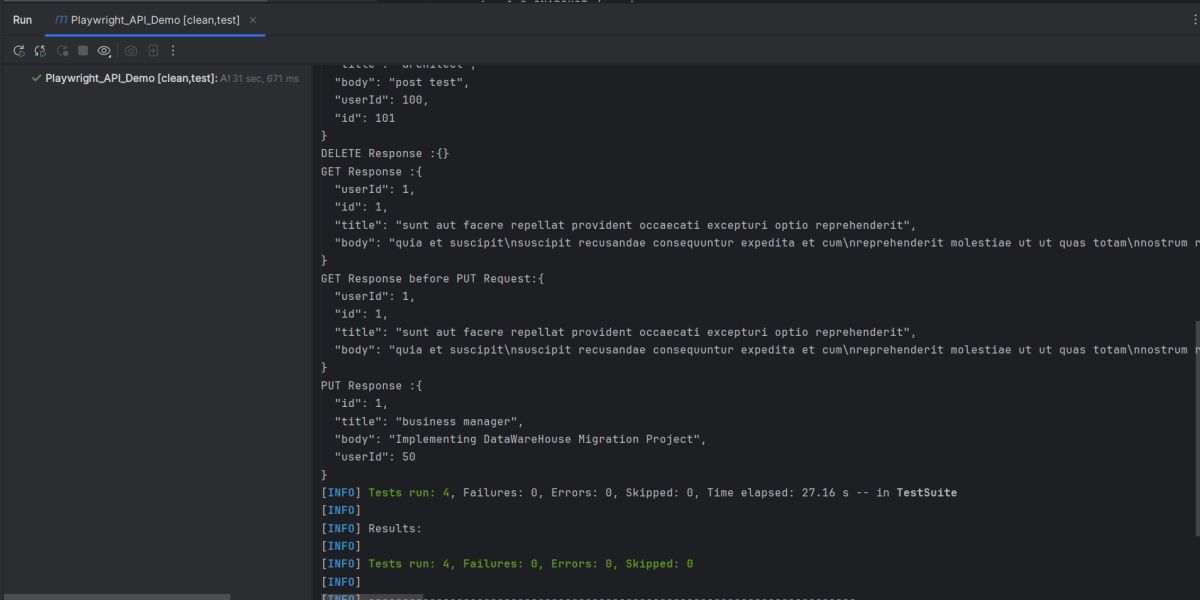
5. Run the tests using the command line
Use the below command to run the tests using the command line.
mvn clean test
The output of the above program is
6. TestNG Report Generation
TestNG creates a target directory that contains index.html report.
Right-click on the index.html and open it in the browser.
Summary
Playwright: Utilized for its ability to handle HTTP requests and execute browser interactions. This code leverages Playwright for making API calls rather than web UI interactions.
Gson: Simplifies the parsing of JSON responses into Java objects, allowing easy assertion of specific fields.
TestNG: Provides the testing framework features such as test annotations and assertions used to validate the API responses.
An HTTP request is a message sent by a client (usually a web browser or a tool like cURL or Postman) to a server, requesting a resource or action to be performed. This is a fundamental part of the Web’s client-server communication model. The HTTP protocol defines how requests and responses are formatted and transmitted over the Internet.
System requirements
The following prerequisites are required to be installed on the machine to begin with a smooth setup and installation.
Java 11 or higher
IntelliJ IDE or any other IDE to create a project
Maven
Dependency List
Playwright – 1.57.0
Java 17
Maven – 3.9.6
TestNG – 7.11.0
Maven Compiler Plugin – 3.15.0
Maven Surefire Plugin – 3.5.4
Implementation Steps
1. Create a new Maven Project
The first step in setup is to create a new Maven project. I will be using IntelliJ in this tutorial. The following steps need to be followed to create a new Maven project :
Open IntelliJ, Navigate to File >> New >> Project
2. In the New Project window, enter the following details:
Name of the Project – Playwright_API_Demo
Location/path where the project needs to be saved – Documents/Playwright (my location)
Select JDK version — I am using JDK 17
Archetype — Search for quickstart and select maven-archetype-quickstartfrom the results
Click on the Create button to create the project.
This will create a project as shown below in the IntelliJ.
2. Setup Playwright with Java and TestNG
Add the Playwright and TestNG dependencies to the pom.xml. The latest dependency can be found from here.
After adding the dependency, refresh the project. We can see that the Playwright jar files are downloaded in External Libraries.
3. Create API tests in
Create Setup Methods
@BeforeMethod: This annotation indicates that setUp() will run before each test method, ensuring that the Playwright environment and API request context are properly initialized.
createAPIRequestContext(): Sets up the API request context with a base URL (https://jsonplaceholder.typicode.com) and common headers (like “Accept: application/json”) that will be used for all requests.
@AfterMethod: Ensures that resources are properly disposed of after every test method execution by calling request.dispose()and playwright.close(). This avoids resource leaks and ensures clean execution for subsequent tests.
  @AfterMethod
    void tearDown() {
        if (request != null) {
            request.dispose();
        }
        if (playwright != null) {
            playwright.close();
        }
    }
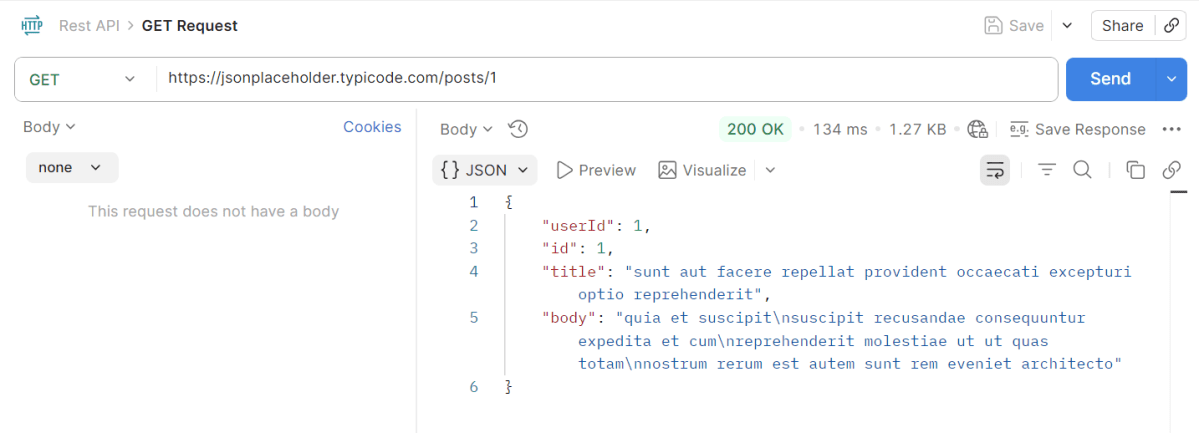
GET Request
What is GET Request?
The GET HTTP method requests a representation of the specified resource. Requests using GET should only be used to request data and shouldn’t contain a body.
The corresponding API Test in Playwright Framework.
 @Test
    public void getUserById() {
        APIResponse response = request.get("/posts/1");
        System.out.println("GET Response :" + response.text());
        Assert.assertEquals(response.status(), 200, "Expected 200 for GET /posts/1");

        Gson gson = new Gson();
        JsonObject jsonResponse = gson.fromJson(response.text(), JsonObject.class);
        Assert.assertEquals(jsonResponse.get("userId").getAsInt(), 1, "Expected userId=1 in response body");
        Assert.assertEquals(jsonResponse.get("id").getAsInt(), 1, "Expected id=1 in response body");
    }
Explanation
We sends a GET request to retrieve a specific post.
Verifies that the response status code is 200 (OK).
Parses the response JSON to check for expected values (`userId` and `id` both equal to 1).
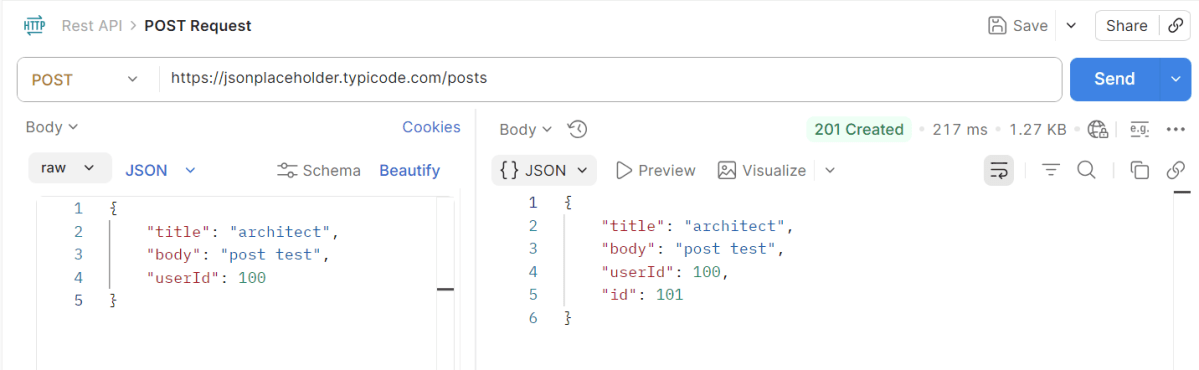
POST Request
What is POST Request?
The POST HTTP method sends data to the server. The type of the body of the request is indicated by the Content-Type header
 @Test
    public void createUser() {
        Map<String, Object> payload = new HashMap<>();
        payload.put("title", "architect");
        payload.put("body", "post test");
        payload.put("userId", 100);

        APIResponse response = request.post("/posts", RequestOptions.create().setData(payload));
        System.out.println("POST Response :" + response.text());
        Assert.assertEquals(response.status(), 201, "Expected 201 for POST /users");

        Gson gson = new Gson();
        JsonObject body = gson.fromJson(response.text(), JsonObject.class);
        Assert.assertEquals(body.get("title").getAsString(), "architect");
        Assert.assertEquals(body.get("body").getAsString(), "post test");
        Assert.assertEquals(body.get("userId").getAsInt(), 100);
        Assert.assertNotNull(body.get("id"), "Expected id in create response");
    }
Explanation
Constructs a payload for creating a new post and sends a POST request.
Verifies that the response status code for successful creation (201).
Parses the response and asserts that the payload values match the expected results, ensuring the ID field is not null, indicating successful resource creation.
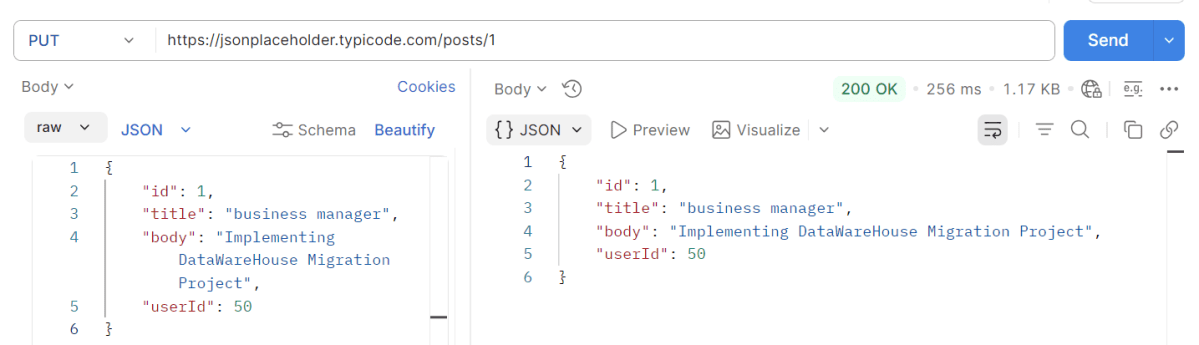
PUT Request
What is PUT Request?
The PUT HTTP method creates a new resource or replaces a representation of the target resource with the request content.
 @Test
    public void updateUser() {

        APIResponse response = request.get("/posts/1");
        System.out.println("GET Response before PUT Request:" + response.text());
        Assert.assertEquals(response.status(), 200, "Expected 200 for GET /posts/1");


        Map<String, Object> payload = new HashMap<>();
        payload.put("id", 1);
        payload.put("title", "business manager");
        payload.put("body", "Implementing DataWareHouse Migration Project");
        payload.put("userId", 50);

        APIResponse response1 = request.put("/posts/1", RequestOptions.create().setData(payload));
        System.out.println("PUT Response :" + response1.text());
        Assert.assertEquals(response1.status(), 200, "Expected 200 for PUT /posts/1");

        Gson gson = new Gson();
        JsonObject body = gson.fromJson(response1.text(), JsonObject.class);
        Assert.assertEquals(body.get("title").getAsString(), "business manager");
        Assert.assertEquals(body.get("body").getAsString(), "Implementing DataWareHouse Migration Project");
        Assert.assertEquals(body.get("userId").getAsInt(), 50);
        Assert.assertNotNull(body.get("id"), "Expected id in create response");

    }
Explanation
Retrieves a post using a GET request to ensure it exists.
Constructs a payload with updated information and sends a PUT request to modify the post.
Verifies that the response status code is 200 to verify successful update.
Verifies that the response JSON contains updated values as specified in the payload.
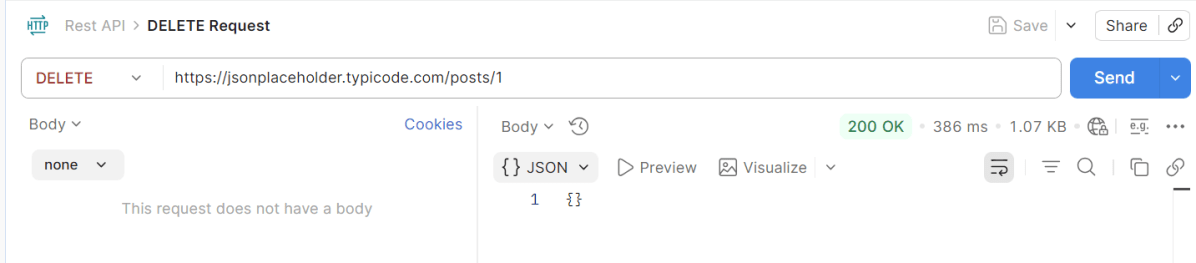
DELETE Request
What is Delete Request?
The DELETE HTTP method asks the server to delete a specified resource. Requests using DELETE should only be used to delete data and shouldn’t contain a body.
Confirms the successful deletion by checking for a 200 response status code.
7. Test Execution through IntelliJ
Go to the Test class and right-click and select Run ‘API_Tests’. The tests will run as IntelliJ tests.
Below is the test execution result.
8. Run the tests using the command line
Use the below command to run the tests using the command line.
mvn clean test
The output of the above program is
9. TestNG Report Generation
TestNG creates a target directory that contains index.html report.
Right-click on the index.html and open it in the browser.
Summary:
Playwright: Utilized for its ability to handle HTTP requests and execute browser interactions. This code leverages Playwright for making API calls rather than web UI interactions.
Gson: Simplifies the parsing of JSON responses into Java objects, allowing easy assertion of specific fields.
TestNG: Provides the testing framework features such as test annotations and assertions used to validate the API responses.
Running only the last failed tests in Playwright can be a useful strategy. It helps in quickly debugging failures. This approach ensures that intermittent issues are resolved.
Playwright provides a way to run tests from the last failed test file using the `–rerun` command-line option. This option is particularly useful in large test suites to focus specifically on the problematic tests.
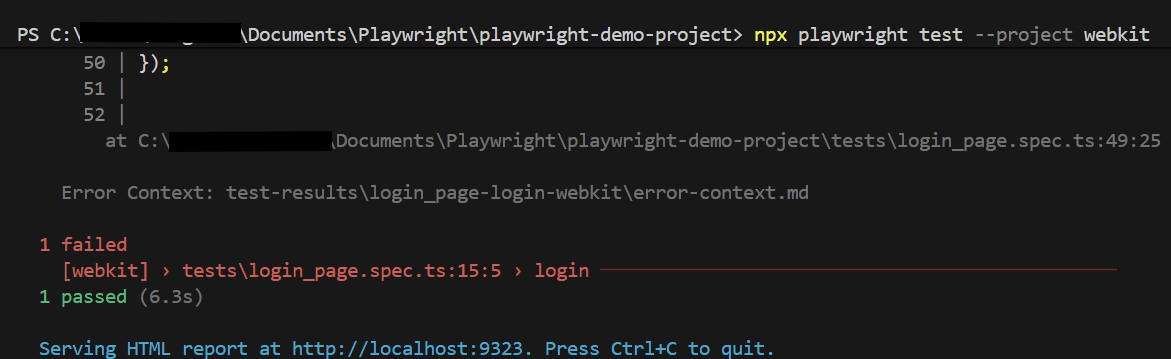
First, execute your regular test suite. For example:
npx playwright test --project webkit
Below are the tests used in this example.
import { test, expect } from '@playwright/test';

test('has title', async ({ page, browserName }) => {
  await page.goto('https://opensource-demo.orangehrmlive.com/');

  console.log(`Running test on browser: ${browserName}`);  // Print the browser name

  await page.waitForTimeout(3000); // Wait for 3 seconds

  // Expect a title "to contain" a substring.
  await expect(page).toHaveTitle(/OrangeHRM/);
});


test('login', async ({ page, browserName }) => {

  const username = 'Admin';
  const password = 'admin123'

  await page.goto('https://opensource-demo.orangehrmlive.com/');

  console.log(`Running test on browser: ${browserName}`);  // Print the browser name

  // Fill in the username
   await page.fill('input[name="username"]', username);

   // Print the username
  console.log(`Logging in with username: ${username}`);

  // Fill in the password
    await page.fill('input[name="password"]', password);

  // Print the password
  console.log(`Logging in with password: ${password}`);

  // Click the login button - Use XPath to locate and click the login button
  const loginButton = page.locator('//button[@type="submit" and contains(@class, "orangehrm-login-button")]');
  await loginButton.click();

  // Check if the page contains text Dashboard - Locate the element using XPath
  const dashboardElement = await page.locator('//h6[contains(@class, "oxd-topbar-header-breadcrumb-module")]');

  // Get the text content from the element
  const dashboardText = await dashboardElement.textContent();

  // Print the text
  console.log(`Dashboard text: ${dashboardText}`);

  expect(dashboardText).toContain('Dashboard1');
});
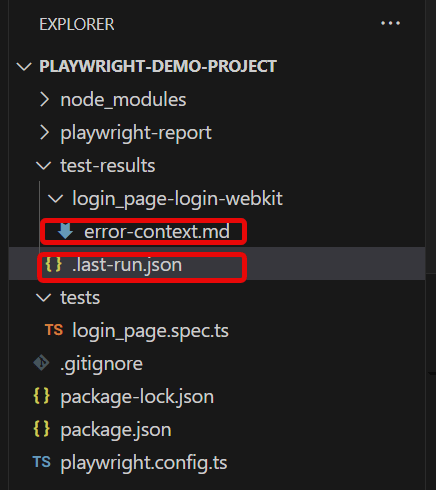
Go to the funnel shape icon called “Testing” or “Test Explorer View”. The failed test detail is mentioned in error-context.md file.
The output of the above program is
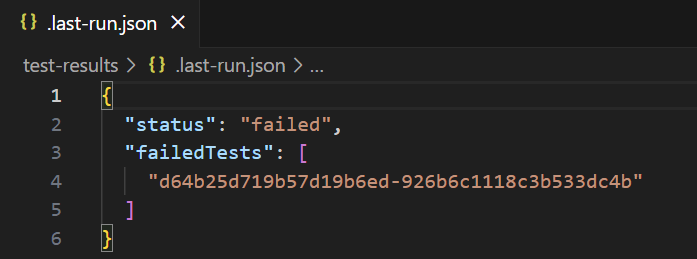
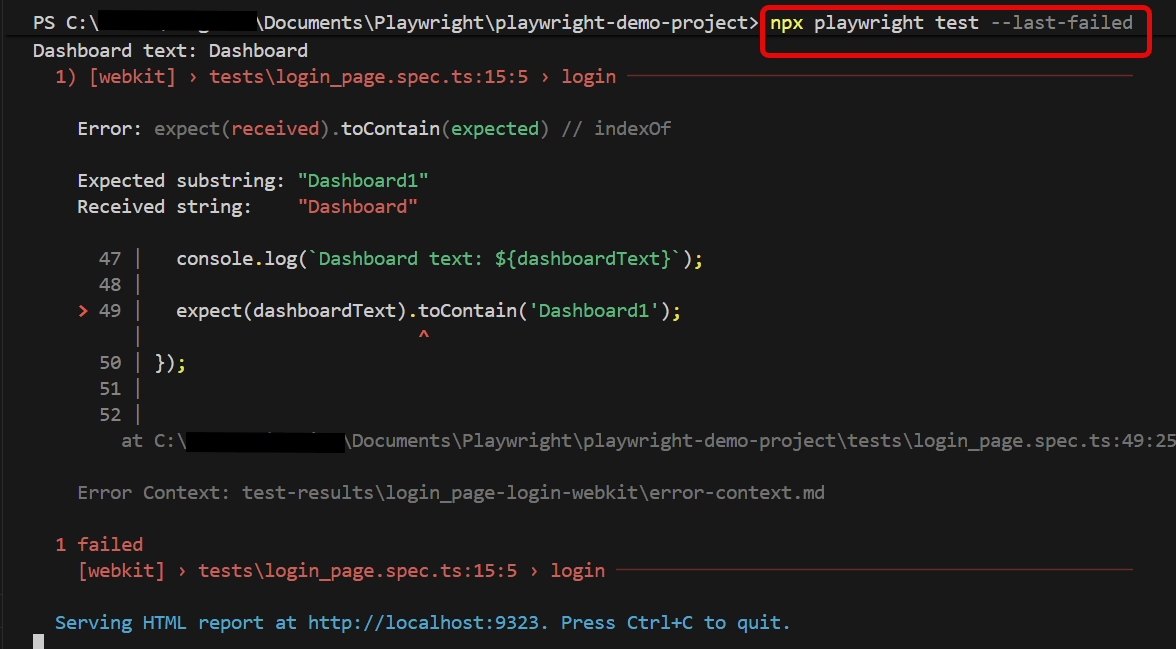
When the tests complete, the failed tests are noted in a file. You can run the last failed tests using the command:
npx playwright test --last-failed
It specifically targets the tests that did not pass in the last test run and executes them again. This is useful for quickly rechecking and fixing issues in tests without having to run the entire test suite again.
The output of the above program is
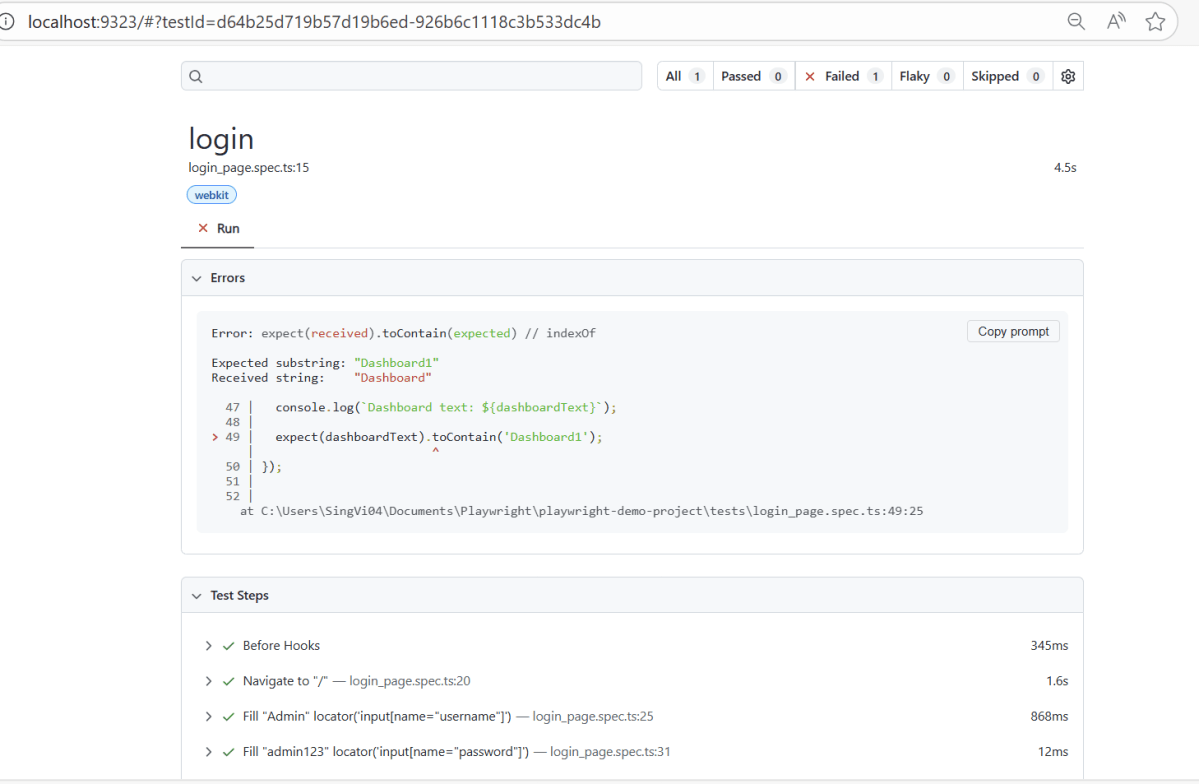
Below is the report generated and it shows that only 1 test is executed.
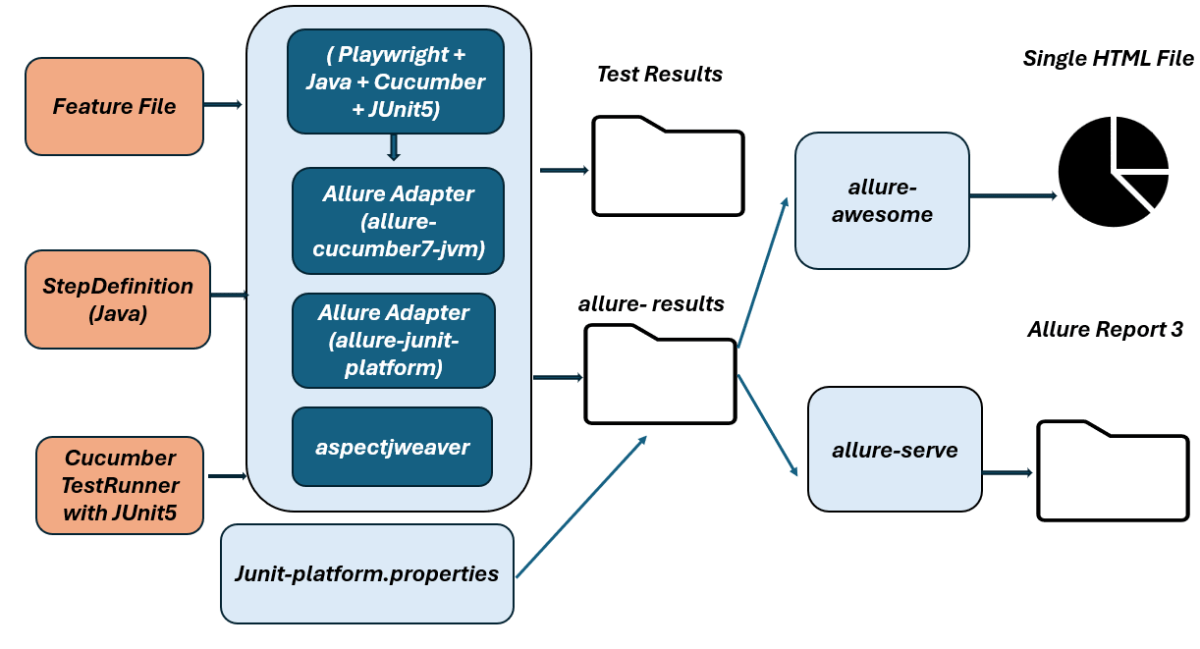
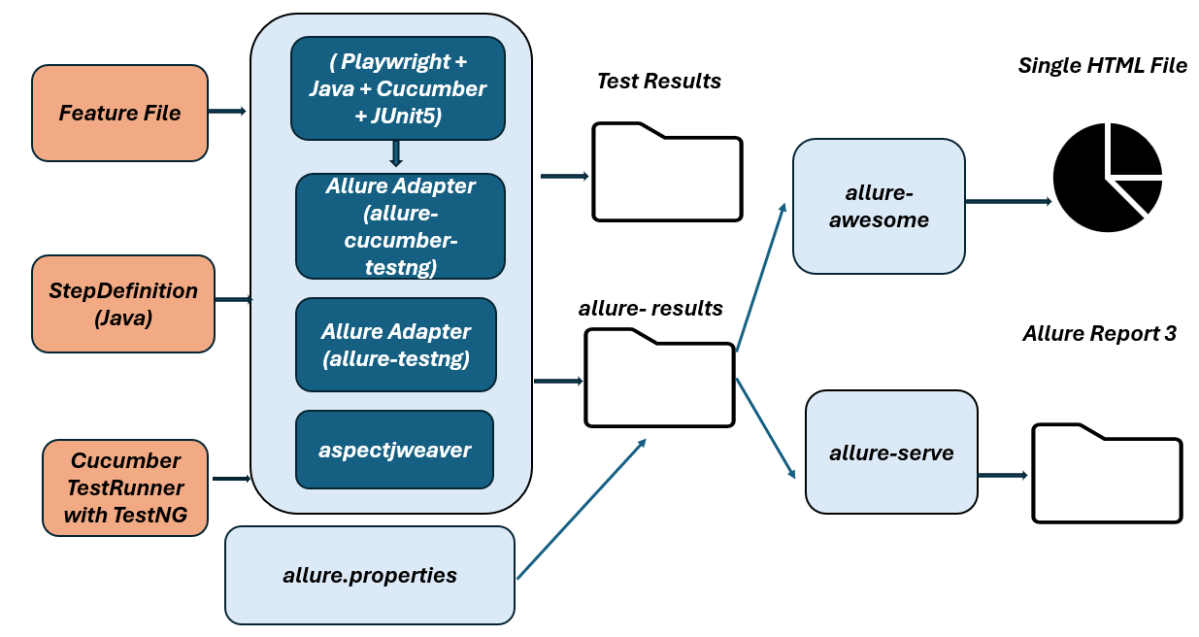
In this tutorial, I will explain how to IntegrateAllure Report 3 with Playwright, Java Cucumber, and JUnit5.
Before starting, make sure to install Allure on your machine. Refer to this tutorial to install allure – What is Allure Report?.
Why Combine Playwright, Cucumber, JUnit5 and Allure?
Playwright provides modern, robust automation for testing web apps across Chromium, Firefox, and WebKit.
Cucumber enables BDD, allowing tests to be written in a natural language format using Gherkin syntax.
Allure Report generates easy-to-understand and aesthetically pleasing test reports, enhancing the feedback loop.
JUnit 5 provides powerful features like parameterized tests, extensions, and a modular architecture for organized and manageable test suites, parallel execution
Together, they empower teams to write readable tests, run them across multiple browsers, and analyze results visually.
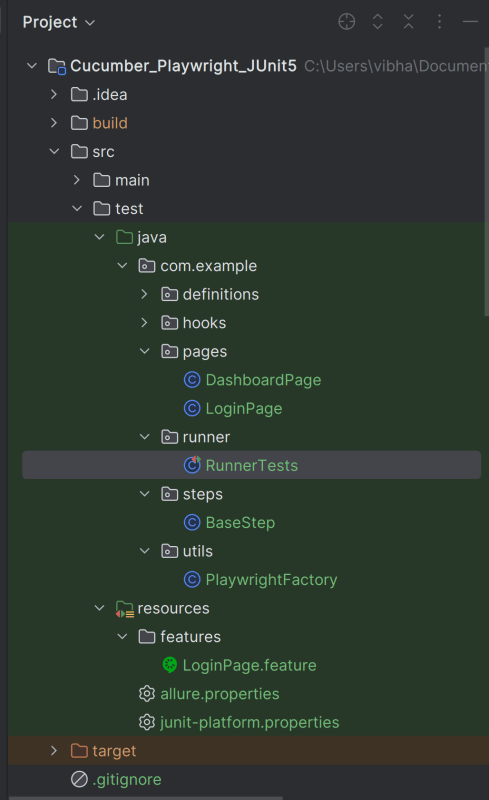
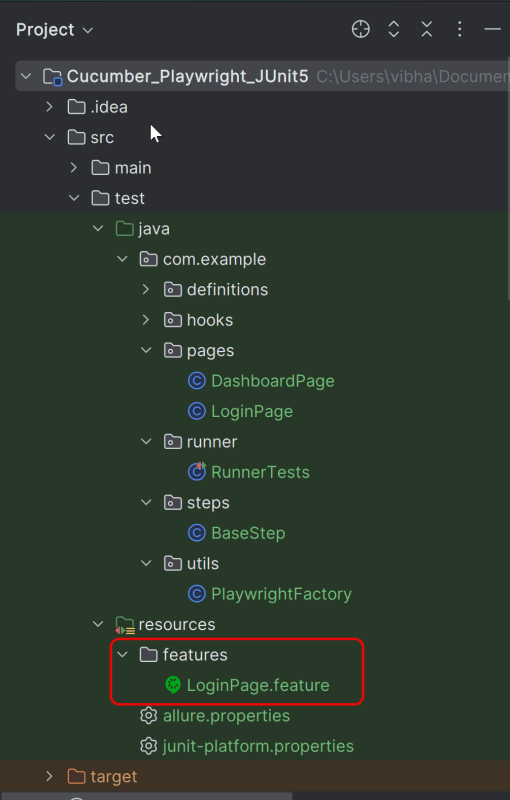
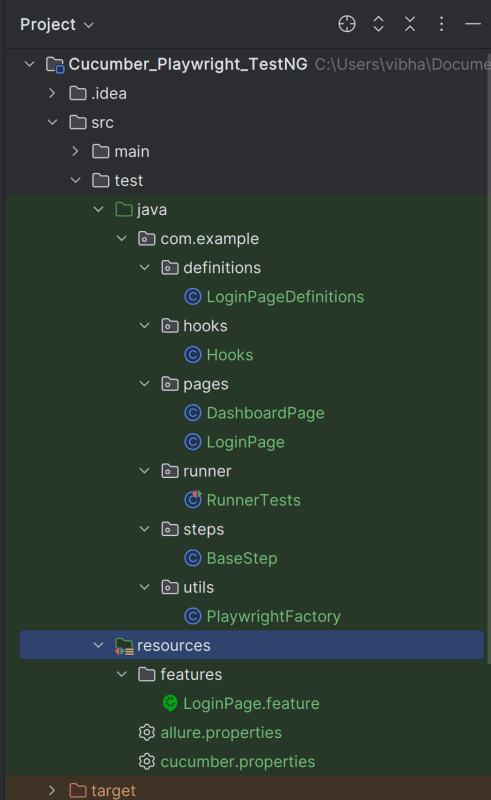
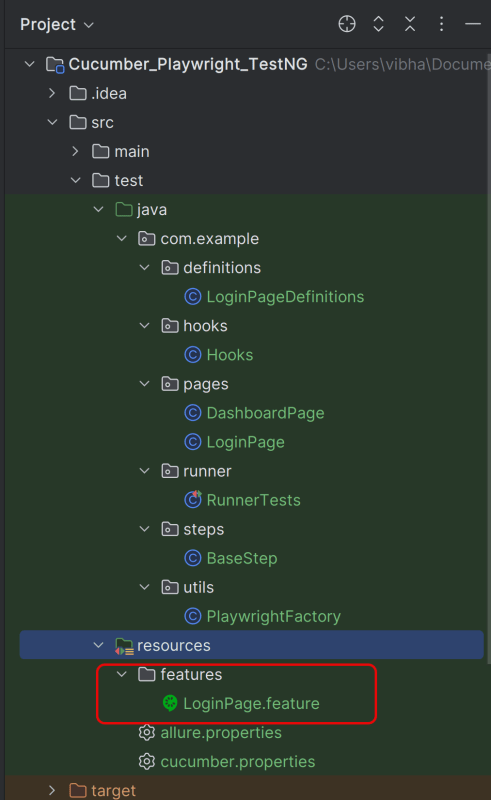
Create a folder – features within src/test/resources to create test scenarios in the Feature file.
Feature file should be saved as an extension of .feature. Add the test scenarios in this feature file. I have added sample test scenarios. In this feature file. The test scenarios are written in Gherkinslanguage.
@allure.label.parent_suite:WebInterface
@allure.label.sub_suite:Login Page
@allure.label.owner:Vibha
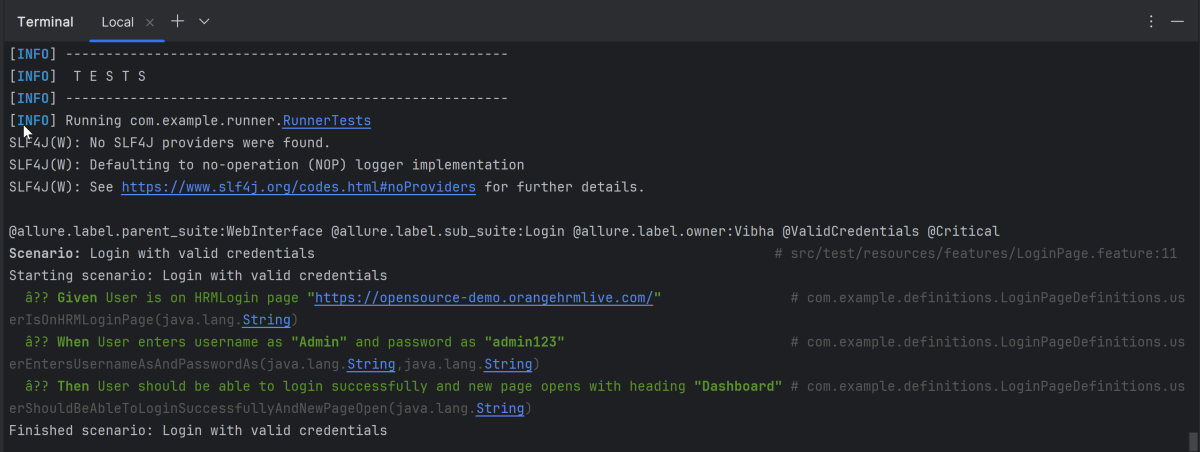
Feature: Login to HRM Application
Background:
Given User is on HRMLogin page "https://opensource-demo.orangehrmlive.com/"
@ValidCredentials @Critical
Scenario: Login with valid credentials
When User enters username as "Admin" and password as "admin123"
Then User should be able to login successfully and new page opens with heading "Dashboard"
@InvalidCredentials @High
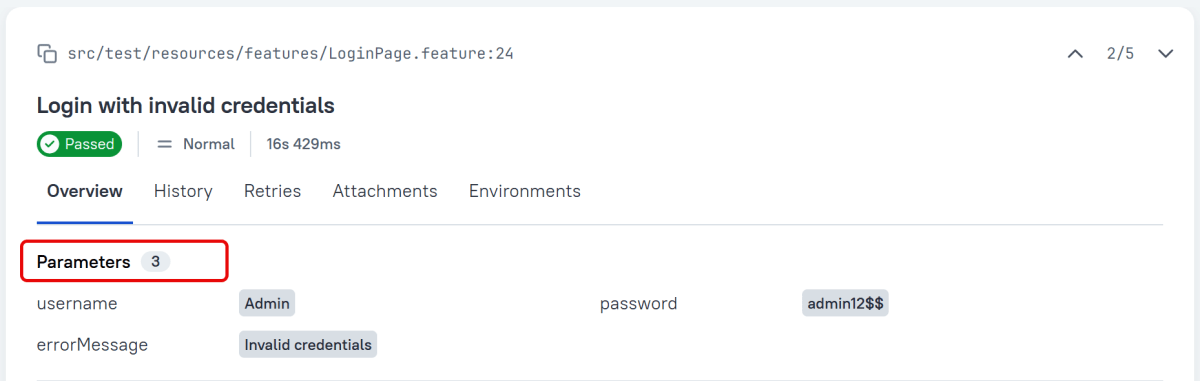
Scenario Outline: Login with invalid credentials
When User enters username as "<username>" and password as "<password>"
Then User should be able to see error message "<errorMessage>"
Examples:
| username | password | errorMessage |
| Admin | admin12$$ | Invalid credentials |
| admin$$ | admin123 | Invalid credentials |
| abc123 | xyz$$ | Invalid credentials |
@MissingUsername @Medium
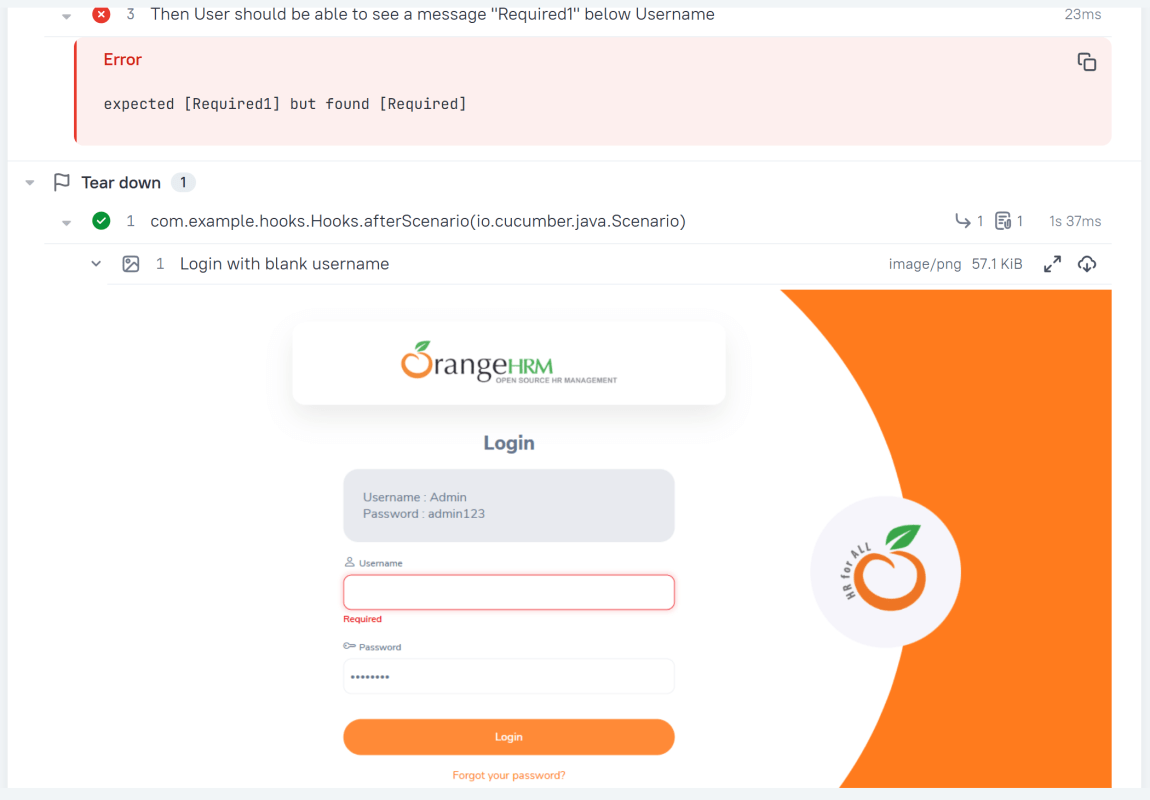
Scenario: Login with blank username
When User enters username as " " and password as "admin123"
Then User should be able to see a message "Required1" below Username
7. Create the step definition class in src/test/java
8. Create a JUnit Cucumber Runner class
This JUnit 5 runner configures and launches Cucumber scenarios by selecting feature files, defining glue code packages, and executing them via the Cucumber engine on the JUnit Platform.
Add Allure Report plugin in the Test Runner to generate the Allure Report.
import static io.cucumber.junit.platform.engine.Constants.GLUE_PROPERTY_NAME;

import org.junit.platform.suite.api.ConfigurationParameter;
import org.junit.platform.suite.api.IncludeEngines;
import org.junit.platform.suite.api.SelectClasspathResource;
import org.junit.platform.suite.api.Suite;

@Suite
@IncludeEngines("cucumber")
@SelectClasspathResource("features")
@ConfigurationParameter(
        key = GLUE_PROPERTY_NAME,
        value = "com.example"
)


public class RunnerTests {
}
1. @Suite – Marks this class as a JUnit 5 test suite. Acts as the entry point for test execution
2. @IncludeEngines(“cucumber”) – Tells JUnit Platform to use the Cucumber engine
3. @SelectClasspathResource(“features”) – Specifies the location of feature file
4. @ConfigurationParameter – Tells Cucumber where to find step definitions and hooks
9. Specify Allure Plugin in junit-platform.properties
Specify the allure plugin in junit-platform.properties which should be placed in src/test/resources:
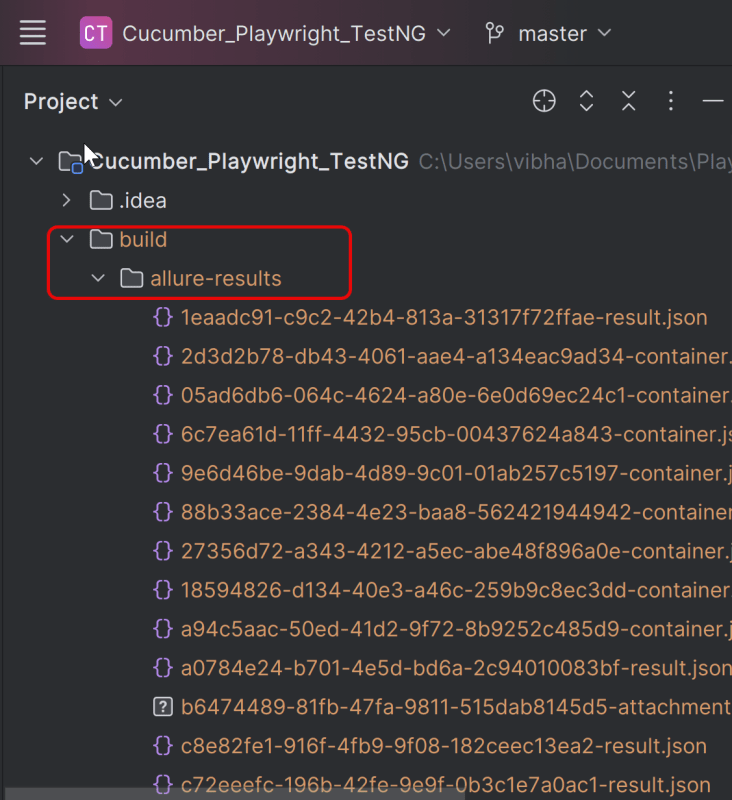
Allure, by default, saves test results in the project’s root directory. However, it is recommended to store your test results in the build output directory.
To configure this, create an allure.properties file and place it in the test resources directory of your project, which is typically located at src/test/resources:
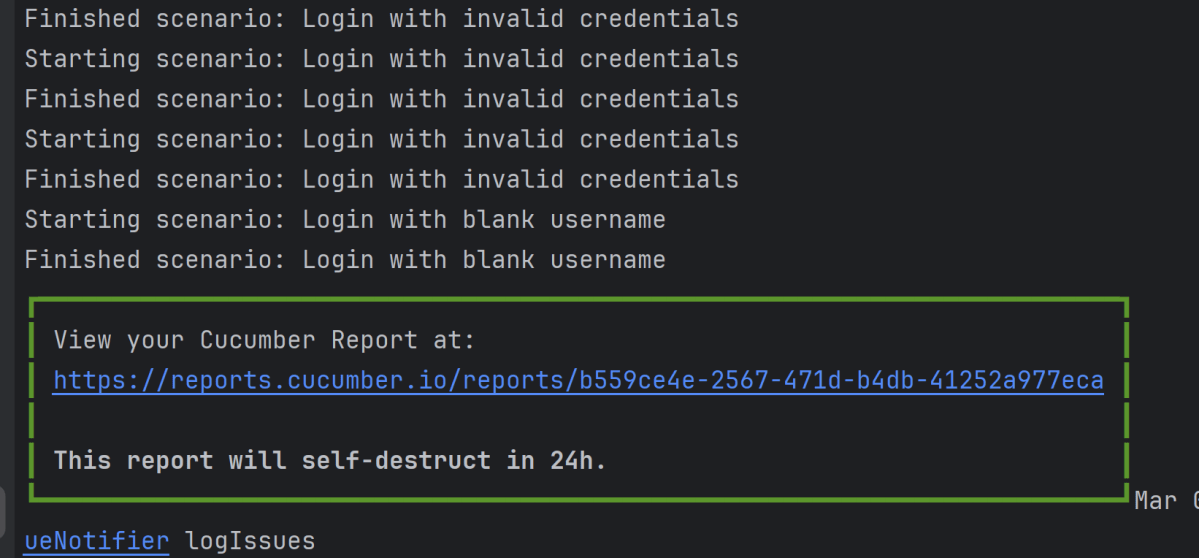
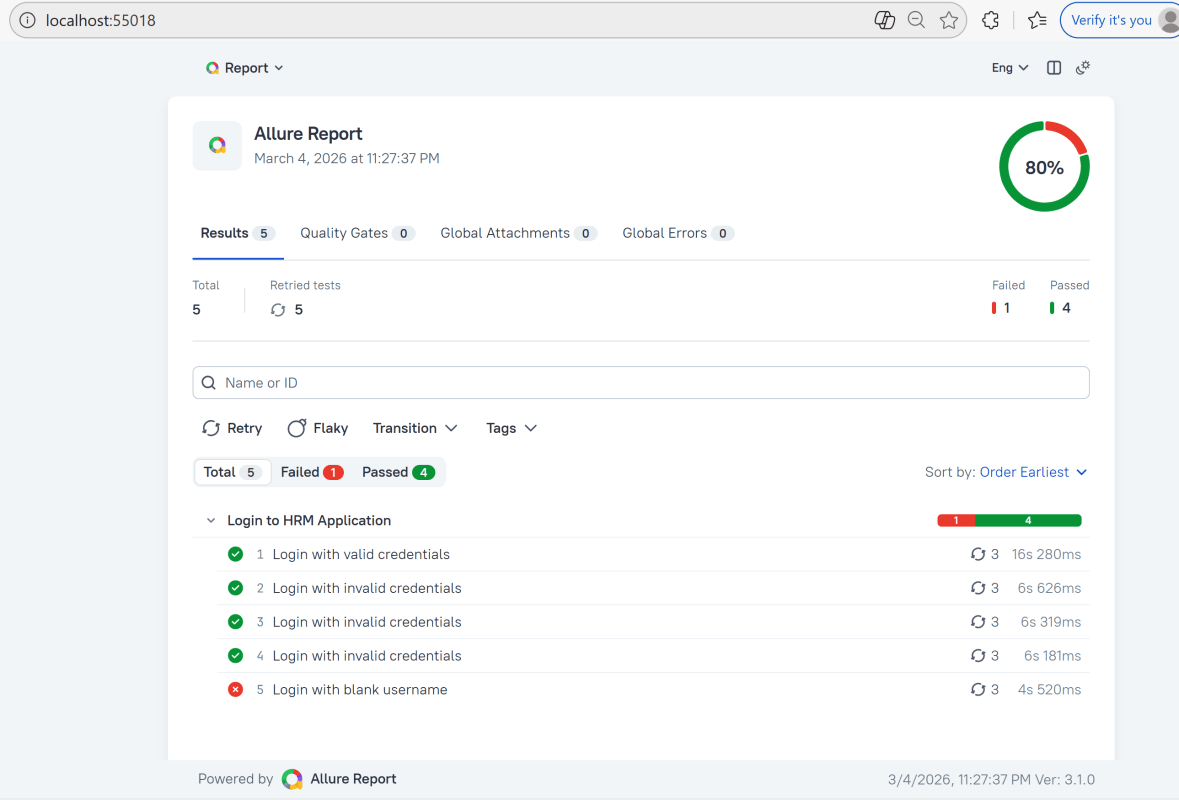
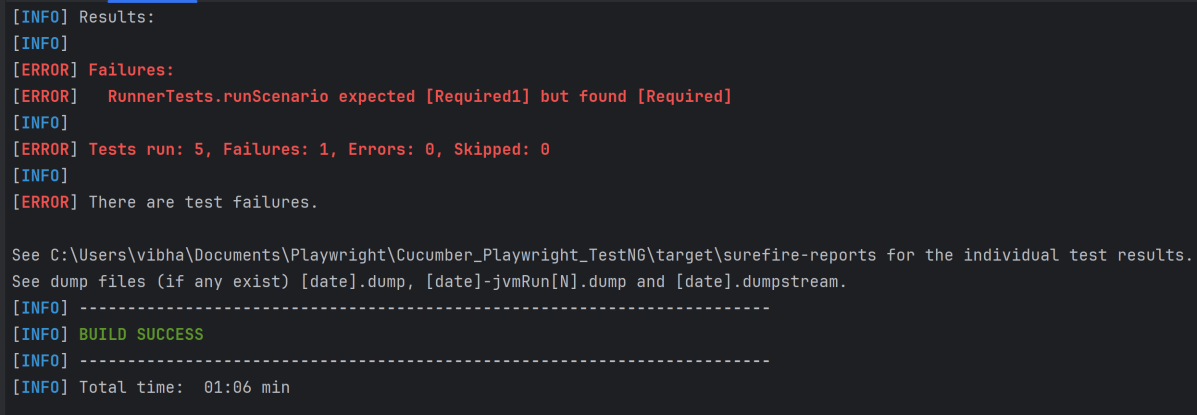
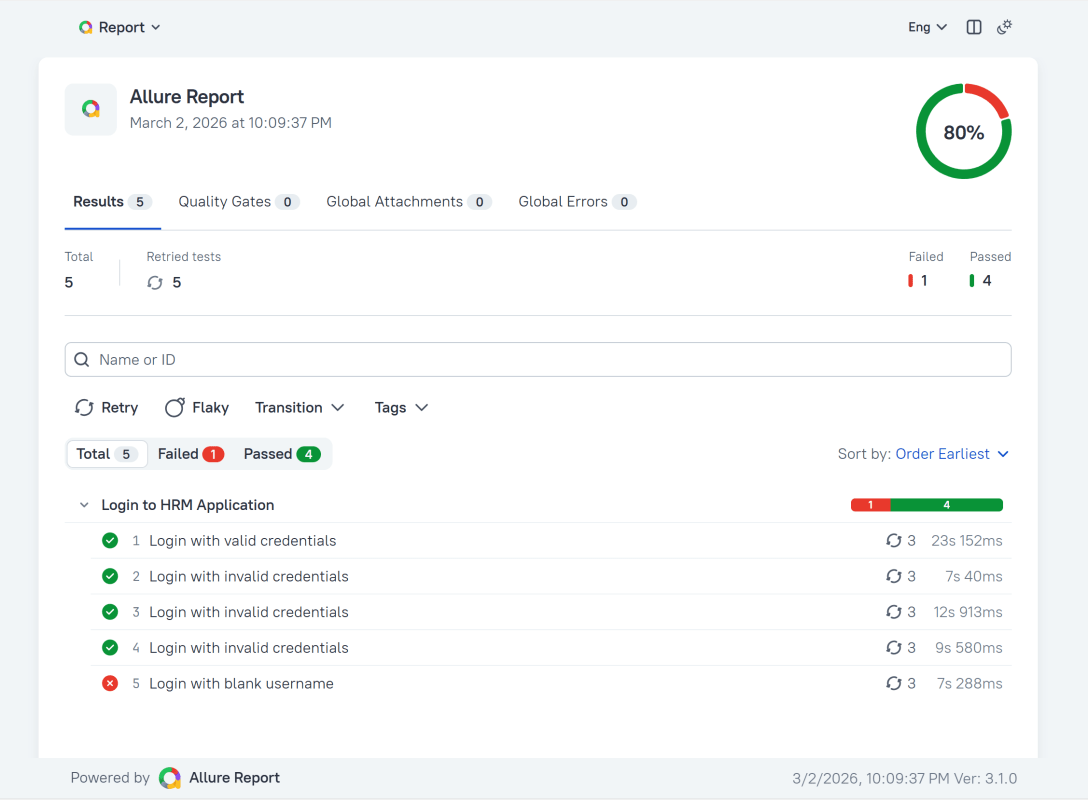
In the image below, we can see that one test failed and four passed out of five tests.
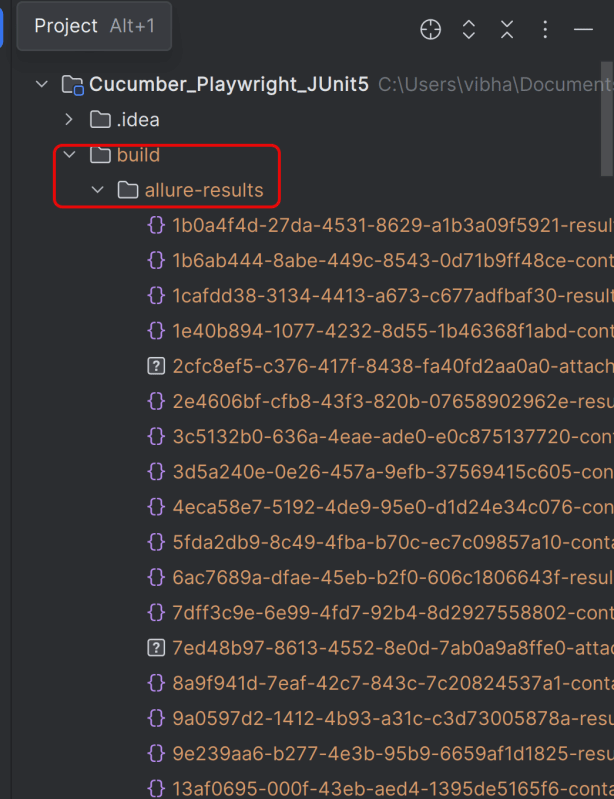
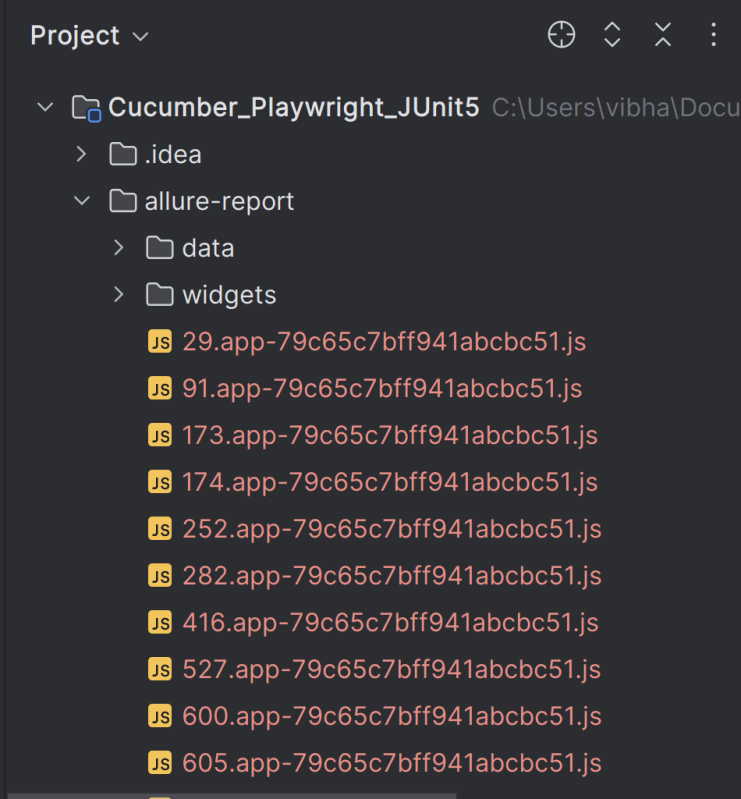
This will create the allure-results folder with all the test reports within build folder. These files will be used to generate Allure Report.
12. How to Generate a Report
allure generate processes the test results and saves an HTML report into the allure-report directory. To view the report, use the allure open command.
allure serve creates the same report as allure generate, then automatically opens the main page of the report in a web browser.
Use the command below to generate the Allure Report
allure serve build/allure-results
This will generate the beautiful Allure Test Report as shown below.
13. How to View a Report
Test reports generated with Allure Report are basically small HTML websites intended to be viewed in a web browser.
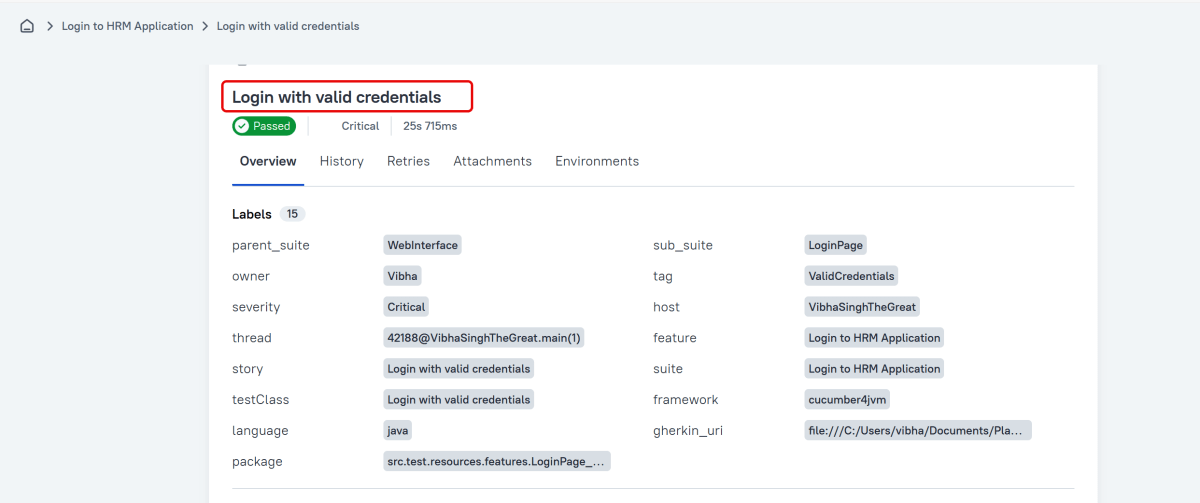
Title
A human-readable title of the test. If not provided, the function name is used instead.
Tags
Any number of short terms the test is related to. Usually it’s a good idea to list relevant features that are being tested. Tags can then be used for filtering.
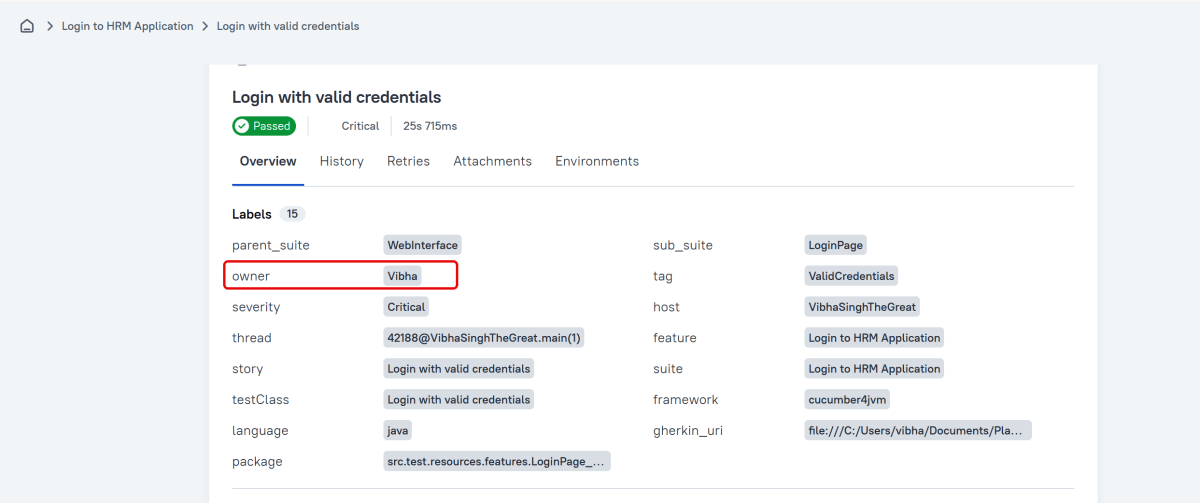
Owner
The team member who is responsible for the test’s stability. For example, this can be the test’s author, the leading developer of the feature being tested, etc.
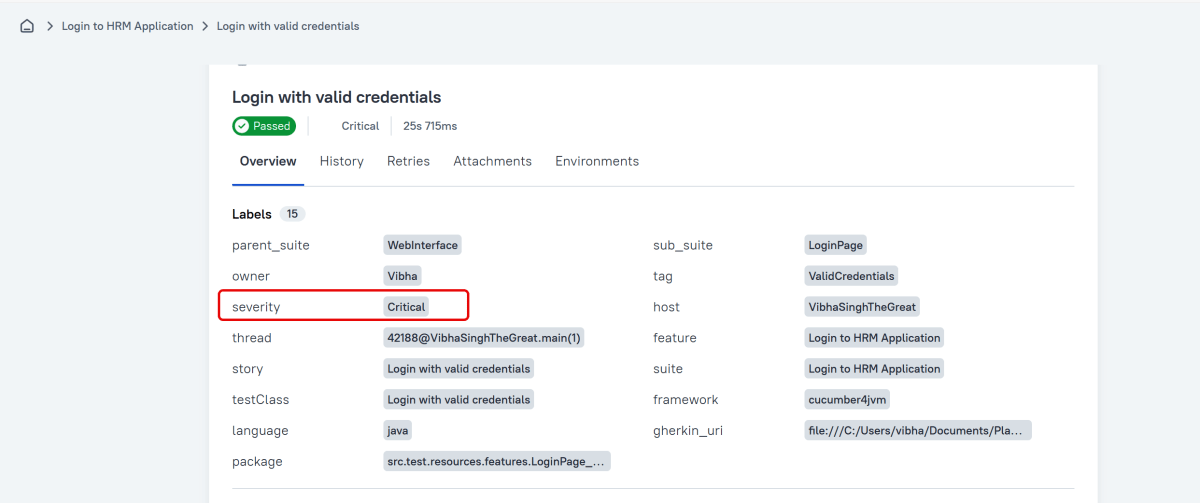
Severity
A value indicating how important the test is. This may give the future reader an idea of how to prioritize the investigations of different test failures.
Allowed values are: “trivial”, “minor”, “normal”, “critical”, and “blocker”.
Support for Scenario Outlines
Allure Cucumber-JVM provides complete support for Scenario Outlines, a feature of Cucumber-JVM that allows for parametrized tests. No special setup is needed to take advantage of this capability within Allure.
Attachment
In Allure reports, you have the ability to attach various types of files, which can greatly enhance the comprehensibility of the report. A common practice is to attach screenshots that capture the state of the user interface at specific moments during test execution.
Allure Cucumber-JVM offers multiple methods for creating attachments, whether from pre-existing files or from content generated on-the-fly.
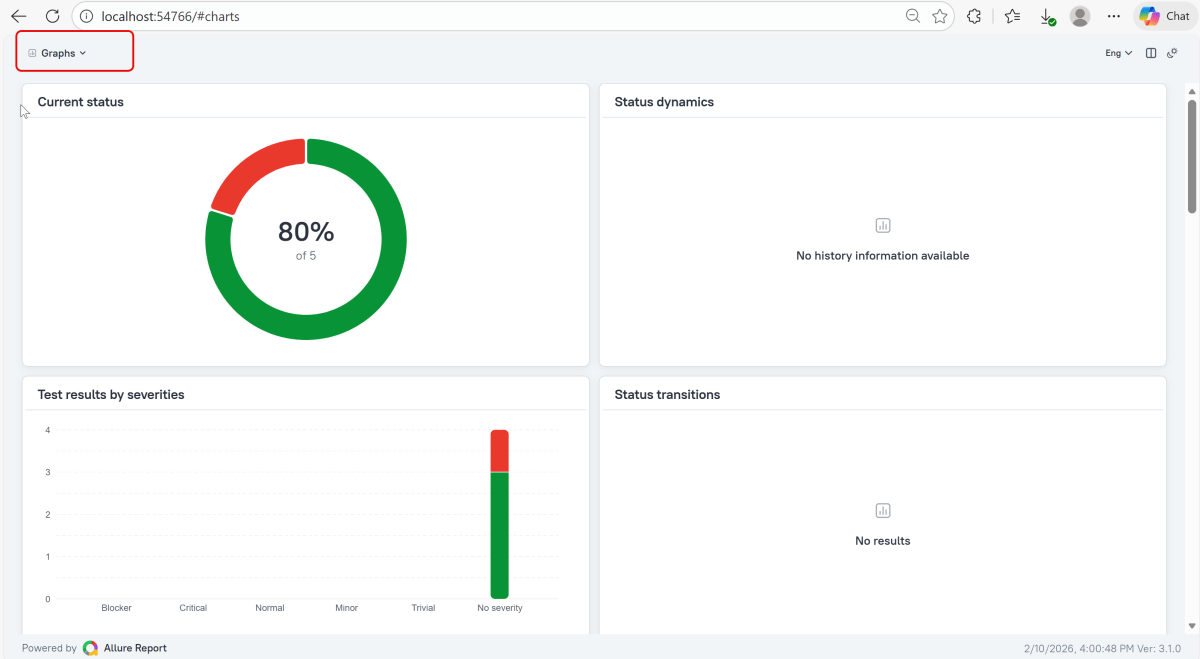
Graphs in Allure Report
Graphs allow you to see different statistics collected from the test data: status breakdown or severity and duration diagrams.
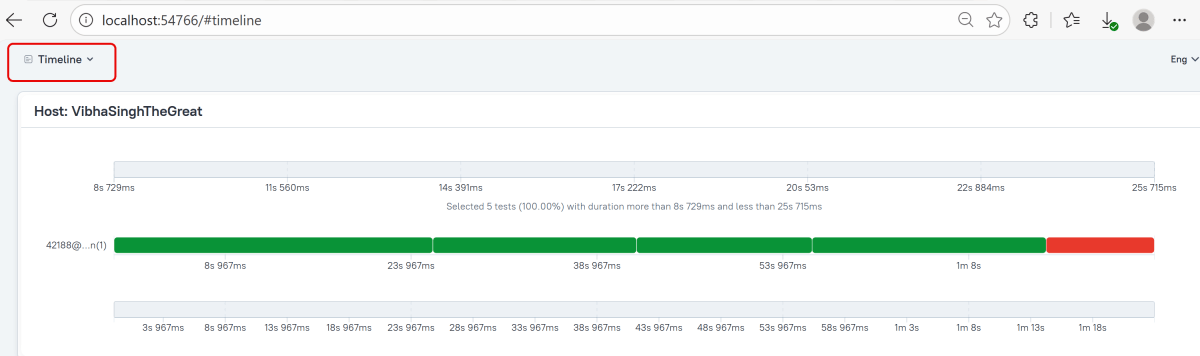
Timeline in Allure Report
The timeline tab visualizes retrospective test execution, allure adaptors collect precise timings of tests, and here on this tab, they are arranged accordingly to their sequential or parallel timing structure.
Generate Reports with the Allure Awesome Plugin
Allure 3 Report also features an advanced report generator plugin – Allure Awesome. It supports additional configuration options, such as generating the report as a single HTML file, setting the theme, custom branding and language of the generated report, and taking known issues into account.
To manually generate a customized Allure Awesome report, use the awesome command:
allure awesome build/allure-results
This will create the allure-report folder with all the test files and index.html report.
Open “index.html“, as this is an HTML report, and open it with the browser. The below image shows index.html.
Right click on index.html->Open In ->Browser ->Edge( any browser).
Summary:
1.Add required dependencies – Include Playwright, JUnit 5, and Allure JUnit5 in pom.xml, and configure the Allure Maven plugin.
2. Write Cucumber Scenarios in Feature File – Define the feature files using Gherkin syntax (.feature) and place them in the appropriate directory (src/test/resources/features).
3. Implement Step Definitions – Create step definitions in Java to connect the Gherkin scenarios to Playwright actions. Ensure these are correctly annotated with Cucumber’s annotations.
4. Create Test Runner – Setup a TestNG runner that combines Cucumber options and ensures Allure configurations are included.
5. Configure Allure Reporting – Utilize Allure annotations like @AllureFeature and @AllureStory within your tests to categorize and logically group test cases. Create an allure.properties file in src/test/resources with necessary configurations like resultsDirectory and linkPattern.
6. Execute Tests and Generate Reports – Execute mvn clean test, then run allure serve allure-results to build and open the HTML report.
Congratulations!! We have integrated an allure report with Playwright, Java Cucumber, and TestNG. I hope this tutorial is useful to you.
Create a folder – features within src/test/resources to create test scenarios in the Feature file.
Feature file should be saved as an extension of .feature. Add the test scenarios in this feature file. I have added sample test scenarios. In this feature file. The test scenarios are written in Gherkinslanguage.
@allure.label.parent_suite:WebInterface
@allure.label.sub_suite:Login Page
@allure.label.owner:Vibha

Feature: Login to HRM Application

  Background:
    Given User is on HRMLogin page "https://opensource-demo.orangehrmlive.com/"

  @ValidCredentials @Critical
  Scenario: Login with valid credentials

    When User enters username as "Admin" and password as "admin123"
    Then User should be able to login successfully and new page opens with heading "Dashboard"

  @InvalidCredentials @High
  Scenario Outline: Login with invalid credentials

    When User enters username as "<username>" and password as "<password>"
    Then User should be able to see error message "<errorMessage>"

    Examples:
      | username   | password  | errorMessage           |
      | Admin      | admin12$$ | Invalid credentials    |
      | admin$$    | admin123  | Invalid credentials    |
      | abc123     | xyz$$     | Invalid credentials    |

  @MissingUsername @Medium
  Scenario: Login with blank username

    When User enters username as " " and password as "admin123"
    Then User should be able to see a message "Required1" below Username
7. Create the step definition class in src/test/java
8. Create a TestNG Cucumber Runner class
We need to create a class called Runner class to run the tests. This class will use the TestNG annotation @Test, which tells TestNG what is the test runner class.
Add Allure Report plugin in the Test Runner to generate the Allure Report.
Note:- @Test annotation marks this class as part of the test. So, if we will remove this annotation, the Allure Report executesCucumberRunnerTests as a separate test suite, so there will be duplicate results.
9. Create testng.xml for the project
<?xml version = "1.0"encoding = "UTF-8"?>
<!DOCTYPE suite SYSTEM "http://testng.org/testng-1.0.dtd">
<suite name = "Suite1">
    <test name = "Test Demo">
        <classes>
            <class name = "com.example.runner.CucumberRunnerTests"/>
        </classes>
    </test>
</suite>
10. Specifying Allure Results location
Allure, by default, saves test results in the project’s root directory. Still, it is recommended to store your test results in the build output directory.
To configure this, create an allure.properties file and place it in the test resources directory of your project, which is typically located at src/test/resources:
In the image below, we can see that one test failed and four passed out of five tests.
This will create the allure-results folder with all the test reports within build folder. These files will be used to generate Allure Report.
12. How to Generate a Report
allure generate processes the test results and saves an HTML report into the allure-report directory. To view the report, use the allure open command.
allure serve creates the same report as allure generate, then automatically opens the main page of the report in a web browser.
Use the command below to generate the Allure Report
allure serve build/allure-results
This will generate the beautiful Allure Test Report as shown below.
13. How to View a Report
Test reports generated with Allure Report are basically small HTML websites intended to be viewed in a web browser.
Title
A human-readable title of the test. If not provided, the function name is used instead.
Tags
Any number of short terms the test is related to. Usually it’s a good idea to list relevant features that are being tested. Tags can then be used for filtering.
Owner
The team member who is responsible for the test’s stability. For example, this can be the test’s author, the leading developer of the feature being tested, etc.
Severity
A value indicating how important the test is. This give the future reader an idea of how to prioritize the investigations of different test failures.
Allowed values are: “trivial”, “minor”, “normal”, “critical”, and “blocker”.
Support for Scenario Outlines
Allure Cucumber-JVM provides complete support for Scenario Outlines, a feature of Cucumber-JVM that allows for parametrized tests. No special setup is needed to take advantage of this capability within Allure.
Attachment
In Allure reports, you have the ability to attach various types of files, which can greatly enhance the comprehensibility of the report. A common practice is to attach screenshots that capture the state of the user interface at specific moments during test execution.
Allure Cucumber-JVM offers multiple methods for creating attachments, whether from pre-existing files or from content generated on-the-fly.
Graphs in Allure Report
Graphs allow you to see different statistics collected from the test data: status breakdown or severity and duration diagrams.
Timeline in Allure Report
The timeline tab visualizes retrospective test execution, allure adaptors collect precise timings of tests, and here on this tab, they are arranged accordingly to their sequential or parallel timing structure.
Generate Reports with the Allure Awesome Plugin
Allure 3 Report also features an advanced report generator plugin – Allure Awesome. It supports additional configuration options, such as generating the report as a single HTML file, setting the theme, custom branding and language of the generated report, and taking known issues into account.
To manually generate a customized Allure Awesome report, use the awesome command:
allure awesome build/allure-results
This will create the allure-report folder with all the test files and index.html report.
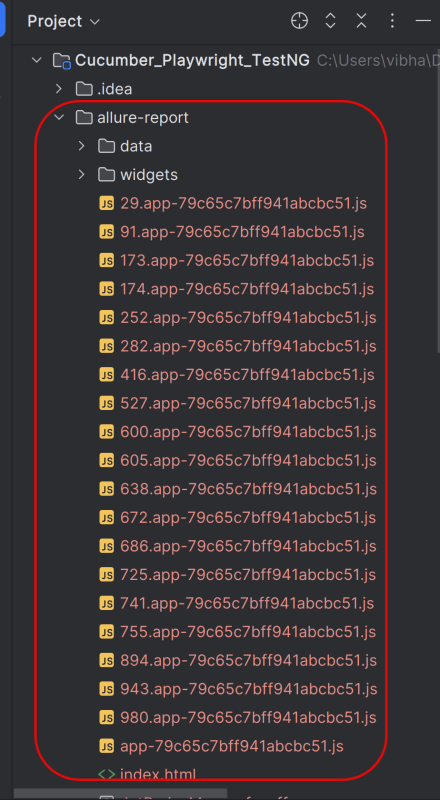
Open “index.html“, as this is an HTML report, and open it with the browser. The below image shows index.html.
Right click on index.html->Open In ->Browser ->Edge( any browser).
Summary:
1.Add required dependencies – Include Playwright, TestNG, and Allure TestNG in pom.xml, and configure the Allure Maven plugin.
2. Write Cucumber Scenarios in Feature File – Define the feature files using Gherkin syntax (.feature) and place them in the appropriate directory (src/test/resources/features).
3. Implement Step Definitions – Create step definitions in Java to connect the Gherkin scenarios to Playwright actions. Ensure these are correctly annotated with Cucumber’s annotations.
4. Create Test Runner – Setup a TestNG runner that combines Cucumber options and ensures Allure configurations are included.
5. Configure Allure Reporting – Utilize Allure annotations like @AllureFeature and @AllureStory within your tests to categorize and logically group test cases. Create an allure.properties file in src/test/resources with necessary configurations like resultsDirectory and linkPattern.
6. Execute Tests and Generate Reports – Execute mvn clean test, then run allure serve allure-results to build and open the HTML report.
Congratulations!! We have integrated an allure report with Playwright, Java Cucumber, and TestNG. I hope this tutorial is useful to you.