I have created a lot of tutorials on creating Test Frameworks by integrating JUnit4 with Selenium, Cucumber, Serenity, Rest API, Springboot. This tutorial explain the steps to Integrate Cucumber7 with JUnit5.
JUnit 5 is composed of several different modules from three different sub-projects.
JUnit 5 = JUnit Platform + JUnit Jupiter + JUnit Vintage
We can use the JUnit Platform to execute Cucumber scenarios.
Add the cucumber-junit-platform-engine dependency to your pom.xml:
<dependency>
   <groupId>io.cucumber</groupId>
   <artifactId>cucumber-junit-platform-engine</artifactId>
   <version>${cucumber.version}</version>
   <scope>test</scope>
</dependency>
This will allow IntelliJ IDEA, Eclipse, Maven, Gradle, etc, to discover, select and execute Cucumber scenarios.
Table of Contents
- Prerequisite
- Dependency List
- Project Structure
- Implementation Steps
- Download and Install Java
- Download and setup Eclipse IDE on the system
- Setup Maven
- Install Cucumber Eclipse Plugin (Only for Eclipse IDE)
- Create a new Maven Project
- Add Maven dependencies to the POM
- Create a feature file in src/test/resources
- Create cucumber.properties file in src/test/resources
- Create a Helper class in src/main/java
- Create Locator classes in src/main/java
- Create Action classes in src/main/java
- Create a Step Definition file in src/test/java
- Create Hook class in src/test/java
- Create a Cucumber Test Runner class in src/test/java
- Run the tests from Maven or Command Line
- Cucumber Report Generation
Prerequisite
- Java Version 17 installed
- Eclipse or IntelliJ installed
- Maven or Gradle installed and setup
- Cucumber Eclipse Plugin installed
Dependency List
- Cucumber – 7.14.0
- Selenium – 4.15.0
- Java – 17
- WebDriverManager – 5.5.3
- Junit Jupiter – 5.10.1
- Maven Compiler – 3.11.0
- Maven Surefire – 3.2.1
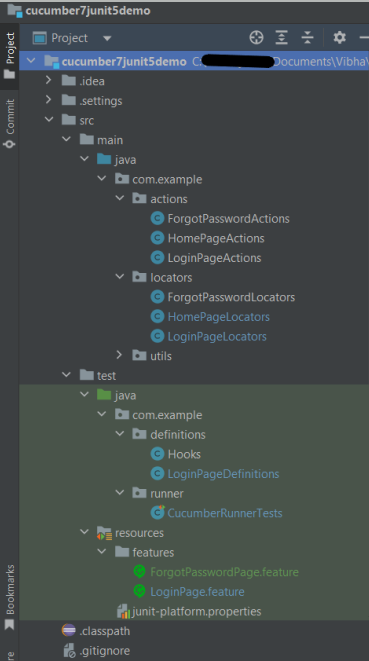
Project Structure
Implementation Steps
Step 1- Download and Install Java
Cucumber and Selenium need Java to be installed on the system to run the tests. Click here to know How to install Java.
Step 2 – Download and setup Eclipse IDE on the system
The Eclipse IDE (integrated development environment) provides strong support for Java developers, which is needed to write Java code. Click here to know How to install Eclipse.
Step 3 – Setup Maven
To build a test framework, we need to add a number of dependencies to the project. It is a very tedious and cumbersome process to add each dependency manually. So, to overcome this problem, we use a build management tool. Maven is a build management tool that is used to define project structure, dependencies, build, and test management. Click here to know How to install Maven.
Step 4 – Install Cucumber Eclipse Plugin (Only for Eclipse IDE)
The Cucumber Eclipse plugin is a plugin that allows eclipse to understand the Gherkin syntax. The Cucumber Eclipse Plugin highlights the keywords present in Feature File. Click here to know more – Install Cucumber Eclipse Plugin.
Step 5 – Create a new Maven Project
Click here to know How to create a Maven project
Below is the Maven project structure. Here,
Group Id – com.example
Artifact Id – Cucumber7JUnit5Demo
Version – 0.0.1-SNAPSHOT
Package – com. example. Cucumber7JUnit5Demo
Step 6 – Add Maven dependencies to the POM
Add the dependencies to the POM.xml.
<project xmlns="http://maven.apache.org/POM/4.0.0" xmlns:xsi="http://www.w3.org/2001/XMLSchema-instance" xsi:schemaLocation="http://maven.apache.org/POM/4.0.0 https://maven.apache.org/xsd/maven-4.0.0.xsd">
  <modelVersion>4.0.0</modelVersion>
  <groupId>com.example</groupId>
  <artifactId>Cucumber7JUnit5Demo</artifactId>
  <version>0.0.1-SNAPSHOT</version>

  <properties>
		<project.build.sourceEncoding>UTF-8</project.build.sourceEncoding>
		<cucumber.version>7.14.0</cucumber.version>
		<selenium.version>4.15.0</selenium.version>
		<webdrivermanager.version>5.5.3</webdrivermanager.version>
		<junit.jupiter.version>5.10.1</junit.jupiter.version>
		<maven.compiler.plugin.version>3.11.0</maven.compiler.plugin.version>
		<maven.surefire.plugin.version>3.2.1</maven.surefire.plugin.version>
		<maven.compiler.source.version>17</maven.compiler.source.version>
		<maven.compiler.target.version>17</maven.compiler.target.version>
	</properties>

	<dependencyManagement>
		<dependencies>
			<dependency>
				<groupId>io.cucumber</groupId>
				<artifactId>cucumber-bom</artifactId>
				<version>${cucumber.version}</version>
				<type>pom</type>
				<scope>import</scope>
			</dependency>
			<dependency>
				<groupId>org.junit</groupId>
				<artifactId>junit-bom</artifactId>
				<version>${junit.jupiter.version}</version>
				<type>pom</type>
				<scope>import</scope>
			</dependency>
		</dependencies>
	</dependencyManagement>

	<dependencies>

		<dependency>
			<groupId>io.cucumber</groupId>
			<artifactId>cucumber-java</artifactId>
			<scope>test</scope>
		</dependency>

		<dependency>
			<groupId>io.cucumber</groupId>
			<artifactId>cucumber-junit-platform-engine</artifactId>
			<scope>test</scope>
		</dependency>

		<!-- JUnit Platform -->
		<dependency>
			<groupId>org.junit.platform</groupId>
			<artifactId>junit-platform-suite</artifactId>
			<scope>test</scope>
		</dependency>

		<dependency>
			<groupId>org.junit.jupiter</groupId>
			<artifactId>junit-jupiter-engine</artifactId>
			<scope>test</scope>
		</dependency>

		<!-- Selenium -->
		<dependency>
			<groupId>org.seleniumhq.selenium</groupId>
			<artifactId>selenium-java</artifactId>
			<version>${selenium.version}</version>
		</dependency>

		<!-- Web Driver Manager -->
		<dependency>
			<groupId>io.github.bonigarcia</groupId>
			<artifactId>webdrivermanager</artifactId>
			<version>${webdrivermanager.version}</version>
		</dependency>

	</dependencies>

	<build>
		<plugins>
			<plugin>
				<groupId>org.apache.maven.plugins</groupId>
				<artifactId>maven-compiler-plugin</artifactId>
				<version>${maven.compiler.plugin.version}</version>
				<configuration>
					<source>${maven.compiler.source.version}</source>
					<target>${maven.compiler.target.version}</target>
				</configuration>
			</plugin>
			<plugin>
				<groupId>org.apache.maven.plugins</groupId>
				<artifactId>maven-surefire-plugin</artifactId>
				<version>${maven.surefire.plugin.version}</version>
				<dependencies>
					<dependency>
						<groupId>org.junit.jupiter</groupId>
						<artifactId>junit-jupiter-engine</artifactId>
						<version>${junit.jupiter.version}</version>
					</dependency>
				</dependencies>
			</plugin>

		</plugins>
	</build>
</project>
Step 7 – Create a feature file in src/test/resources
Below is a sample feature file. Feature file should be saved as an extension of .feature. Add the test scenarios in this feature file. I have added sample test scenarios. The test scenarios are written in Gherkins language.
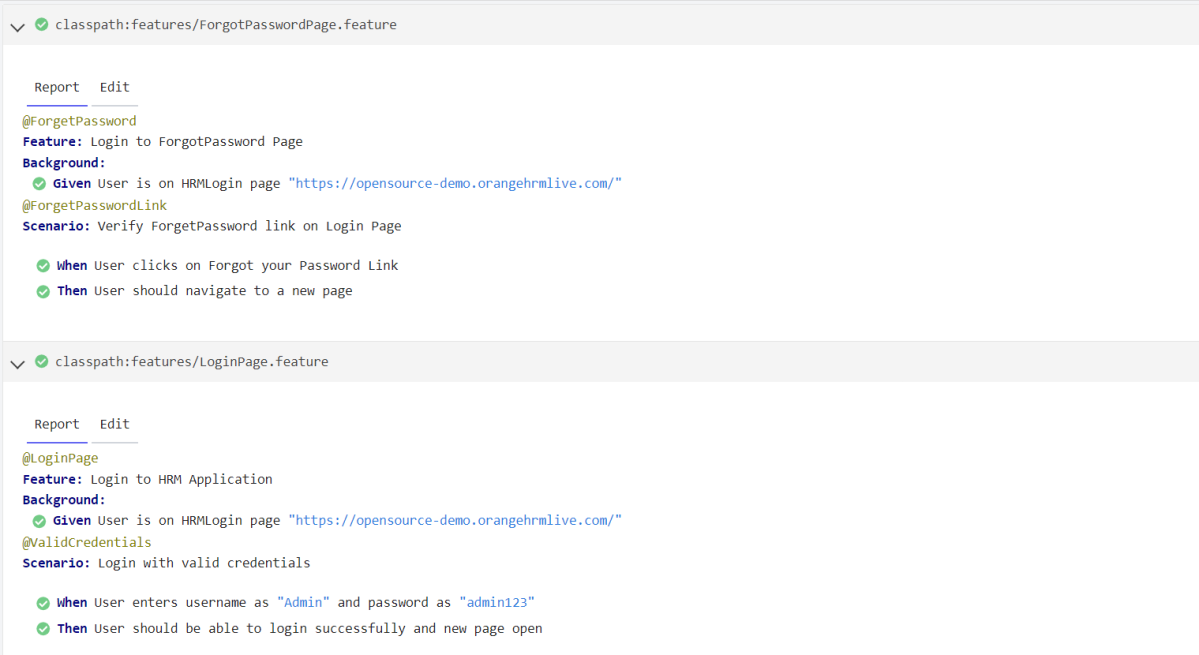
LoginPage.feature
@LoginPage
Feature: Login to HRM Application

Background:
    Given User is on HRMLogin page "https://opensource-demo.orangehrmlive.com/"

   @ValidCredentials
   Scenario: Login with valid credentials

    When User enters username as "Admin" and password as "admin123"
    Then User should be able to login successfully and new page open

   @InvalidCredentials
   Scenario Outline: Login with invalid credentials

    When User enters username as "<username>" and password as "<password>"
    Then User should be able to see error message "<errorMessage>"

  Examples:
  | username   | password    | errorMessage                      |
  | Admin        | admin12$$  | Invalid credentials               |
  | admin$$     | admin123    | Invalid credentials               |
  | abc123        | xyz$$           | Invalid credentials               |


  @FaceBookLink
  Scenario: Verify FaceBook Icon on Login Page

    Then User should be able to see FaceBook Icon

  @LinkedInLink
  Scenario: Verify LinkedIn Icon on Login Page

    Then User should be able to see LinkedIn Icon
ForgetPasswordPage.feature
@ForgetPassword
Feature: Login to ForgotPassword Page

  Background:
    Given User is on HRMLogin page "https://opensource-demo.orangehrmlive.com/"

  @ForgetPasswordLink
  Scenario: Verify ForgetPassword link on Login Page

    When User clicks on Forgot your Password Link
    Then User should navigate to a new page
Step 8 – Create cucumber.properties file in src/test/resources
We need to create the junit-platform.properties file in the src/test/resources folder. Using a property file for reporting is quite helpful if you want to define several different properties.
cucumber.publish.enabled=true
Step 9 – Create a Helper class in src/main/java
We have used Page Object Model with Cucumber and TestNG. Create a Helper class where we are initializing the web driver, initializing the web driver wait, defining the timeouts, and creating a private constructor of the class, it will declare the web driver, so whenever we create an object of this class, a new web browser is invoked.
import java.time.Duration;
import org.openqa.selenium.WebDriver;
import org.openqa.selenium.chrome.ChromeDriver;
import io.github.bonigarcia.wdm.WebDriverManager;
import org.openqa.selenium.chrome.ChromeOptions;

public class HelperClass {

	 private static HelperClass helperClass;

	    private static WebDriver driver;
	    public final static int TIMEOUT = 5;

	     private HelperClass() {

	        WebDriverManager.chromedriver().setup();
			ChromeOptions options = new ChromeOptions();
			options.addArguments("--start-maximized");
	        driver = new ChromeDriver(options);
	        driver.manage().timeouts().implicitlyWait(Duration.ofSeconds(TIMEOUT));
	     }

	    public static void openPage(String url) {
	        driver.get(url);
	    }

	    public static WebDriver getDriver() {
	        return driver;
	    }

	    public static void setUpDriver() {

	        if (helperClass==null) {

	            helperClass = new HelperClass();
	        }
	    }

	    public static void tearDown() {

	        if(driver!=null) {
	             driver.quit();
	        }

	       helperClass = null;
	   }

	}
Step 10 – Create Locator classes in src/main/java
Create a locator class for each page that contains the detail of the locators of all the web elements. Here, I’m creating 3 locator classes – LoginPageLocators, HomePageLocators, and ForgotPasswordLocators.
LoginPageLocators
import org.openqa.selenium.WebElement;
import org.openqa.selenium.support.FindBy;

public class LoginPageLocators {

	@FindBy(name = "username")
    public WebElement userName;

    @FindBy(name = "password")
    public WebElement password;

    @FindBy(id = "logInPanelHeading")
    public WebElement titleText;

    @FindBy(xpath = "//*[@id='app']/div[1]/div/div[1]/div/div[2]/div[2]/form/div[3]/button")
    public WebElement login;

    @FindBy(xpath = "//*[@id='app']/div[1]/div/div[1]/div/div[2]/div[2]/div/div[1]/div[1]/p")
    public  WebElement errorMessage;

    @FindBy(xpath = "//*[@href='https://www.linkedin.com/company/orangehrm/mycompany/']")
    public  WebElement linkedInIcon;

    @FindBy(xpath = "//*[@href='https://www.facebook.com/OrangeHRM/']")
    public  WebElement faceBookIcon;

    @FindBy(xpath = "//*[@id='app']/div[1]/div/div[1]/div/div[2]/div[2]/form/div[4]/p")
    public  WebElement ForgotYourPasswordLink;

}
HomePageLocators
import org.openqa.selenium.WebElement;
import org.openqa.selenium.support.FindBy;

public class HomePageLocators {

	@FindBy(xpath = "//*[@id='app']/div[1]/div[2]/div[2]/div/div[1]/div[1]/div[1]/h5")
	public  WebElement homePageUserName;

}
ForgotPasswordLocators
import org.openqa.selenium.WebElement;
import org.openqa.selenium.support.FindBy;

public class ForgotPasswordLocators {

	@FindBy(xpath = "//*[@id='app']/div[1]/div[1]/div/form/h6")
    public WebElement ForgotPasswordHeading;

}
Step 11 – Create Action classes in src/main/java
Create the action classes for each web page. These action classes contain all the methods needed by the step definitions. In this case, I have created 2 action classes – LoginPageActions, HomePageActions, and ForgotPasswordActions.
LoginPageActions
In this class, the very first thing will do is to create the object of the LoginPageLocators class so that we should be able to access all the PageFactory elements. Secondly, create a public constructor of LoginPageActions class.
import org.openqa.selenium.support.PageFactory;
import com.example.locators.LoginPageLocators;
import com.example.utils.HelperClass;

public class LoginPageActions {

	LoginPageLocators loginPageLocators = null;

    public LoginPageActions() {

    	this.loginPageLocators = new LoginPageLocators();

		PageFactory.initElements(HelperClass.getDriver(),loginPageLocators);
	}

	// Set user name in textbox
    public void setUserName(String strUserName) {
    	loginPageLocators.userName.sendKeys(strUserName);
    }

    // Set password in password textbox
    public void setPassword(String strPassword) {
    	loginPageLocators.password.sendKeys(strPassword);
    }

    // Click on login button
    public void clickLogin() {
    	loginPageLocators.login.click();
    }

    // Get the title of Login Page
    public String getLoginTitle() {
        return loginPageLocators.titleText.getText();
    }

    // Get the title of Login Page
    public String getErrorMessage() {
        return loginPageLocators.errorMessage.getText();
    }

    // LinkedIn Icon is displayed
    public Boolean getLinkedInIcon() {

        return loginPageLocators.linkedInIcon.isDisplayed();
    }

    // FaceBook Icon is displayed
    public Boolean getFaceBookIcon() {

        return loginPageLocators.faceBookIcon.isDisplayed();
    }

    // Click on Forget Your Password link
    public void clickOnForgetYourPasswordLink() {

    	loginPageLocators.ForgotYourPasswordLink.click();
    }

    public void login(String strUserName, String strPassword) {

        // Fill user name
        this.setUserName(strUserName);

        // Fill password
        this.setPassword(strPassword);

        // Click Login button
        this.clickLogin();

    }
}
HomePageActions
import org.openqa.selenium.support.PageFactory;
import com.example.locators.HomePageLocators;
import com.example.utils.HelperClass;

public class HomePageActions {

	HomePageLocators homePageLocators = null;

	public HomePageActions() {

		this.homePageLocators = new HomePageLocators();

		PageFactory.initElements(HelperClass.getDriver(),homePageLocators);
    }

    // Get the User name from Home Page
    public String getHomePageText() {
        return homePageLocators.homePageUserName.getText();
    }

}
ForgotPasswordActions
import org.openqa.selenium.support.PageFactory;
import com.example.locators.ForgotPasswordLocators;
import com.example.utils.HelperClass;

public class ForgotPasswordActions {

	ForgotPasswordLocators forgotPasswordLocators = null;

	public ForgotPasswordActions() {

		this.forgotPasswordLocators = new ForgotPasswordLocators();

		PageFactory.initElements(HelperClass.getDriver(),forgotPasswordLocators);
    }


    // Get the Heading of Forgot Password page
    public String getForgotPasswordPageText() {
        return forgotPasswordLocators.ForgotPasswordHeading.getText();
    }
}
Step 12 – Create a Step Definition file in src/test/java
Create the corresponding Step Definition file of the feature file.
LoginPageDefinitions
import org.junit.jupiter.api.Assertions;
import com.example.actions.ForgotPasswordActions;
import com.example.actions.HomePageActions;
import com.example.actions.LoginPageActions;
import com.example.utils.HelperClass;
import io.cucumber.java.en.Given;
import io.cucumber.java.en.Then;
import io.cucumber.java.en.When;

public class LoginPageDefinitions{

	LoginPageActions objLogin = new LoginPageActions();
    HomePageActions objHomePage = new HomePageActions();
    ForgotPasswordActions objForgotPasswordPage = new ForgotPasswordActions();

    @Given("User is on HRMLogin page {string}")
    public void loginTest(String url) {

    	HelperClass.openPage(url);

    }

    @When("User enters username as {string} and password as {string}")
    public void goToHomePage(String userName, String passWord) {

        // login to application
        objLogin.login(userName, passWord);

        // go the next page

    }

    @When("User clicks on Forgot your Password Link")
    public void goToForgotYourPasswordPage() {

    	objLogin.clickOnForgetYourPasswordLink();

    }

    @Then("User should be able to login sucessfully and new page open")
    public void verifyLogin() {

        // Verify home page
        Assertions.assertTrue(objHomePage.getHomePageText().contains("Employee Information"));

    }

    @Then("User should be able to see error message {string}")
    public void verifyErrorMessage(String expectedErrorMessage) {

        // Verify home page
    	Assertions.assertEquals(objLogin.getErrorMessage(),expectedErrorMessage);

    }

    @Then("User should be able to see LinkedIn Icon")
    public void verifyLinkedInIcon( ) {

    	Assertions.assertTrue(objLogin.getLinkedInIcon());
    }

    @Then("User should be able to see FaceBook Icon")
    public void verifyFaceBookIcon( ) {

    	Assertions.assertTrue(objLogin.getFaceBookIcon());
    }

    @Then("User should navigate to a new page")
    public void verfiyForgetYourPasswordPage() {

   	Assertions.assertEquals(objForgotPasswordPage.getForgotPasswordPageText(), "Reset Password");
    }

}
Step 13 – Create Hook class in src/test/java
Create the hook class that contains the Before and After hook to initialize the web browser and close the web browser.
import org.openqa.selenium.OutputType;
import org.openqa.selenium.TakesScreenshot;
import com.example.utils.HelperClass;
import io.cucumber.java.After;
import io.cucumber.java.Before;
import io.cucumber.java.Scenario;

public class Hooks {

	@Before
    public static void setUp() {

       HelperClass.setUpDriver();
    }

	@After
	public static void tearDown(Scenario scenario) {

		//validate if scenario has failed
		if(scenario.isFailed()) {
			final byte[] screenshot = ((TakesScreenshot) HelperClass.getDriver()).getScreenshotAs(OutputType.BYTES);
			scenario.attach(screenshot, "image/png", scenario.getName());
		}

		HelperClass.tearDown();
	}
}
Step 14 – Create a Cucumber Test Runner class in src/test/java
Cucumber needs a TestRunner class to run the feature files. It is suggested to create a folder with the name of the runner in the src/test/java directory and create the Cucumber TestRunner class in this folder. Below is the code of the Cucumber TestRunner class.
import static io.cucumber.junit.platform.engine.Constants.GLUE_PROPERTY_NAME;
import org.junit.platform.suite.api.ConfigurationParameter;
import org.junit.platform.suite.api.IncludeEngines;
import org.junit.platform.suite.api.SelectClasspathResource;
import org.junit.platform.suite.api.Suite;

@Suite
@IncludeEngines("cucumber")
@SelectClasspathResource("com.example")
@ConfigurationParameter(key = GLUE_PROPERTY_NAME, value = "com.example")

public class CucumberRunnerTests  {

}
Step 15 – Run the tests from Maven or Command Line
Use the below command to run the tests.
mvn clean verify

Step 16 – Cucumber Report Generation
Below is the image of the Cucumber Report generated using the Cucumber Service.
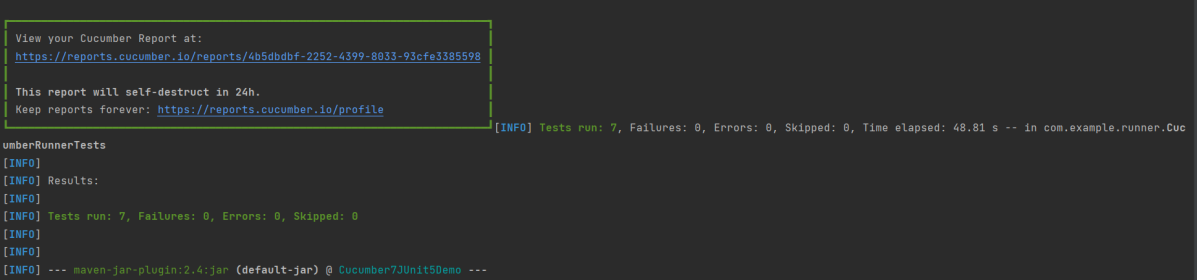
Below is the image of the Cucumber Report.

The complete code can be found on GitHub.
Congratulations!! We have built the framework using Cucumber 7 with JUnit5.

This is a good example of how to run Maven tests. However, what if you just want to run the same as a JUnit test?
LikeLike
@SelectClasspathResource(“com.example”) should be
@SelectClasspathResource(“com/example”) in order to work when run as a JUnit test.
LikeLike
Add @SelectClasspathResource(“/features”) in the Runner class and then run the tests as JUnit Tests
LikeLike
…Thank You for Sharing the article. Implemented a test using this reference. However as I read Junit5+Cuc7 we can have scenarios executed in parallel for a feature file. My feature file has 2 scenarios
Executed via ‘mvn clean test -Dcucumber.features=”src/test/resources/features”
But I dont see scenarios executed in parallel.
Can you please advise on same.
Thanks
VS
LikeLike
Hi Vaibhav, I appreciate you found this article useful. I’m in the process of writing another article on parallel execution of cucumber with JUnit5. It will be out soon. I’ll let you know when it will be out.
LikeLike
Hello , can you please share a example as how @IncludeTag works
I did add @IncludeTags(“tag”) in runner file but via command prompt how should we pass the same
I did refer https://github.com/cucumber/cucumber-jvm/tree/main/cucumber-junit-platform-engine
I tried below
mvn test -Dcucumber.filter.tags=”tag1″ , but does not work ,Can you please advise
LikeLike
Hi Vaibhav, you can try below command
mvn clean test -Dcucumber.filter.tags=”@ValidCredentials”
I think you are missing @, the tests won’t work.
LikeLike
Hello any update on parallelism as I am facing a issue. What happens is lets say I have 20 scenarios and I have cucumber.execution.parallel.config.fixed.parallelism=2 and if due to some reason a test case fails then that thread does not get quit and now as a result of this all scenarios henceforth will be marked as failed even though in UI I can see that scenarios are executed (non headless mode). Is there any way we can make reporting independent of the thread failed or kill that thread after some time and report gets created as expected. Thanks Vaibhav
LikeLike
.. Will check and revert. Have u tried failed test cases to rerun only on Juni5+Cucu7
Thanks VS
LikeLike
Hi, Vaibhav
Thank you very much for sharing your knowledge, I will use it as a basis for my studies,
Friend, doubt, I’m getting the error below when I run the project, am I doing something wrong?
‘TestEngine with ID ‘cucumber’ failed to discover tests’
LikeLike
Hi, are you trying to run the tests through command line or from junit runner? The tests should run through command line. If you will try to run the tests through junit runner in case of junit5, you will see the error that testengine failed to discover the tests
LikeLike
I tried to run using runner, and also via cmd, but both give the error.
LikeLike
Hi me again. Somehow could you please share github link so I can clone your project to view it?
LikeLiked by 1 person
I got error: [ERROR] Unknown lifecycle phase “.features=src/test/resources/features”. You must specify a valid lifecycle phase or a goal in the format : or :[:]:. Av
ailable lifecycle phases are: pre-clean, clean, post-clean, validate, initialize, generate-sources, process-sources, generate-resources, process-resources, compile, process-classes, generate-test-sources, process-test-sources, gener
ate-test-resources, process-test-resources, test-compile, process-test-classes, test, prepare-package, package, pre-integration-test, integration-test, post-integration-test, verify, install, deploy, pre-site, site, post-site, site-
deploy. -> [Help 1]
LikeLike
You can try to run this command – mvn clean test -D”cucumber.features=src/test/resources/features”. But, in this case, the tests will be executed twice. So, I suggest to use mvn clean test. This command will run all the tests.
LikeLike
how to print the step definition (test methods) in the console after the test cases get executed. , i.e., monochrome=true which annotation to use in the test runner class.
LikeLike
You can try monochrome=true. It will print the output in the readable format.
LikeLike
thank you for article. Could you please add parallel execution using same.
LikeLike
Thanks i am able to run the test cases but i cant see any reports generated. am i missing something.
LikeLike
If you have added cucumber.publish.enabled=true to your cucumber.properties file, then you should be able to see a Cucumber Report. The path of the Cucumber report will be displayed in the execution console.
LikeLike