This tutorial describes the creation of the Gradle Java Project to test Rest API using Cucumber BDD and Rest-Assured.
In this tutorial, I will explain creating a framework for the testing of Rest API in Cucumber BDD.
Table of Contents
- Dependency List
- Project Structure
- Implementation Steps
- Download and Install Java
- Download and setup Eclipse IDE on the system
- Setup Gradle
- Create a new Gradle Project
- Add Rest-Assured and Cucumber dependencies to the Gradle project
- Add Configuration to build.gradle
- Add Gradle Cucumber Task to build.gradle
- Create a feature file under src/test/resources
- Create the Step Definition class or Glue Code for the Test Scenario
- Create a Cucumber Runner class
- Run the tests from JUnit
- Run the tests from the Command Line
- Cucumber Report Generation
Dependency List
- Cucumber – 6.8.1 or above
- Java 8 or above
- JUnit 4
- Gradle 6.6.1 (Build Tool)
- Rest Assured 4.3.3

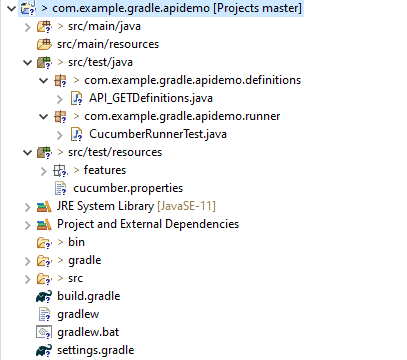
Project Structure
Implementation Steps
Step 1- Download and Install Java
Cucumber and Rest-Assured need Java to be installed on the system to run the tests. Click here to learn How to install Java.
Step 2 – Download and setup Eclipse IDE on the system
The Eclipse IDE (integrated development environment) provides strong support for Java developers. Click here to learn How to install Eclipse.
Step 3 – Setup Gradle
To build a test framework, we need to add several dependencies to the project. This can be achieved by any build tool. I have used the Gradle Build Tool. Click here to learn How to install Gradle.
Step 4 – Create a new Gradle Project

To create a new Gradle project, go to the top left side and select File -> New Project -> Gradle -> Gradle project -> Next -> Enter Project Name and Project Location ->Next ->Select Gradle Version ->Next ->Review the Configuration -> Finish.
Click here to know How to create a Gradle Java project. Below is the structure of the Gradle project.

Step 5 – Add Rest-Assured and Cucumber dependencies to the Gradle project
This syntax is used for Gradle 5.0 and higher.
dependencies {
    // This dependency is exported to consumers, that is to say found on their compile classpath.
    api 'org.apache.commons:commons-math3:3.6.1'

    // This dependency is used internally, and not exposed to consumers on their own compile classpath.
    implementation 'com.google.guava:guava:29.0-jre'

    testImplementation 'io.cucumber:cucumber-java:6.8.1'
    testImplementation 'io.cucumber:cucumber-junit:6.8.1'
    testImplementation 'io.rest-assured:rest-assured:4.3.3'
If you are using Gradle 4.10.3 or older, use the below dependency block to build.gradle.
dependencies {
    testCompile 'io.cucumber:cucumber-java:6.8.1'
}
Step 6 – Add Configuration to build.gradle
The below configuration is added to the build.gradle when Gradle is 5.0 or higher version.
configurations {
    cucumberRuntime {
        extendsFrom testImplementation
    }
}
If Gradle is 4.10.3 or older, use the below configuration.
configurations {
    cucumberRuntime {
        extendsFrom testRuntime
    }
}
Step 7 – Add Gradle Cucumber Task to build.gradle
task cucumber() {
    dependsOn assemble, testClasses
    doLast {
        javaexec {
            main = "io.cucumber.core.cli.Main"
            classpath = configurations.cucumberRuntime + sourceSets.main.output + sourceSets.test.output
            args = ['--plugin', 'pretty', '--glue', 'com.example.gradle.apidemo', 'src/test/resources']
        }
    }
}
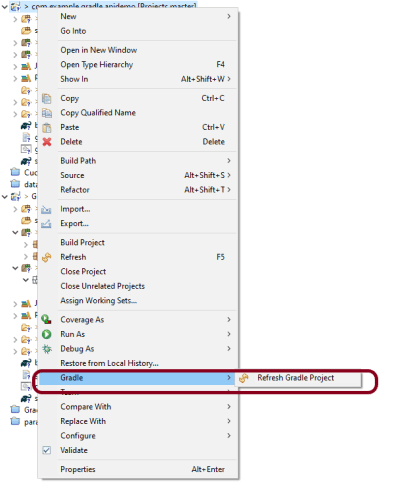
Once you have added dependencies, configurations, and Gradle cucumber task, Right-click on the project, Hover to the Gradle option, and click Refresh Gradle Project. Eclipse does not automatically update the classpath of the build.gradle file is updated. Select Gradle Refresh Gradle Project from the context menu of the project or from your build.gradle file for that.
Step 8 – Create a feature file under src/test/resources
A new Gradle Project is created with 4 folders – src/main/java, src/main/resources, src/test/java and src/test/resources. Features are created under the src/test/resources directory. Create a folder with name features. Now, create the feature file in this folder. The feature file should be saved with the extension .feature. This feature file contains the test scenarios created to test the application. The Test Scenarios are written in Gherkins language in the format of Given, When, Then, And, But.
Below is an example of a Test Scenario where we are using the GET method to get the information from the API.
Feature: Validation of get method

@GetUserDetails
  Scenario Outline: Send a valid Request to get user details

  Given I send a request to the URL to get user details
  Then the response will return status 200 and id <id> and salary <employee_salary> and name "<employee_name>" and age <employee_age> and message "<message>"

Examples:
    |id  |employee_salary|employee_name |employee_age  |message                                  |
    |1   |320800         |Tiger Nixon   |61            |Successfully! Record has been fetched.   |
Step 9 – Create the Step Definition class or Glue Code for the Test Scenario
Step Definition acts as an intermediate to your runner and feature file. It stores the mapping between each step of the scenario in the Feature file. So when you run the scenario, it will scan the step definition file to check the matched glue or test code.
import io.restassured.http.ContentType;

import io.restassured.response.ValidatableResponse;

import static io.restassured.RestAssured.given;
import static org.hamcrest.Matchers.equalTo;

import io.cucumber.java.en.Given;
import io.cucumber.java.en.Then;

public class API_GETDefinitions {


    private ValidatableResponse validatableResponse;

    private String endpoint = "http://dummy.restapiexample.com/api/v1/employee/1";

    @Given("I send a request to the URL to get user details")
    public void sendRequest(){
        validatableResponse = given().contentType(ContentType.JSON)
                .when().get(endpoint).then();

        System.out.println("Response :"+validatableResponse.extract().asPrettyString());
    }


    @Then("the response will return status {int} and id {int} and salary {int} and name {string} and age {int} and message {string}")
    public void verifyStatus(int statusCode, int id, int emp_Salary, String emp_name, int emp_age, String message ){

        validatableResponse.assertThat().statusCode(statusCode);

        validatableResponse.assertThat().body("data.id",equalTo(id));

        validatableResponse.assertThat().body("data.employee_salary",equalTo(emp_Salary));

        validatableResponse.assertThat().body("data.employee_name",equalTo(emp_name));

        validatableResponse.assertThat().body("data.employee_age",equalTo(emp_age));

        validatableResponse.assertThat().body("message",equalTo(message));

    }
}
In order to use REST assured effectively, it’s recommended to statically import methods from the following classes:
import io.restassured.RestAssured.*
import io.restassured.matcher.RestAssuredMatchers.*
import static org.hamcrest.Matchers.*
given() method is imported from package:
import static io.restassured.RestAssured.given;
equalTo() method is imported from package:
import static org.hamcrest.Matchers;
Step 10 – Create a Cucumber Runner class
A runner will help us to run the feature file and act as an interlink between the feature file and step definition Class. To know more about Runner, refer to this link.
import org.junit.runner.RunWith;

import io.cucumber.junit.Cucumber;
import io.cucumber.junit.CucumberOptions;

@RunWith(Cucumber.class)

@CucumberOptions(plugin ="pretty",features= {"src/test/resources/features/API_GET.feature"}, glue= {"com.example.gradle.apidemo"})

public class CucumberRunnerTest {

}
Step 11 – Run the tests from JUnit
You can execute the test script by right-clicking on the Test Runner class -> Run As JUnit.


Step 12 – Run the tests from the Command Line
Run the following Gradle task from the directory path where build.gradle file is located. To know more about this report, refer here.
gradle cucumber
Below is the screenshot of the execution of Cucumber tests in Command-Line.

Step 13 – Cucumber Report Generation
To get Cucumber Test Reports, add cucumber.properties under src/test/resources and add the below instruction in the file.
cucumber.publish.enabled=true
Below is the image of the Cucumber Report.

We are done! Congratulations on making it through this tutorial and hope you found it useful! Happy Learning!!
