Many organizations aim to execute automation tests across various browsers, such as Chrome, Firefox, Edge, and others, to ensure a consistent user experience. Serenity offers the capability to run tests on different browsers, supporting this need.
We can set up multiple driver configurations using the environments section, as demonstrated below.
Fluent waits provide more flexibility, allowing us to specify polling intervals and ignore specific exceptions during the wait time. Fluent Wait not only lets you specify the maximum amount of time to wait for a condition but also allows you to define the frequency with which the condition is checked and to ignore specific exceptions during the wait time.
Key Features of Fluent Wait:
Timeout: The maximum amount of time to wait for the condition.
Polling Frequency: How often the condition should be checked.
Ignoring Exceptions: The ability to ignore specific types of exceptions while waiting.
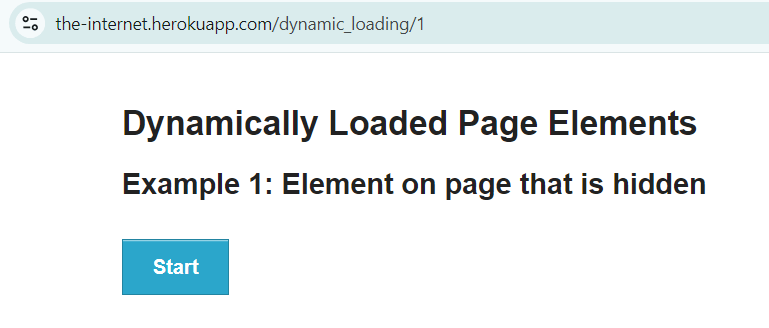
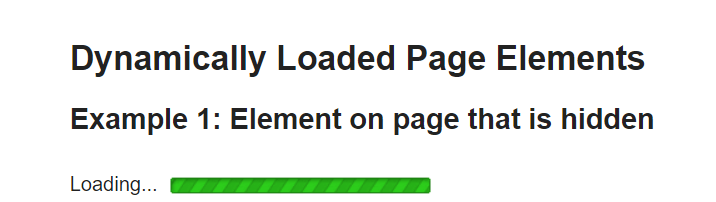
Below is an example that shows that loading of element take sometime. So to wait for the element, we can use the Fluent Wait.
Step 1
Step 2
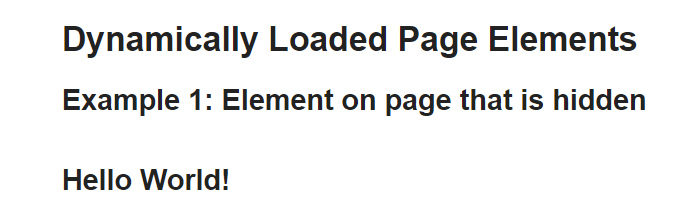
Step 3
Below is the example of Fluent wait.
import net.serenitybdd.annotations.DefaultUrl;
import net.serenitybdd.annotations.Managed;
import net.serenitybdd.core.annotations.findby.FindBy;
import net.serenitybdd.core.pages.PageObject;
import net.serenitybdd.core.pages.WebElementFacade;
import net.serenitybdd.junit.runners.SerenityRunner;
import org.junit.Test;
import org.junit.runner.RunWith;
import org.openqa.selenium.ElementNotInteractableException;
import org.openqa.selenium.WebDriver;
import org.openqa.selenium.WebElement;
import org.openqa.selenium.support.ui.FluentWait;
import java.time.Duration;
import java.util.function.Function;
@RunWith(SerenityRunner.class)
@DefaultUrl("http://the-internet.herokuapp.com/dynamic_loading/1")
public class FluentWait_Demo extends PageObject {
@Managed
WebDriver driver;
@FindBy(xpath = "//*[@id='start']/button")
WebElementFacade startButton;
@FindBy(xpath = "//*[@id='finish']/h4")
WebElementFacade pageText;
@Test
public void fluentWaitDemo() throws InterruptedException {
open();
startButton.click();
waitForElementWithFluentWait(pageText);
}
public void waitForElementWithFluentWait(WebElement pageText) {
FluentWait wait = new FluentWait<>(getDriver())
.withTimeout(Duration.ofSeconds(10))
.pollingEvery(Duration.ofSeconds(2))
.ignoring(ElementNotInteractableException.class);
wait.until((Function<WebDriver, Boolean>)
driver -> pageText.isDisplayed());
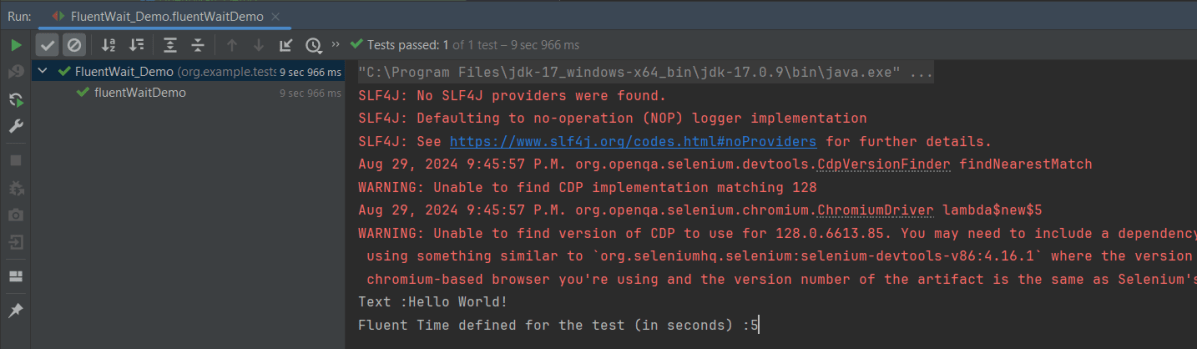
System.out.println("Text :" + pageText.getText());
System.out.println("Fluent Time defined for the test (in seconds) :" + getWaitForTimeout().toSeconds());
}
}
Explanation:
withTimeout(Duration.ofSeconds(10)): Specifies the maximum time to wait for the condition to be met, which is 30 seconds in this case.
pollingEvery(Duration.ofSeconds(2)): Specifies the interval at which the check should be performed, here it is every 5 seconds.
ignoring(ElementNotInteractableException.class): Instructs the wait to ignore ElementNotInteractableException that might occur during the polling period.
The output of the above program is
Fluent Wait supports various conditions similar to explicit waits, such as:
visibilityOfElementLocated
presenceOfElementLocated
elementToBeClickable
textToBePresentInElementLocated
alertIsPresent
elementToBeSelected
frameToBeAvailableAndSwitchToIt
Custom conditions
We can use Lambda expression to simplify the condition:
public void waitForElementWithFluentWait(WebElement pageText) {
        FluentWait wait = new FluentWait<>(getDriver())
                .withTimeout(Duration.ofSeconds(10))
                .pollingEvery(Duration.ofSeconds(2))
                .ignoring(ElementNotInteractableException.class);

       wait.until(driver -> pageText.isDisplayed());

        System.out.println("Text :" + pageText.getText());
        System.out.println("Fluent Time defined for the test (in seconds) :" + getWaitForTimeout().toSeconds());
    }
We are done! Congratulations on making it through this tutorial and hope you found it useful! Happy Learning!!
Step 4 – Create the Test Class sunder src/test/java folder
ApplicationLoginJUnit5Tests.java
import com.example.steps.StepDashboardPage;
import com.example.steps.StepForgetPasswordPage;
import com.example.steps.StepLoginPage;
import net.serenitybdd.annotations.Steps;
import net.serenitybdd.annotations.Title;
import net.serenitybdd.core.Serenity;
import net.serenitybdd.junit5.SerenityJUnit5Extension;
import org.junit.jupiter.api.Test;
import org.junit.jupiter.api.extension.ExtendWith;
import static org.assertj.core.api.Assertions.assertThat;
@ExtendWith(SerenityJUnit5Extension.class)
public class ApplicationLoginTests {
@Steps
NavigateActions navigate;
@Steps
StepLoginPage loginPage;
@Steps
StepDashboardPage dashboardPage;
@Steps
StepForgetPasswordPage forgetPasswordPage;
@Test
@Title("Login to application with valid credentials navigates to DashBoard page")
public void successfulLogin() {
navigate.toTheHomePage();
// When
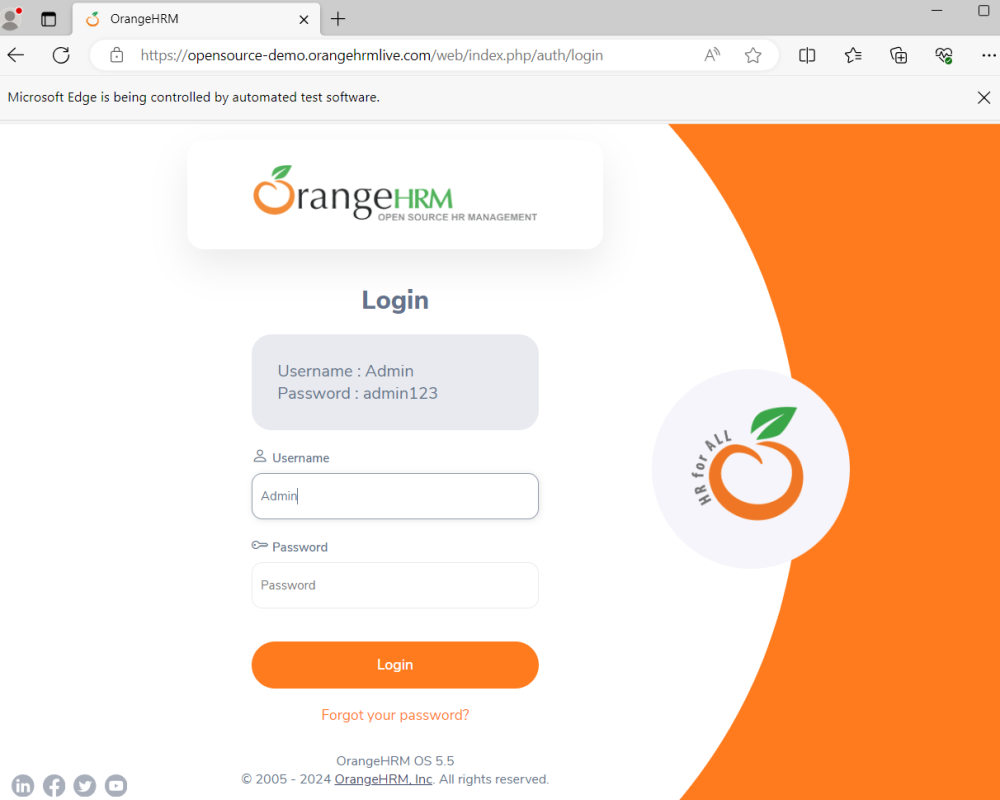
loginPage.inputUserName("Admin");
loginPage.inputPassword("admin123");
loginPage.clickLogin();
// Then
Serenity.reportThat("Passing valid credentials navigates to DashBoard page",
() -> assertThat(dashboardPage.getHeading()).isEqualToIgnoringCase("Dashboard"));
}
@Test
@Title("Login to application with invalid credential generates error message")
void unsuccessfulLogin() {
navigate.toTheHomePage();
// When
loginPage.inputUserName("Admin");
loginPage.inputPassword("admin1232");
loginPage.clickLogin();
// Then
Serenity.reportThat("Passing invalid credentials generates error message",
() -> assertThat(loginPage.loginPageErrorMessage()).isEqualToIgnoringCase("Invalid credentials"));
}
@Test
@Title("Verify Forgot your password link")
void clickForgetPasswordLink() {
// Given
navigate.toTheHomePage();
// When
loginPage.clickForgetPasswordLink();
// Then
Serenity.reportThat("Open Forget Password Page after clicking forget password link",
() -> assertThat(forgetPasswordPage.getHeadingForgetPasswordPage())
.isEqualToIgnoringCase("Reset Password"));
}
}
To run a JUnit5 test with Serenity BDD, simply add the annotation@net.serenitybdd.junit5.SerenityTest (instead of @org.junit.runner.RunWith(net.serenitybdd.junit.runners.SerenityRunner.class) for JUnit4.
@ExtendWith(SerenityJUnit5Extension.class)
@Testis imported from package:-
import org.junit.jupiter.api.Test;
StepDashboardPage
import net.serenitybdd.annotations.Step;

import net.serenitybdd.core.pages.PageObject;
import net.serenitybdd.core.pages.WebElementFacade;
import org.openqa.selenium.support.FindBy;

public class StepDashboardPage extends PageObject {

    @FindBy(xpath = "//*[@class='oxd-topbar-header-breadcrumb']/h6")
    WebElementFacade dashboardPageTitle;

    @Step("Heading of DashBoard Page")
    public String getHeading() {
        return dashboardPageTitle.getText();
    }
}
The WebElementFacade class contains a convenient fluent API for dealing with web elements, providing some commonly-used extra features that are not provided out-of-the-box by the WebDriver API. WebElementFacades are largely interchangeable with WebElements: you just declare a variable of type WebElementFacade instead of type WebElement
The @Steps annotation marks a Serenity step library. Create the test following the Given/When/Then pattern and using step methods from the step library. The @Title annotation lets you provide your own title for this test in the test reports. Serenity @Title is considered for the Serenity report. Consistently with Junit4, the @Title annotation does not influence the name in the Junit report.
The JUnit Serenity integration provides some special support for Serenity Page Objects. In particular, Serenity will automatically instantiate any PageObjectfields in your JUnit test.
Junit5 @Disabled annotation can be used on test and step methods(same as @Ignore in JUnit4).
NavigateAction
import net.serenitybdd.annotations.Step;
import net.serenitybdd.core.steps.UIInteractionSteps;

public class NavigateAction extends UIInteractionSteps {

    @Step
    public void toTheHomePage() {
        openPageNamed("loginForm");

    }
}
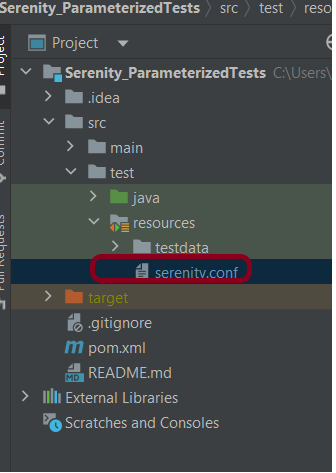
Step 5 – Create serenity.conf file under src/test/resources
serenity.conf file is used to specify various features like the type of web driver used, various test environments, run tests in headless mode, and many more options.
In the previous tutorial, I explainedSerenity BDD with Cucumber for Web Application. In this tutorial, I will explain the Integration of Serenity with JUnit4. This tutorial gives an idea of how to set up a new project where we like to use Serenity as BDD Framework and JUnit as a Testing framework.
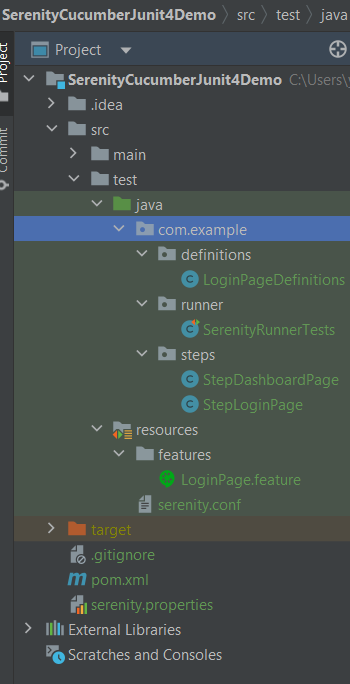
This project consists of various classes – ApplicationLoginTests (This is the Test Class which is going to contain all the tests). NavigationActions is the Action class that is used to open the webpage or application. StepLoginPage, StepDashboardPage, and StepForgotPasswordPage are the Page Object classes that contain multiple functionalities of that page and that help to keep the code clean.
Implementation Steps
Step 1 – Update the Properties section
Update the Properties section in Maven pom.xml, in case of Maven project.
The Test Class – ApplicationLoginTests is created under src/test/java directory.
package org.example.tests;

import net.serenitybdd.annotations.Pending;
import net.serenitybdd.annotations.Steps;
import net.serenitybdd.annotations.Title;
import net.serenitybdd.core.Serenity;
import net.serenitybdd.junit.runners.SerenityRunner;
import org.example.steps.StepDashBoardPage;
import org.example.steps.StepForgotPasswordPage;
import org.example.steps.StepLoginPage;
import org.junit.Test;
import org.junit.runner.RunWith;

import static org.junit.Assert.assertTrue;

@RunWith(SerenityRunner.class)
public class ApplicationLoginTests {

    @Steps
    NavigateActions navigate;

    @Steps
    StepLoginPage loginPage;

    @Steps
    StepDashBoardPage dashboardPage;

    @Steps
    StepForgotPasswordPage forgetPasswordPage;


    @Test
    @Title("Login to application with invalid credential generates error message")
    public void invalidCredentials() {

        // Given
        navigate.toTheHomePage();

        // When
        loginPage.inputUserName("Admin");
        loginPage.inputPassword("admin");
        loginPage.clickLogin();

        // Then
        Serenity.reportThat("Passing invalid credentials generates error message",
                () -> assertTrue(loginPage.errorMessage().equalsIgnoreCase("Invalid Credentials")));

    }

    @Test
    @Title("Login to application with valid credentials navigates to DashBoard page")
    public void successfulLogin() {

        navigate.toTheHomePage();
        // loginPage.open();

        // When
        loginPage.inputUserName("Admin");
        loginPage.inputPassword("admin123");
        loginPage.clickLogin();

        // Then
        Serenity.reportThat("Passing valid credentials navigates to DashBoard page",
                () -> assertTrue(dashboardPage.getHeading().equalsIgnoreCase("DashBoard")));
    }


    @Test
    @Pending
    @Title("Verify Forgot your password link")
    public void clickForgetPasswordLink() {

        // Given
        navigate.toTheHomePage();

        // When
        loginPage.clickForgetPasswordLink();

        // Then
        Serenity.reportThat("Open Forget Password Page after clicking forget password link",
                () -> assertTrue(forgetPasswordPage.getHeadingForgetPasswordPage().equalsIgnoreCase("Reset Password")));

    }

}
The tests run using the Serenity test runner – @RunWith(SerenityRunner.class).
The @Steps annotation marks a Serenity step library.
Create the test following the Given/When/Then pattern and using step methods from the step library.
The @Title annotation lets you provide your own title for this test in the test reports.
Step 5 – Create the Action class
Create NavigateActions class under src/test/java. This class is used to open a web browser with the URL specified. This class is extended from UIInteractionSteps.
openPageNamed() method opens an environment-specific page defined in the serenity.conf file under the pages section. The value of loginForm is derived from serenity.config:
package org.example.tests;

import net.serenitybdd.annotations.Step;
import net.serenitybdd.core.steps.UIInteractionSteps;

public class NavigateActions extends UIInteractionSteps {

    @Step
    public void toTheHomePage() {
        // openUrl("https://opensource-demo.orangehrmlive.com/");

        openPageNamed("loginForm");
    }
}
The JUnit Serenity integration provides some special support for Serenity Page Objects. In particular, Serenity will automatically instantiate any PageObject fields in the JUnit test. When a field of type StepLoginPage is declared in the test, Serenity instantiates it for you. The page is automatically instantiated and ready to be used.
@Managed
WebDriver driver;
@Managed declares a WebDriver instance that will be managed by Serenity. The WebDriver instance will be initialized automatically.
The driver parameter lets you define what WebDriver driver you want to run these tests in. Possible values include Firefox, chrome, iexplorer, phantomjs, appium, safari, edge, and htmlunit. The default browser in Serenity is Firefox. There are multiple ways to configure webDriver. One of the ways is to mention with @Managed as shown below:
@Managed(driver="chrome")
Step 7 – Create the serenity.conf file
Serenity.conf file is used to specify various features like the type of webdriver used, various test environments, run test in headless mode, and many more options. Serenity.conf can also contain settings like start size, disable sandbox, disable gpu, and others that need to be added to chrome.switches setting. Create serenity.conf file under src/test/resources.
The serenity.properties file is created at the root of the project.
serenity.project.name = Serenity and Junit4 Demo
Step 9 – Run the tests through the command
Open the command line and go to the location where the pom.xml of the project is present and type the below command.
mvn clean verify
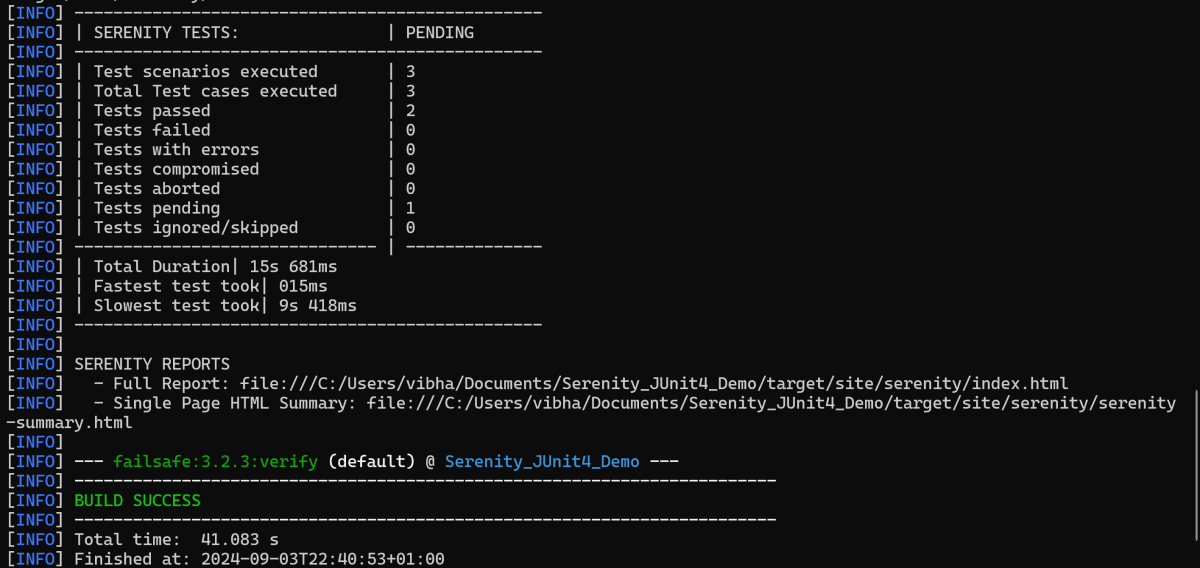
Below is the execution status.
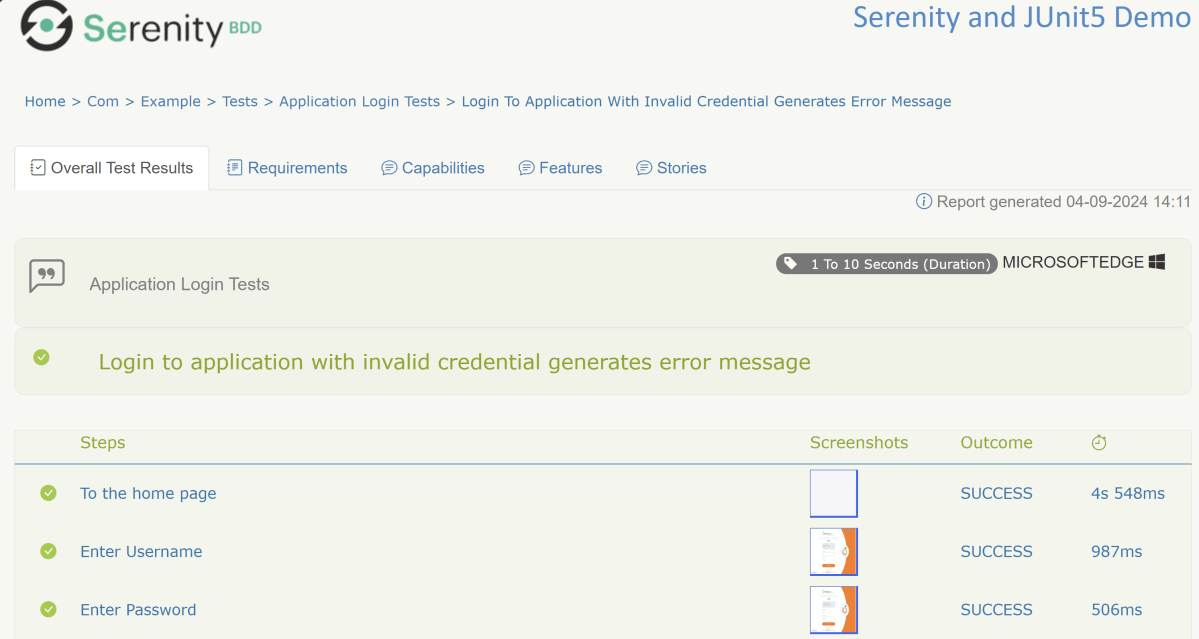
Step 10 – View the Serenity Reports
There are 2 types of reports are generated – Index.htmland Serenity-Summary.html.
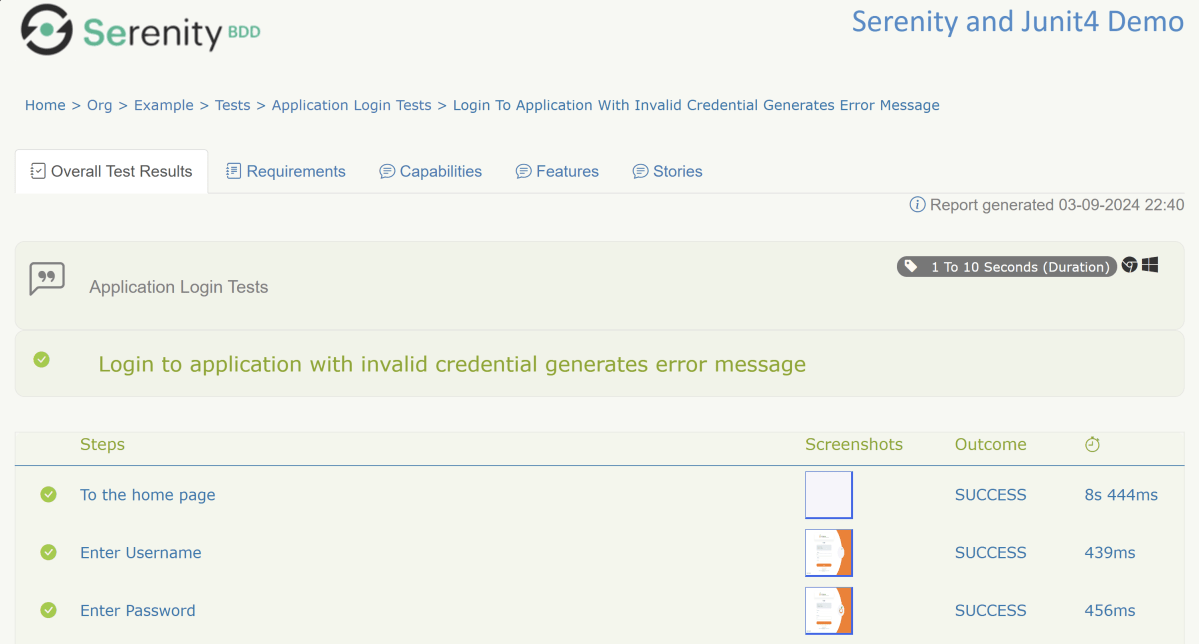
Index.html
We can see the value of the @Title annotation, ‘Login to the application with valid credentials navigates to DashBoard page’, added as the heading. The value of @Step annotation, ‘Enter Username’, and ‘Enter Password’ is added to the Report as various steps.
This report contains a screenshot of each step also.
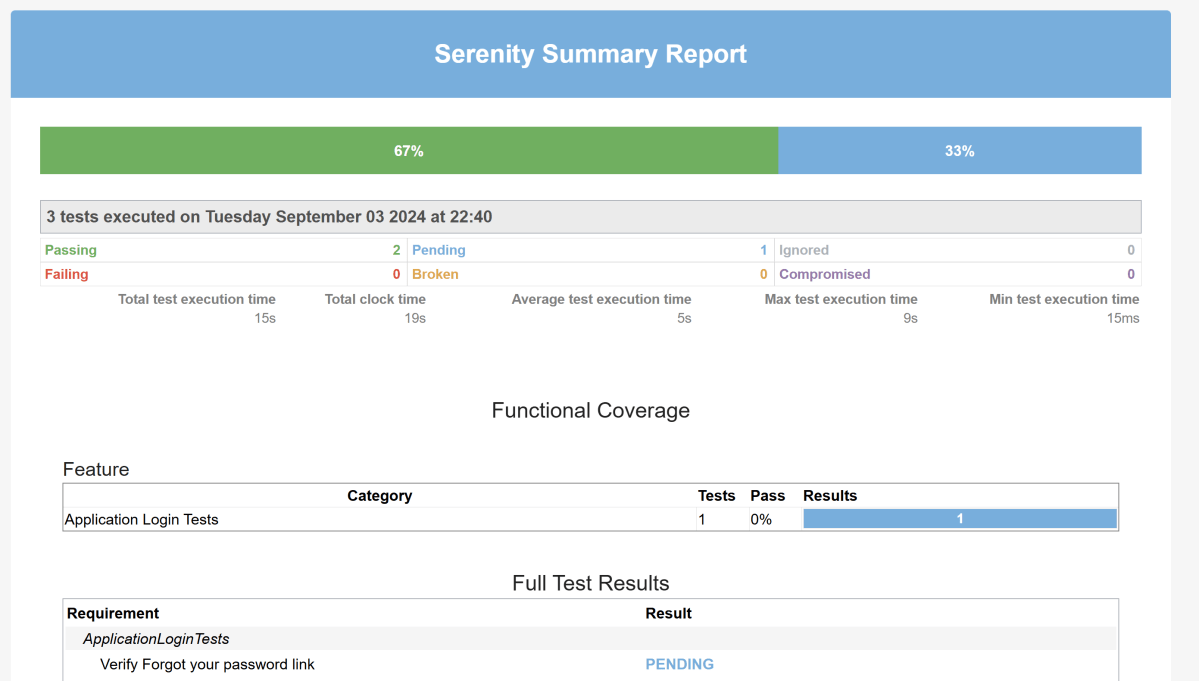
Emailable Report (Serenity-Summary.html)
These reports are present under /target/site/serenity.
Skipping the tests
In Serenity, you use the @Pending annotation, either for a test or for a @Step-annotated method, to indicate that the scenario is still being implemented and that the results are not available yet. These tests appear as ‘Pending’ (shown in blue) in the test reports.
    @Test
	@Pending
	@Title("Verify Forgot your password link")
	public void clickForgetPasswordLink() {

		// Given
		loginPage.open();

		// When
		loginPage.clickForgetPasswordLink();

		// Then
		Assert.assertTrue(forgetpasswordPage.ForgetPasswordPage());
	}
The output of the above program is
Tests marked with@Ignorewill appear as ‘Ignored’ (from JUnit) and appears as grey in the test reports.
We are done! Congratulations on making it through this tutorial and hope you found it useful! Happy Learning!!
Serenity BDD has strong WebDriver integration and manages WebDriver instances. It is not needed to create or close the WebDriver instance of the Serenity Tests.
Serenity uses a library WebDriver Manager, which manages the driver for us. We don’t need to explicitly download and configure the WebDriver binaries for us.
The simplest way to configure the driver we want to use is in our project’s serenity.config file (which will be present in src/test/resources folder).
Microsoft Edge is a Chromium driver, so the configuration is very similar to Chrome. The main difference is the use of “ms:edgeOptions” instead of “goog:chromeOptions”. A typical configuration is shown below:
There is another way to run the tests in edge browser, use the @Managed annotation.
@Managed annotation in Serenity will manage the WebDriver instance, including opening the appropriate driver at the start of each test, and shutting it down when the test is finished. @Managed provides an option for the user to select the WebDriver driver to the run the tests in it. The possible values are firefox, chrome, iexplorer, phantomjs, appium, safari, edge, and htmlunit. There are multiple ways to manage the WebDriver. One of the way is shown below:
In the below program, the tests are running on the Edge browser. The driver name is mentioned with @Managed annotation.
import net.serenitybdd.annotations.Managed;
import net.serenitybdd.annotations.Steps;
import net.serenitybdd.annotations.Title;
import net.serenitybdd.core.Serenity;
import net.serenitybdd.junit.runners.SerenityRunner;
import org.junit.Test;
import org.junit.runner.RunWith;
import org.openqa.selenium.WebDriver;

import static org.assertj.core.api.Assertions.assertThat;

@RunWith(SerenityRunner.class)
public class EdgeTests {

    private String userName;
    private String passWord;
    private String errorMessage;

    @Managed(driver = "edge")
    WebDriver driver;

    @Steps
    NavigateActions navigate;

    @Steps
    StepLoginPage loginPage;


    @Test
    @Title("Login to application with invalid credential generates error message")
    public void invalidCredentials() {

        // Given
        navigate.toTheHomePage();

        // When
        loginPage.inputUserName("Admin");
        loginPage.inputPassword("admin");
        loginPage.clickLogin();

        // Then
        Serenity.reportThat("Passing invalid credentials generates error message",
                () -> assertThat(assertThat(loginPage.errorMessage()).isEqualToIgnoringCase("Invalid Credentials")));

    }

}
NavigateActions
import net.serenitybdd.annotations.Step;
import net.serenitybdd.core.steps.UIInteractionSteps;

public class NavigateActions extends UIInteractionSteps {

    @Step
    public void toTheHomePage() {
        openPageNamed("loginForm");
    }
}
In the previous tutorial, I have explained theData Driven Tests in Serenity where test data are defined in Tests. In this tutorial, I will explain the Data Driven tests in Serenity where we will get the test data from CSV file.
Serenity lets us perform data-driven testing using test data in a CSV file. We store our test data in a CSV file (by default with columns separated by commas), with the first column acting as a header.
We need to create a test class containing properties that match the columns in the test data, as you did for the data-driven test in the previous example. The test class will typically contain one or more tests that use these properties as parameters to the test step or Page Object methods.
Here, we need to keep in mind that as the tests are parameterized , we need to use the Parameterized test runner to perform data-driven tests.
@UseTestDataFrom annotation is used to indicate where to find the CSV file (this can either be a file on the classpath or a relative or absolute file path – putting the data set on the class path (e.g. in src/test/resources) makes the tests more portable).
ParameterizedTestsUsingCSV Class contains the SerenityParameterizedRunner as well as provides the path of the test data file using @UseTestDataFrom, and the Tests.
The Serenity Parameterized Runner creates a new instance of this class for each row of data in the CSV file, assigning the properties with corresponding values in the test data. As you can see, I have mentioned 3 variables in the CSV file – userName, passWord, and errorMessage. I have declared the same private variables in the Test Class too – username, password, and errorMessage that match the columns in the test data file. Keep this in mind, that the column name should be the same in test data file and Test.
The heading of parameters present in the Serenity Report (Index.html) like Username, Password, and Error Message are generated by @TestData(columnNames).
The description of the Test Step in the Serenity Report is modified by using @Qualifier. It is used to mark a method as a qualifier in an instantiated data-driven test case.
The test class needs to have a WebDriver instance with a @Managed annotation for Serenity to manage it in the background. That is all that is required, we do not need to manage the driver anymore. Each test class will need this driver variable declaration.
The Test Class uses Step Class (StepLoginPage) and Action Class (NavigateActions) to perform the Tests. StepLoginPage contains test steps that represent the level of abstraction between the code that interacts with the application. NavigateAction page is used to open an environment-specific page defined in the serenity.config file under the pages section.
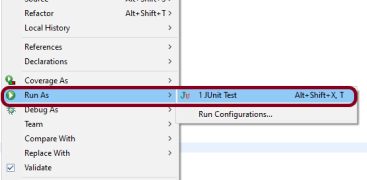
This test can be executed by JUnit as well as from the command line
JUnit – Right-click on the Test, select Run As, and then select JUnit Test in Eclipse.
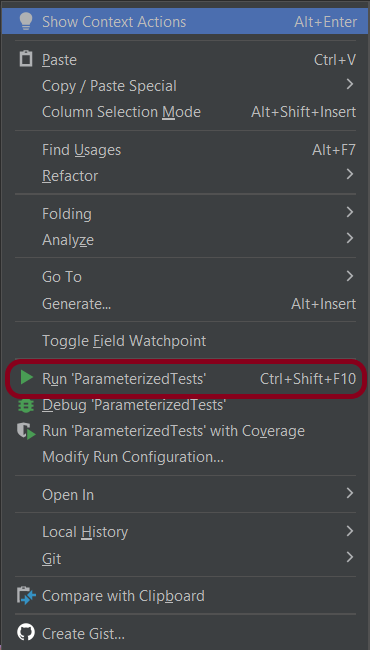
If you are using IntelliJ, then right-click and select Run “ParameterizedTests”
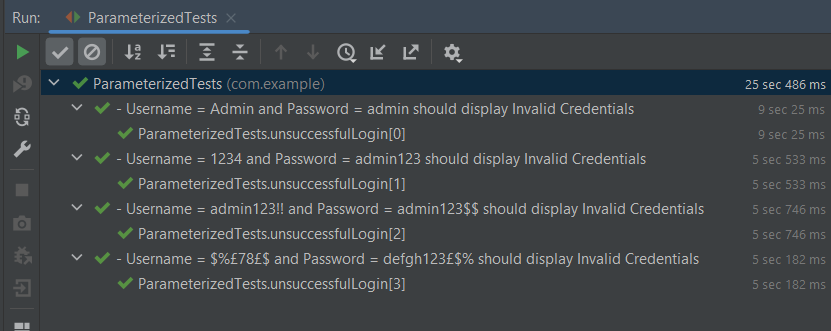
The Test execution status can be seen as shown below:
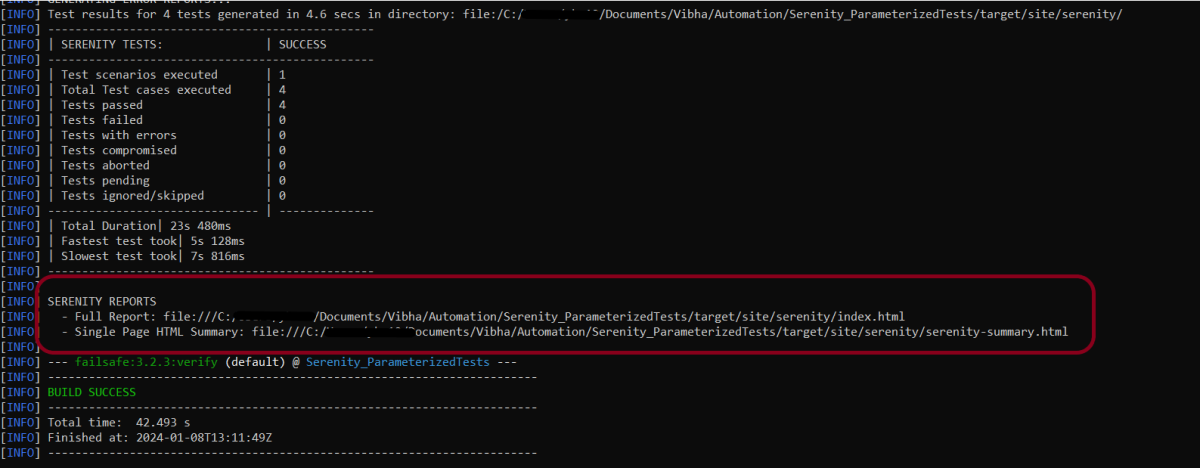
To run the tests using the command line, use the below command
mvn clean verify
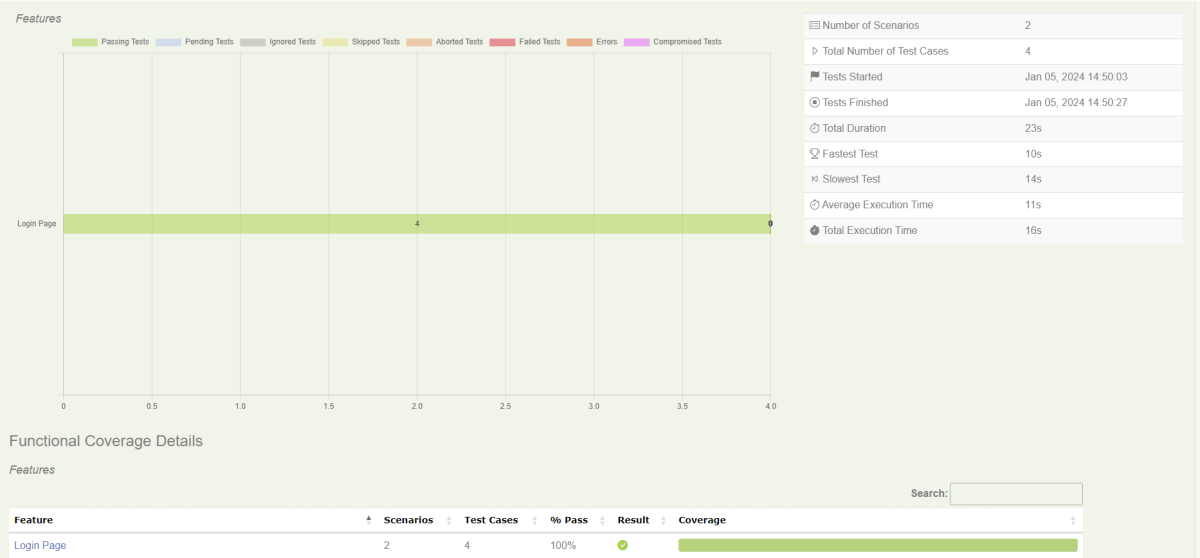
This will execute the tests and will generate the Test Execution Report as shown below.
The reports are generated as shown in the below image.
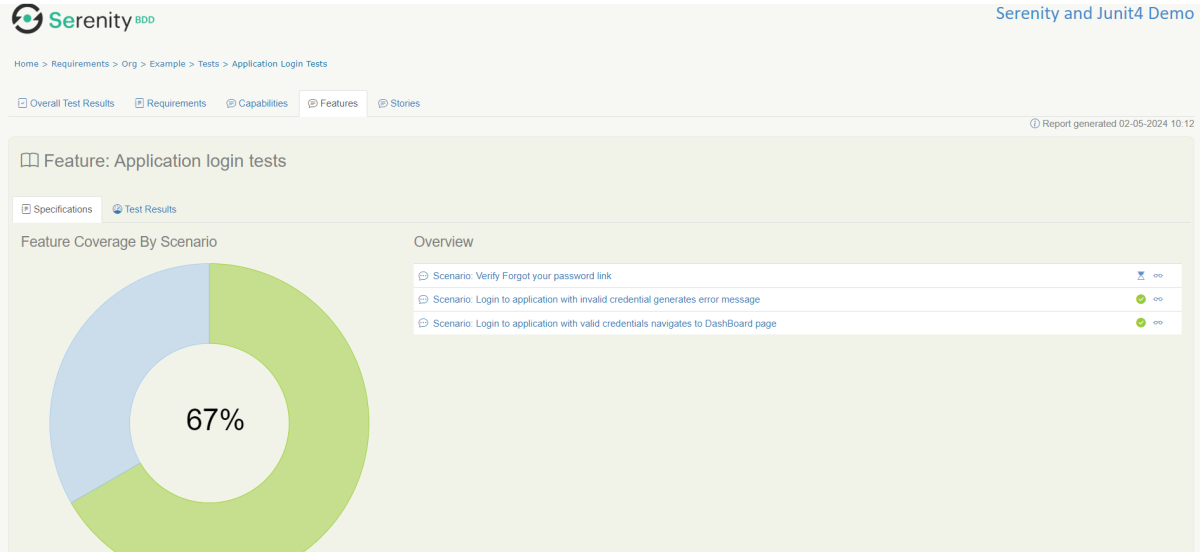
Serenity generates very descriptive and beautiful reports – Index.html and Serenity Summary Report.
Index.html
This page provides the detail about the Test, its corresponding test data, the status of each test scenario with screenshots, and the execution time of each test.
This is the expanded view of all the test steps of a test with their screenshots. This also shows the execution time of each step in the test.
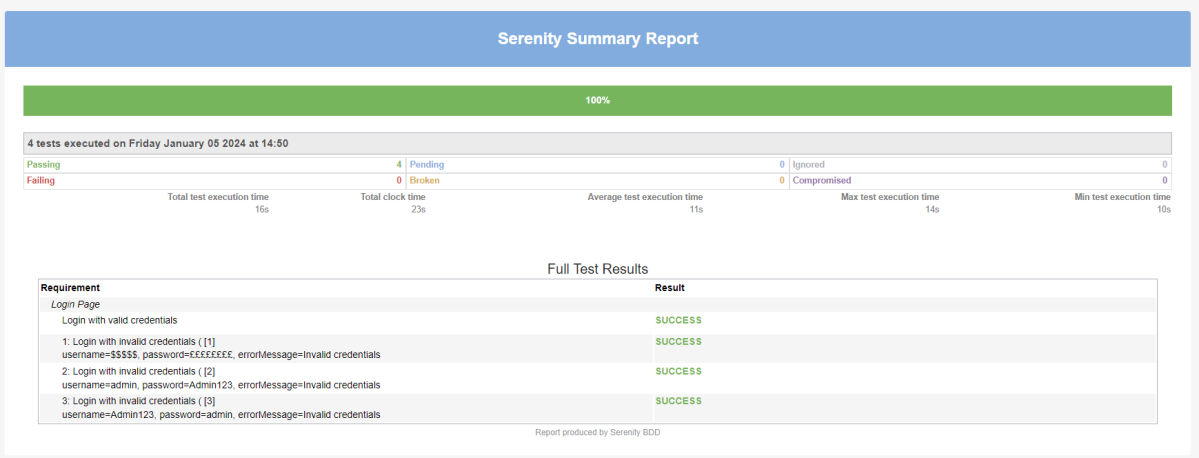
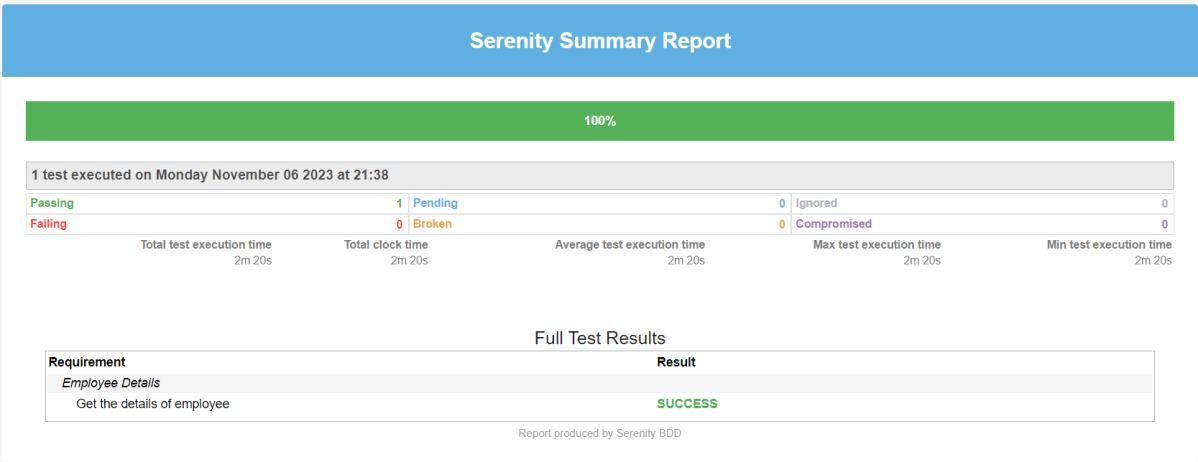
Serenity Summary Report
This report is a single-page, self-contained HTML summary report, containing an overview of the test results, and a configurable breakdown of the status of different areas of the application.
We are done! Congratulations on making it through this tutorial and hope you found it useful! Happy Learning!!
Serenity BDD is an open-source library that aims to make the idea of living documentation a reality.
Serenity BDD helps you write cleaner and more maintainable automated acceptance and regression tests faster. Serenity also uses the test results to produce illustrated, narrative reports that document and describe what your application does and how it works. Serenity tells you not only what tests have been executed, but more importantly, what requirements have been tested.
One key advantage of using Serenity BDD is that you do not have to invest time in building and maintaining your own automation framework.
Serenity BDD provides strong support for different types of automated acceptance testing, including:
Rich built-in support for web testing with Selenium.
REST API testing with Rest Assured.
Highly readable, maintainable, and scalable automated testing with the Screenplay pattern.
Getting started Cucumber 6 with Serenity BDD
Cucumber is a popular tool for automating BDD-style acceptance criteria.
Serenity seamlessly supports Cucumber 2.x, Cucumber 5, and Cucumber 6. However, this flexibility requires a little tweaking in the build dependencies.
If you are using Maven, you need to do the following:
exclude the default cucumber-core dependency from your serenity-core dependency
Add dependencies on the Cucumber 6.x version of cucumber-java and cucumber-junit into your project.
Prerequisite:
Serenity – 4.0.30
JUnit4 – 4.13.2
Serenity Cucumber – 4.0.30
Maven Compiler – 3.12.1
Maven Surefire Plugin – 3.2.3
Java – 17
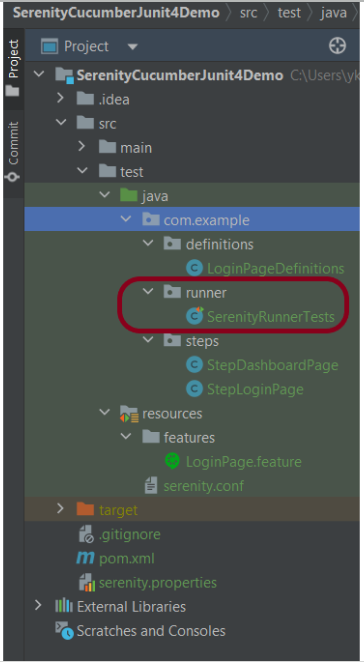
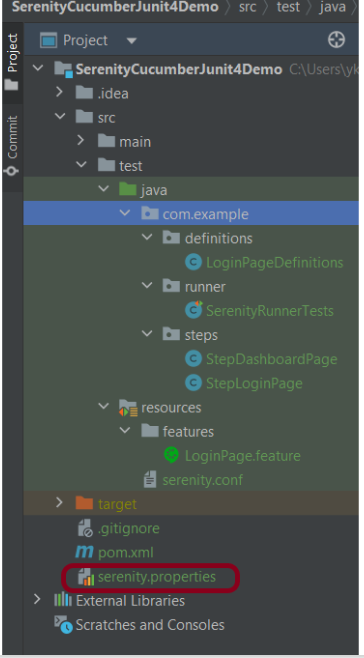
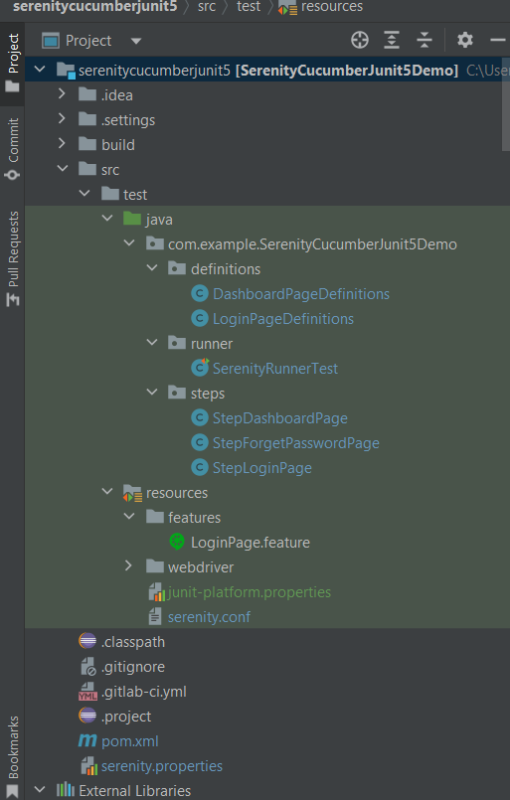
Project Structure
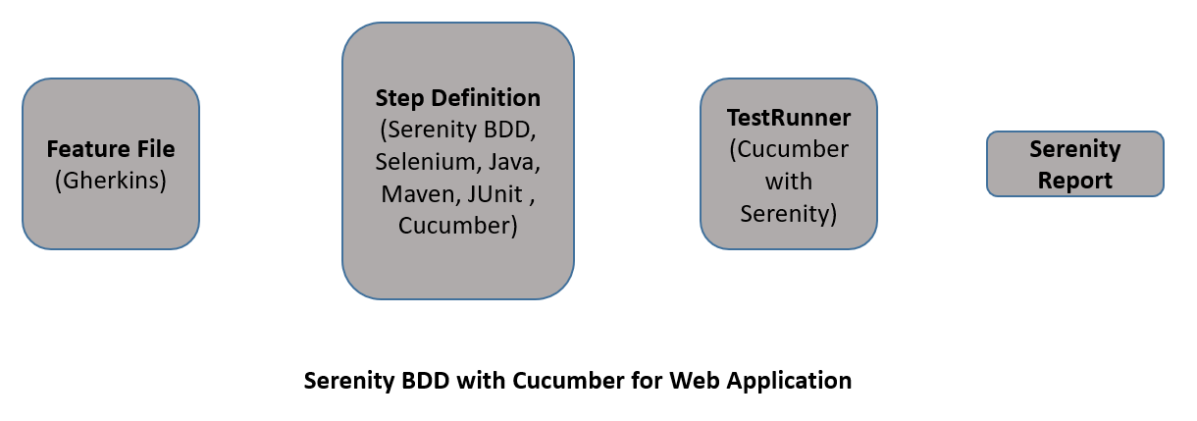
Relationship between Web Application, Serenity BDD, Cucumber, and Selenium
Implementation Steps
Step 1: Add Serenity, Cucumber, and JUnit4 dependencies to the Maven project
The pom.xml will look like something as shown below.
Step 2: Create a Feature File under src/test/resources
A Feature File is an entry point to the Cucumber tests. This is a file where you will describe your tests in Descriptive language (Like English). A feature file can contain a scenario or can contain many scenarios in a single feature file. Below is an example of a Feature file.
Feature: Login Page

@ValidCredentials
   Scenario: Login with valid credentials

    Given User is on Home page
    When User enters username as "Admin"
    And User enters password as "admin123"
    Then User should be able to login successfully

@InValidCredentials
   Scenario Outline: Login with invalid credentials

    Given User is on Home page
    When User enters username as '<username>'
    And User enters password as '<password>'
    Then User should be able to see error message '<errorMessage>'

  Examples:
   | username   | password  | errorMessage                      |
   | $$$$$      | ££££££££  | Invalid credentials               |
   | admin      | Admin123  | Invalid credentials               |
   | Admin123   | admin     | Invalid credentials               |
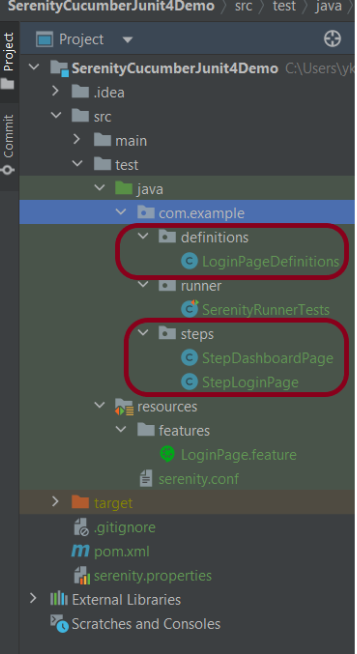
Step 3: Create the Step Definition class
The glue code shown below uses Serenity step libraries as action classes to make the tests easier to read and to improve maintainability.
These classes declare using the Serenity @Steps annotation. The @Steps annotation tells Serenity to create a new instance of the class, and inject any other steps or page objects that this instance might need.
Each action class models a particular facet of user behavior: navigating to a particular page, performing a search, or retrieving the results of a search. These classes design to be small and self-contained, which makes them more stable and easier to maintain.
LoginPageDefinitioncontains the steps to open the web browser, enter the username, enter the password and click on the Login Button
package com.example.definitions;

import com.example.steps.StepDashboardPage;
import com.example.steps.StepLoginPage;
import io.cucumber.java.en.Given;
import io.cucumber.java.en.Then;
import io.cucumber.java.en.When;
import net.serenitybdd.annotations.Steps;
import org.junit.Assert;

public class LoginPageDefinitions {

    @Steps
    StepLoginPage loginPage;

    @Steps
    StepDashboardPage dashPage;

    @Given("User is on Home page")
    public void openApplication() {
        loginPage.open();
        System.out.println("Page is opened");
    }

    @When("User enters username as {string}")
    public void enterUsername(String userName) {
        System.out.println("Enter Username");
        loginPage.inputUserName(userName);
    }

    @When("User enters password as {string}")
    public void enterPassword(String passWord) {
        loginPage.inputPassword(passWord);

        loginPage.clickLogin();
    }

    @Then("User should be able to login successfully")
    public void clickOnLoginButton() {
        dashPage.loginVerify();
    }

    @Then("User should be able to see error message {string}")
    public void unsucessfulLogin(String expectedErrorMessage) throws InterruptedException {

        String actualErrorMessage = loginPage.errorMessage();
        Assert.assertEquals(expectedErrorMessage, actualErrorMessage);
    }

}
This annotation lets you define a URL or a set of URLs that work with a particular page.
StepLoginPage is created by extending it from PageObject class. In this class, $() method used below, which locates a web element using a By locator or an XPath or CSS expression. This class is responsible for uniquely locating elements on the page, and it does this by defining locators or occasionally by resolving web elements dynamically.
Step 4: Create Serenity Test Runner under src/test/java
We cannot run a Feature file on its own in a cucumber-based framework. We need to create a Java class, which will run the Feature File. It is the starting point for JUnit to start executing the tests. TestRunner class creates under src/test/java. When you run the tests with serenity, you use the CucumberWithSerenity test runner. If the feature files are not in the same package as the test runner class, you also need to use the @CucumberOptions class to provide the root directory where the feature files found.
Below is the code for SerenityRunnerTests.
import io.cucumber.junit.CucumberOptions;
import net.serenitybdd.cucumber.CucumberWithSerenity;
import org.junit.runner.RunWith;

@RunWith(CucumberWithSerenity.class)
@CucumberOptions(plugin = { "pretty" }, features = "src/test/resources/features/LoginPage.feature",
        glue="com.example.definitions")

public class SerenityRunnerTests {}
Step 5: Create serenity.conf (Configuration File)
Serenity uses serenity.conf file in thesrc/test/resources directory to configure test execution options. serenity.config can also contain the environment URL and other options like headless mode and soon.
In the previous tutorial, I explained theSerenity BDD with Cucumber for Web Application using Junit4. In this tutorial, I will explain the same Test Framework using Serenity, Cucumber, and JUnit5. This tutorial gives a clear picture of the initial setup of a BDD Framework.
The JUnit Platform serves as a foundation for launching testing frameworks on the JVM. It also defines the TestEngine API for developing a testing framework that runs on the platform.
JUnit Jupiter is the combination of the new programming model and extension model for writing tests and extensions in JUnit 5. The Jupiter sub-project provides a TestEngine for running Jupiter based tests on the platform.
JUnit Vintage provides a TestEngine for running JUnit 3 and JUnit 4 based tests on the platform. It requires JUnit 4.12 or later to be present on the class/module path.
JUnit5 is not completely integrated with Serenity with Cucumber. So, it is advisable to usejupiter-vintage-engine for the Cucumber TestRunner classes.
Step 2 – Download and setup Eclipse IDE on the system
The Eclipse IDE (integrated development environment) provides strong support for Java developers which is needed to write Java code. Click here to know How to install Eclipse.
Step 3 – Setup Maven and create a new Maven Project
Step 8 – Create a feature file under src/test/resources
The purpose of the Feature keyword is to provide a high-level description of a software feature, and to group related scenarios. To know more about the Feature file, please refer this tutorial.
Feature: Login to HRM

   @ValidCredentials
   Scenario: Login with valid credentials

    Given User is on Home page
    When User enters username as "Admin"
    And User enters password as "admin123"
    Then User should be able to login successfully

    @InValidCredentials
    Scenario Outline: Login with invalid credentials

    Given User is on Home page
    When User enters username as '<username>'
    And User enters password as '<password>'
    Then User should be able to see error message '<errorMessage>'

   Examples:
    |username   |password       |errorMessage               |
    |admin        |admin            |Invalid credentials        |
    |abc            |admin123       |Invalid credentials        |
    |abc            |abc123           |Invalid credentials         |
    |1$£"          | 45£"%           |Invalid credentials        |

   @ForgetPassword
   Scenario: Verify Forget Password Functionality

    Given User is on Home page
    When User clicks on Forgot your password link
    Then User should be able to see new page which contains Reset Password button
Step 9 – Create junit-platform.properties file under src/test/resources (optional)
This is an optional step. Cucumber of version 6.7 and above provides the functionality to generate a beautiful cucumber report. For this, it is needed to add a file junit-platform.properties under src/test/resources.
cucumber.publish.enabled = true
Step 10 – Create the Step Definition class or Glue Code
A Step Definition is a Java method with an expression that links it to one or more Gherkin steps. When Cucumber executes a Gherkin step in a scenario, it will look for a matching step definition to execute. You can have all of your step definitions in one file, or in multiple files.
LoginPageDefinitions
import static org.junit.jupiter.api.Assertions.assertEquals;
import static org.junit.jupiter.api.Assertions.assertTrue;

import com.example.SerenityCucumberJunit5Demo.steps.StepDashboardPage;
import com.example.SerenityCucumberJunit5Demo.steps.StepForgetPasswordPage;
import com.example.SerenityCucumberJunit5Demo.steps.StepLoginPage;

import io.cucumber.java.en.Given;
import io.cucumber.java.en.Then;
import io.cucumber.java.en.When;
import net.serenitybdd.annotations.Steps;


public class LoginPageDefinitions {

	@Steps
	StepLoginPage loginPage;

	@Steps
	StepDashboardPage dashPage;

	@Steps
	StepForgetPasswordPage forgetpasswordPage;

	@Given("User is on Home page")
	public void openApplication() {
		loginPage.open();
	}

	@When("User enters username as {string}")
	public void enterUsername(String userName) {

		loginPage.inputUserName(userName);
	}

	@When("User enters password as {string}")
	public void enterPassword(String passWord) {
		loginPage.inputPassword(passWord);
		loginPage.clickLogin();
	}

	@Then("User should be able to login successfully")
	public void clickOnLoginButton() {
		dashPage.loginVerify();
	}

	@Then("User should be able to see error message {string}")
	public void unsucessfulLogin(String expectedErrorMessage) {
		String actualErrorMessage = loginPage.errorMessage();

		System.out.println("Actual Error Message :" + actualErrorMessage);

		assertEquals(expectedErrorMessage, actualErrorMessage);
	}

	@When("User clicks on Forgot your password link")
	public void clickForgetPasswordLink() {
		loginPage.clickForgetPasswordLink();
	}

	@Then("User should be able to see new page which contains Reset Password button")
	public void verifyForgetPasswordPage() {

		assertTrue(forgetpasswordPage.ForgetPasswordPage());
	}
}
Assertions in JUnit-Vintage Engine are imported from the below package:-
import static org.junit.jupiter.api.Assertions.*;
DashboardPageDefinitions
import com.example.SerenityCucumberJunit5Demo.steps.StepDashboardPage;
import net.serenitybdd.annotations.Step;
import net.serenitybdd.annotations.Steps;

public class DashboardPageDefinitions {

	@Steps
	StepDashboardPage dashPage;

	@Step
	public void verifyAdminLogin() {
		dashPage.loginVerify();
	}
}
The corresponding Test Step classes are – StepLoginPage and StepDashboardPage.
There are multiple ways to identify a web element on the web page – one of the ways is to use @FindBy or $(By.).
I prefer to use @FindBy as I need not find the same element multiple times. Using @FindBy, I have identified a web element and defined a WebElementFacacde for the same which is reusable.
Cucumber runs the feature files via JUnit and needs a dedicated test runner class to actually run the feature files. When you run the tests with Serenity, you use theCucumberWithSerenity test runner. You also need to use the @CucumberOptionsclass to provide the root directory where the feature files can be found.
import static io.cucumber.junit.platform.engine.Constants.GLUE_PROPERTY_NAME;
import static io.cucumber.junit.platform.engine.Constants.PLUGIN_PROPERTY_NAME;

import org.junit.platform.suite.api.ConfigurationParameter;
import org.junit.platform.suite.api.IncludeEngines;
import org.junit.platform.suite.api.SelectClasspathResource;
import org.junit.platform.suite.api.Suite;

@Suite
@IncludeEngines("cucumber")
@SelectClasspathResource("/features")
@ConfigurationParameter(key = GLUE_PROPERTY_NAME, value = "com.example.SerenityCucumberJunit5Demo.definitions")
@ConfigurationParameter(key = PLUGIN_PROPERTY_NAME, value = "io.cucumber.core.plugin.SerenityReporterParallel,pretty,timeline:build/test-results/timeline")

public class SerenityRunnerTest {

}
Step 12 – Create serenity.conf file under src/test/resources
The serenity configuration file is used to configure the drivers so the test cases can run successfully. This file contains an operating system-specific binary. The binary file sits between your test and the browser. It acts as an intermediary, an interface between your tests and the browser you are using.
You can also configure the webdriver.base.url property for different environments in the serenity.conf configuration file.
Step 13 – Create serenity.properties file at the root of the project
serenity.project.name = Serenity and Cucumber and JUnit5 Demo
Step 14 – Run the tests from Command Line
Open the command line and go to the location where pom.xml of the project is present and type the below command.
mvn clean verify
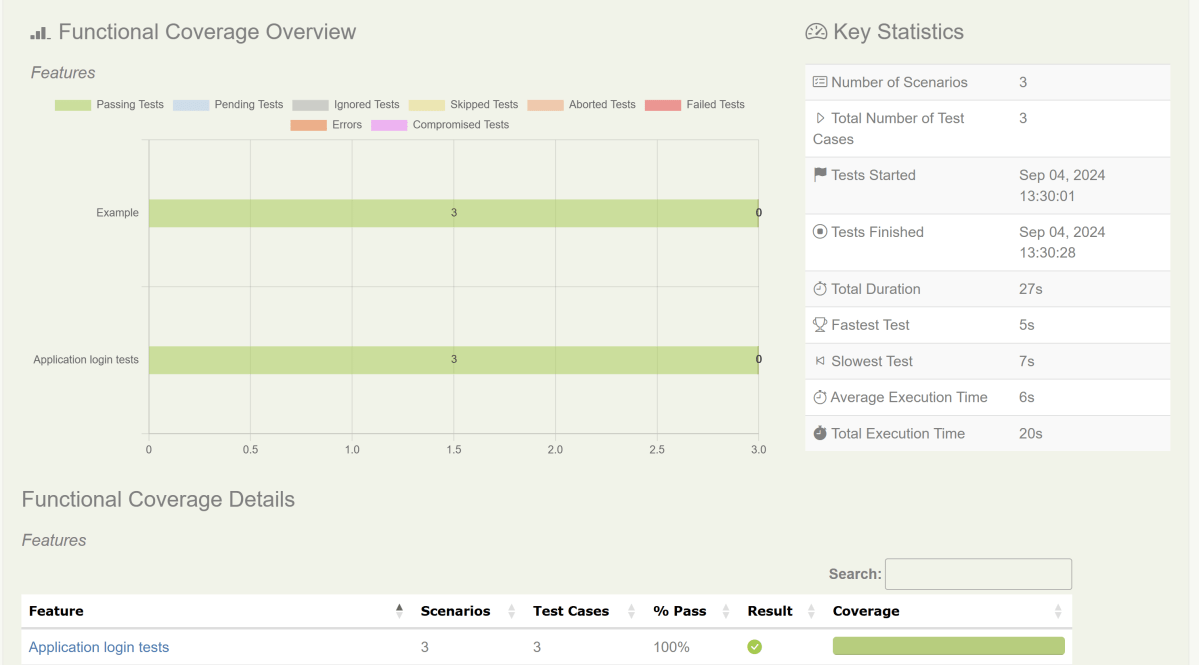
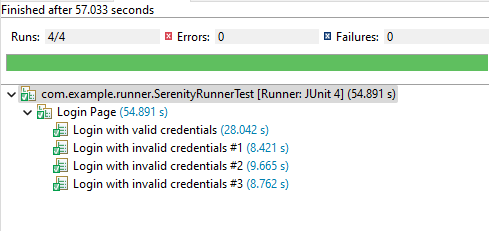
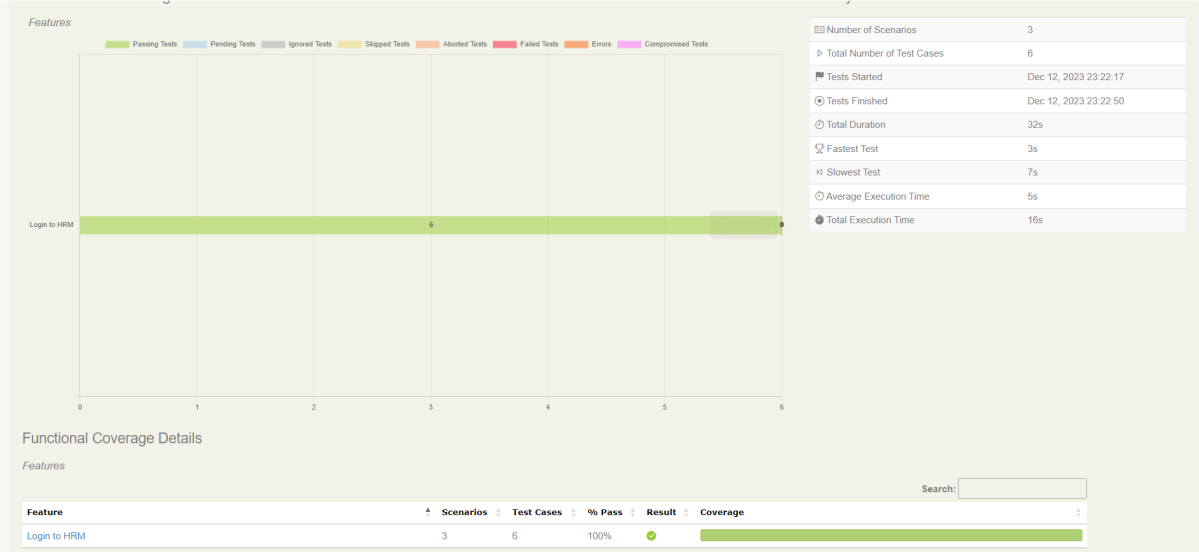
Step 15 – Test Execution Status
The image displayed above shows the execution status.
The feature file contains 3 test cases. Test Case 2 is a Test Scenario that has 4 examples. So, in total we have 6 tests. This information is clearly mentioned in the new version of Serenity.
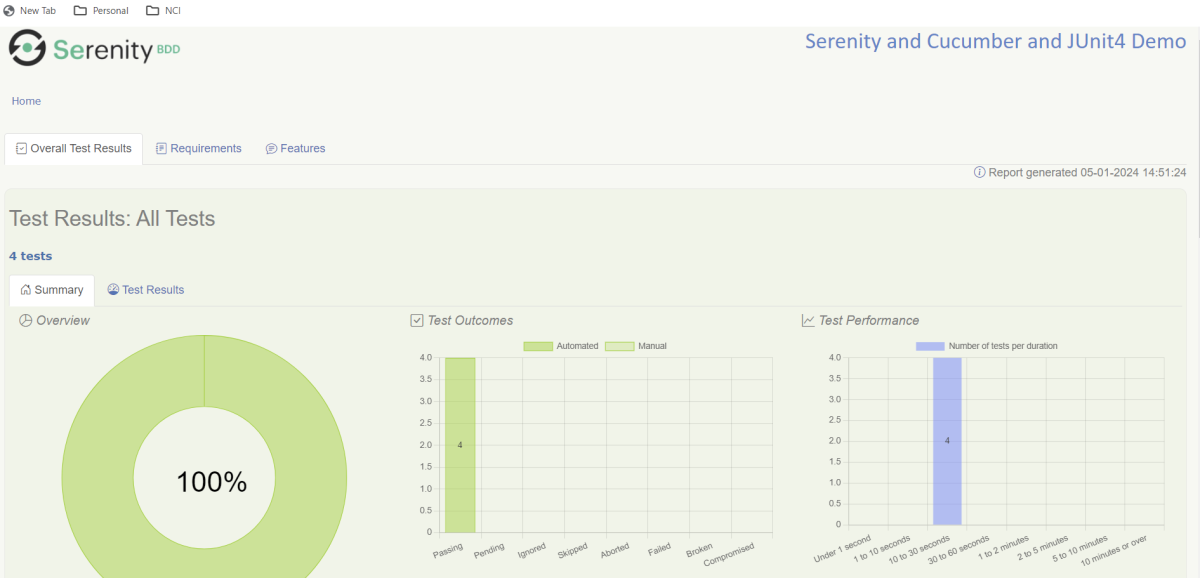
Step 16 – Serenity Report Generation
The best part about Serenity is the report generation by it. The Reports contain all possible types of information, you can think of with minimal extra effort. There are multiple types of reports are generated. We are interested in index.html and serenity-summary.html. To know more about Serenity Reports, please refer to tutorials for Index.html and Serenity-Summary.html. Below is the new Serenity Report.
index.html
2. serenity-summary.html
Step 17 – Cucumber Report Generation (Optional)
Every Test Execution generates a Cucumber Report (Version 6.7.0) and above as shown in the image.
Copy the URL and paste it to a browser and it shows the report as shown below:
To know more about Cucumber Reports, refertothis tutorial.
We are done! Congratulations on making it through this tutorial and hope you found it useful! Happy Learning!!
Serenity BDD is an open-source library that aims to make the idea of living documentation a reality.
What is Rest Assured?
Rest Assured is one of the most powerful libraries for testing RESTful API using Java language. Rest-Assured is a Java-based library that is used to test RESTful Web Services. This library behaves like a headless Client to access REST web services. The rest-Assured library also provides the ability to validate the HTTP Responses received from the server.
Prerequisite
Java 17 installed
Maven installed
Eclipse or IntelliJ installed
Dependency List
Java 17
Maven – 3.9.5
Serenity – 4.0.18
Serenity Rest Assured – 4.0.18
Rest Assured – 5.3.2
JUnit – 4.13.2
Maven Surefire Plugin – 3.1.2
Maven Failsafe Plugin – 3.1.2
Maven Compiler Plugin – 3.11.0
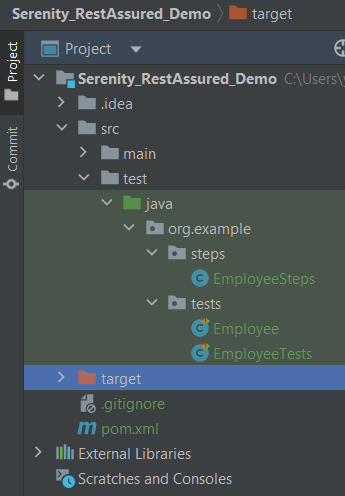
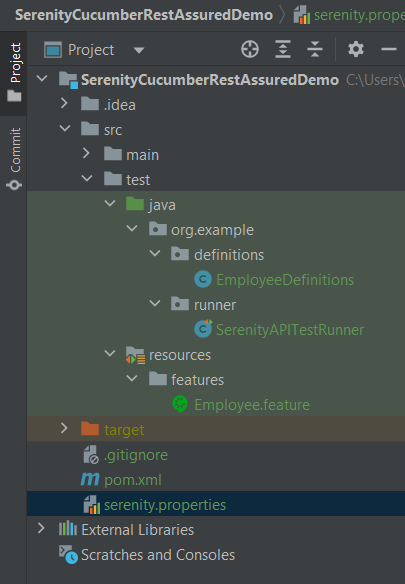
Project Structure
Implementation Steps
Step 1 – Update the Properties section in Maven pom.xml
Step 4 – Create the Test Code in src/java/testdirectory
There are 2 ways to create the same test. One approach is to have a Definition file that contains all the test code as shown below.
package org.example.tests;

import io.restassured.response.Response;
import net.serenitybdd.rest.SerenityRest;
import org.json.JSONObject;
import org.junit.Test;

import static org.hamcrest.Matchers.equalTo;

public class Employee {
    private static final String URL = "https://reqres.in/api";
    public Response response;

    int id = 2;

    @Test
    public void verifyValidUser() {

        response = SerenityRest
                .given()
                .contentType("application/json")
                .header("Content-Type", "application/json")
                .when()
                .get(URL + "/users/" + id);

        SerenityRest.restAssuredThat(response -> response.statusCode(200)
                .body("data.id", equalTo(2))
                .body("data.email", equalTo("janet.weaver@reqres.in"))
                .body("data.first_name", equalTo("Janet"))
                .body("data.last_name", equalTo("Weaver")));

    }

    @Test
    public void verifyCreateUser() {
        JSONObject data = new JSONObject();

        data.put("name", "Test");
        data.put("job", "Test Architect");

        response = SerenityRest
                .given()
                .contentType("application/json")
                .header("Content-Type", "application/json")
                .body(data.toString())
                .when()
                .post(URL + "/users");

        SerenityRest.restAssuredThat(response -> response.statusCode(201)
                .body("name", equalTo("Test"))
                .body("job", equalTo("Test Architect")));

    }

}
Another approach is that all tests are split into reusable blocks called “steps“. The main principle of the BDD approach is that we are trying to keep complexity to a high-level human-readable level. First of all, let’s create a separate package to keep our steps. It is always better to keep them separate as it shows which classes contain reusable components. It is better to make steps smaller. So let’s make separate reusable steps from our tests:
package org.example.steps;

import io.restassured.response.Response;
import net.serenitybdd.annotations.Step;
import net.serenitybdd.rest.SerenityRest;
import org.json.JSONObject;

import static org.hamcrest.Matchers.equalTo;

public class EmployeeSteps {
    private static final String URL = "https://reqres.in/api";
    public Response response;

    @Step("Search user by id {0}")
    public void sendUser(int id) {
        response = SerenityRest
                .given()
                .contentType("application/json")
                .header("Content-Type", "application/json")
                .when()
                .get(URL + "/users/" + id);

    }

    @Step("Create a new user")
    public void createUser() {

        JSONObject data = new JSONObject();

        data.put("name", "Test");
        data.put("job", "Test Architect");

        response = SerenityRest
                .given()
                .contentType("application/json")
                .header("Content-Type", "application/json")
                .body(data.toString())
                .when()
                .post(URL + "/users");

    }

    @Step("Verify the status code {0}")
    public void verifyStatusCode(int expectedStatusCode) {
        SerenityRest.restAssuredThat(response -> response.statusCode(expectedStatusCode));
    }

    @Step("Verify the user id {0}")
    public void verifyId(int expectedId) {
        SerenityRest.restAssuredThat(response -> response.body("data.id", equalTo(expectedId)));
    }

    @Step("Verify the user first name {0}")
    public void verifyFirstName(String expectedFirstName) {

        SerenityRest.restAssuredThat(response -> response.body("data.first_name", equalTo(expectedFirstName)));
    }

    @Step("Verify the user last name {0}")
    public void verifyLastName(String expectedLastName) {
        SerenityRest.restAssuredThat(response -> response.body("data.last_name", equalTo(expectedLastName)));
    }

    @Step("Verify the user email {0}")
    public void verifyEmail(String expectedEmail) {
        SerenityRest.restAssuredThat(response -> response.body("data.email", equalTo(expectedEmail)));
    }

    @Step("Verify the new user name {0}")
    public void verifyNewUserName(String expectedName) {
        SerenityRest.restAssuredThat(response -> response.body("name", equalTo(expectedName)));
    }

    @Step("Verify the new user job {0}")
    public void verifyNewUserJob(String expectedJob) {
        SerenityRest.restAssuredThat(response -> response.body("job", equalTo(expectedJob)));
    }

}
Now our steps are ready. Let’s refactor the main class with our tests:
One more important thing we added is the “@RunWith(SerenityRunner.class)” annotation on top of the class. As we have now organized our structure to meet some basic Serenity principles, we are ready to run the test using Serenity. This time (after we added the mentioned annotation) these tests will be run using the “SerenityRunner”. For that we can use exactly the same command to run our tests:
mvn clean verify
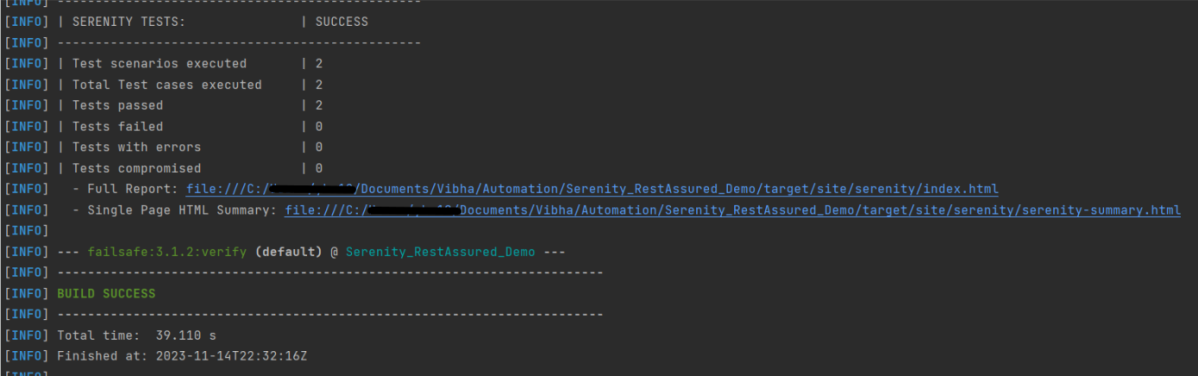
The output of the above program is
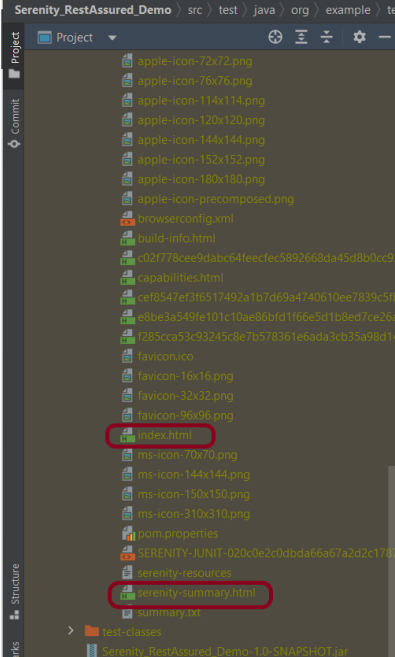
In the console, you should find printed messages for tests to start. At the same time under the target directory you can find the HTML-generated report we were talking about before:
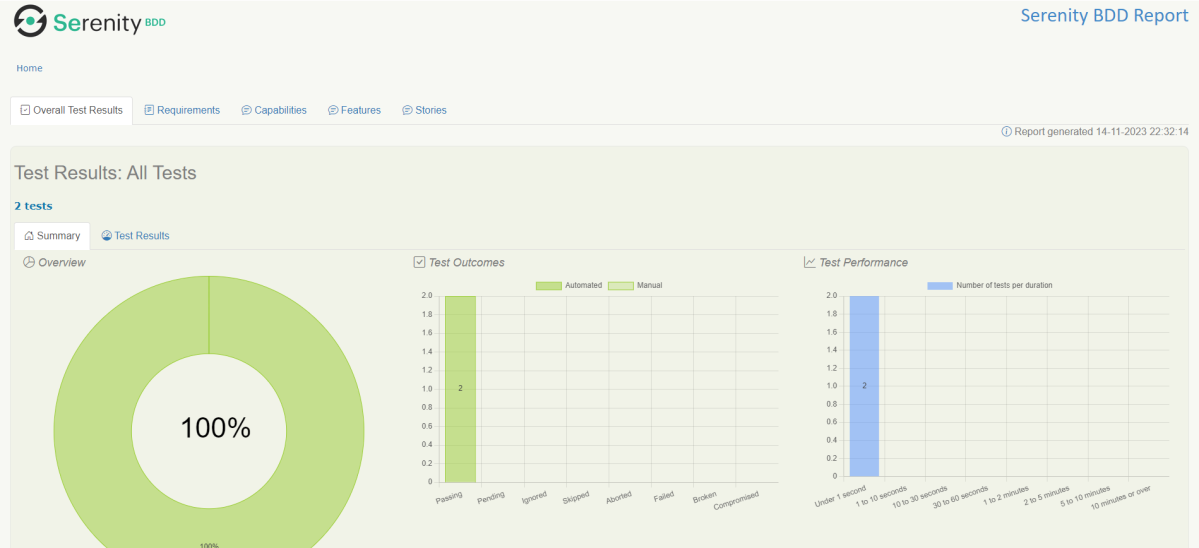
You can open the report in any browser:
If you click on any test you should see a detailed description of the test steps:
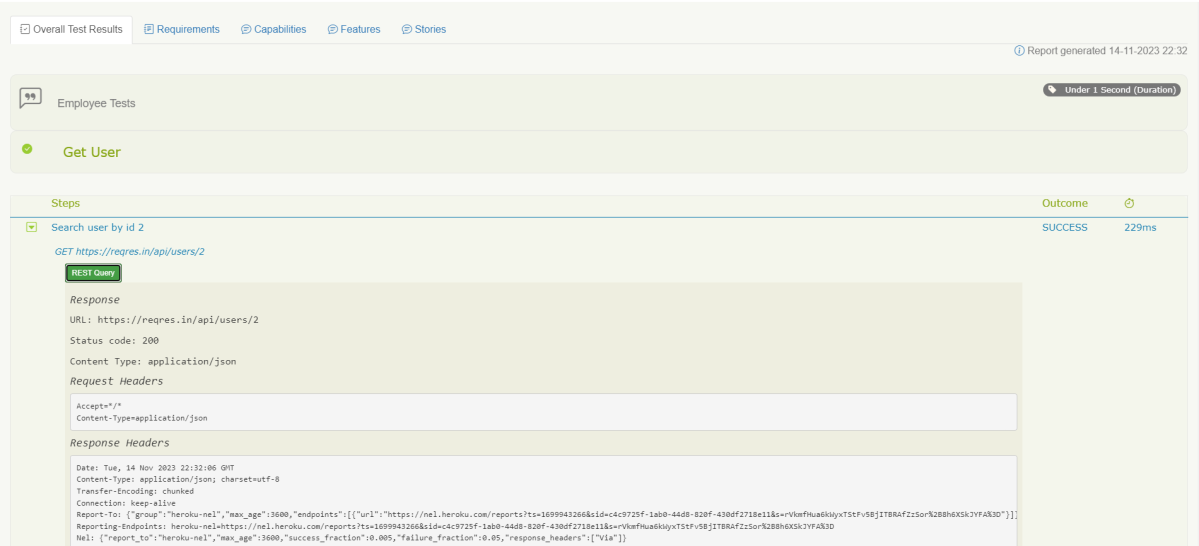
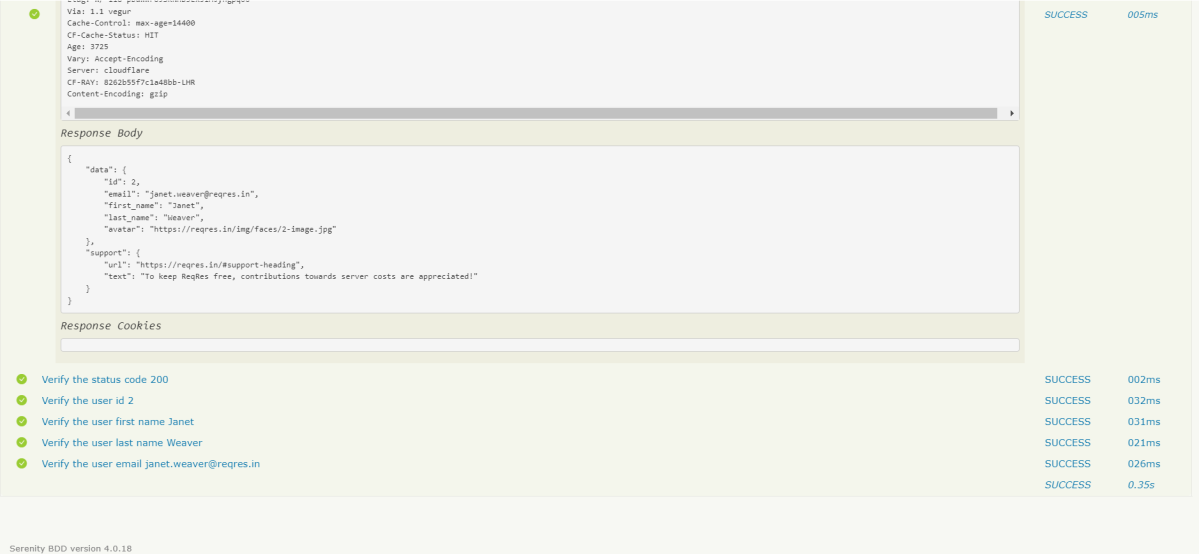
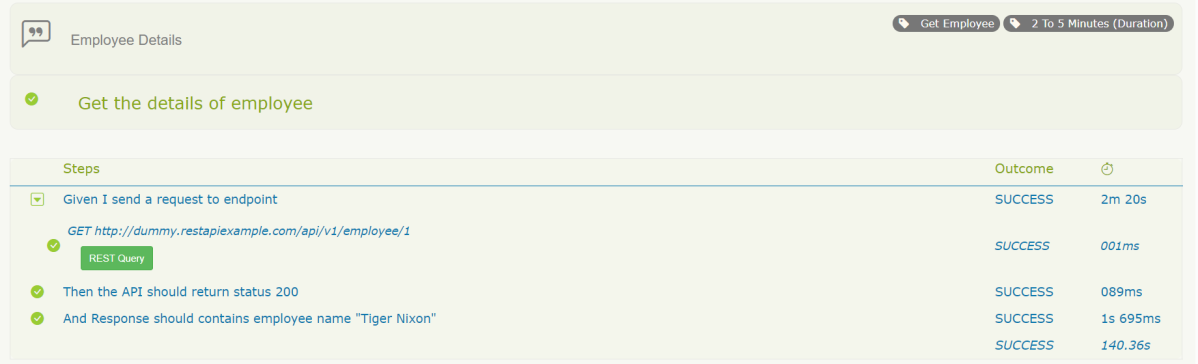
One of the most important features of the Serenity and REST Assured integration is that by using detailed reporting, you can easily validate all requests and response details even if you are not adding any logs inside tests. Like the example above, for each executed REST request you can click the button “REST Query” and get a detailed request and response description:
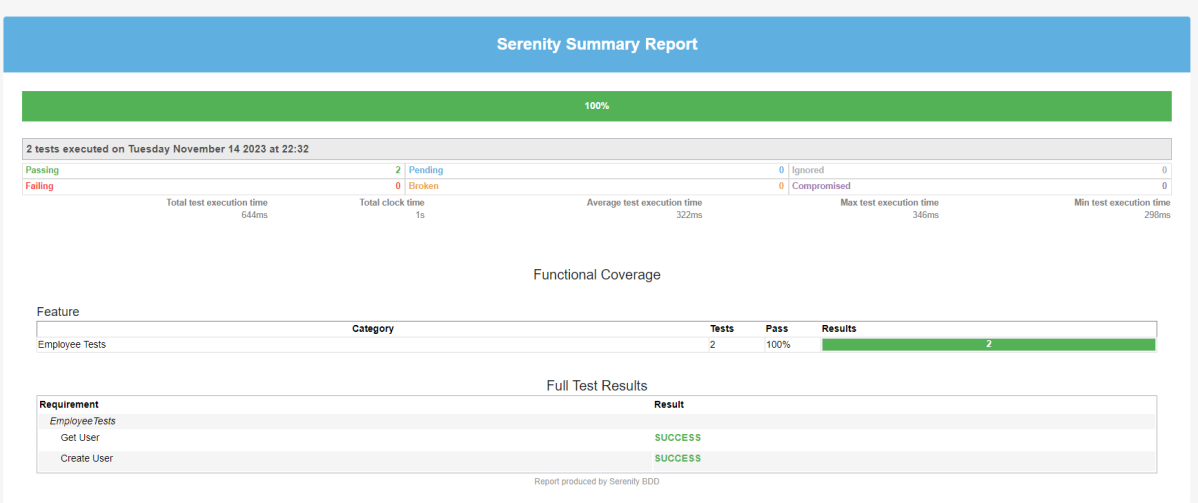
There is another very useful Serenity Report – Serenity Symmary.html
As you can see, Serenity and REST Assured provide you with a wonderful combination. REST Assured keeps API testing clean and easy to maintain, while Serenity gives you outstanding test reporting and flexibility in running and grouping your tests inside a test suite.
We are done! Congratulations on making it through this tutorial and hope you found it useful! Happy Learning!!
Serenity BDD is an open-source library that aims to make the idea of living documentation a reality.
What is Rest Assured?
Rest Assured is one of the most powerful libraries for testing RESTful API using Java language. Rest-Assured is a Java-based library that is used to test RESTful Web Services. This library behaves like a headless Client to access REST web services. The Rest-Assured library also provides the ability to validate the HTTP Responses received from the server. For e.g. we can verify the Status code, Status message, Headers, and even the Body of the response. This makes Rest-Assured a very flexible library that can be used for testing. In this post, we will learn how to write high-quality, expressive REST API tests using Rest Assured and Serenity BDD.
Prerequisite
Java 17 installed
Maven installed
Eclipse or IntelliJ installed
Dependency List:
Java 17
Maven – 3.9.5
Serenity – 4.0.18
Serenity Rest Assured – 4.0.18
Serenity Cucumber – 4.0.18
Rest Assured – 5.3.2
JUnit – 4.13.2
Maven Surefire Plugin – 3.2.1
Maven Failsafe Plugin – 3.2.1
Maven Compiler Plugin – 3.11.0
Project Structure
Implementation Steps
Step 1 – Update Properties section in Maven pom.xml
Step 4 – Create a Feature filein src/test/resources
Create a features folder within src/test/resources to create test scenarios in the Feature file. Test Scenarios are created in a Feature File which contains an overall description of a feature as well as a number of scenarios. Feature files can be placed in different locations, but you can reduce the amount of configuration you need to do with serenity if you put them in the src/test/resources/features directory. In this feature file, will send a request, and the response should be of status “200” and employee name of “Tiger Nixon”. The feature file looks something like this:
Feature: Employee Details

  @GetEmployee
  Scenario: Get the details of employee
    Given I send a request to endpoint
    Then the API should return status 200
    And Response should contains employee name "Tiger Nixon"
Step 5 – Create the Step Definition class or Glue Code
To use Rest-assured, Serenity provides class SerenityRest
import net.serenitybdd.rest.SerenityRest;
It is a Java method with an expression that is used to link it to Gherkin steps. When Cucumber executes a Gherkin step, it will look for a matching step definition to execute. These use annotations like @given, @when, and @then to match lines in the scenario to java methods
package org.example.definitions;

import io.cucumber.java.en.And;
import io.cucumber.java.en.Given;
import io.cucumber.java.en.Then;
import io.restassured.response.Response;
import net.serenitybdd.rest.SerenityRest;
import static org.hamcrest.Matchers.equalTo;

public class EmployeeDefinitions {
    private static final String URL = "http://dummy.restapiexample.com/api/v1/employee/1";
    public Response response;

    @Given("I send a request to endpoint")
    public void sendRequest()  {

        response = SerenityRest.given().contentType("application/json").header("Content-Type", "application/json")
                .when().get(URL);
    }

    @Then("the API should return status {int}")
    public void verifyResponse(int status) {
        SerenityRest.restAssuredThat(response -> response.statusCode(status));
    }

    @And("Response should contains employee name {string}")
    public void verifyResponseContent(String expectedEmployeeName) {

        SerenityRest.restAssuredThat(response -> response.body("data.employee_name", equalTo(expectedEmployeeName)));
    }
}
Step 6 – Create Serenity Test Runner
Cucumber runs the feature files via JUnit and needs a dedicated Test Runner class to run the feature files. When you run the tests with serenity, you use the CucumberWithSerenity test runner. If the feature files are not in the same package as the test runner class, you also need to use the@CucumberOptionsclass to provide the root directory where the feature files can be found. It is the starting point for JUnit to start executing the tests. TestRunner class is created undersrc/test/java. The test runner to run all of the feature files looks like this:
import org.junit.runner.RunWith;

import io.cucumber.junit.CucumberOptions;
import net.serenitybdd.cucumber.CucumberWithSerenity;

@RunWith(CucumberWithSerenity.class)
@CucumberOptions(plugin = { "pretty" }, features = "src/test/resources/features/Employee.feature", glue = {
		"org.example.definitions" })

public class SerenityAPITestRunner {

}
Step 7 – Create serenity.properties file
Serenity.properties file is created at the root level.
serenity.project.name = Rest API Testing using Serenity, Cucumber and JUnit4
Step 8 – Serenity Tests Execution
You can run the tests from SerenityAPITestRunner or from the command line by
mvn clean verify
Test Execution Page looks like this as shown below image
Step 9 – Verify the Serenity Reports
A number of reports are generated, but we are concerned about index.html and serenity-summary.html.
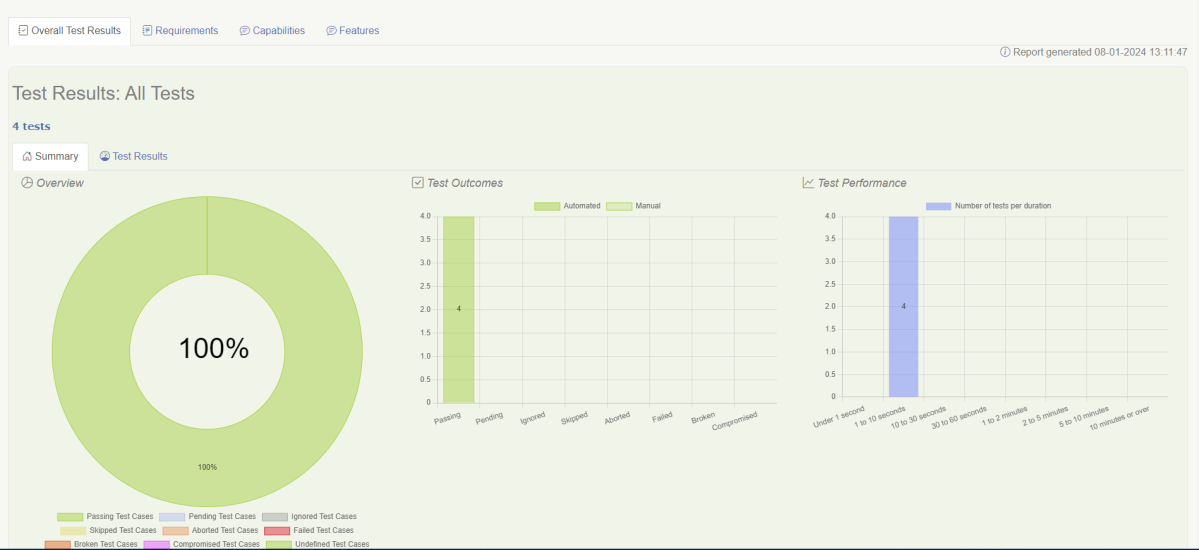
The report is well-formatted and contains consolidated results. Reporting is one of the major pillars of Serenity. Serenity Report not only reports on whether a test scenario passes or fails but documents what it did, in a step-by-step narrative format. The below pic illustrates the test results for our first acceptance criteria:
The test report generated by Serenity is placed under target/site/serenity/index.html.
Index.html
The first tab is called “Overall Test Results” and it provides information about test statistics. This Overall Test Result shows the Scenario Results (No Of Test Cases Pass, No Of Test Cases Failed, No of Test Cases Pending, No Of Test Cases Ignored, No Of Test Cases Skipped).
In the below pic, the report shows the test scenario steps status and time taken for each step to execute.
With the use of the REST Query button, it’s possible to display query details. Visible details:
There is also the “Requirements” tab. When we have tests as part of our code base, all test results will be organized as associated with requirements.
There is also a “Features” tab. This page lists all the features that are part of your suite. If you expand that row you’ll see the bit of narrative text that is part of the current feature file.
Serenity-Summary.html
We are done! Congratulations on making it through this tutorial and hope you found it useful! Happy Learning!!