Masterthought library provides pretty HTML reports for Cucumber. The cucumber JSON file is used to generate the HTML for the website. This Java report publisher was made particularly with publishing cucumber reports to the Jenkins build server in mind. It releases aesthetically pleasing HTML reports with charts displaying the outcomes of cucumber runs.
Cucumber lacks a sophisticated reporting feature. Cucumber generates a number of simple reports as part of the BDD framework; using the output from these same reports, we can use the Masterthought reporting plugin to produce more extensive HTML reports. Masterthought reporting plugin generates not only fancy reports but also detailed ones by reading a default report ‘cucumber.json’ generated by cucumber.
Table of Contents
- Prerequisite
- Dependency List
- Project Structure
- Implementation Steps
- Download and Install Java
- Download and setup Eclipse IDE on the system
- Setup Maven
- Install Cucumber Eclipse Plugin (Only for Eclipse IDE
- Create a new Maven Project
- Add Selenium, TestNG, Cucumber, and Masterthought dependencies to the project
- Create a feature file (LoginPage.feature) containing all the test scenarios under src/test/resources/features
- Create the test code locating the web elements in src/main/java
- Create the Step Definition class or Glue Code in src/test/java
- Create a TestNG Cucumber Runner class in src/test/java
- Create testng.xml
- Run the tests from Command Line
- Cucumber Report Generation
Prerequisite
- Java 11 installed
- Maven installed
- Eclipse or IntelliJ installed
Dependency List
- Selenium – 4.3.0
- Java 11
- Cucumber – 7.6.0
- Maven – 3.8.1
- TestNG – 7.6.0
- Cucumber Reporting Plugin – 5.7.4
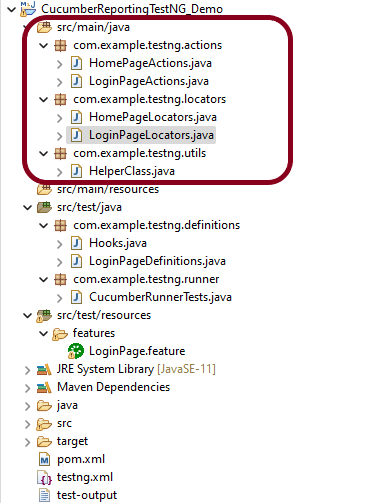
Project Structure

Implementation Steps
- Download and Install Java on the system
- Download and setup Eclipse IDE on the system
- Setup Maven
- Install Cucumber Eclipse Plugin (For Eclipse IDE)
- Create a new Maven Project
- Add Selenium, TestNG, Cucumber, and Masterthought dependencies to the project
- Create a feature file under src/test/resources
- Create the test code locating the web elements in src/main/java
- Create the Step Definition class or Glue Code in src/test/java
- Create a TestNG Cucumber Runner class in src/test/java
- Create testng.xml
- Run the tests from Command Line
- Cucumber Report Generation
Step 1- Download and Install Java
Cucumber and Selenium need Java to be installed on the system to run the tests. Click here to know How to install Java.
Step 2 – Download and setup Eclipse IDE on the system
The Eclipse IDE (integrated development environment) provides strong support for Java developers, which is needed to write Java code. Click here to know How to install Eclipse.
Step 3 – Setup Maven
To build a test framework, we need to add a number of dependencies to the project. It is a very tedious and cumbersome process to add each dependency manually. So, to overcome this problem, we use a build management tool. Maven is a build management tool that is used to define project structure, dependencies, build, and test management. Click here to know How to install Maven.
Step 4 – Install Cucumber Eclipse Plugin (Only for Eclipse IDE)
The Cucumber Eclipse plugin is a plugin that allows eclipse to understand the Gherkin syntax. The Cucumber Eclipse Plugin highlights the keywords present in Feature File. Click here to know more – Install Cucumber Eclipse Plugin.
Step 5 – Create a new Maven Project
Click here to know How to create a Maven project
Below is the Maven project structure. Here,
Group Id – com.example
Artifact Id – CucumberReportingTestNG_Demo
Version – 0.0.1-SNAPSHOT
Package – com. example.testng
Step 6 – Add Selenium, TestNG, Cucumber, and Masterthought dependencies to the project
Masterthought Dependency
<dependency>
			<groupId>net.masterthought</groupId>
			<artifactId>cucumber-reporting</artifactId>
			<version>${maven.cucumber.reporting.version}</version>
</dependency>
Masterthought Plugin
<plugin>
		<groupId>net.masterthought</groupId>
		<artifactId>maven-cucumber-reporting</artifactId>
		<version>${maven.cucumber.reporting.version}</version>

		<executions>
			<execution>
				<id>execution</id>
				<phase>test</phase>
				<goals>
					<goal>generate</goal>
				</goals>
				<configuration>
					<projectName>Cucumber Reporting Example</projectName>
					<outputDirectory>${project.build.directory}/cucumber-report-html</outputDirectory>
					<inputDirectory>${project.build.directory}</inputDirectory>
					<jsonFiles>
						<param>**/*.json</param>
					</jsonFiles>
				</configuration>
			</execution>
		</executions>
</plugin>
The complete POM.xml for the project is shown below:-
<project xmlns="http://maven.apache.org/POM/4.0.0" xmlns:xsi="http://www.w3.org/2001/XMLSchema-instance" xsi:schemaLocation="http://maven.apache.org/POM/4.0.0 https://maven.apache.org/xsd/maven-4.0.0.xsd">
	<modelVersion>4.0.0</modelVersion>
	<groupId>com.example</groupId>
	<artifactId>CucumberReportingTestNG_Demo</artifactId>
	<version>0.0.1-SNAPSHOT</version>

	<properties>
		<project.build.sourceEncoding>UTF-8</project.build.sourceEncoding>
		<cucumber.version>7.6.0</cucumber.version>
		<selenium.version>4.3.0</selenium.version>
		<webdrivermanager.version>5.2.1</webdrivermanager.version>
		<testng.version>7.6.0</testng.version>
		<apache.common.version>2.4</apache.common.version>
		<maven.compiler.plugin.version>3.10.1</maven.compiler.plugin.version>
		<maven.surefire.plugin.version>3.0.0-M7</maven.surefire.plugin.version>
		<maven.compiler.source.version>11</maven.compiler.source.version>
		<maven.compiler.target.version>11</maven.compiler.target.version>
		<maven.cucumber.reporting.version>5.7.4</maven.cucumber.reporting.version>
	</properties>

	<dependencies>

		<dependency>
			<groupId>io.cucumber</groupId>
			<artifactId>cucumber-java</artifactId>
			<version>${cucumber.version}</version>
		</dependency>

		<dependency>
			<groupId>io.cucumber</groupId>
			<artifactId>cucumber-testng</artifactId>
			<version>${cucumber.version}</version>
			<scope>test</scope>
		</dependency>

		<!-- Selenium -->
		<dependency>
			<groupId>org.seleniumhq.selenium</groupId>
			<artifactId>selenium-java</artifactId>
			<version>${selenium.version}</version>
		</dependency>

		<!-- Web Driver Manager -->
		<dependency>
			<groupId>io.github.bonigarcia</groupId>
			<artifactId>webdrivermanager</artifactId>
			<version>${webdrivermanager.version}</version>
		</dependency>

		<!-- TestNG -->
		<dependency>
			<groupId>org.testng</groupId>
			<artifactId>testng</artifactId>
			<version>${testng.version}</version>
			<scope>test</scope>
		</dependency>

		<!-- Apache Common -->
		<dependency>
			<groupId>org.apache.directory.studio</groupId>
			<artifactId>org.apache.commons.io</artifactId>
			<version>${apache.common.version}</version>
		</dependency>

       <!-- Cucumber Reporting-->
		<dependency>
			<groupId>net.masterthought</groupId>
			<artifactId>cucumber-reporting</artifactId>
			<version>${maven.cucumber.reporting.version}</version>
		</dependency>

	</dependencies>

	<build>
		<plugins>
			<plugin>
				<groupId>org.apache.maven.plugins</groupId>
				<artifactId>maven-compiler-plugin</artifactId>
				<version>${maven.compiler.plugin.version}</version>
				<configuration>
					<source>${maven.compiler.source.version}</source>
					<target>${maven.compiler.target.version}</target>
				</configuration>
			</plugin>
			<plugin>
				<groupId>org.apache.maven.plugins</groupId>
				<artifactId>maven-surefire-plugin</artifactId>
				<version>${maven.surefire.plugin.version}</version>
				<configuration>
					<testFailureIgnore>True</testFailureIgnore>
					<suiteXmlFiles>
						<suiteXmlFile>testng.xml</suiteXmlFile>
					</suiteXmlFiles>
				</configuration>
			</plugin>

			<plugin>
				<groupId>net.masterthought</groupId>
				<artifactId>maven-cucumber-reporting</artifactId>
				<version>${maven.cucumber.reporting.version}</version>

				<executions>
					<execution>
						<id>execution</id>
						<phase>test</phase>
						<goals>
							<goal>generate</goal>
						</goals>
						<configuration>
							<projectName>Cucumber Reporting Example</projectName>
							<outputDirectory>${project.build.directory}/cucumber-report-html</outputDirectory>
							<inputDirectory>${project.build.directory}</inputDirectory>
							<jsonFiles>
								<param>**/*.json</param>
							</jsonFiles>
						</configuration>
					</execution>
				</executions>
			</plugin>
		</plugins>
	</build>
</project>
Step 7 – Create a feature file (LoginPage.feature) containing all the test scenarios under src/test/resources/features
It is recommended to create a features folder in src/test/resources directory. Create all the feature files in this features folder. Feature file should be saved as an extension of .feature.
Feature: Login to HRM Application

Background:
    Given User is on HRMLogin page "https://opensource-demo.orangehrmlive.com/"

   @ValidCredentials
   Scenario: Login with valid credentials

    When User enters username as "Admin" and password as "admin123"
    Then User should be able to login successfully and new page open

   @InvalidCredentials
   Scenario Outline: Login with invalid credentials

    When User enters username as "<username>" and password as "<password>"
    Then User should be able to see error message "<errorMessage>"

  Examples:
   | username   | password  | errorMessage                       |
   | $$$$$        | ££££££££  | Invalid credentials               |
   | admin        | Admin123  | Invalid credentials              |
Step 8 – Create the test code locating the web elements in src/main/java
LoginPageLocators
import org.openqa.selenium.WebElement;
import org.openqa.selenium.support.FindBy;

public class LoginPageLocators {

	@FindBy(name = "username")
    public WebElement userName;

    @FindBy(name = "password")
    public WebElement password;

    @FindBy(id = "logInPanelHeading")
    public WebElement titleText;

    @FindBy(xpath = "//*[@id='app']/div[1]/div/div[1]/div/div[2]/div[2]/form/div[3]/button")
    public WebElement login;

    @FindBy(xpath = "//*[@id='app']/div[1]/div/div[1]/div/div[2]/div[2]/div/div[1]/div[1]/p")
    public  WebElement errorMessage;

    @FindBy(xpath = "//*[@href='https://www.facebook.com/OrangeHRM/mycompany']") //Invalid Xpath
    public  WebElement faceBookIcon;

    @FindBy(xpath = "//*[@id='app']/div[1]/div/div[1]/div/div[2]/div[2]/form/div[1]/div/span")
    public WebElement missingUsernameErrorMessage;
}
HomePageLocators
import org.openqa.selenium.WebElement;
import org.openqa.selenium.support.FindBy;

public class HomePageLocators {

	@FindBy(xpath = "//*[@id='app']/div[1]/div[1]/header/div[1]/div[1]/span/h6")
	public  WebElement homePageUserName;

}
LoginPageActions
import org.openqa.selenium.support.PageFactory;
import com.example.testng.locators.LoginPageLocators;
import com.example.testng.utils.HelperClass;

public class LoginPageActions {

LoginPageLocators loginPageLocators = null;

    public LoginPageActions() {

    	this.loginPageLocators = new LoginPageLocators();

		PageFactory.initElements(HelperClass.getDriver(),loginPageLocators);
	}

    public void login(String strUserName, String strPassword) {

        // Fill user name
    	loginPageLocators.userName.sendKeys(strUserName);

        // Fill password
    	loginPageLocators.password.sendKeys(strPassword);

        // Click Login button
    	loginPageLocators.login.click();

    }

    //Get the title of Login Page")
    public String getLoginTitle() {
        return loginPageLocators.titleText.getText();
    }

    // Get the error message of Login Page
    public String getErrorMessage() {
        return loginPageLocators.errorMessage.getText();
    }

}
HomePageActions
import org.openqa.selenium.support.PageFactory;
import com.example.testng.locators.HomePageLocators;
import com.example.testng.utils.HelperClass;

public class HomePageActions {

	HomePageLocators homePageLocators = null;

	public HomePageActions() {

		this.homePageLocators = new HomePageLocators();

		PageFactory.initElements(HelperClass.getDriver(),homePageLocators);
    }

    // Get the User name from Home Page
    public String getHomePageText() {
        return homePageLocators.homePageUserName.getText();
    }

}
HelperClass
import java.time.Duration;
import org.openqa.selenium.WebDriver;
import org.openqa.selenium.chrome.ChromeDriver;
import io.github.bonigarcia.wdm.WebDriverManager;

public class HelperClass {

	private static HelperClass helperClass;

	private static WebDriver driver;
    public final static int TIMEOUT = 10;

	 private HelperClass() {

			WebDriverManager.chromedriver().setup();
	    	driver = new ChromeDriver();
	    	driver.manage().timeouts().implicitlyWait(Duration.ofSeconds(TIMEOUT));
	        driver.manage().window().maximize();

	 }

    public static void openPage(String url) {
        driver.get(url);
    }

	public static WebDriver getDriver() {
		return driver;

	}

	public static void setUpDriver() {

		if (helperClass==null) {

			helperClass = new HelperClass();
		}
	}

	 public static void tearDown() {

		 if(driver!=null) {
			 driver.close();
			 driver.quit();
		 }

		 helperClass = null;

	 }

}
Step 9 – Create the Step Definition class or Glue Code in src/test/java
It is recommended to create a definitions folder in src/test/java directory. The StepDefinition files should be created in this definitions directory. within the folder called definitions.
LoginPageDefinitions
import org.junit.Assert;
import com.example.junit.actions.ForgetPasswordPageActions;
import com.example.junit.actions.HomePageActions;
import com.example.junit.actions.LoginPageActions;
import com.example.junit.utils.HelperClass;
import io.cucumber.java.en.Given;
import io.cucumber.java.en.Then;
import io.cucumber.java.en.When;

public class LoginPageDefinitions{

	LoginPageActions objLogin = new LoginPageActions();
    HomePageActions objHomePage = new HomePageActions();
    ForgetPasswordPageActions objForgotPasswordPage = new ForgetPasswordPageActions();


    @Given("User is on HRMLogin page {string}")
    public void loginTest(String url) {

    	HelperClass.openPage(url);

    }

    @When("User enters username as {string} and password as {string}")
    public void goToHomePage(String userName, String passWord) {

        // login to application
        objLogin.login(userName, passWord);

        // go the next page

    }

    @Then("User should be able to login successfully and new page open")
    public void verifyLogin() {

        // Verify home page
        Assert.assertTrue(objHomePage.getHomePageText().contains("Dashboard"));

    }

    @Then("User should be able to see error message {string}")
    public void verifyErrorMessage(String expectedErrorMessage) {

        // Verify home page
        Assert.assertEquals(objLogin.getErrorMessage(),expectedErrorMessage);

    }

}
Hooks
import com.example.junit.utils.HelperClass;
import io.cucumber.java.After;
import io.cucumber.java.Before;

public class Hooks {

	@Before
    public static void setUp() {

       HelperClass.setUpDriver();
    }

	@After
	public static void tearDown() {

		HelperClass.tearDown();
	}
}
Step 10 – Create a TestNG Cucumber Runner class in src/test/java
We need to create a class called Runner class to run the tests. This class will use the TestNG annotation @RunWith(), which tells TestNG what is the test runner class. TestRunner should be created under src/test/java within the folder called runner.
AbstractTestNGCucumberTests – Runs each cucumber scenario found in the features as a separate test.
import io.cucumber.testng.AbstractTestNGCucumberTests;
import io.cucumber.testng.CucumberOptions;

@CucumberOptions(tags = "", features = "src/test/resources/features/LoginPage.feature", glue = "com.example.testng.definitions",
    plugin= {"pretty", "html:test-output","json:target/cucumber/cucumber.json", "html:target/cucumber-html-report"})

public class CucumberRunnerTests extends AbstractTestNGCucumberTests {

}
Step 11 – Create testng.xml
TestNG.xml is used to run multiple tests in a single execution.
<?xml version="1.0" encoding="UTF-8"?>
<!DOCTYPE suite SYSTEM "https://testng.org/testng-1.0.dtd">
<suite name="Suite">
  <test name="Cucumber Reporting">

  <classes>
  <class name = "com.example.testng.runner.CucumberRunnerTests"/>
  </classes>
  </test> <!-- Test -->
</suite> <!-- Suite -->
Step 12 – Run the tests from Command Line
Use the below command to execute the tests.
mvn clean test
The output of the above program is

Step 13 – Cucumber Report Generation
Refresh your project and check inside \target\cucumber-html-reports that the report generated with name feature-overview.

There are different types of HTML reports gets generated as a part of the test execution cycle.
1. feature-overview – This HTML report gives an overall overview of test execution. Main HTML report which covers all different sections like Features, Tags, Steps, and Failures.

2. failures-overview – This HTML report gives an overview of all failed tests.

3. step-overview – This HTML report shows step statistics for the current cycle.

4. tag-overview – This HTML report shows passing and failing statistics for different tags used in test execution.

Congratulations on making it through this tutorial and hope you found it useful! Happy Learning!! Cheers!!

I followed the details as mentioned here, but when I ran using mvn clean test, it is created the json alone not the html report foder
LikeLike
Are you using Eclipse or IntelliJ? IntelliJ don’t generate html report automatically. You need to make changes in the configuration
LikeLike
what kind of changes are required in intelliJ
LikeLike
Go to the Run option present at the top menu ->Edit Configuration -> select Listeners tab -> Use default listeners should be checked.
LikeLike
test output text file data not displaying in the project
LikeLike
Hi, Pls let me know how to send the overview-features.html report in email, because when I use to send the email in the @AfterSuite, but report is getting generated after email is sent.
LikeLike