In this tutorial, I will explain the Integration of Serenity BDD with Rest Assured for the testing of RestFul API.
Table Of Contents
- What is Serenity BDD?
- What is Rest Assured?
- Prerequisite
- Dependency List
- Project Structure
- Implementation Steps
What is Serenity BDD?
Serenity BDD is an open-source library that aims to make the idea of living documentation a reality.
What is Rest Assured?
Rest Assured is one of the most powerful libraries for testing RESTful API using Java language. Rest-Assured is a Java-based library that is used to test RESTful Web Services. This library behaves like a headless Client to access REST web services. The rest-Assured library also provides the ability to validate the HTTP Responses received from the server.
Prerequisite
- Java 17 installed
- Maven installed
- Eclipse or IntelliJ installed
Dependency List
- Java 17
- Maven – 3.9.5
- Serenity – 4.0.18
- Serenity Rest Assured – 4.0.18
- Rest Assured – 5.3.2
- JUnit – 4.13.2
- Maven Surefire Plugin – 3.1.2
- Maven Failsafe Plugin – 3.1.2
- Maven Compiler Plugin – 3.11.0
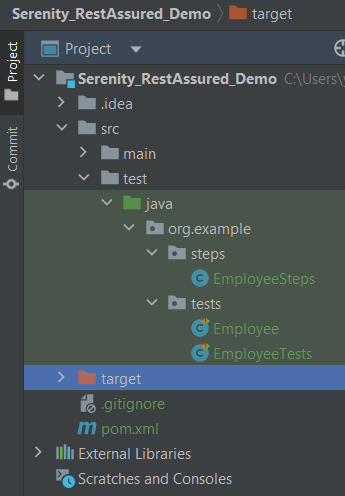
Project Structure
Implementation Steps
Step 1 – Update the Properties section in Maven pom.xml
<properties>
    <project.build.sourceEncoding>UTF-8</project.build.sourceEncoding>
    <serenity.version>4.0.18</serenity.version>
    <serenity.maven.version>4.0.18</serenity.maven.version>
    <junit.version>4.13.2</junit.version>
    <rest.assured.version>5.3.2</rest.assured.version>
    <json.version>20231013</json.version>
    <maven.surefire.plugin.version>3.1.2</maven.surefire.plugin.version>
    <maven.failsafe.plugin.version>3.1.2</maven.failsafe.plugin.version>
    <maven.compiler.plugin.version>3.11.0</maven.compiler.plugin.version>
    <maven.compiler.source>17</maven.compiler.source>
    <maven.compiler.target>17</maven.compiler.target>
    <tags></tags>
  </properties>
Step 2 – Add dependencies to POM.xml
Add Serenity, Serenity Cucumber, Serenity Rest Assured, Rest Assured, and JUnit dependencies to POM.xml.
<dependencies>
   <dependency>
            <groupId>net.serenity-bdd</groupId>
            <artifactId>serenity-core</artifactId>
            <version>${serenity.version}</version>
            <scope>test</scope>
        </dependency>

        <dependency>
            <groupId>net.serenity-bdd</groupId>
            <artifactId>serenity-junit</artifactId>
            <version>${serenity.version}</version>
            <scope>test</scope>
        </dependency>

        <dependency>
            <groupId>net.serenity-bdd</groupId>
            <artifactId>serenity-screenplay-rest</artifactId>
            <version>${serenity.version}</version>
            <scope>test</scope>
        </dependency>

        <dependency>
            <groupId>net.serenity-bdd</groupId>
            <artifactId>serenity-rest-assured</artifactId>
            <version>${serenity.version}</version>
            <scope>test</scope>
        </dependency>

        <dependency>
            <groupId>io.rest-assured</groupId>
            <artifactId>rest-assured</artifactId>
            <version>${rest.assured.version}</version>
            <scope>test</scope>
        </dependency>

        <dependency>
            <groupId>junit</groupId>
            <artifactId>junit</artifactId>
            <version>${junit.version}</version>
            <scope>test</scope>
        </dependency>

       <dependency>
           <groupId>org.json</groupId>
           <artifactId>json</artifactId>
           <version>${json.version}</version>
        </dependency>

    </dependencies>
Step 3 – Update the Build Section of pom.xml
<build>
        <plugins>
            <plugin>
                <groupId>org.apache.maven.plugins</groupId>
                <artifactId>maven-surefire-plugin</artifactId>
                <version>${maven.surefire.plugin.version}</version>
                <configuration>
                    <skip>true</skip>
                </configuration>
            </plugin>
            <plugin>
                <artifactId>maven-failsafe-plugin</artifactId>
                <version>${maven.failsafe.plugin.version}</version>
                <configuration>
                    <includes>
                        <include>**/*.java</include>
                        <include>**/*.Tests</include>
                    </includes>
                </configuration>
                <executions>
                    <execution>
                        <goals>
                            <goal>integration-test</goal>
                            <goal>verify</goal>
                        </goals>
                    </execution>
                </executions>
            </plugin>
            <plugin>
                <groupId>org.apache.maven.plugins</groupId>
                <artifactId>maven-compiler-plugin</artifactId>
                <version>${maven.compiler.plugin.version}</version>
                <configuration>
                    <source>${maven.compiler.source}</source>
                    <target>${maven.compiler.target}</target>
                </configuration>
            </plugin>
           <plugin>
               <groupId>net.serenity-bdd.maven.plugins</groupId>
               <artifactId>serenity-maven-plugin</artifactId>
               <version>${serenity.version}</version>
               <dependencies>
                  <dependency>
                       <groupId>net.serenity-bdd</groupId>
                       <artifactId>serenity-single-page-report</artifactId>
                       <version>${serenity.version}</version>
                  </dependency>
               </dependencies>
               <configuration>
                   <tags>${tags}</tags>
                   <reports>single-page-html</reports>
               </configuration>
               <executions>
                  <execution>
                      <id>serenity-reports</id>
                      <phase>post-integration-test</phase>
                      <goals>
                          <goal>aggregate</goal>
                      </goals>
                   </execution>
               </executions>
           </plugin>
        </plugins>
    </build>
Step 4 – Create the Test Code in src/java/test directory
There are 2 ways to create the same test. One approach is to have a Definition file that contains all the test code as shown below.
package org.example.tests;

import io.restassured.response.Response;
import net.serenitybdd.rest.SerenityRest;
import org.json.JSONObject;
import org.junit.Test;

import static org.hamcrest.Matchers.equalTo;

public class Employee {
    private static final String URL = "https://reqres.in/api";
    public Response response;

    int id = 2;

    @Test
    public void verifyValidUser() {

        response = SerenityRest
                .given()
                .contentType("application/json")
                .header("Content-Type", "application/json")
                .when()
                .get(URL + "/users/" + id);

        SerenityRest.restAssuredThat(response -> response.statusCode(200)
                .body("data.id", equalTo(2))
                .body("data.email", equalTo("janet.weaver@reqres.in"))
                .body("data.first_name", equalTo("Janet"))
                .body("data.last_name", equalTo("Weaver")));

    }

    @Test
    public void verifyCreateUser() {
        JSONObject data = new JSONObject();

        data.put("name", "Test");
        data.put("job", "Test Architect");

        response = SerenityRest
                .given()
                .contentType("application/json")
                .header("Content-Type", "application/json")
                .body(data.toString())
                .when()
                .post(URL + "/users");

        SerenityRest.restAssuredThat(response -> response.statusCode(201)
                .body("name", equalTo("Test"))
                .body("job", equalTo("Test Architect")));

    }

}
Another approach is that all tests are split into reusable blocks called “steps“. The main principle of the BDD approach is that we are trying to keep complexity to a high-level human-readable level. First of all, let’s create a separate package to keep our steps. It is always better to keep them separate as it shows which classes contain reusable components. It is better to make steps smaller. So let’s make separate reusable steps from our tests:
package org.example.steps;

import io.restassured.response.Response;
import net.serenitybdd.annotations.Step;
import net.serenitybdd.rest.SerenityRest;
import org.json.JSONObject;

import static org.hamcrest.Matchers.equalTo;

public class EmployeeSteps {
    private static final String URL = "https://reqres.in/api";
    public Response response;

    @Step("Search user by id {0}")
    public void sendUser(int id) {
        response = SerenityRest
                .given()
                .contentType("application/json")
                .header("Content-Type", "application/json")
                .when()
                .get(URL + "/users/" + id);

    }

    @Step("Create a new user")
    public void createUser() {

        JSONObject data = new JSONObject();

        data.put("name", "Test");
        data.put("job", "Test Architect");

        response = SerenityRest
                .given()
                .contentType("application/json")
                .header("Content-Type", "application/json")
                .body(data.toString())
                .when()
                .post(URL + "/users");

    }

    @Step("Verify the status code {0}")
    public void verifyStatusCode(int expectedStatusCode) {
        SerenityRest.restAssuredThat(response -> response.statusCode(expectedStatusCode));
    }

    @Step("Verify the user id {0}")
    public void verifyId(int expectedId) {
        SerenityRest.restAssuredThat(response -> response.body("data.id", equalTo(expectedId)));
    }

    @Step("Verify the user first name {0}")
    public void verifyFirstName(String expectedFirstName) {

        SerenityRest.restAssuredThat(response -> response.body("data.first_name", equalTo(expectedFirstName)));
    }

    @Step("Verify the user last name {0}")
    public void verifyLastName(String expectedLastName) {
        SerenityRest.restAssuredThat(response -> response.body("data.last_name", equalTo(expectedLastName)));
    }

    @Step("Verify the user email {0}")
    public void verifyEmail(String expectedEmail) {
        SerenityRest.restAssuredThat(response -> response.body("data.email", equalTo(expectedEmail)));
    }

    @Step("Verify the new user name {0}")
    public void verifyNewUserName(String expectedName) {
        SerenityRest.restAssuredThat(response -> response.body("name", equalTo(expectedName)));
    }

    @Step("Verify the new user job {0}")
    public void verifyNewUserJob(String expectedJob) {
        SerenityRest.restAssuredThat(response -> response.body("job", equalTo(expectedJob)));
    }

}
Now our steps are ready. Let’s refactor the main class with our tests:
package org.example.tests;

import net.serenitybdd.annotations.Steps;
import net.serenitybdd.annotations.Title;
import net.serenitybdd.junit.runners.SerenityRunner;
import org.example.steps.EmployeeSteps;
import org.junit.Test;
import org.junit.runner.RunWith;

@RunWith(SerenityRunner.class)
public class EmployeeTests {
    @Steps
    EmployeeSteps employeeSteps;

    @Test
    @Title("Get User")
    public void verifyValidUser() {
        employeeSteps.sendUser(2);
        employeeSteps.verifyStatusCode(200);
        employeeSteps.verifyId(2);
        employeeSteps.verifyFirstName("Janet");
        employeeSteps.verifyLastName("Weaver");
        employeeSteps.verifyEmail("janet.weaver@reqres.in");

    }

    @Test
    @Title("Create User")
    public void createValidUser() {

        employeeSteps.createUser();
        employeeSteps.verifyStatusCode(201);
        employeeSteps.verifyNewUserName("Test");
        employeeSteps.verifyNewUserJob("Test Architect");

    }

}
Step 5 – Execute the tests
One more important thing we added is the “@RunWith(SerenityRunner.class)” annotation on top of the class. As we have now organized our structure to meet some basic Serenity principles, we are ready to run the test using Serenity. This time (after we added the mentioned annotation) these tests will be run using the “SerenityRunner”. For that we can use exactly the same command to run our tests:
mvn clean verify
The output of the above program is
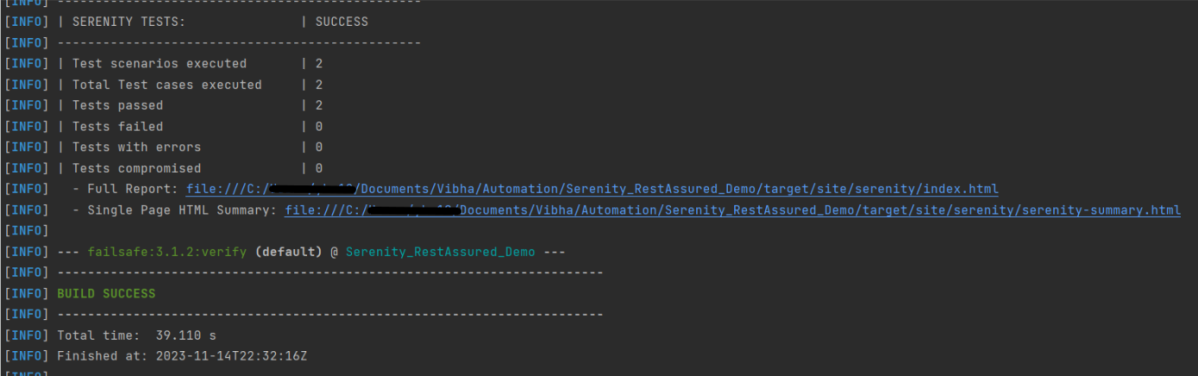
In the console, you should find printed messages for tests to start. At the same time under the target directory you can find the HTML-generated report we were talking about before:
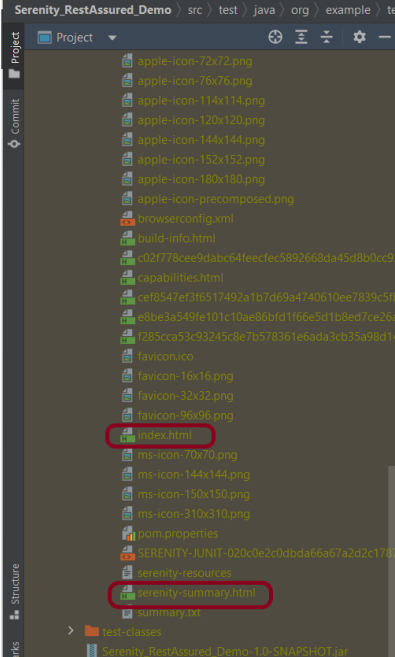
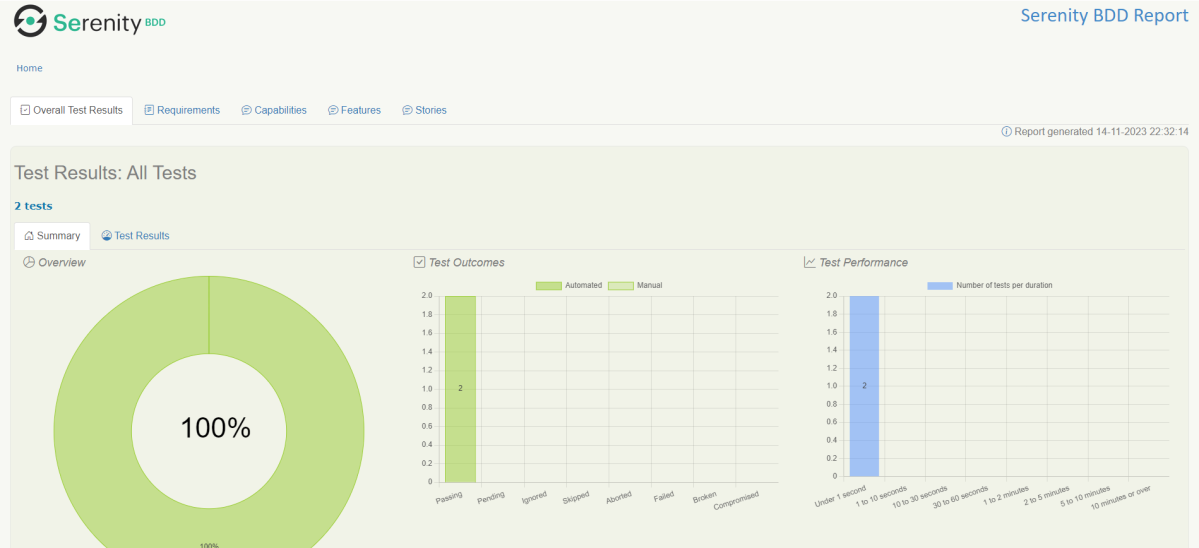
You can open the report in any browser:

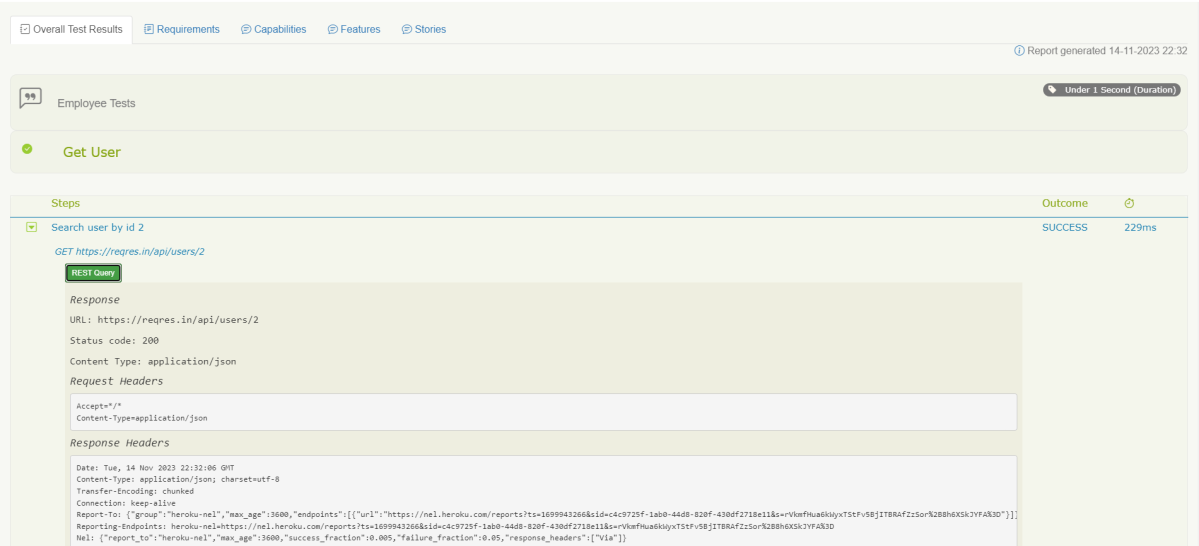
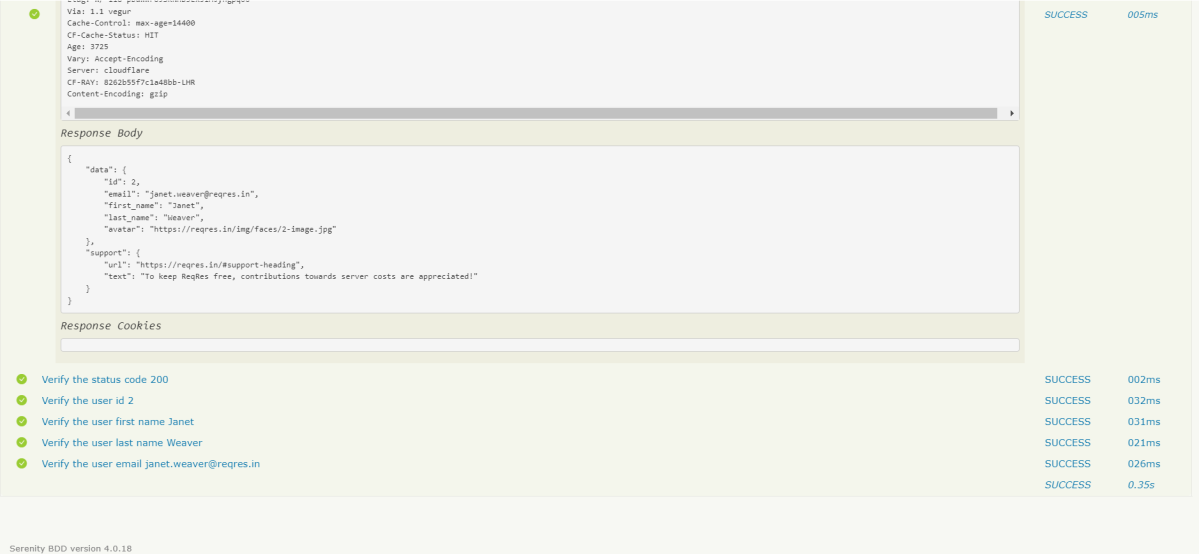
If you click on any test you should see a detailed description of the test steps:

One of the most important features of the Serenity and REST Assured integration is that by using detailed reporting, you can easily validate all requests and response details even if you are not adding any logs inside tests. Like the example above, for each executed REST request you can click the button “REST Query” and get a detailed request and response description:
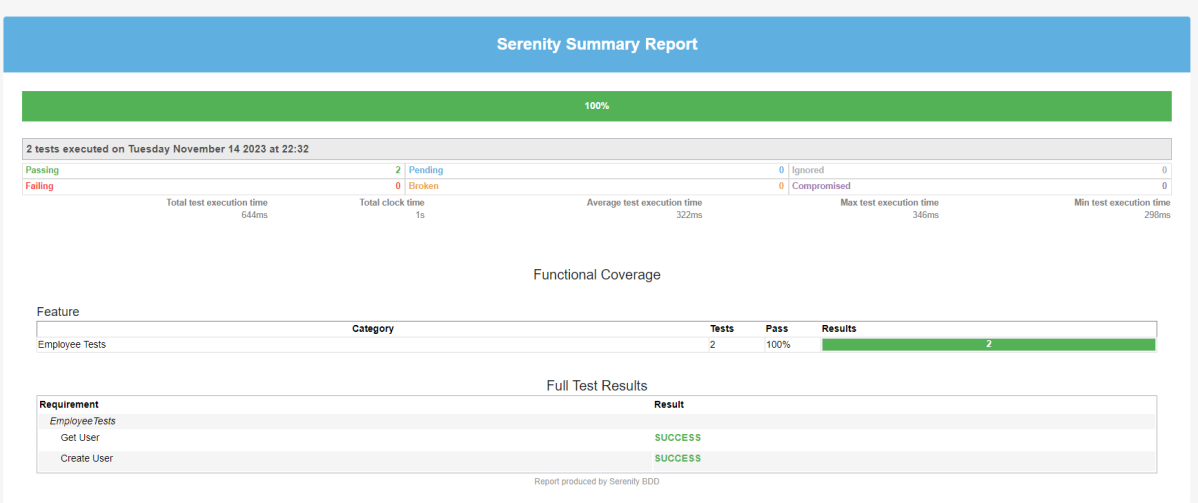
There is another very useful Serenity Report – Serenity Symmary.html
As you can see, Serenity and REST Assured provide you with a wonderful combination. REST Assured keeps API testing clean and easy to maintain, while Serenity gives you outstanding test reporting and flexibility in running and grouping your tests inside a test suite.
We are done! Congratulations on making it through this tutorial and hope you found it useful! Happy Learning!!
