Gradle is an open-source build automation tool that is designed to be flexible enough to build almost any type of software. Gradle runs on the JVM and you must have a Java Development Kit (JDK) installed to use it. Several major IDEs allow you to import Gradle builds and interact with them: Android Studio, IntelliJ IDEA, Eclipse, and NetBeans.
Java is a general-purpose programming language that is a concurrent, class-based, and object-oriented language. Java follows the concept of “write once and run anywhere (WORA).” This means that compiled Java code can be run on all different platforms that support Java. There’s no need for recompilation.
Maven is a powerful and widely used build automation and project management tool primarily used for Java projects. It simplifies the process of managing a software project by providing a standard way to build, manage dependencies, and generate documentation.
GitLab is a web-based Git repository that provides free open and private repositories, issue-following capabilities, and wikis. It is a complete DevOps platform that enables professionals to perform all the tasks in a project from project planning and source code management to monitoring and security.
Why Use GitLab?
The primary advantage of using GitLab is that it allows all team members to collaborate at all stages of the project. GitLab provides tracking from planning to creation to assist developers in automating the entire DevOps lifecycle and achieving the best results possible. GitLab is becoming increasingly popular among developers due to its extensive set of features and code building blocks.
In this tutorial, I will explain how we can clone a project from GitLab in IntelliJ.
Implementation Steps
Clone the project from GitLab
Step 1 – Go to GitLab and select the project that you want to clone. Click on the blue colour “Clone” button, then copy the hyperlink as shown in the image. You can either Clone with SSH or Clone with HTTPS.
Import the cloned project in IntelliJ
Step 2– From the main menu, select Git -> Clone
Another way is File ->New -> Project from Version Control
Step 3 – In the Get from Version Controldialog, specify the URL of the remote repository you want to clone. This is retrieved from Step 1. Click the Clone button.
Step 4– A dialog box will appear to log in to GitLab. Provide the username and password of GitLab. Select the “Log In” button.
Step 5– When you import or clone a project for the first time, IntelliJ IDEA analyses it. If the IDE detects more than one configuration (for example, Eclipse and Gradle), it prompts you to select which configuration you want to use. Select the necessary configuration and click the OK button. I have selected the Maven project.
Step 6– Once I have selected the Maven project, a new dialog box will appear. IntelliJ asks you to either Trust the Project or Preview it in Safe Mode. I trust the project, so I have selected the Trust Project button.
Step 7– IntelliJ will ask if you want to open the project in the current window or New Window. It is always a good practice to open the project in a New Window.
Step 8– We have successfully imported the GitLab Repository as shown in the below image.
Congratulations on making it through this tutorial and hope you found it useful! Happy Learning!! Cheers!!
In this tutorial we will discuss to create a JUnit project using IntelliJ. We will be at first creating a simple Java Project and will add JUnit5 as well as create a Maven Project, then we will add a basic Class and a JUnitTest for it.
Step 2 – Right click on the project and select Open Module Settings.
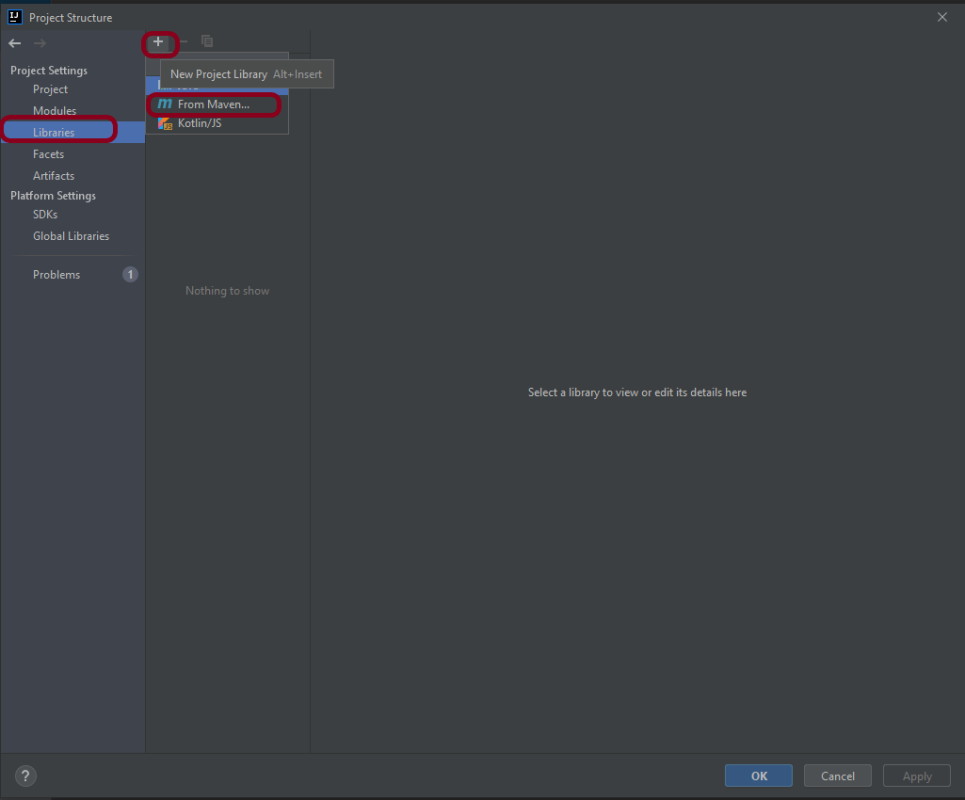
Step 3 – Go to the “Libraries” group, click the little plus (look up), and choose “From Maven…” option.
Step 4 – Search for “junit” — something like “junit:junit-4.13“. Click the “OK“ button.
Step 5– A new dialog will appear to confirm that “junit:junit:4.13.2” will be added to the module. Click the “OK“ button.
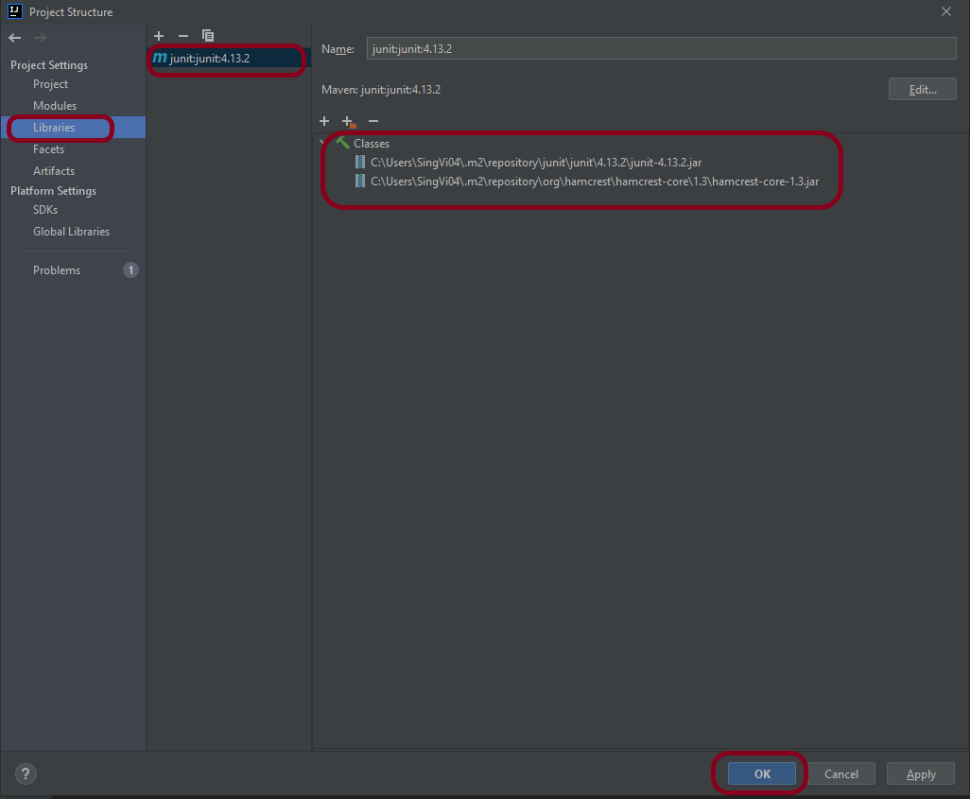
Step 6 – This screens shows that junit:junit:4.13.2 is added to the Libraries. It contains the highlighted classes – junit-4.13.2.jar and hamcrest-core-1.3.jar. Click the “OK” button.
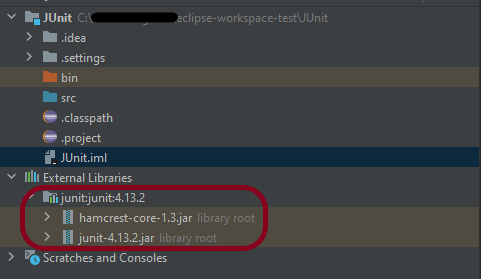
Step 7– This image shows that the Junit is added to the External Libraries.
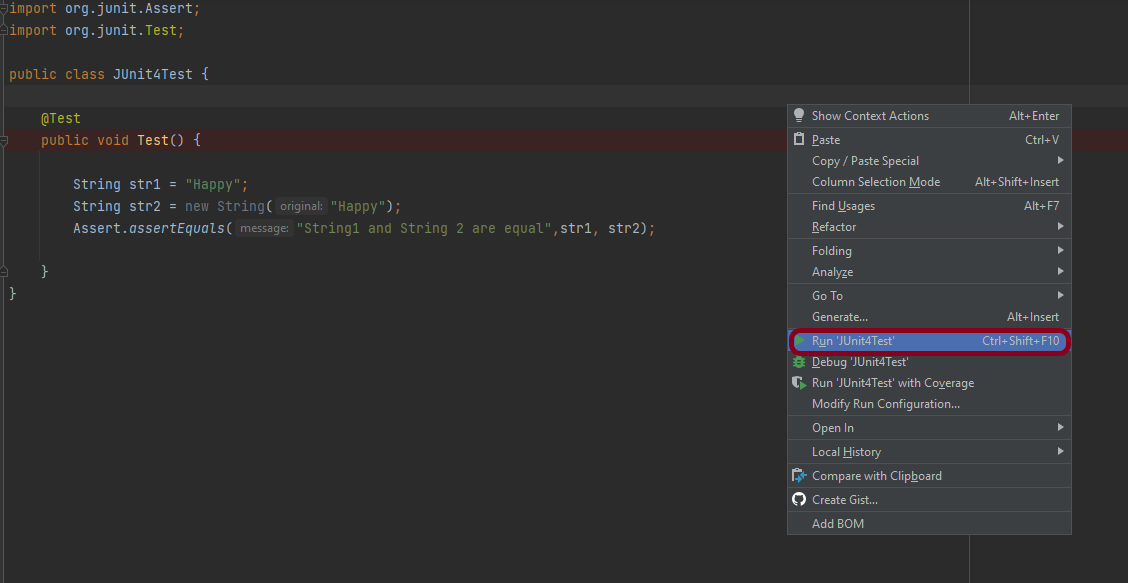
Step 8– Create a Java Class – JUnit4Test under src and create a JUnit test to verify that it is installed properly.
import org.junit.Assert;
import org.junit.Test;

public class JUnit4Test {

    @Test
    public void Test() {

        String str1 = "Happy";
        String str2 = new String("Happy");
        Assert.assertEquals("String1 and String 2 are equal",str1, str2);

    }
}
Step 9– There are many ways to run the test. One of the way is to Right-Click and select Run JUnit4Test
The successful execution of the test shows that the JUnit is configured properly.
Create a Maven Project
Add Junit dependency to the POM.xml and build the project.
Now we need to apply the changes in the build script. Press Ctrl+Shift+O or click Load Maven Changes in the notification that appears in the top-right corner of the editor.
Create a Java Class – JUnit4Test under src/test/javaand create a JUnit test to verify that it is installed properly.
import org.junit.Test;
import static org.junit.Assert.assertArrayEquals;

public class JUnitMavenTest {

    @Test
    public void Test() {

        String[] expected = {"happy","days","summer","spring"};
        String[] actual = {"happy","days","summer","spring"};

        assertArrayEquals("Expected and Actual Arrays are not equal",expected,actual);

    }
}
The output of the above program is
Similarly, to add JUnit5 we can add below mentioned dependencies to the POM.xml.
JUnit is an open source Unit Testing Framework for JAVA. JUnit is a simple framework to write repeatable tests. It is an instance of the xUnit architecture for unit testing frameworks.
This tutorial describes how to create and run a Spring application in IntelliJ IDEA. For this purpose, we need IntelliJ IDEA Ultimate Version. The Ultimate edition is commercial version (which has trial version for 30 days post which you needs license).
IntelliJ Ultimate will create a Spring Boot Maven project generated by Spring Initializr. This is the quickest way to create a Spring application, and IntelliJ IDEA provides a dedicated project wizard for it.
Steps to create a new Spring Boot project
Step 1 – From the main menu, select File -> New -> Project.
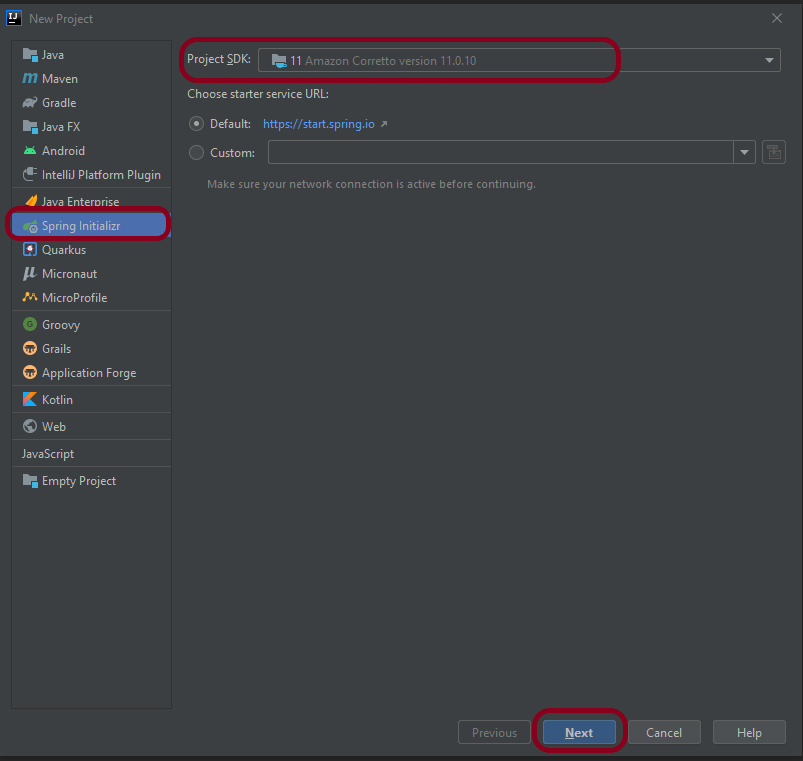
Step 2 – In the left pane of the New Project wizard, select Spring Initializr.
From the Project SDK list, select the JDK that you want to use in the project. I have used – 11 Amazon Corretto version 11.0.10.
If the JDK is installed on your computer, but not defined in the IDE, select Add JDK and specify the path to the JDK home directory.
If you don’t have the necessary JDK on your computer, please Download JDK from here.
To check if you have Java installed on your machine or not, please use the below command in command prompt.
java -version
This shows that Java 11 is already installed on my machine.
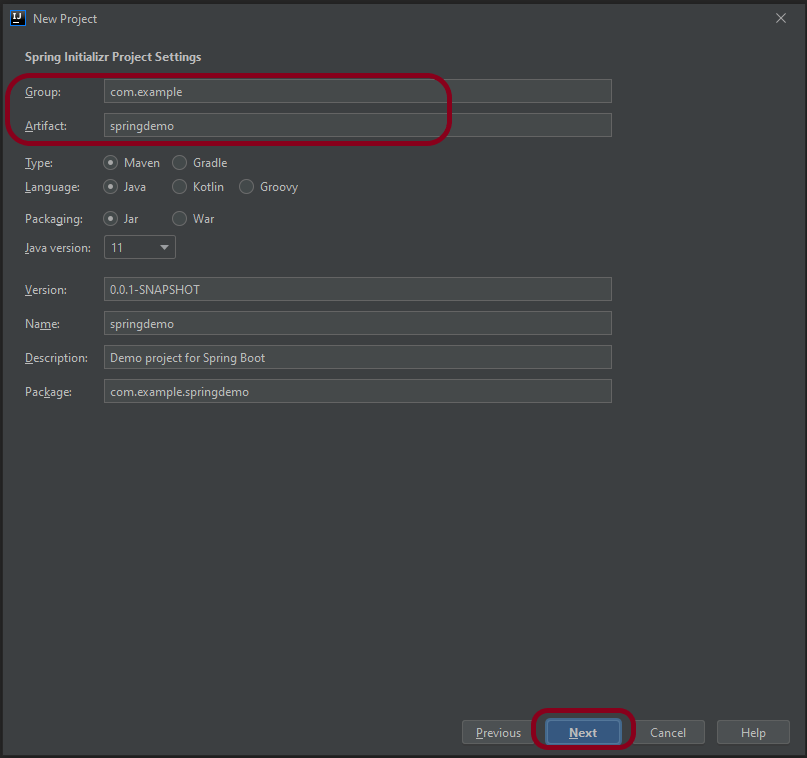
Step 4 – Mention the Group and Artifact name. Other Information is auto populated. Change them, if you want something different than already mentioned. Click the Nextbutton.
Step 5 – Select the Spring Web dependency under Web and click the Next button. I have used this combination because I want to create a RESTful application using Apache Tomcat.
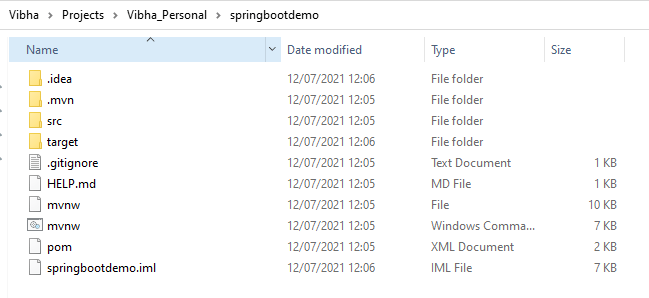
Step 6 – A new window appears where mention the location where you want to save the new project. I have created a folder springbootdemo and save the project files in that folder.
Step 7 – Below is the structure of new project on local machine
Step 8 – This is how the project looks in IntelliJ.
Spring Initializr generates a valid project structure with the following files:
A build configuration file – pom.xml for Maven.
A class with the main() method to bootstrap the application – SpringbootdemoApplication.
An empty JUnit test class – SpringbootdemoApplicationTests.
An empty Spring application configuration file – application.properties.
Step 9 – To run the application, Right click on the SpringbootdemoApplication.java class and select Run SpringbootdemoApplication
The springbootdemoApplication is started and this is the image of the execution screen.
GitLab is the open DevOps platform, delivered as a single application that spans the entire software development lifecycle. If you’re not using GitLab, your DevOps lifecycle is likely spread across any number of applications. These silos take overhead to integrate, manage, configure, and maintain, slowing down your team and your deployments. Moving to a single application will speed up your workflow and help you deliver better software, faster. To know more about GitLab, click here.
In this article, we will see how to push an existing project to GitLab using Eclipse IDE.
Implementation Steps
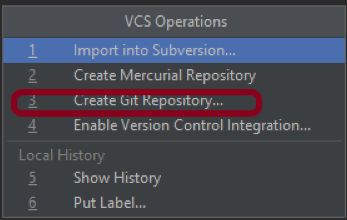
Step 1 – Go to Git at the top, select VCS ->VCS Oprations -> Create Git Repository.
This will convert the project to a Git project.
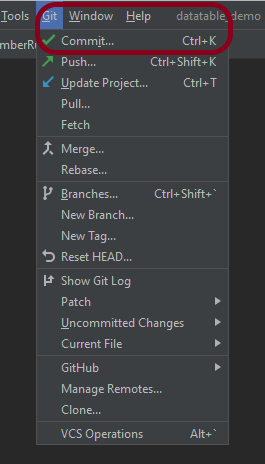
Step 2 – Go to Git option present at the top and then select “Commit” option.
Step 3 – This will show all the files which are uncommitted. Select the files you want to commit and mention a message in the below message box as “New project from IntelliJ to GitLab“. Click on the Commit button.
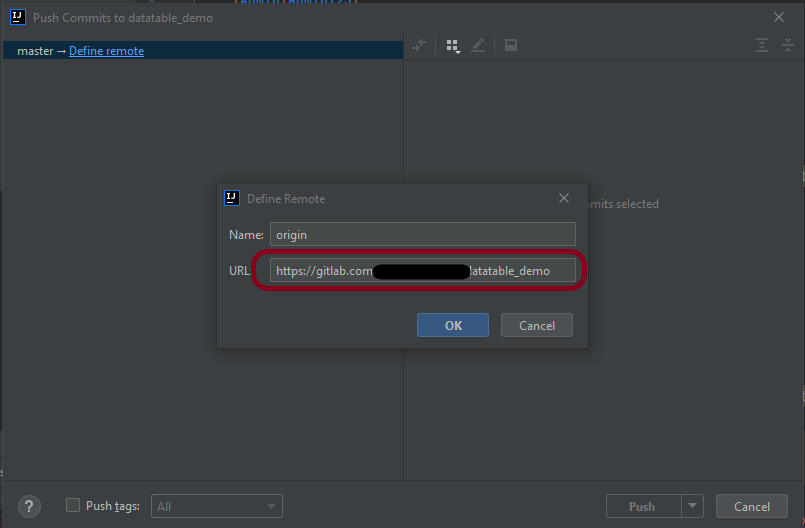
Step 4 – A window opens where we need to mention the location where the project should be pushed in GitLab.
Click the OK button. It will ask for credentials to the GitLab, provide them.
Step 5 – The below image shows that the latest code is moved to GitLab. Here, the origin branch is used to commit and pushed the changes. If we are using a local branch to commit and push the changes, then we need to create a merge request to merge the code of the new branch to the code of existing origin(master branch).
Congratulations on making it through this tutorial and hope you found it useful! Happy Learning!! Cheers!!
Step 1- Create a Project Folder and change the directory path to the folder where we want to save the latest files created post creation of the project. Here, I have created a folder – GradleIntelliJDemoFromCMD and changed the directory path.
cd C:\Users\Vibha\Projects\Vibha_Personal\GradleIntelliJDemoFromCMD
Step 2 – Open the Terminal in IntelliJ.
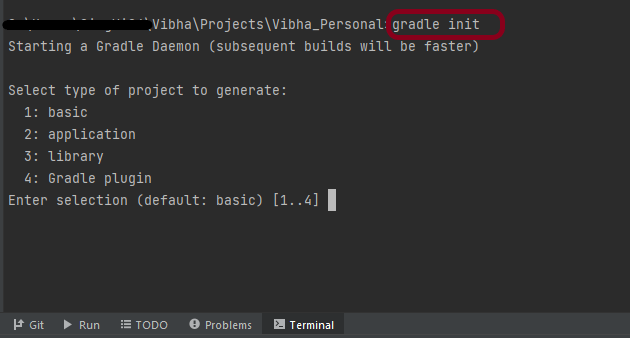
Step 3 – Gradle comes with a built-in task, called init , that initializes a new Gradle project in an empty folder. The init task uses the (also built-in) wrapper task to create a Gradle wrapper script, gradlew. Type the below command and press ENTER.
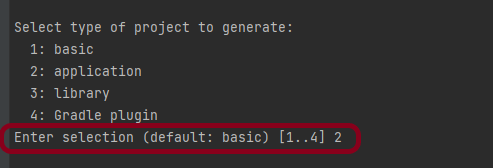
Step 4 – Select the type of project to generate. I’m selecting the application option as if I select basic, it won’t create a src directory. Type 2 and press ENTER.
Step 5 – Select implementation language. This is a Java project, so TYPE 3(Java) and press ENTER.
Step 6 – Select build script DSL (Domain Specific Language) – As in Maven POM.xml (XML) is created to build a script file, here we can use Groovy or Kotlin to build the script file. Type 1 (Groovy) and press ENTER.
Step 7 – Select Test Framework – There are 4 different test frameworks. Depending on your requirement, select an option. I have selected 1 (JUnit 4) and press ENTER.
Step 8 – It needs the Project name and Source Package name. If I won’t provide the project name, it will take by default my current folder name which is Gradle_Project. Similarly, if I won’t provide the Source Package name, then it will provide the current project name as Source Package Name.
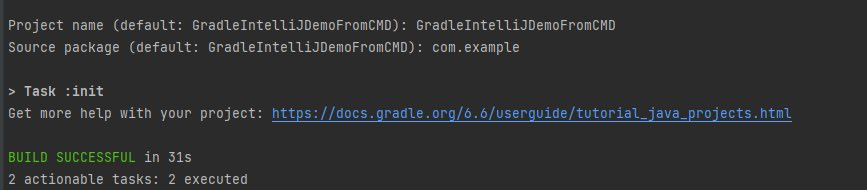
Project name – GradleIntelliJDemoFromCMD Source Package – com.example
Press ENTER. init script will run and create a Gradle project. You can see as the build is successfull.
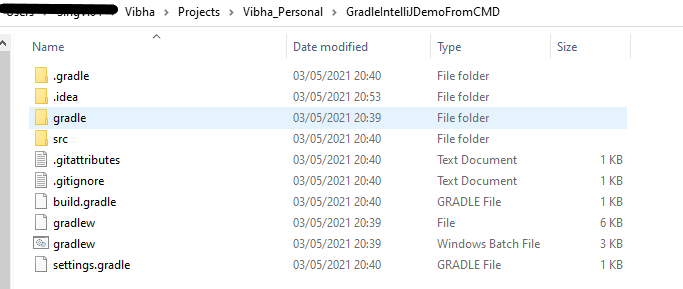
Step 9 – The project is created and placed under the folder GradleIntelliJDemoFromCMD as shown below.
This project structure will have below mentioned files:-
In the previous tutorial, I have explained How to create a Java Gradle in IntelliJ. This tutorial will explain How to import the Java Gradle project in IntelliJ.
Steps to follow:-
Step 1 – Open IntelliJ IDEA and Welcome Screen appears. Click the Open button present on Welcome Screen.
Step 2 – Navigate to your Gradle project and select the top-level folder. Select the project you want to Import. Select the OK button to proceed to the next screen.
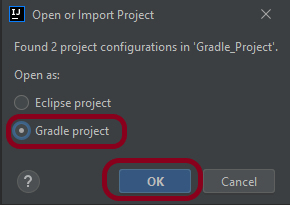
Step 3 – A screen appears to Open or Import project. It will have all the possible configurations for the project. As this is a Gradle project, select Gradle project and click the OK Button.
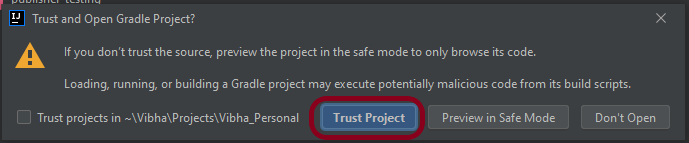
Step 4 – A warning message box will appear. Select Trust Project button and move forward.
Step 5 – The imported project structure in IntelliJ is shown below.
Step 6 – This screen shows that the project is imported and build successfully.
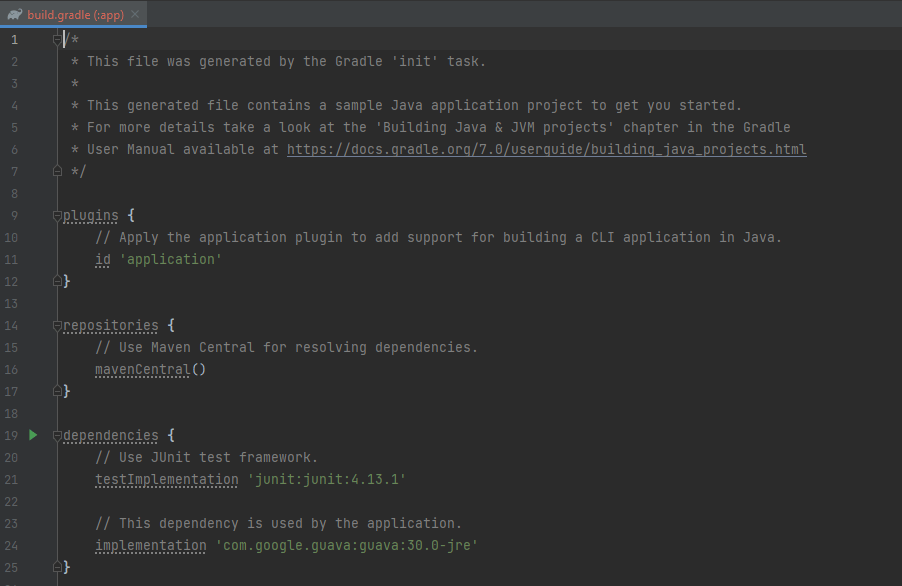
Step 7 – This screen shows the build.gradle of the imported project.
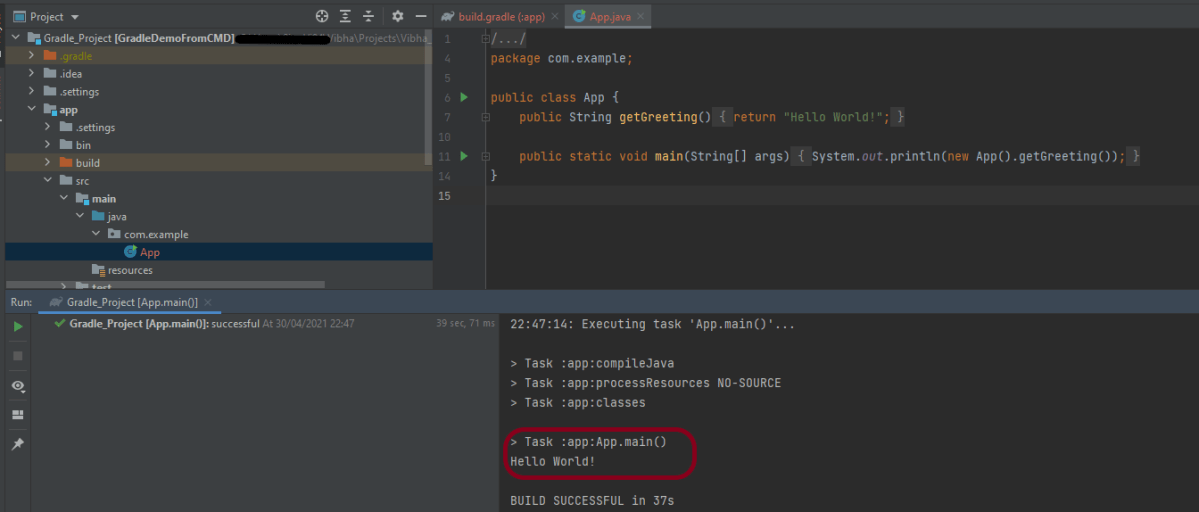
Step 8 – Run the test present in the project. Here, I have run App. Right-click on App ->Run ‘App.main()’. The below screen shows that the project is imported successfully.
That’s it! We are done!!!
Congratulations on making it through this tutorial and hope you found it useful! Happy Learning!! Cheers!!