What is GitLab?
GitLab is the open DevOps platform, delivered as a single application that spans the entire software development lifecycle. If you’re not using GitLab, your DevOps lifecycle is likely spread across any number of applications. These silos take overhead to integrate, manage, configure, and maintain, slowing down your team and your deployments. Moving to a single application will speed up your workflow and help you deliver better software, faster. To know more about GitLab, click here.
In this article, we will see how to push an existing project to GitLab using Eclipse IDE.
Implementation Steps
Step 1 – Go to GitLab and select the project which you want to clone. Click on the blue color “Clone” button and then copy the hyperlink as shown in the image. You can either Clone with SSH or Clone with HTTPS.

Step 2 – Open Eclipse IDE and right-click on the project you want to push and go to the Team ->Share project.

Step 3 – It will add the project to the given repository as shown below image. Select the Finish button.
As you can see, the given project is Git Repository. If the project is not GIT Repository, refer to this tutorial – How to create a new Git Repository to convert the project in GIT Repository.

Step 4 – Again, Right-Click on the project and go to the Team ->commit.

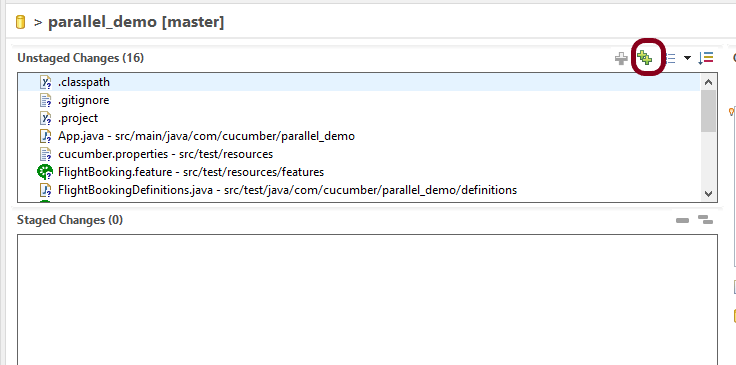
Step 5 – Select the files you want to commit and click green color + sign or Drag and Drop the files from “Unstaged Changes to Staged Changes“.
This is how the stage files looks like as shown below.

Step 6 – Write the commit message in “Commit Message” and click “Commit and Push“.

Step 7 – Fill in the below details in this window and click the “Preview” button.
URI – This is the URL that we have cloned from GitLab in Step 1.
Host – gitlab.com
Repository path – the path of the project in GitLab (This is auto-populated after entering URI)
Authentication
User – Username of GitLab
Password – password of GitLab

Step 8 – A new window will open which provides the detail of the Destination location of the project. Click the “Preview” button.

Step 9 – Push to the new branch of GitLab Repository and click the Push button.

Step 10 – As this is a new project with a master branch, you can see the whole project migrated in GitLab. If we are not using the master branch, but the local branch, then we need to create a merge request to merge the latest changes in the already existing project in GitLab.

Cheers!!Congratulations on making it through this tutorial and hope you found it useful! Happy Learning!!
