In the previous tutorial, I have explained about How to create Gradle project in IntelliJ without Command Line. In this tutorial, I will explain how to create a Gradle Java project using Command Line in IntelliJ.
Implementation Steps
Step 1- Create a Project Folder and change the directory path to the folder where we want to save the latest files created post creation of the project. Here, I have created a folder – GradleIntelliJDemoFromCMD and changed the directory path.
cd C:\Users\Vibha\Projects\Vibha_Personal\GradleIntelliJDemoFromCMD
Step 2 – Open the Terminal in IntelliJ.

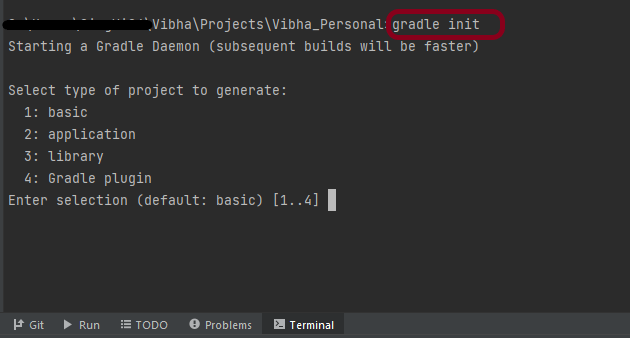
Step 3 – Gradle comes with a built-in task, called init , that initializes a new Gradle project in an empty folder. The init task uses the (also built-in) wrapper task to create a Gradle wrapper script, gradlew. Type the below command and press ENTER.
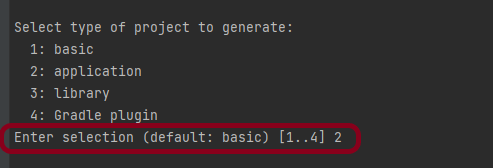
Step 4 – Select the type of project to generate. I’m selecting the application option as if I select basic, it won’t create a src directory. Type 2 and press ENTER.
Step 5 – Select implementation language. This is a Java project, so TYPE 3 (Java) and press ENTER.

Step 6 – Select build script DSL (Domain Specific Language) – As in Maven POM.xml (XML) is created to build a script file, here we can use Groovy or Kotlin to build the script file. Type 1 (Groovy) and press ENTER.

Step 7 – Select Test Framework – There are 4 different test frameworks. Depending on your requirement, select an option. I have selected 1 (JUnit 4) and press ENTER.

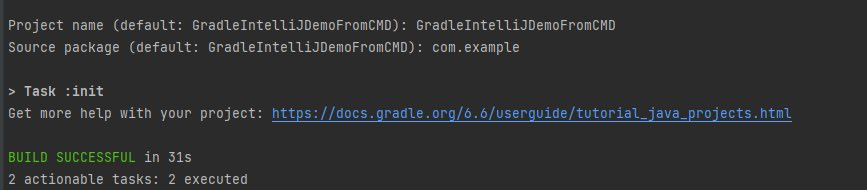
Step 8 – It needs the Project name and Source Package name. If I won’t provide the project name, it will take by default my current folder name which is Gradle_Project. Similarly, if I won’t provide the Source Package name, then it will provide the current project name as Source Package Name.
Project name – GradleIntelliJDemoFromCMD
Source Package – com.example
Press ENTER. init script will run and create a Gradle project. You can see as the build is successfull.
Step 9 – The project is created and placed under the folder GradleIntelliJDemoFromCMD as shown below.
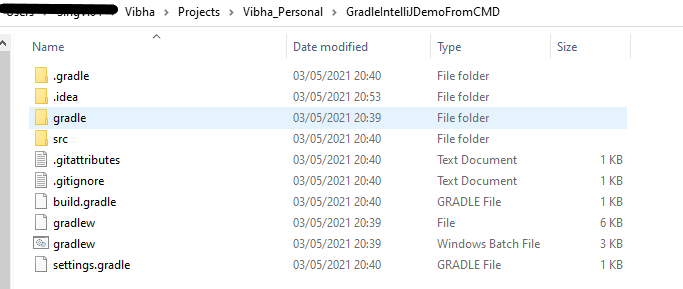
This project structure will have below mentioned files:-
- Generated folder for wrapper files – wrapper
- Gradle wrapper start scripts – gradlew, gradlew.bat
- Settings file to define build name and subprojects – settings.gradle
- Build script of lib project – build.gradle
- Default Java source folder – src/main/java
- Default Java test source folder – src/test/java
That’s it. We are done.
Congratulations on making it through this tutorial and hope you found it useful! Happy Learning!! Cheers!!
