In the previous tutorial, we showed youWhat is Feature File in Cucumber is. This tutorial will show you how to run this feature file.
Once the Feature file is created, we need to create a class called Runner class to run the tests. This class will use the JUnit annotation @RunWith(), which tells JUnit what is the test runner class.
We cannot run a Feature file on its own in a cucumber-based framework. We need to create a Java class, which will run the Feature File. It is the starting point for JUnit to start executing the tests. TestRunner class is created under src/test/java. In this tutorial, Cucumber uses the JUnit framework to run the tests. Apart from JUnit, we can also use the TestNG Test Runner class to run the cucumber tests.
JUnit Test Runner Class
First, we need to add the below dependencies to the POM.xml (in the case of the Maven project).
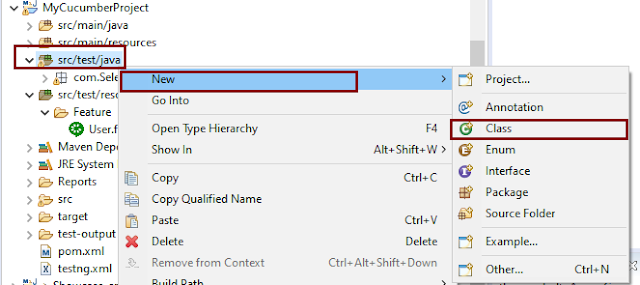
Create a new runner class file called CucumberRunnerTest.
Select and Right-Click on the package outline. Click on the New→Class.
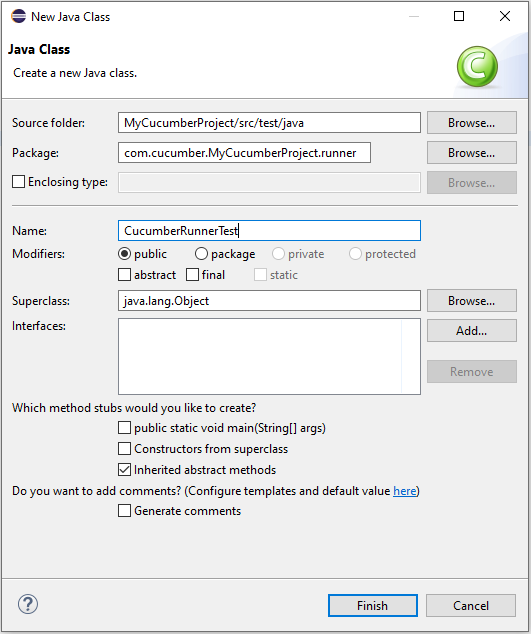
Provide the Java class a name, such as CucumberRunnerTest, and click the Finish button.
Import Statements
1) @RunWithannotation tells JUnit that tests should run using the Cucumber class.
import org.junit.runner.RunWith;
2) Cucumber.class is imported from:
import io.cucumber.junit.Cucumber;
3) @CucumberOptionsannotation tells Cucumber where to look for feature files, what reporting system to use, and some other things also. But as of now, in the above test, we have just told it for the Feature file folder. It is imported from:
import io.cucumber.junit.CucumberOptions;
The CucumberRunnerTest class looks like shown below:
import org.junit.runner.RunWith;
import io.cucumber.junit.Cucumber;
import io.cucumber.junit.CucumberOptions;

@RunWith(Cucumber.class)
@CucumberOptions(plugin = "pretty", features = "src/test/resources/Features/MyHoliday.feature", tags = "@BookOneWayFlight")

public class CucumberRunnerTest {

}
The first parameter, called features, provides the location of the feature file. Similarly, the second parameter, called tags, provides the tag name (scenario) which needs to run. Apart from these, we can use plugins, and glue, in the CucumberOptions.
The feature file is placed under src/test/resources, so it is added as the path for the Feature file.
Run the Cucumber Test
As we know, the Feature file is already created in the previous tutorial. TestRunner class is created to run the Cucumber Tests.
Right Click on CucumberRunnerTest class and Click Run As > JUnit Test Application
The output of the Test Execution looks as shown below image.
This output shows that the Feature file is created, and Test Runner is able to run the Feature File. But this error shows that we should implement these methods so that the Steps mentioned in the Feature file can be traced to Java methods, which can be executed while executing the feature file. Don’t worry about this error. We will see how to create step definitions in the next tutorial.
Congratulations on making it through this tutorial and hope you found it useful! Happy Learning!! Cheers!!
In the previous tutorial, I provided the Introduction of Rest Assured. In this tutorial, I will explain how to set up a basic Rest Assured Maven project in Eclipse IDE. Before starting, let us recap about Rest Assured.
REST Assured is a Java DSL for simplifying testing of REST-based services built on top of HTTP Builder. It supports POST, GET, PUT, DELETE, OPTIONS, PATCH, and HEAD requests. It can be used to validate and verify the response of these requests.
The Rest Assured library also provides the ability to validate the HTTP Responses received from the server. This makes Rest-Assured a very flexible library that can be used for testing.REST Assured can be used to test XML as well as JSON-based web services. REST Assured can be integrated with JUnit and TestNG frameworks for writing test cases for our application.
What is Maven?
Apache Maven is a software project management and comprehension tool. Based on the concept of a project object model (POM), Maven can manage a project’s build, reporting and documentation from a central piece of information.
Implementation Steps
Step 1- Download and Install Java
Rest-Assured needs Java to be installed on the system to run the tests. Click here to learn How to install Java.
Step 2 – Download and setup Eclipse IDE on the system
The Eclipse IDE (integrated development environment) provides strong support for Java developers. Click here to learn How to install Eclipse.
Step 3 – Setup Maven
To build a test framework, we need to add several dependencies to the project. Click here to learn How to install Maven.
Step 4 – Create a new Maven Project
Go to File -> New Project-> Maven-> Maven project ->Next
Step 4.1 – Select “Create a simple project”. Click on the Next Button.
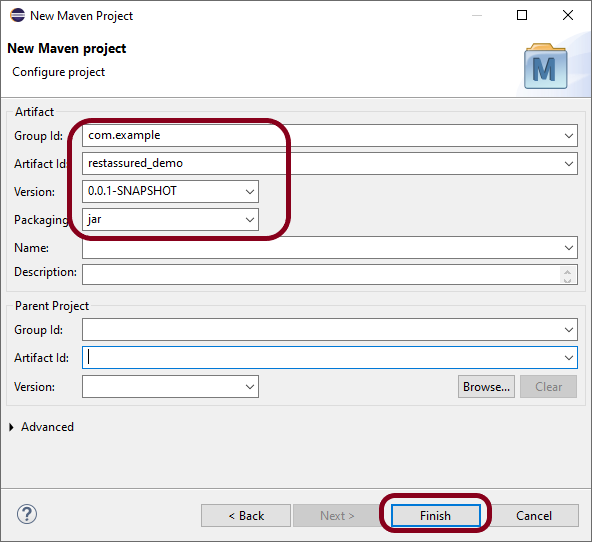
Step 4.2 – Provide Group Id and Artifact Id and click on the finish button.
Group Id – com.example Artifact Id – restassured_demo
Step 4.3 – Below is the structure of the Maven project in Eclipse.
Step 4.4– This is the structure of POM.xml created for the project.
Step 5 – Add Rest Assured, and JUnit dependencies to the project
In the Project Explorer, navigate to your Maven project and open pom.xml. Add REST Assured dependency under dependencies in the pom.xml file. The latest version can be found from here.
Right-click on your project in the Eclipse Project Explorer. Choose `Maven` -> `Update Project…` and confirm to download the specified dependencies.
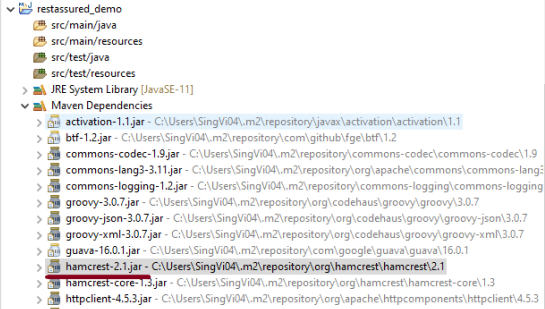
Below are the Rest Assured, and junit jar files present under Maven Dependencies.
Step 8 – Create a Test Class
Right-click on the src/test/java folder, create a new package (e.g., com.example.tests).
Create a new Java class inside this package (e.g., ApiTests.java).
Use the following example to set up a basic REST Assured GET request test.
package com.example.tests;

import org.junit.Test;

import static org.hamcrest.Matchers.equalTo;
import static io.restassured.RestAssured.given;

public class APITests {

	String BaseURL = "https://reqres.in/api/users";

	@Test
	public void getUser() {

		// Given
		given()

				// When
				.when().get(BaseURL + "/2")

				// Then
				.then().statusCode(200).statusLine("HTTP/1.1 200 OK")

				// To verify user of id 2
				.body("data.id", equalTo(2)).body("data.email", equalTo("janet.weaver@reqres.in"))
				.body("data.first_name", equalTo("Janet")).body("data.last_name", equalTo("Weaver"));
	}

}
Step 9 – Run the Test
Right-click on your test class and select Run As -> JUnit Test to execute your REST Assured tests.
The output of the above program is
Point to Remember
1. Don’t add the dependency on Hamcrest explicitly. Rest Assured includes it by default. You can see it in the Maven Dependencies folder under the project.
Congratulations on making it through this tutorial and hope you found it useful! Happy Learning!!
Gradle is an open-source build automation tool that is designed to be flexible enough to build almost any type of software. Gradle runs on the JVM and you must have a Java Development Kit (JDK) installed to use it. Several major IDEs allow you to import Gradle builds and interact with them: Android Studio, IntelliJ IDEA, Eclipse, and NetBeans.
Java is a general-purpose programming language that is a concurrent, class-based, and object-oriented language. Java follows the concept of “write once and run anywhere (WORA).” This means that compiled Java code can be run on all different platforms that support Java. There’s no need for recompilation.
Maven is a powerful and widely used build automation and project management tool primarily used for Java projects. It simplifies the process of managing a software project by providing a standard way to build, manage dependencies, and generate documentation.
In the previous tutorial, we have discussed about How to install Maven on Windows. In this tutorial, we will see How To Create Selenium Maven Project in Eclipse IDE.
Prerequisite:
Maven Installed on machine
Java installed on machine
Integrated Development Environment (IDE) like IntelliJ IDEA or Eclipse is installed
Steps to follow:
Step 1 – To create a new project – Click on the New and then select – Project option.
Step 2 – Select the Maven Projectand click on the “Next” button.
Step 3 – You can select the default workplace or mention the location where you want to save the project.
Click the “Next“ button.
Step 4 – Select maven-archetype-quickstart option as shown below and click on the “Next” button.
Step 5 – Provide the Group Id, Artifact Id details and click the “Finish” button.
Group Id : com.example
Artifact Id : SeleniumMaven_Demo
Step 6 – The structure of the project looks as shown in the below image.
Step 7 – POM file will look like below image
<?xml version="1.0" encoding="UTF-8"?>

<project xmlns="http://maven.apache.org/POM/4.0.0" xmlns:xsi="http://www.w3.org/2001/XMLSchema-instance"
  xsi:schemaLocation="http://maven.apache.org/POM/4.0.0 http://maven.apache.org/xsd/maven-4.0.0.xsd">
  <modelVersion>4.0.0</modelVersion>

  <groupId>com.example</groupId>
  <artifactId>SeleniumMaven_Demo</artifactId>
  <version>0.0.1-SNAPSHOT</version>

  <name>SeleniumMaven_Demo</name>
  <!-- FIXME change it to the project's website -->
  <url>http://www.example.com</url>

  <properties>
    <project.build.sourceEncoding>UTF-8</project.build.sourceEncoding>
    <maven.compiler.source>1.7</maven.compiler.source>
    <maven.compiler.target>1.7</maven.compiler.target>
  </properties>

  <dependencies>
    <dependency>
      <groupId>junit</groupId>
      <artifactId>junit</artifactId>
      <version>4.11</version>
      <scope>test</scope>
    </dependency>
  </dependencies>

  <build>
    <pluginManagement><!-- lock down plugins versions to avoid using Maven defaults (may be moved to parent pom) -->
      <plugins>
        <!-- clean lifecycle, see https://maven.apache.org/ref/current/maven-core/lifecycles.html#clean_Lifecycle -->
        <plugin>
          <artifactId>maven-clean-plugin</artifactId>
          <version>3.1.0</version>
        </plugin>
        <!-- default lifecycle, jar packaging: see https://maven.apache.org/ref/current/maven-core/default-bindings.html#Plugin_bindings_for_jar_packaging -->
        <plugin>
          <artifactId>maven-resources-plugin</artifactId>
          <version>3.0.2</version>
        </plugin>
        <plugin>
          <artifactId>maven-compiler-plugin</artifactId>
          <version>3.8.0</version>
        </plugin>
        <plugin>
          <artifactId>maven-surefire-plugin</artifactId>
          <version>2.22.1</version>
        </plugin>
        <plugin>
          <artifactId>maven-jar-plugin</artifactId>
          <version>3.0.2</version>
        </plugin>
        <plugin>
          <artifactId>maven-install-plugin</artifactId>
          <version>2.5.2</version>
        </plugin>
        <plugin>
          <artifactId>maven-deploy-plugin</artifactId>
          <version>2.8.2</version>
        </plugin>
        <!-- site lifecycle, see https://maven.apache.org/ref/current/maven-core/lifecycles.html#site_Lifecycle -->
        <plugin>
          <artifactId>maven-site-plugin</artifactId>
          <version>3.7.1</version>
        </plugin>
        <plugin>
          <artifactId>maven-project-info-reports-plugin</artifactId>
          <version>3.0.0</version>
        </plugin>
      </plugins>
    </pluginManagement>
  </build>
</project>
In the previous tutorials, we discussed BDD(Behaviour Driven Development) and Gherkin. Cucumberis one such open-source tool, which supports Behaviour Driven Development (BDD). In simple words, Cucumber can be defined as a testing framework, driven by plain English. It serves as documentation, automated tests, and development aid – all in one.
In this tutorial, we will set up Cucumber with Eclipse.
Java is a robust programming language. Java is a general-purpose programming language that is concurrent; class-based and object-oriented language. Java follows the concept of “write once and run anywhere (WORA)” which means that compiled Java code can be run on all different platforms that support Java without the need for recompilation. Cucumber supports the Java platform for execution. Click here to know How to install Java.
2. Download and Start Eclipse
Eclipse is an Integrated Development Environment (IDE). It contains a base workspace and an extensible plug-in system for customizing the environment. To download Eclipse, please refer to this tutorial – How to install Eclipse.
3. Maven – How to install Maven on Windows
Apache Maven is a software project management and comprehension tool. It uses the concept of a project object model (POM), Maven can manage a project’s build, reporting, and documentation from a central piece of information. MAVEN helps us in creating the project structure and managing and downloading the dependencies. We need to define the required dependencies in pom.xml. To install Maven on Windows, please refer to this tutorial –How to install Maven.
4. Install Cucumber Eclipse Plugin
The Cucumber plugin is an Eclipse plugin that allows eclipse to understand the Gherkin syntax. Cucumber Eclipse Plugin highlights the keywords present in Feature File. To install Cucumber Eclipse Plugin, please refer to this tutorial – How to install Cucumber Eclipse Plugin
This will indicate Maven, which Cucumber files are to be downloaded from the central repository to the local repository. Create one more dependency tag.
This will indicate Maven, which Cucumber JUnit files are to download from the central repository to the local repository. Create one more dependency tag.
GitLab is a web-based Git repository that provides free open and private repositories, issue-following capabilities, and wikis. It is a complete DevOps platform that enables professionals to perform all the tasks in a project—from project planning and source code management to monitoring and security.
In this tutorial, I will explain how we can clone a project from GitLab in Eclipse.
Implementation Steps
Step 1– Go to GitLab and select the project which you want to clone. Click on the blue color “Clone” button then copy the hyperlink as shown in the image. You can either Clone with SSH or Clone with HTTPS.
Step 2 – Open Eclipse and go to “File > Import” in eclipse as shown in the image.
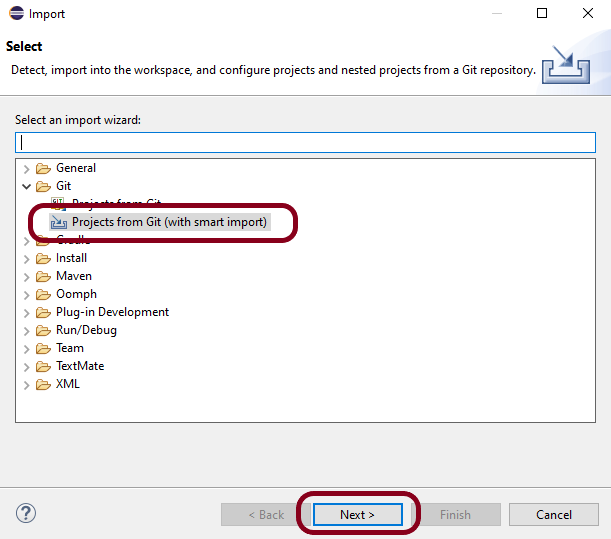
Step 3– A window will pop up in which select Git Folder. Under the Git folder, select the option – “Projects from Git(with smart import)”as shown in the image.
Click on the “NEXT” button.
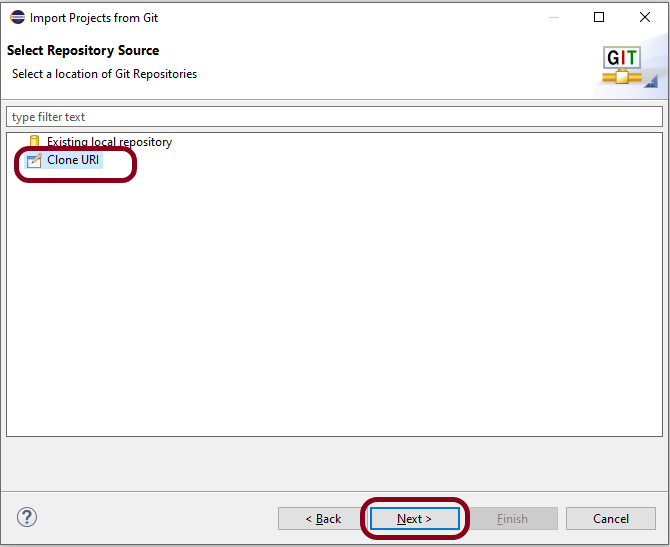
Step 4 – A new window will pop up in which select the option – “Clone URI” as shown in the image.
Click on the “NEXT” button.
Step 5 – Another window will pop up in which you have to paste the“GitLab Repository URL” and also“GitLab UserID and Password” and click on the “Next” button.
URI – This is the URL that we have cloned from GitLab in Step 1. Host – gitlab.com Repository path – path of the project in GitLab (This is auto-populated after entering URI)
Authentication User – Username of GitLab Password – password of GitLab
Step 6 – Select master and select “When fetching a commit, also fetch its tags“.
Click on the “Next” button.
Step 7 – Select the “Folder directory” in which you want to import the repository.
Click on the “Finish” button.
Step 8 – We have successfully imported the GitLab Repository as shown in the below image.
Congratulations on making it through this tutorial and hope you found it useful! Happy Learning!! Cheers!!
The Page Object model is an object design pattern in Selenium. Web pages are represented as classes. The various elements on the page are defined as variables in the class. All possible user interactions can then be implemented as methods in the class.
Advantages of Page Object Model
Simplifies the process of adapting to changes in the UI. When page elements change due to a UI update, modifications are isolated to the page object class.
Page objects contain methods that represent user actions on a web page. These methods make the tests more readable and understandable.
Common code related to web pages is stored in page classes. This code is reused in tests. This approach results in the reduction of the code.
What is Cucumber?
Cucumber is one such open-source tool, which supports Behavior Driven Development(BDD). In simple words, Cucumber can be defined as a testing framework, driven by plain English. It serves as documentation, automated tests, and development aid – all in one.
Dependency List
Cucumber Java – 7.6.0
Cucumber JUnit4 – 7.6.0
Java 11
Maven – 3.8.6
Selenium – 4.3.0
JUnit – 4.13.2
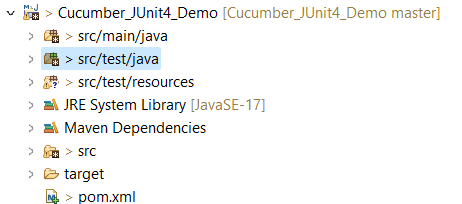
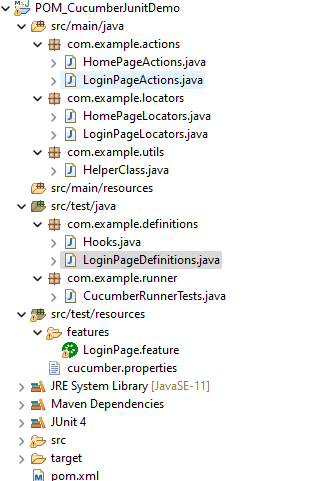
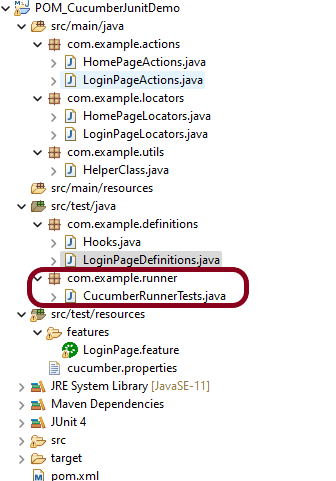
Project Structure
Implementation Steps
Step 1- Download and Install Java
Cucumber and Selenium need Java to be installed on the system to run the tests. Click here to know How to install Java.
Step 2 – Download and setup Eclipse IDE on the system
The Eclipse IDE (integrated development environment) provides strong support for Java developers. Click here to know How to install Eclipse.
Step 3 – Setup Maven
To build a test framework, we need to add a number of dependencies to the project. Click here to know How to install Maven.
Step 4 – Install Cucumber Eclipse Plugin
The cucumber plugin is an Eclipse plugin that allows eclipse to understand the Gherkin syntax. When we are working with cucumber, we write the feature files that contain Feature, Scenario, Given, When, Then, And, and But. They also include Tags, Scenario Outline, and Examples. By default, eclipse doesn’t understand these keywords so it doesn’t show any syntax highlighter. Cucumber Eclipse Plugin highlights the keywords present in Feature File. Refer to this tutorial to get more detail – How to setup Cucumber with Eclipse.
Step 5 – Create a new Maven Project
To create a new Maven project, go to the File -> New Project-> Maven-> Maven project-> Next -> Enter Group ID & Artifact ID -> Finish.
Step 6 – Create source folder src/test/resources to create test scenarios in the Feature file
A new Maven Project is created with 2 folders – src/main/java and src/test/java. To create test scenarios, we need a new source folder called – src/test/resources. To create this folder, right-click on your maven project ->select New ->Java and then Source Folder.
Mention the source folder name as src/test/resources and click the Next button. This will create a source folder under your new Maven project as shown in the below image.
Step 7 – Add Selenium, JUnit4, and Cucumber dependencies to the project
Step 8 – Add Maven Compiler Plugin and Surefire Plugin
The compiler plugin is used to compile the source code of a Maven project. This plugin has two goals, which are already bound to specific phases of the default lifecycle:
Step 9 – Create a feature file in the src/test/resourcesdirectory
Create a folder with name features. Now, create the feature file in this folder. The feature file should be saved with extension .feature. This feature file contains the test scenarios created to test the application. The Test Scenarios are written in Gherkins language in the format of Given, When, Then, And, But.
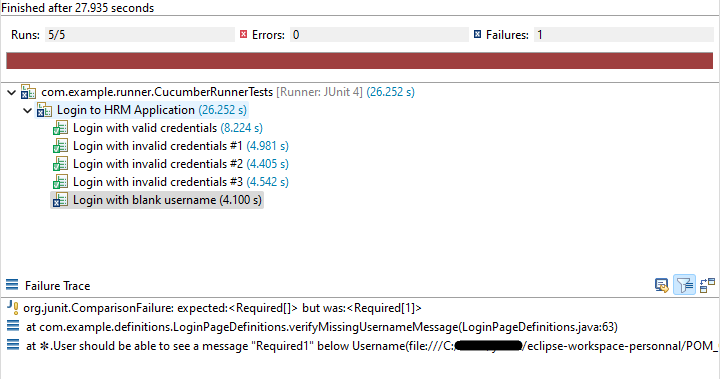
Below is an example of Test Scenarios in the feature file. I have failed one test scenario intentionally – @MissingUsername.
Feature: Login to HRM Application

Background:
   Given User is on HRMLogin page "https://opensource-demo.orangehrmlive.com/"

   @ValidCredentials
   Scenario: Login with valid credentials

    When User enters username as "Admin" and password as "admin123"
    Then User should be able to login sucessfully and new page open

   @InvalidCredentials
   Scenario Outline: Login with invalid credentials

    When User enters username as "<username>" and password as "<password>"
    Then User should be able to see error message "<errorMessage>"

  Examples:
  | username   | password  | errorMessage                      |
  | Admin      | admin12$$ | Invalid credentials               |
  | admin$$    | admin123  | Invalid credentials               |
  | abc123     | xyz$$     | Invalid credentials               |


   @MissingUsername
   Scenario Outline: Login with blank username

    When User enters username as " " and password as "admin123"
    Then User should be able to see a message "Required1" below Username
Step 10 – Create the classes for locators, actions, and utilities in src/main/java
Create a Java Class for each page where define WebElements as variables using Annotation @FindBy. Create another Java class that contains methods for actions performed on WebElements. Here, I’m going to create 2 classes for locators – LoginPageLocators and HomePageLocators.java as well as 2 classes for actions – LoginPageActions and HomePageActions
The Locator class contains WebElements which are identified by @FindBy annotation as shown below:-
Action class contains methods for the action to be performed on the web elements identified in the locator class as shown below:-
public void login(String strUserName, String strPassword) {

           // Fill user name
           this.setUserName(strUserName);

           // Fill password
           this.setPassword(strPassword);

           // Click Login button
           this.clickLogin();
     }
}
The initElements is a static method of the PageFactory class that is used to initialize all the web elements located by @FindBy annotation. Only after the WebElements are initialized, they can be used in the methods to perform actions.
public Login(WebDriver driver) {
           this.driver = driver;
           // This initElements method will create all WebElements
           PageFactory.initElements(driver, this);
     }
Below is the sample code of the LoginPageLocators.
import org.openqa.selenium.WebElement;
import org.openqa.selenium.support.FindBy;

public class LoginPageLocators {

	@FindBy(name = "username")
    public WebElement userName;

    @FindBy(name = "password")
    public WebElement password;

    @FindBy(xpath = "//*[@id='app']/div[1]/div/div[1]/div/div[2]/div[2]/form/div[1]/div/span")
    public WebElement missingUsernameErrorMessage;

    @FindBy(xpath = "//*[@id='app']/div[1]/div/div[1]/div/div[2]/div[2]/form/div[3]/button")
    public WebElement login;

    @FindBy(xpath = "//*[@id='app']/div[1]/div/div[1]/div/div[2]/div[2]/div/div[1]/div[1]/p")
    public  WebElement errorMessage;

}
Below is the sample code for the HomePageLocators.
import org.openqa.selenium.WebElement;
import org.openqa.selenium.support.FindBy;

public class HomePageLocators {

	  @FindBy(xpath = "//*[@id='app']/div[1]/div[2]/div[2]/div/div[1]/div[1]/div[1]/h5")
	  public  WebElement homePageUserName;

}
Create the action classes for each web page. These action classes contain all the methods needed by the step definitions. In this case, I have created 2 action classes – LoginPageActions, HomePageActions
LoginPageActions
import org.openqa.selenium.support.PageFactory;

import com.example.locators.LoginPageLocators;
import com.example.utils.HelperClass;

public class LoginPageActions {

LoginPageLocators loginPageLocators = null;

    public LoginPageActions() {

    	this.loginPageLocators = new LoginPageLocators();

		PageFactory.initElements(HelperClass.getDriver(),loginPageLocators);
	}

	// Set user name in textbox
    public void setUserName(String strUserName) {
    	loginPageLocators.userName.sendKeys(strUserName);
    }

    // Set password in password textbox
    public void setPassword(String strPassword) {
    	loginPageLocators.password.sendKeys(strPassword);
    }

    // Click on login button
    public void clickLogin() {
    	loginPageLocators.login.click();
    }


   // Get the error message when username is blank
    public String getMissingUsernameText() {
        return loginPageLocators.missingUsernameErrorMessage.getText();
    }

    // Get the Error Message
    public String getErrorMessage() {
        return loginPageLocators.errorMessage.getText();
    }

    public void login(String strUserName, String strPassword) {

        // Fill user name
        this.setUserName(strUserName);

        // Fill password
        this.setPassword(strPassword);

        // Click Login button
        this.clickLogin();

    }
}
HomePageActions
import org.openqa.selenium.support.PageFactory;

import com.example.locators.HomePageLocators;
import com.example.utils.HelperClass;

public class HomePageActions {

	HomePageLocators homePageLocators = null;

    public HomePageActions() {

        this.homePageLocators = new HomePageLocators();

        PageFactory.initElements(HelperClass.getDriver(),homePageLocators);
    }


    // Get the User name from Home Page
    public String getHomePageText() {
        return homePageLocators.homePageUserName.getText();
    }

}
Create a Helper class where we are initializing the web driver. We are also initializing the web driver wait and defining the timeouts. A private constructor of the class is created. It will declare the web driver. Whenever we create an object of this class, a new web browser is invoked.
import java.time.Duration;
import org.openqa.selenium.WebDriver;
import org.openqa.selenium.chrome.ChromeDriver;
import io.github.bonigarcia.wdm.WebDriverManager;

public class HelperClass {

	 private static HelperClass helperClass;

	    private static WebDriver driver;
	    public final static int TIMEOUT = 10;

	     private HelperClass() {

	        WebDriverManager.chromedriver().setup();
	        driver = new ChromeDriver();
	        driver.manage().timeouts().implicitlyWait(Duration.ofSeconds(TIMEOUT));
	        driver.manage().window().maximize();
	     }

	    public static void openPage(String url) {
	        driver.get(url);
	    }

	    public static WebDriver getDriver() {
	        return driver;
	    }

	    public static void setUpDriver() {

	        if (helperClass==null) {

	            helperClass = new HelperClass();
	        }
	    }

	    public static void tearDown() {

	        if(driver!=null) {
	             driver.close();
	             driver.quit();
	        }

	       helperClass = null;
	   }

	}
Step 11 – Create a Java Class called Definition in src/test/java
Create a Java Class called Definition where we will create the Test Code related to Given, When, Then of the Feature file in src/test/java
Now, we need to create the Step Definition of the Feature File – LoginPageDefinitions.java.
import org.junit.Assert;

import com.example.actions.ForgotPasswordActions;
import com.example.actions.HomePageActions;
import com.example.actions.LoginPageActions;
import com.example.utils.HelperClass;

import io.cucumber.java.en.Given;
import io.cucumber.java.en.Then;
import io.cucumber.java.en.When;

public class LoginPageDefinitions {

	LoginPageActions objLogin = new LoginPageActions();
    HomePageActions objHomePage = new HomePageActions();

    @Given("User is on HRMLogin page {string}")
    public void loginTest(String url) {

    	HelperClass.openPage(url);

    }

    @When("User enters username as {string} and password as {string}")
    public void goToHomePage(String userName, String passWord) {

        // login to application
        objLogin.login(userName, passWord);

        // go the next page

    }

    @Then("User should be able to login sucessfully and new page open")
    public void verifyLogin() {

        // Verify home page
        Assert.assertTrue(objHomePage.getHomePageText().contains("Employee Information"));

    }

    @Then("User should be able to see error message {string}")
    public void verifyErrorMessage(String expectedErrorMessage) {

        // Verify home page
    	Assert.assertEquals(objLogin.getErrorMessage(),expectedErrorMessage);

    }

    @Then("User should be able to see a message {string} below Username")
    public void verifyMissingUsernameMessage(String message) {

    	Assert.assertEquals(objLogin.getMissingUsernameText(),message);
    }

}
Step 12 – Create a Hook class in src/test/java
Create the hook class that contains the Before and After hook to initialize the web browser and close the web browser. I have added the code to take the screenshot of the failed scenario in @After Hook.
import org.openqa.selenium.OutputType;
import org.openqa.selenium.TakesScreenshot;

import com.example.utils.HelperClass;

import io.cucumber.java.After;
import io.cucumber.java.Before;
import io.cucumber.java.Scenario;

public class Hooks {

	@Before
    public static void setUp() {

       HelperClass.setUpDriver();
    }

	@After
	public static void tearDown(Scenario scenario) {

		//validate if scenario has failed
		if(scenario.isFailed()) {
			final byte[] screenshot = ((TakesScreenshot) HelperClass.getDriver()).getScreenshotAs(OutputType.BYTES);
			scenario.attach(screenshot, "image/png", scenario.getName());
		}

		HelperClass.tearDown();
	}
}
Step 13 – Create a JUnit Cucumber Runner classin the src/test/java directory
Cucumber needs a TestRunner class to run the feature files. It is suggested to create a folder with the name of the runner in the src/test/java directory. Then create the Cucumber TestRunner class in this folder. Below is the code of the Cucumber TestRunner class.
import org.junit.runner.RunWith;
import io.cucumber.junit.Cucumber;
import io.cucumber.junit.CucumberOptions;

@RunWith(Cucumber.class)
@CucumberOptions(tags = "", features = "src/test/resources/features/LoginPage.feature", glue = "com.example.definitions",
                 plugin = {})

public class CucumberRunnerTests {

}
Note:- The name of the Runner class should end with Test otherwise we can’t run the tests using Command Line.
Step 14 – Run the tests from JUnit
You can execute the test script by right-clicking on TestRunner class -> Run As JUnit.
Step 15 – Run the tests from the Command Line
Run the below command in the command prompt to run the tests and to get the test execution report.
mvn clean test
The output of the above program is
Step 16 – Cucumber Report Generation
To get Cucumber Test Reports, add cucumber.properties under src/test/resources and add the below instruction in the file.
cucumber.publish.enabled=true
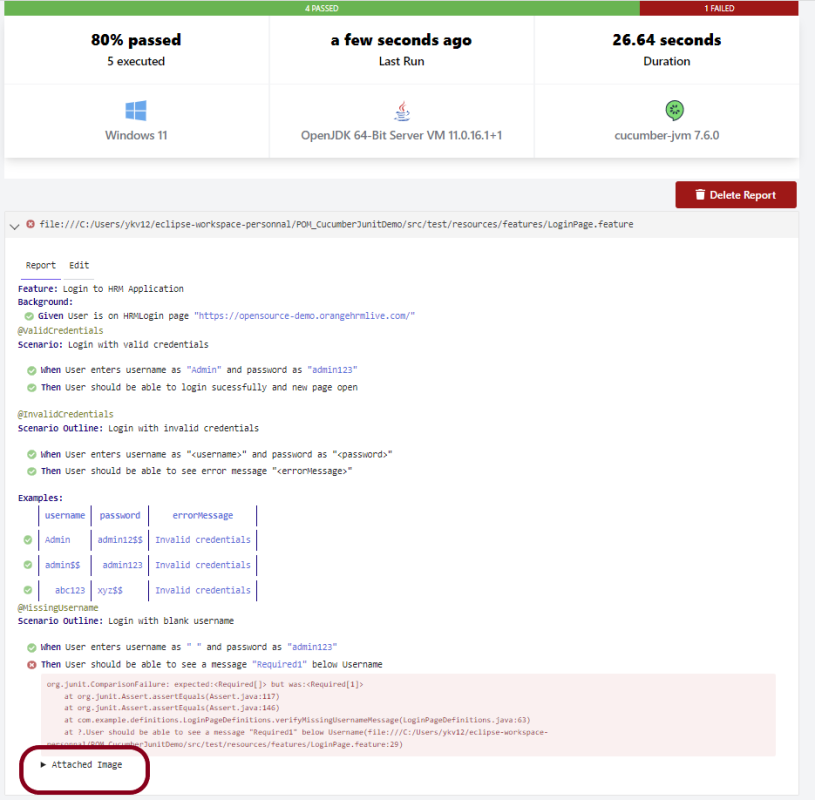
Below is the image of the Cucumber Report generated using Cucumber Service.
In the above example, as we can see, one of the tests has failed. So, when a test fails, we have written the code to take a screenshot of the failed step. The highlighted box above shows the image of the failed test. You can click on that to see the screenshot.
That’s it! Congratulations on making it through this tutorial and hope you found it useful! Happy Learning!!
Cucumber tests are grouped into features. A Feature file is one in which we store a description of the features and scenarios to be tested. It is used to provide a high-level description of test scenarios and group-related scenarios. A Feature File is an entry point to the Cucumber tests.
The first keyword in the Feature file is the Feature keyword, followed by: and short text that describes the feature.
You can add free-form text underneath the Feature to add more description.
These description lines are ignored by Cucumber at runtime, but are available for reporting (They are included by default in HTML reports).
The name and the optional description have no special meaning to Cucumber. Their purpose is to provide a place for you to document important aspects of the feature, such as a brief explanation and a list of business rules (general acceptance criteria).
The free format description for Feature ends when you start a line with the keyword Example or Scenario Outline (or their alias keywords).
You can place tags above Feature to group related features, independent of your file and directory structure.
A simple feature file consists of the following keywords/parts −
FeatureFile Name – Name of the feature under test. For example, here is LoginPage.feature
Feature − Describe the feature under test, like here “Login to HRM Application”
Scenario− What is the test scenario we want to test
Given − Prerequisite before the test steps get executed.
When − Specific condition that should match to execute the next step.
Then − What should happen if the condition mentioned in WHEN is satisfied
And/But – If we have several Given’s, When’s, or Then’s, then we can use And /But
Steps to create a Feature file
Step 1 – Create a new Maven project.
Step 2 – Add cucumber-java dependency to the POM.xml.
Step 3 – It is suggested to create the Feature files in the src/test/resources source folder. By default, this folder is not present. So, first, create a Source Folder named src/test/resources. Right-click on the project, and select New → Source Folder.
Provide the name to the Source Folder and click on the Finish button.
This creates a new Source Folder.
Step 4 –We want all our Feature files to be present inside a folder. So, create a new folder with the name Features in the src/test/resources folder.
Right-click on the src/test/resources folder, and select New →Package. Provide the name of Features to the package and click the Finish button.
Step 5 – Create a Feature file in the features package.
Right-click on the Feature folder, select New ->File and mention the name LoginPage.feature. Click the Finish button. (Remember to add .feature at the end of the file, otherwise, this feature file will be just an ordinary plain text file).
The below image is an example of the new feature file created. This sample feature file gives an idea how what an actual Feature file should look like.
Below is an example of a valid feature file.
@LoginPage
Feature: Login to HRM Application

   @ValidCredentials
   Scenario: Login with valid credentials

   Given User is on HRMLogin page "https://opensource-demo.orangehrmlive.com/"
    When User enters username as "Admin" and password as "admin123"
    Then User should be able to login successfully and new page open