In this tutorial, I will test a SOAP Service using Rest Assured. I will verify the status code, line of Status, and content of the Response. To set up a basic Rest Assured Maven Project, click here and Gradle project, click here.
Add the below-mentioned dependencies to the pom.xml.
SOAP is an XML-based protocol for accessing web services over HTTP. It has some specifications that could be used across all applications.
SOAP messages are XML documents that are comprised of the following three basic building blocks:
The SOAP Envelope encapsulates all the data in a message and identifies the XML document as a SOAP message.
The Header element contains additional information about the SOAP message. This information could be authentication credentials, for example, which are used by the calling application.
The Body element includes the details of the actual message that needs to be sent from the web service to the calling application. This data includes call and response information.
Implementation Steps:
Step 1 – I have created an XML file for the soap request body in the project resource folder. “Number.xml” is the name of the file.
Step 2 – Specify the base URL to the RESTful web service using the RestAssuredclass.
RestAssured.baseURI = "http://www.dneonline.com";
Step 3 – The response to a request made by REST Assured.
Response response = given()
Response is imported from package:
import io.restassured.response.Response;
Step 4 – Set the content type to specify the format in which the request payload will be sent to the server. Here, the Content-Type is “text/xml; charset=utf-8”.
A Request Body is created by using the below snippet:
requestBody = new File(getClass().getClassLoader().getResource("Number.xml").getFile());
Step 6 – Send the POST request to the server and receive the response of the request made by REST Assured. This response contains every detail returned by hitting request i.e. response body, response headers, status code, status lines, cookies, etc. The response is imported from package:
import io.restassured.response.Response;
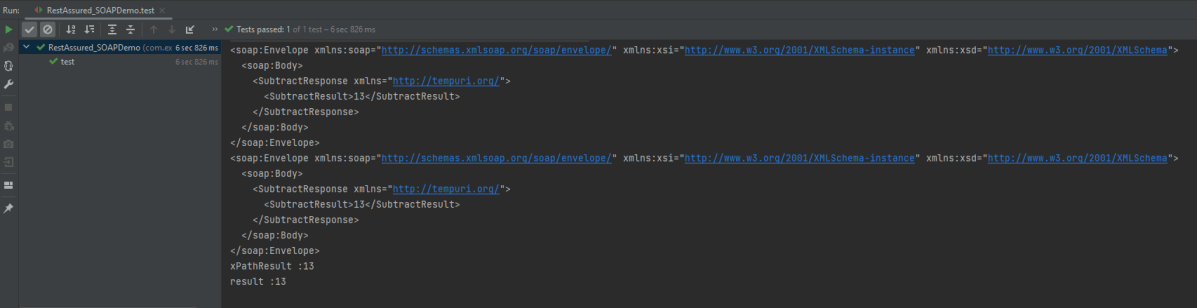
Step 7 – To validate a response like status code or value, we have used the below code
In the last tutorial, I explained How to test GET Request using Rest Assured. In this tutorial, I will automate a POST Request using Rest Assured. I will verify the status code, line of Status, and content of the Response. To set up a basic Rest Assured Maven Project, click here and Gradle project, click here.
Add the below-mentioned dependencies to the pom.xml. The latest dependency can be downloaded from here.
An HTTP POST method is used to create a new resource in the collection of resources. The request body is passed as a JSON/XML or in a different format. If a resource is created successfully by the endpoint or server, it returns a status code 201(Created). It also provides a Location header with a link to the newly-created resource with the 201 HTTP status. It may return 200 (OK) and 204 (No Content) status code as well, based on how the API is developed.
POST is neither safe nor idempotent. It is therefore recommended for non-idempotent resource requests. Making two identical POST requests will most result in two resources containing the same information.
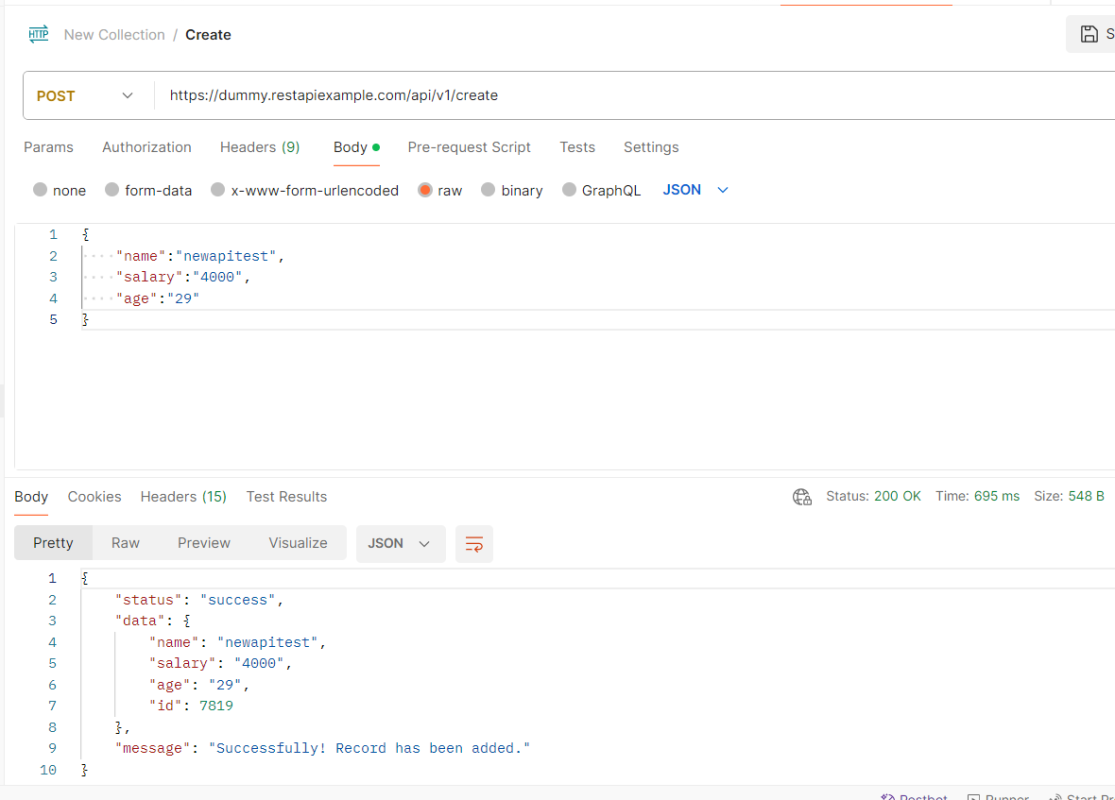
Below is an example of a Request performing POST operation in Postman.
Below are the steps to test a POST Request using Rest Assured:
Step 1 – Specify the base URL to the RESTful web service using the RestAssuredclass.
Step 2 – Every Request in the Rest-Assured library is represented by an interface called RequestSpecification. This interface allows modifying the request, like adding headers or adding authentication details. Use the RestAssuredclass to generate a RequestSpecification.
contentTypeis imported from restassured.http package:
import io.restassured.http.ContentType;
Step 4 – Pass Request Body as String.
requestSpecification.body(jsonString);
Step 5 – Send the POST request to the server. Then receive the response of the request made by REST Assured. This response contains every detail returned by hitting request i.e. response body, response headers, status code, status lines, cookies, etc. The response is imported from package:
import io.restassured.response.Response;
Step 6 – To validate a response like status code or value, we need to get the reference of type ValidatableResponse.
ValidatableResponse is an interface. A validatable response to a request made by, REST Assured. ValidatableResponse is imported from package:
PrettyPrint() – It prints the response body if possible and returns it as a string. Pretty printing is possible for content-types JSON, XML, and HTML.
Below is the example of testing a POST request in Non-BDD format. I have used ValidatableResponse for the assertion of status. It is also used for the status line and body of the Response.
import io.restassured.RestAssured;
import io.restassured.http.ContentType;
import io.restassured.response.Response;
import io.restassured.response.ValidatableResponse;
import io.restassured.specification.RequestSpecification;
import org.junit.Test;
import static org.hamcrest.CoreMatchers.equalTo;

public class POST_NonBDDDemo {

    RequestSpecification requestSpecification;
    Response response;
    ValidatableResponse validatableResponse;

    @Test
    public void verifyStatusCode() {

        String jsonString = "{\"name\":\"newapitest\",\"salary\":\"4000\",\"age\":\"29\"}";

        RestAssured.baseURI = "https://dummy.restapiexample.com/api/v1/create";

        // Create a request specification
        requestSpecification = RestAssured.given();

        // Setting content type to specify format in which request payload will be sent.
        requestSpecification.contentType(ContentType.JSON);

        // Adding body as string
        requestSpecification.body(jsonString);

        // Calling POST method
        response = requestSpecification.post();

        // Let's print response body.
        String responseString = response.prettyPrint();

        /*
         * To perform validation on response, we need to get ValidatableResponse type of
         * response
         */
        validatableResponse = response.then();

        // Check status code
        validatableResponse.statusCode(200);

        // It will check if status line is as expected
        validatableResponse.statusLine("HTTP/1.1 200 OK");

        // Check response body - name attribute
        validatableResponse.body("data.name", equalTo("newapitest"));

        // Check response body - message attribute
        validatableResponse.body("message", equalTo("Successfully! Record has been added."));

    }
}
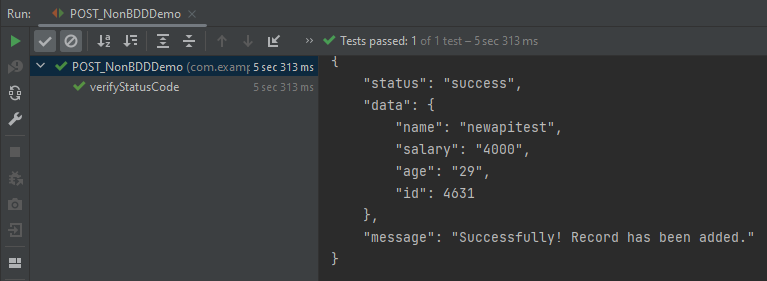
The below image shows the test result of the above test.
Test implemented in BDD Format
1. equalTois used for assertion, and is imported from a static hamcrest package:
import static org.hamcrest.Matchers.equalTo;
2. givenis a static import from package:
import static io.restassured.RestAssured.given;
Below is an example of a BDD Test.
import io.restassured.http.ContentType;
import io.restassured.response.ValidatableResponse;
import org.junit.Test;
import static io.restassured.RestAssured.given;
import static org.hamcrest.CoreMatchers.equalTo;

public class POST_BDDDemo {

    ValidatableResponse validatableResponse;

    @Test
    public void createUser() {

        String json = "{\"name\":\"apitest\",\"salary\":\"5000\",\"age\":\"30\"}";

        // GIVEN
        validatableResponse = given()
                .baseUri("https://dummy.restapiexample.com/api")
                .contentType(ContentType.JSON)
                .body(json)

                // WHEN
                .when()
                .post("/v1/create")

                // THEN
                .then()
                .assertThat().statusCode(200).body("data.name", equalTo("apitest"))
                .body("message", equalTo("Successfully! Record has been added."));

        System.out.println("Response :" + validatableResponse.extract().asPrettyString());
    }

}
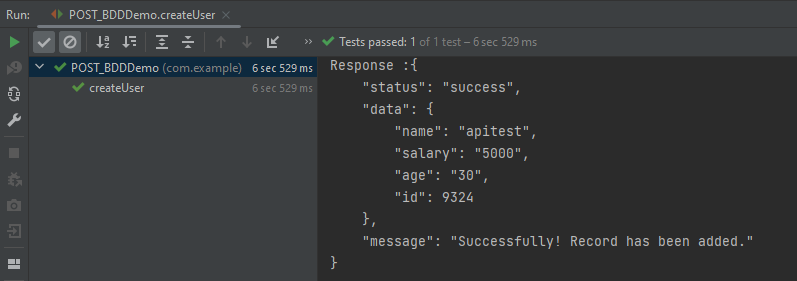
The below image shows the test result of the above test.
Explanation:
1. This string represents the JSON payload that will be sent in the body of the POST request. It includes fields like name, salary, and age.
Rest–Assuredis a Java-based library that is used to test RESTful Web Services. REST-assured was designed to simplify the testing and validation of REST APIs. It takes influence from testing techniques used in dynamic languages such as Ruby and Groovy.
JUnit is an open source Unit Testing Framework for JAVA. JUnit is a simple framework to write repeatable tests. It is an instance of the xUnit architecture for unit testing frameworks.
GitHub is a for-profit organization that provides cloud-based Git repository hosting. It simplifies the use of Git for version control and collaboration by individuals and teams. The GitHub interface is simple enough that even inexperienced coders can use it. Without GitHub, using Git generally necessitates a bit more technical know-how and command-line proficiency.
Furthermore, anyone can sign up for and host a public code repository for free, making GitHub particularly popular with open-source projects.
In this tutorial, I will explain how we can clone a project from GitLab in Eclipse.
Implementation Steps
Clone the Project
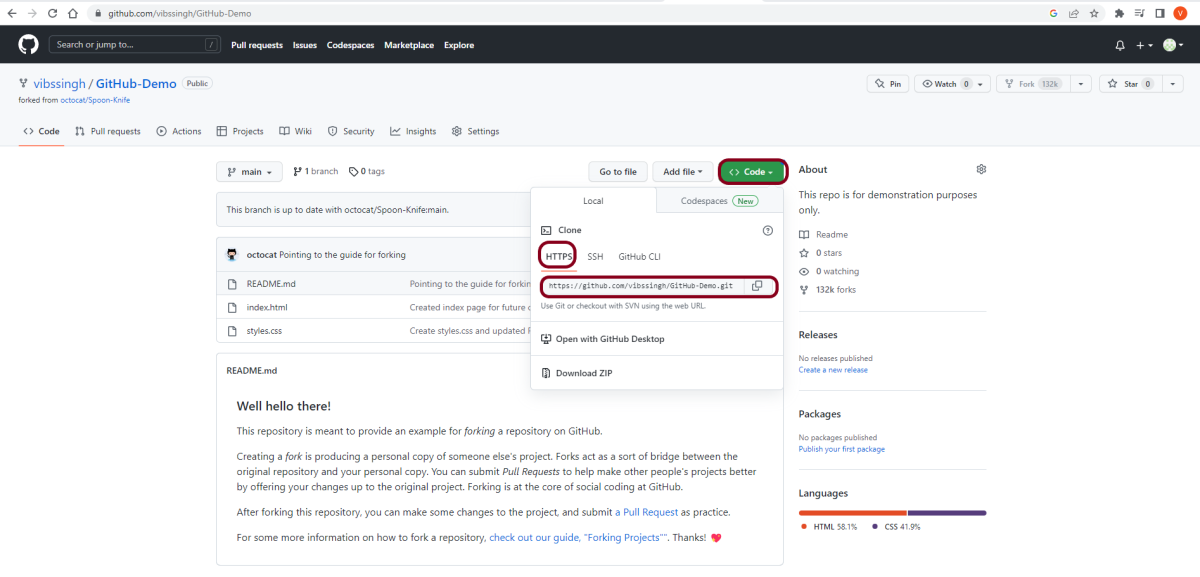
Step 1 – Go to GitHub and select the project which you want to clone. Click on the green colour “Code” button, then copy the hyperlink as shown in the image. You can either Clone with HTTPS, SSH, or GitHub CLI.
Import the project in Eclipse
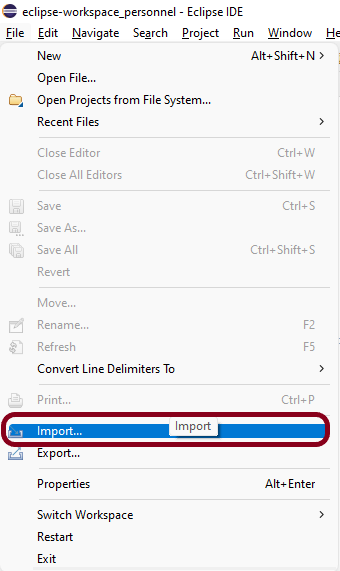
Step 2 – Open Eclipse and go to File > Import in eclipse as shown in the image.
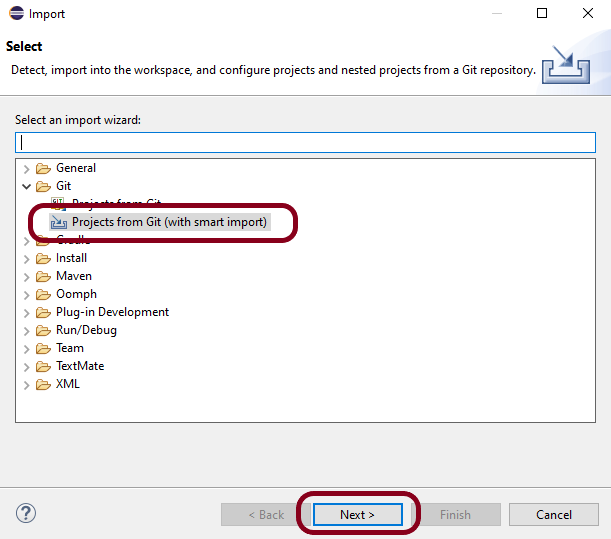
Step 3– A window will pop up in which select Git Folder. Under the Git folder, select the option – Projects from Git (with smart import)as shown in the image.
Click on the NEXT button.
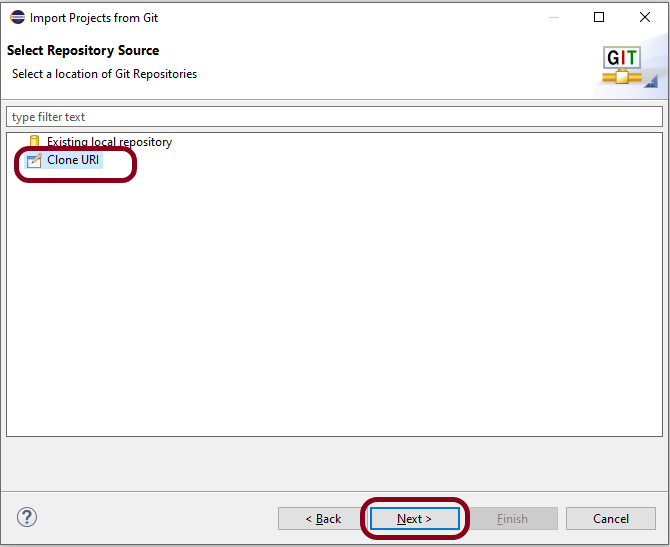
Step 4 – A new window will pop up in which select the option –Clone URI as shown in the image.
Click on the NEXT button.
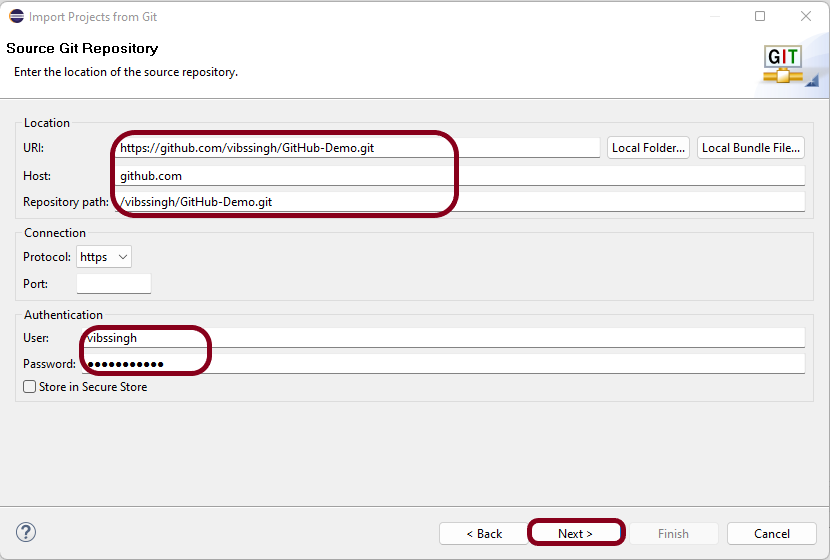
Step 5 – Another window will pop up in which you have to paste theGitHub Repository URL and alsoGitHub User ID and Passwordand click on the “Next” button.
URI – This is the URL that we have cloned from GitHub in Step 1. Host – github.com Repository path – Path of the project in GitHub (This is auto-populated after entering URI)
Authentication User – Username of GitHub Password – Password of GitHub
Step 6– Select main and select “When fetching a commit, also fetch its tags“.
Click on the “Next” button.
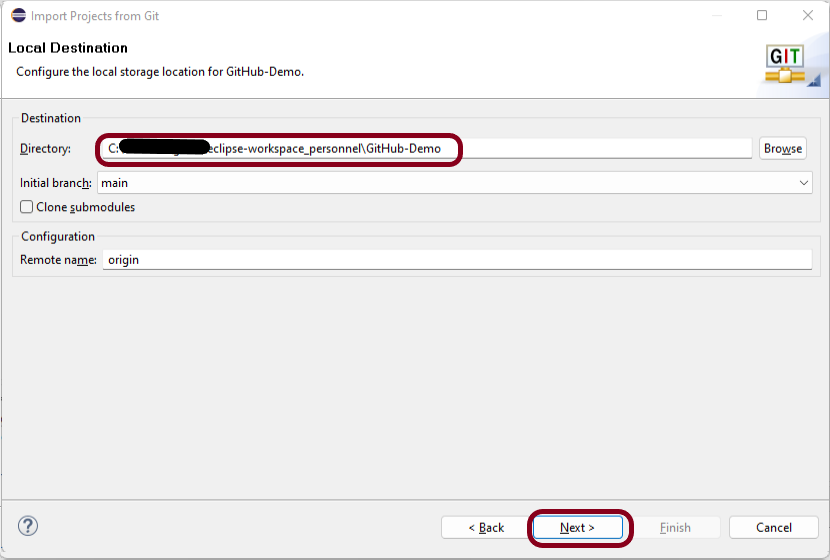
Step 7– Select the Folder directory in which you want to import the repository.
Click on the Next button.
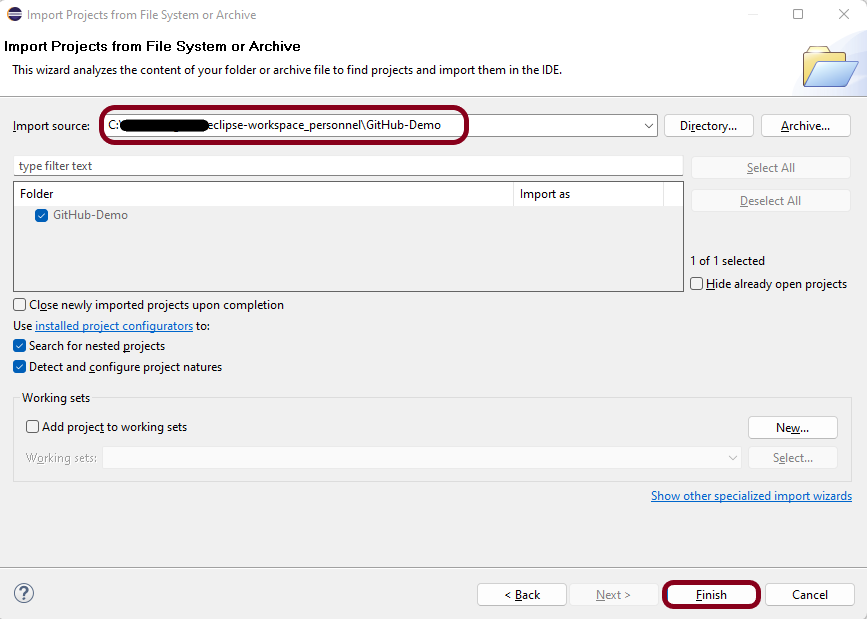
Step 8 – Select the Import Source, this is auto-generated. This wizard analyzes the content of the folder to find the project and import them into the IDE.
Click on the Finish button.
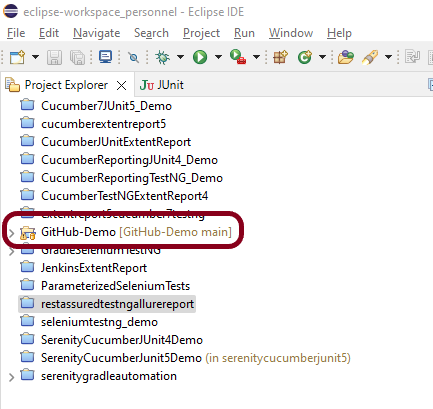
Step 9 – We have successfully imported the GitHub Repository as shown in the below image.
Congratulations on making it through this tutorial and hope you found it useful! Happy Learning!! Cheers!!
The previous tutorial explained the Integration of Cucumber with Selenium and JUnit4 in a Maven Project. This tutorial explains the test automation framework based on Gradle, Cucumber, Selenium, and JUnit4.
Pre Requisite:
Java 8 or above installed
Eclipse or IntelliJ IDE installed
Gradle Installed
Environment variables JAVA_HOME and GRADLE_HOME are correctly configured
In this tutorial, I’ll create a BDD Framework for the testing of web applications using Cucumber, and Selenium WebDriver with JUnit4. This framework consists of:-
Cucumber Java- 7.6.0
Cucumber JUnit– 7.6.0
Java 11
JUnit4 – 4.13.2
Gradle – 7.5.1
Selenium – 4.3.0
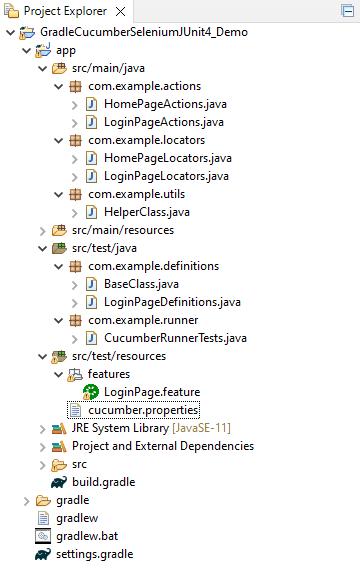
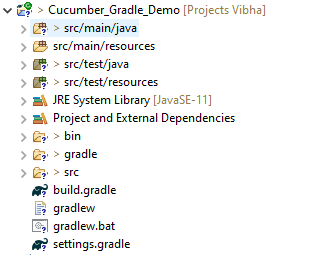
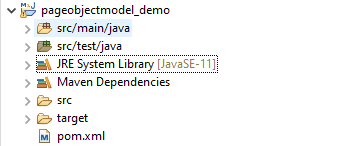
Project Structure
Steps to set up Cucumber Test Automation Framework with Selenium and TestNG
Download and Install Java on the system
Download and setup Eclipse IDE on the system
Install and setup Gradle
Install Cucumber Eclipse Plugin (For Eclipse IDE)
Create a new Gradle Project
Add Selenium, JUnit4, and Cucumberdependencies to the build.gradle
Create a featurefile under src/test/resources
Create the classes for locators, actions, and utilitiesin src/main/java
Create the Step Definition class or Glue Code in src/test/java
Create a Hook class to contain the initialization and closing of the browser in src/test/java
Create a JUnit4 Cucumber Runnerclass in src/test/java
Run the tests from Command Line
Cucumber Report Generation
Implementation Steps
Step 1- Download and Install Java
Cucumber and Selenium need Java to be installed on the system to run the tests. Click here to know How to install Java.
Step 2 – Download and setup Eclipse IDE on the system
The Eclipse IDE (integrated development environment) provides strong support for Java developers. Click here to know How to install Eclipse.
Step 3 – Setup Maven
To build a test framework, we need to add a number of dependencies to the project. Click here to know How to install Maven.
Step 4 – Install Cucumber Eclipse Plugin
The cucumber plugin is an Eclipse plugin that allows eclipse to understand the Gherkin syntax. When we are working with cucumber we will write the feature files that contain Feature, Scenario, Given, When, Then, And, But, Tags, Scenario Outline, and Examples. By default, eclipse doesn’t understand these keywords so it doesn’t show any syntax highlighter. Cucumber Eclipse Plugin highlights the keywords present in Feature File. Refer to this tutorial to get more detail – How to setup Cucumber with Eclipse.
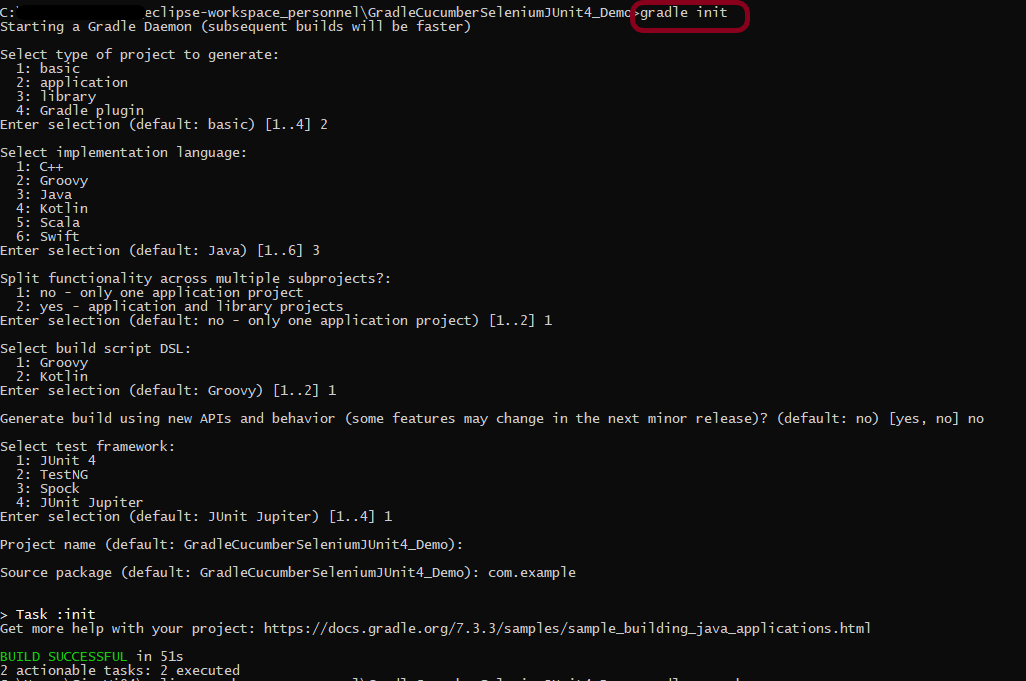
Step 5 – Create a new Gradle Project
Below are the steps to create the Gradle project from the command line.
Step 6 – Add Selenium, JUnit4, and Cucumber dependencies to the build.gradle
Add below mentioned Selenium, JUnit4, and Cucumber dependencies to the project.
/*
 * This file was generated by the Gradle 'init' task.
 *
 */

plugins {
    // Apply the application plugin to add support for building a CLI application in Java.
    id 'application'
}

repositories {
    // Use Maven Central for resolving dependencies.
    mavenCentral()
}

java {
    sourceCompatibility = 11
    targetCompatibility = 11
}

dependencies {

    testImplementation 'io.cucumber:cucumber-java:7.6.0'
    testImplementation 'io.cucumber:cucumber-junit:7.6.0'

    // Use JUnit test framework.
    testImplementation 'junit:junit:4.13.2'

    // This dependency is used by the application.
    implementation 'com.google.guava:guava:30.1.1-jre'
    implementation 'org.seleniumhq.selenium:selenium-java:4.4.0'
    implementation 'io.github.bonigarcia:webdrivermanager:5.3.0'
}

application {
    // Define the main class for the application.
    mainClass = 'com.example.App'
}

configurations {
    cucumberRuntime {
        extendsFrom testImplementation
    }
}

task cucumber() {
    dependsOn assemble, testClasses
    doLast {

        javaexec {
            main = "io.cucumber.core.cli.Main"
            classpath = configurations.cucumberRuntime + sourceSets.main.output + sourceSets.test.output

            args = ['--plugin', 'pretty',
            '--glue', 'com.example.definitions', 'src/test/resources'
            ]
        }

    }
}
Step 7 – Create a feature file in the src/test/resources directory
Create a folder with name features. Now, create the feature file in this folder. The feature file should be saved with the extension .feature. This feature file contains the test scenarios created to test the application. The Test Scenarios are written in Gherkins language in the format of Given, When, Then, And, But.
Feature: Login to HRM Application

Background:
   Given User is on HRMLogin page "https://opensource-demo.orangehrmlive.com/"

   @ValidCredentials
   Scenario: Login with valid credentials

    When User enters username as "Admin" and password as "admin123"
    Then User should be able to login sucessfully and new page open

   @InvalidCredentials
   Scenario Outline: Login with invalid credentials

    When User enters username as "<username>" and password as "<password>"
    Then User should be able to see error message "<errorMessage>"

  Examples:
  | username   | password  | errorMessage                      |
  | Admin      | admin12$$ | Invalid credentials               |
  | admin$$    | admin123  | Invalid credentials               |
  | abc123     | xyz$$     | Invalid credentials               |
  | $$$$$$     | %%%%%     | Invalid credentials               |

   @MissingUsername @FailedTest
   Scenario: Verify error message when username is missing

    When User enters username as "" and password as "admin123"
    Then User should be able to see error message for empty username as "Empty Username"
Step 8 – Create the classes for locators, actions, and utilities in src/main/java
Below is the sample code of the LoginPageLocators.
import org.openqa.selenium.WebElement;
import org.openqa.selenium.support.FindBy;

public class LoginPageLocators {

	@FindBy(name = "username")
    public WebElement userName;

    @FindBy(name = "password")
    public WebElement password;

    @FindBy(xpath = "//*[@id='app']/div[1]/div/div[1]/div/div[2]/div[2]/form/div[3]/button")
    public WebElement login;

    @FindBy(xpath = "//*[@id='app']/div[1]/div/div[1]/div/div[2]/div[2]/div/div[1]/div[1]/p")
    public  WebElement errorMessage;

    @FindBy(xpath = "//*[@id='app']/div[1]/div/div[1]/div/div[2]/div[2]/form/div[1]/div/span")
    public WebElement missingUsernameErrorMessage;

}
Below is the sample code for the HomePageLocators.
import org.openqa.selenium.WebElement;
import org.openqa.selenium.support.FindBy;

public class HomePageLocators {

	   @FindBy(xpath = "//*[@id='app']/div[1]/div[2]/div[2]/div/div[1]/div[1]/div[1]/h5")
	   public  WebElement homePageUserName;

}
Create the action classes for each web page. These action classes contain all the methods needed by the step definitions. In this case, I have created 2 action classes – LoginPageActions and HomePageActions.
LoginPageActions
import org.openqa.selenium.support.PageFactory;
import com.example.locators.LoginPageLocators;
import com.example.utils.HelperClass;

public class LoginPageActions {

	LoginPageLocators loginPageLocators = null;

    public LoginPageActions() {

    	this.loginPageLocators = new LoginPageLocators();
		PageFactory.initElements(HelperClass.getDriver(),loginPageLocators);
	}

    public void login(String strUserName, String strPassword) {

        // Fill user name
    	loginPageLocators.userName.sendKeys(strUserName);

        // Fill password
    	loginPageLocators.password.sendKeys(strPassword);

        // Click Login button
    	loginPageLocators.login.click();

    }

    // Get the error message when invalid credentials are provided
    public String getErrorMessage() {
        return loginPageLocators.errorMessage.getText();
    }

   // Get the error message when username is blank
   public String getMissingUsernameText() {
        return loginPageLocators.missingUsernameErrorMessage.getText();
    }
}
HomePageActions
import org.openqa.selenium.support.PageFactory;
import com.example.locators.HomePageLocators;
import com.example.utils.HelperClass;

public class HomePageActions {

	HomePageLocators homePageLocators = null;

	public HomePageActions() {

		this.homePageLocators = new HomePageLocators();

		PageFactory.initElements(HelperClass.getDriver(),homePageLocators);
    }


    // Get the User name from Home Page
    public String getHomePageText() {
        return homePageLocators.homePageUserName.getText();
    }

}
Create a Helper class where we are initializing the web driver, initializing the web driver wait, defining the timeouts, and creating a private constructor of the class, it will declare the web driver, so whenever we create an object of this class, a new web browser is invoked.
import java.time.Duration;
import org.openqa.selenium.WebDriver;
import org.openqa.selenium.chrome.ChromeDriver;
import io.github.bonigarcia.wdm.WebDriverManager;

public class HelperClass {

	private static HelperClass helperClass;
	private static WebDriver driver;
    public final static int TIMEOUT = 10;

	 private HelperClass() {

			WebDriverManager.chromedriver().setup();
	    	driver = new ChromeDriver();
	        driver.manage().timeouts().implicitlyWait(Duration.ofSeconds(TIMEOUT));
	        driver.manage().window().maximize();

	 }

    public static void openPage(String url) {
        driver.get(url);
    }

	public static WebDriver getDriver() {
		return driver;
	}

	public static void setUpDriver() {

		if (helperClass==null) {

			helperClass = new HelperClass();
		}
	}

	 public static void tearDown() {

		 if(driver!=null) {
			 driver.close();
			 driver.quit();
		 }

		 helperClass = null;

	 }
}
Step 9 – Create the Step Definition class or Glue Code in src/test/java
Now, we need to create the Step Definition of the Feature File
LoginPageDefinitions.java
import org.junit.Assert;
import com.example.actions.HomePageActions;
import com.example.actions.LoginPageActions;
import com.example.utils.HelperClass;
import io.cucumber.java.en.Given;
import io.cucumber.java.en.Then;
import io.cucumber.java.en.When;

public class LoginPageDefinitions {

	LoginPageActions objLogin = new LoginPageActions();
    HomePageActions objHomePage = new HomePageActions();

    @Given("User is on HRMLogin page {string}")
    public void loginTest(String url) {

    	HelperClass.openPage(url);
    }

    @When("User enters username as {string} and password as {string}")
    public void goToHomePage(String userName, String passWord) {

        objLogin.login(userName, passWord);
    }

    @Then("User should be able to login sucessfully and new page open")
    public void verifyLogin() {

        Assert.assertTrue(objHomePage.getHomePageText().contains("Employee Information"));
    }

    @Then("User should be able to see error message {string}")
    public void verifyErrorMessageForInvalidCredentials(String expectedErrorMessage) {

        Assert.assertEquals(expectedErrorMessage,objLogin.getErrorMessage());
    }

    @Then("User should be able to see error message for empty username as {string}")
    public void verifyErrorMessageForEmptyUsername(String expectedErrorMessage) {

        Assert.assertEquals(expectedErrorMessage,objLogin.getMissingUsernameText());

    }
}
Step 10 – Create a Hook class to contain the initialization and closing of the browser in src/test/java
import org.openqa.selenium.OutputType;
import org.openqa.selenium.TakesScreenshot;
import com.example.utils.HelperClass;
import io.cucumber.java.After;
import io.cucumber.java.Before;
import io.cucumber.java.Scenario;

public class BaseClass {

	@Before
    public static void setUp() {

       HelperClass.setUpDriver();
    }

	@After
	public static void tearDown(Scenario scenario) {


		//validate if scenario has failed
		if(scenario.isFailed()) {
			final byte[] screenshot = ((TakesScreenshot) HelperClass.getDriver()).getScreenshotAs(OutputType.BYTES);
			scenario.attach(screenshot, "image/png", scenario.getName());
		}

		HelperClass.tearDown();
	}
}
Step 11 – Create a JUnit Cucumber Runner class in src/test/java
Cucumber needs a TestRunner class to run the feature files. It is suggested to create a folder with the name of the runner in the src/test/java directory and create the Cucumber TestRunner class in this folder. Below is the code of the Cucumber TestRunner class.
import org.junit.runner.RunWith;
import io.cucumber.junit.Cucumber;
import io.cucumber.junit.CucumberOptions;

@RunWith(Cucumber.class)
@CucumberOptions(tags = "", features = {"src/test/resources/features/LoginPage.feature"}, glue = {"com.example.definitions"})

public class CucumberRunnerTests {

}
Step 12 – Run the tests from Command Line
Run the below command in the command prompt to run the tests and to get the test execution report.
gradle cucumber
The output of the above program is
Step 13 – Cucumber Report Generation
To get Cucumber Test Reports, add cucumber.properties under src/test/resources and add the below instruction in the file
cucumber.publish.enabled=true
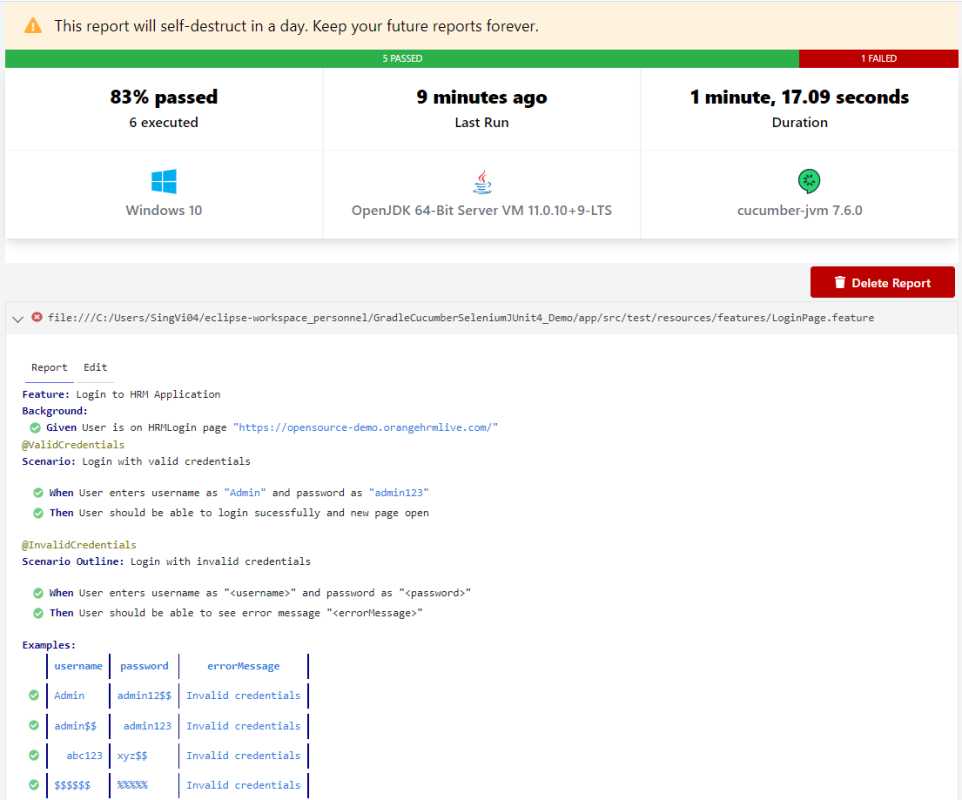
Below is the image of the Cucumber Report generated using the Cucumber Service.
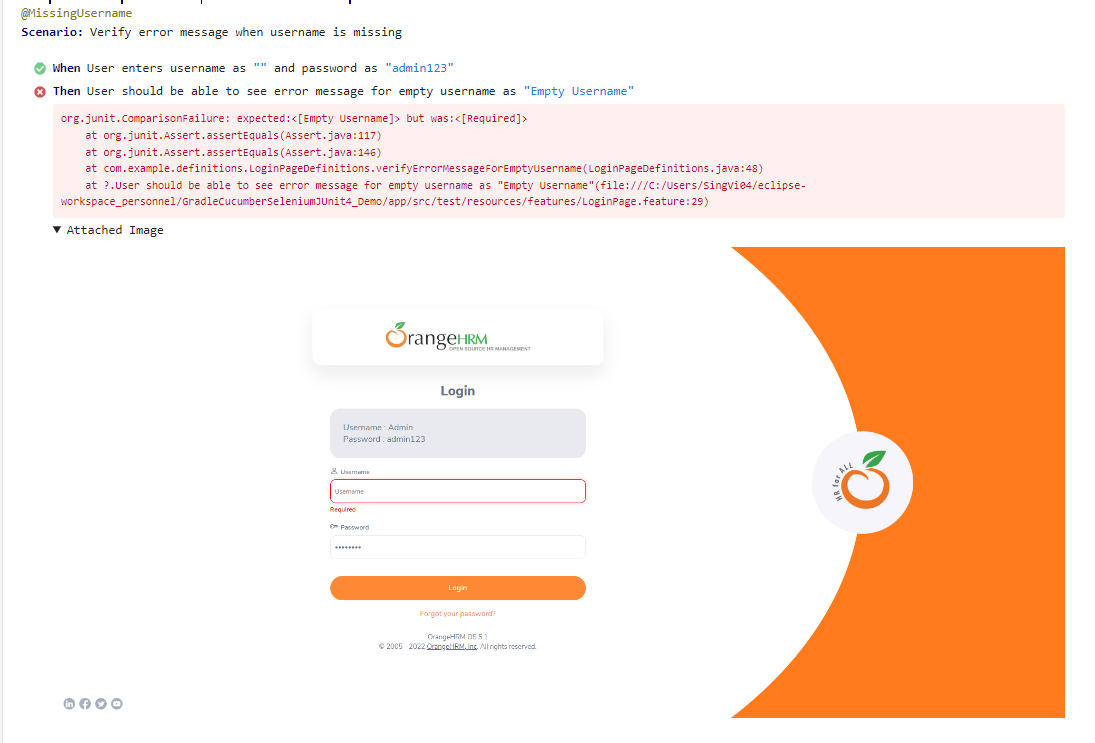
In the above example, as we can see, one of the tests has failed. So, when a test fails, we have written the code to take a screenshot of the failed step. The highlighted box above shows the image of the failed test. You can click on that to see the screenshot.
Congratulations on making it through this tutorial and hope you found it useful! Happy Learning!! Cheers!!
In this tutorial, I am going to build an automation framework to test theSpringboot application with Cucumber, Rest Assured, and TestNG.
What is Springboot?
Spring Boot is an open-source micro-framework maintained by a company called Pivotal. It provides Java developers with a platform to get started with an auto-configurable production-grade Spring application. With it, developers can get started quickly without losing time on preparing and configuring their Spring application.
What is Cucumber?
Cucumber is a software tool that supports behavior-driven development (BDD). Cucumber can be defined as a testing framework, driven by plain English. It serves as documentation, automated tests, and development aid – all in one.
This framework consists of:
Springboot – 2.5.2
Cucumber – 7.3.4
Java 11
TestNG – 7.3.4
Maven – 3.8.1
RestAssured – 5.1.1
Steps to setup Cucumber Test Automation Framework for API Testing using Rest-Assured
Add SpringbootTest, Rest-Assured, JUnit, and Cucumber dependencies to the project
Create a source folder src/test/resources and create a feature file under src/test/resources
Create the Step Definition class or Glue Code for the Test Scenario under the src/test/java directory
Create a Cucumber Runner class under the src/test/java directory
Run the tests from Cucumber Test Runner
Run the tests from Command Line
Run the tests from TestNG
Generation of TestNG Reports
Cucumber Report Generation
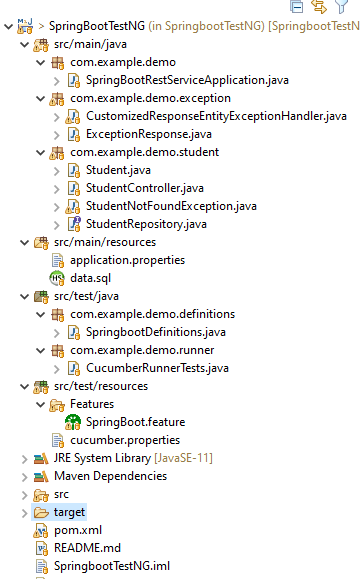
Below is the structure of a SpringBoot application project
We need the below files to create a SpringBoot Application.
SpringBootRestServiceApplication.java
The Spring Boot Application class is generated with Spring Initializer. This class acts as the launching point for the application.
import org.springframework.boot.SpringApplication;
import org.springframework.boot.autoconfigure.SpringBootApplication;

@SpringBootApplication
public class SpringBootRestServiceApplication {

    public static void main(String[] args) {

        SpringApplication.run(SpringBootRestServiceApplication.class, args);
    }
}
Student.java
This is JPA Entity for Student class
import javax.persistence.Entity;
import javax.persistence.GeneratedValue;
import javax.persistence.Id;
import javax.validation.constraints.NotBlank;
import javax.validation.constraints.NotNull;
import javax.validation.constraints.Size;

@Entity
public class Student {
    @Id
    @GeneratedValue
    private Long id;

    @NotNull
    @Size(min = 4, message = "Name should have atleast 4 characters")
    private String name;

    @NotBlank(message = "passportNumber is mandatory")
    private String passportNumber;

    public Student() {
        super();
    }

    public Student(Long id, String name, String passportNumber) {
        super();
        this.id = id;
        this.name = name;
        this.passportNumber = passportNumber;
    }

    public Long getId() {
        return id;
    }

    public void setId(Long id) {
        this.id = id;
    }

    public String getName() {
        return name;
    }

    public void setName(String name) {
        this.name = name;
    }

    public String getPassportNumber() {
        return passportNumber;
    }

    public void setPassportNumber(String passportNumber) {
        this.passportNumber = passportNumber;
    }
}
StudentRepository.java
This is JPA Repository for Student. This is created using Spring Data JpaRepository.
Spring Boot automatically loads the application.properties whenever it starts up. You can de-reference values from the property file in the java code through the environment.
spring.jpa.defer-datasource-initialization=true
data.sql
Data is loaded from data.sql into the Student table. Spring Boot would execute this script after the tables are created from the entities.
insert into student values(10001,'Annie', 'E1234567');
insert into student values(20001,'John', 'A1234568');
insert into student values(30001,'David','C1232268');
insert into student values(40001,'Amy','D213458');
Test Automation Framework Implementation
Step 1 – Add SpringbootTest, Cucumber, Rest-Assured, and TestNG dependencies to the project (Maven project)
Step 2 – Create a source folder src/test/resources and create a feature file under src/test/resources
By default, the Maven project has an src/test/java directory only. Create a new Source Folder under src/test with the name of resources. Create a folder name as Features within the src/test/resources directory.
Create a feature file to test the Springboot application. Below is a sample feature file.
Feature: Verify springboot application using Cucumber and TestNG

  @ReceiveUserDetails
  Scenario Outline: Send a valid Request to get user details
    Given I send a request to the URL "/students" to get user details
    Then The response will return status 200
    And The response contains id <studentID> and names "<studentNames>" and passport_no "<studentPassportNo>"

    Examples:
      |studentID    |studentNames  |studentPassportNo|
      |10001        |Annie         |E1234567         |
      |20001        |John          |A1234568         |
      |30001        |David         |C1232268         |
      |40001        |Amy           |D213458          |


  @CreateUser
  Scenario: Send a valid Request to create a user
    Given I send a request to the URL "/students" to create a user with name "Annie" and passportNo "E1234567"
    Then The response will return status 201
    And Resend the request to the URL "/students" and the response returned contains name "Annie" and passport_no "E1234567"
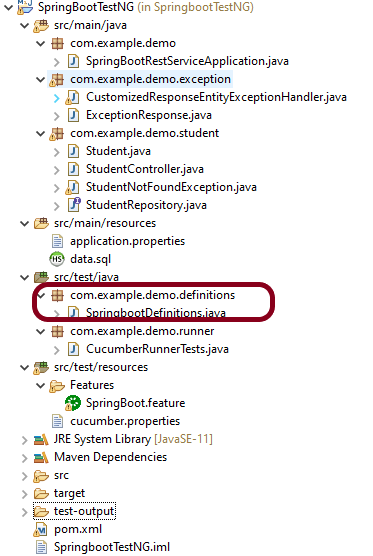
Step 3 – Create the Step Definition class or Glue Code for the Test Scenario under src/test/java
The corresponding step definition file of the above feature file is shown below.
import static io.restassured.RestAssured.given;
import static org.hamcrest.Matchers.containsString;
import static org.hamcrest.Matchers.equalTo;
import static org.hamcrest.Matchers.hasItem;
import org.json.JSONObject;
import org.springframework.boot.test.context.SpringBootTest;
import org.springframework.boot.web.server.LocalServerPort;
import io.cucumber.java.en.Given;
import io.cucumber.java.en.Then;
import io.cucumber.spring.CucumberContextConfiguration;
import io.restassured.RestAssured;
import io.restassured.http.ContentType;
import io.restassured.response.ValidatableResponse;
import io.restassured.specification.RequestSpecification;

@CucumberContextConfiguration
@SpringBootTest(webEnvironment = SpringBootTest.WebEnvironment.RANDOM_PORT)
public class SpringbootDefinitions {

	private final static String BASE_URI = "http://localhost";

	@LocalServerPort
	private int port;

	private ValidatableResponse validatableResponse, validatableResponse1;

	private void configureRestAssured() {
		RestAssured.baseURI = BASE_URI;
		RestAssured.port = port;
	}

	protected RequestSpecification requestSpecification() {
		configureRestAssured();
		return given();
	}

	@Given("I send a request to the URL {string} to get user details")
	public void getStudentDetails(String endpoint) throws Throwable {
		validatableResponse = requestSpecification().contentType(ContentType.JSON).when().get(endpoint).then();
		System.out.println("RESPONSE :" + validatableResponse.extract().asString());
	}

	@Given("I send a request to the URL {string} to create a user with name {string} and passportNo {string}")
	public void createStudent(String endpoint, String studentName, String studentPassportNumber) throws Throwable {

		JSONObject student = new JSONObject();
		student.put("name", studentName);
		student.put("passportNumber", studentPassportNumber);

		validatableResponse = requestSpecification().contentType(ContentType.JSON).body(student.toString()).when()
				.post(endpoint).then();
		System.out.println("RESPONSE :" + validatableResponse.extract().asString());
	}

	@Then("The response will return status {int}")
	public void verifyStatusCodeResponse(int status) {
		validatableResponse.assertThat().statusCode(equalTo(status));

	}

	@Then("The response contains id {int} and names {string} and passport_no {string}")
	public void verifyResponse(int id, String studentName, String passportNo) {
		validatableResponse.assertThat().body("id", hasItem(id)).body(containsString(studentName))
				.body(containsString(passportNo));

	}

	@Then("Resend the request to the URL {string} and the response returned contains name {string} and passport_no {string}")
	public void verifyNewStudent(String endpoint, String studentName, String passportNo) {

		validatableResponse1 = requestSpecification().contentType(ContentType.JSON).when().get(endpoint).then();
		System.out.println("RESPONSE :" + validatableResponse1.extract().asString());
		validatableResponse1.assertThat().body(containsString(studentName)).body(containsString(passportNo));

	}
}
To make Cucumber aware of your test configuration you can annotate a configuration class on your glue path with @CucumberContextConfiguration and with one of the following annotations: @ContextConfiguration, @ContextHierarchy, or @BootstrapWith.It is imported from:
By default, @SpringBootTest does not start the webEnvironment to refine further how your tests run. It has several options: MOCK(default), RANDOM_PORT, DEFINED_PORT, NONE.
RANDOM_PORT loads a WebServerApplicationContext and provides a real web environment. The embedded server is started and listens on a random port. LocalServerPort is imported from the package:
Step 4 – Create a Cucumber TestNG Runner class under src/test/java
A runner will help us to run the feature file and acts as an interlink between the feature file and StepDefinition Class. The TestRunner should be created within the directory src/test/java.
import io.cucumber.testng.AbstractTestNGCucumberTests;
import io.cucumber.testng.CucumberOptions;

@CucumberOptions(features = {"src/test/resources/Features"}, glue = {"com.example.demo.definitions"})
public class CucumberRunnerTests extends AbstractTestNGCucumberTests {

}
The @CucumberOptions annotation is responsible for pointing to the right feature package, configuring the plugin for a better reporting of tests in the console output, and specifying the package where extra glue classes may be found. We use it to load configuration and classes that are shared between tests.
Step 5 – Run the tests from Cucumber Test Runner
You can execute the test script by right-clicking onTestRunner class -> Run As TestNG in Eclipse.
In case you are using IntelliJ, select “Run CucumberRunnerTests“.
SpringBootTest creates an application context containing all the objects we need for the Integration Testing It, starts the embedded server, creates a web environment, and then enables methods to do Integration testing.
Step 6 – Run the tests from Command Line
Use the below command to run the tests through the command line.
mvn clean test
Step 7 – Run the tests from TestNG
Create a testng.xml in the project as shown below:
<?xml version="1.0" encoding="UTF-8"?>
<!DOCTYPE suite SYSTEM "https://testng.org/testng-1.0.dtd">
<suite name = "Suite1">
  <test name = "SpringBoot Cucumber TestNG Demo">
    <classes>
          <class name = "com.example.demo.runner.CucumberRunnerTests"/>
     </classes>
   </test>
</suite>
Step 8 – Generation of TestNG Reports
TestNG generates various types of reports underthe test-output folder like emailable-report.html, index.html, testng-results.xml.
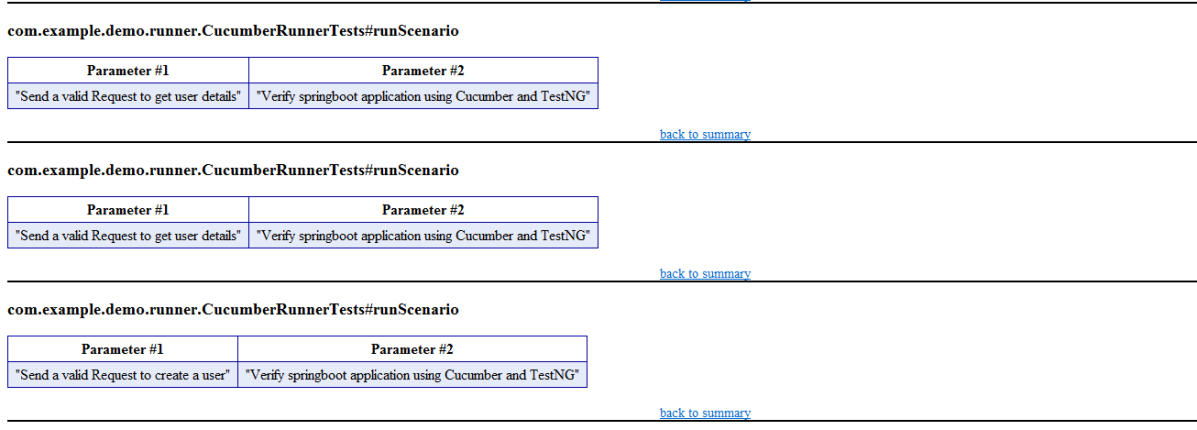
We are interested in the “emailable-report.html” report. Open “emailable-report.html”, as this is an HTML report, and open it with the browser. The below image shows emailable-report.html.
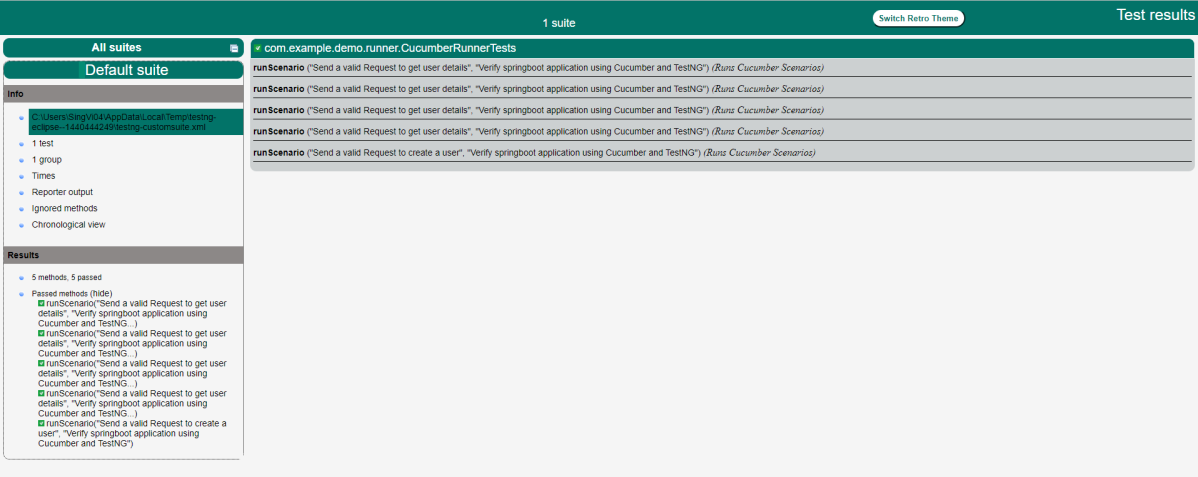
TestNG also produce “index.html” report, and it resides under test-output folder. The below image shows index.html report.
Step 9 – Cucumber Report Generation
Add cucumber.properties under src/test/resources and add the below instruction in the file.
cucumber.publish.enabled=true
The link to the Cucumber Report is present in the execution status.
Below is the image of the Cucumber Report generated using the Cucumber Service.
Complete Source Code: Refer to GitHub for the source code.
Congratulations!! We are able to build a test framework to test the SpringBoot application using Cucumber, Rest Assured, and TestNG.
GitLab is the open DevOps platform, delivered as a single application that spans the entire software development lifecycle. If you’re not using GitLab, your DevOps lifecycle is likely spread across any number of applications. These silos take overhead to integrate, manage, configure, and maintain, slowing down your team and your deployments. Moving to a single application will speed up your workflow and help you deliver better software, faster. To know more about GitLab, click here.
In this article, we will see how to push an existing project to GitLab using Eclipse IDE.
Implementation Steps
Step 1 – Go to GitLab and select the project which you want to clone. Click on the blue color “Clone” button and then copy the hyperlink as shown in the image. You can either Clone with SSH or Clone with HTTPS.
Step 2 – Open Eclipse IDE and right-click on the project you want to push and go to the Team ->Share project.
Step 3 – It will add the project to the given repository as shown below image. Select the Finishbutton.
As you can see, the given project is Git Repository. If the project is not GIT Repository, refer to this tutorial – How to create a new Git Repository to convert the project in GIT Repository.
Step 4 – Again, Right-Click on the project and go to theTeam ->commit.
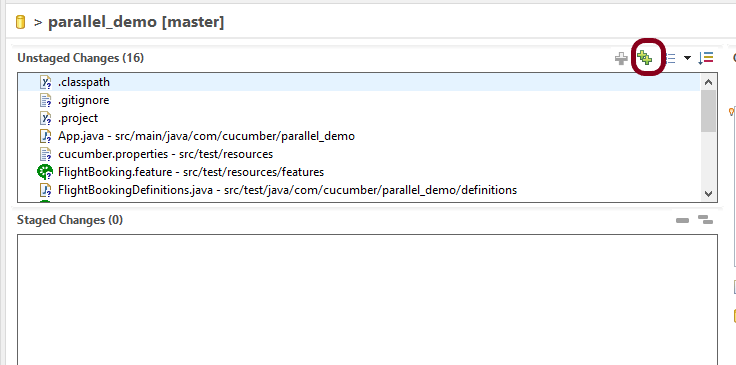
Step 5 – Select the files you want to commit and click green color + sign or Drag and Drop the files from “Unstaged Changes to Staged Changes“.
This is how the stage files looks like as shown below.
Step 6 – Write the commit message in “Commit Message” and click “Commit and Push“.
Step 7 – Fill in the below details in this window and click the “Preview” button.
URI – This is the URL that we have cloned from GitLab in Step 1. Host – gitlab.com Repository path – the path of the project in GitLab (This is auto-populated after entering URI)
Authentication User – Username of GitLab Password – password of GitLab
Step 8 – A new window will open which provides the detail of the Destination location of the project. Click the “Preview” button.
Step 9 – Push to the new branch of GitLab Repository and click the Push button.
Step 10 – As this is a new project with a master branch, you can see the whole project migrated in GitLab. If we are not using the master branch, but the local branch, then we need to create a merge request to merge the latest changes in the already existing project in GitLab.
Cheers!!Congratulations on making it through this tutorial and hope you found it useful! Happy Learning!!
The implementation of a test framework is considered successful and effective, if the test framework supports test execution in multiple ways. The tests in a Gradle Cucumber Framework can be executed as JUnit Tests, Gradle Tests and Gradle commands from Command Line.
In this tutorial, I will explain to run Gradle tests from Command Line.
Versions Used
Cucumber – 7.5.0
Java – 11
JUnit – 4.13.2
Rest Assured – 4.3.3
To execute tests using JUnit Tests and Gradle Tests, we need to create a JUnit TestRunner.
Steps to follow
Create a Gradle Java Project.
Add Rest-Assured and Cucumber dependencies to the Gradle project
Add Configuration to build.gradle
Add Gradle Cucumber Task to build.gradle
Create a feature file under src/test/resources
Create the Step Definition class or Glue Code for the Test Scenario
Run the tests from Command Line
Step 1 – Create a Gradle project
Step 2 – Add the below-mentioned dependencies in the Gradle project inbuild.gradle.
plugins {
    // Apply the java-library plugin to add support for Java Library

    id 'java-library'

}

repositories {
    // Use jcenter for resolving dependencies.
    // You can declare any Maven/Ivy/file repository here.
    jcenter()
    mavenCentral()
}

dependencies {
    // This dependency is exported to consumers, that is to say found on their compile classpath.
    api 'org.apache.commons:commons-math3:3.6.1'

    // This dependency is used internally, and not exposed to consumers on their own compile classpath.
    implementation 'com.google.guava:guava:29.0-jre'

    // Use JUnit test framework
    testImplementation 'junit:junit:4.13'
    testImplementation 'io.cucumber:cucumber-java:6.6.1'
    testImplementation 'io.cucumber:cucumber-junit:6.6.1'
    testImplementation 'io.rest-assured:rest-assured:4.3.3'
}
Here, task cucumber will execute all the tests present in the project irrespective of the number of feature files and scenarios within the feature file.
Step 5 – Create a feature file under src/test/resources
I have created 2 sample feature files – API_GetExample.feature and API_PostExample.feature.
Below is the API_GetExample.feature
@getexample
Feature: Validation of get method

  @GetUserDetails
  Scenario Outline: Send a valid Request to get user details

  Given I send a request to the URL to get user details
  Then the response will return status 200 and id <id> and salary <employee_salary> and name "<employee_name>" and age <employee_age> and message "<message>"

Examples:
    |id  |employee_salary|employee_name |employee_age  |message                                  |
    |1   |320800         |Tiger Nixon   |61            |Successfully! Record has been fetched.   |


  @GetAllUsers
  Scenario Outline: Send a valid Request to get the details of all the users

  Given I send a request to the URL to get the details of all the users
  Then the response will return status 200 and message "<message>"

Examples:
      |message                                  |
      | Successfully! All records has been fetched.   |
API_PostExample.feature
@postexample
Feature: Validation of POST method

  @CreateUser
  Scenario Outline: Send Request to create a user

  Given I send a request to the URL to create a new user
  Then the response will return status 200 and name "<employee_name>" and message "<message>"

Examples:
    |employee_name |message                                |
    |posttest      |Successfully! Record has been added.   |
1. Run Test from Command Line
1. Open the command prompt and change the directory to the project location.
cd C:\Users\Vibha\Projects\Vibha_Personal\Cucumber_Gradle_Demo
2. All feature files should be in src/test/resources and create the Cucumber Runner class as CucumberRunnerTest. Note:- The Runner class name should end with Test to execute the tests from Command Line
2. Running all Feature files or Tests from Command Line
The below command will run all the tests present in the project. As you can see, there are 2 feature files – API_GetExample.feature contains 2 scenarios, and API_PostExample.feature contains 1 scenario.
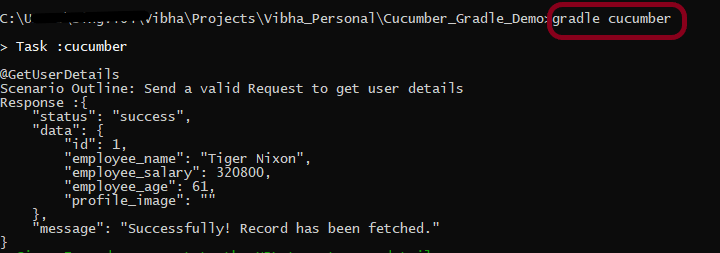
gradle cucumber
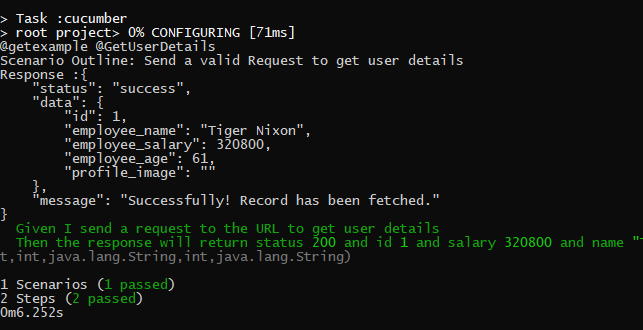
The below screenshot shows that Task: Cucumber is triggered.
The below screenshot shows that the tests are executed and the status of the tests.
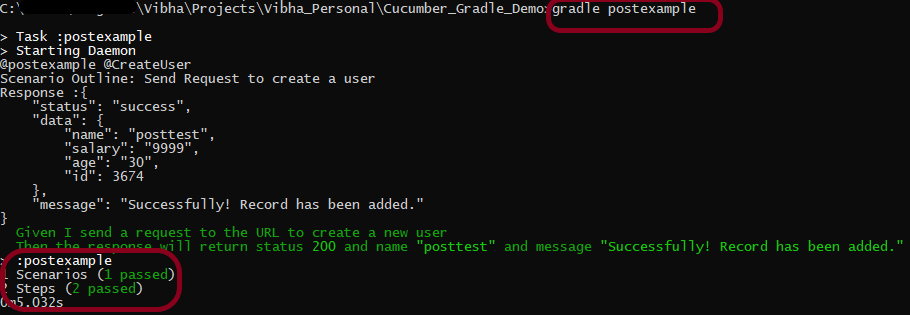
3. Running a Feature file from Command Line
To run a particular feature, create a task – postexample for that feature in the build.gradle as shown in the below example.
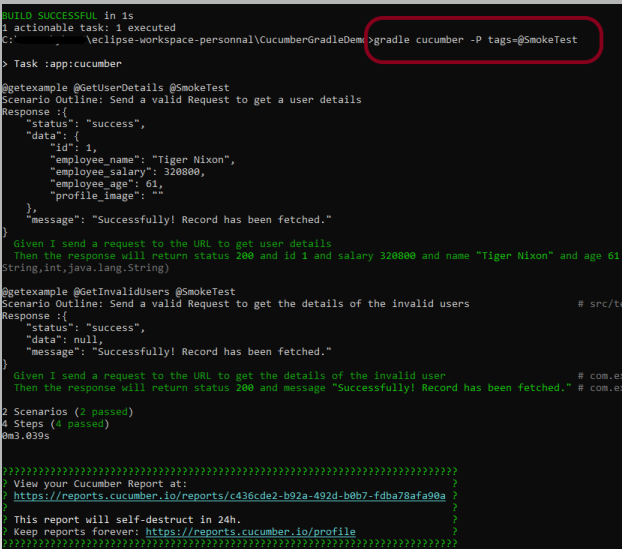
Use the below-mentioned command to run the tests tagged with tag = GetUserDetails.
gradle cucumber -P tags=@GetUserDetails
5. Running a group of tests from Command Line
Below is the feature file
@getexample
Feature: Validation of get method

  @GetUserDetails @SmokeTest
  Scenario Outline: Send a valid Request to get a user details

  Given I send a request to the URL to get user details
  Then the response will return status 200 and id <id> and salary <employee_salary> and name "<employee_name>" and age <employee_age> and message "<message>"

Examples:
    |id  |employee_salary|employee_name |employee_age  |message                                  |
    |1   |320800         |Tiger Nixon   |61            |Successfully! Record has been fetched.   |

  @GetAllUsers
  Scenario Outline: Send a valid Request to get the details of all the users

  Given I send a request to the URL to get the details of all the users
  Then the response will return status 200 and message "<message>"

Examples:
    |message                                        |
    | Successfully! All records has been fetched.   |


  @GetInvalidUsers @SmokeTest
  Scenario Outline: Send a valid Request to get the details of the invalid users

  Given I send a request to the URL to get the details of the invalid user
  Then the response will return status 200 and message "<message>"

Examples:
    | message                                  |
    | Successfully! Record has been fetched.   |

  @GetInvalidUsers
  Scenario Outline: Send a valid Request to get the details of the user with id 0

  Given I send a request to the URL to get the details of the user with id 0
  Then the response will return status 200 and message "<message>" and error "<errorMessage>"

Examples:
    | message             | errorMessage  |
    | Not found record.   | id is empty   |

  @Test3
  Scenario: Test 3

  Given I send a request to the URL to get the details of the user3
  Then the response will return successfully


  @Test4
  Scenario: Test 4

  Given I send a request to the URL to get the details of the user4
  Then the response will return successfully
I want to run 2 tests – @GetUserDetails and @GetInvalidUsers. I can create a task with the name of @SmokeTest and assign these scenarios wit h the same tag. The task will look like as shown below:
6. Skipping the execution of a group of tests from Command Line
In the below feature file, I have marked 4 tests as “@Ignore” and 2 are valid.
Feature: Validation of get method

  @GetUserDetails @SmokeTest
  Scenario Outline: Send a valid Request to get a user details

  Given I send a request to the URL to get user details
  Then the response will return status 200 and id <id> and salary <employee_salary> and name "<employee_name>" and age <employee_age> and message "<message>"

Examples:
    |id  |employee_salary|employee_name |employee_age  |message                                  |
    |1   |320800         |Tiger Nixon   |61            |Successfully! Record has been fetched.   |


  @GetAllUsers @Ignore
  Scenario Outline: Send a valid Request to get the details of all the users

  Given I send a request to the URL to get the details of all the users
  Then the response will return status 200 and message "<message>"

Examples:
    |message                                        |
    | Successfully! All records has been fetched.   |


  @GetInvalidUsers @SmokeTest @Ignore
  Scenario Outline: Send a valid Request to get the details of the invalid users

  Given I send a request to the URL to get the details of the invalid user
  Then the response will return status 200 and message "<message>"

Examples:
    | message                                  |
    | Successfully! Record has been fetched.   |

  @GetInvalidUsers @Ignore
  Scenario Outline: Send a valid Request to get the details of the user with id 0

  Given I send a request to the URL to get the details of the user with id 0
  Then the response will return status 200 and message "<message>" and error "<errorMessage>"

Examples:
    | message             | errorMessage  |
    | Not found record.   | id is empty   |

  @Test3 @Ignore
  Scenario: Test 3

  Given I send a request to the URL to get the details of the user3
  Then the response will return successfully


  @Test4
  Scenario: Test 4

  Given I send a request to the URL to get the details of the user4
  Then the response will return successfully
Add the below-mentioned tag in the build.gradle.
def tags = (findProperty('tags') == null) ? 'not @Ignore' : findProperty('tags') + ' and not @Ignore'
Use the below-mentioned command to run the tests.
gradle cucumber
The program will execute only 2 tests and will skip the rest 4 tests. The output of the above program is
If I use the tag @SmokeTest here in the command line, then it will run all the tests tagged with @SmokeTest, but will ignore the tests tagged with @Ignore. So, in this case, it will run only 1 test – @GetUserDetails.
Page Object Model(POM) is an object design pattern in Selenium webdriver which tells how to organize the object repository. In this case, we refer to web elements as Objects. Page Object Model(POM) is not a Test Framework.
In the Page Object Model (POM), each web page is represented as a separate class. For example, consider HRM website. It has many web pages like Login , Dashboard , Assign Leave, Leave List, Timesheets, etc. Under this model, for each web page in the application, there should be a corresponding Page Class. This Page class will identify the WebElements of that web page and also contains Page methods that perform operations on those WebElements.
If a new web element is added or an existing web element is updated, then you can add or update that web element in object repository by navigating to class which has same name as webpage.
The object repository is independent of test cases, so we can use the same object repository for a different purpose with different tools. For example, we can integrate Page Object Model in Selenium with TestNG/JUnit for functional Testing and at the same time with JBehave/Cucumber for acceptance testing.
POM enhances test maintenance, readability and reducing code duplication.
In this tutorial, I’m creating a project using Page Object Model as Design Pattern and TestNG as the Test Automation Framework.
Steps to create a Page Object Model Project
Download and Install Java on system
Download and setup Eclipse IDE on system
Setup Maven
Create a new Maven Project
Add dependencies to pom.xml
Create Page Class for each page – LoginPage.Java and DashboardPage.java
Create tests for each Page – BaseTests, LoginTests and DashboardTests
Create a TestNG.XML
Run the tests from TestNG.xml
TestNG Report Generation
Step 1- Download and Install Java
Click here to know How to install Java. To check if Java is already installed on your machine, use the below command in the command line. This command will show the version of Java installed on your machine.
java -version
Step 2 – Download and setup Eclipse IDE on system
The Eclipse IDE (integrated development environment) provides strong support for Java developer. The Eclipse IDE for Java Developers distribution is designed to support standard Java development. It includes support for the Maven and Gradle build system and support for the Git version control system. Click here to know How to install Eclipse.
Step 3 – Setup Maven
To build a test framework, we need to add a number of dependencies to the project. It is very tedious and cumbersome process to add each dependency manually. So, to overcome this problem, we use a build management tool. Maven is a build management tool which is used to define project structure, dependencies, build, and test management. Click here to know How to install Maven.
To know if Maven is already installed or not on your machine, type this command in the command line. This command will show the version of Maven installed on your machine.
Step 6 – Create Page Class for each page – LoginPage.Java and DashboardPage.java
I want to test 2 pages – Login and Dashboard. So, I’m creating 2 seperate class. Each class will contain its web elements and methods of that page.
LoginPage.Java
import org.openqa.selenium.By;
import org.openqa.selenium.WebDriver;

public class LoginPage {

	WebDriver driver;

	By userName = By.name("txtUsername");

	By password = By.name("txtPassword");

	By titleText = By.id("logInPanelHeading");

	By login = By.id("btnLogin");

	public LoginPage(WebDriver driver) {
		this.driver = driver;
	}

	// Set user name in textbox
	public void setUserName(String strUserName) {
		driver.findElement(userName).sendKeys(strUserName);
	}

	// Set password in password textbox
	public void setPassword(String strPassword) {
		driver.findElement(password).sendKeys(strPassword);
	}

	// Click on login button
	public void clickLogin() {
		driver.findElement(login).click();
	}

	// Get the title of Login Page
	public String getLoginTitle() {
		return driver.findElement(titleText).getText();
	}

	public void login(String strUserName, String strPasword) {

		// Fill user name
		this.setUserName(strUserName);

		// Fill password
		this.setPassword(strPasword);

		// Click Login button
		this.clickLogin();
	}
}
DashboardPage.java
import org.openqa.selenium.By;
import org.openqa.selenium.WebDriver;

public class DashboardPage {

	WebDriver driver;

	By homePageUserName = By.id("welcome");

	public DashboardPage(WebDriver driver) {
		this.driver = driver;

	}

	// Get the User name from Home Page
	public String getHomePageText() {
		return driver.findElement(homePageUserName).getText();
	}

}
Step 7 – Create tests for each Page – BaseTests, LoginTests and DashboardTests
Here, I have created 3 classes. BaseTest class to contain startUp and tearDown methods. These methods will run once before the after of every class. LoginTests and DashboardTests classes contain the tests related to LoginPage and DashboardPage respectively.
BaseTest
import java.util.concurrent.TimeUnit;

import org.openqa.selenium.WebDriver;
import org.openqa.selenium.firefox.FirefoxDriver;
import org.testng.annotations.AfterClass;
import org.testng.annotations.BeforeClass;

import com.example.pageobjectmodel_demo.pages.DashboardPage;
import com.example.pageobjectmodel_demo.pages.LoginPage;

public class BaseTest {

	public static WebDriver driver;
	LoginPage objLogin;
	DashboardPage objDashboardPage;

	@BeforeClass
	public void setup() {
		System.setProperty("webdriver.gecko.driver",
				"C:\\Users\\Vibha\\Software\\geckodriver-v0.26.0-win64\\geckodriver.exe");
		driver = new FirefoxDriver();
		driver.manage().window().maximize();
		driver.manage().timeouts().implicitlyWait(10, TimeUnit.SECONDS);
		driver.get("https://opensource-demo.orangehrmlive.com/");
	}

	@AfterClass
	public void close() {
		driver.close();
	}
}
LoginTests
import org.testng.Assert;
import org.testng.annotations.Test;

import com.example.pageobjectmodel_demo.pages.DashboardPage;
import com.example.pageobjectmodel_demo.pages.LoginPage;

public class LoginTests extends BaseTest {

	LoginPage objLogin;
	DashboardPage objDashboardPage;

	@Test(priority = 0)
	public void loginTest() {

		// Create Login Page object
		objLogin = new LoginPage(driver);

		// Verify login page text
		String loginPageTitle = objLogin.getLoginTitle();
		Assert.assertTrue(loginPageTitle.contains("LOGIN Panel"));
	}

}
DashboardTests
import org.testng.Assert;
import org.testng.annotations.Test;

import com.example.pageobjectmodel_demo.pages.DashboardPage;
import com.example.pageobjectmodel_demo.pages.LoginPage;

public class DashboardTests extends BaseTest {

	LoginPage objLogin;
	DashboardPage objDashboardPage;

	@Test(priority = 0)
	public void DasboardTest() {

		objLogin = new LoginPage(driver);

		// login to application
		objLogin.login("Admin", "admin123");

		// go the dashboard page
		objDashboardPage = new DashboardPage(driver);

		// Verify dashboard page
		Assert.assertTrue(objDashboardPage.getHomePageText().contains("Welcome"));
	}

}
Step 8 – Create a TestNG.XML
Here, I have mentioned 2 test classes. So, when I will run the tests from TestNG.xml, it will run the tests of both the classes. If will mention any one class, then the test of that particular class will be executed.
<?xml version = "1.0"encoding = "UTF-8"?>
<!DOCTYPE suite SYSTEM "http://testng.org/testng-1.0.dtd">
<suite name = "PageObjectModel">
  <test name = "PageObjectModel Tests">
    <classes>
          <class name = "com.example.pageobjectmodel_demo.tests.LoginTests"/>
          <class name = "com.example.pageobjectmodel_demo.tests.DashboardTests"/>
     </classes>
   </test>
</suite>
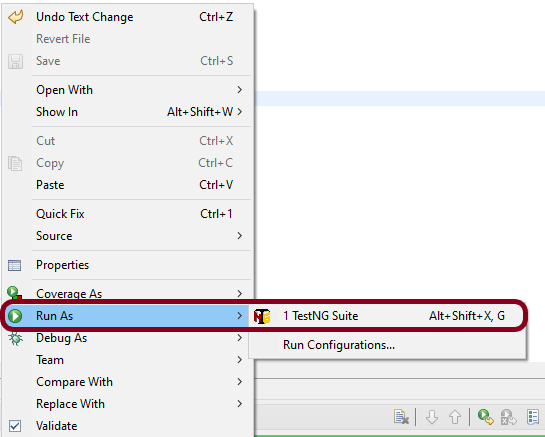
Step 9 – Run the tests from TestNG.xml
Right click on TestNG.xml and select Run As TestNG Suite.
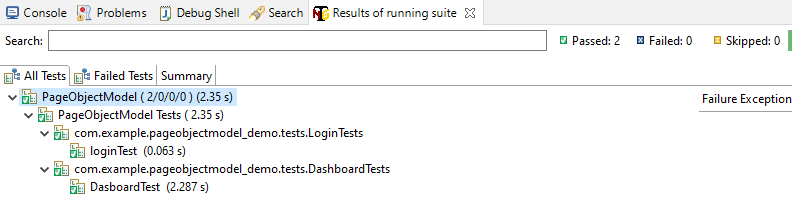
The execution status looks like as shown below.
Step 10 – TestNG Report Generation
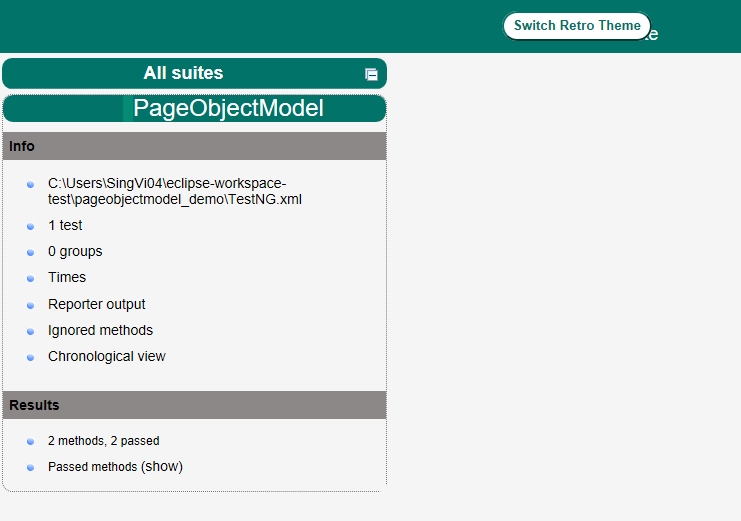
Once the execution is finished, refresh the project. It will create a test-output folder containing various reports generated by TestNG. Below is the screenshot of the report folder.
Image of Index.html report
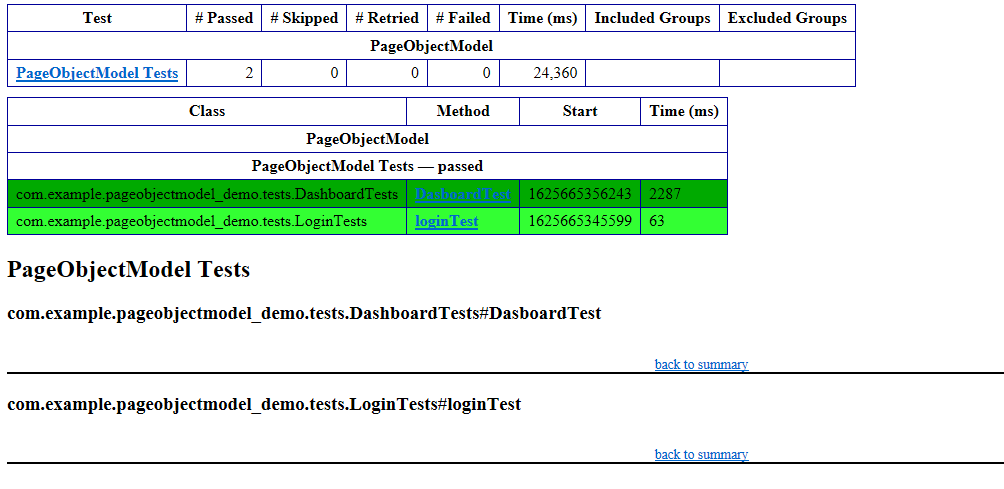
Image of emailable-report.html
Cheers! Congratulations on making it through this tutorial and hope you found it useful! Happy Learning!!