In the previous tutorial, we discussed How to disable Test Cases using TestNG. In this tutorial, we will see how we can create a dependency between Selenium Test Cases using TestNG.
Imagine there is a situation in which a test case can only be executed if a particular test case executes successfully. This can be achieved in TestNG by dependsOnMethod().
Below is an example.
To Run the TestNG program, right-click on the Java Program – here it is TestNGMethodDependencyDemo, select Run As TestNG Test(Eclipse).
Below is an example of dependsOnMethod() method.
import org.testng.annotations.Test;

public class TestNGMethodDependencyDemo {

    @Test
    public static void FirstTest() {
        System.out.println("This is Test Case 1");
    }

    @Test(dependsOnMethods = "FirstTest")
    public static void SecondTest() {
        System.out.println("This is Test Case 2 and will be executed after Test Case 1 successfully executed");
    }

    @Test
    public static void ThirdTest() {
        System.out.println("This is Test Case 3");
    }

    @Test
    public static void FourthTest() {
        System.out.println("This is Test Case 4");
    }
}
The output of the above program is
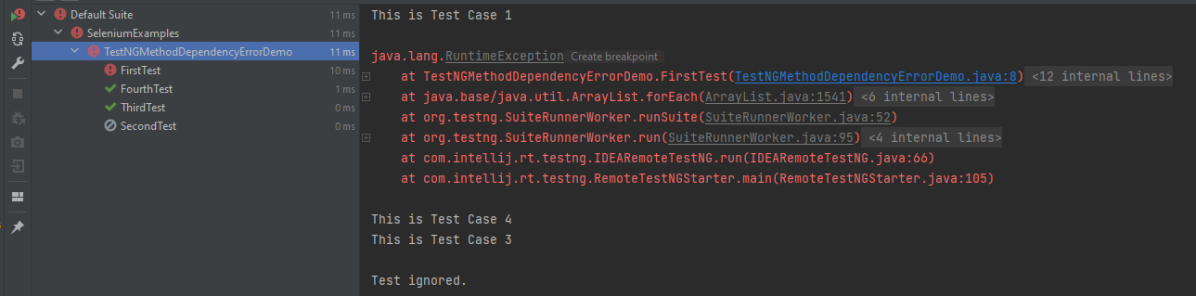
In the below scenario, Test Case 2 is dependent on Test CASE 1. If Test Case 1 fails, then Test Case 2 will skip.
package TestNGDemo;

import org.testng.annotations.Test;
public class TestNGMethodDependencyErrorDemo {

      @Test
      public static void FirstTest() {
            System.out.println("This is Test Case 1");
            throw new RuntimeException();
      }

      @Test(dependsOnMethods = "FirstTest")
      public static void SecondTest() {
          System.out.println("This is Test Case 2 and will be executed after Test Case 1 sucessfully executed");
     }

     @Test
     public static void ThirdTest() {
          System.out.println("This is Test Case 3");
     }

      @Test
      public static void FourthTest() {
            System.out.println("This is Test Case 4");
    }
}
The output of the above program is
We are done. Congratulations on making it through this tutorial and hope you found it useful!
TestNG is a testing framework inspired by JUnit and NUnit but introduces some new functionalities that make it more powerful and easier to use. The software testers to efficiently run the automated test scripts created in Selenium Webdriver use TestNG. Its full form is the “Testing New Generation” framework. It is used mostly to assert the results in an Automated Script as well as generate reports for test execution.
Follow the below steps to install TestNG on Eclipse:
Launch Eclipse go to the Help option present at the top and select –“Install New Software”.
A dialog box will appear, click on the Add button
A new dialog box will appear. Mention the Name as TestNG and the location as “http://beust.com/eclipse/” and click on the Add button.
Check the TestNG checkbox and click on the “Next” action button. The installation will start and the Eclipse will restart after installation.
To verify if TestNG is installed successfully or not, go to Window, select Show View, and then Other. Select Java and see within the Java folder, you will see TestNG. This shows that TestNG is successfully installed on the machine
Right-click on the project in Eclipse -> Select build path -> Configure Build Path.
Select the library tab -> Click on Add library button -> Select TestNG-> Click on Next -> Click on Finish and Apply and close.
6. It allows for cross-browser testing which means a web application tests on different browsers and operating systems. Here, mention different browser names in the parameter.
<parameter name="browser" value="Edge" />
7. It helps to integrate the TestNG framework in CI/CD pipelines such as GitLab, GitHub, Jenkins.
5. What are the types of Asserts in TestNG?
There are two types of assert in TestNG – Hard Assert and Soft Assert.
Hard Assert: Hard Assert is the normal assert that is used to do validations in the TestNG class.
We have to use the Assert class for hard assert as follows:
6. What is TestNG Assert and list out some common Assertions supported by TestNG?
TestNG Asserts help us to verify the condition of the test in the middle of the test run. Based on the TestNG Assertions, we will consider a successful test only if it completed the test run without throwing any exception. Some of the common assertions supported by TestNG are:
Groups are specified in your testng.xml file and can be found either under the <test> or <suite> tag. Groups specified in the <suite> tag apply to all the <test> tags underneath.
import org.testng.annotations.Test;

public class TestNGGroupDemo {

    @Test(alwaysRun = true, groups = { "e2etest", "integerationtest" })
    public void testPrintMessage() {
        System.out.println("This method is run by both e2e and integeration test");
    }

    @Test(alwaysRun = true, groups = { "e2etest" })
    public void testE2EMessage() {
        System.out.println("This method is run by e2e test");
    }

    @Test(alwaysRun = true, groups = { "integerationtest" })
    public void testingIntegrationMessage() {
        System.out.println("This method is run by integeration test");
    }

    @Test(alwaysRun = true, groups = { "acceptancetest" })
    public void testingAcceptanceMessage() {
        System.out.println("This method is run by Acceptance test");
    }

    @Test(alwaysRun = true, groups = { "e2etest", "acceptancetest" })
    public void testE2EAndAcceptanceMessage() {
        System.out.println("This method is run by both e2e and acceptance test");
    }

    @Test(alwaysRun = true, groups = { "e2etest", "integerationtest", "acceptancetest" })
    public void testE2EAndAcceptanceAndIntegrationMessage() {
        System.out.println("This method is run by e2e, integration and acceptance test");
    }

}
TestNG.xml
<?xml version = "1.0" encoding = "UTF-8"?>
<!DOCTYPE suite SYSTEM "http://testng.org/testng-1.0.dtd" >
<suite name = "TestNG Demo">
    <test name = "TestNG Grouping">
        <groups>
            <run>
                <include name = "e2etest" />
            </run>
        </groups>
        <classes>
            <class name = "TestNGGroupDemo" />
        </classes>
    </test>
</suite>
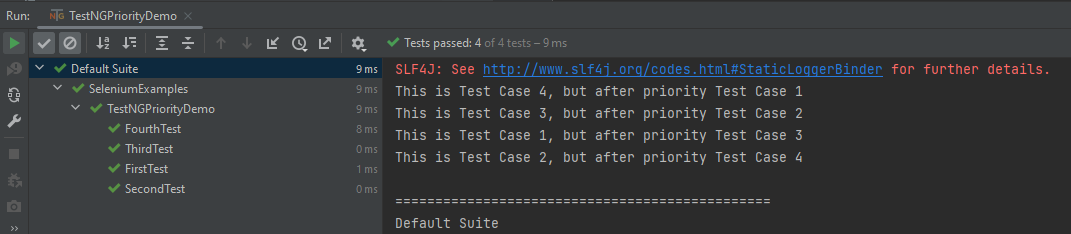
We use priority attribute to the @Test annotations. If no priority is assigned to a Test Case, then the annotated test methods are, executed as per the alphabetical order of the tests
import org.testng.annotations.Test;

public class TestNGPriorityDemo {

    @Test(priority = 3)
    public static void FirstTest() {
        System.out.println("This is Test Case 1, but after priority Test Case 3");
    }


    @Test(priority = 4)
    public static void SecondTest() {
        System.out.println("This is Test Case 2, but after priority Test Case 4");
    }


    @Test(priority = 2)
    public static void ThirdTest() {
        System.out.println("This is Test Case 3, but after priority Test Case 2");
    }


    @Test(priority = 1)
    public static void FourthTest() {
        System.out.println("This is Test Case 4, but after priority Test Case 1");
    }
}
9. How can we make one test method dependent on others using TestNG?
Using the dependsOnMethods parameter inside @Test annotation in TestNG we can make one test method run only after the successful execution of the dependent test method. Dependencyis a feature in TestNG that allows a test method to depend on a single or a group of test methods. Method dependency only works if the “depend-on-method” is part of the same class or any of the inherited base classes (i.e. while extending a class)
         @Test
            public static void FirstTest() {
                        System.out.println("This is Test Case 1");
            }

          @Test(dependsOnMethods = "FirstTest")
             public static void SecondTest() {
                        System.out.println("This is Test Case 2 and will be executed after Test Case 1 sucessfully executed");
            }

           @Test
           public static void ThirdTest() {
                       System.out.println("This is Test Case 3");
             }

           @Test
             public static void FourthTest() {
                            System.out.println("This is Test Case 4");
         }
}
11. How do you exclude a group from the test execution cycle?
Excluding a group in TestNG denotes that this particular group refrains from running during the execution, and TestNG will ignore it. Additionally, the name of the group that we want to exclude is defined in the XML file by the following syntax:
<?xml version = "1.0"encoding = "UTF-8"?>
<!DOCTYPE suite SYSTEM "http://testng.org/testng-1.0.dtd">
<suite name = "Suite1">
   <test name = "Test Demo">
      <groups>
         <run>
            <exclude name = "e2etest"/>
         </run>
      </groups>
      <classes>
         <class name = "com.selenium.testng.TestNGDemo.TestNGGroupDemo"/>
      </classes>
   </test>
</suite>
By putting our group “e2etest” inside the exclude tag, we are requesting TestNG to ignore the test cases under the group “e2etest”.
12. How to run test cases in parallel using TestNG?
In testng.xml, if we set the ‘parallel’ attribute on the tag to ‘methods’, testNG will run all the ‘@Test’ methods in the tag in a separate thread.
The parallel attribute of suite tag can accept four values:
tests – All the test cases inside tag of testng.xml file will run parallel classes – All the test cases inside a java class will run parallel methods – All the methods with @Test annotation will execute parallel instances – Test cases in same instance will execute in parallel but two methods of two different instances will run in a different thread.
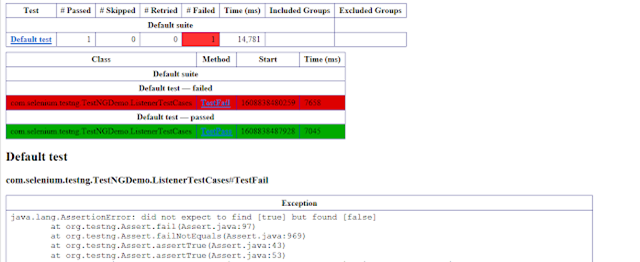
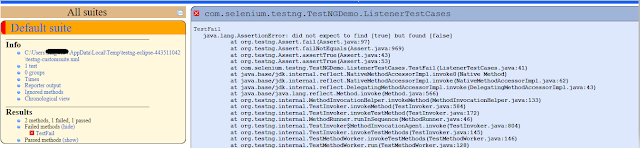
13. What is the use of @Listener annotation in TestNG?
A listener is defined as an interface that modifies the default TestNG’s behavior. It allows customizing TestNG reports or logs. There are many types of TestNG listeners available. Here are a few listeners:
20. How to pass the parameter in the test case through testng.xml file?
TestNG can pass different test data to a test case as arguments which is called parametrization
@Parameters("value")
TestNG.xml looks like this as shown below. Here, the parameter name is the browser name value for the browser is “Chrome”. So, this “Chrome” value is passed to Test as a parameter, and as a result a Google Chrome browser opens.
<?xml version = "1.0" encoding = "UTF-8"?>
<!DOCTYPE suite SYSTEM "http://testng.org/testng-1.0.dtd" >
<suite name = "TestSuite">
  <test name="ChromeTest">
<parameter name="browser" value="Chrome" />
<classes>
<class name="com.selenium.testng.TestNGDemo.TestNGParameterizationDemo">
</class>
</classes>
</test>
</suite>
TestNG provides several features like prioritizing the test cases, grouping the test cases, skipping the test cases, defining dependencies between test cases, and so on. The previous tutorial has explained the parameters in TestNG.
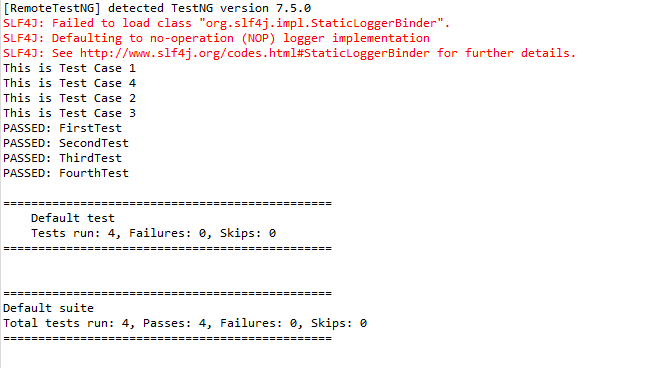
In this tutorial, we will see how the test cases can be prioritized using TestNG. If no priority is assigned to a Test Case, then the annotated test methods are executed as per the alphabetical order of the tests.
Below is an example
import org.testng.annotations.Test;

public class TestNGPriorityDemo {


     @Test
     public static void FirstTest() {
           System.out.println("This is Test Case 1");
     }

     @Test
     public static void SecondTest() {
           System.out.println("This is Test Case 2");
     }

     @Test
     public static void ThirdTest() {
           System.out.println("This is Test Case 3");
     }

     @Test
     public static void FourthTest() {
           System.out.println("This is Test Case 4");
     }
}
The output of the above program is
In the above example, FirstTest and FourthTest have the highest preference as per the alphabetical order. F comes before S and T. FirstTest is executed before Fourth because preference of I is higher than O.
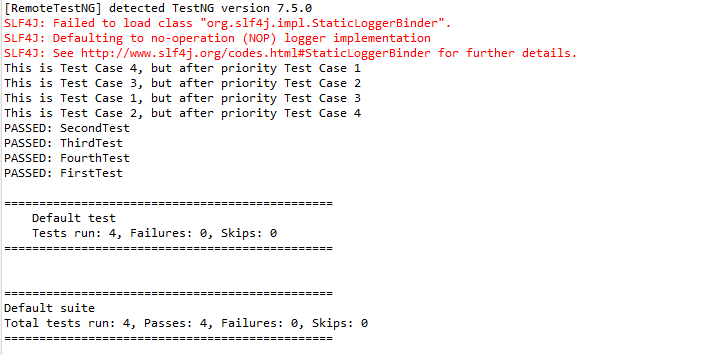
The methods can be prioritized by assigning a number to the annotated test cases. The smaller the number, the higher the priority. Priority can be assigned as parameters while defining the test cases. In the below example, we have assigned priority to test cases, and now they are executed as per the priority. The Test Case with priority = 1 has the highest precedence. It overrides the rule of executing test cases by alphabetical order.
To Run the TestNG program, right-click on the program, select Run As TestNG Test.
import org.testng.annotations.Test;

public class TestNGPriorityDemo {


     @Test(priority = 3)
     public static void FirstTest() {
           System.out.println("This is Test Case 1, but after priority Test Case 3");
     }


     @Test(priority = 4)
     public static void SecondTest() {
           System.out.println("This is Test Case 2, but after priority Test Case 4");
     }


     @Test(priority = 2)
     public static void ThirdTest() {
           System.out.println("This is Test Case 3, but after priority Test Case 2");
     }


     @Test(priority = 1)
     public static void FourthTest() {
          System.out.println("This is Test Case 4, but after priority Test Case 1");
     }
}
The output of the above program is
We are done. Congratulations on making it through this tutorial and hope you found it useful!
Cucumber is not an API automation tool, but it works well with other API automation tools.
There are 2 most commonly used Automation Tools for JVM to test API – Rest-Assured and Karate. In this tutorial, I will use RestAssured with Cucumber and TestNG for API Testing.
REST Assured is a Java library that provides a domain-specific language (DSL) for writing powerful, maintainable tests for RESTful APIs. REST Assured can be used easily in combination with existing unit testing frameworks, such as JUnit and TestNG. Rest assured, no matter how complex the JSON structures are, Rest Assured has methods to retrieve data from almost every part of the request and response.
What is Cucumber?
Cucumber is one such open-source tool, which supports Behaviour Driven Development(BDD). In simple words, Cucumber can be defined as a testing framework, driven by plain English. It serves as documentation, automated tests, and development aid – all in one.
Each scenario is a set of steps that the Cucumber must complete. Cucumber validates the software’s compliance with the specification and generates a report indicating success or failure for each scenario.
The cucumber must adhere to some basic syntax rules known as Gherkin to comprehend the scenarios.
In this tutorial, I will explain creating a framework for the testing of Rest API in Cucumber BDD.
Dependency List
Cucumber – 7.18.0
Java 17
TestNG – 7.10.2
Maven – 3.9.6
Rest Assured – 5.4.0
Maven Compiler – 3.13.0
Maven Surefire – 3.2.5
Project Structure
Implementation Steps
Step 1 – Download and Install Java
Cucumber and Rest-Assured need Java to be installed on the system to run the tests. Click here to learn How to install Java.
Step 2 – Download and setup Eclipse IDE on the system
The Eclipse IDE (integrated development environment) provides strong support for Java developers. Click here to learn How to install Eclipse.
Step 3 – Setup Maven
To build a test framework, we need to add several dependencies to the project. Click here to learn How to install Maven.
Step 4 – Create a new Maven Project
File -> New Project-> Maven-> Maven project-> Next -> Enter Group ID & Artifact ID -> Finish
Step 5 – Install the Cucumber Eclipse plugin for the Eclipse project(Eclipse Only)
The Cucumber plugin is an Eclipse plugin that allows Eclipse to understand the Gherkin syntax. Cucumber Eclipse Plugin highlights the keywords present in the Feature File. To install Cucumber Eclipse Plugin, please refer to this tutorial – How to install Cucumber Eclipse Plugin.
Step 6 – Create source folder src/test/resources
Create source folder src/test/resources to create test scenarios in the Feature file.
A new Maven Project is created with 2 folders – src/main/java and src/test/java. To create test scenarios, we need a new source folder called – src/test/resources. To create this folder, right-click on your Maven project ->select New ->Java, and then Source Folder.
Mention the source folder name as src/test/resources and click the Next button. This will create a source folder under your new Maven project.
Step 7 – Add dependencies to the project
Add Rest Assured, Cucumber, and TestNG dependencies in the pom.xml/build.gradle. REST Assured includes JsonPath and XmlPath as transitive dependencies.
Step 8 – Add Maven Compiler Plugin and Surefire Plugin
The compiler plugin is used to compile the source code of a Maven project. This plugin has two goals, which are already bound to specific phases of the default lifecycle:
Step 9 – Create a feature file under src/test/resources
Create a folder with name features. Now, create the feature file in this folder. The feature file should be saved with the extension .feature. This feature file contains the test scenarios created to test the application. The Test Scenarios are written in Gherkins language in the format of Given, When, Then, And, But.
Below is an example of a Test Scenario where we are using the GET method to get the information from the API.
Feature: Validation of get method

  @GetUserDetails
  Scenario Outline: Send a valid Request to get user details

    Given I send a request to the URL to get user details
    Then the response will return status <statusCode> and id <id> and email "<employee_email>" and first name "<employee_firstname>" and last name "<employee_lastname>"

    Examples:
    | statusCode | id  | employee_email          | employee_firstname | employee_lastname |
    | 200        | 2   | janet.weaver@reqres.in  | Janet              | Weaver            |
Step 10 – Create the Step Definition class or Glue Code
StepDefinition acts as an intermediate to your runner and feature file. It stores the mapping between each step of the scenario in the Feature file. So when you run the scenario, it will scan the step definition file to check the matched glue or test code.
import io.cucumber.java.en.Given;
import io.cucumber.java.en.Then;
import io.restassured.http.ContentType;
import io.restassured.response.ValidatableResponse;

import static io.restassured.RestAssured.given;
import static org.hamcrest.Matchers.equalTo;

public class APIDemoDefinitions {

    private ValidatableResponse validatableResponse;
    private String endpoint = "https://reqres.in/api/users/2";

    @Given("I send a request to the URL to get user details")
    public void sendRequest(){
        validatableResponse = given().contentType(ContentType.JSON)
                .when().get(endpoint).then();

        System.out.println("Response :"+validatableResponse.extract().asPrettyString());
    }

    @Then("the response will return status {int} and id {int} and email {string} and first name {string} and last name {string}")
    public void verifyStatus(int expectedStatusCode, int expectedId, String expectedEmail, String expectedFirstName, String expectedLastName){

        validatableResponse.assertThat().statusCode(expectedStatusCode).body("data.id",equalTo(expectedId)).and()
                .body("data.email",equalTo(expectedEmail)).body("data.first_name",equalTo(expectedFirstName))
                .body("data.last_name",equalTo(expectedLastName));

    }
}
To use REST assured effectively it’s recommended to statically import methods from the following classes:
A runner will help us run the feature file and act as an interlink between the feature file and the StepDefinition Class.
import io.cucumber.testng.AbstractTestNGCucumberTests;
import io.cucumber.testng.CucumberOptions;

@CucumberOptions(tags = "", features = {"src/test/resources/features"}, glue = {"com.example.stepdefinitions"},
        plugin = {})
public class CucumberRunnerTests extends AbstractTestNGCucumberTests {

}
Note:- The name of the Runner class should end with Test otherwise we can’t run the tests using Command-Line.
Step 12 – Create a testng.xml file
Create a testng.xml at the root of the project.
<?xml version="1.0" encoding="UTF-8"?>
<!DOCTYPE suite SYSTEM "https://testng.org/testng-1.0.dtd">
<suite name="Suite">
    <test  name="Rest Assured, Cucumber with TestNG Test">
        <classes>
            <class name="com.example.runner.CucumberRunnerTests"/>
        </classes>
    </test> <!-- Test -->
</suite> <!-- Suite -->
Step 13 – Run the tests from TestNG
You can execute the test script by right-clicking on TestRunner class -> Run As TestNG (Eclipse).
You can execute the test script by right-clicking on TestRunner class -> Run CucumberRunnerTests (IntelliJ).
Step 14 – Run the tests from the testng.xml
Right-click on the testng.xml. Click on Run’...\testng.xml’.
Step 15 – TestNG Report Generation
TestNG generates various types of reports under the test-output or target folder like emailable-report.html, index.html, and testng-results.xml.
We are interested in the ‘emailable-report.html’ report. Open “emailable-report.html“, as this is an HTML report, and open it with the browser. The below image shows emailable-report.html.
emailable-report.html
Index.html
TestNG also produces “index.html” report, and it resides under the test-output folder. The below image shows the index.html report.
Step 16 – Run the tests from the Command Line
Run the below command in the command prompt to run the tests and to get the test execution report.
mvn clean test
The output of the above program is
Step 17 – Cucumber Report Generation
To get Cucumber Test Reports, add cucumber.properties under src/test/resources and add the below instruction in the file.
Parallelism or multi-threading in software terms is defined as the ability of the software, operating system, or program to execute multiple parts or sub-components of another program simultaneously.
Parallel testing helps to reduce execution time and efforts and results in faster time to delivery. In a scenario where we have two versions of software available, and we need to check its stability and compatibility, we can run the two versions simultaneously and find issues at a much faster rate.
How to run Parallel Tests with Selenium?
TestNG provides multiple ways to execute tests in separate threads. In testng.xml, if we set ‘parallel’ attribute on the tag to ‘methods’, testNG will run all the ‘@Test’ methods in tag in a separate thread.
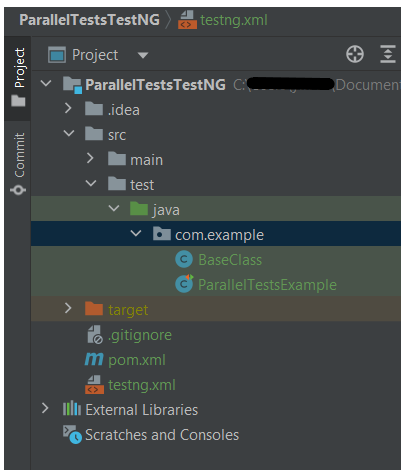
The project Structure looks like shown below:-
To start with, add the below mentioned dependencies to POM.xml (Maven project)
Let us create a class with multiple tests. In the below Example, we have created three test cases or methods . We want to run these methods parallelly. To achieve this, we need to add the below command in testng.xml
parallel="methods"
Below is an example of parallel tests.
import org.openqa.selenium.By;
import org.openqa.selenium.WebDriver;
import org.openqa.selenium.chrome.ChromeDriver;
import org.openqa.selenium.chrome.ChromeOptions;
import org.testng.Assert;
import org.testng.annotations.*;

import java.time.Duration;

public class ParallelTestsExample1 {


    @Test
    public void invalidLoginTest() {

        System.out.println("Test Case 1 with Thread Id - "+Thread.currentThread().getId());
        ChromeOptions options = new ChromeOptions();
        options.addArguments("--start-maximized");
        WebDriver driver = new ChromeDriver(options);
        driver.manage().timeouts().implicitlyWait(Duration.ofSeconds(5));
        driver.get("https://opensource-demo.orangehrmlive.com/web/index.php/auth/login");
        driver.findElement(By.name("username")).sendKeys("admin123123");
        driver.findElement(By.name("password")).sendKeys("adm");
        driver.findElement(By.xpath("//*[@class='oxd-form']/div[3]/button")).click();
        String expectedError = driver.findElement(By.xpath("//*[@class='orangehrm-login-error']/div[1]/div[1]/p")).getText();
        Assert.assertTrue(expectedError.contains("Invalid credentials"));

    }

    @Test
    public void validLoginTest() throws InterruptedException {

        System.out.println("Test Case 2 with Thread Id - "+Thread.currentThread().getId());
        ChromeOptions options = new ChromeOptions();
        options.addArguments("--start-maximized");
        WebDriver driver = new ChromeDriver(options);
        driver.manage().timeouts().implicitlyWait(Duration.ofSeconds(5));
        driver.get("https://opensource-demo.orangehrmlive.com/web/index.php/auth/login");
        driver.findElement(By.name("username")).sendKeys("Admin");
        driver.findElement(By.name("password")).sendKeys("admin123");
        driver.findElement(By.xpath("//*[@class='oxd-form']/div[3]/button")).click();
        String expectedTitle = driver.findElement(By.xpath("//*[@class='oxd-topbar-header-breadcrumb']/h6")).getText();
        Assert.assertTrue(expectedTitle.contains("Dashboard"));
    }

    @Test
    public void forgotLinkTest() {

        System.out.println("Test Case 3 with Thread Id - "+Thread.currentThread().getId());
        ChromeOptions options = new ChromeOptions();
        options.addArguments("--start-maximized");
        WebDriver driver = new ChromeDriver(options);
        driver.manage().timeouts().implicitlyWait(Duration.ofSeconds(5));
        driver.get("https://opensource-demo.orangehrmlive.com/web/index.php/auth/login");

        String expectedLink = driver.findElement(By.className("orangehrm-login-forgot-header")).getText();
        Assert.assertTrue(expectedLink.contains("Forgot your password?"));
    }


}
Now, let us create a testng.xml. Right click on the project and select TestNG -> Convert to TestNG.
The attribute thread-count allows you to specify how many threads should be allocated for this execution.
parallel = “methods” means that the methods will run parallel
The parallel attribute can be extended for multiple values, as below:
· Methods: Helps run methods in separate threads
· Tests: Help to run all methods belonging to the same tag in the same thread, means tests will run sequentially
· Classes: Helps to run all methods belonging to a class in a single thread
· Instances: Helps run all methods in the same instance in the same thread
testng.xml
<?xml version="1.0" encoding="UTF-8"?>
<!DOCTYPE suite SYSTEM "https://testng.org/testng-1.0.dtd">
<suite name="Suite">
  <test name="Parallel Tests" parallel = "methods" thread-count="3">
    <classes>
      <class name="com.example.parallel.ParallelTestsExample"/>
    </classes>
  </test> <!-- Test -->
</suite> <!-- Suite -->
How to run the tests?
Right-click on testng.xml and select Run AS -> TestNG Suite. If you will run the Test Class – ParallelTestDemo.java as Right click and then Run As TestNG Tests, then the methods will run sequentially.
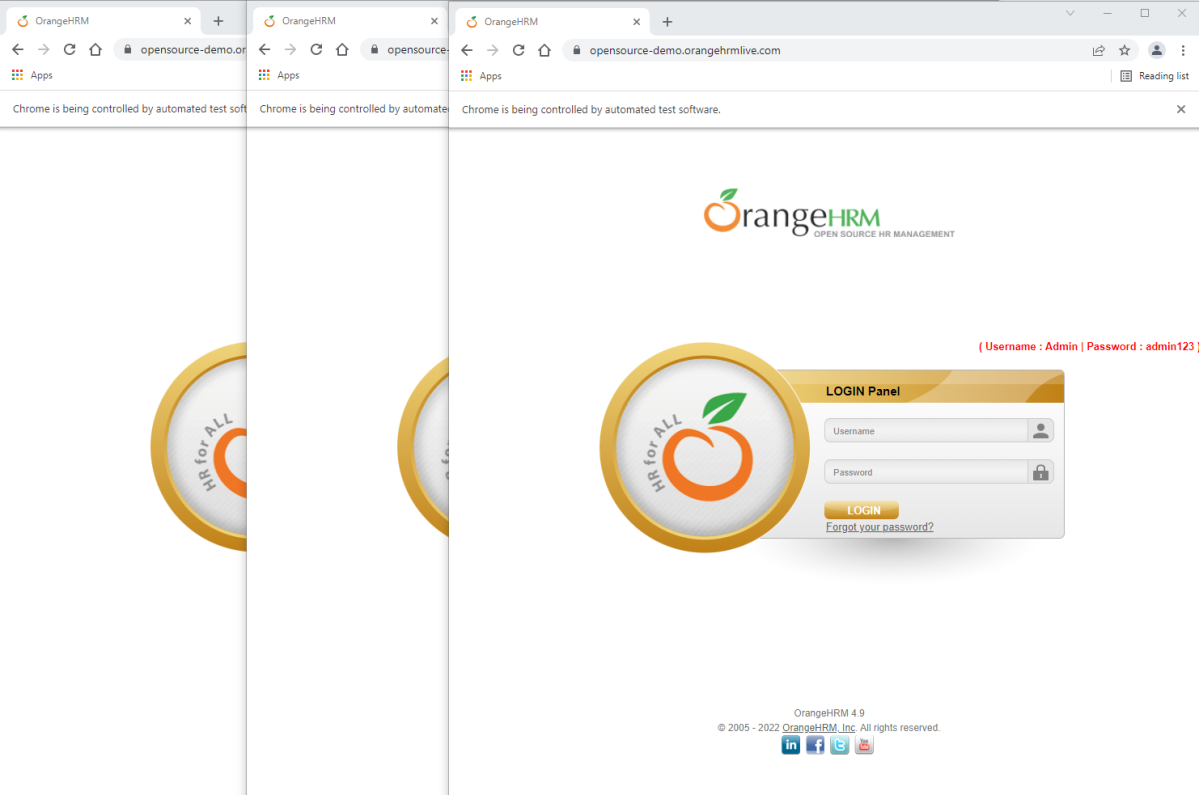
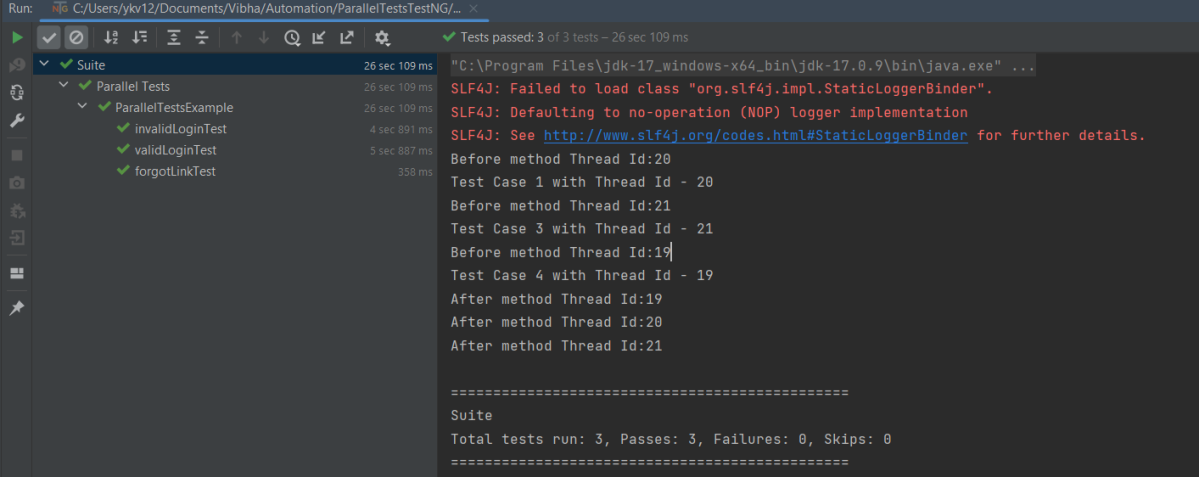
Execution
Here it can be seen that 3 tests were running on thread no – 19, 20 and 21. Out of all 3 tests, browser for only 1 test is closed and rest 2 browsers are left open.
First thread initialized a browser and set a value to static WebDriver reference. Second thread initialized another browser and set a new value to the same static WebDriver reference and this will impact value set by first thread as it is a static.All threads wanted to close same browser that is the reason there is one configuration method failure as one browser is closed another threads will not find sessions to close the browsers. Browser was closed already so last 2 tests did not able to close the browser.
To overcome this issue, will use ThreadLocal<WebDriver>. The complete program looks like as below:
First, I will create a HelperClass which contains the initialization of driver and closing the driver. I like to keep the tests only in Test Class. This is not mandatory. You can combine the code of both classes in one also.
HelperClass
import org.openqa.selenium.WebDriver;
import org.openqa.selenium.chrome.ChromeDriver;
import org.openqa.selenium.chrome.ChromeOptions;
import org.testng.annotations.AfterMethod;
import org.testng.annotations.BeforeMethod;

import java.time.Duration;

public class BaseClass {

    private static final ThreadLocal<WebDriver> driver = new ThreadLocal<WebDriver>();

    @BeforeMethod
    public void setDriver()  {

        ChromeOptions options = new ChromeOptions();
        options.addArguments("--start-maximized");
        driver.set(new ChromeDriver(options));
        driver.get().manage().timeouts().implicitlyWait(Duration.ofSeconds(5));
        driver.get().get("https://opensource-demo.orangehrmlive.com/web/index.php/auth/login");
        System.out.println("Before method Thread Id:" + Thread.currentThread().getId());

    }

    public WebDriver getDriver() {
        return driver.get();
    }

    @AfterMethod
    public  void closeBrowser() {
        System.out.println("After method Thread Id:" + Thread.currentThread().getId());
        driver.get().quit();
        driver.remove();
    }
}
ParallelTestsExample
import org.openqa.selenium.By;
import org.testng.Assert;
import org.testng.annotations.Test;

public class ParallelTestsExample extends BaseClass{

    @Test
    public void invalidLoginTest() {

        System.out.println("Test Case 1 with Thread Id - "+Thread.currentThread().getId());

        getDriver().findElement(By.name("username")).sendKeys("admin123123");
        getDriver().findElement(By.name("password")).sendKeys("adm");
        getDriver().findElement(By.xpath("//*[@class='oxd-form']/div[3]/button")).click();
        String expectedError = getDriver().findElement(By.xpath("//*[@class='orangehrm-login-error']/div[1]/div[1]/p")).getText();
        Assert.assertTrue(expectedError.contains("Invalid credentials"));

    }

    @Test
    public void validLoginTest() throws InterruptedException {

        System.out.println("Test Case 2 with Thread Id - "+Thread.currentThread().getId());

        getDriver().findElement(By.name("username")).sendKeys("Admin");
        getDriver().findElement(By.name("password")).sendKeys("admin123");
        getDriver().findElement(By.xpath("//*[@class='oxd-form']/div[3]/button")).click();
        Thread.sleep(5000);
        String expectedTitle = getDriver().findElement(By.xpath("//*[@class='oxd-topbar-header-breadcrumb']/h6")).getText();
        Assert.assertTrue(expectedTitle.contains("Dashboard"));
    }

    @Test
    public void forgotLinkTest() {

        System.out.println("Test Case 3 with Thread Id - "+Thread.currentThread().getId());

        String expectedLink = getDriver().findElement(By.className("orangehrm-login-forgot-header")).getText();
        Assert.assertTrue(expectedLink.contains("Forgot your password?"));
    }

}
The output of the above program is
Report Generation
TestNG generates 2 reports – emailable-report.html and index.html
Emailable-Report.html
Go to test-output folder and open emailable-report.html
This report gives a summary of all the tests executed, passed, failed, skipped and retried with their respective execution time.
Index.html
This report provides the detailed description of the tests like no of tests present, no of methods, time taken by each step, total time taken by each steps, testng.xml data and soon.
Run Tests Sequentially
If you will run the Test Class – ParallelTestDemo.java as Right click and then Run As TestNG Tests, then the methods will run sequentially. Here all tests are run with Thread 1 whereas with parallel execution tests were run with different threads.
We can make parallel = none, if don’t want to run them parallel. It is shown below that all the tests are running on Thread 1 that means once a test ends then another test starts on that thread.
In this tutorial, I will explain Parallel Testing using Cucumber with TestNG.
Cucumber-JVM allows parallel execution across multiple threads since version 4.0.0. There are several options to incorporate this built-in feature in a Cucumber project. You can do so by using JUnit, TestNG, or CLI.
Cucumber can be executed in parallel using TestNG and Maven test execution plugins by setting the data providerparallel option to true.
In TestNG, the scenarios and rows in a scenario outline are executed in multiple threads. One can use either Maven Surefire or Failsafe plugin for executing the runners. In this tutorial, I’m using the Maven Surefire plugin.
Feature: Login to HRM Application

  Background:
    Given User is on Home page

  @ValidCredentials
  Scenario: Login with valid credentials - Feature 1, Scenario -1

    When User enters username as "Admin" and password as "admin123"
    Then User should be able to login successfully

  @InvalidCredentials
  Scenario Outline: Login with invalid credentials - Feature 1, Scenario -2

    When User enters username as "<username>" and password as "<password>"
    Then User should be able to see error message "<errorMessage>"

    Examples:
      | username    | password   | errorMessage                      |
      | Admin        | admin12$$  | Invalid credentials               |
      | admin$$     | admin123   | Invalid credentials               |
      | abc123       | xyz$$      | Invalid credentials               |
ForgotPasswordPage.feature
Feature: Forgot Password Page

  Background:
    Given User is on Home page

  @BackFunctionality
  Scenario: Validate the cancel functionality - Feature 2, Scenario - 1

    When User clicks on Forgot your password? link
    Then User should be able to navigate to Reset Password page
    And User clicks on Cancel button to go back to Login Page

  @ResetFunctionality
  Scenario: Validate the Reset Password functionality - Feature 2, Scenario - 2

    When User clicks on Forgot your password? link
    Then User should be able to navigate to Reset Password page
    And User clicks on Reset Password button and provide username as "abc1234"
    And Verify the message "Reset Password link sent successfully"
Step 6 – Create Page Object Model classes of both feature files
Page Object Model class contains all the locators and the actions performed on these locators for the particular class to improve the readability and maintainability of the code.
Below are the Page Object Model classes for these feature files.
LoginPage
import org.openqa.selenium.By;
import org.openqa.selenium.WebDriver;

public class LoginPage {

    public WebDriver driver;

    By userName = By.name("username");
    By passWord = By.name("password");
    By login = By.xpath("//*[@id='app']/div[1]/div/div[1]/div/div[2]/div[2]/form/div[3]/button");
    By errorMessage = By.xpath("//*[@class='orangehrm-login-error']/div[1]/div[1]/p");
    By forgotPasswordLink = By.xpath("//*[@id='app']/div[1]/div/div[1]/div/div[2]/div[2]/form/div[4]/p");
    By loginPageTitle = By.xpath("//*[@id='app']/div[1]/div/div[1]/div/div[2]/h5");

    public LoginPage(WebDriver driver) {
        this.driver = driver;
    }

    public String getErrorMessage() {
        return driver.findElement(errorMessage).getText();
    }

    public void login(String strUserName, String strPassword) {

        // Fill user name
        driver.findElement(userName).sendKeys(strUserName);

        // Fill password
        driver.findElement(passWord).sendKeys(strPassword);

        // Click Login button
        driver.findElement(login).click();

    }

    // Click on Forgot Password link
    public void clickOnForgotPasswordLink() {
        driver.findElement(forgotPasswordLink).click();
    }

    //Get Login Page Title
    public String getLoginPageTitle() {
        return driver.findElement(loginPageTitle).getText();
    }
}
HomePage
import org.openqa.selenium.By;
import org.openqa.selenium.WebDriver;

public class HomePage {

    public WebDriver driver;

    public HomePage(WebDriver driver) {
        this.driver = driver;
    }

    By homePageUserName = By.xpath("//*[@class='oxd-topbar-header-breadcrumb']/h6");

    public String getHomePageText() {
        return driver.findElement(homePageUserName).getText();
    }
}
ForgotPasswordPage
import org.openqa.selenium.By;
import org.openqa.selenium.WebDriver;

public class ForgotPasswordPage {

    WebDriver driver;

     By forgotPasswordPageTitle = By.xpath("//*[@id='app']/div[1]/div[1]/div/form/h6");
     By cancelBtn = By.xpath("//*[@id='app']/div[1]/div[1]/div/form/div[2]/button[1]");
     By resetPasswordBtn = By.xpath("//*[@id='app']/div[1]/div[1]/div/form/div[2]/button[2]");
     By userName = By.name("username");
     By resetMessage = By.xpath("//*[@id='app']/div[1]/div[1]/div/h6");

    public ForgotPasswordPage(WebDriver driver) {
        this.driver = driver;
    }

    // Get the Title of ForgotPage
    public String getForgotPageText() {
        return driver.findElement(forgotPasswordPageTitle).getText();
    }

    // Click Cancel Button
    public void clickOnCancelBtn() {
         driver.findElement(cancelBtn).click();
    }

    // Click ResetPassword Button
    public void clickOnRestPasswordBtn() {
        driver.findElement(resetPasswordBtn).click();
    }

    // Type username in TextBox
    public void TypeOnUsernameTextBox(String username) {
        driver.findElement(userName).sendKeys(username);
    }

    // Get Message
    public String getRestMessage() {
        return driver.findElement(resetMessage).getText();
    }
}
PageObjectManager – This class creates the object of all the above-mentioned Page Object Model classes. This an optional class. If you want you can create the objects in StepDefinition class also.
public class PageObjectManager {

    public LoginPage loginPage;
    public HomePage homePage;
    public ForgotPasswordPage forgotPasswordPage;
    public WebDriver driver;


    public PageObjectManager(WebDriver driver)
    {
        this.driver = driver;
    }

    public LoginPage getLoginPage()
    {

        loginPage= new LoginPage(driver);
        return loginPage;
    }

    public HomePage getHomePage()
    {
        homePage = new HomePage(driver);
        return homePage;
    }

    public ForgotPasswordPage getForgotPasswordPage()
    {
        forgotPasswordPage = new ForgotPasswordPage(driver);
        return forgotPasswordPage;
    }
}
Step 7 – Create the Step Definition classes for both feature files or Glue Code
Below is the Step Definition for LoginPage.feature.
import io.cucumber.java.en.Given;
import io.cucumber.java.en.Then;
import io.cucumber.java.en.When;
import pageObjects.HomePage;
import pageObjects.LoginPage;
import pageObjects.PageObjectManager;
import utils.TestSetUp;
import org.testng.Assert;

public class LoginPageDefinitions {

    TestSetUp setUp;
    public PageObjectManager pageObjectManager;
    public LoginPage loginPage;
    public HomePage homePage;


    public LoginPageDefinitions(TestSetUp setUp) {
        this.setUp = setUp;
        this.loginPage = setUp.pageObjectManager.getLoginPage();
        this.homePage= setUp.pageObjectManager.getHomePage();
    }

    @Given("User is on Home page")
    public void loginTest() throws IOException {
        setUp.baseTest.WebDriverManager().get("https://opensource-demo.orangehrmlive.com/");

    }

    @When("User enters username as {string} and password as {string}")
    public void goToHomePage(String userName, String passWord) {

        // login to application
        loginPage.login(userName, passWord);

        // go the next page

    }

    @Then("User should be able to login successfully")
    public void verifyLogin() {

        // Verify home page
        Assert.assertTrue(homePage.getHomePageText().contains("Dashboard"));

    }

    @Then("User should be able to see error message {string}")
    public void verifyErrorMessage(String expectedErrorMessage) {

        // Verify home page
        Assert.assertEquals(loginPage.getErrorMessage(),expectedErrorMessage);

    }

}
Below is the Step Definition for ForgotPasswordPage.feature.
import io.cucumber.java.en.Then;
import io.cucumber.java.en.When;
import pageObjects.ForgotPasswordPage;
import pageObjects.LoginPage;
import pageObjects.PageObjectManager;
import utils.TestSetUp;
import org.testng.Assert;

public class ForgotPasswordPageDefinitions{

    TestSetUp setUp;
    PageObjectManager pageObjectManager;
    public LoginPage loginPage;
    public  ForgotPasswordPage forgotPasswordPage;

    public ForgotPageDefinitions(TestSetUp setUp) {
        this.setUp = setUp;
        this.loginPage = setUp.pageObjectManager.getLoginPage();
        this.forgotPasswordPage = setUp.pageObjectManager.getForgotPasswordPage();
    }

    @When("User clicks on Forgot your password? link")
    public void forgotPasswordLink() {

        loginPage.clickOnForgotPasswordLink();

    }

    @Then("User should be able to navigate to Reset Password page")
    public void verifyForgotPasswordPage() {

        Assert.assertEquals(forgotPasswordPage.getForgotPageText(),"Reset Password");

    }

    @Then("User clicks on Cancel button to go back to Login Page")
    public void verifyCancelBtn() {

        forgotPasswordPage.clickOnCancelBtn();
        Assert.assertEquals(loginPage.getLoginPageTitle(),"Login");

    }

    @Then("User clicks on Reset Password button and provide username as {string}")
    public void verifyResetPasswordBtn(String username) {

        forgotPasswordPage.TypeOnUsernameTextBox(username);
        forgotPasswordPage.clickOnRestPasswordBtn();

    }

    @Then("Verify the message {string}")
    public void verifyMessage(String message) {

        Assert.assertEquals(forgotPasswordPage.getRestMessage(),message);

    }
}
Step 8 – Create the Hook Class and Dependency Injection class (TestSetUp) and BaseTest class
Below is the code for the ApplicationHook Class.
import io.cucumber.java.After;
import utils.TestSetUp;

public class ApplicationHooks {

 public TestSetUp setUp;

    public ApplicationHooks(TestSetUp setUp) {
        this.setUp = setUp;
    }

    @After
    public void tearDown( ) throws IOException {
        setUp.baseTest.WebDriverManager().quit();
    }
}
Below is the code for the Dependency Injection class. In Cucumber, if we want to share the state between multiple-step definition files, we will need to use dependency injection (DI).
import org.openqa.selenium.WebDriver;
import org.openqa.selenium.WebElement;
import pageObjects.PageObjectManager;

public class TestSetUp {

    public WebElement errorMessage;
    public WebElement homePageUserName;
    public PageObjectManager pageObjectManager;
    public BaseTest baseTest;

    public TestSetUp()  {

        baseTest = new BaseTest();
        pageObjectManager = new PageObjectManager(baseTest.WebDriverManager());

    }
}
BaseTest class is used to initialize the WebDriver.
import io.github.bonigarcia.wdm.WebDriverManager;
import org.openqa.selenium.WebDriver;
import org.openqa.selenium.chrome.ChromeDriver;
import java.time.Duration;

public class BaseTest {

    public WebDriver driver;
    public final static int TIMEOUT = 10;

    public WebDriver WebDriverManager ()  {


        if (driver == null) {

            ChromeOptions options = new ChromeOptions();
            driver = new ChromeDriver(options);
            driver.manage().timeouts().implicitlyWait(Duration.ofSeconds(TIMEOUT));
            driver.manage().window().maximize();
            driver.get(url);

        }
        return driver;
    }
}
Step 9 – Create a Cucumber TestNG Runner class
Add a cucumber runner by extending the AbstractTestNGCucumberTests class and overriding the scenarios method. Set the parallel option value to true for the DataProvider annotation.
import io.cucumber.testng.AbstractTestNGCucumberTests;
import io.cucumber.testng.CucumberOptions;
import org.testng.annotations.DataProvider;

@CucumberOptions(tags = "", features = "src/test/resources/features", glue = "org.example.definitions")
public class CucumberRunnerTests  extends AbstractTestNGCucumberTests {

   @Override
    @DataProvider(parallel = true)
    public Object[][] scenarios() {
        return super.scenarios();
    }

}
Step 10 – Report Generation
Add cucumber.properties under src/test/resources and add the below instruction in the file.
cucumber.publish.enabled=true
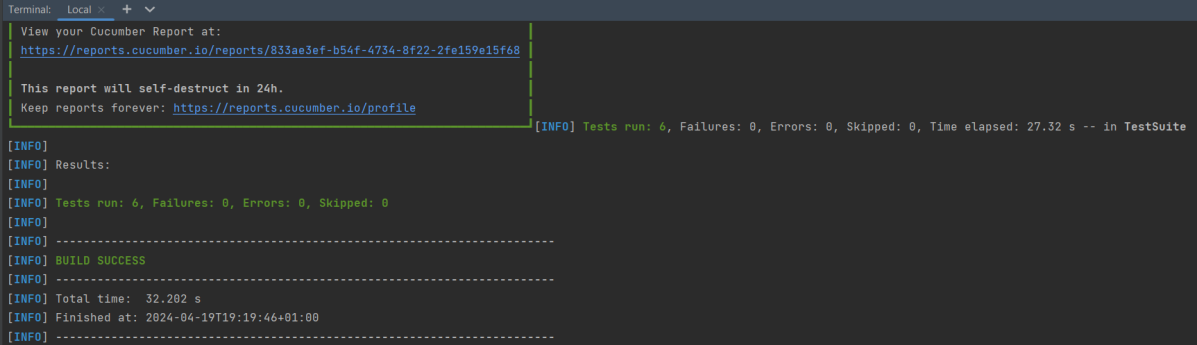
Step 11 – Execute the test from Command Line
Use the below-mentioned command in the command prompt to run the tests.
mvn clean test
The output of the above program is
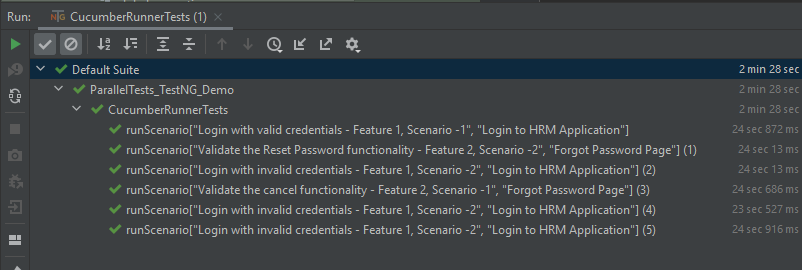
Step 12 – Execute the tests from TestNG Runner
Go to the Runner class and right-click Run As TestNG Test. The tests will run as TestNG tests. (Eclipse)
In the case of IntelliJ, right-click and select Run “CucumberRunnerTests”.
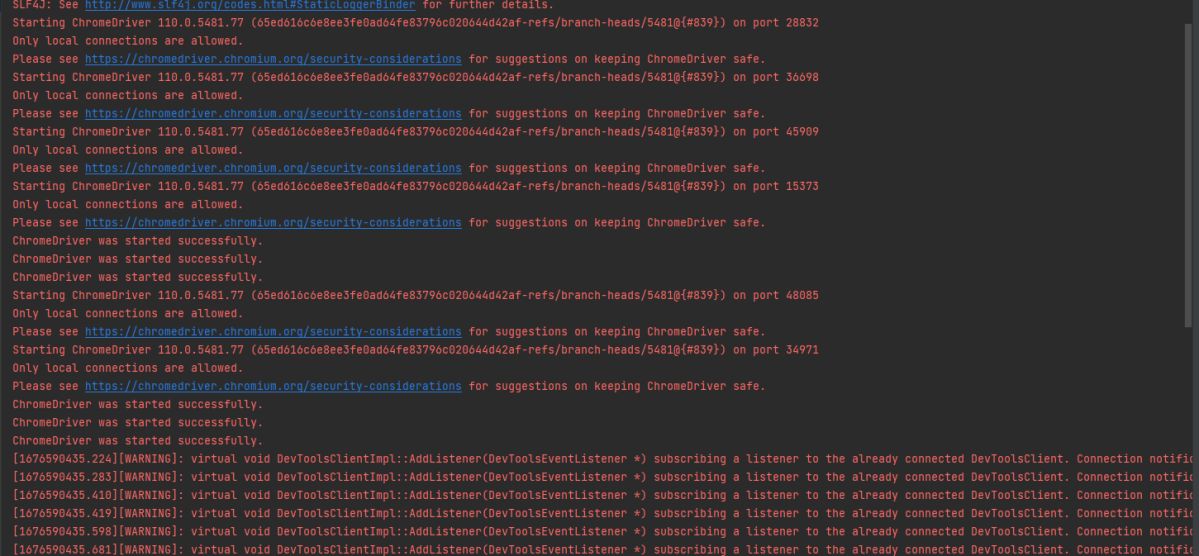
Step 13 – Test Execution Result
All the tests are started at the same time, so they share different threads. The way tests are executed is different in them. With non-parallel tests, all the scenarios of the same feature are executed together, and then the scenarios of another feature file. Whereas in parallel tests, all the tests are started at the same time, so there won’t be any specific order.
All the scenarios have started simultaneously.
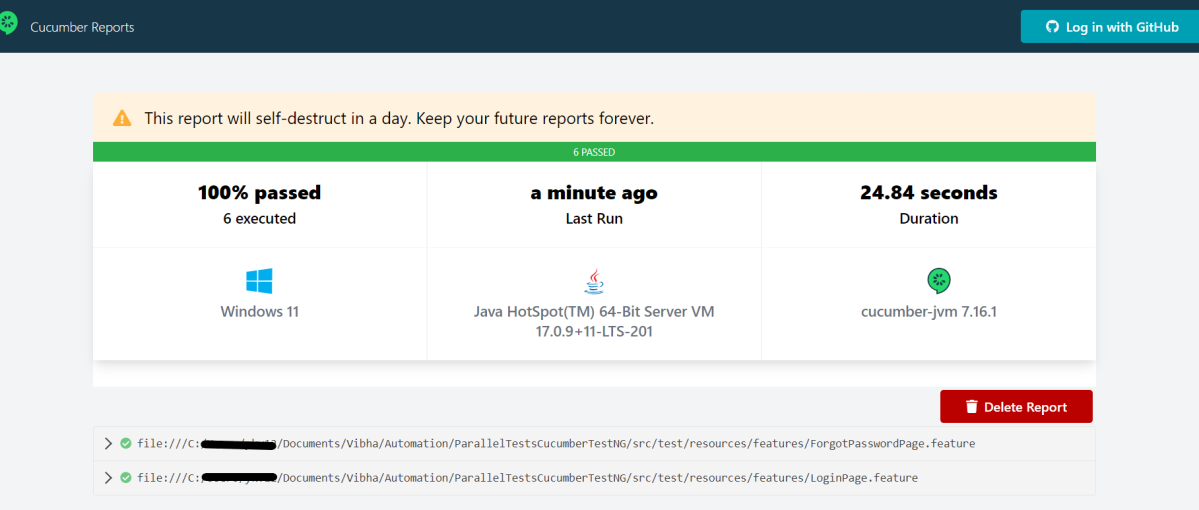
The Cucumber Report is shown below:
There are chances that we don’t want to run all the scenarios simultaneously, in this case, we need to add the below-mentioned configuration in the pom.xml. The value =2 means that 2 scenarios will be executed simultaneously.
In the last tutorial, I have explain the Parameters in TestNG which passes different test data to the test case as arguments. Similar to TestNG Parameters, DataProviders are a means to pass data to test scripts in TestNG. In this tutorial, I will explain about the DataProviders in TestNG.
What is DataProvider in TestNG?
The DataProvider in TestNG is another way to pass the parameters in the test function, the other one being TestNG parameters. Using DataProvider in TestNG, we can easily inject multiple values into the same test case. It comes inbuilt in TestNG and is popularly used in data-driven frameworks.
Syntax of DataProvider
@DataProvider (name = "name_of_dataprovider")
public Object[][] dpMethod() {
    return new Object [][] { values}
}
A Data Provider is a method on the class that returns an array of array of objects. This method is annotated with @DataProvider
A @Test method specifies its Data Provider with the dataProvider attribute. This name must correspond to a method on the same class annotated with @DataProvider(name=”…”) with a matching name.
TestNG dataprovider returns a 2d list of objects..An array of array of objects (Object[][]) where the first dimension’s size is the number of times the test method will be invoked and the second dimension size contains an array of objects that must be compatible with the parameter types of the test method.
DataProviders are not declared on top of the functions like TestNG parameters but have a method of their own, which in regular speaking terms called a dataprovider method. For example, dpMethod here.
The dataprovider name calls the dataprovider method, and if there is no name specified by the tester, then the dataprovider method is the default name used in the receiving @Test case.
Data providers can run in parallel with the attribute parallel.
Below is the basic example of using DataProvider in TestNG.
import org.openqa.selenium.By;
import org.openqa.selenium.Keys;
import org.openqa.selenium.WebDriver;
import org.openqa.selenium.WebElement;
import org.openqa.selenium.chrome.ChromeDriver;
import org.openqa.selenium.chrome.ChromeOptions;
import org.testng.annotations.AfterMethod;
import org.testng.annotations.BeforeMethod;
import org.testng.annotations.DataProvider;
import org.testng.annotations.Test;

public class DataProvider_Demo {

    WebDriver driver;

    @DataProvider(name = "testData")
    public Object[][] dataProvFunc() {
        return new Object[][] { { "Selenium" }, { "TestNG" } };
    }

    @BeforeMethod
    public void setUp() {

        System.out.println("Start the test");
        ChromeOptions options = new ChromeOptions();
        options.addArguments("--start-maximized");
        driver = new ChromeDriver(options);
        driver.get("https://www.bing.com/");

    }

    // Passing the dataProvider to the test method through @Test annotation
    @Test(dataProvider = "testData")
    public void search(String keyWord) {
        WebElement txtBox = driver.findElement(By.id("sb_form_q"));
        txtBox.sendKeys(keyWord);
        System.out.println("Keyword entered is : " + keyWord);
        txtBox.sendKeys(Keys.ENTER);
        System.out.println("Search result is displayed.");
    }

    @AfterMethod
    public void burnDown() {
        driver.quit();

        System.out.println("End the test");
    }

}
In the above example, I am passing two search keywords, viz “Selenium” and “TestNG” to the test method using the DataProvider method. You can run the code and check the output.
The output of the above program is
Here, Test is executed with two values, but we have run the test only once.
Inheriting DataProvider in TestNG
It is messy to have supporting methods like DataProvider and test code in one class. It is always preferred to declare the test case in one class and define TestNG parameters like DataProviders in another class. By default, the data provider will be looked for in the current test class or one of its base classes. If you want to put your data provider in a different class, it needs to be a static method or a class with a non-arg constructor, and you specify the class where it can be found in the dataProviderClass attribute.
Let us create separate classes for the DataProvider method and the test method, as shown below:
DataProvider Class
public class DPDemo {

	@DataProvider(name = "testData")
	public Object[][] dataProvFunc() {
		return new Object[][] {
          { "Selenium" }, { "TestNG" }, { "Automation" } };
	}
}
We can see that all we did was create a DataProvider method in a Class and create a new class for Test Code.
import org.openqa.selenium.By;
import org.openqa.selenium.Keys;
import org.openqa.selenium.WebDriver;
import org.openqa.selenium.WebElement;
import org.openqa.selenium.chrome.ChromeDriver;
import org.openqa.selenium.chrome.ChromeOptions;
import org.testng.annotations.AfterMethod;
import org.testng.annotations.BeforeMethod;
import org.testng.annotations.Test;

public class DataProviderInheritance_Demo {

    WebDriver driver;

    @BeforeMethod
    public void setUp() {

        System.out.println("Start the test");
        ChromeOptions options = new ChromeOptions();
        options.addArguments("--start-maximized");
        driver = new ChromeDriver(options);
        driver.get("https://www.bing.com/");

    }

    // Passing the dataProvider to the test method through @Test annotation
    @Test(dataProvider = "testData", dataProviderClass = DPDemo.class)
    public void search(String keyWord) {
        WebElement txtBox = driver.findElement(By.id("sb_form_q"));
        txtBox.sendKeys(keyWord);
        System.out.println("Keyword entered is : " + keyWord);
        txtBox.sendKeys(Keys.ENTER);
        System.out.println("Search result is displayed.");
    }

    @AfterMethod
    public void burnDown() {
        driver.quit();
        System.out.println("End the test");
    }

}
As you can see, to handle the inheritance, all we did was add an attribute to the test method (highlighted above), which specifies the class that has the DataProvider method.
The output of the above program is
Passing Multiple Parameter Values in TestNG DataProviders
Passing multiple values is pretty similar to passing numerous parameters. The only difference is that we will pass various values to a single parameter so that a string of input(s) is sent in one go.
Let us quickly understand this concept with the help of the code as shown below.
DataProvider Class
public class DPDemo {

	@DataProvider(name = "testData")
	public Object[][] dataProvFunc() {
		return new Object[][] { { "Automation Tester", "2-5 years" }, { "Performance Tester", "3+ years" },
				{ "DevOps", "5+ years" } };
	}
}
Test Code – DataProviderInheritanceDemo
import org.openqa.selenium.By;
import org.openqa.selenium.Keys;
import org.openqa.selenium.WebDriver;
import org.openqa.selenium.WebElement;
import org.openqa.selenium.chrome.ChromeDriver;
import org.openqa.selenium.chrome.ChromeOptions;
import org.testng.annotations.AfterMethod;
import org.testng.annotations.BeforeMethod;
import org.testng.annotations.Test;

public class DataProviderInheritanceDemo {

    WebDriver driver;

    @BeforeMethod
    public void setUp() {

        System.out.println("Start the test");
        ChromeOptions options = new ChromeOptions();
        options.addArguments("--start-maximized");
        driver = new ChromeDriver(options);
        driver.get("https://www.bing.com/");

    }

    // Passing the dataProvider to the test method through @Test annotation
    @Test(dataProvider = "testData", dataProviderClass = DPDemo.class)
    public void search(String keyWord1, String keyWord2) {

        WebElement txtBox = driver.findElement(By.id("sb_form_q"));
        txtBox.sendKeys(keyWord1, keyWord2);
        System.out.println("Keyword entered is : " + keyWord1 + " " + keyWord2);
        txtBox.sendKeys(Keys.ENTER);
        System.out.println("Search result is displayed.");
    }

    @AfterMethod
    public void burnDown() {
        driver.quit();
        System.out.println("End the test");
    }
}
Run the test script, and you will see both the values for the TestNG parameters being passed in one go.
The output of the above program is
We are done! Congratulations on making it through this tutorial and hope you found it useful! Happy Learning!!
Spring Boot makes it easy to create stand-alone, production-grade Spring based Applications that you can “just run”. We take an opinionated view of the Spring platform and third-party libraries, so you can get started with minimum fuss. Most Spring Boot applications need minimal Spring configuration.
Gradle is an open-source build automation tool that is designed to be flexible enough to build almost any type of software. Gradle runs on the JVM and you must have a Java Development Kit (JDK) installed to use it. Several major IDEs allow you to import Gradle builds and interact with them: Android Studio, IntelliJ IDEA, Eclipse, and NetBeans.
Allure Framework is a lightweight, flexible multi-language test report tool that not only displays a very concise representation of what has been tested in a neat web report form, but also allows everyone involved in the development process to extract the most useful information from everyday test execution.