In this tutorial, I will explain Parallel Testing using Cucumber with TestNG.
Cucumber-JVM allows parallel execution across multiple threads since version 4.0.0. There are several options to incorporate this built-in feature in a Cucumber project. You can do so by using JUnit, TestNG, or CLI.
Cucumber can be executed in parallel using TestNG and Maven test execution plugins by setting the data provider parallel option to true.
In TestNG, the scenarios and rows in a scenario outline are executed in multiple threads. One can use either Maven Surefire or Failsafe plugin for executing the runners. In this tutorial, I’m using the Maven Surefire plugin.
Table of Contents:
- Prerequisite
- Dependency List
- Detailed Step Description
- Create a Maven project
- Update Properties section in Maven pom.xml
- Add Cucumber, Selenium, and TestNG dependencies to the project
- Add Surefire plugin configuration to the build section of the POM
- Create 2 feature files in src/test/resources – LoginPage.feature and ForgotPasswordPage.feature
- Create Page Object Model classes of both feature files
- Create the Step Definition classes for both feature files or Glue Code
- Create the Hook Class and Dependency Injection class (TestSetUp) and BaseTest class
- Create a Cucumber TestNG Runner class
- Report Generation
- Execute the test from Command Line
- Execute the tests from TestNG Runner
- Test Execution Result
Prerequisite
- Java is installed
- Maven is installed
- TestNG is installed
- Eclipse or IntelliJ Java IDE installed
Dependency List
- Selenium – 4.19.1
- Java 17
- Cucumber Java – 7.16.1
- Cucumber TestNG – 7.16.1
- Maven – 3.9.5
- TestNG – 7.10.1
- Maven Surefire Plugin – 3.2.5
- Maven Compiler Plugin – 3.13.1
Detailed Step Description
Step 1 – Create a Maven project
Create a Maven project in your favorite IDE using the cucumber archetype. To know more about this, click here.

Step 2 – Update Properties section in Maven pom.xml
<properties>
        <project.build.sourceEncoding>UTF-8</project.build.sourceEncoding>
        <selenium.version>4.19.1</selenium.version>
        <cucumber.version>7.16.1</cucumber.version>
        <testng.version>7.10.1</testng.version>
        <maven.compiler.plugin.version>3.13.0</maven.compiler.plugin.version>
        <maven.surefire.plugin.version>3.2.5</maven.surefire.plugin.version>
        <maven.compiler.source>17</maven.compiler.source>
        <maven.compiler.target>17</maven.compiler.target>
    </properties>
Step 3 – Add Cucumber, Selenium, and TestNG dependencies to the project
Add below mentioned Cucumber-Java and Cucumber-TestNG and Selenium-java dependencies to the project.
<dependencies>

        <!--Cucumber Dependencies -->
        <dependency>
            <groupId>io.cucumber</groupId>
            <artifactId>cucumber-java</artifactId>
            <version>${cucumber.version}</version>
        </dependency>

        <dependency>
            <groupId>io.cucumber</groupId>
            <artifactId>cucumber-testng</artifactId>
            <version>${cucumber.version}</version>
            <scope>test</scope>
        </dependency>

        <!-- Selenium Dependency -->
        <dependency>
            <groupId>org.seleniumhq.selenium</groupId>
            <artifactId>selenium-java</artifactId>
            <version>${selenium.version}</version>
        </dependency>

        <!-- TestNG Dependency -->
        <dependency>
            <groupId>org.testng</groupId>
            <artifactId>testng</artifactId>
            <version>${testng.version}</version>
            <scope>test</scope>
        </dependency>

        <!-- Dependency Injection-->
        <dependency>
            <groupId>io.cucumber</groupId>
            <artifactId>cucumber-picocontainer</artifactId>
            <version>${cucumber.version}</version>
            <scope>test</scope>
        </dependency>

    </dependencies>
Step 4 – Add Surefire plugin configuration to the build section of the POM
 <plugin>
            <groupId>org.apache.maven.plugins</groupId>
            <artifactId>maven-surefire-plugin</artifactId>
            <version>${maven.surefire.plugin.version}</version>
            <configuration>
                <parallel>methods</parallel>
                <useUnlimitedThreads>true</useUnlimitedThreads>
            </configuration>
  </plugin>
The complete POM.xml is shown below:
<?xml version="1.0" encoding="UTF-8"?>
<project xmlns="http://maven.apache.org/POM/4.0.0"
         xmlns:xsi="http://www.w3.org/2001/XMLSchema-instance"
         xsi:schemaLocation="http://maven.apache.org/POM/4.0.0 http://maven.apache.org/xsd/maven-4.0.0.xsd">
    <modelVersion>4.0.0</modelVersion>

    <groupId>org.example</groupId>
    <artifactId>ParallelTests_TestNG_Demo</artifactId>
    <version>1.0-SNAPSHOT</version>

    <properties>
        <project.build.sourceEncoding>UTF-8</project.build.sourceEncoding>
        <selenium.version>4.8.0</selenium.version>
        <cucumber.version>7.11.1</cucumber.version>
        <testng.version>7.7.1</testng.version>
        <webdrivermanager.version>5.3.2</webdrivermanager.version>
        <maven.compiler.plugin.version>3.10.1</maven.compiler.plugin.version>
        <maven.surefire.plugin.version>3.0.0-M7</maven.surefire.plugin.version>
        <maven.compiler.source>11</maven.compiler.source>
        <maven.compiler.target>11</maven.compiler.target>
    </properties>

    <dependencies>

        <!--Cucumber Dependencies -->
        <dependency>
            <groupId>io.cucumber</groupId>
            <artifactId>cucumber-java</artifactId>
            <version>${cucumber.version}</version>
        </dependency>

        <dependency>
            <groupId>io.cucumber</groupId>
            <artifactId>cucumber-testng</artifactId>
            <version>${cucumber.version}</version>
            <scope>test</scope>
        </dependency>

        <!-- Selenium Dependency -->
        <dependency>
            <groupId>org.seleniumhq.selenium</groupId>
            <artifactId>selenium-java</artifactId>
            <version>${selenium.version}</version>
        </dependency>

        <!-- TestNG Dependency -->
        <dependency>
            <groupId>org.testng</groupId>
            <artifactId>testng</artifactId>
            <version>${testng.version}</version>
            <scope>test</scope>
        </dependency>

        <!-- Dependency Injection-->
        <dependency>
            <groupId>io.cucumber</groupId>
            <artifactId>cucumber-picocontainer</artifactId>
            <version>${cucumber.version}</version>
            <scope>test</scope>
        </dependency>

        <!-- WebDriver Manager Dependency -->
        <dependency>
            <groupId>io.github.bonigarcia</groupId>
            <artifactId>webdrivermanager</artifactId>
            <version>${webdrivermanager.version}</version>
        </dependency>

    </dependencies>
    <build>
        <plugins>

            <plugin>
                <groupId>org.apache.maven.plugins</groupId>
                <artifactId>maven-compiler-plugin</artifactId>
                <version>${maven.compiler.plugin.version}</version>
                <configuration>
                    <source>${maven.compiler.source}</source>
                    <target>${maven.compiler.target}</target>
                </configuration>
            </plugin>

            <plugin>
                <groupId>org.apache.maven.plugins</groupId>
                <artifactId>maven-surefire-plugin</artifactId>
                <version>${maven.surefire.plugin.version}</version>
                <configuration>
                    <parallel>methods</parallel>
                    <useUnlimitedThreads>true</useUnlimitedThreads>
                </configuration>
            </plugin>
        </plugins>
    </build>

</project>
Step 5 – Create 2 feature files in src/test/resources – LoginPage.feature and ForgotPasswordPage.feature
A Feature File is an entry point to the Cucumber tests.
The first keyword in the Feature file is the Feature keyword, followed by: and short text that describes the feature.
To know more about the Feature file, please refer to this tutorial.
Below are the sample feature files.
LoginPage.feature
Feature: Login to HRM Application

  Background:
    Given User is on Home page

  @ValidCredentials
  Scenario: Login with valid credentials - Feature 1, Scenario -1

    When User enters username as "Admin" and password as "admin123"
    Then User should be able to login successfully

  @InvalidCredentials
  Scenario Outline: Login with invalid credentials - Feature 1, Scenario -2

    When User enters username as "<username>" and password as "<password>"
    Then User should be able to see error message "<errorMessage>"

    Examples:
      | username    | password   | errorMessage                      |
      | Admin        | admin12$$  | Invalid credentials               |
      | admin$$     | admin123   | Invalid credentials               |
      | abc123       | xyz$$      | Invalid credentials               |
ForgotPasswordPage.feature
Feature: Forgot Password Page

  Background:
    Given User is on Home page

  @BackFunctionality
  Scenario: Validate the cancel functionality - Feature 2, Scenario - 1

    When User clicks on Forgot your password? link
    Then User should be able to navigate to Reset Password page
    And User clicks on Cancel button to go back to Login Page

  @ResetFunctionality
  Scenario: Validate the Reset Password functionality - Feature 2, Scenario - 2

    When User clicks on Forgot your password? link
    Then User should be able to navigate to Reset Password page
    And User clicks on Reset Password button and provide username as "abc1234"
    And Verify the message "Reset Password link sent successfully"
Step 6 – Create Page Object Model classes of both feature files
Page Object Model class contains all the locators and the actions performed on these locators for the particular class to improve the readability and maintainability of the code.
Below are the Page Object Model classes for these feature files.
LoginPage
import org.openqa.selenium.By;
import org.openqa.selenium.WebDriver;

public class LoginPage {

    public WebDriver driver;

    By userName = By.name("username");
    By passWord = By.name("password");
    By login = By.xpath("//*[@id='app']/div[1]/div/div[1]/div/div[2]/div[2]/form/div[3]/button");
    By errorMessage = By.xpath("//*[@class='orangehrm-login-error']/div[1]/div[1]/p");
    By forgotPasswordLink = By.xpath("//*[@id='app']/div[1]/div/div[1]/div/div[2]/div[2]/form/div[4]/p");
    By loginPageTitle = By.xpath("//*[@id='app']/div[1]/div/div[1]/div/div[2]/h5");

    public LoginPage(WebDriver driver) {
        this.driver = driver;
    }

    public String getErrorMessage() {
        return driver.findElement(errorMessage).getText();
    }

    public void login(String strUserName, String strPassword) {

        // Fill user name
        driver.findElement(userName).sendKeys(strUserName);

        // Fill password
        driver.findElement(passWord).sendKeys(strPassword);

        // Click Login button
        driver.findElement(login).click();

    }

    // Click on Forgot Password link
    public void clickOnForgotPasswordLink() {
        driver.findElement(forgotPasswordLink).click();
    }

    //Get Login Page Title
    public String getLoginPageTitle() {
        return driver.findElement(loginPageTitle).getText();
    }
}
HomePage
import org.openqa.selenium.By;
import org.openqa.selenium.WebDriver;

public class HomePage {

    public WebDriver driver;

    public HomePage(WebDriver driver) {
        this.driver = driver;
    }

    By homePageUserName = By.xpath("//*[@class='oxd-topbar-header-breadcrumb']/h6");

    public String getHomePageText() {
        return driver.findElement(homePageUserName).getText();
    }
}
ForgotPasswordPage
import org.openqa.selenium.By;
import org.openqa.selenium.WebDriver;

public class ForgotPasswordPage {

    WebDriver driver;

     By forgotPasswordPageTitle = By.xpath("//*[@id='app']/div[1]/div[1]/div/form/h6");
     By cancelBtn = By.xpath("//*[@id='app']/div[1]/div[1]/div/form/div[2]/button[1]");
     By resetPasswordBtn = By.xpath("//*[@id='app']/div[1]/div[1]/div/form/div[2]/button[2]");
     By userName = By.name("username");
     By resetMessage = By.xpath("//*[@id='app']/div[1]/div[1]/div/h6");

    public ForgotPasswordPage(WebDriver driver) {
        this.driver = driver;
    }

    // Get the Title of ForgotPage
    public String getForgotPageText() {
        return driver.findElement(forgotPasswordPageTitle).getText();
    }

    // Click Cancel Button
    public void clickOnCancelBtn() {
         driver.findElement(cancelBtn).click();
    }

    // Click ResetPassword Button
    public void clickOnRestPasswordBtn() {
        driver.findElement(resetPasswordBtn).click();
    }

    // Type username in TextBox
    public void TypeOnUsernameTextBox(String username) {
        driver.findElement(userName).sendKeys(username);
    }

    // Get Message
    public String getRestMessage() {
        return driver.findElement(resetMessage).getText();
    }
}
PageObjectManager – This class creates the object of all the above-mentioned Page Object Model classes. This an optional class. If you want you can create the objects in StepDefinition class also.
public class PageObjectManager {

    public LoginPage loginPage;
    public HomePage homePage;
    public ForgotPasswordPage forgotPasswordPage;
    public WebDriver driver;


    public PageObjectManager(WebDriver driver)
    {
        this.driver = driver;
    }

    public LoginPage getLoginPage()
    {

        loginPage= new LoginPage(driver);
        return loginPage;
    }

    public HomePage getHomePage()
    {
        homePage = new HomePage(driver);
        return homePage;
    }

    public ForgotPasswordPage getForgotPasswordPage()
    {
        forgotPasswordPage = new ForgotPasswordPage(driver);
        return forgotPasswordPage;
    }
}
Step 7 – Create the Step Definition classes for both feature files or Glue Code
Below is the Step Definition for LoginPage.feature.
import io.cucumber.java.en.Given;
import io.cucumber.java.en.Then;
import io.cucumber.java.en.When;
import pageObjects.HomePage;
import pageObjects.LoginPage;
import pageObjects.PageObjectManager;
import utils.TestSetUp;
import org.testng.Assert;

public class LoginPageDefinitions {

    TestSetUp setUp;
    public PageObjectManager pageObjectManager;
    public LoginPage loginPage;
    public HomePage homePage;


    public LoginPageDefinitions(TestSetUp setUp) {
        this.setUp = setUp;
        this.loginPage = setUp.pageObjectManager.getLoginPage();
        this.homePage= setUp.pageObjectManager.getHomePage();
    }

    @Given("User is on Home page")
    public void loginTest() throws IOException {
        setUp.baseTest.WebDriverManager().get("https://opensource-demo.orangehrmlive.com/");

    }

    @When("User enters username as {string} and password as {string}")
    public void goToHomePage(String userName, String passWord) {

        // login to application
        loginPage.login(userName, passWord);

        // go the next page

    }

    @Then("User should be able to login successfully")
    public void verifyLogin() {

        // Verify home page
        Assert.assertTrue(homePage.getHomePageText().contains("Dashboard"));

    }

    @Then("User should be able to see error message {string}")
    public void verifyErrorMessage(String expectedErrorMessage) {

        // Verify home page
        Assert.assertEquals(loginPage.getErrorMessage(),expectedErrorMessage);

    }

}
Below is the Step Definition for ForgotPasswordPage.feature.
import io.cucumber.java.en.Then;
import io.cucumber.java.en.When;
import pageObjects.ForgotPasswordPage;
import pageObjects.LoginPage;
import pageObjects.PageObjectManager;
import utils.TestSetUp;
import org.testng.Assert;

public class ForgotPasswordPageDefinitions{

    TestSetUp setUp;
    PageObjectManager pageObjectManager;
    public LoginPage loginPage;
    public  ForgotPasswordPage forgotPasswordPage;

    public ForgotPageDefinitions(TestSetUp setUp) {
        this.setUp = setUp;
        this.loginPage = setUp.pageObjectManager.getLoginPage();
        this.forgotPasswordPage = setUp.pageObjectManager.getForgotPasswordPage();
    }

    @When("User clicks on Forgot your password? link")
    public void forgotPasswordLink() {

        loginPage.clickOnForgotPasswordLink();

    }

    @Then("User should be able to navigate to Reset Password page")
    public void verifyForgotPasswordPage() {

        Assert.assertEquals(forgotPasswordPage.getForgotPageText(),"Reset Password");

    }

    @Then("User clicks on Cancel button to go back to Login Page")
    public void verifyCancelBtn() {

        forgotPasswordPage.clickOnCancelBtn();
        Assert.assertEquals(loginPage.getLoginPageTitle(),"Login");

    }

    @Then("User clicks on Reset Password button and provide username as {string}")
    public void verifyResetPasswordBtn(String username) {

        forgotPasswordPage.TypeOnUsernameTextBox(username);
        forgotPasswordPage.clickOnRestPasswordBtn();

    }

    @Then("Verify the message {string}")
    public void verifyMessage(String message) {

        Assert.assertEquals(forgotPasswordPage.getRestMessage(),message);

    }
}
Step 8 – Create the Hook Class and Dependency Injection class (TestSetUp) and BaseTest class
Below is the code for the ApplicationHook Class.
import io.cucumber.java.After;
import utils.TestSetUp;

public class ApplicationHooks {

 public TestSetUp setUp;

    public ApplicationHooks(TestSetUp setUp) {
        this.setUp = setUp;
    }

    @After
    public void tearDown( ) throws IOException {
        setUp.baseTest.WebDriverManager().quit();
    }
}
Below is the code for the Dependency Injection class. In Cucumber, if we want to share the state between multiple-step definition files, we will need to use dependency injection (DI).
import org.openqa.selenium.WebDriver;
import org.openqa.selenium.WebElement;
import pageObjects.PageObjectManager;

public class TestSetUp {

    public WebElement errorMessage;
    public WebElement homePageUserName;
    public PageObjectManager pageObjectManager;
    public BaseTest baseTest;

    public TestSetUp()  {

        baseTest = new BaseTest();
        pageObjectManager = new PageObjectManager(baseTest.WebDriverManager());

    }
}
BaseTest class is used to initialize the WebDriver.
import io.github.bonigarcia.wdm.WebDriverManager;
import org.openqa.selenium.WebDriver;
import org.openqa.selenium.chrome.ChromeDriver;
import java.time.Duration;

public class BaseTest {

    public WebDriver driver;
    public final static int TIMEOUT = 10;

    public WebDriver WebDriverManager ()  {


        if (driver == null) {

            ChromeOptions options = new ChromeOptions();
            driver = new ChromeDriver(options);
            driver.manage().timeouts().implicitlyWait(Duration.ofSeconds(TIMEOUT));
            driver.manage().window().maximize();
            driver.get(url);

        }
        return driver;
    }
}
Step 9 – Create a Cucumber TestNG Runner class
Add a cucumber runner by extending the AbstractTestNGCucumberTests class and overriding the scenarios method. Set the parallel option value to true for the DataProvider annotation.
import io.cucumber.testng.AbstractTestNGCucumberTests;
import io.cucumber.testng.CucumberOptions;
import org.testng.annotations.DataProvider;

@CucumberOptions(tags = "", features = "src/test/resources/features", glue = "org.example.definitions")
public class CucumberRunnerTests  extends AbstractTestNGCucumberTests {

   @Override
    @DataProvider(parallel = true)
    public Object[][] scenarios() {
        return super.scenarios();
    }

}
Step 10 – Report Generation
Add cucumber.properties under src/test/resources and add the below instruction in the file.
cucumber.publish.enabled=true
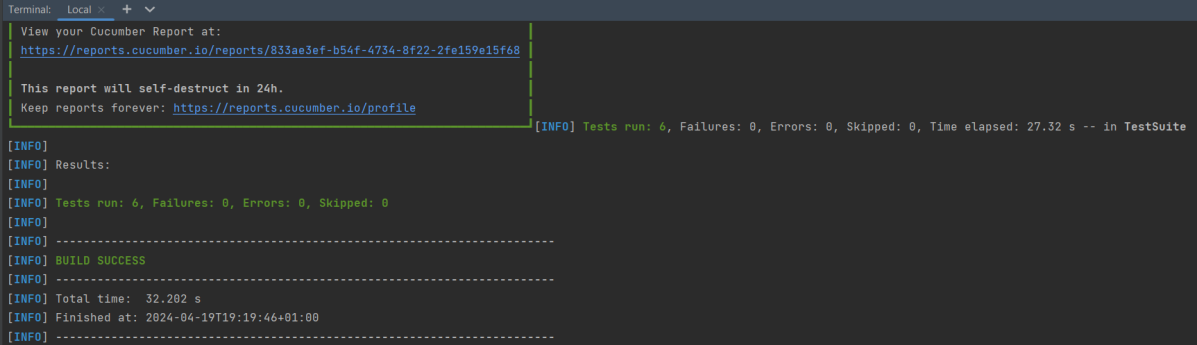
Step 11 – Execute the test from Command Line
Use the below-mentioned command in the command prompt to run the tests.
mvn clean test
The output of the above program is
Step 12 – Execute the tests from TestNG Runner
Go to the Runner class and right-click Run As TestNG Test. The tests will run as TestNG tests. (Eclipse)

In the case of IntelliJ, right-click and select Run “CucumberRunnerTests”.
Step 13 – Test Execution Result
All the tests are started at the same time, so they share different threads. The way tests are executed is different in them. With non-parallel tests, all the scenarios of the same feature are executed together, and then the scenarios of another feature file. Whereas in parallel tests, all the tests are started at the same time, so there won’t be any specific order.
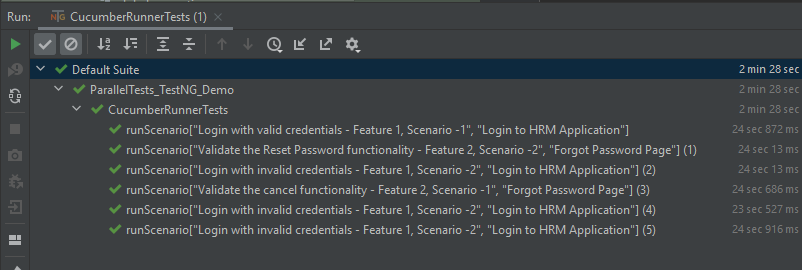
All the scenarios have started simultaneously.
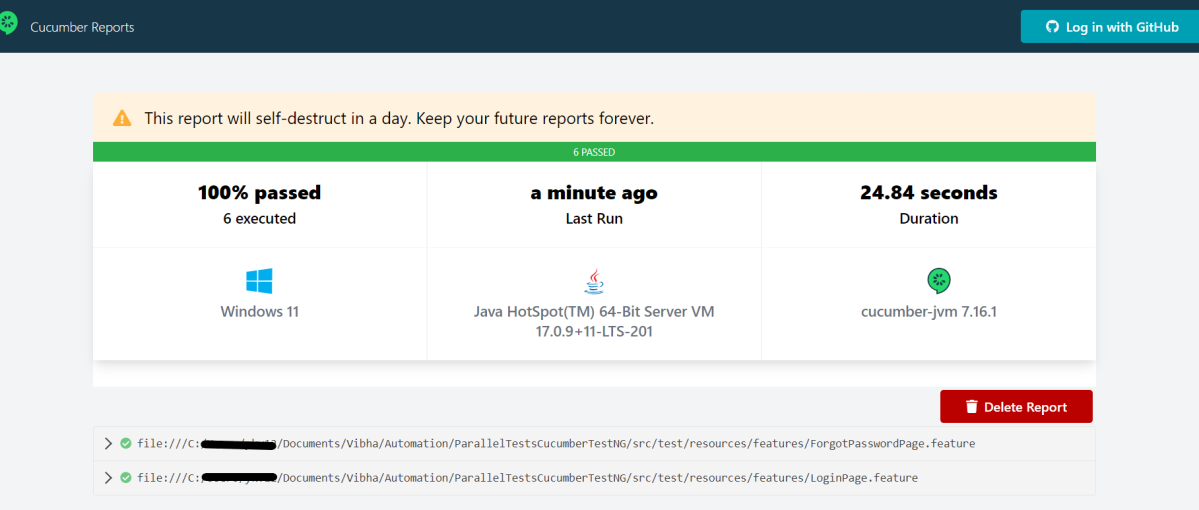
The Cucumber Report is shown below:
There are chances that we don’t want to run all the scenarios simultaneously, in this case, we need to add the below-mentioned configuration in the pom.xml. The value =2 means that 2 scenarios will be executed simultaneously.
  <configuration>
                    <properties>
                        <property>
                            <name>dataproviderthreadcount</name>
                            <value>2</value>
                        </property>
                    </properties>
 </configuration>
The default thread count of the dataprovider in parallel mode is 10.
Congratulations on making it through this tutorial and hope you found it useful! Happy Learning!! Cheers!!
There is another tutorial that shows Parallel Testing in Cucumber with JUnit.
The complete source code can be found here – GitHub

This example presumes that all of a scenario’s steps are found in a single step-definition class, which has its own test runner.
If my Scenario Outline has:
* “Given I add to my basket” defined in FruitSteps.java
* “When I pay for my order” defined in CheckoutSteps.java
* “Then my total payment is $” defined in CheckoutAssertions.java
…where should the WebDriver be declared, so that each thread has its own WebDriver, but that WebDriver is accessible by all the definition classes?
LikeLike
You can try to have Page Object Model Framework to make WebDriver accessbile by all the definition classes omething like this – https://qaautomation.expert/2021/04/12/page-objects-with-selenium-and-cucumber/. But use TestNG, instead of JUnit4 and use the concept of parallel test from the current blog. It should work.
LikeLike
A few things (because what is testing all about, if not telling people that there’s something wrong with the thing they made?):
– The site your tests are running against has evidently changed, because almost none of your element selectors work.
– The Pre-requisites don’t mention downloading a suitable webdriver.
– The webdriver location path in the code is specific to your own computer. WebDriverManager (as used in that Page Object Model post you suggested) with Chrome works great though.
– in the LoginDefinition class, you use assertThat() and containsString(), but they’re not declared anywhere. (In HomePageDefinition, you use the working org.testng method Assert.assertEquals() ).
– Because driver.quit() is called at the end of the final step of each script, the browser and the webdriver only close if the test passes. When a test fails (and there were many, until I fixed the driver location and selectors), you quickly end up with many unsupervised webdrivers taking up system resources.
– Please include the package and import declarations of the classes, and a screenshot of the full file tree at the end, for people to check against their own structure.
But! After fixing the various issues, it ran four tests at once (though without adapting it to a page-object model yet), so I’m very happy indeed. Many thanks 🙂
LikeLike
I appreciate the time you have taken out to write the detailed feedback. I know the locators of the website changes very frequently, but will try to fix other issues.
LikeLike
Thanks for your efforts but i have followed all the steps except 8 step because i am using thirdparty report tool. and when i run the runner file all testcase are running but in the url it is showing as in URL data:, and for one browser the url opens but no action get performed
LikeLike
Sometimes, if network is slow, it happens that few browser is unable to respond. I have updated the code with a new approach. You can try this also.
LikeLike
Thank you sir, will check with new code
LikeLike
How to dynamically pass thread count ? Let’s say I enable parallel execution but for testing purposes in eclipse I want to run 1 thread some times and 2 threads in another run and so.
I tried doing this
methods
1
false
I have 3 scenarios in a single feature.
Though the count is 1 , I am seeing 3 threads opened.
The complete plugin is :
org.apache.maven.plugins
maven-surefire-plugin
3.1.2
methods
1
false
LikeLike
I have added threadcount part in the tutorial to run the specific number of threads. For TestNG, we need to use dataproviderthreadcount property to run specific number of threads.
LikeLike
For values I want to be able to change quickly, I abstract them out to items in the POM.xml:
3
testng.xml
and then refer to them where needed
org.apache.maven.plugins
maven-surefire-plugin
3.0.0-M7
dataproviderthreadcount
${parallel.tests}
${xmlFileToRun}
This way, you can define any values you want in your mvn command with the -D argument:
mvn clean test -DxmlFileToRun=testngOther.xml -Dparallel.tests=1
LikeLike
(Sorry, WordPress won’t let me post xml in the reply. Replace the regular brackets with angled brackets)
(properties)
(parallel.tests)3(/parallel.tests)
(suiteXmlFile)testng.xml(/suiteXmlFile)
(/properties)
and then refer to them where needed:
(plugin)
(groupId)org.apache.maven.plugins(/groupId)
(artifactId)maven-surefire-plugin(/artifactId)
(version)${maven.surefire.plugin.version}(/version)
(configuration)
(properties)
(property)
(name)dataproviderthreadcount(/name)
(value)${parallel.tests}(/value)
(/property)
(/properties)
(suiteXmlFiles)
(suiteXmlFile)${suiteXmlFile}(/suiteXmlFile)
(/suiteXmlFiles)
(/configuration)
(/plugin)
This way, you can define any values you want in your mvn command with the -D argument:
mvn clean test -DxmlFileToRun=testngOther.xml -Dparallel.tests=1
LikeLike
I used your logic to implement the parallel testing , its working but its opening unnecessary browser instance
LikeLike
Can you please explain how the Cucumber-TestNG script can be parametrized from testng.xml? Thanks!
LikeLike
This implementation works for individual scenarios in feature files, it opens each scenario in a new browser instance
But, I have to implement something a bit different, the feature files have to each run in a different browser instance, because all the scenarios in my feature files execute in a flow, testing many functionalities in a single page. The implementation described in this page is not useful as the flow gets broken because the scenarios run parallelly
Need to do this because I have about 40 feature files, covering tests in many pages
LikeLike