TestNG provides several features like prioritizing the test cases, grouping the test cases, skipping the test cases, defining dependencies between test cases, and so on. The previous tutorial has explained the parameters in TestNG.
In this tutorial, we will see how the test cases can be prioritized using TestNG.
If no priority is assigned to a Test Case, then the annotated test methods are executed as per the alphabetical order of the tests.
Below is an example
import org.testng.annotations.Test;

public class TestNGPriorityDemo {


     @Test
     public static void FirstTest() {
           System.out.println("This is Test Case 1");
     }

     @Test
     public static void SecondTest() {
           System.out.println("This is Test Case 2");
     }

     @Test
     public static void ThirdTest() {
           System.out.println("This is Test Case 3");
     }

     @Test
     public static void FourthTest() {
           System.out.println("This is Test Case 4");
     }
}
The output of the above program is
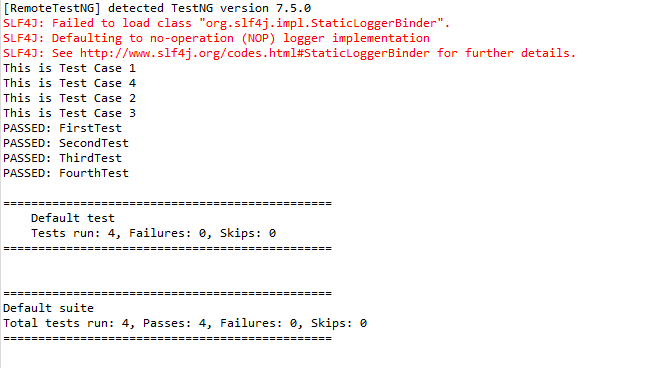
In the above example, FirstTest and FourthTest have the highest preference as per the alphabetical order. F comes before S and T. FirstTest is executed before Fourth because preference of I is higher than O.
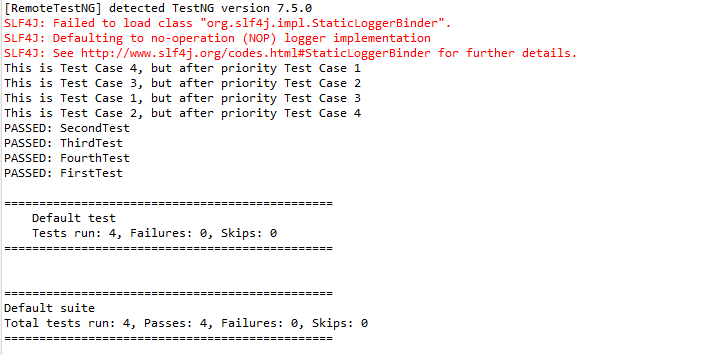
The methods can be prioritized by assigning a number to the annotated test cases. The smaller the number, the higher the priority. Priority can be assigned as parameters while defining the test cases. In the below example, we have assigned priority to test cases, and now they are executed as per the priority. The Test Case with priority = 1 has the highest precedence. It overrides the rule of executing test cases by alphabetical order.
To Run the TestNG program, right-click on the program, select Run As TestNG Test.

import org.testng.annotations.Test;

public class TestNGPriorityDemo {


     @Test(priority = 3)
     public static void FirstTest() {
           System.out.println("This is Test Case 1, but after priority Test Case 3");
     }


     @Test(priority = 4)
     public static void SecondTest() {
           System.out.println("This is Test Case 2, but after priority Test Case 4");
     }


     @Test(priority = 2)
     public static void ThirdTest() {
           System.out.println("This is Test Case 3, but after priority Test Case 2");
     }


     @Test(priority = 1)
     public static void FourthTest() {
          System.out.println("This is Test Case 4, but after priority Test Case 1");
     }
}
The output of the above program is
We are done. Congratulations on making it through this tutorial and hope you found it useful!
