Logging plays an important role in understanding the behaviour of the test. When we are testing an API, it is good to know how the APIs are behaving. We should understand how the request is made and how we received the response from the API. It’s important to check what the headers look like. We also need to see what the body looks like. Additionally, verify what parameters we are providing to the request. All of this helps us debug the test code. It helps us identify the reason for the failure of the test.
REST Assured, provide support to a different type of logging as shown below:-
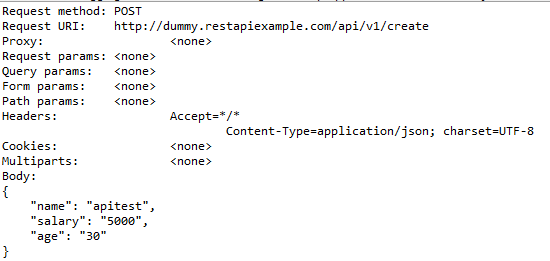
To log all request specification details including parameters, headers, and body of the request, log().all() needs to be added to post given() section.
import org.testng.annotations.Test;
import io.restassured.http.ContentType;
import static io.restassured.RestAssured.*;
import static org.hamcrest.Matchers.equalTo;

public class RestTests {

	@Test
    public void requestLoggingDemo() {

        String json = "{\"name\":\"apitest\",\"salary\":\"5000\",\"age\":\"30\"}";

        // GIVEN
        given()
               .log().all()
               .baseUri("https://dummy.restapiexample.com/api")
               .contentType(ContentType.JSON)
               .body(json)

        // WHEN
         .when()
                .post("/v1/create")

        // THEN
          .then()
                 .assertThat()
                 .statusCode(200)
                 .body("data.name", equalTo("apitest"))
                 .body("message", equalTo("Successfully! Record has been added."));

    }

}
The output of the above program is
Other different request logging options are:-
given().log().params(). .. // Log only the parameters of the request
given().log().body(). .. // Log only the request body
given().log().headers(). .. // Log only the request headers
given().log().cookies(). .. // Log only the request cookies
given().log().method(). .. // Log only the request method
given().log().path(). .. // Log only the request path
Response Logging
If you want to print the response body regardless of the status code, you can do
get("/x").then().log().body()..
This will print the response body regardless of an error occurring.
import org.testng.annotations.Test;
import io.restassured.http.ContentType;
import static io.restassured.RestAssured.*;
import static org.hamcrest.Matchers.equalTo;

public class RestTests {

  @Test
	public void responseLoggingDemo() {

		String json = "{\"name\":\"apitest\",\"salary\":\"5000\",\"age\":\"30\"}";

		// GIVEN
		given()
              .baseUri("https://dummy.restapiexample.com/api")
              .contentType(ContentType.JSON)
			  .body(json)

		 // WHEN
		  .when()
                 .post("/v1/create")

		// THEN
		  .then()
                 .log().all()
                 .statusCode(200)
                 .body("data.name", equalTo("apitest"))
				 .body("message", equalTo("Successfully! Record has been added."));

	}
}
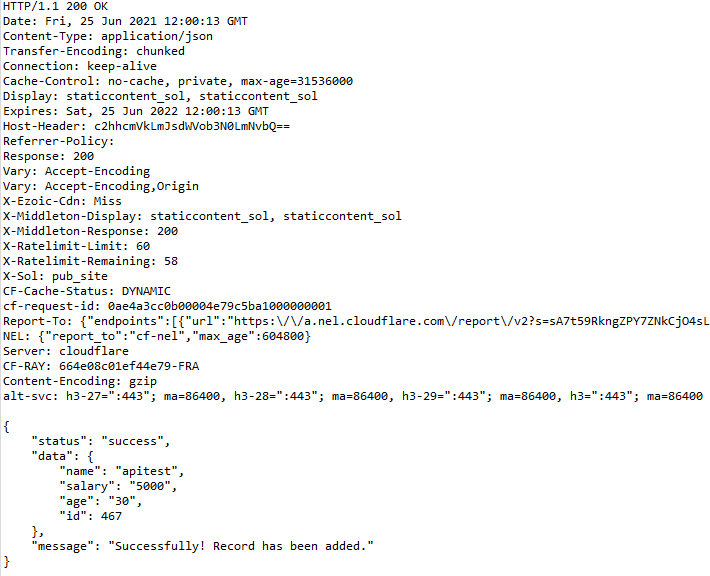
The output of the above program is
Conditional Logging
What if you want to perform logging conditionally? For example, log in if validation fails and the status code is equal to 200. Also, log in if the server returns a status code >=400.
.then().log().ifStatusCodeIsEqualTo(302). .. // Only log if the status code is equal to 302
.then().log().ifStatusCodeMatches(matcher). .. // Only log if the status code matches the supplied Hamcrest matcher
Let us create an example of conditional logging.
import org.testng.annotations.Test;
import io.restassured.http.ContentType;
import static io.restassured.RestAssured.*;
import static org.hamcrest.Matchers.equalTo;

public class RestTests {

	@Test
	public void conditionalResponseLoggingDemo() {

		String json = "{\"name\":\"apitest\",\"salary\":\"5000\",\"age\":\"30\"}";

		// GIVEN
		given()
               .baseUri("https://dummy.restapiexample.com/api")
               .contentType(ContentType.JSON)
			   .body(json)

		// WHEN
		 .when()
               .post("/v1/create")

		// THEN
		 .then()
                .log().ifStatusCodeIsEqualTo(200)
                .assertThat().statusCode(200)
				.body("data.name", equalTo("apitest"))
                .body("message", equalTo("Successfully! Record has been added."));

	}

}
The output of the above program is
Logging to a text file with Rest Assured
We will see how we can log all the request and response data to a txt file using Rest Assured.
Create a PrintStream object. You have to provide an object of FileOutputStream() to the PrintStream() constructor. Provide the path to the logging.txt file in FileOutputStream().
REST Assured gives us a filter() method, this filter method accepts RequestLoggingFilter and ResponseLoggingFilter. They have two methods, logRequestTo() and logResponseTo() methods respectively. These methods expect a Stream.
Pass the log stream we created to these methods.
import org.testng.annotations.Test;
import io.restassured.filter.log.RequestLoggingFilter;
import io.restassured.filter.log.ResponseLoggingFilter;
import io.restassured.http.ContentType;
import static io.restassured.RestAssured.*;
import static org.hamcrest.Matchers.equalTo;
import java.io.FileNotFoundException;
import java.io.FileOutputStream;
import java.io.PrintStream;

public class RestTests {

	@Test
	public void responsetoFileDemo() throws FileNotFoundException {

		PrintStream log = new PrintStream(new FileOutputStream("logging.txt"));

		String json = "{\"name\":\"apitest\",\"salary\":\"5000\",\"age\":\"30\"}";

		// GIVEN
		given()
               .baseUri("https://dummy.restapiexample.com/api")
               .contentType(ContentType.JSON)
				.body(json)
                .filter(RequestLoggingFilter.logRequestTo(log))
				.filter(ResponseLoggingFilter.logResponseTo(log))

		// WHEN
		 .when()
                .post("/v1/create")

		// THEN
          .then()
                 .log().ifStatusCodeIsEqualTo(200)
                 .assertThat().statusCode(200)
				 .body("data.name", equalTo("apitest"))
                 .body("message", equalTo("Successfully! Record has been added."));

	}
}
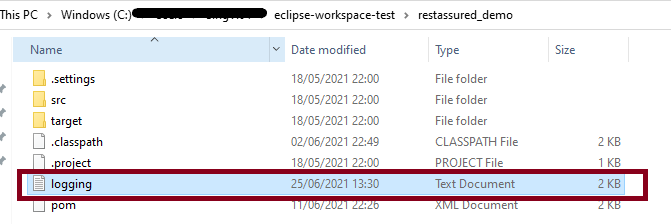
The output of the above program is
Mostly we have more than 1 test, and we want to save the log of all the tests in the text file. We can create a @BeforeClass method, and this class contains the code to create the file and append the data to that file.
import org.testng.annotations.BeforeClass;
import org.testng.annotations.Test;
import io.restassured.filter.log.RequestLoggingFilter;
import io.restassured.filter.log.ResponseLoggingFilter;
import io.restassured.http.ContentType;
import static io.restassured.RestAssured.*;
import static org.hamcrest.Matchers.equalTo;

public class LogTest {

	 public PrintStream log ;
	 RequestLoggingFilter requestLoggingFilter;
	 ResponseLoggingFilter responseLoggingFilter;

	@BeforeClass
	public void init() throws FileNotFoundException {

		 log = new PrintStream(new FileOutputStream("test_logging.txt"),true);
		 requestLoggingFilter = new RequestLoggingFilter(log);
		 responseLoggingFilter = new ResponseLoggingFilter(log);

	}

	@Test
	public void test1() {

		// Given
		given()

         .contentType(ContentType.JSON)
         . filters(requestLoggingFilter,responseLoggingFilter)

          .when()
             .get("https://dummy.restapiexample.com/api/v1/employee/2")

           .then()
           		.log().ifStatusCodeIsEqualTo(200)
           		.assertThat().statusCode(200).statusLine("HTTP/1.1 200 OK")

           		// To verify booking id at index 2
				.body("data.employee_name", equalTo("Garrett Winters"))
				.body("message", equalTo("Successfully! Record has been fetched."));
	}

	@Test
	public void test2() {

		// Given
		given()

         .contentType(ContentType.JSON)
         . filters(requestLoggingFilter,responseLoggingFilter)

          .when()
             .get("https://dummy.restapiexample.com/api/v1/employee/1")

           .then()
           .log().ifStatusCodeIsEqualTo(200)
           .assertThat().statusCode(200).statusLine("HTTP/1.1 200 OK")
				// To verify booking id at index 1
				.body("data.employee_name", equalTo("Tiger Nixon"))
				.body("message", equalTo("Successfully! Record has been fetched."));
	}


	@Test
    public void test3() throws FileNotFoundException {


        String json = "{\"name\":\"apitest\",\"salary\":\"5000\",\"age\":\"30\"}";

        // GIVEN
        given()
               .baseUri("https://dummy.restapiexample.com/api")
               .contentType(ContentType.JSON)
                .body(json)
               .filters(requestLoggingFilter,responseLoggingFilter)

        // WHEN
         .when()
                .post("/v1/create")

        // THEN
          .then()
                 .log().ifStatusCodeIsEqualTo(200)
                 .assertThat().statusCode(200)
                 .body("data.name", equalTo("apitest"))
                 .body("message", equalTo("Successfully! Record has been added."));

    }

}
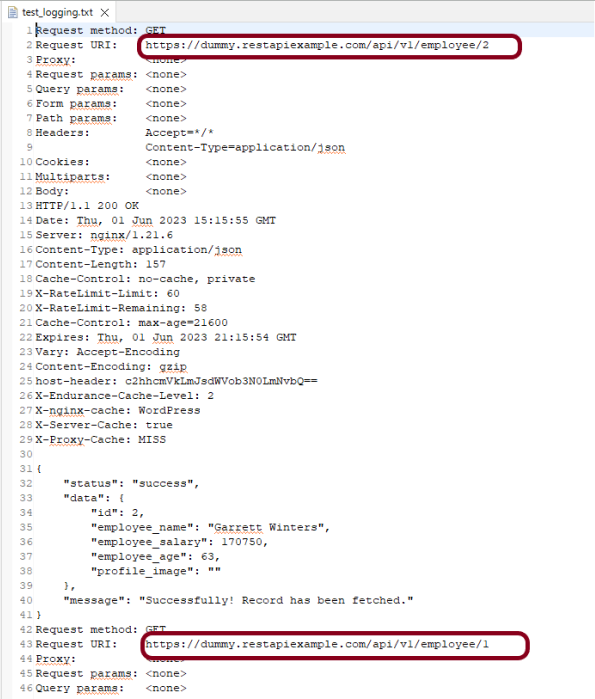
The below file shows that the log for multiple requests is saved here.
Congratulations on making it through this tutorial and hope you found it useful! Happy Learning!!
Selenium is an open-source tool. It is not a single automation tool like QTP. Instead, it is a suite of software or a set of JAR files. These tools automate web browsers across various browsers. Selenium is used by many companies, but a few to mention are Netflix, Google, HubSpot, Fitbit, Accenture, IBM, and more.
Selenium – Introduction, Installation, Test Script
In the previous tutorial, I explained the Page Object Model with Selenium, Cucumber and JUnit. In this tutorial, I’ll create a BDD Framework for web application testing. I will use the Page Object Model with Selenium, Cucumber, and TestNG.
The Page Object model is an object design pattern in Selenium, where web pages are represented as classes, the various elements on the page are defined as variables in the class and all possible user interactions can then be implemented as methods in the class.
What is Cucumber?
Cucumber is one such open-source tool, which supports Behavior Driven Development(BDD). In simple words, Cucumber can be defined as a testing framework, driven by plain English. It serves as documentation, automated tests, and development aid – all in one.
Dependency List
Cucumber Java – 7.18.1
Cucumber TestNG – 7.18.1
Java 17
Maven – 3.9.6
Selenium – 4.23.0
TestNG – 7.10.2
Maven Compiler – 3.13.0
Maven Surefire – 3.3.1
Project Structure
Implementation Steps
Step 1- Download and Install Java
Cucumber and Selenium need Java to be installed on the system to run the tests. Click here to learn How to install Java.
Step 2 – Setup Maven
To build a test framework, we need to add a number of dependencies to the project. Click here to learn How to install Maven.
Step 3 – Install Cucumber Eclipse Plugin(Only for Eclipse)
The cucumber plugin is an Eclipse plugin that allows eclipse to understand the Gherkin syntax. When we are working with cucumber we will write the feature files that contain Feature, Scenario, Given, When, Then, And, But, Tags, Scenario Outline, and Examples. By default, eclipse doesn’t understand these keywords so it doesn’t show any syntax highlighter. Cucumber Eclipse Plugin highlights the keywords present in Feature File. Refer to this tutorial to get more detail – How to setup Cucumber with Eclipse.
Step 4 – Create a new Maven Project
To create a new Maven project, go to the File -> New Project-> Maven-> Maven project-> Next -> Enter Group ID & Artifact ID -> Finish.
Step 5 – Create source folder src/test/resources to create test scenarios in the Feature file
A new Maven Project is created with 2 folders – src/main/javaand src/test/java. To create test scenarios, we need a new source folder called – src/test/resources. To create this folder, right-click on test directory ->select New ->Directory, and then it shows Maven Source Directories as resources as shown below.
Double-click on the resources directory and a new source directory under your new Maven project is created as shown in the below image.
Step 6 – Add Selenium, TestNG, and Cucumber dependencies to the project
Add below mentioned Selenium, TestNG, and Cucumber dependencies to the project.
Step 7 – Add Maven Compiler Plugin and Surefire Plugin
The compiler plugin is used to compile the source code of a Maven project. This plugin has two goals, which are already bound to specific phases of the default lifecycle:
Step 8 – Create a feature file in the src/test/resources
Create a folder with name features. Now, create the feature file in this folder. The feature file should be saved with the extension .feature. This feature file contains the test scenarios created to test the application. The Test Scenarios are written in Gherkins language in the format of Given, When, Then, And, But.
Below is an example of Test Scenarios in the feature file. I have failed one test scenario intentionally – @MissingUsername.
Feature: Login to HRM Application

  Background:
    Given User is on HRMLogin page "https://opensource-demo.orangehrmlive.com/"

  @ValidCredentials
  Scenario: Login with valid credentials

    When User enters username as "Admin" and password as "admin123"
    Then User should be able to login successfully and new page open

  @InvalidCredentials
  Scenario Outline: Login with invalid credentials

    When User enters username as "<username>" and password as "<password>"
    Then User should be able to see error message "<errorMessage>"

    Examples:
      | username   | password  | errorMessage           |
      | Admin      | admin12$$ | Invalid credentials    |
      | admin$$    | admin123  | Invalid credentials    |
      | abc123     | xyz$$     | Invalid credentials    |

  @MissingUsername @FailedTest
  Scenario: Login with blank username

    When User enters username as " " and password as "admin123"
    Then User should be able to see a message "Required1" below Username
Step 9 – Create the classes for locators, actions, and utilities in src/main/java
Create folders – actions, locators, and utils in src/main/java.
Create a Java Class for each page where define WebElements as variables using Annotation @FindBy. Create another Java class that contains methods for actions performed on WebElements. Here, I’m going to create 2 classes for locators – LoginPageLocatorsand HomePageLocators as well as 2 classes for actions – LoginPageActionsand HomePageActions
TheLocator class contains WebElements which are identified by @FindByannotation as shown below:-
Action class contains methods for the action to be performed on the web elements identified in the locator class.
The initElements is a static method of PageFactory class that is used to initialize all the web elements located by @FindBy annotation. Only after the WebElements are initialized, they can be used in the methods to perform actions.
public Login(WebDriver driver) {
           this.driver = driver;
           // This initElements method will create all WebElements
           PageFactory.initElements(driver, this);
     }
Below is the sample code of the LoginPageLocators.
import org.openqa.selenium.WebElement;
import org.openqa.selenium.support.FindBy;

public class LoginPageLocators {

	@FindBy(name = "username")
    public WebElement userName;

    @FindBy(name = "password")
    public WebElement password;

    @FindBy(xpath = "//*[@id='app']/div[1]/div/div[1]/div/div[2]/div[2]/form/div[1]/div/span")
    public WebElement missingUsernameErrorMessage;

    @FindBy(xpath = "//*[@id='app']/div[1]/div/div[1]/div/div[2]/div[2]/form/div[3]/button")
    public WebElement login;

    @FindBy(xpath = "//*[@id='app']/div[1]/div/div[1]/div/div[2]/div[2]/div/div[1]/div[1]/p")
    public  WebElement errorMessage;

}
Below is the sample code for the HomePageLocators.
import org.openqa.selenium.WebElement;
import org.openqa.selenium.support.FindBy;

public class HomePageLocators {

	  @FindBy(xpath = "//span[@class='oxd-topbar-header-breadcrumb']/h6")
	  public  WebElement homePageUserName;

}
Create the action classesfor each web page. These action classes contain all the methods needed by the step definitions. In this case, I have created 2 action classes – LoginPageActions, HomePageActions
LoginPageActions
import org.example.locators.LoginPageLocators;
import org.example.utils.HelperClass;
import org.openqa.selenium.support.PageFactory;

public class LoginPageActions {

    LoginPageLocators loginPageLocators = null;

    public LoginPageActions() {

        this.loginPageLocators = new LoginPageLocators();

        PageFactory.initElements(HelperClass.getDriver(),loginPageLocators);
    }

    // Get the error message when username is blank
    public String getMissingUsernameText() {
        return loginPageLocators.missingUsernameErrorMessage.getText();
    }

    // Get the Error Message
    public String getErrorMessage() {
        return loginPageLocators.errorMessage.getText();
    }

    public void login(String strUserName, String strPassword) {

        // Fill user name
        loginPageLocators.userName.sendKeys(strUserName);

        // Fill password
        loginPageLocators.password.sendKeys(strPassword);

        // Click Login button
        loginPageLocators.login.click();

    }
HomePageActions
import org.example.locators.HomePageLocators;
import org.example.utils.HelperClass;
import org.openqa.selenium.support.PageFactory;

public class HomePageActions {

    HomePageLocators homePageLocators = null;

    public HomePageActions() {

        this.homePageLocators = new HomePageLocators();
        PageFactory.initElements(HelperClass.getDriver(),homePageLocators);
    }

    // Get the User name from Home Page
    public String getHomePageText() {
        return homePageLocators.homePageUserName.getText();
    }

}
Create a Helper class where we are initializing the web driver, initializing the web driver wait, defining the timeouts, and creating a private constructor of the class, it will declare the web driver, so whenever we create an object of this class, a new web browser is invoked.
package com.example.utils;

import java.time.Duration;
import org.openqa.selenium.WebDriver;
import org.openqa.selenium.chrome.ChromeDriver;
import io.github.bonigarcia.wdm.WebDriverManager;
import org.openqa.selenium.chrome.ChromeOptions;

public class HelperClass {

	 private static HelperClass helperClass;

	    private static WebDriver driver;
	    public final static int TIMEOUT = 5;

	     private HelperClass() {

	        WebDriverManager.chromedriver().setup();
			ChromeOptions options = new ChromeOptions();
			options.addArguments("--start-maximized");
	        driver = new ChromeDriver(options);
	        driver.manage().timeouts().implicitlyWait(Duration.ofSeconds(TIMEOUT));
	     }

	    public static void openPage(String url) {
	        driver.get(url);
	    }

	    public static WebDriver getDriver() {
	        return driver;
	    }

	    public static void setUpDriver() {

	        if (helperClass==null) {

	            helperClass = new HelperClass();
	        }
	    }

	    public static void tearDown() {

	        if(driver!=null) {
	             driver.quit();
	        }

	       helperClass = null;
	   }

	}
Step 10 – Create a StepDefinition class in src/test/java
Create a Java Class called Definition where we will create the Test Code related to the Given, When, Then of Feature file in src/test/java.
Now, we need to create the Step Definition of the Feature File – LoginPageDefinitions.java.
import io.cucumber.java.en.Given;
import io.cucumber.java.en.Then;
import io.cucumber.java.en.When;
import org.example.actions.HomePageActions;
import org.example.actions.LoginPageActions;
import org.example.utils.HelperClass;
import org.testng.Assert;

public class LoginPageDefinitions {

    LoginPageActions objLogin = new LoginPageActions();
    HomePageActions objHomePage = new HomePageActions();

    @Given("User is on HRMLogin page {string}")
    public void loginTest(String url) {

        HelperClass.openPage(url);

    }

    @When("User enters username as {string} and password as {string}")
    public void goToHomePage(String userName, String passWord) {

        // login to application
        objLogin.login(userName, passWord);

    }

    @Then("User should be able to login successfully and new page open")
    public void verifyLogin() {

        // Verify home page
        Assert.assertTrue(objHomePage.getHomePageText().contains("Dashboard"));

    }

    @Then("User should be able to see error message {string}")
    public void verifyErrorMessage(String expectedErrorMessage) {

        // Verify error message
        Assert.assertEquals(objLogin.getErrorMessage(),expectedErrorMessage);

    }

    @Then("User should be able to see a message {string} below Username")
    public void verifyMissingUsernameMessage(String message) {

        Assert.assertEquals(objLogin.getMissingUsernameText(),message);
    }

}
Step 11 – Create a Hook class in src/test/java
Create thehook class that contains the Before and After hook to initialize the web browser and close the web browser. I have added the code to take the screenshot of the failed scenario in @After Hook.
Below is the code for the Hooks class.
import org.openqa.selenium.OutputType;
import org.openqa.selenium.TakesScreenshot;
import com.example.utils.HelperClass;
import io.cucumber.java.After;
import io.cucumber.java.Before;
import io.cucumber.java.Scenario;

public class Hooks {

	@Before
    public static void setUp() {

       HelperClass.setUpDriver();
    }

	@After
	public static void tearDown(Scenario scenario) {

		//validate if scenario has failed
		if(scenario.isFailed()) {
			final byte[] screenshot = ((TakesScreenshot) HelperClass.getDriver()).getScreenshotAs(OutputType.BYTES);
			scenario.attach(screenshot, "image/png", scenario.getName());
		}

		HelperClass.tearDown();
	}
}
Step 12 – Create a TestNG Cucumber Runner classin the src/test/java
Cucumber needs a TestRunner class to run the feature files. It is suggested to create a folder with the name of the runner in the src/test/java directory and create the Cucumber TestRunner class in this folder. Below is the code of the Cucumber TestRunner class.
Below is the code for CucumberRunnerTests class.
import io.cucumber.testng.AbstractTestNGCucumberTests;
import io.cucumber.testng.CucumberOptions;

@CucumberOptions(tags = "", features = "src/test/resources/features/LoginPage.feature", glue = "com.example.definitions",
        plugin = {})

public class CucumberRunnerTests extends AbstractTestNGCucumberTests {
}
Note:- The name of the Runner class should end with Test otherwise we can’t run the tests using Command Line.
Step 13 – Run the tests from TestNG
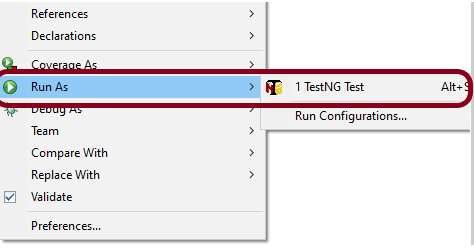
You can execute the test script by right-clicking on TestRunner class -> Run As TestNG. (Eclipse)
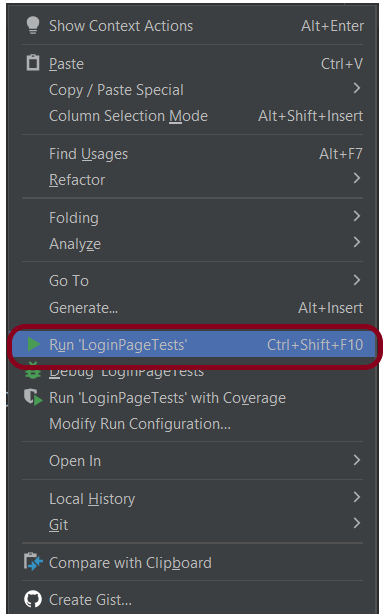
In the case of the IntelliJ project, right-click on the runner class and select Run ‘CucumberRunnerTests’.
The output of the above program is
Step 14 – Run the tests from testng.xml
Create a testng.xml as shown below and run the tests as TestNG.
<?xml version="1.0" encoding="UTF-8"?>
<!DOCTYPE suite SYSTEM "https://testng.org/testng-1.0.dtd">
<suite name="Suite">
    <test  name="Cucumber with TestNG Test">
        <classes>
            <class name="com.example.runner.CucumberRunnerTests"/>
        </classes>
    </test> <!-- Test -->
</suite> <!-- Suite -->
The testng.xml is highlighted below:
Step 15 – Run the tests from Command Line
Run the below command in the command prompt to run the tests and to get the test execution report.
mvn clean test
The output of the above program is
Step 16 – Cucumber Report Generation
To get Cucumber Test Reports, add cucumber.properties under src/test/resources and add the below instruction in the file.
cucumber.publish.enabled=true
Below is the image of the Cucumber Report generated using the Cucumber Service.
In the above example, as we can see, one of the tests has failed. So, when a test fails, we have written the code to take a screenshot of the failed step. The Attached Image shows the image of the failed test. You can click on that to see the screenshot.
Step 17 – TestNG Report Generation
TestNG generates various types of reports under the target->surefire-reports folder like emailable-report.html, index.html, testng-results.xml.
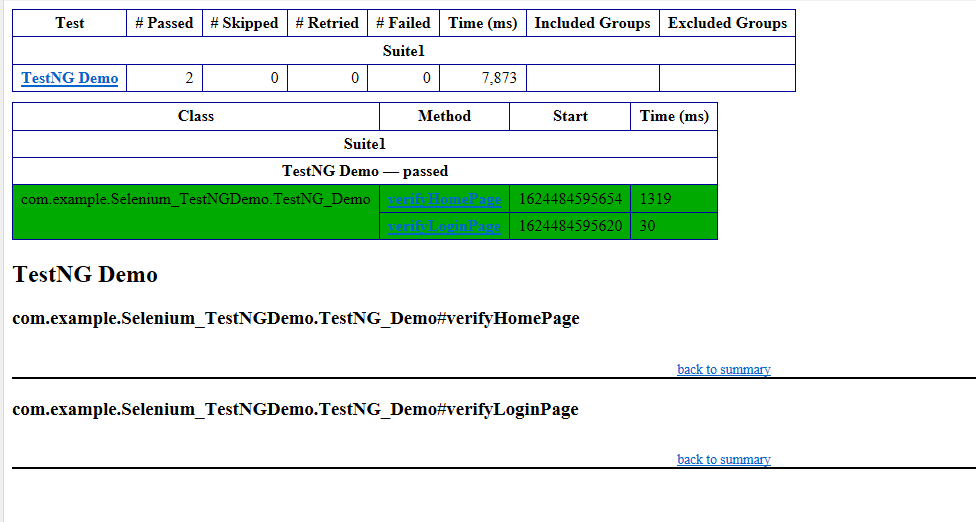
We are interested in the “emailable-report.html” report. Open “emailable-report.html“, as this is an HTML report, and open it with the browser. The below image shows emailable-report.html.
emailable-report.html
Index.html
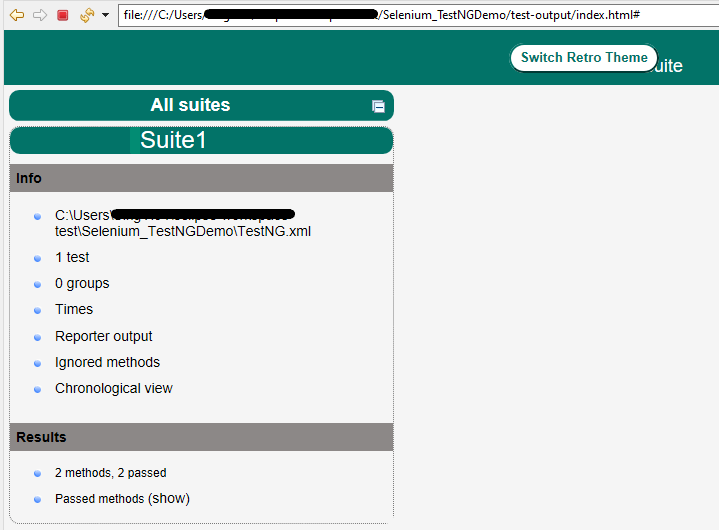
TestNG also produces an “index.html” report. The below image shows the index.html report.
In the previous tutorial, I discussed the Jenkins pipeline. This tutorial will discuss the steps to create the Jenkins pipeline for Selenium tests. This is an important step in CI/CD.
3. To generate a HTML Report in Jenkins, we need to download the HTML Publisher Plugin. Please refer to this tutorial to install the plugin – How to generate HTML Reports in Jenkins
Implementation Steps
Step 1: Create a new pipeline project
Give the Name of the project – Selenium_PipelineDemo.
Click on the pipeline project.
Click on the OK button.
In the General section, enter the project description in the Description box.
Step 2: Scroll down to Pipeline
From the Definition field, choose the “Pipeline script from SCM” option. This option instructs Jenkins to obtain your Pipeline from Source Control Management (SCM), which will be your locally cloned Git repository.
From the SCM field, choose Git.
The “Repositories” section contains the “Repository URL” and “Credentials“.
In the Repository URL field, specify the directory path of the GitLab/GitHub project.
In the Credentials field, specify the username and password needed to log in to GitLab/GitHub.
In this case, I have the project present in GitLab and using it.
Step 3: Create Jenkinsfile
Create and save a new text file with the name Jenkinsfile at the root of the project in the GitLab repository. Here, we are using the Selenium project with TestNG. To learn more about the Integration of Selenium with TestNG, please refer to this tutorial – Integration of Selenium and TestNG.
For this tutorial, we are using Declarative syntax. The sample example is given below:
Here, I have used emailable-report.html, you can also use index.html and that report will be published.
pipeline {
    agent any

    stages {
        stage('Test') {
            steps {
                bat "mvn -D clean test"
            }

            post {
                // If Maven was able to run the tests, even if some of the test
                // failed, record the test results and archive the jar file.
                success {
                   publishHTML([
                       allowMissing: false,
                       alwaysLinkToLastBuild: false,
                       keepAll: false,
                       reportDir: 'target/surefire-reports/',
                       reportFiles: 'emailable-report.html',
                       reportName: 'HTML Report',
                       reportTitles: '',
                       useWrapperFileDirectly: true])
                }
            }
        }
    }
}
Step 4: Specify branches to build a section under Repositories
Branch Specifier – */master (This is my main branch)
ScriptPath – Jenkinsfile
Click on the Apply and Save buttons.
We have created a new Maven project “Selenium_PipelineDemo” with the configuration to run the Selenium Test with TestNG.
Step 5: Execute the tests
Let’s execute it now by clicking on the “Build Now” button.
Right-click on Build Number (here in my case it is #11) and click on Console Output to see the result.
Below is the test execution summary.
Step 6: Pipeline Steps
Once the execution is completed, and we want to see the Pipeline Steps, click on the Pipeline Steps mentioned on the left side of the page.
Step 7: View the Report
Once the execution is completed, go back to “Selenium_PipelineDemo”. We can see below that the HTML Report is generated.
We could see a link to view ‘HTML Reports’. Click on the HTML Reports. It displays the emailable-report.html Report.
Tip: If you don’t see the Report UI intact, then you need to configure a simple groovy script. For that, go to Dashboard–>Manage Jenkins–>Script Console and add the script as:
In this tutorial we will discuss to create a JUnit project using IntelliJ. We will be at first creating a simple Java Project and will add JUnit5 as well as create a Maven Project, then we will add a basic Class and a JUnitTest for it.
Step 2 – Right click on the project and select Open Module Settings.
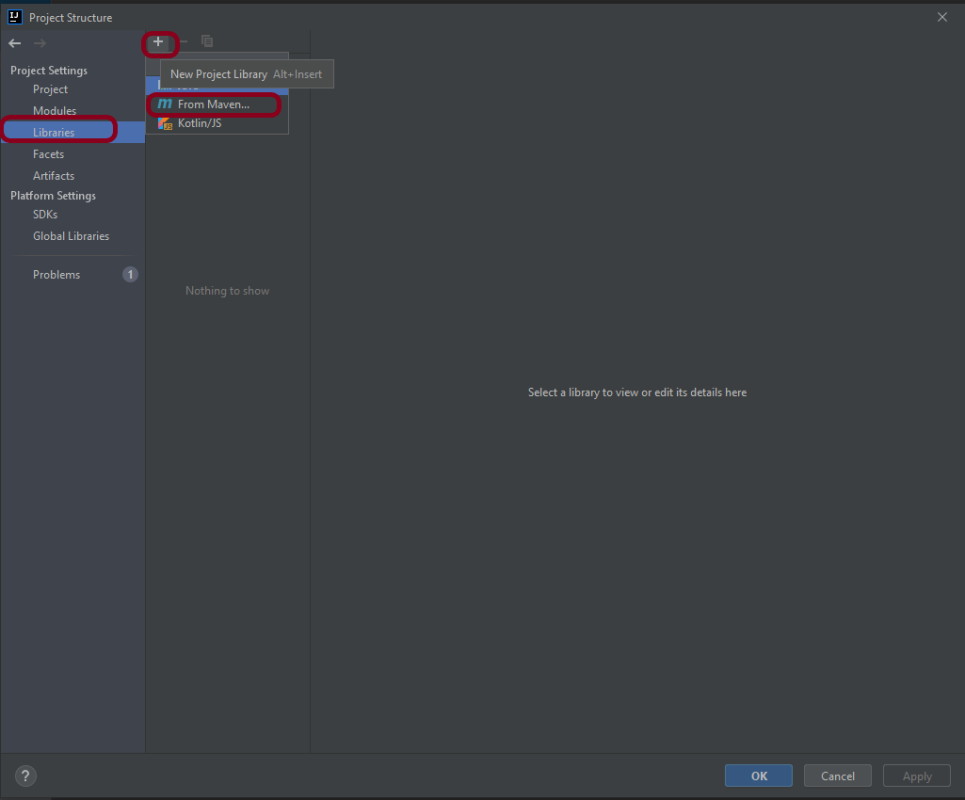
Step 3 – Go to the “Libraries” group, click the little plus (look up), and choose “From Maven…” option.
Step 4 – Search for “junit” — something like “junit:junit-4.13“. Click the “OK“ button.
Step 5– A new dialog will appear to confirm that “junit:junit:4.13.2” will be added to the module. Click the “OK“ button.
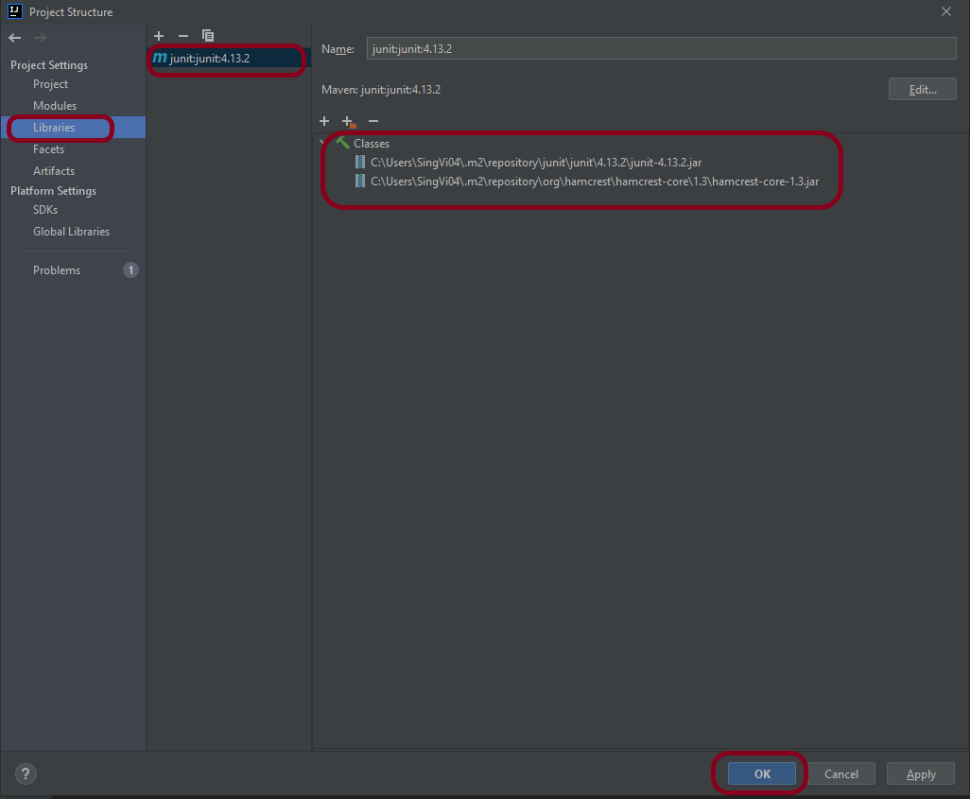
Step 6 – This screens shows that junit:junit:4.13.2 is added to the Libraries. It contains the highlighted classes – junit-4.13.2.jar and hamcrest-core-1.3.jar. Click the “OK” button.
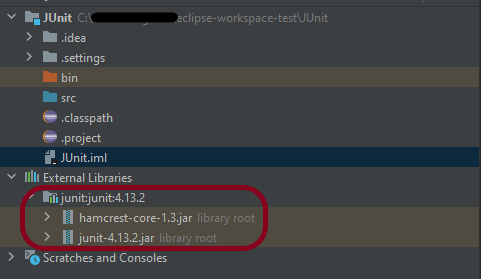
Step 7– This image shows that the Junit is added to the External Libraries.
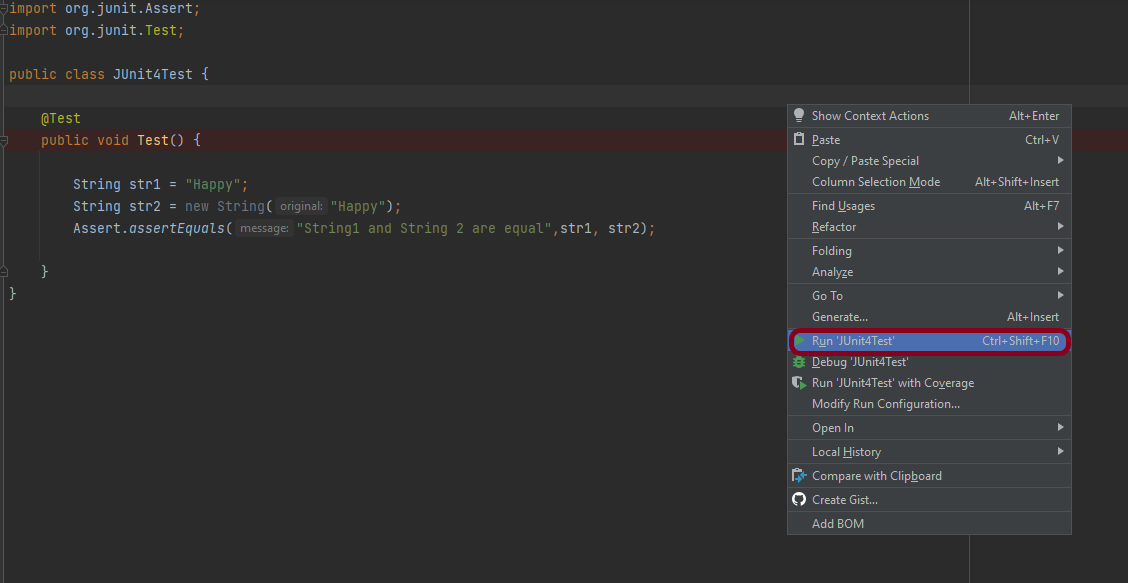
Step 8– Create a Java Class – JUnit4Test under src and create a JUnit test to verify that it is installed properly.
import org.junit.Assert;
import org.junit.Test;

public class JUnit4Test {

    @Test
    public void Test() {

        String str1 = "Happy";
        String str2 = new String("Happy");
        Assert.assertEquals("String1 and String 2 are equal",str1, str2);

    }
}
Step 9– There are many ways to run the test. One of the way is to Right-Click and select Run JUnit4Test
The successful execution of the test shows that the JUnit is configured properly.
Create a Maven Project
Add Junit dependency to the POM.xml and build the project.
Now we need to apply the changes in the build script. Press Ctrl+Shift+O or click Load Maven Changes in the notification that appears in the top-right corner of the editor.
Create a Java Class – JUnit4Test under src/test/javaand create a JUnit test to verify that it is installed properly.
import org.junit.Test;
import static org.junit.Assert.assertArrayEquals;

public class JUnitMavenTest {

    @Test
    public void Test() {

        String[] expected = {"happy","days","summer","spring"};
        String[] actual = {"happy","days","summer","spring"};

        assertArrayEquals("Expected and Actual Arrays are not equal",expected,actual);

    }
}
The output of the above program is
Similarly, to add JUnit5 we can add below mentioned dependencies to the POM.xml.
In the previous tutorial, I explained the Integration of the Allure Report with Rest Assured with JUnit4. In this tutorial, I will explain how to Integrate Allure Report with Rest Assured and TestNG.
The below example covers the implementation of Allure Report for Rest API using Rest Assured, TestNG, Java, and Maven.
Step 4 – Create the Test Code for the testing of REST API under src/test/java
To see our request and response in more detail using Rest Assured, we need to add a line to our Rest Assured tests. This will provide the request and response details in the report.
.filter(new AllureRestAssured())
import io.qameta.allure.*;
import io.qameta.allure.restassured.AllureRestAssured;
import io.restassured.http.ContentType;
import org.json.JSONObject;
import org.testng.annotations.Test;
import static io.restassured.RestAssured.given;
import static org.hamcrest.Matchers.equalTo;

@Epic("REST API Regression Testing using TestNG")
@Feature("Verify CRUID Operations on User module")
public class RestAPITests {

    @Test(description = "To get the details of user with id 3", priority = 0)
    @Story("GET Request with Valid User")
    @Severity(SeverityLevel.NORMAL)
    @Description("Test Description : Verify the details of user of id-3")
    public void verifyUser() {

        // Given
        given()

                .filter(new AllureRestAssured())
                // When
                .when()
                .get("https://reqres.in/api/users/3")

                // Then
                .then()
                .statusCode(200)
                .statusLine("HTTP/1.1 200 OK")

                // To verify user of id 3
                .body("data.email", equalTo("emma.wong@reqres.in"))
                .body("data.first_name", equalTo("Emma"))
                .body("data.last_name", equalTo("Wong"));
    }

    @Test(description = "To create a new user", priority = 1)
    @Story("POST Request")
    @Severity(SeverityLevel.NORMAL)
    @Description("Test Description : Verify the creation of a new user")
    public void createUser() {

        JSONObject data = new JSONObject();

        data.put("name", "RestAPITest");
        data.put("job", "Testing");

        // GIVEN
        given()

                .filter(new AllureRestAssured())
                .contentType(ContentType.JSON)
                .body(data.toString())

                // WHEN
                .when()
                .post("https://reqres.in/api/users")

                // THEN
                .then()
                .statusCode(201)
                .body("name", equalTo("RestAPITest"))
                .body("job", equalTo("Testing"));

    }

}
Step 5 – Create testng.xml for the project
<?xml version = "1.0"encoding = "UTF-8"?>
<!DOCTYPE suite SYSTEM "http://testng.org/testng-1.0.dtd">
<suite name = "Suite1">
    <test name = "TestNG Test Demo">
        <classes>
            <class name = "org.example.RestAPITests"/>
        </classes>
    </test>
</suite>
Step 6 – Run the Test and Generate Allure Report
To run the tests, use the below command
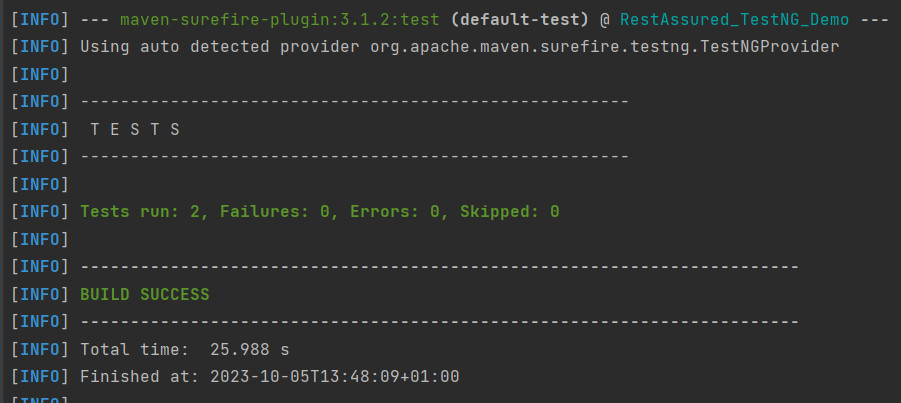
mvn clean test
In the below image, we can see that all three tests are passed.
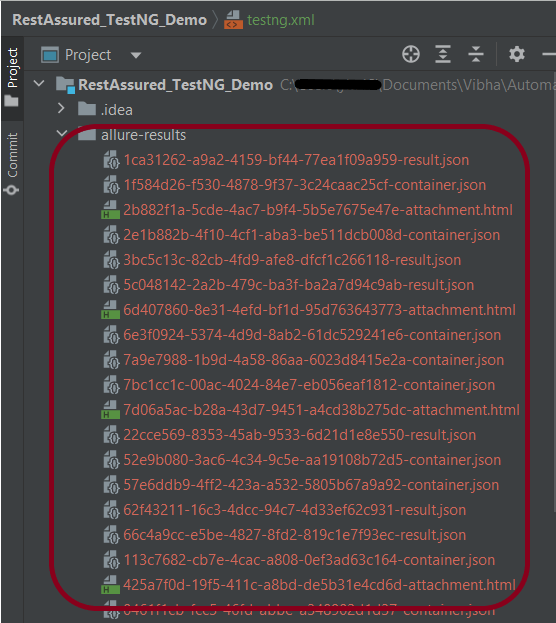
This will create the allure-results folder with all the test reports. These files will be used to generate the Allure Report.
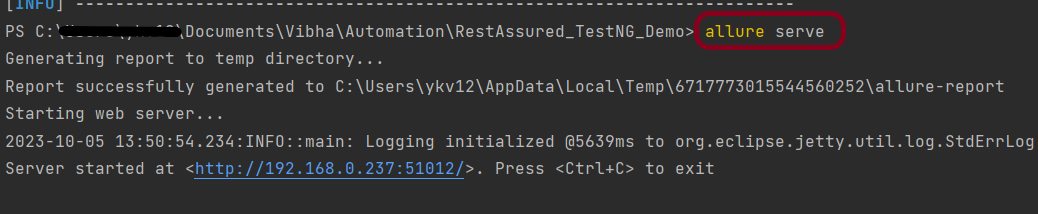
To create an Allure Report, use the below command
allure serve
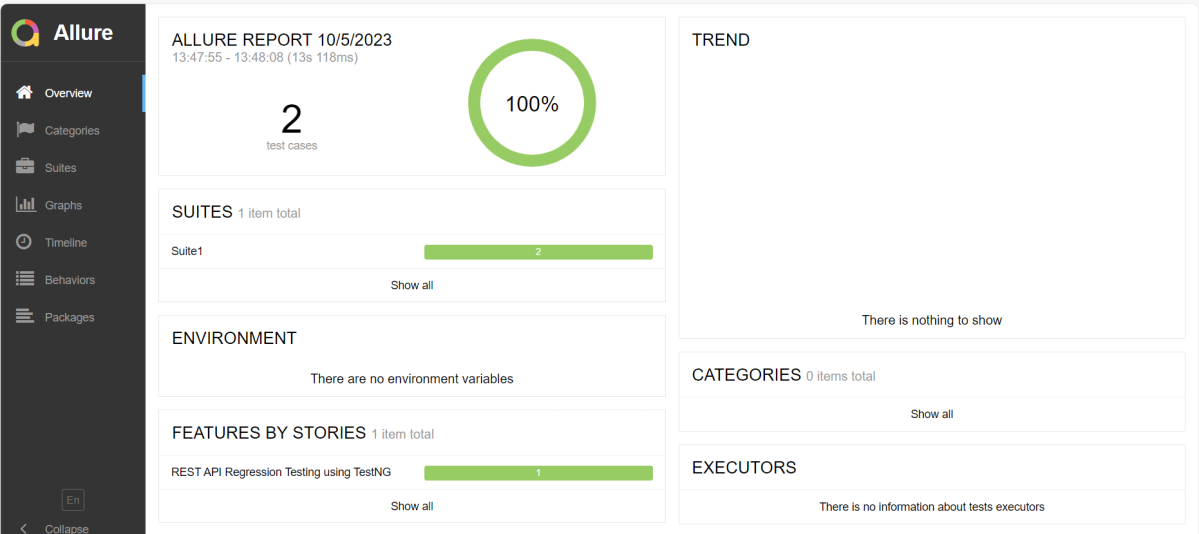
This will generate the beautiful Allure Test Report as shown below.
Allure Report Dashboard
The overview page hosts several default widgets representing the basic characteristics of your project and test environment.
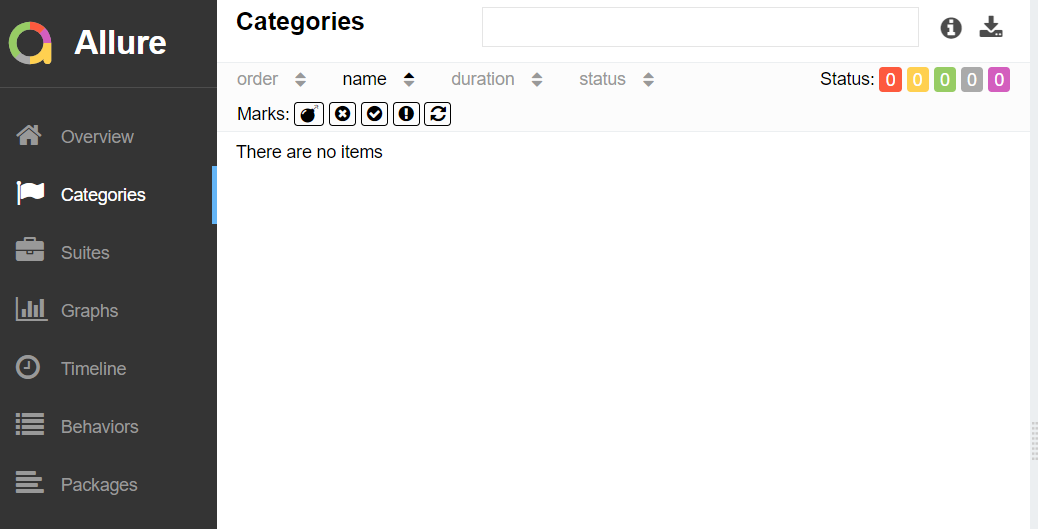
Categories in Allure Report
The categories tab gives you a way to create custom defect classifications to apply for test results. There are two categories of defects – Product Defects (failed tests) and Test Defects (broken tests).
Suites in Allure Report
On the Suites tab a standard structural representation of executed tests, grouped by suites and classes, can be found.
View test history
Each time you run the report from the command line with the mvn clean test command, a new result JSON file will get added to the allure-results folder. Allure can use those files to include a historical view of your tests. Let’s give that a try.
To get started, run mvn clean test a few times and watch how the number of files in the allure-reports folder grows.
Now go back to view your report. Select Suites from the left nav, select one of your tests and click Retries in the right pane. You should see the history of test runs for that test:
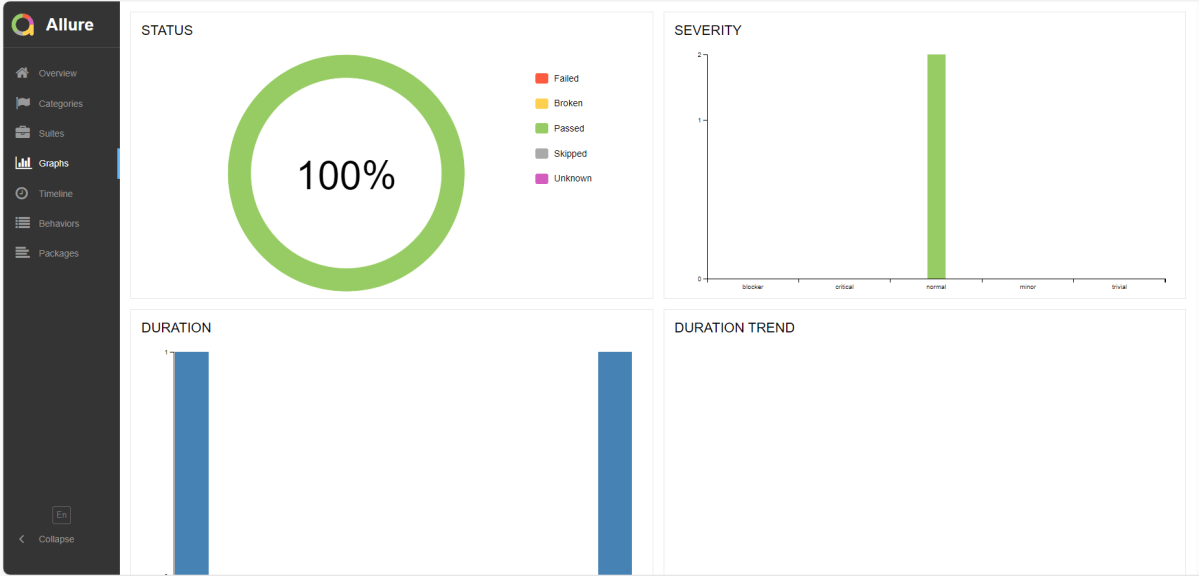
Graphs in Allure Report
Graphs allow you to see different statistics collected from the test data: status breakdown or severity and duration diagrams.
Timeline in Allure Report
Timeline tab visualizes retrospective of tests execution, allure adaptors collect precise timings of tests, and here on this tab, they are arranged accordingly to their sequential or parallel timing structure.
Behaviors of Allure Report
This tab groups test results according to Epic, Feature, and Story tags.
Packages in Allure Report
The packages tab represents a tree-like layout of test results, grouped by different packages.
We are done! Congratulations on making it through this tutorial and hope you found it useful! Happy Learning!!
As we know, REST Assured is a Java DSL for simplifying the testing of REST-based services built on top of HTTP Builder. In this tutorial, I’ll create a Test Framework for the testing of REST API using REST Assured and TestNG as the test framework.
Java needs to be present on the system to run the tests. Click here to know How to install Java. To know if Java is installed or not on your machine, type this command in the command line. This command will show the version of Java installed on your machine.
java -version
Step 2 – Download and setup Eclipse IDE on the system
The Eclipse IDE (integrated development environment) provides strong support for Java developers, which is needed to write Java code. Click here to know How to install Eclipse.
Step 3 – Setup Maven
To build a test framework, we need to add a number of dependencies to the project. It is a very tedious and cumbersome process to add each dependency manually. So, to overcome this problem, we use a build management tool. Maven is a build management tool that is used to define project structure, dependencies, build, and test management. Click here to know How to install Maven.
To know if Maven is already installed or not on your machine, type this command in the command line. This command will show the version of Maven installed on your machine.
To know more about priority in TestNG, please refer tothis tutorial.
import io.restassured.http.ContentType;
import org.json.JSONObject;
import org.testng.annotations.Test;
import static io.restassured.RestAssured.given;
import static org.hamcrest.Matchers.equalTo;

public class RestAPITests {

    @Test(description = "To get the details of user with id 3", priority = 0)
    public void verifyUser() {

        // Given
        given()

                // When
                .when()
                .get("https://reqres.in/api/users/3")

                // Then
                .then()
                .statusCode(200)
                .statusLine("HTTP/1.1 200 OK")

                // To verify user of id 3
                .body("data.email", equalTo("emma.wong@reqres.in"))
                .body("data.first_name", equalTo("Emma"))
                .body("data.last_name", equalTo("Wong"));
    }

    @Test(description = "To create a new user", priority = 1)
    public void createUser() {

        JSONObject data = new JSONObject();

        data.put("name", "RestAPITest");
        data.put("job", "Testing");

        // GIVEN
        given()
                .contentType(ContentType.JSON)
                .body(data.toString())

                // WHEN
                .when()
                .post("https://reqres.in/api/users")

                // THEN
                .then()
                .statusCode(201)
                .body("name", equalTo("RestAPITest"))
                .body("job", equalTo("Testing"));

    }

}
Step 7 – Test Execution through TestNG
Go to the Runner class and right-click Run As TestNG Test. The tests will run as TestNG tests. (Eclipse)
Right-click on the test page and select Run ‘RestAPITests’ in thecase of Intellij.
This is how the execution console will look like. (IntelliJ)
Eclipse
Step 8 – Run the tests from TestNG.xml
Create a TestNG.xml as shown below and run the tests as TestNG. Here, the tests are present in class – com.example. Selenium_TestNGDemo.API_Test.
<?xml version = "1.0"encoding = "UTF-8"?>
<!DOCTYPE suite SYSTEM "http://testng.org/testng-1.0.dtd">
<suite name = "Suite1">
    <test name = "TestNG Test Demo">
        <classes>
            <class name = "org.example.RestAPITests"/>
        </classes>
    </test>
</suite>
Step 9 – TestNG Report Generation
After the test execution, refresh the project, and a new folder with the name test-output will be generated. This folder contains the reports generated by TestNG. The structure of folder test-output looks as shown below.
Emailable-report.html
We are interested in “emailable-report.html” report. Open “emailable-report.html”, as this is an HTML report, open it with the browser. The below image shows emailable-report.html.
Index.html
TestNG also produces “index.html” report, and it resides under the test-output folder. The below image shows the index.html report. This report contains a high-level summary of the tests.
JSONArrayrepresents an immutable JSON array (an ordered sequence of zero or more values). It also provides an unmodifiable list view of the values in the array.
JSON array can store multiple value types. The values in a JSONArray can be of the following types: JsonObject, JsonArray, JsonString, JsonNumber, JsonValue.TRUE, JsonValue.FALSE, and JsonValue.NULL.
The array index begins with 0.
The square brackets [ ] are used to declare the JSON array.
An API can accept a JSON Array payload as a request body. Imagine, we want to add employee details of more than one employee in the below example. In this case, we can pass multiple JSON objects within a JSON array. I have explained 2 ways to create JSON Object – map or JsonObject. Refer to any one of the tutorials to get to know about the creation of JSON Object.
To create a JSON Array, we need to add org.jsonMaven dependency, as shown below. The latest version can be found here.
Create a JSON Object and add the first employee details.
Create another JSON Object and add second guest details.
Create a JSONArray.
Add both JSON Objects to JSONArray.
Below is an example of creating a request from JSONArray with multiple JSON Objects. I am using a logger just to print the JSON body in the Console.
import io.restassured.RestAssured;
import io.restassured.http.ContentType;
import org.json.JSONArray;
import org.json.JSONObject;
import org.junit.Test;
import static org.hamcrest.Matchers.equalTo;

public class Json_Demo {

    @Test
    public void passBodyAsJsonArrayDemo() {

        // JSON Object for first employee
        JSONObject data1 = new JSONObject();

        data1.put("employee_name", "ObjectTest");
        data1.put("profile_image", "test1.png");
        data1.put("employee_age", "30");
        data1.put("employee_salary", "11111");

        // JSON Object for second employee
        JSONObject data2 = new JSONObject();

        data2.put("employee_name", "MapTest");
        data2.put("profile_image", "test2.png");
        data2.put("employee_age", "20");
        data2.put("employee_salary", "99999");

        // Creating JSON array to add both JSON objects
        JSONArray array = new JSONArray();
        array.put(data1);
        array.put(data2);

        // Send the request
        RestAssured.given()
                .contentType(ContentType.JSON)
                .body(array.toString())
                .log().all()

                .when()
                .post("https://dummy.restapiexample.com/api/v1/create")

                .then()
                .assertThat().statusCode(200)
                .body("message", equalTo("Successfully! Record has been added."))
                .log().all();
    }
}
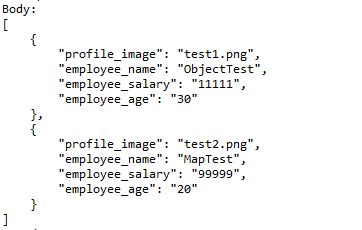
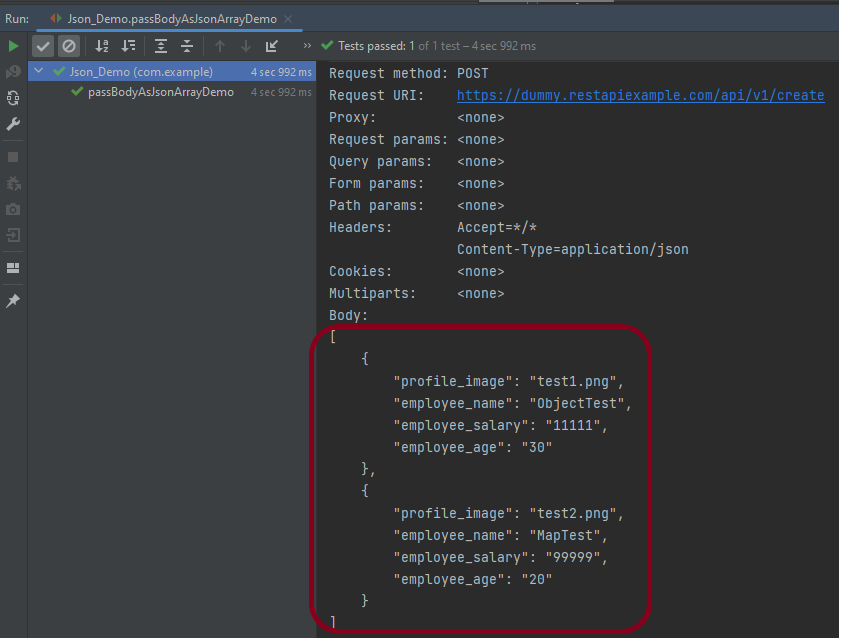
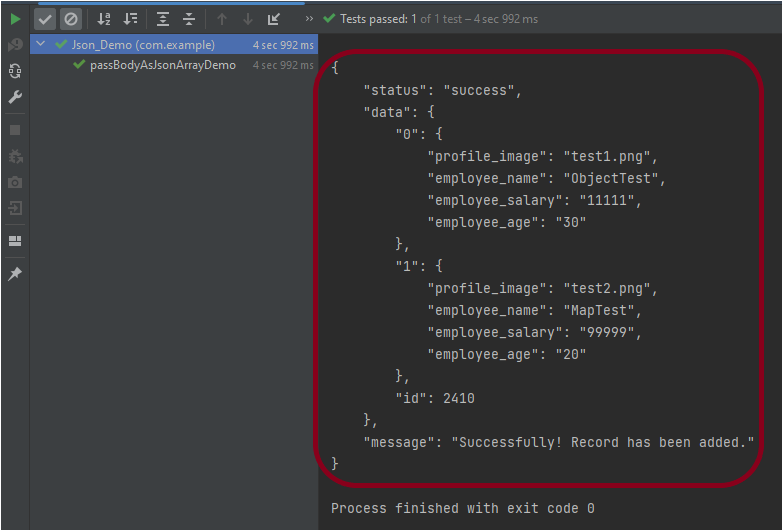
The output of the above program is
Explanation:
1. Creating JSON Objects:
Two “JSONObject” instances (‘data1‘ and ‘data2‘) are created to represent two employees. Each JSON object contains employee details such as name, profile image, age, and salary.
       // JSON Object for first employee
        JSONObject data1 = new JSONObject();

        data1.put("employee_name", "ObjectTest");
        data1.put("profile_image", "test1.png");
        data1.put("employee_age", "30");
        data1.put("employee_salary", "11111");

        // JSON Object for second employee
        JSONObject data2 = new JSONObject();

        data2.put("employee_name", "MapTest");
        data2.put("profile_image", "test2.png");
        data2.put("employee_age", "20");
        data2.put("employee_salary", "99999");
2. Creating a JSON Array:
A JSONArrayinstance is created, and both JSON objects (data1 and data2) are added to it.
JSONArray array = new JSONArray();
array.put(data1);
array.put(data2);
3. Sending the POST Request:
3.1 The RestAssured library constructs and sends the HTTP POST request. It sets the content type of the request to JSON.
contentType(ContentType.JSON)
3.2 Converts the JSON array into a string format and sets it as the body of the request.
.body(array.toString())
3.3 Logs all details of the request for debugging purposes.
4.2 Asserts that the response status code is 200, indicating a successful request.
.assertThat().statusCode(200)
4.3 Asserts that the body of the response contains the specified message, confirming successful addition of records.
.body("message", equalTo("Successfully! Record has been added."))
4.4 Logs all details of the response for debugging purposes.
.log().all()
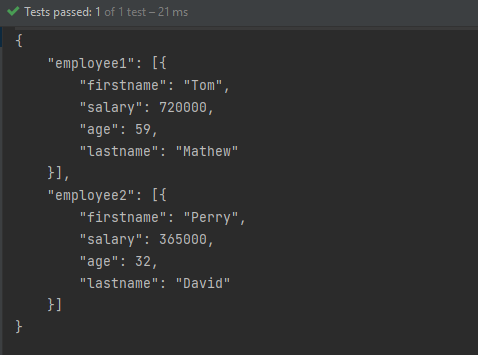
Complex JSON Array
Let us see an example of a complex JSON Array. This structure represents two separate employee data sets. Each is contained within its own JSON array. The whole is encapsulated within a larger JSON object identified by keys employee1and employee2.
Two JSONArray instances (array1 and array2) are created to encapsulate each employee’s JSON object.
JSONArray array1 = new JSONArray();
array1.put(data1);

JSONArray array2 = new JSONArray();
array2.put(data2);
3. Composing The JSON Structure:
A third JSONObject, data3, is created to aggregate the two JSON arrays under separate keys: employee1 and employee2.
JSONObject data3 = new JSONObject();
data3.put("employee1", array1);
data3.put("employee2", array2);
4. Output the JSON Object:
The entire composite JSON structure (data3) is printed to the console. The toString(4) method formats the output with an indentation of 4 spaces for readability.
System.out.println(data3.toString(4));
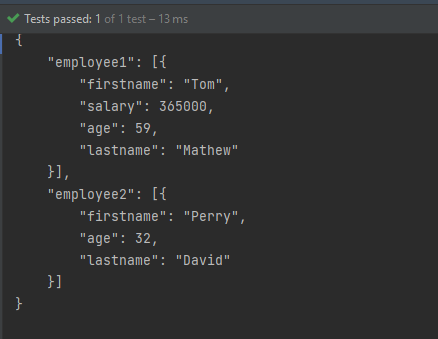
Similarly, there is another way to create this JSON Structure.
import org.json.JSONArray;
import org.json.JSONObject;
import org.junit.Test;

public class Json_Demo {

    @Test
    public void passBodyAsJsonArray1() {

        // Creating JSON array to add first JSON object
        JSONArray array1 = new JSONArray();
        array1.put(new JSONObject().put("firstname", "Tom").put("lastname", "Mathew").put("age", 59).put("salary",
                720000));

        // Creating JSON array
        JSONArray array2 = new JSONArray();
        array2.put(new JSONObject().put("firstname", "Perry").put("lastname", "David").put("age", 32).put("salary",
                365000));

        // Create JSON Object to add JSONArrays
        JSONObject data1 = new JSONObject();
        data1.put("employee1", array1);
        data1.put("employee2", array2);

        System.out.println(data1.toString(4));

    }
}
The output of the above program is
Congratulations on making it through this tutorial and hope you found it useful! Happy Learning!! Cheers!!
In this tutorial, I’ll create a Framework for the testing of web applications using Selenium Webdriver with TestNG.
We integrate Selenium with TestNG because Selenium does not have any inbuilt reporting feature. TestNG generates detailed HTML reports of test executions. It is easy to manage dependencies between test methods in TestNG which is quite difficult in Selenium.
Selenium needs Java to be installed on the system to run the tests. Click here to learn How to install Java.
Step 2 – Download and setup Eclipse IDE on the system
The Eclipse IDE (integrated development environment) provides strong support for Java developers, which is needed to write Java code. Click here to learn How to install Eclipse.
Step 3 – Setup Maven
To build a test framework, we need to add a number of dependencies to the project. It is a very tedious and cumbersome process to add each dependency manually. So, to overcome this problem, we use a build management tool. Maven is a build management tool that is used to define project structure, dependencies, build, and test management. Click here to learn How to install Maven.
After the addition of dependencies in pom.xml, the Maven Dependencies folder will be updated automatically with all the JAR file related to the dependencies.
Step 6 – Create a Test file under src/test/java
@BeforeMethod – This annotated method will be run before each test method i.e say there are three test methods (i.e test cases), then @BeforeMethod annotated method will be called thrice before each test method.
@AfterMethod– methods under this annotation will be executed after each Test method.
@Test – The annotated method is part of a test case.
Description– You can describe your test case under the description, stating what it does.
description = "This test validates title of login functionality"
Priority– You can prioritize the order of your test methods by defining a priority. Based on the defined priority, the test shall execute in that order.
priority = 0
Below is an example of Selenium Tests with TestNG.
BaseTests
import org.openqa.selenium.WebDriver;
import org.openqa.selenium.chrome.ChromeDriver;
import org.openqa.selenium.chrome.ChromeOptions;
import org.testng.annotations.AfterMethod;
import org.testng.annotations.BeforeMethod;

import java.time.Duration;

public class BaseTests {

    public static WebDriver driver;
    public final static int TIMEOUT = 10;

    @BeforeMethod
    public void setup() {

        ChromeOptions options = new ChromeOptions();
        options.addArguments("--remote-allow-origins=*");
        options.addArguments("--no-sandbox");
        options.addArguments("--disable-dev-shm-usage");
        options.addArguments("--headless");
        driver = new ChromeDriver(options);
        driver.manage().window().maximize();
        driver.get("https://opensource-demo.orangehrmlive.com/");
        driver.manage().timeouts().implicitlyWait(Duration.ofSeconds(TIMEOUT));

    }

    @AfterMethod
    public void tearDown() {
        driver.quit();
    }

}
LoginTests
import org.testng.Assert;
import org.testng.annotations.Test;

public class LoginPageTests extends BaseTests{

    @Test
    public void invalidCredentials() {

	    LoginPage objLoginPage = new LoginPage(driver);
    	objLoginPage.login("admin$$", "admin123");

    	// Verify Error Message
    	 Assert.assertEquals("Invalid credentials",objLoginPage.getErrorMessage());

    }

    @Test
    public void validLogin() {

	    LoginPage objLoginPage = new LoginPage(driver);
    	objLoginPage.login("Admin", "admin123");

    	HomePage objHomePage = new HomePage(driver);

    	// Verify Home Page
    	Assert.assertEquals("Dashboard",objHomePage.getHomePageText());

    }

}
Step 7 – Test Execution through TestNG
Go to the Runner class and right-click Run As TestNG Test. The tests will run as TestNG tests (in Eclipse).
Intellij
Step 8 – Run the tests from TestNG.xml
Create a TestNG.xml as shown below and run the tests as TestNG.
<?xml version = "1.0"encoding = "UTF-8"?>
<!DOCTYPE suite SYSTEM "http://testng.org/testng-1.0.dtd">
<suite name = "Suite1">
  <test name = "TestNG Demo">
    <classes>
          <class name = "com.example.Selenium_TestNGDemo.TestNG_Demo"/>
     </classes>
   </test>
</suite>
Step 9 – TestNG Report Generation
TestNG generates various types of reports under test-output folder like emailable-report.html, index.html, testng-results.xml.
We are interested in the “emailable-report.html” report. Open “emailable-report.html“, as this is an HTML report, and open it with the browser. The below image shows emailable-report.html.
TestNG also produces an “index.html” report, and it resides under the test-output folder. The below image shows the index.html report. This is the latest theme of the report.
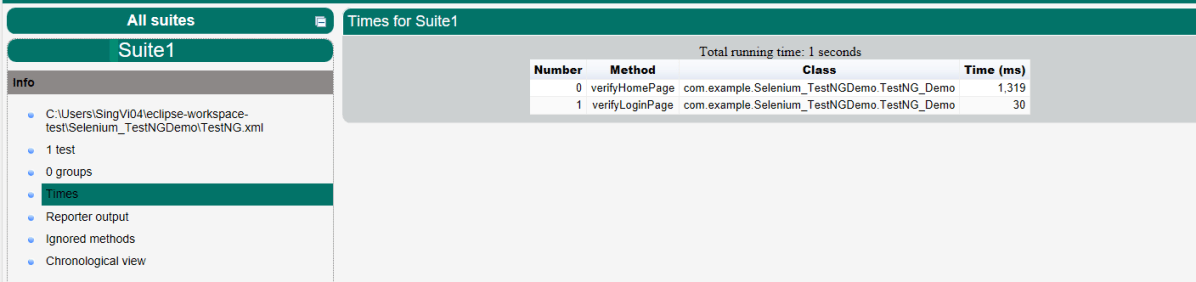
The links present on the left side are clickable. I have clicked the Times link, and you can see the details on the right side.
That’s it! Congratulations on making it through this tutorial and hope you found it useful! Happy Learning!!
The LinkedHashMapClass is just like HashMapwith an additional feature of maintaining an order of elements inserted into it. However, the linked hash map is based on both a hash table and a linked list to enhance the functionality of the hash map.
It maintains a doubly-linked list running through all its entries, in addition to an underlying array of default size 16.
LinkedHashMap contains values based on the key. It implements the Map interface and extends the HashMap class.
Create a LinkedHashMap object as shown below from:-
import java.util.LinkedHashMap;
Syntax of LinkedHashMap
LinkedHashMap<String, String> employeeDetail = new LinkedHashMap<String, String>();

LinkedHashMap<String, String> employeeDetail = new LinkedHashMap<>();

LinkedHashMap<String, Integer> employeeDetail = new LinkedHashMap<String, Integer>();
Adding the Elements
Below is an example where we are adding items to HashMap by using put() method.
import java.util.LinkedHashMap;

public class LinkedHashMap_Demo {
    public static void main(String a[]) {

        // Creating an empty LinkedHashMap
        LinkedHashMap<String, String> linkedHashMap = new LinkedHashMap<String, String>();

        // Adding entries in Map using put() method
        linkedHashMap.put("Tim", "DBA");
        linkedHashMap.put("Cillian", "SDET");
        linkedHashMap.put("Patrick", "BA");
        linkedHashMap.put("Brendan", "Dev");

        // Printing all entries inside Map
        System.out.println("Linked HashMap :" + linkedHashMap);

    }
}
The output of the above program is
Accessing an Element
To access a value in the LinkedHashMap, use the get() method and refer to its key:-
import java.util.LinkedHashMap;

public class LinkedHashMap_Demo {
    public static void main(String a[]) {

        // Creating an empty LinkedHashMap
        LinkedHashMap<String, String> linkedHashMap = new LinkedHashMap<String, String>();

        // Adding entries in Map using put() method
        linkedHashMap.put("Tim", "DBA");
        linkedHashMap.put("Cillian", "SDET");
        linkedHashMap.put("Patrick", "BA");
        linkedHashMap.put("Brendan", "Dev");

        // Printing all entries inside Map
        System.out.println("Linked HashMap :" + linkedHashMap);

        // Access a value
        System.out.println("Access Value of Key Patrick :" + linkedHashMap.get("Patrick"));

    }
}
The output of the above program is
Removing an Element
To remove an item, use the remove() method and refer to the key:
import java.util.LinkedHashMap;

public class LinkedHashMap_Demo {
    public static void main(String a[]) {

        // Creating an empty LinkedHashMap
        LinkedHashMap<String, String> linkedHashMap = new LinkedHashMap<String, String>();

        // Adding entries in Map using put() method
        linkedHashMap.put("Tim", "DBA");
        linkedHashMap.put("Cillian", "SDET");
        linkedHashMap.put("Patrick", "BA");
        linkedHashMap.put("Brendan", "Dev");

        // Printing all entries inside Map
        System.out.println("Linked HashMap :" + linkedHashMap);

        // Removing the mapping with Key Brendan
        linkedHashMap.remove("Brendan");

        // Printing the updated map
        System.out.println("Updated Map :" + linkedHashMap);

    }
}
The output of the above program is
To remove all items, use the clear()method:-
import java.util.LinkedHashMap;

public class LinkedHashMap_Demo {
    public static void main(String a[]) {

        // Creating an empty LinkedHashMap
        LinkedHashMap<String, String> linkedHashMap = new LinkedHashMap<String, String>();

        // Adding entries in Map using put() method
        linkedHashMap.put("Tim", "DBA");
        linkedHashMap.put("Cillian", "SDET");
        linkedHashMap.put("Patrick", "BA");
        linkedHashMap.put("Brendan", "Dev");

        // Printing all entries inside Map
        System.out.println("Linked HashMap :" + linkedHashMap);

        // Removing the mapping with Key Brendan
        linkedHashMap.clear();

        // Printing the updated map
        System.out.println("Updated Map :" + linkedHashMap);

    }
}
The output of the above program is
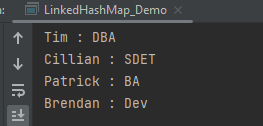
Iterating through the LinkedHashMap
There are multiple ways to iterate through the LinkedHashMap. The most famous way is to use a for-each loop over the set view of the map (fetched using the map.entrySet() instance method). Then for each entry (set element), the values of key and value can be fetched using the getKey() and the getValue() method.
import java.util.LinkedHashMap;
import java.util.Map;

public class LinkedHashMap_Demo {
    public static void main(String a[]) {

        // Creating an empty LinkedHashMap
        LinkedHashMap<String, String> linkedHashMap = new LinkedHashMap<String, String>();

        // Adding entries in Map using put() method
        linkedHashMap.put("Tim", "DBA");
        linkedHashMap.put("Cillian", "SDET");
        linkedHashMap.put("Patrick", "BA");
        linkedHashMap.put("Brendan", "Dev");

        // For-each loop for traversal over Map
        for (Map.Entry<String, String> mapElement : linkedHashMap.entrySet()) {

            String key = mapElement.getKey();

            // Finding the value
            // using getValue() method
            String value = mapElement.getValue();

            // Printing the key-value pairs
            System.out.println(key + " : " + value);
        }
    }
}
The output of the above program is
Methods in LinkedHashMap
import java.util.LinkedHashMap;

public class LinkedHashMap_Demo {
    public static void main(String a[]) {

        // Creating an empty LinkedHashMap
        LinkedHashMap<String, String> linkedHashMap = new LinkedHashMap<String, String>();

        // Adding entries in Map using put() method
        linkedHashMap.put("Tim", "DBA");
        linkedHashMap.put("Cillian", "SDET");
        linkedHashMap.put("Patrick", "BA");
        linkedHashMap.put("Brendan", "Dev");

        // Getting and printing value for a specific key
        System.out.println("Getting value for key 'Patrick' :" + linkedHashMap.get("Patrick"));

        // Getting size of Map using size() method
        System.out.println("Size of the map :" + linkedHashMap.size());

        // Checking whether Map is empty or not
        System.out.println("Is map empty? :" + linkedHashMap.isEmpty());

        // Using containsKey() method to check for a value
        System.out.println("Contains value 'SDET' "  + linkedHashMap.containsValue("SDET"));

        // Using containsKey() method to check for a key
        System.out.println("Contains key 'Brendan'? :" + linkedHashMap.containsKey("Brendan"));

        // Removing entry using remove() method
        System.out.println("Delete element 'Brendan' :" + linkedHashMap.remove("Brendan"));

        // Printing mappings to the console
        System.out.println("Mappings of LinkedHashMap :" + linkedHashMap);
        }
}
The output of the above program is
We are done! Congratulations on making it through this tutorial and hope you found it useful! Happy Learning!!