In this tutorial, I’ll create a Framework for the testing of web applications using Selenium Webdriver with TestNG.
We integrate Selenium with TestNG because Selenium does not have any inbuilt reporting feature. TestNG generates detailed HTML reports of test executions. It is easy to manage dependencies between test methods in TestNG which is quite difficult in Selenium.
Table of Contents
Dependency List
- Selenium- 4.21.0
- Java 17
- TestNG – 7.10.2
- Maven – 3.9.6
- Maven Surefire – 3.2.5
- Maven Compiler – 3.13.0
Project Structure

Implementation Steps
Step 1- Download and Install Java
Selenium needs Java to be installed on the system to run the tests. Click here to learn How to install Java.
Step 2 – Download and setup Eclipse IDE on the system
The Eclipse IDE (integrated development environment) provides strong support for Java developers, which is needed to write Java code. Click here to learn How to install Eclipse.
Step 3 – Setup Maven
To build a test framework, we need to add a number of dependencies to the project. It is a very tedious and cumbersome process to add each dependency manually. So, to overcome this problem, we use a build management tool. Maven is a build management tool that is used to define project structure, dependencies, build, and test management. Click here to learn How to install Maven.
Step 4 – Create a new Maven Project
Click here to learn How to create a Maven project
Below is the Maven project structure. Here,
Group Id – com.example
Artifact Id – Selenium_TestNGDemo
Version – 0.0.1-SNAPSHOT
Package – com. example. Selenium_TestNGDemo
Step 5 – Add Selenium and TestNG dependencies to the project
As this is a Maven project, we can add the dependencies in POM.xml as shown below.
<project xmlns="http://maven.apache.org/POM/4.0.0" xmlns:xsi="http://www.w3.org/2001/XMLSchema-instance" xsi:schemaLocation="http://maven.apache.org/POM/4.0.0 https://maven.apache.org/xsd/maven-4.0.0.xsd">
	<modelVersion>4.0.0</modelVersion>
	<groupId>com.example</groupId>
	<artifactId>SeleniumTestNG_Demo</artifactId>
	<version>0.0.1-SNAPSHOT</version>

	<properties>
		<project.build.sourceEncoding>UTF-8</project.build.sourceEncoding>
		<selenium.version>4.21.0</selenium.version>
		<testng.version>7.10.2</testng.version>
		<maven.compiler.plugin.version>3.13.0</maven.compiler.plugin.version>
		<maven.compiler.source.version>17</maven.compiler.source.version>
		<maven.compiler.target.version>17</maven.compiler.target.version>
		<maven.surefire.plugin.version>3.2.5</maven.surefire.plugin.version>
	</properties>

	<dependencies>

		<!-- Selenium -->
		<dependency>
			<groupId>org.seleniumhq.selenium</groupId>
			<artifactId>selenium-java</artifactId>
			<version>${selenium.version}</version>
		</dependency>

		<!-- TestNG -->
		<dependency>
			<groupId>org.testng</groupId>
			<artifactId>testng</artifactId>
			<version>${testng.version}</version>
			<scope>test</scope>
		</dependency>

	</dependencies>

	<build>
		<plugins>
			<plugin>
				<groupId>org.apache.maven.plugins</groupId>
				<artifactId>maven-compiler-plugin</artifactId>
				<version>${maven.compiler.plugin.version}</version>
				<configuration>
					<source>${maven.compiler.source.version}</source>
					<target>${maven.compiler.target.version}</target>
				</configuration>
			</plugin>
			 <plugin>
              <groupId>org.apache.maven.plugins</groupId>
              <artifactId>maven-surefire-plugin</artifactId>
              <version>${maven.surefire.plugin.version}</version>
              <configuration>
                    <suiteXmlFiles>
                        <suiteXmlFile>testng.xml</suiteXmlFile>
                    </suiteXmlFiles>
             </configuration>
        </plugin>
      </plugins>
  </build>
</project>
After the addition of dependencies in pom.xml, the Maven Dependencies folder will be updated automatically with all the JAR file related to the dependencies.

Step 6 – Create a Test file under src/test/java
@BeforeMethod – This annotated method will be run before each test method i.e say there are three test methods (i.e test cases), then @BeforeMethod annotated method will be called thrice before each test method.
@AfterMethod – methods under this annotation will be executed after each Test method.
@Test – The annotated method is part of a test case.
Description – You can describe your test case under the description, stating what it does.
description = "This test validates title of login functionality"
Priority – You can prioritize the order of your test methods by defining a priority. Based on the defined priority, the test shall execute in that order.
priority = 0
Below is an example of Selenium Tests with TestNG.
BaseTests
import org.openqa.selenium.WebDriver;
import org.openqa.selenium.chrome.ChromeDriver;
import org.openqa.selenium.chrome.ChromeOptions;
import org.testng.annotations.AfterMethod;
import org.testng.annotations.BeforeMethod;

import java.time.Duration;

public class BaseTests {

    public static WebDriver driver;
    public final static int TIMEOUT = 10;

    @BeforeMethod
    public void setup() {

        ChromeOptions options = new ChromeOptions();
        options.addArguments("--remote-allow-origins=*");
        options.addArguments("--no-sandbox");
        options.addArguments("--disable-dev-shm-usage");
        options.addArguments("--headless");
        driver = new ChromeDriver(options);
        driver.manage().window().maximize();
        driver.get("https://opensource-demo.orangehrmlive.com/");
        driver.manage().timeouts().implicitlyWait(Duration.ofSeconds(TIMEOUT));

    }

    @AfterMethod
    public void tearDown() {
        driver.quit();
    }

}
LoginTests
import org.testng.Assert;
import org.testng.annotations.Test;

public class LoginPageTests extends BaseTests{

    @Test
    public void invalidCredentials() {

	    LoginPage objLoginPage = new LoginPage(driver);
    	objLoginPage.login("admin$$", "admin123");

    	// Verify Error Message
    	 Assert.assertEquals("Invalid credentials",objLoginPage.getErrorMessage());

    }

    @Test
    public void validLogin() {

	    LoginPage objLoginPage = new LoginPage(driver);
    	objLoginPage.login("Admin", "admin123");

    	HomePage objHomePage = new HomePage(driver);

    	// Verify Home Page
    	Assert.assertEquals("Dashboard",objHomePage.getHomePageText());

    }

}
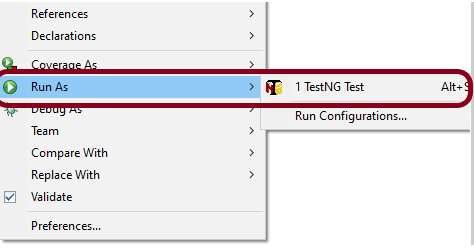
Step 7 – Test Execution through TestNG
Go to the Runner class and right-click Run As TestNG Test. The tests will run as TestNG tests (in Eclipse).
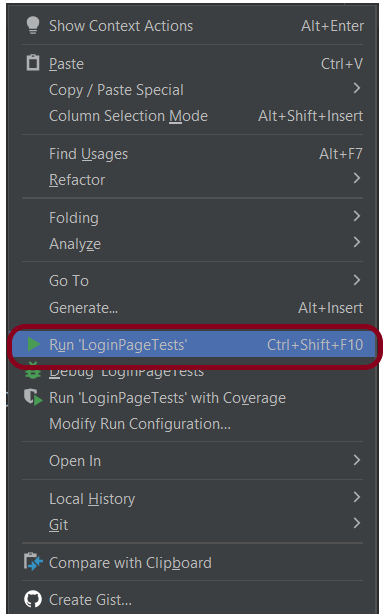
Intellij
Step 8 – Run the tests from TestNG.xml
Create a TestNG.xml as shown below and run the tests as TestNG.
<?xml version = "1.0"encoding = "UTF-8"?>
<!DOCTYPE suite SYSTEM "http://testng.org/testng-1.0.dtd">
<suite name = "Suite1">
  <test name = "TestNG Demo">
    <classes>
          <class name = "com.example.Selenium_TestNGDemo.TestNG_Demo"/>
     </classes>
   </test>
</suite>
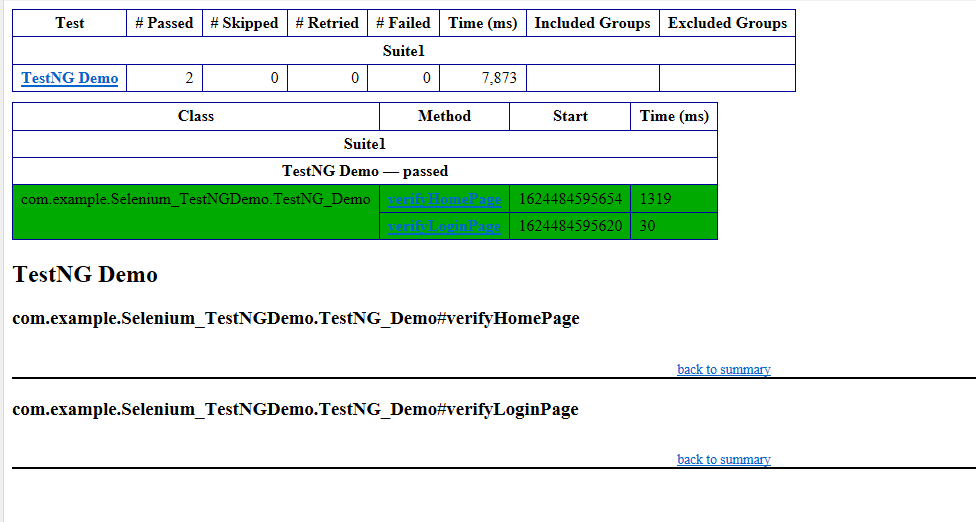
Step 9 – TestNG Report Generation
TestNG generates various types of reports under test-output folder like emailable-report.html, index.html, testng-results.xml.

We are interested in the “emailable-report.html” report. Open “emailable-report.html“, as this is an HTML report, and open it with the browser. The below image shows emailable-report.html.
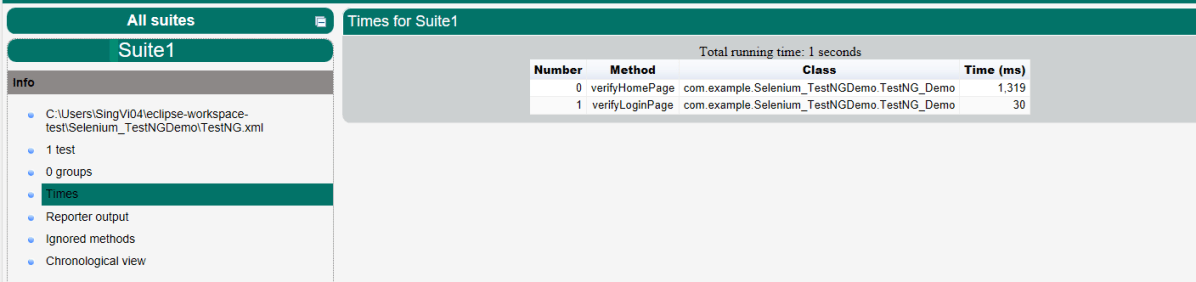
TestNG also produces an “index.html” report, and it resides under the test-output folder. The below image shows the index.html report. This is the latest theme of the report.
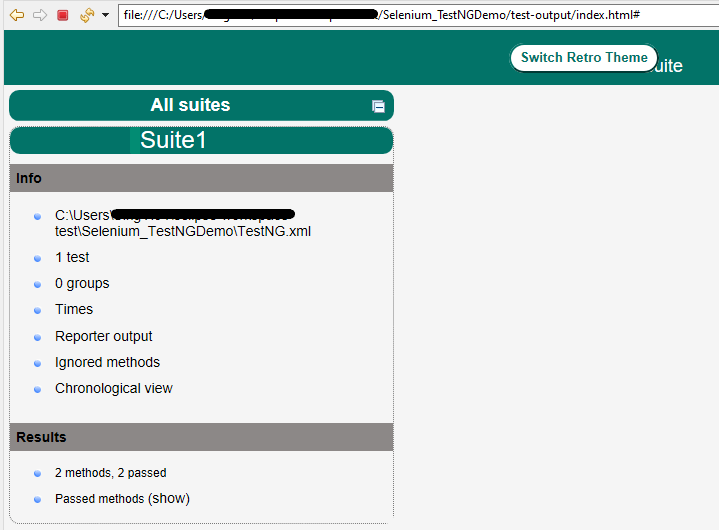
The links present on the left side are clickable. I have clicked the Times link, and you can see the details on the right side.
That’s it! Congratulations on making it through this tutorial and hope you found it useful! Happy Learning!!
The complete code can be found here on GitHub – vibssingh/Selenium-TestNG.
