We assume here that Selenium WebDriver is download and installed with Eclipse. If not, please refer this link
In this tutorial, we will see how to create a simple Selenium WebDriver script using JAVA. The most important thing is that JAVA, Eclipse and Selenium WebDriver are already install in the machine. If not, then please refer the link – How to Download & Install Selenium WebDriver.
To create our first Selenium WebDriver Script, we have to create a Java Project, Package and Class in Eclipse.
1. Create a Java Project “AutomationSuite” – Click File ->New ->Other ->Project ->Java Project. Click Next.
- Provide Package Name – here I have provided AutomationSuite
- JRE – Use an execution environment JRE: JavaSE-1.8 (This is the version of Java on your machine)
- Project Layout – Create separate folders for source and class files


ii. Create a package “SeleniumTutorial” – Right click Java Project (AutomationSuite) ->Click File ->New ->Package

iii. Create a Java Class “FirstProgram” – Right click Java Package (SeleniumTutorial) ->Click File ->New ->Class

- Name: Name of the class (FirstProgram)
- Modifiers – Public
- Which method stubs would you like to create – public static void main(String[] args) and click Finish

Above displayed image explains the structure of Project in Eclipse.
Add Selenium Jar files to the Java Project
1. Right click on AutomationSuite and click on Properties.
2. Click on Java Build Path. Select Libraries. Click on – Add External JARs
3. Go to the path where Selenium WebDriver JAR folder was downloaded and select 2 JAR files – client-combined-3.141.59 and client-combined-3.141.59-sources and click on Open button.
4. Similarly, go to Lib folder of Selenium file and select the entire JAR present there
5. To verify that the JAR’s are added or not, click on Referenced Libraries and will see all these JARs are present here. For more details, refer the link
Scenario:
To open appropriate URL and verify the title of the home page
Steps:
i. Open Chrome browser
ii. Go to the specified URL – http://www.google.com
iii. Verify the title and print the output of the title
iv. Close the Chrome browser
import java.util.concurrent.TimeUnit;
import org.openqa.selenium.chrome.ChromeDriver;

public class FirstProgram {

     public static void main(String[] args) {

 System.setProperty("webdriver.chrome.driver","C:\\Users\\vibha\\Downloads\\Drivers\\chromedriver_win32\\chromedriver.exe"");

         WebDriver driver = new ChromeDriver();
         driver.manage().timeouts().implicitlyWait(40, TimeUnit.SECONDS);
         driver.get("https://www.google.com/");
         String PageTiltle = driver.getTitle();
         System.out.println("Page Title :"+PageTiltle);
         driver.close();
     }
}
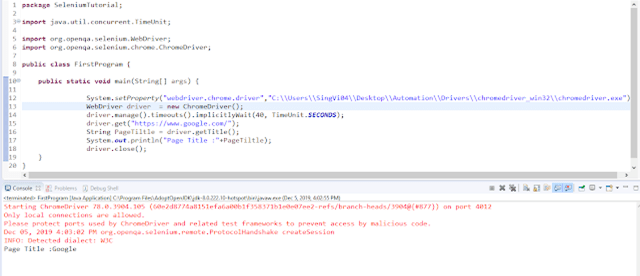
To run this program, go to Run->Run or Green Icon shown below


Thanks for the introduction to the Selenium Tutorial. I was able to follow through the steps without issue. I did see in the first scenario we imported firefox driver however referencing chrome driver in the code. Per reference document for google driver I end up using import org.openqa.selenium.*;import org.openqa.selenium.chrome.*; and it worked.
LikeLike
I'm glad that this blog has helped you. Thanks for pointing out the mistake. I have updated the code.
LikeLike