Selenium is an open-source tool. It is not a single automation tool like QTP. Instead, it is a suite of software or a set of JAR files. These tools automate web browsers across various browsers. Selenium is used by many companies, but a few to mention are Netflix, Google, HubSpot, Fitbit, Accenture, IBM, and more.
Selenium – Introduction, Installation, Test Script
In the previous tutorial, I explained the Page Object Model with Selenium, Cucumber and JUnit. In this tutorial, I’ll create a BDD Framework for web application testing. I will use the Page Object Model with Selenium, Cucumber, and TestNG.
The Page Object model is an object design pattern in Selenium, where web pages are represented as classes, the various elements on the page are defined as variables in the class and all possible user interactions can then be implemented as methods in the class.
What is Cucumber?
Cucumber is one such open-source tool, which supports Behavior Driven Development(BDD). In simple words, Cucumber can be defined as a testing framework, driven by plain English. It serves as documentation, automated tests, and development aid – all in one.
Dependency List
Cucumber Java – 7.18.1
Cucumber TestNG – 7.18.1
Java 17
Maven – 3.9.6
Selenium – 4.23.0
TestNG – 7.10.2
Maven Compiler – 3.13.0
Maven Surefire – 3.3.1
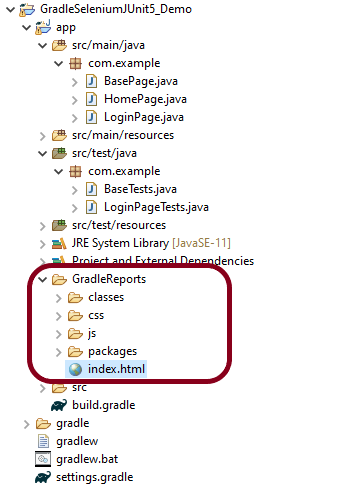
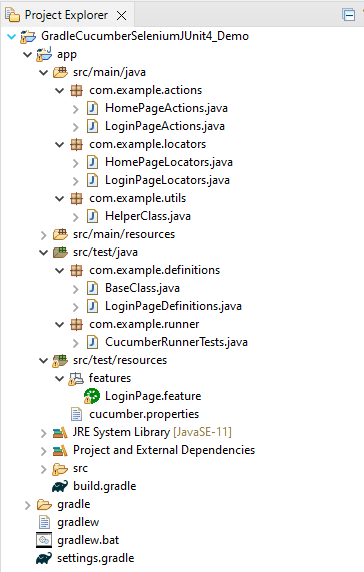
Project Structure
Implementation Steps
Step 1- Download and Install Java
Cucumber and Selenium need Java to be installed on the system to run the tests. Click here to learn How to install Java.
Step 2 – Setup Maven
To build a test framework, we need to add a number of dependencies to the project. Click here to learn How to install Maven.
Step 3 – Install Cucumber Eclipse Plugin(Only for Eclipse)
The cucumber plugin is an Eclipse plugin that allows eclipse to understand the Gherkin syntax. When we are working with cucumber we will write the feature files that contain Feature, Scenario, Given, When, Then, And, But, Tags, Scenario Outline, and Examples. By default, eclipse doesn’t understand these keywords so it doesn’t show any syntax highlighter. Cucumber Eclipse Plugin highlights the keywords present in Feature File. Refer to this tutorial to get more detail – How to setup Cucumber with Eclipse.
Step 4 – Create a new Maven Project
To create a new Maven project, go to the File -> New Project-> Maven-> Maven project-> Next -> Enter Group ID & Artifact ID -> Finish.
Step 5 – Create source folder src/test/resources to create test scenarios in the Feature file
A new Maven Project is created with 2 folders – src/main/javaand src/test/java. To create test scenarios, we need a new source folder called – src/test/resources. To create this folder, right-click on test directory ->select New ->Directory, and then it shows Maven Source Directories as resources as shown below.
Double-click on the resources directory and a new source directory under your new Maven project is created as shown in the below image.
Step 6 – Add Selenium, TestNG, and Cucumber dependencies to the project
Add below mentioned Selenium, TestNG, and Cucumber dependencies to the project.
Step 7 – Add Maven Compiler Plugin and Surefire Plugin
The compiler plugin is used to compile the source code of a Maven project. This plugin has two goals, which are already bound to specific phases of the default lifecycle:
Step 8 – Create a feature file in the src/test/resources
Create a folder with name features. Now, create the feature file in this folder. The feature file should be saved with the extension .feature. This feature file contains the test scenarios created to test the application. The Test Scenarios are written in Gherkins language in the format of Given, When, Then, And, But.
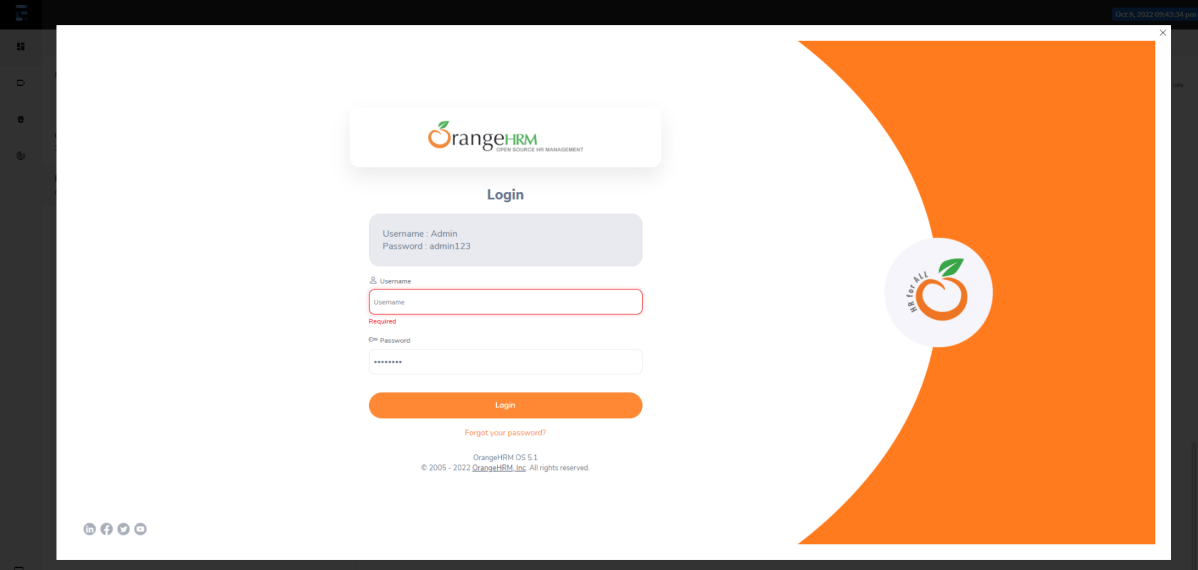
Below is an example of Test Scenarios in the feature file. I have failed one test scenario intentionally – @MissingUsername.
Feature: Login to HRM Application

  Background:
    Given User is on HRMLogin page "https://opensource-demo.orangehrmlive.com/"

  @ValidCredentials
  Scenario: Login with valid credentials

    When User enters username as "Admin" and password as "admin123"
    Then User should be able to login successfully and new page open

  @InvalidCredentials
  Scenario Outline: Login with invalid credentials

    When User enters username as "<username>" and password as "<password>"
    Then User should be able to see error message "<errorMessage>"

    Examples:
      | username   | password  | errorMessage           |
      | Admin      | admin12$$ | Invalid credentials    |
      | admin$$    | admin123  | Invalid credentials    |
      | abc123     | xyz$$     | Invalid credentials    |

  @MissingUsername @FailedTest
  Scenario: Login with blank username

    When User enters username as " " and password as "admin123"
    Then User should be able to see a message "Required1" below Username
Step 9 – Create the classes for locators, actions, and utilities in src/main/java
Create folders – actions, locators, and utils in src/main/java.
Create a Java Class for each page where define WebElements as variables using Annotation @FindBy. Create another Java class that contains methods for actions performed on WebElements. Here, I’m going to create 2 classes for locators – LoginPageLocatorsand HomePageLocators as well as 2 classes for actions – LoginPageActionsand HomePageActions
TheLocator class contains WebElements which are identified by @FindByannotation as shown below:-
Action class contains methods for the action to be performed on the web elements identified in the locator class.
The initElements is a static method of PageFactory class that is used to initialize all the web elements located by @FindBy annotation. Only after the WebElements are initialized, they can be used in the methods to perform actions.
public Login(WebDriver driver) {
           this.driver = driver;
           // This initElements method will create all WebElements
           PageFactory.initElements(driver, this);
     }
Below is the sample code of the LoginPageLocators.
import org.openqa.selenium.WebElement;
import org.openqa.selenium.support.FindBy;

public class LoginPageLocators {

	@FindBy(name = "username")
    public WebElement userName;

    @FindBy(name = "password")
    public WebElement password;

    @FindBy(xpath = "//*[@id='app']/div[1]/div/div[1]/div/div[2]/div[2]/form/div[1]/div/span")
    public WebElement missingUsernameErrorMessage;

    @FindBy(xpath = "//*[@id='app']/div[1]/div/div[1]/div/div[2]/div[2]/form/div[3]/button")
    public WebElement login;

    @FindBy(xpath = "//*[@id='app']/div[1]/div/div[1]/div/div[2]/div[2]/div/div[1]/div[1]/p")
    public  WebElement errorMessage;

}
Below is the sample code for the HomePageLocators.
import org.openqa.selenium.WebElement;
import org.openqa.selenium.support.FindBy;

public class HomePageLocators {

	  @FindBy(xpath = "//span[@class='oxd-topbar-header-breadcrumb']/h6")
	  public  WebElement homePageUserName;

}
Create the action classesfor each web page. These action classes contain all the methods needed by the step definitions. In this case, I have created 2 action classes – LoginPageActions, HomePageActions
LoginPageActions
import org.example.locators.LoginPageLocators;
import org.example.utils.HelperClass;
import org.openqa.selenium.support.PageFactory;

public class LoginPageActions {

    LoginPageLocators loginPageLocators = null;

    public LoginPageActions() {

        this.loginPageLocators = new LoginPageLocators();

        PageFactory.initElements(HelperClass.getDriver(),loginPageLocators);
    }

    // Get the error message when username is blank
    public String getMissingUsernameText() {
        return loginPageLocators.missingUsernameErrorMessage.getText();
    }

    // Get the Error Message
    public String getErrorMessage() {
        return loginPageLocators.errorMessage.getText();
    }

    public void login(String strUserName, String strPassword) {

        // Fill user name
        loginPageLocators.userName.sendKeys(strUserName);

        // Fill password
        loginPageLocators.password.sendKeys(strPassword);

        // Click Login button
        loginPageLocators.login.click();

    }
HomePageActions
import org.example.locators.HomePageLocators;
import org.example.utils.HelperClass;
import org.openqa.selenium.support.PageFactory;

public class HomePageActions {

    HomePageLocators homePageLocators = null;

    public HomePageActions() {

        this.homePageLocators = new HomePageLocators();
        PageFactory.initElements(HelperClass.getDriver(),homePageLocators);
    }

    // Get the User name from Home Page
    public String getHomePageText() {
        return homePageLocators.homePageUserName.getText();
    }

}
Create a Helper class where we are initializing the web driver, initializing the web driver wait, defining the timeouts, and creating a private constructor of the class, it will declare the web driver, so whenever we create an object of this class, a new web browser is invoked.
package com.example.utils;

import java.time.Duration;
import org.openqa.selenium.WebDriver;
import org.openqa.selenium.chrome.ChromeDriver;
import io.github.bonigarcia.wdm.WebDriverManager;
import org.openqa.selenium.chrome.ChromeOptions;

public class HelperClass {

	 private static HelperClass helperClass;

	    private static WebDriver driver;
	    public final static int TIMEOUT = 5;

	     private HelperClass() {

	        WebDriverManager.chromedriver().setup();
			ChromeOptions options = new ChromeOptions();
			options.addArguments("--start-maximized");
	        driver = new ChromeDriver(options);
	        driver.manage().timeouts().implicitlyWait(Duration.ofSeconds(TIMEOUT));
	     }

	    public static void openPage(String url) {
	        driver.get(url);
	    }

	    public static WebDriver getDriver() {
	        return driver;
	    }

	    public static void setUpDriver() {

	        if (helperClass==null) {

	            helperClass = new HelperClass();
	        }
	    }

	    public static void tearDown() {

	        if(driver!=null) {
	             driver.quit();
	        }

	       helperClass = null;
	   }

	}
Step 10 – Create a StepDefinition class in src/test/java
Create a Java Class called Definition where we will create the Test Code related to the Given, When, Then of Feature file in src/test/java.
Now, we need to create the Step Definition of the Feature File – LoginPageDefinitions.java.
import io.cucumber.java.en.Given;
import io.cucumber.java.en.Then;
import io.cucumber.java.en.When;
import org.example.actions.HomePageActions;
import org.example.actions.LoginPageActions;
import org.example.utils.HelperClass;
import org.testng.Assert;

public class LoginPageDefinitions {

    LoginPageActions objLogin = new LoginPageActions();
    HomePageActions objHomePage = new HomePageActions();

    @Given("User is on HRMLogin page {string}")
    public void loginTest(String url) {

        HelperClass.openPage(url);

    }

    @When("User enters username as {string} and password as {string}")
    public void goToHomePage(String userName, String passWord) {

        // login to application
        objLogin.login(userName, passWord);

    }

    @Then("User should be able to login successfully and new page open")
    public void verifyLogin() {

        // Verify home page
        Assert.assertTrue(objHomePage.getHomePageText().contains("Dashboard"));

    }

    @Then("User should be able to see error message {string}")
    public void verifyErrorMessage(String expectedErrorMessage) {

        // Verify error message
        Assert.assertEquals(objLogin.getErrorMessage(),expectedErrorMessage);

    }

    @Then("User should be able to see a message {string} below Username")
    public void verifyMissingUsernameMessage(String message) {

        Assert.assertEquals(objLogin.getMissingUsernameText(),message);
    }

}
Step 11 – Create a Hook class in src/test/java
Create thehook class that contains the Before and After hook to initialize the web browser and close the web browser. I have added the code to take the screenshot of the failed scenario in @After Hook.
Below is the code for the Hooks class.
import org.openqa.selenium.OutputType;
import org.openqa.selenium.TakesScreenshot;
import com.example.utils.HelperClass;
import io.cucumber.java.After;
import io.cucumber.java.Before;
import io.cucumber.java.Scenario;

public class Hooks {

	@Before
    public static void setUp() {

       HelperClass.setUpDriver();
    }

	@After
	public static void tearDown(Scenario scenario) {

		//validate if scenario has failed
		if(scenario.isFailed()) {
			final byte[] screenshot = ((TakesScreenshot) HelperClass.getDriver()).getScreenshotAs(OutputType.BYTES);
			scenario.attach(screenshot, "image/png", scenario.getName());
		}

		HelperClass.tearDown();
	}
}
Step 12 – Create a TestNG Cucumber Runner classin the src/test/java
Cucumber needs a TestRunner class to run the feature files. It is suggested to create a folder with the name of the runner in the src/test/java directory and create the Cucumber TestRunner class in this folder. Below is the code of the Cucumber TestRunner class.
Below is the code for CucumberRunnerTests class.
import io.cucumber.testng.AbstractTestNGCucumberTests;
import io.cucumber.testng.CucumberOptions;

@CucumberOptions(tags = "", features = "src/test/resources/features/LoginPage.feature", glue = "com.example.definitions",
        plugin = {})

public class CucumberRunnerTests extends AbstractTestNGCucumberTests {
}
Note:- The name of the Runner class should end with Test otherwise we can’t run the tests using Command Line.
Step 13 – Run the tests from TestNG
You can execute the test script by right-clicking on TestRunner class -> Run As TestNG. (Eclipse)
In the case of the IntelliJ project, right-click on the runner class and select Run ‘CucumberRunnerTests’.
The output of the above program is
Step 14 – Run the tests from testng.xml
Create a testng.xml as shown below and run the tests as TestNG.
<?xml version="1.0" encoding="UTF-8"?>
<!DOCTYPE suite SYSTEM "https://testng.org/testng-1.0.dtd">
<suite name="Suite">
    <test  name="Cucumber with TestNG Test">
        <classes>
            <class name="com.example.runner.CucumberRunnerTests"/>
        </classes>
    </test> <!-- Test -->
</suite> <!-- Suite -->
The testng.xml is highlighted below:
Step 15 – Run the tests from Command Line
Run the below command in the command prompt to run the tests and to get the test execution report.
mvn clean test
The output of the above program is
Step 16 – Cucumber Report Generation
To get Cucumber Test Reports, add cucumber.properties under src/test/resources and add the below instruction in the file.
cucumber.publish.enabled=true
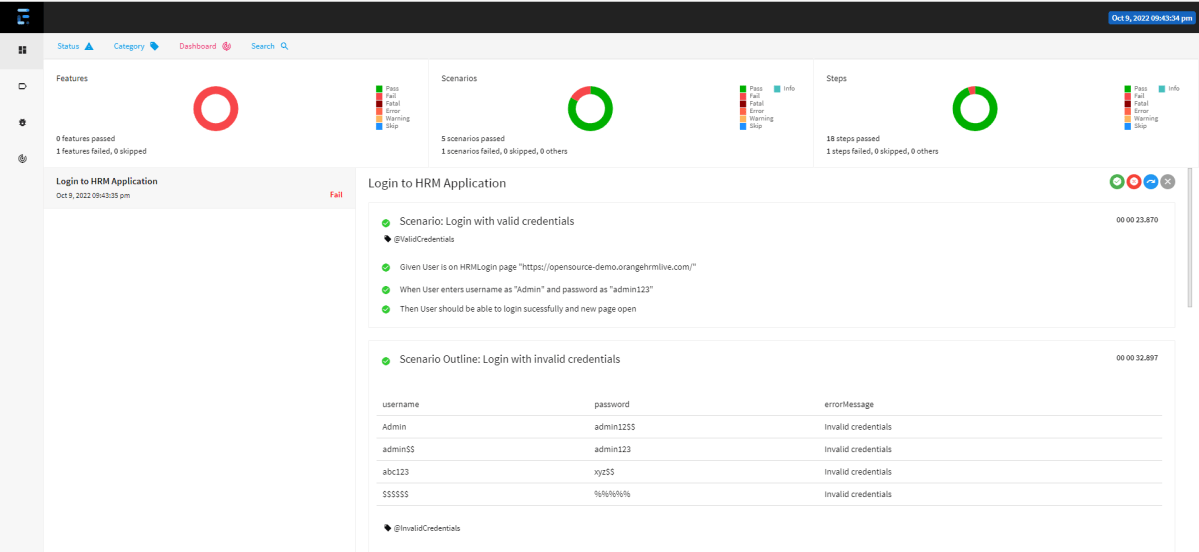
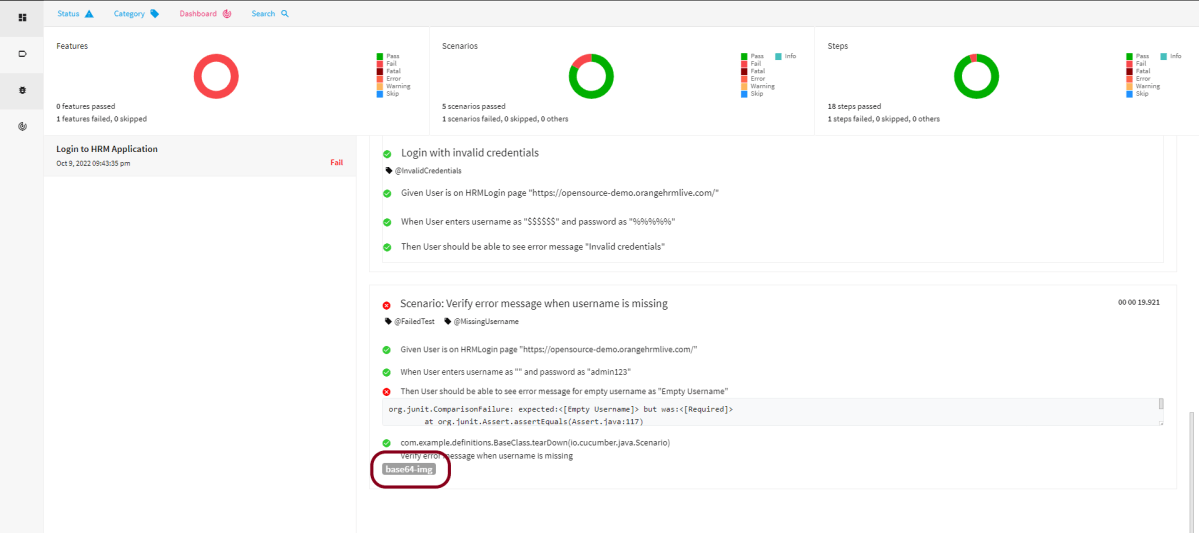
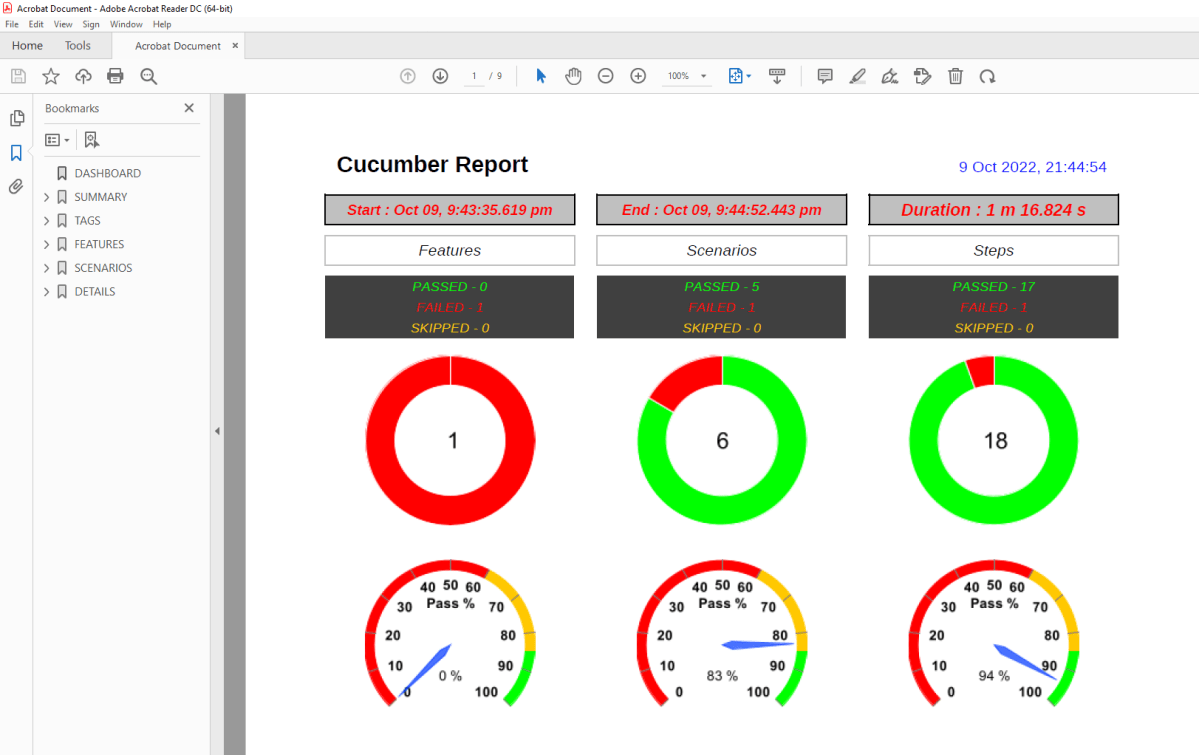
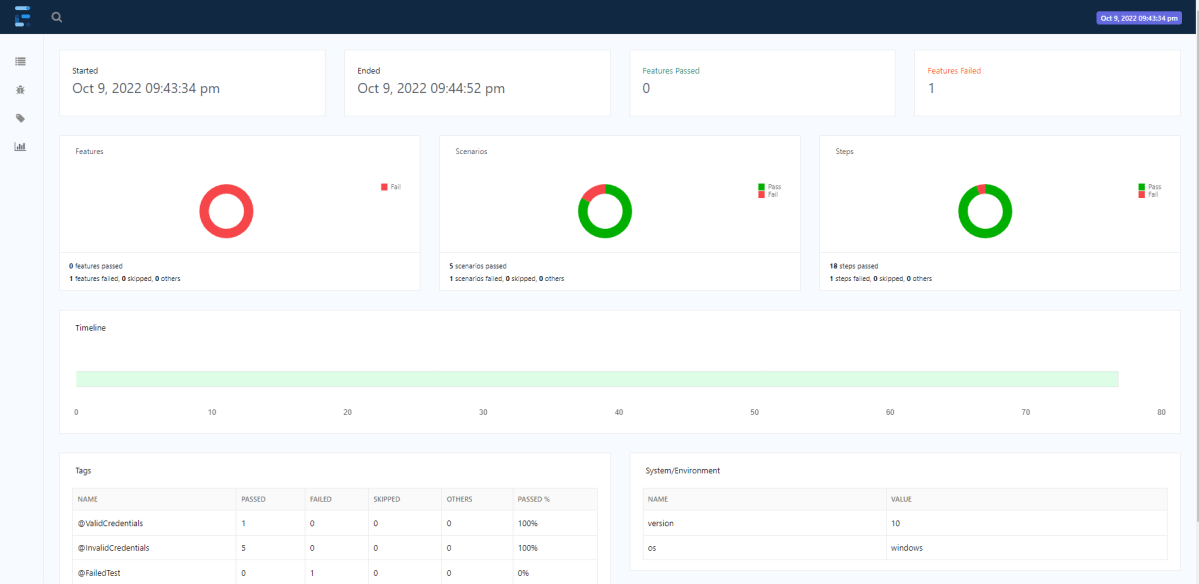
Below is the image of the Cucumber Report generated using the Cucumber Service.
In the above example, as we can see, one of the tests has failed. So, when a test fails, we have written the code to take a screenshot of the failed step. The Attached Image shows the image of the failed test. You can click on that to see the screenshot.
Step 17 – TestNG Report Generation
TestNG generates various types of reports under the target->surefire-reports folder like emailable-report.html, index.html, testng-results.xml.
We are interested in the “emailable-report.html” report. Open “emailable-report.html“, as this is an HTML report, and open it with the browser. The below image shows emailable-report.html.
emailable-report.html
Index.html
TestNG also produces an “index.html” report. The below image shows the index.html report.
Selenium needs Java to be installed on the system to run the tests. Click here to know How to install Java.
Step 2 – Download and setup Eclipse IDE on the system
The Eclipse IDE (integrated development environment) provides strong support for Java developers. Click here to know How to install Eclipse.
Step 3 – Setup Gradle
To build a test framework, we need to add several dependencies to the project. This can be achieved by any build tool. I have used Gradle Build Tool. Click here to know How to install Gradle.
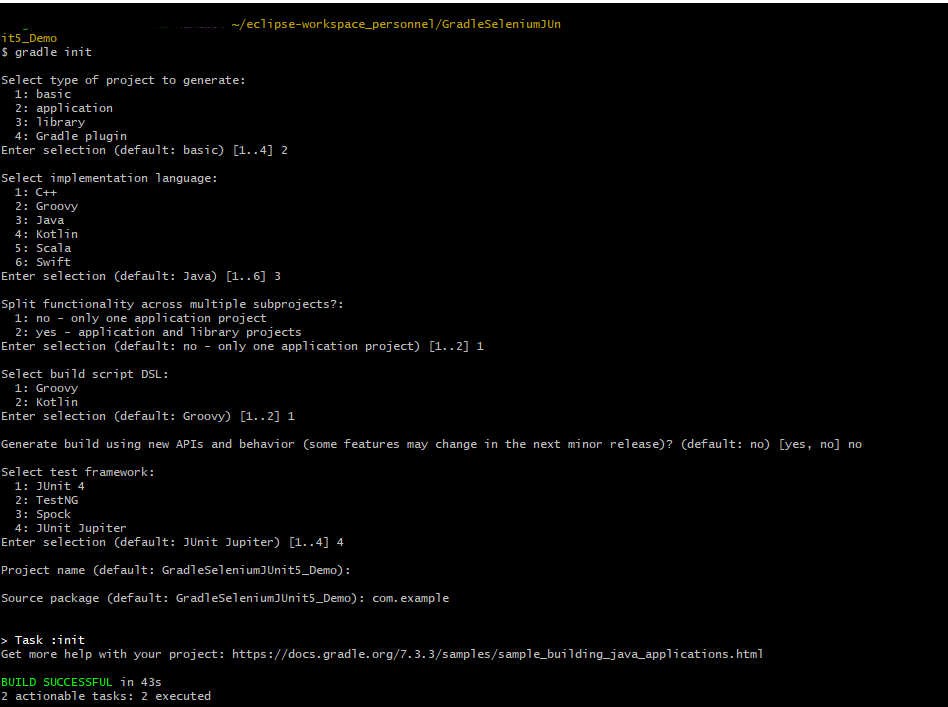
Step 4 – Create a new Gradle Project
Below are the steps to create the Gradle project from command line.
Step 5 – Add Selenium and TestNG dependencies to the Gradle project
dependencies {
    // Use TestNG framework, also requires calling test.useTestNG() below
    testImplementation 'org.testng:testng:7.10.0'

    // This dependency is used by the application.
    implementation libs.guava
    implementation 'org.seleniumhq.selenium:selenium-java:4.24.0'
}
Step 6 – Add Gradle Test Task to build.gradle
tasks.named('test') {
    // Use TestNG for unit tests.
    useTestNG() {
    useDefaultListeners = true
	outputDirectory = file("$projectDir/TestNG_Reports")
   }
 reports.html.setDestination(file("$projectDir/GradleReports"))
}
The complete gradle.build looks like something shown below.
/*
 * This file was generated by the Gradle 'init' task.
 *
 * This generated file contains a sample Java application project to get you started.
 * For more details on building Java & JVM projects, please refer to https://docs.gradle.org/8.10/userguide/building_java_projects.html in the Gradle documentation.
 */

plugins {
    // Apply the application plugin to add support for building a CLI application in Java.
    id 'java'
}

repositories {
    // Use Maven Central for resolving dependencies.
    mavenCentral()
}

dependencies {
    // Use TestNG framework, also requires calling test.useTestNG() below
    testImplementation 'org.testng:testng:7.10.0'

    // This dependency is used by the application.
    implementation libs.guava
    implementation 'org.seleniumhq.selenium:selenium-java:4.24.0'
}

// Apply a specific Java toolchain to ease working on different environments.
java {
    toolchain {
        languageVersion = JavaLanguageVersion.of(17)
    }
}

tasks.named('test') {
    // Use TestNG for unit tests.
    useTestNG() {
        useDefaultListeners = true
        outputDirectory = file("$projectDir/TestNG_Reports")
    }
    reports.html.setDestination(file("$projectDir/GradleReports"))
}
Step 7 – Create Test Code under src/test/java
Let us write the code to test a web application. I have created 3 tests and out of 3, 1 test will fail intentionally.
package org.example;

import org.openqa.selenium.By;
import org.openqa.selenium.WebDriver;
import org.openqa.selenium.chrome.ChromeDriver;
import org.openqa.selenium.chrome.ChromeOptions;
import org.testng.Assert;
import org.testng.annotations.AfterMethod;
import org.testng.annotations.BeforeMethod;
import org.testng.annotations.Test;

import java.time.Duration;

public class LoginTests {

    WebDriver driver;

    @BeforeMethod
    public void setUp() {

        ChromeOptions options = new ChromeOptions();
        driver = new ChromeDriver(options);
        driver.manage().timeouts().implicitlyWait(Duration.ofSeconds(10));
        driver.manage().window().maximize();
        driver.get("https://opensource-demo.orangehrmlive.com/");

    }

    @Test(description = "This test validates error message when credentials are incorrect", priority = 0)
    public void verifyIncorrectCredentials() {

        driver.findElement(By.name("username")).sendKeys("Admin");
        driver.findElement(By.name("password")).sendKeys("admin123$$");
        driver.findElement(By.xpath("//*[@class='oxd-form']/div[3]/button")).submit();

        String actualErrorMessage = driver.findElement(By.xpath("//*[@class='orangehrm-login-error']/div/div/p")).getText();

        // Verify Error Message
        Assert.assertEquals(actualErrorMessage,"Invalid credentials");

    }

    @Test(description = "This test will fail", priority = 1)
    public void verifyBlankCredentials() {

        driver.findElement(By.name("username")).sendKeys("");
        driver.findElement(By.name("password")).sendKeys("admin123$$");
        driver.findElement(By.xpath("//*[@class='oxd-form']/div[3]/button")).submit();

        String actualErrorMessage = driver.findElement(By.xpath("//*[@class='oxd-form-row']/div/span")).getText();

        // Verify Error Message
        Assert.assertEquals(actualErrorMessage,"Invalid credentials");

    }

    @Test(description = "This test validates  successful login to Home page", priority = 2)
    public void verifyLoginPage() {

        driver.findElement(By.name("username")).sendKeys("Admin");
        driver.findElement(By.name("password")).sendKeys("admin123");
        driver.findElement(By.xpath("//*[@class='oxd-form']/div[3]/button")).submit();

        String homePageHeading = driver.findElement(By.xpath("//*[@class='oxd-topbar-header-breadcrumb']/h6")).getText();

        //Verify new page - HomePage
        Assert.assertEquals(homePageHeading,"Dashboard");

    }

    @AfterMethod
    public void tearDown() {

        driver.quit();
    }
}
Step 8 – Create testng.xml
Right-click on the project and select TestNG and select Convert to TestNG.
<?xml version="1.0" encoding="UTF-8"?>
<!DOCTYPE suite SYSTEM "https://testng.org/testng-1.0.dtd">
<suite name="Suite">
  <test name="Selenium Tests with TestNG">
    <classes>
      <class name="org.example.LoginTests"/>
    </classes>
  </test> <!-- Test -->
</suite> <!-- Suite -->
Step 9 – Run the tests from TestNG
Right-Click on the testng.xml and select Run As TestNG Suite.
The output of the above tests in Eclipse Console is as shown below.
This also generates a folder with the name test-output that contains the TestNG reports like index.html,emailable-report.html.
Step 10 – Run the tests from Command Line
To run the tests from the command line, use the below-mentioned command.
gradle clean test
The output of the above program is
Step 11 – TestNG and Gradle Report generation
Once the test execution is finished, refresh the project. We will see 2 folders – GradleReports and TestNG_ Reports.
Gradle Reports
This folder contains index.html.
Right-click on index.html and select open with Web Browser. This report shows the summary of all the tests executed. As you can see that Failed tests are selected (highlighted in blue), so the name of the test failed along with the class name is displayed here.
TestNG Reports
Go to TestNG_Reports folder and right-click and open emailable-report.html.
Index.html
Congratulations on making it through this tutorial and hope you found it useful! Happy Learning!! Cheers!!
The previous tutorial explained the generation of Allure Report with Cucumber5, Selenium and JUnit4 in a Maven project. In this tutorial, I will explain the steps to create an Allure Report with Cucumber7, Selenium, and JUnit5 in a Maven project.
Step 2 – Create Step Definition, feature file, and Test Runner Classes
Create Locator and Action classes and Step Definition corresponding to the feature file and Test Runner Class
There is another tutorial that explains the project structure as well as the feature file and corresponding Step Definitions, please refer to this tutorial – Integration of Cucumber7 with Selenium and JUnit5.
Step 3 – Execute the Tests
Use the below command to run the tests
mvn clean test
The output of the above program is
Step 4 – Generate the Allure Report
Once the test execution is finished, a folder named allure-results will be generated in thetarget folder.
To generate the Allure Report, first, go to the target folder.
cd target
Now, use the below command to generate the Allure Report
allure serve
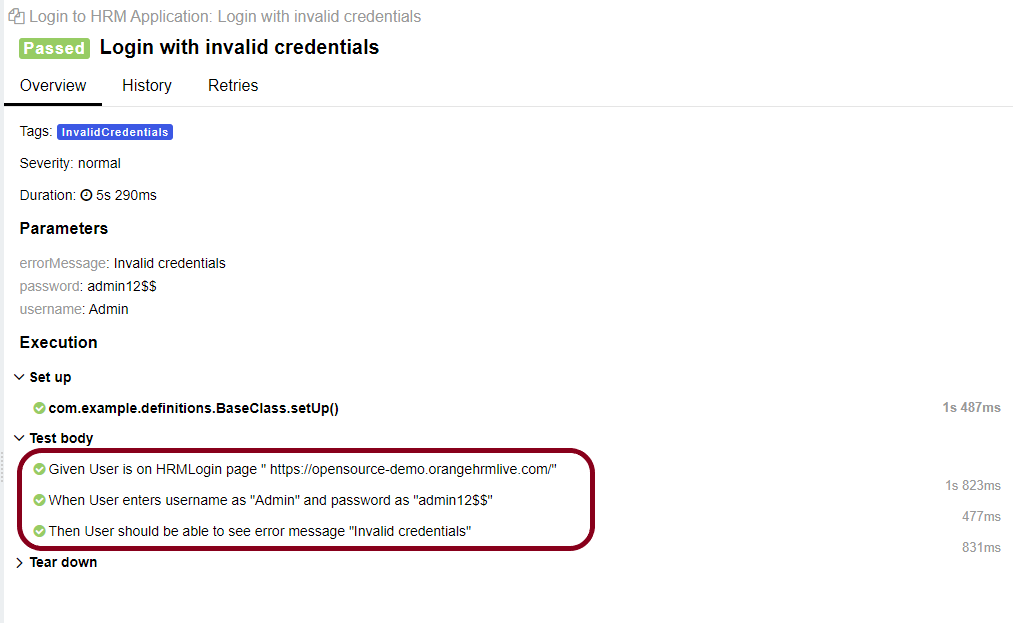
This will generate the beautiful Allure Test Report as shown below.
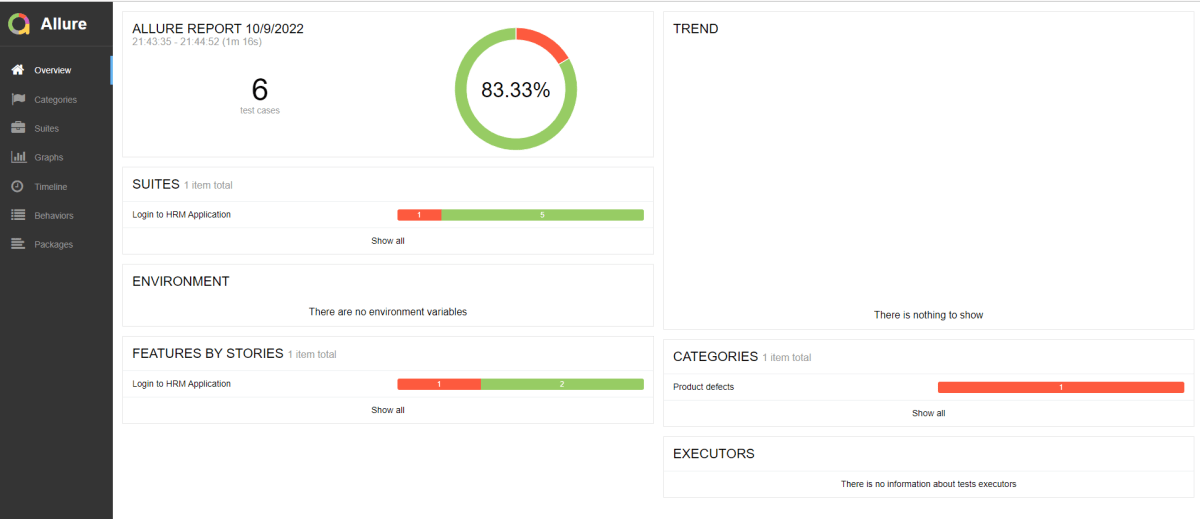
Allure Report Dashboard
The overview page hosts several default widgets representing the basic characteristics of your project and test environment.
Statistics – overall report statistics.
Launches – if this report represents several test launches, statistics per launch will be shown here.
Behaviours – information on results aggregated according to stories and features.
Executors – information on test executors that were used to run the tests.
History Trend – if tests accumulate some historical data, its trend will be calculated and shown on the graph.
Environment – information on the test environment.
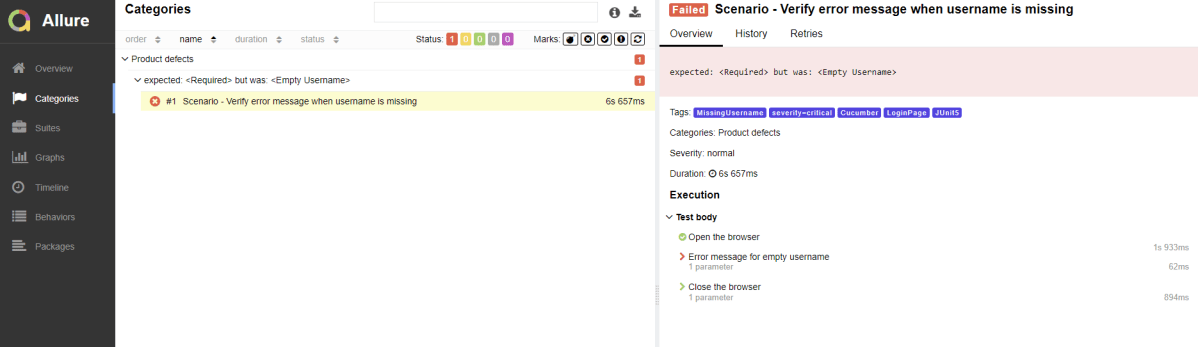
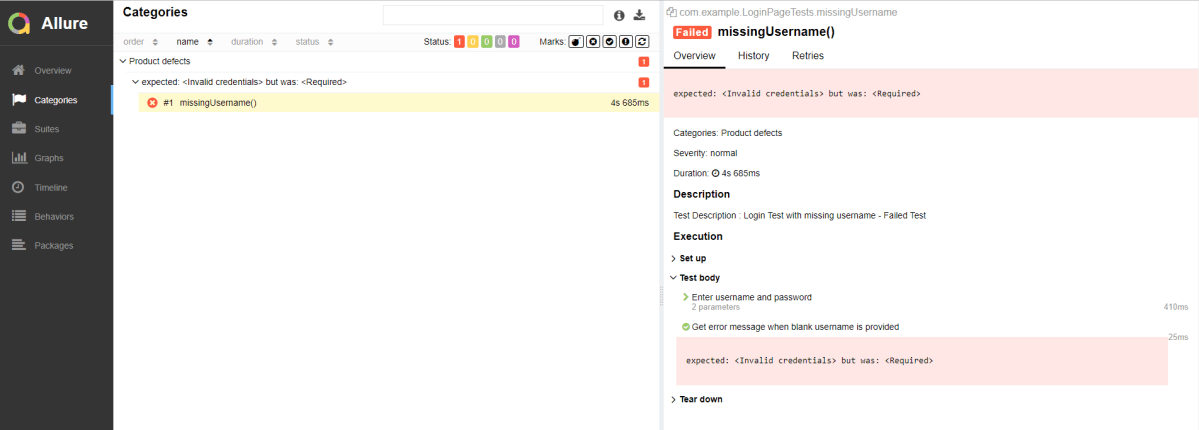
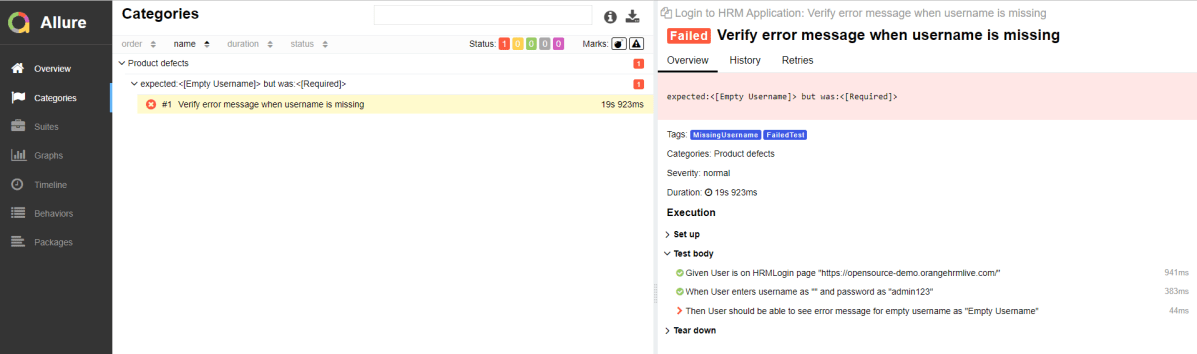
Categories in Allure Report
The categories tab gives you a way to create custom defect classifications to apply for test results. There are two categories of defects – Product Defects (failed tests) and Test Defects (broken tests).
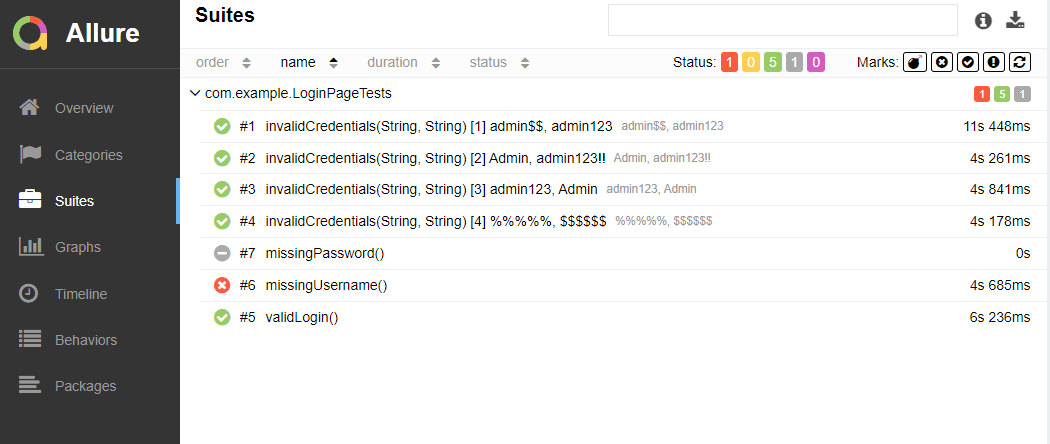
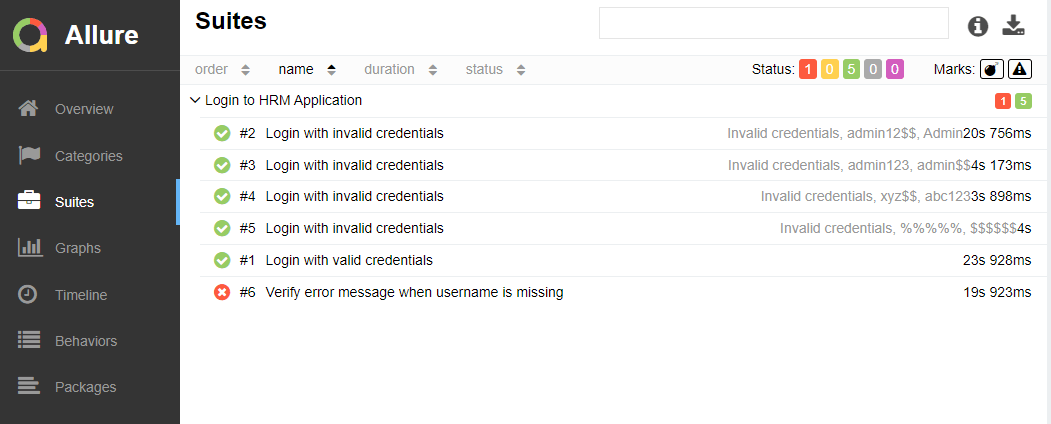
Suites in Allure Report
On the Suites tab a standard structural representation of executed tests, grouped by suites and classes can be found.
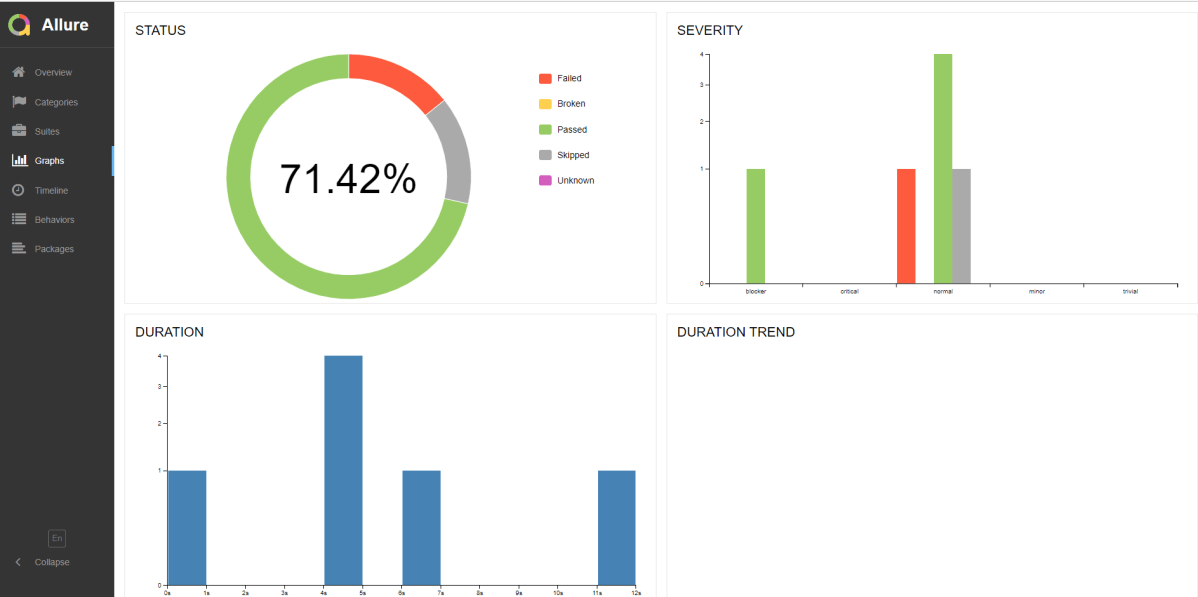
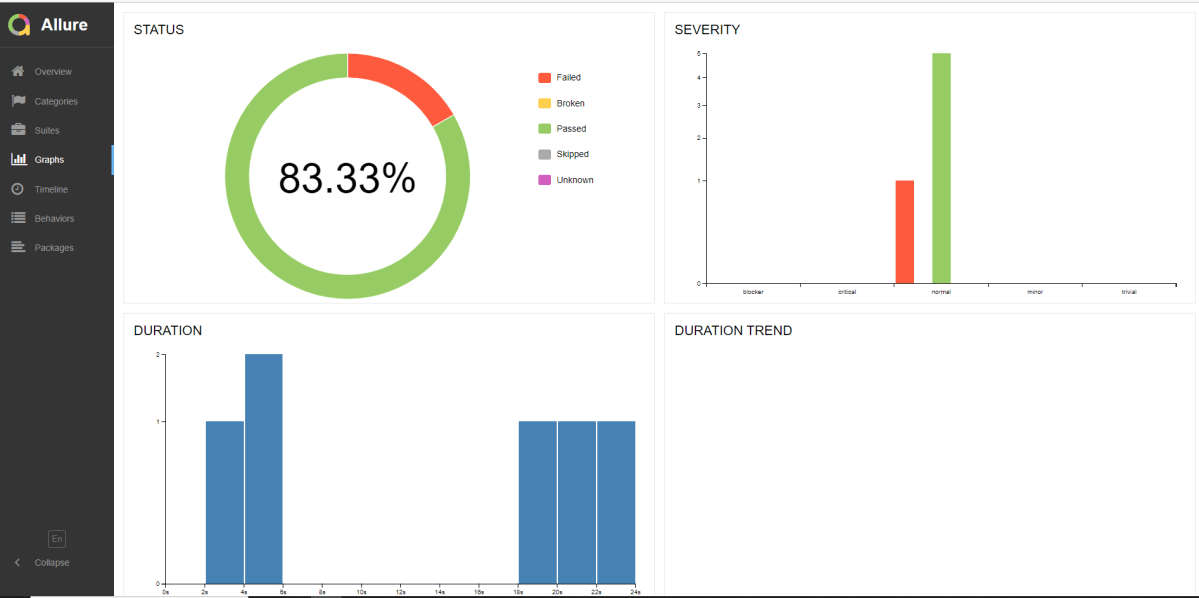
Graphs in Allure Report
Graphs allow you to see different statistics collected from the test data: status breakdown or severity and duration diagrams.
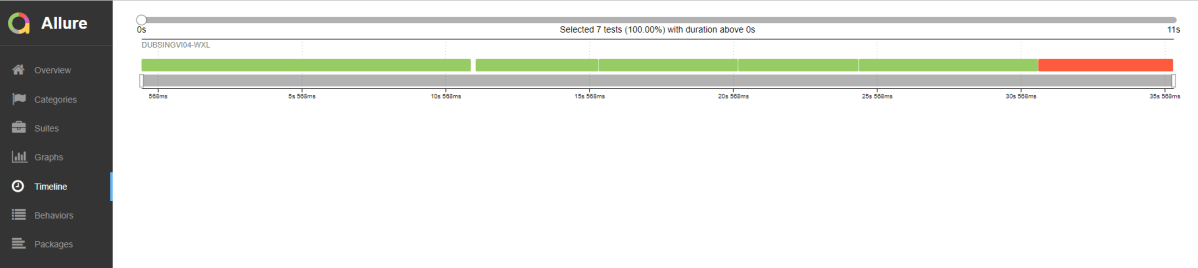
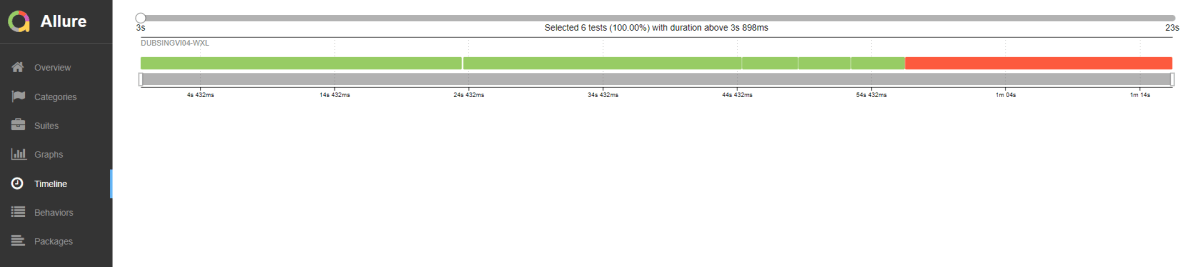
Timeline in Allure Report
The timeline tab visualizes retrospective test execution, allure adaptors collect precise timings of tests, and here on this tab, they are arranged accordingly to their sequential or parallel timing structure.
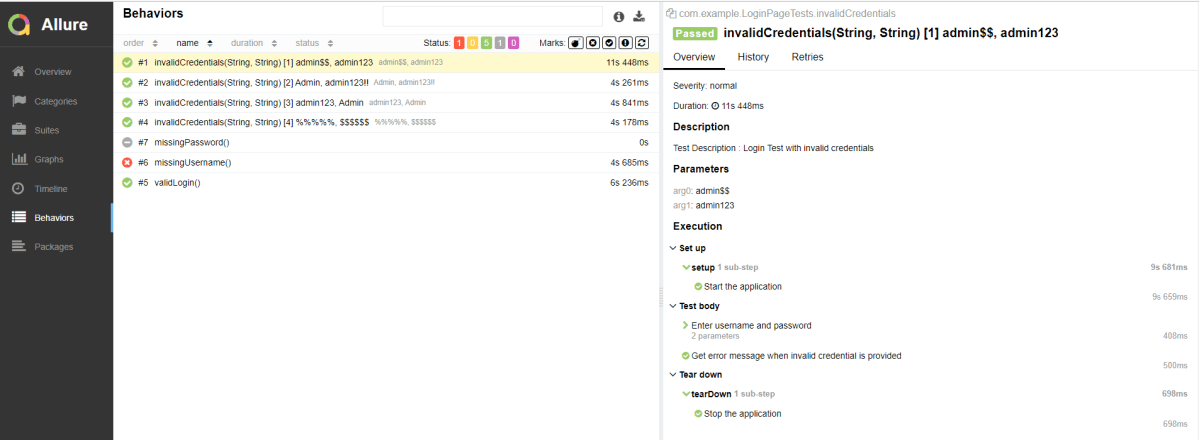
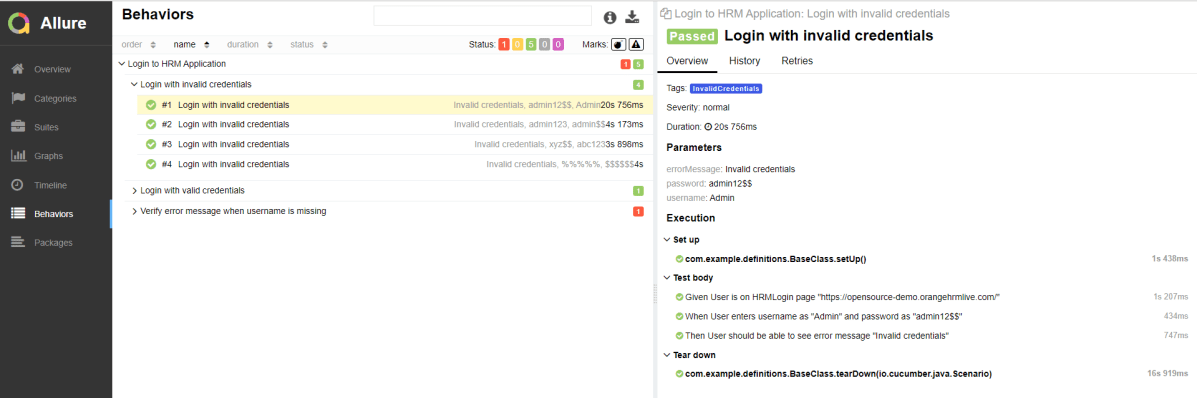
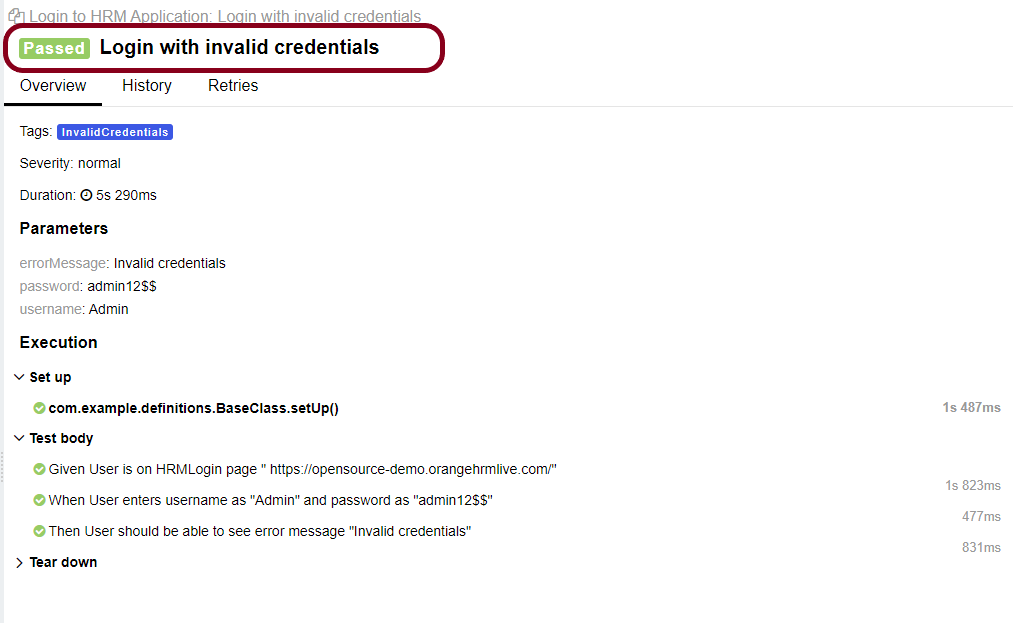
Behaviors of Allure Report
This tab groups test results according to Epic, Feature, Story, Test Severity, Test Description, Test Steps, and so on.
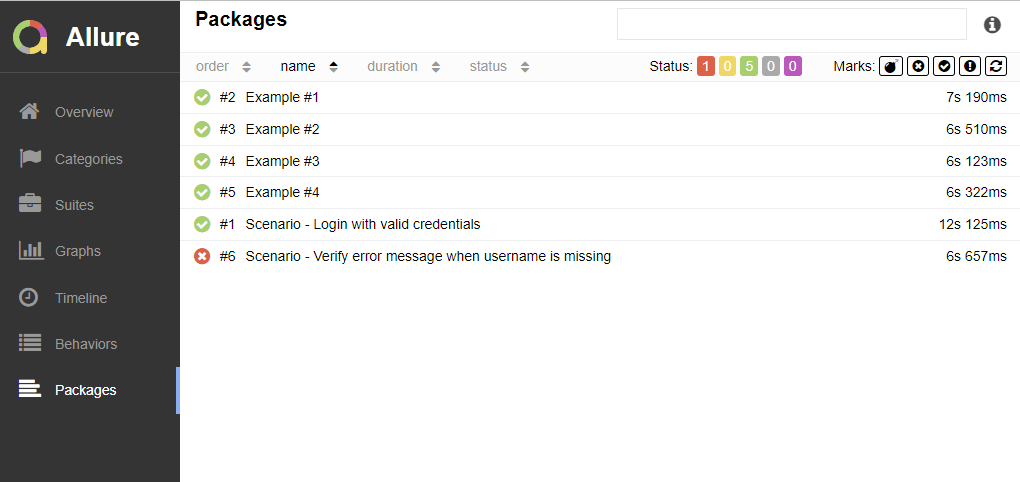
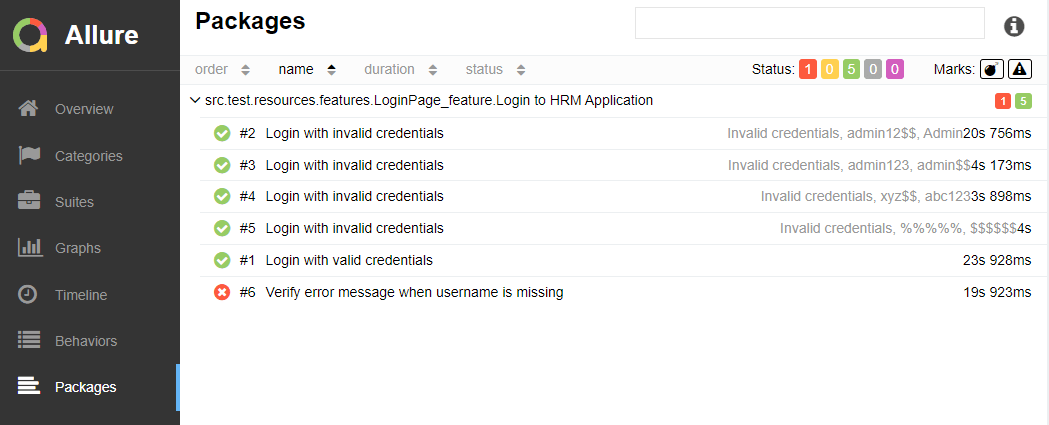
Packages in Allure Report
The packages tab represents a tree-like layout of test results, grouped by different packages.
Congratulations on making it through this tutorial and hope you found it useful! Happy Learning!! Cheers!!
A headless browser is like any other browser but without a Head/GUI (Graphical User Interface). A headless browser is used to automate the browser without launching the browser. While the tests are running, we could not see the browser, but we can see the test results coming on the console.
Headless browser testing is generally faster when compared to actual UI testing as it doesn’t wait for the whole page to render before performing any action.
The traditional way is to add –headless, and since version 96, Chrome has a new headless mode that allows users to get the full browser functionality (even run extensions). Between versions 96 to 108 it was –headless=chrome, after version 109, it is –headless=new.
The complete program looks like as shown below:
import org.junit.jupiter.api.Assertions;
import org.junit.jupiter.api.Test;
import org.openqa.selenium.chrome.ChromeDriver;
import org.openqa.selenium.chrome.ChromeOptions;

public class HeadlessChrome_Demo {

    public ChromeDriver driver;

    @Test
    public void test() {

        // Create an object of Chrome Options class
        ChromeOptions options = new ChromeOptions();

        // pass the argument -–headless and maximize to Chrome Options class.
        options.addArguments("--start-maximize");
        options.addArguments("--headless=new");

        // Create an object of Chrome Driver class and pass the Chrome Options object as
        // an argument
        driver = new ChromeDriver(options);

        System.out.println("Executing Chrome Driver in Headless mode..");
        driver.get("https://duckduckgo.com/");

        String titlePage = driver.getTitle();
        System.out.println("Title of Page :" + titlePage);
        Assertions.assertEquals("DuckDuckGo — Privacy, simplified.",titlePage);

        // Close the driver
        driver.close();

    }

}
The output of the above program is
Congratulations!! We are able to run Chrome tests in Selenium in headless mode.
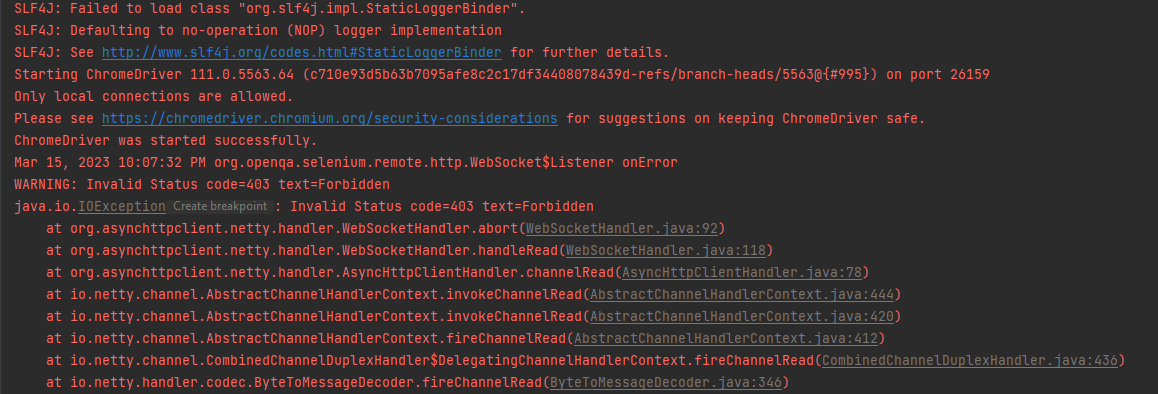
Selenium Version – 4.8.3 has implemented the fix for Chrome Version 111. As per the below changelog, we don’t need to add “–remote-allow-origins=*”, if we are using Selenium Version – 4.8.3.
Chrome Version 111 is recently released that has broken the Selenium Tests. In the current scenario, I’m using Selenium 4.8.0. You can see a simple Selenium test where we want to open a Chrome Browser and open Google.com failed.
import io.github.bonigarcia.wdm.WebDriverManager;
import org.openqa.selenium.WebDriver;
import org.openqa.selenium.chrome.ChromeDriver;
import java.time.Duration;
public class ChromeTests {
public static void main(String[] args) {
WebDriverManager.chromedriver().setup();
WebDriver driver = new ChromeDriver();
driver.manage().timeouts().implicitlyWait(Duration.ofSeconds(20));
driver.get("https://www.google.com/");
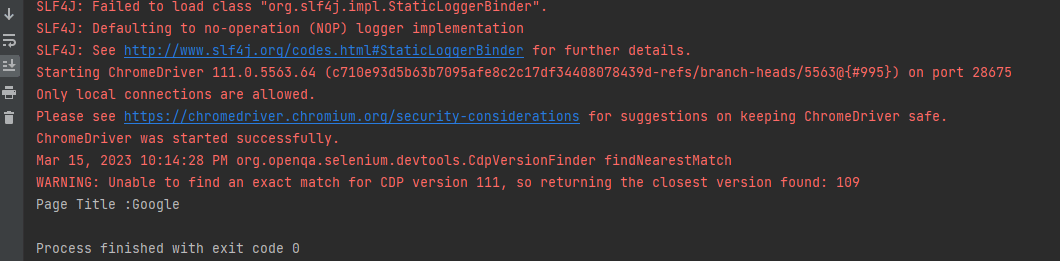
String PageTiltle = driver.getTitle();
System.out.println("Page Title :"+PageTiltle);
driver.close();
}
}
The output of the above program is
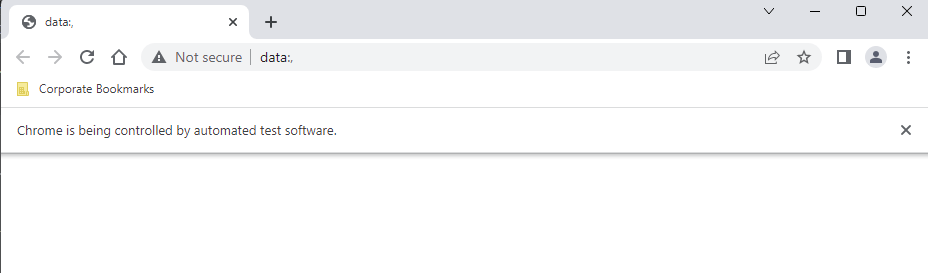
Below is the screenshot of the Chrome Browser trying to open Google.com.
One of the solutions is to add “–remote-allow-origins=*” to ChromeOptions. The sample code is shown below:
import io.github.bonigarcia.wdm.WebDriverManager;
import org.openqa.selenium.WebDriver;
import org.openqa.selenium.chrome.ChromeDriver;
import org.openqa.selenium.chrome.ChromeOptions;
import java.time.Duration;

public class ChromeTests {

    public static void main(String[] args) {

        ChromeOptions options = new ChromeOptions();
        options.addArguments("--remote-allow-origins=*");
        WebDriver driver = new ChromeDriver(options);
        driver.manage().timeouts().implicitlyWait(Duration.ofSeconds(20));
        driver.get("https://www.google.com/");
        String PageTiltle = driver.getTitle();
        System.out.println("Page Title :"+PageTiltle);
        driver.close();
    }
}
By default, Selenium 4 is compatible with Chrome v75 and greater.
The output of the above program is
Hopefully, this trick will help you in your automation journey.
Environment variables JAVA_HOME, ALLURE_HOME and GRADLE_HOME correctly configured
In this tutorial, I’ll create a BDD Framework for creating an Allure Report for Selenium WebDriver with JUnit5. This framework consists of:-
Dependency List
Java 11
JUnit– 5.8.2
Gradle – 7.3.3
Selenium – 4.3.0
Allure Report – 2.19
AspectJ Weaver – 1.9.7
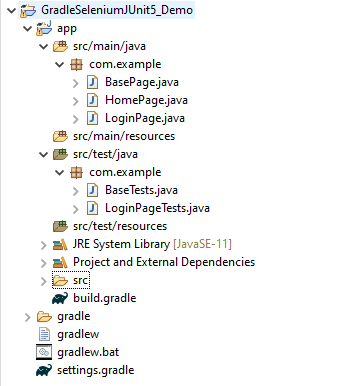
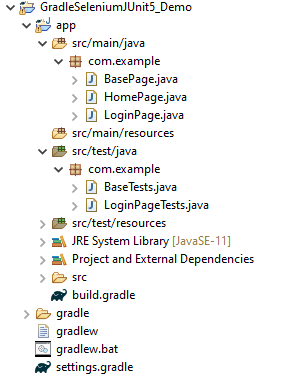
Project Structure
Implementation Steps
There is another tutorial that explains the steps to create a Gradle Project with Selenium and JUnit5. Please refer to this tutorial –Gradle – Integration of Selenium and JUnit5.
Step 1 – Add dependencies to build.gradle
Add Selenium, JUnit5, and Allure-JUnit5 dependencies in build.gradle
/*
 * This file was generated by the Gradle 'init' task.
 *
 */

plugins {
    // Apply the application plugin to add support for building a CLI application in Java.
    id 'application'
    id 'io.qameta.allure' version '2.11.0'
}

repositories {
    // Use Maven Central for resolving dependencies.
    mavenCentral()
}

java {
    sourceCompatibility = 11
    targetCompatibility = 11
}

dependencies {
    // Use JUnit Jupiter for testing.
    testImplementation 'org.junit.jupiter:junit-jupiter:5.8.2'
    testRuntimeOnly 'org.junit.jupiter:junit-jupiter-engine:5.8.2'

     // Allure
     implementation 'io.qameta.allure:allure-junit5:2.19.0'
     runtimeOnly 'org.aspectj:aspectjweaver:1.9.7'

    // This dependency is used by the application.
    implementation 'com.google.guava:guava:30.1.1-jre'
    implementation 'org.seleniumhq.selenium:selenium-java:4.4.0'
    implementation 'io.github.bonigarcia:webdrivermanager:5.3.0'
}

application {
    // Define the main class for the application.
    mainClass = 'com.example.App'
}

tasks.named('test') {
    // Use JUnit Platform for unit tests.
    useJUnitPlatform()  {
    }
}
Step 2 – Create Pages and Test Code for the pages
As mentioned above, there is another tutorial that explains the project structure as well as the feature file and corresponding Step Definitions, please refer to this tutorial – Gradle Project with Selenium and JUnit5.
Below is the sample test code. I have added features of the allure report like @Severity, @Description.
import org.junit.jupiter.api.Test;
import org.junit.jupiter.params.ParameterizedTest;
import org.junit.jupiter.params.provider.CsvSource;
import static org.junit.jupiter.api.Assertions.assertEquals;
import org.junit.jupiter.api.Disabled;
import io.qameta.allure.Description;
import io.qameta.allure.Severity;
import io.qameta.allure.SeverityLevel;

public class LoginPageTests extends BaseTests{

	@Severity(SeverityLevel.NORMAL)
    @ParameterizedTest
    @CsvSource({
            "admin$$,admin123",
            "Admin,admin123!!",
            "admin123,Admin",
            "%%%%%,$$$$$$"})
	@Description("Test Description : Login Test with invalid credentials")
    public void invalidCredentials(String username, String password) {

	    LoginPage objLoginPage = new LoginPage(driver);
    	objLoginPage.login(username, password);

    	// Verify Error Message
    	 assertEquals("Invalid credentials",objLoginPage.getErrorMessage());

    }

	@Severity(SeverityLevel.BLOCKER)
    @Test
	@Description("Test Description : Login Test with valid credentials")
    public void validLogin() {

	    LoginPage objLoginPage = new LoginPage(driver);
    	objLoginPage.login("Admin", "admin123");

    	HomePage objHomePage = new HomePage(driver);

    	// Verify Home Page
    	 assertEquals("Employee Information",objHomePage.getHomePageText());
    }

	@Severity(SeverityLevel.NORMAL)
    @Test
	@Description("Test Description : Login Test with missing username - Failed Test")
    public void missingUsername() {

	    LoginPage objLoginPage = new LoginPage(driver);
    	objLoginPage.login("", "admin123");

    	// Verify Error Message
   	     assertEquals("Invalid credentials",objLoginPage.getMissingUsernameText());

    }

	@Severity(SeverityLevel.NORMAL)
    @Test @Disabled
	@Description("Test Description : Login Test with missing password")
    public void missingPassword() {

	    LoginPage objLoginPage = new LoginPage(driver);
    	objLoginPage.login("admin", "");

    	// Verify Error Message
   	     assertEquals("Invalid credentials",objLoginPage.getMissingPasswordText());

    }
}
Below is the BaseTest class, where I have shown the use of @Step of Allure Report.
import java.time.Duration;
import org.junit.jupiter.api.AfterEach;
import org.junit.jupiter.api.BeforeEach;
import org.openqa.selenium.WebDriver;
import org.openqa.selenium.chrome.ChromeDriver;
import io.github.bonigarcia.wdm.WebDriverManager;
import io.qameta.allure.Step;

public class BaseTests {

	public WebDriver driver;
	public final static int TIMEOUT = 10;

	@BeforeEach
    @Step("Start the application")
    public void setup() {
    	WebDriverManager.chromedriver().setup();
	    driver = new ChromeDriver();
	    driver.manage().window().maximize();
	    driver.get("https://opensource-demo.orangehrmlive.com/");
	    driver.manage().timeouts().implicitlyWait(Duration.ofSeconds(TIMEOUT));

    }

    @AfterEach
    @Step("Stop the application")
    public void tearDown() {
        driver.quit();
    }

}
Step 3 – Execute the Tests
Go to the app project and run the tests, using the below command
gradle clean test
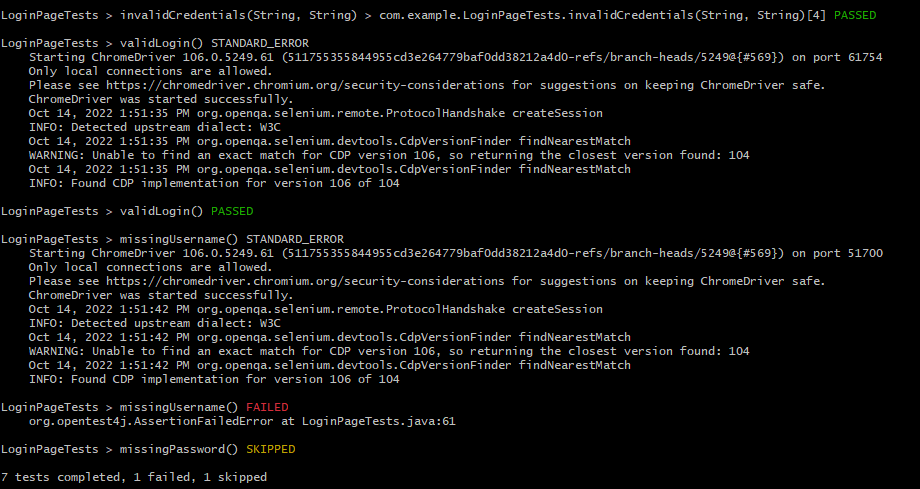
The output of the test execution is
Step 4 – Generate the Allure Report
Once the test execution is finished, a folder named allure-results will be generated in thebuild folder.
Note:- Make sure that you move to the folder app, because the build folder is present in the app folder.
To generate an Allure Report, use the below command.
allure serve build/allure-results
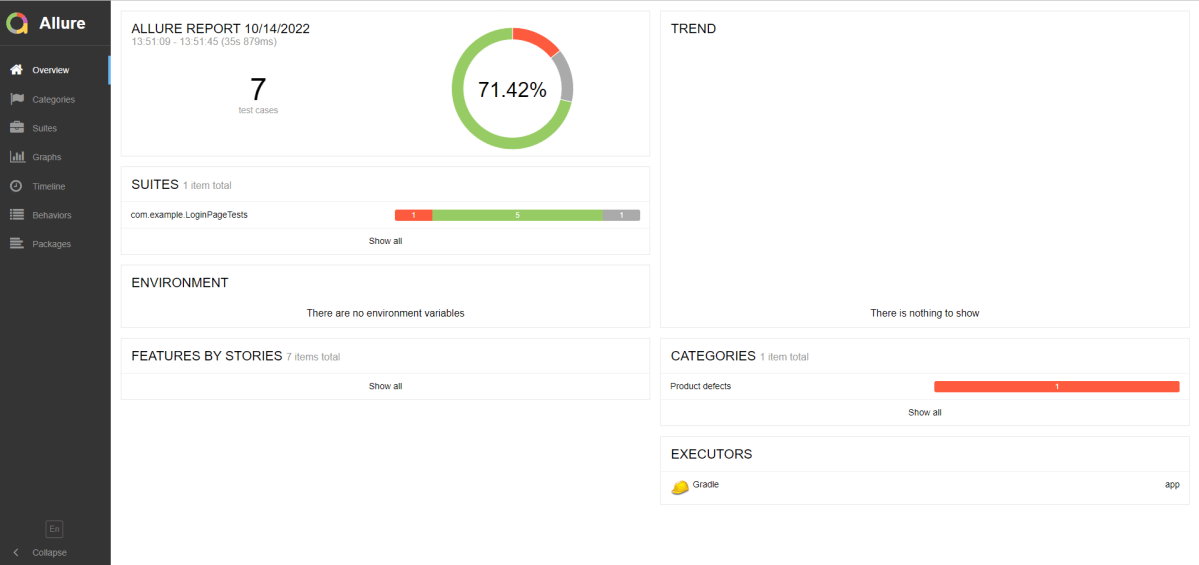
This will generate the beautiful Allure Test Report as shown below.
Allure Report Dashboard
The overview page hosts several default widgets representing the basic characteristics of your project and test environment.
Statistics – overall report statistics.
Launches – if this report represents several test launches, statistics per launch will be shown here.
Behaviors – information on results aggregated according to stories and features.
Executors – information on test executors that were used to run the tests.
History Trend – if tests accumulated some historical data, its trend will be calculated and shown on the graph.
Environment – information on the test environment.
Categories in Allure Report
The categories tab gives you a way to create custom defect classifications to apply for test results. There are two categories of defects – Product Defects (failed tests) and Test Defects (broken tests).
Suites in Allure Report
On the Suites tab a standard structural representation of executed tests, grouped by suites and classes, can be found.
Graphs in Allure Report
Graphs allow you to see different statistics collected from the test data: status breakdown or severity and duration diagrams.
Timeline in Allure Report
The timeline tab visualizes retrospective test execution, allure adaptors collect precise timings of tests, and here on this tab, they are arranged accordingly to their sequential or parallel timing structure.
Behaviors of Allure Report
This tab groups test results according to Epic, Feature, Story, Test Severity, Test Description, Test Steps, and so on.
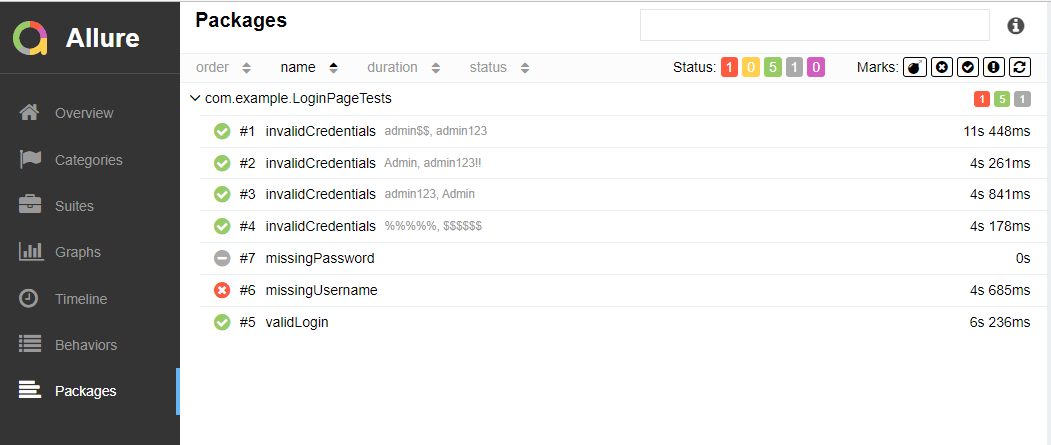
Packages in Allure Report
The packages tab represents a tree-like layout of test results, grouped by different packages.
Congratulations on making it through this tutorial and hope you found it useful! Happy Learning!! Cheers!!
Environment variables JAVA_HOME and GRADLE_HOME are correctly configured
This framework consists of:
Java 11
JUnit Jupiter – 5.8.2
JUnit Jupiter Engine – 5.8.2
Gradle – 7.3.3 (Build Tool)
Selenium – 4.3.0
Steps to set up Gradle Java Project for Selenium and JUnit5
Download and Install Java on the system
Download and setup Eclipse IDE on the system
Setup Gradle on System
Create a new Gradle Project
Add Selenium and JUnit5 dependencies to the Gradle project
Create Pages and Test Code for the pages
Run the tests from Command Line
Gradle Report generation
Project Structure
Implementation Steps
Step 1- Download and Install Java
Selenium needs Java to be installed on the system to run the tests. Click here to know How to install Java.
Step 2 – Download and setup Eclipse IDE on the system
The Eclipse IDE (integrated development environment) provides strong support for Java developers. Click here to know How to install Eclipse.
Step 3 – Setup Gradle
To build a test framework, we need to add several dependencies to the project. This can be achieved by any build tool. I have used Gradle Build Tool. Click here to know How to install Gradle.
Step 5 – Add Selenium and JUnit5 dependencies to the Gradle project
/*
 * This file was generated by the Gradle 'init' task.
 *
 */

plugins {
    // Apply the application plugin to add support for building a CLI application in Java.
    id 'application'
}

repositories {
    // Use Maven Central for resolving dependencies.
    mavenCentral()
}

java {
    sourceCompatibility = 11
    targetCompatibility = 11
}

dependencies {
    // Use JUnit Jupiter for testing.
    testImplementation 'org.junit.jupiter:junit-jupiter:5.8.2'
    testRuntimeOnly 'org.junit.jupiter:junit-jupiter-engine:5.8.2'

    implementation 'com.google.guava:guava:30.1.1-jre'
    implementation 'org.seleniumhq.selenium:selenium-java:4.4.0'
    implementation 'io.github.bonigarcia:webdrivermanager:5.3.0'
}

application {
    // Define the main class for the application.
    mainClass = 'com.example.App'
}

tasks.named('test') {
    // Use JUnit Platform for unit tests.
    useJUnitPlatform()  {
    }

 testLogging {
        events "passed", "skipped", "failed"
        showStandardStreams = true
    }

    systemProperties System.properties
    reports.html.setDestination(file("$projectDir/GradleReports"))
}
Step 6 – Create Pages and Test Code for the pages
We have used PageFactory model to build the tests. I have created a package named pages and created the page classes in that folder. Page class contains the locators of each web element present on that particular page along with the methods of performing actions using these web elements.
This is the BasePage that contains the PageFactory.initElements.
import org.openqa.selenium.WebDriver;
import org.openqa.selenium.support.PageFactory;

public class BasePage {

	  public WebDriver driver;

	  public BasePage(WebDriver driver) {
		  this.driver = driver;
		  PageFactory.initElements(driver,this);
	}

}
Below is the code for LoginPage and HomePage
LoginPage
import org.openqa.selenium.WebDriver;
import org.openqa.selenium.WebElement;
import org.openqa.selenium.support.FindBy;

public class LoginPage extends BasePage{

	 public LoginPage(WebDriver driver) {
		 super(driver);
    }

	@FindBy(name = "username")
    public WebElement userName;

    @FindBy(name = "password")
    public WebElement password;

    @FindBy(xpath = "//*[@id='app']/div[1]/div/div[1]/div/div[2]/div[2]/form/div[1]/div/span")
    public WebElement missingUsernameErrorMessage;

    @FindBy(xpath = "//*[@id='app']/div[1]/div/div[1]/div/div[2]/div[2]/form/div[1]/div/span")
    public WebElement missingPasswordErrorMessage;

    @FindBy(xpath = "//*[@id='app']/div[1]/div/div[1]/div/div[2]/div[2]/form/div[3]/button")
    public WebElement login;

    @FindBy(xpath = "//*[@id='app']/div[1]/div/div[1]/div/div[2]/div[2]/div/div[1]/div[1]/p")
    public  WebElement errorMessage;

    public String getMissingUsernameText() {
        return missingUsernameErrorMessage.getText();
    }

    public String getMissingPasswordText() {
        return missingPasswordErrorMessage.getText();
    }

    public String getErrorMessage() {
        return errorMessage.getText();
    }

    public void login(String strUserName, String strPassword) {

    	userName.sendKeys(strUserName);
    	password.sendKeys(strPassword);
    	login.click();

    }

}
HomePage
import org.openqa.selenium.WebDriver;
import org.openqa.selenium.WebElement;
import org.openqa.selenium.support.FindBy;

public class HomePage extends BasePage {

	public HomePage(WebDriver driver) {
		super(driver);
	}

	  @FindBy(xpath = "//*[@id='app']/div[1]/div[2]/div[2]/div/div[1]/div[1]/div[1]/h5")
	  public  WebElement homePageUserName;

	    public String getHomePageText() {
	       return homePageUserName.getText();
   }

}
Here, we have BaseTests Class also which contains the common methods needed by other test pages.
import java.time.Duration;
import org.junit.jupiter.api.AfterEach;
import org.junit.jupiter.api.BeforeEach;
import org.openqa.selenium.WebDriver;
import org.openqa.selenium.chrome.ChromeDriver;
import io.github.bonigarcia.wdm.WebDriverManager;

public class BaseTests {

	public WebDriver driver;
	public final static int TIMEOUT = 10;

	@BeforeEach
    public void setup() {
    	WebDriverManager.chromedriver().setup();
	    driver = new ChromeDriver();
	    driver.manage().window().maximize();
	    driver.get("https://opensource-demo.orangehrmlive.com/");
	    driver.manage().timeouts().implicitlyWait(Duration.ofSeconds(TIMEOUT));

    }

    @AfterEach
    public void tearDown() {
        driver.quit();
    }

}
LoginPageTests
import org.junit.jupiter.api.Test;
import org.junit.jupiter.params.ParameterizedTest;
import org.junit.jupiter.params.provider.CsvSource;
import static org.junit.jupiter.api.Assertions.assertEquals;
import org.junit.jupiter.api.Disabled;

public class LoginPageTests extends BaseTests{

    @ParameterizedTest
    @CsvSource({
            "admin$$,admin123",
            "Admin,admin123!!",
            "admin123,Admin",
            "%%%%%,$$$$$$"})
    public void invalidCredentials(String username, String password) {

	    LoginPage objLoginPage = new LoginPage(driver);
    	objLoginPage.login(username, password);

    	// Verify Error Message
    	 assertEquals("Invalid credentials",objLoginPage.getErrorMessage());

    }

    @Test
    public void validLogin() {

	    LoginPage objLoginPage = new LoginPage(driver);
    	objLoginPage.login("Admin", "admin123");

    	HomePage objHomePage = new HomePage(driver);

    	// Verify Home Page
    	 assertEquals("Employee Information",objHomePage.getHomePageText());

    }

    @Test
    public void missingUsername() {

	    LoginPage objLoginPage = new LoginPage(driver);
    	objLoginPage.login("", "admin123");

    	// Verify Error Message
   	     assertEquals("Invalid credentials",objLoginPage.getMissingUsernameText());

    }

    @Test @Disabled
    public void missingPassword() {

	    LoginPage objLoginPage = new LoginPage(driver);
    	objLoginPage.login("admin", "");

    	// Verify Error Message
   	     assertEquals("Invalid credentials",objLoginPage.getMissingPasswordText());

    }

}
Step 7 – Run the tests from Command Line
Note:- As you can see, my project has two parts – GradleSeleniumJUnit5_Demo and app.
Go to the app project and run the tests, using the below command.
gradle clean test
The output of the above program is
Step 8 – Gradle Report generation
Once the test execution is finished, refresh the project. We will see a folder – GradleReports. This report is generated when the tests are executed through the command line.
This folder contains index.html.
Right-click on index.html and select open with Web Browser. This report shows the summary of all the tests executed. As you can see that Failed tests are selected (highlighted in blue), so the name of the test failed along with the class name is displayed here.
This report contains detailed information about the failed test, which is shown below.
This shows the list of all the tests – passed, failed, or ignored.
The previous tutorial explained the generation of ExtentReports Version 5 for Cucumber 7 and TestNG in a Maven project. In this tutorial, I will explain the steps to create an Extent Report Version 5 for Cucumber, Selenium, and Junit4 in a Gradle project.
Pre Requisite:
Java 8 or above installed
Eclipse or IntelliJ IDE installed
Gradle Installed
Environment variable JAVA_HOME and GRADLE_HOME correctly configured
In this tutorial, I’ll create a BDD Framework for the testing of web applications using Cucumber, Selenium WebDriver with JUnit4. This framework consists of:-
Cucumber Java- 7.6.0
Cucumber JUnit – 7.6.0
Java 11
JUnit – 4.13.2
Gradle – 7.5.1
Selenium – 4.3.0
ExtentReport – 5.0.9
GrassHopper Cucumber Adapter – 1.7.0
Implementation Steps
Add ExtentReport dependency to the build.gradle
Add ExtentCucumberAdapter plugin to task cucumber
Add Cucumber, Selenium and JUnit4 , and dependencies in build.gradle
Create Locator and Action classes and Step Definition corresponding to the feature file
Create extent.properties file in resources folder and paste the below code
Step 3 – Add Cucumber, Selenium and JUnit4, and dependencies in build.gradle
dependencies {
testImplementation 'io.cucumber:cucumber-java:7.6.0'
testImplementation 'io.cucumber:cucumber-junit:7.6.0'
// Use JUnit test framework.
testImplementation 'junit:junit:4.13.2'
//ExtentReport
implementation 'tech.grasshopper:extentreports-cucumber7-adapter:1.7.0'
implementation 'com.aventstack:extentreports:5.0.9'
// This dependency is used by the application.
implementation 'com.google.guava:guava:30.1.1-jre'
implementation 'org.seleniumhq.selenium:selenium-java:4.4.0'
implementation 'io.github.bonigarcia:webdrivermanager:5.3.0'
}
The complete build.gradle is shown below:
/*
* This file was generated by the Gradle 'init' task.
*
*/
plugins {
// Apply the application plugin to add support for building a CLI application in Java.
id 'application'
}
repositories {
// Use Maven Central for resolving dependencies.
mavenCentral()
}
java {
sourceCompatibility = 11
targetCompatibility = 11
}
dependencies {

    testImplementation 'io.cucumber:cucumber-java:7.6.0'
    testImplementation 'io.cucumber:cucumber-junit:7.6.0'

    // Use JUnit test framework.
    testImplementation 'junit:junit:4.13.2'

    //ExtentReport
    implementation 'tech.grasshopper:extentreports-cucumber7-adapter:1.7.0'
    implementation 'com.aventstack:extentreports:5.0.9'

    // This dependency is used by the application.
    implementation 'com.google.guava:guava:30.1.1-jre'
    implementation 'org.seleniumhq.selenium:selenium-java:4.4.0'
    implementation 'io.github.bonigarcia:webdrivermanager:5.3.0'
}
application {
// Define the main class for the application.
mainClass = 'com.example.App'
}
configurations {
cucumberRuntime {
extendsFrom testImplementation
}
}
task cucumber() {
dependsOn assemble, testClasses
doLast {
javaexec {
main = "io.cucumber.core.cli.Main"
classpath = configurations.cucumberRuntime + sourceSets.main.output + sourceSets.test.output
args = ['--plugin', 'pretty',
'--plugin', 'io.qameta.allure.cucumber7jvm.AllureCucumber7Jvm',
'--plugin', 'com.aventstack.extentreports.cucumber.adapter.ExtentCucumberAdapter:',
'--glue', 'com.example.definitions', 'src/test/resources']
}
}
}
Step 4 – Create Locator and Action classes and Step Definition corresponding to the feature file
As mentioned above, there is another tutorial that explains the project structure as well as the feature file and corresponding Step Definitions, please refer to this tutorial – Gradle Project with Cucumber, Selenium and JUnit4.
Step 5 – Create extent.properties file in resources folder and paste the below code
Go to the app project and run the tests, using the below command
gradle cucumber
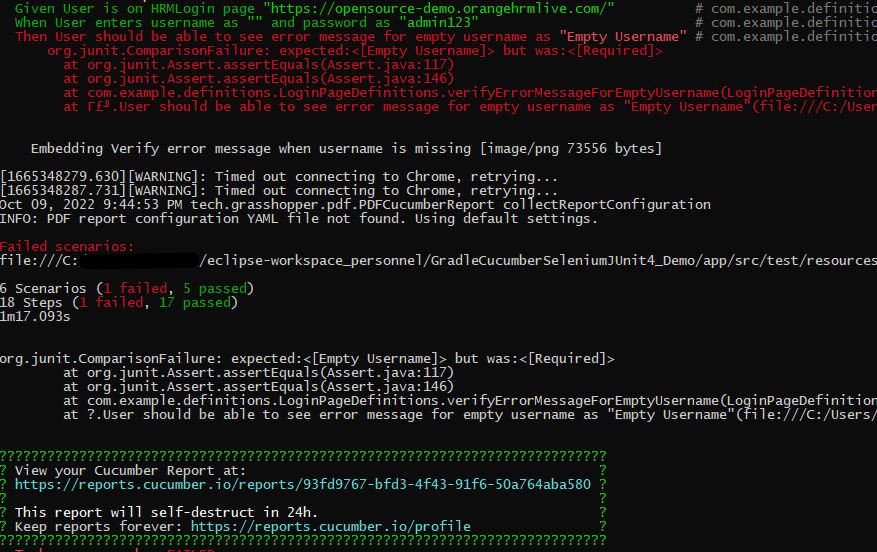
The output of the above program is
Step 7: View the ExtentReports
Refresh the project and will see a new folder – SparkReport_ which further contains 4 folders –HtmlReport, PdfReport, Reports, and Screenshots.
The ExtentReport will be present in the Report’s folder with the name Spark.html. PDF Report is present in the PdfReport folder and HTML Report is present in the HtmlReport folder. We can see that the Screenshots’ folder is empty because we have used base64imagesrc feature which resulted in no physical screenshots. The screenshots are embedded in the reports.
Right-click and open the ExtentHtml.html report with the Web Browser. The report also has a summary section that displays the summary of the execution. The summary includes the overview of the pass/fail using a pictogram, start time, end time, and pass/fail details of features as shown in the image below.
ExtentHtml.html
The failed test has screenshot embedded in it. Double click on mase64image and it will open the screenshot in full screen.
The previous tutorial explained the generation of Allure Report with Cucumber5, Selenium and JUnit4in a Maven project. In this tutorial, I will explain the steps to create an Allure Report with Cucumber, Selenium, and JUnit4 in a Gradle project.
Prerequisite:
Java 8 or above installed
Eclipse or IntelliJ IDE installed
Gradle Installed
Environment variables JAVA_HOME, ALLURE_HOME and GRADLE_HOME are correctly configured
In this tutorial, I’ll create a BDD Framework for the testing of web applications using Cucumber7, and Selenium 4 with JUnit4. This framework consists of:-
Cucumber Java- 7.6.0
Cucumber JUnit4 – 7.6.0
Java 11
JUnit4 – 4.13.2
Gradle – 7.3.3
Selenium – 4.3.0
Allure Cucumber – 2.19.0
AspectJ Weaver – 1.9.7
Project Structure
Implementation Steps
Add Cucumber, Selenium, TestNG, and Allure-JUnit dependencies in build.gradle
Create Locator and Action classes and Step Definition corresponding to the feature file and Test Runner Class
Step 1 – Add Cucumber, Selenium, TestNG, and Allure-JUnit4 dependencies in build.gradle
/*
 * This file was generated by the Gradle 'init' task.
 *
 */

plugins {
    // Apply the application plugin to add support for building a CLI application in Java.
    id 'application'
    id 'io.qameta.allure' version '2.11.0'
}

repositories {
    // Use Maven Central for resolving dependencies.
    mavenCentral()
}

java {
    sourceCompatibility = 11
    targetCompatibility = 11
}

dependencies {

    testImplementation 'io.cucumber:cucumber-java:7.6.0'
    testImplementation 'io.cucumber:cucumber-junit:7.6.0'

    // Use JUnit test framework.
    testImplementation 'junit:junit:4.13.2'

    // Allure
    implementation 'io.qameta.allure:allure-cucumber7-jvm:2.19.0'
    runtimeOnly 'org.aspectj:aspectjweaver:1.9.7'

    // This dependency is used by the application.
    implementation 'com.google.guava:guava:30.1.1-jre'
    implementation 'org.seleniumhq.selenium:selenium-java:4.4.0'
    implementation 'io.github.bonigarcia:webdrivermanager:5.3.0'
}

application {
    // Define the main class for the application.
    mainClass = 'com.example.App'
}

configurations {
    cucumberRuntime {
        extendsFrom testImplementation
    }
}

task cucumber() {
    dependsOn assemble, testClasses
    doLast {
        javaexec {

           systemProperty("allure.results.directory", "build/allure-results")
            main = "io.cucumber.core.cli.Main"
            classpath = configurations.cucumberRuntime + sourceSets.main.output + sourceSets.test.output
            args = ['--plugin', 'pretty',
            '--glue', 'com.example.definitions', 'src/test/resources']
        }
    }
}
Step 2 – Create Locator and Action classes and Step Definition corresponding to the feature file and Test Runner Class
As mentioned above, there is another tutorial that explains the project structure as well as the feature file and corresponding Step Definitions, please refer to this tutorial – Gradle Project with Cucumber, Selenium, and JUnit4.
Step 3 – Execute the Tests
Go to the app project and run the tests, using the below command
gradle cucumber
The output of the test execution is
Step 4 – Generate the Allure Report
Once the test execution is finished, a folder named allure-results will be generated in thebuild folder.
Note:- Make sure that you move to the folder app because the build folder is present in the app folder.
allure serve build/allure-results
Allure Report Dashboard
The overview page hosts several default widgets representing the basic characteristics of your project and test environment.
Statistics – overall report statistics.
Launches – if this report represents several test launches, statistics per launch will be shown here.
Behaviors – information on results aggregated according to stories and features.
Executors – information on test executors that were used to run the tests.
History Trend – if tests accumulated some historical data, its trend will be calculated and shown on the graph.
Environment – information on the test environment.
Categories in Allure Report
The categories tab gives you a way to create custom defect classifications to apply for test results. There are two categories of defects – Product Defects (failed tests) and Test Defects (broken tests).
Suites in Allure Report
On the Suites tab a standard structural representation of executed tests, grouped by suites and classes can be found.
Graphs in Allure Report
Graphs allow you to see different statistics collected from the test data: status breakdown or severity and duration diagrams.
Timeline in Allure Report
The timeline tab visualizes retrospective test execution, allure adaptors collect precise timings of tests, and here on this tab, they are arranged accordingly to their sequential or parallel timing structure.
Behaviors of Allure Report
This tab groups test results according to Epic, Feature, Story, Test Severity, Test Description, Test Steps, and so on.
Packages in Allure Report
The packages tab represents a tree-like layout of test results, grouped by different packages.
BDD Features
The feature’s description appears in every scenario.
All scenario steps are automatically translated into allure steps.
Congratulations on making it through this tutorial and hope you found it useful! Happy Learning!! Cheers!!