The previous tutorial explained the Integration of Selenium and JUnit5 in a Gradle project. In this tutorial, I will explain the steps to create an Allure Report with Selenium and JUnit5 in a Gradle project.
Table of Contents
Prerequisite:
- Java 8 or above installed
- Eclipse or IntelliJ IDE installed
- Gradle Installed
- Environment variables JAVA_HOME, ALLURE_HOME and GRADLE_HOME correctly configured
In this tutorial, I’ll create a BDD Framework for creating an Allure Report for Selenium WebDriver with JUnit5. This framework consists of:-
Dependency List
- Java 11
- JUnit– 5.8.2
- Gradle – 7.3.3
- Selenium – 4.3.0
- Allure Report – 2.19
- AspectJ Weaver – 1.9.7
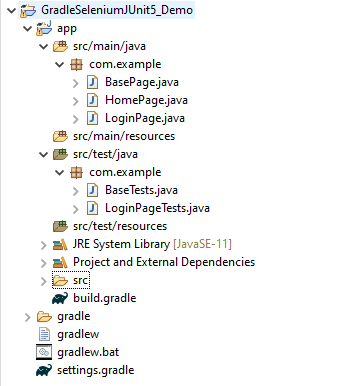
Project Structure
Implementation Steps
There is another tutorial that explains the steps to create a Gradle Project with Selenium and JUnit5. Please refer to this tutorial – Gradle – Integration of Selenium and JUnit5.
Step 1 – Add dependencies to build.gradle
Add Selenium, JUnit5, and Allure-JUnit5 dependencies in build.gradle
/*
 * This file was generated by the Gradle 'init' task.
 *
 */

plugins {
    // Apply the application plugin to add support for building a CLI application in Java.
    id 'application'
    id 'io.qameta.allure' version '2.11.0'
}

repositories {
    // Use Maven Central for resolving dependencies.
    mavenCentral()
}

java {
    sourceCompatibility = 11
    targetCompatibility = 11
}

dependencies {
    // Use JUnit Jupiter for testing.
    testImplementation 'org.junit.jupiter:junit-jupiter:5.8.2'
    testRuntimeOnly 'org.junit.jupiter:junit-jupiter-engine:5.8.2'

     // Allure
     implementation 'io.qameta.allure:allure-junit5:2.19.0'
     runtimeOnly 'org.aspectj:aspectjweaver:1.9.7'

    // This dependency is used by the application.
    implementation 'com.google.guava:guava:30.1.1-jre'
    implementation 'org.seleniumhq.selenium:selenium-java:4.4.0'
    implementation 'io.github.bonigarcia:webdrivermanager:5.3.0'
}

application {
    // Define the main class for the application.
    mainClass = 'com.example.App'
}

tasks.named('test') {
    // Use JUnit Platform for unit tests.
    useJUnitPlatform()  {
    }
}
Step 2 – Create Pages and Test Code for the pages
As mentioned above, there is another tutorial that explains the project structure as well as the feature file and corresponding Step Definitions, please refer to this tutorial – Gradle Project with Selenium and JUnit5.
Below is the sample test code. I have added features of the allure report like @Severity, @Description.
I have used Parameterized Tests here, to know more about that, please refer to this tutorial – How to run parameterized Selenium test using JUnit5.
import org.junit.jupiter.api.Test;
import org.junit.jupiter.params.ParameterizedTest;
import org.junit.jupiter.params.provider.CsvSource;
import static org.junit.jupiter.api.Assertions.assertEquals;
import org.junit.jupiter.api.Disabled;
import io.qameta.allure.Description;
import io.qameta.allure.Severity;
import io.qameta.allure.SeverityLevel;

public class LoginPageTests extends BaseTests{

	@Severity(SeverityLevel.NORMAL)
    @ParameterizedTest
    @CsvSource({
            "admin$$,admin123",
            "Admin,admin123!!",
            "admin123,Admin",
            "%%%%%,$$$$$$"})
	@Description("Test Description : Login Test with invalid credentials")
    public void invalidCredentials(String username, String password) {

	    LoginPage objLoginPage = new LoginPage(driver);
    	objLoginPage.login(username, password);

    	// Verify Error Message
    	 assertEquals("Invalid credentials",objLoginPage.getErrorMessage());

    }

	@Severity(SeverityLevel.BLOCKER)
    @Test
	@Description("Test Description : Login Test with valid credentials")
    public void validLogin() {

	    LoginPage objLoginPage = new LoginPage(driver);
    	objLoginPage.login("Admin", "admin123");

    	HomePage objHomePage = new HomePage(driver);

    	// Verify Home Page
    	 assertEquals("Employee Information",objHomePage.getHomePageText());
    }

	@Severity(SeverityLevel.NORMAL)
    @Test
	@Description("Test Description : Login Test with missing username - Failed Test")
    public void missingUsername() {

	    LoginPage objLoginPage = new LoginPage(driver);
    	objLoginPage.login("", "admin123");

    	// Verify Error Message
   	     assertEquals("Invalid credentials",objLoginPage.getMissingUsernameText());

    }

	@Severity(SeverityLevel.NORMAL)
    @Test @Disabled
	@Description("Test Description : Login Test with missing password")
    public void missingPassword() {

	    LoginPage objLoginPage = new LoginPage(driver);
    	objLoginPage.login("admin", "");

    	// Verify Error Message
   	     assertEquals("Invalid credentials",objLoginPage.getMissingPasswordText());

    }
}
Below is the BaseTest class, where I have shown the use of @Step of Allure Report.
import java.time.Duration;
import org.junit.jupiter.api.AfterEach;
import org.junit.jupiter.api.BeforeEach;
import org.openqa.selenium.WebDriver;
import org.openqa.selenium.chrome.ChromeDriver;
import io.github.bonigarcia.wdm.WebDriverManager;
import io.qameta.allure.Step;

public class BaseTests {

	public WebDriver driver;
	public final static int TIMEOUT = 10;

	@BeforeEach
    @Step("Start the application")
    public void setup() {
    	WebDriverManager.chromedriver().setup();
	    driver = new ChromeDriver();
	    driver.manage().window().maximize();
	    driver.get("https://opensource-demo.orangehrmlive.com/");
	    driver.manage().timeouts().implicitlyWait(Duration.ofSeconds(TIMEOUT));

    }

    @AfterEach
    @Step("Stop the application")
    public void tearDown() {
        driver.quit();
    }

}
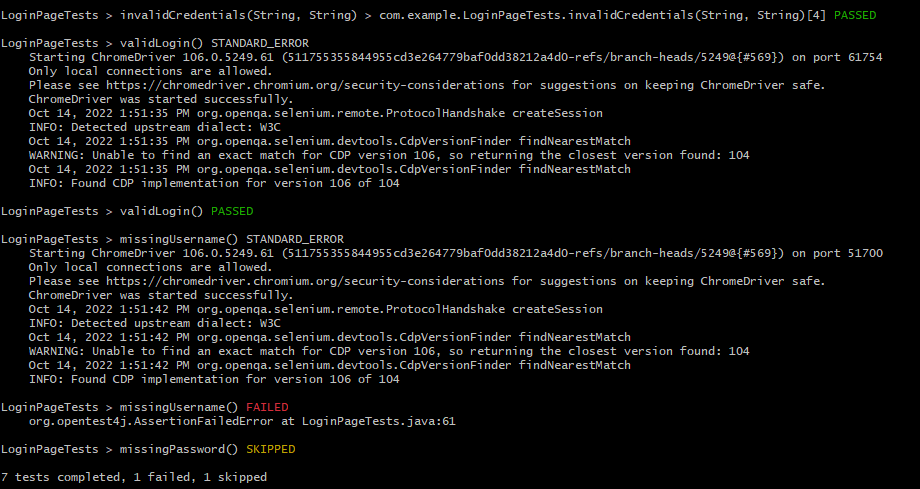
Step 3 – Execute the Tests
Go to the app project and run the tests, using the below command
gradle clean test
The output of the test execution is
Step 4 – Generate the Allure Report
Once the test execution is finished, a folder named allure-results will be generated in the build folder.
Note:- Make sure that you move to the folder app, because the build folder is present in the app folder.

To generate an Allure Report, use the below command.
allure serve build/allure-results
This will generate the beautiful Allure Test Report as shown below.
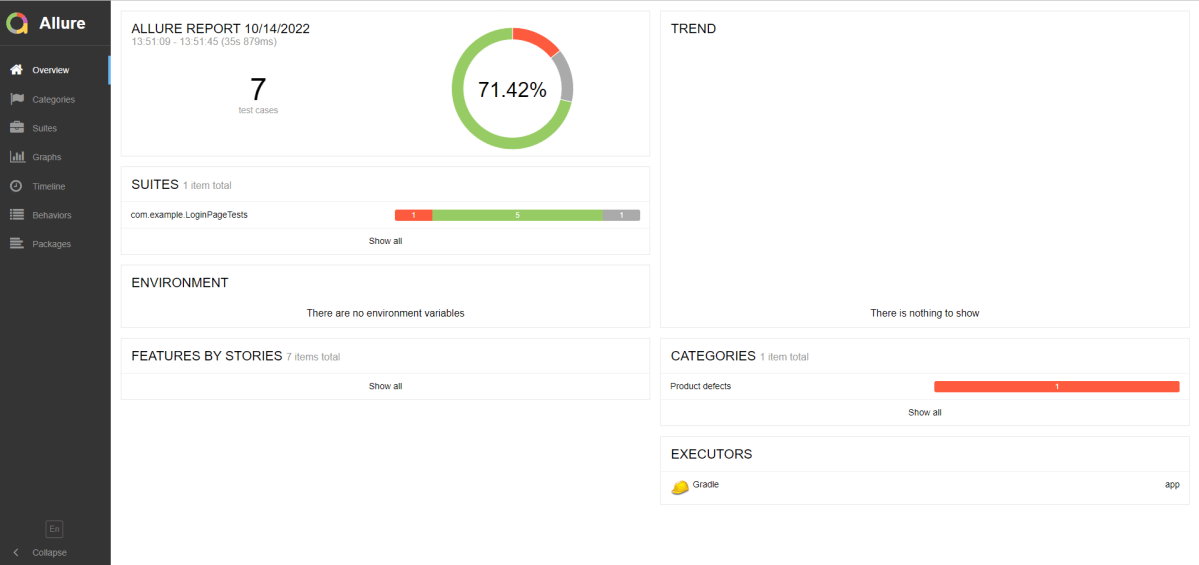
Allure Report Dashboard
The overview page hosts several default widgets representing the basic characteristics of your project and test environment.
- Statistics – overall report statistics.
- Launches – if this report represents several test launches, statistics per launch will be shown here.
- Behaviors – information on results aggregated according to stories and features.
- Executors – information on test executors that were used to run the tests.
- History Trend – if tests accumulated some historical data, its trend will be calculated and shown on the graph.
- Environment – information on the test environment.
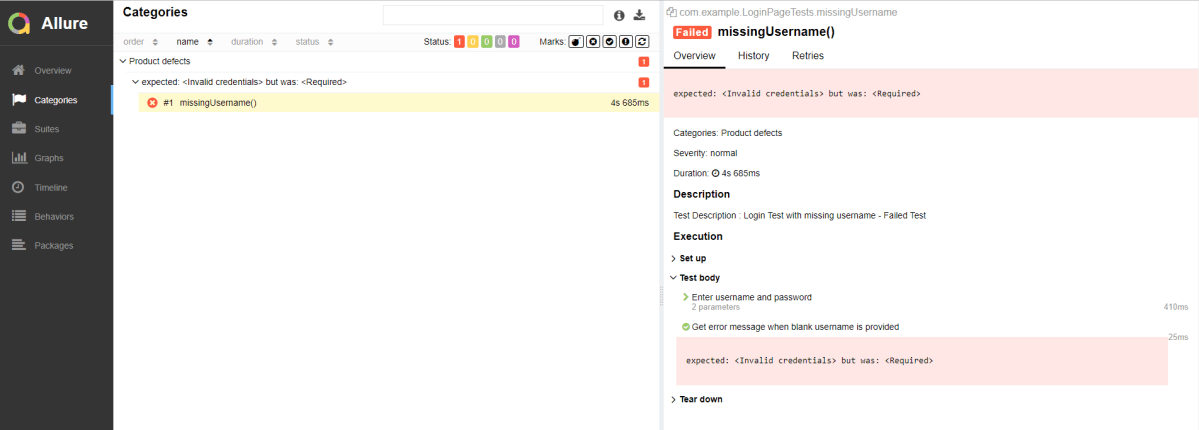
Categories in Allure Report
The categories tab gives you a way to create custom defect classifications to apply for test results. There are two categories of defects – Product Defects (failed tests) and Test Defects (broken tests).
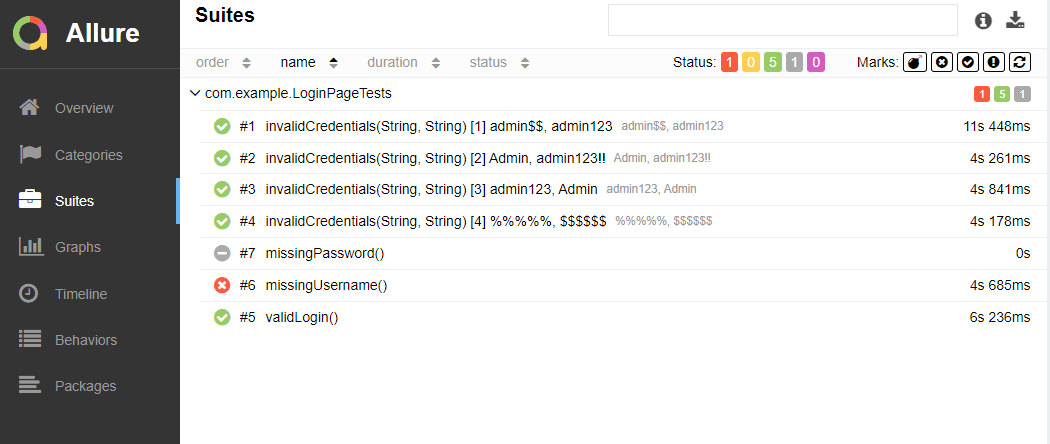
Suites in Allure Report
On the Suites tab a standard structural representation of executed tests, grouped by suites and classes, can be found.
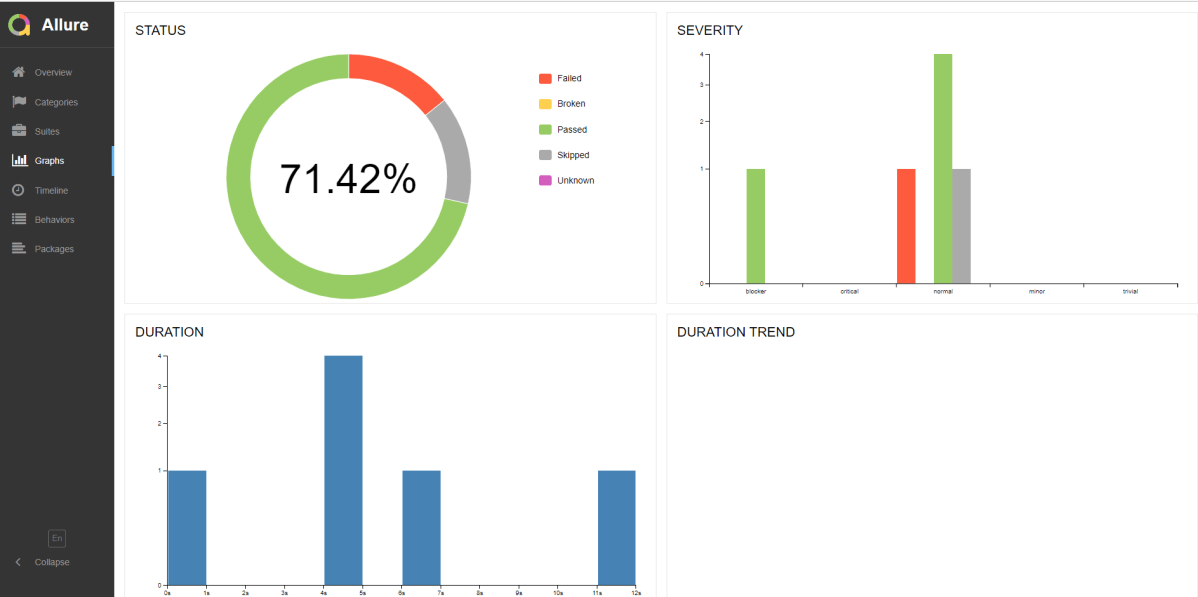
Graphs in Allure Report
Graphs allow you to see different statistics collected from the test data: status breakdown or severity and duration diagrams.
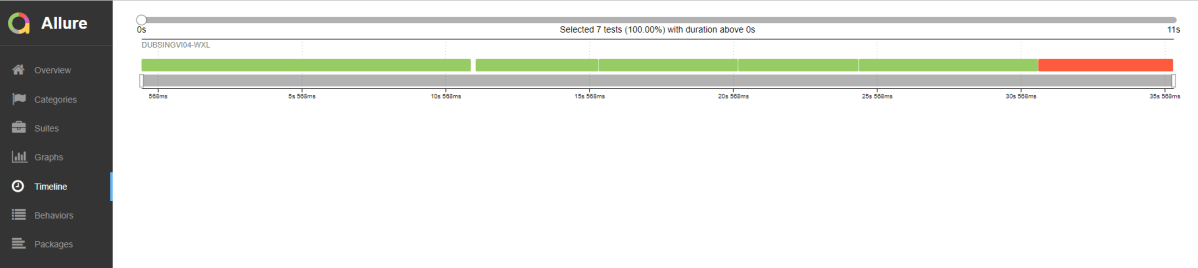
Timeline in Allure Report
The timeline tab visualizes retrospective test execution, allure adaptors collect precise timings of tests, and here on this tab, they are arranged accordingly to their sequential or parallel timing structure.
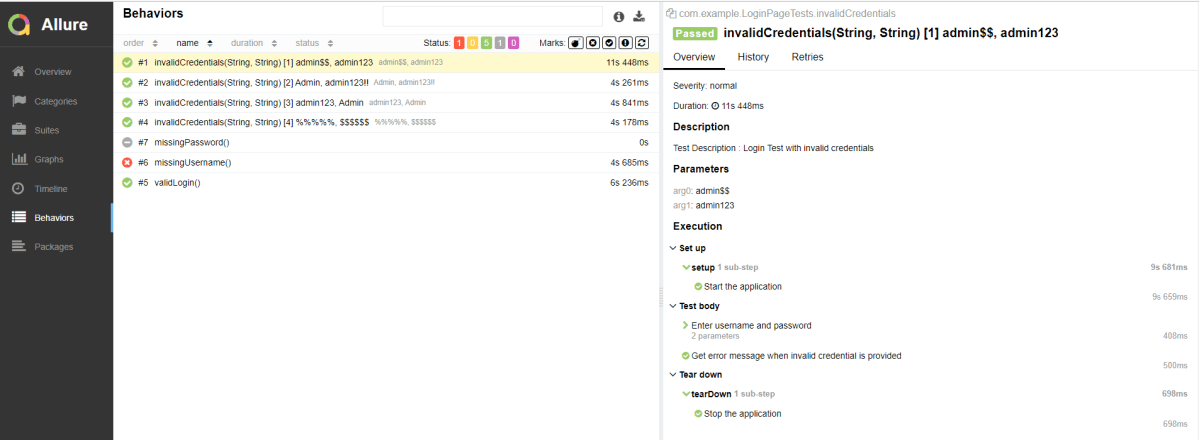
Behaviors of Allure Report
This tab groups test results according to Epic, Feature, Story, Test Severity, Test Description, Test Steps, and so on.
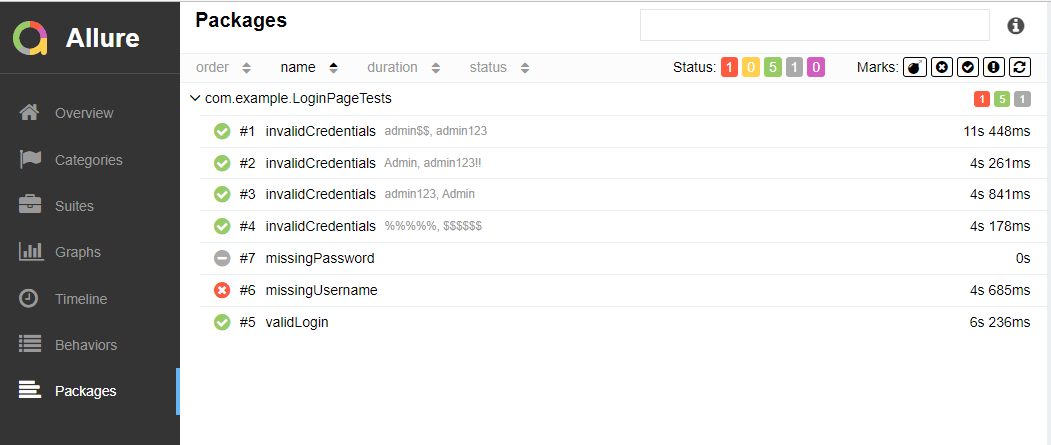
Packages in Allure Report
The packages tab represents a tree-like layout of test results, grouped by different packages.
Congratulations on making it through this tutorial and hope you found it useful! Happy Learning!! Cheers!!

Thank you for providing this valuable information here.
However, I need clarification on this:
Note:- Make sure that you move to the folder app, because the build folder is present in the app folder.
What do you mean by that ^?
LikeLike
nvm. figured out.
but was wondering if you can implement this reporting system in CI/CD on ADO?
LikeLike
Hi, yes we can implement this reporting system in CI/CD. I have implemented it in GitHub pipeline/GitLab pipeline/Jenkins CI/CD. So, it should be feasible for ADO too.
LikeLike