Allure Framework is a lightweight, flexible multi-language test report tool that not only displays a very concise representation of what has been tested in a neat web report form, but also allows everyone involved in the development process to extract the most useful information from everyday test execution.
Selenium 4
How to run Chrome tests in headless mode in Selenium
This tutorial explains the steps to run the Selenium tests for Chrome browser in headless mode. We are going to run the tests in Selenium 4 as well as Selenium 3.
What is headless browser?
A headless browser is like any other browser, but without a Head/GUI (Graphical User Interface). A headless browser is used to automate the browser without launching the browser. While the tests are running, we could not see the browser, but we can see the test results coming on the console.
Headless browser testing is generally faster when compared to actual UI testing as it doesn’t wait for the whole page to render before performing any action.
When we need to execute automated test cases remotely on a server or in any of the build and release pipelines for continuous integration servers like Gitlab or Jenkins, it is not always possible to install real browsers on such remote machines. We can use headless browsers to run automation tests efficiently.
It is easy to perform multi-tasking with a Headless browser. The browser or our machine can do anything else while the tests run in the background.
There are 2 ways to add dependencies to the Selenium project.
1. Manually add the dependencies to the project.
Download Selenium Version from here (Selenium 3 & Selenium 4)
Download ChromeDriver Binary (Selenium 3 only)
Download the latest version of WebDriverManager (Selenium 3 only)
Once the Selenium and WebDriverManager folders are downloaded, unzip the folder. Once the zip file is extracted, reference these jar files in the project. For this, navigate to project properties and click Build Path-> Configure Build Path in Eclipse. Click “Add External Jars“. After clicking on the “Add External JARs“, selected all the extracted JARs. The JARs files are present in the project.
2. Add the below dependencies to pom.xml or build.gradle.
Selenium 4
Add below dependencies to the project.
 <dependency>
      <groupId>org.seleniumhq.selenium</groupId>
      <artifactId>selenium-java</artifactId>
      <version>4.16.1</version>
 </dependency>
The complete program looks like as shown below:
package com.example.steps;

import org.openqa.selenium.WebDriver;
import org.openqa.selenium.chrome.ChromeDriver;
import org.openqa.selenium.chrome.ChromeOptions;
import org.openqa.selenium.firefox.FirefoxDriver;
import org.openqa.selenium.firefox.FirefoxOptions;

public class ChromeOptionsHeadless_Demo {

    public static void main(String[] args) {

        // Create an object of Chrome Options class
        ChromeOptions options = new ChromeOptions();

        // Set Firefox Headless mode as TRUE
        options.addArguments("--headless=new");

        // Create an object of WebDriver class and pass the Chrome Options object
        // as an argument
        WebDriver driver = new ChromeDriver(options);

        // Navigate to site url
        driver.get("https://duckduckgo.com/");

        System.out.println("Executing Chrome Driver in Headless mode..");
        System.out.println("Page Title : " + driver.getTitle());
        System.out.println("Page URL  : " + driver.getCurrentUrl());

        // Close the driver
        driver.quit();
    }

}
The output of the above program is

Selenium 3
Add below dependencies to the project.
 <dependency>
      <groupId>org.seleniumhq.selenium</groupId>
      <artifactId>selenium-java</artifactId>
      <version>3.141.59</version>
 </dependency>
We know that to execute Selenium automation scripts on browsers like chrome or firefox, we must download the binary files of these drivers like chromedriver and geckodriver, etc. After this, we need to set the path to these binaries in the automation script or add the classpath location. Here, we want to execute Selenium WebDriver automation scripts on the Chrome browser, then you need first to download chromedriver.exe and then use the System.setProperty method to set its path as follows:
	// Set the path of ChromeDriver
	System.setProperty("webdriver.chrome.driver",
				"C:\\Users\\Vibha\\Software\\chromedriver_win32_98.0.4758.102\\chromedriver.exe");
The complete program looks like as shown below:
import org.openqa.selenium.chrome.ChromeDriver;
import org.openqa.selenium.chrome.ChromeOptions;

public class ChromeOptionsHeadless1 {

	public static void main(String[] args) {

		// Set the path of ChromeDriver
		System.setProperty("webdriver.chrome.driver",
				"C:\\Users\\Vibha\\Software\\chromedriver_win32_98.0.4758.102\\chromedriver.exe");

		// Create an object of Chrome Options class
		ChromeOptions options = new ChromeOptions();

		// pass the argument –headless to Chrome Options class.
		options.addArguments("--headless");

		// Create an object of Chrome Driver class and pass the Chrome Options object as
		// an argument
		ChromeDriver driver = new ChromeDriver(options);

		System.out.println("Executing Chrome Driver in Headless mode..");
		driver.get("https://duckduckgo.com/");

		System.out.println("Title of Page :" + driver.getTitle());
		System.out.println("Page URL  : " + driver.getCurrentUrl());

		// Close the driver
		driver.close();

	}
}
The output of the above program is

How to run headless Chrome Tests in Selenium using WebDriverManager?
WebDriverManager
<!-- https://mvnrepository.com/artifact/io.github.bonigarcia/webdrivermanager -->
<dependency>
    <groupId>io.github.bonigarcia</groupId>
    <artifactId>webdrivermanager</artifactId>
    <version>5.1.0</version>
</dependency>
WebDriverManager has an automated way to download browser executables(exes) or binaries. It supports different browsers like Chrome, Firefox, Microsoft Edge, Internet Explorer, Opera, or PhantomJS.
WebDriverManager.chromedriver().setup: checks for the latest version of the specified WebDriver binary. If the binaries are not present on the machine, then it will download the WebDriver binaries. Next, it instantiates the Selenium WebDriver instance with the ChromeDriver.
import org.openqa.selenium.chrome.ChromeDriver;
import org.openqa.selenium.chrome.ChromeOptions;

import io.github.bonigarcia.wdm.WebDriverManager;

public class ChromeOptionsHeadless2 {

	public static void main(String[] args) {

		// WebDriverManager downloads chrome browser executables or binaries.
		WebDriverManager.chromedriver().setup();

		// Create an object of Chrome Options class
		ChromeOptions options = new ChromeOptions();

		// pass the argument –headless to Chrome Options class.
		options.addArguments("--headless");

		// Create an object of Chrome Driver class and pass the Chrome Options object as
		// an argument
		ChromeDriver driver = new ChromeDriver(options);

		System.out.println("Executing Chrome Driver in Headless mode..");
		driver.get("https://duckduckgo.com/");

		System.out.println("Title of Page :" + driver.getTitle());
		System.out.println("Page URL  : " + driver.getCurrentUrl());

		// Close the driver
		driver.close();

	}

}
The output of the above program is

Congratulations!! We are able to run Chrome tests in Selenium in headless mode.
How to run Firefox tests in headless mode in Selenium
This tutorial explains the steps to run the Selenium tests on Firefox browser in headless mode. We are going to run the tests in Selenium. To run the Selenium tests on Chrome browser in headless mode, refer this tutorial.
To start with, we need to add dependencies to the project.
Manually add the dependencies to the project
Download Selenium Version from here
Download Firefox Binary from here
Download the latest version of WebDriverManager (Download this if you want to use WebDriverManager to download browser executables(exes) or binaries automatically, then skip downloading FireFox Binary).
Selenium 4
Add the below dependencies to pom.xml or build.gradle.
<dependency>
    <groupId>org.seleniumhq.selenium</groupId>
    <artifactId>selenium-java</artifactId>
    <version>4.16.1</version>
</dependency>
Below is an example to run the Firefox tests in the headless mode.
import org.openqa.selenium.WebDriver;
import org.openqa.selenium.firefox.FirefoxDriver;
import org.openqa.selenium.firefox.FirefoxOptions;

public class FirefoxOptionsHeadless_Demo {

    public static void main(String[] args) {

        // Create an object of Firefox Options class
        FirefoxOptions options = new FirefoxOptions();

        // Set Firefox Headless mode as TRUE
        options.addArguments("-headless");

        // Create an object of WebDriver class and pass the Firefox Options object
        // as an argument
        WebDriver driver = new FirefoxDriver(options);

        // Navigate to site url
        driver.get("https://duckduckgo.com/");

        System.out.println("Executing Firefox Driver in Headless mode..");
        System.out.println("Page Title : " + driver.getTitle());
        System.out.println("Page URL  : " + driver.getCurrentUrl());

        // Close the driver
        driver.quit();
    }

}
The output of the above program is

Selenium 3
Add the below dependencies to pom.xml or build.gradle.
<!-- https://mvnrepository.com/artifact/org.seleniumhq.selenium/selenium-java -->
    <dependency>
      <groupId>org.seleniumhq.selenium</groupId>
      <artifactId>selenium-java</artifactId>
      <version>3.141.59</version>
    </dependency>
What is headless browser?
A headless browser is like any other browser, but without a GUI (Graphical User Interface). A headless browser is used to automate the browser without launching the browser. While the tests are running, we could not see the browser, but we can see the test results coming on the console. This makes the test execution faster than normal execution. This is suitable for parallel testing as UI tests needs a lot of memory and resources.
The path of Gecko Driver (used for Firefox browser) needs to be set up in the Test using System.setProperty().Here, we use the methods setHeadless (true) of the FirfoxOptions class provided by Selenium WebDriver.
The complete program looks like as shown below:
import org.openqa.selenium.WebDriver;
import org.openqa.selenium.firefox.FirefoxDriver;
import org.openqa.selenium.firefox.FirefoxOptions;

public class FirefoxOptionsHeadless1 {

	public static void main(String[] args) {

		// Set the path of GeckoDriver
		System.setProperty("webdriver.gecko.driver",
				"C:\\Users\\Vibha\\Software\\geckodriver\\geckodriver.exe");

		// Create an object of Firefox Options class
		FirefoxOptions options = new FirefoxOptions();

		// Set Firefox Headless mode as TRUE
		options.setHeadless(true);

		// Create an object of WebDriver class and pass the Firefox Options object
		// as an argument
		WebDriver driver = new FirefoxDriver(options);

		// Navigate to site url
		driver.get("https://duckduckgo.com/");

		System.out.println("Executing Firefox Driver in Headless mode..");
		System.out.println("Page Title : " + driver.getTitle());
		System.out.println("Page URL  : " + driver.getCurrentUrl());

		// Close the driver
		driver.close();
	}
}
The output of the above program is
How to run headless Firefox Tests in Selenium using WebDriverManager?
WebDriverManager
<!-- https://mvnrepository.com/artifact/io.github.bonigarcia/webdrivermanager -->
<dependency>
    <groupId>io.github.bonigarcia</groupId>
    <artifactId>webdrivermanager</artifactId>
    <version>5.1.0</version>
</dependency>
WebDriverManager.firefoxdriver().setup(): checks for the latest version of the specified WebDriver binary. If the binaries are not present on the machine, then it will download the WebDriver binaries. In this case, it is not needed to download Firefox binary and set up the path
import org.openqa.selenium.WebDriver;
import org.openqa.selenium.firefox.FirefoxDriver;
import org.openqa.selenium.firefox.FirefoxOptions;

import io.github.bonigarcia.wdm.WebDriverManager;

public class FirefoxOptionsHeadless2 {

	public static void main(String[] args) {

		WebDriverManager.firefoxdriver().setup();

		// Create an object of Firefox Options class
		FirefoxOptions options = new FirefoxOptions();

		// Set Firefox Headless mode as TRUE
		options.setHeadless(true);

		// Create an object of Firefox Driver class and pass the Firefox Options object
		// as an argument
		WebDriver driver = new FirefoxDriver(options);

		// Navigate to the url
		driver.get("https://duckduckgo.com/");

		System.out.println("Executing Firefox Driver in Headless mode..");
		System.out.println("Page Title : " + driver.getTitle());
		System.out.println("Page URL  : " + driver.getCurrentUrl());

		// Close the driver
		driver.close();
	}

}
Congratulations!! We have run the tests in headless mode in FireFox.
How to handle browser cookies in Selenium WebDriver
What is a Cookie?
A cookie is a small piece of data that is sent from a website and stored on your computer. Cookies are mostly used to recognize the user and load the stored information. Using Selenium WebDriver we can easily pass the cookie to the domain. Each cookie is associated with a name, value, domain, path, expiry, and the status of whether it is secure or not. In order to validate a client, a server parses all of these values in a cookie. Handling cookies during your automated testing is a common task since most websites are using cookies to track and retain specific user information.
Why do I need to handle cookies during automated testing?
Automated test runs may encounter a possible issue. It is possible that the website being tested is using the same cookie to store particular data for several tests.
Let’s take an example where you are adding an item to a shopping cart to test it. If one test adds the item to the cart, data might be saved in a cookie.
It’s possible that the logic in the second test believes the cart is empty. However, the second test fails since the cookie from the previous test is still saved.
In Selenium WebDriver, we can query and interact with cookies with the below built-in methods.
Various cookie operations
Create and add the cookie
The add_cookie() method takes a cookie dictionary as its parameter, focusing on the most important attributes – name and value.
driver.manage().addCookie(arg0);
Get Named Cookie
It returns the serialized cookie data matching the cookie name among all associated cookies.
driver.manage().getCookieNamed(arg0);
Get All Cookies
It returns a ‘successful serialized cookie data’ for the current browsing context. If the browser is no longer available, it returns an error.
driver.manage().getCookies();
Delete specific cookie
It deletes the cookie data matching the provided cookie name.
driver.manage().deleteCookieNamed(arg0);
Delete all cookies
It deletes all the cookies of the current browsing context.
driver.manage().deleteAllCookies();
Let us see an example where we add cookies, get the details of the cookies, delete a particular cookie, and delete all the cookies. I’m using Selenium – 4.15.0.
import org.openqa.selenium.Cookie;
import org.openqa.selenium.chrome.ChromeDriver;
import org.openqa.selenium.chrome.ChromeOptions;
import org.openqa.selenium.firefox.FirefoxDriver;
import java.util.Set;

public class Cookie_Demo {

    public static void main(String[] args) {

        ChromeOptions options = new ChromeOptions();
        options.addArguments("--start-maximize");

        ChromeDriver driver = new ChromeDriver(options);
        String URL = "http://google.com/";
        driver.navigate().to(URL);

        // Add the cookies into current browser context
        driver.manage().addCookie(new Cookie("mycookie1", "123456789123"));
        driver.manage().addCookie(new Cookie("mycookie2", "we34rf125ty6"));
        Cookie cookie1 = new Cookie("mycookie3", "ABCDEFGH");
        driver.manage().addCookie(cookie1);


        // Get All available cookies
        System.out.println("List of Cookies");
        Set<Cookie> cookiesList = driver.manage().getCookies();
        for (Cookie getcookies : cookiesList) {
            System.out.println(getcookies);
        }

        // Get cookie details with named cookie 'foo'
        System.out.println("Get detail of 2nd cookie");
        Cookie cookie2 = driver.manage().getCookieNamed("mycookie2");
        System.out.println(cookie2);

        // delete a cookie with name 'mycookie2'
        System.out.println("Delete 2nd cookie");
        driver.manage().deleteCookieNamed("mycookie2");

        // deletes all cookies
        System.out.println("Delete all cookies");
        driver.manage().deleteAllCookies();

        driver.quit();

    }
}
The output of the above program is

Congratulations on making it through this tutorial and hope you found it useful! Happy Learning!! Cheers!!
Advance Selenium Tutorials
If you are planning to learn Selenium WebDriver and if you have completed Basic Selenium tutorial, then you can start Advanced Selenium Tutorials which will talk about different frameworks, tools integration, external data reading from different sources, and so on.
Handling Excels
| Chapter 1 How to download and install Apache POI | |
| Chapter 2 Reading Excel Data with Apache POI in Java | |
| Chapter 3 How to Write Data to Excel File in Java using Apache POI | |
| Chapter 4 How to update existing excel in Java | |
| Chapter 5 Change Font Style in Excel with Apache POI – NEW |
Handling PDFs
| Chapter 1 Download PDF in Chrome with Selenium Java |
| Chapter 2 Download PDF in Firefox with Selenium Java |
| Chapter 3 Download PDF in Edge with Selenium Java |
| Chapter 4 Read PDF Files with Selenium in Java |
| Chapter 5 How to Write in PDF with Selenium and Java |
| Chapter 6 Merge PDF Files in Selenium with Java |
Selenium – Capture Screenshots
Advance Selenium
Docker
| Chapter 1 How to run Selenium 3 on Docker |
Selenium with Cucumber
| Chapter 1 Integration of Cucumber with Selenium and JUnit | |
| Chapter 2 Integration of Cucumber with Selenium and TestNG | |
| Chapter 3 Integration of Cucumber7 with Selenium and JUnit5 |
Selenium with Serenity
Gradle Projects with Selenium
| Chapter 1 How to create Gradle project with Selenium and TestNG | |
| Chapter 2 How to create Gradle project with Selenium and JUnit4 |
Frameworks
Selenium 4
| Chapter 1 New Features in Selenium 4 | |
| Chapter 2 Selenium Tests failing on Chrome Version 111 | |
| Chapter 3 How to run Chrome tests in headless mode in Selenium4 |
Selenium Grid
| Chapter 1 Selenium 4 Grid : How to use Standalone Grid |
| Chapter 2 Selenium 4 Grid – Parallel Testing |
| Chapter 3 Selenium Grid 4 with Docker |
| Chapter 4 Cross Browser Testing with Selenium Grid 4 and Docker |
Reports
| Chapter 1 Integration of Allure Report with Selenium and JUnit4 | |
| Chapter 2 Integration of Allure Report with Selenium and JUnit5 | |
| Chapter 3 Integration of Allure Report with Selenium and TestNG |
Database
| Chapter 1 How to connect to SQL Server using Java |
CI/CD
Basic Selenium Tutorials
Selenium Multiple Choice Questions – MCQ1
Selenium Multiple Choice Questions – MCQ2
Selenium Multiple Choice Questions – MCQ3
Selenium Interview Questions and Answers
Advanced Selenium Interview Questions and Answers
Page Object Model with Selenium, Cucumber and JUnit4
In this tutorial, I’ll create a Page Object Model Framework for testing web applications. I will use Selenium, Cucumber, and JUnit4.
Table of Contents
- What is Page Object Model (POM)?
- Advantages of Page Object Model
- What is Cucumber?
- Dependency List
- Project Structure
- Implementation Steps
- Download and Install Java
- Download and setup Eclipse IDE on the system
- Setup Maven
- Install Cucumber Eclipse Plugin
- Create a new Maven Project
- Create source folder src/test/resources to create test scenarios in the Feature file
- Add Selenium, JUnit4, and Cucumber dependencies to the project
- Add Maven Compiler Plugin and Surefire Plugin
- Create a feature file in the src/test/resources directory
- Create the classes for locators, actions, and utilities in src/main/java
- Create a Java Class called Definition in src/test/java
- Create a Hook class in src/test/java
- Create a JUnit Cucumber Runner class in the src/test/java directory
- Run the tests from JUnit
- Run the tests from the Command Line
- Cucumber Report Generation
What is Page Object Model (POM)?
The Page Object model is an object design pattern in Selenium. Web pages are represented as classes. The various elements on the page are defined as variables in the class. All possible user interactions can then be implemented as methods in the class.
Advantages of Page Object Model
- Simplifies the process of adapting to changes in the UI. When page elements change due to a UI update, modifications are isolated to the page object class.
- Page objects contain methods that represent user actions on a web page. These methods make the tests more readable and understandable.
- Common code related to web pages is stored in page classes. This code is reused in tests. This approach results in the reduction of the code.
What is Cucumber?
Cucumber is one such open-source tool, which supports Behavior Driven Development(BDD). In simple words, Cucumber can be defined as a testing framework, driven by plain English. It serves as documentation, automated tests, and development aid – all in one.
Dependency List
- Cucumber Java – 7.6.0
- Cucumber JUnit4 – 7.6.0
- Java 11
- Maven – 3.8.6
- Selenium – 4.3.0
- JUnit – 4.13.2
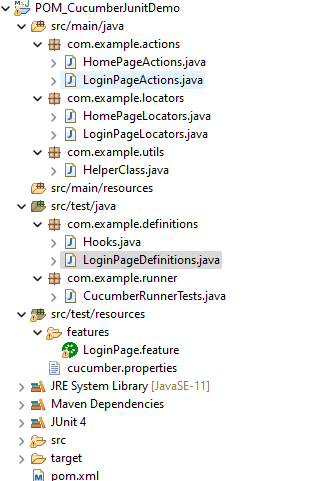
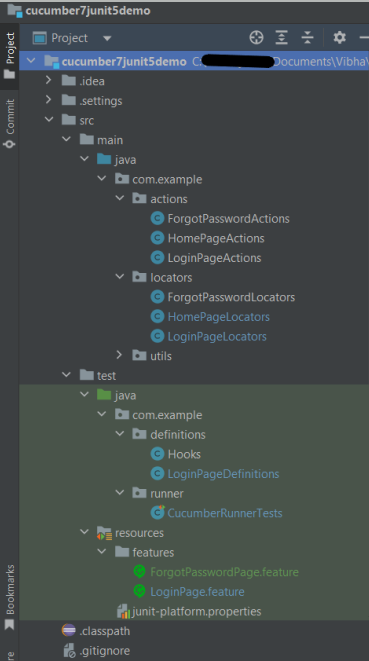
Project Structure

Implementation Steps
Step 1- Download and Install Java
Cucumber and Selenium need Java to be installed on the system to run the tests. Click here to know How to install Java.
Step 2 – Download and setup Eclipse IDE on the system
The Eclipse IDE (integrated development environment) provides strong support for Java developers. Click here to know How to install Eclipse.
Step 3 – Setup Maven
To build a test framework, we need to add a number of dependencies to the project. Click here to know How to install Maven.
Step 4 – Install Cucumber Eclipse Plugin
The cucumber plugin is an Eclipse plugin that allows eclipse to understand the Gherkin syntax. When we are working with cucumber, we write the feature files that contain Feature, Scenario, Given, When, Then, And, and But. They also include Tags, Scenario Outline, and Examples. By default, eclipse doesn’t understand these keywords so it doesn’t show any syntax highlighter. Cucumber Eclipse Plugin highlights the keywords present in Feature File. Refer to this tutorial to get more detail – How to setup Cucumber with Eclipse.
Step 5 – Create a new Maven Project
To create a new Maven project, go to the File -> New Project-> Maven-> Maven project-> Next -> Enter Group ID & Artifact ID -> Finish.
Click here to know How to create a Maven project
Step 6 – Create source folder src/test/resources to create test scenarios in the Feature file
A new Maven Project is created with 2 folders – src/main/java and src/test/java. To create test scenarios, we need a new source folder called – src/test/resources. To create this folder, right-click on your maven project ->select New ->Java and then Source Folder.
Mention the source folder name as src/test/resources and click the Next button. This will create a source folder under your new Maven project as shown in the below image.

Step 7 – Add Selenium, JUnit4, and Cucumber dependencies to the project
Add below mentioned Selenium, JUnit4, and Cucumber dependencies to the project. I have added WebDriverManager dependency to the POM.xml to download the driver binaries automatically. To know more about this, please refer to this tutorial – How to manage driver executables using WebDriverManager.
    <properties>
		<project.build.sourceEncoding>UTF-8</project.build.sourceEncoding>
		<cucumber.version>7.6.0</cucumber.version>
		<selenium.version>4.3.0</selenium.version>
		<webdrivermanager.version>5.2.1</webdrivermanager.version>
		<junit.version>4.13.2</junit.version>
		<apache.common.version>2.4</apache.common.version>
		<maven.compiler.plugin.version>3.10.1</maven.compiler.plugin.version>
		<maven.surefire.plugin.version>3.0.0-M7</maven.surefire.plugin.version>
		<maven.compiler.source.version>11</maven.compiler.source.version>
		<maven.compiler.target.version>11</maven.compiler.target.version>
	</properties>

	<dependencies>

		<dependency>
			<groupId>io.cucumber</groupId>
			<artifactId>cucumber-java</artifactId>
			<version>${cucumber.version}</version>
		</dependency>

		<dependency>
			<groupId>io.cucumber</groupId>
			<artifactId>cucumber-junit</artifactId>
			<version>${cucumber.version}</version>
			<scope>test</scope>
		</dependency>

		<!-- Selenium -->
		<dependency>
			<groupId>org.seleniumhq.selenium</groupId>
			<artifactId>selenium-java</artifactId>
			<version>${selenium.version}</version>
		</dependency>

		<!-- Web Driver Manager -->
		<dependency>
			<groupId>io.github.bonigarcia</groupId>
			<artifactId>webdrivermanager</artifactId>
			<version>${webdrivermanager.version}</version>
		</dependency>

		<!-- JUnit 4 -->
		<dependency>
			<groupId>junit</groupId>
			<artifactId>junit</artifactId>
			<version>${junit.version}</version>
			<scope>test</scope>
		</dependency>

		<!-- Apache Common -->
		<dependency>
			<groupId>org.apache.directory.studio</groupId>
			<artifactId>org.apache.commons.io</artifactId>
			<version>${apache.common.version}</version>
		</dependency>

	</dependencies>
Step 8 – Add Maven Compiler Plugin and Surefire Plugin
The compiler plugin is used to compile the source code of a Maven project. This plugin has two goals, which are already bound to specific phases of the default lifecycle:
- compile – compile main source files
- testCompile – compile test source files
<plugins>
			<plugin>
				<groupId>org.apache.maven.plugins</groupId>
				<artifactId>maven-compiler-plugin</artifactId>
				<version>${maven.compiler.plugin.version}</version>
				<configuration>
					<source>${maven.compiler.source.version}</source>
					<target>${maven.compiler.target.version}</target>
				</configuration>
			</plugin>
			<plugin>
				<groupId>org.apache.maven.plugins</groupId>
				<artifactId>maven-surefire-plugin</artifactId>
				<version>${maven.surefire.plugin.version}</version>
				<configuration>
                <includes>
                    <include>**/*Tests.java</include>
                </includes>
				</configuration>
			</plugin>
		</plugins>
The complete POM.xml looks like as shown below
<project xmlns="http://maven.apache.org/POM/4.0.0" xmlns:xsi="http://www.w3.org/2001/XMLSchema-instance" xsi:schemaLocation="http://maven.apache.org/POM/4.0.0 https://maven.apache.org/xsd/maven-4.0.0.xsd">
	<modelVersion>4.0.0</modelVersion>
	<groupId>com.example</groupId>
	<artifactId>POM_CucumberJunitDemo</artifactId>
	<version>0.0.1-SNAPSHOT</version>


	<properties>
		<project.build.sourceEncoding>UTF-8</project.build.sourceEncoding>
		<cucumber.version>7.6.0</cucumber.version>
		<selenium.version>4.3.0</selenium.version>
		<webdrivermanager.version>5.2.1</webdrivermanager.version>
		<junit.version>4.13.2</junit.version>
		<apache.common.version>2.4</apache.common.version>
		<maven.compiler.plugin.version>3.10.1</maven.compiler.plugin.version>
		<maven.surefire.plugin.version>3.0.0-M7</maven.surefire.plugin.version>
		<maven.compiler.source.version>11</maven.compiler.source.version>
		<maven.compiler.target.version>11</maven.compiler.target.version>
	</properties>

	<dependencies>

		<dependency>
			<groupId>io.cucumber</groupId>
			<artifactId>cucumber-java</artifactId>
			<version>${cucumber.version}</version>
		</dependency>

		<dependency>
			<groupId>io.cucumber</groupId>
			<artifactId>cucumber-junit</artifactId>
			<version>${cucumber.version}</version>
			<scope>test</scope>
		</dependency>

		<!-- Selenium -->
		<dependency>
			<groupId>org.seleniumhq.selenium</groupId>
			<artifactId>selenium-java</artifactId>
			<version>${selenium.version}</version>
		</dependency>

		<!-- Web Driver Manager -->
		<dependency>
			<groupId>io.github.bonigarcia</groupId>
			<artifactId>webdrivermanager</artifactId>
			<version>${webdrivermanager.version}</version>
		</dependency>

		<!-- JUnit 4 -->
		<dependency>
			<groupId>junit</groupId>
			<artifactId>junit</artifactId>
			<version>${junit.version}</version>
			<scope>test</scope>
		</dependency>

		<!-- Apache Common -->
		<dependency>
			<groupId>org.apache.directory.studio</groupId>
			<artifactId>org.apache.commons.io</artifactId>
			<version>${apache.common.version}</version>
		</dependency>

	</dependencies>

	<build>
		<plugins>
			<plugin>
				<groupId>org.apache.maven.plugins</groupId>
				<artifactId>maven-compiler-plugin</artifactId>
				<version>${maven.compiler.plugin.version}</version>
				<configuration>
					<source>${maven.compiler.source.version}</source>
					<target>${maven.compiler.target.version}</target>
				</configuration>
			</plugin>
			<plugin>
				<groupId>org.apache.maven.plugins</groupId>
				<artifactId>maven-surefire-plugin</artifactId>
				<version>${maven.surefire.plugin.version}</version>
				<configuration>
                <includes>
                    <include>**/*Tests.java</include>
                </includes>
				</configuration>
			</plugin>
		</plugins>
	</build>
</project>
Step 9 – Create a feature file in the src/test/resources directory
Create a folder with name features. Now, create the feature file in this folder. The feature file should be saved with extension .feature. This feature file contains the test scenarios created to test the application. The Test Scenarios are written in Gherkins language in the format of Given, When, Then, And, But.

Below is an example of Test Scenarios in the feature file. I have failed one test scenario intentionally – @MissingUsername.
Feature: Login to HRM Application

Background:
   Given User is on HRMLogin page "https://opensource-demo.orangehrmlive.com/"

   @ValidCredentials
   Scenario: Login with valid credentials

    When User enters username as "Admin" and password as "admin123"
    Then User should be able to login sucessfully and new page open

   @InvalidCredentials
   Scenario Outline: Login with invalid credentials

    When User enters username as "<username>" and password as "<password>"
    Then User should be able to see error message "<errorMessage>"

  Examples:
  | username   | password  | errorMessage                      |
  | Admin      | admin12$$ | Invalid credentials               |
  | admin$$    | admin123  | Invalid credentials               |
  | abc123     | xyz$$     | Invalid credentials               |


   @MissingUsername
   Scenario Outline: Login with blank username

    When User enters username as " " and password as "admin123"
    Then User should be able to see a message "Required1" below Username
Step 10 – Create the classes for locators, actions, and utilities in src/main/java

Create a Java Class for each page where define WebElements as variables using Annotation @FindBy. Create another Java class that contains methods for actions performed on WebElements. Here, I’m going to create 2 classes for locators – LoginPageLocators and HomePageLocators.java as well as 2 classes for actions – LoginPageActions and HomePageActions
The Locator class contains WebElements which are identified by @FindBy annotation as shown below:-
@FindBy(name = "txtUsername")
WebElement userName;
Action class contains methods for the action to be performed on the web elements identified in the locator class as shown below:-
public void login(String strUserName, String strPassword) {

           // Fill user name
           this.setUserName(strUserName);

           // Fill password
           this.setPassword(strPassword);

           // Click Login button
           this.clickLogin();
     }
}
The initElements is a static method of the PageFactory class that is used to initialize all the web elements located by @FindBy annotation. Only after the WebElements are initialized, they can be used in the methods to perform actions.
public Login(WebDriver driver) {
           this.driver = driver;
           // This initElements method will create all WebElements
           PageFactory.initElements(driver, this);
     }
Below is the sample code of the LoginPageLocators.
import org.openqa.selenium.WebElement;
import org.openqa.selenium.support.FindBy;

public class LoginPageLocators {

	@FindBy(name = "username")
    public WebElement userName;

    @FindBy(name = "password")
    public WebElement password;

    @FindBy(xpath = "//*[@id='app']/div[1]/div/div[1]/div/div[2]/div[2]/form/div[1]/div/span")
    public WebElement missingUsernameErrorMessage;

    @FindBy(xpath = "//*[@id='app']/div[1]/div/div[1]/div/div[2]/div[2]/form/div[3]/button")
    public WebElement login;

    @FindBy(xpath = "//*[@id='app']/div[1]/div/div[1]/div/div[2]/div[2]/div/div[1]/div[1]/p")
    public  WebElement errorMessage;

}
Below is the sample code for the HomePageLocators.
import org.openqa.selenium.WebElement;
import org.openqa.selenium.support.FindBy;

public class HomePageLocators {

	  @FindBy(xpath = "//*[@id='app']/div[1]/div[2]/div[2]/div/div[1]/div[1]/div[1]/h5")
	  public  WebElement homePageUserName;

}
Create the action classes for each web page. These action classes contain all the methods needed by the step definitions. In this case, I have created 2 action classes – LoginPageActions, HomePageActions
LoginPageActions
import org.openqa.selenium.support.PageFactory;

import com.example.locators.LoginPageLocators;
import com.example.utils.HelperClass;

public class LoginPageActions {

LoginPageLocators loginPageLocators = null;

    public LoginPageActions() {

    	this.loginPageLocators = new LoginPageLocators();

		PageFactory.initElements(HelperClass.getDriver(),loginPageLocators);
	}

	// Set user name in textbox
    public void setUserName(String strUserName) {
    	loginPageLocators.userName.sendKeys(strUserName);
    }

    // Set password in password textbox
    public void setPassword(String strPassword) {
    	loginPageLocators.password.sendKeys(strPassword);
    }

    // Click on login button
    public void clickLogin() {
    	loginPageLocators.login.click();
    }


   // Get the error message when username is blank
    public String getMissingUsernameText() {
        return loginPageLocators.missingUsernameErrorMessage.getText();
    }

    // Get the Error Message
    public String getErrorMessage() {
        return loginPageLocators.errorMessage.getText();
    }

    public void login(String strUserName, String strPassword) {

        // Fill user name
        this.setUserName(strUserName);

        // Fill password
        this.setPassword(strPassword);

        // Click Login button
        this.clickLogin();

    }
}
HomePageActions
import org.openqa.selenium.support.PageFactory;

import com.example.locators.HomePageLocators;
import com.example.utils.HelperClass;

public class HomePageActions {

	HomePageLocators homePageLocators = null;

    public HomePageActions() {

        this.homePageLocators = new HomePageLocators();

        PageFactory.initElements(HelperClass.getDriver(),homePageLocators);
    }


    // Get the User name from Home Page
    public String getHomePageText() {
        return homePageLocators.homePageUserName.getText();
    }

}
Create a Helper class where we are initializing the web driver. We are also initializing the web driver wait and defining the timeouts. A private constructor of the class is created. It will declare the web driver. Whenever we create an object of this class, a new web browser is invoked.
import java.time.Duration;
import org.openqa.selenium.WebDriver;
import org.openqa.selenium.chrome.ChromeDriver;
import io.github.bonigarcia.wdm.WebDriverManager;

public class HelperClass {

	 private static HelperClass helperClass;

	    private static WebDriver driver;
	    public final static int TIMEOUT = 10;

	     private HelperClass() {

	        WebDriverManager.chromedriver().setup();
	        driver = new ChromeDriver();
	        driver.manage().timeouts().implicitlyWait(Duration.ofSeconds(TIMEOUT));
	        driver.manage().window().maximize();
	     }

	    public static void openPage(String url) {
	        driver.get(url);
	    }

	    public static WebDriver getDriver() {
	        return driver;
	    }

	    public static void setUpDriver() {

	        if (helperClass==null) {

	            helperClass = new HelperClass();
	        }
	    }

	    public static void tearDown() {

	        if(driver!=null) {
	             driver.close();
	             driver.quit();
	        }

	       helperClass = null;
	   }

	}
Step 11 – Create a Java Class called Definition in src/test/java
Create a Java Class called Definition where we will create the Test Code related to Given, When, Then of the Feature file in src/test/java

Now, we need to create the Step Definition of the Feature File – LoginPageDefinitions.java.
import org.junit.Assert;

import com.example.actions.ForgotPasswordActions;
import com.example.actions.HomePageActions;
import com.example.actions.LoginPageActions;
import com.example.utils.HelperClass;

import io.cucumber.java.en.Given;
import io.cucumber.java.en.Then;
import io.cucumber.java.en.When;

public class LoginPageDefinitions {

	LoginPageActions objLogin = new LoginPageActions();
    HomePageActions objHomePage = new HomePageActions();

    @Given("User is on HRMLogin page {string}")
    public void loginTest(String url) {

    	HelperClass.openPage(url);

    }

    @When("User enters username as {string} and password as {string}")
    public void goToHomePage(String userName, String passWord) {

        // login to application
        objLogin.login(userName, passWord);

        // go the next page

    }

    @Then("User should be able to login sucessfully and new page open")
    public void verifyLogin() {

        // Verify home page
        Assert.assertTrue(objHomePage.getHomePageText().contains("Employee Information"));

    }

    @Then("User should be able to see error message {string}")
    public void verifyErrorMessage(String expectedErrorMessage) {

        // Verify home page
    	Assert.assertEquals(objLogin.getErrorMessage(),expectedErrorMessage);

    }

    @Then("User should be able to see a message {string} below Username")
    public void verifyMissingUsernameMessage(String message) {

    	Assert.assertEquals(objLogin.getMissingUsernameText(),message);
    }

}
Step 12 – Create a Hook class in src/test/java
Create the hook class that contains the Before and After hook to initialize the web browser and close the web browser. I have added the code to take the screenshot of the failed scenario in @After Hook.

import org.openqa.selenium.OutputType;
import org.openqa.selenium.TakesScreenshot;

import com.example.utils.HelperClass;

import io.cucumber.java.After;
import io.cucumber.java.Before;
import io.cucumber.java.Scenario;

public class Hooks {

	@Before
    public static void setUp() {

       HelperClass.setUpDriver();
    }

	@After
	public static void tearDown(Scenario scenario) {

		//validate if scenario has failed
		if(scenario.isFailed()) {
			final byte[] screenshot = ((TakesScreenshot) HelperClass.getDriver()).getScreenshotAs(OutputType.BYTES);
			scenario.attach(screenshot, "image/png", scenario.getName());
		}

		HelperClass.tearDown();
	}
}
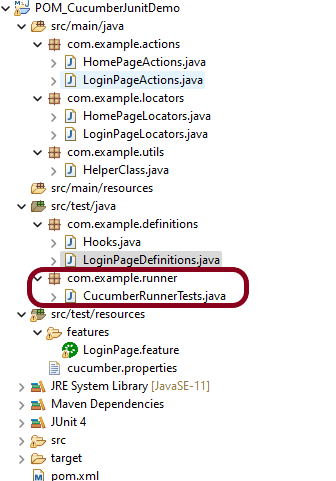
Step 13 – Create a JUnit Cucumber Runner class in the src/test/java directory
Cucumber needs a TestRunner class to run the feature files. It is suggested to create a folder with the name of the runner in the src/test/java directory. Then create the Cucumber TestRunner class in this folder. Below is the code of the Cucumber TestRunner class.
import org.junit.runner.RunWith;
import io.cucumber.junit.Cucumber;
import io.cucumber.junit.CucumberOptions;

@RunWith(Cucumber.class)
@CucumberOptions(tags = "", features = "src/test/resources/features/LoginPage.feature", glue = "com.example.definitions",
                 plugin = {})

public class CucumberRunnerTests {

}
Note:- The name of the Runner class should end with Test otherwise we can’t run the tests using Command Line.
Step 14 – Run the tests from JUnit
You can execute the test script by right-clicking on TestRunner class -> Run As JUnit.
Step 15 – Run the tests from the Command Line
Run the below command in the command prompt to run the tests and to get the test execution report.
mvn clean test
The output of the above program is

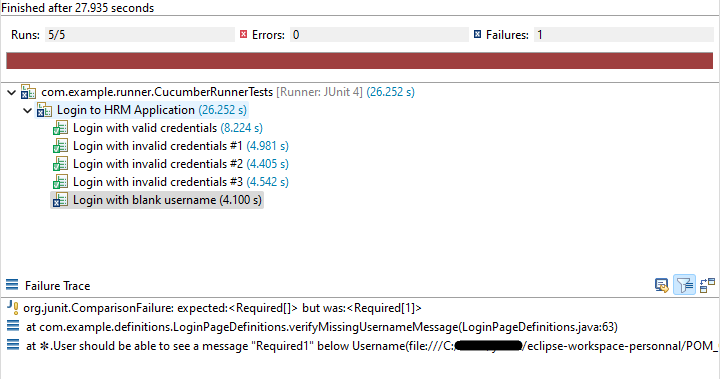
Step 16 – Cucumber Report Generation
To get Cucumber Test Reports, add cucumber.properties under src/test/resources and add the below instruction in the file.
cucumber.publish.enabled=true
Below is the image of the Cucumber Report generated using Cucumber Service.
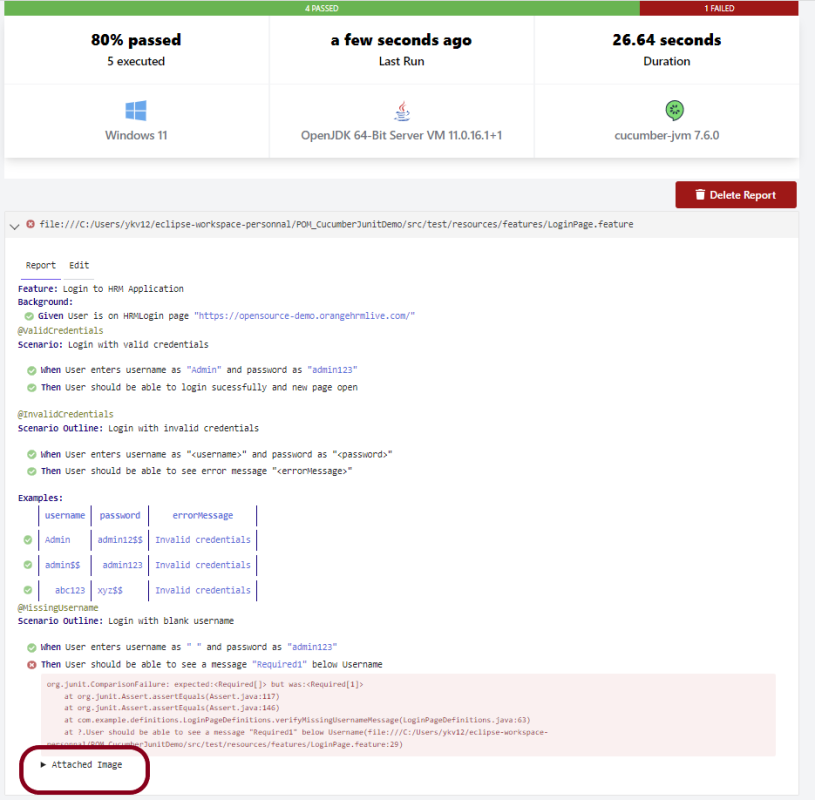
In the above example, as we can see, one of the tests has failed. So, when a test fails, we have written the code to take a screenshot of the failed step. The highlighted box above shows the image of the failed test. You can click on that to see the screenshot.

That’s it! Congratulations on making it through this tutorial and hope you found it useful! Happy Learning!!
Additional Tutorials
Integration of Cucumber7 with Selenium and JUnit5
I have created a lot of tutorials on creating Test Frameworks by integrating JUnit4 with Selenium, Cucumber, Serenity, Rest API, Springboot. This tutorial explain the steps to Integrate Cucumber7 with JUnit5.
JUnit 5 is composed of several different modules from three different sub-projects.
JUnit 5 = JUnit Platform + JUnit Jupiter + JUnit Vintage
We can use the JUnit Platform to execute Cucumber scenarios.
Add the cucumber-junit-platform-engine dependency to your pom.xml:
<dependency>
   <groupId>io.cucumber</groupId>
   <artifactId>cucumber-junit-platform-engine</artifactId>
   <version>${cucumber.version}</version>
   <scope>test</scope>
</dependency>
This will allow IntelliJ IDEA, Eclipse, Maven, Gradle, etc, to discover, select and execute Cucumber scenarios.
Table of Contents
- Prerequisite
- Dependency List
- Project Structure
- Implementation Steps
- Download and Install Java
- Download and setup Eclipse IDE on the system
- Setup Maven
- Install Cucumber Eclipse Plugin (Only for Eclipse IDE)
- Create a new Maven Project
- Add Maven dependencies to the POM
- Create a feature file in src/test/resources
- Create cucumber.properties file in src/test/resources
- Create a Helper class in src/main/java
- Create Locator classes in src/main/java
- Create Action classes in src/main/java
- Create a Step Definition file in src/test/java
- Create Hook class in src/test/java
- Create a Cucumber Test Runner class in src/test/java
- Run the tests from Maven or Command Line
- Cucumber Report Generation
Prerequisite
- Java Version 17 installed
- Eclipse or IntelliJ installed
- Maven or Gradle installed and setup
- Cucumber Eclipse Plugin installed
Dependency List
- Cucumber – 7.14.0
- Selenium – 4.15.0
- Java – 17
- WebDriverManager – 5.5.3
- Junit Jupiter – 5.10.1
- Maven Compiler – 3.11.0
- Maven Surefire – 3.2.1
Project Structure
Implementation Steps
Step 1- Download and Install Java
Cucumber and Selenium need Java to be installed on the system to run the tests. Click here to know How to install Java.
Step 2 – Download and setup Eclipse IDE on the system
The Eclipse IDE (integrated development environment) provides strong support for Java developers, which is needed to write Java code. Click here to know How to install Eclipse.
Step 3 – Setup Maven
To build a test framework, we need to add a number of dependencies to the project. It is a very tedious and cumbersome process to add each dependency manually. So, to overcome this problem, we use a build management tool. Maven is a build management tool that is used to define project structure, dependencies, build, and test management. Click here to know How to install Maven.
Step 4 – Install Cucumber Eclipse Plugin (Only for Eclipse IDE)
The Cucumber Eclipse plugin is a plugin that allows eclipse to understand the Gherkin syntax. The Cucumber Eclipse Plugin highlights the keywords present in Feature File. Click here to know more – Install Cucumber Eclipse Plugin.
Step 5 – Create a new Maven Project
Click here to know How to create a Maven project
Below is the Maven project structure. Here,
Group Id – com.example
Artifact Id – Cucumber7JUnit5Demo
Version – 0.0.1-SNAPSHOT
Package – com. example. Cucumber7JUnit5Demo
Step 6 – Add Maven dependencies to the POM
Add the dependencies to the POM.xml.
<project xmlns="http://maven.apache.org/POM/4.0.0" xmlns:xsi="http://www.w3.org/2001/XMLSchema-instance" xsi:schemaLocation="http://maven.apache.org/POM/4.0.0 https://maven.apache.org/xsd/maven-4.0.0.xsd">
  <modelVersion>4.0.0</modelVersion>
  <groupId>com.example</groupId>
  <artifactId>Cucumber7JUnit5Demo</artifactId>
  <version>0.0.1-SNAPSHOT</version>

  <properties>
		<project.build.sourceEncoding>UTF-8</project.build.sourceEncoding>
		<cucumber.version>7.14.0</cucumber.version>
		<selenium.version>4.15.0</selenium.version>
		<webdrivermanager.version>5.5.3</webdrivermanager.version>
		<junit.jupiter.version>5.10.1</junit.jupiter.version>
		<maven.compiler.plugin.version>3.11.0</maven.compiler.plugin.version>
		<maven.surefire.plugin.version>3.2.1</maven.surefire.plugin.version>
		<maven.compiler.source.version>17</maven.compiler.source.version>
		<maven.compiler.target.version>17</maven.compiler.target.version>
	</properties>

	<dependencyManagement>
		<dependencies>
			<dependency>
				<groupId>io.cucumber</groupId>
				<artifactId>cucumber-bom</artifactId>
				<version>${cucumber.version}</version>
				<type>pom</type>
				<scope>import</scope>
			</dependency>
			<dependency>
				<groupId>org.junit</groupId>
				<artifactId>junit-bom</artifactId>
				<version>${junit.jupiter.version}</version>
				<type>pom</type>
				<scope>import</scope>
			</dependency>
		</dependencies>
	</dependencyManagement>

	<dependencies>

		<dependency>
			<groupId>io.cucumber</groupId>
			<artifactId>cucumber-java</artifactId>
			<scope>test</scope>
		</dependency>

		<dependency>
			<groupId>io.cucumber</groupId>
			<artifactId>cucumber-junit-platform-engine</artifactId>
			<scope>test</scope>
		</dependency>

		<!-- JUnit Platform -->
		<dependency>
			<groupId>org.junit.platform</groupId>
			<artifactId>junit-platform-suite</artifactId>
			<scope>test</scope>
		</dependency>

		<dependency>
			<groupId>org.junit.jupiter</groupId>
			<artifactId>junit-jupiter-engine</artifactId>
			<scope>test</scope>
		</dependency>

		<!-- Selenium -->
		<dependency>
			<groupId>org.seleniumhq.selenium</groupId>
			<artifactId>selenium-java</artifactId>
			<version>${selenium.version}</version>
		</dependency>

		<!-- Web Driver Manager -->
		<dependency>
			<groupId>io.github.bonigarcia</groupId>
			<artifactId>webdrivermanager</artifactId>
			<version>${webdrivermanager.version}</version>
		</dependency>

	</dependencies>

	<build>
		<plugins>
			<plugin>
				<groupId>org.apache.maven.plugins</groupId>
				<artifactId>maven-compiler-plugin</artifactId>
				<version>${maven.compiler.plugin.version}</version>
				<configuration>
					<source>${maven.compiler.source.version}</source>
					<target>${maven.compiler.target.version}</target>
				</configuration>
			</plugin>
			<plugin>
				<groupId>org.apache.maven.plugins</groupId>
				<artifactId>maven-surefire-plugin</artifactId>
				<version>${maven.surefire.plugin.version}</version>
				<dependencies>
					<dependency>
						<groupId>org.junit.jupiter</groupId>
						<artifactId>junit-jupiter-engine</artifactId>
						<version>${junit.jupiter.version}</version>
					</dependency>
				</dependencies>
			</plugin>

		</plugins>
	</build>
</project>
Step 7 – Create a feature file in src/test/resources
Below is a sample feature file. Feature file should be saved as an extension of .feature. Add the test scenarios in this feature file. I have added sample test scenarios. The test scenarios are written in Gherkins language.
LoginPage.feature
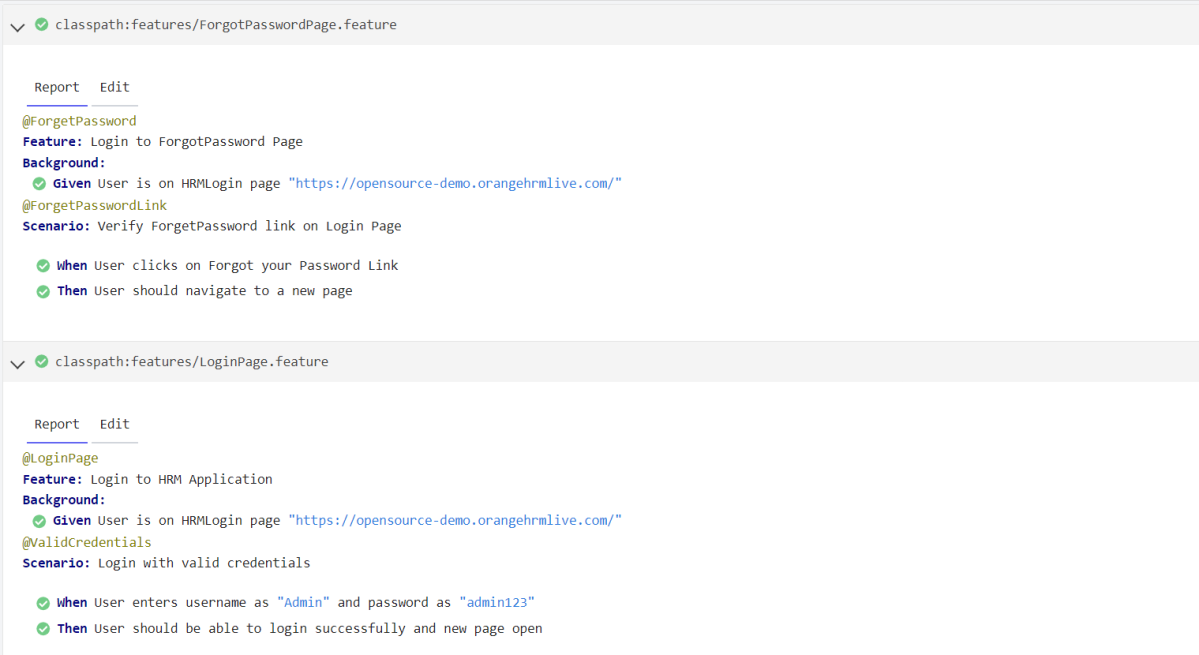
@LoginPage
Feature: Login to HRM Application

Background:
    Given User is on HRMLogin page "https://opensource-demo.orangehrmlive.com/"

   @ValidCredentials
   Scenario: Login with valid credentials

    When User enters username as "Admin" and password as "admin123"
    Then User should be able to login successfully and new page open

   @InvalidCredentials
   Scenario Outline: Login with invalid credentials

    When User enters username as "<username>" and password as "<password>"
    Then User should be able to see error message "<errorMessage>"

  Examples:
  | username   | password    | errorMessage                      |
  | Admin        | admin12$$  | Invalid credentials               |
  | admin$$     | admin123    | Invalid credentials               |
  | abc123        | xyz$$           | Invalid credentials               |


  @FaceBookLink
  Scenario: Verify FaceBook Icon on Login Page

    Then User should be able to see FaceBook Icon

  @LinkedInLink
  Scenario: Verify LinkedIn Icon on Login Page

    Then User should be able to see LinkedIn Icon
ForgetPasswordPage.feature
@ForgetPassword
Feature: Login to ForgotPassword Page

  Background:
    Given User is on HRMLogin page "https://opensource-demo.orangehrmlive.com/"

  @ForgetPasswordLink
  Scenario: Verify ForgetPassword link on Login Page

    When User clicks on Forgot your Password Link
    Then User should navigate to a new page
Step 8 – Create cucumber.properties file in src/test/resources
We need to create the junit-platform.properties file in the src/test/resources folder. Using a property file for reporting is quite helpful if you want to define several different properties.
cucumber.publish.enabled=true
Step 9 – Create a Helper class in src/main/java
We have used Page Object Model with Cucumber and TestNG. Create a Helper class where we are initializing the web driver, initializing the web driver wait, defining the timeouts, and creating a private constructor of the class, it will declare the web driver, so whenever we create an object of this class, a new web browser is invoked.
import java.time.Duration;
import org.openqa.selenium.WebDriver;
import org.openqa.selenium.chrome.ChromeDriver;
import io.github.bonigarcia.wdm.WebDriverManager;
import org.openqa.selenium.chrome.ChromeOptions;

public class HelperClass {

	 private static HelperClass helperClass;

	    private static WebDriver driver;
	    public final static int TIMEOUT = 5;

	     private HelperClass() {

	        WebDriverManager.chromedriver().setup();
			ChromeOptions options = new ChromeOptions();
			options.addArguments("--start-maximized");
	        driver = new ChromeDriver(options);
	        driver.manage().timeouts().implicitlyWait(Duration.ofSeconds(TIMEOUT));
	     }

	    public static void openPage(String url) {
	        driver.get(url);
	    }

	    public static WebDriver getDriver() {
	        return driver;
	    }

	    public static void setUpDriver() {

	        if (helperClass==null) {

	            helperClass = new HelperClass();
	        }
	    }

	    public static void tearDown() {

	        if(driver!=null) {
	             driver.quit();
	        }

	       helperClass = null;
	   }

	}
Step 10 – Create Locator classes in src/main/java
Create a locator class for each page that contains the detail of the locators of all the web elements. Here, I’m creating 3 locator classes – LoginPageLocators, HomePageLocators, and ForgotPasswordLocators.
LoginPageLocators
import org.openqa.selenium.WebElement;
import org.openqa.selenium.support.FindBy;

public class LoginPageLocators {

	@FindBy(name = "username")
    public WebElement userName;

    @FindBy(name = "password")
    public WebElement password;

    @FindBy(id = "logInPanelHeading")
    public WebElement titleText;

    @FindBy(xpath = "//*[@id='app']/div[1]/div/div[1]/div/div[2]/div[2]/form/div[3]/button")
    public WebElement login;

    @FindBy(xpath = "//*[@id='app']/div[1]/div/div[1]/div/div[2]/div[2]/div/div[1]/div[1]/p")
    public  WebElement errorMessage;

    @FindBy(xpath = "//*[@href='https://www.linkedin.com/company/orangehrm/mycompany/']")
    public  WebElement linkedInIcon;

    @FindBy(xpath = "//*[@href='https://www.facebook.com/OrangeHRM/']")
    public  WebElement faceBookIcon;

    @FindBy(xpath = "//*[@id='app']/div[1]/div/div[1]/div/div[2]/div[2]/form/div[4]/p")
    public  WebElement ForgotYourPasswordLink;

}
HomePageLocators
import org.openqa.selenium.WebElement;
import org.openqa.selenium.support.FindBy;

public class HomePageLocators {

	@FindBy(xpath = "//*[@id='app']/div[1]/div[2]/div[2]/div/div[1]/div[1]/div[1]/h5")
	public  WebElement homePageUserName;

}
ForgotPasswordLocators
import org.openqa.selenium.WebElement;
import org.openqa.selenium.support.FindBy;

public class ForgotPasswordLocators {

	@FindBy(xpath = "//*[@id='app']/div[1]/div[1]/div/form/h6")
    public WebElement ForgotPasswordHeading;

}
Step 11 – Create Action classes in src/main/java
Create the action classes for each web page. These action classes contain all the methods needed by the step definitions. In this case, I have created 2 action classes – LoginPageActions, HomePageActions, and ForgotPasswordActions.
LoginPageActions
In this class, the very first thing will do is to create the object of the LoginPageLocators class so that we should be able to access all the PageFactory elements. Secondly, create a public constructor of LoginPageActions class.
import org.openqa.selenium.support.PageFactory;
import com.example.locators.LoginPageLocators;
import com.example.utils.HelperClass;

public class LoginPageActions {

	LoginPageLocators loginPageLocators = null;

    public LoginPageActions() {

    	this.loginPageLocators = new LoginPageLocators();

		PageFactory.initElements(HelperClass.getDriver(),loginPageLocators);
	}

	// Set user name in textbox
    public void setUserName(String strUserName) {
    	loginPageLocators.userName.sendKeys(strUserName);
    }

    // Set password in password textbox
    public void setPassword(String strPassword) {
    	loginPageLocators.password.sendKeys(strPassword);
    }

    // Click on login button
    public void clickLogin() {
    	loginPageLocators.login.click();
    }

    // Get the title of Login Page
    public String getLoginTitle() {
        return loginPageLocators.titleText.getText();
    }

    // Get the title of Login Page
    public String getErrorMessage() {
        return loginPageLocators.errorMessage.getText();
    }

    // LinkedIn Icon is displayed
    public Boolean getLinkedInIcon() {

        return loginPageLocators.linkedInIcon.isDisplayed();
    }

    // FaceBook Icon is displayed
    public Boolean getFaceBookIcon() {

        return loginPageLocators.faceBookIcon.isDisplayed();
    }

    // Click on Forget Your Password link
    public void clickOnForgetYourPasswordLink() {

    	loginPageLocators.ForgotYourPasswordLink.click();
    }

    public void login(String strUserName, String strPassword) {

        // Fill user name
        this.setUserName(strUserName);

        // Fill password
        this.setPassword(strPassword);

        // Click Login button
        this.clickLogin();

    }
}
HomePageActions
import org.openqa.selenium.support.PageFactory;
import com.example.locators.HomePageLocators;
import com.example.utils.HelperClass;

public class HomePageActions {

	HomePageLocators homePageLocators = null;

	public HomePageActions() {

		this.homePageLocators = new HomePageLocators();

		PageFactory.initElements(HelperClass.getDriver(),homePageLocators);
    }

    // Get the User name from Home Page
    public String getHomePageText() {
        return homePageLocators.homePageUserName.getText();
    }

}
ForgotPasswordActions
import org.openqa.selenium.support.PageFactory;
import com.example.locators.ForgotPasswordLocators;
import com.example.utils.HelperClass;

public class ForgotPasswordActions {

	ForgotPasswordLocators forgotPasswordLocators = null;

	public ForgotPasswordActions() {

		this.forgotPasswordLocators = new ForgotPasswordLocators();

		PageFactory.initElements(HelperClass.getDriver(),forgotPasswordLocators);
    }


    // Get the Heading of Forgot Password page
    public String getForgotPasswordPageText() {
        return forgotPasswordLocators.ForgotPasswordHeading.getText();
    }
}
Step 12 – Create a Step Definition file in src/test/java
Create the corresponding Step Definition file of the feature file.
LoginPageDefinitions
import org.junit.jupiter.api.Assertions;
import com.example.actions.ForgotPasswordActions;
import com.example.actions.HomePageActions;
import com.example.actions.LoginPageActions;
import com.example.utils.HelperClass;
import io.cucumber.java.en.Given;
import io.cucumber.java.en.Then;
import io.cucumber.java.en.When;

public class LoginPageDefinitions{

	LoginPageActions objLogin = new LoginPageActions();
    HomePageActions objHomePage = new HomePageActions();
    ForgotPasswordActions objForgotPasswordPage = new ForgotPasswordActions();

    @Given("User is on HRMLogin page {string}")
    public void loginTest(String url) {

    	HelperClass.openPage(url);

    }

    @When("User enters username as {string} and password as {string}")
    public void goToHomePage(String userName, String passWord) {

        // login to application
        objLogin.login(userName, passWord);

        // go the next page

    }

    @When("User clicks on Forgot your Password Link")
    public void goToForgotYourPasswordPage() {

    	objLogin.clickOnForgetYourPasswordLink();

    }

    @Then("User should be able to login sucessfully and new page open")
    public void verifyLogin() {

        // Verify home page
        Assertions.assertTrue(objHomePage.getHomePageText().contains("Employee Information"));

    }

    @Then("User should be able to see error message {string}")
    public void verifyErrorMessage(String expectedErrorMessage) {

        // Verify home page
    	Assertions.assertEquals(objLogin.getErrorMessage(),expectedErrorMessage);

    }

    @Then("User should be able to see LinkedIn Icon")
    public void verifyLinkedInIcon( ) {

    	Assertions.assertTrue(objLogin.getLinkedInIcon());
    }

    @Then("User should be able to see FaceBook Icon")
    public void verifyFaceBookIcon( ) {

    	Assertions.assertTrue(objLogin.getFaceBookIcon());
    }

    @Then("User should navigate to a new page")
    public void verfiyForgetYourPasswordPage() {

   	Assertions.assertEquals(objForgotPasswordPage.getForgotPasswordPageText(), "Reset Password");
    }

}
Step 13 – Create Hook class in src/test/java
Create the hook class that contains the Before and After hook to initialize the web browser and close the web browser.
import org.openqa.selenium.OutputType;
import org.openqa.selenium.TakesScreenshot;
import com.example.utils.HelperClass;
import io.cucumber.java.After;
import io.cucumber.java.Before;
import io.cucumber.java.Scenario;

public class Hooks {

	@Before
    public static void setUp() {

       HelperClass.setUpDriver();
    }

	@After
	public static void tearDown(Scenario scenario) {

		//validate if scenario has failed
		if(scenario.isFailed()) {
			final byte[] screenshot = ((TakesScreenshot) HelperClass.getDriver()).getScreenshotAs(OutputType.BYTES);
			scenario.attach(screenshot, "image/png", scenario.getName());
		}

		HelperClass.tearDown();
	}
}
Step 14 – Create a Cucumber Test Runner class in src/test/java
Cucumber needs a TestRunner class to run the feature files. It is suggested to create a folder with the name of the runner in the src/test/java directory and create the Cucumber TestRunner class in this folder. Below is the code of the Cucumber TestRunner class.
import static io.cucumber.junit.platform.engine.Constants.GLUE_PROPERTY_NAME;
import org.junit.platform.suite.api.ConfigurationParameter;
import org.junit.platform.suite.api.IncludeEngines;
import org.junit.platform.suite.api.SelectClasspathResource;
import org.junit.platform.suite.api.Suite;

@Suite
@IncludeEngines("cucumber")
@SelectClasspathResource("com.example")
@ConfigurationParameter(key = GLUE_PROPERTY_NAME, value = "com.example")

public class CucumberRunnerTests  {

}
Step 15 – Run the tests from Maven or Command Line
Use the below command to run the tests.
mvn clean verify

Step 16 – Cucumber Report Generation
Below is the image of the Cucumber Report generated using the Cucumber Service.
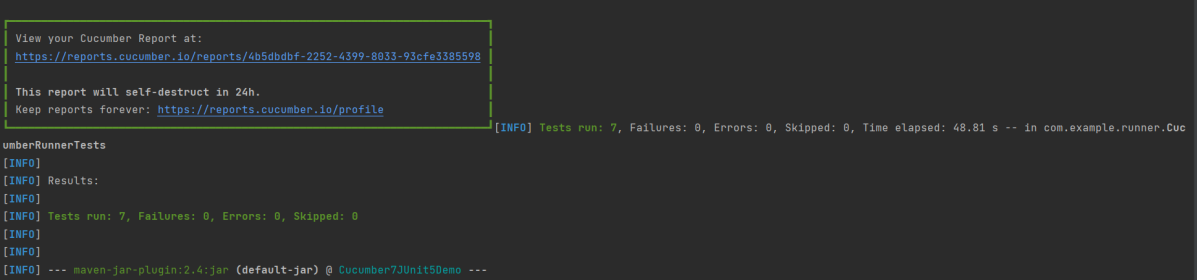
Below is the image of the Cucumber Report.

The complete code can be found on GitHub.
Congratulations!! We have built the framework using Cucumber 7 with JUnit5.
Jenkins Tutorial
Jenkins is a self-contained, open-source automation server that can be used to automate all sorts of tasks related to building, testing, and delivering or deploying software.
Jenkins can be installed through native system packages, Docker, or even run standalone by any machine with a Java Runtime Environment (JRE) installed.

| Chapter 1 What is Jenkins? | |
| Chapter 2 How to install Jenkins on Windows 10 | |
| Chapter 3 How to configure Java and Maven in Jenkins | |
| Chapter 4 Integration Of Jenkins With Selenium WebDriver | |
| Chapter 5 How to install Maven Plugin in Jenkins | |
| Chapter 6 How to install Plugins from Jenkins CLI? | |
| Chapter 7 Integrate Gradle project with Jenkins | |
| Chapter 8 How to install Plugins in Jenkins | |
| Chapter 9 How to Schedule a Jenkins Job | |
| Chapter 10 Build History Metrics in Jenkins | |
| Chapter 11 How to install the trends-related plugin in Jenkins? | |
| Chapter 12 How to run parameterized Selenium tests in Jenkins |
Reports in Jenkins
| Chapter 1 How to generate TestNG Report in Jenkins | |
| Chapter 2 How to create JUnit Report in Jenkins | |
| Chapter 3 Integration of Allure Report with Jenkins | |
| Chapter 4 How to generate HTML Reports in Jenkins | |
| Chapter 5 Integration of Cucumber Report with TestNG in Jenkins | |
| Chapter 6 Serenity with Jenkins | |
| Chapter 7 How to publish ExtentReport using Jenkins |
Jenkins Pipeline
CI/CD
| Chapter 1 Integration of GitHub with Jenkins | |
| Chapter 2 Jenkins GitLab Integration |
Python

Integration of Cucumber with Selenium and TestNG
Cucumber is a BDD Tool, and Selenium WebDriver is used for the automation of web applications. Imagine we need to build a test framework. This framework can be used by businesses to understand the test scenarios. It can also test the web application. This can be achieved by integrating Cucumber with Selenium. I’m going to use TestNG as the Test Automation tool for assertions. In the previous tutorial, I used Cucumber with Page Object Model. To know more about this, please refer to this tutorial – Page Object Model with Selenium, Cucumber, and TestNG.
In this tutorial, I’ll create a BDD Framework for the testing of web applications. I will use Cucumber, Selenium WebDriver, Maven and TestNG.
Table of Contents:
- Dependency List
- Project Structure
- Implementation Steps
- Download and Install Java
- Download and setup Eclipse IDE on the system
- Setup Maven
- Install Cucumber Eclipse Plugin (Only for Eclipse IDE)
- Download and install TestNG plugin
- Create a new Maven Project
- Create source folder src/test/resources to create test scenarios in Feature file
- Add Selenium, TestNG, and Cucumber dependencies to the project
- Add Maven Compiler Plugin and SureFire Plugin
- Create a feature file under src/test/resources/features
- Create the step definition class in src/test/java
- Create a TestNG Cucumber Runner class in src/test/java
- Test Execution through TestNG
- Run the tests from TestNG.xml
- Run the tests from Command Line
- Cucumber Report Generation
- TestNG Report Generation
Dependency List:
- Cucumber Java- 7.15.0
- Cucumber TestNG – 7.15.0
- Java 17
- TestNG – 7.10.0
- Maven – 3.9.6
- Selenium – 4.16.1
- Maven Compiler Plugin- 3.12.1
- Maven Surefire Plugin – 3.2.3

Project Structure

Implementation Steps
Step 1- Download and Install Java
Cucumber and Selenium need Java to be installed on the system to run the tests. Click here to know How to install Java.
Step 2 – Download and setup Eclipse IDE on the system
The Eclipse IDE (integrated development environment) provides strong support for Java developers, which is needed to write Java code. Click here to know How to install Eclipse.
Step 3 – Setup Maven
To build a test framework, we need to add a number of dependencies to the project. It is a very tedious and cumbersome process to add each dependency manually. So, to overcome this problem, we use a build management tool. Maven is a build management tool that is used to define project structure, dependencies, build, and test management. Click here to know How to install Maven.
Step 4 – Install Cucumber Eclipse Plugin (Only for Eclipse IDE)
The Cucumber Eclipse plugin is a plugin that allows eclipse to understand the Gherkin syntax. The Cucumber Eclipse Plugin highlights the keywords present in Feature File. Click here to know more – How to install Cucumber Eclipse Plugin
Step 5 – Download and install TestNG plugin
TestNG plugin is needed to run the tests as TestNG tests as mentioned in step 13. Click here to know – How to download and install TestNG in Eclipse.
Step 6 – Create a new Maven Project
Click here to know How to create a Maven project
Below is the Maven project structure. Here,
Group Id – com.example
Artifact Id – Cucumber_TestNG_Demo
Version – 0.0.1-SNAPSHOT
Package – com. example. Cucumber_TestNG_Demo
Step 7 – Create source folder src/test/resources to create test scenarios in Feature file
When a new Maven Project is created, it has 2 folders – src/main/java and src/test/java as shown below image. To create test scenarios, we need a new source folder called – src/test/resources. To create this folder, right-click on your maven project ->select New ->Java, and then Source Folder.
Step 8 – Add Selenium, TestNG, and Cucumber dependencies to the project
Add the below-mentioned Selenium, TestNG, and Cucumber dependencies to the project.
 <properties>
    <project.build.sourceEncoding>UTF-8</project.build.sourceEncoding>
    <cucumber.version>7.15.0</cucumber.version>
    <selenium.version>4.16.1</selenium.version>
    <testng.version>7.10.0</testng.version>
    <maven.compiler.plugin.version>3.12.1</maven.compiler.plugin.version>
    <maven.surefire.plugin.version>3.2.3</maven.surefire.plugin.version>
    <maven.compiler.source.version>17</maven.compiler.source.version>
    <maven.compiler.target.version>17</maven.compiler.target.version>
  </properties>

    <dependencies>

        <dependency>
            <groupId>io.cucumber</groupId>
            <artifactId>cucumber-java</artifactId>
            <version>${cucumber.version}</version>
        </dependency>

        <dependency>
            <groupId>io.cucumber</groupId>
            <artifactId>cucumber-testng</artifactId>
            <version>${cucumber.version}</version>
            <scope>test</scope>
        </dependency>

        <!-- Selenium -->
        <dependency>
            <groupId>org.seleniumhq.selenium</groupId>
            <artifactId>selenium-java</artifactId>
            <version>${selenium.version}</version>
        </dependency>

        <!-- TestNG -->
        <dependency>
            <groupId>org.testng</groupId>
            <artifactId>testng</artifactId>
            <version>${testng.version}</version>
            <scope>test</scope>
        </dependency>

    </dependencies>
Step 9 – Add Maven Compiler Plugin and SureFire Plugin
The compiler plugin is used to compile the source code of a Maven project. This plugin has two goals, which are already bound to specific phases of the default lifecycle:
- compile – compile main source files
- testCompile – compile test source files
<build>
        <plugins>
            <plugin>
                <groupId>org.apache.maven.plugins</groupId>
                <artifactId>maven-compiler-plugin</artifactId>
                <version>${maven.compiler.plugin.version}</version>
                <configuration>
                    <source>${maven.compiler.source.version}</source>
                    <target>${maven.compiler.target.version}</target>
                </configuration>
            </plugin>
            <plugin>
                <groupId>org.apache.maven.plugins</groupId>
                <artifactId>maven-surefire-plugin</artifactId>
                <version>${maven.surefire.plugin.version}</version>
                <configuration>
                    <suiteXmlFiles>
                        <suiteXmlFile>testng.xml</suiteXmlFile>
                    </suiteXmlFiles>
                </configuration>
            </plugin>
        </plugins>
    </build>
If you don’t add a compiler plugin to the POM.xml, the build will fail. This happens when you try to run the tests through Maven.
Then the build will fail with the below message.

The complete POM.xml is shown below.
<project xmlns="http://maven.apache.org/POM/4.0.0" xmlns:xsi="http://www.w3.org/2001/XMLSchema-instance"
  xsi:schemaLocation="http://maven.apache.org/POM/4.0.0 http://maven.apache.org/xsd/maven-4.0.0.xsd">
  <modelVersion>4.0.0</modelVersion>

  <groupId>com.example</groupId>
  <artifactId>Cucumber_TestNG_Demo</artifactId>
  <version>1.0-SNAPSHOT</version>
  <packaging>jar</packaging>

  <name>Cucumber_TestNG_Demo</name>
  <url>http://maven.apache.org</url>

  <properties>
    <project.build.sourceEncoding>UTF-8</project.build.sourceEncoding>
    <cucumber.version>7.15.0</cucumber.version>
    <selenium.version>4.16.1</selenium.version>
    <testng.version>7.10.0</testng.version>
    <maven.compiler.plugin.version>3.12.1</maven.compiler.plugin.version>
    <maven.surefire.plugin.version>3.2.3</maven.surefire.plugin.version>
    <maven.compiler.source.version>17</maven.compiler.source.version>
    <maven.compiler.target.version>17</maven.compiler.target.version>
  </properties>

  <dependencies>

    <dependency>
      <groupId>io.cucumber</groupId>
      <artifactId>cucumber-java</artifactId>
      <version>${cucumber.version}</version>
    </dependency>

    <dependency>
      <groupId>io.cucumber</groupId>
      <artifactId>cucumber-testng</artifactId>
      <version>${cucumber.version}</version>
      <scope>test</scope>
    </dependency>

    <!-- Selenium -->
    <dependency>
      <groupId>org.seleniumhq.selenium</groupId>
      <artifactId>selenium-java</artifactId>
      <version>${selenium.version}</version>
    </dependency>

    <!-- TestNG -->
    <dependency>
      <groupId>org.testng</groupId>
      <artifactId>testng</artifactId>
      <version>${testng.version}</version>
      <scope>test</scope>
    </dependency>

  </dependencies>
  <build>
    <plugins>
      <plugin>
        <groupId>org.apache.maven.plugins</groupId>
        <artifactId>maven-compiler-plugin</artifactId>
        <version>${maven.compiler.plugin.version}</version>
        <configuration>
          <source>${maven.compiler.source.version}</source>
          <target>${maven.compiler.target.version}</target>
        </configuration>
      </plugin>
      <plugin>
        <groupId>org.apache.maven.plugins</groupId>
        <artifactId>maven-surefire-plugin</artifactId>
        <version>${maven.surefire.plugin.version}</version>
        <configuration>
          <suiteXmlFiles>
            <suiteXmlFile>testng.xml</suiteXmlFile>
          </suiteXmlFiles>
        </configuration>
      </plugin>
    </plugins>
  </build>

</project>
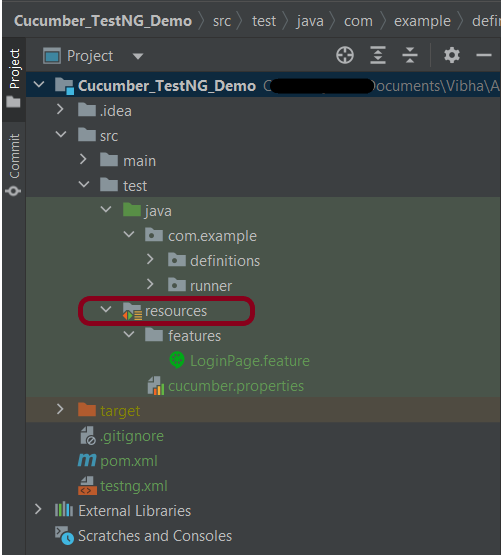
Step 10 – Create a feature file under src/test/resources/features

It is recommended to create a features folder in the src/test/resources directory. Create all the feature files in this features folder. Feature file should be saved as an extension of .feature. The test scenarios in the Feature file are written in Gherkins language. Add the test scenarios in this feature file. I have added sample test scenarios.
Feature: Login to HRM Application

Background:
   Given User is on HRMLogin page "https://opensource-demo.orangehrmlive.com/"

   @ValidCredentials
   Scenario: Login with valid credentials

    When User enters username as "Admin" and password as "admin123"
    Then User should be able to login sucessfully and new page open

   @InvalidCredentials
   Scenario Outline: Login with invalid credentials

    When User enters username as "<username>" and password as "<password>"
    Then User should be able to see error message "<errorMessage>"

  Examples:
   | username   | password     | errorMessage                       |
   | Admin        | admin12$$   | Invalid credentials               |
   | admin$$     | admin123     | Invalid credentials               |
   | abc123        | xyz$$           | Invalid credentials               |
Step 11 – Create the step definition class in src/test/java
Create the step definition class corresponding to the feature file to test the scenarios in the src/test/java directory. The StepDefinition files should be created in this definitions directory within the folder called definitions.

Below is the step definition of the LoginPage feature file.
package com.example.definitions;

import io.cucumber.java.After;
import io.cucumber.java.Before;
import io.cucumber.java.en.Given;
import io.cucumber.java.en.Then;
import io.cucumber.java.en.When;
import io.github.bonigarcia.wdm.WebDriverManager;
import org.openqa.selenium.By;
import org.openqa.selenium.WebDriver;
import org.openqa.selenium.chrome.ChromeDriver;
import org.openqa.selenium.chrome.ChromeOptions;
import org.testng.Assert;
import java.time.Duration;

public class LoginPageDefinitions {
    private static WebDriver driver;
    public final static int TIMEOUT = 5;

    @Before
    public void setUp() {

        ChromeOptions options = new ChromeOptions();
        options.addArguments("--start-maximized");
        driver = new ChromeDriver(options);
        driver.manage().timeouts().implicitlyWait(Duration.ofSeconds(TIMEOUT));

    }

    @Given("User is on HRMLogin page {string}")
    public void loginTest(String url) {

        driver.get(url);

    }

    @When("User enters username as {string} and password as {string}")
    public void goToHomePage(String userName, String passWord) {

        // login to application
        driver.findElement(By.name("username")).sendKeys(userName);
        driver.findElement(By.name("password")).sendKeys(passWord);
        driver.findElement(By.xpath("//*[@class='oxd-form']/div[3]/button")).submit();

    }

    @Then("User should be able to login successfully and new page open")
    public void verifyLogin() {

        String homePageHeading = driver.findElement(By.xpath("//*[@class='oxd-topbar-header-breadcrumb']/h6")).getText();

        //Verify new page - HomePage
        Assert.assertEquals(homePageHeading, "Dashboard");

    }

    @Then("User should be able to see error message {string}")
    public void verifyErrorMessage(String expectedErrorMessage) {

        String actualErrorMessage = driver.findElement(By.xpath("//*[@class='orangehrm-login-error']/div[1]/div[1]/p")).getText();

        // Verify Error Message
        Assert.assertEquals(actualErrorMessage, expectedErrorMessage);

    }

    @After
    public void teardown() {

        driver.quit();
    }

}
assertThat() and containsString are imported from package:-
import static org.hamcrest.MatcherAssert.assertThat;
import static org.hamcrest.Matchers.containsString;
Step 12 – Create a TestNG Cucumber Runner class in src/test/java
We need to create a class called Runner class to run the tests. This class will use the TestNG annotation @RunWith(), which tells TestNG what is the test runner class. TestRunner should be created under src/test/java within the folder called runner.

Below is the code for the Cucumber Runner Class.
import io.cucumber.testng.AbstractTestNGCucumberTests;
import io.cucumber.testng.CucumberOptions;

@CucumberOptions(tags = "", features = {"src/test/resources/features/LoginPage.feature"}, glue = {"com.example.definitions"},
                 plugin = {})

public class CucumberRunnerTests extends AbstractTestNGCucumberTests {

}
AbstractTestNGCucumberTests – Runs each cucumber scenario found in the features as a separate test.
Step 13 – Test Execution through TestNG
Go to the Runner class and right-click “Run As TestNG Test”. The tests will run as TestNG tests. This is for Eclipse.
In case you are using IntelliJ, then select “Run CucumberRunner Tests“.
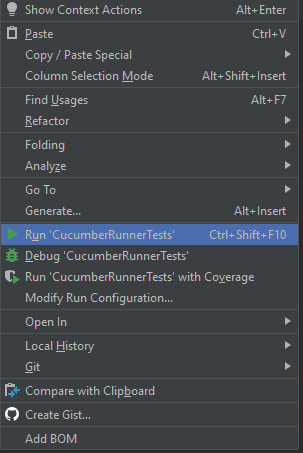
This is what the execution console will look like in Eclipse.
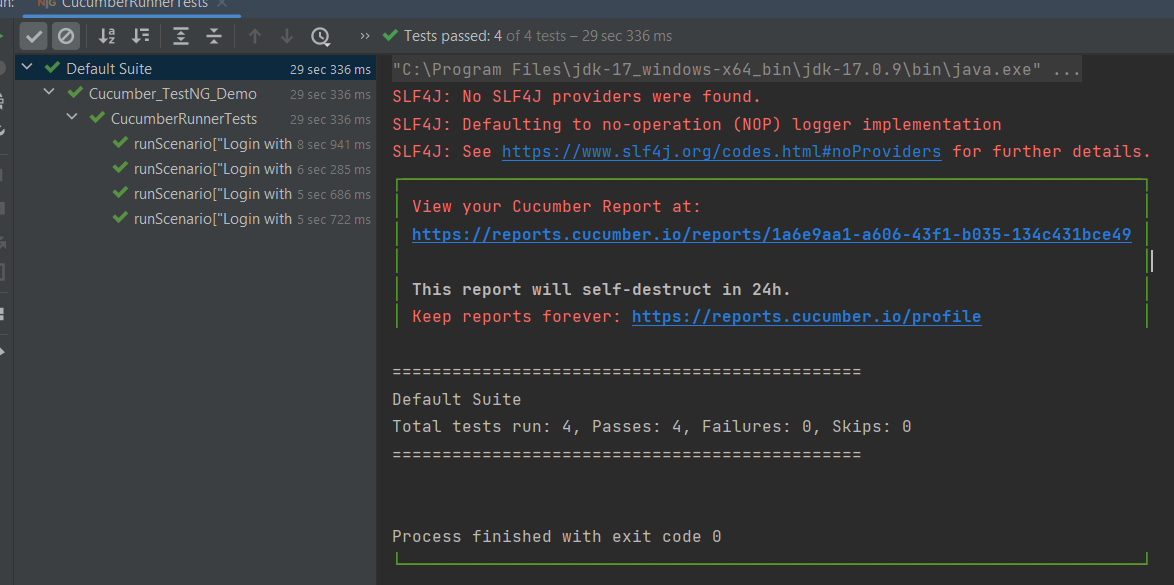
Step 14 – Run the tests from TestNG.xml
Create a TestNG.xml as shown below and run the tests as TestNG.

Below is an example of testng.xml.
<?xml version="1.0" encoding="UTF-8"?>
<!DOCTYPE suite SYSTEM "https://testng.org/testng-1.0.dtd">
<suite name="Suite">
  <test  name="Cucumber with TestNG Test">
    <classes>
      <class name="com.example.runner.CucumberRunnerTests"/>
    </classes>
  </test> <!-- Test -->
</suite> <!-- Suite -->
Step 15 – Run the tests from the Command Line
Run the below command in the command prompt to run the tests and to get the test execution report.
mvn clean test
The execution screen looks like something as shown below.

Step 16 – Cucumber Report Generation
Add cucumber.properties under src/test/resources and add the below instructions in the file.
cucumber.publish.enabled=true
Below is the image of the Cucumber Report generated using the Cucumber Service.
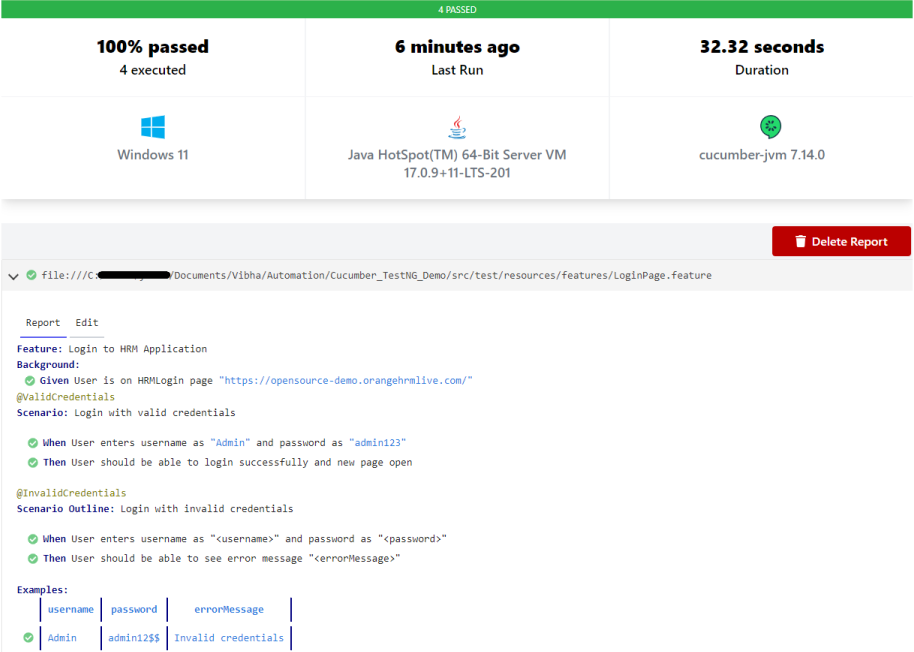
Step 17 – TestNG Report Generation
TestNG generates various types of reports under the test-output or target folder like emailable-report.html, index.html, testng-results.xml.

We are interested in the ‘emailable-report.html’ report. Open “emailable-report.html“, as this is an HTML report, and open it with the browser. The below image shows emailable-report.html.
emailable-report.html
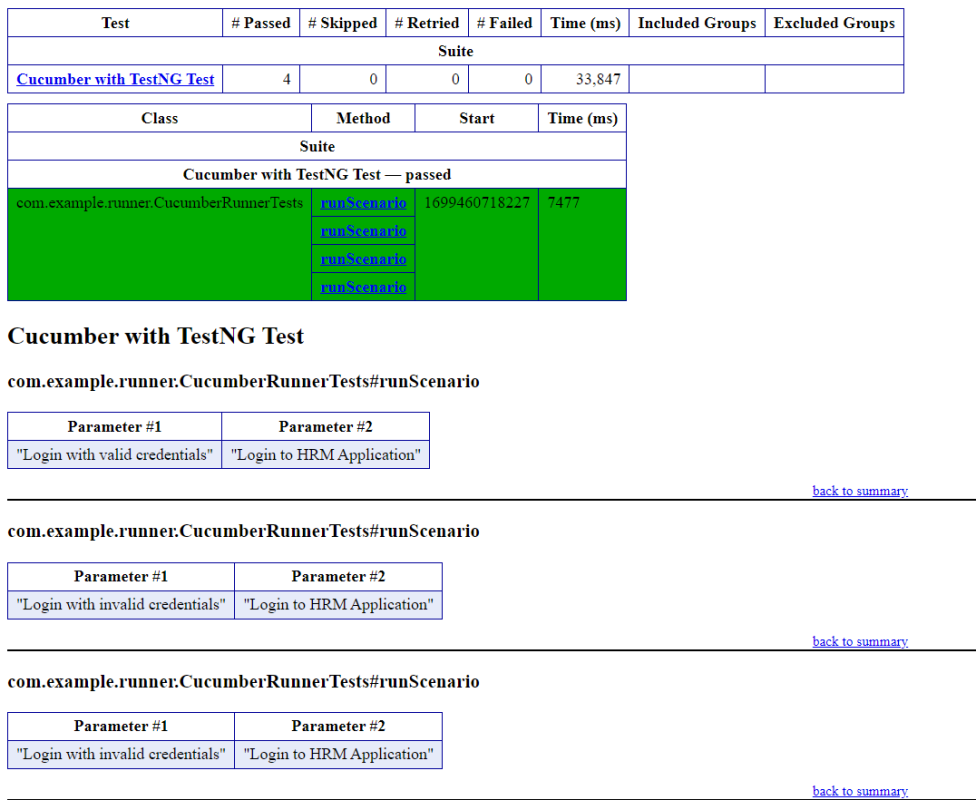
Index.html
TestNG also produces “index.html” report, and it resides under the test-output folder. The below image shows the index.html report.

CI/CD Integration:
Integrating BDD tests with Continuous Integration and Continuous Deployment (CICD) pipelines helps automate the testing process. Tools like Jenkins, GitLab CI, or GitHub Actions can be configured easily. They run BDD tests automatically during the build process. Here’s how:
- Configure the CICD Pipeline: Set up the pipeline to build the project, run tests, and create reports.
- Run Tests: Ensure the pipeline runs your BDD tests using Maven or Gradle.
- Publish Reports: Configure the pipeline to show test results, so you can easily see if there are any issues.
Troubleshooting Tips:
1. Maven Dependencies Not Resolved: The dependencies for Cucumber, Selenium, or TestNG are not resolving in your project. Make sure your pom.xml is correctly configured and the Maven repository has the latest dependencies. Run mvn clean install to force update dependencies. Also, check if you have internet access and the correct settings in your Maven configuration.
2. TestNG XML File Setup: TestNG tests are not running as expected, or the test results are incorrect. Double-check your `testng.xml` configuration to ensure that the correct test classes, packages, or methods are included. Make sure annotations like `@Test` are correctly used in your test classes.
3. Cucumber Features Not Recognized: Cucumber feature files aren’t recognized by your test runner. Verify your `CucumberOptions` in the test runner class points to the correct `features` path and `glue` path for step definitions. Make sure your feature files have the correct `.feature` extension and contain valid Gherkin syntax.
The complete code can be found on GitHub.
If you like to use Cucumber with Page Object Model, please refer to this tutorial – Page Object Model with Selenium, Cucumber, and TestNG.
Congratulations on making it through this tutorial and hope you found it useful! Happy Learning!! Cheers!!
How to add Screenshot to Cucumber ExtentReports
The previous tutorial explained the generation of Extent Report 5 for Cucumber7 and TestNG. This tutorial explains how to add screenshots to the Extent Report.
Table of Contents
Project Structure

To set up the above project, please refer to this tutorial – ExtentReports Version 5 for Cucumber 7 and TestNG.
We want to add screenshots of failed tests to the Extent Report Version 5.
Step 1 – Add Screenshot configuration in extent.properties
extent.reporter.spark.start=true
extent.reporter.spark.out=Reports/Spark.html

#FolderName
basefolder.name=ExtentReports/SparkReport_
basefolder.datetimepattern=d_MMM_YY HH_mm_ss

#Screenshot
screenshot.dir=/Screenshots/
screenshot.rel.path=../Screenshots/
In the above example, we have provided the name “ExtentReports/SparkReport_”. It means that a folder starts with the name “SparkReport_” under the “ExtentReports” folder. The date-time pattern we have provided in another format is the basis of a valid pattern. It will concatenate with the folder name to generate a unique folder for each execution.

As seen in the image above, the “Reports” and “Screenshots” folders get created inside the new folder of SparkReports_. If we look inside the folder, we can see that the report was generated.
We can browse the screenshot folder to see all the screenshots taken during each step. Additionally, screenshots will be generated and named automatically.

Step 2 – Add a method to capture the screenshot
@After
public static void tearDown(Scenario scenario) {

		//validate if scenario has failed
		if(scenario.isFailed()) {
			final byte[] screenshot = ((TakesScreenshot) driver.getScreenshotAs(OutputType.BYTES);
			scenario.attach(screenshot, "image/png", scenario.getName());
		}
In the preceding example, the tearDown() method accepts a Scenario type object. The Scenario can be found within the io.cucumber. We used Selenium’s standard screenshot feature within the method. As an example, we’d like to read the file as a byte[] type. As a parameter, the attach method accepts byte[] type objects. Scenario.attach also includes a screenshot with each step of the scenario. To get the complete project, please refer to this tutorial – ExtentReports Version 5 for Cucumber 6 and TestNG.
The updated Hooks class will be as shown below:
import org.openqa.selenium.OutputType;
import org.openqa.selenium.TakesScreenshot;
import com.example.utils.HelperClass;
import io.cucumber.java.After;
import io.cucumber.java.Before;
import io.cucumber.java.Scenario;

public class Hooks {

	@Before
    public static void setUp() {

       HelperClass.setUpDriver();
    }

	@After
	public static void tearDown(Scenario scenario) {

		//validate if scenario has failed
		if(scenario.isFailed()) {
			final byte[] screenshot = ((TakesScreenshot) HelperClass.getDriver()).getScreenshotAs(OutputType.BYTES);
			scenario.attach(screenshot, "image/png", scenario.getName());
		}

		HelperClass.tearDown();
	}
}
Let’s open the report and view the report. As you can see, besides the scenario, an attachment sign is available, which means something attaches to the scenario. As we have only one failed step, only one screenshot has been captured, as seen in the above image. Right-click on Spark.html and select Open with Web Browser.
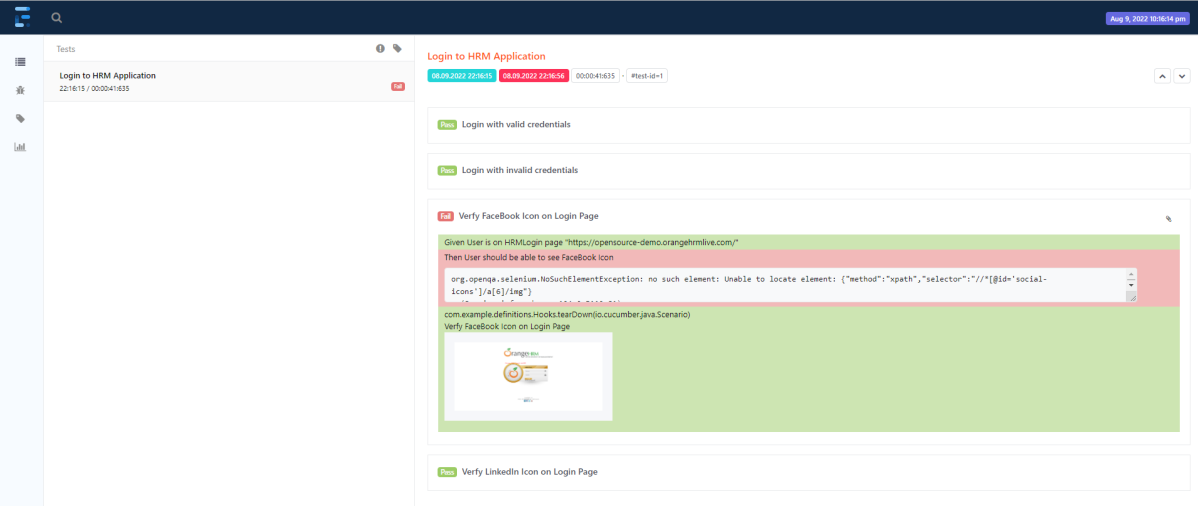
The report also has a summary section that displays the summary of the execution. The summary includes the overview of the pass/fail using a pictogram, start time, end time, and pass/fail details of features as shown in the image below.
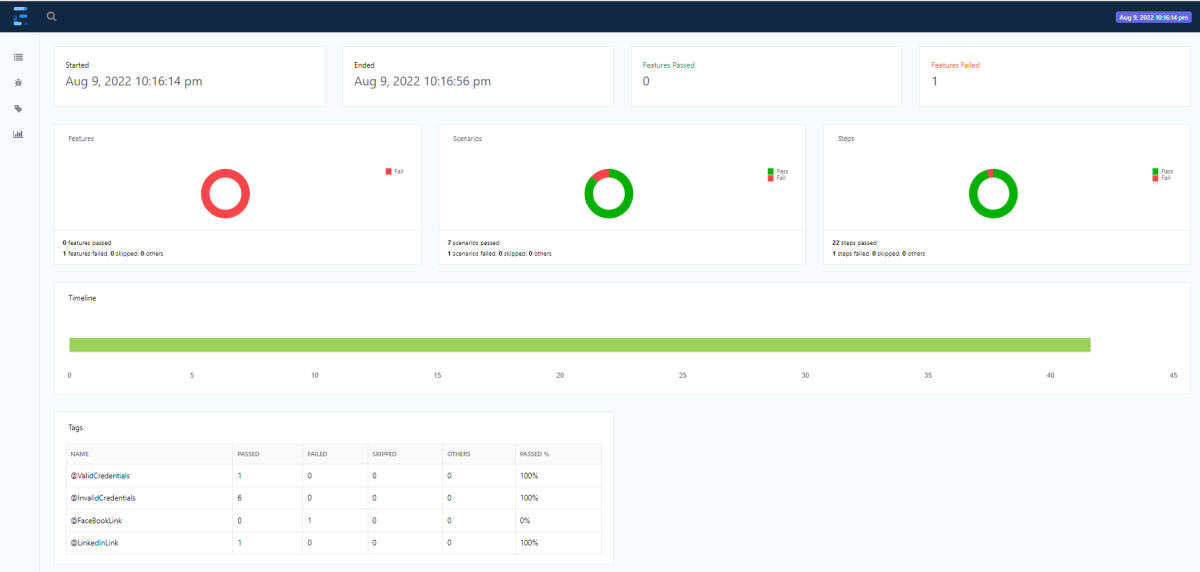
The complete code can be found on GitHub.
Congratulations!! We can attach screenshots of the failed tests. Happy Learning!!
Additional Tutorials
