The previous tutorial explained the generation of ExtentReports Version 5 for Cucumber 7 and TestNG in a Maven project. In this tutorial, I will explain the steps to create an Extent Report Version 5 for Cucumber, Selenium, and Junit4 in a Gradle project.
Pre Requisite:
- Java 8 or above installed
- Eclipse or IntelliJ IDE installed
- Gradle Installed
- Environment variable JAVA_HOME and GRADLE_HOME correctly configured
In this tutorial, I’ll create a BDD Framework for the testing of web applications using Cucumber, Selenium WebDriver with JUnit4. This framework consists of:-
- Cucumber Java- 7.6.0
- Cucumber JUnit – 7.6.0
- Java 11
- JUnit – 4.13.2
- Gradle – 7.5.1
- Selenium – 4.3.0
- ExtentReport – 5.0.9
- GrassHopper Cucumber Adapter – 1.7.0
Implementation Steps
- Add ExtentReport dependency to the build.gradle
- Add ExtentCucumberAdapter plugin to task cucumber
- Add Cucumber, Selenium and JUnit4 , and dependencies in build.gradle
- Create Locator and Action classes and Step Definition corresponding to the feature file
- Create extent.properties file in resources folder and paste the below code
- Execute the Tests
- View the ExtentReports
There is a tutorial that explains the Integration of Cucumber, Selenium, and JUnit4 in a Gradle project. Please refer to this tutorial – Gradle Project with Cucumber, Selenium, and JUnit4.
Step 1 – Add ExtentReport dependency to the build.gradle
To create ExtentReport, we need to add the below-mentioned dependency in build.gradle.
implementation 'tech.grasshopper:extentreports-cucumber7-adapter:1.7.0'
implementation 'com.aventstack:extentreports:5.0.9'
Step 2 – Add ExtentCucumberAdapter plugin to task cucumber
task cucumber() {
    dependsOn assemble, compileTestJava
    doLast {
        javaexec {
            main = "io.cucumber.core.cli.Main"
            classpath = configurations.cucumberRuntime + sourceSets.main.output + sourceSets.test.output
            args = ['--plugin', 'pretty',
            '--plugin', 'io.qameta.allure.cucumber7jvm.AllureCucumber7Jvm',
            '--plugin', 'com.aventstack.extentreports.cucumber.adapter.ExtentCucumberAdapter:',
            '--glue', 'com.example.definitions', 'src/test/resources']
        }
    }
}
Step 3 – Add Cucumber, Selenium and JUnit4, and dependencies in build.gradle
dependencies {

    testImplementation 'io.cucumber:cucumber-java:7.6.0'
    testImplementation 'io.cucumber:cucumber-junit:7.6.0'

    // Use JUnit test framework.
    testImplementation 'junit:junit:4.13.2'

    //ExtentReport
    implementation 'tech.grasshopper:extentreports-cucumber7-adapter:1.7.0'
    implementation 'com.aventstack:extentreports:5.0.9'

    // This dependency is used by the application.
    implementation 'com.google.guava:guava:30.1.1-jre'
    implementation 'org.seleniumhq.selenium:selenium-java:4.4.0'
    implementation 'io.github.bonigarcia:webdrivermanager:5.3.0'
}
The complete build.gradle is shown below:
/*
 * This file was generated by the Gradle 'init' task.
 *
 */

plugins {
    // Apply the application plugin to add support for building a CLI application in Java.
    id 'application'
}

repositories {
    // Use Maven Central for resolving dependencies.
    mavenCentral()
}

java {
    sourceCompatibility = 11
    targetCompatibility = 11
}


dependencies {

    testImplementation 'io.cucumber:cucumber-java:7.6.0'
    testImplementation 'io.cucumber:cucumber-junit:7.6.0'

    // Use JUnit test framework.
    testImplementation 'junit:junit:4.13.2'

    //ExtentReport
    implementation 'tech.grasshopper:extentreports-cucumber7-adapter:1.7.0'
    implementation 'com.aventstack:extentreports:5.0.9'

    // This dependency is used by the application.
    implementation 'com.google.guava:guava:30.1.1-jre'
    implementation 'org.seleniumhq.selenium:selenium-java:4.4.0'
    implementation 'io.github.bonigarcia:webdrivermanager:5.3.0'
}

application {
    // Define the main class for the application.
    mainClass = 'com.example.App'
}

configurations {
    cucumberRuntime {
        extendsFrom testImplementation
    }
}

task cucumber() {
    dependsOn assemble, testClasses
    doLast {
        javaexec {

            main = "io.cucumber.core.cli.Main"
            classpath = configurations.cucumberRuntime + sourceSets.main.output + sourceSets.test.output
            args = ['--plugin', 'pretty',
            '--plugin', 'io.qameta.allure.cucumber7jvm.AllureCucumber7Jvm',
            '--plugin', 'com.aventstack.extentreports.cucumber.adapter.ExtentCucumberAdapter:',
            '--glue', 'com.example.definitions', 'src/test/resources']
        }
    }
}
Step 4 – Create Locator and Action classes and Step Definition corresponding to the feature file
As mentioned above, there is another tutorial that explains the project structure as well as the feature file and corresponding Step Definitions, please refer to this tutorial – Gradle Project with Cucumber, Selenium and JUnit4.
Step 5 – Create extent.properties file in resources folder and paste the below code
#Extent Report
extent.reporter.spark.start=true
extent.reporter.spark.out=Reports/Spark.html

#PDF Report
extent.reporter.pdf.start=true
extent.reporter.pdf.out=PdfReport/ExtentPdf.pdf

#HTML Report
extent.reporter.html.start=true
extent.reporter.html.out=HtmlReport/ExtentHtml.html

#FolderName
basefolder.name=ExtentReports/SparkReport_
basefolder.datetimepattern=d_MMM_YY HH_mm_ss

#Screenshot
screenshot.dir=/Screenshots/
screenshot.rel.path=../Screenshots/

#Base64
extent.reporter.spark.base64imagesrc=true

#System Info
systeminfo.os=windows
systeminfo.version=10
Step 6 – Execute the Tests
Go to the app project and run the tests, using the below command
gradle cucumber
The output of the above program is
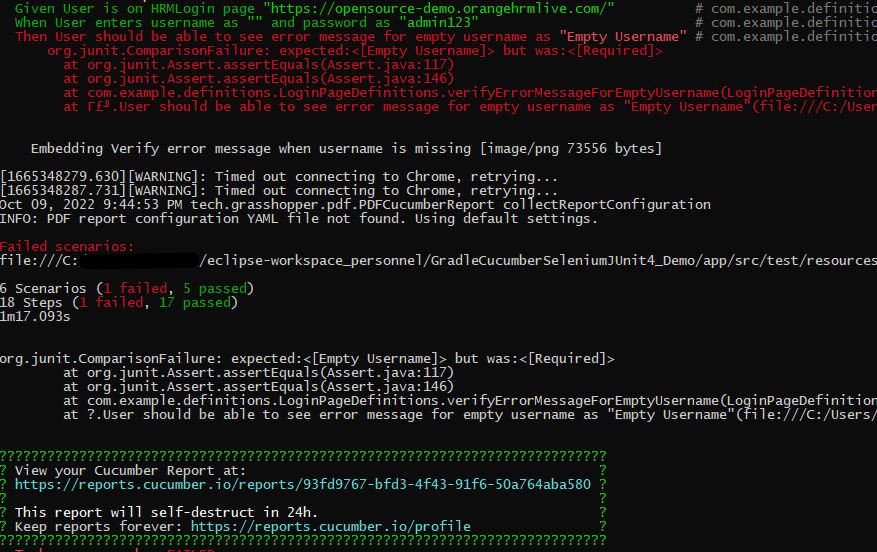
Step 7: View the ExtentReports
Refresh the project and will see a new folder – SparkReport_ which further contains 4 folders –HtmlReport, PdfReport, Reports, and Screenshots.

The ExtentReport will be present in the Report’s folder with the name Spark.html. PDF Report is present in the PdfReport folder and HTML Report is present in the HtmlReport folder. We can see that the Screenshots’ folder is empty because we have used base64imagesrc feature which resulted in no physical screenshots. The screenshots are embedded in the reports.
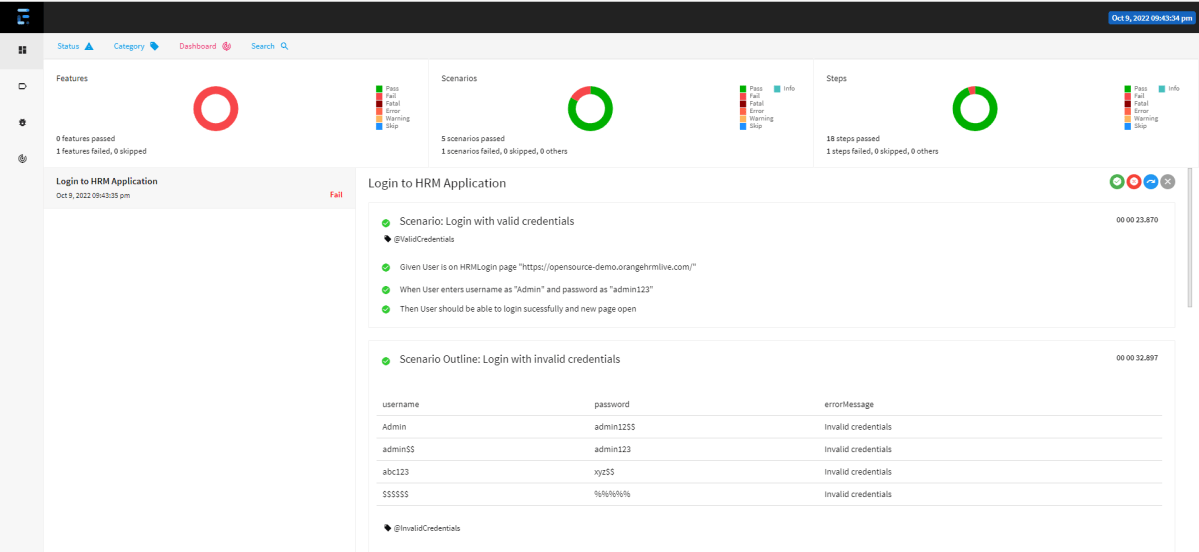
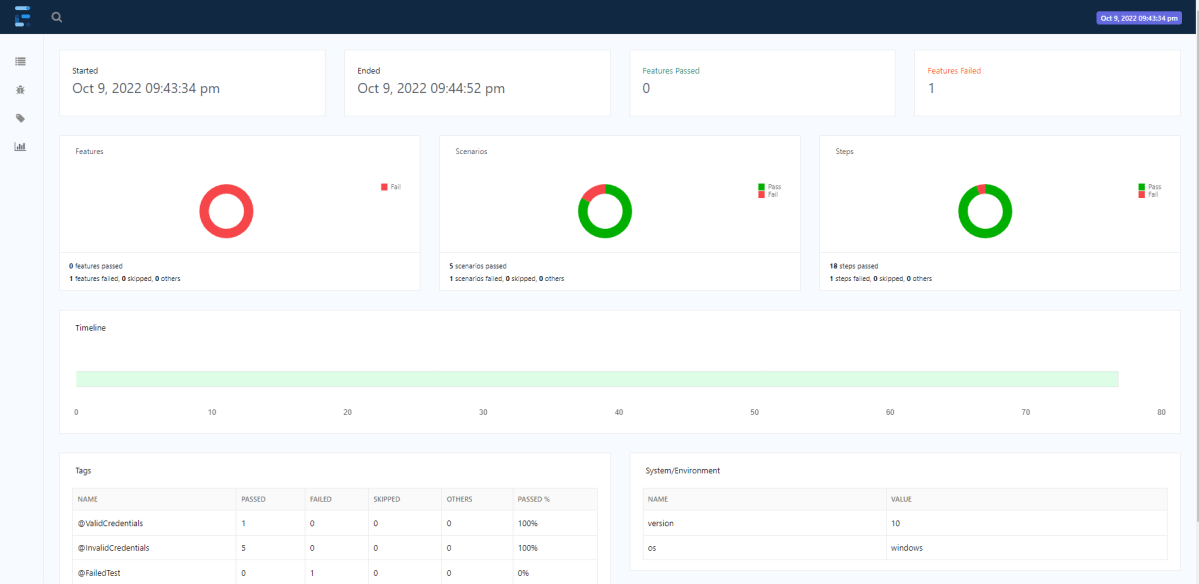
Right-click and open the ExtentHtml.html report with the Web Browser. The report also has a summary section that displays the summary of the execution. The summary includes the overview of the pass/fail using a pictogram, start time, end time, and pass/fail details of features as shown in the image below.
ExtentHtml.html
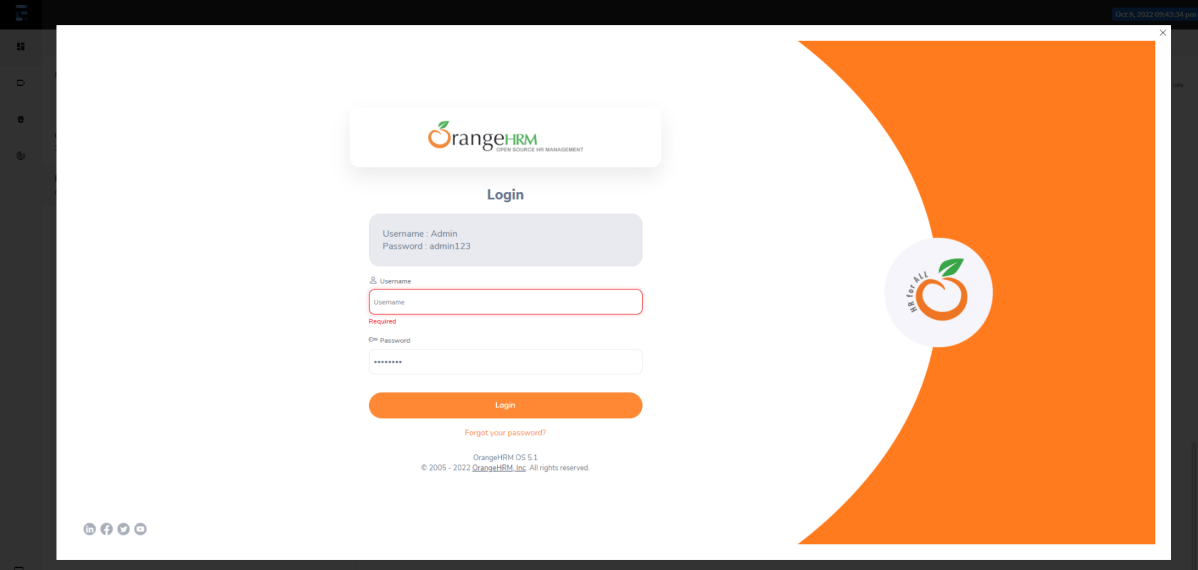
The failed test has screenshot embedded in it. Double click on mase64image and it will open the screenshot in full screen.
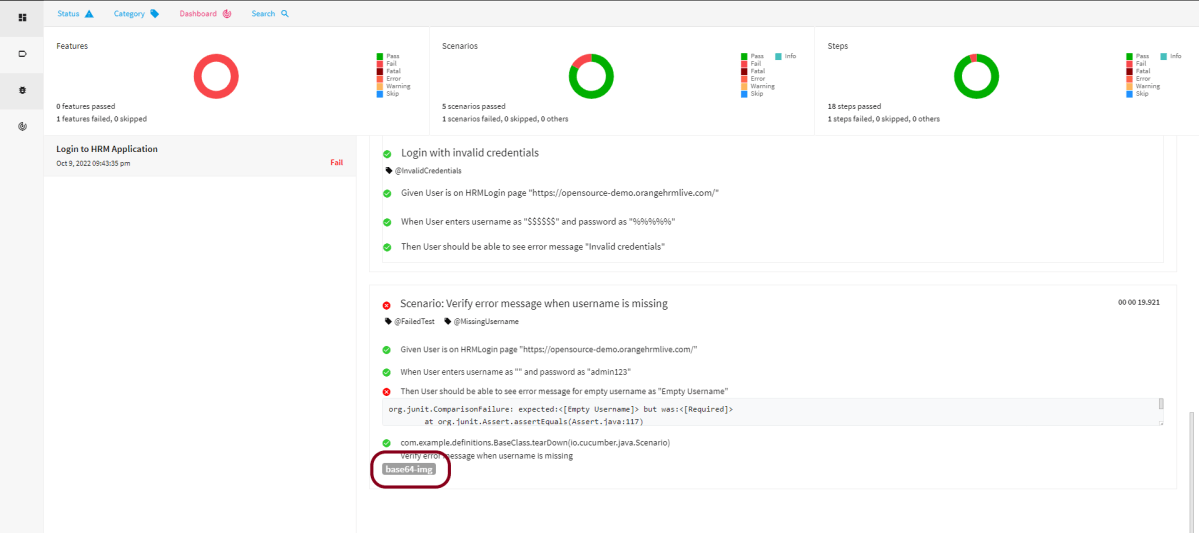
Screenshot of failed Test Case
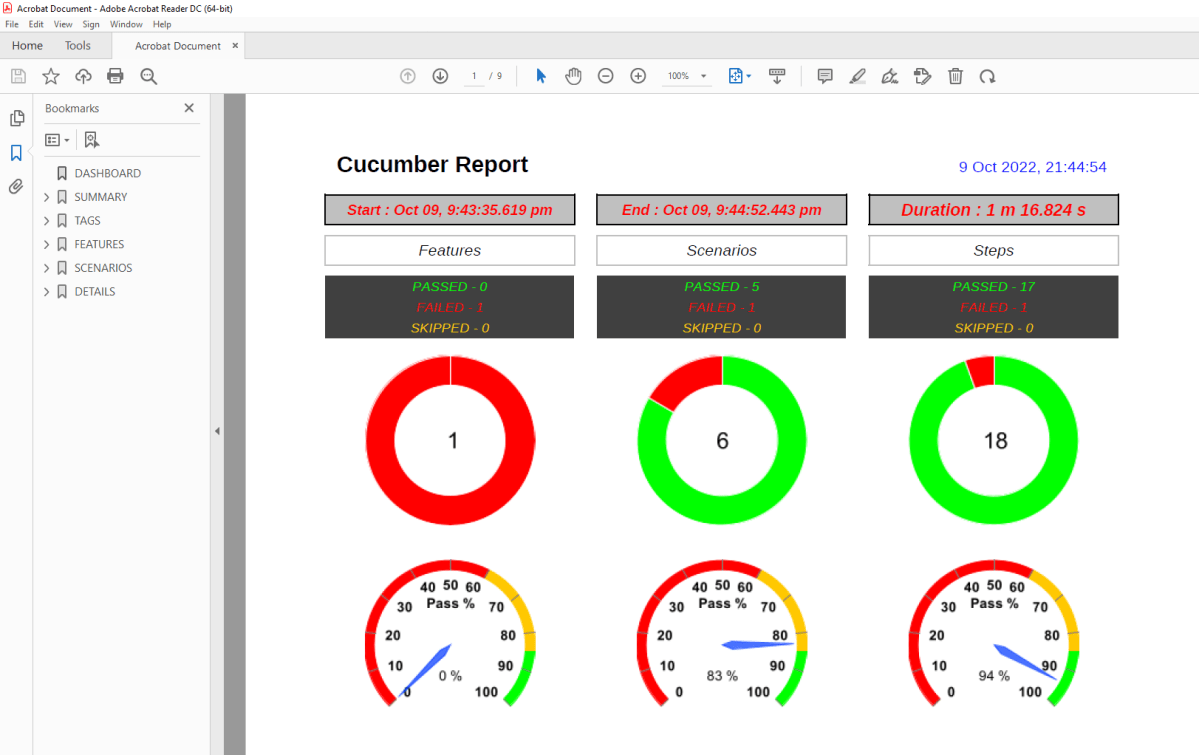
PDF Report
To know more about PDF Report generation, please refer to this tutorial – PDF ExtentReport for Cucumber and TestNG.
Spark Report
Right-click and open the Spark.html report with Web Browser.
Congratulations on making it through this tutorial and hope you found it useful! Happy Learning!! Cheers!!
