BDD is a set of practices that helps to reduce the rework caused by misunderstanding or vague requirements, narrow the communication gaps between the development team, testing team, and customers, and promote continuous communication among them. Cucumber is one such open-source tool, which supports Behaviour Driven Development(BDD). In simple words, Cucumber can be defined as a testing framework, driven by plain English. It serves as documentation, automated tests, and a development aid – all in one.
Cucumber Introduction, Installation, and Configuration
InnvocationCount is one of the feature available in TestNG. InvocationCount is used when we want to run the same test multiple times. If we want to run single @Test 10 times at a single thread, then invocationCount can be used. To invoke a method multiple times, the below syntax is used.
@Test(invocationCount = 3)
In this example, the @Test method will execute for 3 times each on a single thread.
In this tutorial, we will illustrate how to get the current invocation count.
Step 1 − Create a TestNG class, InvocationCount_Demo.
Step 2− Write two @Test methods in the class InvocationCount_Demo as shown in the programming code section below. Add invocationCount=3 to method verifyTitle and 2 to validLoginTest.
Step 3 − Create the testNG.xml as given below to run the TestNG classes.
Step 4− Now, run the testNG.xml or directly TestNG class in IDE or compile and run it using command line.
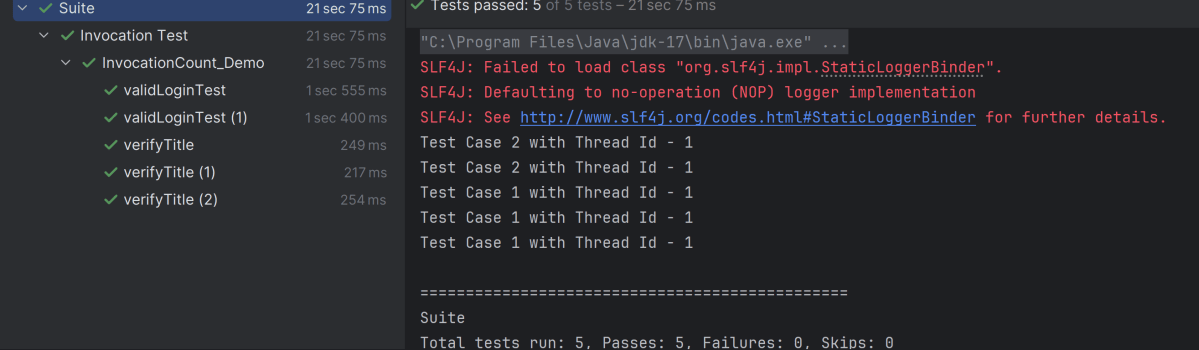
Step 5 − In the output, the user can see a total of 1 thread running sequentially for all invocations of @Test.
import org.openqa.selenium.By;
import org.openqa.selenium.WebDriver;
import org.openqa.selenium.firefox.FirefoxDriver;
import org.openqa.selenium.firefox.FirefoxOptions;
import org.testng.Assert;
import org.testng.annotations.AfterMethod;
import org.testng.annotations.BeforeMethod;
import org.testng.annotations.Test;

import java.time.Duration;


public class InvocationCount_Demo {

    WebDriver driver;

    @BeforeMethod
    public void setup() throws Exception {

        FirefoxOptions options = new FirefoxOptions();
        driver = new FirefoxDriver(options);
        driver.get("https://opensource-demo.orangehrmlive.com/");
        driver.manage().timeouts().implicitlyWait(Duration.ofSeconds(10));
        driver.manage().window().maximize();
    }

    @Test(invocationCount = 3)
    public void verifyTitle() {

        System.out.println("Test Case 1 with Thread Id - " + Thread.currentThread().getId());
        String expectedTitle = driver.findElement(By.xpath("//*[@class='oxd-text oxd-text--h5 orangehrm-login-title']")).getText();
        Assert.assertEquals(expectedTitle,"Login");
    }

    @Test(invocationCount = 2)
    public void validLoginTest() throws InterruptedException {

        System.out.println("Test Case 2 with Thread Id - "+Thread.currentThread().getId());

        driver.findElement(By.name("username")).sendKeys("Admin");
        driver.findElement(By.name("password")).sendKeys("admin123");
        driver.findElement(By.xpath("//*[@class='oxd-form-actions orangehrm-login-action']/button")).click();
        String expectedTitle = driver.findElement(By.xpath("//*[@class='oxd-topbar-header-breadcrumb']/h6")).getText();
        Assert.assertTrue(expectedTitle.contains("Dashboard"));
    }

    @AfterMethod
    public  void closeBrowser() {

        driver.quit();

    }
}
testng.xml
This is a configuration file that is used to organize and run the TestNG test cases. It is very handy when limited tests are needed to execute rather than the full suite.
<?xml version="1.0" encoding="UTF-8"?>
<!DOCTYPE suite SYSTEM "https://testng.org/testng-1.0.dtd">
<suite name="Suite">
    <test name="Invocation Test">
        <classes>
            <class name="com.example.InvocationCount_Demo"/>
        </classes>
    </test> <!-- Test -->
</suite> <!-- Suite -->
The output of the above program is
We can add threadPoolSize to the @Test.
threadPoolSize – It defines the size of the thread pool for any method. The method will be invoked from multiple threads, as specified by invocationCount.
@Test(invocationCount = 3, threadPoolSize)
Congratulations on making it through this tutorial and hope you found it useful! Happy Learning!! Cheers!!
Gson is a Java library that can be used to convert Java Objects into their JSON representation. It can also be used to convert a JSON string to an equivalent Java object. Gson can work with arbitrary Java objects, including pre-existing objects for those you do not have source code.
Provide simple toJson() and fromJson() methods to convert Java objects to JSON and vice versa.
Add the below dependency to POM.xml to use Gson API.
Let us create a table named Employee which contains the data members same as node names in the above JSON payload and their corresponding getter and setter methods.
import java.math.BigDecimal;
import java.util.Map;

public class Employee {

    // private data members of POJO class
    private String firstName;
    private String lastName;
    private int age;
    private Map<String, BigDecimal> salary;
    private String designation;
    private String contactNumber;
    private String emailId;

    // Getter and setter methods
    public String getFirstName() {
        return firstName;
    }

    public void setFirstName(String firstName) {
        this.firstName = firstName;
    }

    public String getLastName() {
        return lastName;
    }

    public void setLastName(String lastName) {
        this.lastName = lastName;
    }

    public int getAge() {
        return age;
    }

    public void setAge(int age) {
        this.age = age;
    }

    public Map<String, BigDecimal> getSalary() {
        return salary;
    }

    public void setSalary(Map<String, BigDecimal> salary) {
        this.salary = salary;
    }

    public String getDesignation() {
        return designation;
    }

    public void setDesignation(String designation) {
        this.designation = designation;
    }

    public String getContactNumber() {
        return contactNumber;
    }

    public void setContactNumber(String contactNumber) {
        this.contactNumber = contactNumber;
    }

    public String getEmailId() {
        return emailId;
    }

    public void setEmailId(String emailId) {
        this.emailId = emailId;
    }

    @Override
    public String toString() {
        return "(firstName: " + firstName + "," +
                "lastName: " + lastName + "," +
                "age: " + age + ", " +
                "salary: " + salary + "," +
                "designation: " + designation + ", " +
                "contactNumber: " + contactNumber + ", " +
                "emailId: " + emailId + ")";

    }
}
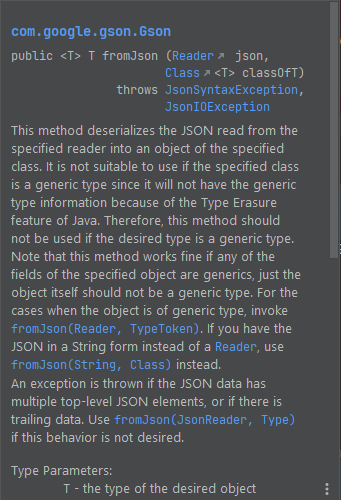
We will convert a JSON Object to a Java Object.
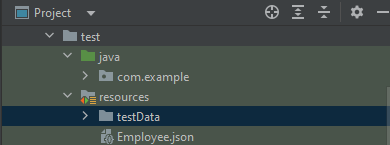
The JSON file – Employee.json is present in src/test/resources.
Below is the image of JSON.
You can create a Gson instance by invoking a new Gson() if the default configuration is all you need, as shown in the below example.
The AssertJproject provides fluent assertion statements for test code written in Java. These assert statements are typically used with Java JUnit tests.
AssertJ is composed of several modules:
A core module to provide assertions for JDK types (String, Iterable, Stream, Path, File, Map…) 1. A Guava module to provide assertions for Guava types (Multimap, Optional…) 2. A Joda Time module to provide assertions for Joda Time types (DateTime, LocalDateTime) 3. A Neo4J module to provide assertions for Neo4J types (Path, Node, Relationship…) 4. A DB module to provide assertions for relational database types (Table, Row, Column…) 5. A Swing module provides a simple and intuitive API for functional testing of Swing user interfaces
What is AssertJ Core?
AssertJ is a Java library that provides a rich set of assertions and truly helpful error messages, improves test code readability, and is designed to be super easy to use within any IDE.
AssertJ Core major versions depend on different Java versions:
AssertJ Core 3.x requires Java 8 or higher
AssertJ Core 2.x requires Java 7 or higher
AssertJ Core 3.x includes all AssertJ Core 2.x features and adds Java 8 specific ones (like exception assertions with lambdas).
The Assertions class is the only class you need to start using AssertJ, it provides all the methods you need.
import static org.assertj.core.api.Assertions.*;
1. Simple Assertion
Verify that age is greater or equal to 50. This assertion will fail
int age = 20;
assertThat(age).isGreaterThanOrEqualTo(30);
The output of the above program is
There is another way to perform the same test. Don’t import the static package.
import org.assertj.core.api.Assertions;
int age = 20;

// Verify that age is greater or equal to 50
Assertions.assertThat(age).isGreaterThanOrEqualTo(30);
This assertion will pass.
int age = 50;

// Verify that age is greater or equal to 50
Assertions.assertThat(age).isGreaterThanOrEqualTo(30);
2. Array Assertions
For an Iterable or an Array there are multiple ways of asserting that their content exist. One of the most common assertions would be to check if an Iterable or Array contains a given element:
int age = 30;
List<Integer> ages = Arrays.asList(20, 25, 33, 45);

// Verify that ages list contains age(30) or not
Assertions.assertThat(ages).contains(age);
Verify if a List starts with a given character. For example “Ugly”:
	List<String> names = Arrays.asList("Here", "Keep", "Ugly", "door", "time");

	@Test
	public void assertJAssertionsExample8() {

		// Verify that ages list contains age(30) or not
		Assertions.assertThat(names).startsWith("Ugly");

	}
The output of the above program is
Assert the size of the list
List<Integer> ages = Arrays.asList(20, 25, 33, 45);

// Verify that list ages contains 5 elements
Assertions.assertThat(ages).hasSize(5);
The output of the above program is
Chaining of assertions
AssertJ allows you to be concise by chaining multiple assertions.
int age = 30;
List<Integer> ages = Arrays.asList(20, 25, 33, 45);

// Verify that the list of age contains 20, and size of list is 4 and match the
// values of all elements
Assertions.assertThat(ages).contains(20).hasSize(4).allMatch(a -> a >= 10 && a <= 30);
The output of the above program is
3. Assertion description
It is often valuable to describe the assertion performed, especially for boolean assertions, where the default error message just complains that it got false instead of true (or vice versa).
You can set such a description as (String description, Object… args) but remember to do it before calling the assertion otherwise it is simply ignored as a failing assertion breaks the chained calls.
Example of a failing assertion with a description:
String name = "Happy Days are here";
Assertions.assertThat(name).as("check name").startsWith("Life");
The error message starts with the given description in [check name]
The output of the above program is
4. Assertions for Date
AssertJ provides special assertions for the Java date class.
Soft assertions AssertJ collects all assertion errors instead of stopping at the first one. Since soft assertions don’t fail at the first error, you need to tell AssertJ when to report the captured assertion errors, we are using assertAll().
SoftAssertions softly = new SoftAssertions();

softly.assertThat("George Martin").as("great authors").isEqualTo("JK Rowling");
softly.assertThat(42).as("comparison").isGreaterThan(120);
softly.assertThat("50").isEqualTo("23");

// Don't forget to call assertAll() otherwise no assertion errors are reported!
softly.assertAll();
The output of the above program is
6. Object Assertions
Objects can be compared in various ways, either to determine the equality of two objects or to examine the fields of an object.
public class AssertJEmployee {

	String name;
	int age;
	float salary;

	public AssertJEmployee(String name, int age, float salary) {
		super();
		this.name = name;
		this.age = age;
		this.salary = salary;
	}

	public String getName() {
		return name;
	}

	public void setName(String name) {
		this.name = name;
	}

	public int getAge() {
		return age;
	}

	public void setAge(int age) {
		this.age = age;
	}

	public float getSalary() {
		return salary;
	}

	public void setSalary(float salary) {
		this.salary = salary;
	}

}
@Test
public void test() {

	AssertJEmployee emp1 = new AssertJEmployee("Tim", 24, 24000);
	AssertJEmployee emp2 = new AssertJEmployee("Tim", 20, 24000);

	Assertions.assertThat(emp1).usingRecursiveComparison().isEqualTo(emp2);
}
The output of the above program is
In the below example, we have used isEqualTo() method that compares object references. We can see that both objects are the same but have different references. So, the assertion fails here.
@Test
public void test() {

	AssertJEmployee emp1 = new AssertJEmployee("Tim", 24, 24000);
	AssertJEmployee emp2 = new AssertJEmployee("Tim", 24, 24000);

	Assertions.assertThat(emp1).isEqualTo(emp2);
}
The output of the above program is
Congratulation! We are able to understand the use of AssertJ. Happy Learning!!
GitLab is a web-based Git repository that provides free open and private repositories, issue-following capabilities, and wikis. It is a complete DevOps platform that enables professionals to perform all the tasks in a project from project planning and source code management to monitoring and security.
Why Use GitLab?
The primary advantage of using GitLab is that it allows all team members to collaborate at all stages of the project. GitLab provides tracking from planning to creation to assist developers in automating the entire DevOps lifecycle and achieving the best results possible. GitLab is becoming increasingly popular among developers due to its extensive set of features and code building blocks.
In this tutorial, I will explain how we can clone a project from GitLab in IntelliJ.
Implementation Steps
Clone the project from GitLab
Step 1 – Go to GitLab and select the project that you want to clone. Click on the blue colour “Clone” button, then copy the hyperlink as shown in the image. You can either Clone with SSH or Clone with HTTPS.
Import the cloned project in IntelliJ
Step 2– From the main menu, select Git -> Clone
Another way is File ->New -> Project from Version Control
Step 3 – In the Get from Version Controldialog, specify the URL of the remote repository you want to clone. This is retrieved from Step 1. Click the Clone button.
Step 4– A dialog box will appear to log in to GitLab. Provide the username and password of GitLab. Select the “Log In” button.
Step 5– When you import or clone a project for the first time, IntelliJ IDEA analyses it. If the IDE detects more than one configuration (for example, Eclipse and Gradle), it prompts you to select which configuration you want to use. Select the necessary configuration and click the OK button. I have selected the Maven project.
Step 6– Once I have selected the Maven project, a new dialog box will appear. IntelliJ asks you to either Trust the Project or Preview it in Safe Mode. I trust the project, so I have selected the Trust Project button.
Step 7– IntelliJ will ask if you want to open the project in the current window or New Window. It is always a good practice to open the project in a New Window.
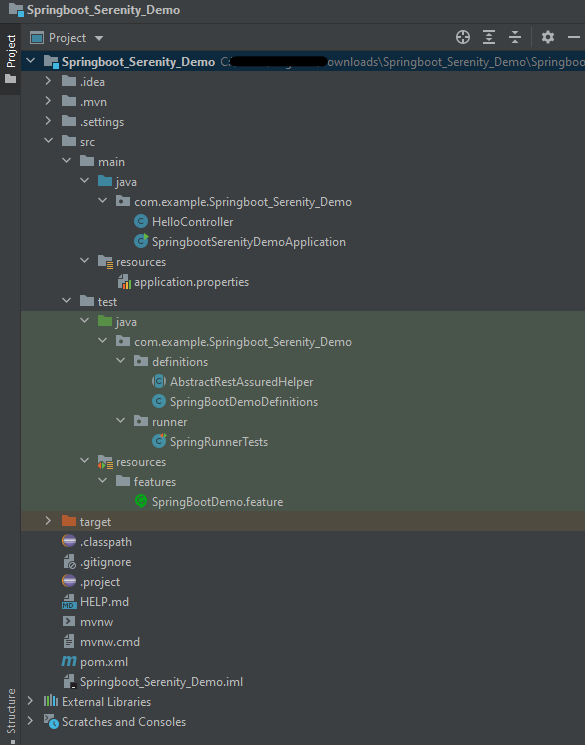
Step 8– We have successfully imported the GitLab Repository as shown in the below image.
Congratulations on making it through this tutorial and hope you found it useful! Happy Learning!! Cheers!!
Gson is a Java library that can be used to convert Java Objects into their JSON representation. It can also be used to convert a JSON string to an equivalent Java object. Gson can work with arbitrary Java objects, including pre-existing objects those you do not have source code.
Provide simple toJson() and fromJson() methods to convert Java objects to JSON and vice versa.
Allow pre-existing unmodifiable objects to be converted to and from JSON.
Extensive support of Java Generics.
Allow custom representations for objects.
Support arbitrarily complex objects (with deep inheritance hierarchies and extensive use of generic types).
Add the below dependency to POM.xml to use Gson API.
Let us create a table named Employee which contains the data members same as node names in the above JSON payload and their corresponding getter and setter methods.
public class Employee {

	// private data members of POJO class
	private String firstName;
	private String lastName;
	private int age;
	private double salary;
	private String designation;
	private String contactNumber;
	private String emailId;

	// Getter and setter methods
	public String getFirstName() {
		return firstName;
	}

	public void setFirstName(String firstName) {
		this.firstName = firstName;
	}

	public String getLastName() {
		return lastName;
	}

	public void setLastName(String lastName) {
		this.lastName = lastName;
	}

	public int getAge() {
		return age;
	}

	public void setAge(int age) {
		this.age = age;
	}

	public double getSalary() {
		return salary;
	}

	public void setSalary(double salary) {
		this.salary = salary;
	}

	public String getDesignation() {
		return designation;
	}

	public void setDesignation(String designation) {
		this.designation = designation;
	}

	public String getContactNumber() {
		return contactNumber;
	}

	public void setContactNumber(String contactNumber) {
		this.contactNumber = contactNumber;
	}

	public String getEmailId() {
		return emailId;
	}

	public void setEmailId(String emailId) {
		this.emailId = emailId;
	}

}
We will convert a Java Object to a JSON object as a String and also will write it into a .json file. There are many variations for the method toJson().
You can create a Gson instance by invoking a new Gson() if the default configuration is all you need, as shown in the below example.
You can also use GsonBuilder to build a Gson instance with various configuration options such as versioning support, pretty-printing, custom JsonSerializer, JsonDeserializer.
Gson is a Java library that can be used to convert Java Objects into their JSON representation. It can also be used to convert a JSON string to an equivalent Java object. Gson can work with arbitrary Java objects, including pre-existing objects those you do not have source code.
Provide simple toJson() and fromJson() methods to convert Java objects to JSON and vice-versa.
Allow pre-existing unmodifiable objects to be converted to and from JSON.
Extensive support of Java Generics.
Allow custom representations for objects.
Support arbitrarily complex objects (with deep inheritance hierarchies and extensive use of generic types).
Add the below dependency to POM.xml to use Gson API.
Let us create a table named Employee which contains the data members same as node names in the above JSON payload and their corresponding getter and setter methods.
public class Employee {

	// private data members of POJO class
	private String firstName;
	private String lastName;
	private int age;
	private double salary;
	private String designation;
	private String contactNumber;
	private String emailId;

	// Getter and setter methods
	public String getFirstName() {
		return firstName;
	}

	public void setFirstName(String firstName) {
		this.firstName = firstName;
	}

	public String getLastName() {
		return lastName;
	}

	public void setLastName(String lastName) {
		this.lastName = lastName;
	}

	public int getAge() {
		return age;
	}

	public void setAge(int age) {
		this.age = age;
	}

	public double getSalary() {
		return salary;
	}

	public void setSalary(double salary) {
		this.salary = salary;
	}

	public String getDesignation() {
		return designation;
	}

	public void setDesignation(String designation) {
		this.designation = designation;
	}

	public String getContactNumber() {
		return contactNumber;
	}

	public void setContactNumber(String contactNumber) {
		this.contactNumber = contactNumber;
	}

	public String getEmailId() {
		return emailId;
	}

	public void setEmailId(String emailId) {
		this.emailId = emailId;
	}

}
We will convert a Java Object to a JSON object as a String and also will write it into a .json file. There are many variations for the method toJson().
You can create a Gson instance by invoking a new Gson() if the default configuration is all you need, as shown in the below example.
You can also use GsonBuilder to build a Gson instance with various configuration options such as versioning support, pretty-printing, custom JsonSerializer, JsonDeserializer.
import com.google.gson.Gson;
import com.google.gson.GsonBuilder;
import org.junit.Test;

public class EmployeeGsonTest {

    @Test
    public void gsonSerializationTest()  {

        // Create an object of POJO class
        Employee employee = new Employee();
        employee.setFirstName("Vibha");
        employee.setLastName("Singh");
        employee.setAge(30);
        employee.setSalary(75000);
        employee.setDesignation("Manager");
        employee.setContactNumber("+919999988822");
        employee.setEmailId("abc@test.com");

        Gson gson = new Gson();
        String employeeJsonPayload = gson.toJson(employee);
        System.out.println("Json :" + employeeJsonPayload);

        Gson builder = new GsonBuilder().setPrettyPrinting().create();
        String employeePrettyJsonPayload = builder.toJson(employee);
        System.out.println("Pretty Json :" + employeePrettyJsonPayload);

    }
}
The execution message is shown below.
We are done! Congratulations on making it through this tutorial and hope you found it useful! Happy Learning!!
Serenity BDD is an open-source library that aims to make the idea of living documentation a reality.
Serenity BDD helps you write cleaner and more maintainable automated acceptance and regression tests faster. Serenity also uses the test results to produce illustrated, narrative reports that document and describe what your application does and how it works. Serenity tells you not only what tests have been executed, but more importantly, what requirements have been tested.
What is SpringBoot Application?
Spring Boot is an open-source micro framework that provides Java developers with a platform to get started with an auto-configurable production-grade Spring application.
Comes with embedded HTTP servers like Tomcat orJetty to test web applications.
Adds many plugins that developers can use to work with embedded and in-memory databases easily. Spring allows you to easily connect with database and queue services like Oracle, PostgreSQL, MySQL, MongoDB, Redis, Solr, ElasticSearch, Rabbit MQ, and others.
Prerequisite
Serenity seamlessly supports Cucumber 6 and Cucumber 7. However, this flexibility requires a little tweaking in the build dependencies. For the Maven project, you need to do the following:
Add serenity-cucumber dependency
Add Springboottest dependency to start up an application context to be used in a test.
Add Junit-Vintage dependency as it is needed for spring boot application of version 2.4 and above with JUnit4.
Project Directory Structure
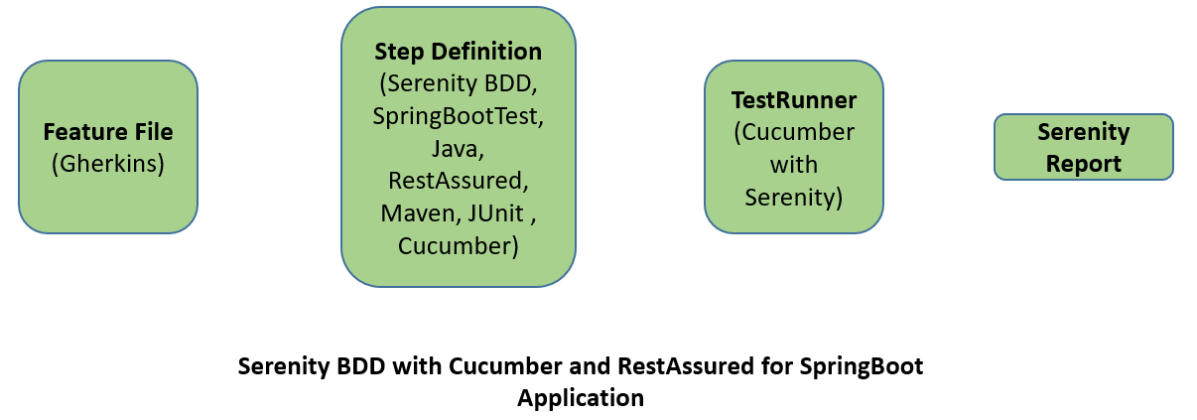
Relationship between SpringBoot, Serenity BDD, Cucumber and Rest Assured
Implementation Steps
Create a source folder – src/test/resources to create test scenarios in the Feature file
AddSpringBoot, Serenity, Cucumber,and JUnit4 dependencies to the project
Create a feature file under src/test/resources
Create the StepDefinition and Helper classes.
Create a Serenity Runner class in the src/test/java directory
Run the tests from JUnit
Run the tests from Command Line
Serenity Report Generation
CucumberReport Generation
Step 1 – Create a source folder – src/test/resources
Right-click on the test directory and select New->Directory and select resources (Maven Source Directories). Create a source folder – src/test/resources to create test scenarios in the Feature file
Step 2 – Add SpringBoot, Serenity, Cucumber, and JUnit4 dependencies to the project
We have added SpringBootTest, Serenity, Cucumber, JUnit4, and JUnit Vintage.
Step 3 – Create a feature file under src/test/resources
Below is an example of a feature file which shows a sample test scenario.
Feature: SpringBoot Request

@ReceiveCorrectResponse

   Scenario Outline: Send a valid Request to get correct response
    Given I send a request to the URL "<url>"
    Then the response will return "<response>"

   Examples:
   | url             | response                   |
   | /               | Hello World, Spring Boot!  |
   | /qaautomation   | Hello QA Automation!       |
The test class mentioned below (AbstractRestAssuredHelper) contains integration tests for the spring boot rest controller mentioned. This test class:
uses @SpringBootTest annotation which loads the actual application context.
uses WebEnvironment.RANDOM_PORT to create and run the application at some random server port.
@LocalServerPort gets the reference of the port where the server has started. It helps in building the actual request URIs to mimic real client interactions.
Step 4 – Create the StepDefinition and Helper classes
Below is the code of the StepDefinition and Helper class. These classes are created in the src/test/java directory.
This class sends the request and receives a response after performing the GET operation. Here, the validation of the response also takes place by asserting the expected and actual response
To use Rest-assured, Serenity provides the class SerenityRest
import org.junit.Assert;
import io.cucumber.java.en.Given;
import io.cucumber.java.en.Then;
import io.restassured.response.Response;
import net.serenitybdd.rest.SerenityRest;
import net.thucydides.core.annotations.Steps;

public class SpringBootDemoDefinitions {

	@Steps
    AbstractRestAssuredHelper helper;
    private Response response;

    @Given("I send a request to the URL {string}")
    public void iSendARequest(String endpoint) throws Exception  {
         response = helper.getAnonymousRequest().contentType("application/json")
                    .header("Content-Type", "application/json").when().get(endpoint);
    }

    @Then("the response will return {string}")
    public void extractResponse(String Expected ) {
          SerenityRest.restAssuredThat(response -> response.statusCode(200));
          String Actual = response.asString();
          Assert.assertEquals(Expected, Actual);
    }
}
Step 5 – Create a Serenity Runner class in the src/test/java directory
We cannot run a Feature file on its own in cucumber-based framework. We need to create a Java class that will run the Feature File. It is the starting point for JUnit to start executing the tests. TestRunner class is created under src/ test/java. When you run the tests with serenity, you use the CucumberWithSerenitytest runner. If the feature files are not in the same package as the test runner class, you also need to use the @CucumberOptionsclass to provide the root directory where the feature files can be found.
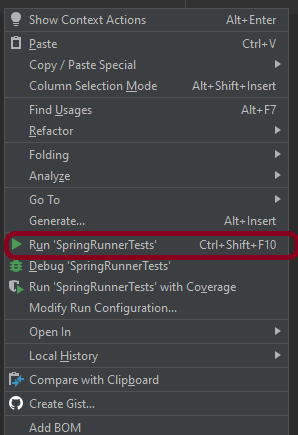
You can run the tests from SpringRunnerTests class. Right-click on the class and select Run ‘SpringRunnerTests’.
Step 7 – Run the tests from Command Line
Run the tests from the command line by using the below command
mvn clean verify
The output of the above program is
The test execution status is shown below:
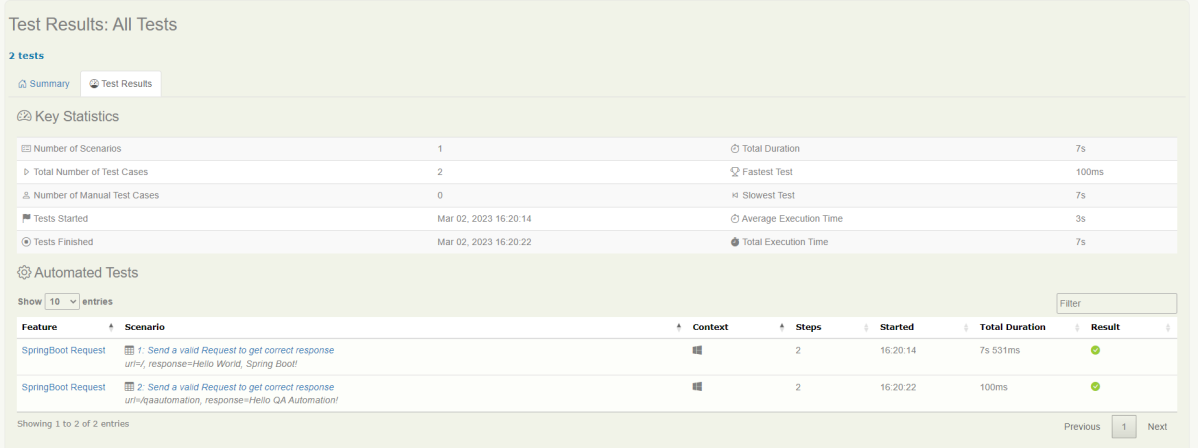
Step 8 – Serenity Report Generation
By default, the test report generated by Serenity is placed under target/site/serenity/index.html. Below is the sample Serenity Report.
Go to the Test Results tab and we can see all the test scenarios.
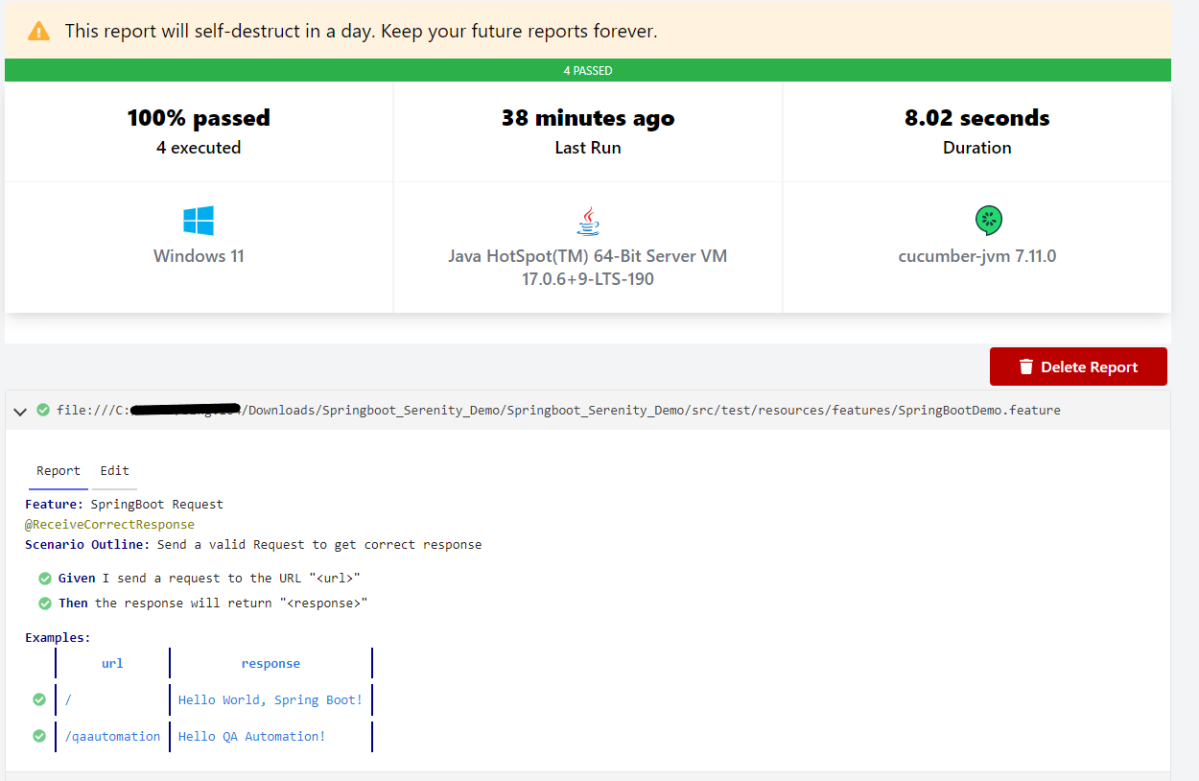
Step 9 – CucumberReport Generation
Cucumber Report can be generated by adding publish=true in SpringRunnerTests as shown in the above example. Click on the link provided in the execution status.
Jenkin’s installed and started on the computer. The current Jenkins version is – 2.361.2
To generate HTML Report in Jenkins, we need to download HTML Publisher Plugin. Please refer to this tutorial to install the plugin – How to install Plugins in Jenkins.
Implementation Steps
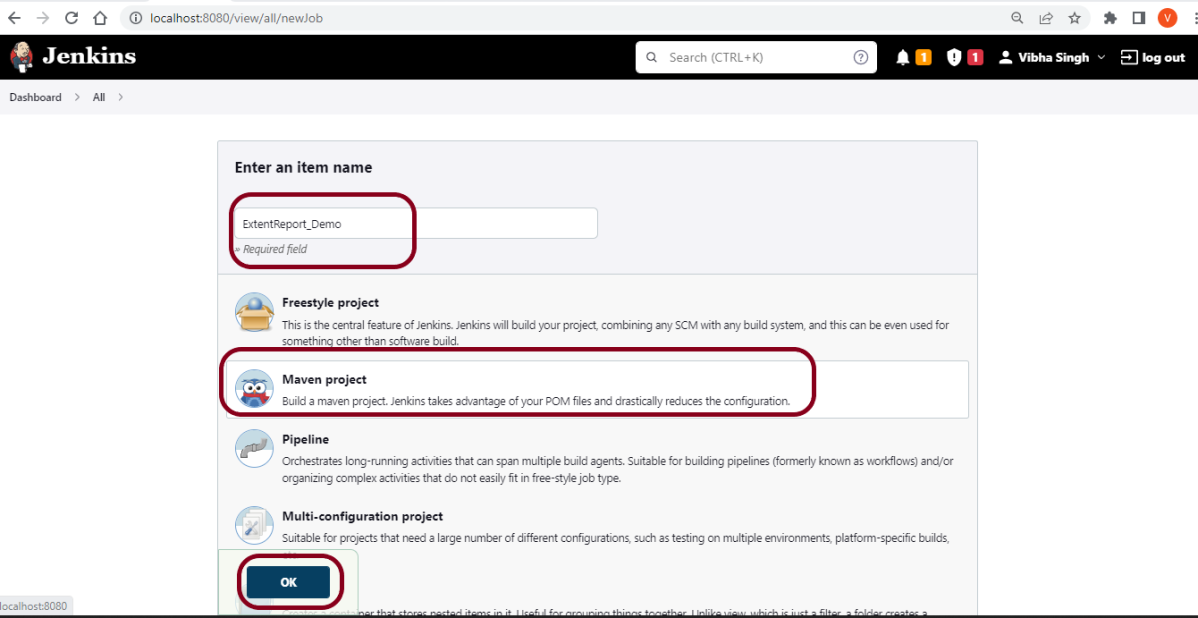
Step 1: Create a new Maven project
Give the Name of the project – ExtentReport_Demo
Click on the Maven project.
Click on the OK button.
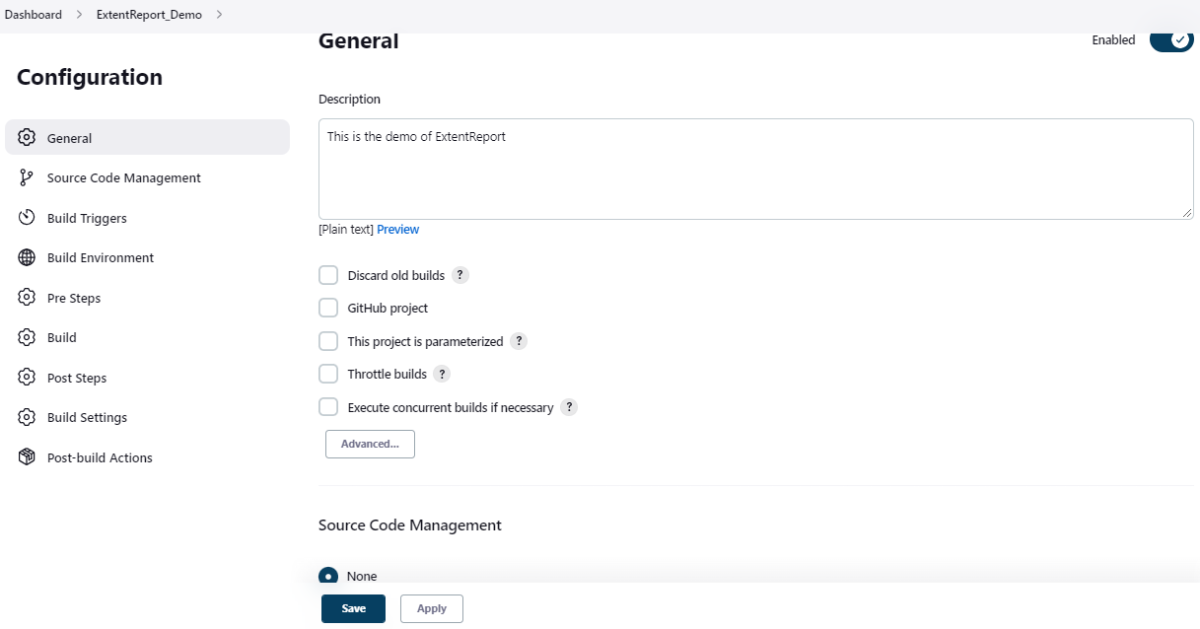
In the General section, enter the project description in the Description box.
Select Source Code Management as None if the project is locally present on the machine.
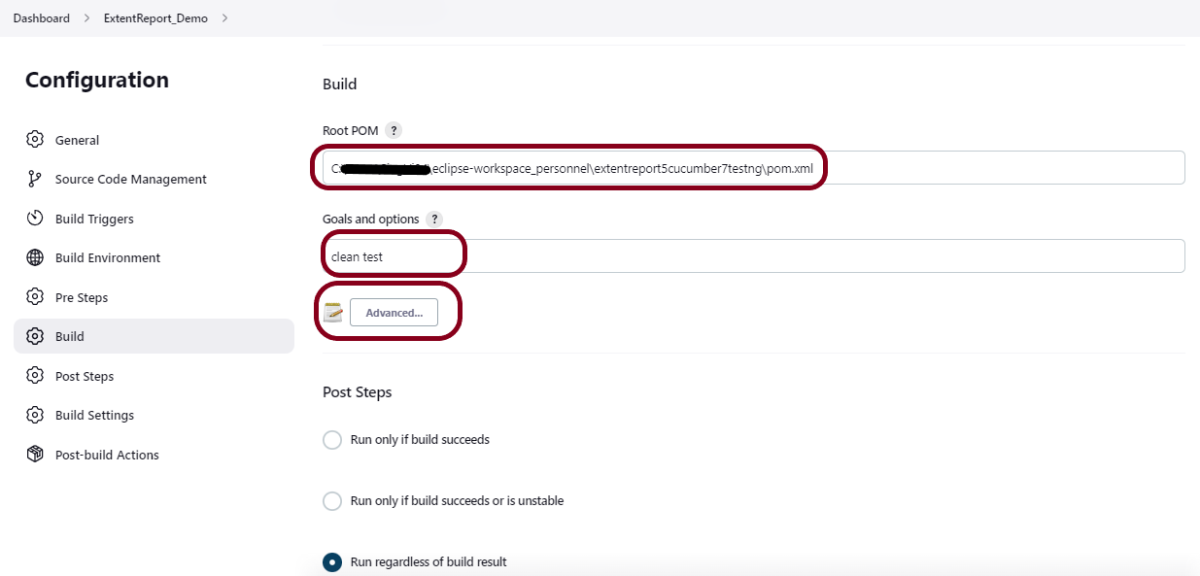
Step 2: Build Management
Go to the Build section of the new job.
In the Root POM textbox, enter the full path to pom.xml
In the Goals and options section, enter “clean test site”
Here, I have used the Selenium project with JUnit, so to see the complete project, please refer to this tutorial – How to generate JUnit4 Report.
Click on the Advanced button.
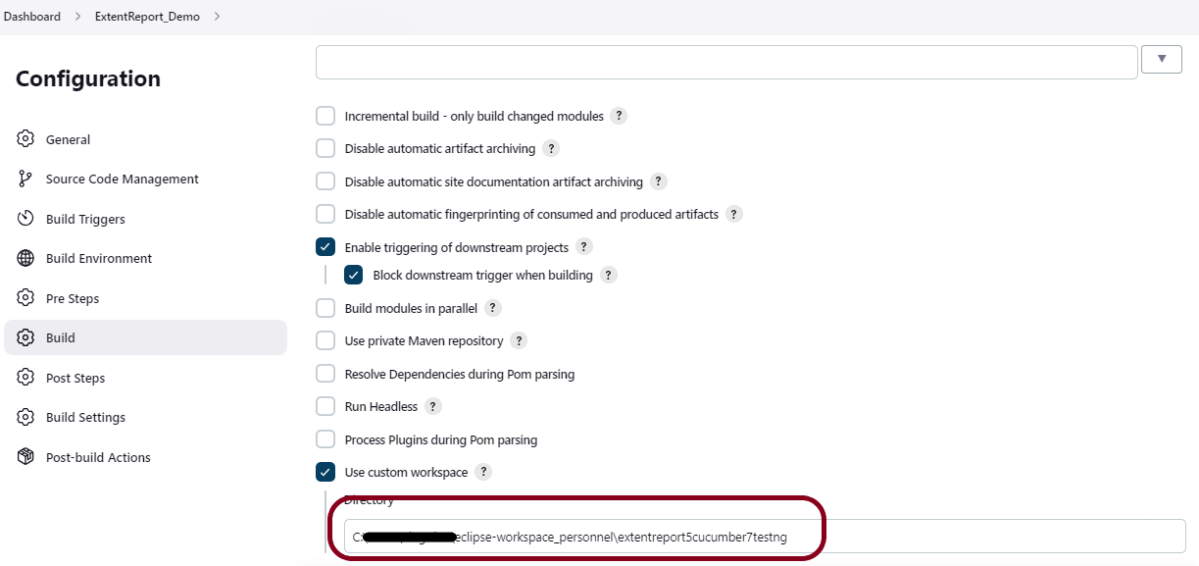
Step 3: Select a custom workspace
Mention the full path of the project in the directory.
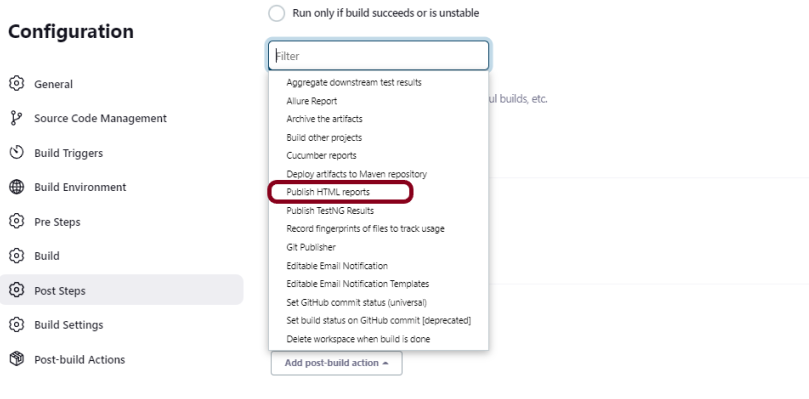
Step 4: Select “Publish HTML reports” from “Post Build Actions”
Scroll down to “Post Build Actions” and click on the “Add Post Build Actions” drop-down list. Select “Publish HTML reports“.
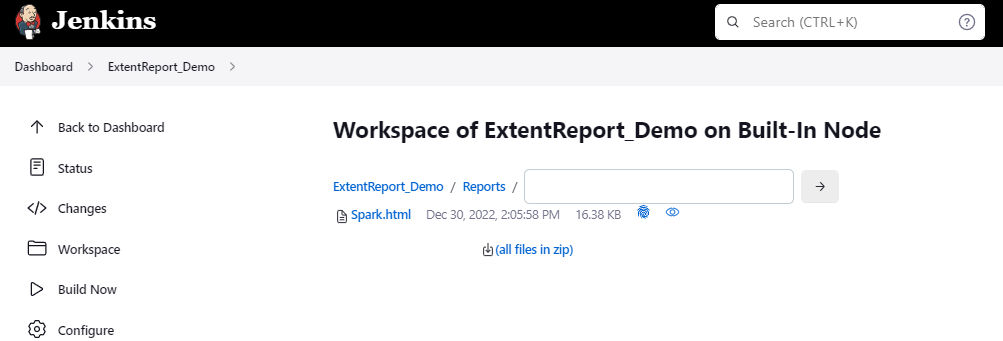
If you want to see where the report is saved in Jenkins, go to the Dashboard ->ExtentReport_Demo project -> Workspace ->target -> Reports -> Spark.html.
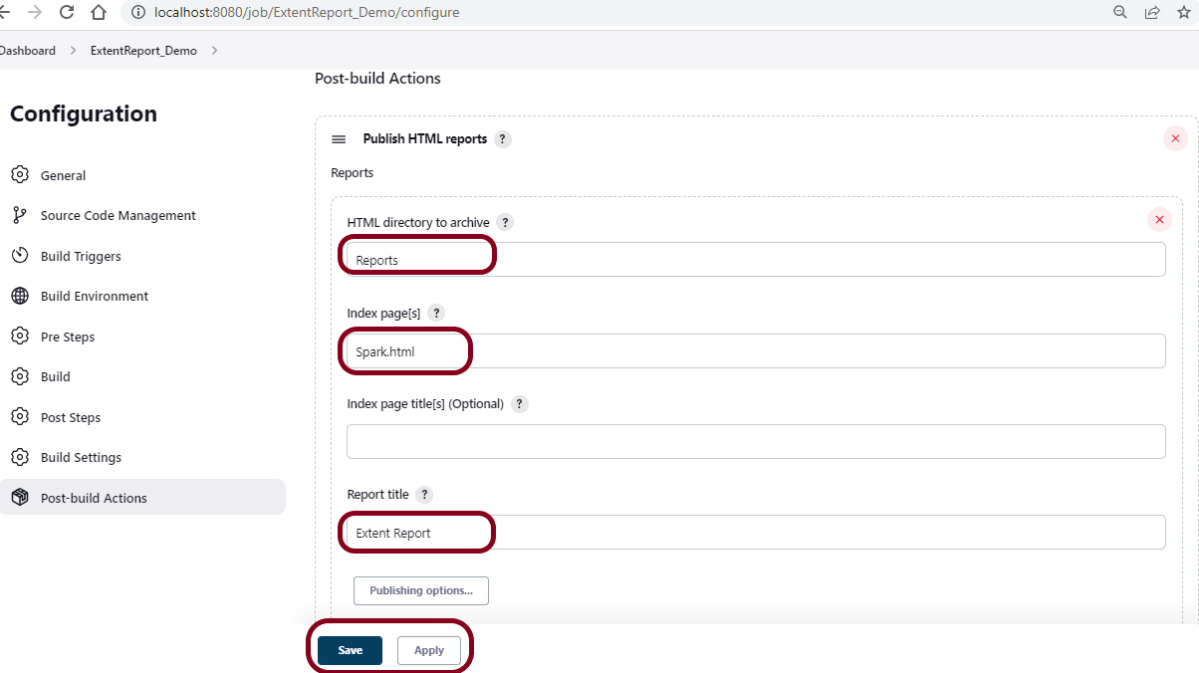
Enter the HTML directory to archive – Reports, Index page[s] – Spark.html, and Report title – Extent Report.
Click on the Apply and Save buttons.
We have created a new Maven project “ExtentReport_Demo” with the configuration to run the Cucumber, and Selenium with TestNG Tests and also to generate HTML Report after execution using Jenkins.
Step 5: Execute the tests
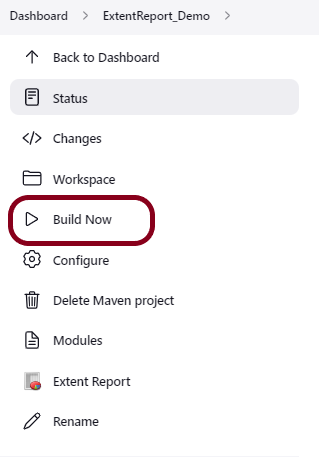
Let’s execute it now by clicking on the “Build Now” button.
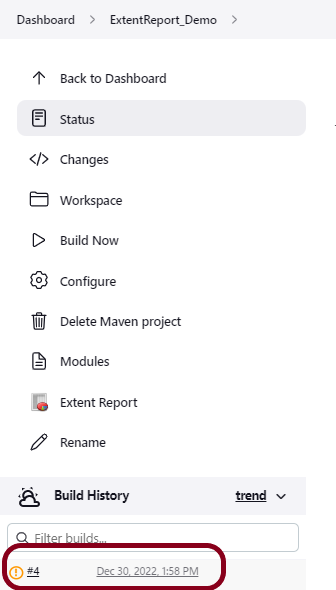
Right-click on Build Number (here in my case it is #4).
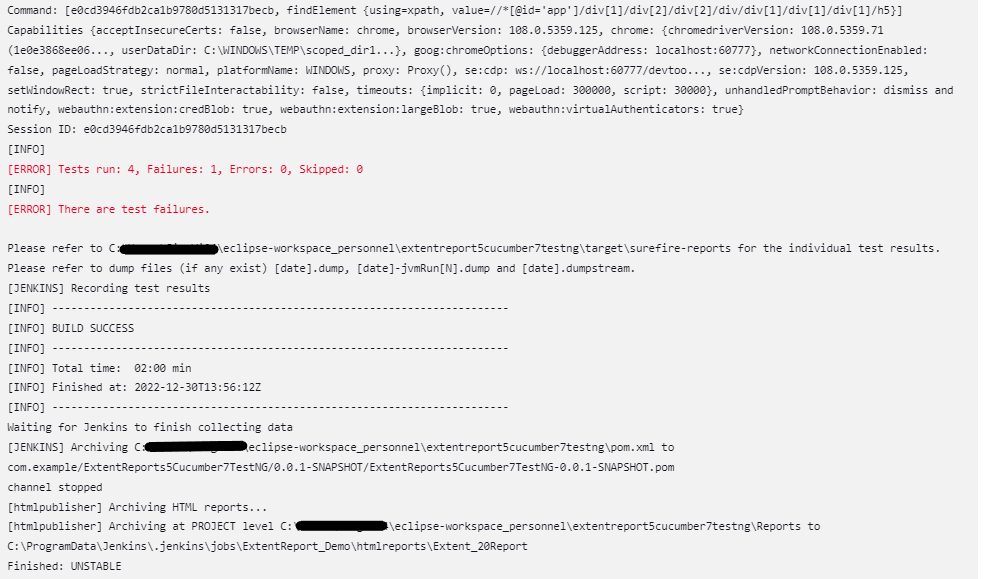
Click on Console Output to see the result.
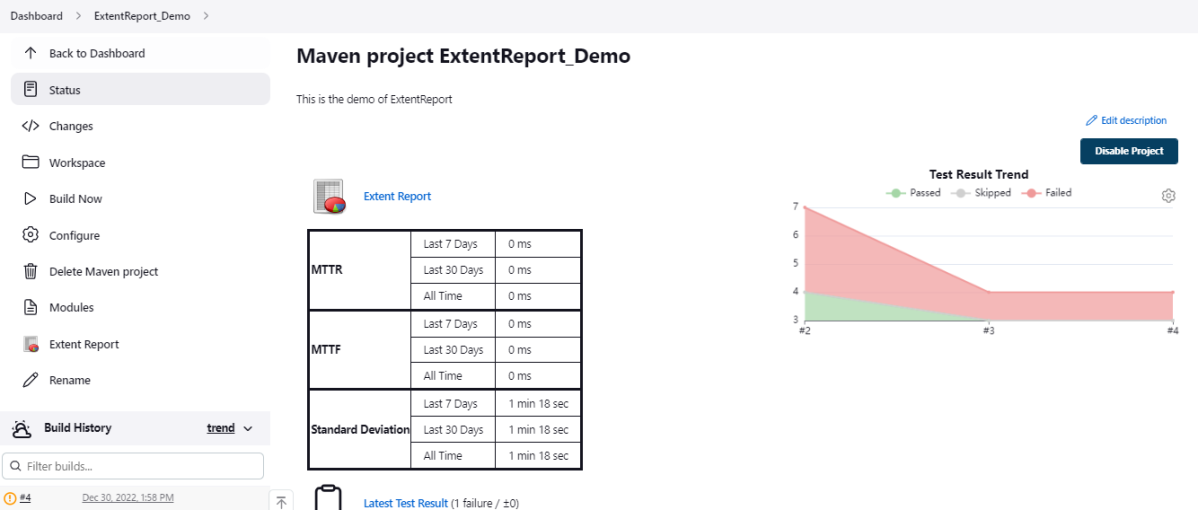
Step 6: View the Extent Report
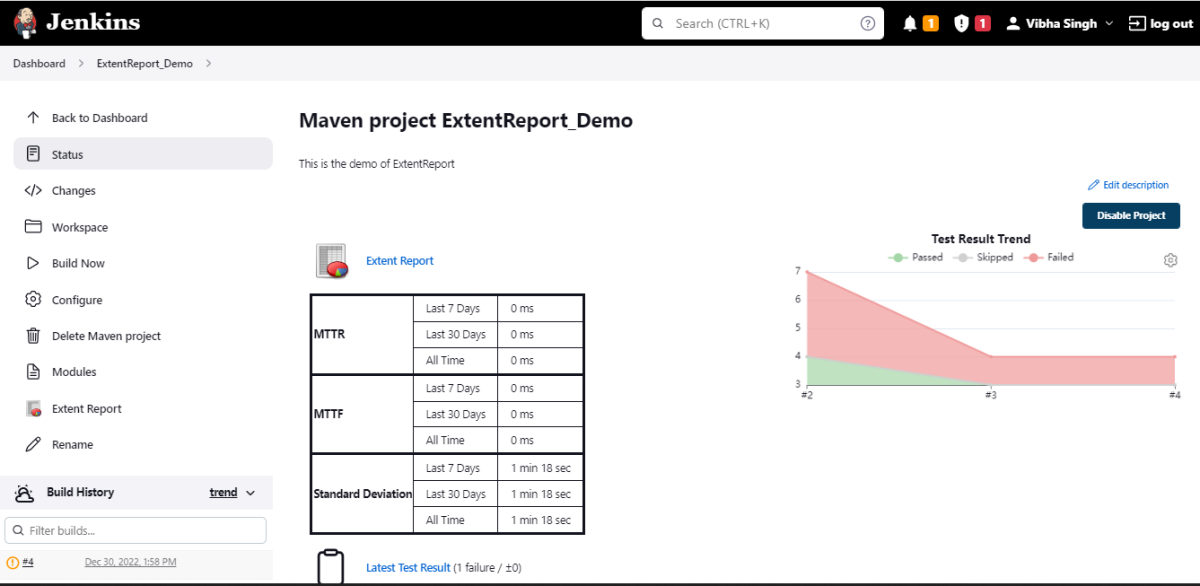
Once the execution is completed, click on go “Back to Project“, and we can see a link to view the “Extent Report“.
We can see here that the Extent Report link is displayed in the Console.
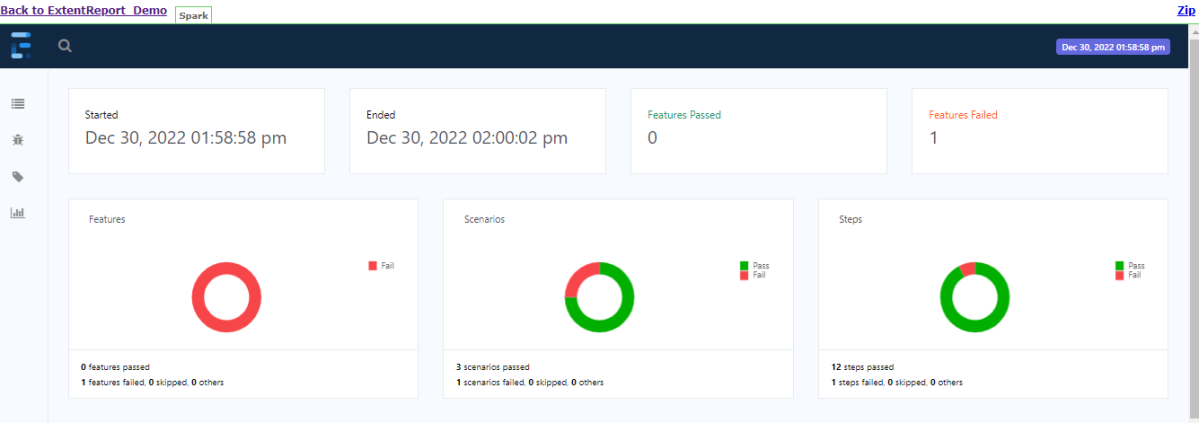
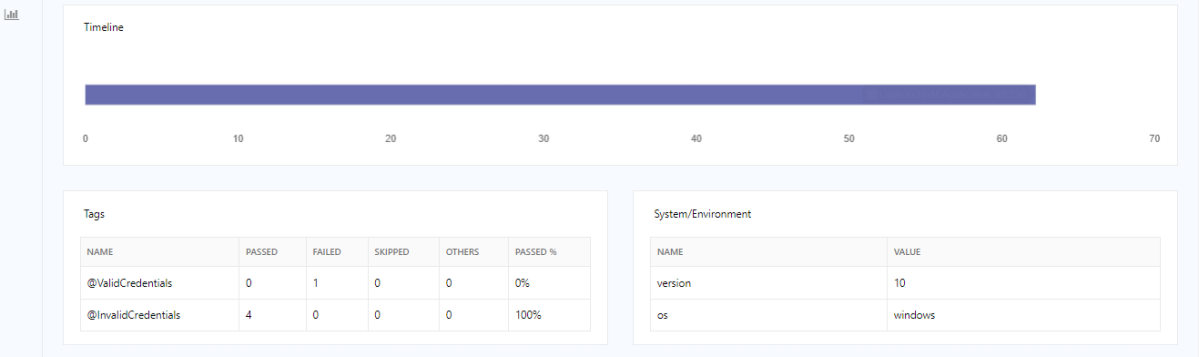
Below is the Extent Report generated in Jenkins.
Tip: If you don’t see the Report UI intact, then you need to configure a simple Groovy script. For that, go to Dashboard–>Manage Jenkins–>Script Console and add the script as:
4. To generate a JUnit Report in Jenkins, we need to download the JUnit Plugin. Please refer to this tutorial to install the plugin – How to install Plugins in Jenkins
Implementation Steps
Step 1: Start the Jenkins server
Start the Jenkins server open the browser and navigate to the below endpoint
In the General section, enter the project description in the Description box.
Select a custom workspace and provide the full path of the project.
Select Source Code Management as None if the project is locally present on the machine
Step 3: Build Steps
In the Build Steps section, select Invoke top-level Maven targets.
The Build Steps window will extend. Mention the below details:-
Maven Version – MAVEN_HOME
Goals – clean test
Click on the Advanced button.
Step 4: Provide the full path to pom.xml
Specify the full path to pom.xml in POM.
Step 5: Select “Publish JUnit test result report” from “Post Build Actions”
Scroll down to “Post Build Actions” and click on the “Add Post Build Actions” drop-down list. Select “Publish JUnit test result report“.
Enter the Result Path as “**/target/surefire-reports/*.xml”.
Click on the Applyand Save buttons.
We have created a new Maven project “JUnitReport_Demo” with the configuration to run the Selenium with JUnit Tests and also to generate JUnit Report after execution using Jenkins.
Step 6: Execute the tests
Let’s execute it now by clicking on the “Build Now” button.
Right-click on Build Number (here in my case it is #2).
Click on Console Output to see the result.
Step 7: View the JUnit Report
Once the execution is completed, we could see a link to view the “Test Report“.
Below is the summary of the Test Execution.
This way, we could generate JUnit Report using Jenkins.
Congratulations on making it through this tutorial and hope you found it useful! Happy Learning!! Cheers!!