DataProviders in TestNG

HOME

In the last tutorial, I have explain the Parameters in TestNG which passes different test data to the test case as arguments. Similar to TestNG Parameters, DataProviders are a means to pass data to test scripts in TestNG. In this tutorial, I will explain about the DataProviders in TestNG.

What is DataProvider in TestNG?

The DataProvider in TestNG is another way to pass the parameters in the test function, the other one being TestNG parameters. Using DataProvider in TestNG, we can easily inject multiple values into the same test case. It comes inbuilt in TestNG and is popularly used in data-driven frameworks.

Syntax of DataProvider

@DataProvider (name = "name_of_dataprovider")
public Object[][] dpMethod() {
    return new Object [][] { values}
}
  •  A Data Provider is a method on the class that returns an array of array of objects.  This method is annotated with @DataProvider
  • A @Test method specifies its Data Provider with the dataProvider attribute. This name must correspond to a method on the same class annotated with @DataProvider(name=”…”) with a matching name.
  • TestNG dataprovider returns a 2d list of objects..An array of array of objects (Object[][]) where the first dimension’s size is the number of times the test method will be invoked and the second dimension size contains an array of objects that must be compatible with the parameter types of the test method.
  • DataProviders are not declared on top of the functions like TestNG parameters but have a method of their own, which in regular speaking terms called a dataprovider method. For example, dpMethod here.
  • The dataprovider name calls the dataprovider method, and if there is no name specified by the tester, then the dataprovider method is the default name used in the receiving @Test case.
  • Data providers can run in parallel with the attribute parallel.

Below is the basic example of using DataProvider in TestNG.

import org.openqa.selenium.By;
import org.openqa.selenium.Keys;
import org.openqa.selenium.WebDriver;
import org.openqa.selenium.WebElement;
import org.openqa.selenium.chrome.ChromeDriver;
import org.openqa.selenium.chrome.ChromeOptions;
import org.testng.annotations.AfterMethod;
import org.testng.annotations.BeforeMethod;
import org.testng.annotations.DataProvider;
import org.testng.annotations.Test;

public class DataProvider_Demo {

    WebDriver driver;

    @DataProvider(name = "testData")
    public Object[][] dataProvFunc() {
        return new Object[][] { { "Selenium" }, { "TestNG" } };
    }

    @BeforeMethod
    public void setUp() {

        System.out.println("Start the test");
        ChromeOptions options = new ChromeOptions();
        options.addArguments("--start-maximized");
        driver = new ChromeDriver(options);
        driver.get("https://www.bing.com/");
        
    }

    // Passing the dataProvider to the test method through @Test annotation
    @Test(dataProvider = "testData")
    public void search(String keyWord) {
        WebElement txtBox = driver.findElement(By.id("sb_form_q"));
        txtBox.sendKeys(keyWord);
        System.out.println("Keyword entered is : " + keyWord);
        txtBox.sendKeys(Keys.ENTER);
        System.out.println("Search result is displayed.");
    }

    @AfterMethod
    public void burnDown() {
        driver.quit();

        System.out.println("End the test");
    }

}

In the above example, I am passing two search keywords, viz “Selenium” and “TestNG” to the test method using the DataProvider method. You can run the code and check the output.

Here, Test is executed with two values, but we have run the test only once.

Inheriting DataProvider in TestNG

It is messy to have supporting methods like DataProvider and test code in one class. It is always preferred to declare the test case in one class and define TestNG parameters like DataProviders in another class. By default, the data provider will be looked for in the current test class or one of its base classes. If you want to put your data provider in a different class, it needs to be a static method or a class with a non-arg constructor, and you specify the class where it can be found in the dataProviderClass attribute.

Let us create separate classes for the DataProvider method and the test method, as shown below:

DataProvider Class

public class DPDemo {

	@DataProvider(name = "testData")
	public Object[][] dataProvFunc() {
		return new Object[][] { 
          { "Selenium" }, { "TestNG" }, { "Automation" } };
	}
}

We can see that all we did was create a DataProvider method in a Class and create a new class for Test Code.

import org.openqa.selenium.By;
import org.openqa.selenium.Keys;
import org.openqa.selenium.WebDriver;
import org.openqa.selenium.WebElement;
import org.openqa.selenium.chrome.ChromeDriver;
import org.openqa.selenium.chrome.ChromeOptions;
import org.testng.annotations.AfterMethod;
import org.testng.annotations.BeforeMethod;
import org.testng.annotations.Test;

public class DataProviderInheritance_Demo {

    WebDriver driver;

    @BeforeMethod
    public void setUp() {

        System.out.println("Start the test");
        ChromeOptions options = new ChromeOptions();
        options.addArguments("--start-maximized");
        driver = new ChromeDriver(options);
        driver.get("https://www.bing.com/");

    }

    // Passing the dataProvider to the test method through @Test annotation
    @Test(dataProvider = "testData", dataProviderClass = DPDemo.class)
    public void search(String keyWord) {
        WebElement txtBox = driver.findElement(By.id("sb_form_q"));
        txtBox.sendKeys(keyWord);
        System.out.println("Keyword entered is : " + keyWord);
        txtBox.sendKeys(Keys.ENTER);
        System.out.println("Search result is displayed.");
    }

    @AfterMethod
    public void burnDown() {
        driver.quit();
        System.out.println("End the test");
    }

}

As you can see, to handle the inheritance, all we did was add an attribute to the test method (highlighted above), which specifies the class that has the DataProvider method. 

Passing Multiple Parameter Values in TestNG DataProviders

Passing multiple values is pretty similar to passing numerous parameters. The only difference is that we will pass various values to a single parameter so that a string of input(s) is sent in one go.

Let us quickly understand this concept with the help of the code as shown below.

DataProvider Class

public class DPDemo {

	@DataProvider(name = "testData")
	public Object[][] dataProvFunc() {
		return new Object[][] { { "Automation Tester", "2-5 years" }, { "Performance Tester", "3+ years" },
				{ "DevOps", "5+ years" } };
	}
}

Test Code – DataProviderInheritanceDemo

import org.openqa.selenium.By;
import org.openqa.selenium.Keys;
import org.openqa.selenium.WebDriver;
import org.openqa.selenium.WebElement;
import org.openqa.selenium.chrome.ChromeDriver;
import org.openqa.selenium.chrome.ChromeOptions;
import org.testng.annotations.AfterMethod;
import org.testng.annotations.BeforeMethod;
import org.testng.annotations.Test;

public class DataProviderInheritanceDemo {

    WebDriver driver;

    @BeforeMethod
    public void setUp() {

        System.out.println("Start the test");
        ChromeOptions options = new ChromeOptions();
        options.addArguments("--start-maximized");
        driver = new ChromeDriver(options);
        driver.get("https://www.bing.com/");

    }

    // Passing the dataProvider to the test method through @Test annotation
    @Test(dataProvider = "testData", dataProviderClass = DPDemo.class)
    public void search(String keyWord1, String keyWord2) {

        WebElement txtBox = driver.findElement(By.id("sb_form_q"));
        txtBox.sendKeys(keyWord1, keyWord2);
        System.out.println("Keyword entered is : " + keyWord1 + " " + keyWord2);
        txtBox.sendKeys(Keys.ENTER);
        System.out.println("Search result is displayed.");
    }

    @AfterMethod
    public void burnDown() {
        driver.quit();
        System.out.println("End the test");
    }
}

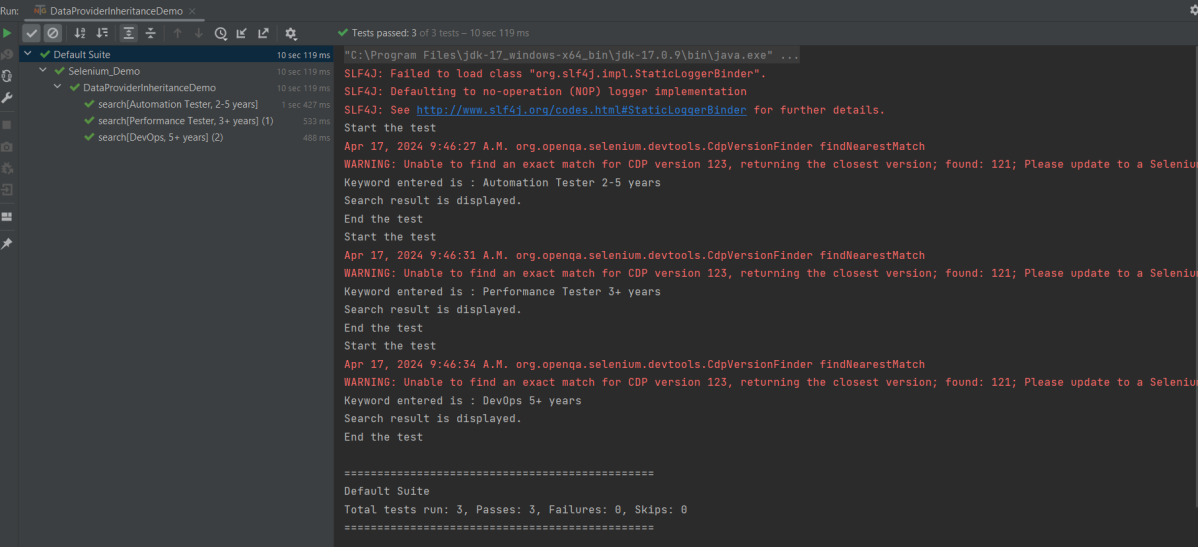
Run the test script, and you will see both the values for the TestNG parameters being passed in one go.

We are done! Congratulations on making it through this tutorial and hope you found it useful! Happy Learning!!

Data Driven Tests using CSV file in Serenity

HOME

In the previous tutorial, I have explained the Data Driven Tests in Serenity where test data are defined in Tests. In this tutorial, I will explain the Data Driven tests in Serenity where we will get the test data from CSV file.

To start with this tutorial, refer this tutorial also which explains how to setup a project with Serenity and JUnit4.

Project Structure

Serenity lets us perform data-driven testing using test data in a CSV file. We store our test data in a CSV file (by default with columns separated by commas), with the first column acting as a header.

We need to create a test class containing properties that match the columns in the test data, as you did for the data-driven test in the previous example. The test class will typically contain one or more tests that use these properties as parameters to the test step or Page Object methods.

Here, we need to keep in mind that as the tests are parameterized , we need to use the Parameterized test runner to perform data-driven tests.

@RunWith(SerenityParameterizedRunner.class)

This is imported from below package

net.serenitybdd.junit.runners.SerenityParameterizedRunner;

@UseTestDataFrom annotation is used to indicate where to find the CSV file (this can either be a file on the classpath or a relative or absolute file path – putting the data set on the class path (e.g. in src/test/resources) makes the tests more portable).

@UseTestDataFrom(value = "testdata/credentials.csv")

Below is the example of the Parameterized Tests.

ParameterizedTestsUsingCSV Class contains the SerenityParameterizedRunner as well as provides the path of the test data file using @UseTestDataFrom, and the Tests.

The Serenity Parameterized Runner creates a new instance of this class for each row of data in the CSV file, assigning the properties with corresponding values in the test data. As you can see, I have mentioned 3 variables in the CSV file – userName, passWord, and errorMessage. I have declared the same private variables in the Test Class too – username, password, and errorMessage that match the columns in the test data file. Keep this in mind, that the column name should be the same in test data file and Test.

import net.serenitybdd.annotations.Managed;
import net.serenitybdd.annotations.Steps;
import net.serenitybdd.annotations.Title;
import net.serenitybdd.core.Serenity;
import net.serenitybdd.junit.runners.SerenityParameterizedRunner;
import net.thucydides.junit.annotations.Qualifier;
import net.thucydides.junit.annotations.TestData;
import net.thucydides.junit.annotations.UseTestDataFrom;
import org.junit.Test;
import org.junit.runner.RunWith;
import org.openqa.selenium.WebDriver;

import static org.assertj.core.api.Assertions.assertThat;

@RunWith(SerenityParameterizedRunner.class)
@UseTestDataFrom(value = "testdata/credentials.csv")
public class ParameterizedTests {

    private String userName;
    private String passWord;
    private String errorMessage;

    @Managed(options = "--start-maximized")
     WebDriver driver;

    @Steps
    NavigateActions navigate;

    @Steps
    StepLoginPage loginPage;


    @TestData(columnNames = "Username, Password, ErrorMessage")

    @Qualifier
    public String qualifier(){return " - " + " Username = " + userName + " and " + " Password = " + passWord + " should display " + errorMessage;}

    @Test
    @Title("Login to application with invalid credential generates error message")
    public void unsuccessfulLogin() {

        // Given
        navigate.toTheHomePage();

        // When
        loginPage.inputUserName(userName);
        loginPage.inputPassword(passWord);
        loginPage.clickLogin();

        // Then
        Serenity.reportThat("Passing invalid credentials generates error message",
                () -> assertThat(assertThat(loginPage.errorMessage()).isEqualToIgnoringCase(errorMessage)));

    }

}

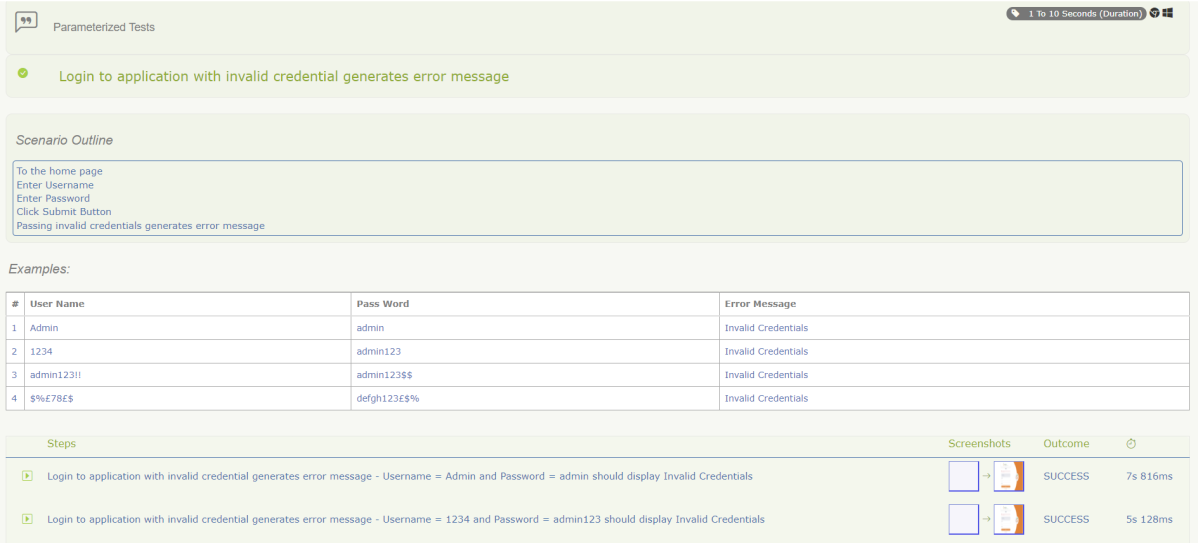
The heading of parameters present in the Serenity Report (Index.html) like Username, Password, and Error Message are generated by @TestData(columnNames).

The description of the Test Step in the Serenity Report is modified by using @Qualifier. It is used to mark a method as a qualifier in an instantiated data-driven test case.

The test class needs to have a WebDriver instance with a @Managed annotation for Serenity to manage it in the background. That is all that is required, we do not need to manage the driver anymore. Each test class will need this driver variable declaration.

The Test Class uses Step Class (StepLoginPage) and Action Class (NavigateActions) to perform the Tests. StepLoginPage contains test steps that represent the level of abstraction between the code that interacts with the application. NavigateAction page is used to open an environment-specific page defined in the serenity.config file under the pages section.

StepLoginPage

import net.serenitybdd.annotations.Step;
import net.serenitybdd.core.pages.PageObject;
import net.serenitybdd.core.pages.WebElementFacade;
import org.openqa.selenium.support.FindBy;

public class StepLoginPage extends PageObject {

    @FindBy(name = "username")
    WebElementFacade username;

    @FindBy(name = "password")
    WebElementFacade password;

    @FindBy(xpath = "//*[@id='app']/div[1]/div/div[1]/div/div[2]/div[2]/form/div[3]/button")
    WebElementFacade submitButton;

    @FindBy(xpath = "//*[@id='app']/div[1]/div/div[1]/div/div[2]/div[2]/div/div[1]/div[1]/p")
    WebElementFacade errorMessage;

    @FindBy(xpath = "//*[@id='app']/div[1]/div/div[1]/div/div[2]/div[2]/form/div[4]/p")
    WebElementFacade linkText;

    @Step("Enter Username")
    public void inputUserName(String userName) {
        username.sendKeys((userName));
    }

    @Step("Enter Password")
    public void inputPassword(String passWord) {
        password.sendKeys((passWord));
    }

    @Step("Click Submit Button")
    public void clickLogin() {
        submitButton.click();
    }

    @Step("Error Message on unsuccessful login")
    public String errorMessage() {
        String actualErrorMessage = errorMessage.getText();
        return actualErrorMessage;
    }

    @Step("Click Forget Password Link")
    public void clickForgetPasswordLink() {
        linkText.click();

        System.out.println("Clicked on Forgot Password Link");
    }

}

NavigateActions

import net.serenitybdd.annotations.Step;
import net.serenitybdd.core.steps.UIInteractionSteps;

public class NavigateActions extends UIInteractionSteps {

    @Step
    public void toTheHomePage() {
        openPageNamed("loginForm");
    }
}

Serenity.config

headless.mode = false

pages{
  loginForm = "https://opensource-demo.orangehrmlive.com/"
  }

environments {
  chrome {
    webdriver {
      driver = chrome
      autodownload = true
      capabilities {
        browserName = "chrome"
        acceptInsecureCerts = true
        "goog:chromeOptions" {
          args = ["--start-maximized", "ignore-certificate-errors",
            "incognito", "disable-infobars", "disable-gpu", "disable-default-apps", "disable-popup-blocking"]
        }
      }
    }
  }
}

This test can be executed by JUnit as well as from the command line

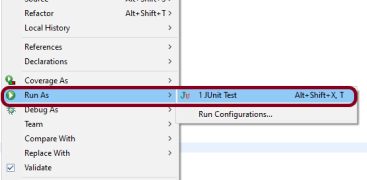
JUnit – Right-click on the Test, select Run As, and then select JUnit Test in Eclipse.

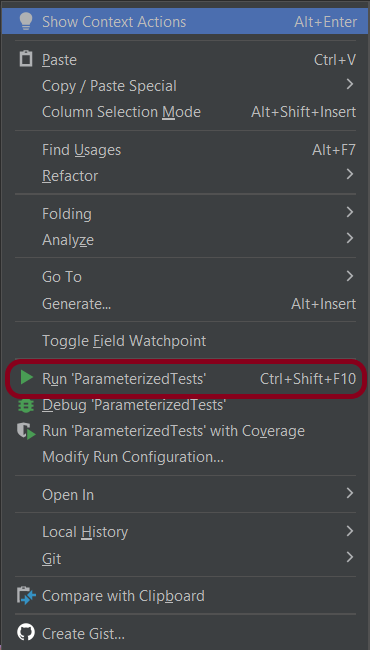
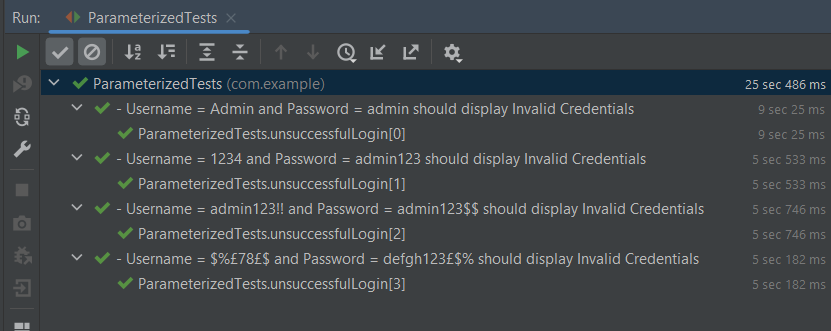
If you are using IntelliJ, then right-click and select Run “ParameterizedTests”

The Test execution status can be seen as shown below:

To run the tests using the command line, use the below command

mvn clean verify

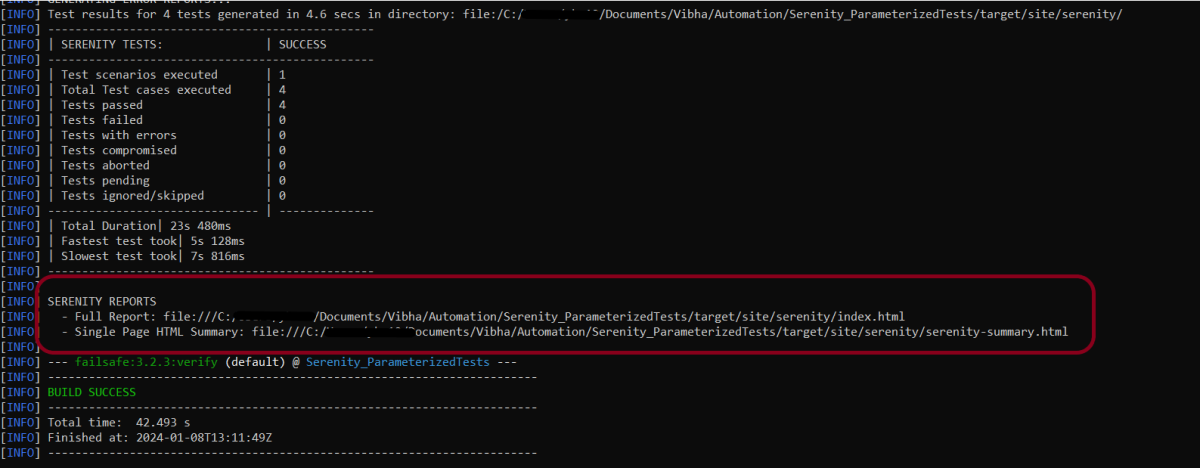
This will execute the tests and will generate the Test Execution Report as shown below.

The reports are generated as shown in the below image.

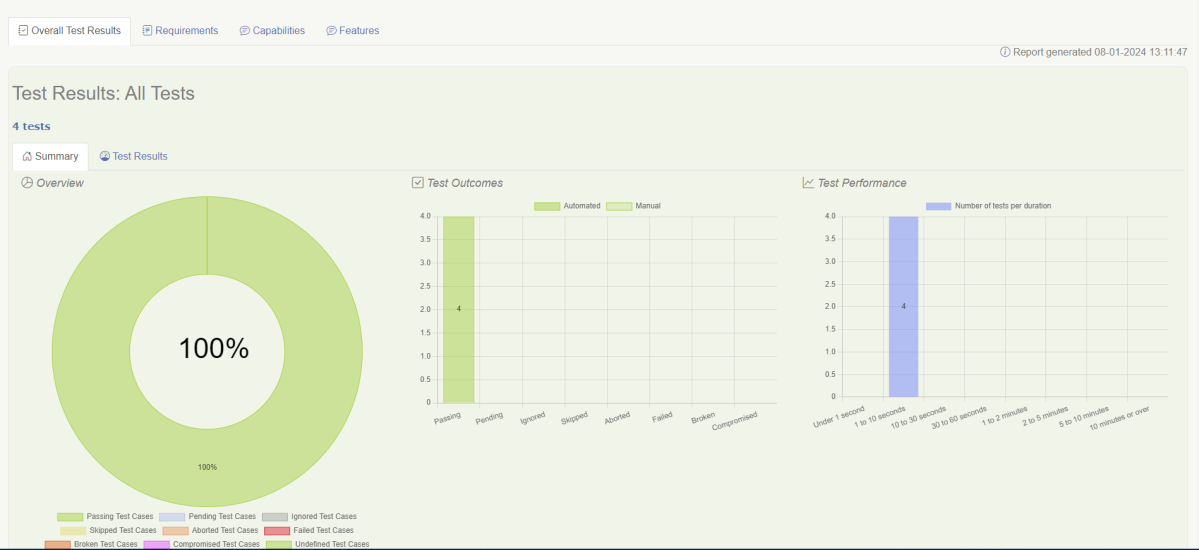
Serenity generates very descriptive and beautiful reports – Index.html and Serenity Summary Report.

Index.html

This page provides the detail about the Test, its corresponding test data, the status of each test scenario with screenshots, and the execution time of each test.

This is the expanded view of all the test steps of a test with their screenshots. This also shows the execution time of each step in the test.

Serenity Summary Report

This report is a single-page, self-contained HTML summary report, containing an overview of the test results, and a configurable breakdown of the status of different areas of the application.

We are done! Congratulations on making it through this tutorial and hope you found it useful! Happy Learning!!

Cucumber Tutorials

 HOME

Cucumber Introduction, Installation, and Configuration

Chapter 1  Introduction of Cucumber Testing Tool (BDD Tool)
Chapter 2 How to install Cucumber Eclipse Plugin
Chapter 3 How to setup Cucumber with Eclipse
Chapter 4 Cucumber – What is Gherkin

Cucumber Scenario, Features & Step Definition

Chapter 1 Cucumber – What is Feature File in Cucumber
Chapter 2 Step Definition in Cucumber
Chapter 3 Cucumber – JUnit Test Runner Class

Cucumber – Hooks & Tags

Chapter 1 Hooks in Cucumber
Chapter 2 Tags in Cucumber
Chapter 3 Conditional Hooks in Cucumber
Chapter 4 Background in Cucumber
Chapter 5 Monochrome in Cucumber

Cucumber – Data Driven Testing

Chapter 1 Data Driven Testing using Scenario Outline in Cucumber
Chapter 2 DataTables in Cucumber

Cucumber Integration with Selenium

Chapter 1 Integration of Cucumber with Selenium and JUnit4
Chapter 2 Integration of Cucumber with Selenium and TestNG
Chapter 3 Page Object Model with Selenium, Cucumber and JUnit
Chapter 4 Page Object Model with Selenium, Cucumber, and TestNG
Chapter 5 Integration of Cucumber7 with Selenium and JUnit5
Chapter 6 Run Cucumber7 with JUnit5 Tests from Maven Command Line
Chapter 7 How to rerun failed tests in Cucumber
Chapter 8 Gradle Project with Cucumber, Selenium and TestNG
Chapter 9 Gradle Project with Cucumber, Selenium and JUnit4

Cucumber – Command Line Execution

Chapter 1 Run Cucumber Test from Command Line
Chapter 2 Run Gradle Cucumber Tests from Command Line

Cucumber Integration with Rest API

Chapter 1 Rest API Test in Cucumber BDD
Chapter 2 How To Create Gradle Project with Cucumber to test Rest API

Cucumber Integration with SpringBoot

Chapter 1 Integration Testing of Springboot with Cucumber and JUnit4
Chapter 2 Integration Testing of Springboot with Cucumber and TestNG

Cucumber – Reporting

Chapter 1 Cucumber Tutorial – Cucumber Reports
Chapter 2 Cucumber Report Service
Chapter 3 Implemention of ‘Masterthought’ Reports in Cucumber
Chapter 4 Implemention of ‘Masterthought’ Reports in Cucumber with JUnit4

Cucumber Integration with Allure Reports

Chapter 1 Allure Report with Cucumber5, Selenium and JUnit4
Chapter 2 Allure Report with Cucumber5, Selenium and TestNG
Chapter 3 Integration of Allure Report with Rest Assured and JUnit4
Chapter 4 Integration of Allure Report with Rest Assured and TestNG
Chapter 5 Gradle – Allure Report for Selenium and TestNG

Cucumber Integration with Extent Reports

Chapter 1 ExtentReports Version 5 for Cucumber 6 and TestNG
Chapter 2 How to add Screenshot to Cucumber ExtentReports
Chapter 3 ExtentReports Version 5 for Cucumber 6 and JUnit4
Chapter 4 PDF ExtentReport for Cucumber and TestNG
Chapter 5 ExtentReports Version 5 for Cucumber 7 and TestNG
Chapter 6 Extent Reports Version 5 for Cucumber7 and JUnit5

Cucumber – Parallel Execution

Chapter 1 Parallel Testing in Cucumber with JUnit
Chapter 2 Parallel Testing in Cucumber with TestNG
Chapter 3 Dependency Injection in Cucumber using Pico-Container

How to load data from CSV files in the Robot Framework?

HOME

In this tutorial, we will discuss data-driven testing in the Robot Framework.

What is Data Driven Testing?

Data Driven Testing is a type of software testing in which test data is maintained in table or spreadsheet format. Data-driven testing enables testers to provide a single test script that may perform tests for all test data from a table and expect the test results to be returned to the same table. Table-driven testing is another name for parameterized testing.

Prerequisite:

  1. Install Python
  2. Install PIP
  3. Install Robot Framework
  4. Install Robot framework Selenium Library
  5. Install PyCharm IDE

Please refer to this tutorial to install Robot Framework – How to install and setup Robot Framework for Python.

Implementation Steps:

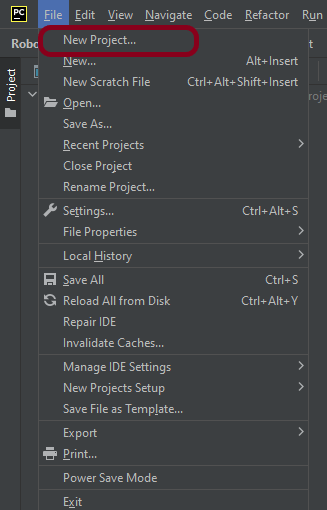
Step 1.1 – Open PyCharm and create a new project. Go to File and select New Project from the main menu.

Step 1.2 – Choose the project location. Click the “Browse” button next to the Location field and specify the directory for your project.

Deselect the Create a main.py welcome script checkbox because you will create a new Python file for this tutorial.

Click on the “Create” Button.

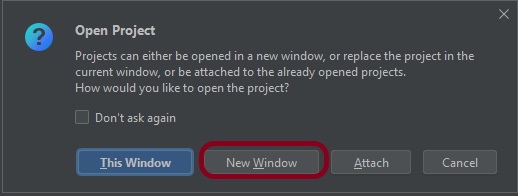
Step 1.3 – A new dialog appears asking to open the project using any one of the given options. I have selected New Window as I like to have separate windows for each project.

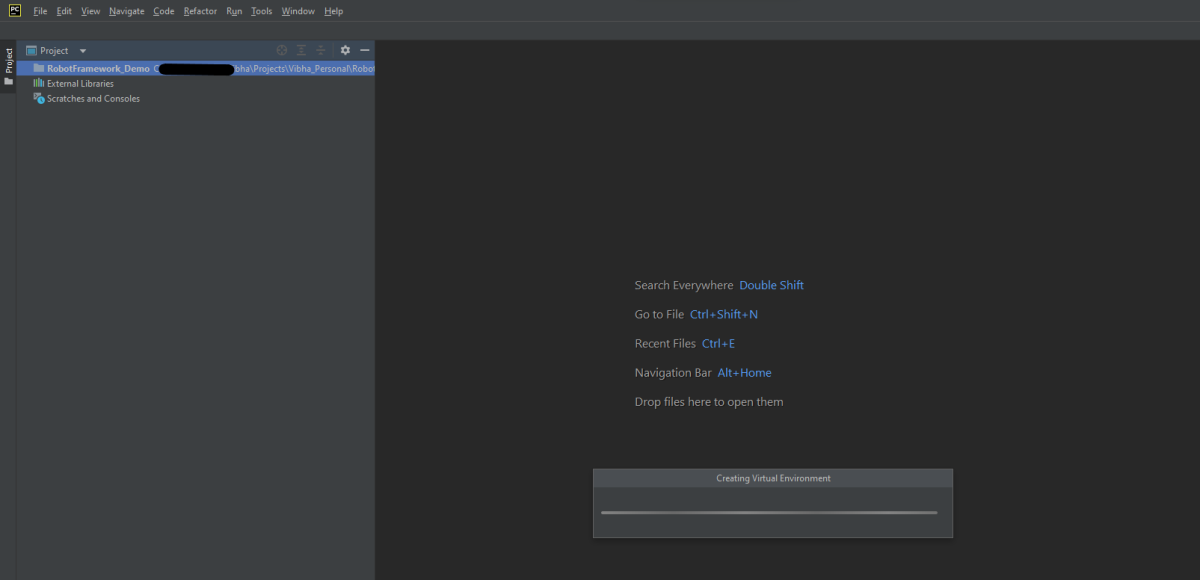
Below is the image of the new project created in PyCharms.

Step 2 – Add datadriver package to the PyCharms

Go to File->Settings ->Project:RobotFramework_Demo ->Python Interpreter.

Click on the “+” sign and enter datadriver in the search bar. It will show a list of packages. Select the “robotframework-datadriver” package and click on the “Install Package”.

Once the package is installed, it can be seen under the package list as shown below:

Step 3 – Create a new directory in the new project

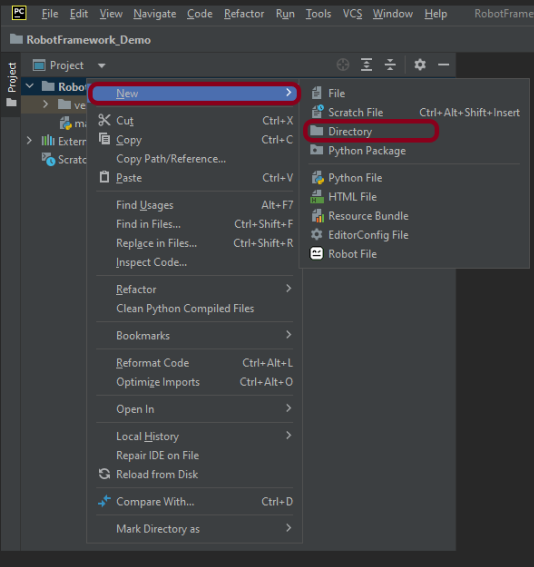
Right-Click on the project, select New->Directory and provide the name as DataDriven

Below is the image of the new directory.

Right-click on the new directory and select New File and provide the name as DataDrivenTesting_Demo.robot as shown below:

Step 4 – Create a test data file (.csv)

Create a folder with the name of Resources in the DataDriven directory.

Add a data.csv file that contains the test data in it.

Make sure that fields are separated by commas.

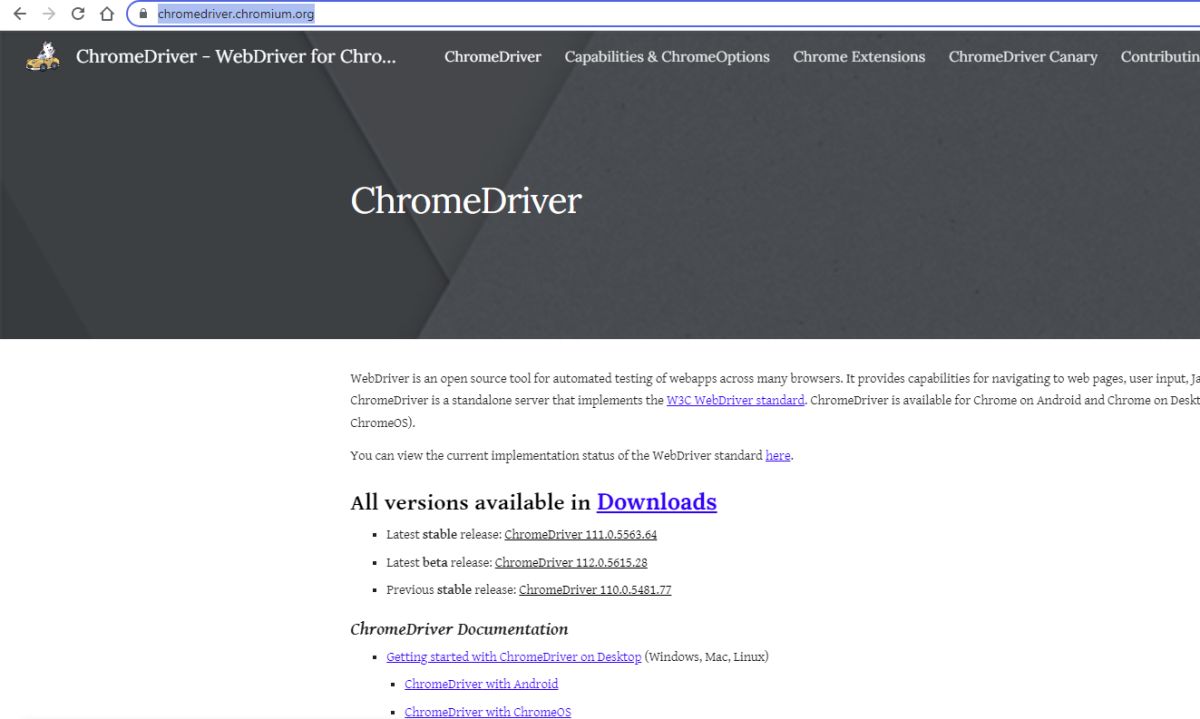
Step 5 – Download ChromeBinaries from the below location

The tests are going to use the Chrome browser, so we need to download the ChromeBinaries to open a blank browser in Chrome.

https://chromedriver.chromium.org/

The chromedriver and geckodriver are placed in a folder name drivers in the RobotFramework_Demo project. I have renamed chromedriver to Chrome and geckodriver to Firefox.

Step 6 – Create a Data Driven Test

We are now going to write test cases. The test case details will be as follows :

A locator is an identifier for the web elements used to identify an element on the web page like id, name, class, xpath, css selector.

To know more about locators, refer to these Selenium Tutorials:

 Locators in Selenium – Locate by ID, ClassName,  Name, TagName,  LinkText, PartialLinkText

Dynamic XPath  in Selenium WebDriver

CSS Selector in Selenium WebDriver

Below is an example of a Data-Driven Test.

*** Settings ***
Documentation    To validate the Login Form
Library     SeleniumLibrary
Library    DataDriver       file=Resources/data.csv     encoding=utf_8      dialect=unix
Test Template    Validate Unsuccessful Login

*** Variables ***
${browser_name}     Chrome
${login_btn}        css:.orangehrm-login-button
${login_error_message}      css:.oxd-alert-content--error


*** Test Cases ***
Login to form using ${Username} and ${Password}     abc     123


*** Keywords ***
Validate Unsuccessful Login
    [Arguments]    ${Username}   ${Password}
    Open the Browser with URL
    Fill the login form     ${Username}   ${Password}
    verify error message is correct


Open the Browser with URL
    Create Webdriver    ${browser_name}  executable_path=/Vibha_Personal/RobotFramework_Demo/drivers/${browser_name}
    Go To    https://opensource-demo.orangehrmlive.com/web/index.php/auth/login
    Maximize Browser Window
    Set Selenium Implicit Wait    2

Fill the login form
  [Arguments]        ${Username}       ${Password}
   Input Text        name:username     ${Username}
   Input Password    name:password     ${Password}
   Click Button    ${login_btn}

Verify error message is correct
    Element Text Should Be    ${login_error_message}   Invalid credentials
     
Close Browser Session
    Close Browser

In the below image, it shows that there are 3 steps to creating a Data-Driven test from an external data source like .csv.

All the below-mentioned keywords are derived from SeleniumLibrary. The functionality of keywords mentioned above:

1. Create Webdriver − The keyword creates an instance of Selenium WebDriver.

2. Go To – This keyword navigates the current browser window to the provided url.

3. Maximize Browser Window – This keyword maximizes the current browser window.

4. Set Selenium Implicit Wait – This keyword sets the implicit wait value used by Selenium.

5. Input Text − This keyword is used to type the given text in the specified textbox identified by the locator name:username.

6. Input Password – This keyword is used to type the given text in the specified password identified by the locator name:password.

The difference compared to Input Text is that this keyword does not log the given password on the INFO level.

7. Click button – This keyword is used to click the button identified by the locator. In this case, it is “Login” button.

8. Element Text Should Be – This keyword is used to verify that the current page contains the exact text identified by the locator. Here, we are checking the exact text “Invalid Credentials”.

These keywords are present in SeleniumLibrary. To know more about these keywords, please refer to this document – https://robotframework.org/SeleniumLibrary/SeleniumLibrary.htm.

To run this script, go to the command line and go to directory tests.

Step 7 – Execute the tests

We need the below command to run the Robot Framework script.

robot ExternalDatDrivenTests_Demo.robot

The output of the above program is

Step 8 – View Report and Log

We have the test case passed. The Robot Framework generates log.html, output.xml, and report.html by default.

Let us now see the report and log details.

Report

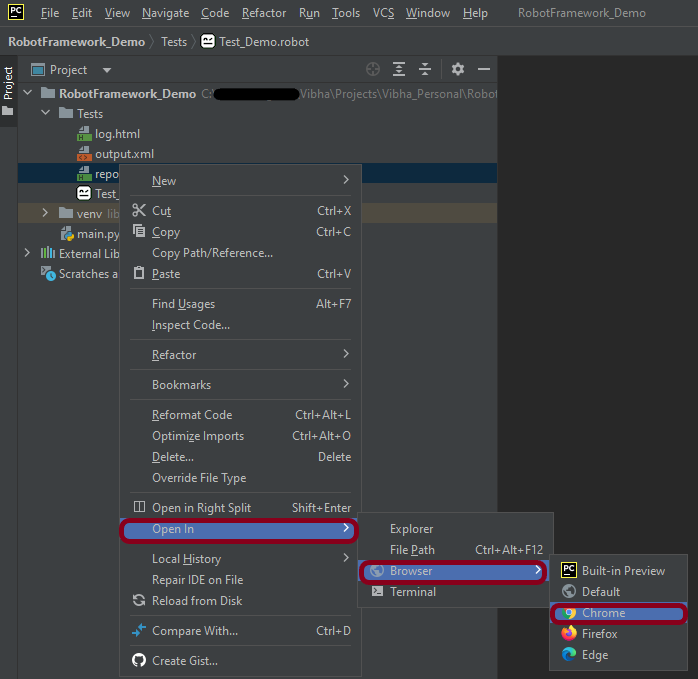
Right-click on report.html. Select Open In->Browser->Chrome(any browser of your wish).

The Report generated by the framework is shown below:

Log

Robot Framework has multiple log levels that control what is shown in the automatically generated log file. The default Robot Framework log level is INFO.

Right-click on log.html. Select Open In->Browser->Chrome(any browser of your wish).

That’s it! Congratulations on making it through this tutorial and hope you found it useful! Happy Learning!!
Data-Driven Testing in Robot Framework 

HOME

In this tutorial, we will discuss data-driven testing in the Robot Framework.

What is Data Driven Testing?

Data Driven Testing is a type of software testing in which test data is maintained in table or spreadsheet format. Data-driven testing enables testers to provide a single test script that may perform tests for all test data from a table and expect the test results to be returned to the same table. Table-driven testing is another name for parameterized testing.

Prerequisite:

  1. Install Python
  2. Install PIP
  3. Install Robot Framework
  4. Install Robot framework Selenium Library
  5. Install PyCharm IDE

Please refer to this tutorial to install Robot Framework – How to install and setup Robot Framework for Python.

Implementation Steps:

Step 1.1 – Open PyCharm and create a new project. Go to File and select New Project from the main menu.

Step 1.2 – Choose the project location. Click the “Browse” button next to the Location field and specify the directory for your project.

Deselect the Create a main.py welcome script checkbox because you will create a new Python file for this tutorial.

Click on the “Create” Button.

Step 1.3 – A new dialog appears asking to open the project using any one of the given options. I have selected New Window as I like to have separate windows for each project.

Below is the image of the new project created in PyCharms.

Step 2 – Create a new directory in the new project

Right-Click on the project, select New->Directory and provide the name as DataDriven

Below is the image of the new directory.

Right-click on the new directory and select New File and provide the name as DataDrivenTesting_Demo.robot as shown below:

Step 3 – Download ChromeBinaries from the below location

The tests are going to use the Chrome browser, so we need to download the ChromeBinaries to open a blank browser in Chrome.

https://chromedriver.chromium.org/

The chromedriver and geckodriver are placed in a folder name drivers in the RobotFramework_Demo project. I have renamed chromedriver to Chrome and geckodriver to Firefox.

Step 4 – Create a Data Driven Test

We are now going to write test cases. The test case details will be as follows :

A locator is an identifier for the web elements used to identify an element on the web page like id, name, class, xpath, css selector.

To know more about locators, refer to these Selenium Tutorials:

 Locators in Selenium – Locate by ID, ClassName,  Name, TagName,  LinkText, PartialLinkText

Dynamic XPath  in Selenium WebDriver

CSS Selector in Selenium WebDriver

Below is an example of a Data-Driven Test

*** Settings ***
Documentation   To validate the Login form
Library     SeleniumLibrary
Test Teardown   Close Browser
Test Template   Validate UnSuccesful Login
Documentation   To validate the Login form
Library     SeleniumLibrary
Test Template   Validate UnSuccesful Login

*** Variables ***
${browser_name}     Chrome
${login_btn}        css:.orangehrm-login-button
${login_error_message}      css:.oxd-alert-content--error


*** Test Cases ***              username        password
Invalid username                abc             admin123
Invalid password                Admin           abc
Special characters              @#$             %$^&
Invalid username and password   abc             abc123


*** Keywords ***
Validate UnSuccesful Login
    [Arguments]     ${username}     ${password}
    Open the Browser with URL
    Fill the login form         ${username}      ${password}
    Verify the error message is correct
    Close Browser Session

Open the Browser with URL
    Create Webdriver    ${browser_name}  executable_path=/Vibha_Personal/RobotFramework_Demo/drivers/${browser_name}
    Go To    https://opensource-demo.orangehrmlive.com/web/index.php/auth/login
    Maximize Browser Window
    Set Selenium Implicit Wait    2

Fill the login Form
    [arguments]         ${username}          ${password}
    Input Text          name:username        ${username}
    Input Password      name:password        ${password}
    Click Button        ${login_btn}


Verify the error message is correct
   ${result}=   Get Text    ${login_error_message}
   Should Be Equal As Strings     ${result}     Invalid credentials

Close Browser Session
    Close Browser

In the below image, it shows that there are 3 steps to creating a Data-Driven test.

All the below-mentioned keywords are derived from SeleniumLibrary. The functionality of keywords mentioned above:

. Create Webdriver − The keyword creates an instance of Selenium WebDriver.

2. Go To – This keyword navigates the current browser window to the provided url.

3. Maximize Browser Window – This keyword maximizes the current browser window.

4. Set Selenium Implicit Wait – This keyword sets the implicit wait value used by Selenium.

5. Input Text − This keyword is used to type the given text in the specified textbox identified by the locator name:username.

6. Input Password – This keyword is used to type the given text in the specified password identified by the locator name:password.

The difference compared to Input Text is that this keyword does not log the given password on the INFO level.

7. Click button – This keyword is used to click the button identified by the locator. In this case, it is “Login” button.

8. ${result} – This is a variable that holds the text value of the error message that is located by css:.oxd-alert-content–error.

9. Get Text – This keyword returns the text value of the element identified by located by css:.oxd-alert-content–error.

10. Should Be Equal As Strings – This keyword is used from builtIn keyword. This keyword returns false if objects are unequal after converting them to strings.

These keywords are present in SeleniumLibrary. To know more about these keywords, please refer to this document – https://robotframework.org/SeleniumLibrary/SeleniumLibrary.htm.

To run this script, go to the command line and go to directory tests.

Step 5 – Execute the tests

We need the below command to run the Robot Framework script.

 robot DataDrivenTesting_Demo.robot

The output of the above program is

Step 6 – View Report and Log

We have the test case passed. The Robot Framework generates log.html, output.xml, and report.html by default.

Let us now see the report and log details.

Report

Right-click on report.html. Select Open In->Browser->Chrome(any browser of your wish).

The Report generated by the framework is shown below:

Log

Robot Framework has multiple log levels that control what is shown in the automatically generated log file. The default Robot Framework log level is INFO.

Right-click on log.html. Select Open In->Browser->Chrome(any browser of your wish).

That’s it! Congratulations on making it through this tutorial and hope you found it useful! Happy Learning!!
Robot Framework Tutorials

HOME

Robot Framework is a generic open-source automation framework. It can be used for test automation and robotic process automation (RPA). RPA is extensively used for Web Application Automation, API Automation, RPA, and Database Testing.

Robot Framework has an easy syntax, utilizing human-readable keywords. Its capabilities can be extended by libraries implemented with Python, Java, or many other programming languages.

Chapter 1 How to Install Python on Windows 11
Chapter 2 How to install PyCharms on Windows 11
Chapter 3 What is Robot Framework
Chapter 4 How to install and setup Robot Framework for Python
Chapter 5 Robot Framework – Working With Browsers Using Selenium Library
Chapter 6 Robot Framework Features – Settings, Libraries, Variables, Keywords, Resources, Reports, Logs
Chapter 7 What are variables in Robot Framework?
Chapter 8 How to handle text box in Robot Framework
Chapter 9 How to handle radio buttons in Robot Framework
Chapter 10 How to handle checkbox in Robot Framework
Chapter 11 How to handle dropdowns in Robot Framework
Chapter 12 How to handle multiple windows in Robot Framework
Chapter 13 How to handle alerts in Robot Framework
Chapter 14 What is Resource File in Robot Framework 
Chapter 15 How to run all the tests from the folder in Robot Framework
Chapter 16 How to implement tagging in Robot Framework
Chapter 17 How to rerun failed tests in Robot Framework
Chapter 18 How to use Drag and Drop in Robot Framework?
Chapter 19 How to set variable values from Runtime command in Robot Framework
Chapter 20 Page Object Model in Robot Framework with Selenium and Python
Chapter 21 Parallel Testing in Robot Framework
Chapter 22 How to run headless tests in Robot Framework 
Chapter 23 Integration of Allure Report with Robot Framework
Chapter 24 How to write tests in Robot Framework in BDD Format

Data-Driven Testing

Chapter 1 Data-Driven Testing in Robot Framework 
Chapter 2 How to load data from CSV files in the Robot Framework?

API Testing

Chapter 1 How to perform API Testing in Robot Framework

CI/CD

Chapter 1 Run Robot Framework Tests in GitLab CI/CD
Chapter 2How to run Robot Framework in GitHub Actions

Jenkins

Chapter 1 How to integrate Robot Framework with Jenkins
Chapter 2 How to run parameterized Robot Framework tests in Jenkins

Data Driven Tests in Serenity with JUnit

HOME

In the previous tutorial, I have explained the Testing of Web Application using Serenity with JUnit4. In this tutorial, I will explain Data Driven Tests in Serenity with JUnit4. Serenity provides features to support Data Driven tests. Refer this tutorial to know how to setup a Serenity project with JUnit4.

There is a parameterized Test Runner to perform data driven tests in JUnit4.

@RunWith(SerenityParameterizedRunner.class)

This runner is very similar to the JUnit Parameterized test runner. Here, @TestData annotation is used to provide test data to the test, and you can use all of the other Serenity annotations like (@Managed, @Steps, @Title and so on). This test runner will also generate proper serenity reports for the executed tests.

Below is an example of data-driven serenity test. In this test, I have created a Test Class (ParameterizationTests) and Step Class (StepLoginPage) and Action Class (NavigateActions). I am passing a set of incorrect credentials to the Login page and will verify the error message.

Here is the code for ParameterizationTests.

@RunWith(SerenityParameterizedRunner.class)
public class ParameterizationTests {

    private final String userName;
    private final String passWord;
    private final String errorMessage;

    @Managed(options = "--headless")
    WebDriver driver;

    @Steps
    NavigateActions navigate;

    @Steps
    StepLoginPage loginPage;

    public ParameterizationTests(String userName, String passWord, String errorMessage) {
        super();
        this.userName = userName;
        this.passWord = passWord;
        this.errorMessage = errorMessage;
    }

    @TestData(columnNames = "Username, Password, ErrorMessage")
    public static Collection<Object[]> testData() {
        return Arrays.asList(new Object[][] { { "Admin12", "", "Password cannot be empty" },
                { "", "abc12", "Username cannot be empty" }, { "_Admin1", "admin123_", "Invalid credentials" },
                { " ", " ", "Username cannot be empty" } });
    }

    @Qualifier
     public String qualifier(){return " - " + " Username = " + userName + " and " + " Password = " + passWord + " should display " + errorMessage;}
    @Test
    @Title("Login to application with invalid credential generates error message")
    public void unsuccessfulLogin() {

        // Given
        navigate.toTheHomePage();

        // When
        loginPage.inputUserName(userName);
        loginPage.inputPassword(passWord);
        loginPage.clickLogin();

        // Then
        Serenity.reportThat("Passing invalid credentials generates error message",
                () -> assertThat(loginPage.loginPageErrorMessage()).isEqualToIgnoringCase(errorMessage));
    }

}

@TestData is the annotation for a method which provides parameters to be injected into the test class constructor by Parameterized. testData() method returns an array list of objects as shown above.

The test data is injected into member variables – userName and passWord. These values are represented as instance variables in the test class, and instantiated via the constructor. These member variables are used in the test.

@Managed is annotated as a WebDriver field that is managed by the Test Runner. The Serenity Test Runner will instantiate this WebDriver before the tests start, and close it once they have all finished.

Here is the code for the StepLoginPage.

public class StepLoginPage extends PageObject {

    @FindBy(name = "txtUsername")
    WebElementFacade username;

    @FindBy(name = "txtPassword")
    WebElementFacade txtPassword;

    @FindBy(name = "Submit")
    WebElementFacade submitButton;

    @FindBy(id = "spanMessage")
    WebElementFacade errorMessage;

    @FindBy(xpath = "//*[@id='forgotPasswordLink']/a")
    WebElementFacade forgotPasswordLinkText;

    @Step("Enter Username")
    public void inputUserName(String userName) {
        $("[name='txtUsername']").sendKeys((userName));
    }

    @Step("Enter Password")
    public void inputPassword(String passWord) {
        txtPassword.sendKeys((passWord));
    }

    @Step("Click Submit Button")
    public void clickLogin() {
        submitButton.click();
    }

    @Step("Error Message on unsuccessful login")
    public String loginPageErrorMessage() {
        return errorMessage.getText();
    }

    @Step("Click Forget Password Link")
    public void clickForgetPasswordLink() {
        forgotPasswordLinkText.click();
    }
}

NavigateActions

public class NavigateActions extends UIInteractionSteps {

    @Step
    public void toTheHomePage() {
        openPageNamed("loginForm");
    }
}

There are two ways to run the tests.

  1. Run the tests as JUnit Tests. Right click on the test and select Run As ->JUnit Test.

2. Run the tests through command line using below command.

mvn clean verify

This will run the tests as well as generate the test execution reports – Index.html and serenity-emailable.html.

So, the tests are run and the reports are generated at the shown path.

Index.html

The heading of parameters present in the Serenity Report (Index.html) like Username, Password and Error Message are generated by @TestData as shown below:

@TestData(columnNames = "Username, Password, ErrorMessage")

The description of Test Step in the Serenity Report is modified by using @Qualifier.

It is used to mark a method as a qualifier in an instantiated data-driven test case.

  @Qualifier
    public String qualifier(){return " - " + " Username = " + userName + " and " + " Password = " + passWord + " should display " + errorMessage;}

Serenity-Summary.html

It is a single-page, self-contained HTML summary report, containing an overview of the test results, and a configurable breakdown of the status of different areas of the application.

We are done! Congratulations on making it through this tutorial and hope you found it useful! Happy Learning!!
DataProvider in TestNG using Excel

HOME

In the previous tutorial, I explained the DataProvider in TestNG without using Excel. In this tutorial, I will explain the use of Excel in DataProvider for TestNG.

I have created an Excel – SearchInBing.xlsx and placed it on the Desktop. You can create a Test Data folder in your project and place the Excel file within it. So, my datasheet looks like the below:

Next, we will create a DataProvider method that will use another method to read the Excel file & create a 2D object from the row & column values of the Excel and return the same value, so that our test script can use it. The code for it would look like the below:

import org.apache.poi.ss.usermodel.Cell;
import org.testng.annotations.DataProvider;

import java.io.FileInputStream;
import java.io.IOException;

import org.apache.poi.xssf.usermodel.XSSFRow;
import org.apache.poi.xssf.usermodel.XSSFSheet;
import org.apache.poi.xssf.usermodel.XSSFWorkbook;

public class ExcelDataProvider {

    @DataProvider(name = "excelData")
    public Object[][] excelDataProvider() throws IOException {

        // We are creating an object from the excel sheet data by calling a method that
        // reads data from the excel stored locally in our system
        Object[][] arrObj = getExcelData(
                C:\\Users\\Vibha\\Desktop\\SearchInBing.xlsx","Details");
        return arrObj;
}

    // This method handles the excel - opens it and reads the data from the
    // respective cells using a for-loop & returns it in the form of a string array
    public String[][] getExcelData(String fileName, String sheetName) throws IOException {
        String[][] data = null;
        try {

            FileInputStream fis = new FileInputStream(fileName);
            XSSFWorkbook workbook = new XSSFWorkbook(fis);
            XSSFSheet sheet = workbook.getSheet(sheetName);
            XSSFRow row = sheet.getRow(0);
            int noOfRows = sheet.getPhysicalNumberOfRows();
            int noOfCols = row.getLastCellNum();
            Cell cell;
            data = new String[noOfRows - 1][noOfCols];

            for (int i = 1; i < noOfRows; i++) {
                for (int j = 0; j < noOfCols; j++) {
                    row = sheet.getRow(i);
                    cell = row.getCell(j);
                    data[i - 1][j] = cell.getStringCellValue();
                }
            }
        } catch (Exception e) {
            System.out.println("The exception is: " + e.getMessage());
        }
        return data;
    }
}

Now, create a class that contains the test code. By default, the data provider will be looked for in the current test class or one of its base classes. If you want to put your data provider in a different class, it needs to be a static method or a class with a no-arg constructor, and you specify the class where it can be found in the data provider class attribute.

import io.github.bonigarcia.wdm.WebDriverManager;
import org.openqa.selenium.By;
import org.openqa.selenium.Keys;
import org.openqa.selenium.WebDriver;
import org.openqa.selenium.WebElement;
import org.openqa.selenium.chrome.ChromeDriver;
import org.testng.Assert;
import org.testng.annotations.AfterMethod;
import org.testng.annotations.BeforeMethod;
import org.testng.annotations.Test;

public class DataProviderWithExcelDemo {
    
  WebDriver driver;

   @BeforeMethod
    public void setUp() {
        System.out.println("Start test");
        WebDriverManager.chromedriver().setup();
        driver = new ChromeDriver();
        driver.get("https://www.bing.com");
        driver.manage().window().maximize();

    }

    @Test(dataProvider = "excelData", dataProviderClass = ExcelDataProvider.class)
    public void search(String keyWord1, String keyWord2) {

        WebElement txtBox = driver.findElement(By.id("sb_form_q"));
        txtBox.sendKeys(keyWord1, " ", keyWord2);
        System.out.println("Keyword entered is : " + keyWord1 + " " + keyWord2);
        txtBox.sendKeys(Keys.ENTER);
        System.out.println("Search results are displayed.");
        System.out.println("RESULT: "+ driver.getTitle());
        Assert.assertTrue(driver.getPageSource().contains(keyWord1));
    }

    @AfterMethod
    public void burnDown() {
        driver.quit();
    }

}

To run the code, right-click and Select – TestNG Test.

The Execution status will look like this, as shown below:

This test execution generates reports under the test-output folder.

We are concerned about two reports – index.html and emailable-report.html.

Below is the image of emailable-report.html.

Below is the image of index.html.

See how easy it is to read data from Excel and use it in the Test Code using DataProvider.

I hope you have enjoyed this tutorial. Happy Learning!!