Page Object Model without Page Factory in Selenium Webdriver

HOME

What is Page Object Model?

Page Object Model(POM) is an object design pattern in Selenium webdriver which tells how to organize the object repository. In this case, we refer to web elements as Objects. Page Object Model(POM) is not a Test Framework.

In the Page Object Model (POM), each web page is represented as a separate class. For example, consider HRM website. It has many web pages like Login , Dashboard , Assign Leave, Leave List, Timesheets, etc. Under this model, for each web page in the application, there should be a corresponding Page Class. This Page class will identify the WebElements of that web page and also contains Page methods that perform operations on those WebElements.

If a new web element is added or an existing web element is updated, then you can add or update that web element in object repository by navigating to class which has same name as webpage.

The object repository is independent of test cases, so we can use the same object repository for a different purpose with different tools. For example, we can integrate Page Object Model in Selenium with TestNG/JUnit for functional Testing and at the same time with JBehave/Cucumber for acceptance testing.

POM enhances test maintenance, readability and reducing code duplication.

In this tutorial, I’m creating a project using Page Object Model as Design Pattern and TestNG as the Test Automation Framework.

Steps to create a Page Object Model Project

  1. Download and Install Java on system
  2. Download and setup Eclipse IDE on system
  3. Setup Maven
  4. Create a new Maven Project
  5. Add dependencies to pom.xml
  6. Create Page Class for each page – LoginPage.Java and DashboardPage.java
  7. Create tests for each Page – BaseTests, LoginTests and DashboardTests
  8. Create a TestNG.XML
  9. Run the tests from TestNG.xml
  10. TestNG Report Generation

Step 1- Download and Install Java

Click here to know How to install Java. To check if Java is already installed on your machine, use the below command in the command line. This command will show the version of Java installed on your machine.

java -version

Step 2 – Download and setup Eclipse IDE on system

The Eclipse IDE (integrated development environment) provides strong support for Java developer. The Eclipse IDE for Java Developers distribution is designed to support standard Java development. It includes support for the Maven and Gradle build system and support for the Git version control system. Click here to know How to install Eclipse.

Step 3 – Setup Maven

To build a test framework, we need to add a number of dependencies to the project. It is very tedious and cumbersome process to add each dependency manually. So, to overcome this problem, we use a build management tool. Maven is a build management tool which is used to define project structure, dependencies, build, and test management. Click here to know How to install Maven.

To know if Maven is already installed or not on your machine, type this command in the command line. This command will show the version of Maven installed on your machine.

mvn -version

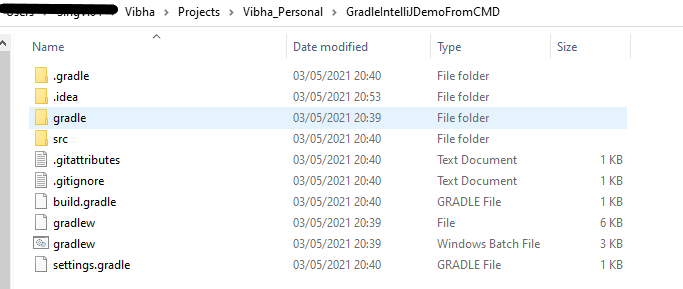
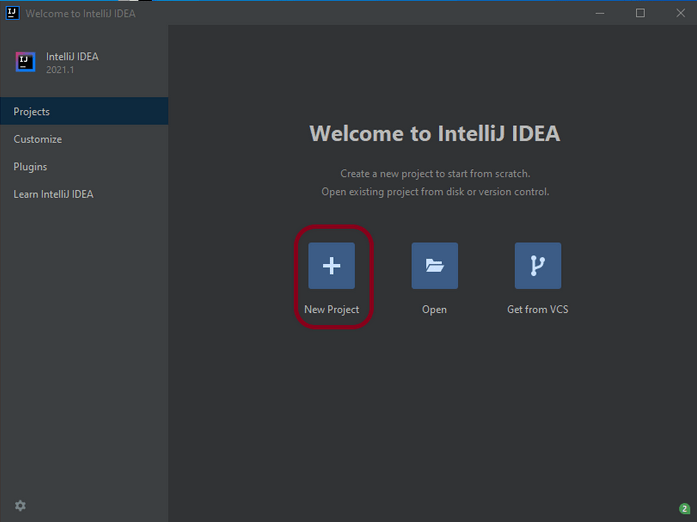
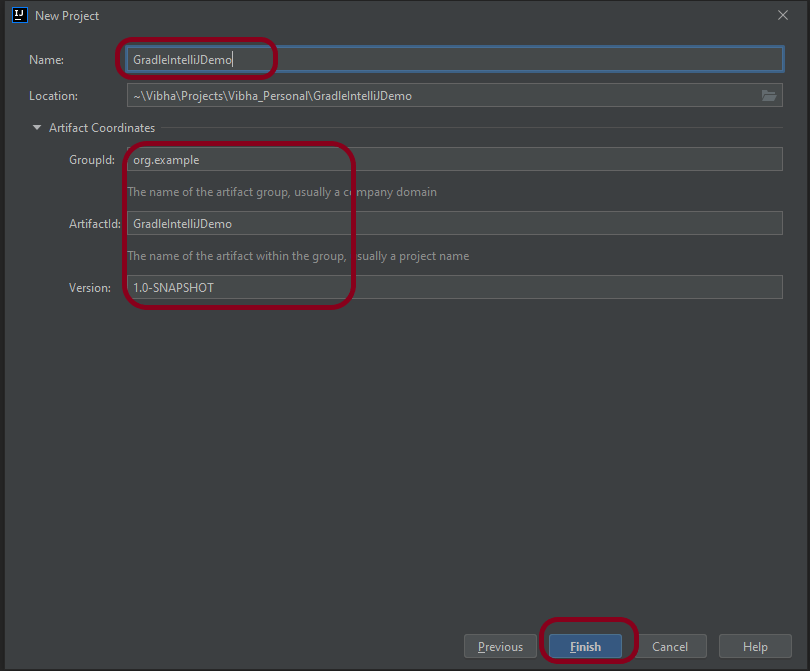
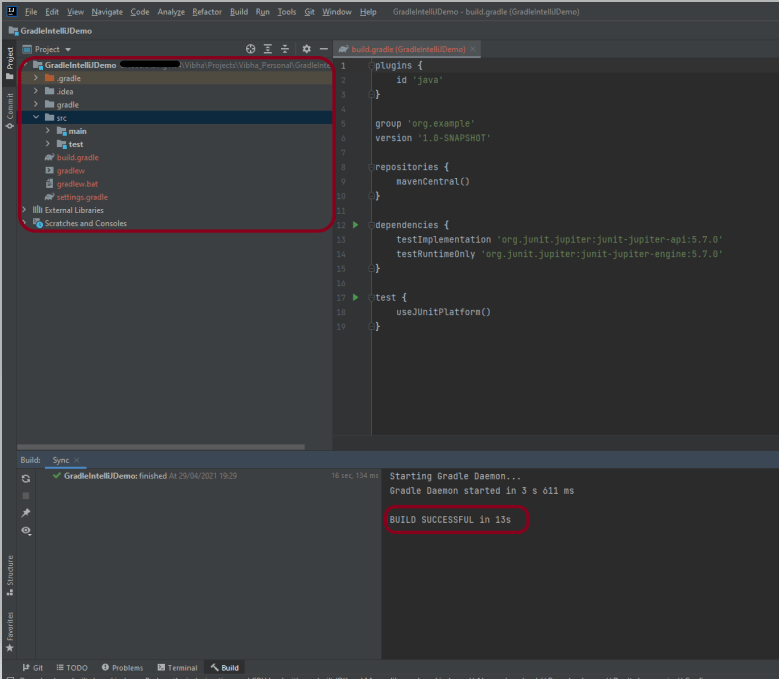
Step 4 – Create a new Maven Project

Click here to know How to create a Maven project

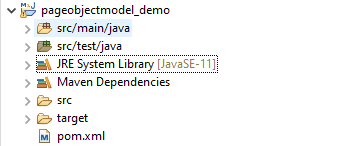
Below is the Maven project structure. Here,

Group Id – com.example
Artifact Id – pageobjectmodel_demo
Version – 0.0.1-SNAPSHOT
Package – com. example.pageobjectmodel_demo

Step 5 – Add dependencies to the pom.xml

I have added Selenium and TestNG dependencies.

<dependencies>
  
   <!-- https://mvnrepository.com/artifact/org.seleniumhq.selenium/selenium-java -->
    <dependency>
      <groupId>org.seleniumhq.selenium</groupId>
      <artifactId>selenium-java</artifactId>
      <version>3.141.59</version>
    </dependency>
    
    <!-- https://mvnrepository.com/artifact/org.testng/testng -->
    <dependency>
      <groupId>org.testng</groupId>
      <artifactId>testng</artifactId>
      <version>7.4.0</version>
      <scope>test</scope>
    </dependency>   
    
</dependencies>

Step 6 – Create Page Class for each page – LoginPage.Java and DashboardPage.java

I want to test 2 pages – Login and Dashboard. So, I’m creating 2 seperate class. Each class will contain its web elements and methods of that page.

LoginPage.Java

import org.openqa.selenium.By;
import org.openqa.selenium.WebDriver;

public class LoginPage {

	WebDriver driver;

	By userName = By.name("txtUsername");

	By password = By.name("txtPassword");

	By titleText = By.id("logInPanelHeading");

	By login = By.id("btnLogin");

	public LoginPage(WebDriver driver) {
		this.driver = driver;
	}

	// Set user name in textbox
	public void setUserName(String strUserName) {
		driver.findElement(userName).sendKeys(strUserName);
	}

	// Set password in password textbox
	public void setPassword(String strPassword) {
		driver.findElement(password).sendKeys(strPassword);
	}

	// Click on login button
	public void clickLogin() {
		driver.findElement(login).click();
	}

	// Get the title of Login Page
	public String getLoginTitle() {
		return driver.findElement(titleText).getText();
	}

	public void login(String strUserName, String strPasword) {

		// Fill user name
		this.setUserName(strUserName);

		// Fill password
		this.setPassword(strPasword);

		// Click Login button
		this.clickLogin();
	}
}

DashboardPage.java

import org.openqa.selenium.By;
import org.openqa.selenium.WebDriver;

public class DashboardPage {

	WebDriver driver;

	By homePageUserName = By.id("welcome");

	public DashboardPage(WebDriver driver) {
		this.driver = driver;

	}

	// Get the User name from Home Page
	public String getHomePageText() {
		return driver.findElement(homePageUserName).getText();
	}

}

Step 7 – Create tests for each Page – BaseTests, LoginTests and DashboardTests

Here, I have created 3 classes. BaseTest class to contain startUp and tearDown methods. These methods will run once before the after of every class. LoginTests and DashboardTests classes contain the tests related to LoginPage and DashboardPage respectively.

BaseTest

import java.util.concurrent.TimeUnit;

import org.openqa.selenium.WebDriver;
import org.openqa.selenium.firefox.FirefoxDriver;
import org.testng.annotations.AfterClass;
import org.testng.annotations.BeforeClass;

import com.example.pageobjectmodel_demo.pages.DashboardPage;
import com.example.pageobjectmodel_demo.pages.LoginPage;

public class BaseTest {

	public static WebDriver driver;
	LoginPage objLogin;
	DashboardPage objDashboardPage;

	@BeforeClass
	public void setup() {
		System.setProperty("webdriver.gecko.driver",
				"C:\\Users\\Vibha\\Software\\geckodriver-v0.26.0-win64\\geckodriver.exe");
		driver = new FirefoxDriver();
		driver.manage().window().maximize();
		driver.manage().timeouts().implicitlyWait(10, TimeUnit.SECONDS);
		driver.get("https://opensource-demo.orangehrmlive.com/");
	}

	@AfterClass
	public void close() {
		driver.close();
	}
}

LoginTests

import org.testng.Assert;
import org.testng.annotations.Test;

import com.example.pageobjectmodel_demo.pages.DashboardPage;
import com.example.pageobjectmodel_demo.pages.LoginPage;

public class LoginTests extends BaseTest {

	LoginPage objLogin;
	DashboardPage objDashboardPage;

	@Test(priority = 0)
	public void loginTest() {

		// Create Login Page object
		objLogin = new LoginPage(driver);

		// Verify login page text
		String loginPageTitle = objLogin.getLoginTitle();
		Assert.assertTrue(loginPageTitle.contains("LOGIN Panel"));
	}

}

DashboardTests

import org.testng.Assert;
import org.testng.annotations.Test;

import com.example.pageobjectmodel_demo.pages.DashboardPage;
import com.example.pageobjectmodel_demo.pages.LoginPage;

public class DashboardTests extends BaseTest {

	LoginPage objLogin;
	DashboardPage objDashboardPage;

	@Test(priority = 0)
	public void DasboardTest() {

		objLogin = new LoginPage(driver);

		// login to application
		objLogin.login("Admin", "admin123");

		// go the dashboard page
		objDashboardPage = new DashboardPage(driver);

		// Verify dashboard page
		Assert.assertTrue(objDashboardPage.getHomePageText().contains("Welcome"));
	}

}

Step 8 – Create a TestNG.XML

Here, I have mentioned 2 test classes. So, when I will run the tests from TestNG.xml, it will run the tests of both the classes. If will mention any one class, then the test of that particular class will be executed.

<?xml version = "1.0"encoding = "UTF-8"?>
<!DOCTYPE suite SYSTEM "http://testng.org/testng-1.0.dtd">
<suite name = "PageObjectModel">
  <test name = "PageObjectModel Tests">
    <classes>
          <class name = "com.example.pageobjectmodel_demo.tests.LoginTests"/>
          <class name = "com.example.pageobjectmodel_demo.tests.DashboardTests"/>
     </classes>  
   </test>
</suite>

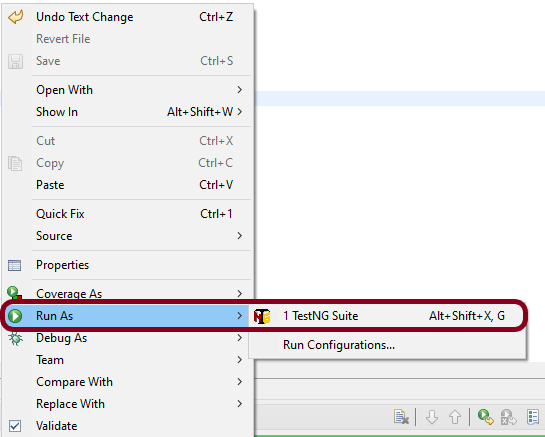
Step 9 – Run the tests from TestNG.xml

Right click on TestNG.xml and select Run As TestNG Suite.

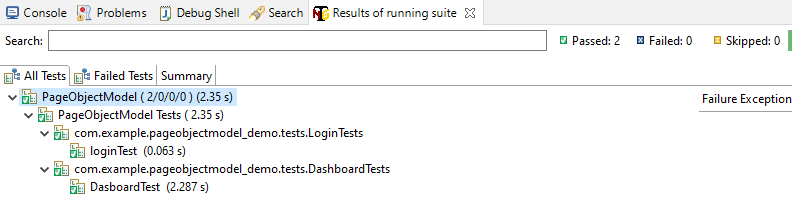
The execution status looks like as shown below.

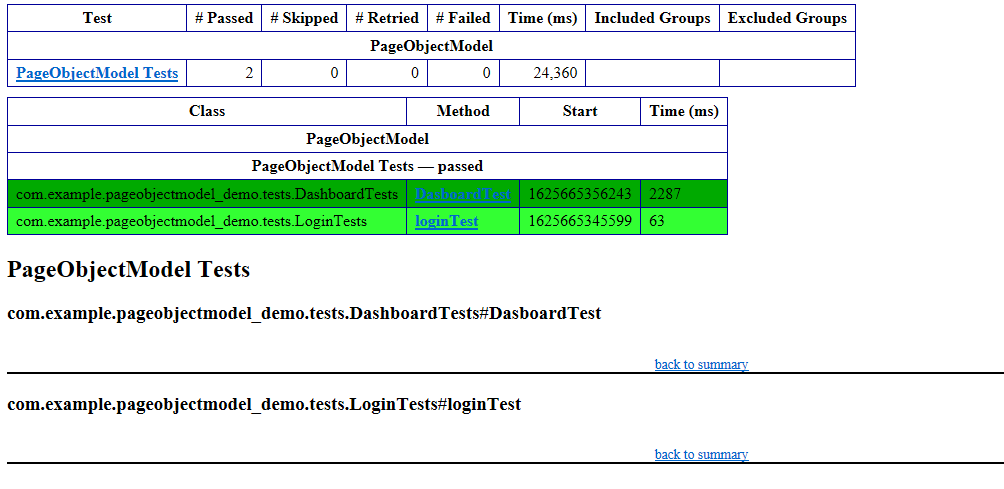
Step 10 – TestNG Report Generation

Once the execution is finished, refresh the project. It will create a test-output folder containing various reports generated by TestNG. Below is the screenshot of the report folder.

Image of Index.html report

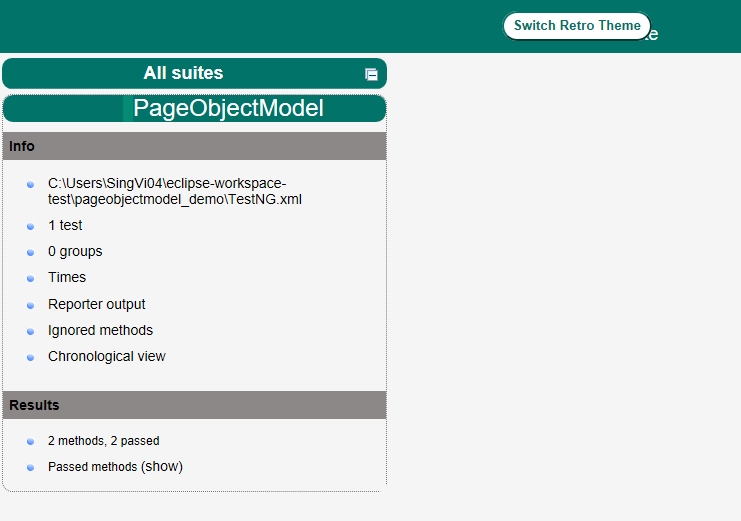
Image of emailable-report.html

Cheers! Congratulations on making it through this tutorial and hope you found it useful! Happy Learning!!

Iterators in Java

HOME

‘Iterator’ is an interface which belongs to collection framework. It allows us to traverse the collection, access the data element and remove the data elements of the collection.

java.util package has public interface Iterator and contains three methods:

  1. boolean hasNext(): It returns true if Iterator has more element to iterate.
  2. Object next(): It returns the next element in the collection until the hasNext()method return true. This method throws ‘NoSuchElementException’ if there is no next element.
  3. void remove(): It removes from the underlying collection the last element returned by this iterator (optional operation). This method can be called only once per call to next(). The behavior of an iterator is unspecified if the underlying collection is modified while the iteration is in progress in any way other than by calling this method.
  4. forEachRemaining – Performs the given action for each remaining element until all elements have been processed or the action throws an exception. Actions are performed in the order of iteration, if that order is specified. Exceptions thrown by the action are relayed to the caller.

Below is an example of use of Iterator. The iterator() method is used to get an iterator for any collection:

public class IteratorDemo {

   public static void main(String[] args) {

		ArrayList<String> cars = new ArrayList<String>();
		cars.add("Audi");
		cars.add("BMW");
		cars.add("Ford");
		cars.add("Duster");

		// Get the iterator
		Iterator<String> it = cars.iterator();

		// Print the first item
		System.out.println("First element from list :"+it.next());

	}
}

Output
First element from list :Audi

Looping through Collection

In the below example, we are looping through the collection using hasNext() and next() methods of Iterator.

public class IteratorDemo {

	 public static void main(String[] args) {

		ArrayList<String> cars = new ArrayList<String>();
		cars.add("Audi");
		cars.add("BMW");
		cars.add("Ford");
		cars.add("Duster");

		// Get the iterator
		Iterator<String> iterator = cars.iterator();

		System.out.println("List elements : ");

		while (iterator.hasNext())
			System.out.print(iterator.next() + " ");

		System.out.println();
	}
}

Output
List elements : 
Audi BMW Ford Duster 

Removing elements from Collection

Iterators are designed to easily change the collections that they loop through. The remove() method can remove items from a collection while looping. In the below example, I’m deleting the items whose reminder are not 0.

public class IteratorDemo {

	 public static void main(String[] args) {

		ArrayList<Integer> numbers = new ArrayList<Integer>();
		numbers.add(20);
		numbers.add(8);
		numbers.add(10);
		numbers.add(50);

        // Get the iterator
		Iterator<Integer> it = numbers.iterator();

		System.out.println("List of Numbers : ");
		while (it.hasNext()) {

			Integer i = it.next();

			if (i / 10 == 0) {
				it.remove();
			}
		}
		System.out.println(numbers);
	}

}

Output
List of Numbers : 
[20, 10, 50]

I hope you are cleared about Iterators now. Enjoy learning. Cheers!!

HashMap in Java

HOME

A HashMap stores items in “key/value” pairs, and you can access them by an index of another type (e.g. a String).

One object is used as a key (index) to another object (value). It can store different types: String keys and Integer values, or the same type, like String keys and String values. We need to import java.util.HashMap or its superclass in order to use the HashMap class and methods.

It is not an ordered collection, which means it does not return the keys and values in the same order in which they have been inserted into the HashMap.

Create a HashMap object as shown below from:-

import java.util.HashMap;

Syntax of HashMap

HashMap<String, String> employeeDetail = new HashMap<String, String>();

HashMap<String, String> employeeDetail = new HashMap<>();

HashMap<String, Integer> employeeDetail = new HashMap<String, Integer>();

Add Items

Below is an example where we are adding items to HashMap by using put() method.

import java.util.HashMap;

public class HashMap_Demo {
    public static void main(String[] args) {

        /* This is how to declare HashMap of key and Value as String  */
        HashMap<String, String> employeeDetail = new HashMap<String, String>();

        // Add keys and values (Name, Designation)
        employeeDetail.put("Tim", "DBA");
        employeeDetail.put("Dong", "SDET");
        employeeDetail.put("Nisha", "BA");
        employeeDetail.put("Ulana", "Dev");

        System.out.println("Detail of Employees :" + employeeDetail);
    }

}

Below is an example where we are adding items to HashMap by using put() method.

Here, the key is String, and the Value is Integer.

import java.util.HashMap;

public class HashMap_Demo {
    public static void main(String[] args) {

        // Combination of String(key) and Integer(value)
        HashMap<String, Integer> employeeAge = new HashMap<String, Integer>();

        // Add keys and values (Name, Age)
        employeeAge.put("Tim", 25);
        employeeAge.put("Dong", 26);
        employeeAge.put("Nisha", 29);
        employeeAge.put("Ulana", 34);

        System.out.println("Age of Employees :" + employeeAge);
    }

}

Access an Item

To access a value in the HashMap, use the get() method and refer to its key:-

import java.util.HashMap;

public class HashMap_Demo {
    public static void main(String[] args) {

        // Combination of String(key) and Integer(value)
        HashMap<String, Integer> employeeAge = new HashMap<String, Integer>();

        // Add keys and values (Name, Age)
        employeeAge.put("Tim", 25);
        employeeAge.put("Dong", 26);
        employeeAge.put("Nisha", 29);
        employeeAge.put("Ulana", 34);

        System.out.println("Age of Employees :"+ employeeAge);

        // Access a value
        System.out.println("Access Value of Key Nisha :" + employeeAge.get("Nisha"));
    }
}

Remove an Item

To remove an item, use the remove() method and refer to the key:

import java.util.HashMap;

public class HashMap_Demo {
    public static void main(String[] args) {

        // Combination of String(key) and Integer(value)
        HashMap<String, Integer> employeeAge = new HashMap<String, Integer>();

        // Add keys and values (Name, Age)
        employeeAge.put("Tim", 25);
        employeeAge.put("Dong", 26);
        employeeAge.put("Nisha", 29);
        employeeAge.put("Ulana", 34);

        System.out.println("Age of Employees :" + employeeAge);

        // To remove an item, use the remove() method and refer to the key
        employeeAge.remove("Ulana");
        System.out.println("List of Employee after removing Ulana :" + employeeAge);
    }
}

To remove all items, use the clear() method:-

import java.util.HashMap;

public class HashMap_Demo {
    public static void main(String[] args) {

        // Combination of String(key) and Integer(value)
        HashMap<String, Integer> employeeAge = new HashMap<String, Integer>();

        // Add keys and values (Name, Age)
        employeeAge.put("Tim", 25);
        employeeAge.put("Dong", 26);
        employeeAge.put("Nisha", 29);
        employeeAge.put("Ulana", 34);

        System.out.println("Age of Employees :" + employeeAge);

        // To remove all items, use the clear() method:
        employeeAge.clear();
        System.out.println("List of Employes after clear:" + employeeAge);
    }
}

Checking whether HashMap is empty or not

We are using isEmpty() method of the HashMap class to perform this check.

import java.util.HashMap;

public class HashMap_Demo {
    public static void main(String[] args) {

        /* This is how to declare HashMap */
        HashMap<String, String> employeeDetail = new HashMap<String, String>();

        // Add keys and values (Name, Designation)
        employeeDetail.put("Tim", "DBA");
        employeeDetail.put("Dong", "SDET");
        employeeDetail.put("Nisha", "BA");
        employeeDetail.put("Ulana", "Dev");

        System.out.println("Detail of Employees :" + employeeDetail);

        // Checking whether HashMap is empty or not
        System.out.println("Is HashMap Empty? " + employeeDetail.isEmpty());

        // Delete all items from HasMap
        employeeDetail.clear();
        System.out.println("Is HashMap Empty now? " + employeeDetail.isEmpty());
    }
}

Check if a particular key exists in HashMap

We will be using containsKey() method of the HashMap class to perform this check.  This method returns a boolean value.

import java.util.HashMap;

public class HashMap_Demo {
    public static void main(String[] args) {

        /* This is how to declare HashMap */
        HashMap<String, String> employeeDetail = new HashMap<String, String>();

        // Add keys and values (Name, Designation)
        employeeDetail.put("Tim", "DBA");
        employeeDetail.put("Dong", "SDET");
        employeeDetail.put("Nisha", "BA");
        employeeDetail.put("Ulana", "Dev");

        System.out.println("Detail of Employees :" + employeeDetail);

        // Check if a particular key exists in HashMap
        boolean flag = employeeDetail.containsKey("Nisha");
        System.out.println("Key Nisha exists in HashMap? : " + flag);

        boolean flag1 = employeeDetail.containsKey("Shawn");
        System.out.println("Key Shawn exists in HashMap? : " + flag1);
    }
}

Check if a particular value exists in HashMap

We will be using containsValue() method of the HashMap class to perform this check.

import java.util.HashMap;

public class HashMap_Demo {
    public static void main(String[] args) {

        /* This is how to declare HashMap */
        HashMap<String, String> employeeDetail = new HashMap<String, String>();

        // Add keys and values (Name, Designation)
        employeeDetail.put("Tim", "DBA");
        employeeDetail.put("Dong", "SDET");
        employeeDetail.put("Nisha", "BA");
        employeeDetail.put("Ulana", "Dev");

        System.out.println("Detail of Employees :" + employeeDetail);

        // Check if a particular value exists in HashMap
        boolean valueExists = employeeDetail.containsValue("Dev");
        System.out.println("String Dev exists in HashMap? : " + valueExists);

        boolean valueNotExists = employeeDetail.containsValue("Test");
        System.out.println("String Test exists in HashMap? : " + valueNotExists);
    }
}

We are done! Congratulations on making it through this tutorial and hope you found it useful! Happy Learning!!

How to set style in Excel in Java using Apache POI

HOME

In the previous tutorial, I have explained about How to add Formulas in Excel in Java. In this tutorial, I will explain How to customize the style of cells in Excel in Java using Apache POI.

I’m using Apache POI to write data to the excel file. To download and install Apache POI, refer here.

If you are using maven, then you need to add below dependency in pom.xml.

<!-- https://mvnrepository.com/artifact/org.apache.poi/poi -->
<dependency>
    <groupId>org.apache.poi</groupId>
    <artifactId>poi</artifactId>
    <version>5.0.0</version>
</dependency>
   
   
<!-- https://mvnrepository.com/artifact/org.apache.poi/poi-ooxml -->
<dependency>
    <groupId>org.apache.poi</groupId>
    <artifactId>poi-ooxml</artifactId>
    <version>5.0.0</version>
</dependency>

To know more about various interfaces and classes for managing Excel, please refer to this tutorial.

In the below example, I have an existing excel with the name of “EmployeeDetails.xlsx”.

Steps to Customize the style in Excel

Step 1 – Create a blank work and then a sheet with name Write_TestData.

XSSFWorkbook workbook = new XSSFWorkbook();
XSSFSheet sheet = workbook.createSheet("Write_TestData");

Step 2- XSSFWorkbook and XSSFSheet are imported from the below consecutive packages.

import org.apache.poi.xssf.usermodel.XSSFWorkbook;
import org.apache.poi.xssf.usermodel.XSSFSheet;

Step 3 – Write data to the sheet. To know more about this part, refer this link.

Step 4 – Set the auto Size for column 0.

sheet.autoSizeColumn(0);

Step 5 – To create a cell style, we only need a reference to the excel workbook:

	CellStyle style = workbook.createCellStyle();

Step 6 – CellStyle is imported from package mentioned below.

import org.apache.poi.ss.usermodel.CellStyle;

Step 7 – To create font style and add attributes to this font

XSSFFont font = workbook.createFont();

Step 8 – XSSFFont is imported from below package

import org.apache.poi.xssf.usermodel.XSSFFont;

Step 9 – To set the Background Colour of the cell.

style.setFillForegroundColor(IndexedColors.BLUE_GREY.getIndex());
style.setFillPattern(FillPatternType.SOLID_FOREGROUND);

Step 10 – BackgroundColor and FillPattern are imported from the below consecutive packages.

import org.apache.poi.ss.usermodel.IndexedColors;
import org.apache.poi.ss.usermodel.FillPatternType;

Step 11 – Write data to an OutputStream. Use the below code to write output stream.

FileOutputStream out = new FileOutputStream(new File("Styled_EmployeeDetails.xlsx"));
workbook.write(out);

Below is the complete program to show various cell setyles for Row 0 (Header Row).

import java.io.File;
import java.io.FileOutputStream;
import java.util.ArrayList;

import org.apache.poi.ss.usermodel.CellStyle;
import org.apache.poi.ss.usermodel.FillPatternType;
import org.apache.poi.ss.usermodel.HorizontalAlignment;
import org.apache.poi.ss.usermodel.IndexedColors;
import org.apache.poi.xssf.usermodel.XSSFCell;
import org.apache.poi.xssf.usermodel.XSSFFont;
import org.apache.poi.xssf.usermodel.XSSFRow;
import org.apache.poi.xssf.usermodel.XSSFSheet;
import org.apache.poi.xssf.usermodel.XSSFWorkbook;

public class ExcelStyleExample {

	public static void main(String[] args) {

		try {
			// create blank workbook
			XSSFWorkbook workbook = new XSSFWorkbook();

			// Create a blank sheet
			XSSFSheet sheet = workbook.createSheet("Write_TestData");

			ArrayList<Object[]> data = new ArrayList<Object[]>();
			data.add(new String[] { "Name", "Id", "Salary" });
			data.add(new Object[] { "Jim Lawrence", "001A", 10000 });
			data.add(new Object[] { "Jack", "1001B", 40000 });
			data.add(new Object[] { "Tim", "2001C", 20000 });
			data.add(new Object[] { "Gina", "1004S", 30000 });

			// Iterate over data and write to sheet
			int rownum = 0;
			for (Object[] employeeDetails : data) {

				// Create Row
				XSSFRow row = sheet.createRow(rownum++);

				int cellnum = 0;
				for (Object obj : employeeDetails) {

					// Create cell
					XSSFCell cell = row.createCell(cellnum++);

					// Set value to cell
					if (obj instanceof String)
						cell.setCellValue((String) obj);
					else if (obj instanceof Double)
						cell.setCellValue((Double) obj);
					else if (obj instanceof Integer)
						cell.setCellValue((Integer) obj);

					// Set Column width to the maximum for Column 0
					sheet.autoSizeColumn(0);

					if (rownum == 1) {

						CellStyle style = null;

						// Creating a font
						XSSFFont font = workbook.createFont();

						font.setFontHeightInPoints((short) 10);
						font.setFontName("Verdana");
						font.setColor(IndexedColors.BLACK.getIndex());
						font.setBold(true);
						font.setItalic(false);

						// Creating cell Style
						style = workbook.createCellStyle();

						// Setting Foreground Colour
						style.setFillForegroundColor(IndexedColors.BLUE_GREY.getIndex());
						style.setFillPattern(FillPatternType.SOLID_FOREGROUND);

						// Setting Alignment of font
						style.setAlignment(HorizontalAlignment.CENTER);

						// Setting font to style
						style.setFont(font);

						// Setting cell style
						cell.setCellStyle(style);

					}
				}
			}

			// Write the workbook in file system
			FileOutputStream out = new FileOutputStream(new File("Styled_EmployeeDetails.xlsx"));
			workbook.write(out);

			System.out.println("Style of Excel is updated successfully");

			out.close();

			// Close workbook
			workbook.close();
		} catch (Exception e) {
			e.printStackTrace();
		}

	}

}

How to update existing excel in Java

HOME

In the previous tutorial, I explained about creating a new Excel file and writing data in that new Excel file using Java. In this tutorial, I will explain How to open and update existing Excel files in Java.

I’m using Apache POI to write data to the Excel file. To download and install Apache POI, refer here.

If you are using Maven, then you need to add the below dependency in pom.xml.

<dependency>
    <groupId>org.apache.poi</groupId>
    <artifactId>poi</artifactId>
    <version>5.0.0</version>
</dependency>
  
<dependency>
    <groupId>org.apache.poi</groupId>
    <artifactId>poi-ooxml</artifactId>
    <version>5.0.0</version>
</dependency>

To know more about various interfaces and classes for managing Excel, please refer to this tutorial.

In the below example, I have an existing Excel with the name “EmployeeDetails.xlsx”.

This is Excel which I am going to update. I will add 2 rows below the last row in Excel.

Below is a complete example of updating the data in existing Excel. One thing we need to note here is that we can update the Excel file only when we close it first.

import java.io.File;
import java.io.FileInputStream;
import java.io.FileOutputStream;
import java.io.IOException;
import org.apache.poi.xssf.usermodel.XSSFCell;
import org.apache.poi.xssf.usermodel.XSSFRow;
import org.apache.poi.xssf.usermodel.XSSFSheet;
import org.apache.poi.xssf.usermodel.XSSFWorkbook;

public class ExcelFileUpdateExample {

	public static void main(String[] args) {

		try {

			FileInputStream fis = new FileInputStream(new File("EmployeeDetails.xlsx"));

			// Create object of XSSFWorkbook class
			XSSFWorkbook workbook = new XSSFWorkbook(fis);

			// Create object of XSSFWorkbook class
			XSSFSheet sheet = workbook.getSheet("Write_TestData");

			Object[][] bookData = { { "SeleniumTest", "0000A", 9999 }, { "JavaTest", "0000B", 9990 }, };

			// Get last row in Sheet
			int rowCount = sheet.getLastRowNum();

			for (Object[] Book : bookData) {

				// Create row for all the new data
				XSSFRow row = sheet.createRow(++rowCount);

				int columnCount = 0;

				// Create new cell for each row
				XSSFCell cell = row.createCell(columnCount);

				for (Object field : Book) {

					cell = row.createCell(columnCount++);
					if (field instanceof String) {
						cell.setCellValue((String) field);
					} else if (field instanceof Integer) {
						cell.setCellValue((Integer) field);
					}
				}

			}

			fis.close();

			// Write the workbook in file system
			FileOutputStream outputStream = new FileOutputStream("EmployeeDetails.xlsx");
			workbook.write(outputStream);
			System.out.println("Excel is updated successfully");

			// Close the workbook
			workbook.close();
			outputStream.close();

		} catch (IOException e) {
			e.printStackTrace();
		}
	}

}

The output of the above program is

Below is the updated Excel.

Update a specific cell in the Excel file

In the below example, I will update the value in a specific cell. As you can see in the above image, I will update, 1004S to “Updated Value”. Below is the code snippet for the same.

XSSFCell cell = sheet.getRow(4).getCell(1);

cell.setCellType(CellType.STRING);
cell.setCellValue("Updated Value");

Below is the complete program.

import java.io.File;
import java.io.FileInputStream;
import java.io.FileOutputStream;
import java.io.IOException;
import org.apache.poi.ss.usermodel.CellType;
import org.apache.poi.xssf.usermodel.XSSFCell;
import org.apache.poi.xssf.usermodel.XSSFSheet;
import org.apache.poi.xssf.usermodel.XSSFWorkbook;

public class UpdateExcelDemo {

	public static void main(String[] args) {

		try {

			// Create an object of FileInputStream class to read excel file
			FileInputStream fis = new FileInputStream(new File("EmployeeDetails.xlsx"));

			// Create object of XSSFWorkbook class
			XSSFWorkbook workbook = new XSSFWorkbook(fis);

			// Read excel sheet by sheet name
			XSSFSheet sheet = workbook.getSheet("Write_TestData");

			// Print data present at row 0 column 2
			System.out.println(sheet.getRow(4).getCell(1).getStringCellValue());

			// Get the Cell at index 3 from the above row
			XSSFCell cell = sheet.getRow(4).getCell(1);

			cell.setCellType(CellType.STRING);
			cell.setCellValue("Updated Value");

			// Write the output to the file
			FileOutputStream fileOut = new FileOutputStream(new File("EmployeeDetails.xlsx"));
			workbook.write(fileOut);

			System.out.println("Id column in Excel is updated successfully");
			fileOut.close();

			// Closing the workbook
			workbook.close();

		} catch (IOException e) {
			e.printStackTrace();
		}

	}
}

The output of the above program is

Below is the updated Excel.

That’s it! Well done.

Congratulations on making it through this tutorial and hope you found it useful! Happy Learning!! Cheers!!

How To Create Gradle Project with Cucumber to test Rest API

HOME

This tutorial describes the creation of the Gradle Java Project to test Rest API using Cucumber BDD and Rest-Assured.

In this tutorial, I will explain creating a framework for the testing of Rest API in Cucumber BDD.

  1. Cucumber – 6.8.1 or above
  2. Java 8 or above
  3. JUnit 4
  4. Gradle 6.6.1 (Build Tool)
  5. Rest Assured 4.3.3

Project Structure

Step 1- Download and Install Java

Cucumber and Rest-Assured need Java to be installed on the system to run the tests. Click here to learn How to install Java.

Step 2 – Download and setup Eclipse IDE on the system

The Eclipse IDE (integrated development environment) provides strong support for Java developers. Click here to learn How to install Eclipse.

Step 3 – Setup Gradle

To build a test framework, we need to add several dependencies to the project. This can be achieved by any build tool. I have used the Gradle Build Tool. Click here to learn How to install Gradle.

Step 4 – Create a new Gradle Project

To create a new Gradle project, go to the top left side and select File -> New Project -> Gradle -> Gradle project -> Next -> Enter Project Name and Project Location ->Next ->Select Gradle Version ->Next ->Review the Configuration -> Finish.

Click here to know How to create a Gradle Java project. Below is the structure of the Gradle project.

Step 5 – Add Rest-Assured and Cucumber dependencies to the Gradle project

This syntax is used for Gradle 5.0 and higher.

dependencies {
    // This dependency is exported to consumers, that is to say found on their compile classpath.
    api 'org.apache.commons:commons-math3:3.6.1'

    // This dependency is used internally, and not exposed to consumers on their own compile classpath.
    implementation 'com.google.guava:guava:29.0-jre'
    
    testImplementation 'io.cucumber:cucumber-java:6.8.1'
    testImplementation 'io.cucumber:cucumber-junit:6.8.1'
    testImplementation 'io.rest-assured:rest-assured:4.3.3'

If you are using Gradle 4.10.3 or older, use the below dependency block to build.gradle.

dependencies {
    testCompile 'io.cucumber:cucumber-java:6.8.1'
}

Step 6 – Add Configuration to build.gradle

The below configuration is added to the build.gradle when Gradle is 5.0 or higher version.

configurations {
    cucumberRuntime {
        extendsFrom testImplementation
    }
}

If Gradle is 4.10.3 or older, use the below configuration.

configurations {
    cucumberRuntime {
        extendsFrom testRuntime
    }
}

Step 7 – Add Gradle Cucumber Task to build.gradle 

task cucumber() {
    dependsOn assemble, testClasses
    doLast {
        javaexec {
            main = "io.cucumber.core.cli.Main"
            classpath = configurations.cucumberRuntime + sourceSets.main.output + sourceSets.test.output
            args = ['--plugin', 'pretty', '--glue', 'com.example.gradle.apidemo', 'src/test/resources']
        }
    }
}

Once you have added dependencies, configurations, and Gradle cucumber task, Right-click on the project, Hover to the Gradle option, and click Refresh Gradle Project. Eclipse does not automatically update the classpath of the build.gradle file is updated. Select Gradle  Refresh Gradle Project from the context menu of the project or from your build.gradle file for that.

Step 8 – Create a feature file under src/test/resources

A new Gradle Project is created with 4 folders – src/main/java, src/main/resources, src/test/java and src/test/resources. Features are created under the src/test/resources directory. Create a folder with name features. Now, create the feature file in this folder. The feature file should be saved with the extension .feature. This feature file contains the test scenarios created to test the application. The Test Scenarios are written in Gherkins language in the format of Given, When, Then, And, But.

Below is an example of a Test Scenario where we are using the GET method to get the information from the API.

Feature: Validation of get method
 
@GetUserDetails
  Scenario Outline: Send a valid Request to get user details
 
  Given I send a request to the URL to get user details
  Then the response will return status 200 and id <id> and salary <employee_salary> and name "<employee_name>" and age <employee_age> and message "<message>"
 
Examples:
    |id  |employee_salary|employee_name |employee_age  |message                                  |
    |1   |320800         |Tiger Nixon   |61            |Successfully! Record has been fetched.   |
   

Step 9 – Create the Step Definition class or Glue Code for the Test Scenario

Step Definition acts as an intermediate to your runner and feature file. It stores the mapping between each step of the scenario in the Feature file. So when you run the scenario, it will scan the step definition file to check the matched glue or test code.

import io.restassured.http.ContentType;
 
import io.restassured.response.ValidatableResponse;
 
import static io.restassured.RestAssured.given;
import static org.hamcrest.Matchers.equalTo;
 
import io.cucumber.java.en.Given;
import io.cucumber.java.en.Then;
 
public class API_GETDefinitions {
     
 
    private ValidatableResponse validatableResponse;
 
    private String endpoint = "http://dummy.restapiexample.com/api/v1/employee/1";
  
    @Given("I send a request to the URL to get user details")
    public void sendRequest(){
        validatableResponse = given().contentType(ContentType.JSON)
                .when().get(endpoint).then();   
         
        System.out.println("Response :"+validatableResponse.extract().asPrettyString());
    }
  
  
    @Then("the response will return status {int} and id {int} and salary {int} and name {string} and age {int} and message {string}")
    public void verifyStatus(int statusCode, int id, int emp_Salary, String emp_name, int emp_age, String message ){
         
        validatableResponse.assertThat().statusCode(statusCode);
         
        validatableResponse.assertThat().body("data.id",equalTo(id));
         
        validatableResponse.assertThat().body("data.employee_salary",equalTo(emp_Salary));
         
        validatableResponse.assertThat().body("data.employee_name",equalTo(emp_name));
         
        validatableResponse.assertThat().body("data.employee_age",equalTo(emp_age));
         
        validatableResponse.assertThat().body("message",equalTo(message));      
         
    }
}

In order to use REST assured effectively, it’s recommended to statically import methods from the following classes:

import io.restassured.RestAssured.*
import io.restassured.matcher.RestAssuredMatchers.*
import static org.hamcrest.Matchers.*

given() method is imported from package:

import static io.restassured.RestAssured.given;

equalTo() method is imported from package:

import static org.hamcrest.Matchers;

Step 10 – Create a Cucumber Runner class 

A runner will help us to run the feature file and act as an interlink between the feature file and step definition Class. To know more about Runner, refer to this link.

import org.junit.runner.RunWith;

import io.cucumber.junit.Cucumber;
import io.cucumber.junit.CucumberOptions;

@RunWith(Cucumber.class)

@CucumberOptions(plugin ="pretty",features= {"src/test/resources/features/API_GET.feature"}, glue= {"com.example.gradle.apidemo"})

public class CucumberRunnerTest {

}

Step 11 – Run the tests from JUnit

You can execute the test script by right-clicking on the Test Runner class -> Run As JUnit.

Step 12 – Run the tests from the Command Line

Run the following Gradle task from the directory path where build.gradle file is located. To know more about this report, refer here.

gradle cucumber

Below is the screenshot of the execution of Cucumber tests in Command-Line.

Step 13 – Cucumber Report Generation

To get Cucumber Test Reports, add cucumber.properties under src/test/resources and add the below instruction in the file.

cucumber.publish.enabled=true

Below is the image of the Cucumber Report.

We are done! Congratulations on making it through this tutorial and hope you found it useful! Happy Learning!!

Parallel Testing in Cucumber with JUnit4

Last Updated On

HOME

In this tutorial, I will explain Parallel Testing using Cucumber with JUnit4.

Cucumber-JVM allows parallel execution across multiple threads since version 4.0.0. There are several options to incorporate this built-in feature in a Cucumber project. You can do so by using JUnit, TestNG, or CLI.

Cucumber can be executed in parallel using JUnit and Maven test execution plugins.

In JUnit, the feature files are run in parallel rather than in scenarios, which means all the scenarios in a feature file will be executed by the same thread. You can use either Maven Surefire or Failsafe plugin to execute the runner. In this tutorial, I’m using the Maven Surefire plugin.

Table of Contents

  1. Dependency List
  2. Detailed Step Description
    1. Create a Maven project
    2. Update the Properties section in Maven pom.xml
    3. Add Cucumber and JUnit dependencies to the project
    4. Add Surefire plugin configuration to the build section of the POM
    5. Create a feature folder in src/test/resources
    6. Create the Page Object Model classes of LoginPage and ForgotPasswordPage feature files
    7. Create the Hook Class and Dependency Injection class (TestSetUp) and BaseTest class
    8. Create a Test Runner to run the tests
    9. Cucumber Report Generation
    10. Execute the tests from the command line
    11. Difference between Parallel tests and Non-Parallel Tests

Dependency List:-

  1. Cucumber Java – 7.11.1
  2. Cucumber JUnit – 7.11.1
  3. Java 11
  4. JUnit– 4.13.2
  5. Maven – 3.8.1
  6. Selenium – 34.8.0
  7. Maven Surefire Plugin – 3.0.0-M7
  8. Maven Compiler Plugin – 3.10.1

Detailed Step Description

Step 1 – Create a Maven project

Create a Maven project in your favorite IDE using the cucumber-archetype or by adding Cucumber dependencies to the POM as detailed here and Junit dependencies here. To know more about How to set up a Cucumber Maven project with Eclipse, please refer to this tutorial – Cucumber Tutorial – How to setup Cucumber with Eclipse.

Below is the structure of the project.

Step 2 – Update the Properties section in Maven pom.xml

   <properties>
        <project.build.sourceEncoding>UTF-8</project.build.sourceEncoding>
        <selenium.version>4.8.0</selenium.version>
        <cucumber.version>7.11.1</cucumber.version>
        <junit.version>4.13.2</junit.version>
        <webdrivermanager.version>5.3.2</webdrivermanager.version>
        <extent.version>5.0.9</extent.version>
        <extent.cucumber.adapter.version>1.10.1</extent.cucumber.adapter.version>
        <maven.compiler.plugin.version>3.10.1</maven.compiler.plugin.version>
        <maven.surefire.plugin.version>3.0.0-M7</maven.surefire.plugin.version>
        <maven.compiler.source>11</maven.compiler.source>
        <maven.compiler.target>11</maven.compiler.target>
    </properties>

Step 3 – Add Cucumber and JUnit dependencies to the project

Add below mentioned Cucumber-Java and Cucumber-JUnit dependencies to the project.

  <dependencies>

        <!--Cucumber Dependencies -->
        <dependency>
            <groupId>io.cucumber</groupId>
            <artifactId>cucumber-java</artifactId>
            <version>${cucumber.version}</version>
        </dependency>

        <dependency>
            <groupId>io.cucumber</groupId>
            <artifactId>cucumber-junit</artifactId>
            <version>${cucumber.version}</version>
            <scope>test</scope>
        </dependency>

        <!-- Selenium Dependency -->
        <dependency>
            <groupId>org.seleniumhq.selenium</groupId>
            <artifactId>selenium-java</artifactId>
            <version>${selenium.version}</version>
        </dependency>

        <!-- JUnit4 Dependency -->
        <dependency>
            <groupId>junit</groupId>
            <artifactId>junit</artifactId>
            <version>${junit.version}</version>
            <scope>test</scope>
        </dependency>


        <!-- Dependency Injection-->
        <dependency>
            <groupId>io.cucumber</groupId>
            <artifactId>cucumber-picocontainer</artifactId>
            <version>${cucumber.version}</version>
            <scope>test</scope>
        </dependency>

        <!-- WebDriver Manager Dependency -->
        <dependency>
            <groupId>io.github.bonigarcia</groupId>
            <artifactId>webdrivermanager</artifactId>
            <version>${webdrivermanager.version}</version>
        </dependency>

    </dependencies>
  

Step 4 – Add Surefire plugin configuration to the build section of the POM

 <plugin>
    <groupId>org.apache.maven.plugins</groupId>
    <artifactId>maven-surefire-plugin</artifactId>
    <version>${maven.surefire.plugin.version}</version>
   <configuration>
        <parallel>methods</parallel>
        <useUnlimitedThreads>true</useUnlimitedThreads>
        <testFailureIgnore>true</testFailureIgnore>
	</configuration>
</plugin> 

To set the thread count to a specific number instead of useUnlimitedThreads use the below setting.

<configuration>
    <parallel>methods</parallel>
    <threadCount>4</threadCount>
</configuration>

The thread count in the above setting is 4 threads per core.

The complete POM.xml is shown below:

<?xml version="1.0" encoding="UTF-8"?>
<project xmlns="http://maven.apache.org/POM/4.0.0"
         xmlns:xsi="http://www.w3.org/2001/XMLSchema-instance"
         xsi:schemaLocation="http://maven.apache.org/POM/4.0.0 http://maven.apache.org/xsd/maven-4.0.0.xsd">
    <modelVersion>4.0.0</modelVersion>

    <groupId>org.example</groupId>
    <artifactId>ParallelTests_Cucumber_JUnit4_Demo</artifactId>
    <version>1.0-SNAPSHOT</version>

    <properties>
        <project.build.sourceEncoding>UTF-8</project.build.sourceEncoding>
        <selenium.version>4.8.0</selenium.version>
        <cucumber.version>7.11.1</cucumber.version>
        <junit.version>4.13.2</junit.version>
        <webdrivermanager.version>5.3.2</webdrivermanager.version>
        <extent.version>5.0.9</extent.version>
        <extent.cucumber.adapter.version>1.10.1</extent.cucumber.adapter.version>
        <maven.compiler.plugin.version>3.10.1</maven.compiler.plugin.version>
        <maven.surefire.plugin.version>3.0.0-M7</maven.surefire.plugin.version>
        <maven.compiler.source>11</maven.compiler.source>
        <maven.compiler.target>11</maven.compiler.target>
    </properties>

    <dependencies>

        <!--Cucumber Dependencies -->
        <dependency>
            <groupId>io.cucumber</groupId>
            <artifactId>cucumber-java</artifactId>
            <version>${cucumber.version}</version>
        </dependency>

        <dependency>
            <groupId>io.cucumber</groupId>
            <artifactId>cucumber-junit</artifactId>
            <version>${cucumber.version}</version>
            <scope>test</scope>
        </dependency>

        <!-- Selenium Dependency -->
        <dependency>
            <groupId>org.seleniumhq.selenium</groupId>
            <artifactId>selenium-java</artifactId>
            <version>${selenium.version}</version>
        </dependency>

        <!-- JUnit4 Dependency -->
        <dependency>
            <groupId>junit</groupId>
            <artifactId>junit</artifactId>
            <version>${junit.version}</version>
            <scope>test</scope>
        </dependency>


        <!-- Dependency Injection-->
        <dependency>
            <groupId>io.cucumber</groupId>
            <artifactId>cucumber-picocontainer</artifactId>
            <version>${cucumber.version}</version>
            <scope>test</scope>
        </dependency>

        <!-- WebDriver Manager Dependency -->
        <dependency>
            <groupId>io.github.bonigarcia</groupId>
            <artifactId>webdrivermanager</artifactId>
            <version>${webdrivermanager.version}</version>
        </dependency>

    </dependencies>
    <build>
        <plugins>

            <plugin>
                <groupId>org.apache.maven.plugins</groupId>
                <artifactId>maven-compiler-plugin</artifactId>
                <version>${maven.compiler.plugin.version}</version>
                <configuration>
                    <source>${maven.compiler.source}</source>
                    <target>${maven.compiler.target}</target>
                </configuration>
            </plugin>

            <plugin>
                <groupId>org.apache.maven.plugins</groupId>
                <artifactId>maven-surefire-plugin</artifactId>
                <version>${maven.surefire.plugin.version}</version>
                <configuration>
                    <parallel>methods</parallel>
                    <useUnlimitedThreads>true</useUnlimitedThreads>
                </configuration>
            </plugin>
        </plugins>
    </build>

</project>

Step 5 – Create a feature folder in src/test/resources

Add 2 feature files – LoginPage.feature and ForgotPasswordPage.feature in the features folder present in src/test/resources.

LoginPage.feature

Feature: Login to HRM Application

  Background:
    Given User is on Home page

  @ValidCredentials
  Scenario: Login with valid credentials - Feature 1, Scenario - 1

    When User enters username as "Admin" and password as "admin123"
    Then User should be able to login successfully

  @InvalidCredentials
  Scenario Outline: Login with invalid credentials - Feature 1, Scenario - 2

    When User enters username as "<username>" and password as "<password>"
    Then User should be able to see error message "<errorMessage>"

    Examples:
      | username    | password   | errorMessage                      |
      | Admin       | admin12$$  | Invalid credentials               |
      | admin$$     | admin123   | Invalid credentials               |
      | abc123      | xyz$$      | Invalid credentials               |
      |             | xyz$$      | Invalid credentials               |

ForgotPasswordPage.feature

Feature: Forgot Password Page

  Background:
    Given User is on Home page

  @BackFunctionality
  Scenario: Validate the cancel functionality - Feature 2, Scenario - 1

    When User clicks on Forgot your password? link
    Then User should be able to navigate to Reset Password page
    And User clicks on Cancel button to go back to Login Page

  @ResetFunctionality
  Scenario: Validate the Reset Password functionality - Feature 2, Scenario - 2

    When User clicks on Forgot your password? link
    Then User should be able to navigate to Reset Password page
    And User clicks on Reset Password button and provide username as "abc1234"
    And Verify the message "Reset Password link sent successfully"

Step 6 – Create the Page Object Model classes of LoginPage and ForgotPasswordPage feature files

Page Object Model class contains all the locators and the actions performed on these locators for the particular class to improve the readability and maintainability of the code.

Below are the Page Object Model classes for these feature files.

LoginPage

import org.openqa.selenium.By;
import org.openqa.selenium.WebDriver;
 
public class LoginPage {
 
    public WebDriver driver;
     
    By userName = By.name("username");
    By passWord = By.name("password");
    By login = By.xpath("//*[@id='app']/div[1]/div/div[1]/div/div[2]/div[2]/form/div[3]/button");
    By errorMessage = By.xpath("//*[@id='app']/div[1]/div/div[1]/div/div[2]/div[2]/div/div[1]/div[1]/p");
    By forgotPasswordLink = By.xpath("//*[@id='app']/div[1]/div/div[1]/div/div[2]/div[2]/form/div[4]/p");
    By loginPageTitle = By.xpath("//*[@id='app']/div[1]/div/div[1]/div/div[2]/h5");
     
    public LoginPage(WebDriver driver) {
        this.driver = driver;
    }
     
    public String getErrorMessage() {
        return driver.findElement(errorMessage).getText();
    }
 
    public void login(String strUserName, String strPassword) {
 
        // Fill user name
        driver.findElement(userName).sendKeys(strUserName);
 
        // Fill password
        driver.findElement(passWord).sendKeys(strPassword);
 
        // Click Login button
        driver.findElement(login).click();
 
    }
 
    // Click on Forgot Password link
    public void clickOnForgotPasswordLink() {
        driver.findElement(forgotPasswordLink).click();
    }
 
    //Get Login Page Title
    public String getLoginPageTitle() {
        return driver.findElement(loginPageTitle).getText();
    }
}

HomePage

import org.openqa.selenium.By;
import org.openqa.selenium.WebDriver;
 
public class HomePage {
 
    public WebDriver driver;
 
    public HomePage(WebDriver driver) {
        this.driver = driver;
    }
 
    By homePageUserName = By.xpath("//*[@id='app']/div[1]/div[1]/header/div[1]/div[1]/span/h6");
 
    public String getHomePageText() {
        return driver.findElement(homePageUserName).getText();
    }
}

ForgotPasswordPage

import org.openqa.selenium.By;
import org.openqa.selenium.WebDriver;
 
public class ForgotPasswordPage {
 
    WebDriver driver;
 
     By forgotPasswordPageTitle = By.xpath("//*[@id='app']/div[1]/div[1]/div/form/h6");
     By cancelBtn = By.xpath("//*[@id='app']/div[1]/div[1]/div/form/div[2]/button[1]");
     By resetPasswordBtn = By.xpath("//*[@id='app']/div[1]/div[1]/div/form/div[2]/button[2]");
     By userName = By.name("username");
     By resetMessage = By.xpath("//*[@id='app']/div[1]/div[1]/div/h6");
 
    public ForgotPasswordPage(WebDriver driver) {
        this.driver = driver;
    }
 
    // Get the Title of ForgotPage
    public String getForgotPageText() {
        return driver.findElement(forgotPasswordPageTitle).getText();
    }
 
    // Click Cancel Button
    public void clickOnCancelBtn() {
         driver.findElement(cancelBtn).click();
    }
 
    // Click ResetPassword Button
    public void clickOnRestPasswordBtn() {
        driver.findElement(resetPasswordBtn).click();
    }
 
    // Type username in TextBox
    public void TypeOnUsernameTextBox(String username) {
        driver.findElement(userName).sendKeys(username);
    }
 
    // Get Message
    public String getRestMessage() {
        return driver.findElement(resetMessage).getText();
    }
}

PageObjectManager – This class creates the object of all the above-mentioned Page Object Model classes. This an optional class. If you want you can create the objects in StepDefinition class also.

public class PageObjectManager {
 
    public LoginPage loginPage;
    public HomePage homePage;
    public ForgotPasswordPage forgotPasswordPage;
    public WebDriver driver;
 
 
    public PageObjectManager(WebDriver driver)
    {
        this.driver = driver;
    }
 
    public LoginPage getLoginPage()
    {
 
        loginPage= new LoginPage(driver);
        return loginPage;
    }
 
    public HomePage getHomePage()
    {
        homePage = new HomePage(driver);
        return homePage;
    }
 
    public ForgotPasswordPage getForgotPasswordPage()
    {
        forgotPasswordPage = new ForgotPasswordPage(driver);
        return forgotPasswordPage;
    }
}

Step 7 – Create the Step Definition classes for both feature files or Glue Code

Below is the Step Definition for LoginPage.feature.

import org.example.pageObjects.HomePage;
import org.example.pageObjects.LoginPage;
import org.example.pageObjects.PageObjectManager;
import org.example.utils.TestSetUp;
import io.cucumber.java.en.Given;
import io.cucumber.java.en.Then;
import io.cucumber.java.en.When;
import org.junit.Assert;

public class LoginPageDefinitions {

    TestSetUp setUp;
    public PageObjectManager pageObjectManager;
    public LoginPage loginPage;
    public HomePage homePage;


    public LoginPageDefinitions(TestSetUp setUp)  {
        this.setUp = setUp;
        this.loginPage = setUp.pageObjectManager.getLoginPage();
        this.homePage= setUp.pageObjectManager.getHomePage();
    }

    @Given("User is on Home page")
    public void loginTest()  {
        setUp.baseTest.WebDriverManager().get("https://opensource-demo.orangehrmlive.com/");

    }

    @When("User enters username as {string} and password as {string}")
    public void goToHomePage(String userName, String passWord) {

        // login to application
        loginPage.login(userName, passWord);

        // go the next page

    }

    @Then("User should be able to login successfully")
    public void verifyLogin() {

        // Verify home page
        Assert.assertTrue(homePage.getHomePageText().contains("Dashboard"));

    }

    @Then("User should be able to see error message {string}")
    public void verifyErrorMessage(String expectedErrorMessage) {

        // Verify home page
        Assert.assertEquals(loginPage.getErrorMessage(),expectedErrorMessage);

    }

}

Below is the Step Definition for ForgotPasswordPage.feature.

import io.cucumber.java.en.Then;
import io.cucumber.java.en.When;
import org.example.pageObjects.ForgotPasswordPage;
import org.example.pageObjects.LoginPage;
import org.example.pageObjects.PageObjectManager;
import org.example.utils.TestSetUp;
import org.junit.Assert;


public class ForgotPasswordPageDefinitions {

    TestSetUp setUp;
    PageObjectManager pageObjectManager;
    public LoginPage loginPage;
    public  ForgotPasswordPage forgotPasswordPage;

    public ForgotPasswordPageDefinitions(TestSetUp setUp) {
        this.setUp = setUp;
        this.loginPage = setUp.pageObjectManager.getLoginPage();
        this.forgotPasswordPage = setUp.pageObjectManager.getForgotPasswordPage();
    }

    @When("User clicks on Forgot your password? link")
    public void forgotPasswordLink() {

        loginPage.clickOnForgotPasswordLink();

    }

    @Then("User should be able to navigate to Reset Password page")
    public void verifyForgotPasswordPage() {

        Assert.assertEquals(forgotPasswordPage.getForgotPageText(),"Reset Password");

    }

    @Then("User clicks on Cancel button to go back to Login Page")
    public void verifyCancelBtn() {

        forgotPasswordPage.clickOnCancelBtn();
        Assert.assertEquals(loginPage.getLoginPageTitle(),"Login");

    }

    @Then("User clicks on Reset Password button and provide username as {string}")
    public void verifyResetPasswordBtn(String username) {

        forgotPasswordPage.TypeOnUsernameTextBox(username);
        forgotPasswordPage.clickOnRestPasswordBtn();

    }

    @Then("Verify the message {string}")
    public void verifyMessage(String message) {

        //  ForgotPasswordPage forgotPasswordPage = setUp.pageObjectManager.getForgotPasswordPage();
        Assert.assertEquals(forgotPasswordPage.getRestMessage(),message);

    }
}

Step 8 – Create the Hook Class and Dependency Injection class (TestSetUp) and BaseTest class

Below is the code for the ApplicationHook Class.

import io.cucumber.java.After;
import io.cucumber.java.AfterStep;
import io.cucumber.java.Scenario;
import org.example.utils.TestSetUp;
import org.openqa.selenium.OutputType;
import org.openqa.selenium.TakesScreenshot;
import org.openqa.selenium.WebDriver;

public class ApplicationHooks {

 public TestSetUp setUp;

    public ApplicationHooks(TestSetUp setUp) {
        this.setUp = setUp;
    }

    @After
    public void tearDown( )  {
        setUp.baseTest.WebDriverManager().quit();
    }

    @AfterStep
    public void addScreenshot(Scenario scenario) {

        WebDriver driver =  setUp.baseTest.WebDriverManager();
        if(scenario.isFailed()) {
            final byte[] screenshot = ((TakesScreenshot) driver).getScreenshotAs(OutputType.BYTES);
            scenario.attach(screenshot, "image/png", "image");
        }

    }

}

Below is the code for the Dependency Injection class. In Cucumber, if we want to share the state between multiple-step definition files, we will need to use dependency injection (DI). 

import org.openqa.selenium.WebDriver;
import org.openqa.selenium.WebElement;
import pageObjects.PageObjectManager;
 
public class TestSetUp {
 
    public WebElement errorMessage;
    public WebElement homePageUserName;
    public PageObjectManager pageObjectManager;
    public BaseTest baseTest;
 
    public TestSetUp()  {
 
        baseTest = new BaseTest();
        pageObjectManager = new PageObjectManager(baseTest.WebDriverManager());
 
    }
}

BaseTest class is used to initialize the WebDriver.

import io.github.bonigarcia.wdm.WebDriverManager;
import org.openqa.selenium.WebDriver;
import org.openqa.selenium.chrome.ChromeDriver;
import java.time.Duration;
 
public class BaseTest {
 
    public WebDriver driver;
    public final static int TIMEOUT = 10;
 
    public WebDriver WebDriverManager ()  {
 
    
        if (driver == null) {
         
            WebDriverManager.chromedriver().setup();
            driver = new ChromeDriver();
            driver.manage().timeouts().implicitlyWait(Duration.ofSeconds(TIMEOUT));
            driver.manage().window().maximize();
            driver.get(url);
 
        }
        return driver;
    }
}

Step 9 – Create a Test Runner to run the tests

import io.cucumber.junit.Cucumber;
import io.cucumber.junit.CucumberOptions;
import org.junit.runner.RunWith;

@RunWith(Cucumber.class)
@CucumberOptions(tags = "", features = "src/test/resources/features", glue = "org.example.definitions")

public class CucumberRunnerTests  {

}

Step 10 – Cucumber Report Generation

To get Cucumber Test Reports, add cucumber.properties in src/test/resources and add the below instruction in the file.

cucumber.publish.enabled=true

Step 11 – Execute the tests from the command line

mvn clean test

Below is the execution screen. There are two feature files.

When we invoke the test through Maven, the surefire plugin executes the Feature files parallelly. Here, LoginPage has 5 scenarios and ForgotPasswordPage has 2 scenarios. So, initially when the execution will start 1 scenario from both the tests will be executed parallelly and then again one test from each feature will execute. Later, we will be left with 4 scenarios in the LoginPage feature file, so the scenario will run sequentially of the LoginPage feature file.

All the tests of a particular feature file are executed together as feature files are run in parallel, not scenarios.

Step 12 – Difference between Parallel tests and Non-Parallel Tests

Parallel Tests

Below is the Cucumber Report generated for parallel tests.

When the tests are run as JUnit tests from CucumberRunnerTests, then the tests are executed sequentially.

We are done! Congratulations on making it through this tutorial and hope you found it useful! Happy Learning!!

In the next tutorial, I explained Parallel Testing in Cucumber with TestNG.

How to create Gradle Java project in IntelliJ using Command Line

HOME

In the previous tutorial, I have explained about How to create Gradle project in IntelliJ without Command Line. In this tutorial, I will explain how to create a Gradle Java project using Command Line in IntelliJ.

Implementation Steps

Step 1- Create a Project Folder and change the directory path to the folder where we want to save the latest files created post creation of the project. Here, I have created a folder – GradleIntelliJDemoFromCMD and changed the directory path.

cd C:\Users\Vibha\Projects\Vibha_Personal\GradleIntelliJDemoFromCMD

Step 2 – Open the Terminal in IntelliJ.

Step 3 – Gradle comes with a built-in task, called init , that initializes a new Gradle project in an empty folder. The init task uses the (also built-in) wrapper task to create a Gradle wrapper script, gradlew. Type the below command and press ENTER.

Step 4 – Select the type of project to generate. I’m selecting the application option as if I select basic, it won’t create a src directory. Type 2 and press ENTER.

Step 5 – Select implementation language. This is a Java project, so TYPE 3 (Java) and press ENTER.

Step 6 – Select build script DSL (Domain Specific Language) – As in Maven POM.xml (XML) is created to build a script file, here we can use Groovy or Kotlin to build the script file. Type 1 (Groovy) and press ENTER.

Step 7 – Select Test Framework – There are 4 different test frameworks. Depending on your requirement, select an option. I have selected 1 (JUnit 4) and press ENTER.

Step 8 – It needs the Project name and Source Package name. If I won’t provide the project name, it will take by default my current folder name which is Gradle_Project. Similarly, if I won’t provide the Source Package name, then it will provide the current project name as Source Package Name.

Project name – GradleIntelliJDemoFromCMD
Source Package – com.example

Press ENTER. init script will run and create a Gradle project. You can see as the build is successfull.

Step 9 – The project is created and placed under the folder GradleIntelliJDemoFromCMD as shown below.

This project structure will have below mentioned files:-

  1. Generated folder for wrapper files – wrapper
  2. Gradle wrapper start scripts – gradlew, gradlew.bat
  3. Settings file to define build name and subprojects – settings.gradle
  4. Build script of lib project – build.gradle
  5. Default Java source folder – src/main/java
  6. Default Java test source folder – src/test/java

That’s it. We are done.

Congratulations on making it through this tutorial and hope you found it useful! Happy Learning!! Cheers!!

How to create Gradle project in IntelliJ

HOME

In the previous tutorial, I have explained how to create a Simple Java project in IntelliJ IDEA IDE. In this tutorial, I will explain about creating a Gradle project in IntelliJ IDE.

Step 1 – Open the IntelliJ. It will look as shown below. To create a New Project, click on New Project Icon.

Step 2 – Click on File Option, hover on New Option and click on Project Option as shown below.

Step 3 – Select New Project as Gradle.
Project SDK should be current Java version available.
Additional Libraries – Java
Click on the Next Button.

Step 4 – Below screen will appear. Mention the Name, Group Id, Artifact Id and Version . Click the Finish button

Name : GradleIntelliJDemo
Group Id : com.example
Artifact Id :  GradleIntelliJDemo
Version : 1.0-SNAPSHOT

Step 5 – This dialog box will appear on the screen. This provides you the option to open the project in current window or will open a new window with this project. I’m selecting the option – New Window.

Step 6 – This screen shows the structure of Gradle project as well as build.gradle file.

Step 7 – Project Folder Creation – We can see a folder with the name of project – GradleIntelliJDemo in our Eclipse Workspace.

Step 8 – Right click build.gradle and select Run GradleIntelliJDemo. If the build is successful, below screen appears.

This is how we can create the Gradle project – MavenIntelliJDemo in IntelliJ.

Congratulations on making it through this tutorial and hope you found it useful! Happy Learning!! Cheers!!

How to create a Java Maven project using Command Line in IntelliJ

HOME

In the previous tutorial, I have explained How to create Maven Java project in Intellij without Command Line. In this tutorial, I will explain about creation of Java Maven Project using Command Line in IntelliJ.

Step 1 – Open IntelliJ IDEA IDE. Click on Terminal Button as shown in the below image.

Step 2 – Go to the path where you want to create the project. This can be done by typing command

cd path of folder

Step 3 – This tells Maven to generate a Java project from a Maven template.

mvn archetype:generate

Step 4 – We need to mention the number as displayed on your screen in Command Prompt to proceed further. Like here, Choose a number or apply filter has 1771, so I have also mentioned 1771 in command prompt.

Step 5 – We need to provide again input in command prompt. This time program wants to know which version we want to use. I prefer to use the latest version. Here, it is 8, so I have selected version 8.

Step 6 – We need to provide 2 input here

A) Value of groupId – This serves as the group identifier of your Maven project, it should be in a form similar to Java packages, such as com.example
B) Value of artifactId – This serves as the group-local identifier of my Maven project like MavenIntelliJFromCMD
C) Value of Version – The initial version of our project. The default is 1.0-SNAPSHOT
D) Value of package – The name of our root package. The default is groupId we have created earlier.
We will notice the INFO message about the properties.

If the displayed settings are correct, then just enter Y in :: prompt.

Step 7 – Successful Build – Below screenshot shows that the Maven IntelliJ Project built successfully.

Step 8 – Contents of Project Folder – Open folder MavenIntelliJFromCMD to see the contents of the folder. It should have POM file and src.

This project can be imported in IntelliJ and can be used further. To know how to import Java Maven project in Intellij, click here.

That’s it! We have created a Maven Project in IntelliJ using Command Line.

Congratulations on making it through this tutorial and hope you found it useful! Happy Learning!! Cheers!!