TestNG is a well thought Test Framework. It provides a lot of different features which makes the life of a tester a little easy. It happens sometimes that a test execution fails, but the failure is not a product bug, but there can be different reasons for the failure such as the environment is down, third party web service is down, or the browser becomes unresponsive. Imagine a scenario where we need to run a test suite consisting of 100 tests and a few tests failed as a result of a known intermittent environment issue. We know that these tests can pass if rerun a couple of times. So, in this case, the retry functionality of TestNG comes to the rescue. This is one of the best and most frequently used functionality.
In this tutorial let us study how we can implement retry on failed tests in TestNG. In order to achieve this, we have to first understand the org.testng.IRetryAnalyzer interface.
To start with, please add the below dependencies to the Maven Project.
<dependencies>

      <dependency>
          <groupId>org.seleniumhq.selenium</groupId>
          <artifactId>selenium-java</artifactId>
          <version>3.141.59</version>
      </dependency>

      <dependency>
          <groupId>io.github.bonigarcia</groupId>
          <artifactId>webdrivermanager</artifactId>
          <version>5.1.0</version>
       </dependency>

      <dependency>
           <groupId>org.testng</groupId>
           <artifactId>testng</artifactId>
           <version>7.5</version>
           <scope>test</scope>
      </dependency>

  </dependencies>
IRetryAnalyzer – It is an interface to implement to be able to have a chance to retry a failed test. The definition of this interface is
public interface IRetryAnalyzer {

  /**
   * Returns true if the test method has to be retried, false otherwise.
   *
   * @param result The result of the test method that just ran.
   * @return true if the test method has to be retried, false otherwise.
   */
  boolean retry(ITestResult result);
}
This method implementation returns true if you want to re-execute your failed test and false if you don’t want to re-execute your test.
When you bind a retry analyzer to a test, TestNG automatically invokes the retry analyzer to determine if TestNG can retry a test case again in an attempt to see if the test that just fails now passes. Here is how you use a retry analyzer:
- Bind this implementation to the @Test annotation for e.g., @Test(retryAnalyzer = Retry.class)
- Build an implementation of the interface org.testng.IRetryAnalyzer
1. Add IRetryAnalyzer to the @Test Annotation
First of all, you need to create a class that implements the IRetryAnalyzer like the below example:
import org.testng.IRetryAnalyzer;
import org.testng.ITestResult;

public class Retry implements IRetryAnalyzer {

	int retryCount = 0;
	int maxRetryCount = 2;

	public boolean retry(ITestResult result) {

	if(!result.isSuccess()) {                         //Check if test is failed

		if(retryCount<maxRetryCount) {                //Check if the maximum number of test execution is reached
			System.out.println("Retrying Test : Re-running " + result.getName() +
 " for " + (retryCount+1) + " time(s)."); //Print the number of Retry attempts

			retryCount++;                             //Increase the maxRetryCount by 1

			result.setStatus(ITestResult.FAILURE);    //Mark test as failed
         return true;                                 //Rerun the failed test
		} else {
			result.setStatus(ITestResult.FAILURE);    //TestNG marks last run as failed, if last run is max retry
		}
	  }else {
			result.setStatus(ITestResult.SUCCESS);    //TestNG parks test as passed when the test test passes

	  }

return false;
	}
}
This example shows that failed test case will run 3 times till it passes. In case it fails the third time, test execution will stop and TestNG will mark this case as failed. We can change the number of tries by changing the value of maxRetryCount.
Using retryAnalyzer attribute in the @Test annotation
The next step is to associate your test cases with IRetryAnalyzer. In order to do this, you need to use the method below.
@Test(retryAnalyzer = Retry.class)
public void verifyLoginPage() {
}
Let us see the complete implementation with the help of the below example.
import java.util.concurrent.TimeUnit;
import org.openqa.selenium.By;
import org.openqa.selenium.WebDriver;
import org.openqa.selenium.chrome.ChromeDriver;
import org.openqa.selenium.chrome.ChromeOptions;
import org.testng.Assert;
import org.testng.annotations.AfterTest;
import org.testng.annotations.BeforeTest;
import org.testng.annotations.Test;
import io.github.bonigarcia.wdm.WebDriverManager;

public class RetryFailedTests {

	WebDriver driver;

    @BeforeTest
    public void setUp() {

    	WebDriverManager.chromedriver().setup();

        ChromeOptions chromeOptions = new ChromeOptions();

        driver = new ChromeDriver(chromeOptions);
        driver.get("https://opensource-demo.orangehrmlive.com/");

        driver.manage().window().maximize();
        driver.manage().timeouts().implicitlyWait(30, TimeUnit.SECONDS);
    }

    @Test(retryAnalyzer = Retry.class)
    public void verifyLoginPage() {

        String expectedTitle = driver.findElement(By.xpath("//*[@id='logInPanelHeading']")).getText();

        System.out.println("Title :" + expectedTitle);
        Assert.assertTrue(expectedTitle.equalsIgnoreCase("LOGIN Panel !!"));
    }

    @Test(retryAnalyzer = Retry.class)
    public void verifyHomePage() {

        System.out.println("Username Entered");
        driver.findElement(By.name("txtUsername")).sendKeys("Admin");

        System.out.println("Password Entered");
        driver.findElement(By.name("txtPassword")).sendKeys("admin123");

        driver.findElement(By.id("btnLogin")).submit();

        String newPageText = driver.findElement(By.id("welcome")).getText();
        System.out.println("newPageText :" + newPageText);
        Assert.assertTrue(newPageText.contains("Welcome"));
    }

    @AfterTest
    public void teardown() {

        driver.quit();
    }

}
In the above example, test – verifyLoginPage() will be retried a maximum of 3 times, if the test fails. To run the tests, Right-click on the class and select Run As ->TestNG Suite.
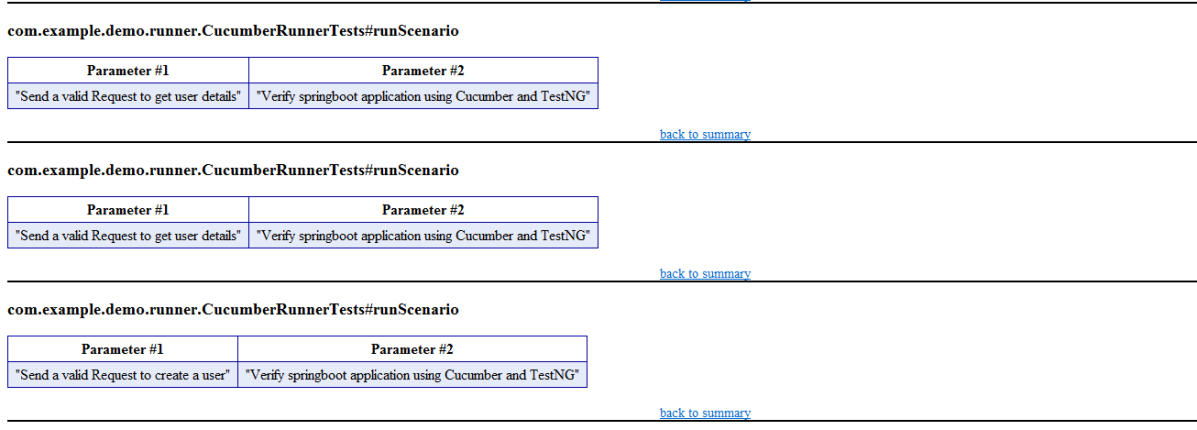
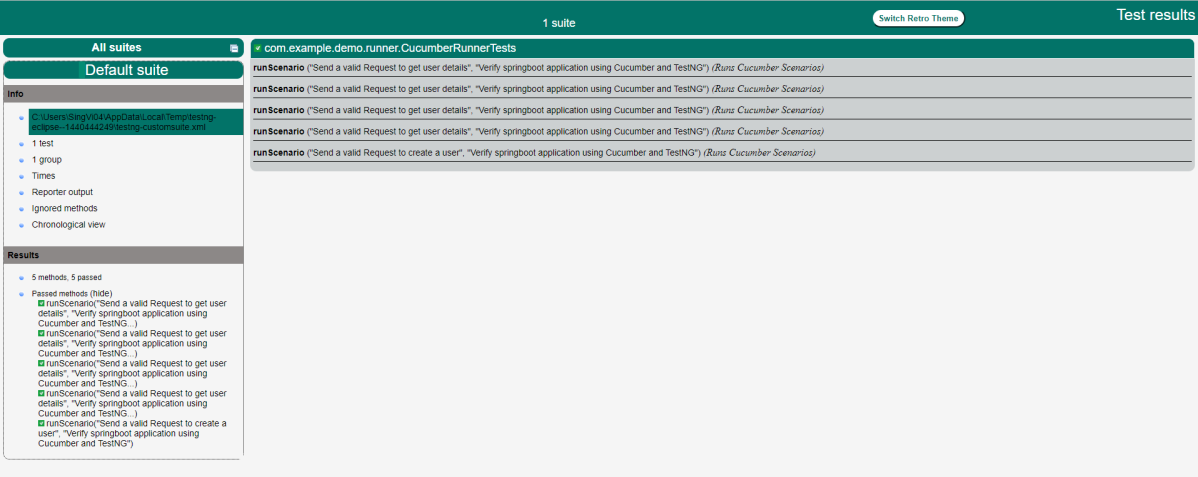
The output of the above program is


2. Implement Interface ITestAnnotationTransformer to retry failed tests
In this case, you would need to implement ITestAnnotationTransformer interface. The implementation of this interface is
public interface IAnnotationTransformer extends ITestNGListener {

  /**
   * This method will be invoked by TestNG to give you a chance to modify a TestNG annotation read
   * from your test classes. You can change the values you need by calling any of the setters on the
   * ITest interface.
   *
   * <p>Note that only one of the three parameters testClass, testConstructor and testMethod will be
   * non-null.
   *
   * @param annotation The annotation that was read from your test class.
   * @param testClass If the annotation was found on a class, this parameter represents this class
   *     (null otherwise).
   * @param testConstructor If the annotation was found on a constructor, this parameter represents
   *     this constructor (null otherwise).
   * @param testMethod If the annotation was found on a method, this parameter represents this
   *     method (null otherwise).
   */
  default void transform(
      ITestAnnotation annotation, Class testClass, Constructor testConstructor, Method testMethod) {
    // not implemented
  }
The transform method is called for every test during the test run. We can use this listener for our retry analyzer as shown below:
import java.lang.reflect.Constructor;
import java.lang.reflect.Method;
import org.testng.IAnnotationTransformer;
import org.testng.annotations.ITestAnnotation;

public class RetryListener implements IAnnotationTransformer{

	public void transform(ITestAnnotation arg0, Class arg1, Constructor arg2,Method arg3) {

			arg0.setRetryAnalyzer(Retry.class);
		}

	}
Now let us create a class that contains all the tests.
import java.util.concurrent.TimeUnit;
import org.openqa.selenium.By;
import org.openqa.selenium.WebDriver;
import org.openqa.selenium.chrome.ChromeDriver;
import org.openqa.selenium.chrome.ChromeOptions;
import org.testng.Assert;
import org.testng.annotations.AfterTest;
import org.testng.annotations.BeforeTest;
import org.testng.annotations.Test;
import io.github.bonigarcia.wdm.WebDriverManager;

public class RetryTests {

	WebDriver driver;

    @BeforeTest
    public void setUp() {

    	 WebDriverManager.chromedriver().setup();

         ChromeOptions chromeOptions = new ChromeOptions();

         driver = new ChromeDriver(chromeOptions);
         driver.get("https://opensource-demo.orangehrmlive.com/");

         driver.manage().window().maximize();
         driver.manage().timeouts().implicitlyWait(30, TimeUnit.SECONDS);
    }

    @Test(description = "This test validates title of login functionality")
    public void verifyLoginPage() {

        String expectedTitle = driver.findElement(By.xpath("//*[@id='logInPanelHeading']")).getText();

        System.out.println("Title :" + expectedTitle);
        Assert.assertTrue(expectedTitle.equalsIgnoreCase("LOGIN Panel !!"));
    }

    @Test(description = "This test validates  successful login to Home page")
    public void verifyHomePage() {

        System.out.println("Username Entered");
        driver.findElement(By.name("txtUsername")).sendKeys("Admin");

        System.out.println("Password Entered");
        driver.findElement(By.name("txtPassword")).sendKeys("admin123");

        driver.findElement(By.id("btnLogin")).submit();

        String newPageText = driver.findElement(By.id("welcome")).getText();
        System.out.println("newPageText :" + newPageText);
        Assert.assertTrue(newPageText.contains("Welcome"));
    }

    @AfterTest
    public void teardown() {

        driver.quit();
    }

}
Once we have the implementation of IAnnotationTransformer, we just need to add it as a listener in the testng.xml. Like this:
<?xml version="1.0" encoding="UTF-8"?>
<!DOCTYPE suite SYSTEM "https://testng.org/testng-1.0.dtd">
<suite name="Suite">

<listeners>
<listener class-name="com.example.retrydemo.RetryListener"></listener>

</listeners>

  <test name="Test">
    <classes>
      <class name="com.example.retrydemo.RetryTests"/>
    </classes>
  </test> <!-- Test -->
</suite> <!-- Suite -->
Now let us run the tests. Right-click on testng.xml and select Run As -> TestNG Suite.
The output of the above program is


This is pretty much it on this topic. Congratulations on making it through this tutorial and hope you found it useful! Happy Learning!! Cheers!!