The throws keyword in Java is used in the signature of method to indicate that this method might throw one of the listed type of exceptions. The caller to these methods has to handle the exception using a try-catch block.
As you can see from the above syntax, we can use throws to declare multiple exceptions.
Below is an example of throws exception. Here, as you can see IOException is listed as an exception. This exception is handled by a try catch block when findFile() method is called.
public class ThrowsExample {

	public static void findFile() throws IOException {

		File file= new File("C:\\test.txt");
		FileInputStream stream = new FileInputStream(file);

	}

	public static void main(String[] args) {
		try {
			findFile();
		} catch (IOException e) {
			System.out.println(e);
		}
	}
}

Output
java.io.FileNotFoundException: C:\test.txt (The system cannot find the file specified)
When we run this program, if the file test.txt does not exist, FileInputStream throws a FileNotFoundException which extends the IOException class.
If a method does not handle exceptions, the type of exceptions that may occur within it must be specified in the throws clause so that methods further up in the call stack can handle them or specify them using throws keyword themselves.
The findFile() method specifies that an IOException can be thrown. The main() method calls this method and handles the exception if it is thrown.
In a program, if there is a chance of raising an exception then compiler always warn us about it and compulsorily we should handle that checked exception, Otherwise we will get compile time error saying unreported exception XXX must be caught or declared to be thrown. To prevent this compile time error we can handle the exception in two ways:
We have caught the exception i.e. we have handled the exception using try/catch block.
We have declared the exception i.e. specified throws keyword with the method.
Case 1 : Handle Exception Using try-catch block
In case we handle the exception, the code will be executed fine whether exception occurs during the program or not.
class Demo {
	void method() throws IOException {
		throw new IOException("IOException Occurred");
	}
}

public class TestThrowsExample2 {

	public static void main(String[] args) {
		try {
			Demo demo = new Demo();
			demo.method();
		} catch (Exception e) {
			System.out.println("Exception handled");
		}

		System.out.println("Continue the program...");
	}
}

Output
Exception handled
Continue the program...
Case 2: We declare the exception, if exception does not occur, the code will be executed fine.
class Test {
	void method() throws IOException {
		System.out.println("No Exception");
	}
}

public class TestThrowsExample3 {

	public static void main(String[] args) {
		try {
			Test test = new Test();
			test.method();
		} catch (Exception e) {
			System.out.println("Exception handled");
		}

		System.out.println("Continue the program...");
	}
}

Output
No Exception
Continue the program...
Case 3 : We declare the exception and the exception occurs, it will be thrown at runtime because throws does not handle the exception.
class TestDemo {
	void method() throws IOException {
		throw new IOException("IOException Occurred");
	}
}

public class TestThrowsExample4 {

	public static void main(String[] args) throws IOException {
		TestDemo test = new TestDemo();
		test.method();
		System.out.println("Continue the program...");

	}

}

Output
Exception in thread "main" java.io.IOException: IOException Occurred
I have created an Excel – SearchInBing.xlsx and placed it on the Desktop. You can create a Test Data folder in your project and place the Excel file within it. So, my datasheet looks like the below:
Next, we will create a DataProvider method that will use another method to read the Excel file & create a 2D object from the row & column values of the Excel and return the same value, so that our test script can use it. The code for it would look like the below:
import org.apache.poi.ss.usermodel.Cell;
import org.testng.annotations.DataProvider;

import java.io.FileInputStream;
import java.io.IOException;

import org.apache.poi.xssf.usermodel.XSSFRow;
import org.apache.poi.xssf.usermodel.XSSFSheet;
import org.apache.poi.xssf.usermodel.XSSFWorkbook;

public class ExcelDataProvider {

    @DataProvider(name = "excelData")
    public Object[][] excelDataProvider() throws IOException {

        // We are creating an object from the excel sheet data by calling a method that
        // reads data from the excel stored locally in our system
        Object[][] arrObj = getExcelData(
                C:\\Users\\Vibha\\Desktop\\SearchInBing.xlsx","Details");
        return arrObj;
}

    // This method handles the excel - opens it and reads the data from the
    // respective cells using a for-loop & returns it in the form of a string array
    public String[][] getExcelData(String fileName, String sheetName) throws IOException {
        String[][] data = null;
        try {

            FileInputStream fis = new FileInputStream(fileName);
            XSSFWorkbook workbook = new XSSFWorkbook(fis);
            XSSFSheet sheet = workbook.getSheet(sheetName);
            XSSFRow row = sheet.getRow(0);
            int noOfRows = sheet.getPhysicalNumberOfRows();
            int noOfCols = row.getLastCellNum();
            Cell cell;
            data = new String[noOfRows - 1][noOfCols];

            for (int i = 1; i < noOfRows; i++) {
                for (int j = 0; j < noOfCols; j++) {
                    row = sheet.getRow(i);
                    cell = row.getCell(j);
                    data[i - 1][j] = cell.getStringCellValue();
                }
            }
        } catch (Exception e) {
            System.out.println("The exception is: " + e.getMessage());
        }
        return data;
    }
}
Now, create a class that contains the test code. By default, the data provider will be looked for in the current test class or one of its base classes. If you want to put your data provider in a different class, it needs to be a static method or a class with a no-arg constructor, and you specify the class where it can be found in the data provider class attribute.
In this tutorial, I will explain creating a framework for the testing of Web Applications in Cucumber BDD.
Pre-Requisite
Java 11 installed
Gradle installed
Eclipse or IntelliJ installed
This framework consists of:
Serenity – 2.6.0
Serenity Cucumber – 2.6.0
Java 11
JUnit – 4.13.2
Gradle – 7.2
Steps to setup Gradle Java Project for Web Application using Serenity, Cucumber6 and JUnit4
Download and Install Java on the system
Download and setup Eclipse IDE on the system
Setup Gradle on System and create a new Gradle Project
Update repositories, plugins, and dependencies to the Gradle project
Create a feature file under src/test/resources
Create the Step Definition class or Glue Code for the Test Scenario
Create a Serenity Cucumber Runnerclass
Create serenity.conffile under src/test/resources
Create serenity.properties file at the root of the project
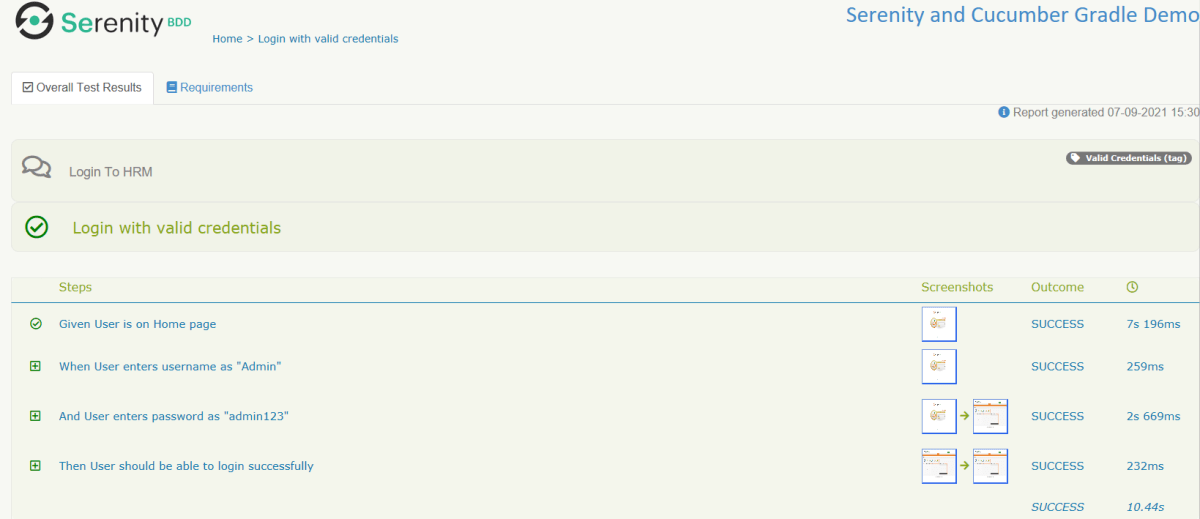
Run the tests through commandline which generates Serenity Report
Step 1- Download and Install Java
Cucumber and Rest-Assured need Java to be installed on the system to run the tests. Click here to know How to install Java.
Step 2 – Download and setup Eclipse IDE on system
The Eclipse IDE (integrated development environment) provides strong support for Java developers. Click here to know How to install Eclipse.
Step 3 – Setup Gradle
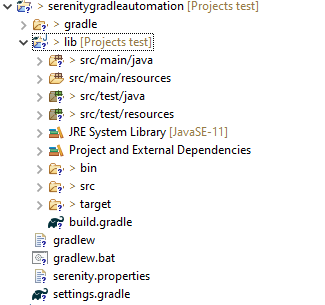
To build a test framework, we need to add several dependencies to the project. This can be achieved by any build Tool. I have used Gradle Build Tool. Click here to know How to install Gradle. Click here to know How to create a Gradle Java project. Below is the structure of the Gradle project.
Step 4 – Update repositories, plugin, and dependencies to the Gradle project
Step 5 – Create a feature file under src/test/resources
AFeature Fileis an entry point to the Cucumber tests. This is a file where you will describe your tests in Descriptive language (Like English). A feature file can contain a scenario or can contain many scenarios in a single feature file. Below is an example of Feature file.
Feature: Login to HRM

   @ValidCredentials
   Scenario: Login with valid credentials

    Given User is on Home page
    When User enters username as "Admin"
    And User enters password as "admin123"
    Then User should be able to login successfully
Step 6 – Create the Step Definition class or Glue Code for the Test Scenario
The steps definition file stores the mapping between each step of the test scenario defined in the feature file with a code of the function to be executed. So, now when Cucumber executes a step of the scenario mentioned in the feature file, it scans the step definition file and figures out which function is to be called.
Create a StepDefinition class for LoginPage.feature
public class LoginPageDefinitions {

    @Steps
    StepLoginPage loginPage;

    @Steps
    StepDashboardPage dashPage;

    @Steps
    StepForgetPasswordPage forgetpasswordPage;

    @Given("User is on Home page")
    public void openApplication() {
        loginPage.open();
        System.out.println("Page is opened");
    }

    @When("User enters username as {string}")
    public void enterUsername(String userName) {
        System.out.println("Enter Username");
        loginPage.inputUserName(userName);
    }

    @When("User enters password as {string}")
    public void enterPassword(String passWord) {
        loginPage.inputPassword(passWord);

        loginPage.clickLogin();
    }

    @Then("User should be able to login successfully")
    public void clickOnLoginButton() {
        dashPage.loginVerify();
    }

}
Serenity Step Libraries integrate smoothly into Cucumber Step Definition files; all you need to do is to annotate a step library variable with the @Steps annotation. Methods that represent a business task or action (inputUserName()), and that will appear in the reports as a separate step, are annotated with the @Step annotation. Here, I have created two StepClasses – StepLoginPage and StepDashboardPage
public class StepLoginPage extends PageObject {

    @Step("Enter Username")
    public void inputUserName(String userName) {
        $(By.name("txtUsername")).sendKeys((userName));
    }

    @Step("Enter Password")
    public void inputPassword(String passWord) {
        $(By.name("txtPassword")).sendKeys((passWord));
    }

    @Step("Click Submit Button")
    public void clickLogin() {
        $(By.name("Submit")).click();
    }

}
StepDashboardPage
public class StepDashboardPage extends PageObject {

    @Step("Successful login")
    public void loginVerify() {
        String dashboardTitle = $(By.id("welcome")).getText();
        assertThat(dashboardTitle, containsString("Welcome"));
    }
}
Step 7 – Create a Serenity Cucumber Runner class
import org.junit.runner.RunWith;

import io.cucumber.junit.CucumberOptions;
import net.serenitybdd.cucumber.CucumberWithSerenity;

@RunWith(CucumberWithSerenity.class)
@CucumberOptions(plugin = {}, features = "lib/src/test/resources/features", glue = "serenitygradleautomation.definitions")

public class CucumberTestSuite {

}
Step 8 – Create serenity.conf file under src/test/resources
Serenity.conf file is used to specify various features like the type of webdriver used, various test environments, run tests in headless mode, and many more options.
Below is the sample project which uses Selenium and TestNG which is used to generate an Allure Report.
We have 2 pages. Below is the code for Login Page which contains all the web elements and methods related to that web elements.
LoginPage.java
public class LoginPage {

	WebDriver driver;

	By userName = By.name("txtUsername");

	By password = By.name("txtPassword");

	By titleText = By.id("logInPanelHeading");

	By login = By.id("btnLogin");

	By errorMessage = By.id("spanMessage");

	public LoginPage(WebDriver driver) {
		this.driver = driver;
	}

	// Set user name in textbox
	public void setUserName(String strUserName) {
		driver.findElement(userName).sendKeys(strUserName);
	}

	// Set password in password textbox
	public void setPassword(String strPassword) {
		driver.findElement(password).sendKeys(strPassword);
	}

	// Click on login button
	public void clickLogin() {
		driver.findElement(login).click();
	}

	@Step("Verify title of Login Page")
	public void verifyPageTitle() {
		String loginPageTitle = driver.findElement(titleText).getText();
		Assert.assertTrue(loginPageTitle.contains("LOGIN Panel"));
	}

    /* Failed Test */
	@Step("Verify error message when invalid credentail is provided")
	public void verifyErrorMessage() {
		String invalidCredentialErrorMessage = driver.findElement(errorMessage).getText();
		Assert.assertTrue(invalidCredentialErrorMessage.contains("Incorrect Credentials"));
	}

	@Step("Enter username and password")
	public void login(String strUserName, String strPasword) {

		// Fill user name
		this.setUserName(strUserName);

		// Fill password
		this.setPassword(strPasword);

		// Click Login button
		this.clickLogin();

	}
}
Dashboard.java
public class DashboardPage {

	WebDriver driver;

	By dashboardPageTitle = By.id("welcome");

	By options = By.cssSelector(
			"#dashboard-quick-launch-panel-menu_holder > table > tbody > tr > td:nth-child(1) > div > a > span");

	public DashboardPage(WebDriver driver) {
		this.driver = driver;

	}

	@Step("Verify title of Dashboard page")
	public void verifyDashboardPageTitle() {
		String DashboardPageTitle = driver.findElement(dashboardPageTitle).getText();
		Assert.assertTrue(DashboardPageTitle.contains("Welcome"));
	}

	@Step("Verify Quick Launch Options on Dashboard page")
	public void verifyQuickLaunchOptions() {
		String QuickLaunchOptions = driver.findElement(options).getText();
		Assert.assertTrue(QuickLaunchOptions.contains("Assign Leave"));
	}

}
Below are the Test classes for Login Page and Dashboard Page. Here, we have BaseTest Class also which contains the common methods needed by other test pages.
BaseTest.java
public class BaseTest {

	public static WebDriver driver;
	LoginPage objLogin;
	DashboardPage objDashboardPage;

	@Step("Start the application")
	@BeforeMethod
	public void setup() {
		System.setProperty("webdriver.gecko.driver",
				"C:\\Users\\Vibha\\Software\\geckodriver-v0.26.0-win64\\geckodriver.exe");
		driver = new FirefoxDriver();
		driver.manage().window().maximize();
		driver.manage().timeouts().implicitlyWait(10, TimeUnit.SECONDS);
		driver.get("https://opensource-demo.orangehrmlive.com/");
	}

	@Step("Stop the application")
	@AfterMethod
	public void close() {
		driver.close();
	}
}
LoginTests.java
@Epic("Web Application Regression Testing")
@Feature("Login Page Tests")
@Listeners(TestExecutionListener.class)
public class LoginTests extends BaseTest {
LoginPage objLogin;
DashboardPage objDashboardPage;
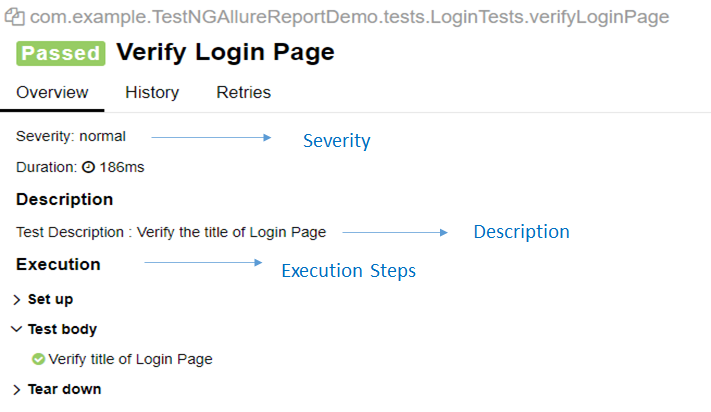
@Severity(SeverityLevel.NORMAL)
@Test(priority = 0, description = "Verify Login Page")
@Description("Test Description : Verify the title of Login Page")
@Story("Title of Login Page")
public void verifyLoginPage() {
// Create Login Page object
objLogin = new LoginPage(driver);
// Verify login page text
objLogin.verifyPageTitle();
}
/* Failed Test */
@Severity(SeverityLevel.BLOCKER)
@Test(priority = 1, description = "Login with invalid username and password")
@Description("Test Description : Login Test with invalid credentials")
@Story("Unsuccessful Login to Application")
public void invalidCredentialTest() {
// Create Login Page object
objLogin = new LoginPage(driver);
objLogin.login("test", "test123");
// Verify login page text
objLogin.verifyErrorMessage();
}
}
We can order tests by severity by using @Severityannotation. Click here to know more about other Allure annotations.
DashboardTests.java
@Epic("Web Application Regression Testing")
@Feature("Dashboard Page Tests")
@Listeners(TestExecutionListener.class)
public class DashboardTests extends BaseTest {

	LoginPage objLogin;
	DashboardPage objDashboardPage;

	@Severity(SeverityLevel.BLOCKER)
	@Test(priority = 0, description = "Verify Dashboard Page")
	@Description("Test Description : After successful login to application opens Dashboard page")
	@Story("Successful login of application opens Dashboard Page")

	public void DasboardTest() {

		objLogin = new LoginPage(driver);

		// login to application
		objLogin.login("Admin", "admin123");

		// go the dashboard page
		objDashboardPage = new DashboardPage(driver);

		// Verify dashboard page
		objDashboardPage.verifyQuickLaunchOptions();

	}

}
We can group tests with @Epic, @Feature, and @Stories annotations. Click here to know more about other Allure annotations.
TestExecutionListener.class
We can add attachments to our reports by using @Attachmentannotation. It can return String, byte [], etc. I need to add @Listeners({ TestExecutionListener.class }) declaration at the top of the test classes. Click here to know more about other Allure annotations.
public class TestExecutionListener implements ITestListener {

	@Attachment(value = "Screenshot of {0}", type = "image/png")
	public byte[] saveScreenshot(String name, WebDriver driver) {
		return (byte[]) ((TakesScreenshot) driver).getScreenshotAs(OutputType.BYTES);
	}

	@Override
	public void onTestFailure(ITestResult result) {
		saveScreenshot(result.getName(), BaseTest.driver);
	}

}
Step 5 – Create testng.xml for the project
TestNG.xml
<?xml version="1.0" encoding="UTF-8"?>
<!DOCTYPE suite SYSTEM "https://testng.org/testng-1.0.dtd">
<suite name = "Allure Reports">
  <test name = "Login Page Tests">
    <classes>
          <class name = "com.example.TestNGAllureReportDemo.tests.LoginTests"/>

          </classes>
          </test>
    <test name =" Dashboard Tests">
    <classes>
          <class name = "com.example.TestNGAllureReportDemo.tests.DashboardTests"/>
          </classes>
    </test>

</suite>
Step 6 – Run the Test and Generate Allure Report
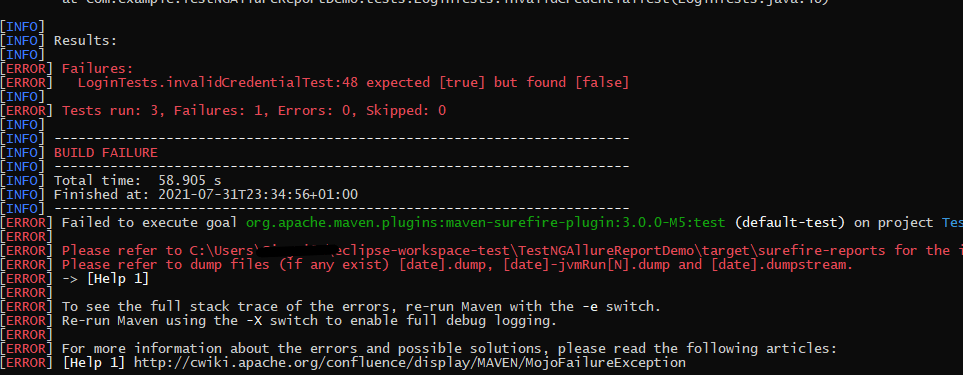
To run the tests, use the below command
mvn clean test
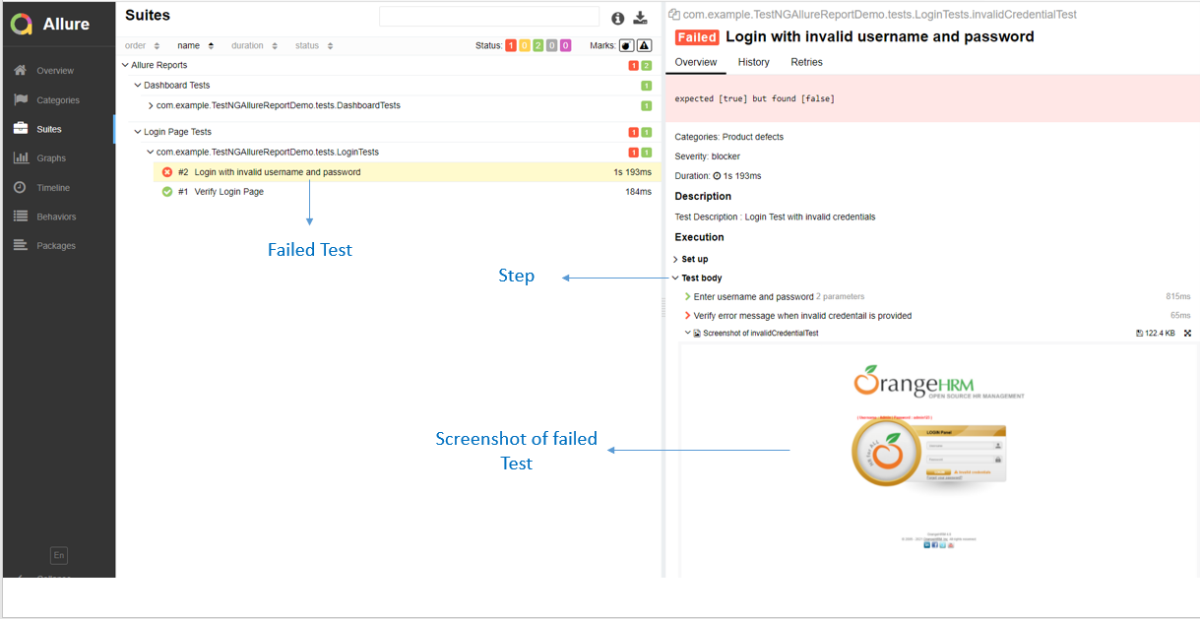
In the below image, we can see that one test failed and two passed out of three tests.
To create an Allure Report, use the below command
allure serve
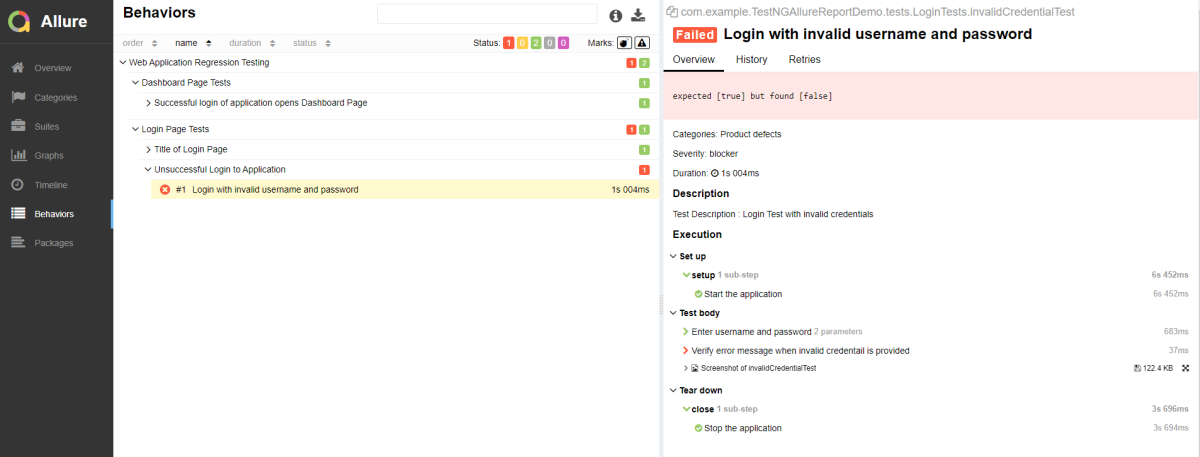
This will generate the beautiful Allure Test Report as shown below.
Allure Report Dashboard
The overview page hosts several default widgets representing the basic characteristics of your project and test environment.
Statistics – overall report statistics.
Launches – if this report represents several test launches, statistics per launch will be shown here.
Behaviors – information on results aggregated according to stories and features.
Executors – information on test executors that were used to run the tests.
History Trend – if tests accumulated some historical data, it’s a trend that will be calculated and shown on the graph.
Environment – information on the test environment.
Categories in Allure Report
The categories tab gives you a way to create custom defects classifications to apply for test results. There are two categories of defects – Product Defects (failed tests) and Test Defects (broken tests).
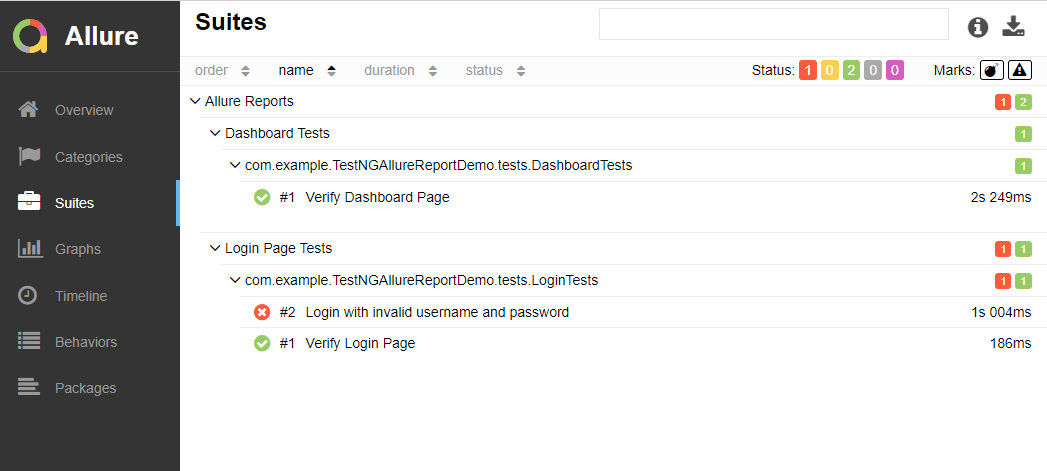
Suites in Allure Report
On the Suites tab a standard structural representation of executed tests, grouped by suites and classes can be found.
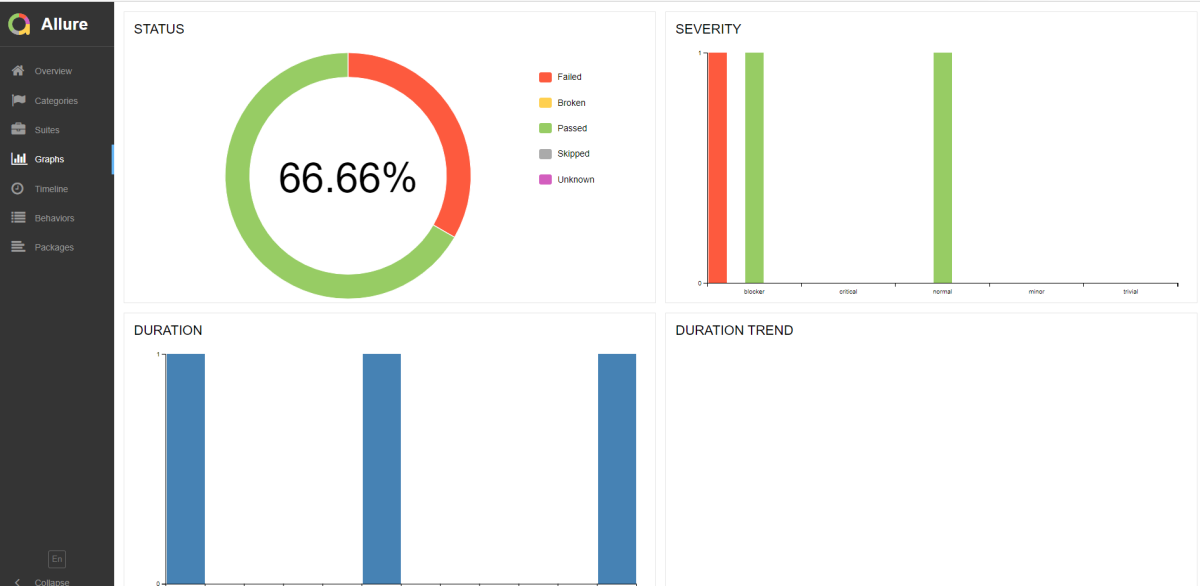
Graphs in Allure Report
Graphs allow you to see different statistics collected from the test data: status breakdown or severity and duration diagrams.
Timeline in Allure Report
The timeline tab visualizes retrospective of tests execution, allure adaptors collect precise timings of tests, and here on this tab, they are arranged accordingly to their sequential or parallel timing structure.
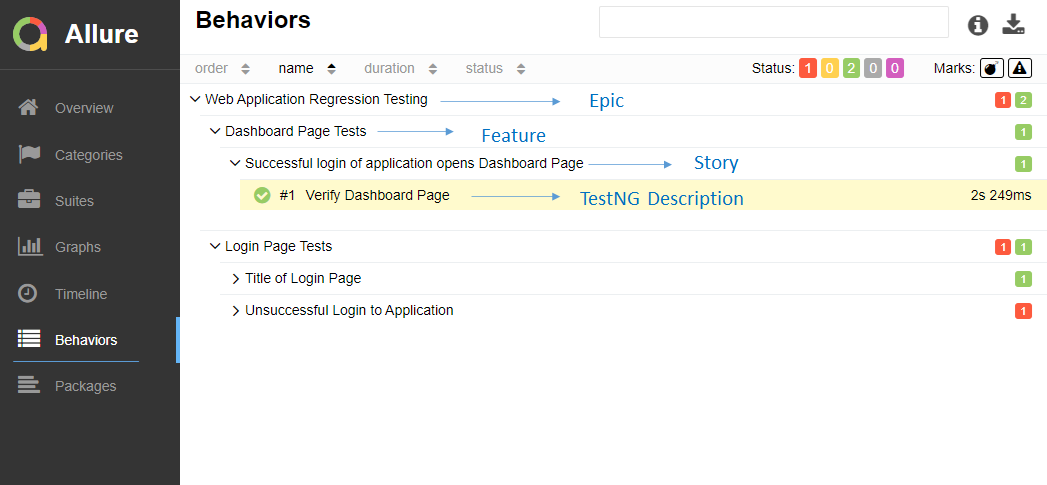
Behaviors of Allure Report
This tab groups test results according to Epic, Feature, and Story tags.
Packages in Allure Report
The packages tab represents a tree-like layout of test results, grouped by different packages.
If you click on the (highlighted tab), it will show the test execution report in the below format.
Congratulations on making it through this tutorial and hope you found it useful! Happy Learning!! Cheers!!
REST Assured is a Java DSL for simplifying the testing of REST-based services built on top of HTTP Builder. It supports POST, GET, PUT, DELETE, OPTIONS, PATCH, and HEAD requests and can be used to validate and verify the response to these requests.
The rest-Assured library also provides the ability to validate the HTTP Responses received from the server. For e.g. we can verify the Status code, Status message, Headers, and even the Body of the response. This makes Rest-Assured a very flexible library that can be used for testing.
Dependency List:
Springboot – 3.2.3
Java 17
JUnit – 4.13.2
Maven – 3.9.6
RestAssured – 5.3.2
Junit Vintage
Sample SpringBoot Application
Below is the sample SpringBoot application used for the testing.
The Spring Boot Application class is generated with Spring Initializer. This class acts as the launching point for the application.
import org.springframework.boot.SpringApplication;
import org.springframework.boot.autoconfigure.SpringBootApplication;

@SpringBootApplication
public class SpringBootDemoApplication {

	public static void main(String[] args) {
		SpringApplication.run(SpringBootDemoApplication.class, args);
	}

}
The JPA Entity is any Java POJO, which can represent the underlying table structure. As our service is based on the Student table, we will create a Student Entity object.
import jakarta.persistence.Entity;
import jakarta.persistence.GeneratedValue;
import jakarta.persistence.Id;
import jakarta.validation.constraints.NotBlank;
import jakarta.validation.constraints.NotNull;
import jakarta.validation.constraints.Size;


@Entity
public class Student {

    @Id
    @GeneratedValue
    private Long id;

    @NotNull
    @Size(min = 4, message = "Name should have atleast 4 characters")
    private String name;

    @NotBlank(message = "passportNumber is mandatory")
    private String passportNumber;

    public Student() {
        super();
    }

    public Student(Long id, String name, String passportNumber) {
        super();
        this.id = id;
        this.name = name;
        this.passportNumber = passportNumber;
    }

    public Long getId() {
        return id;
    }

    public void setId(Long id) {
        this.id = id;
    }

    public String getName() {
        return name;
    }

    public void setName(String name) {
        this.name = name;
    }

    public String getPassportNumber() {
        return passportNumber;
    }

    public void setPassportNumber(String passportNumber) {
        this.passportNumber = passportNumber;
    }
}
The Repository represents the DAO layer, which typically does all the database operations. Thanks to Spring Data, who provides the implementations for these methods. Let’s have a look at our StudentRepository, which extends the JpaRepository. There are no method declarations here in the StudentRepository. That is because Spring Data’s JpaRepository has already declared basic CRUD methods.
Spring Rest Controller exposes all services on the student resource. RestController used for the below example is shown below.
import jakarta.validation.Valid;
import org.springframework.beans.factory.annotation.Autowired;
import org.springframework.hateoas.EntityModel;
import org.springframework.hateoas.server.mvc.WebMvcLinkBuilder;
import org.springframework.http.ResponseEntity;
import org.springframework.web.bind.annotation.*;
import org.springframework.web.servlet.support.ServletUriComponentsBuilder;
import java.net.URI;
import java.util.List;
import java.util.Optional;

import static org.springframework.hateoas.server.mvc.WebMvcLinkBuilder.linkTo;
import static org.springframework.hateoas.server.mvc.WebMvcLinkBuilder.methodOn;

@RestController
public class StudentController {

    @Autowired
    private StudentRepository studentRepository;

    @GetMapping("/students")
    public List<Student> retrieveAllStudents() {
        return studentRepository.findAll();
    }

    @GetMapping("/students/{id}")
    public EntityModel<Student> retrieveStudent(@PathVariable long id) {
        Optional<Student> student = studentRepository.findById(id);

        if (!student.isPresent())
            throw new StudentNotFoundException("id-" + id);

        EntityModel<Student> resource = EntityModel.of(student.get());

        WebMvcLinkBuilder linkTo = linkTo(methodOn(this.getClass()).retrieveAllStudents());

        resource.add(linkTo.withRel("all-students"));

        return resource;
    }

    @PostMapping("/students")
    public ResponseEntity<Object> createStudent(@Valid @RequestBody Student student) {
        Student savedStudent = studentRepository.save(student);

        URI location = ServletUriComponentsBuilder.fromCurrentRequest().path("/{id}")
                .buildAndExpand(savedStudent.getId()).toUri();

        return ResponseEntity.created(location).build();

    }

    @DeleteMapping("/students/{id}")
    public void deleteStudent(@PathVariable long id) {
        studentRepository.deleteById(id);
    }

    @PutMapping("/students/{id}")
    public ResponseEntity<Object> updateStudent(@Valid @RequestBody Student student, @PathVariable long id) {

        Optional<Student> studentOptional = studentRepository.findById(id);

        if (!studentOptional.isPresent())
            return ResponseEntity.notFound().build();

        student.setId(id);

        studentRepository.save(student);

        return ResponseEntity.noContent().build();
    }
}
StudentNotFoundException
import org.springframework.http.HttpStatus;
import org.springframework.web.bind.annotation.ResponseStatus;

@ResponseStatus(HttpStatus.NOT_FOUND)
public class StudentNotFoundException extends RuntimeException {

    public StudentNotFoundException(String exception) {
        super(exception);
    }

}
application.properties
spring.jpa.defer-datasource-initialization=true
data.sql
insert into student values(10001,'Annie', 'E1234567');
insert into student values(20001,'John', 'A1234568');
insert into student values(30001,'David','C1232268');
insert into student values(40001,'Amy','D213458');
Implementation Steps
Step 1 – Add SpringbootTest and Rest-Assured dependencies to the project
Step 2 – Create a test file under src/test/java and write the test code
package org.example;

import io.restassured.RestAssured;
import io.restassured.http.ContentType;
import io.restassured.response.ValidatableResponse;
import org.json.JSONException;
import org.json.JSONObject;
import org.junit.Before;
import org.junit.Test;
import org.junit.runner.RunWith;
import org.springframework.boot.test.context.SpringBootTest;
import org.springframework.boot.test.web.server.LocalServerPort;
import org.springframework.test.context.junit4.SpringRunner;

import static io.restassured.RestAssured.given;
import static org.hamcrest.Matchers.equalTo;

@RunWith(SpringRunner.class)
@SpringBootTest(webEnvironment = SpringBootTest.WebEnvironment.RANDOM_PORT)
public class SpringbootDemoTests {

    private final static String BASE_URI = "http://localhost";

    @LocalServerPort
    private int port;

    private ValidatableResponse validatableResponse;

    private ValidatableResponse validatableResponse1;

    @Before
    public void configureRestAssured() {
        RestAssured.baseURI = BASE_URI;
        RestAssured.port = port;
    }

    /* Get operation - Get the details of a Student */
    @Test
    public void listUsers() {

        validatableResponse = given()
                .contentType(ContentType.JSON)
                .when()
                .get("/students")
                .then()
                .assertThat().statusCode(200);

    }

    /* Get operation - Get the details of a Student */
    @Test
    public void listAUser() {

        validatableResponse = given()
                .contentType(ContentType.JSON)
                .when()
                .get("/students/30001")
                .then()
                .assertThat().log().all().statusCode(200)
                .body("id",equalTo(30001))
                .body("name",equalTo("David"))
                .body("passportNumber",equalTo("C1232268"));;
    }

    /* Create operation - Create a new Student */
    @Test
    public void createAUser() throws JSONException {

        JSONObject newStudent = new JSONObject();

        newStudent.put("name", "Timmy");
        newStudent.put("passportNumber", "ZZZ12345");

        validatableResponse = given()
                .contentType(ContentType.JSON).body(newStudent.toString())
                .when()
                .post("/students")
                .then()
                .log().all().assertThat().statusCode(201);

        /* Verify that a new Student is created */
        validatableResponse1 = given()
                .contentType(ContentType.JSON)
                .when()
                .get("/students/1")
                .then()
                .log().all().assertThat().statusCode(200)
                .body("id",equalTo(1))
                .body("name",equalTo("Timmy"))
                .body("passportNumber",equalTo("ZZZ12345"));

    }

    /* Update operation - Update PassportNumber of a Student */
    @Test
    public void updateAUser() throws JSONException {

        JSONObject newStudent = new JSONObject();

        newStudent.put("name", "John");
        newStudent.put("passportNumber", "YYYY1234");

        validatableResponse = given()
                .contentType(ContentType.JSON).body(newStudent.toString())
                .when()
                .put("/students/20001")
                .then()
                .log().all().assertThat().statusCode(204);

        /* Verify that the updated Student has updated PassportNumber */
        validatableResponse1 = given()
                .contentType(ContentType.JSON)
                .when()
                .get("/students/20001")
                .then()
                .log().all().assertThat().statusCode(200)
                .body("id",equalTo(20001))
                .body("name",equalTo("John"))
                .body("passportNumber",equalTo("YYYY1234"));

    }

    /* Delete operation - Delete a Student */
    @Test
    public void deleteAUser() throws JSONException {

        validatableResponse = given()
                .contentType(ContentType.JSON)
                .when()
                .delete("/students/10003")
                .then()
                .log().all().assertThat().statusCode(200);


        /* Verify that the deleted Student Request returns STATUS 404 */
        validatableResponse1 = given()
                .contentType(ContentType.JSON)
                .when()
                .get("/students/10003")
                .then()
                .log().all().assertThat().statusCode(404);

    }
}
When a class is annotated with @RunWith or extends a class annotated with @RunWith, JUnit will invoke the class it references to run the tests in that class instead of the runner built into JUnit.
SpringRunner is an alias for the SpringJUnit4ClassRunner. Here, we have simply annotated a JUnit 4-based test class with @RunWith(SpringRunner.class). The Spring TestContext Framework provides generic, annotation-driven unit and integration testing support that is agnostic of the testing framework in use (JUnit, TestNG).
We build the test class with @SpringBootTestannotation which starts up an Application Contextused throughout our test. In the classes property of @SpringBootTest annotation, we can specify which configuration classes build our Application Context. By default, @SpringBootTest annotation does not provide any web environment. In order to set up a test web server we need to use @SpringBootTest’s webEnvironment annotation. There are a few modes in which the web server can be started.
RANDOM_PORT – this is a recommended option where a real, embedded web server starts on a random port
DEFINED_PORT – web server will start on an 8080 or a port defined in application.properties
MOCK – loads a mock web environment where embedded servers are not started up.
Step 3 – Run the tests from JUnit
Right-click Run as JUnit Tests (Eclipse)
Right Click and select Run SpringBootDemoTests (IntelliJ)
Step 4 – Run the tests from Command Line
Open a command prompt and use the below command to run the tests.
mvn clean test
To run the tests from the command line, we need to add junit-vintage-engine dependency. Starting with Spring Boot 2.4, JUnit 5’s vintage engine has been removed from the spring-boot-starter-test.
GitLab is the open DevOps platform, delivered as a single application that spans the entire software development lifecycle. If you’re not using GitLab, your DevOps lifecycle is likely spread across any number of applications. These silos take overhead to integrate, manage, configure, and maintain, slowing down your team and your deployments. Moving to a single application will speed up your workflow and help you deliver better software, faster. To know more about GitLab, click here.
In this article, we will see how to push an existing project to GitLab using Eclipse IDE.
Implementation Steps
Step 1 – Go to GitLab and select the project which you want to clone. Click on the blue color “Clone” button and then copy the hyperlink as shown in the image. You can either Clone with SSH or Clone with HTTPS.
Step 2 – Open Eclipse IDE and right-click on the project you want to push and go to the Team ->Share project.
Step 3 – It will add the project to the given repository as shown below image. Select the Finishbutton.
As you can see, the given project is Git Repository. If the project is not GIT Repository, refer to this tutorial – How to create a new Git Repository to convert the project in GIT Repository.
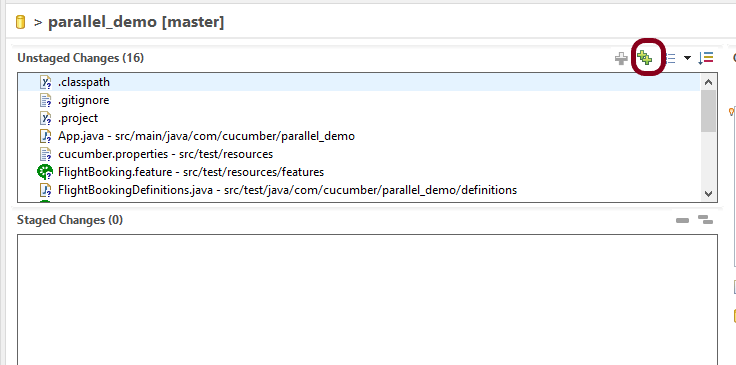
Step 4 – Again, Right-Click on the project and go to theTeam ->commit.
Step 5 – Select the files you want to commit and click green color + sign or Drag and Drop the files from “Unstaged Changes to Staged Changes“.
This is how the stage files looks like as shown below.
Step 6 – Write the commit message in “Commit Message” and click “Commit and Push“.
Step 7 – Fill in the below details in this window and click the “Preview” button.
URI – This is the URL that we have cloned from GitLab in Step 1. Host – gitlab.com Repository path – the path of the project in GitLab (This is auto-populated after entering URI)
Authentication User – Username of GitLab Password – password of GitLab
Step 8 – A new window will open which provides the detail of the Destination location of the project. Click the “Preview” button.
Step 9 – Push to the new branch of GitLab Repository and click the Push button.
Step 10 – As this is a new project with a master branch, you can see the whole project migrated in GitLab. If we are not using the master branch, but the local branch, then we need to create a merge request to merge the latest changes in the already existing project in GitLab.
Cheers!!Congratulations on making it through this tutorial and hope you found it useful! Happy Learning!!
Page Object Model(POM) is an object design pattern in Selenium webdriver which tells how to organize the object repository. In this case, we refer to web elements as Objects. Page Object Model(POM) is not a Test Framework.
In the Page Object Model (POM), each web page is represented as a separate class. For example, consider HRM website. It has many web pages like Login , Dashboard , Assign Leave, Leave List, Timesheets, etc. Under this model, for each web page in the application, there should be a corresponding Page Class. This Page class will identify the WebElements of that web page and also contains Page methods that perform operations on those WebElements.
If a new web element is added or an existing web element is updated, then you can add or update that web element in object repository by navigating to class which has same name as webpage.
The object repository is independent of test cases, so we can use the same object repository for a different purpose with different tools. For example, we can integrate Page Object Model in Selenium with TestNG/JUnit for functional Testing and at the same time with JBehave/Cucumber for acceptance testing.
POM enhances test maintenance, readability and reducing code duplication.
In this tutorial, I’m creating a project using Page Object Model as Design Pattern and TestNG as the Test Automation Framework.
Steps to create a Page Object Model Project
Download and Install Java on system
Download and setup Eclipse IDE on system
Setup Maven
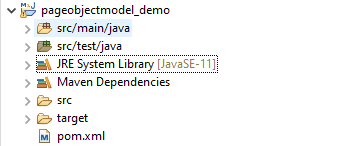
Create a new Maven Project
Add dependencies to pom.xml
Create Page Class for each page – LoginPage.Java and DashboardPage.java
Create tests for each Page – BaseTests, LoginTests and DashboardTests
Create a TestNG.XML
Run the tests from TestNG.xml
TestNG Report Generation
Step 1- Download and Install Java
Click here to know How to install Java. To check if Java is already installed on your machine, use the below command in the command line. This command will show the version of Java installed on your machine.
java -version
Step 2 – Download and setup Eclipse IDE on system
The Eclipse IDE (integrated development environment) provides strong support for Java developer. The Eclipse IDE for Java Developers distribution is designed to support standard Java development. It includes support for the Maven and Gradle build system and support for the Git version control system. Click here to know How to install Eclipse.
Step 3 – Setup Maven
To build a test framework, we need to add a number of dependencies to the project. It is very tedious and cumbersome process to add each dependency manually. So, to overcome this problem, we use a build management tool. Maven is a build management tool which is used to define project structure, dependencies, build, and test management. Click here to know How to install Maven.
To know if Maven is already installed or not on your machine, type this command in the command line. This command will show the version of Maven installed on your machine.
Step 6 – Create Page Class for each page – LoginPage.Java and DashboardPage.java
I want to test 2 pages – Login and Dashboard. So, I’m creating 2 seperate class. Each class will contain its web elements and methods of that page.
LoginPage.Java
import org.openqa.selenium.By;
import org.openqa.selenium.WebDriver;

public class LoginPage {

	WebDriver driver;

	By userName = By.name("txtUsername");

	By password = By.name("txtPassword");

	By titleText = By.id("logInPanelHeading");

	By login = By.id("btnLogin");

	public LoginPage(WebDriver driver) {
		this.driver = driver;
	}

	// Set user name in textbox
	public void setUserName(String strUserName) {
		driver.findElement(userName).sendKeys(strUserName);
	}

	// Set password in password textbox
	public void setPassword(String strPassword) {
		driver.findElement(password).sendKeys(strPassword);
	}

	// Click on login button
	public void clickLogin() {
		driver.findElement(login).click();
	}

	// Get the title of Login Page
	public String getLoginTitle() {
		return driver.findElement(titleText).getText();
	}

	public void login(String strUserName, String strPasword) {

		// Fill user name
		this.setUserName(strUserName);

		// Fill password
		this.setPassword(strPasword);

		// Click Login button
		this.clickLogin();
	}
}
DashboardPage.java
import org.openqa.selenium.By;
import org.openqa.selenium.WebDriver;

public class DashboardPage {

	WebDriver driver;

	By homePageUserName = By.id("welcome");

	public DashboardPage(WebDriver driver) {
		this.driver = driver;

	}

	// Get the User name from Home Page
	public String getHomePageText() {
		return driver.findElement(homePageUserName).getText();
	}

}
Step 7 – Create tests for each Page – BaseTests, LoginTests and DashboardTests
Here, I have created 3 classes. BaseTest class to contain startUp and tearDown methods. These methods will run once before the after of every class. LoginTests and DashboardTests classes contain the tests related to LoginPage and DashboardPage respectively.
BaseTest
import java.util.concurrent.TimeUnit;

import org.openqa.selenium.WebDriver;
import org.openqa.selenium.firefox.FirefoxDriver;
import org.testng.annotations.AfterClass;
import org.testng.annotations.BeforeClass;

import com.example.pageobjectmodel_demo.pages.DashboardPage;
import com.example.pageobjectmodel_demo.pages.LoginPage;

public class BaseTest {

	public static WebDriver driver;
	LoginPage objLogin;
	DashboardPage objDashboardPage;

	@BeforeClass
	public void setup() {
		System.setProperty("webdriver.gecko.driver",
				"C:\\Users\\Vibha\\Software\\geckodriver-v0.26.0-win64\\geckodriver.exe");
		driver = new FirefoxDriver();
		driver.manage().window().maximize();
		driver.manage().timeouts().implicitlyWait(10, TimeUnit.SECONDS);
		driver.get("https://opensource-demo.orangehrmlive.com/");
	}

	@AfterClass
	public void close() {
		driver.close();
	}
}
LoginTests
import org.testng.Assert;
import org.testng.annotations.Test;

import com.example.pageobjectmodel_demo.pages.DashboardPage;
import com.example.pageobjectmodel_demo.pages.LoginPage;

public class LoginTests extends BaseTest {

	LoginPage objLogin;
	DashboardPage objDashboardPage;

	@Test(priority = 0)
	public void loginTest() {

		// Create Login Page object
		objLogin = new LoginPage(driver);

		// Verify login page text
		String loginPageTitle = objLogin.getLoginTitle();
		Assert.assertTrue(loginPageTitle.contains("LOGIN Panel"));
	}

}
DashboardTests
import org.testng.Assert;
import org.testng.annotations.Test;

import com.example.pageobjectmodel_demo.pages.DashboardPage;
import com.example.pageobjectmodel_demo.pages.LoginPage;

public class DashboardTests extends BaseTest {

	LoginPage objLogin;
	DashboardPage objDashboardPage;

	@Test(priority = 0)
	public void DasboardTest() {

		objLogin = new LoginPage(driver);

		// login to application
		objLogin.login("Admin", "admin123");

		// go the dashboard page
		objDashboardPage = new DashboardPage(driver);

		// Verify dashboard page
		Assert.assertTrue(objDashboardPage.getHomePageText().contains("Welcome"));
	}

}
Step 8 – Create a TestNG.XML
Here, I have mentioned 2 test classes. So, when I will run the tests from TestNG.xml, it will run the tests of both the classes. If will mention any one class, then the test of that particular class will be executed.
<?xml version = "1.0"encoding = "UTF-8"?>
<!DOCTYPE suite SYSTEM "http://testng.org/testng-1.0.dtd">
<suite name = "PageObjectModel">
  <test name = "PageObjectModel Tests">
    <classes>
          <class name = "com.example.pageobjectmodel_demo.tests.LoginTests"/>
          <class name = "com.example.pageobjectmodel_demo.tests.DashboardTests"/>
     </classes>
   </test>
</suite>
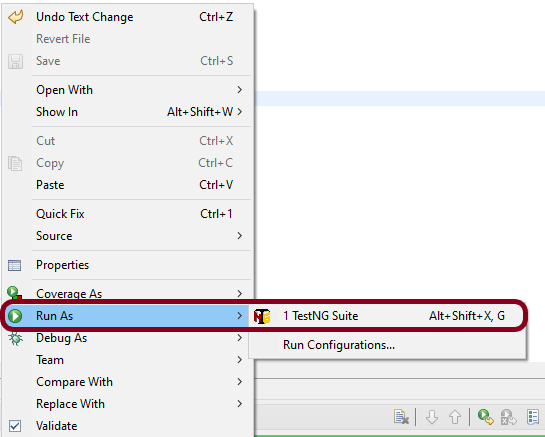
Step 9 – Run the tests from TestNG.xml
Right click on TestNG.xml and select Run As TestNG Suite.
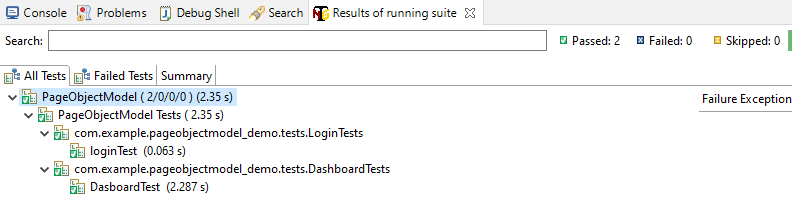
The execution status looks like as shown below.
Step 10 – TestNG Report Generation
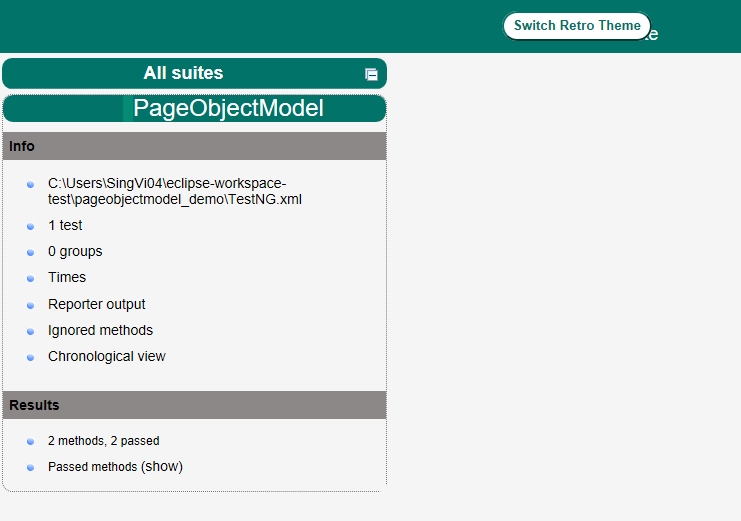
Once the execution is finished, refresh the project. It will create a test-output folder containing various reports generated by TestNG. Below is the screenshot of the report folder.
Image of Index.html report
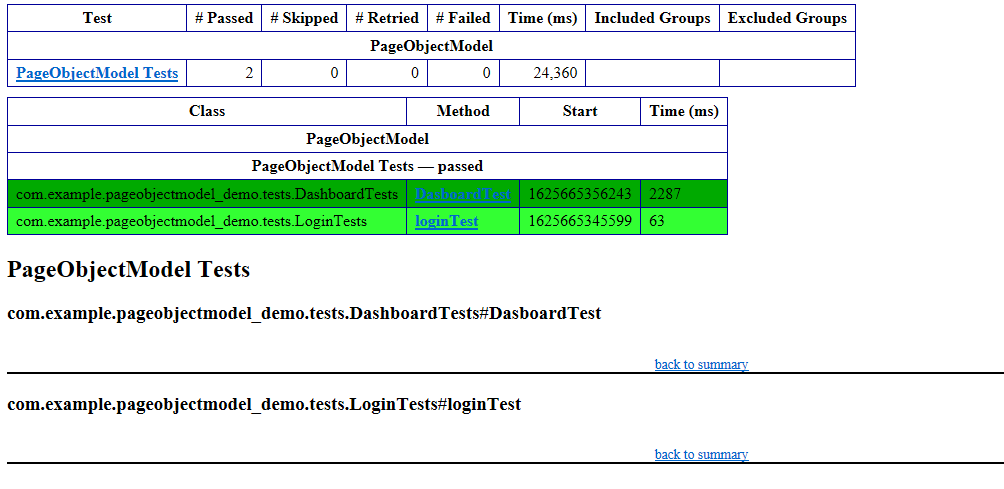
Image of emailable-report.html
Cheers! Congratulations on making it through this tutorial and hope you found it useful! Happy Learning!!
‘Iterator’ is an interface which belongs to collection framework. It allows us to traverse the collection, access the data element and remove the data elements of the collection.
java.util package has public interface Iterator and contains three methods:
boolean hasNext(): It returns true if Iterator has more element to iterate.
Object next(): It returns the next element in the collection until the hasNext()method return true. This method throws ‘NoSuchElementException’ if there is no next element.
void remove(): It removes from the underlying collection the last element returned by this iterator (optional operation). This method can be called only once per call to next(). The behavior of an iterator is unspecified if the underlying collection is modified while the iteration is in progress in any way other than by calling this method.
forEachRemaining– Performs the given action for each remaining element until all elements have been processed or the action throws an exception. Actions are performed in the order of iteration, if that order is specified. Exceptions thrown by the action are relayed to the caller.
Below is an example of use of Iterator. The iterator() method is used to get an iterator for any collection:
public class IteratorDemo {

   public static void main(String[] args) {

		ArrayList<String> cars = new ArrayList<String>();
		cars.add("Audi");
		cars.add("BMW");
		cars.add("Ford");
		cars.add("Duster");

		// Get the iterator
		Iterator<String> it = cars.iterator();

		// Print the first item
		System.out.println("First element from list :"+it.next());

	}
}

Output
First element from list :Audi
Looping through Collection
In the below example, we are looping through the collection using hasNext() and next() methods of Iterator.
public class IteratorDemo {

	 public static void main(String[] args) {

		ArrayList<String> cars = new ArrayList<String>();
		cars.add("Audi");
		cars.add("BMW");
		cars.add("Ford");
		cars.add("Duster");

		// Get the iterator
		Iterator<String> iterator = cars.iterator();

		System.out.println("List elements : ");

		while (iterator.hasNext())
			System.out.print(iterator.next() + " ");

		System.out.println();
	}
}

Output
List elements :
Audi BMW Ford Duster
Removing elements from Collection
Iterators are designed to easily change the collections that they loop through. The remove() method can remove items from a collection while looping. In the below example, I’m deleting the items whose reminder are not 0.
public class IteratorDemo {

	 public static void main(String[] args) {

		ArrayList<Integer> numbers = new ArrayList<Integer>();
		numbers.add(20);
		numbers.add(8);
		numbers.add(10);
		numbers.add(50);

        // Get the iterator
		Iterator<Integer> it = numbers.iterator();

		System.out.println("List of Numbers : ");
		while (it.hasNext()) {

			Integer i = it.next();

			if (i / 10 == 0) {
				it.remove();
			}
		}
		System.out.println(numbers);
	}

}

Output
List of Numbers :
[20, 10, 50]
I hope you are cleared about Iterators now. Enjoy learning. Cheers!!
A HashMap stores items in “key/value”pairs, and you can access them by an index of another type (e.g. a String).
One object is used as a key (index) to another object (value). It can store different types: String keys and Integer values, or the same type, like String keys and String values. We need to import java.util.HashMap or its superclass in order to use the HashMap class and methods.
It is not an ordered collection, which means it does not return the keys and values in the same order in which they have been inserted into the HashMap.
HashMap<String, String> employeeDetail = new HashMap<String, String>();

HashMap<String, String> employeeDetail = new HashMap<>();

HashMap<String, Integer> employeeDetail = new HashMap<String, Integer>();
Add Items
Below is an example where we are adding items to HashMap by using put() method.
import java.util.HashMap;

public class HashMap_Demo {
    public static void main(String[] args) {

        /* This is how to declare HashMap of key and Value as String  */
        HashMap<String, String> employeeDetail = new HashMap<String, String>();

        // Add keys and values (Name, Designation)
        employeeDetail.put("Tim", "DBA");
        employeeDetail.put("Dong", "SDET");
        employeeDetail.put("Nisha", "BA");
        employeeDetail.put("Ulana", "Dev");

        System.out.println("Detail of Employees :" + employeeDetail);
    }

}
The output of the above program is
Below is an example where we are adding items to HashMap by using put() method.
Here, the key is String, and the Value is Integer.
import java.util.HashMap;

public class HashMap_Demo {
    public static void main(String[] args) {

        // Combination of String(key) and Integer(value)
        HashMap<String, Integer> employeeAge = new HashMap<String, Integer>();

        // Add keys and values (Name, Age)
        employeeAge.put("Tim", 25);
        employeeAge.put("Dong", 26);
        employeeAge.put("Nisha", 29);
        employeeAge.put("Ulana", 34);

        System.out.println("Age of Employees :" + employeeAge);
    }

}
The output of the above program is
Access an Item
To access a value in the HashMap, use the get() method and refer to its key:-
import java.util.HashMap;

public class HashMap_Demo {
    public static void main(String[] args) {

        // Combination of String(key) and Integer(value)
        HashMap<String, Integer> employeeAge = new HashMap<String, Integer>();

        // Add keys and values (Name, Age)
        employeeAge.put("Tim", 25);
        employeeAge.put("Dong", 26);
        employeeAge.put("Nisha", 29);
        employeeAge.put("Ulana", 34);

        System.out.println("Age of Employees :"+ employeeAge);

        // Access a value
        System.out.println("Access Value of Key Nisha :" + employeeAge.get("Nisha"));
    }
}
The output of the above program is
Remove an Item
To remove an item, use the remove() method and refer to the key:
import java.util.HashMap;

public class HashMap_Demo {
    public static void main(String[] args) {

        // Combination of String(key) and Integer(value)
        HashMap<String, Integer> employeeAge = new HashMap<String, Integer>();

        // Add keys and values (Name, Age)
        employeeAge.put("Tim", 25);
        employeeAge.put("Dong", 26);
        employeeAge.put("Nisha", 29);
        employeeAge.put("Ulana", 34);

        System.out.println("Age of Employees :" + employeeAge);

        // To remove an item, use the remove() method and refer to the key
        employeeAge.remove("Ulana");
        System.out.println("List of Employee after removing Ulana :" + employeeAge);
    }
}
The output of the above program is
To remove all items, use the clear()method:-
import java.util.HashMap;

public class HashMap_Demo {
    public static void main(String[] args) {

        // Combination of String(key) and Integer(value)
        HashMap<String, Integer> employeeAge = new HashMap<String, Integer>();

        // Add keys and values (Name, Age)
        employeeAge.put("Tim", 25);
        employeeAge.put("Dong", 26);
        employeeAge.put("Nisha", 29);
        employeeAge.put("Ulana", 34);

        System.out.println("Age of Employees :" + employeeAge);

        // To remove all items, use the clear() method:
        employeeAge.clear();
        System.out.println("List of Employes after clear:" + employeeAge);
    }
}
The output of the above program is
Checking whether HashMap is empty or not
We are using isEmpty() method of the HashMap class to perform this check.
import java.util.HashMap;

public class HashMap_Demo {
    public static void main(String[] args) {

        /* This is how to declare HashMap */
        HashMap<String, String> employeeDetail = new HashMap<String, String>();

        // Add keys and values (Name, Designation)
        employeeDetail.put("Tim", "DBA");
        employeeDetail.put("Dong", "SDET");
        employeeDetail.put("Nisha", "BA");
        employeeDetail.put("Ulana", "Dev");

        System.out.println("Detail of Employees :" + employeeDetail);

        // Checking whether HashMap is empty or not
        System.out.println("Is HashMap Empty? " + employeeDetail.isEmpty());

        // Delete all items from HasMap
        employeeDetail.clear();
        System.out.println("Is HashMap Empty now? " + employeeDetail.isEmpty());
    }
}
The output of the above program is
Check if a particular key exists in HashMap
We will be using containsKey() method of the HashMap class to perform this check. This method returns a boolean value.
import java.util.HashMap;

public class HashMap_Demo {
    public static void main(String[] args) {

        /* This is how to declare HashMap */
        HashMap<String, String> employeeDetail = new HashMap<String, String>();

        // Add keys and values (Name, Designation)
        employeeDetail.put("Tim", "DBA");
        employeeDetail.put("Dong", "SDET");
        employeeDetail.put("Nisha", "BA");
        employeeDetail.put("Ulana", "Dev");

        System.out.println("Detail of Employees :" + employeeDetail);

        // Check if a particular key exists in HashMap
        boolean flag = employeeDetail.containsKey("Nisha");
        System.out.println("Key Nisha exists in HashMap? : " + flag);

        boolean flag1 = employeeDetail.containsKey("Shawn");
        System.out.println("Key Shawn exists in HashMap? : " + flag1);
    }
}
The output of the above program is
Check if a particular value exists in HashMap
We will be using containsValue()method of the HashMap class to perform this check.
import java.util.HashMap;

public class HashMap_Demo {
    public static void main(String[] args) {

        /* This is how to declare HashMap */
        HashMap<String, String> employeeDetail = new HashMap<String, String>();

        // Add keys and values (Name, Designation)
        employeeDetail.put("Tim", "DBA");
        employeeDetail.put("Dong", "SDET");
        employeeDetail.put("Nisha", "BA");
        employeeDetail.put("Ulana", "Dev");

        System.out.println("Detail of Employees :" + employeeDetail);

        // Check if a particular value exists in HashMap
        boolean valueExists = employeeDetail.containsValue("Dev");
        System.out.println("String Dev exists in HashMap? : " + valueExists);

        boolean valueNotExists = employeeDetail.containsValue("Test");
        System.out.println("String Test exists in HashMap? : " + valueNotExists);
    }
}
The output of the above program is
We are done! Congratulations on making it through this tutorial and hope you found it useful! Happy Learning!!
In the previous tutorial, I have explained about How to add Formulas in Excel in Java. In this tutorial, I will explain How to customize the style of cells in Excel in Java using Apache POI.
I’m using Apache POI to write data to the excel file. To download and install Apache POI, refer here.
If you are using maven, then you need to add below dependency in pom.xml.