In this tutorial, I’ll explain about Polymorphism in Java. It is one of the four concepts of OOPs. It is a concept where we can perform a single action in multiple ways. Poly means many and morphs means form. Polymorphism allows us to define one interface and have multiple implementations. An example of polymorphism is that there are different forms of communication like calls, SMS, picture messages, etc.
Method Overriding in Java – This is an example of runtime time (or dynamic polymorphism)
Complie Time Polymorphism
It is also known as static polymorphism. Method Overloading is an example of static polymorphism. It is a feature that allows a class to have more than one method having the same name if their argument lists are different. Error if any occur, resolved during compile time.
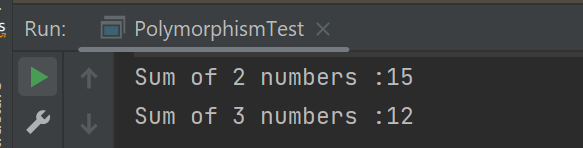
Below is an example of static polymorphism.
Calculation
public class Calculation {

	void sum(int a, int b) {
		System.out.println("Sum of 2 numbers :" + (a + b));
	}

	void sum(int x, int y, int z) {
		System.out.println("Sum of 3 numbers :" + (x + y + z));
	}

}
PolymorphismTest
public class PolymorphismTest {

	public static void main(String[] args) {

		Calculation cal = new Calculation();
		cal.sum(10, 5);
		cal.sum(2, 6, 4);

	}
}
The output of the above program is
Dynamic Polymorphism
It is also known as Dynamic Method Dispatch. In this, the call to the overridden method happens at the runtime. This type of polymorphism is achieved by Method Overriding. Declaring a method in sub class that is already present in the parent class is known as method overriding.
Below is an example of dynamic polymorphism
Parent Class
public class Bank {

	 //Overridden method
	public void getRateOfInterest() {

		System.out.println("getRateOfInterest() method of parent class");
		System.out.println("Interest Rate of Bank :" + 0);

	}
}
Child 1 Class
public class BOI extends Bank {

    // Overriding method
	public void getRateOfInterest() {

		System.out.println("getRateOfInterest() method of child 1 class");
		System.out.println("Interest Rate of BOI Bank :" + 4.1);

	}

}
Child 2 Class
public class BoFA extends Bank {

    // Overriding method
	public void getRateOfInterest() {

		System.out.println("getRateOfInterest() method of child 2 class");
		System.out.println("Interest Rate of BofA Bank :" + 3.2);

	}

}
Child 3 Class
public class SBI extends Bank {

	// Overriding method
	public void getRateOfInterest() {

		System.out.println("getRateOfInterest() method of child 3 class");
		System.out.println("Interest Rate of SBI Bank :" + 5.3);

	}
}
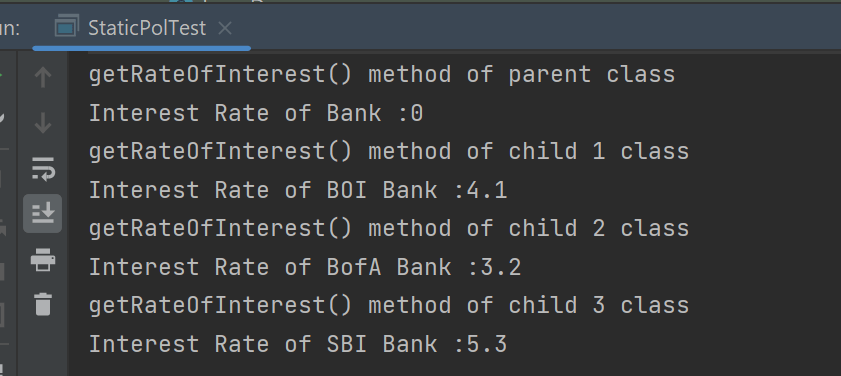
Test Class
public class StaticPolTest {

	public static void main(String[] args) {

		Bank bank1 = new Bank();
		bank1.getRateOfInterest();

		BOI bank2 = new BOI();
		bank2.getRateOfInterest();

		BofA bank3 = new BofA();
		bank3.getRateOfInterest();

		SBI bank4 = new SBI();
		bank4.getRateOfInterest();
	}

}
The output of the above program is
Points to note for Method Overriding:-
The argument list of the overriding method (method of subclass) must match the overridden method (the method of parent class). The data types of the arguments and their sequence should exactly match.
The access Modifier of the overriding method (method of a subclass) cannot be more restrictive than the overridden method of the parent class.
Suppose, I have changed the access modifier of SBI class from public to protected and then run the StaticPolTest program. In that case, I’ll get a compile-time error.
getRateOfInterest() method of parent class
Interest Rate of Bank :0
getRateOfInterest() method of child 1 class
Interest Rate of BOI Bank :4.1
getRateOfInterest() method of child 2 class
Interest Rate of BofA Bank :3.2
Exception in thread "main" java.lang.Error: Unresolved compilation problem:
	Cannot reduce the visibility of the inherited method from Bank

	at JavaDemo.Polymorphism.SBI.getRateOfInterest(SBI.java:6)
	at JavaDemo.Polymorphism.StaticPolTest.main(StaticPolTest.java:17)
The static variable in Java is used for memory management mostly. We can use static keywords with variables, methods, and nested classes. This tutorial will discuss Static Variable and Static Methods.
What is a Static Variable?
If any variable is, declared static, then it is called a static variable. The static variable gets memory only once in the class area at the time of class loading.
Static variables belong to the class itself, they can be accessed directly using the class name without creating an object/instance of that class.
Assume in a college, there are 250 students. Each student has a unique name & roll no, so when the objects are created all the instance data members will get the memory. However, the college name is the same for all the students. Then we do not need to allocate memory 250 times for the students. Therefore, it is advisable to make the college static variable, which means the variable is created once and used by all students.
Below is an example of a static variable.
public class Student {

    int rollNo;
    String name;
    static String college = "Trinity"; // Static Variable

    Student(int r, String n) // Constructor
    {
        rollNo = r;
        name = n;
    }

    void displayInformation() {
        System.out.println("Roll_No: " + rollNo + ", Name: " + name + ", College: " + college);
    }

    public static void main(String[] args) {

        Student S1 = new Student(111, "Tom");
        Student S2 = new Student(222, "Terry");
        S1.displayInformation();
        S2.displayInformation();
    }
}
The output of the above program is
What is the Static Method
If any method is declared static, then it is called a static method. A static method belongs to the class not to the object of the class.
A static method can be accessed without creating the object of the class.
The static method can access data members and can change their value of it.
public class Student {

    int rollNo;
    String name;
    static String college = "Trinity"; // Static Variable

    Student(int r, String n) // Constructor
    {
        rollNo = r;
        name = n;
    }

    static void change() {
        college = "CITM";
    }


    void displayInformation() {
        System.out.println("Roll_No: " + rollNo + ", Name: " + name + ", College: " + college);
    }

    public static void main(String[] args) {
        change();    // Calling Static method
        Student S1 = new Student(111, "Tom");
        Student S2 = new Student(222, "Terry");
        S1.displayInformation();
        S2.displayInformation();
    }
The output of the above program is
In the above example, change() is a static method, and it is accessed without creating the object.
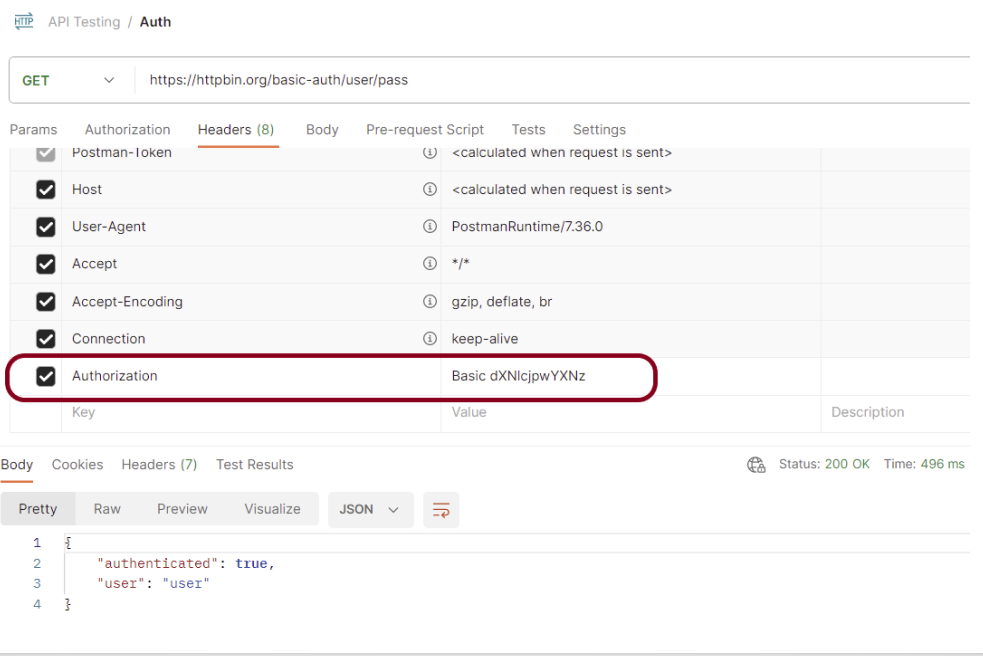
When you are doing API testing, sometimes the APIs or endpoints are protected. This means you need to be authenticated and authorized to perform certain actions. REST assured supports several authentication schemes, for example, OAuth, digest, certificate, form, and pre-emptive basic authentication.
In this post, we’ll look at how to pass the authorization token in the header in REST Assured.
What is an authorization token?
An authorization token, often referred to as an access token, is a piece of data or credential that is used to authenticate and authorize access to protected resources or operations in a system.
Add the below-mentioned dependencies to the Maven project.
Gradle is an open-source build automation tool that is designed to be flexible enough to build almost any type of software. Gradle runs on the JVM and you must have a Java Development Kit (JDK) installed to use it. Several major IDEs allow you to import Gradle builds and interact with them: Android Studio, IntelliJ IDEA, Eclipse, and NetBeans.
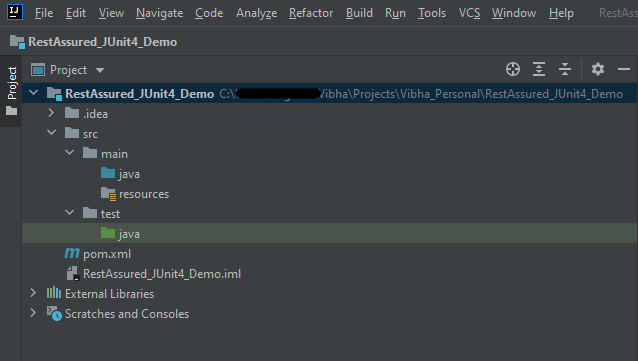
Step 4 – Create a Test Code for the testing of REST API under src/test/java
Rest Assured and Allure Report are two popular tools for testing. Rest Assured is used for API testing and Allure Report is used for creating detailed reports about tests. To see our request and response in more detail using these tools, we need to add a line to our Rest Assured tests. This will provide the request and response details in the report.
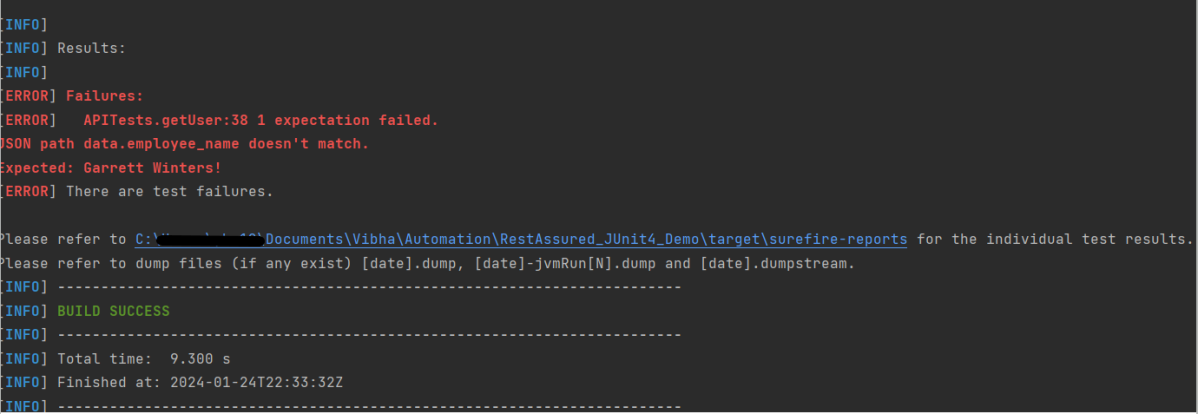
For testing purpose, first test – Get Request one fails.
.filter(new AllureRestAssured())
Below is an example of the tests.
package org.example;

import io.qameta.allure.*;
import io.qameta.allure.restassured.AllureRestAssured;
import io.restassured.http.ContentType;
import org.json.JSONObject;
import org.junit.Test;

import static io.restassured.RestAssured.given;
import static org.hamcrest.core.IsEqual.equalTo;

@Epic("REST API Regression Testing using JUnit4")
@Feature("Verify CRUID Operations on Employee module")
public class APITests {

    String BaseURL = "https://dummy.restapiexample.com/api";


    @Test
    @Story("GET Request")
    @Severity(SeverityLevel.NORMAL)
    @Description("Test Description : Verify the details of employee of id-2")
    public void getUser() {

        // GIVEN
        given()
                .filter(new AllureRestAssured())

                // WHEN
                .when()
                .get(BaseURL + "/v1/employee/2")

                // THEN
                .then()
                .statusCode(200)
                .statusLine("HTTP/1.1 200 OK")
                // To verify booking id at index 2
                .body("data.employee_name", equalTo("Garrett Winters!"))
                .body("message", equalTo("Successfully! Record has been fetched."));

    }

    @Test
    @Story("POST Request")
    @Severity(SeverityLevel.NORMAL)
    @Description("Test Description : Verify the creation of a new employee")
    public void createUser() {

        JSONObject data = new JSONObject();

        data.put("employee_name", "APITest");
        data.put("employee_salary", "99999");
        data.put("employee_age", "30");

        // GIVEN
        given()
                .filter(new AllureRestAssured())
                .contentType(ContentType.JSON)
                .body(data.toString())

                // WHEN
                .when()
                .post(BaseURL + "/v1/create")

                // THEN
                .then()
                .statusCode(200)
                .body("data.employee_name", equalTo("APITest"))
                .body("message", equalTo("Successfully! Record has been added."));

    }
}
Step 5 – Run the Test and Generate Allure Report
To run the tests, use the below command
mvn clean test
The output of the above program is
This will create allure-results folder with all the test reports. These files will be used to generate Allure Report.
To create Allure Report, use the below command
allure serve
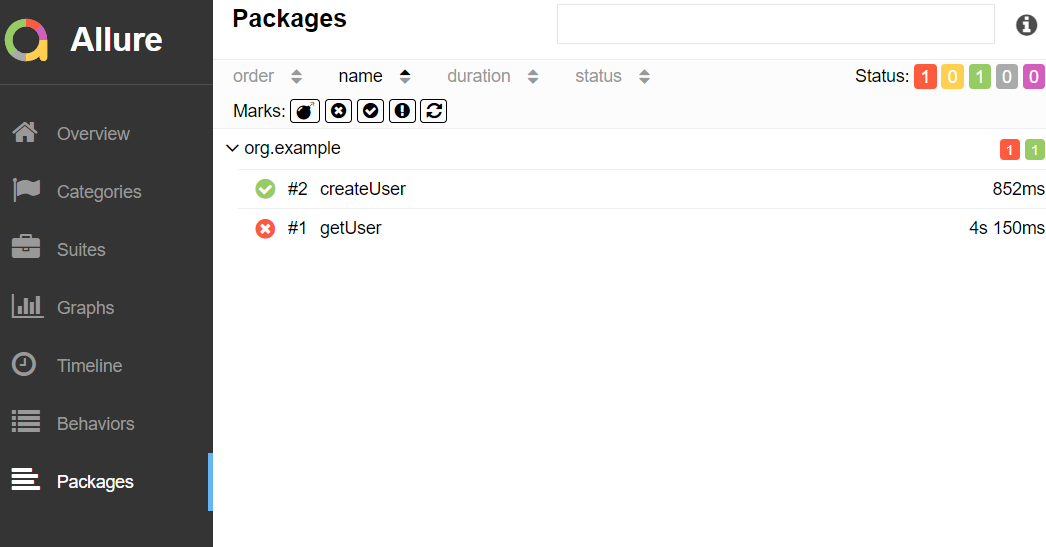
This will generate the beautiful Allure Test Report as shown below.
Allure Report Dashboard
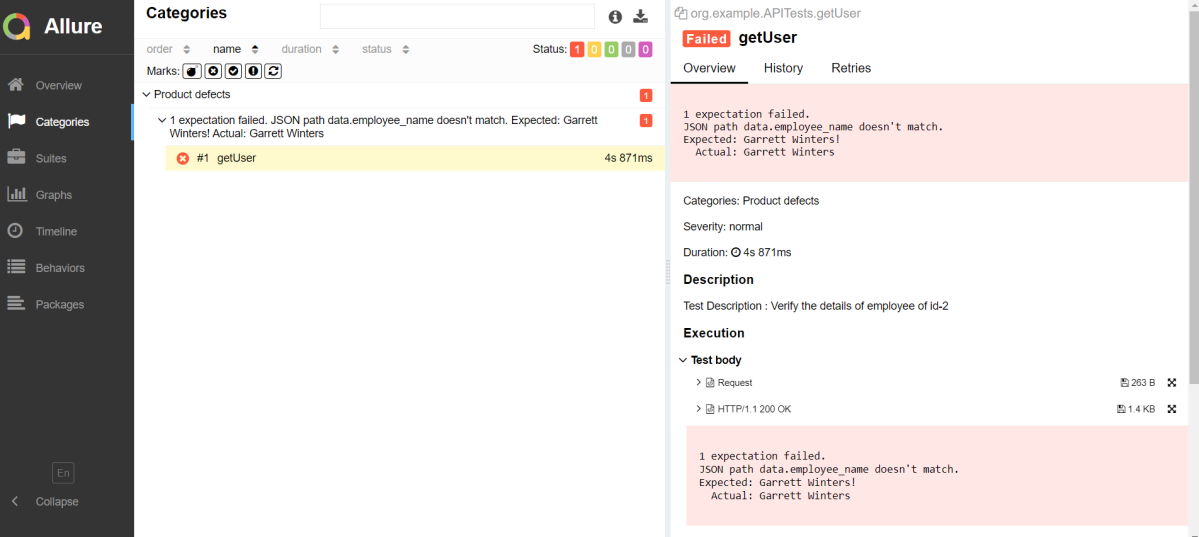
Categories in Allure Report
The categories tab gives you a way to create custom defects classifications to apply for test results. There are two categories of defects – Product Defects (failed tests) and Test Defects (broken tests).
Suites in Allure Report
On the Suites tab a standard structural representation of executed tests, grouped by suites and classes can be found.
View test history
Each time you run the report from the command line with the mvn clean test command, a new result JSON file will get added to the allure-results folder. Allure can use those files to include a historical view of your tests. Let’s give that a try.
To get started, run mvn clean test a few times and watch how the number of files in the allure-reports folder grows.
Now go back to view your report. Select Suites from the left nav, select one of your tests and click Retries in the right pane. You should see the history of test runs for that test:
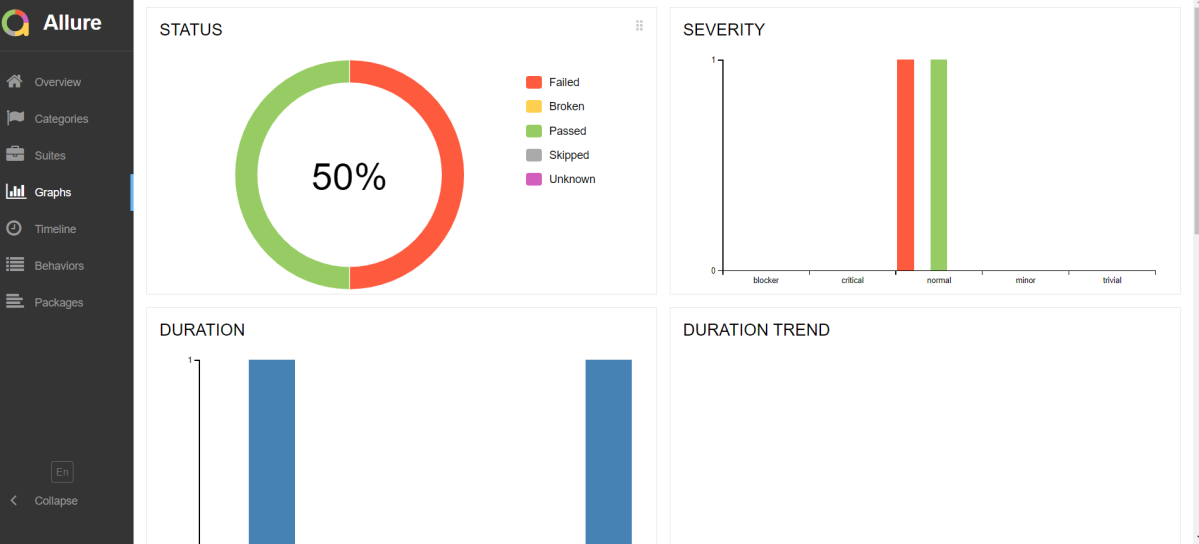
Graphs in Allure Report
Graphs allow you to see different statistics collected from the test data: status breakdown or severity and duration diagrams.
Timeline in Allure Report
Timeline tab visualizes retrospective of tests execution, allure adaptors collect precise timings of tests, and here on this tab, they are arranged accordingly to their sequential or parallel timing structure.
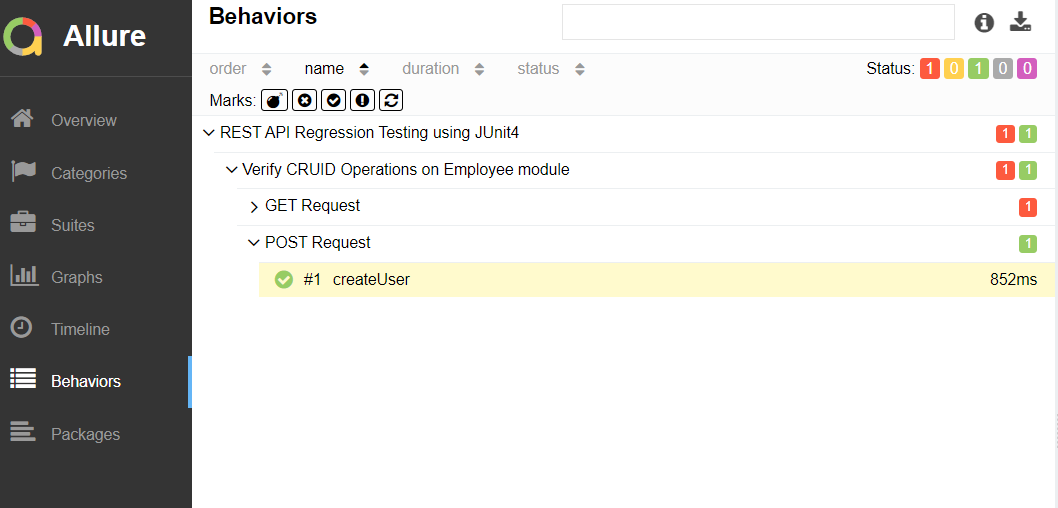
Behaviors of Allure Report
This tab groups test results according to Epic, Feature, and Story tags.
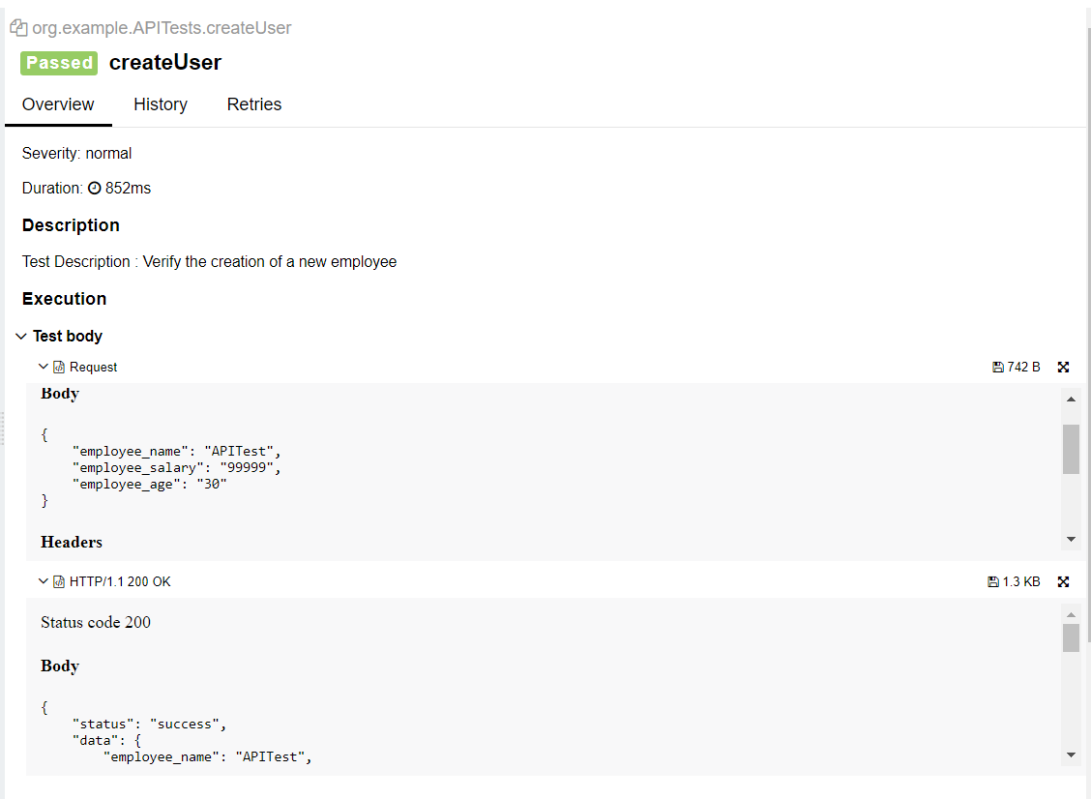
The below image shows the request body sent and the status code of the response, its body, and header provided by API.
Packages in Allure Report
The packages tab represents a tree-like layout of test results, grouped by different packages.
We are done! Congratulations on making it through this tutorial and hope you found it useful! Happy Learning!!
Rest Assured enables you to test REST APIs using java libraries and integrates well with Maven/Gradle. REST Assured is a Java library that provides a domain-specific language (DSL) for writing powerful, maintainable tests for RESTful APIs.
What is JUnit?
JUnit is a simple framework to write repeatable tests. It is an instance of the xUnit architecture for unit testing frameworks. JUnit 4 is one of the most popular unit testing frameworks which has a significant role in the test-driven development process.
Dependency List:-
REST Assured – 5.4.0
Java 17
JUnit – 4.13.2
Maven – 3.9.6
Detailed Step Description
Step 1- Download and Install Java
Java needs to be present on the system to run the tests. Click here to know How to install Java. To know if Java is installed or not on your machine, type this command in the command line. This command will show the version of Java installed on your machine.
java -version
Step 2 – Download and setup Eclipse IDE on the system
The Eclipse IDE (integrated development environment) provides strong support for Java developers, which is needed to write Java code. Click here to know How to install Eclipse.
Step 3 – Setup Maven
To build a test framework, we need to add a number of dependencies to the project. It is a very tedious and cumbersome process to add each dependency manually. So, to overcome this problem, we use a build management tool. Maven is a build management tool that is used to define project structure, dependencies, build, and test management. Click here to know How to install Maven.
To know if Maven is already installed or not on your machine, type this command in the command line. This command will show the version of Maven installed on your machine.
The tests should be written in src/test/java directory. To know how to create a JSON Request body using JSONObject, please refer to this tutorial.
import io.restassured.http.ContentType;
import org.json.JSONObject;
import org.junit.Test;
import static org.hamcrest.Matchers.equalTo;
import static io.restassured.RestAssured.given;

public class APITests {

    String BaseURL = "https://dummy.restapiexample.com/api";


    @Test
    public void createUser() {

        JSONObject data = new JSONObject();

        data.put("employee_name", "NewUser1");
        data.put("employee_salary", "1000");
        data.put("employee_age", "35");

        // GIVEN
        given()
                .contentType(ContentType.JSON)
                .body(data.toString())

                // WHEN
                .when()
                .post(BaseURL + "/v1/create")

                // THEN
                .then()
                .statusCode(200)
                .body("data.employee_name", equalTo("NewUser1"))
                .body("message", equalTo("Successfully! Record has been added."));

    }

}
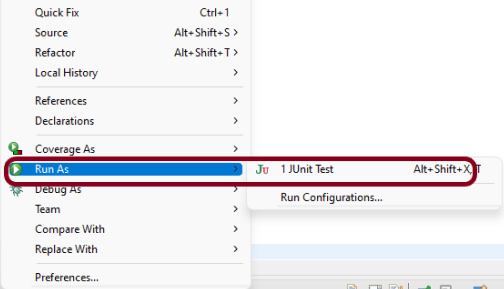
Step 7 – Test Execution through JUnit Test
Go to the Runner class and right-click Run As JUnit Test. The tests will run as JUnit tests. (Eclipse)
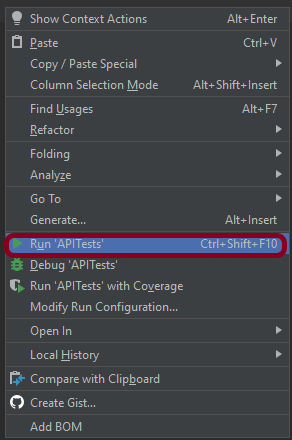
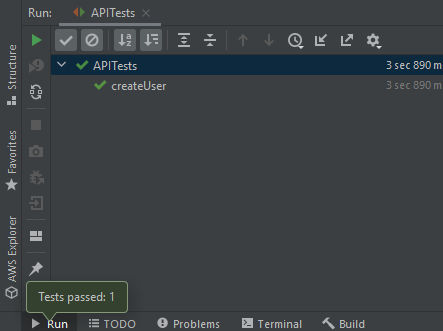
Below is the image to run the tests in IntelliJ.
This is how the execution console will look like.
Step 8 – Run the tests from the command line
Maven Site Plugin creates a folder – site under the target directory, and the Maven Surefire Report plugin generates the JUnit Reports in the site folder. We need to run the tests through the command line to generate the JUnit Report.
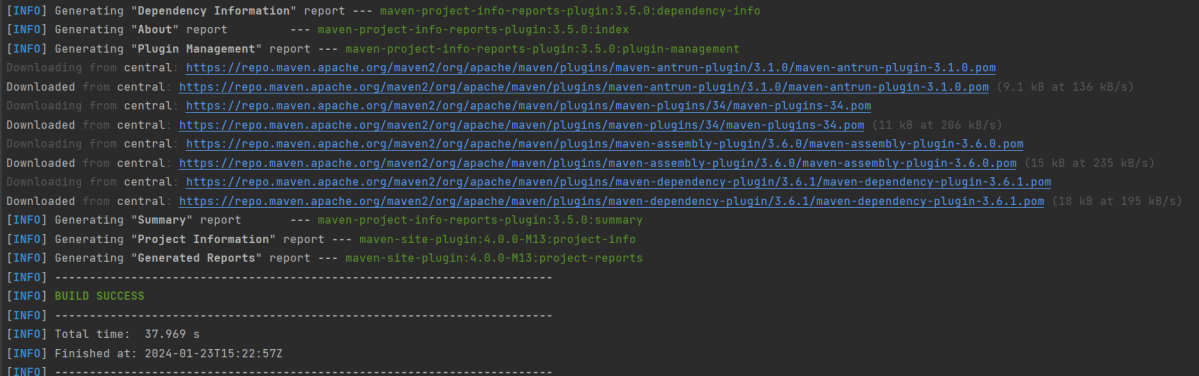
mvn clean test site
The output of the above program is
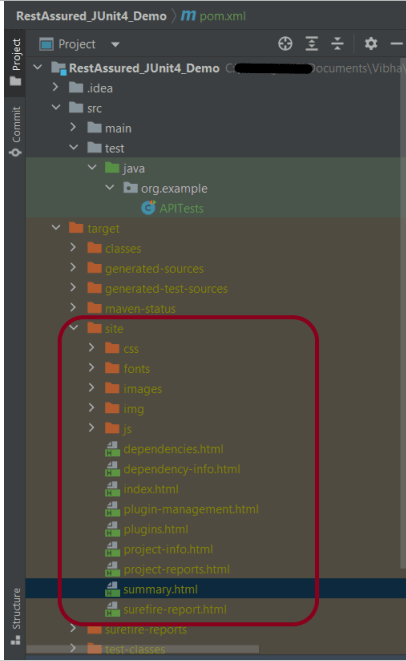
Step 9 – Report Generation
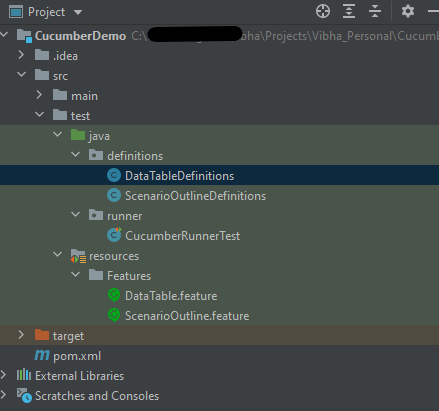
After the test execution, refresh the project, and a new folder with the name site in the target folder will be generated. This folder contains the reports generated by JUnit. The structure of the folder site looks as shown below.
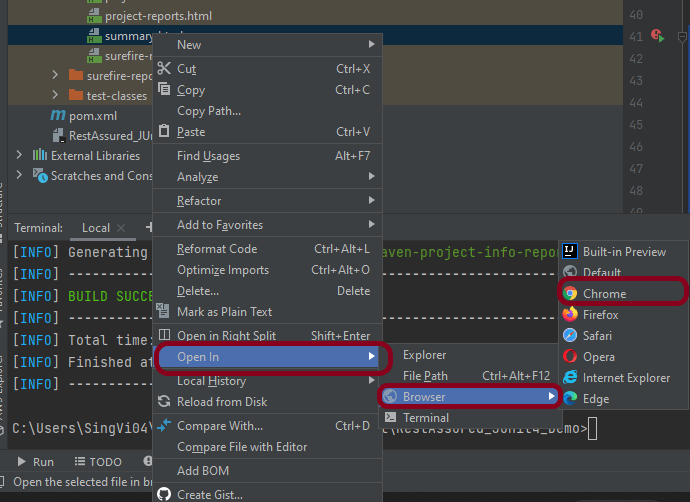
Step 10 – View the Report
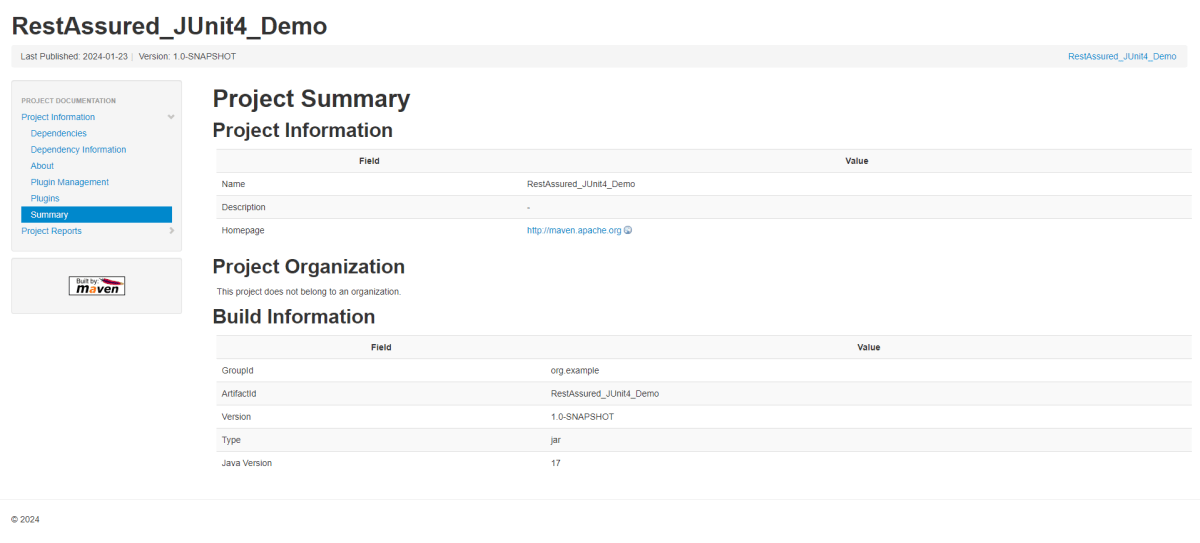
Right-click on the summary.html report and select Open In -> Browser ->Chrome.
Summary Report
Below is the summary Report.
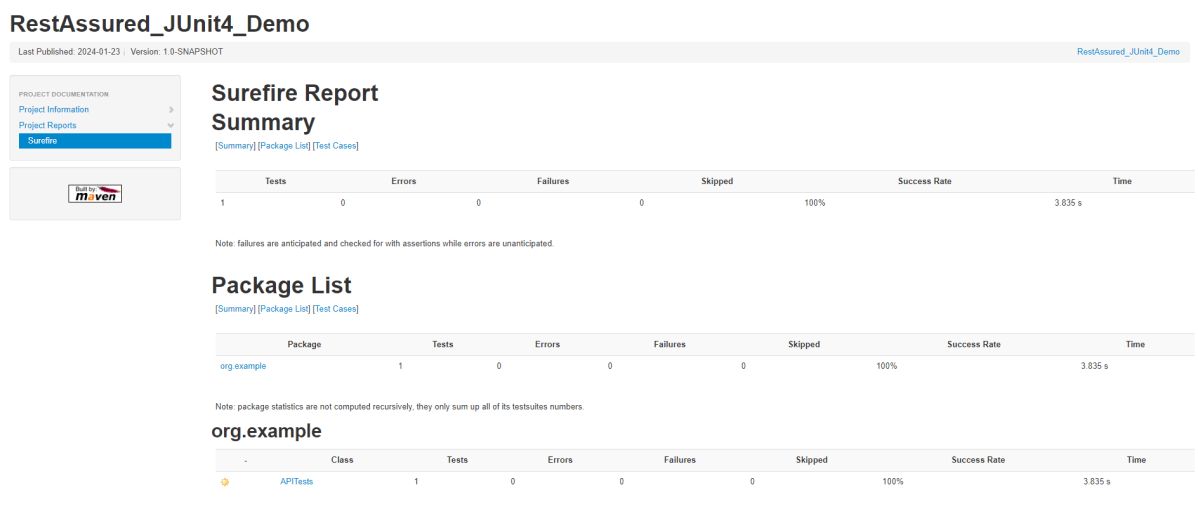
Surefire Report
Below is an example of a Surefire Report. This report contains a summary of the test execution.
We are done! Congratulations on making it through this tutorial and hope you found it useful! Happy Learning!!
One of the major testing workflows involves switching between multiple windows. Selenium WebDriver has specific switch commands to serve this purpose. Selenium WebDriver assigns an alphanumeric id to each window as soon as the WebDriver object is instantiated. This unique alphanumeric id is called a window handle. Selenium uses this unique id to switch control among several windows. In simple terms, each unique window has a unique ID, so that Selenium can differentiate when it is switching controls from one window to the other.
1) GetWindowHandle
To get the window handle of the current window. It returns a string of alphanumeric window handles.
String parentHandle= driver.getWindowHandle();
2) GetWindowHandles
To get the window handle of all the windows. It returns a set of window handle.
Set handle= driver.getWindowHandles();
3) SwitchTo Window
WebDriver supports moving between named windows using the “switchTo” method.
driver.switchTo().window("windowName");
Let us explain window switch with an example:-
1) Launch new Browser and open https://demoqa.com/browser-windows 2) Check the count of windows which is 1 3) Locate “New Window” button using Id – “windowButton” and click to open a new window 4) Get the count of both windows which is now 2. 5) Get the parent window handle and print it to console 6) Get the window handles of both the open windows and print them 7) Switch to the new window (child window) 8) Get the text of Child Window and print it 9) Close the new window (child window)
The program for the above scenario is shown below:
package com.example.definitions;

import org.openqa.selenium.By;
import org.openqa.selenium.WebDriver;
import org.openqa.selenium.WebElement;
import org.openqa.selenium.chrome.ChromeDriver;
import org.openqa.selenium.chrome.ChromeOptions;
import java.util.Iterator;
import java.util.Set;
import java.util.concurrent.TimeUnit;

public class WindowSwitchDemo {

    public static void main(String[] args) {

        ChromeOptions options = new ChromeOptions();
        options.addArguments("--start-maximized");
        WebDriver driver = new ChromeDriver(options);
        driver.manage().timeouts().implicitlyWait(10, TimeUnit.SECONDS);

        // Pass application url
        driver.get("https://demoqa.com/browser-windows");

        //Count of window - 1
        Set<String> allWindowHandles = driver.getWindowHandles();
        System.out.println("Count of Window :" + allWindowHandles.size());

        //Open a child window
        driver.findElement(By.id("windowButton")).click();

        //Count of windows , changed from 1 to 2
        Set<String> newAllWindowHandles = driver.getWindowHandles();
        System.out.println("New Count of Window :" + newAllWindowHandles.size());

        // Get the detail of the parent window
        String ParentHandle = driver.getWindowHandle();
        System.out.println("Parent Window :" + ParentHandle);

        //Get details of parent and child windows
        Iterator<String> iterator = newAllWindowHandles.iterator();
        String mainWindow = iterator.next();
        String childWindow = iterator.next();
        System.out.println("Parent Window :" + mainWindow);
        System.out.println("Child Window :" + childWindow);

        //Switch control to child window
        driver.switchTo().window(childWindow);

        //Verify the text present on child window
        WebElement text = driver.findElement(By.id("sampleHeading"));
        System.out.println("Child_Title :" + text.getText());

        // Close Child window
        driver.close();

        // Switch back to parent window
        driver.switchTo().window(ParentHandle);
        System.out.println("Parent Title :" + driver.getTitle());

        // Close Parent window
        driver.quit();
    }

}
The output of the above program is
What is the difference between driver.close() and driver.quit()?
When we are working on multiple windows and a selective window needs to be closed, then transfer the control to that window and use driver.close() to close the selective window. This will not stop the execution of the rest of the program. But, in case it is needed to close all the open windows, then use driver.quit() which will close all the windows opened in a particular session. It basically stops the driver instance, and any further actions to WebDriver may result in an exception. It is generally the last statement of any code.
Congratulations. We have learnt about window switching in Selenium. I hope you find this tutorial helpful. Happy Learning!!
Cucumber Data Tables can be used to add multiple parameters in Step Definition in a tabular form rather than putting all the parameters in the Gherkin statement. This is much easier to read and multiple rows of data can be passed in the same step. Data tables from Gherkin can be accessed by using the DataTable object as the last parameter in a Step Definition. This conversion can be done either by Cucumber or manually.
Let’s write a simple data table and see how we use it.
1. Table into List of a List of Strings
| firstName | lastName | age |
| Thomas    | Brown | 30 |
| Perry     | Wilson | 26 |
| Ashley    | William | 27 |

java type: List<List<String>>

The natural representation of list of a list of strings is shown below.

[
  [ "firstName", "lastName", "age" ],
  [ "Thomas", "Brown", "30" ],
  [ "Perry", "Wilson", "26" ],
  [ "Ashley", "William", "27" ]
]
2. Table into List of Maps
java type: List<Map<String, String>>
The natural representation of list of maps is shown below.

[
  { "firstName": "Thomas", "lastName": "Brown",  "age": "30" },
  { "firstName": "Perry",  "lastName": "Wilson", "age": "26" },
  { "firstName": "Ashley", "lastName": "William", "age": "27" }
]
3. Table into Single Map
Table where first colum is key as shown below

| IN  | India          |
| IRE | Ireland        |
java type: Map<String, String>

TO convert the table into a single map

{
  "IN": "India",
  "IRE": "Ireland"
}
4. Table into map that uses a list as its value
 A table with multiple column values per key.

 | IN  | India          | 29  |
 | IRE | Ireland        | 8   |

java type: Map<String, List<String>>

{
  "IN":  ["India","29"],
  "IRE": ["Ireland","8"]
}
Now, let us see how we can use DataTable in Cucumber
Cucumber Data Tables Example in Java
Data Table without Header Example
Below is an example of how to implement Data Tables without a Header. For example, we want to test the Login Page of an application. We can either mention all the arguments inside the Gherkin statement or use a table to list all the arguments, as we used below:
Feature: Login to HRM Application

  @ValidCredentials
  Scenario: Login with valid credentials - Data Table without Header

    Given User is on HRMLogin page
    When User enters valid credentials
      | Admin | admin123 |
    Then User should be able to login successfully and new page open
Below is the Step Definition of the above scenario.
import io.cucumber.datatable.DataTable;
import io.cucumber.java.After;
import io.cucumber.java.Before;
import io.cucumber.java.en.Given;
import io.cucumber.java.en.Then;
import io.cucumber.java.en.When;
import org.junit.Assert;
import org.openqa.selenium.By;
import org.openqa.selenium.WebDriver;
import org.openqa.selenium.chrome.ChromeDriver;
import java.util.List;
import java.util.Map;
import java.util.concurrent.TimeUnit;
import static org.hamcrest.CoreMatchers.containsString;
import static org.hamcrest.MatcherAssert.assertThat;

public class DataTableDefinitions {

    WebDriver driver;

 @Before
    public void setup() {

        ChromeOptions options = new ChromeOptions();
        options.addArguments("--start-maximized");
        driver = new ChromeDriver(options);
        driver.manage().timeouts().implicitlyWait(Duration.ofSeconds(5));

    }

    @Given("User is on HRMLogin page")
    public void userOnHomePage() {

        driver.get("https://opensource-demo.orangehrmlive.com/");
    }

     @When("User enters valid credentials")
    public void entersValidCredential(DataTable dataTable) throws InterruptedException{

        System.out.println("Credentials Entered");

        List<List<String>> signUpForm = dataTable.asLists(String.class);
        String userName = signUpForm.get(0).get(0);
        String passWord = signUpForm.get(0).get(1);
        driver.findElement(By.name("username")).sendKeys(userName);
        driver.findElement(By.name("password")).sendKeys(passWord);
        driver.findElement(By.xpath("//*[@class='oxd-form']/div[3]/button")).submit();
    }

    @Then("User should be able to login successfully and new page open")
    public void successfulLogin() throws InterruptedException {

        String newPageText = driver.findElement(By.xpath("//*[@class='oxd-topbar-header-breadcrumb']/h6")).getText();
        System.out.println("newPageText :" + newPageText);
        assertThat(newPageText, containsString("Dashboard"));
    }

    @After
    public void teardown(){
        driver.quit();
    }
}
To run the Feature file, we need a Cucumber TestRunner.
import io.cucumber.junit.Cucumber;
import io.cucumber.junit.CucumberOptions;
import org.junit.runner.RunWith;

@RunWith(Cucumber.class)
@CucumberOptions(monochrome = true, plugin = "pretty", features = "src/test/resources/Features/DataTable.feature",
        glue = "definitions", tags="@ValidCredentials")

public class CucumberRunnerTest {
}
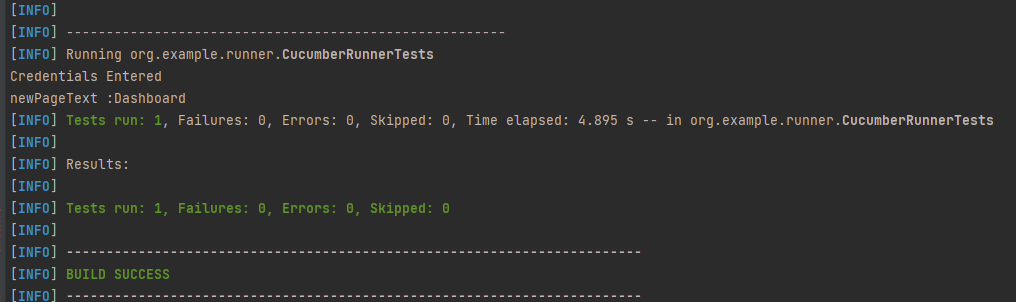
The output of the above program is
In the above example, we don’t have a header. We have just got the List object. We get the values of DataTable starting from 0 index.
Cucumber converts the above table into a list of lists. It treats each row as a list of the column values. We use the asLists method — supplying a String.class argument — to convert the DataTable argument to a List<List<String>>. This Class argument informs the asLists method of what data type we expect each element to be.
Data Table with Header and Single Row Example
Below is a cucumber data tables example with the header.
Adding a header to your table makes it easier to read and maintain.
@InValidCredential
Scenario: Login with invalid credential - Header with Single Row
Given User is on HRMLogin page
Then User enters invalid credentials and Login will be unsuccessful with error message
| Username | Password | ErrorMessage |
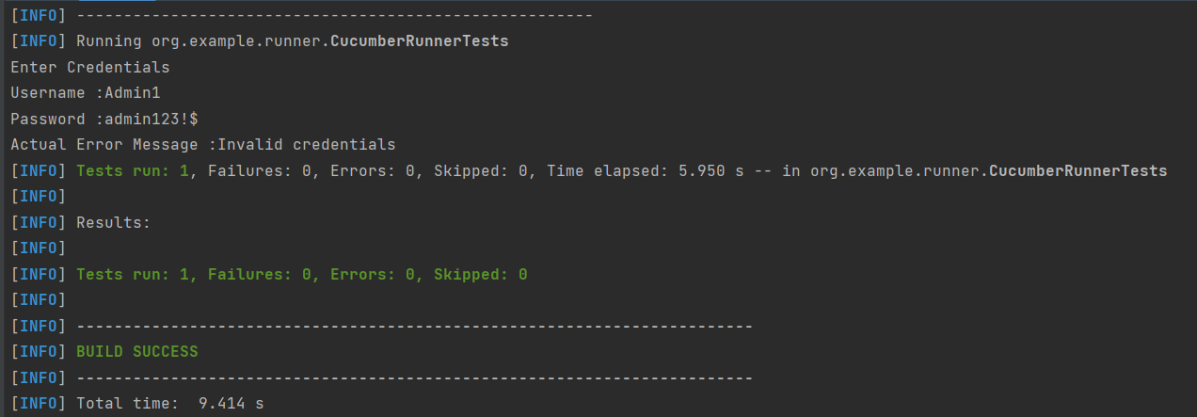
| Admin1 | admin123!$ | Invalid credentials |
Below is the Step Definition of the above scenario.
package org.example.definitions;

import io.cucumber.datatable.DataTable;
import io.cucumber.java.After;
import io.cucumber.java.Before;
import io.cucumber.java.en.Given;
import io.cucumber.java.en.Then;
import io.cucumber.java.en.When;
import org.junit.Assert;
import org.openqa.selenium.By;
import org.openqa.selenium.WebDriver;
import org.openqa.selenium.chrome.ChromeDriver;
import org.openqa.selenium.chrome.ChromeOptions;

import java.time.Duration;
import java.util.List;
import java.util.Map;

public class DataTableDefinitions {

    WebDriver driver;

    @Before
    public void setup() {

        ChromeOptions options = new ChromeOptions();
        options.addArguments("--start-maximized");
        driver = new ChromeDriver(options);
        driver.manage().timeouts().implicitlyWait(Duration.ofSeconds(5));

    }

    @Given("User is on HRMLogin page")
    public void userOnHomePage() {

        driver.get("https://opensource-demo.orangehrmlive.com/");
    }

    @Then("User enters invalid credentials and Login will be unsuccessful with error message")
    public void entersInvalidCredential(DataTable userTable) throws InterruptedException {

        System.out.println("Enter Credentials");
        List<Map<String, String>> user = userTable.asMaps(String.class, String.class);

        String userName = user.get(0).get("Username");
        System.out.println("Username :" + userName);
        driver.findElement(By.name("username")).sendKeys(userName);

        String passWord = user.get(0).get("Password");
        System.out.println("Password :" + passWord);
        driver.findElement(By.name("password")).sendKeys(passWord);

        driver.findElement(By.xpath("//*[@class='oxd-form']/div[3]/button")).submit();

        String errorMessage = user.get(0).get("ErrorMessage");
        String actualErrorMessage = driver.findElement(By.xpath("//*[@class='orangehrm-login-error']/div[1]/div[1]/p")).getText();
        System.out.println("Actual Error Message :" + actualErrorMessage);
        Assert.assertTrue(actualErrorMessage.equalsIgnoreCase(errorMessage));

    }

    @After
    public void teardown(){
        driver.quit();
    }

}
The output of the above program is
In the above example, we have only 1 row with the header, so have used get(0) to retrieve the first row of DataTable. After that, I used get(“HeaderName”) to get the value of the row of DataTable.
Data Table with Header and Multiple Rows Example
Below is a cucumber data table example with multiple rows of data with the header. This is helpful when we want to test multiple combinations of data in a step.
  @Multiple_InValidCredentials
  Scenario: Login with invalid credentials - Data Table with Header and Multiple Rows

    Given User is on HRMLogin page
    Then User enters invalid credentials and Login will be unsuccessful with custom error messages
      | Username    | Password  | ErrorMessage         |
      | Admin1      | admin123! | Invalid credentials  |
      | Admina      | admin123a | Invalid credentials  |
Below is the Step Definition of the above scenario
import io.cucumber.datatable.DataTable;
import io.cucumber.java.After;
import io.cucumber.java.Before;
import io.cucumber.java.en.Given;
import io.cucumber.java.en.Then;
import io.cucumber.java.en.When;
import org.junit.Assert;
import org.openqa.selenium.By;
import org.openqa.selenium.WebDriver;
import org.openqa.selenium.chrome.ChromeDriver;
import java.util.List;
import java.util.Map;
import java.util.concurrent.TimeUnit;
import static org.hamcrest.CoreMatchers.containsString;
import static org.hamcrest.MatcherAssert.assertThat;

public class DataTableDefinitions {

    WebDriver driver;

     @Before
    public void setup() {

        ChromeOptions options = new ChromeOptions();
        options.addArguments("--start-maximized");
        driver = new ChromeDriver(options);
        driver.manage().timeouts().implicitlyWait(Duration.ofSeconds(5));

    }

    @Given("User is on HRMLogin page")
    public void userOnHomePage() {

        driver.get("https://opensource-demo.orangehrmlive.com/");
    }

     @Then("User enters invalid credentials and Login will be unsuccessful with custom error messages")
    public void entersInvalidCredentials(DataTable userTable) throws InterruptedException {

        System.out.println("Enter Credentials");

        List<Map<String, String>> user = userTable.asMaps(String.class, String.class);
        for (Map<String, String> form : user) {

            String userName = form.get("Username");
            System.out.println("Username :" + userName);
            driver.findElement(By.name("username")).sendKeys(userName);

            String passWord = form.get("Password");
            System.out.println("Password :" + passWord);
            driver.findElement(By.name("password")).sendKeys(passWord);

            driver.findElement(By.xpath("//*[@class='oxd-form']/div[3]/button")).submit();

            String errorMessage = form.get("ErrorMessage");
            String actualErrorMessage = driver.findElement(By.xpath("//*[@class='orangehrm-login-error']/div[1]/div[1]/p")).getText();
            System.out.println("Actual Error Message :" + actualErrorMessage);

            Assert.assertTrue(actualErrorMessage.equalsIgnoreCase(errorMessage));

        }
    }

    @After
    public void teardown(){
        driver.quit();
    }

}
The output of the above program is
Cucumber creates a list containing each row, but instead maps the column heading to each column value. Cucumber repeats this process for each subsequent row. We use the asMaps method — supplying two String.class arguments — to convert the DataTable argument to a List<Map<String, String>>.
The first argument denotes the data type of the key (header). The second indicates the data type of each column value. Thus, we supply two String.class arguments because our headers (key) and title and author (values) are all Strings.
Congratulations on making it through this tutorial and hope you found it useful! Happy Learning!! Cheers!!
ArrayList is a part of collection framework and is present in java.util package. It provides us dynamic arrays in Java. ArrayList is a resizable-array implementation of the List interface. In this tutorial, we will cover the below topics:-
1) What is the difference between Array and ArrayList?
Array has fixed length, so if it is full we cannot add more elements, similarly if we delete few elements from the array, there will not be any change in the memory consumption. Whereas ArrayList can grow dynamically. We can add elements as well can delete the elements and this will make changes in the memory consumption. The size of an array cannot modified (if you want to add or remove elements to/from an array, we have to create a new one). While elements can added and removed from an ArrayList.
2) How to create an ArrayList?
This statement creates an ArrayList with the name Companies with type “String”.
import java.util.ArrayList; // import the ArrayList class
ArrayListCompanies = new ArrayList(); // Create an ArrayList object
3) How to add elements to an ArrayList?
We can add element to an ArrayList by using add() method. There are many ways to add elements.
1) To add the element at the end of the List.
Companies.add("Samsung");
2) To add the element at the specified location in ArrayList, we can specify the index in the add method like this.
Companies.add(2,"Microsoft");
4) How to remove elements from ArrayList?
1) To remove the element with name.
Companies.remove("MI");
2) To remove the element at the specified location in ArrayList, we can specify the index in the remove method.
Companies.remove(1);
5) ArrayList SizeMethod
To find out how many elements an ArrayList have, use the size() method.
Companies.size();
Let me show how to add and remove elements from an ArrayList with the help of an example.
package com.example.definitions;
import java.util.ArrayList;
import java.util.function.Predicate;
public class ArrayList_IteratorExample {
public static void main(String[] args) {
//Create ArrayList of String
ArrayList<String> Companies = new ArrayList();
// Check if an ArrayList is empty
System.out.println("Is Company List empty :"+Companies.isEmpty());
// Adding new elements to the ArrayList
Companies.add("Samsung");
Companies.add("Apple");
Companies.add("Motorola");
Companies.add("Google");
Companies.add("Sony");
Companies.add("Blackberry");
System.out.println("Company List is :"+Companies);
// Adding an element at a particular index in an ArrayList
Companies.add(2,"Microsoft");
System.out.println("Updated Company List is:"+Companies);
// Find the size of an ArrayList
System.out.println("Size of Company List: "+Companies.size());
// Retrieve the element at a given index
System.out.println("First Company in list: "+Companies.get(0));
// Retrieve the last element from ArrayList
String LastCompany = Companies.get(Companies.size()-1);
System.out.println("Last Company in list: "+LastCompany);
// Remove the element
Companies.remove("MI");
// Remove the element at index '1'
Companies.remove(1);
System.out.println("Updated Company List after removal is:"+Companies);
// Remove first occurrence of the given element from the ArrayList
// (The remove() method returns false if the element does not exist in the ArrayList)
boolean isRemoved = Companies.remove("Lenovo");
System.out.println("Lenovo exists in Company List :"+isRemoved);
// Remove all the elements that satisfy the given predicate
Predicate<String> newCompanies = company -> company.startsWith("B");
Companies.removeIf(newCompanies);
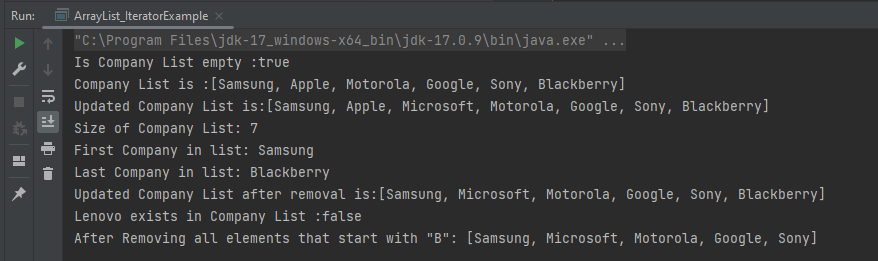
System.out.println("After Removing all elements that start with \"B\": " + Companies);
}
}
The output of the above program is
6) Method to iterate through ArrayList
There are various methods to iterate through ArrayList. We will discuss few of the methods. 1) Iterator interface 2) For -each loop 3) For loop 4) While loop
package com.example.definitions;
import java.util.ArrayList;
public class ArrayList_IteratorExample {
public static void main(String[] args) {
//Creating arraylist
ArrayList<String> Companies = new ArrayList();
// Adding new elements to the ArrayList
Companies.add("Samsung");
Companies.add("Apple");
Companies.add("Motorola");
Companies.add("Google");
Companies.add("Sony");
Companies.add("Blackberry");
//Traversing list through Iterator
for(String a:Companies)
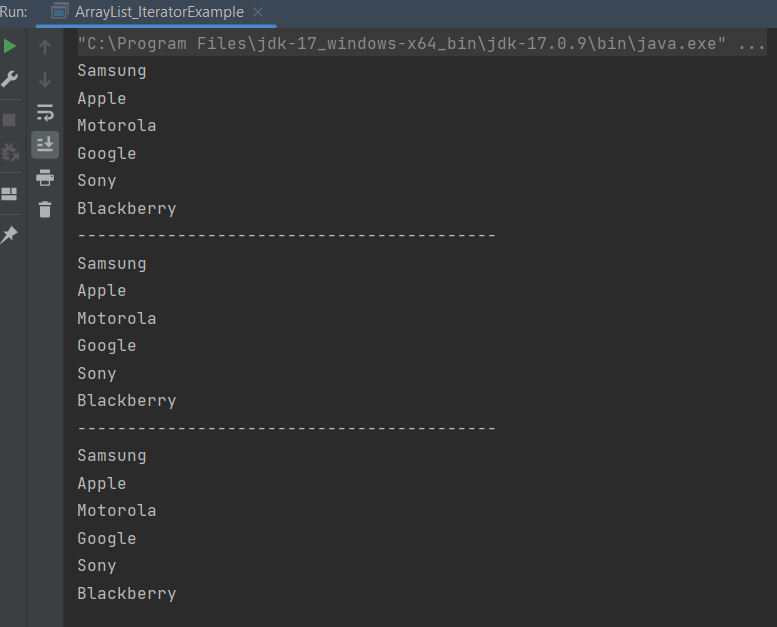
System.out.println(a);
System.out.println("------------------------------------------");
//Traversing list through for loop
for(int i=0;i<Companies.size();i++)
{
System.out.println(Companies.get(i));
}
System.out.println("------------------------------------------");
// Traversing list through For-Each loop
for(String a:Companies)
System.out.println(a);
}
}
The output of the above program is
Congratulations on making it through this tutorial and hope you found it useful! Happy Learning!! Cheers!!
Java is a general-purpose programming language that is a concurrent, class-based, and object-oriented language. Java follows the concept of “write once and run anywhere (WORA).” This means that compiled Java code can be run on all different platforms that support Java. There’s no need for recompilation.