In this tutorial, we will see how can we retrieve the child nodes from an XML in Java.
What is XML?
XML stands for eXtensible Markup Language. It is a markup language much like HTML and was designed to store and transport data. XML was designed to be both human- and machine-readable. It is a flexible way to create information formats and share both the format and the data on the World Wide Web, intranets, and elsewhere.
1.A File object inputFile is created, representing the XML file located at “src/test/resources/testData/test.xml”.
2. A DocumentBuilderFactory instance is created. This is a factory API that enables applications to obtain a parser that produces DOM object trees from XML documents.
4. The XML document is parsed using the DocumentBuilder instance, resulting in a Document object that represents the entire XML document.
Document doc = dBuilder.parse(inputFile);
5. The normalize method is called on the Document object to ensure that the document’s DOM tree is fully normalized, which means that it is structurally correct according to the XML specification
doc.getDocumentElement().normalize();
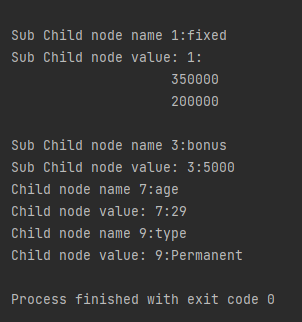
6. It retrieves a NodeList of all employee elements in the document and prints out the number of such elements.
7. It iterates over each employee node in the NodeList. For each employee node, it prints out the node name and retrieves a NodeList of its child nodes.
for (int temp = 0; temp < nodeList.getLength(); temp++) {
Node node = nodeList.item(temp);
System.out.println("\nCurrent Element :" + node.getNodeName());
8. It then iterates over each child node of the employee node. If the child node is an element node (as opposed to other types of nodes like text nodes or comment nodes), it prints out the name and text content of the child node.
NodeList childNodes = node.getChildNodes();
for (int i = 0; i < childNodes.getLength(); i++) {
Node childNode = childNodes.item(i);
if (childNode.getNodeType() == Node.ELEMENT_NODE) {
System.out.println("Child node name " + i + ":" + childNode.getNodeName());
System.out.println("Child node value: " + i + ":" + childNode.getTextContent());
}
}
9. If any exceptions occur during the parsing process (such as ParserConfigurationException, SAXException, or IOException), they are caught, and their stack traces are printed out.
The complete program is mentioned below:
package com.example.XML;
import org.w3c.dom.Document;
import org.w3c.dom.Element;
import org.w3c.dom.Node;
import org.w3c.dom.NodeList;
import org.xml.sax.SAXException;
import javax.xml.parsers.DocumentBuilder;
import javax.xml.parsers.DocumentBuilderFactory;
import javax.xml.parsers.ParserConfigurationException;
import java.io.File;
import java.io.IOException;
public class ChildNodes {
public static void main(String[] args) {
try {
//Create a DocumentBuilder
File inputFile = new File("src/test/resources/testData/test1.xml");
DocumentBuilderFactory dbFactory = DocumentBuilderFactory.newInstance();
DocumentBuilder dBuilder = dbFactory.newDocumentBuilder();
Document doc = dBuilder.parse(inputFile);
doc.getDocumentElement().normalize();
//Extract the root element
System.out.println("Root element :" + doc.getDocumentElement().getNodeName());
NodeList nodeList = doc.getElementsByTagName("employee");
System.out.println("Node Length :" + nodeList.getLength());
for (int temp = 0; temp < nodeList.getLength(); temp++) {
                Node node = nodeList.item(temp);
                System.out.println("\nCurrent Element :" + node.getNodeName());
  NodeList childNodes = node.getChildNodes();
                for (int i = 0; i < childNodes.getLength(); i++) {
                    Node childNode = childNodes.item(i);
                    if (childNode.getNodeType() == Node.ELEMENT_NODE) {
                        System.out.println("Child node name " + i + ":" + childNode.getNodeName());
                        System.out.println("Child node value: " + i + ":" + childNode.getTextContent());

                    }
                }
}
} catch (ParserConfigurationException | SAXException | IOException e) {
e.printStackTrace();
}
}
}
In the previous tutorial, we showed youWhat is Feature File in Cucumber is. This tutorial will show you how to run this feature file.
Once the Feature file is created, we need to create a class called Runner class to run the tests. This class will use the JUnit annotation @RunWith(), which tells JUnit what is the test runner class.
We cannot run a Feature file on its own in a cucumber-based framework. We need to create a Java class, which will run the Feature File. It is the starting point for JUnit to start executing the tests. TestRunner class is created under src/test/java. In this tutorial, Cucumber uses the JUnit framework to run the tests. Apart from JUnit, we can also use the TestNG Test Runner class to run the cucumber tests.
JUnit Test Runner Class
First, we need to add the below dependencies to the POM.xml (in the case of the Maven project).
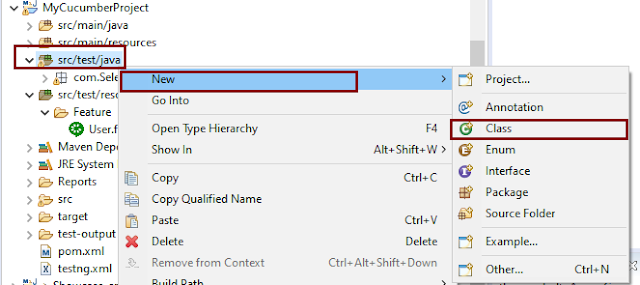
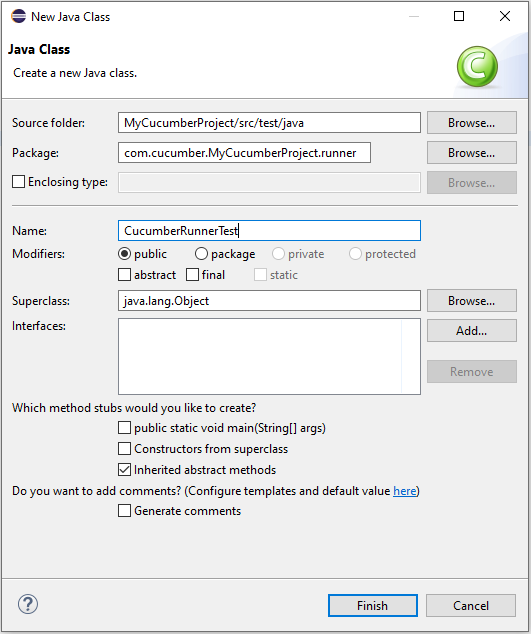
Create a new runner class file called CucumberRunnerTest.
Select and Right-Click on the package outline. Click on the New→Class.
Provide the Java class a name, such as CucumberRunnerTest, and click the Finish button.
Import Statements
1) @RunWithannotation tells JUnit that tests should run using the Cucumber class.
import org.junit.runner.RunWith;
2) Cucumber.class is imported from:
import io.cucumber.junit.Cucumber;
3) @CucumberOptionsannotation tells Cucumber where to look for feature files, what reporting system to use, and some other things also. But as of now, in the above test, we have just told it for the Feature file folder. It is imported from:
import io.cucumber.junit.CucumberOptions;
The CucumberRunnerTest class looks like shown below:
import org.junit.runner.RunWith;
import io.cucumber.junit.Cucumber;
import io.cucumber.junit.CucumberOptions;

@RunWith(Cucumber.class)
@CucumberOptions(plugin = "pretty", features = "src/test/resources/Features/MyHoliday.feature", tags = "@BookOneWayFlight")

public class CucumberRunnerTest {

}
The first parameter, called features, provides the location of the feature file. Similarly, the second parameter, called tags, provides the tag name (scenario) which needs to run. Apart from these, we can use plugins, and glue, in the CucumberOptions.
The feature file is placed under src/test/resources, so it is added as the path for the Feature file.
Run the Cucumber Test
As we know, the Feature file is already created in the previous tutorial. TestRunner class is created to run the Cucumber Tests.
Right Click on CucumberRunnerTest class and Click Run As > JUnit Test Application
The output of the Test Execution looks as shown below image.
This output shows that the Feature file is created, and Test Runner is able to run the Feature File. But this error shows that we should implement these methods so that the Steps mentioned in the Feature file can be traced to Java methods, which can be executed while executing the feature file. Don’t worry about this error. We will see how to create step definitions in the next tutorial.
Congratulations on making it through this tutorial and hope you found it useful! Happy Learning!! Cheers!!
In this tutorial, I will explain Parallel Testing using Cucumber with TestNG.
Cucumber-JVM allows parallel execution across multiple threads since version 4.0.0. There are several options to incorporate this built-in feature in a Cucumber project. You can do so by using JUnit, TestNG, or CLI.
Cucumber can be executed in parallel using TestNG and Maven test execution plugins by setting the data providerparallel option to true.
In TestNG, the scenarios and rows in a scenario outline are executed in multiple threads. One can use either Maven Surefire or Failsafe plugin for executing the runners. In this tutorial, I’m using the Maven Surefire plugin.
Feature: Login to HRM Application

  Background:
    Given User is on Home page

  @ValidCredentials
  Scenario: Login with valid credentials - Feature 1, Scenario -1

    When User enters username as "Admin" and password as "admin123"
    Then User should be able to login successfully

  @InvalidCredentials
  Scenario Outline: Login with invalid credentials - Feature 1, Scenario -2

    When User enters username as "<username>" and password as "<password>"
    Then User should be able to see error message "<errorMessage>"

    Examples:
      | username    | password   | errorMessage                      |
      | Admin        | admin12$$  | Invalid credentials               |
      | admin$$     | admin123   | Invalid credentials               |
      | abc123       | xyz$$      | Invalid credentials               |
ForgotPasswordPage.feature
Feature: Forgot Password Page

  Background:
    Given User is on Home page

  @BackFunctionality
  Scenario: Validate the cancel functionality - Feature 2, Scenario - 1

    When User clicks on Forgot your password? link
    Then User should be able to navigate to Reset Password page
    And User clicks on Cancel button to go back to Login Page

  @ResetFunctionality
  Scenario: Validate the Reset Password functionality - Feature 2, Scenario - 2

    When User clicks on Forgot your password? link
    Then User should be able to navigate to Reset Password page
    And User clicks on Reset Password button and provide username as "abc1234"
    And Verify the message "Reset Password link sent successfully"
Step 6 – Create Page Object Model classes of both feature files
Page Object Model class contains all the locators and the actions performed on these locators for the particular class to improve the readability and maintainability of the code.
Below are the Page Object Model classes for these feature files.
LoginPage
import org.openqa.selenium.By;
import org.openqa.selenium.WebDriver;

public class LoginPage {

    public WebDriver driver;

    By userName = By.name("username");
    By passWord = By.name("password");
    By login = By.xpath("//*[@id='app']/div[1]/div/div[1]/div/div[2]/div[2]/form/div[3]/button");
    By errorMessage = By.xpath("//*[@class='orangehrm-login-error']/div[1]/div[1]/p");
    By forgotPasswordLink = By.xpath("//*[@id='app']/div[1]/div/div[1]/div/div[2]/div[2]/form/div[4]/p");
    By loginPageTitle = By.xpath("//*[@id='app']/div[1]/div/div[1]/div/div[2]/h5");

    public LoginPage(WebDriver driver) {
        this.driver = driver;
    }

    public String getErrorMessage() {
        return driver.findElement(errorMessage).getText();
    }

    public void login(String strUserName, String strPassword) {

        // Fill user name
        driver.findElement(userName).sendKeys(strUserName);

        // Fill password
        driver.findElement(passWord).sendKeys(strPassword);

        // Click Login button
        driver.findElement(login).click();

    }

    // Click on Forgot Password link
    public void clickOnForgotPasswordLink() {
        driver.findElement(forgotPasswordLink).click();
    }

    //Get Login Page Title
    public String getLoginPageTitle() {
        return driver.findElement(loginPageTitle).getText();
    }
}
HomePage
import org.openqa.selenium.By;
import org.openqa.selenium.WebDriver;

public class HomePage {

    public WebDriver driver;

    public HomePage(WebDriver driver) {
        this.driver = driver;
    }

    By homePageUserName = By.xpath("//*[@class='oxd-topbar-header-breadcrumb']/h6");

    public String getHomePageText() {
        return driver.findElement(homePageUserName).getText();
    }
}
ForgotPasswordPage
import org.openqa.selenium.By;
import org.openqa.selenium.WebDriver;

public class ForgotPasswordPage {

    WebDriver driver;

     By forgotPasswordPageTitle = By.xpath("//*[@id='app']/div[1]/div[1]/div/form/h6");
     By cancelBtn = By.xpath("//*[@id='app']/div[1]/div[1]/div/form/div[2]/button[1]");
     By resetPasswordBtn = By.xpath("//*[@id='app']/div[1]/div[1]/div/form/div[2]/button[2]");
     By userName = By.name("username");
     By resetMessage = By.xpath("//*[@id='app']/div[1]/div[1]/div/h6");

    public ForgotPasswordPage(WebDriver driver) {
        this.driver = driver;
    }

    // Get the Title of ForgotPage
    public String getForgotPageText() {
        return driver.findElement(forgotPasswordPageTitle).getText();
    }

    // Click Cancel Button
    public void clickOnCancelBtn() {
         driver.findElement(cancelBtn).click();
    }

    // Click ResetPassword Button
    public void clickOnRestPasswordBtn() {
        driver.findElement(resetPasswordBtn).click();
    }

    // Type username in TextBox
    public void TypeOnUsernameTextBox(String username) {
        driver.findElement(userName).sendKeys(username);
    }

    // Get Message
    public String getRestMessage() {
        return driver.findElement(resetMessage).getText();
    }
}
PageObjectManager – This class creates the object of all the above-mentioned Page Object Model classes. This an optional class. If you want you can create the objects in StepDefinition class also.
public class PageObjectManager {

    public LoginPage loginPage;
    public HomePage homePage;
    public ForgotPasswordPage forgotPasswordPage;
    public WebDriver driver;


    public PageObjectManager(WebDriver driver)
    {
        this.driver = driver;
    }

    public LoginPage getLoginPage()
    {

        loginPage= new LoginPage(driver);
        return loginPage;
    }

    public HomePage getHomePage()
    {
        homePage = new HomePage(driver);
        return homePage;
    }

    public ForgotPasswordPage getForgotPasswordPage()
    {
        forgotPasswordPage = new ForgotPasswordPage(driver);
        return forgotPasswordPage;
    }
}
Step 7 – Create the Step Definition classes for both feature files or Glue Code
Below is the Step Definition for LoginPage.feature.
import io.cucumber.java.en.Given;
import io.cucumber.java.en.Then;
import io.cucumber.java.en.When;
import pageObjects.HomePage;
import pageObjects.LoginPage;
import pageObjects.PageObjectManager;
import utils.TestSetUp;
import org.testng.Assert;

public class LoginPageDefinitions {

    TestSetUp setUp;
    public PageObjectManager pageObjectManager;
    public LoginPage loginPage;
    public HomePage homePage;


    public LoginPageDefinitions(TestSetUp setUp) {
        this.setUp = setUp;
        this.loginPage = setUp.pageObjectManager.getLoginPage();
        this.homePage= setUp.pageObjectManager.getHomePage();
    }

    @Given("User is on Home page")
    public void loginTest() throws IOException {
        setUp.baseTest.WebDriverManager().get("https://opensource-demo.orangehrmlive.com/");

    }

    @When("User enters username as {string} and password as {string}")
    public void goToHomePage(String userName, String passWord) {

        // login to application
        loginPage.login(userName, passWord);

        // go the next page

    }

    @Then("User should be able to login successfully")
    public void verifyLogin() {

        // Verify home page
        Assert.assertTrue(homePage.getHomePageText().contains("Dashboard"));

    }

    @Then("User should be able to see error message {string}")
    public void verifyErrorMessage(String expectedErrorMessage) {

        // Verify home page
        Assert.assertEquals(loginPage.getErrorMessage(),expectedErrorMessage);

    }

}
Below is the Step Definition for ForgotPasswordPage.feature.
import io.cucumber.java.en.Then;
import io.cucumber.java.en.When;
import pageObjects.ForgotPasswordPage;
import pageObjects.LoginPage;
import pageObjects.PageObjectManager;
import utils.TestSetUp;
import org.testng.Assert;

public class ForgotPasswordPageDefinitions{

    TestSetUp setUp;
    PageObjectManager pageObjectManager;
    public LoginPage loginPage;
    public  ForgotPasswordPage forgotPasswordPage;

    public ForgotPageDefinitions(TestSetUp setUp) {
        this.setUp = setUp;
        this.loginPage = setUp.pageObjectManager.getLoginPage();
        this.forgotPasswordPage = setUp.pageObjectManager.getForgotPasswordPage();
    }

    @When("User clicks on Forgot your password? link")
    public void forgotPasswordLink() {

        loginPage.clickOnForgotPasswordLink();

    }

    @Then("User should be able to navigate to Reset Password page")
    public void verifyForgotPasswordPage() {

        Assert.assertEquals(forgotPasswordPage.getForgotPageText(),"Reset Password");

    }

    @Then("User clicks on Cancel button to go back to Login Page")
    public void verifyCancelBtn() {

        forgotPasswordPage.clickOnCancelBtn();
        Assert.assertEquals(loginPage.getLoginPageTitle(),"Login");

    }

    @Then("User clicks on Reset Password button and provide username as {string}")
    public void verifyResetPasswordBtn(String username) {

        forgotPasswordPage.TypeOnUsernameTextBox(username);
        forgotPasswordPage.clickOnRestPasswordBtn();

    }

    @Then("Verify the message {string}")
    public void verifyMessage(String message) {

        Assert.assertEquals(forgotPasswordPage.getRestMessage(),message);

    }
}
Step 8 – Create the Hook Class and Dependency Injection class (TestSetUp) and BaseTest class
Below is the code for the ApplicationHook Class.
import io.cucumber.java.After;
import utils.TestSetUp;

public class ApplicationHooks {

 public TestSetUp setUp;

    public ApplicationHooks(TestSetUp setUp) {
        this.setUp = setUp;
    }

    @After
    public void tearDown( ) throws IOException {
        setUp.baseTest.WebDriverManager().quit();
    }
}
Below is the code for the Dependency Injection class. In Cucumber, if we want to share the state between multiple-step definition files, we will need to use dependency injection (DI).
import org.openqa.selenium.WebDriver;
import org.openqa.selenium.WebElement;
import pageObjects.PageObjectManager;

public class TestSetUp {

    public WebElement errorMessage;
    public WebElement homePageUserName;
    public PageObjectManager pageObjectManager;
    public BaseTest baseTest;

    public TestSetUp()  {

        baseTest = new BaseTest();
        pageObjectManager = new PageObjectManager(baseTest.WebDriverManager());

    }
}
BaseTest class is used to initialize the WebDriver.
import io.github.bonigarcia.wdm.WebDriverManager;
import org.openqa.selenium.WebDriver;
import org.openqa.selenium.chrome.ChromeDriver;
import java.time.Duration;

public class BaseTest {

    public WebDriver driver;
    public final static int TIMEOUT = 10;

    public WebDriver WebDriverManager ()  {


        if (driver == null) {

            ChromeOptions options = new ChromeOptions();
            driver = new ChromeDriver(options);
            driver.manage().timeouts().implicitlyWait(Duration.ofSeconds(TIMEOUT));
            driver.manage().window().maximize();
            driver.get(url);

        }
        return driver;
    }
}
Step 9 – Create a Cucumber TestNG Runner class
Add a cucumber runner by extending the AbstractTestNGCucumberTests class and overriding the scenarios method. Set the parallel option value to true for the DataProvider annotation.
import io.cucumber.testng.AbstractTestNGCucumberTests;
import io.cucumber.testng.CucumberOptions;
import org.testng.annotations.DataProvider;

@CucumberOptions(tags = "", features = "src/test/resources/features", glue = "org.example.definitions")
public class CucumberRunnerTests  extends AbstractTestNGCucumberTests {

   @Override
    @DataProvider(parallel = true)
    public Object[][] scenarios() {
        return super.scenarios();
    }

}
Step 10 – Report Generation
Add cucumber.properties under src/test/resources and add the below instruction in the file.
cucumber.publish.enabled=true
Step 11 – Execute the test from Command Line
Use the below-mentioned command in the command prompt to run the tests.
mvn clean test
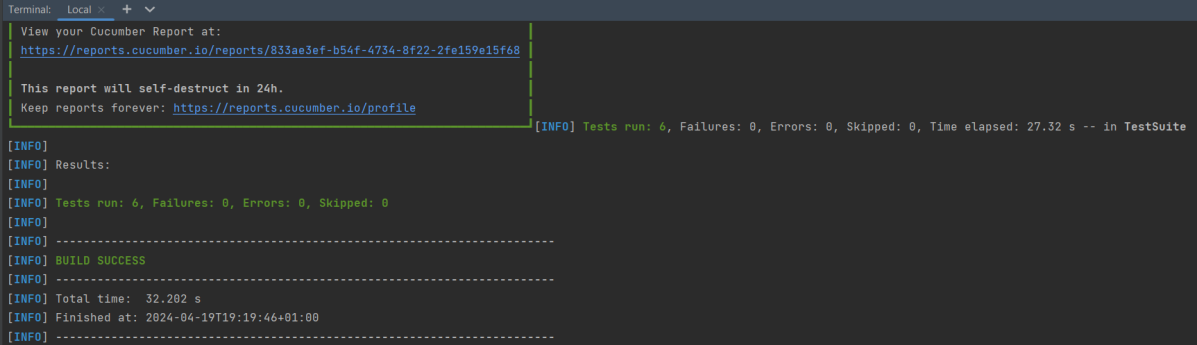
The output of the above program is
Step 12 – Execute the tests from TestNG Runner
Go to the Runner class and right-click Run As TestNG Test. The tests will run as TestNG tests. (Eclipse)
In the case of IntelliJ, right-click and select Run “CucumberRunnerTests”.
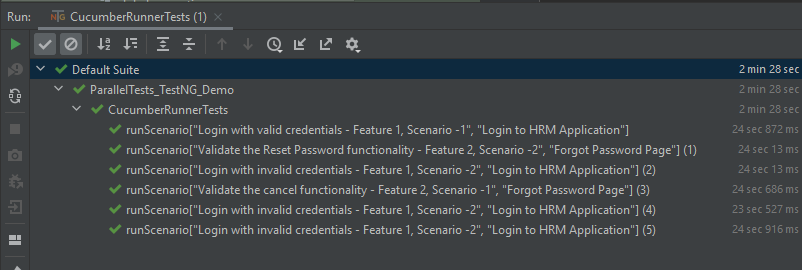
Step 13 – Test Execution Result
All the tests are started at the same time, so they share different threads. The way tests are executed is different in them. With non-parallel tests, all the scenarios of the same feature are executed together, and then the scenarios of another feature file. Whereas in parallel tests, all the tests are started at the same time, so there won’t be any specific order.
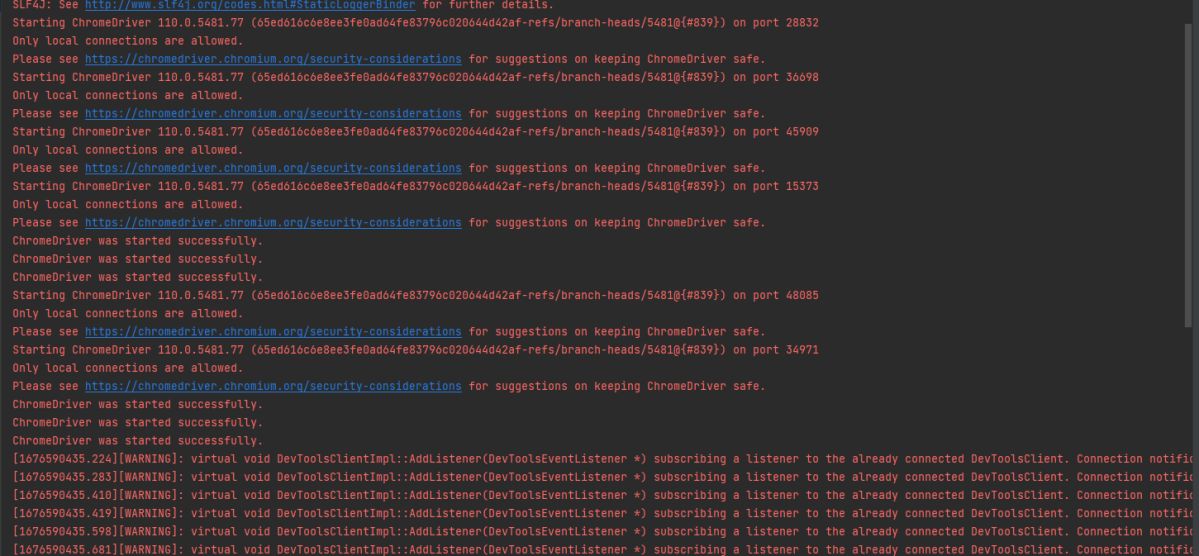
All the scenarios have started simultaneously.
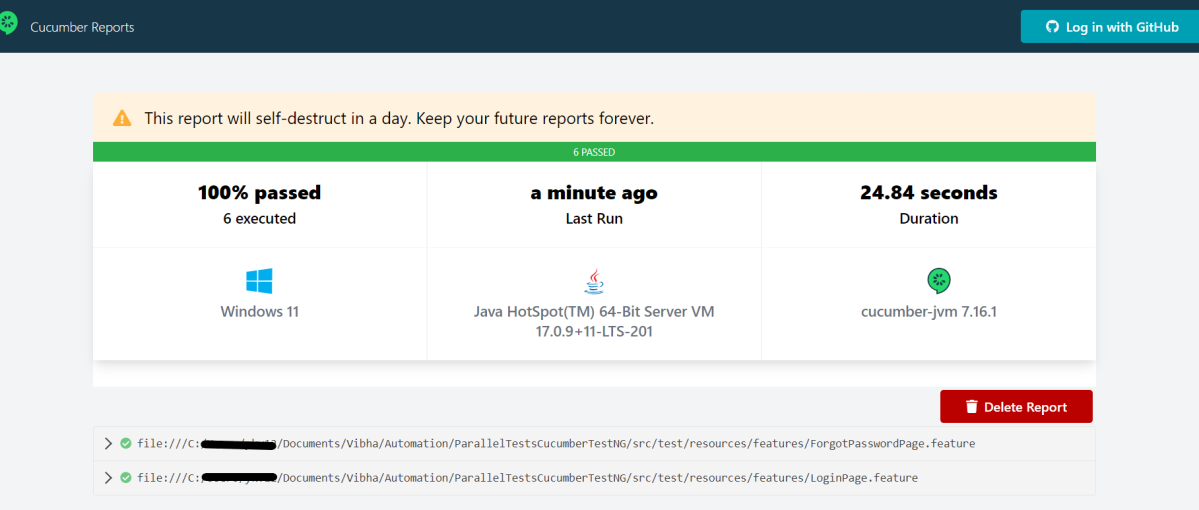
The Cucumber Report is shown below:
There are chances that we don’t want to run all the scenarios simultaneously, in this case, we need to add the below-mentioned configuration in the pom.xml. The value =2 means that 2 scenarios will be executed simultaneously.
In the previous tutorial, it is explained how to automate Checkbox in Selenium. In this tutorial, we will learn how to handle Drop Down & Multiple Select Operations. DropDown & Multiple Select Operations work together and almost the same way. The only difference between these two deselecting statements & multiple selections is not allowed on DropDown.
To identify DropDown or multi-select list on a web page, we can use any one of the options like id, name, xpath, css, etc.
To perform any operation on DropDown, we need to do 2 things:-
1) Selenium WebDrivers provides a class called “Select “class that is used to automate dropdown, and it is imported from the package:
org.openqa.selenium.support.ui.Select
2) Create a new Select object of class Select.
Select oSelect = new Select());
We can access all the methods residing inside the SELECT class by typing oSelect + dot.
Different Select Commands
Before we discuss various select commands, we should know how the HTML code of DropDown actually looks
1) selectByVisibleText
selectByVisibleText(String arg0): void – Choose the option given under any dropdowns and multiple selection boxes with selectByVisibleText method. It takes a parameter of String that is one of the Value of Select element and it returns nothing.
To select the text One
select.selectByVisibleText("One");
2) selectByIndex
selectByIndex(int arg0): void – It is almost the same as selectByVisibleText but the only difference here is that we provide the index number of the option here rather than the option text. It takes a parameter of int which is the index value of the Select element and it returns nothing.
To select the value 3 using index
select.selectByIndex(3);
3) selectByValue
selectByValue(String arg0): void – It selects the option of the value. It takes a parameter of String that is of the value of the Select element and it returns nothing.
To select the value of two
 Select mselect = new Select(driver.findElement(By.id("redirect")));
 mselect.selectByValue("two");
Let us explain this with the help of an example.
1) Launch a new Browser and open “https://www.selenium.dev/selenium/web/formPage.html“ 2) Print the list of options in the dropdown. 3) Select option ‘One’ (Use selectByVisibleText) 4) Select option ‘3’ (Use selectByIndex) 5) Select option ‘two’ (Use selectByValue) 6) Close the browser
The complete program looks like as shown below:
package org.example;

import org.openqa.selenium.By;
import org.openqa.selenium.WebDriver;
import org.openqa.selenium.WebElement;
import org.openqa.selenium.firefox.FirefoxDriver;
import org.openqa.selenium.firefox.FirefoxOptions;
import org.openqa.selenium.support.ui.Select;

import java.time.Duration;
import java.util.List;

public class DropDown_Demo {

    public static void main(String[] args)  {

        // Initiate Firefox browser
        FirefoxOptions firefoxOptions = new FirefoxOptions();
        WebDriver driver = new FirefoxDriver(firefoxOptions);

        // Implicit Wait
        driver.manage().window().maximize();
        driver.manage().timeouts().implicitlyWait(Duration.ofSeconds(5));

        // Pass application url
        driver.get("https://www.selenium.dev/selenium/web/formPage.html");

        //Get the list of options from dropdown
        Select select = new Select(driver.findElement(By.name("select-default")));
        List<WebElement> listElements = select.getOptions();
        System.out.println("List of options in dropdown:" );
        for(WebElement options: listElements)
            System.out.println(options.getText());

        // Select option 'Two' (Use selectByVisibleText)
        System.out.println("Select the Option by Text - One");
        select.selectByVisibleText("One");

        // Select option '3' (Use selectByIndex)
        System.out.println("Select the Option by Index 3 - Still learning how to count, apparently");
        select.selectByIndex(3);

        // Select option 'two' (Use selectByValue)
        System.out.println("Select the Option by selectByValue - two");
        Select mselect = new Select(driver.findElement(By.id("redirect")));
        mselect.selectByValue("two");

        // close the browser
        driver.close();
    }

}
The output of the above program is
Different DeSelect Methods
The way we select different values of DropDown and Multi Select, we can deselect the options similarly.
1) deselectAll
deselectAll( ): void – Clear all selected entries. This is only valid when the SELECT supports multiple selections.
Syntax:
oSelect.deselectAll;
2) deselectByIndex
deselectByIndex(int arg0): void –Deselect the option at the given index.
Syntax:
oSelect.deselectByIndex;
3) deselectByValue
deselectByValue(String arg0): void –Deselect all options that have a value matching the argument.
Syntax:
oSelect.deselectByValue;
4) deselectByVisibleText
deselectByVisibleText(String arg0): void – Deselect all options that display text matching the argument.
Syntax:
oSelect.deselectByVisibleText
Below is an example of how to operate on multi-selection options.
1) Launch a new Browser and open “https://www.selenium.dev/selenium/web/formPage.html“ 2) Print the list of options in the dropdown. 3) Select options ‘eggs’ and ‘sausages’. 4) Print and select all the options for the selected Multiple selection list. 5) Deselect option eggs. 6) Deselect all options 7) Close the browser
package org.example;

import org.openqa.selenium.By;
import org.openqa.selenium.WebDriver;
import org.openqa.selenium.WebElement;
import org.openqa.selenium.firefox.FirefoxDriver;
import org.openqa.selenium.firefox.FirefoxOptions;
import org.openqa.selenium.support.ui.Select;

import java.time.Duration;
import java.util.List;

public class MultiSelect_Demo {

    public static void main(String[] args) {

        // Initiate Firefox browser
        FirefoxOptions firefoxOptions = new FirefoxOptions();
        WebDriver driver = new FirefoxDriver(firefoxOptions);

        // Implicit Wait
        driver.manage().window().maximize();
        driver.manage().timeouts().implicitlyWait(Duration.ofSeconds(5));

        // Pass application url
        driver.get("https://www.selenium.dev/selenium/web/formPage.html");

        //Get the list of options from dropdown
        Select select = new Select(driver.findElement(By.name("multi")));
        List<WebElement> listElements = select.getOptions();
        System.out.println("List of options in dropdown:");
        for (WebElement options : listElements)
            System.out.println(options.getText());

        // Select option 'Ham' (Use selectByVisibleText)
        System.out.println("Select the Option by Text - Eggs");
        select.selectByVisibleText("Eggs");

        // Select option '2' (Use selectByIndex)
        System.out.println("Select the Option by Index 2 - Sausages");
        select.selectByIndex(2);

        System.out.println("*************************************");
        //Get the list of selected options
        System.out.println("The selected values in the dropdown options are -");
        List<WebElement> selectedOptions = select.getAllSelectedOptions();

        for(WebElement selectedOption: selectedOptions)
            System.out.println(selectedOption.getText());

        // Deselect the value "eggs" by Value
        System.out.println("*************************************");
        System.out.println("DeSelect option eggs by Value");
        select.deselectByValue("eggs");

        System.out.println("*************************************");
        System.out.println("The latest selected values in the dropdown options are -");
        List<WebElement> reselectedOptions = select.getAllSelectedOptions();

        for(WebElement selectedOption: reselectedOptions)
            System.out.println(selectedOption.getText());

        select.deselectAll();

        driver.quit();
    }
}
The output of the above program is
That’s it! Congratulations on making it through this tutorial and hope you found it useful! Happy Learning!!
When we launch a browser using Selenium WebDriver, by default it is not in its maximized state. In this post, we will see how to maximize and minimize a browser during automation.
Maximize the window
It is recommended to maximize the browser before performing any operation on the browser to make sure that the tests run in a consistent environment, with a known window size. This helps in avoiding issues that might arise due to varying browser window sizes. When the browser window isn’t maximized, certain web elements might be hidden or located outside the visible area. Maximizing the window makes sure these elements become visible and accessible for interaction during automated testing.
driver.manage().window().maximize();
Below is an example to maximize the window.
package org.example;

import org.openqa.selenium.WebDriver;
import org.openqa.selenium.chrome.ChromeDriver;

import java.time.Duration;

public class Maximize_Demo {

    public static void main(String args[])  {

        WebDriver driver = new ChromeDriver();
        driver.manage().window().maximize();
        driver.manage().timeouts().implicitlyWait(Duration.ofSeconds(4));
        driver.get("https://www.bing.com/");
        System.out.println("Page Title :" + driver.getTitle());
        driver.quit();
    }
}
The output of the above program is
Minimize the window
Minimizing the window enables us to carry out background tasks or operations on the machine without disrupting the test execution. This can be especially useful when we need to work on other tasks while the tests are in progress.
Minimizing the window can sometimes reveal behaviors or functionalities that are triggered when the browser window is not in focus or is minimized. This can be valuable for testing scenarios where the application’s behavior under such conditions needs to be verified.
Selenium 4 and above support the below code.
driver.manage().window().minimize();
Below is an example to minimize the window.
package org.example;

import org.openqa.selenium.WebDriver;
import org.openqa.selenium.chrome.ChromeDriver;

import java.time.Duration;

public class Minimize_Demo {

    public static void main(String args[]) {

        WebDriver driver = new ChromeDriver();
        driver.manage().window().minimize();
        driver.manage().timeouts().implicitlyWait(Duration.ofSeconds(4));
        driver.get("https://www.bing.com/");
        System.out.println("Page Title :" + driver.getTitle());
        driver.quit();
    }
}
The output of the above program is
That’s it! Congratulations on making it through this tutorial and hope you found it useful! Happy Learning!!
In the last tutorial, I have explain the Parameters in TestNG which passes different test data to the test case as arguments. Similar to TestNG Parameters, DataProviders are a means to pass data to test scripts in TestNG. In this tutorial, I will explain about the DataProviders in TestNG.
What is DataProvider in TestNG?
The DataProvider in TestNG is another way to pass the parameters in the test function, the other one being TestNG parameters. Using DataProvider in TestNG, we can easily inject multiple values into the same test case. It comes inbuilt in TestNG and is popularly used in data-driven frameworks.
Syntax of DataProvider
@DataProvider (name = "name_of_dataprovider")
public Object[][] dpMethod() {
    return new Object [][] { values}
}
A Data Provider is a method on the class that returns an array of array of objects. This method is annotated with @DataProvider
A @Test method specifies its Data Provider with the dataProvider attribute. This name must correspond to a method on the same class annotated with @DataProvider(name=”…”) with a matching name.
TestNG dataprovider returns a 2d list of objects..An array of array of objects (Object[][]) where the first dimension’s size is the number of times the test method will be invoked and the second dimension size contains an array of objects that must be compatible with the parameter types of the test method.
DataProviders are not declared on top of the functions like TestNG parameters but have a method of their own, which in regular speaking terms called a dataprovider method. For example, dpMethod here.
The dataprovider name calls the dataprovider method, and if there is no name specified by the tester, then the dataprovider method is the default name used in the receiving @Test case.
Data providers can run in parallel with the attribute parallel.
Below is the basic example of using DataProvider in TestNG.
import org.openqa.selenium.By;
import org.openqa.selenium.Keys;
import org.openqa.selenium.WebDriver;
import org.openqa.selenium.WebElement;
import org.openqa.selenium.chrome.ChromeDriver;
import org.openqa.selenium.chrome.ChromeOptions;
import org.testng.annotations.AfterMethod;
import org.testng.annotations.BeforeMethod;
import org.testng.annotations.DataProvider;
import org.testng.annotations.Test;

public class DataProvider_Demo {

    WebDriver driver;

    @DataProvider(name = "testData")
    public Object[][] dataProvFunc() {
        return new Object[][] { { "Selenium" }, { "TestNG" } };
    }

    @BeforeMethod
    public void setUp() {

        System.out.println("Start the test");
        ChromeOptions options = new ChromeOptions();
        options.addArguments("--start-maximized");
        driver = new ChromeDriver(options);
        driver.get("https://www.bing.com/");

    }

    // Passing the dataProvider to the test method through @Test annotation
    @Test(dataProvider = "testData")
    public void search(String keyWord) {
        WebElement txtBox = driver.findElement(By.id("sb_form_q"));
        txtBox.sendKeys(keyWord);
        System.out.println("Keyword entered is : " + keyWord);
        txtBox.sendKeys(Keys.ENTER);
        System.out.println("Search result is displayed.");
    }

    @AfterMethod
    public void burnDown() {
        driver.quit();

        System.out.println("End the test");
    }

}
In the above example, I am passing two search keywords, viz “Selenium” and “TestNG” to the test method using the DataProvider method. You can run the code and check the output.
The output of the above program is
Here, Test is executed with two values, but we have run the test only once.
Inheriting DataProvider in TestNG
It is messy to have supporting methods like DataProvider and test code in one class. It is always preferred to declare the test case in one class and define TestNG parameters like DataProviders in another class. By default, the data provider will be looked for in the current test class or one of its base classes. If you want to put your data provider in a different class, it needs to be a static method or a class with a non-arg constructor, and you specify the class where it can be found in the dataProviderClass attribute.
Let us create separate classes for the DataProvider method and the test method, as shown below:
DataProvider Class
public class DPDemo {

	@DataProvider(name = "testData")
	public Object[][] dataProvFunc() {
		return new Object[][] {
          { "Selenium" }, { "TestNG" }, { "Automation" } };
	}
}
We can see that all we did was create a DataProvider method in a Class and create a new class for Test Code.
import org.openqa.selenium.By;
import org.openqa.selenium.Keys;
import org.openqa.selenium.WebDriver;
import org.openqa.selenium.WebElement;
import org.openqa.selenium.chrome.ChromeDriver;
import org.openqa.selenium.chrome.ChromeOptions;
import org.testng.annotations.AfterMethod;
import org.testng.annotations.BeforeMethod;
import org.testng.annotations.Test;

public class DataProviderInheritance_Demo {

    WebDriver driver;

    @BeforeMethod
    public void setUp() {

        System.out.println("Start the test");
        ChromeOptions options = new ChromeOptions();
        options.addArguments("--start-maximized");
        driver = new ChromeDriver(options);
        driver.get("https://www.bing.com/");

    }

    // Passing the dataProvider to the test method through @Test annotation
    @Test(dataProvider = "testData", dataProviderClass = DPDemo.class)
    public void search(String keyWord) {
        WebElement txtBox = driver.findElement(By.id("sb_form_q"));
        txtBox.sendKeys(keyWord);
        System.out.println("Keyword entered is : " + keyWord);
        txtBox.sendKeys(Keys.ENTER);
        System.out.println("Search result is displayed.");
    }

    @AfterMethod
    public void burnDown() {
        driver.quit();
        System.out.println("End the test");
    }

}
As you can see, to handle the inheritance, all we did was add an attribute to the test method (highlighted above), which specifies the class that has the DataProvider method.
The output of the above program is
Passing Multiple Parameter Values in TestNG DataProviders
Passing multiple values is pretty similar to passing numerous parameters. The only difference is that we will pass various values to a single parameter so that a string of input(s) is sent in one go.
Let us quickly understand this concept with the help of the code as shown below.
DataProvider Class
public class DPDemo {

	@DataProvider(name = "testData")
	public Object[][] dataProvFunc() {
		return new Object[][] { { "Automation Tester", "2-5 years" }, { "Performance Tester", "3+ years" },
				{ "DevOps", "5+ years" } };
	}
}
Test Code – DataProviderInheritanceDemo
import org.openqa.selenium.By;
import org.openqa.selenium.Keys;
import org.openqa.selenium.WebDriver;
import org.openqa.selenium.WebElement;
import org.openqa.selenium.chrome.ChromeDriver;
import org.openqa.selenium.chrome.ChromeOptions;
import org.testng.annotations.AfterMethod;
import org.testng.annotations.BeforeMethod;
import org.testng.annotations.Test;

public class DataProviderInheritanceDemo {

    WebDriver driver;

    @BeforeMethod
    public void setUp() {

        System.out.println("Start the test");
        ChromeOptions options = new ChromeOptions();
        options.addArguments("--start-maximized");
        driver = new ChromeDriver(options);
        driver.get("https://www.bing.com/");

    }

    // Passing the dataProvider to the test method through @Test annotation
    @Test(dataProvider = "testData", dataProviderClass = DPDemo.class)
    public void search(String keyWord1, String keyWord2) {

        WebElement txtBox = driver.findElement(By.id("sb_form_q"));
        txtBox.sendKeys(keyWord1, keyWord2);
        System.out.println("Keyword entered is : " + keyWord1 + " " + keyWord2);
        txtBox.sendKeys(Keys.ENTER);
        System.out.println("Search result is displayed.");
    }

    @AfterMethod
    public void burnDown() {
        driver.quit();
        System.out.println("End the test");
    }
}
Run the test script, and you will see both the values for the TestNG parameters being passed in one go.
The output of the above program is
We are done! Congratulations on making it through this tutorial and hope you found it useful! Happy Learning!!
We can parse the JSON or XML response into POJO classes. After parsing into POJO classes, we can easily get values from the response easily. This is called De-serialization. For this, we can use any JSON parser APIs. Here, we are going to use Gson API.
To start with, add the below dependency to the project.
Let us create a class called Employee with a field name exactly (case-sensitive) the same as node names in the above JSON string because with the default setting while parsing JSON object to Java object, it will look on getter setter methods of field names.
public class Employee {

	// private variables or data members of POJO class
	private String firstName;
	private String lastName;
	private int age;
	private double salary;
	private String designation;
	private String contactNumber;
	private String emailId;

	// Getter and setter methods
	public String getFirstName() {
		return firstName;
	}

	public void setFirstName(String firstName) {
		this.firstName = firstName;
	}

	public String getLastName() {
		return lastName;
	}

	public void setLastName(String lastName) {
		this.lastName = lastName;
	}

	public int getAge() {
		return age;
	}

	public void setAge(int age) {
		this.age = age;
	}

	public double getSalary() {
		return salary;
	}

	public void setSalary(double salary) {
		this.salary = salary;
	}

	public String getDesignation() {
		return designation;
	}

	public void setDesignation(String designation) {
		this.designation = designation;
	}

	public String getContactNumber() {
		return contactNumber;
	}

	public void setContactNumber(String contactNumber) {
		this.contactNumber = contactNumber;
	}

	public String getEmailId() {
		return emailId;
	}

	public void setEmailId(String emailId) {
		this.emailId = emailId;
	}

}
Gson class provides multiple overloaded fromJson() methods to achieve this. Below is a list of available methods:-
In the below test, I have mentioned the JSON Payload string in the test and used Gson API to deserialize the JSON payload to JAVA Object.
   @Test
	public void getDetailFromJson() {

		// De-serializing from JSON String
		String jsonString = "{\r\n" + "  \"firstName\": \"Tom\",\r\n" + "  \"lastName\": \"John\",\r\n"
				+ "  \"age\": 30,\r\n" + "  \"salary\": 50000.0,\r\n" + "  \"designation\": \"Lead\",\r\n"
				+ "  \"contactNumber\": \"+917642218922\",\r\n" + "  \"emailId\": \"abc@test.com\"\r\n" + "}";

		Gson gson = new Gson();
		// Pass JSON string and the POJO class
		Employee employee = gson.fromJson(jsonString, Employee.class);

		// Now use getter method to retrieve values
		System.out.println("Details of Employee is as below:-");
		System.out.println("First Name : " + employee.getFirstName());
		System.out.println("Last Name : " + employee.getLastName());
		System.out.println("Age : " + employee.getAge());
		System.out.println("Salary : " + employee.getSalary());
		System.out.println("designation : " + employee.getDesignation());
		System.out.println("contactNumber : " + employee.getContactNumber());
		System.out.println("emailId : " + employee.getEmailId());
		System.out.println("########################################################");

	}
The output of the above program is
We can get the JSON payload from a file present in a project under src/test/resources as shown in the below image.
public class EmployeeDeserializationGsonTest {

	@Test
	public void fromFile() throws FileNotFoundException {

		Gson gson = new Gson();
		// De-serializing from a json file
		String userDir = System.getProperty("user.dir");
		File inputJsonFile = new File(userDir + "\\src\\test\\resources\\EmployeePayloadUsingGson.json");
		FileReader fileReader = new FileReader(inputJsonFile);
		Employee employee1 = gson.fromJson(fileReader, Employee.class);

		// Now use getter method to retrieve values
		System.out.println("Details of Employee is as below:-");
		System.out.println("First Name : " + employee1.getFirstName());
		System.out.println("Last Name : " + employee1.getLastName());
		System.out.println("Age : " + employee1.getAge());
		System.out.println("Salary : " + employee1.getSalary());
		System.out.println("designation : " + employee1.getDesignation());
		System.out.println("contactNumber : " + employee1.getContactNumber());
		System.out.println("emailId : " + employee1.getEmailId());
		System.out.println("########################################################");
	}
}
The output of the above program is
We are done! Congratulations on making it through this tutorial and hope you found it useful! Happy Learning!!
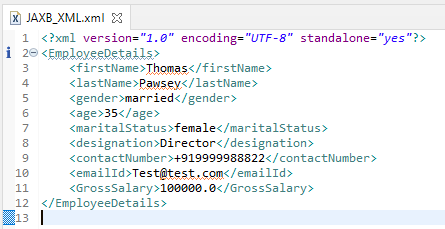
As of Java 11, JAXB is not part of the JRE anymore, and you need to configure the relevant libraries via your dependency management system, for example, either Maven or Gradle.
Configure the Java compiler level to be at least 11 and add the JAXB dependencies to your pom file.
In the previous tutorial, I provided the Introduction of Rest Assured. In this tutorial, I will explain how to set up a basic Rest Assured Maven project in Eclipse IDE. Before starting, let us recap about Rest Assured.
REST Assured is a Java DSL for simplifying testing of REST-based services built on top of HTTP Builder. It supports POST, GET, PUT, DELETE, OPTIONS, PATCH, and HEAD requests. It can be used to validate and verify the response of these requests.
The Rest Assured library also provides the ability to validate the HTTP Responses received from the server. This makes Rest-Assured a very flexible library that can be used for testing.REST Assured can be used to test XML as well as JSON-based web services. REST Assured can be integrated with JUnit and TestNG frameworks for writing test cases for our application.
What is Maven?
Apache Maven is a software project management and comprehension tool. Based on the concept of a project object model (POM), Maven can manage a project’s build, reporting and documentation from a central piece of information.
Implementation Steps
Step 1- Download and Install Java
Rest-Assured needs Java to be installed on the system to run the tests. Click here to learn How to install Java.
Step 2 – Download and setup Eclipse IDE on the system
The Eclipse IDE (integrated development environment) provides strong support for Java developers. Click here to learn How to install Eclipse.
Step 3 – Setup Maven
To build a test framework, we need to add several dependencies to the project. Click here to learn How to install Maven.
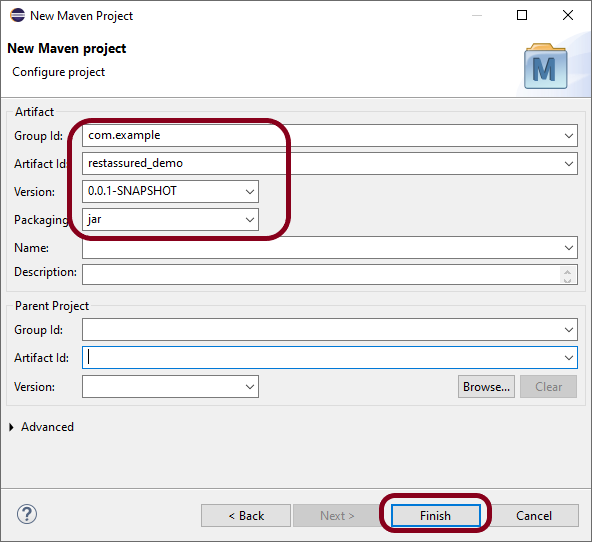
Step 4 – Create a new Maven Project
Go to File -> New Project-> Maven-> Maven project ->Next
Step 4.1 – Select “Create a simple project”. Click on the Next Button.
Step 4.2 – Provide Group Id and Artifact Id and click on the finish button.
Group Id – com.example Artifact Id – restassured_demo
Step 4.3 – Below is the structure of the Maven project in Eclipse.
Step 4.4– This is the structure of POM.xml created for the project.
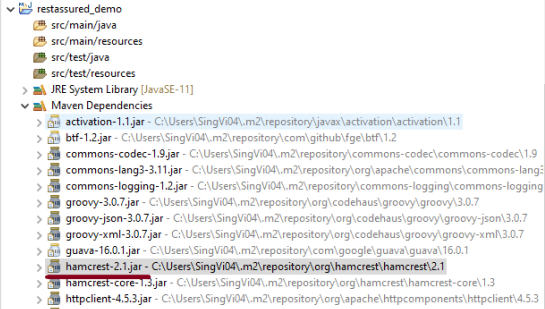
Step 5 – Add Rest Assured, and JUnit dependencies to the project
In the Project Explorer, navigate to your Maven project and open pom.xml. Add REST Assured dependency under dependencies in the pom.xml file. The latest version can be found from here.
Right-click on your project in the Eclipse Project Explorer. Choose `Maven` -> `Update Project…` and confirm to download the specified dependencies.
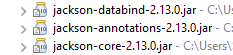
Below are the Rest Assured, and junit jar files present under Maven Dependencies.
Step 8 – Create a Test Class
Right-click on the src/test/java folder, create a new package (e.g., com.example.tests).
Create a new Java class inside this package (e.g., ApiTests.java).
Use the following example to set up a basic REST Assured GET request test.
package com.example.tests;

import org.junit.Test;

import static org.hamcrest.Matchers.equalTo;
import static io.restassured.RestAssured.given;

public class APITests {

	String BaseURL = "https://reqres.in/api/users";

	@Test
	public void getUser() {

		// Given
		given()

				// When
				.when().get(BaseURL + "/2")

				// Then
				.then().statusCode(200).statusLine("HTTP/1.1 200 OK")

				// To verify user of id 2
				.body("data.id", equalTo(2)).body("data.email", equalTo("janet.weaver@reqres.in"))
				.body("data.first_name", equalTo("Janet")).body("data.last_name", equalTo("Weaver"));
	}

}
Step 9 – Run the Test
Right-click on your test class and select Run As -> JUnit Test to execute your REST Assured tests.
The output of the above program is
Point to Remember
1. Don’t add the dependency on Hamcrest explicitly. Rest Assured includes it by default. You can see it in the Maven Dependencies folder under the project.
Congratulations on making it through this tutorial and hope you found it useful! Happy Learning!!
In this tutorial, I will explain the creation of JSON Object Payload with the help of POJO (Plain Old Java Object).
What is POJO?
POJO stands for Plain Old Java Object. It is a very simple object, and it has no bounds or we can say that it has no restrictions other than the Java language specification. Also, it does not require any classpath.
A big advantage of POJO is it increases the readability and reusability of our project code and developers find it easy when understanding the code. Also, POJO is easy to write and anyone can understand them easily.
Now let’s deep dive into some technical terms about the POJO. Below are a few points about the POJO are:
A POJO should not have to extend prespecified classes.
Secondly, a POJO should not have implemented any prespecified interface.
Lastly, POJO should not contain prespecified annotations
A POJO class can follow some rules for better usability. These rules are:-
Each variable should be declared as private just to restrict direct access.
Each variable that needs to be accessed outside class may have a getter, a setter, or both methods. If the value of a field is stored after some calculations, then we must not have any setter method for that.
It Should have a default public constructor.
Can override toString(), hashcode, and equals() methods.
POJO classes are extensively used for creating JSON and XML payloads for API.
In the below example, let me create a simple JSON with some nodes which is actually a 1:1 mapping i.e. each key has a single value, and the type of values is mixed.
Let us create variables in the POJO class now for the above JSON. Now, a class name Employee will be created with the private data members as mentioned in the above JSON. Since we have created all variables as private, then there should be a way to manipulate or retrieve these data. So we create the corresponding getter and setter methods for these data members.
It is very tedious to create getter and setter methods for all the data members for big JSON strings. Every IDE gives you a shortcut to generate getter and setter methods. Here, I am using Eclipse and creating these getter and setter methods.
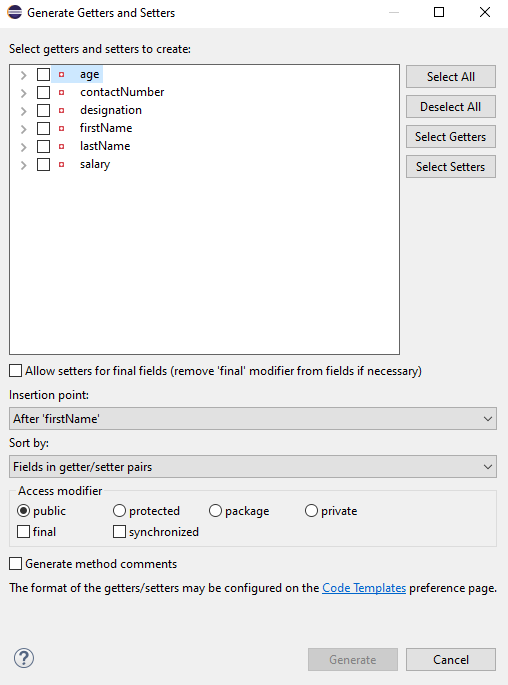
Select all the data members and Right-clickon the page. Then select Source and then select Generate Getter and Setter methods.
This opens a new screen as shown below.
You can select the data member for which you want to create the getter and setter method. I want to create the getter and setter methods for all the data members, so click on Select All and then click on the Generate Button. This will generate the getter and setter methods for all the data members.
Below is the sample code of the Employee table, which contains the data members needed for Employee JSON and their corresponding getter and setter methods.
public class Employee {

	// private variables or data members of POJO class
	private String firstName;
	private String lastName;
	private int age;
	private double salary;
	private String designation;
	private String contactNumber;
	private String emailId;

	// Getter and setter methods
	public String getFirstName() {
		return firstName;
	}

	public void setFirstName(String firstName) {
		this.firstName = firstName;
	}

	public String getLastName() {
		return lastName;
	}

	public void setLastName(String lastName) {
		this.lastName = lastName;
	}

	public int getAge() {
		return age;
	}

	public void setAge(int age) {
		this.age = age;
	}

	public double getSalary() {
		return salary;
	}

	public void setSalary(double salary) {
		this.salary = salary;
	}

	public String getDesignation() {
		return designation;
	}

	public void setDesignation(String designation) {
		this.designation = designation;
	}

	public String getContactNumber() {
		return contactNumber;
	}

	public void setContactNumber(String contactNumber) {
		this.contactNumber = contactNumber;
	}

	public String getEmailId() {
		return emailId;
	}

	public void setEmailId(String emailId) {
		this.emailId = emailId;
	}

}
Using the above POJO class, you can create any number of custom Employee objects and each object can be converted into a JSON Object and Each JSON object can be parsed into Employee POJO.
We will create a JSON object from POJO and vice versa now, which is generally called serialization and deserialization using Jackson APIs.
Serialization – Serialization is a process where you convert an Instance of a Class (Object of a class) into a Byte Stream. Here, we are converting Employee class object to JSON representation or Object
Deserialization – It is the reverse of serializing. In this process, we will read the Serialized byte stream from the file and convert it back into the Class instance representation. Here, we are converting a JSON Object to an Employee class object.
We are using Jackson API for Serialization and Deserialization. So, add the Jackson dependency to the project.
ObjectMapper provides functionality for reading and writing JSON, either to and from basic POJOs (Plain Old Java Objects), or to and from a general-purpose JSON Tree Model (JsonNode), as well as related functionality for performing conversions. It is also highly customizable to work both with different styles of JSON content and to support more advanced object concepts such as polymorphism and object identity.
Now, let us create a Test Class to show Serialization.
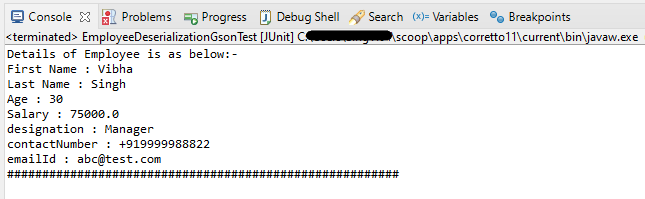
public class EmployeeTest {

	@Test
	public void serializationTest()  {

		Employee employee = new Employee();
		employee.setFirstName("Vibha");
		employee.setLastName("Singh");
		employee.setAge(30);
		employee.setSalary(75000);
		employee.setDesignation("Manager");

		// Converting a Java class object to a JSON payload as string
		ObjectMapper mapper = new ObjectMapper();
		String employeeJson = mapper.writeValueAsString(employee);
		String employeePrettyJson = mapper.writerWithDefaultPrettyPrinter().writeValueAsString(employee);
		System.out.println(employeeJson);
		System.out.println(employeePrettyJson);
   }
}try {
			String employeeJson = mapper.writeValueAsString(employee);
			System.out.println(employeeJson);
			String employeePrettyJson = mapper.writerWithDefaultPrettyPrinter().writeValueAsString(employee);
			System.out.println(employeePrettyJson);
		} catch (JsonProcessingException e) {
			e.printStackTrace();
		}
	}
The output of the above program is
Here, ObjectMapper from fasterxml.jackson.databind is used for Serialization.
writeValueAsString() is a method that can be used to serialize any Java value as a String.
writerWithDefaultPrettyPrinter() is used to pretty-print the JSON output. It is a Factory method for constructing ObjectWriter that will serialize objects using the default pretty printer for indentation.
I hope this has helped to clear your doubts regarding POJO and how to create JSON objects using POJO.
We are done! Congratulations on making it through this tutorial and hope you found it useful! Happy Learning!!