Cucumber Multiple-Choice Questions with Answers – MCQ2

HOME

Cucumber Multiple Choice Questions – MCQ1

Answer


Answer


Answer


Answer


Answer


Answer


Answer


mvn test -Dcucumber.filter.tags="@regression"
mvn test -Dcucumber.tags="@regression"
mvn test -cucumber.filter.tags="@regression"

Answer


mvn test -Dcucumber.features="src/test/resources/features/Login.feature"
mvn test -Dcucumber.features="src/test/resources/features/Login"
mvn test -cucumber.feature="src/test/resources/features/Login.feature"

Answer


mvn test -Dcucumber.gluecode="com.example.stepdefinitions"
mvn test -Dcucumber.glue_code="com.example.stepdefinitions"
mvn test -Dcucumber.glue="com.example.stepdefinitions"

Answer


mvn test -Dcucumber.plugin="html:target/cucumber-reports/cucumberReport.html"
mvn test -cucumber.plugin="html:target/cucumber-reports/cucumberReport.html"
mvn test -Dcucumber.plugins="target/cucumber-reports/cucumberReport"

Answer


Answer


Scenario Outline: Login to Home Page
  Given user is logged in
  When user clicks <link>
  Then user will be logged out

  @mobile
  Examples:
    | link                   |
    |  mobile logout |

  @desktop
  Examples:
    | link                    |
    | desktop logout |

Answer


Answer


mvn test -Dcucumber.features="src/test/resources/LoginPage.feature" -Dcucumber.filter.tags="@ValidCredentials"
mvn test -Dcucumber.features="src/test/resources/LoginPage.feature" and -Dcucumber.filter.tags="@ValidCredentials"
mvn test -Dcucumber.features="src/test/resources/LoginPage.feature" or -Dcucumber.filter.tags="@ValidCredentials"

Answer


Answer


import io.cucumber.junit.CucumberOptions;
import org.junit.runner.RunWith;

@RunWith
@CucumberOptions(plugin = {"pretty"})
public class RunCucumberTest {
}
import io.cucumber.junit.Cucumber;
import io.cucumber.junit.CucumberOptions;

@CucumberOptions(plugin = {"pretty"})
public class RunCucumberTest {
}
import io.cucumber.junit.Cucumber;
import io.cucumber.junit.CucumberOptions;
import org.junit.runner.RunWith;

@RunWith(Cucumber.class)
@CucumberOptions(plugin = {"pretty"})
public class RunCucumberTest {
}

Answer


Answer


import io.cucumber.junit.Cucumber;
import io.cucumber.junit.CucumberOptions;
import org.junit.runner.RunWith;

@RunWith(Cucumber.class)
@CucumberOptions(monochrome=true)
public class RunCucumberTest {
}
import io.cucumber.junit.Cucumber;
import io.cucumber.junit.CucumberOptions;
import org.junit.runner.RunWith;

@RunWith(Cucumber.class)
@CucumberOptions(plugin = {"pretty", "summary"})
public class RunCucumberTest {
}
import io.cucumber.junit.Cucumber;
import io.cucumber.junit.CucumberOptions;
import org.junit.runner.RunWith;

@RunWith(Cucumber.class)
@CucumberOptions(snippets = SnippetType.CAMELCASE)
public class RunCucumberTest {
}
import io.cucumber.junit.Cucumber;
import io.cucumber.junit.CucumberOptions;
import org.junit.runner.RunWith;

@RunWith(Cucumber.class)
@CucumberOptions(dryRun=true)
public class RunCucumberTest {
}

Answer


mvn test -Dcucumber.tags="@smoke and @regression"

Answer


Answer


Answer


Answer


Answer


import io.cucumber.testng.AbstractTestNGCucumberTests;
import io.cucumber.testng.CucumberOptions;
 
@CucumberOptions(features = "src/test/resources/Features")
 public class CucumberRunnerTests extends AbstractTestNGCucumberTests {
 
}

Answer

====================================================================

API Automation with REST Assured, Cucumber and TestNG

HOME

Cucumber is not an API automation tool, but it works well with other API automation tools.

There are 2 most commonly used Automation Tools for JVM to test API – Rest-Assured and Karate. In this tutorial, I will use RestAssured with Cucumber and TestNG for API Testing.

What is Rest Assured?

REST Assured is a Java library that provides a domain-specific language (DSL) for writing powerful, maintainable tests for RESTful APIs. REST Assured can be used easily in combination with existing unit testing frameworks, such as JUnit and TestNG. Rest assured, no matter how complex the JSON structures are, Rest Assured has methods to retrieve data from almost every part of the request and response.

What is Cucumber?

Cucumber is one such open-source tool, which supports Behaviour Driven Development(BDD). In simple words, Cucumber can be defined as a testing framework, driven by plain English. It serves as documentation, automated tests, and development aid – all in one.

Each scenario is a set of steps that the Cucumber must complete. Cucumber validates the software’s compliance with the specification and generates a report indicating success or failure for each scenario.

The cucumber must adhere to some basic syntax rules known as Gherkin to comprehend the scenarios.

In this tutorial, I will explain creating a framework for the testing of Rest API in Cucumber BDD.

Dependency List

  1. Cucumber – 7.18.0
  2. Java 17
  3. TestNG – 7.10.2
  4. Maven – 3.9.6
  5. Rest Assured – 5.4.0
  6. Maven Compiler – 3.13.0
  7. Maven Surefire – 3.2.5

Project Structure

Step 1 – Download and Install Java

Cucumber and Rest-Assured need Java to be installed on the system to run the tests. Click here to learn How to install Java.

Step 2 – Download and setup Eclipse IDE on the system

The Eclipse IDE (integrated development environment) provides strong support for Java developers. Click here to learn How to install Eclipse.

Step 3 – Setup Maven

To build a test framework, we need to add several dependencies to the project. Click here to learn How to install Maven.

Step 4 – Create a new Maven Project

File -> New Project-> Maven-> Maven project-> Next -> Enter Group ID & Artifact ID -> Finish

Click here to learn How to create a Maven project

Step 5 – Install the Cucumber Eclipse plugin for the Eclipse project (Eclipse Only)

The Cucumber plugin is an Eclipse plugin that allows Eclipse to understand the Gherkin syntax. Cucumber Eclipse Plugin highlights the keywords present in the Feature File. To install Cucumber Eclipse Plugin, please refer to this tutorial – How to install Cucumber Eclipse Plugin.

Step 6 – Create source folder src/test/resources

A new Maven Project is created with 2 folders – src/main/java and src/test/java. To create test scenarios, we need a new source folder called – src/test/resources. To create this folder, right-click on your Maven project ->select New ->Java, and then Source Folder.

Mention the source folder name as src/test/resources and click the Next button. This will create a source folder under your new Maven project.

Step 7 – Add dependencies to the project

<properties>
    <project.build.sourceEncoding>UTF-8</project.build.sourceEncoding>
    <rest.assured.version>5.4.0</rest.assured.version>
    <cucumber.version>7.18.0</cucumber.version>
    <testng.version>7.10.2</testng.version>
    <maven.compiler.plugin.version>3.13.0</maven.compiler.plugin.version>
    <maven.compiler.source>17</maven.compiler.source>
    <maven.compiler.target>17</maven.compiler.target>
    <maven.surefire.plugin.version>3.2.5</maven.surefire.plugin.version>
  </properties>

  <dependencies>

    <!-- Rest Assured -->
    <dependency>
      <groupId>io.rest-assured</groupId>
      <artifactId>rest-assured</artifactId>
      <version>${rest.assured.version}</version>
      <scope>test</scope>
    </dependency>

    <!-- Cucumber with TestNG -->
    <dependency>
      <groupId>io.cucumber</groupId>
      <artifactId>cucumber-testng</artifactId>
      <version>${cucumber.version}</version>
    </dependency>

    <!-- Cucumber with Java -->
    <dependency>
      <groupId>io.cucumber</groupId>
      <artifactId>cucumber-java</artifactId>
      <version>${cucumber.version}</version>
    </dependency>

    <!-- TestNG -->
    <dependency>
      <groupId>org.testng</groupId>
      <artifactId>testng</artifactId>
      <version>${testng.version}</version>
      <scope>test</scope>
    </dependency>

  </dependencies>

Step 8 – Add Maven Compiler Plugin and Surefire Plugin

The compiler plugin is used to compile the source code of a Maven project. This plugin has two goals, which are already bound to specific phases of the default lifecycle:

  • compile – compile main source files
  • testCompile – compile test source files
 <build>
    <plugins>
      <plugin>
        <groupId>org.apache.maven.plugins</groupId>
        <artifactId>maven-compiler-plugin</artifactId>
        <version>${maven.compiler.plugin.version}</version>
        <configuration>
          <source>${maven.compiler.source}</source>
          <target>${maven.compiler.target}</target>
        </configuration>
      </plugin>

      <plugin>
        <groupId>org.apache.maven.plugins</groupId>
        <artifactId>maven-surefire-plugin</artifactId>
        <version>${maven.surefire.plugin.version}</version>
        <configuration>
          <suiteXmlFiles>
            <suiteXmlFile>testng.xml</suiteXmlFile>
          </suiteXmlFiles>
        </configuration>
      </plugin>
    </plugins>
  </build>

The complete POM.xml will look like something below:

<project xmlns="http://maven.apache.org/POM/4.0.0" xmlns:xsi="http://www.w3.org/2001/XMLSchema-instance"
  xsi:schemaLocation="http://maven.apache.org/POM/4.0.0 http://maven.apache.org/xsd/maven-4.0.0.xsd">
  <modelVersion>4.0.0</modelVersion>

  <groupId>com.example</groupId>
  <artifactId>RestAPI_Cucumber_TestNG_Demo</artifactId>
  <version>1.0-SNAPSHOT</version>
  <packaging>jar</packaging>

  <name>RestAPI_Cucumber_TestNG_Demo</name>
  <url>http://maven.apache.org</url>

  <properties>
    <project.build.sourceEncoding>UTF-8</project.build.sourceEncoding>
    <rest.assured.version>5.4.0</rest.assured.version>
    <cucumber.version>7.18.0</cucumber.version>
    <testng.version>7.10.2</testng.version>
    <maven.compiler.plugin.version>3.13.0</maven.compiler.plugin.version>
    <maven.compiler.source>17</maven.compiler.source>
    <maven.compiler.target>17</maven.compiler.target>
    <maven.surefire.plugin.version>3.2.5</maven.surefire.plugin.version>
  </properties>

  <dependencies>

    <!-- Rest Assured -->
    <dependency>
      <groupId>io.rest-assured</groupId>
      <artifactId>rest-assured</artifactId>
      <version>${rest.assured.version}</version>
      <scope>test</scope>
    </dependency>

    <!-- Cucumber with TestNG -->
    <dependency>
      <groupId>io.cucumber</groupId>
      <artifactId>cucumber-testng</artifactId>
      <version>${cucumber.version}</version>
    </dependency>

    <!-- Cucumber with Java -->
    <dependency>
      <groupId>io.cucumber</groupId>
      <artifactId>cucumber-java</artifactId>
      <version>${cucumber.version}</version>
    </dependency>

    <!-- TestNG -->
    <dependency>
      <groupId>org.testng</groupId>
      <artifactId>testng</artifactId>
      <version>${testng.version}</version>
      <scope>test</scope>
    </dependency>

  </dependencies>

  <build>
    <plugins>
      <plugin>
        <groupId>org.apache.maven.plugins</groupId>
        <artifactId>maven-compiler-plugin</artifactId>
        <version>${maven.compiler.plugin.version}</version>
        <configuration>
          <source>${maven.compiler.source}</source>
          <target>${maven.compiler.target}</target>
        </configuration>
      </plugin>

      <plugin>
        <groupId>org.apache.maven.plugins</groupId>
        <artifactId>maven-surefire-plugin</artifactId>
        <version>${maven.surefire.plugin.version}</version>
        <configuration>
          <suiteXmlFiles>
            <suiteXmlFile>testng.xml</suiteXmlFile>
          </suiteXmlFiles>
        </configuration>
      </plugin>
    </plugins>
  </build>
</project>

Step 9 – Create a feature file under src/test/resources

Create a folder with name features. Now, create the feature file in this folder. The feature file should be saved with the extension .feature. This feature file contains the test scenarios created to test the application. The Test Scenarios are written in Gherkins language in the format of Given, When, Then, And, But.

Below is an example of a Test Scenario where we are using the GET method to get the information from the API.

Feature: Validation of get method

  @GetUserDetails
  Scenario Outline: Send a valid Request to get user details

    Given I send a request to the URL to get user details
    Then the response will return status <statusCode> and id <id> and email "<employee_email>" and first name "<employee_firstname>" and last name "<employee_lastname>"

    Examples:
    | statusCode | id  | employee_email          | employee_firstname | employee_lastname |
    | 200        | 2   | janet.weaver@reqres.in  | Janet              | Weaver            |

Step 10 – Create the Step Definition class or Glue Code

StepDefinition acts as an intermediate to your runner and feature file. It stores the mapping between each step of the scenario in the Feature file. So when you run the scenario, it will scan the step definition file to check the matched glue or test code.

import io.cucumber.java.en.Given;
import io.cucumber.java.en.Then;
import io.restassured.http.ContentType;
import io.restassured.response.ValidatableResponse;

import static io.restassured.RestAssured.given;
import static org.hamcrest.Matchers.equalTo;

public class APIDemoDefinitions {

    private ValidatableResponse validatableResponse;
    private String endpoint = "https://reqres.in/api/users/2";

    @Given("I send a request to the URL to get user details")
    public void sendRequest(){
        validatableResponse = given().contentType(ContentType.JSON)
                .when().get(endpoint).then();

        System.out.println("Response :"+validatableResponse.extract().asPrettyString());
    }

    @Then("the response will return status {int} and id {int} and email {string} and first name {string} and last name {string}")
    public void verifyStatus(int expectedStatusCode, int expectedId, String expectedEmail, String expectedFirstName, String expectedLastName){

        validatableResponse.assertThat().statusCode(expectedStatusCode).body("data.id",equalTo(expectedId)).and()
                .body("data.email",equalTo(expectedEmail)).body("data.first_name",equalTo(expectedFirstName))
                .body("data.last_name",equalTo(expectedLastName));

    }
}

To use REST assured effectively it’s recommended to statically import methods from the following classes:

io.restassured.RestAssured.*
io.restassured.matcher.RestAssuredMatchers.*
org.hamcrest.Matchers.*

Step 11 – Create a TestNG Cucumber Runner class

A runner will help us run the feature file and act as an interlink between the feature file and the StepDefinition Class.

import io.cucumber.testng.AbstractTestNGCucumberTests;
import io.cucumber.testng.CucumberOptions;

@CucumberOptions(tags = "", features = {"src/test/resources/features"}, glue = {"com.example.stepdefinitions"},
        plugin = {})
public class CucumberRunnerTests extends AbstractTestNGCucumberTests {

}

Note:- The name of the Runner class should end with Test otherwise we can’t run the tests using Command-Line.

<?xml version="1.0" encoding="UTF-8"?>
<!DOCTYPE suite SYSTEM "https://testng.org/testng-1.0.dtd">
<suite name="Suite">
    <test  name="Rest Assured, Cucumber with TestNG Test">
        <classes>
            <class name="com.example.runner.CucumberRunnerTests"/>
        </classes>
    </test> <!-- Test -->
</suite> <!-- Suite -->

Step 13 – Run the tests from TestNG

You can execute the test script by right-clicking on TestRunner class -> Run As TestNG (Eclipse).

Step 16 – Run the tests from the Command Line

Run the below command in the command prompt to run the tests and to get the test execution report.

mvn clean test

Step 17 – Cucumber Report Generation

To get Cucumber Test Reports, add cucumber.properties under src/test/resources and add the below instruction in the file.

cucumber.publish.enabled=true

We are done! Congratulations on making it through this tutorial and hope you found it useful! Happy Learning!!

Cucumber Multiple Choice Answers – MCQ1

HOME


@LoginPage
Feature: Login to HRM Application
  
   @ValidCredentials
   Scenario: Login with valid credentials
     
   Given User is on HRMLogin page "https://opensource-demo.orangehrmlive.com/"
    When User enters username as "Admin" and password as "admin123"
    Then User should be able to login successfully and new page open

import org.junit.runner.RunWith;
import io.cucumber.junit.Cucumber;
import io.cucumber.junit.CucumberOptions;
 
@RunWith(Cucumber.class)
@CucumberOptions(plugin = "pretty", features = "src/test/resources/Features/MyHoliday.feature", tags = "@BookOneWayFlight")
 
public class CucumberRunnerTest {
 
}


Feature: Login to HRM Application
 
  Background:
    Given User is on HRMLogin page "https://opensource-demo.orangehrmlive.com/"
 
  @ValidCredentials
  Scenario: Login with valid credentials
 
    When User enters username as "Admin" and password as "admin123"
    Then User should be able to login successfully and new page open
 
  @MissingUsername
  Scenario: Login with blank username
 
    When User enters username as " " and password as "admin123"
    Then User should be able to see a message "Required" below Username


Cucumber Multiple Choice Questions – MCQ1

HOME

Answer


Answer


Answer


Answer


Answer


Answer


Answer


Answer


Answer


Answer


Answer


Answer


Answer


Answer


Answer


Answer


Answer


Answer


Answer


Answer


Answer


Answer


Answer


Answer


Answer

====================================================================

Multiple Choice Questions

HOME

  1. Programming Languages
    1. Java
  2. Test Automation Frameworks
    1. Selenium
    2. Advance Selenium
    3. Robot Framework
    4. JUnit4
    5. TestNG
    6. BDD
    7. Cucumber
  3. API Testing
    1. Rest API
    2. Pytest Framework
  4. DevOps & Continuous Integration/Continuous Deployment (CI/CD)
    1. DevOps
    2. Jenkins
  5. Version Control Systems
    1. Git
    2. GitHub
  6. Containerization
    1. Docker
  7. Database
    1. SQL
  8. Types of Testing
    1. Security Testing
    2. Performance Testing
    3. ETL Testing
  9. Microservices

BDD Multiple Choice Questions – MCQ1

Cucumber Multiple Choice Questions – MCQ1
Cucumber Multiple-Choice Questions with Answers – MCQ2

Jenkins Multiple Choice Questions – MCQ1
Jenkins Multiple Choice Questions – MCQ2

GitHub Multiple Choice Questions – MCQ1

Docker – Basic Level – Multiple Choice Questions and Answers – MCQ1
Docker – Advance Level – Multiple Choice Questions and Answers – MCQ1

Cucumber Interview Questions and Answers 2025

Last Updated On

HOME

1. What is BDD? Why do we use BDD?

BDD (behavior-driven development ) is an Agile software development process that encourages collaboration among developers, QA, and business participants in a software project.

Why do we use BDD
BDD increases and improves collaboration between various teams involved in the project to easily engage with the product development cycle. We use a simple English language called Gherkins to write test scenarios.


2. What is Cucumber? What are the advantages of Cucumber?

Cucumber is an open-source tool that supports Behavior Driven Development (BDD). It is written in Rugby Language. Cucumber reads executable specification written in plain English language (Gherkins) and validates that the software act as per the executable specifications.

Advantages of Cucumber

  • Cucumber supports different languages like Java.net and Ruby. 
  • It acts as a bridge between the business and technical language. We can accomplish this by creating a test case in plain English text. 
  • It allows the test script to be written without knowledge of any code; it allows the involvement of non-programmers as well. 
  • It serves the purpose of an end-to-end test framework, unlike other tools. 
  • Due to simple test script architecture, Cucumber provides code re-usability.

Please refer to this tutorial for more detailsIntroduction of Cucumber Testing Tool (BDD Tool)


3. What is the programming language used by Cucumber?

The cucumber tool provides support for multiple programming languages such as Java, .Net, Ruby, etc. It can also be integrated with multiple tools such as Selenium, Capybara, etc.

Please refer to this tutorial for more detailsIntroduction of Cucumber Testing Tool (BDD Tool)


4. What is Gherkin?

Gherkin is a set of grammar rules that makes plain text structured enough for Cucumber to understand. 

Gherkin serves multiple purposes:-

  • Unambiguous executable specification
  • Automated testing using Cucumber
  • Document how the system actually behaves

Please refer to this tutorial for more detailsCucumber – What is Gherkin.


5. What are the files required to execute a Cucumber test scenario?

Features
Step Definition
Test Runner


6. What is a Feature File?

A Feature File is a file in which we store features, descriptions of the features and scenarios to be tested. The first line of the feature file must start with the keyword ‘Feature’ followed by the description of the application under test. A feature file may include multiple scenarios within the same file. A feature file has the extension .feature. Below is an example of the Feature file.

Feature: Login to HRM Application 
 
   @ValidCredentials
   Scenario: Login with valid credentials
     
    Given User is on Home page
    When User enters username as "Admin"
    And User enters password as "admin123"
    Then User should be able to login sucessfully

Please refer to this tutorial for more details –  Cucumber – What is Feature File in Cucumber.


7. What are the various keywords that are used in Cucumber for writing a scenario?

Below mentioned are the keywords used for writing a scenario:

  1. Given – It is used to describe the initial context of the scenario.  When the Given step is executed, it will configure the system to a well-defined state, such as creating & configuring objects or adding data to a test database.
  2. When – It is used to describe an event or action. This can be a person interacting with the system or it can be an event triggered by another system.
  3. Then – It is used to describe the expected outcome of the scenario
  4. And/But – If we have several Given’s, When’s, or Then’s, then we can use And /But.

Please refer to this tutorial for more details – Cucumber – What is Feature File in Cucumber.


8. What is the purpose of the Step Definition file in Cucumber?

It is a Java method with an expression, which is used to link it to Gherkin steps. When Cucumber executes a Gherkin step, it will look for a matching step definition to execute. Step definitions can be written in many programming languages.

Feature: Book flight ticket for one-way trip
Scenario: flight ticket for one-way trip from Dublin 
Given  I live in Dublin 
  
@Given ("I live in Dublin") 
public voidVacation()
   {
        System.out.println("I live in Dublin");
   }

Please refer to this tutorial for more details – Step Definition in Cucumber


9. What is the use of the Background keyword in Cucumber?

Background keyword is used to group multiple given statements into a single group. This is generally used when the same set of given statements is repeated in each scenario in the feature file. For example, you need to pass the bearer token in every test. So, this can be done by defining the Given statement as background.

Please refer to this tutorial for more details – Background in Cucumber


10. What is the purpose of the Cucumber Options tag?

The cucumber Options tag is used to provide a link between the feature files and step definition files. Each step of the feature file is mapped to a corresponding method on the step definition file.

Below is the syntax of the Cucumber Options tag:

@CucumberOptions(features="src/test/resources/features/MyHoliday.feature",tags = { "@BookOneWayFlight"})

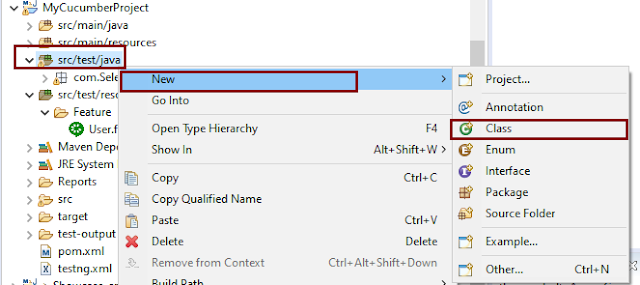
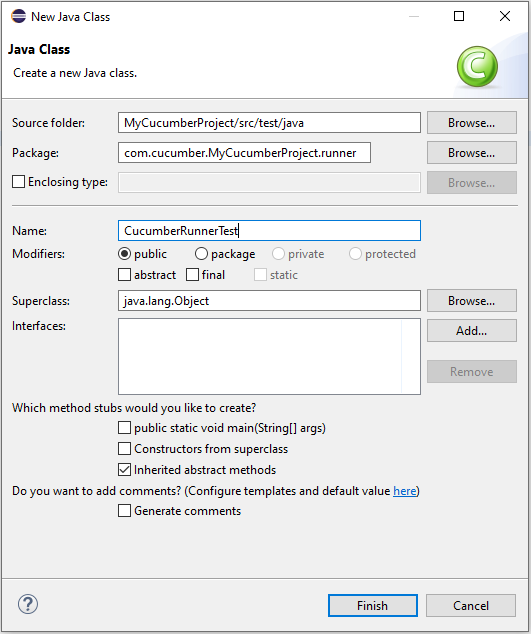
11. What is TestRunner class in Cucumber?

It is the starting point for JUnit to start executing the tests. TestRunner class is used to provide the link between the feature file and the step definition file.

Below is an example of TestRunner class.

import org.junit.runner.RunWith;
import io.cucumber.junit.Cucumber;
import io.cucumber.junit.CucumberOptions;
 
@RunWith(Cucumber.class)
@CucumberOptions(features = "src/test/resources/Feature/MyHoliday.feature", tags = { "@BookOneWayFlight"})
 
public classTestRunner { 
}

Please refer to this tutorial for more details – Cucumber – JUnit Test Runner Class.


12. What is a profile in cucumber?

You can create Cucumber profiles to run a set of features and step definitions. Use the following command to execute a cucumber profile.

Syntax:

cucumber features -p <profile_name>

Example:

cucumber features -p Integration

13. What are hooks in Cucumber?

Hooks are blocks of code that can run at various points in the Cucumber execution cycle

1- Before: executes before the feature file execution.
2- After: executes after the feature file execution.
3- BeforeStep: executes before each step execution.
4- AfterStep: executes after each step execution.

Below is an example of hooks.

public class CucumberHooksExampleDefinitions {
 
    WebDriver driver;
 
    @Before
    public void setup() {
 
        System.out.println("---------------------Before Executing----------------------");
        ChromeOptions chromeOptions = new ChromeOptions();
        chromeOptions.addArguments("--start-maximized");
        driver = new ChromeDriver(chromeOptions);
        driver.manage().timeouts().implicitlyWait(5, TimeUnit.SECONDS);
    }
 
    @BeforeStep
    public void beforeStepTest() {
        System.out.println("--------------BeforeStep Executing---------------");
    }
 
    @Given("User is on Home page")
    public void userOnHomePage() {
 
        System.out.println("Open Website");
        driver.get("https://opensource-demo.orangehrmlive.com/");
    }
 
    @When("User enters username as {string}")
    public void entersUsername(String userName) throws InterruptedException {
 
        System.out.println("Enter userName");
        driver.findElement(By.name("txtUsername")).sendKeys(userName);
 
    }
 
    @When("User enters password as {string}")
    public void entersPassword(String passWord) throws InterruptedException {
 
        System.out.println("Enter passWord");
        driver.findElement(By.name("txtPassword")).sendKeys(passWord);
 
        driver.findElement(By.id("btnLogin")).submit();
    }
 
    @Then("User should be able to login sucessfully")
    public void sucessfullLogin() throws InterruptedException {
 
        String newPageText = driver.findElement(By.id("welcome")).getText();
        System.out.println("newPageText:" + newPageText);
        assertThat(newPageText, containsString("Welcome"));
 
    }
 
    @AfterStep
    public void afterStepTest() {
        System.out.println("--------------------AfterStep Executing---------------------");
    }
 
    @After
    public void close() {
        driver.close();
        System.out.println("--------------------After Executing----------------------");
    }
}

Please refer to this tutorial for more details – Hooks in Cucumber


14. What are cucumber tags?

Tags are a great way to organize Features and Scenarios. Cucumber tags help in filtering the scenarios. We can tag the scenarios and then run them based on tags.

Below is an example of the tag.

Feature: Sample use of Tags in Cucumber
 
  @ValidCredentials
  Scenario: Login with valid credentials
    
   Given User is on Home page
   When User enters username as "Admin"
   And User enters password as "admin123"
   Then User should be able to login sucessfully

Here, @ValidCredentials is the Tag.

Please refer to this tutorial for more details – Tags in Cucumber.


15. What is the use of features property under the Cucumber Options tag?

Feature property under Cucumber option tag lets Cucumber know the location of Feature Files. As in the below example, the location of the feature file is under src/test/resources/features.

@CucumberOptions(features = "src/test/resources/Feature/MyHoliday.feature")

Please refer to this tutorial for more details – Cucumber – What is Feature File in Cucumber.


16. What is the use of glue property under the Cucumber Options tag?

The glue property lets Cucumber know the location of the Step Definition file. As in the below example, the location of the step definition is “com.cucumber.demo.definitions”.

@CucumberOptions(features = { "src/test/resources/features/MyHoliday.feature" }, glue = {"com.cucumber.demo.definitions" }

17. What is the Scenario Outline in the feature file?

Scenario outline is a way of parameterization of scenarios in Cucumber. It is used to repeat the same tests by passing different values or arguments to Step Definition. Scenario Outline must be followed by the keyword ‘Examples’, which specifies the set of values for each parameter.

Scenario Outline: Book Flight for one-way trip
   
  Given I live in Dublin with adults and kids
  And I want to book one way flight ticket from Dublin to London on 
  When I search online
  Then TripAdvisor should provide me options of flights on 
  And Cost of my flight should not be more than Euro per person
 And Tickets should be refundable
   
 Examples:
  |noOfAdults         |noOfKids         |travelDate    |flightFare    |
  |2                  |  2              |22-Jan-2020   |100           |
  |1                  |  0              |12-Mar-2020   |50            |

Please refer to this tutorial for more details – Data Driven Testing using Scenario Outline in Cucumber


18. What is the purpose of the Examples keyword in Cucumber?

Examples – All scenario outlines have to be followed by the Examples section. This contains the data that has to be passed on to the scenario in Feature File. Scenario Outline must be followed by the keyword ‘Examples’, which specifies the set of values for each parameter.

The example is shown in the previous example.

Please refer to this tutorial for more details – Data Driven Testing using Scenario Outline in Cucumber


19. Should any code be written within the TestRunner class?

No code should be written under the TestRunner class. It should include the tags @RunWith and @CucumberOptions.


20. What is the purpose of a cucumber dry-run?

We use to compile the cucumber feature files and step definitions. If there occur any compilation errors, then it shows them on the console.

@RunWith(Cucumber.class)
@CucumberOptions(dryRun=true)
public class RunCucumberTest {
}

21. List out some of the main differences between Jbehave and Cucumber?

1- Jbehave is Java-based and Cucumber is Ruby-based.
2- Jbehave is story-driven whereas the Cucumber is feature-driven.


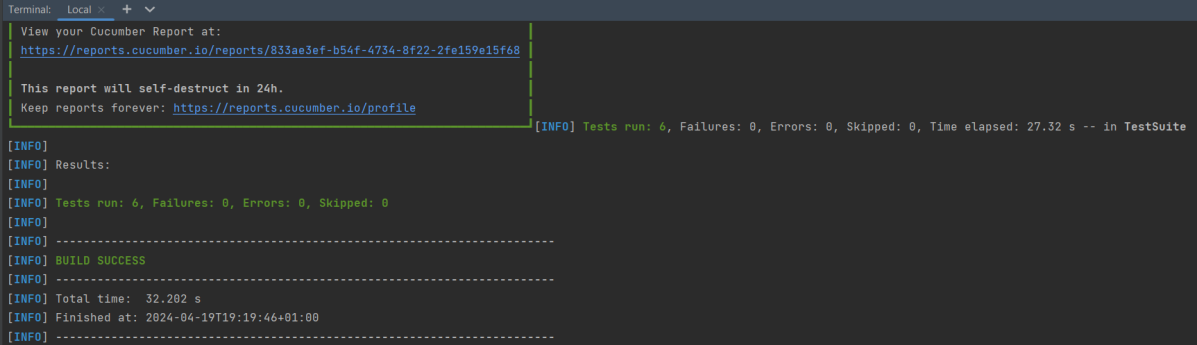
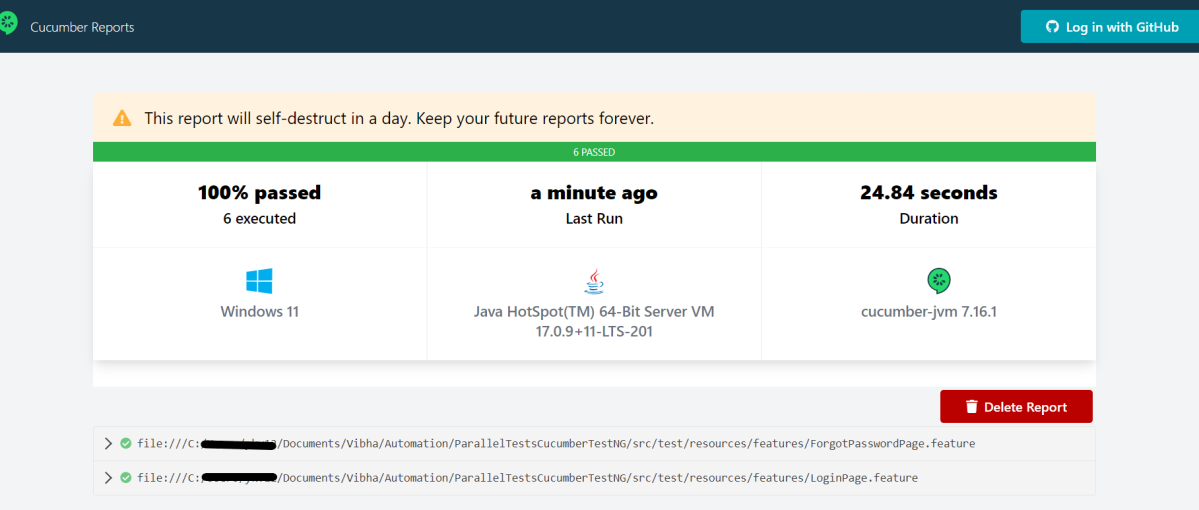
22. What are the steps to generate a report in Cucumber?

We run the following command to produce HTML reports.

@RunWith(Cucumber.class)
@CucumberOptions(plugin = {"pretty", "html:target/cucumber"})
public class RunCucumberTest {
}

Cucumber Version 6.7.0 and above we can create a Cucumber Report by adding a cucumber.properties file in src/test/resources and mention the below instruction in it.

cucumber.publish.enabled=true

Please refer to this tutorial for more details – Cucumber Report Service


23. Does Cucumber comes with an assertion library?

No, Cucumber does not come with an assertion library. It uses assertion from unit testing tools like JUnit, TestNG, JavaScript, RSpec.


24. How to run a Cucumber test using tags in Command-Line?

mvn test -Dcucumber.filter.tags="@BookOneWayFlight"

mvn test -Dcucumber.options="@BookOneWayFlight"

Please refer to this tutorial for more detailsRun Cucumber Test from Command Line.


25. Can we use Selenium with Cucumber?

Yes, we can use Selenium with Cucumber to test a Web Application. Cucumber makes the tests readable for business also. To know more about the Integration of Selenium with Cucumber, refer to this tutorial – Integration of Cucumber with Selenium and JUnit


26. What is DataTable in Cucumber?

Data Tables in Cucumber are used to add multiple parameters in Step Definition in a tabular form rather than putting all the parameters in the Gherkin statement. This is much easier to read and multiple rows of data can be passed in the same step. Data tables from Gherkin can be accessed by using the DataTable object as the last parameter in a Step Definition. Below is an example of DataTable.

Feature: Login to HRM Application 
  
   @ValidCredentials
   Scenario: Login with valid credentials
      
    Given User is on HRMLogin page
    When User enters valid credentials
    |Admin|admin123|
    Then User should be able to login sucessfully and new page open

Please refer to this tutorial for more details – DataTables in Cucumber


27. What is the difference between Scenario Outline and DataTables in Cucumber?

Scenario Outline

  1. The Scenario Outline keyword is used to run the same Scenario multiple times, with different combinations of data.
  2. Cucumber automatically runs the complete test the number of times equal to the number of data in the Test Set.
  3. Example tables always have a header row, because the compiler needs to match the header columns to the placeholders in the Scenario Outline’s steps.
Scenario Outline: Book Flight for one-way trip
   
  Given I live in Dublin with adults and kids
  And I want to book one way flight ticket from Dublin to London on 
  When I search online
  Then TripAdvisor should provide me options of flights on 
  And Cost of my flight should not be more than Euro per person
 And Tickets should be refundable
   
 Examples:
  |noOfAdults         |noOfKids         |travelDate    |flightFare    |
  |2                  |  2              |22-Jan-2020   |100           |
  |1                  |  0              |12-Mar-2020   |50            |

DataTable

  1. No keyword is used to define the test data
  2. This works only for the single step, below which it is defined
  3. Data tables are passed wholesale to the step definitions, and it’s up to the user to interpret them. They don’t necessarily have a header row.
Feature: Login to HRM Application 
  
   @ValidCredentials
   Scenario: Login with valid credentials
      
    Given User is on HRMLogin page
    When User enters valid credentials
    |Admin|admin123|
    Then User should be able to login sucessfully and new page open

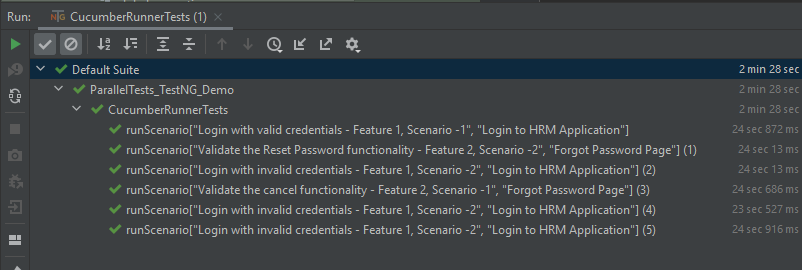
28. Can we run Cucumber tests parallelly?

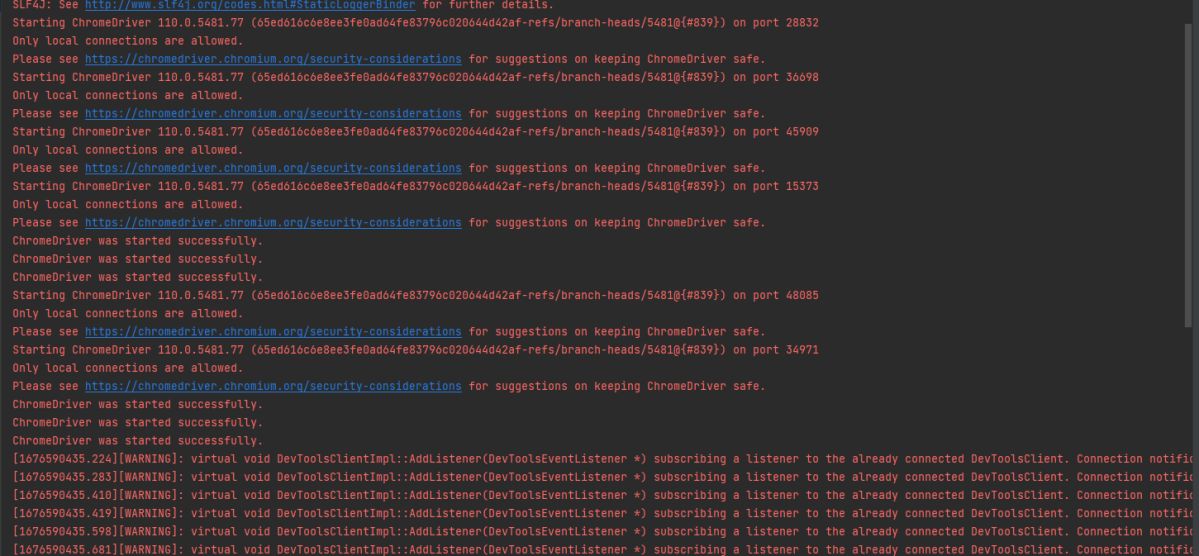
Yes, we can run Cucumber tests parallelly. Cucumber-JVM allows parallel execution across multiple threads since version 4.0.0.

Cucumber Scenarios can be executed in parallel using the JUnit Platform

Cucumber can be executed in parallel using JUnit and Maven test execution plugins

Cucumber can be executed in parallel using TestNG and Maven test execution plugins.

Please refer to this tutorial for more details – Parallel Testing in Cucumber with TestNG.


29. Can we use Cucumber with Rest Assured?

Cucumber is not an API automation tool, but it works well with other API automation tools, like Rest Assured.

Please refer to this tutorial for more details – Rest API Test in Cucumber BDD.

This tutorial gives an idea of various questions that can be asked in an interview. Hope this helps you in the preparation of the Interview.

Cucumber Tutorial – JUnit Test Runner Class

HOME

In the previous tutorial, we showed you What is Feature File in Cucumber is. This tutorial will show you how to run this feature file. 

Once the Feature file is created, we need to create a class called Runner class to run the tests. This class will use the JUnit annotation @RunWith(), which tells JUnit what is the test runner class.

We cannot run a Feature file on its own in a cucumber-based framework. We need to create a Java class, which will run the Feature File. It is the starting point for JUnit to start executing the tests. TestRunner class is created under src/test/java. In this tutorial, Cucumber uses the JUnit framework to run the tests. Apart from JUnit, we can also use the TestNG Test Runner class to run the cucumber tests. 

JUnit Test Runner Class

First, we need to add the below dependencies to the POM.xml (in the case of the Maven project).

<dependencies>
  
  <dependency>
    <groupId>io.cucumber</groupId>
    <artifactId>cucumber-java</artifactId>
    <version>7.16.1</version>
  </dependency>

  <dependency>
    <groupId>io.cucumber</groupId>
    <artifactId>cucumber-junit</artifactId>
    <version>7.16.1</version>
    <scope>test</scope>
  </dependency>
    
  <dependency>
      <groupId>junit</groupId>
      <artifactId>junit</artifactId>
      <version>4.13.2</version>
      <scope>test</scope>
  </dependency>
    
</dependencies>

Create a new runner class file called CucumberRunnerTest

Select and Right-Click on the package outline. Click on the New→Class.

Provide the Java class a name, such as CucumberRunnerTest, and click the Finish button.

Import Statements

1) @RunWith annotation tells JUnit that tests should run using the Cucumber class.

import org.junit.runner.RunWith;

2) Cucumber.class is imported from:

import io.cucumber.junit.Cucumber;

3) @CucumberOptions annotation tells Cucumber where to look for feature files, what reporting system to use, and some other things also. But as of now, in the above test, we have just told it for the Feature file folder. It is imported from:

import io.cucumber.junit.CucumberOptions;

The CucumberRunnerTest class looks like shown below:

import org.junit.runner.RunWith;
import io.cucumber.junit.Cucumber;
import io.cucumber.junit.CucumberOptions;

@RunWith(Cucumber.class)
@CucumberOptions(plugin = "pretty", features = "src/test/resources/Features/MyHoliday.feature", tags = "@BookOneWayFlight")

public class CucumberRunnerTest {

}

The first parameter, called features, provides the location of the feature file. Similarly, the second parameter, called tags, provides the tag name (scenario) which needs to run. Apart from these, we can use plugins, and glue, in the CucumberOptions.

The feature file is placed under src/test/resources, so it is added as the path for the Feature file.

Run the Cucumber Test

As we know, the Feature file is already created in the previous tutorial. TestRunner class is created to run the Cucumber Tests.

Right Click on CucumberRunnerTest class and Click Run As  > JUnit Test Application

The output of the Test Execution looks as shown below image.

This output shows that the Feature file is created, and Test Runner is able to run the Feature File. But this error shows that we should implement these methods so that the Steps mentioned in the Feature file can be traced to Java methods, which can be executed while executing the feature file. Don’t worry about this error. We will see how to create step definitions in the next tutorial.

Congratulations on making it through this tutorial and hope you found it useful! Happy Learning!! Cheers!!

Parallel Testing in Cucumber with TestNG

Last Updated On

HOME

In this tutorial, I will explain Parallel Testing using Cucumber with TestNG.

Cucumber-JVM allows parallel execution across multiple threads since version 4.0.0. There are several options to incorporate this built-in feature in a Cucumber project. You can do so by using JUnit, TestNG, or CLI.

Cucumber can be executed in parallel using TestNG and Maven test execution plugins by setting the data provider parallel option to true.

In TestNG, the scenarios and rows in a scenario outline are executed in multiple threads. One can use either Maven Surefire or Failsafe plugin for executing the runners. In this tutorial, I’m using the Maven Surefire plugin.

Table of Contents:

  1. Prerequisite
  2. Dependency List
  3. Detailed Step Description
    1. Create a Maven project
    2. Update Properties section in Maven pom.xml
    3. Add Cucumber, Selenium, and TestNG dependencies to the project
    4. Add Surefire plugin configuration to the build section of the POM
    5. Create 2 feature files in src/test/resources – LoginPage.feature and ForgotPasswordPage.feature
    6. Create Page Object Model classes of both feature files
    7. Create the Step Definition classes for both feature files or Glue Code
    8. Create the Hook Class and Dependency Injection class (TestSetUp) and BaseTest class
    9. Create a Cucumber TestNG Runner class
    10. Report Generation
    11. Execute the test from Command Line
    12. Execute the tests from TestNG Runner
    13. Test Execution Result

Prerequisite

  1. Java is installed
  2. Maven is installed
  3. TestNG is installed
  4. Eclipse or IntelliJ Java IDE installed

Dependency List

  1. Selenium – 4.19.1
  2. Java 17
  3. Cucumber Java – 7.16.1
  4. Cucumber TestNG – 7.16.1
  5. Maven – 3.9.5
  6. TestNG – 7.10.1
  7. Maven Surefire Plugin – 3.2.5
  8. Maven Compiler Plugin – 3.13.1

Detailed Step Description

Step 1 – Create a Maven project

Create a Maven project in your favorite IDE using the cucumber archetype. To know more about this, click here.

Step 2 – Update Properties section in Maven pom.xml

<properties>
        <project.build.sourceEncoding>UTF-8</project.build.sourceEncoding>
        <selenium.version>4.19.1</selenium.version>
        <cucumber.version>7.16.1</cucumber.version>
        <testng.version>7.10.1</testng.version>
        <maven.compiler.plugin.version>3.13.0</maven.compiler.plugin.version>
        <maven.surefire.plugin.version>3.2.5</maven.surefire.plugin.version>
        <maven.compiler.source>17</maven.compiler.source>
        <maven.compiler.target>17</maven.compiler.target>
    </properties>

Step 3 – Add Cucumber, Selenium, and TestNG dependencies to the project

Add below mentioned Cucumber-Java and Cucumber-TestNG and Selenium-java dependencies to the project.

<dependencies>

        <!--Cucumber Dependencies -->
        <dependency>
            <groupId>io.cucumber</groupId>
            <artifactId>cucumber-java</artifactId>
            <version>${cucumber.version}</version>
        </dependency>

        <dependency>
            <groupId>io.cucumber</groupId>
            <artifactId>cucumber-testng</artifactId>
            <version>${cucumber.version}</version>
            <scope>test</scope>
        </dependency>

        <!-- Selenium Dependency -->
        <dependency>
            <groupId>org.seleniumhq.selenium</groupId>
            <artifactId>selenium-java</artifactId>
            <version>${selenium.version}</version>
        </dependency>

        <!-- TestNG Dependency -->
        <dependency>
            <groupId>org.testng</groupId>
            <artifactId>testng</artifactId>
            <version>${testng.version}</version>
            <scope>test</scope>
        </dependency>

        <!-- Dependency Injection-->
        <dependency>
            <groupId>io.cucumber</groupId>
            <artifactId>cucumber-picocontainer</artifactId>
            <version>${cucumber.version}</version>
            <scope>test</scope>
        </dependency>

    </dependencies>
  

Step 4 – Add Surefire plugin configuration to the build section of the POM

 <plugin>
            <groupId>org.apache.maven.plugins</groupId>
            <artifactId>maven-surefire-plugin</artifactId>
            <version>${maven.surefire.plugin.version}</version>
            <configuration>
                <parallel>methods</parallel>
                <useUnlimitedThreads>true</useUnlimitedThreads>
            </configuration>
  </plugin>

The complete POM.xml is shown below:

<?xml version="1.0" encoding="UTF-8"?>
<project xmlns="http://maven.apache.org/POM/4.0.0"
         xmlns:xsi="http://www.w3.org/2001/XMLSchema-instance"
         xsi:schemaLocation="http://maven.apache.org/POM/4.0.0 http://maven.apache.org/xsd/maven-4.0.0.xsd">
    <modelVersion>4.0.0</modelVersion>

    <groupId>org.example</groupId>
    <artifactId>ParallelTests_TestNG_Demo</artifactId>
    <version>1.0-SNAPSHOT</version>

    <properties>
        <project.build.sourceEncoding>UTF-8</project.build.sourceEncoding>
        <selenium.version>4.8.0</selenium.version>
        <cucumber.version>7.11.1</cucumber.version>
        <testng.version>7.7.1</testng.version>
        <webdrivermanager.version>5.3.2</webdrivermanager.version>
        <maven.compiler.plugin.version>3.10.1</maven.compiler.plugin.version>
        <maven.surefire.plugin.version>3.0.0-M7</maven.surefire.plugin.version>
        <maven.compiler.source>11</maven.compiler.source>
        <maven.compiler.target>11</maven.compiler.target>
    </properties>

    <dependencies>

        <!--Cucumber Dependencies -->
        <dependency>
            <groupId>io.cucumber</groupId>
            <artifactId>cucumber-java</artifactId>
            <version>${cucumber.version}</version>
        </dependency>

        <dependency>
            <groupId>io.cucumber</groupId>
            <artifactId>cucumber-testng</artifactId>
            <version>${cucumber.version}</version>
            <scope>test</scope>
        </dependency>

        <!-- Selenium Dependency -->
        <dependency>
            <groupId>org.seleniumhq.selenium</groupId>
            <artifactId>selenium-java</artifactId>
            <version>${selenium.version}</version>
        </dependency>

        <!-- TestNG Dependency -->
        <dependency>
            <groupId>org.testng</groupId>
            <artifactId>testng</artifactId>
            <version>${testng.version}</version>
            <scope>test</scope>
        </dependency>

        <!-- Dependency Injection-->
        <dependency>
            <groupId>io.cucumber</groupId>
            <artifactId>cucumber-picocontainer</artifactId>
            <version>${cucumber.version}</version>
            <scope>test</scope>
        </dependency>

        <!-- WebDriver Manager Dependency -->
        <dependency>
            <groupId>io.github.bonigarcia</groupId>
            <artifactId>webdrivermanager</artifactId>
            <version>${webdrivermanager.version}</version>
        </dependency>

    </dependencies>
    <build>
        <plugins>

            <plugin>
                <groupId>org.apache.maven.plugins</groupId>
                <artifactId>maven-compiler-plugin</artifactId>
                <version>${maven.compiler.plugin.version}</version>
                <configuration>
                    <source>${maven.compiler.source}</source>
                    <target>${maven.compiler.target}</target>
                </configuration>
            </plugin>

            <plugin>
                <groupId>org.apache.maven.plugins</groupId>
                <artifactId>maven-surefire-plugin</artifactId>
                <version>${maven.surefire.plugin.version}</version>
                <configuration>
                    <parallel>methods</parallel>
                    <useUnlimitedThreads>true</useUnlimitedThreads>
                </configuration>
            </plugin>
        </plugins>
    </build>

</project>

Step 5 – Create 2 feature files in src/test/resources – LoginPage.feature and ForgotPasswordPage.feature

Feature File is an entry point to the Cucumber tests.

The first keyword in the Feature file is the Feature keyword, followed by: and short text that describes the feature.

To know more about the Feature file, please refer to this tutorial.

Below are the sample feature files.

LoginPage.feature

Feature: Login to HRM Application

  Background:
    Given User is on Home page

  @ValidCredentials
  Scenario: Login with valid credentials - Feature 1, Scenario -1

    When User enters username as "Admin" and password as "admin123"
    Then User should be able to login successfully

  @InvalidCredentials
  Scenario Outline: Login with invalid credentials - Feature 1, Scenario -2

    When User enters username as "<username>" and password as "<password>"
    Then User should be able to see error message "<errorMessage>"

    Examples:
      | username    | password   | errorMessage                      |
      | Admin        | admin12$$  | Invalid credentials               |
      | admin$$     | admin123   | Invalid credentials               |
      | abc123       | xyz$$      | Invalid credentials               |

ForgotPasswordPage.feature

Feature: Forgot Password Page

  Background:
    Given User is on Home page

  @BackFunctionality
  Scenario: Validate the cancel functionality - Feature 2, Scenario - 1

    When User clicks on Forgot your password? link
    Then User should be able to navigate to Reset Password page
    And User clicks on Cancel button to go back to Login Page

  @ResetFunctionality
  Scenario: Validate the Reset Password functionality - Feature 2, Scenario - 2

    When User clicks on Forgot your password? link
    Then User should be able to navigate to Reset Password page
    And User clicks on Reset Password button and provide username as "abc1234"
    And Verify the message "Reset Password link sent successfully"

Step 6 – Create Page Object Model classes of both feature files

Page Object Model class contains all the locators and the actions performed on these locators for the particular class to improve the readability and maintainability of the code.

Below are the Page Object Model classes for these feature files.

LoginPage

import org.openqa.selenium.By;
import org.openqa.selenium.WebDriver;

public class LoginPage {

    public WebDriver driver;

    By userName = By.name("username");
    By passWord = By.name("password");
    By login = By.xpath("//*[@id='app']/div[1]/div/div[1]/div/div[2]/div[2]/form/div[3]/button");
    By errorMessage = By.xpath("//*[@class='orangehrm-login-error']/div[1]/div[1]/p");
    By forgotPasswordLink = By.xpath("//*[@id='app']/div[1]/div/div[1]/div/div[2]/div[2]/form/div[4]/p");
    By loginPageTitle = By.xpath("//*[@id='app']/div[1]/div/div[1]/div/div[2]/h5");

    public LoginPage(WebDriver driver) {
        this.driver = driver;
    }

    public String getErrorMessage() {
        return driver.findElement(errorMessage).getText();
    }

    public void login(String strUserName, String strPassword) {

        // Fill user name
        driver.findElement(userName).sendKeys(strUserName);

        // Fill password
        driver.findElement(passWord).sendKeys(strPassword);

        // Click Login button
        driver.findElement(login).click();

    }

    // Click on Forgot Password link
    public void clickOnForgotPasswordLink() {
        driver.findElement(forgotPasswordLink).click();
    }

    //Get Login Page Title
    public String getLoginPageTitle() {
        return driver.findElement(loginPageTitle).getText();
    }
}

HomePage

import org.openqa.selenium.By;
import org.openqa.selenium.WebDriver;

public class HomePage {

    public WebDriver driver;

    public HomePage(WebDriver driver) {
        this.driver = driver;
    }

    By homePageUserName = By.xpath("//*[@class='oxd-topbar-header-breadcrumb']/h6");

    public String getHomePageText() {
        return driver.findElement(homePageUserName).getText();
    }
}

ForgotPasswordPage

import org.openqa.selenium.By;
import org.openqa.selenium.WebDriver;

public class ForgotPasswordPage {

    WebDriver driver;

     By forgotPasswordPageTitle = By.xpath("//*[@id='app']/div[1]/div[1]/div/form/h6");
     By cancelBtn = By.xpath("//*[@id='app']/div[1]/div[1]/div/form/div[2]/button[1]");
     By resetPasswordBtn = By.xpath("//*[@id='app']/div[1]/div[1]/div/form/div[2]/button[2]");
     By userName = By.name("username");
     By resetMessage = By.xpath("//*[@id='app']/div[1]/div[1]/div/h6");

    public ForgotPasswordPage(WebDriver driver) {
        this.driver = driver;
    }

    // Get the Title of ForgotPage
    public String getForgotPageText() {
        return driver.findElement(forgotPasswordPageTitle).getText();
    }

    // Click Cancel Button
    public void clickOnCancelBtn() {
         driver.findElement(cancelBtn).click();
    }

    // Click ResetPassword Button
    public void clickOnRestPasswordBtn() {
        driver.findElement(resetPasswordBtn).click();
    }

    // Type username in TextBox
    public void TypeOnUsernameTextBox(String username) {
        driver.findElement(userName).sendKeys(username);
    }

    // Get Message
    public String getRestMessage() {
        return driver.findElement(resetMessage).getText();
    }
}

PageObjectManager – This class creates the object of all the above-mentioned Page Object Model classes. This an optional class. If you want you can create the objects in StepDefinition class also.

public class PageObjectManager {

    public LoginPage loginPage;
    public HomePage homePage;
    public ForgotPasswordPage forgotPasswordPage;
    public WebDriver driver;


    public PageObjectManager(WebDriver driver)
    {
        this.driver = driver;
    }

    public LoginPage getLoginPage()
    {

        loginPage= new LoginPage(driver);
        return loginPage;
    }

    public HomePage getHomePage()
    {
        homePage = new HomePage(driver);
        return homePage;
    }

    public ForgotPasswordPage getForgotPasswordPage()
    {
        forgotPasswordPage = new ForgotPasswordPage(driver);
        return forgotPasswordPage;
    }
}


Step 7 – Create the Step Definition classes for both feature files or Glue Code

Below is the Step Definition for LoginPage.feature.

import io.cucumber.java.en.Given;
import io.cucumber.java.en.Then;
import io.cucumber.java.en.When;
import pageObjects.HomePage;
import pageObjects.LoginPage;
import pageObjects.PageObjectManager;
import utils.TestSetUp;
import org.testng.Assert;

public class LoginPageDefinitions {

    TestSetUp setUp;
    public PageObjectManager pageObjectManager;
    public LoginPage loginPage;
    public HomePage homePage;


    public LoginPageDefinitions(TestSetUp setUp) {
        this.setUp = setUp;
        this.loginPage = setUp.pageObjectManager.getLoginPage();
        this.homePage= setUp.pageObjectManager.getHomePage();
    }

    @Given("User is on Home page")
    public void loginTest() throws IOException {
        setUp.baseTest.WebDriverManager().get("https://opensource-demo.orangehrmlive.com/");

    }

    @When("User enters username as {string} and password as {string}")
    public void goToHomePage(String userName, String passWord) {

        // login to application
        loginPage.login(userName, passWord);

        // go the next page

    }

    @Then("User should be able to login successfully")
    public void verifyLogin() {

        // Verify home page
        Assert.assertTrue(homePage.getHomePageText().contains("Dashboard"));

    }

    @Then("User should be able to see error message {string}")
    public void verifyErrorMessage(String expectedErrorMessage) {

        // Verify home page
        Assert.assertEquals(loginPage.getErrorMessage(),expectedErrorMessage);

    }

}

Below is the Step Definition for ForgotPasswordPage.feature.

import io.cucumber.java.en.Then;
import io.cucumber.java.en.When;
import pageObjects.ForgotPasswordPage;
import pageObjects.LoginPage;
import pageObjects.PageObjectManager;
import utils.TestSetUp;
import org.testng.Assert;

public class ForgotPasswordPageDefinitions{

    TestSetUp setUp;
    PageObjectManager pageObjectManager;
    public LoginPage loginPage;
    public  ForgotPasswordPage forgotPasswordPage;

    public ForgotPageDefinitions(TestSetUp setUp) {
        this.setUp = setUp;
        this.loginPage = setUp.pageObjectManager.getLoginPage();
        this.forgotPasswordPage = setUp.pageObjectManager.getForgotPasswordPage();
    }

    @When("User clicks on Forgot your password? link")
    public void forgotPasswordLink() {

        loginPage.clickOnForgotPasswordLink();

    }

    @Then("User should be able to navigate to Reset Password page")
    public void verifyForgotPasswordPage() {

        Assert.assertEquals(forgotPasswordPage.getForgotPageText(),"Reset Password");

    }

    @Then("User clicks on Cancel button to go back to Login Page")
    public void verifyCancelBtn() {

        forgotPasswordPage.clickOnCancelBtn();
        Assert.assertEquals(loginPage.getLoginPageTitle(),"Login");

    }

    @Then("User clicks on Reset Password button and provide username as {string}")
    public void verifyResetPasswordBtn(String username) {

        forgotPasswordPage.TypeOnUsernameTextBox(username);
        forgotPasswordPage.clickOnRestPasswordBtn();

    }

    @Then("Verify the message {string}")
    public void verifyMessage(String message) {

        Assert.assertEquals(forgotPasswordPage.getRestMessage(),message);

    }
}

Step 8 – Create the Hook Class and Dependency Injection class (TestSetUp) and BaseTest class

Below is the code for the ApplicationHook Class.

import io.cucumber.java.After;
import utils.TestSetUp;

public class ApplicationHooks {

 public TestSetUp setUp;

    public ApplicationHooks(TestSetUp setUp) {
        this.setUp = setUp;
    }

    @After
    public void tearDown( ) throws IOException {
        setUp.baseTest.WebDriverManager().quit();
    }
}

Below is the code for the Dependency Injection class. In Cucumber, if we want to share the state between multiple-step definition files, we will need to use dependency injection (DI). 

import org.openqa.selenium.WebDriver;
import org.openqa.selenium.WebElement;
import pageObjects.PageObjectManager;

public class TestSetUp {

    public WebElement errorMessage;
    public WebElement homePageUserName;
    public PageObjectManager pageObjectManager;
    public BaseTest baseTest;

    public TestSetUp()  {

        baseTest = new BaseTest();
        pageObjectManager = new PageObjectManager(baseTest.WebDriverManager());

    }
}

BaseTest class is used to initialize the WebDriver.

import io.github.bonigarcia.wdm.WebDriverManager;
import org.openqa.selenium.WebDriver;
import org.openqa.selenium.chrome.ChromeDriver;
import java.time.Duration;

public class BaseTest {

    public WebDriver driver;
    public final static int TIMEOUT = 10;

    public WebDriver WebDriverManager ()  {

   
        if (driver == null) {
        
            ChromeOptions options = new ChromeOptions();
            driver = new ChromeDriver(options);
            driver.manage().timeouts().implicitlyWait(Duration.ofSeconds(TIMEOUT));
            driver.manage().window().maximize();
            driver.get(url);

        }
        return driver;
    }
}

Step 9 – Create a Cucumber TestNG Runner class

Add a cucumber runner by extending the AbstractTestNGCucumberTests class and overriding the scenarios method. Set the parallel option value to true for the DataProvider annotation.

import io.cucumber.testng.AbstractTestNGCucumberTests;
import io.cucumber.testng.CucumberOptions;
import org.testng.annotations.DataProvider;

@CucumberOptions(tags = "", features = "src/test/resources/features", glue = "org.example.definitions")
public class CucumberRunnerTests  extends AbstractTestNGCucumberTests {

   @Override
    @DataProvider(parallel = true)
    public Object[][] scenarios() {
        return super.scenarios();
    }

}

Step 10 – Report Generation

Add cucumber.properties under src/test/resources and add the below instruction in the file.

cucumber.publish.enabled=true

Step 11 – Execute the test from Command Line

Use the below-mentioned command in the command prompt to run the tests.

mvn clean test

The output of the above program is

Step 12 – Execute the tests from TestNG Runner

Go to the Runner class and right-click Run As TestNG Test. The tests will run as TestNG tests. (Eclipse)

In the case of IntelliJ, right-click and select Run “CucumberRunnerTests”.

Step 13 – Test Execution Result

All the tests are started at the same time, so they share different threads. The way tests are executed is different in them. With non-parallel tests, all the scenarios of the same feature are executed together, and then the scenarios of another feature file. Whereas in parallel tests, all the tests are started at the same time, so there won’t be any specific order.

All the scenarios have started simultaneously.

The Cucumber Report is shown below:

There are chances that we don’t want to run all the scenarios simultaneously, in this case, we need to add the below-mentioned configuration in the pom.xml. The value =2 means that 2 scenarios will be executed simultaneously.

  <configuration>
                    <properties>
                        <property>
                            <name>dataproviderthreadcount</name>
                            <value>2</value>
                        </property>
                    </properties>
 </configuration>

The default thread count of the dataprovider in parallel mode is 10.

Congratulations on making it through this tutorial and hope you found it useful! Happy Learning!! Cheers!!

There is another tutorial that shows Parallel Testing in Cucumber with JUnit.

The complete source code can be found here – GitHub

SpringBoot Tutorials


HOME

Spring Boot makes it easy to create stand-alone, production-grade Spring based Applications that you can “just run”. We take an opinionated view of the Spring platform and third-party libraries, so you can get started with minimum fuss. Most Spring Boot applications need minimal Spring configuration.

Chapter 1 Create your first SpringBoot application in IntelliJ
Chapter 2 SpringBoot Integration Test
Chapter 3 Integration Testing of Springboot with RestAssured
Chapter 4 Testing of SpringBoot REST Application using Serenity BDD and Rest Assured for GET Method
Chapter 5 Testing of SpringBoot REST Application using Serenity BDD and Rest Assured for POST Method to create a Resource
Chapter 6 Testing of SpringBoot REST Application using Serenity BDD and Rest Assured for PUT Method to update a Resource
Chapter 7 Testing of SpringBoot REST Application using Serenity BDD and Rest Assured for DELETE Method to delete a Resource
Chapter 8 Testing of SpringBoot Validation for RESTful Services
Chapter 9 Testing of SpringBoot Exception Handling
Chapter 10 SpringBoot WireMock
Chapter 11 SpringBoot Dependency Injection using Autowired

SpringBoot Testing with JUnit

Chapter 1 Integration Testing of Springboot with Cucumber and JUnit4
Chapter 2 Integration Testing of SpringBoot Application with Serenity BDD, Cucumber and JUnit4
Chapter 3 Testing of SpringBoot Application with Serenity and JUnit5
Chapter 4 Testing of SpringBoot Application with Serenity BDD, Cucumber and JUnit5
Chapter 5 Testing of SpringBoot Application with JUnit5

SpringBoot with TestNG

Chapter 1 Testing of SpringBoot Application with TestNG
Chapter 2 Integration Testing of Springboot with Cucumber and TestNG

SpringBoot with Gradle

Chapter 1 Testing of Gradle SpringBoot Application with Serenity, Cucumber and JUnit4
Chapter 2 Testing of Gradle SpringBoot Application with Serenity and JUnit5

CI/CD

Chapter 1 How to run SpringBoot tests with GitHub Actions
Chapter 2 How to run SpringBoot project in GitLab CI/CD

Gradle Tutorials

Last Updated On

HOME

Gradle is an open-source build automation tool that is designed to be flexible enough to build almost any type of software.
Gradle runs on the JVM and you must have a Java Development Kit (JDK) installed to use it.
Several major IDEs allow you to import Gradle builds and interact with them: Android Studio, IntelliJ IDEA, Eclipse, and NetBeans.

Installation of Gradle

Chapter 1 How to install Gradle on Windows

Creation of Gradle project

Chapter 1 How to create Java Gradle project in Eclipse
Chapter 2 How to create a Java Gradle project using Command Line
Chapter 3 How to create Gradle project in IntelliJ
Chapter 4 How to create Gradle Java project in IntelliJ using Command Line

Importing of Gradle Project

Chapter 1 How to import Java Gradle project in Eclipse
Chapter 2 How to import Java Gradle project in IntelliJ

Gradle Project in Cucumber

Chapter 1 How To Create Gradle Project with Cucumber to test Rest API
Chapter 2 Run Gradle Cucumber Tests from Command Line
Chapter 3 Gradle Project with Cucumber, Selenium and TestNG
Chapter 4 Gradle Project with Cucumber, Selenium and JUnit4

Gradle Project in Serenity

Chapter 1 Serenity BDD with Gradle and Cucumber for Web Application
Chapter 2 Serenity BDD with Cucumber and Rest Assured in Gradle
Chapter 3 Serenity Emailable Report in Gradle

Gradle Project with Selenium

Chapter 1 How to create Gradle project with Selenium and TestNG
Chapter 2 How to create Gradle project with Selenium and JUnit4
Chapter 3 Gradle – Integration of Selenium and JUnit5

Gradle Project in Rest API

Chapter 1 Setup Basic REST Assured Gradle Project In Eclipse IDE

Allure Reports for Gradle Project

Chapter 1 Gradle – Allure Report for Selenium and TestNG
Chapter 2 Gradle – Allure Report for Selenium and JUnit4
Chapter 3 Gradle – Allure Report for Cucumber, Selenium and TestNG

Extent Reports for Gradle Project

Chapter 1 Gradle – Extent Report Version 5 for Cucumber, Selenium, and TestNG

Gradle with Jenkins

Chapter 1 Integrate Gradle project with Jenkins
Chapter 2 How to create Jenkins pipeline for Gradle project