Rest Assured enables you to test REST APIs using Java libraries and integrates well with Maven/Gradle. REST Assured is a Java library that provides a domain-specific language (DSL) for writing powerful, maintainable tests for RESTful APIs.
What is JUnit5?
JUnit 5 is the next generation of JUnit. JUnit 5 is composed of several different modules from three different sub-projects.
Java needs to be present on the system to run the tests. Click here to know How to install Java. To know if Java is installed or not on your machine, type this command in the command line. This command will show the version of Java installed on your machine.
java -version
Step 2 – Download and setup Eclipse IDE on the system
The Eclipse IDE (integrated development environment) provides strong support for Java developers, which is needed to write Java code. Click here to learn How to install Eclipse.
Step 3 – Setup Maven
To build a test framework, we need to add a number of dependencies to the project. It is a very tedious and cumbersome process to add each dependency manually. So, to overcome this problem, we use a build management tool. Maven is a build management tool that is used to define project structure, dependencies, build, and test management. Click here to learn How to install Maven.
To know if Maven is already installed or not on your machine, type this command in the command line. This command will show the version of Maven installed on your machine.
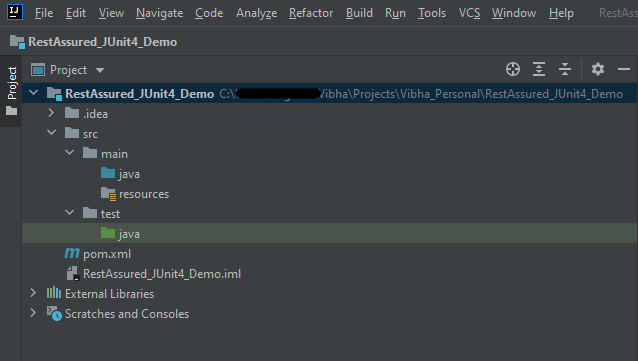
The tests should be written in src/test/java directory. To learn how to create a JSON Request body using JSONObject, please refer to this tutorial.
import io.restassured.http.ContentType;
import org.json.JSONObject;
import org.junit.jupiter.api.Test;
import static io.restassured.RestAssured.given;
import static org.hamcrest.Matchers.equalTo;

public class APITests {

        String BaseURL = "https://reqres.in/api";

    @Test
    public void createUser() {

        JSONObject data = new JSONObject();

        data.put("name", "NewUser1");
        data.put("job", "Testing");

        // GIVEN
        given()
                .contentType(ContentType.JSON)
                .body(data.toString())

                // WHEN
                .when()
                .post(BaseURL + "/users")

                // THEN
                .then()
                .statusCode(201)
                .body("name", equalTo("NewUser1"))
                .body("job", equalTo("Testing"))
                .log().all();

    }

    @Test
    public void getUser() {  //Failed Test

        // GIVEN
        given()
                .contentType(ContentType.JSON)

                // WHEN
                .when()
                .get(BaseURL + "/users/2")

                // THEN
                .then()
                .statusCode(200)
                .body("data.first_name", equalTo("Janet1"))
                .log().all();

    }

}
Step 7 – Test Execution through JUnit Test
Go to the Runner class and right-click Run As JUnit Test. The tests will run as JUnit tests.
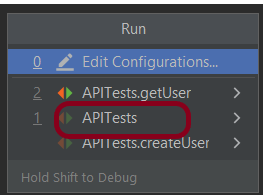
Below is the image to run the tests in IntelliJ.
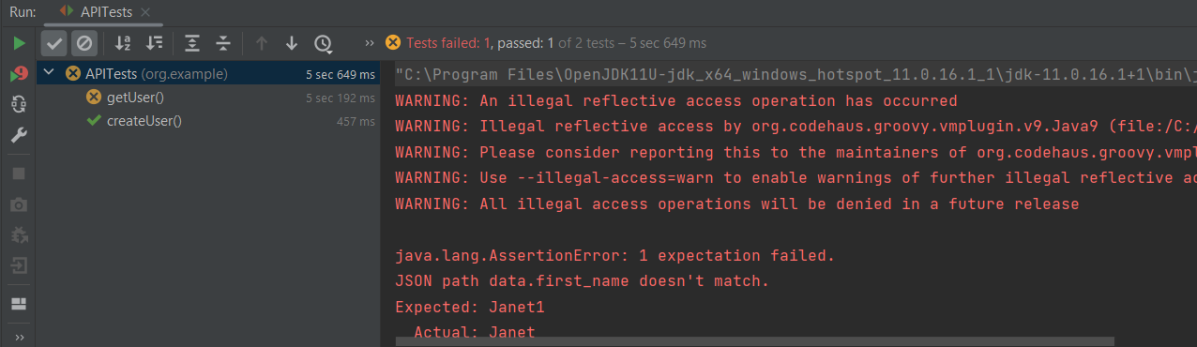
This is how the execution console will look like.
Step 8 – Run the tests from the command line
Maven Site Plugin creates a folder – site under the target directory, and the Maven Surefire Report plugin generates the JUnit Reports in the site folder. We need to run the tests through the command line to generate the JUnit Report.
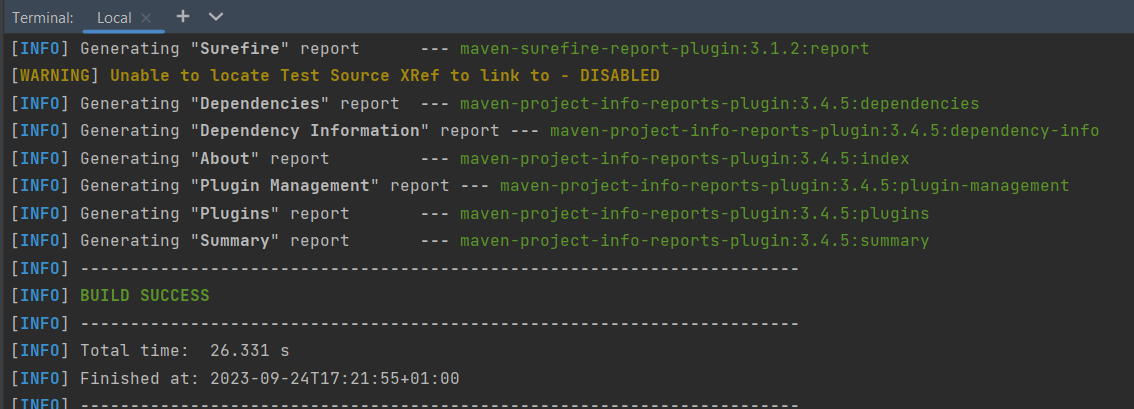
mvn clean test site
The output of the above program is
Step 9 – Report Generation
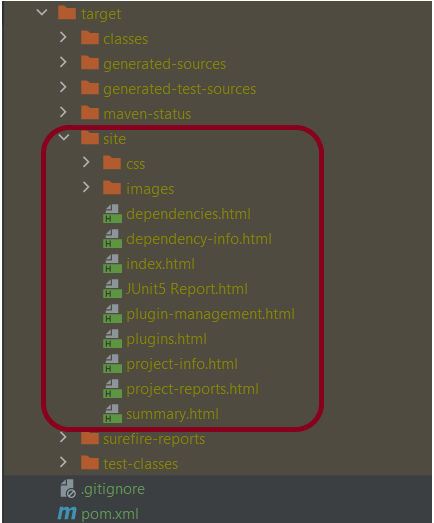
After the test execution, refresh the project, and a new folder with the name site in the target folder will be generated. This folder contains the reports generated by JUnit. The structure of the folder site looks as shown below.
View the Report
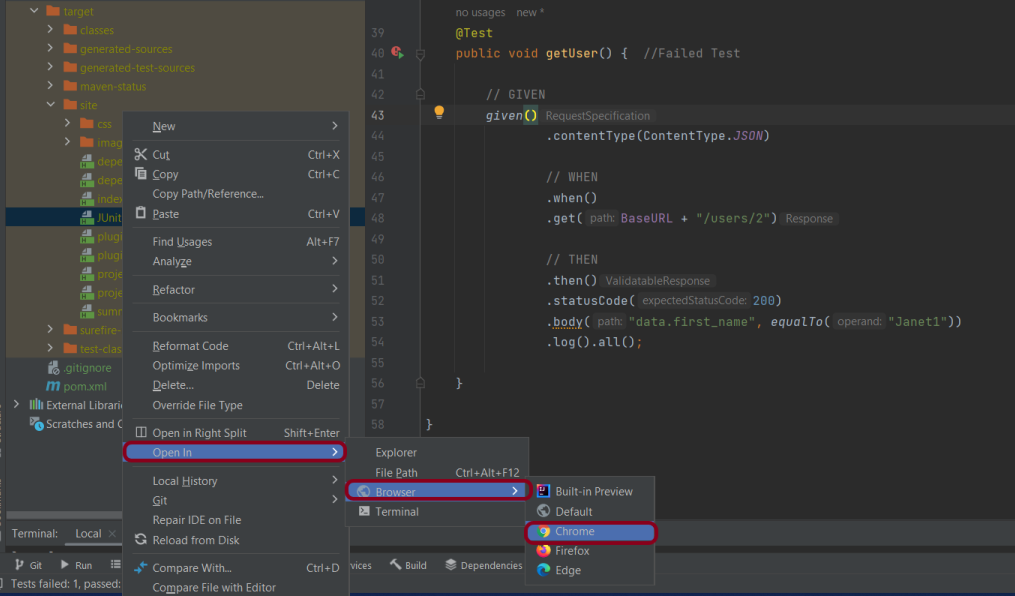
Right-click on the Junit5 Report.html and select Open In -> Browser ->Chrome.
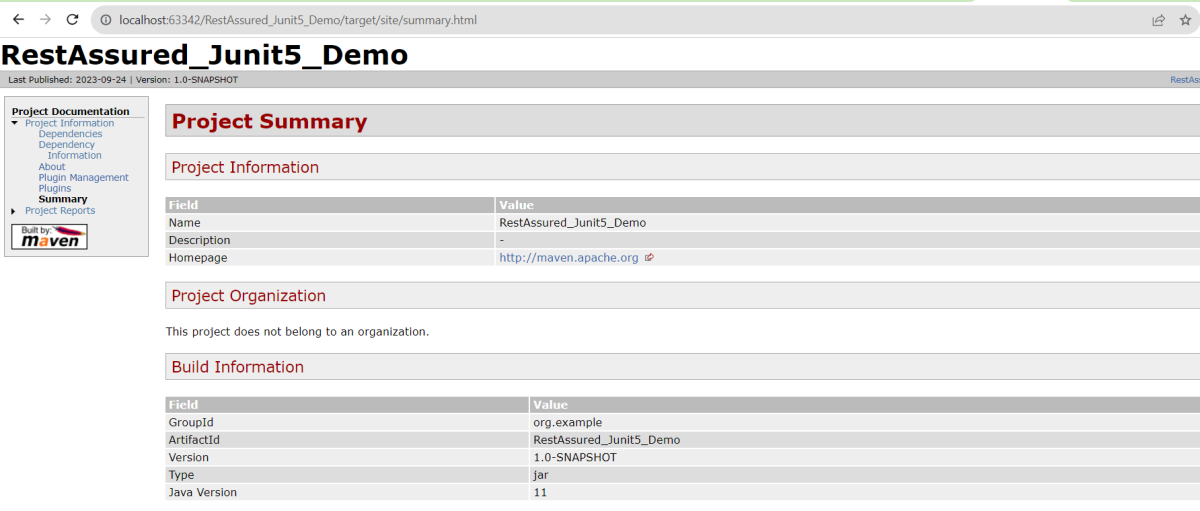
Summary Report
Below is the summary Report.
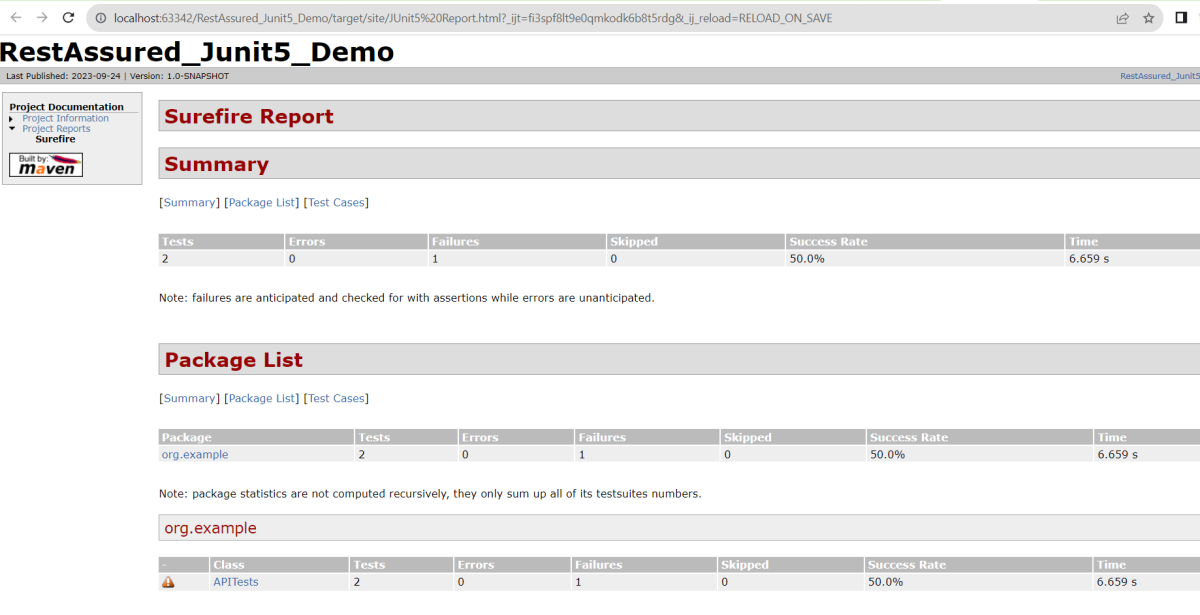
Surefire Report
Below is an example of a Surefire Report. This report contains a summary of the test execution.
We are done! Congratulations on making it through this tutorial and hope you found it useful! Happy Learning!!
Logging plays an important role in understanding the behaviour of the test. When we are testing an API, it is good to know how the APIs are behaving. We should understand how the request is made and how we received the response from the API. It’s important to check what the headers look like. We also need to see what the body looks like. Additionally, verify what parameters we are providing to the request. All of this helps us debug the test code. It helps us identify the reason for the failure of the test.
REST Assured, provide support to a different type of logging as shown below:-
To log all request specification details including parameters, headers, and body of the request, log().all() needs to be added to post given() section.
import org.testng.annotations.Test;
import io.restassured.http.ContentType;
import static io.restassured.RestAssured.*;
import static org.hamcrest.Matchers.equalTo;

public class RestTests {

	@Test
    public void requestLoggingDemo() {

        String json = "{\"name\":\"apitest\",\"salary\":\"5000\",\"age\":\"30\"}";

        // GIVEN
        given()
               .log().all()
               .baseUri("https://dummy.restapiexample.com/api")
               .contentType(ContentType.JSON)
               .body(json)

        // WHEN
         .when()
                .post("/v1/create")

        // THEN
          .then()
                 .assertThat()
                 .statusCode(200)
                 .body("data.name", equalTo("apitest"))
                 .body("message", equalTo("Successfully! Record has been added."));

    }

}
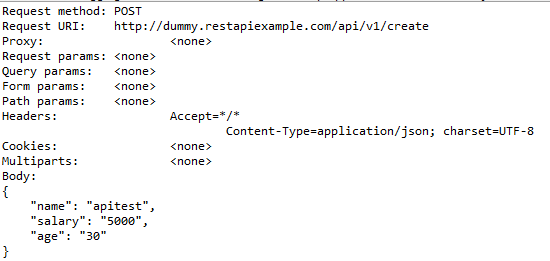
The output of the above program is
Other different request logging options are:-
given().log().params(). .. // Log only the parameters of the request
given().log().body(). .. // Log only the request body
given().log().headers(). .. // Log only the request headers
given().log().cookies(). .. // Log only the request cookies
given().log().method(). .. // Log only the request method
given().log().path(). .. // Log only the request path
Response Logging
If you want to print the response body regardless of the status code, you can do
get("/x").then().log().body()..
This will print the response body regardless of an error occurring.
import org.testng.annotations.Test;
import io.restassured.http.ContentType;
import static io.restassured.RestAssured.*;
import static org.hamcrest.Matchers.equalTo;

public class RestTests {

  @Test
	public void responseLoggingDemo() {

		String json = "{\"name\":\"apitest\",\"salary\":\"5000\",\"age\":\"30\"}";

		// GIVEN
		given()
              .baseUri("https://dummy.restapiexample.com/api")
              .contentType(ContentType.JSON)
			  .body(json)

		 // WHEN
		  .when()
                 .post("/v1/create")

		// THEN
		  .then()
                 .log().all()
                 .statusCode(200)
                 .body("data.name", equalTo("apitest"))
				 .body("message", equalTo("Successfully! Record has been added."));

	}
}
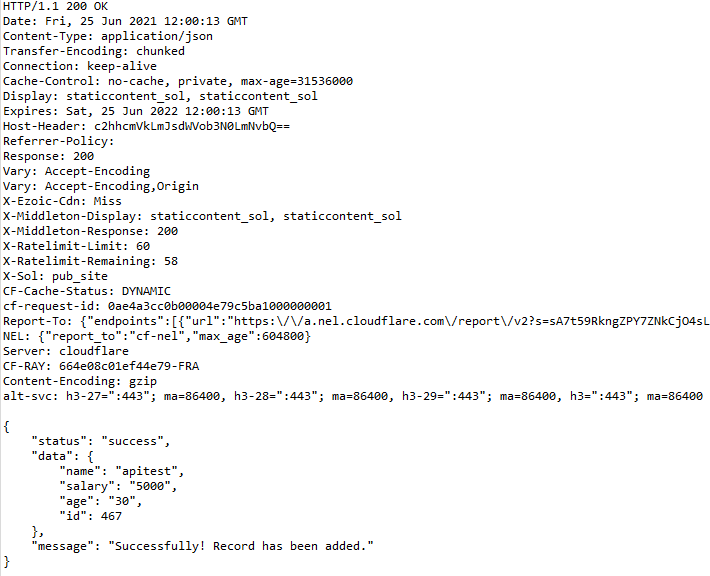
The output of the above program is
Conditional Logging
What if you want to perform logging conditionally? For example, log in if validation fails and the status code is equal to 200. Also, log in if the server returns a status code >=400.
.then().log().ifStatusCodeIsEqualTo(302). .. // Only log if the status code is equal to 302
.then().log().ifStatusCodeMatches(matcher). .. // Only log if the status code matches the supplied Hamcrest matcher
Let us create an example of conditional logging.
import org.testng.annotations.Test;
import io.restassured.http.ContentType;
import static io.restassured.RestAssured.*;
import static org.hamcrest.Matchers.equalTo;

public class RestTests {

	@Test
	public void conditionalResponseLoggingDemo() {

		String json = "{\"name\":\"apitest\",\"salary\":\"5000\",\"age\":\"30\"}";

		// GIVEN
		given()
               .baseUri("https://dummy.restapiexample.com/api")
               .contentType(ContentType.JSON)
			   .body(json)

		// WHEN
		 .when()
               .post("/v1/create")

		// THEN
		 .then()
                .log().ifStatusCodeIsEqualTo(200)
                .assertThat().statusCode(200)
				.body("data.name", equalTo("apitest"))
                .body("message", equalTo("Successfully! Record has been added."));

	}

}
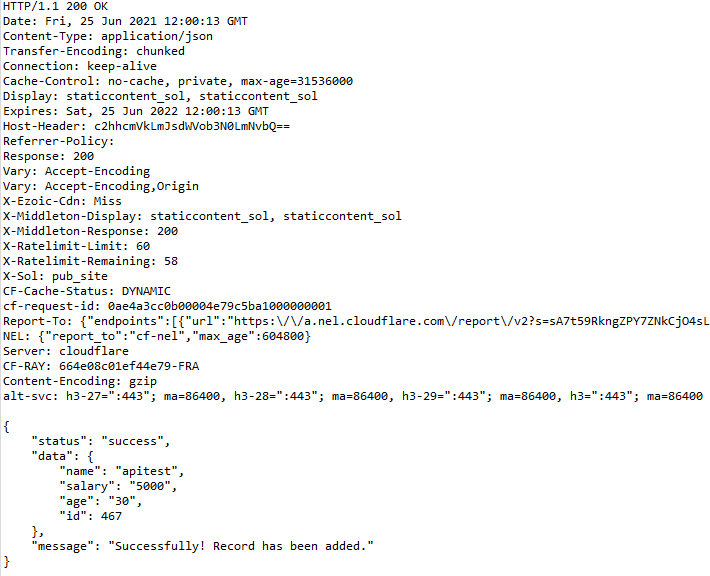
The output of the above program is
Logging to a text file with Rest Assured
We will see how we can log all the request and response data to a txt file using Rest Assured.
Create a PrintStream object. You have to provide an object of FileOutputStream() to the PrintStream() constructor. Provide the path to the logging.txt file in FileOutputStream().
REST Assured gives us a filter() method, this filter method accepts RequestLoggingFilter and ResponseLoggingFilter. They have two methods, logRequestTo() and logResponseTo() methods respectively. These methods expect a Stream.
Pass the log stream we created to these methods.
import org.testng.annotations.Test;
import io.restassured.filter.log.RequestLoggingFilter;
import io.restassured.filter.log.ResponseLoggingFilter;
import io.restassured.http.ContentType;
import static io.restassured.RestAssured.*;
import static org.hamcrest.Matchers.equalTo;
import java.io.FileNotFoundException;
import java.io.FileOutputStream;
import java.io.PrintStream;

public class RestTests {

	@Test
	public void responsetoFileDemo() throws FileNotFoundException {

		PrintStream log = new PrintStream(new FileOutputStream("logging.txt"));

		String json = "{\"name\":\"apitest\",\"salary\":\"5000\",\"age\":\"30\"}";

		// GIVEN
		given()
               .baseUri("https://dummy.restapiexample.com/api")
               .contentType(ContentType.JSON)
				.body(json)
                .filter(RequestLoggingFilter.logRequestTo(log))
				.filter(ResponseLoggingFilter.logResponseTo(log))

		// WHEN
		 .when()
                .post("/v1/create")

		// THEN
          .then()
                 .log().ifStatusCodeIsEqualTo(200)
                 .assertThat().statusCode(200)
				 .body("data.name", equalTo("apitest"))
                 .body("message", equalTo("Successfully! Record has been added."));

	}
}
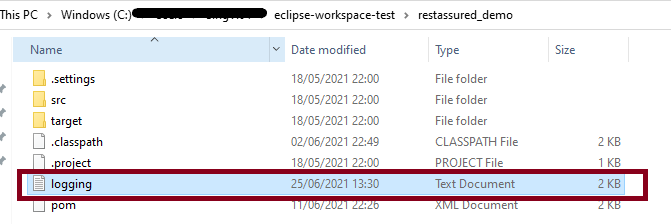
The output of the above program is
Mostly we have more than 1 test, and we want to save the log of all the tests in the text file. We can create a @BeforeClass method, and this class contains the code to create the file and append the data to that file.
import org.testng.annotations.BeforeClass;
import org.testng.annotations.Test;
import io.restassured.filter.log.RequestLoggingFilter;
import io.restassured.filter.log.ResponseLoggingFilter;
import io.restassured.http.ContentType;
import static io.restassured.RestAssured.*;
import static org.hamcrest.Matchers.equalTo;

public class LogTest {

	 public PrintStream log ;
	 RequestLoggingFilter requestLoggingFilter;
	 ResponseLoggingFilter responseLoggingFilter;

	@BeforeClass
	public void init() throws FileNotFoundException {

		 log = new PrintStream(new FileOutputStream("test_logging.txt"),true);
		 requestLoggingFilter = new RequestLoggingFilter(log);
		 responseLoggingFilter = new ResponseLoggingFilter(log);

	}

	@Test
	public void test1() {

		// Given
		given()

         .contentType(ContentType.JSON)
         . filters(requestLoggingFilter,responseLoggingFilter)

          .when()
             .get("https://dummy.restapiexample.com/api/v1/employee/2")

           .then()
           		.log().ifStatusCodeIsEqualTo(200)
           		.assertThat().statusCode(200).statusLine("HTTP/1.1 200 OK")

           		// To verify booking id at index 2
				.body("data.employee_name", equalTo("Garrett Winters"))
				.body("message", equalTo("Successfully! Record has been fetched."));
	}

	@Test
	public void test2() {

		// Given
		given()

         .contentType(ContentType.JSON)
         . filters(requestLoggingFilter,responseLoggingFilter)

          .when()
             .get("https://dummy.restapiexample.com/api/v1/employee/1")

           .then()
           .log().ifStatusCodeIsEqualTo(200)
           .assertThat().statusCode(200).statusLine("HTTP/1.1 200 OK")
				// To verify booking id at index 1
				.body("data.employee_name", equalTo("Tiger Nixon"))
				.body("message", equalTo("Successfully! Record has been fetched."));
	}


	@Test
    public void test3() throws FileNotFoundException {


        String json = "{\"name\":\"apitest\",\"salary\":\"5000\",\"age\":\"30\"}";

        // GIVEN
        given()
               .baseUri("https://dummy.restapiexample.com/api")
               .contentType(ContentType.JSON)
                .body(json)
               .filters(requestLoggingFilter,responseLoggingFilter)

        // WHEN
         .when()
                .post("/v1/create")

        // THEN
          .then()
                 .log().ifStatusCodeIsEqualTo(200)
                 .assertThat().statusCode(200)
                 .body("data.name", equalTo("apitest"))
                 .body("message", equalTo("Successfully! Record has been added."));

    }

}
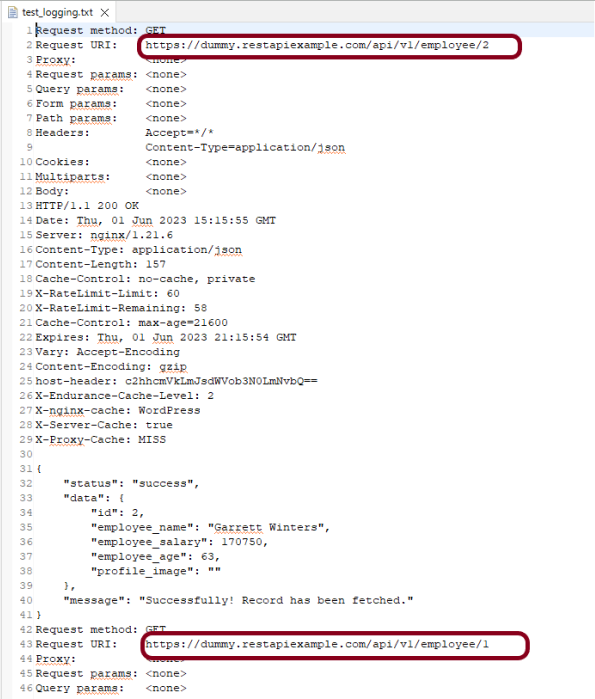
The below file shows that the log for multiple requests is saved here.
Congratulations on making it through this tutorial and hope you found it useful! Happy Learning!!
Step 1 – Verify that the plugin is present in Available option in Plugin Manager
Login to Jenkins UI.
Provide a username and password and click on the Sign-in Button.
Click on the Manage Jenkins. Choose Manage Plugins.
On the Plugin Manager Page, go to the Available option and type Serenity or any plugin of your choice. Here we can see that Serenity is present in the Available option.
Step 2 – Go to Jenkins CLI
Click on the Manage Jenkins. Choose Jenkins CLI.
Step 3 – Download Jenkins CLI
Download jenkins-cli.jar from the Jenkins CLI page as shown in the image.
Step 4 – Run the Jenkins CLI command
Open Windows or PowerShell command line and go to the location where the jenkins-cli.jar file is placed on your machine.
Selenium is an open-source tool. It is not a single automation tool like QTP. Instead, it is a suite of software or a set of JAR files. These tools automate web browsers across various browsers. Selenium is used by many companies, but a few to mention are Netflix, Google, HubSpot, Fitbit, Accenture, IBM, and more.
Selenium – Introduction, Installation, Test Script
The response assertion control panel lets you add pattern strings to be compared against various fields of the request or response. The pattern strings are:
You can also choose whether the strings will be expected to match the entire response, or if the response is only expected to contain the pattern. You can attach multiple assertions to any controller for additional flexibility.
What is Assertion Results
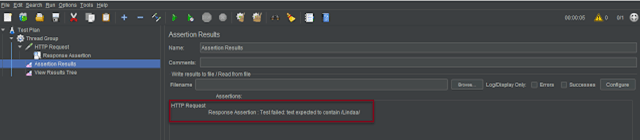
The Assertion Results visualizer shows the Label of each sample taken. It also reports failures of any Assertions that are part of the test plan.
Note – Assertion Results MUST NOT BE USED during load test as it consumes a lot of resources (memory and CPU). Use it only for either functional testing or during Test Plan debugging and Validation.
Create a Test Plan in JMeter
Step 1 – Add Thread Group
Select Test Plan on the tree
Add Thread Group
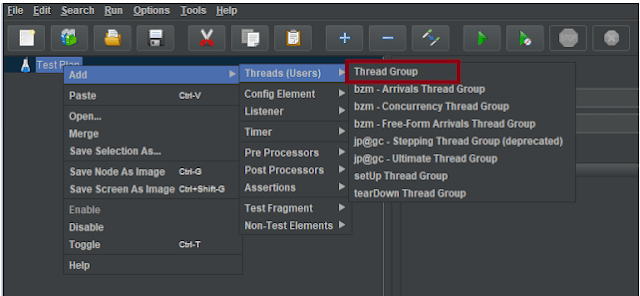
To add Thread Group: Right click on the “Test Plan” and add a new thread group: Add -> Threads (Users) -> Thread Group
In the Thread Group control panel, enter Thread Properties as follows:
Number of Threads: 1 – Number of users connects to the target website Loop Count: 1 – Number of time to execute testing Ramp-Up Period: 1
Step 2 – Adding JMeter elements
The JMeter element used here is HTTP Request Sampler. In HTTP Request Control Panel, the Path field indicates which URL request you want to send
Add HTTP Request Sampler
To add: Right-click on Thread Group and select: Add -> Sampler -> HTTP Request
Below mentioned are the values used in HTTP Request to perform the test
Name – HTTP Request Server Name or IP – localhost Port – 8000 Method – GET Path – /example
Step 3 – Add Assertions
Add Response Assertion
The response assertion control panel lets you add pattern strings to be compared against various fields of the request or response.
To add: Right-click on HTTP Request and select: Add -> Assertions-> Response Assertions
Here, I have selected below options:-
Apply to : Main Sample only Field to Test: Text Response Pattern Matching Rules: Contains Pattern To Test: Linda
Step 4 – Add Listeners
Add Assertion Results
The Assertion Results visualizer shows the Label of each sample taken. It also reports failures of any Assertions that are part of the test plan.
To add: Right-click on Thread Group and select: Add -> Listener-> Assertion Results
View Result Tree
View Result Tree show results of the user request in basic HTML format
To add: Right click Test Plan, Add -> Listener -> View Result Tree
Step 5 – Save the Test Plan
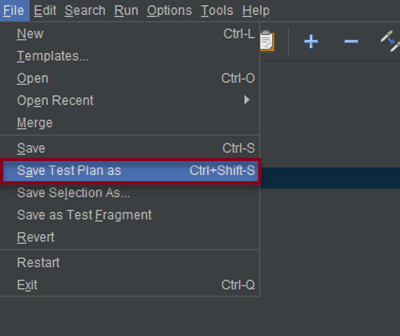
To Save: Click File Select -> Save Test Plan as ->Give name of the Test Plan. It will be saved as .jmx format
Step 6 – Run the Test Plan
Click on Green Triangle as shown at the top to run the test
Step 7 – View the Execution Status in Assertion Results
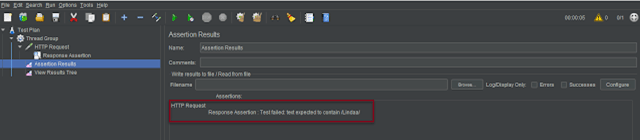
Click on Assertion Results to see the status of Run. Successful request will like shown below.
If the test fails, we will see message mentioning the error in the Assertion Results
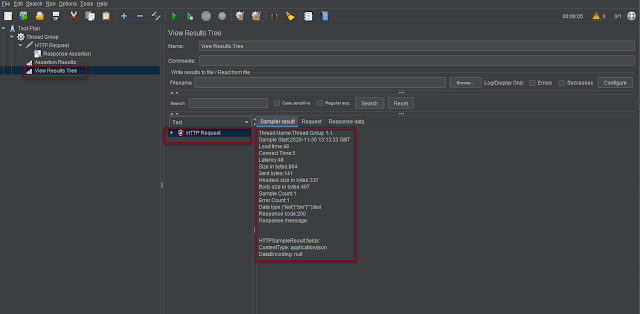
Step 8 – View the Execution Status in View Result Tree
Click on View Result Tree to see the status of Run. Successful request will like shown below.
View Result Tree with failed request looks like below.
That’s it! Congratulations on making it through this tutorial and hope you found it useful! Happy Learning!!
The previous tutorial has explained the Integration of Selenium with TestNG and the tests are executed through either TestNG Suite or testng.xml. This tutorial explains the steps to run the TestNG Tests through the command line.
Prerequisite
Selenium
TestNG
Maven
Java 11
Maven Compiler Plugin
Maven Surefire Plugin
Imagine we need to run the TestNG Tests in CI/CD pipelines like Jenkins or GitLab, then we can’t right-click and select TestNG Suite or tesng.xml to run the tests. In such situations, the tests can be executed through the command line.
We need to add plugins to pom.xml to compile the test code and then run the tests. To know more about Maven Surefire Plugin for TestNG, refer to this blog.
Create a sample class that has @Test methods. In the example below, we have created a class as below:
import static org.testng.Assert.assertTrue;
import static org.hamcrest.Matchers.containsString;
import static org.hamcrest.MatcherAssert.assertThat;
import org.openqa.selenium.By;
import org.openqa.selenium.WebDriver;
import org.openqa.selenium.firefox.FirefoxDriver;
import org.testng.annotations.AfterTest;
import org.testng.annotations.BeforeTest;
import org.testng.annotations.Test;

public class TestNGRunFromCommandLine {

	 WebDriver driver;

	    @BeforeTest
	    public void setUp() {
	        System.setProperty("webdriver.gecko.driver",
	                "C:\\Users\\Vibha\\Software\\geckodriver\\geckodriver.exe");

	        driver = new FirefoxDriver();
	        driver.get("https://opensource-demo.orangehrmlive.com/");

	        driver.manage().window().maximize();
	    }

	    @Test(description = "This test validates title of login functionality", priority = 0)
	    public void verifyLoginPage() {

	        String expectedTitle = driver.findElement(By.xpath("//*[@id='logInPanelHeading']")).getText();
	        System.out.println("Title :" + expectedTitle);
	        assertTrue(expectedTitle.equalsIgnoreCase("LOGIN Panel"));
	    }

	    @Test(description = "This test validates  successful login to Home page", priority = 1)
	    public void verifyHomePage() {

	        System.out.println("Username Entered");
	        driver.findElement(By.name("txtUsername")).sendKeys("Admin");

	        System.out.println("Password Entered");
	        driver.findElement(By.name("txtPassword")).sendKeys("admin123");

	        driver.findElement(By.id("btnLogin")).submit();

	        String newPageText = driver.findElement(By.xpath("//*[@id='content']/div/div[1]/h1")).getText();
	        System.out.println("newPageText :" + newPageText);
	        assertThat(newPageText, containsString("Dashboard"));
	    }

	    @AfterTest
	    public void teardown() {

	        driver.quit();
	    }
	}
The below is the testng.xml file, which will execute all the tests that are available under ‘TestNGRunFromCommandLine‘ class.
<?xml version="1.0" encoding="UTF-8"?>
<!DOCTYPE suite SYSTEM "https://testng.org/testng-1.0.dtd">
<suite name="Suite">
  <test name="Test">
    <classes>
      <class name="TestNG_Demo.TestNGRunFromCommandLine"/>
    </classes>
  </test>
</suite>
Run the tests using command line
The below commands are used to execute the ‘testng.xml’ file from the command line. First, we need to go the place where the pom.xml of the project is placed. Then use the mvn compile test to compile the code and execute the TestNG tests.
cd C:\Users\Vibha\Projects\Vibha_Personal\ParallelTestsTestNG
mvn compile test
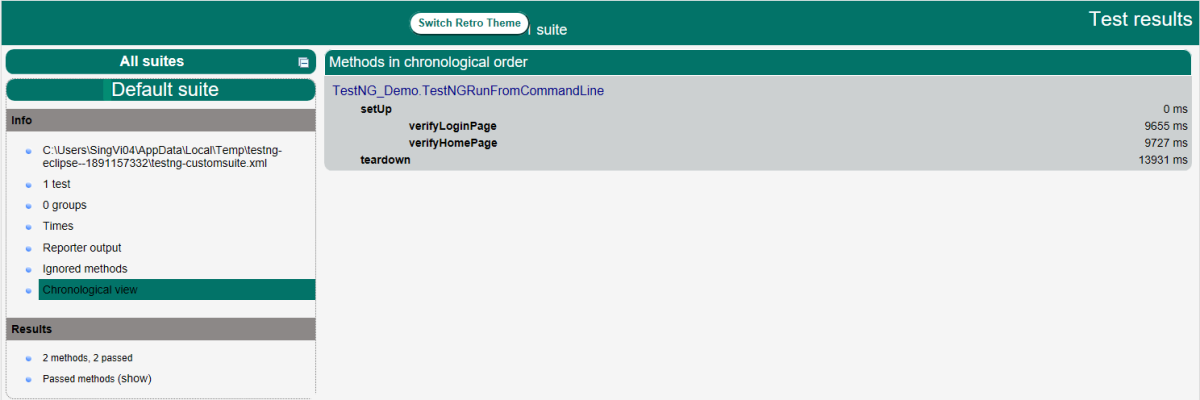
After executing the above command, it should execute the tests that we have specified in testng.xml file. Below is the screenshot after the execution of the tests.
This execution generates various TestNG Reports. We are concerned about emailable-report.html and index.html.
Emailable-Report.html
An emailable report is a type of summary report that one can transfer to other people in the team through any medium. Click on option “emailable-report.html”. Click on the options web browser. The output reports in TestNG reporting will look like below:
Index.html
Index report contains the index-like structure of different parts of the report, such as failed tests, test file, passed tests, etc.
Right-click on the index.html from the project directory. Select the option open with the web browser option.
The result will look like this:
Congratulations. This tutorial has explained running the tests of TestNG using Command Line. Happy Learning!!
In this tutorial, we will go through what are Locators and different type of locators in Selenium. The prerequisite of any automation tool is to locate the web elements on a web page. Buy WHY?
One of the example is that suppose you want to login to gmail using any automation tool. Therefore, in this case you need to enter your email or phone and click on Next button. Here, Email Textbox and Next button are web elements.
Find the link element with partial matching visible text
Syntax
driver.findElement(By.partialLinkText("Forgot "))
7) XPath
Full form of XPath is XML Path. It is used to locate a web element on a web page using HTML DOM structure
Syntax
By.xpath("//tagname[@Attribute = ‘value’]")
//: select the current node. tagname: name of the tag of a particular node. @: to select attribute. Attribute: name of the attribute of the node. Value: value of the attribute
There are 2 types of Xpath:-
1) Absolute Path 2) Relative Path
Absolute Path – It is the direct way to find any element. But as name suggest, it needs to be absolute. Any change made in the path will fail the xpath, result tool will not be able to locate the we element on the page.
Relative Path –Relative XPath begins from the current location and is prefixed with a “//”. It starts from the middle of the DOM structure. To know more about XPath, click here
Syntax
By.xpath("//input[@name='identifier']")
8) CSS Selectors
CSS Selectors are string patterns used to identify an element based on a combination of HTML tag, id, class, and attributes. Locating by CSS Selector is more complicated than the previous methods, but it is the most common locating strategy of advanced Selenium users because it can access even those elements that have no ID or name. To know more about CSS, click here
Below is an example that shows how to use different locators. In this example, we have used Id, name, className, tagName, partialLinkText and LinkText locators.
package org.example;

import org.openqa.selenium.By;
import org.openqa.selenium.WebDriver;
import org.openqa.selenium.WebElement;
import org.openqa.selenium.chrome.ChromeDriver;
import org.openqa.selenium.chrome.ChromeOptions;

import java.time.Duration;
import java.util.List;

public class Automation_Practice_Form {

    protected static WebDriver driver;
    public static void main(String[] args) {

        ChromeOptions options = new ChromeOptions();
        options.addArguments("--start-maximized");
        driver = new ChromeDriver(options);
        driver.manage().timeouts().implicitlyWait(Duration.ofSeconds(2));
        driver.get("https://opensource-demo.orangehrmlive.com/");
        driver.manage().window().maximize();

        // Locate link by partialLinkText
        String PartialLinkText_Text = driver.findElement(By.partialLinkText("Orange")).getText();
        System.out.println("Text of PartialLinkText Locator is ->" + PartialLinkText_Text);

        // Locate FirstName by name
        driver.findElement(By.name("username")).sendKeys("Admin");

        // Locate LastName by id
        driver.findElement(By.name("password")).sendKeys("admin123");

        // Locate options of DropDown by tagName
        List<WebElement> linkName = driver.findElements(By.tagName("a"));
        System.out.println("List of Links:");
        for (WebElement link : linkName) {
            System.out.println(link.getText() + " - " +link.getAttribute("href"));
        }
        driver.close();
    }
}
The output of the above program is
That’s it! Congratulations on making it through this tutorial and hope you found it useful! Happy Learning!!
In the previous tutorial, I explained the Page Object Model with Selenium, Cucumber and JUnit. In this tutorial, I’ll create a BDD Framework for web application testing. I will use the Page Object Model with Selenium, Cucumber, and TestNG.
The Page Object model is an object design pattern in Selenium, where web pages are represented as classes, the various elements on the page are defined as variables in the class and all possible user interactions can then be implemented as methods in the class.
What is Cucumber?
Cucumber is one such open-source tool, which supports Behavior Driven Development(BDD). In simple words, Cucumber can be defined as a testing framework, driven by plain English. It serves as documentation, automated tests, and development aid – all in one.
Dependency List
Cucumber Java – 7.18.1
Cucumber TestNG – 7.18.1
Java 17
Maven – 3.9.6
Selenium – 4.23.0
TestNG – 7.10.2
Maven Compiler – 3.13.0
Maven Surefire – 3.3.1
Project Structure
Implementation Steps
Step 1- Download and Install Java
Cucumber and Selenium need Java to be installed on the system to run the tests. Click here to learn How to install Java.
Step 2 – Setup Maven
To build a test framework, we need to add a number of dependencies to the project. Click here to learn How to install Maven.
Step 3 – Install Cucumber Eclipse Plugin(Only for Eclipse)
The cucumber plugin is an Eclipse plugin that allows eclipse to understand the Gherkin syntax. When we are working with cucumber we will write the feature files that contain Feature, Scenario, Given, When, Then, And, But, Tags, Scenario Outline, and Examples. By default, eclipse doesn’t understand these keywords so it doesn’t show any syntax highlighter. Cucumber Eclipse Plugin highlights the keywords present in Feature File. Refer to this tutorial to get more detail – How to setup Cucumber with Eclipse.
Step 4 – Create a new Maven Project
To create a new Maven project, go to the File -> New Project-> Maven-> Maven project-> Next -> Enter Group ID & Artifact ID -> Finish.
Step 5 – Create source folder src/test/resources to create test scenarios in the Feature file
A new Maven Project is created with 2 folders – src/main/javaand src/test/java. To create test scenarios, we need a new source folder called – src/test/resources. To create this folder, right-click on test directory ->select New ->Directory, and then it shows Maven Source Directories as resources as shown below.
Double-click on the resources directory and a new source directory under your new Maven project is created as shown in the below image.
Step 6 – Add Selenium, TestNG, and Cucumber dependencies to the project
Add below mentioned Selenium, TestNG, and Cucumber dependencies to the project.
Step 7 – Add Maven Compiler Plugin and Surefire Plugin
The compiler plugin is used to compile the source code of a Maven project. This plugin has two goals, which are already bound to specific phases of the default lifecycle:
Step 8 – Create a feature file in the src/test/resources
Create a folder with name features. Now, create the feature file in this folder. The feature file should be saved with the extension .feature. This feature file contains the test scenarios created to test the application. The Test Scenarios are written in Gherkins language in the format of Given, When, Then, And, But.
Below is an example of Test Scenarios in the feature file. I have failed one test scenario intentionally – @MissingUsername.
Feature: Login to HRM Application

  Background:
    Given User is on HRMLogin page "https://opensource-demo.orangehrmlive.com/"

  @ValidCredentials
  Scenario: Login with valid credentials

    When User enters username as "Admin" and password as "admin123"
    Then User should be able to login successfully and new page open

  @InvalidCredentials
  Scenario Outline: Login with invalid credentials

    When User enters username as "<username>" and password as "<password>"
    Then User should be able to see error message "<errorMessage>"

    Examples:
      | username   | password  | errorMessage           |
      | Admin      | admin12$$ | Invalid credentials    |
      | admin$$    | admin123  | Invalid credentials    |
      | abc123     | xyz$$     | Invalid credentials    |

  @MissingUsername @FailedTest
  Scenario: Login with blank username

    When User enters username as " " and password as "admin123"
    Then User should be able to see a message "Required1" below Username
Step 9 – Create the classes for locators, actions, and utilities in src/main/java
Create folders – actions, locators, and utils in src/main/java.
Create a Java Class for each page where define WebElements as variables using Annotation @FindBy. Create another Java class that contains methods for actions performed on WebElements. Here, I’m going to create 2 classes for locators – LoginPageLocatorsand HomePageLocators as well as 2 classes for actions – LoginPageActionsand HomePageActions
TheLocator class contains WebElements which are identified by @FindByannotation as shown below:-
Action class contains methods for the action to be performed on the web elements identified in the locator class.
The initElements is a static method of PageFactory class that is used to initialize all the web elements located by @FindBy annotation. Only after the WebElements are initialized, they can be used in the methods to perform actions.
public Login(WebDriver driver) {
           this.driver = driver;
           // This initElements method will create all WebElements
           PageFactory.initElements(driver, this);
     }
Below is the sample code of the LoginPageLocators.
import org.openqa.selenium.WebElement;
import org.openqa.selenium.support.FindBy;

public class LoginPageLocators {

	@FindBy(name = "username")
    public WebElement userName;

    @FindBy(name = "password")
    public WebElement password;

    @FindBy(xpath = "//*[@id='app']/div[1]/div/div[1]/div/div[2]/div[2]/form/div[1]/div/span")
    public WebElement missingUsernameErrorMessage;

    @FindBy(xpath = "//*[@id='app']/div[1]/div/div[1]/div/div[2]/div[2]/form/div[3]/button")
    public WebElement login;

    @FindBy(xpath = "//*[@id='app']/div[1]/div/div[1]/div/div[2]/div[2]/div/div[1]/div[1]/p")
    public  WebElement errorMessage;

}
Below is the sample code for the HomePageLocators.
import org.openqa.selenium.WebElement;
import org.openqa.selenium.support.FindBy;

public class HomePageLocators {

	  @FindBy(xpath = "//span[@class='oxd-topbar-header-breadcrumb']/h6")
	  public  WebElement homePageUserName;

}
Create the action classesfor each web page. These action classes contain all the methods needed by the step definitions. In this case, I have created 2 action classes – LoginPageActions, HomePageActions
LoginPageActions
import org.example.locators.LoginPageLocators;
import org.example.utils.HelperClass;
import org.openqa.selenium.support.PageFactory;

public class LoginPageActions {

    LoginPageLocators loginPageLocators = null;

    public LoginPageActions() {

        this.loginPageLocators = new LoginPageLocators();

        PageFactory.initElements(HelperClass.getDriver(),loginPageLocators);
    }

    // Get the error message when username is blank
    public String getMissingUsernameText() {
        return loginPageLocators.missingUsernameErrorMessage.getText();
    }

    // Get the Error Message
    public String getErrorMessage() {
        return loginPageLocators.errorMessage.getText();
    }

    public void login(String strUserName, String strPassword) {

        // Fill user name
        loginPageLocators.userName.sendKeys(strUserName);

        // Fill password
        loginPageLocators.password.sendKeys(strPassword);

        // Click Login button
        loginPageLocators.login.click();

    }
HomePageActions
import org.example.locators.HomePageLocators;
import org.example.utils.HelperClass;
import org.openqa.selenium.support.PageFactory;

public class HomePageActions {

    HomePageLocators homePageLocators = null;

    public HomePageActions() {

        this.homePageLocators = new HomePageLocators();
        PageFactory.initElements(HelperClass.getDriver(),homePageLocators);
    }

    // Get the User name from Home Page
    public String getHomePageText() {
        return homePageLocators.homePageUserName.getText();
    }

}
Create a Helper class where we are initializing the web driver, initializing the web driver wait, defining the timeouts, and creating a private constructor of the class, it will declare the web driver, so whenever we create an object of this class, a new web browser is invoked.
package com.example.utils;

import java.time.Duration;
import org.openqa.selenium.WebDriver;
import org.openqa.selenium.chrome.ChromeDriver;
import io.github.bonigarcia.wdm.WebDriverManager;
import org.openqa.selenium.chrome.ChromeOptions;

public class HelperClass {

	 private static HelperClass helperClass;

	    private static WebDriver driver;
	    public final static int TIMEOUT = 5;

	     private HelperClass() {

	        WebDriverManager.chromedriver().setup();
			ChromeOptions options = new ChromeOptions();
			options.addArguments("--start-maximized");
	        driver = new ChromeDriver(options);
	        driver.manage().timeouts().implicitlyWait(Duration.ofSeconds(TIMEOUT));
	     }

	    public static void openPage(String url) {
	        driver.get(url);
	    }

	    public static WebDriver getDriver() {
	        return driver;
	    }

	    public static void setUpDriver() {

	        if (helperClass==null) {

	            helperClass = new HelperClass();
	        }
	    }

	    public static void tearDown() {

	        if(driver!=null) {
	             driver.quit();
	        }

	       helperClass = null;
	   }

	}
Step 10 – Create a StepDefinition class in src/test/java
Create a Java Class called Definition where we will create the Test Code related to the Given, When, Then of Feature file in src/test/java.
Now, we need to create the Step Definition of the Feature File – LoginPageDefinitions.java.
import io.cucumber.java.en.Given;
import io.cucumber.java.en.Then;
import io.cucumber.java.en.When;
import org.example.actions.HomePageActions;
import org.example.actions.LoginPageActions;
import org.example.utils.HelperClass;
import org.testng.Assert;

public class LoginPageDefinitions {

    LoginPageActions objLogin = new LoginPageActions();
    HomePageActions objHomePage = new HomePageActions();

    @Given("User is on HRMLogin page {string}")
    public void loginTest(String url) {

        HelperClass.openPage(url);

    }

    @When("User enters username as {string} and password as {string}")
    public void goToHomePage(String userName, String passWord) {

        // login to application
        objLogin.login(userName, passWord);

    }

    @Then("User should be able to login successfully and new page open")
    public void verifyLogin() {

        // Verify home page
        Assert.assertTrue(objHomePage.getHomePageText().contains("Dashboard"));

    }

    @Then("User should be able to see error message {string}")
    public void verifyErrorMessage(String expectedErrorMessage) {

        // Verify error message
        Assert.assertEquals(objLogin.getErrorMessage(),expectedErrorMessage);

    }

    @Then("User should be able to see a message {string} below Username")
    public void verifyMissingUsernameMessage(String message) {

        Assert.assertEquals(objLogin.getMissingUsernameText(),message);
    }

}
Step 11 – Create a Hook class in src/test/java
Create thehook class that contains the Before and After hook to initialize the web browser and close the web browser. I have added the code to take the screenshot of the failed scenario in @After Hook.
Below is the code for the Hooks class.
import org.openqa.selenium.OutputType;
import org.openqa.selenium.TakesScreenshot;
import com.example.utils.HelperClass;
import io.cucumber.java.After;
import io.cucumber.java.Before;
import io.cucumber.java.Scenario;

public class Hooks {

	@Before
    public static void setUp() {

       HelperClass.setUpDriver();
    }

	@After
	public static void tearDown(Scenario scenario) {

		//validate if scenario has failed
		if(scenario.isFailed()) {
			final byte[] screenshot = ((TakesScreenshot) HelperClass.getDriver()).getScreenshotAs(OutputType.BYTES);
			scenario.attach(screenshot, "image/png", scenario.getName());
		}

		HelperClass.tearDown();
	}
}
Step 12 – Create a TestNG Cucumber Runner classin the src/test/java
Cucumber needs a TestRunner class to run the feature files. It is suggested to create a folder with the name of the runner in the src/test/java directory and create the Cucumber TestRunner class in this folder. Below is the code of the Cucumber TestRunner class.
Below is the code for CucumberRunnerTests class.
import io.cucumber.testng.AbstractTestNGCucumberTests;
import io.cucumber.testng.CucumberOptions;

@CucumberOptions(tags = "", features = "src/test/resources/features/LoginPage.feature", glue = "com.example.definitions",
        plugin = {})

public class CucumberRunnerTests extends AbstractTestNGCucumberTests {
}
Note:- The name of the Runner class should end with Test otherwise we can’t run the tests using Command Line.
Step 13 – Run the tests from TestNG
You can execute the test script by right-clicking on TestRunner class -> Run As TestNG. (Eclipse)
In the case of the IntelliJ project, right-click on the runner class and select Run ‘CucumberRunnerTests’.
The output of the above program is
Step 14 – Run the tests from testng.xml
Create a testng.xml as shown below and run the tests as TestNG.
<?xml version="1.0" encoding="UTF-8"?>
<!DOCTYPE suite SYSTEM "https://testng.org/testng-1.0.dtd">
<suite name="Suite">
    <test  name="Cucumber with TestNG Test">
        <classes>
            <class name="com.example.runner.CucumberRunnerTests"/>
        </classes>
    </test> <!-- Test -->
</suite> <!-- Suite -->
The testng.xml is highlighted below:
Step 15 – Run the tests from Command Line
Run the below command in the command prompt to run the tests and to get the test execution report.
mvn clean test
The output of the above program is
Step 16 – Cucumber Report Generation
To get Cucumber Test Reports, add cucumber.properties under src/test/resources and add the below instruction in the file.
cucumber.publish.enabled=true
Below is the image of the Cucumber Report generated using the Cucumber Service.
In the above example, as we can see, one of the tests has failed. So, when a test fails, we have written the code to take a screenshot of the failed step. The Attached Image shows the image of the failed test. You can click on that to see the screenshot.
Step 17 – TestNG Report Generation
TestNG generates various types of reports under the target->surefire-reports folder like emailable-report.html, index.html, testng-results.xml.
We are interested in the “emailable-report.html” report. Open “emailable-report.html“, as this is an HTML report, and open it with the browser. The below image shows emailable-report.html.
emailable-report.html
Index.html
TestNG also produces an “index.html” report. The below image shows the index.html report.
To generate Allure Report in Jenkins, we need to download Allure Plugin. Please refer to this tutorial to install the plugin – How to install Plugins in Jenkins
Configure Allure
Go back to the Manage Jenkins link as shown below:
When we click on the “Manage Jenkins” link, we are redirected to the Manage Jenkins page, where we can see various types of options, including the “Global Tool Configuration” option.
We need to set the Allure Commandline in Jenkinsas shown below.
Click on the Allure Command line installations button. By default, “Install Automatically” will be checked, so since we are going to use the Allure installed on our local machine, “Install automatically” will install the latest version of Allure.
Provide the Name as ALLURE_HOME because that is what is currently installed on my machine, and also provide the path of Allure in the ALLURE_HOME textbox.
Click on the Apply and Save buttons.
Create a new Maven Jenkins job
Step 1: Create a new project using the Maven project plugin
Give the Name of the project – AllureReportWithSelenium_Demo
Click on the Maven project.
Click on the OK button.
In the General section, enter the project description in the Description box – This is demo of Allure Report in Jenkins.
Select Source Code Management as None if the project is locally present on the machine.
Step 2: Build Management
Go to the Build section of the new job.
In the Root POM textbox, enter pom.xml
In the Goals and options section, enter “clean test”
Click on the Advanced button.
Step 3: Select a custom workspace
Mention the full path of the project in the directory.
Step 4: Select “Allure Reports” from “Post Build Actions”
Scroll down to ‘Post Build Actions’ and click on the ‘Add Post Build Actions’ drop-down list. Select “Allure Report“.
Enter the Result Path as “allure-results” and click on the “Save” button.
Click on the Apply and Save buttons.
We have created a new Maven project “AllureReportWithSelenium_Demo” with the configuration to run the Selenium with TestNG Tests and also to generate Allure Report after execution using Jenkins.
Step 5: Execute the tests
Let’s execute it now by clicking on the “Build Now” button.
Right-click on Build Number (here in my case it is #1).
Click on Console Output to see the result.
Step 6: View the Allure Report
Once the execution is completed, we could see a link to view the ‘Allure Report’.
Click on the Allure Report. It displays the summary of the tests.
There is another way to create Allure Report in Jenkins, which is by using the Jenkins pipeline. To know more about this, please refer to this tutorial – How to create Jenkins pipeline for Allure Report.
Congratulations on making it through this tutorial and hope you found it useful! Happy Learning!! Cheers!!
In this tutorial, we will set the variable values from the Run time command argument in Robot Framework using Selenium WebDriver and Python.
Variables can be changed from the command line using the –variable (-v) option or a variable file using the –variablefile (-V) option. Variables set from the command line are universally accessible for all executed test data files, and they override any variables with the same names in the Variable section and variable files imported into the test data.
Individual variables are established using the syntax –variable name:value, where name is the variable’s name without the $ symbol and value is its value. This option can be used multiple times to define multiple variables. This syntax can only be used to establish scalar variables, and they can only receive string values.
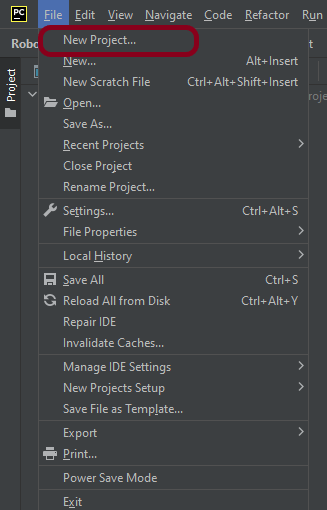
Step 1.1 – Open PyCharm and create a new project. Go to File and select “New Project” from the main menu.
Step 1.2 – Choose the project location. Click the “Browse” button next to the Location field and specify the directory for your project.
Deselect the Create a main.py welcome script checkbox because you will create a new Python file for this tutorial.
Click on the “Create” Button.
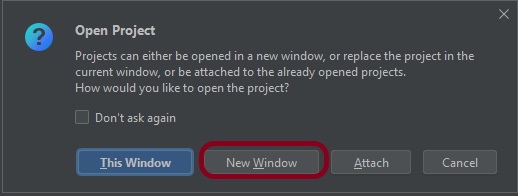
Step 1.3 – A new dialog will appear asking to Open the project using any one of the given options. I have selected New Window as I like to have separate windows for each project.
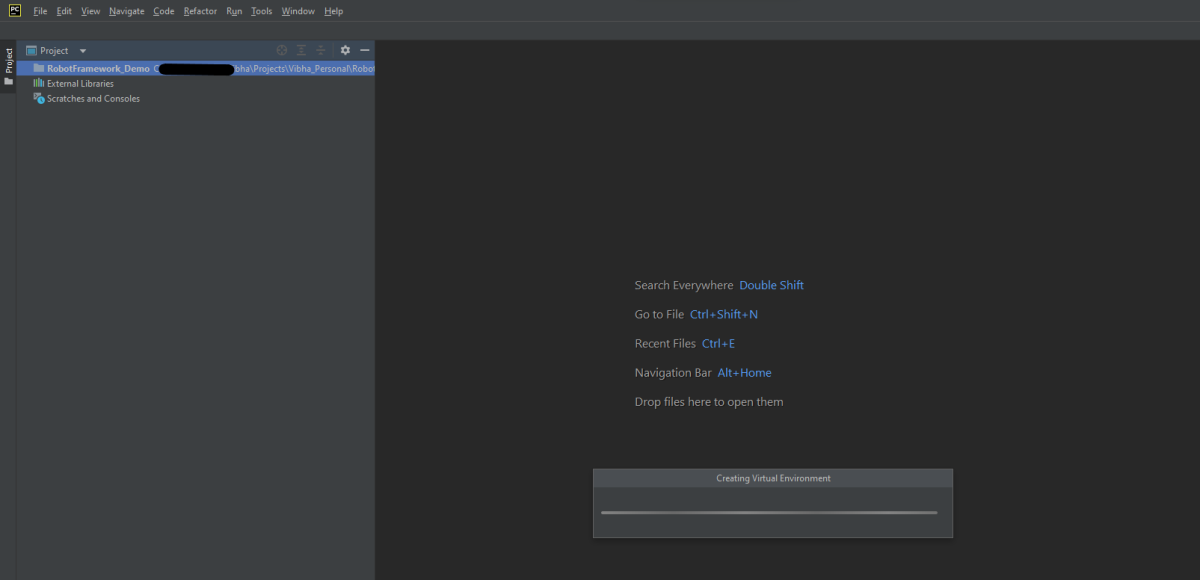
Below is the image of the new project created in PyCharms.
Step 2 – Create a new directory in the new project
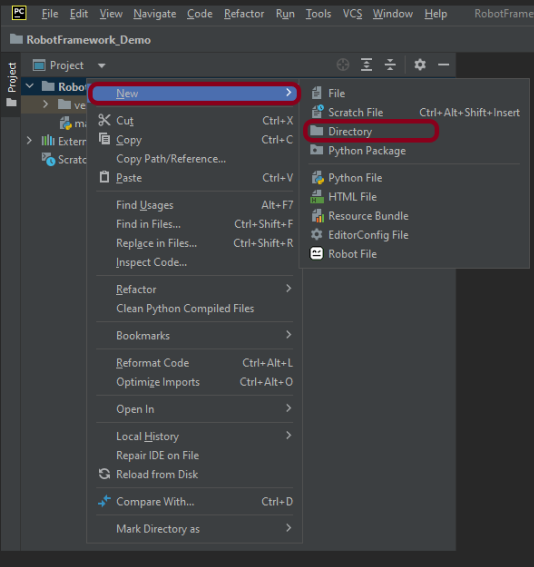
Right-Click on the project, select New->Directory and provide name as PageObject
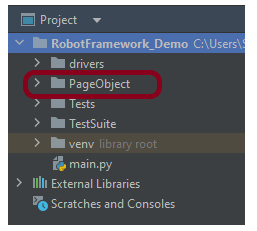
Below is the image of the new directory.
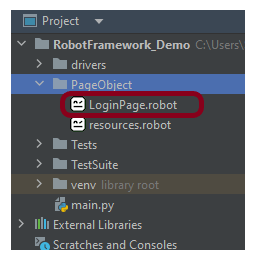
Right-click on the new directory select New File and provide the name LoginPage.robot as shown below:
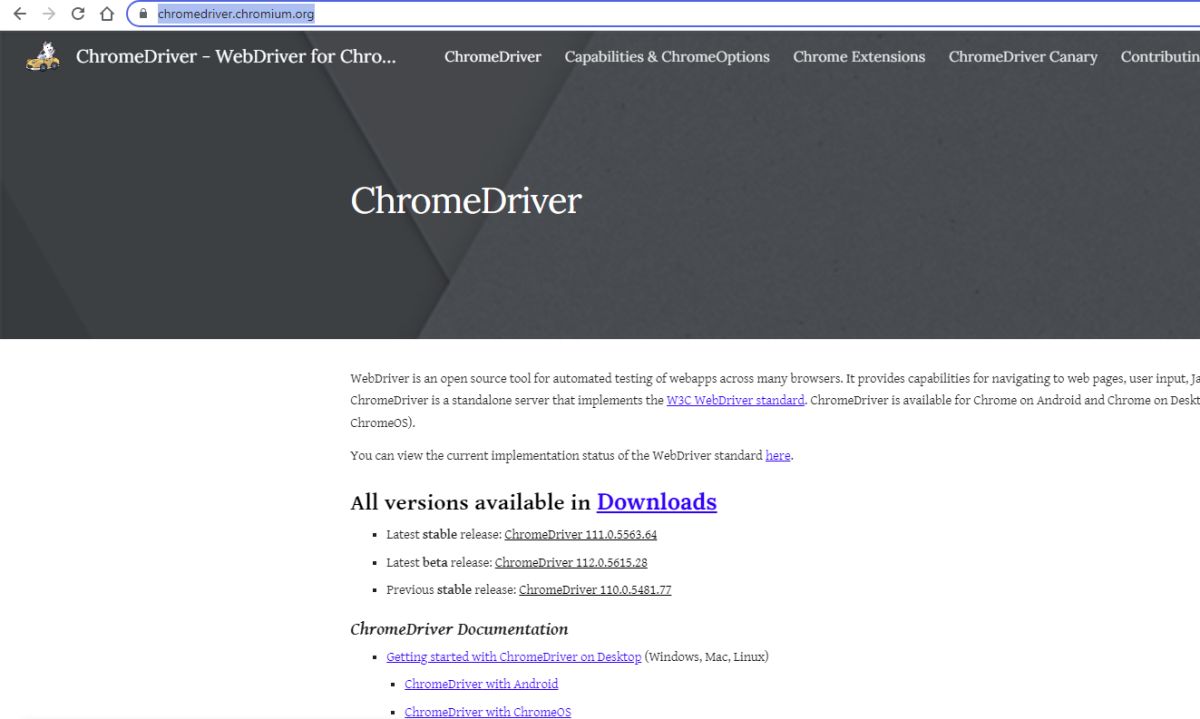
Step 3 – Download ChromeBinaries from the below location
The tests are going to use the Chrome browser, so we need to download the ChromeBinaries to open a blank browser in Chrome.
The chromedriver and geckodriver are placed in a folder name drivers in the RobotFramework_Demo project. I have renamed chromedriver to chrome and geckodriver to firefox.
Step 4 – Create a simple Selenium Test
*** Settings ***
Documentation       Tests to login to Login Page
Library     SeleniumLibrary

*** Variables ***
${valid_username}     Admin
${valid_password}       admin123
${invalid_username}     1234
${invalid_password}     45678
${blank_username}
${blank_password}
${url}      https://opensource-demo.orangehrmlive.com/web/index.php/auth/login
${browser_name}      Chrome
${login_error_message}      css:.oxd-alert-content--error
${dashboard_title}       css:.oxd-topbar-header-breadcrumb-module
${missing_username_error_message}    xpath://*[@class='oxd-form']/div[1]/div/span
${missing_password_error_message}   xpath://*[@class='oxd-form']/div[2]/div/span


*** Test Cases ***

Validate Unsuccessful Login using invalid credentials
    [Tags]    SMOKE
    Open the Browser with URL
    Fill the login form     ${valid_username}       ${invalid_password}
    Verify the error message is correct
    Close Browser Session

Validate Unsuccessful Login for blank username
    [Tags]    REGRESSION
    Open the Browser with URL
    Fill the login form     ${blank_username}       ${valid_password}
    Verify the error message is displayed for username
    Close Browser Session

Validate Unsuccessful Login for blank password
    [Tags]    SMOKE     REGRESSION
    Open the Browser with URL
    Fill the login form     ${valid_username}       ${blank_password}
    Verify the error message is displayed for password
    Close Browser Session

Validate successful Login
    [Tags]    UAT
    Open the Browser with URL
    Fill the login form     ${valid_username}       ${valid_password}
    Verify Dashboard page opens
    Close Browser Session

*** Keywords ***

Open the Browser with URL
    Create Webdriver    ${browser_name}  executable_path=/Vibha_Personal/RobotFramework_Demo/drivers/${browser_name}
    Go To       ${url}
    Maximize Browser Window
    Set Selenium Implicit Wait    5

Fill the login form
   [Arguments]    ${username}      ${password}
   Input Text    css:input[name=username]   ${username}
   Input Password    css:input[name=password]   ${password}
   Click Button    css:.orangehrm-login-button

Verify the error message is correct
    Element Text Should Be    ${login_error_message}    Invalid credentials

Verify Dashboard page opens
    Element Text Should Be    ${dashboard_title}      Dashboard

Verify the error message is displayed for username
     Element Text Should Be    ${missing_username_error_message}      Required

Verify the error message is displayed for password
      Element Text Should Be    ${missing_password_error_message}      Required

Close Browser Session
    Close Browser
Step 5 – Set Variable values from the Runtime command
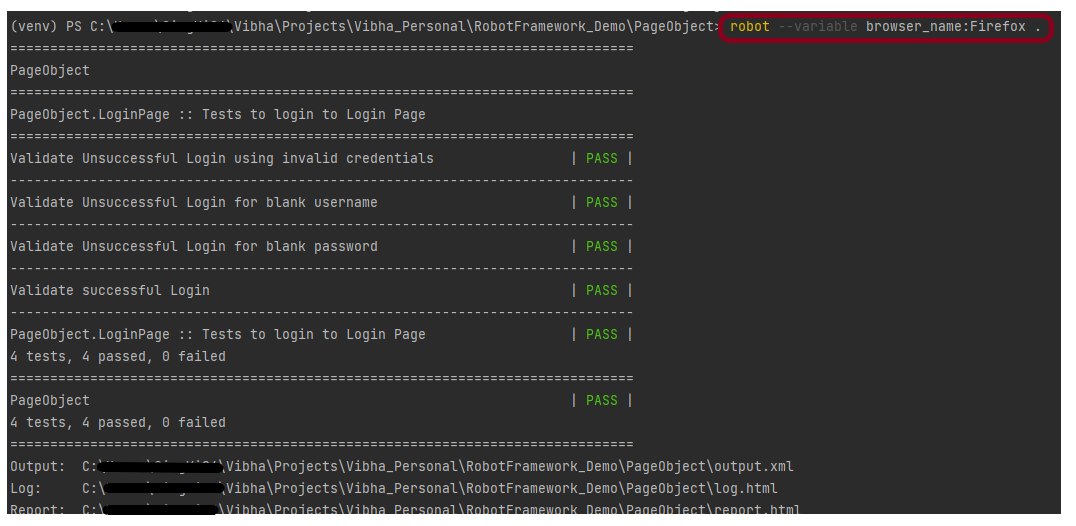
In the above example, we are using the Chrome browser to run the tests. I want to run the tests on the Firefox browser, but without making any changes to the existing code. How this can be achieved? We can pass variable
robot --variable browser_name:Firefox .
The output of the above program is
We have the test case passed. The Robot Framework generates log.html, output.xml, and report.html by default.
Let us now see the report and log details.
Report
Right-click on report.html. Select Open In->Browser->Firefox (any browser of your wish).
The Report generated by the framework is shown below:
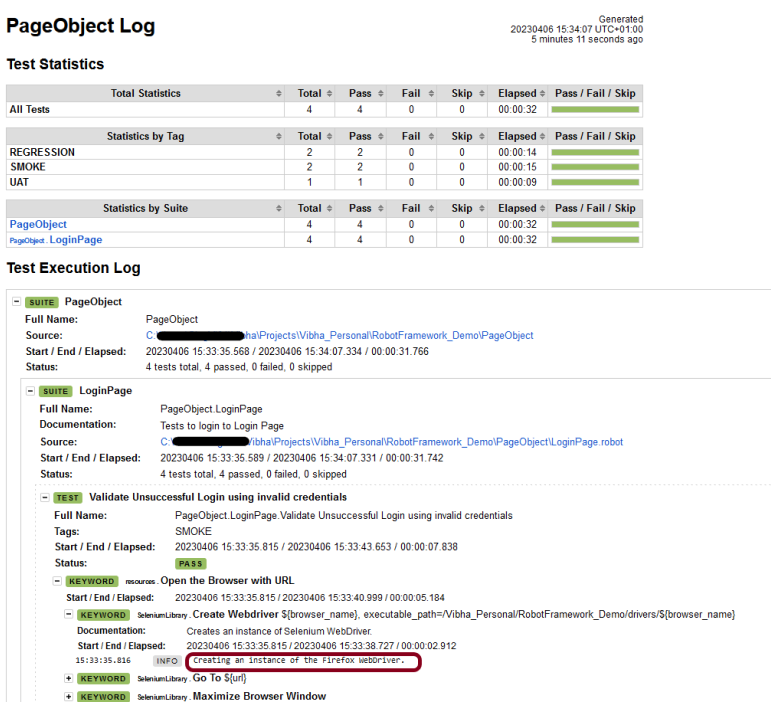
Log
Robot Framework has multiple log levels that control what is shown in the automatically generated log file. The default Robot Framework log level is INFO.
Right-click on log.html. Select Open In->Browser->Firefox (any browser of your wish).
Variables with Tags
If you want to execute only test scenario tagged with UAT using firefox browser, it can be done using the below command: