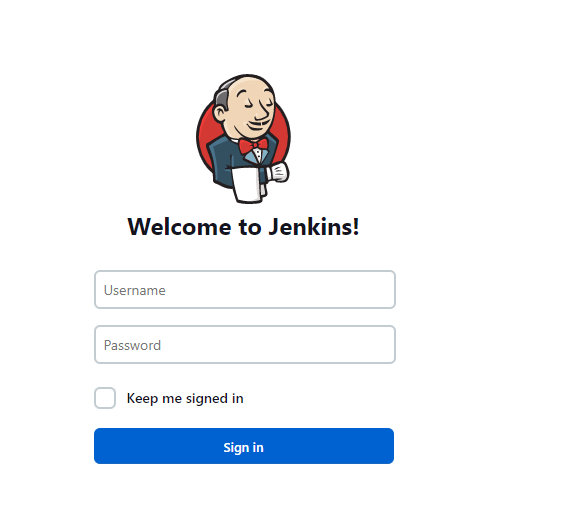
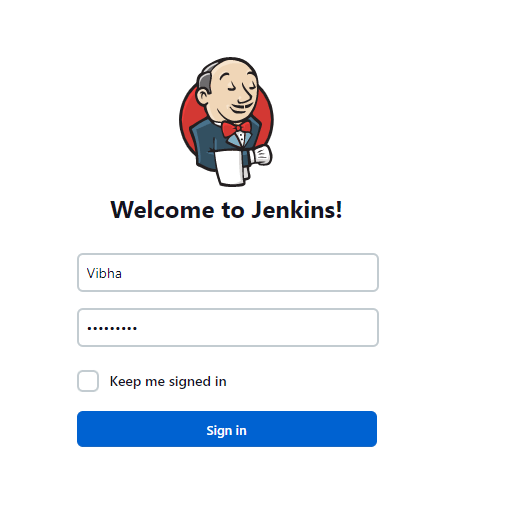
You need to provide a username and password and click on Sign in button.
Step 3: Select Manage Jenkins
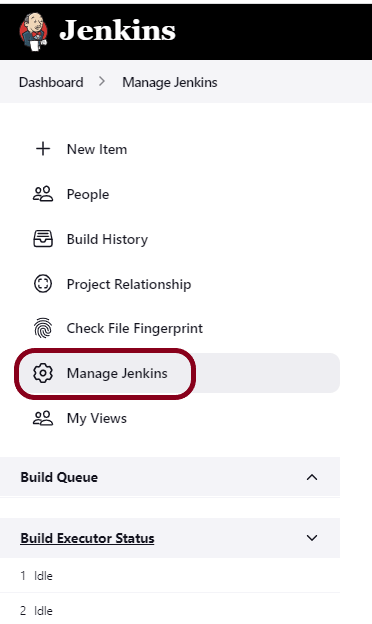
Go to Jenkins Dashboard. After that, click on the Manage Jenkins link as shown below:
Step 4: Select the Global Tool Configuration option
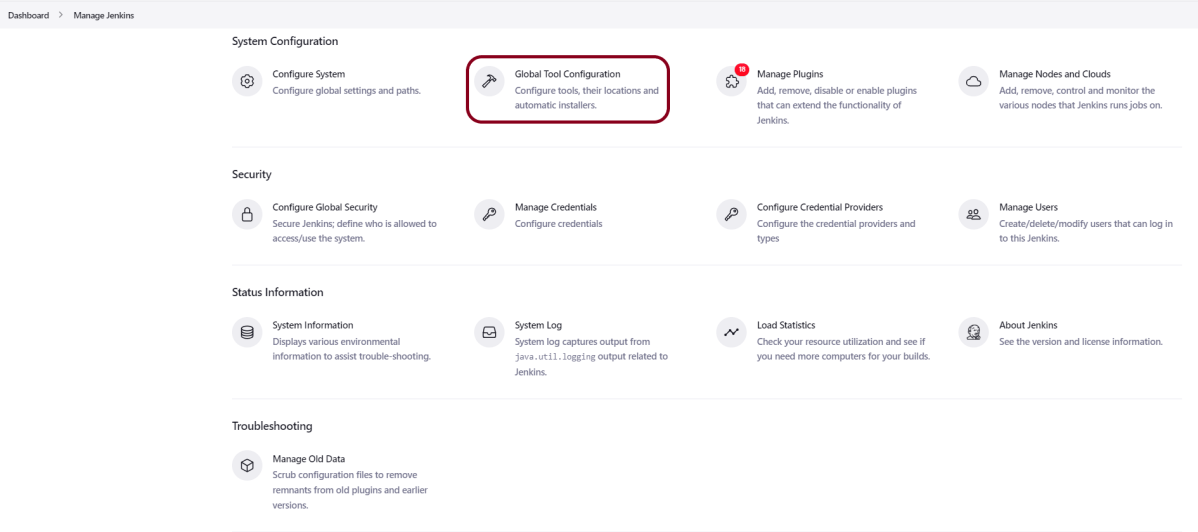
When we click on the “Manage Jenkins” link, we are redirected to the Manage Jenkins page, where we can see various types of options, including the “Global Tool Configuration” option.
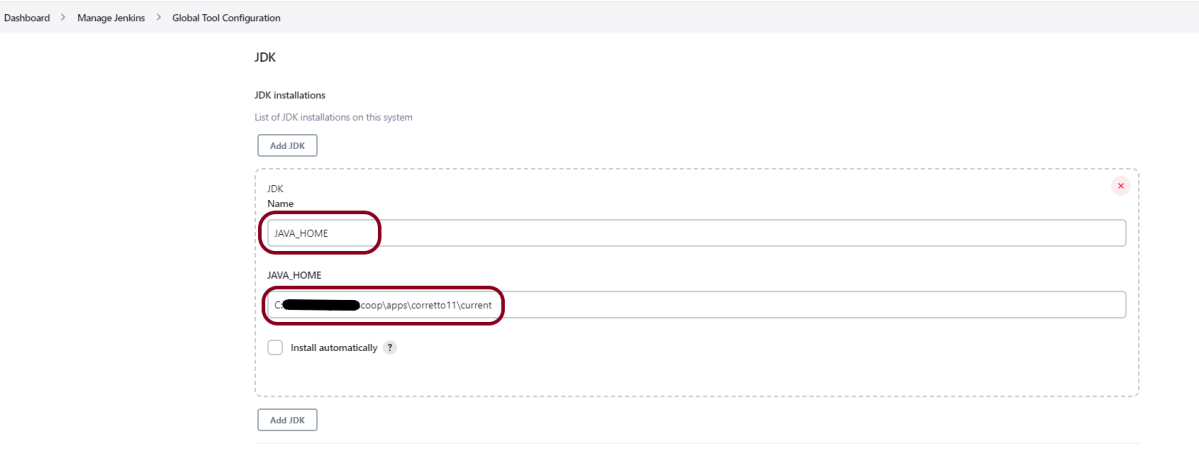
Step 5: Setup JDK Path
We need to set the JDK path in Jenkins as shown below. To know more about setting up Java in Jenkins, please refer to this tutorial – How to configure Java and Maven in Jenkins.
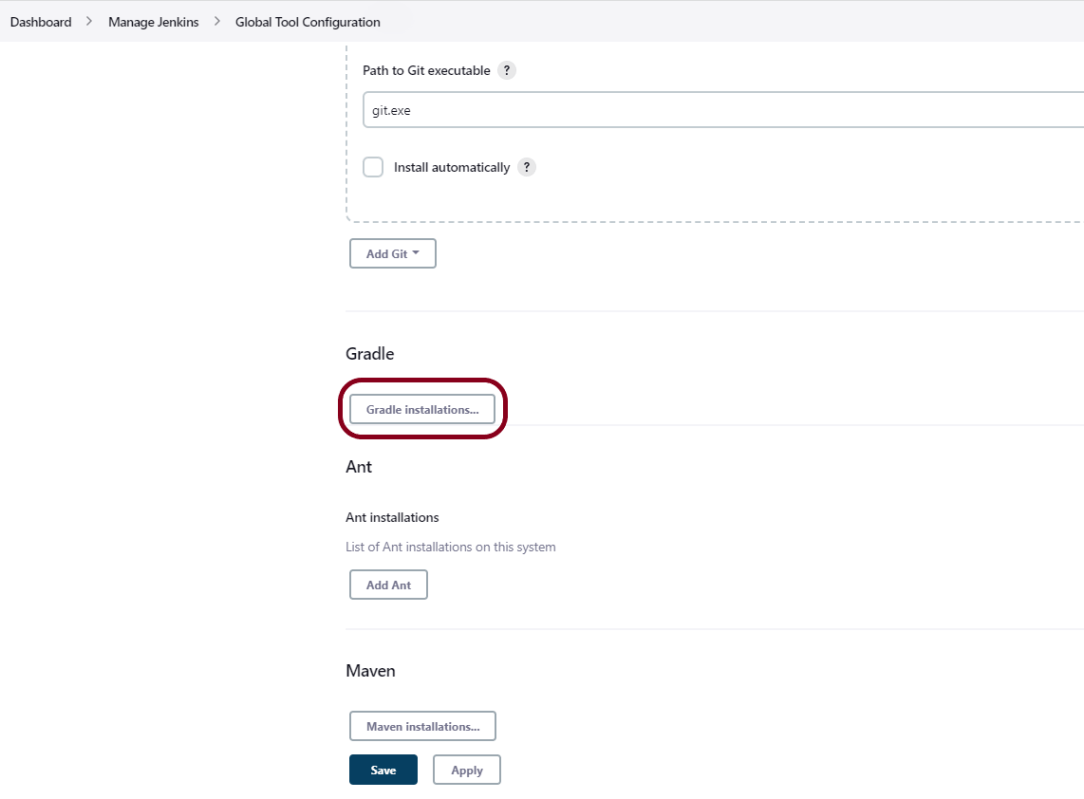
Step 6: Setup Gradle Path
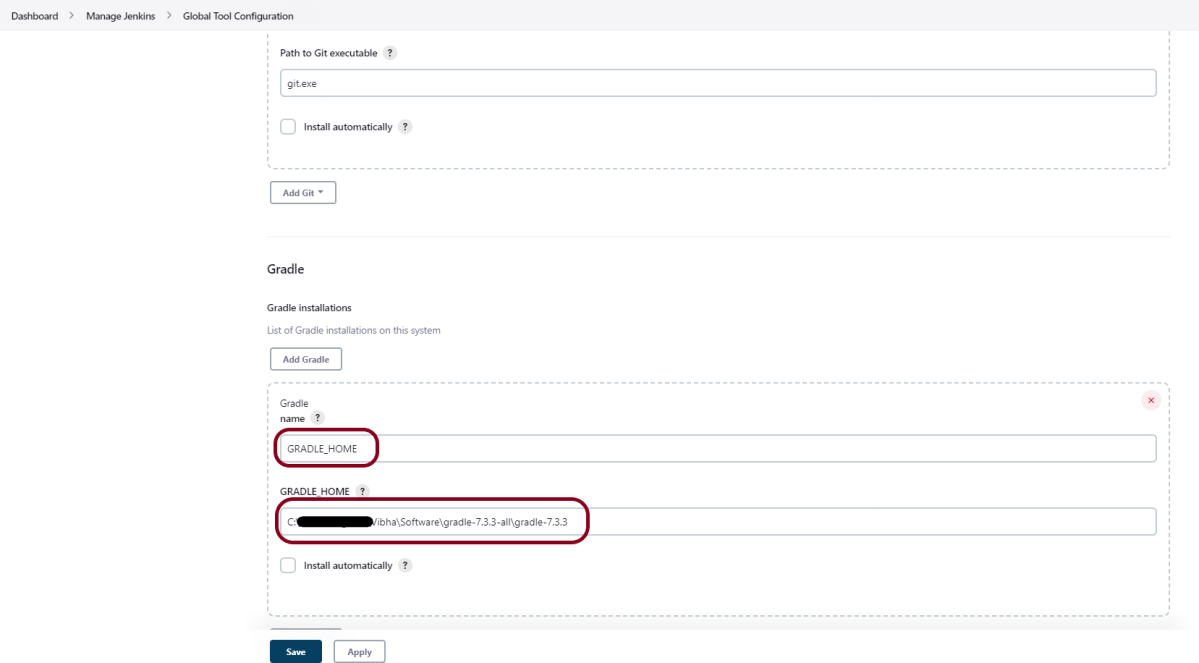
We need to set the Gradle path in Jenkins as shown below.
Click on the Add Gradle Installations button. Kindly note that by default, “Install Automatically” will be checked, so since we are going to use the Gradle installed on our local machine, “Install automatically” will install the latest version of Gradle, and you will also need to provide credentials to download the relevant Maven.
Provide the Gradle’s name as we gave as Gradle 7.3.3 because that is what is currently installed on my machine, and also provide the path of Gradle in the GRADLE_HOME textbox.
Click on the Apply and Save buttons.
Integrate Gradle Project with Jenkins
Step 1: Create a new project using the FreeStyle project plugin
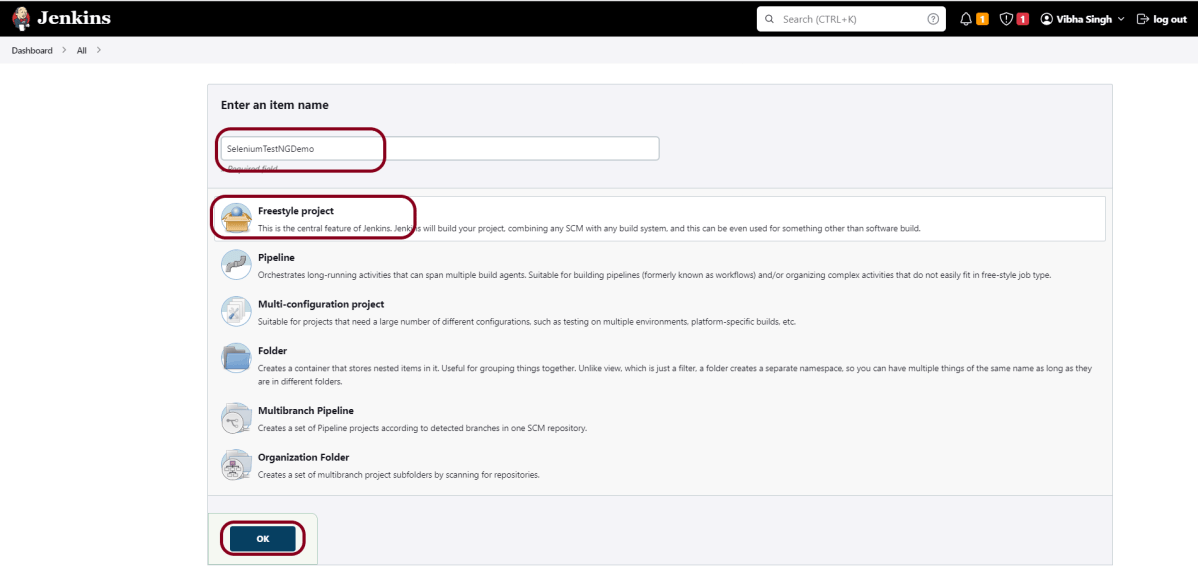
Give the Name of the project.
Click on the Freestyle project.
Click on the OK button.
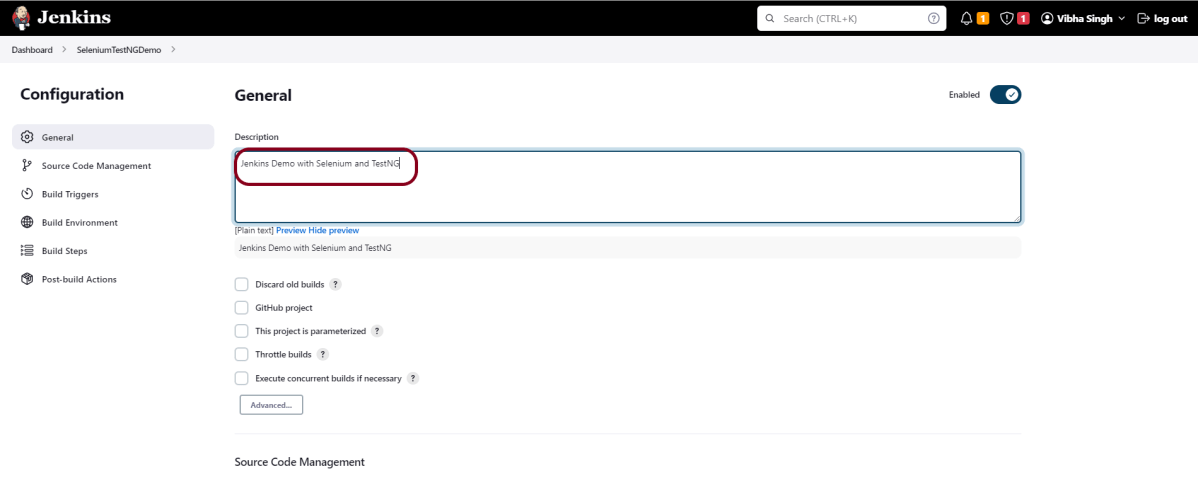
Step 2: Enter the project description in the Description box
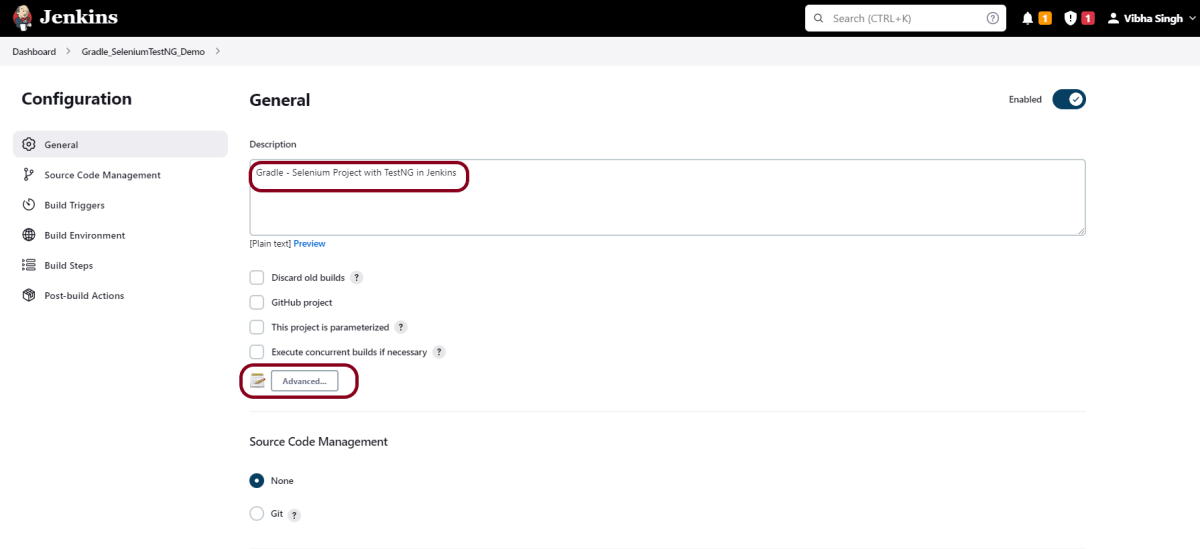
In the general section, describe the project in the description section.
Click on the Advanced button. Mention the full path of the project.
Step 3: Build Management
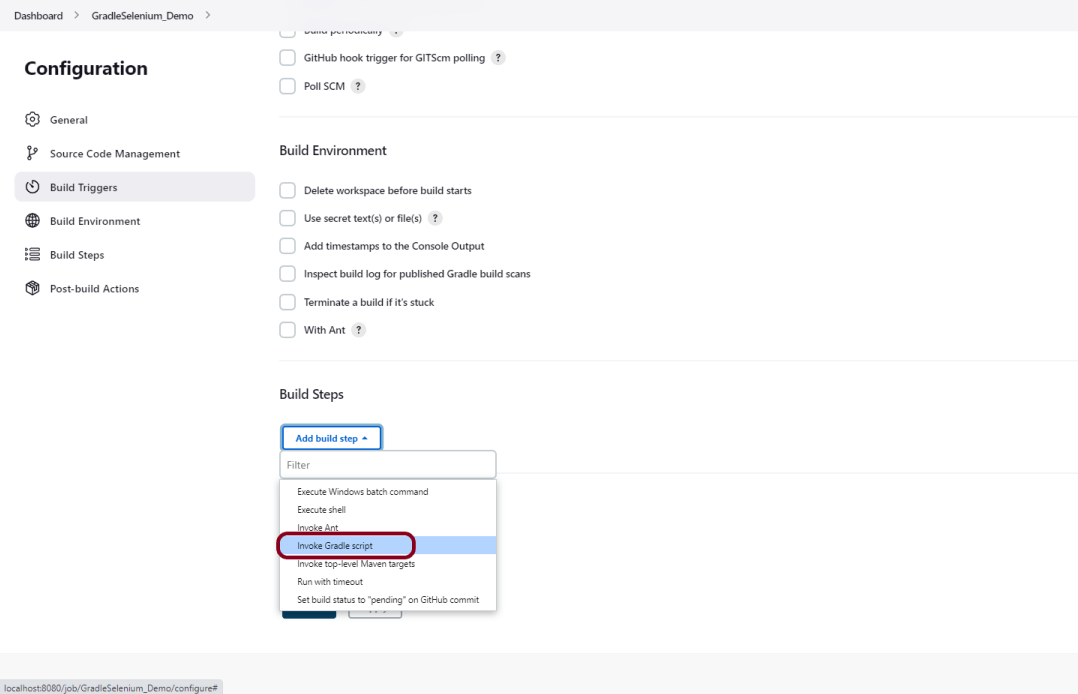
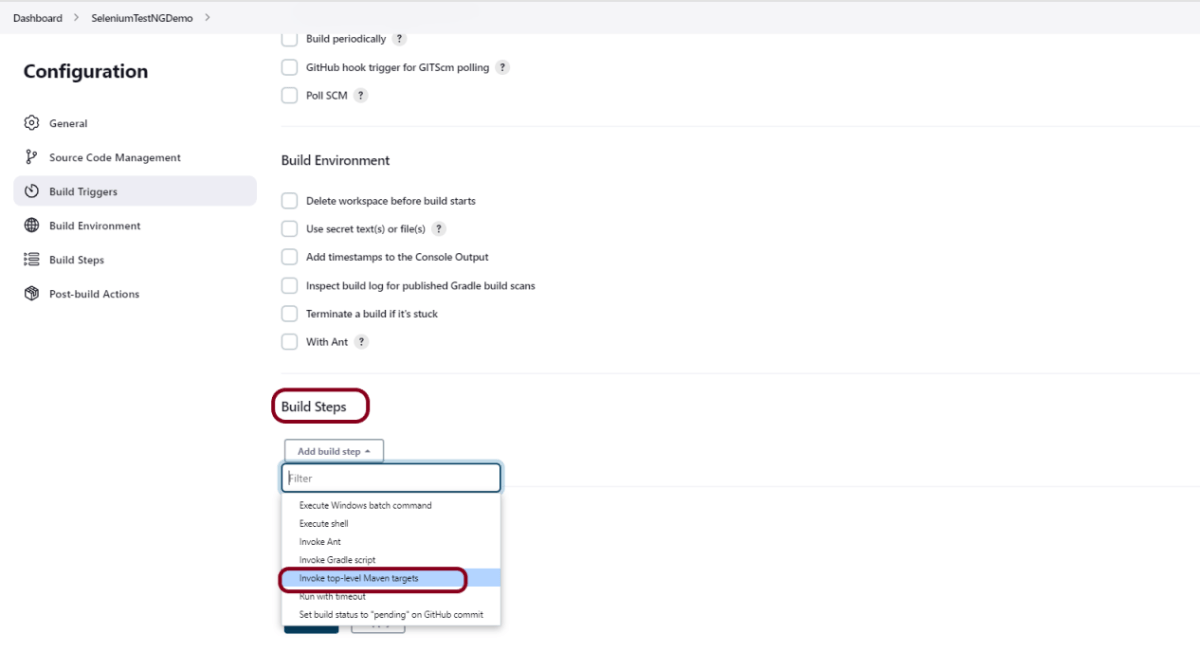
Go to the Build section of the new job and select the option – “Invoke Gradle Script“.
Provide the below-mentioned information:
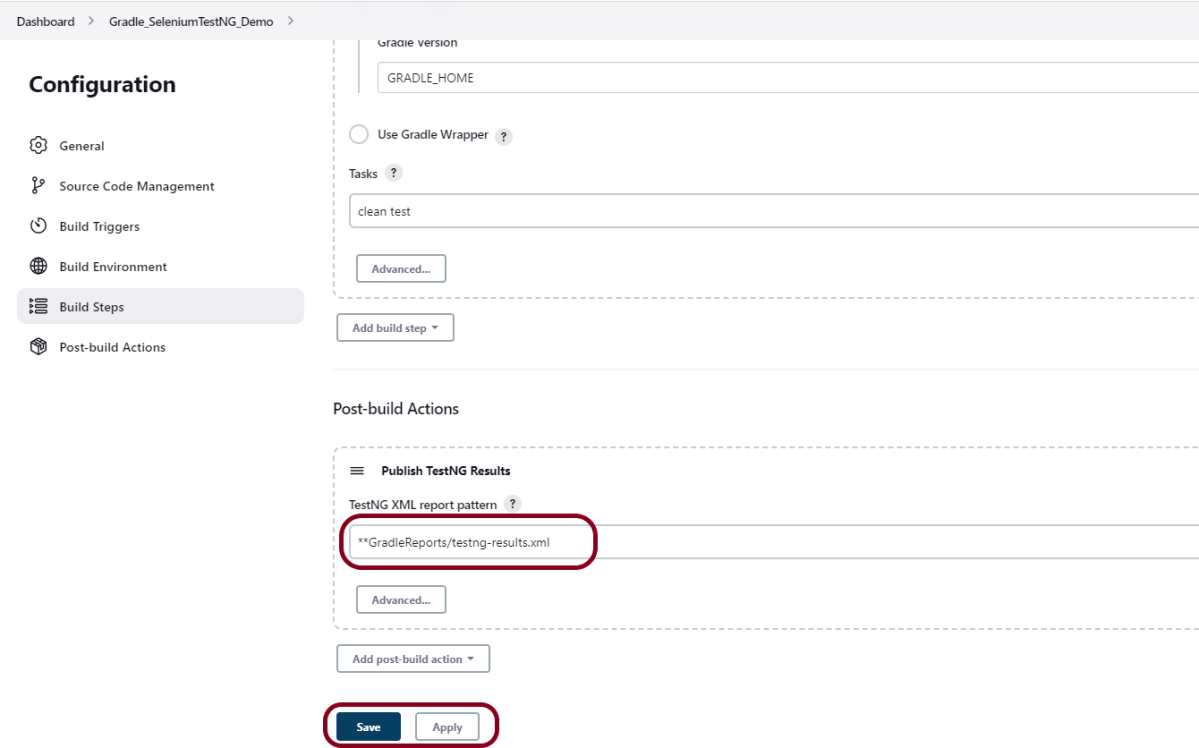
In the Gradle version, enter – GRADLE_HOME.
In the Tasks option section, enter “clean test”
Step 4: Select “Publish TestNG Results” from “Post Build Actions”
Scroll down to “Post Build Actions” and click on the “Add Post Build Actions” drop-down list.
Enter TestNG XML Report Pattern as “**GradleReports/testng-results.xml” and click on the Save button
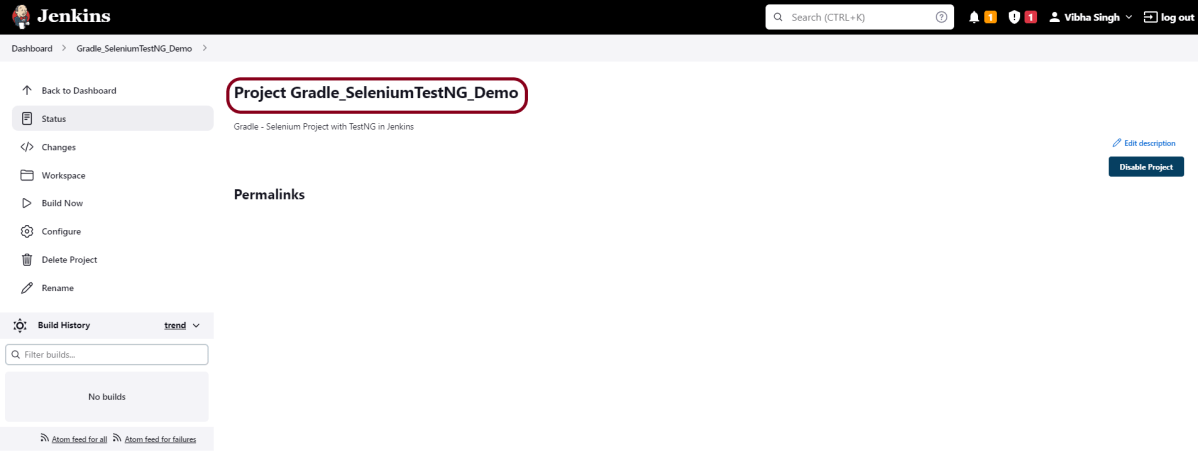
We have created a new project “Gradle_SeleniumTestNG_Demo” with the configuration to run TestNG Tests and also to generate TestNG Reports after execution using Jenkins.
Step 5: Execute the tests
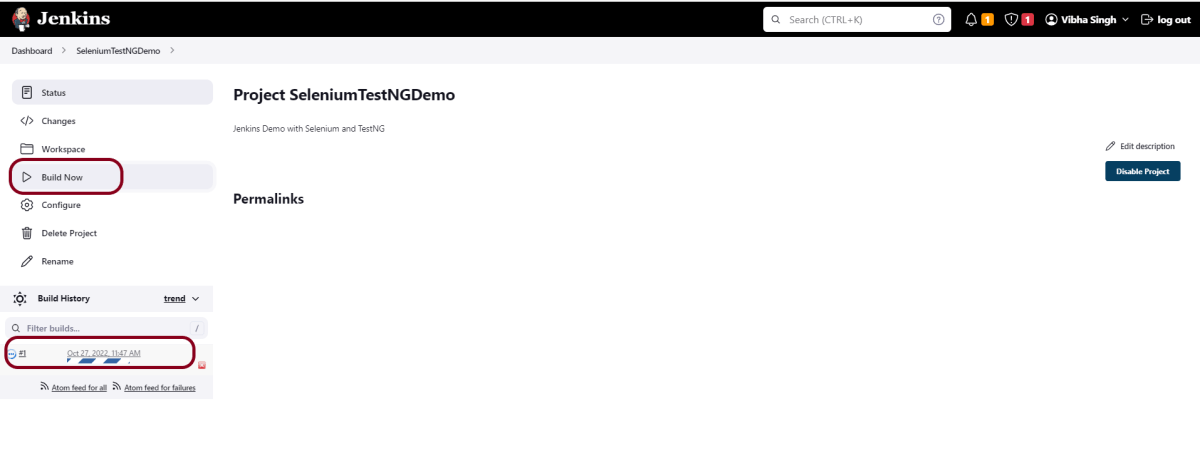
Let’s execute it now by clicking on the “Build Now” button.
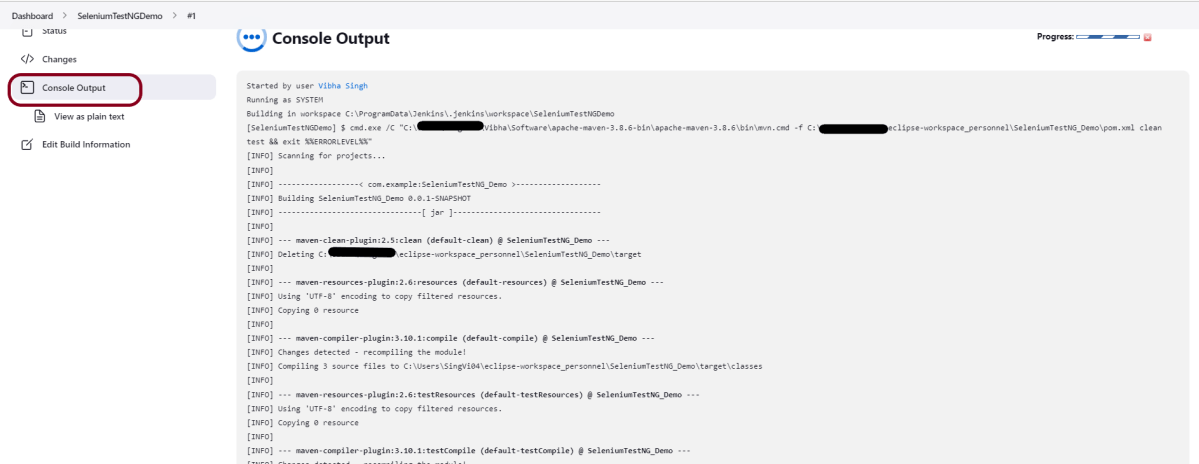
Right-click on Build Number (here in my case it is #2) and click on Console Output to see the result.
The below screen shows that the build failed because I failed one of the tests intentionally to show how the result looks with passed and failed tests.
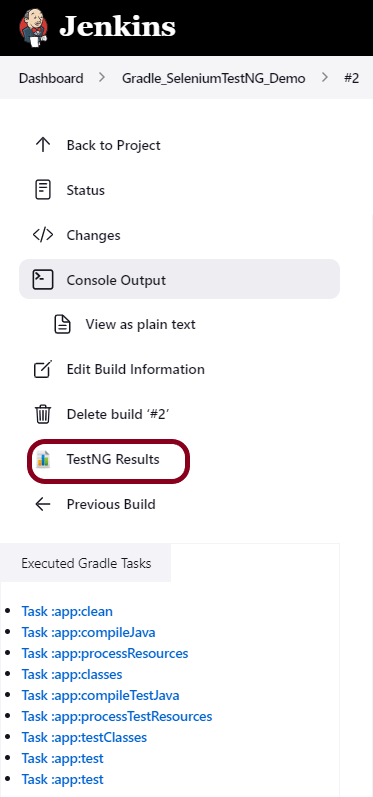
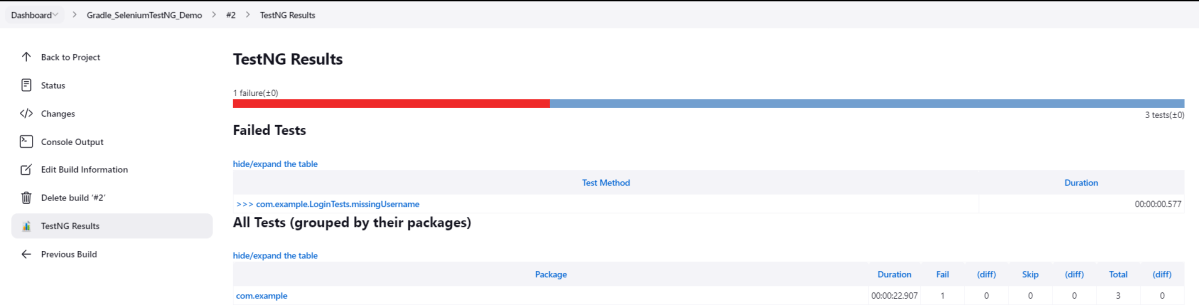
Once the execution is completed, we could see a link to view ‘TestNG Results’.
Click on the TestNG Results. It displays the summary of the tests.
This way, we could integrate the Gradle project with Jenkins.
Congratulations on making it through this tutorial and hope you found it useful! Happy Learning!! Cheers!!
Provide a username and password and click on the Sign-in Button.
Step 3: Download and Install TestNG Results Plugin
Click on the Manage Jenkins. Choose Manage Plugins.
Step 4: Add the TestNG Report plugin
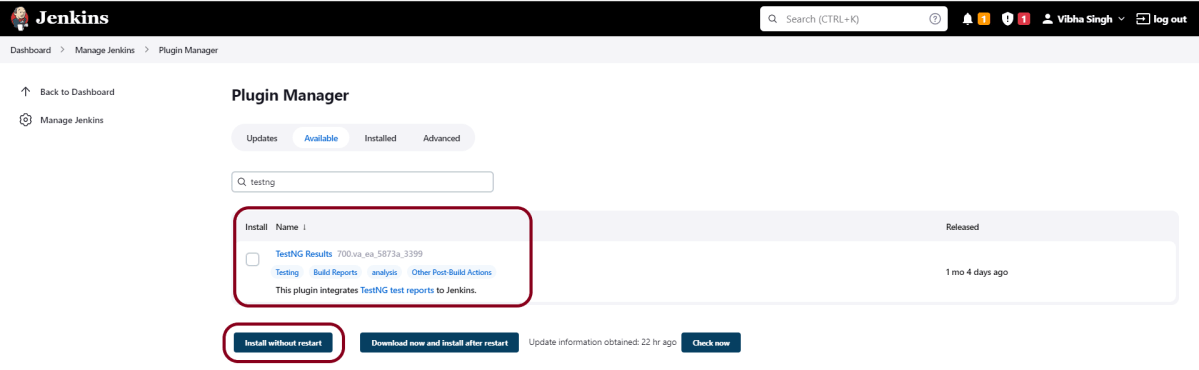
On the Plugins Page, go to the Available option
Select the TestNG Report Plugin
Click on Install without restart.The plugin will take a few moments to finish downloading depending on your internet connection, and will be installed automatically.
You can also select the option Download now and Install after the restart button. In which plugin is installed after the restart
You will be shown a “No updates available” message if you already have the TestNG Report plugin installed.
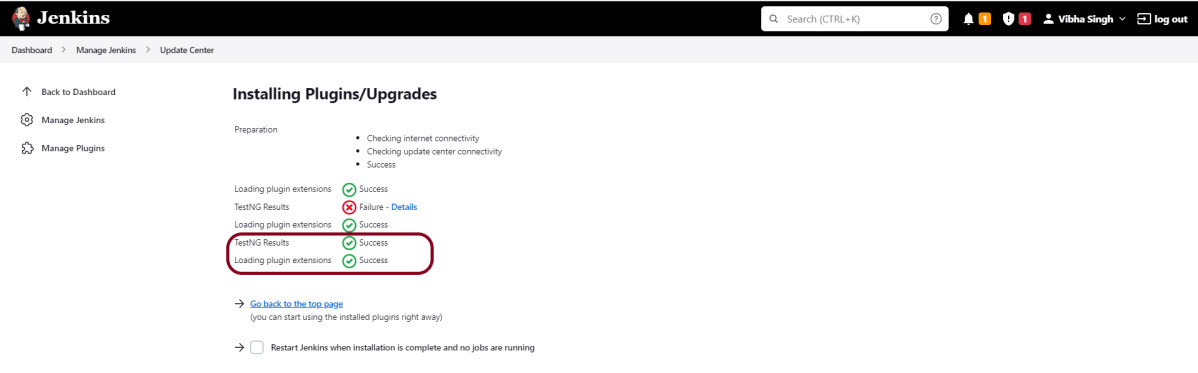
The plugin “TestNG Report” has been installed successfully.
Sometimes, the installation fails because of a network issue. You can try to reinstall it, and it should be successful.
Step 5: Restart Jenkins
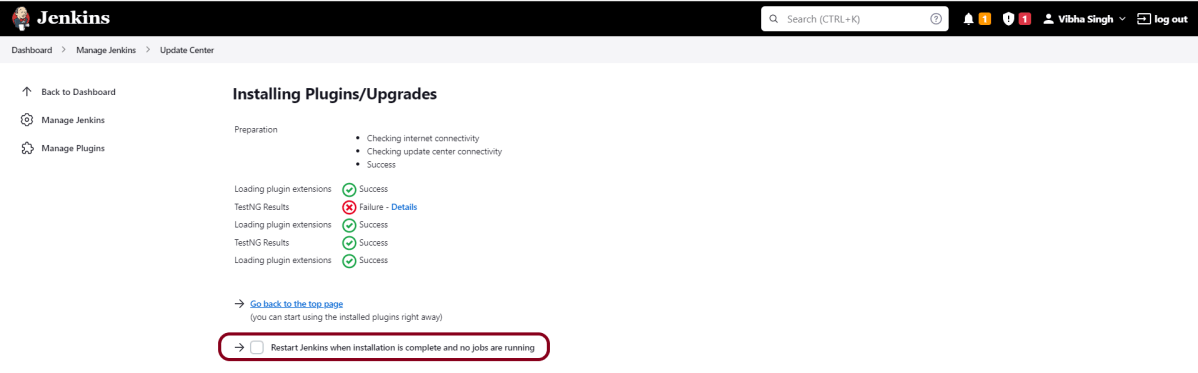
Click on the checkbox “Restart Jenkins when installation is complete when no jobs are running“.
The Jenkins will be restarted. Again, login to Jenkins UI.
Step 6: Create a new project using the Maven project plugin
Give the Name of the project.
Click on the Maven project.
Click on the OK button.
In the General section, enter the project description in the Description box.
Step 7: Build Management
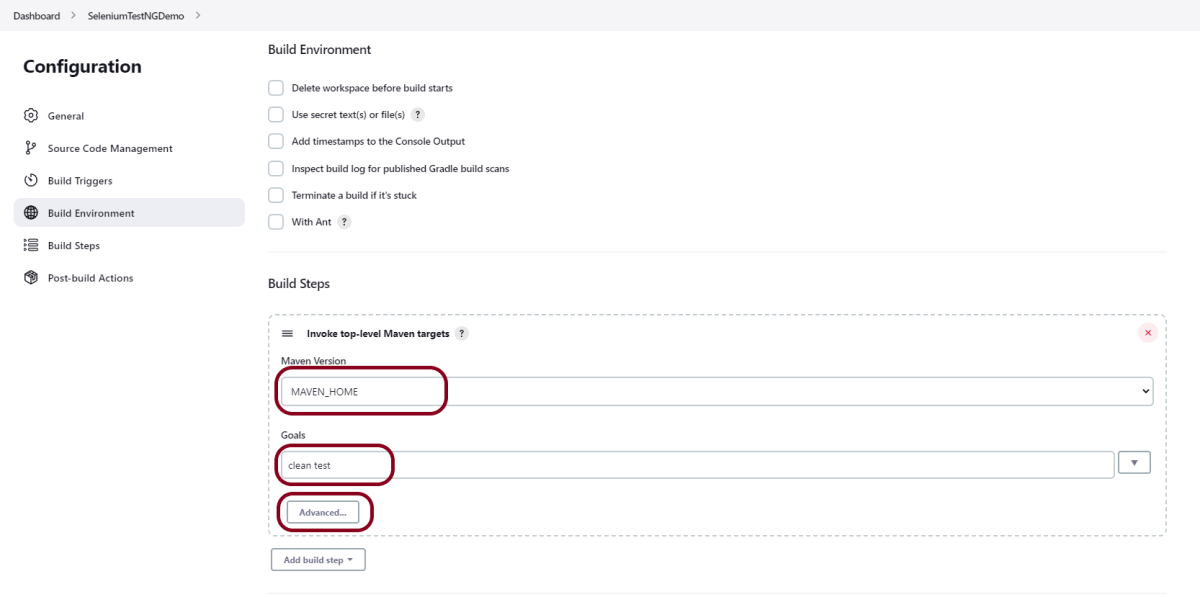
Go to the Build section of the new job.
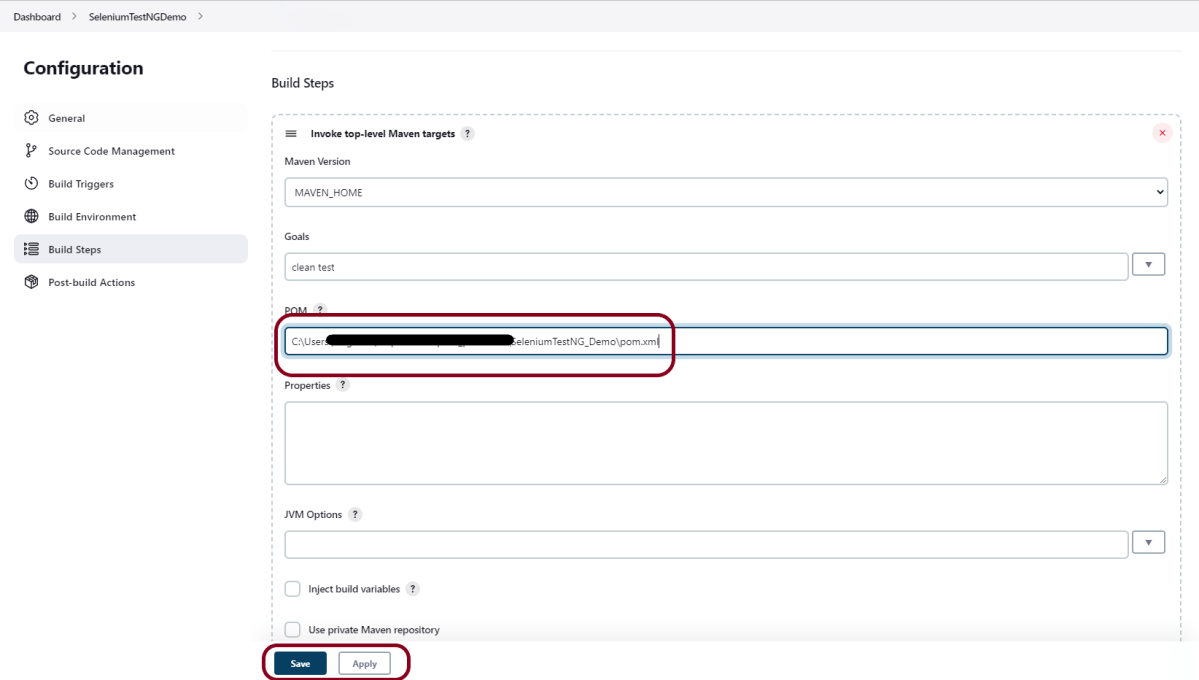
In the Root POM textbox, enter the full path to pom.xml
In the Goals and options section, enter “clean test”
Click on the Advanced button.
Step 8: Select custom workspace
Mention the full path of the project in the directory.
Step 9: Select “Publish TestNG Results” from “Post Build Actions”
Scroll down to ‘Post Build Actions’ and click on the ‘Add Post Build Actions’ drop-down list.
Select “Publish TestNG Results“.
Enter the TestNG XML Report Pattern as “**target/surefire-reports/testng-results.xml” and click on the “Save” button.
We have created a new project “TestNGReport_Demo” with the configuration to run TestNG Tests and also to generate TestNG Reports after execution using Jenkins.
Step 10: Execute the tests
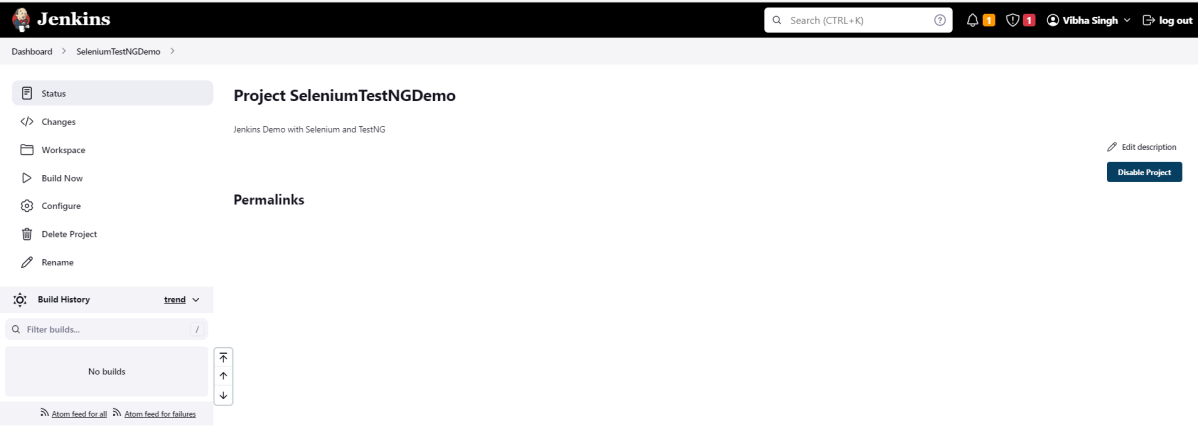
Let’s execute it now by clicking on the “Build Now” button.
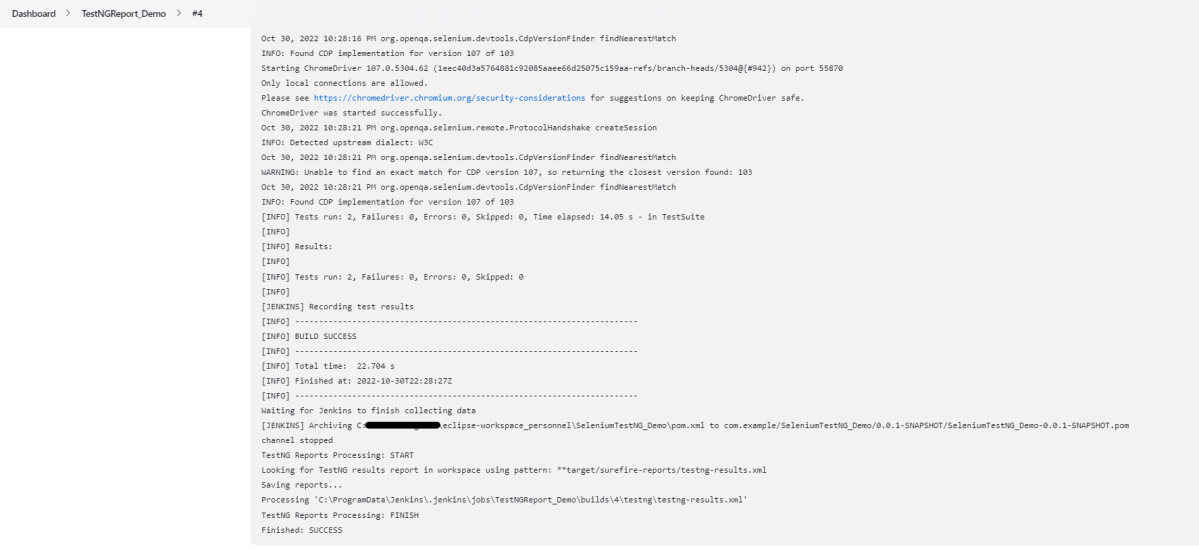
Right-click on Build Number (here in my case it is #4) and click on Console Output to see the result.
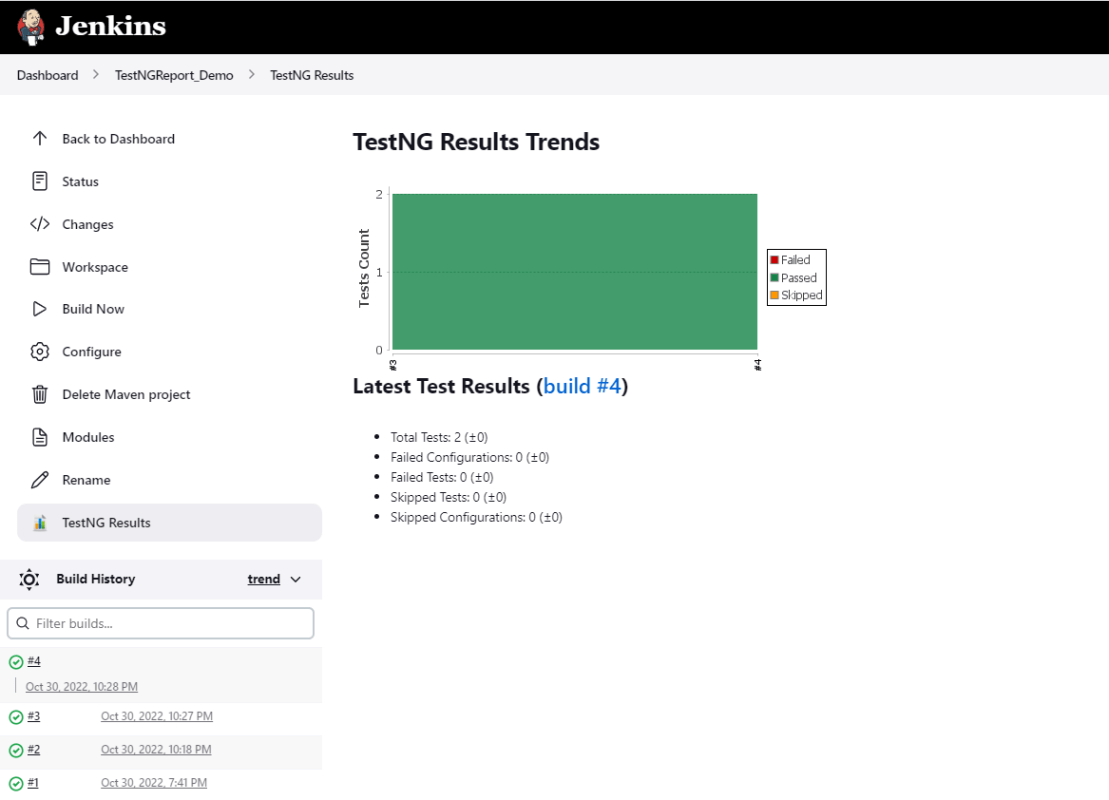
Once the execution is completed, we could see a link to view ‘TestNG Results’.
Step 11: View the TestNG Report
Click on the TestNG Results. It displays the summary of the tests.
This way, we could generate TestNG Reports using Jenkins.
Congratulations on making it through this tutorial and hope you found it useful! Happy Learning!! Cheers!!
Masterthought library provides pretty HTML reports for Cucumber. The cucumber JSON file is used to generate the HTML for the website. This Java report publisher was made particularly with publishing cucumber reports to the Jenkins build server in mind. It releases aesthetically pleasing HTML reports with charts displaying the outcomes of cucumber runs.
Cucumber lacks a sophisticated reporting feature. Cucumber generates a number of simple reports as part of the BDD framework; using the output from these same reports, we can use the Masterthought reporting plugin to produce more extensive HTML reports. Masterthoughtreporting plugin generates not only fancy reports but also detailed ones by reading a default report ‘cucumber.json’ generated by cucumber.
Add Selenium, TestNG, Cucumber, and Masterthought dependencies to the project
Create a feature file under src/test/resources
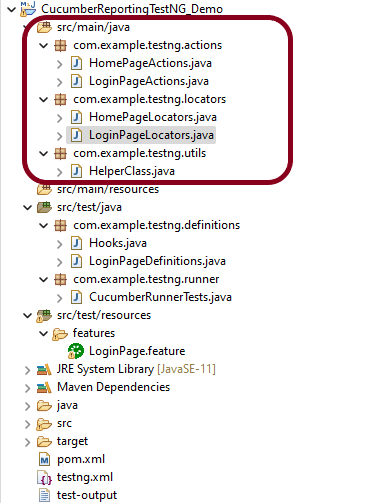
Create the test code locating the web elements in src/main/java
Create the Step Definition class or Glue Code in src/test/java
Create a TestNG Cucumber Runner class in src/test/java
Create testng.xml
Run the tests from Command Line
Cucumber Report Generation
Step 1- Download and Install Java
Cucumber and Selenium need Java to be installed on the system to run the tests. Click here to know How to install Java.
Step 2 – Download and setup Eclipse IDE on the system
The Eclipse IDE (integrated development environment) provides strong support for Java developers, which is needed to write Java code. Click here to know How to install Eclipse.
Step 3 – Setup Maven
To build a test framework, we need to add a number of dependencies to the project. It is a very tedious and cumbersome process to add each dependency manually. So, to overcome this problem, we use a build management tool. Maven is a build management tool that is used to define project structure, dependencies, build, and test management. Click here to know How to install Maven.
The Cucumber Eclipse plugin is a plugin that allows eclipse to understand the Gherkin syntax. The Cucumber Eclipse Plugin highlights the keywords present in Feature File. Click here to know more – Install Cucumber Eclipse Plugin.
Step 7 – Create a feature file (LoginPage.feature) containing all the test scenarios under src/test/resources/features
It is recommended to create a features folder in src/test/resources directory. Create all the feature files in this features folder. Featurefile should be saved as an extension of .feature.
Feature: Login to HRM Application

Background:
    Given User is on HRMLogin page "https://opensource-demo.orangehrmlive.com/"

   @ValidCredentials
   Scenario: Login with valid credentials

    When User enters username as "Admin" and password as "admin123"
    Then User should be able to login successfully and new page open

   @InvalidCredentials
   Scenario Outline: Login with invalid credentials

    When User enters username as "<username>" and password as "<password>"
    Then User should be able to see error message "<errorMessage>"

  Examples:
   | username   | password  | errorMessage                       |
   | $$$$$        | ££££££££  | Invalid credentials               |
   | admin        | Admin123  | Invalid credentials              |
Step 8 – Create the test code locating the web elements in src/main/java
LoginPageLocators
import org.openqa.selenium.WebElement;
import org.openqa.selenium.support.FindBy;

public class LoginPageLocators {

	@FindBy(name = "username")
    public WebElement userName;

    @FindBy(name = "password")
    public WebElement password;

    @FindBy(id = "logInPanelHeading")
    public WebElement titleText;

    @FindBy(xpath = "//*[@id='app']/div[1]/div/div[1]/div/div[2]/div[2]/form/div[3]/button")
    public WebElement login;

    @FindBy(xpath = "//*[@id='app']/div[1]/div/div[1]/div/div[2]/div[2]/div/div[1]/div[1]/p")
    public  WebElement errorMessage;

    @FindBy(xpath = "//*[@href='https://www.facebook.com/OrangeHRM/mycompany']") //Invalid Xpath
    public  WebElement faceBookIcon;

    @FindBy(xpath = "//*[@id='app']/div[1]/div/div[1]/div/div[2]/div[2]/form/div[1]/div/span")
    public WebElement missingUsernameErrorMessage;
}
HomePageLocators
import org.openqa.selenium.WebElement;
import org.openqa.selenium.support.FindBy;

public class HomePageLocators {

	@FindBy(xpath = "//*[@id='app']/div[1]/div[1]/header/div[1]/div[1]/span/h6")
	public  WebElement homePageUserName;

}
LoginPageActions
import org.openqa.selenium.support.PageFactory;
import com.example.testng.locators.LoginPageLocators;
import com.example.testng.utils.HelperClass;

public class LoginPageActions {

LoginPageLocators loginPageLocators = null;

    public LoginPageActions() {

    	this.loginPageLocators = new LoginPageLocators();

		PageFactory.initElements(HelperClass.getDriver(),loginPageLocators);
	}

    public void login(String strUserName, String strPassword) {

        // Fill user name
    	loginPageLocators.userName.sendKeys(strUserName);

        // Fill password
    	loginPageLocators.password.sendKeys(strPassword);

        // Click Login button
    	loginPageLocators.login.click();

    }

    //Get the title of Login Page")
    public String getLoginTitle() {
        return loginPageLocators.titleText.getText();
    }

    // Get the error message of Login Page
    public String getErrorMessage() {
        return loginPageLocators.errorMessage.getText();
    }

}
HomePageActions
import org.openqa.selenium.support.PageFactory;
import com.example.testng.locators.HomePageLocators;
import com.example.testng.utils.HelperClass;

public class HomePageActions {

	HomePageLocators homePageLocators = null;

	public HomePageActions() {

		this.homePageLocators = new HomePageLocators();

		PageFactory.initElements(HelperClass.getDriver(),homePageLocators);
    }

    // Get the User name from Home Page
    public String getHomePageText() {
        return homePageLocators.homePageUserName.getText();
    }

}
HelperClass
import java.time.Duration;
import org.openqa.selenium.WebDriver;
import org.openqa.selenium.chrome.ChromeDriver;
import io.github.bonigarcia.wdm.WebDriverManager;

public class HelperClass {

	private static HelperClass helperClass;

	private static WebDriver driver;
    public final static int TIMEOUT = 10;

	 private HelperClass() {

			WebDriverManager.chromedriver().setup();
	    	driver = new ChromeDriver();
	    	driver.manage().timeouts().implicitlyWait(Duration.ofSeconds(TIMEOUT));
	        driver.manage().window().maximize();

	 }

    public static void openPage(String url) {
        driver.get(url);
    }

	public static WebDriver getDriver() {
		return driver;

	}

	public static void setUpDriver() {

		if (helperClass==null) {

			helperClass = new HelperClass();
		}
	}

	 public static void tearDown() {

		 if(driver!=null) {
			 driver.close();
			 driver.quit();
		 }

		 helperClass = null;

	 }

}
Step 9 – Create the Step Definition class or Glue Code in src/test/java
It is recommended to create a definitions folder in src/test/java directory. The StepDefinition files should be created in this definitionsdirectory. within the folder called definitions.
LoginPageDefinitions
import org.junit.Assert;
import com.example.junit.actions.ForgetPasswordPageActions;
import com.example.junit.actions.HomePageActions;
import com.example.junit.actions.LoginPageActions;
import com.example.junit.utils.HelperClass;
import io.cucumber.java.en.Given;
import io.cucumber.java.en.Then;
import io.cucumber.java.en.When;

public class LoginPageDefinitions{

	LoginPageActions objLogin = new LoginPageActions();
    HomePageActions objHomePage = new HomePageActions();
    ForgetPasswordPageActions objForgotPasswordPage = new ForgetPasswordPageActions();


    @Given("User is on HRMLogin page {string}")
    public void loginTest(String url) {

    	HelperClass.openPage(url);

    }

    @When("User enters username as {string} and password as {string}")
    public void goToHomePage(String userName, String passWord) {

        // login to application
        objLogin.login(userName, passWord);

        // go the next page

    }

    @Then("User should be able to login successfully and new page open")
    public void verifyLogin() {

        // Verify home page
        Assert.assertTrue(objHomePage.getHomePageText().contains("Dashboard"));

    }

    @Then("User should be able to see error message {string}")
    public void verifyErrorMessage(String expectedErrorMessage) {

        // Verify home page
        Assert.assertEquals(objLogin.getErrorMessage(),expectedErrorMessage);

    }

}
Hooks
import com.example.junit.utils.HelperClass;
import io.cucumber.java.After;
import io.cucumber.java.Before;

public class Hooks {

	@Before
    public static void setUp() {

       HelperClass.setUpDriver();
    }

	@After
	public static void tearDown() {

		HelperClass.tearDown();
	}
}
Step 10 – Create a TestNG Cucumber Runner class in src/test/java
We need to create a class called Runner class to run the tests. This class will use the TestNG annotation @RunWith(), which tells TestNG what is the test runner class. TestRunner should be created under src/test/java within the folder called runner.
AbstractTestNGCucumberTests – Runs each cucumber scenario found in the features as a separate test.
import io.cucumber.testng.AbstractTestNGCucumberTests;
import io.cucumber.testng.CucumberOptions;

@CucumberOptions(tags = "", features = "src/test/resources/features/LoginPage.feature", glue = "com.example.testng.definitions",
    plugin= {"pretty", "html:test-output","json:target/cucumber/cucumber.json", "html:target/cucumber-html-report"})

public class CucumberRunnerTests extends AbstractTestNGCucumberTests {

}
Step 11 – Create testng.xml
TestNG.xml is used to run multiple tests in a single execution.
<?xml version="1.0" encoding="UTF-8"?>
<!DOCTYPE suite SYSTEM "https://testng.org/testng-1.0.dtd">
<suite name="Suite">
  <test name="Cucumber Reporting">

  <classes>
  <class name = "com.example.testng.runner.CucumberRunnerTests"/>
  </classes>
  </test> <!-- Test -->
</suite> <!-- Suite -->
Step 12 – Run the tests from Command Line
Use the below command to execute the tests.
mvn clean test
The output of the above program is
Step 13 – Cucumber Report Generation
Refresh your project and check inside \target\cucumber-html-reports that the report generated with name feature-overview.
There are different types of HTML reports gets generated as a part of the test execution cycle.
1. feature-overview – This HTML report gives an overall overview of test execution. Main HTML report which covers all different sections like Features, Tags, Steps, and Failures.
2. failures-overview – This HTML report gives an overview of all failed tests.
3. step-overview – This HTML report shows step statistics for the current cycle.
4. tag-overview – This HTML report shows passing and failing statistics for different tags used in test execution.
Congratulations on making it through this tutorial and hope you found it useful! Happy Learning!! Cheers!!
Sharing Cucumber test results with your colleagues is not easy. To make things easier, the Cucumber team has created a free, cloud-based service for sharing reports across the organization. The Cucumber Reports service, which is currently in early beta, allows you to configure Cucumber (currently only in Ruby or Java flavours) to upload the results of a Cucumber run to the cloud. You can then access them through your browser, which will render them using the same HTML formatter as on the desktop.
Serenity Reports are living documentation that contains the meaningful report for each Test. It illustrated narrative reports that document and describe what your application does and how it works.
We can create beautiful, interactive, and detailed reports for your tests using the Extent Reports library. Add events, screenshots, tags, devices, authors, or any other relevant information you deem necessary to create a descriptive and visually appealing report that you have complete control over.
Jenkins is a well-known open-source tool that aids in the implementation of Continuous Integration (CI) and Continuous Deployment/Continuous Delivery (CD) processes by automating parts of the software development pipeline such as building, testing, and deployment.
What is Selenium?
Selenium is an open-source automation tool that has been widely used for testing web applications. It is basically a suite of software or a set of JAR files to automate web browsers across various browsers. Selenium is used by many companies, but a few to mention are Netflix, Google, HubSpot, Fitbit, and more. Selenium supports multiple languages like Python, Pearl, Ruby, .Net, Java, C#, PHP.
Selenium supports parallel test execution. That means we can open multiple browsers at the same time and execute the test cases. This decrease the execution time significantly. Selenium supports Cross browser test execution.
The introduction of the Global Tool Configuration section in Jenkins 2 is a wise decision. This section contains all the major configurations for external tools, their locations, and automatic installer tools.
Open Jenkins and go to Jenkins Dashboard. After that, click on the Manage Jenkins link as shown below:
When we click on the “Manage Jenkins” link, we are redirected to the Manage Jenkins page, where we can see various types of options, including the “Global Tool Configuration” option.
We need to set the JDK path in Jenkinsas shown below.
Click on the Add JDK button. By default, “Install Automatically” will be checked, so since we are going to use the JDK installed in our local machine, “Install automatically” will install the latest version of JDK, and you will also need to provide credentials to download the relevant JDK.
Provide the JDK’s name as we gave as JDK 11 because that is what is currently installed on my machine and also provide the path of JDK in the JAVA_HOMEtextbox.
Configuring Maven
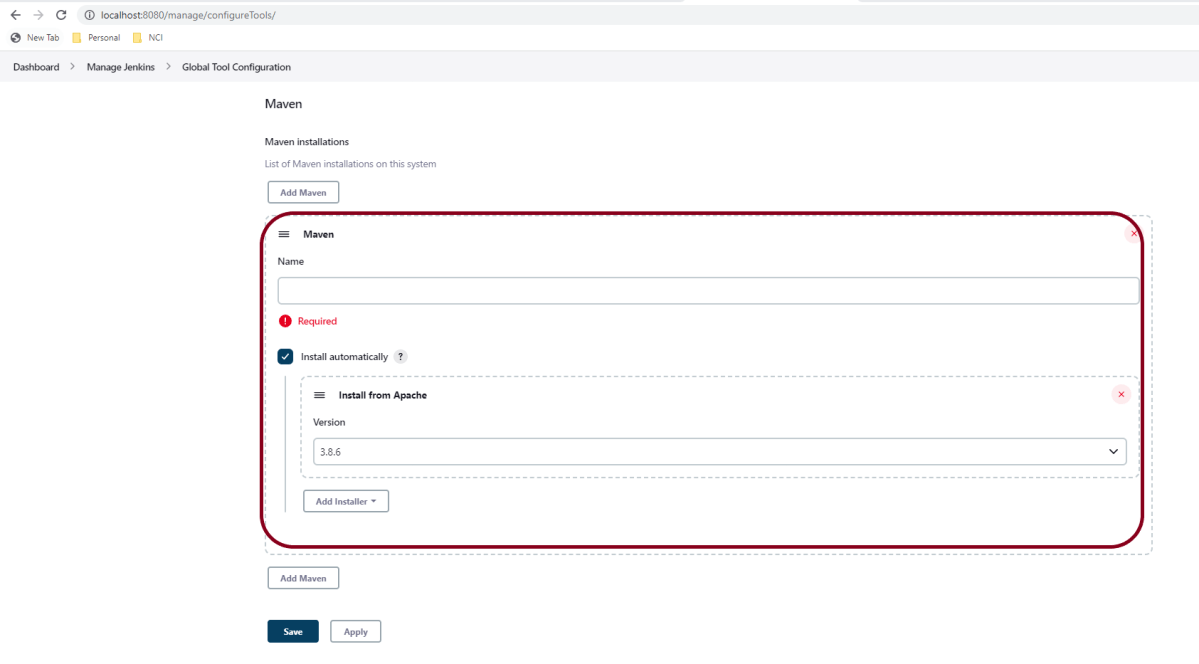
As mentioned above, go to Global Tool Configuration and scroll down to see the Maven option.
Click on the “Add Maven”button. Kindly note that by default, “Install Automatically”will be checked, so since we are going to use the Maven installed on our local machine, “Install automatically” will install the latest version of Maven, and you will also need to provide credentials to download relevant Maven.
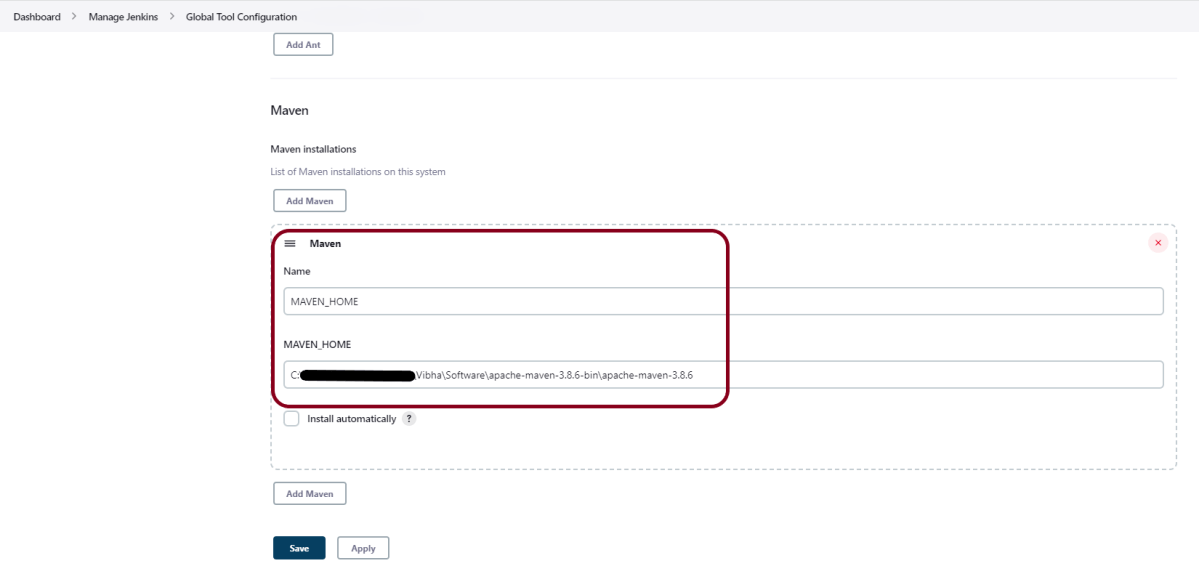
Provide the Maven’s name as we gave as Maven 3.8.6 because that is what is currently installed on my machine, and also provide the path of Maven in the MAVEN_HOME textbox.
Click on the Apply and Save buttons.
Congratulations!!. The above steps configured Java and Maven to Jenkins. Happy Learning
Jenkins is a well-known open-source tool that aids in the implementation of Continuous Integration (CI) and Continuous Deployment/Continuous Delivery (CD) processes by automating parts of the software development pipeline such as building, testing, and deployment.
It provides a centralized platform for automating the entire build pipeline, from code changes to automatic build creation, auto-execution of all layers of tests (Unit, Integration, and End to End), and finally, auto-deploying the successful build.
This allows developers to make more frequent changes while also giving end users more freedom by making new features available more frequently.
What are the prerequisites for the installation of Jenkins?
Hardware Requirements
256 MB of RAM, although more than 2 GB is recommended
10 GB of drive space (for Jenkins and your Docker image)
Software Requirement
Java 11 or Java 17
Docker (navigate to Get Docker site to access the Docker download that’s suitable for your platform)
Web Browser – Any of the browsers such as Google Chrome, Mozilla Firefox, Microsoft Internet Explorer, Microsoft Edge, Safari
Operating System – Jenkins supports almost all the modern operating systems such as Windows, macOS, Linux flavors such as Red Hat, Ubuntu, OpenSUSE, Gentoo, etc.
Installation Steps
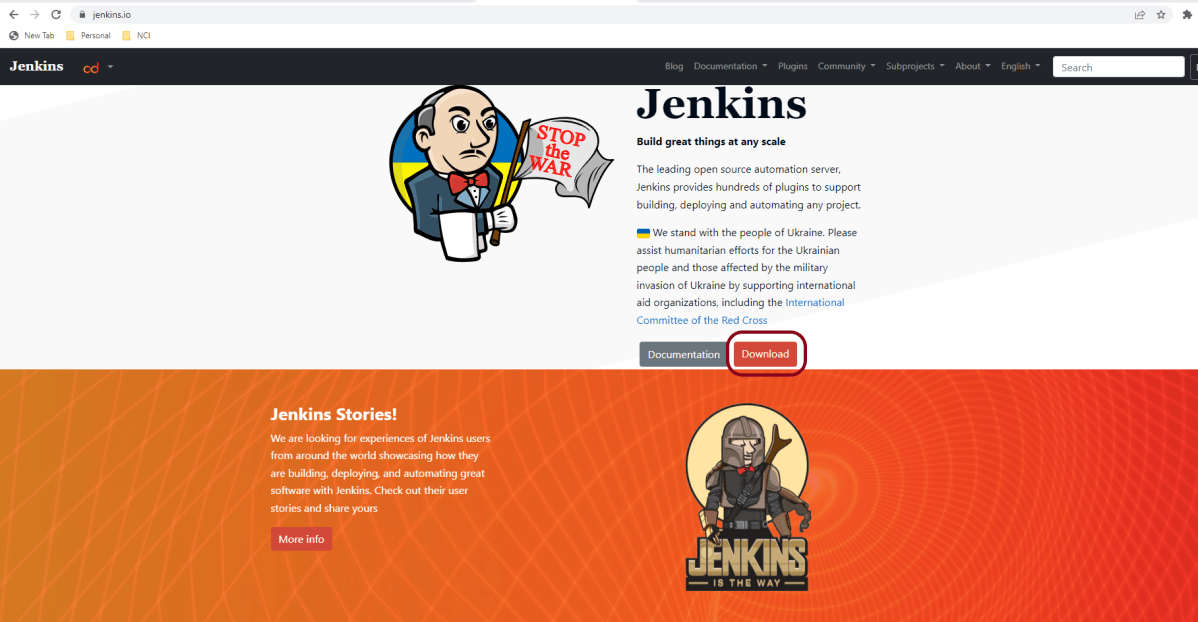
Step 1 – Firstly, go to the official Jenkins website and click on the Download button.
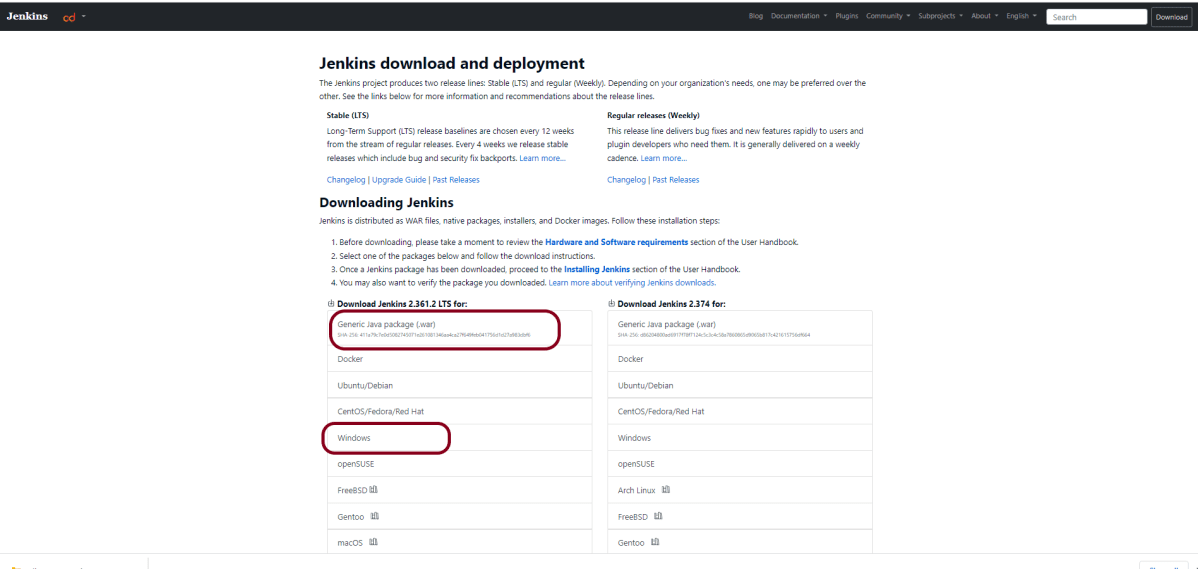
Step 2 – After clicking on the Download button, we will be redirected to the download page.
As we can see, Jenkins produces two releases, one is a stable release, and the other one is the regular bug fixes, which comes every week for all the operating system. I prefer to use the stable version.
Click on the window, and it will download jenkins.msi.
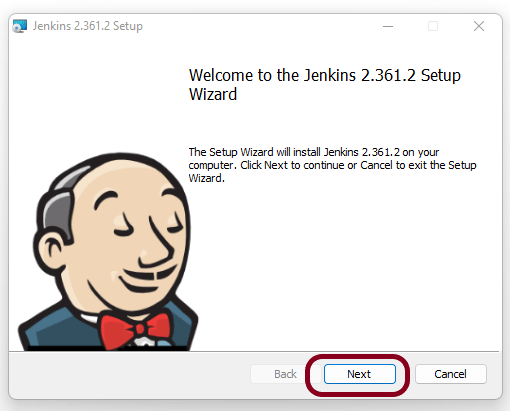
Step 3 – Double-click on jenkins.msi and a dialog box will appear
Step 4 – Choose the location where you want to have the Jenkins instance installed (default location is C:\Program Files\Jenkins), then click on the Next button.
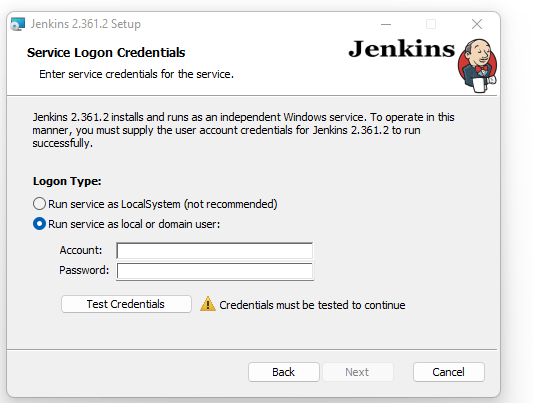
Step 5 – Enter the service logon credentials. It is recommended to select the second option “Run service as local or domain user” as it is more secure.
To run the Jenkins service using this option, you have to enter the domain username and password. Click on the “Test Credentials” button to test your domain credentials, and you will enable the “Next” button. Then, click on the “Next” button after it appears.
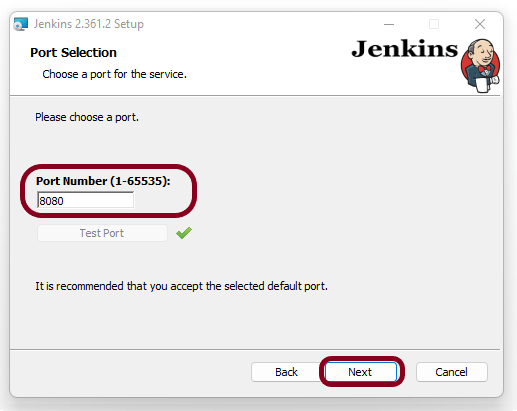
Step 6 – Enter the port on which Jenkins will be running. Click on the “Test Port” button to validate if it is free.
Step 7 – Select the Java home directory, and then click on the “Next” button.
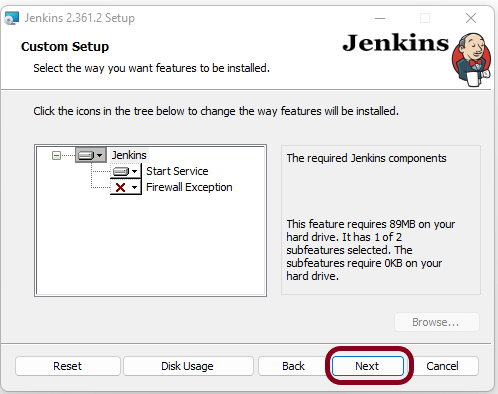
Step 8 – Select any other services that need to be installed with Jenkins and click on the “Next” button.
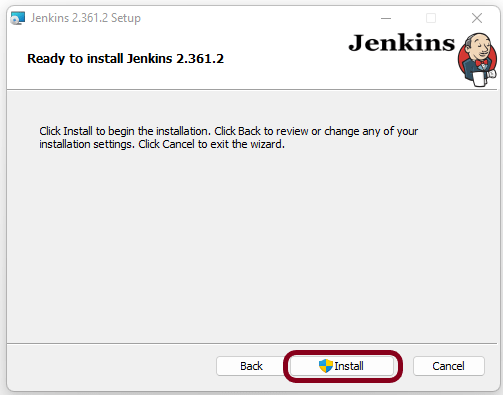
Step 9 – Click the “Install” button to start the installation process.
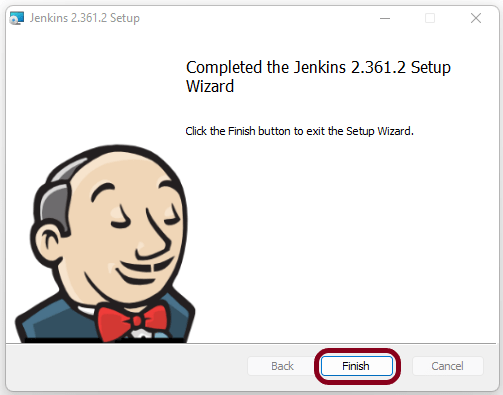
Step 10 – When done, click on “Finish” to complete the installation process. Now that the installation process is out of the way, you need to follow a few more quick steps before you start using Jenkins on Windows.
Unlock Jenkins For Windows
Step 1 – You will automatically be redirected to a local Jenkins page, or you can paste the URL http://localhost:8080 in a browser.
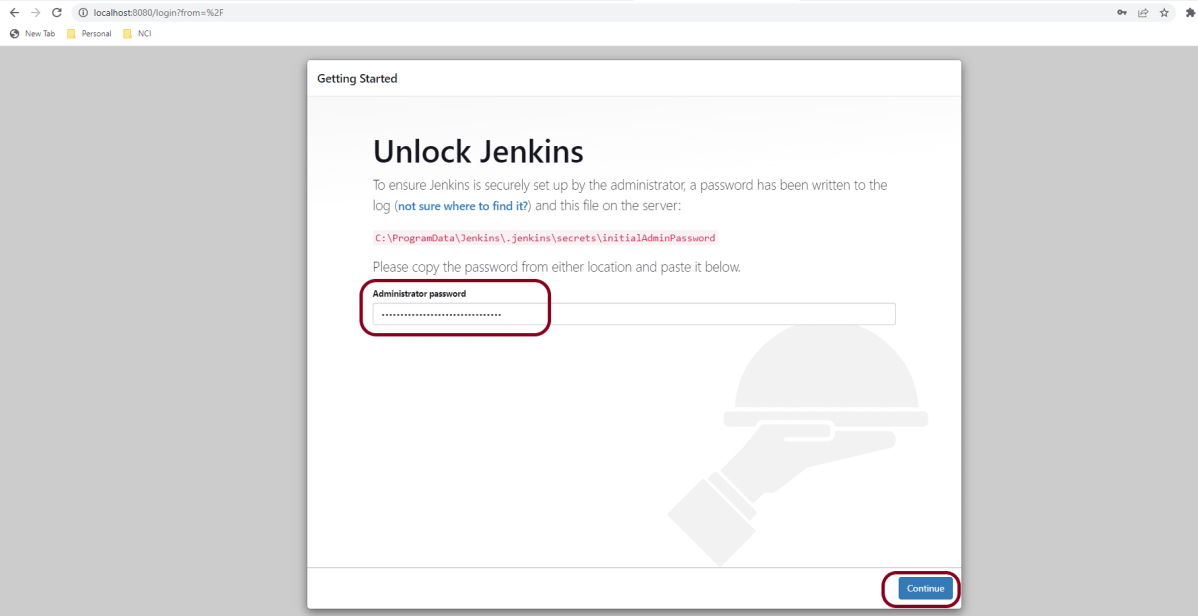
Step 2 – Copy the content of the initialAdminPassword file and paste it into the Administrator password field. Then, click the Continue button.
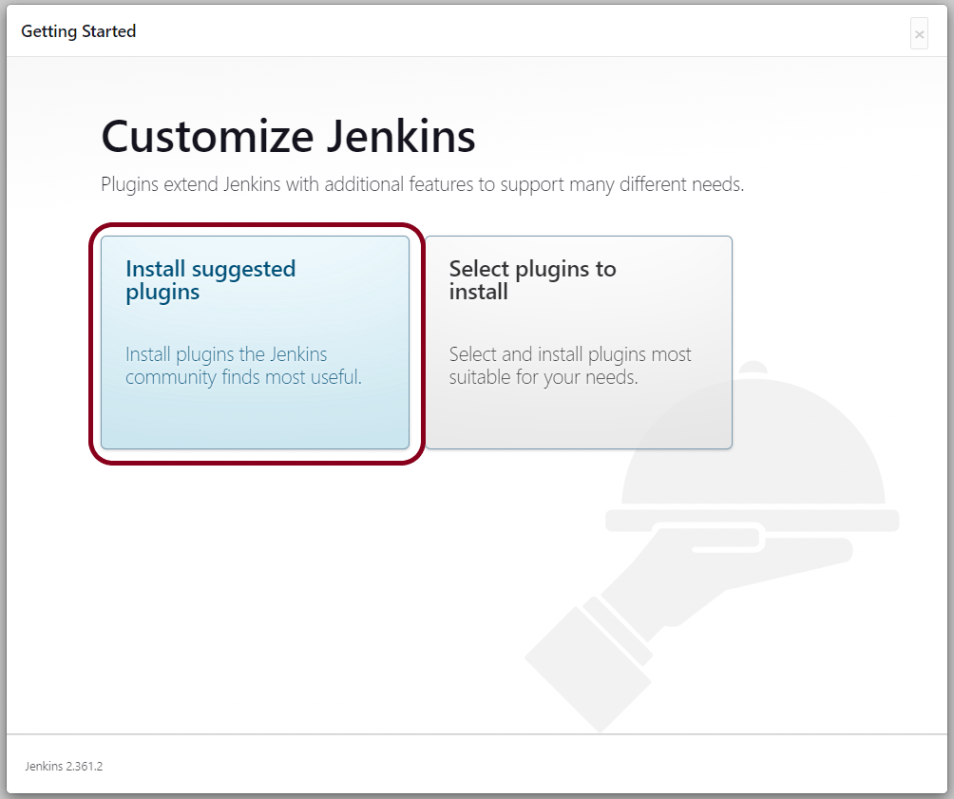
Step 3 – You can install either the suggested plugins or the selected plugins you choose based on your needs. To keep it simple, we will install the suggested plugins that the Jenkins community finds most useful.
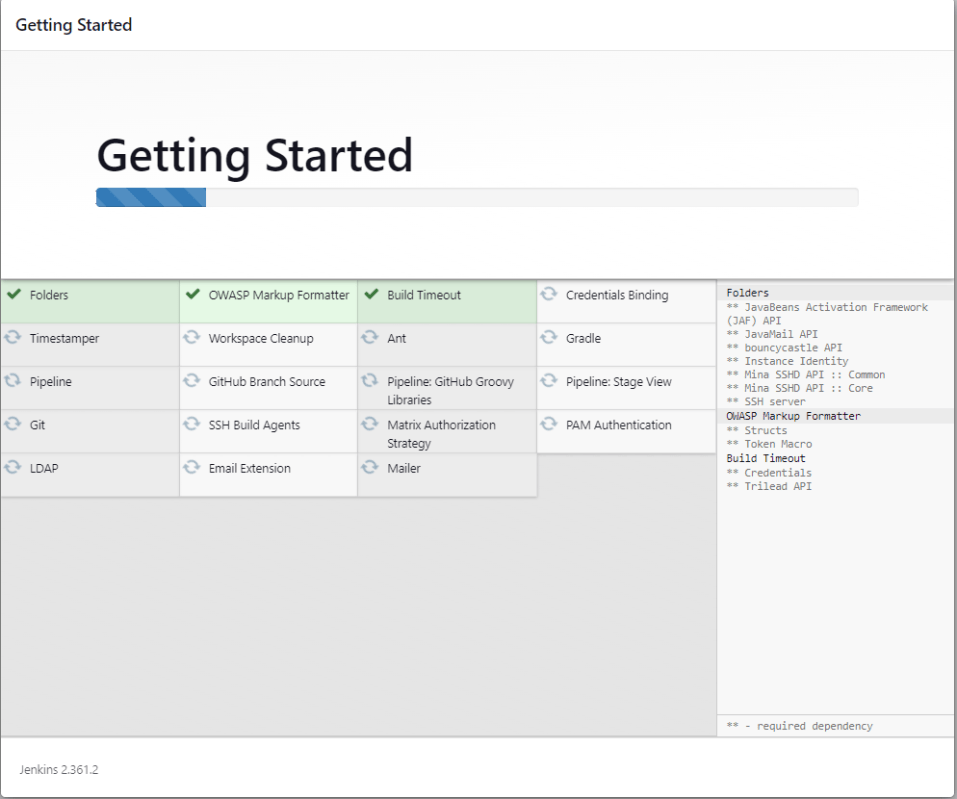
Step 4 – Wait until the plugins are completely installed.
Step 5 – The next thing that you should do is create an Admin user for Jenkins. Then, enter your details and click Save and Continue.
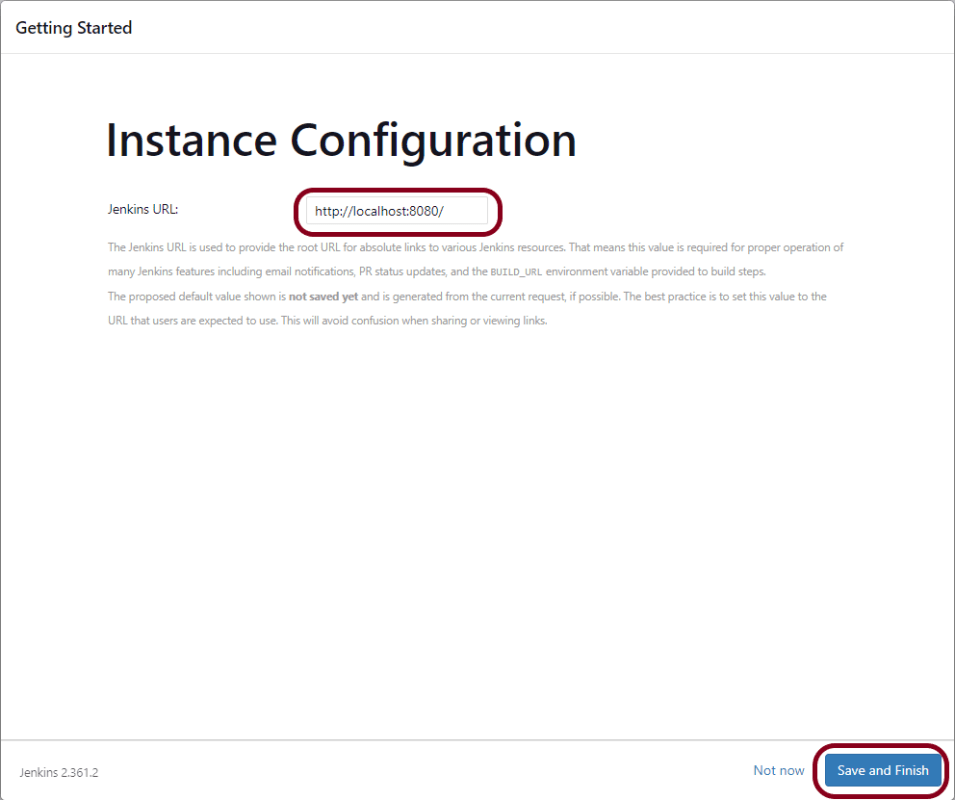
Step 6 – Click on Save and Finish to complete the Jenkins installation.
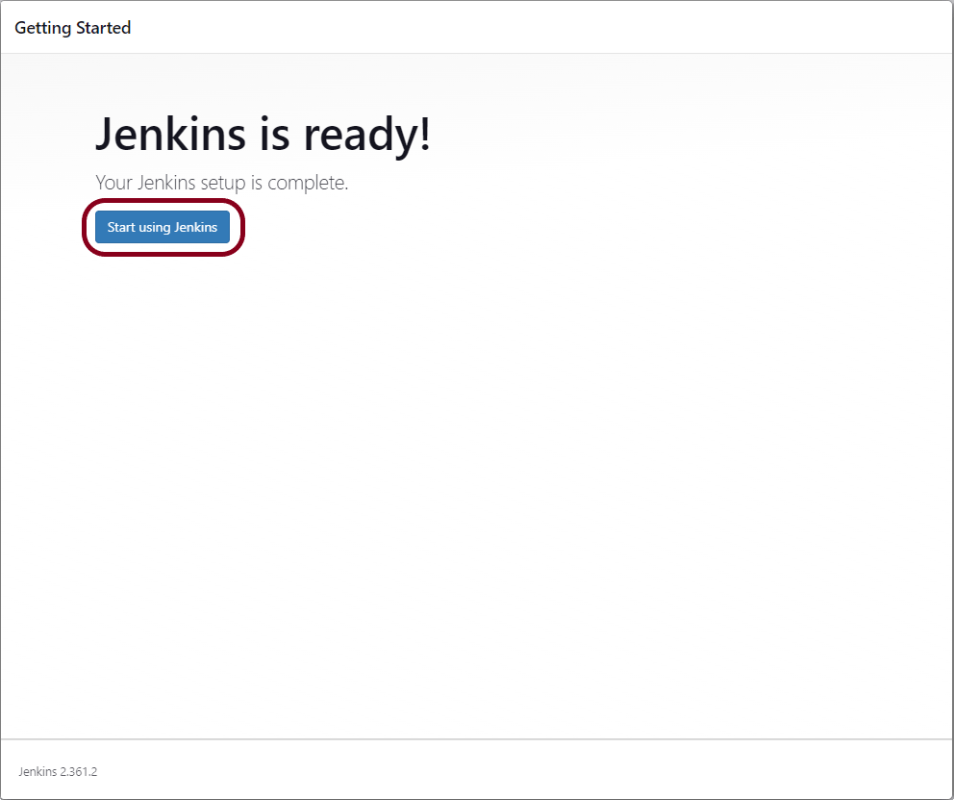
Step 7 – Now, click on the “Start using Jenkins” button to start Jenkins.
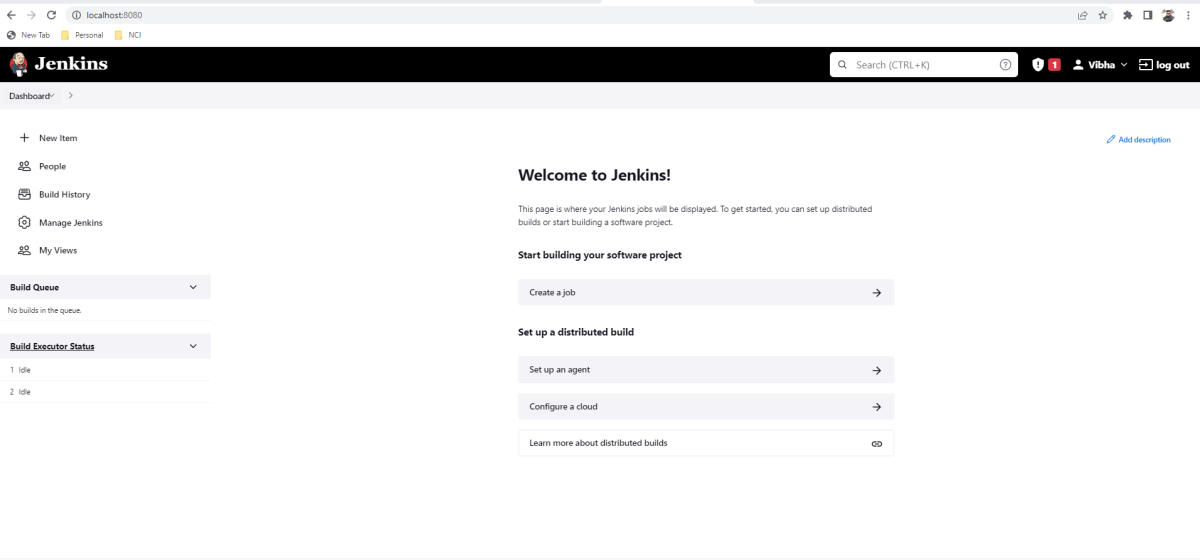
Step 8 – Finally, here is the default Jenkins page. Jenkins is now installed and running on Windows, and you are ready to start building your CI/CD pipeline.
Congratulations!! We have installed Jenkins on Windows 10 successfully.
Environment variables JAVA_HOME, ALLURE_HOME and GRADLE_HOME correctly configured
In this tutorial, I’ll create a BDD Framework for creating an Allure Report for Selenium WebDriver with JUnit5. This framework consists of:-
Dependency List
Java 11
JUnit– 5.8.2
Gradle – 7.3.3
Selenium – 4.3.0
Allure Report – 2.19
AspectJ Weaver – 1.9.7
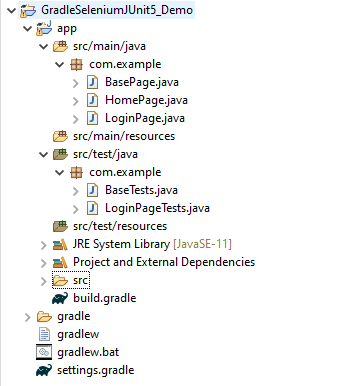
Project Structure
Implementation Steps
There is another tutorial that explains the steps to create a Gradle Project with Selenium and JUnit5. Please refer to this tutorial –Gradle – Integration of Selenium and JUnit5.
Step 1 – Add dependencies to build.gradle
Add Selenium, JUnit5, and Allure-JUnit5 dependencies in build.gradle
/*
 * This file was generated by the Gradle 'init' task.
 *
 */

plugins {
    // Apply the application plugin to add support for building a CLI application in Java.
    id 'application'
    id 'io.qameta.allure' version '2.11.0'
}

repositories {
    // Use Maven Central for resolving dependencies.
    mavenCentral()
}

java {
    sourceCompatibility = 11
    targetCompatibility = 11
}

dependencies {
    // Use JUnit Jupiter for testing.
    testImplementation 'org.junit.jupiter:junit-jupiter:5.8.2'
    testRuntimeOnly 'org.junit.jupiter:junit-jupiter-engine:5.8.2'

     // Allure
     implementation 'io.qameta.allure:allure-junit5:2.19.0'
     runtimeOnly 'org.aspectj:aspectjweaver:1.9.7'

    // This dependency is used by the application.
    implementation 'com.google.guava:guava:30.1.1-jre'
    implementation 'org.seleniumhq.selenium:selenium-java:4.4.0'
    implementation 'io.github.bonigarcia:webdrivermanager:5.3.0'
}

application {
    // Define the main class for the application.
    mainClass = 'com.example.App'
}

tasks.named('test') {
    // Use JUnit Platform for unit tests.
    useJUnitPlatform()  {
    }
}
Step 2 – Create Pages and Test Code for the pages
As mentioned above, there is another tutorial that explains the project structure as well as the feature file and corresponding Step Definitions, please refer to this tutorial – Gradle Project with Selenium and JUnit5.
Below is the sample test code. I have added features of the allure report like @Severity, @Description.
import org.junit.jupiter.api.Test;
import org.junit.jupiter.params.ParameterizedTest;
import org.junit.jupiter.params.provider.CsvSource;
import static org.junit.jupiter.api.Assertions.assertEquals;
import org.junit.jupiter.api.Disabled;
import io.qameta.allure.Description;
import io.qameta.allure.Severity;
import io.qameta.allure.SeverityLevel;

public class LoginPageTests extends BaseTests{

	@Severity(SeverityLevel.NORMAL)
    @ParameterizedTest
    @CsvSource({
            "admin$$,admin123",
            "Admin,admin123!!",
            "admin123,Admin",
            "%%%%%,$$$$$$"})
	@Description("Test Description : Login Test with invalid credentials")
    public void invalidCredentials(String username, String password) {

	    LoginPage objLoginPage = new LoginPage(driver);
    	objLoginPage.login(username, password);

    	// Verify Error Message
    	 assertEquals("Invalid credentials",objLoginPage.getErrorMessage());

    }

	@Severity(SeverityLevel.BLOCKER)
    @Test
	@Description("Test Description : Login Test with valid credentials")
    public void validLogin() {

	    LoginPage objLoginPage = new LoginPage(driver);
    	objLoginPage.login("Admin", "admin123");

    	HomePage objHomePage = new HomePage(driver);

    	// Verify Home Page
    	 assertEquals("Employee Information",objHomePage.getHomePageText());
    }

	@Severity(SeverityLevel.NORMAL)
    @Test
	@Description("Test Description : Login Test with missing username - Failed Test")
    public void missingUsername() {

	    LoginPage objLoginPage = new LoginPage(driver);
    	objLoginPage.login("", "admin123");

    	// Verify Error Message
   	     assertEquals("Invalid credentials",objLoginPage.getMissingUsernameText());

    }

	@Severity(SeverityLevel.NORMAL)
    @Test @Disabled
	@Description("Test Description : Login Test with missing password")
    public void missingPassword() {

	    LoginPage objLoginPage = new LoginPage(driver);
    	objLoginPage.login("admin", "");

    	// Verify Error Message
   	     assertEquals("Invalid credentials",objLoginPage.getMissingPasswordText());

    }
}
Below is the BaseTest class, where I have shown the use of @Step of Allure Report.
import java.time.Duration;
import org.junit.jupiter.api.AfterEach;
import org.junit.jupiter.api.BeforeEach;
import org.openqa.selenium.WebDriver;
import org.openqa.selenium.chrome.ChromeDriver;
import io.github.bonigarcia.wdm.WebDriverManager;
import io.qameta.allure.Step;

public class BaseTests {

	public WebDriver driver;
	public final static int TIMEOUT = 10;

	@BeforeEach
    @Step("Start the application")
    public void setup() {
    	WebDriverManager.chromedriver().setup();
	    driver = new ChromeDriver();
	    driver.manage().window().maximize();
	    driver.get("https://opensource-demo.orangehrmlive.com/");
	    driver.manage().timeouts().implicitlyWait(Duration.ofSeconds(TIMEOUT));

    }

    @AfterEach
    @Step("Stop the application")
    public void tearDown() {
        driver.quit();
    }

}
Step 3 – Execute the Tests
Go to the app project and run the tests, using the below command
gradle clean test
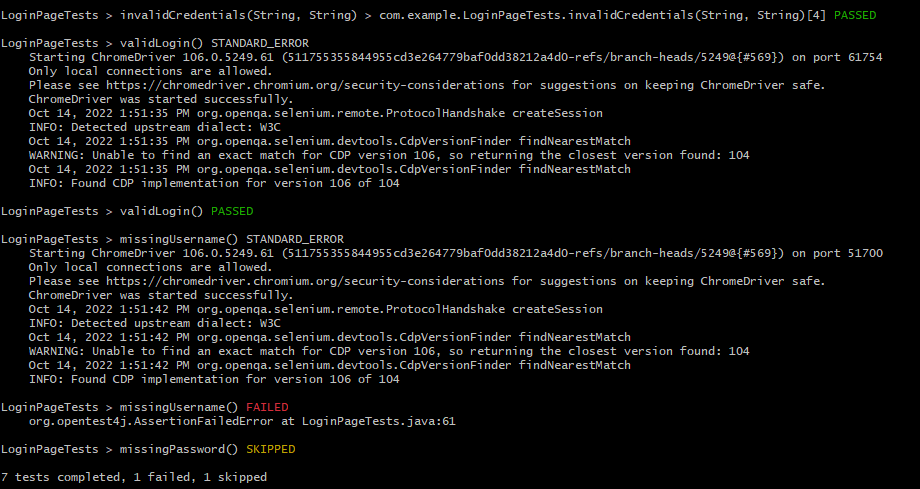
The output of the test execution is
Step 4 – Generate the Allure Report
Once the test execution is finished, a folder named allure-results will be generated in thebuild folder.
Note:- Make sure that you move to the folder app, because the build folder is present in the app folder.
To generate an Allure Report, use the below command.
allure serve build/allure-results
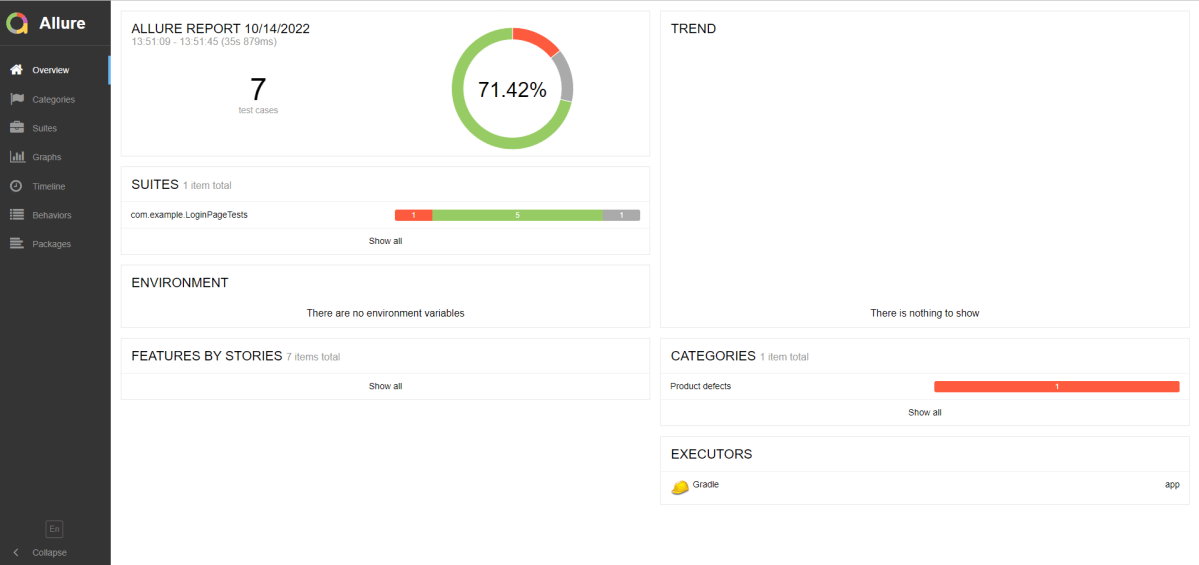
This will generate the beautiful Allure Test Report as shown below.
Allure Report Dashboard
The overview page hosts several default widgets representing the basic characteristics of your project and test environment.
Statistics – overall report statistics.
Launches – if this report represents several test launches, statistics per launch will be shown here.
Behaviors – information on results aggregated according to stories and features.
Executors – information on test executors that were used to run the tests.
History Trend – if tests accumulated some historical data, its trend will be calculated and shown on the graph.
Environment – information on the test environment.
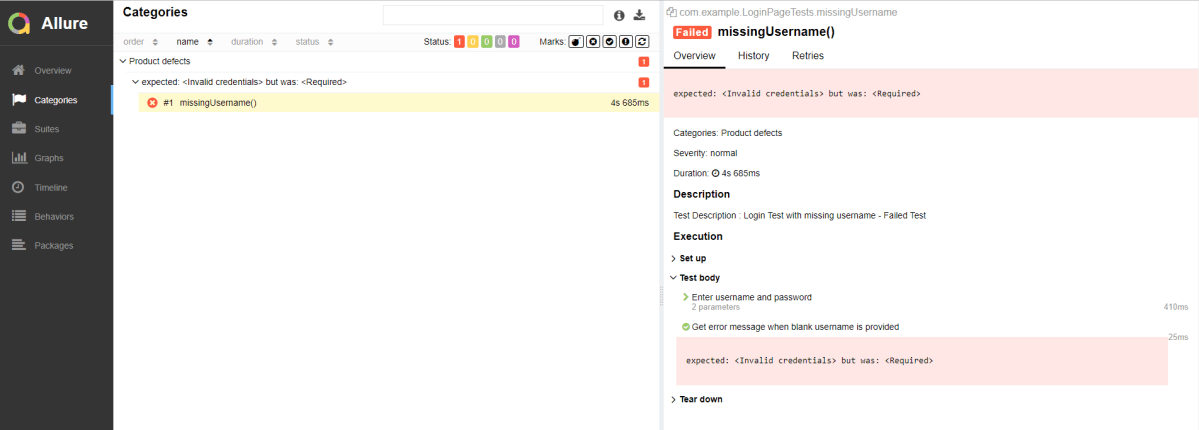
Categories in Allure Report
The categories tab gives you a way to create custom defect classifications to apply for test results. There are two categories of defects – Product Defects (failed tests) and Test Defects (broken tests).
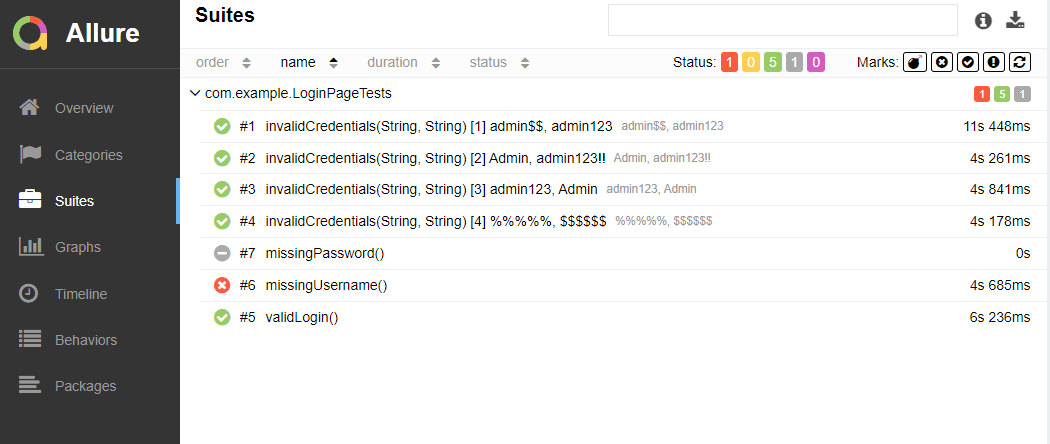
Suites in Allure Report
On the Suites tab a standard structural representation of executed tests, grouped by suites and classes, can be found.
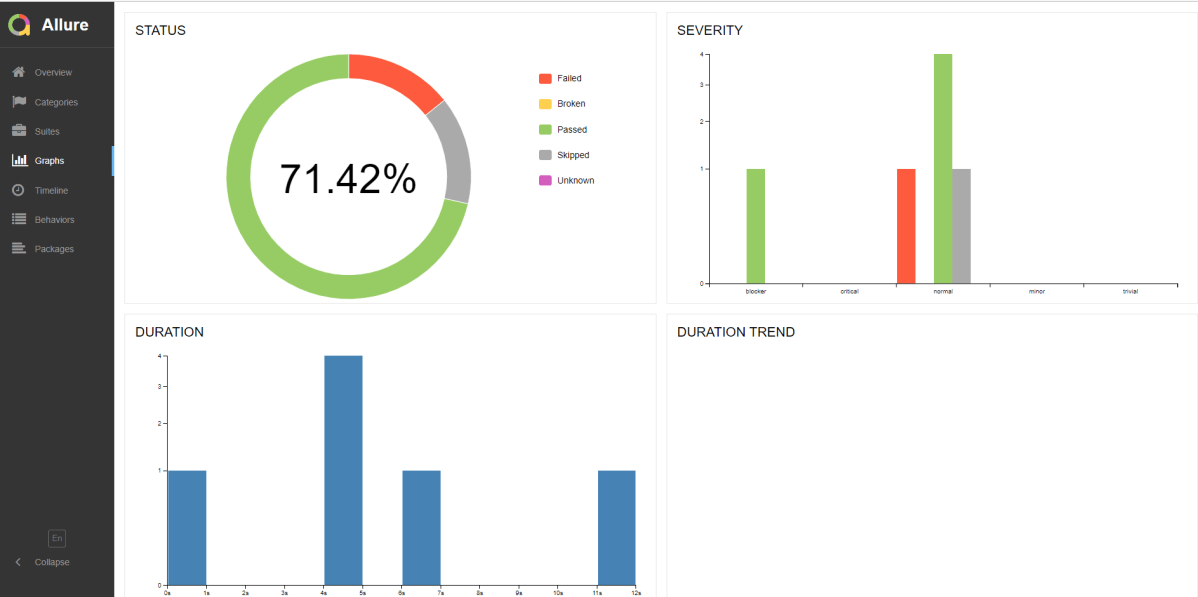
Graphs in Allure Report
Graphs allow you to see different statistics collected from the test data: status breakdown or severity and duration diagrams.
Timeline in Allure Report
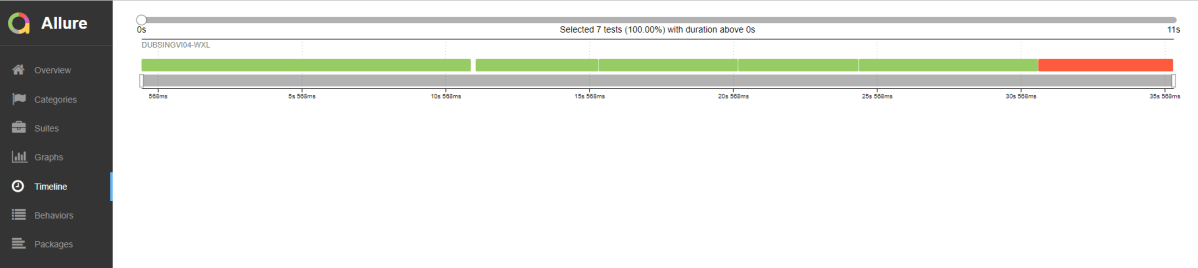
The timeline tab visualizes retrospective test execution, allure adaptors collect precise timings of tests, and here on this tab, they are arranged accordingly to their sequential or parallel timing structure.
Behaviors of Allure Report
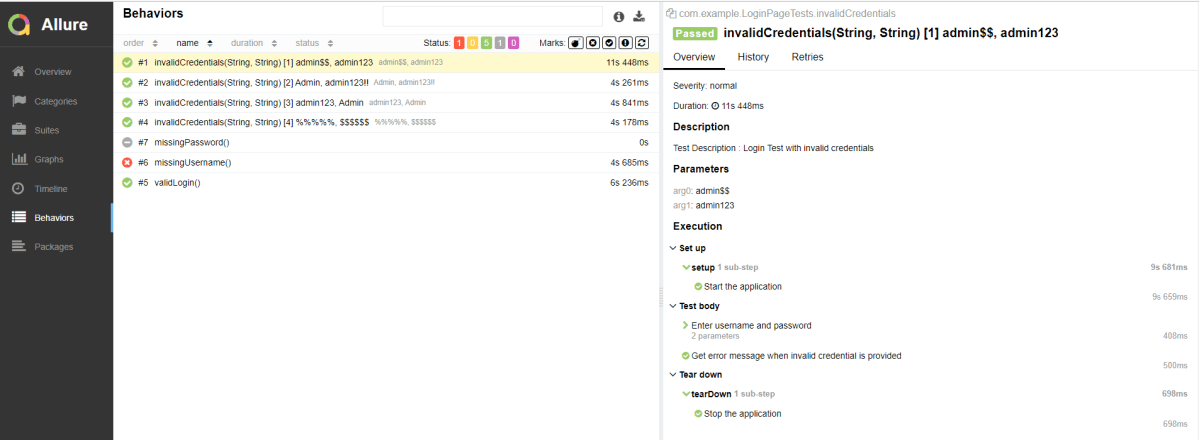
This tab groups test results according to Epic, Feature, Story, Test Severity, Test Description, Test Steps, and so on.
Packages in Allure Report
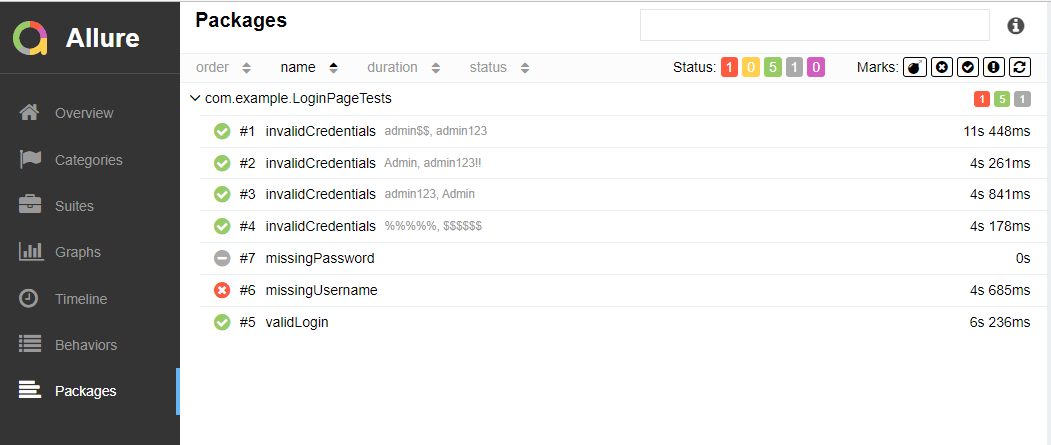
The packages tab represents a tree-like layout of test results, grouped by different packages.
Congratulations on making it through this tutorial and hope you found it useful! Happy Learning!! Cheers!!