Serenity with Jenkins

Last Updated On

HOME

In the previous tutorial, we have seen the Integration Of Jenkins With Selenium WebDriver. In this tutorial, we show you how to execute Serenity tests in Jenkins. 

Table of Contents

  1. Prerequisite
  2. Implementation Steps
    1. Create a new project using the Maven project plugin
    2. Build Management
    3. Select custom workspace
    4. Select “Publish HTML Reports” from “Post Build Actions”
    5. Execute the tests
    6. Serenity Report
  3. How to find the path of reports in Jenkins?

Prerequisite

Jenkins installed and started on the computer

To generate Serenity Report in Jenkins, we need to download HTML Publisher. Please refer to this tutorial to install the plugin – How to install Plugins in Jenkins

Implementation Steps

Step 1: Create a new project using the Maven project plugin

  1. Give the Name of the project.
  2. Click on the Maven project. 
  3. Click on the OK button.

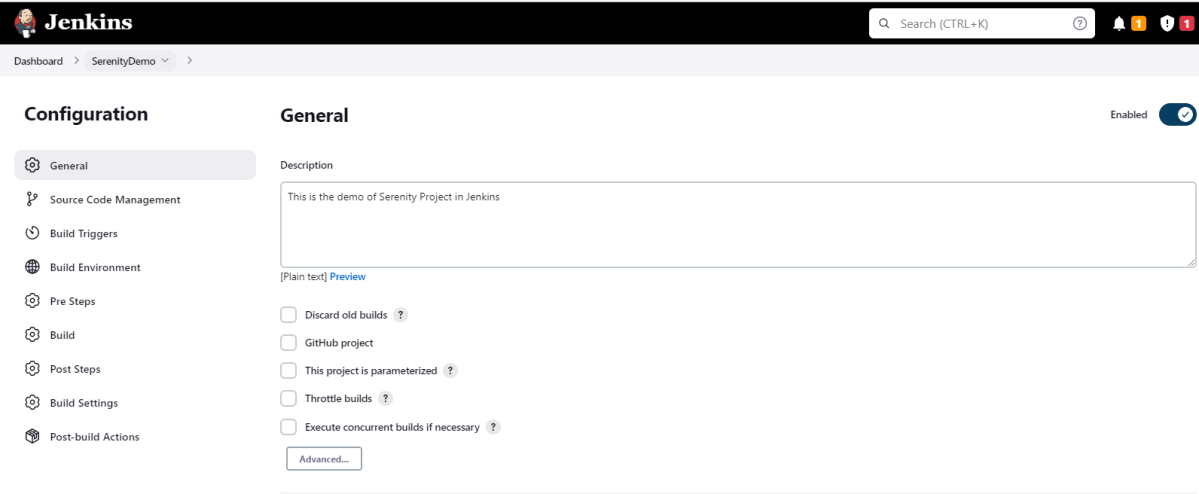
In the General section, enter the project description in the Description box.
Step 2: Build Management

Go to the Build section of the new job.

  1. In the Root POM textbox, enter the full path to pom.xml
  2. In the Goals and options section, enter “clean test“
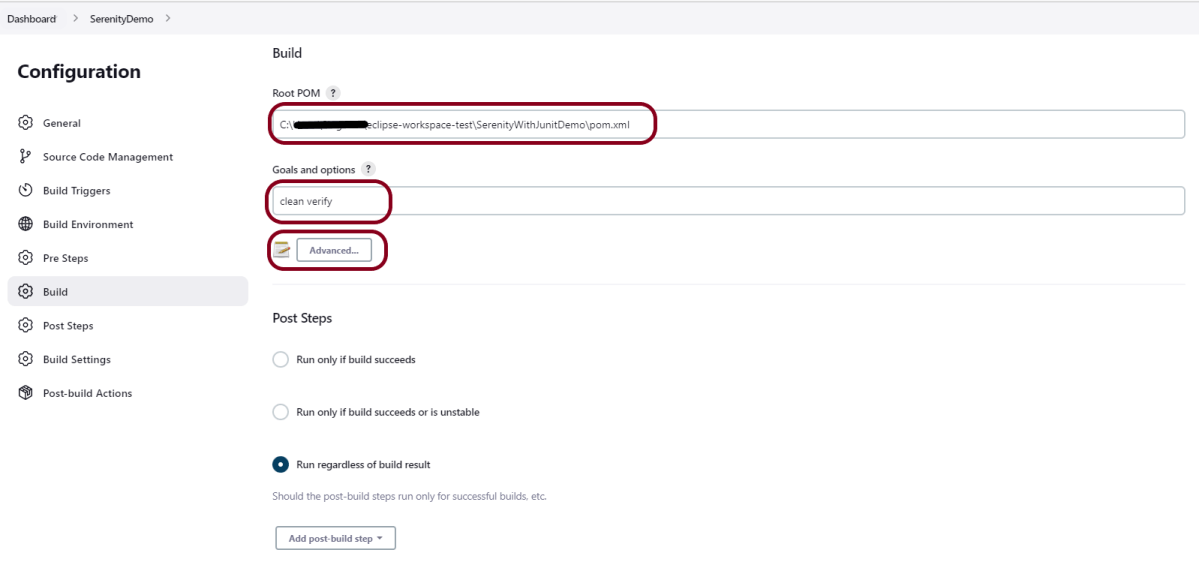
Click on the Advanced button.

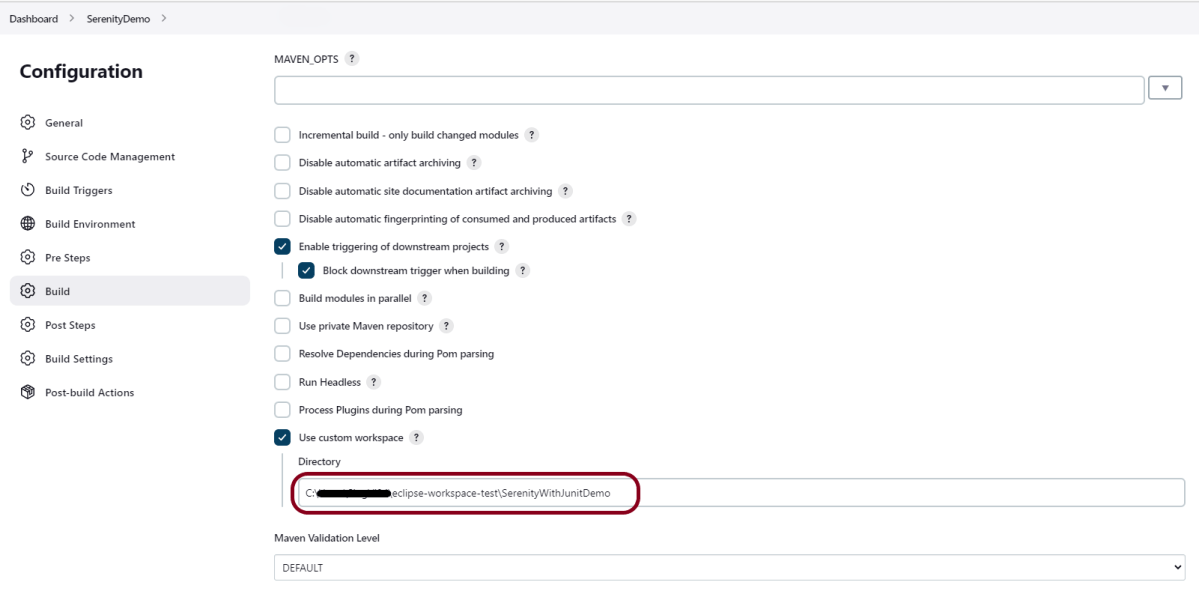
Step 3: Select custom workspace

Mention the full path of the project in the directory.
Step 4: Select “Publish HTML Reports” from “Post Build Actions”

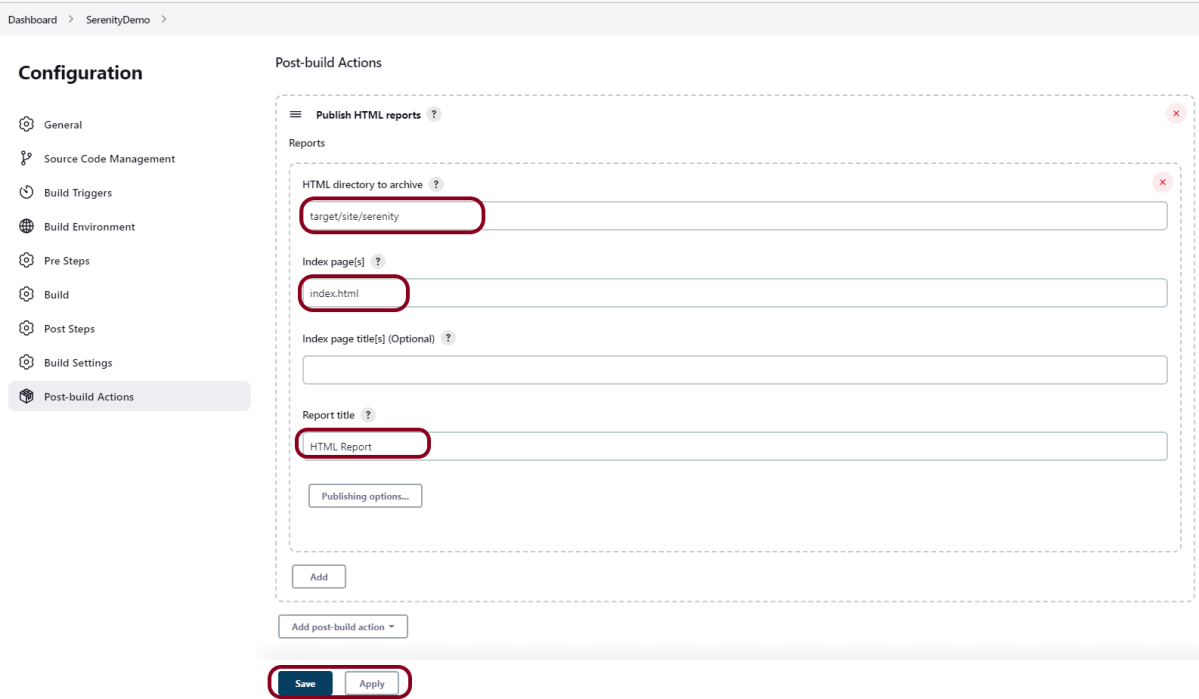
Select “Publish HTML reports“. 
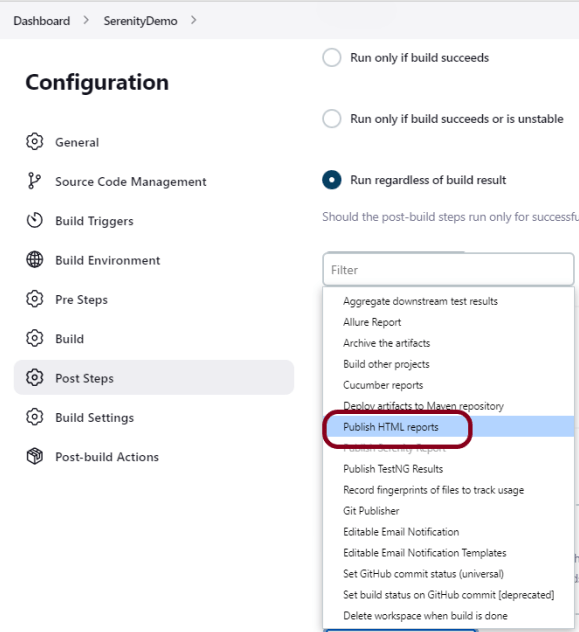
  1. HTML directory to archive – target/site/serenity
  2. Index page[s] – Index.html
  3. Report title – HTML Report

Click on the Apply and Save buttons.

We have created a new Maven project “SerenityDemo” with the configuration to run the Serenity Tests and also to generate a Serenity Report after execution using Jenkins.

Step 5: Execute the tests

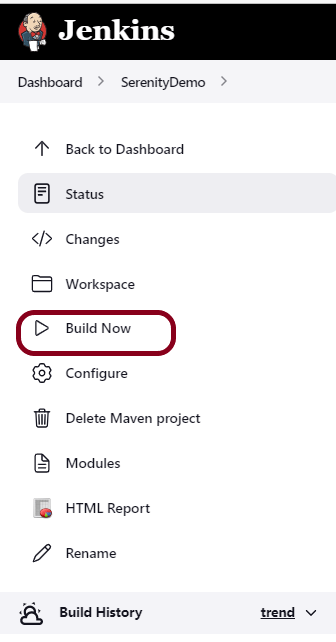
Let’s execute it now by clicking on the “Build Now” button. 
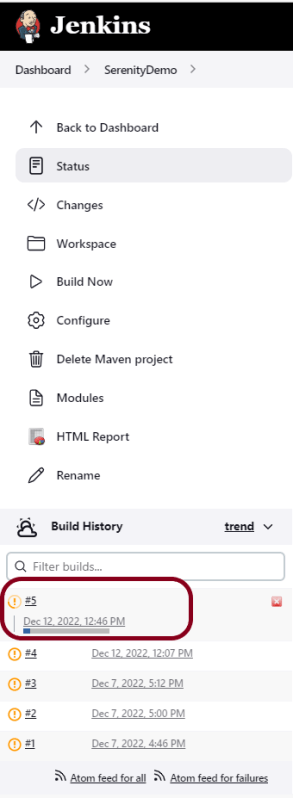
Right-click on Build Number (here in my case it is #5) and click on Console Output to see the result.
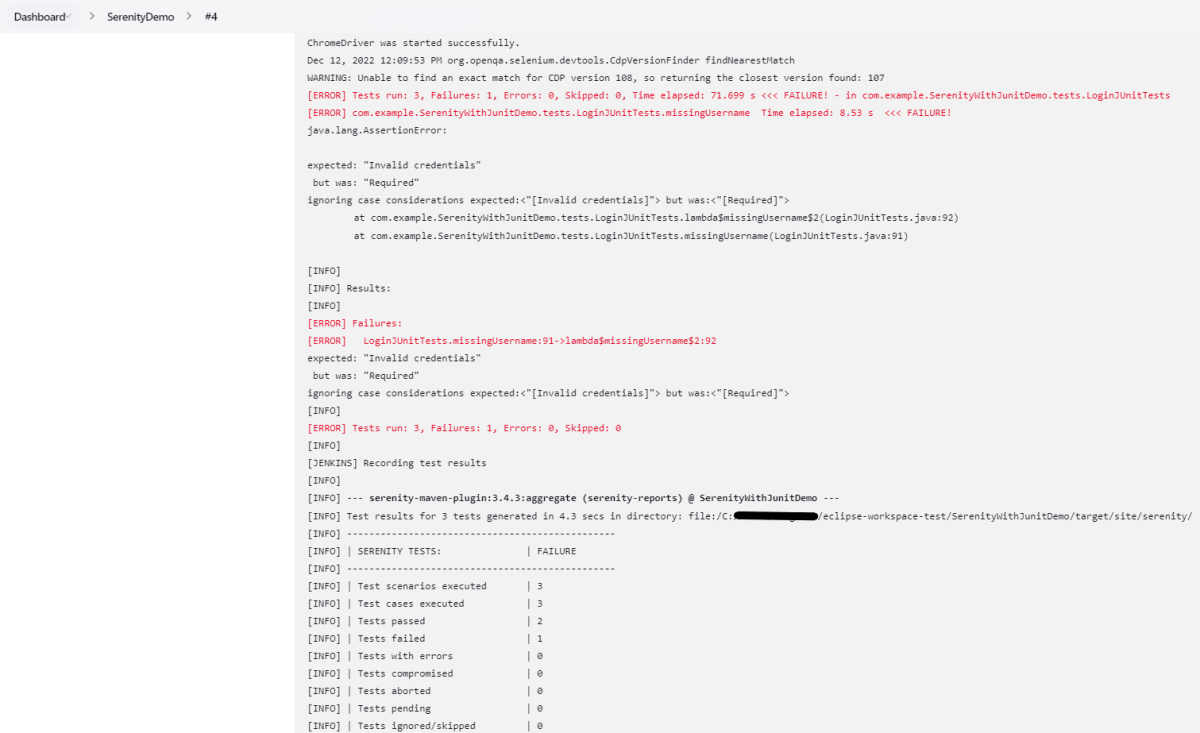
Below is the execution summary of the tests.
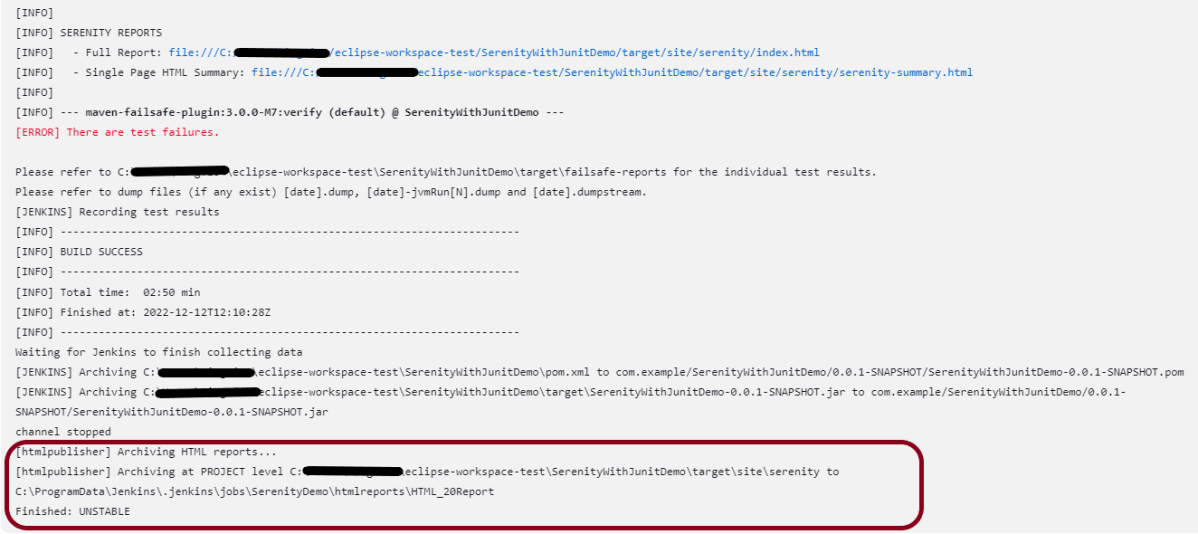
We can see below that the Serenity Reports are generated.
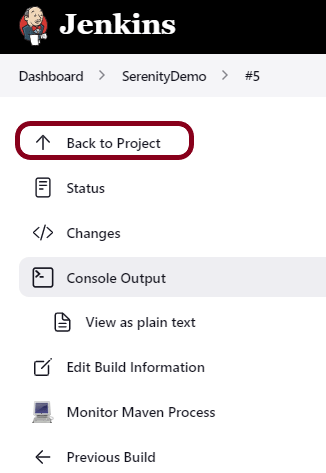
Once the execution is completed, click on “Back to Project“.
Step 6: Serenity Report

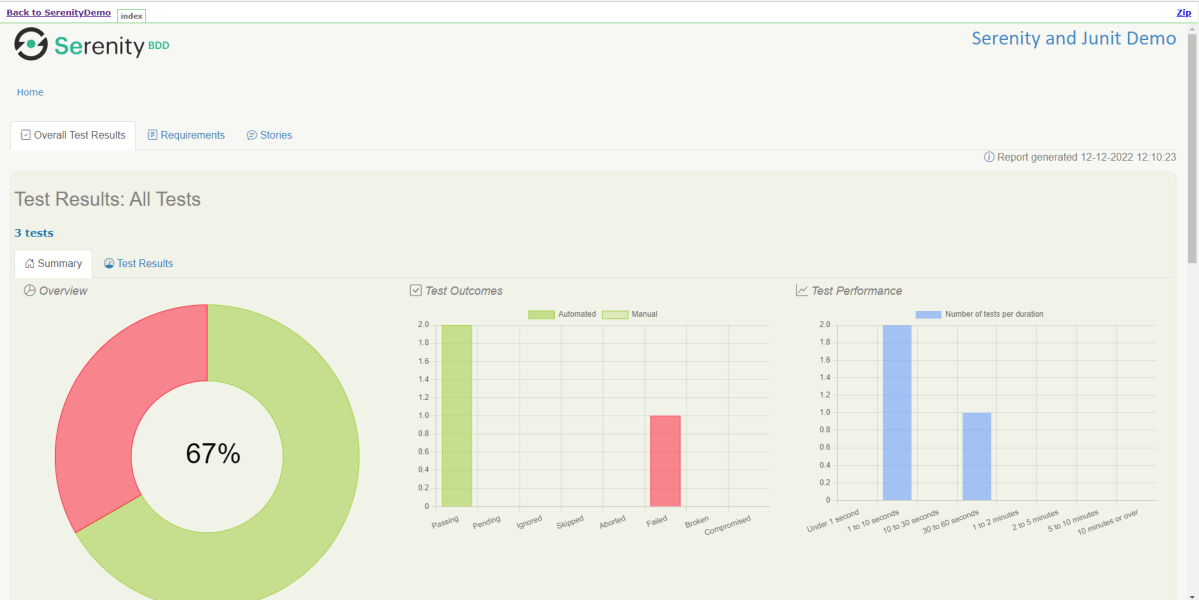
We could see a link to view ‘HTML Reports’. Click on the HTML Reports. It displays the Index.html Report of Serenity.
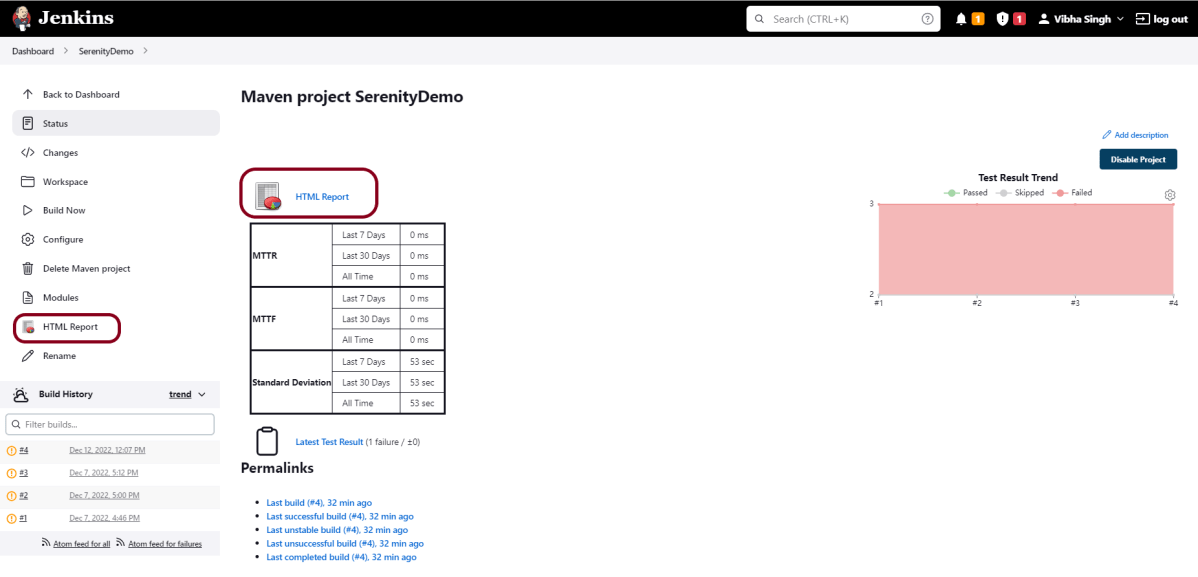
Serenity Report is in HTML format. So, we need to install HTML Publisher Plugin to view the Serenity Reports. Please refer to this tutorial to download and install the HTML Plugin in Jenkins – How to generate HTML Reports in Jenkins.

The Serenity Report looks like as shown below:
How to find the path of reports in Jenkins?

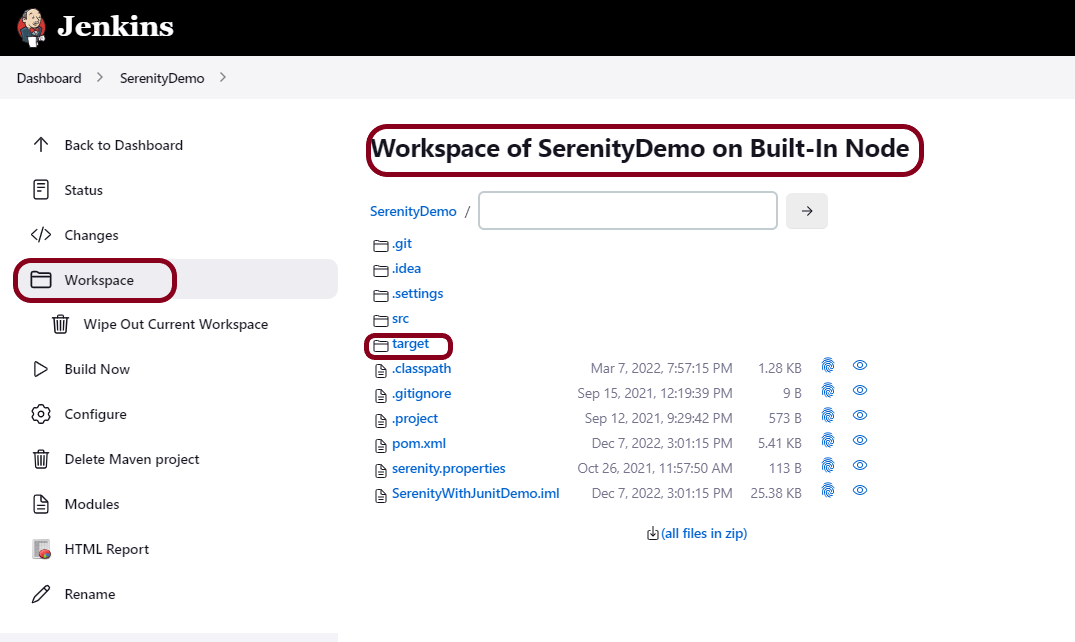
After running successfully, go to the job and click on the “Workspace”  link. As soon as we click on the above-mentioned link, we will be inside this directory. Now click on the “target” link.
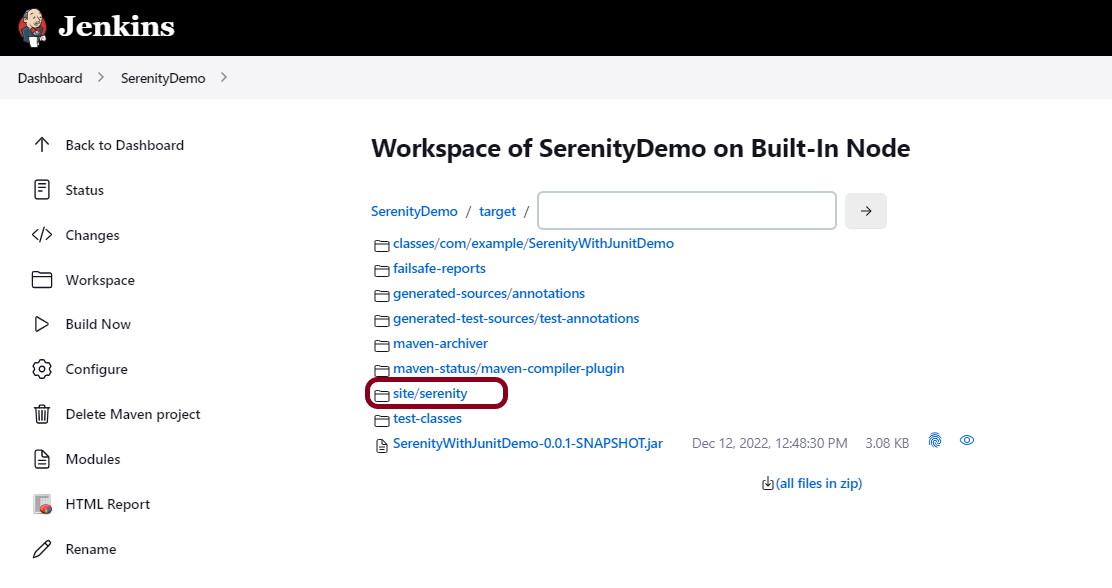
As soon as we click on the above-mentioned link, we will be inside this directory. Now click on the “site/serenity”  link.
As soon as we click on the above-mentioned link, we will be inside this directory. Now we can see all the reports of Serenity.
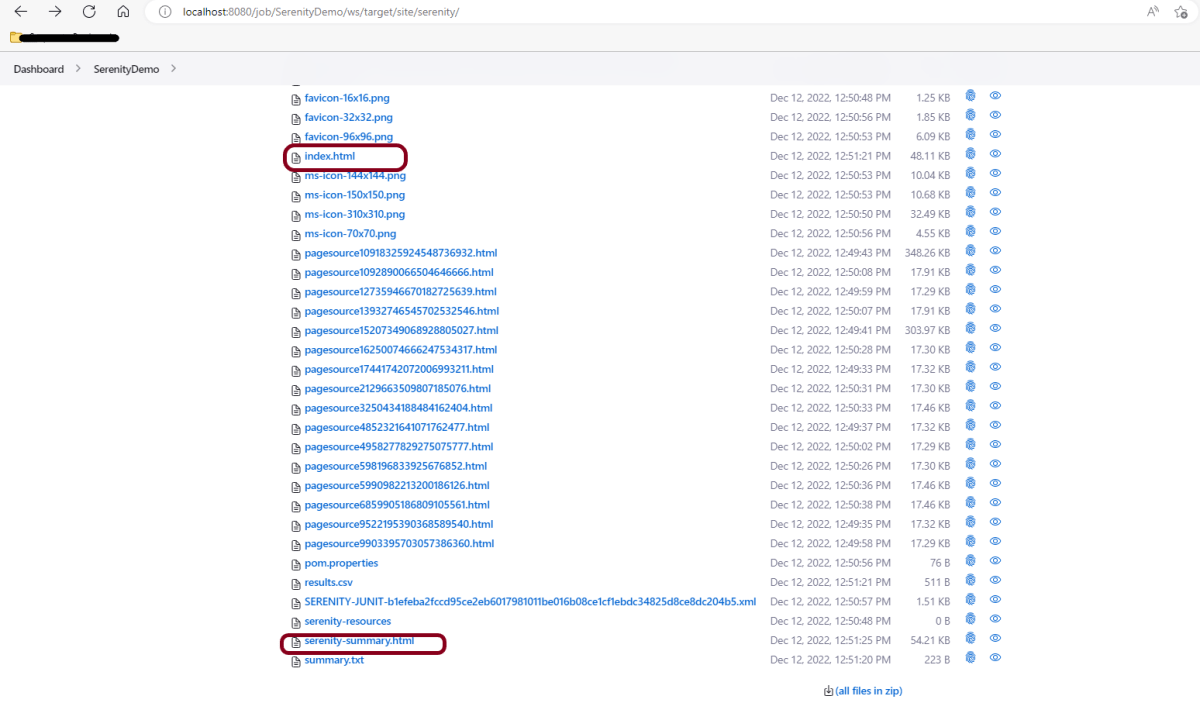
This way, we could run Serenity tests and generate Serenity Reports using Jenkins.

Congratulations on making it through this tutorial and hope you found it useful! Happy Learning!! Cheers!!

How to run parameterized Selenium tests in Jenkins

HOME

When running your Jenkins automation jobs, you may need to pass some parameters to your scripts. These parameters can be a URL, a browser name, or even the test user’s credentials. This tutorial will walk you through the process of creating a parameterized Jenkins job.

  1. Types of parameters
  2. Implementation Steps
    1. Step 1: Create a new project using the Maven project plugin
    2. Step 2: Description of the project
      1. Choice Parameter
      2. String Parameter
    3. Step 3: Source Code Management
    4. Step 4: Build Management
    5. Step 5: Select “TestNG Reports” from “Post Build Actions”
    6. Step 6: Execute the tests
    7. Step 7: View the TestNG Report

    It is recommended to go through these tutorials, before creating a parameterized Jenkins job:-

    Download and install Jenkins on Windows10

    Configure JAVA_HOME and MAVEN_HOME

    Types of parameters

    Jenkins supports several parameter types. Below is a list of the most common ones, but keep in mind that different plugins may add new parameter types:

    • String: any combination of characters and numbers
    • Choice: a pre-defined set of strings from which a user can pick a value
    • Credentials: a pre-defined Jenkins credential
    • File: the full path to a file on the filesystem
    • Multi-line String: same as String, but allows newline characters
    • Password: similar to the Credentials type, but allows us to pass a plain text parameter specific to the job or pipeline
    • Run: an absolute URL to a single run of another job

    Implementation Steps

    Step 1: Create a new project using the Maven project plugin

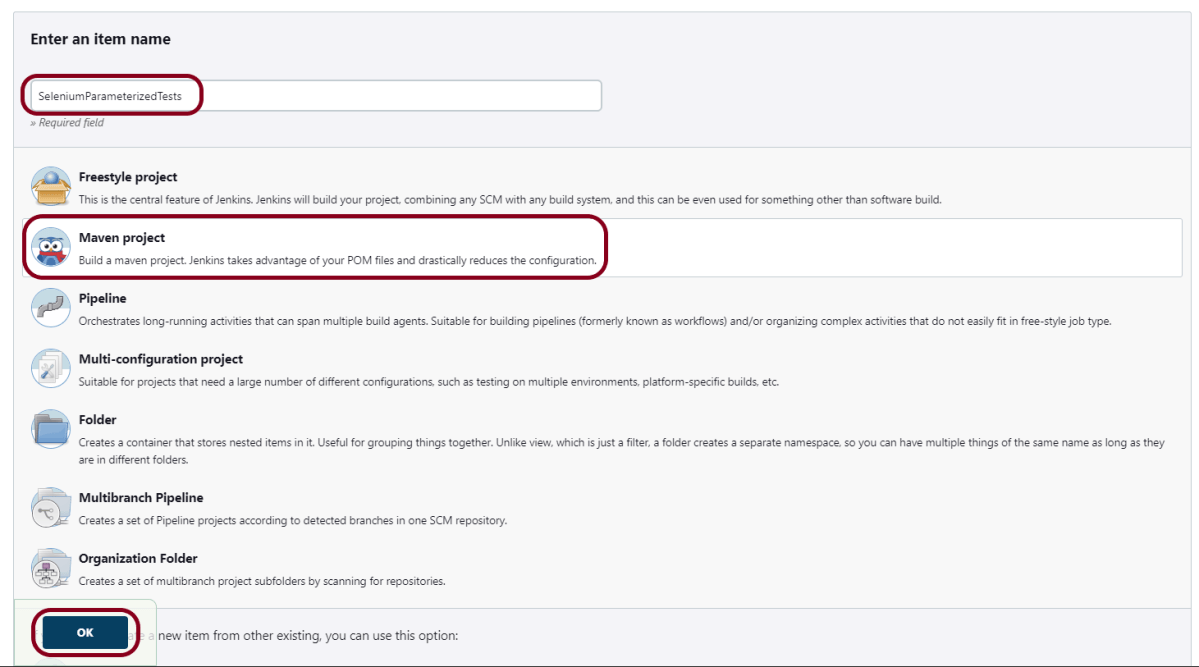
    1. Give the Name of the project.
    2. Click on the Maven project. 
    3. Click on the OK button.

    Step 2: Description of the project

    In the General section, enter the project description in the Description box.

    Check the option – This project is parameterized.

    Click on Add Parameter and we can select any option as shown in the above image.

    Choice Parameter

    As I want to run my tests on different browsers, I have selected Choice Parameter.

    1. Give the Name of the Parameter.
    2. Give the Choices of the Parameter – chrome, firefox
    3. Give the Description of the Parameter – Please select the browser for the test execution.

    String Parameter

    I want to pass the test environment URL in the test. So, I’m selecting a string value. Select String Parameter on the Add Parameter menu.

    1. Give the Name of the Parameter.
    2. Give the Default Value of the Parameter. This value will be used if nothing will be provided.
    3. Give the Description of the Parameter – Provide the environment URL.

    Step 3: Source Code Management

    In the Source Code Management section, select None.

    Step 4: Build Management

    Go to the Build section of the new job.

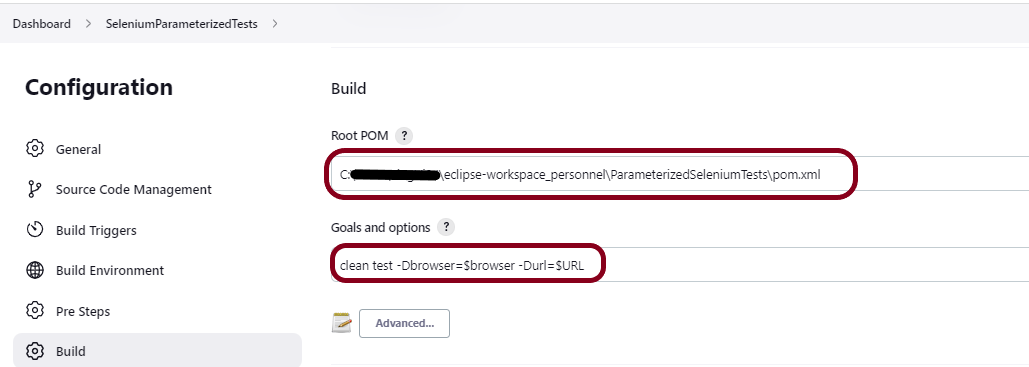
    1. In the Root POM textbox, enter the full path to pom.xml
    2. In the Goals and Options section, enter the below command:
    clean test -Dbrowser=$browser -Durl=$URL
    

    Step 5: Select “TestNG Reports” from “Post Build Actions”

    Scroll down to “Post Build Actions” and click on the “Add Post Build Actions” drop-down list.

    Select “Publish TestNG Results“. 

    Enter the TestNG XML Report Pattern as “**/testng-results.xml” and click on the “Save” button.

    Click on the Apply and Save buttons.

    We have created a new project “SeleniumParameterizedTests” with the configuration to run TestNG Tests and also to generate TestNG Reports after execution using Jenkins.

    Step 6: Execute the tests

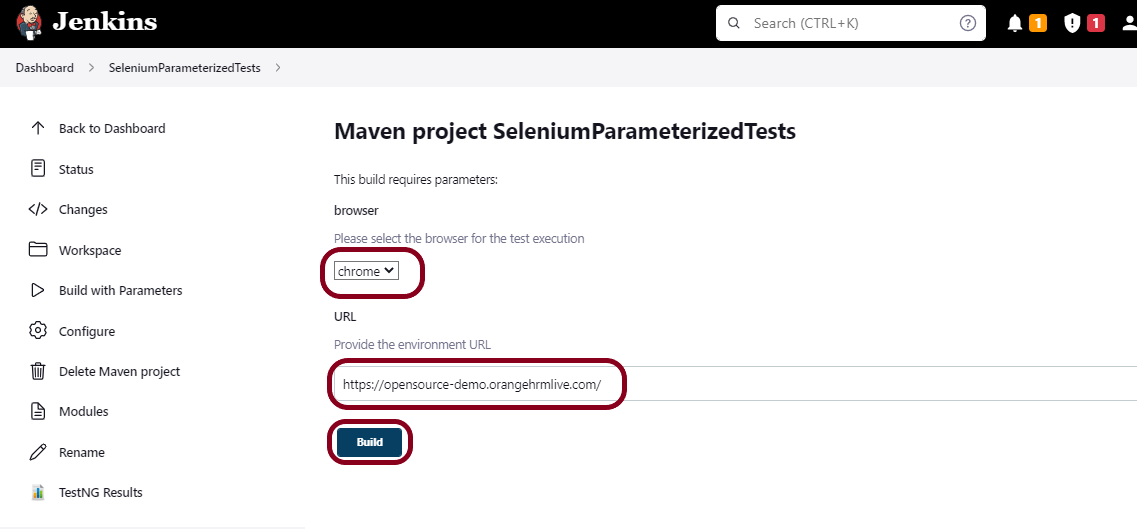
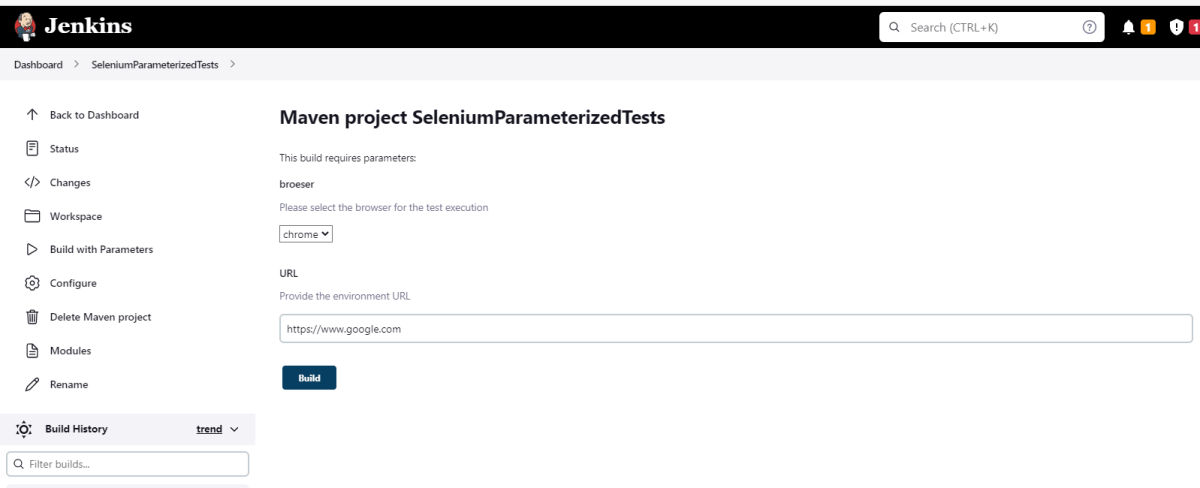
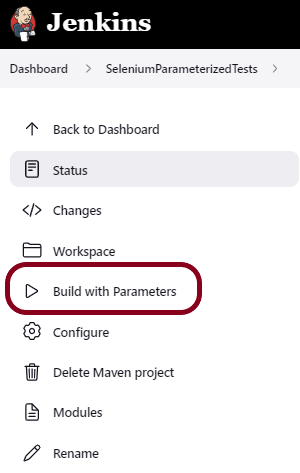
    Let’s execute it now by clicking on the “Build with Parameters” button.

    This screen contains the parameters which we have to select. The browser was a choice parameter and select a parameter from it and URL was a String parameter, so mention the URL in it and click on the “Build” button.

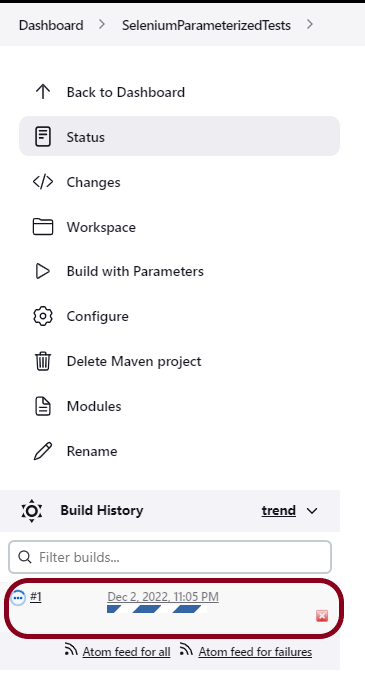
    Right-click on Build Number (here in my case it is #1).

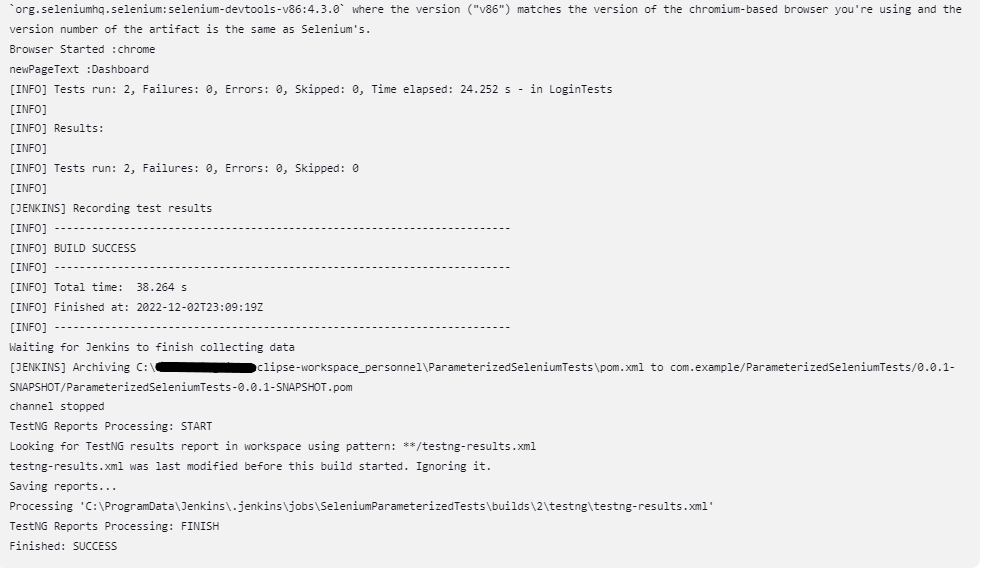
    Click on Console Output to see the result.

    Step 7: View the TestNG Report

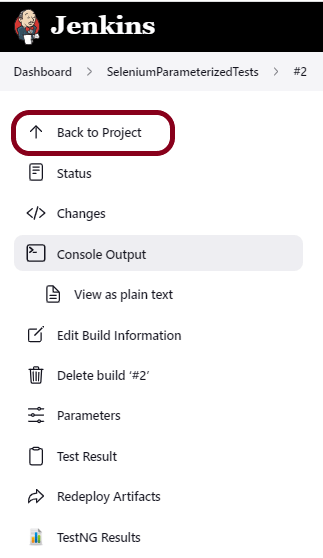
    Once the execution is completed, click on go “Back to Project“, and we could see a link to view the “TestNG Report“.

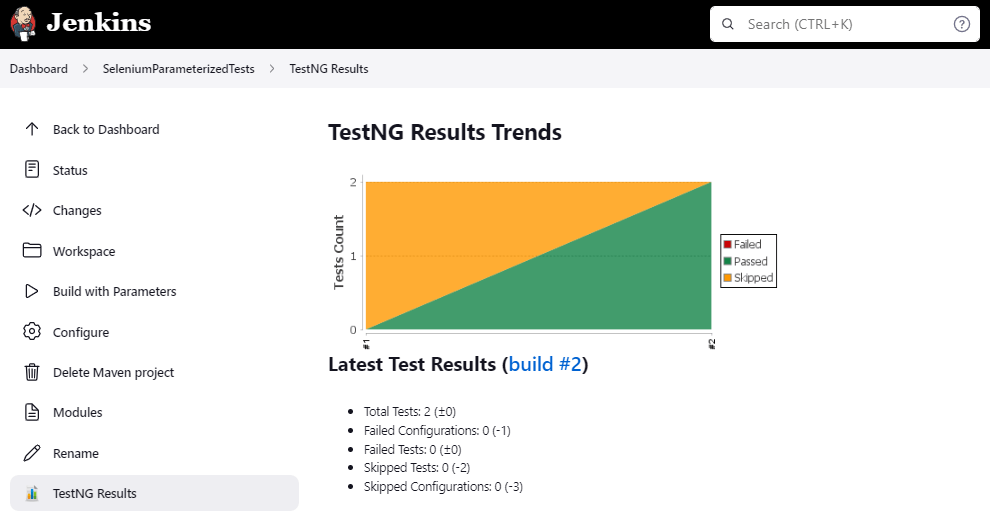
    Click on the TestNG Results. It displays the summary of the tests.

    Congratulations on making it through this tutorial and hope you found it useful! Happy Learning!! Cheers!!

    Additional Tutorials

    Jenkins GitLab Integration
    How to Schedule a Jenkins Job
    How to create Jenkins pipeline for Serenity tests
    Integration of Cucumber Report with TestNG in Jenkins
    How to create Jenkins pipeline for Gradle project
    How to run parameterized Selenium tests in Jenkins

    What is Jenkins?

    HOME

    What is Jenkins?

    Jenkins is a well-known open-source tool that aids in the implementation of Continuous Integration (CI) and Continuous Deployment/Continuous Delivery (CD) processes by automating parts of the software development pipeline such as building, testing, and deployment. It provides a centralized platform for automating the entire build pipeline, from code changes to automatic build creation, auto-execution of all layers of tests (Unit, Integration, and End to End), and finally, auto-deploying the successful build. This allows developers to make more frequent changes while also giving end users more freedom by making new features available more frequently.

    Jenkins can be installed through native system packages, Docker, or even run standalone by any machine with a Java Runtime Environment (JRE) installed.

    What are the advantages of Jenkins?

    • Open Source – It is open source and it is user-friendly, easy to install and does not require additional installations or components.
    • Easily configurable – Jenkins can be easily modified and extended. It deploys code instantly, generates test reports. Jenkins can be configured according to the requirements for continuous integrations and continuous delivery.
    • Good Plugin Ecosystem – Jenkins is flexible because of its large plugin library, which allows for building, deploying, and automating across multiple platforms. It has plugins for TestNG Report, JUnit Report, Cucumber Report, Extent Report, HTML Publisher Report, Gradle, Serenity.
    • Cloud-based architecture – Jenkins tool also supports cloud-based architecture so that you can deploy Jenkins in cloud-based platforms.
    • Platform Independent – Jenkins is available for all platforms and different operating systems, whether OS X, Windows or Linux.
    • Easy support – It is open source and widely used, there is no shortage of support from large online communities of agile teams.
    • Distributed – It is easily distributable due to its master-slave architecture, which we saw in the above section. It can distribute work across multiple machines for efficiently handling the build processes, tests, and deployments.
    • Email Notification – It has notification capability regarding the status of builds in the form of an email.
    • Parallel Execution – Parallel execution of builds in a single workflow is possible in Jenkins with the help of the Pipelines feature.

    Continuous Integration with Jenkins

    1. The code is first committed by a developer/developers to the source code repository.

    2. This shared repository is checked on a regular basis or frequently by the Jenkins server. It will pull all of those changes and begin making preparations for the most recent build as soon as it discovers the new commit.

    3. Here two prospects will be available. Either the build will be unsuccessful or successful.

    4. The team will receive notification right away if the build fails.

    5. Jenkins is prepared to deploy the successful build to the test server if the build succeeds.
    Subsequent to running the expand on the test server, the group will get the notice of the test and assemble results.
    With each successful commit, the teams will always have a deployable build. This process will be ongoing.

    Integration of Cucumber Report with TestNG in Jenkins

    HOME

    In the previous tutorial, we have seen the Implemention of ‘Masterthought’ Reports in Cucumber . In this tutorial, we show you how to generate Cucumber Reports with Jenkins. 

    Pre-Requisite:

    Jenkins installed and started on the computer

    Implementation Steps

    Step 1: Create a JAVA project

    Step 2: Create the Test Code

    You can refer to this tutorial to get the test code – Implemention of ‘Masterthought’ Reports in Cucumber.

    This framework consists of Selenium, Cucumber, TestNG, and Maven.

    Step 3: Start the Jenkins server

    Open the browser and navigate to the localhost and the port in which Jenkins is running.

    http://localhost:8080/

    Step 4: Log in to Jenkins UI

    Provide username and password and click on Sign in.

    Step 5: Download the Cucumber Report plugin

    Click on the Manage Jenkins.

    On the Plugins Page, go to the Available option

    1. Select the Cucumber Report Plugin
    2. Click on Install without restart. The plugin will take a few moments to finish downloading depending on your internet connection and will be installed automatically.
    3. You can also select the option Download now and Install after the restart button. In which plugin is installed after the restart
    4. You will be shown a “No updates available” message if you already have the Maven plugin installed.

    Step 6: Restart Jenkins

    Click on the checkbox “Restart Jenkins when installation is complete when no jobs are running“.

    The Jenkins is being restarted, It is about to restart.

    Again, log in to Jenkins UI.

    Step 7: Create a new project using the Maven project plugin in Jenkins

    1. Give the Name of the project.
    2. Click on the Maven project. 
    3. Click on the OK button.

    Step 8: In the General section, enter the project description in the Description box.

    Step 9: Build Management

    Go to the Build section of the new job.

    • In the Root POM textbox, enter the full path to pom.xml
    • In the Goals and options section, enter “clean test”

    Click on the Advanced button.

    Step 10: Select the custom workspace

    Mention the full path of the project in the directory.

    Step 11: Select “Cucumber reports” from “Post Build Actions“

    Scroll down to “Post Build Actions” and click on the “Add Post Build Actions” drop-down list.

    Select “Cucumber reports”. 

    Click on the Advanced button in Cucumber reports.

    Enter these details in Cucumber Reports – Mention the Report title and File Include Pattern and click on the “Save” and “Apply” buttons.

    We have created a new Maven project “CucumberWithTestNG_Demo” with the configuration to run Cucumber Tests and also to generate Cucumber Reports after execution using Jenkins.

    Step 12: Execute the tests

    Let’s execute it now by clicking on the “Build Now” button. 

    Right-click on Build Number (here in my case it is #1) and click on Console Output to see the result.

    Once the execution is completed, we could see a link to view the “Cucumber reports“.

    Step 13: View the Cucumber Reports

    Click on the Cucumber Reports. It displays the summary of the tests.

    This way, we could generate a Cucumber Report using Jenkins.

    Congratulations on making it through this tutorial and hope you found it useful! Happy Learning!! Cheers!!

    How to install Plugins in Jenkins

    HOME

    What is a Plugin in Jenkins?

    Jenkins plugin is a package in a java-archive format that follows a specific structure during development. Every plugin contains all the necessary information, such as files, images, code, and other extras. That’s why we call the plugin “self-contained.” All Jenkins plugins have .hpi file extensions. All these plugins required in Jenkins can be found in the plugin repository and downloaded from here for a specific need.

    Why are plugins required?

    Every tool in the world tries to match some characteristics. One of the essential features on this list is “extensibility.” Apart from its core functionality, extensibility allows us to improve the tool’s functionality. In this context, Jenkins plugins perform the same function based on the needs of the user.

    Jenkins defines a set of interfaces that Jenkins community developers implement and extend with custom code. So, community developers create plugins based on the required functionality, which we can then install in Jenkins to achieve that functionality.

    Implementation Steps to Install a Plugin in Jenkins

    Pre-Requisite:

    Jenkins installed and started on the computer

    Step 1: Start the Jenkins server and open the browser and navigate to the localhost

    http://localhost:8080/

    Step 2: Log in to Jenkins UI

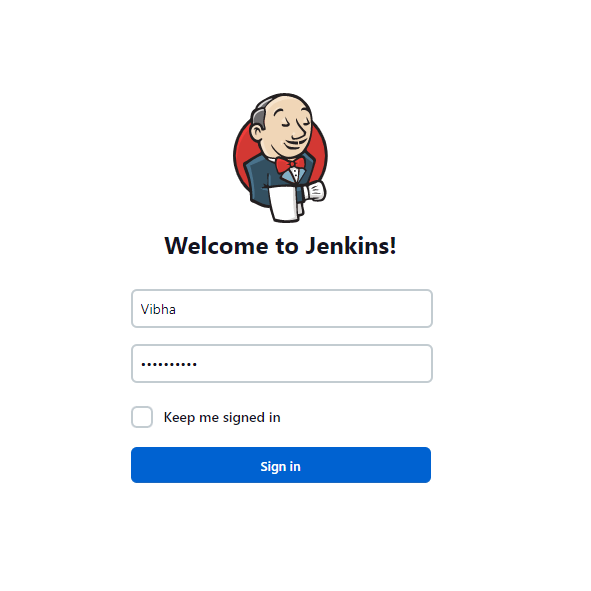
    You need to provide a username and password and click on the Sign-in Button.

    Step 3: Download and Install Plugin

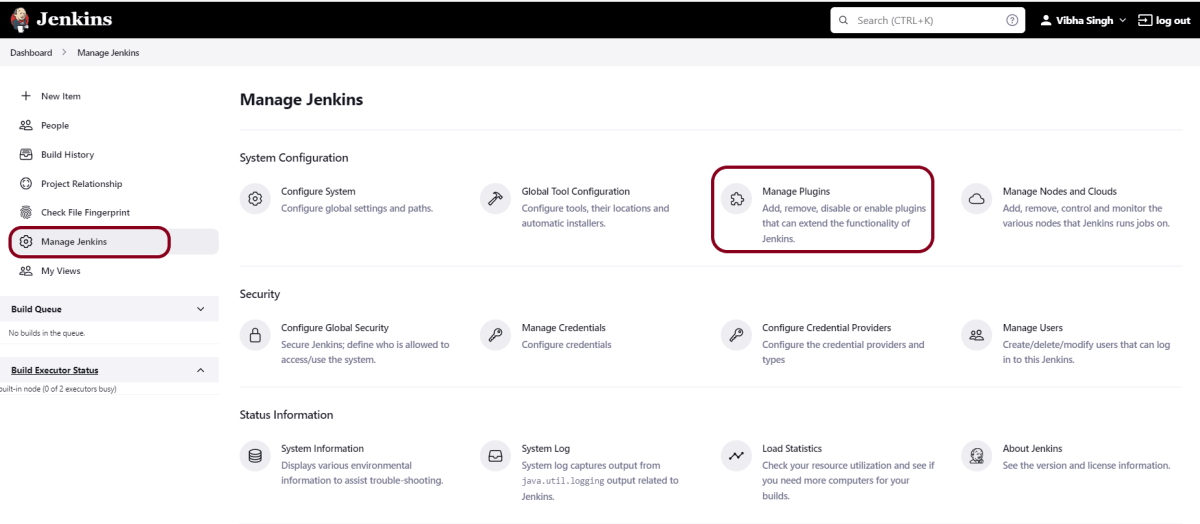
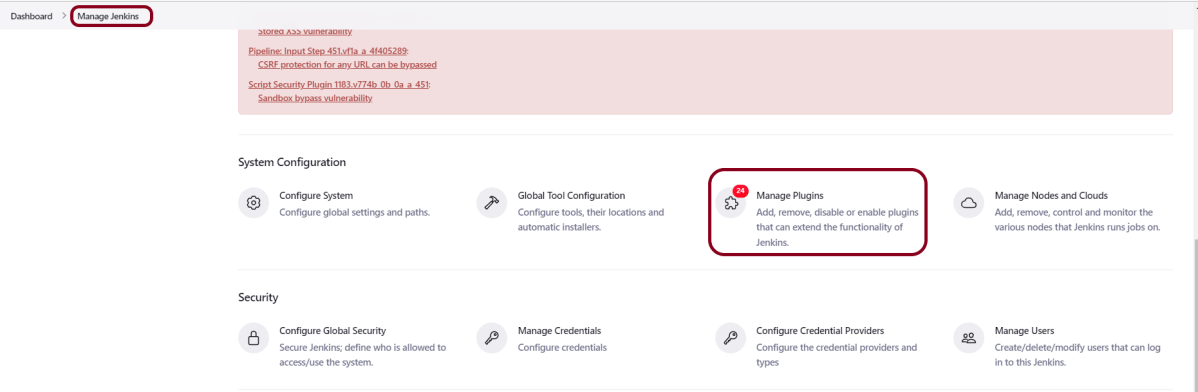
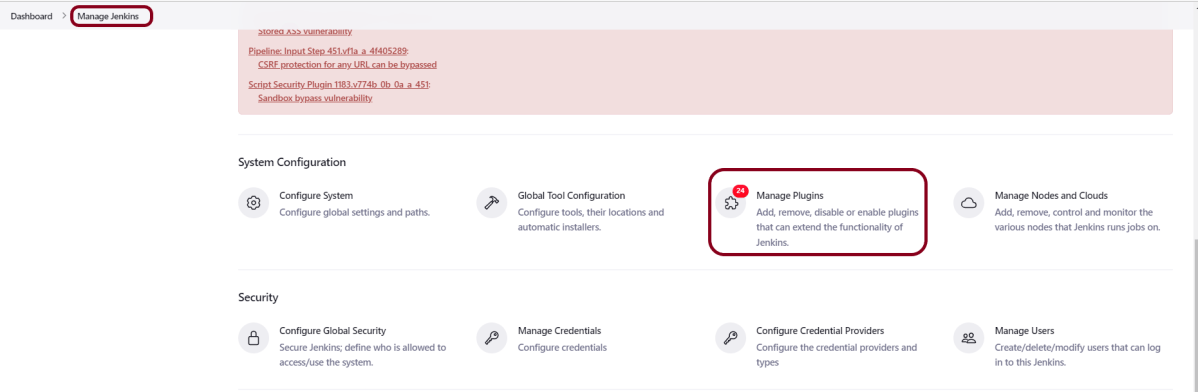
    Click on the Manage Jenkins. As soon as we click on the Manage Jenkins link, we will redirect toward the Manage Jenkins page, and here we need to click on “Manage Plugins”  under the System Configuration section.

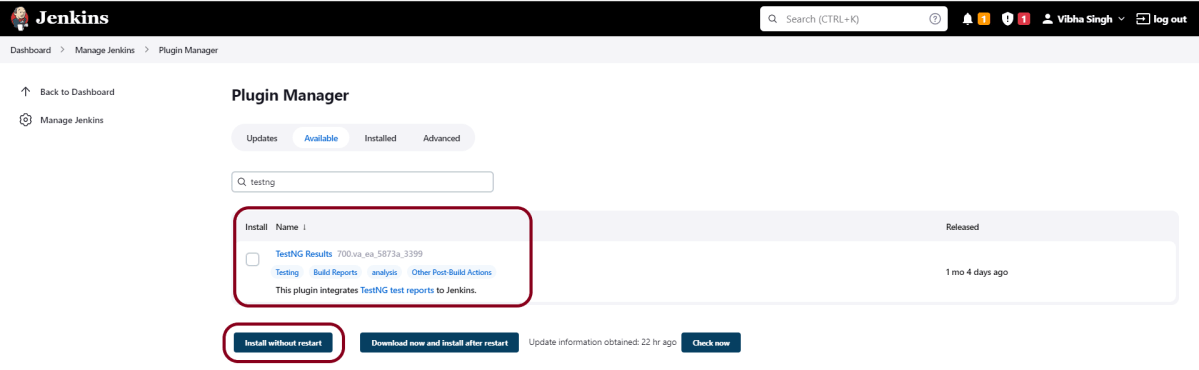
    On the Plugins Page, go to the Available option. You can select any plugin, but for the demo purpose, I’m downloading TestNG Report Plugin.

    1. Select the “TestNG Report” Plugin
    2. Click on “Install without restart.” The plugin will take a few moments to finish downloading depending on your internet connection, and will be installed automatically.
    3. You can also select the option “Download now and Install after the restart” button. In which plugin is installed after the restart
    4. You will be shown a “No updates available” message if you already have the TestNG Report plugin installed.

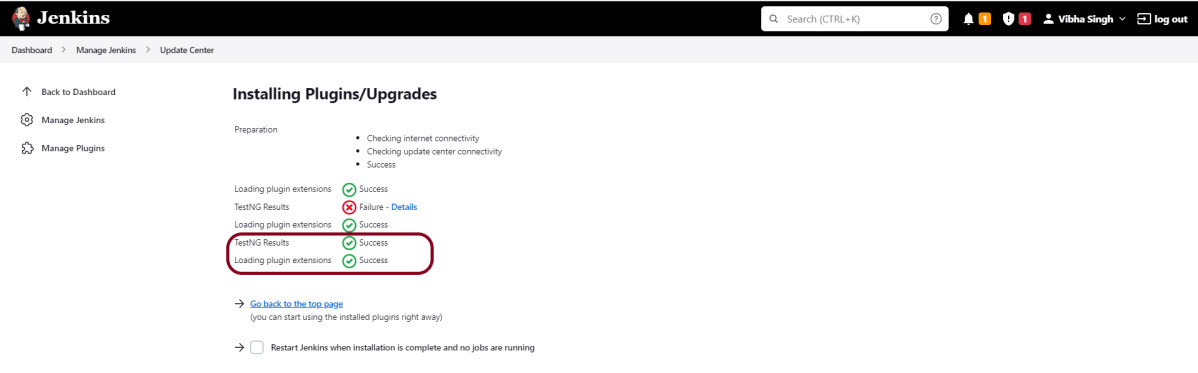
    As soon as the preceding steps are completed, we will be taken to the Plugin installation progress page, where we will see a successful message after the plugin has been successfully installed. During installation, any dependent plugins will begin to install alongside the required plugin.

    Sometimes, the installation fails because of a network issue. You can try to reinstall it, and it should be successful.

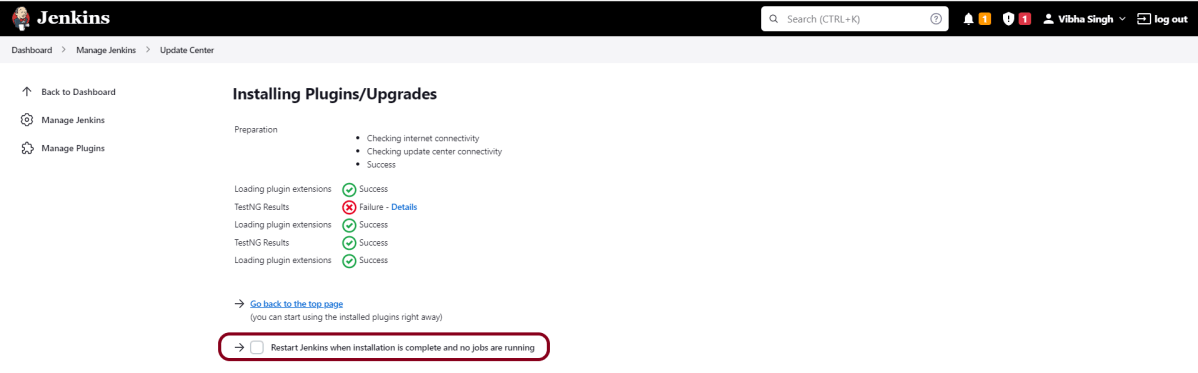
    Step 4: Restart Jenkins

    Click on the checkbox “Restart Jenkins when installation is complete when no jobs are running“.

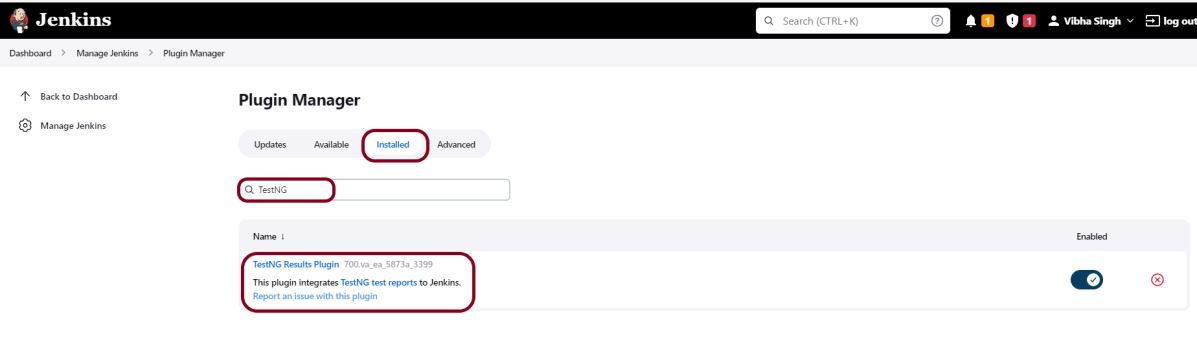
    Step 5: Verify the plugin is installed

    Once the plugins have been installed, go to Manage Jenkins on your Jenkins dashboard. You will see your plugins listed among the rest.

    Congratulations on making it through this tutorial and hope you found it useful! Happy Learning!! Cheers!!

    How to generate JUnit4 Report

    HOME

    For the successful execution of Agile testing requirements, a perfect test automation tool is required. And there are numerous factors to consider when creating a solid automation framework. One such component is reporting, which not only informs you of the success or failure of the project but also assists you in identifying potential bugs. JUnit is another useful framework that can add the ability to generate reports in Selenium. This tutorial explains the steps to generate the JUnit Report.

    Prerequisite:

    1. Java 8 or higher installed
    2. Maven is installed
    3. Eclipse or IntelliJ are installed

    Dependency List:

    1. Selenium – 4.3
    2. Java 11
    3. JUnit4 – 4.13.2
    4. Maven – 3.8.1
    5. Maven Site Plugin – 3.12.0
    6. Maven Surefire Report Plugin – 3.0.0.M6

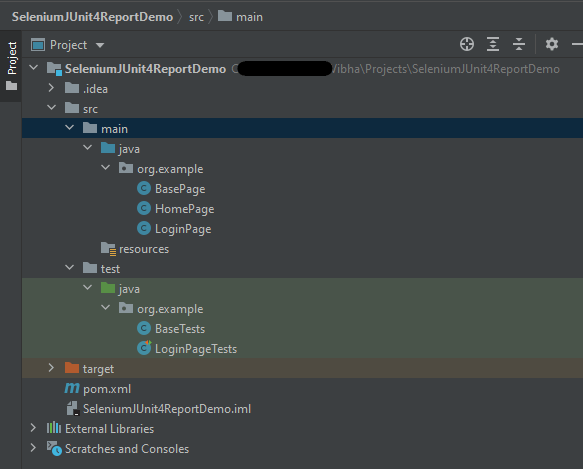
    Project Structure

    To create a Maven project in Eclipse, please refer to this tutorial – Maven – How to import Maven project in Eclipse

    To create a Maven project in Eclipse, please refer to this tutorial – How to create Maven project in IntelliJ

    Implementation Steps

    Step 1 – Add the Maven Site Plugin and Maven Surefire Report plugin

    Maven Site Plugin

    <plugin>
             <groupId>org.apache.maven.plugins</groupId>
              <artifactId>maven-site-plugin</artifactId>
              <version>${maven.site.plugin.version}</version>
    </plugin>
    

    Maven Surefire Report Plugin

    <reporting>
            <plugins>
                <plugin>
                    <groupId>org.apache.maven.plugins</groupId>
                    <artifactId>maven-surefire-report-plugin</artifactId>
                    <version>${maven.surefire.report.plugin.version}</version>
                </plugin>
            </plugins>
        </reporting>
    

    The complete POM.xml looks like

    <?xml version="1.0" encoding="UTF-8"?>
    <project xmlns="http://maven.apache.org/POM/4.0.0" xmlns:xsi="http://www.w3.org/2001/XMLSchema-instance" xsi:schemaLocation="http://maven.apache.org/POM/4.0.0 http://maven.apache.org/xsd/maven-4.0.0.xsd">
        
       <modelVersion>4.0.0</modelVersion>
        <groupId>org.example</groupId>
        <artifactId>SeleniumJUnit4ReportDemo</artifactId>
        <version>1.0-SNAPSHOT</version>
       
        <properties>
            <project.build.sourceEncoding>UTF-8</project.build.sourceEncoding>
            <selenium.version>4.3.0</selenium.version>
            <junit.version>4.13.2</junit.version>
            <webdrivermanager.version>5.2.1</webdrivermanager.version>
            <maven.site.plugin.version>3.12.0</maven.site.plugin.version>
            <maven.compiler.plugin.version>3.10.1</maven.compiler.plugin.version>
            <maven.surefire.plugin.version>3.0.0-M7</maven.surefire.plugin.version>
            <maven.surefire.report.plugin.version>3.0.0-M6</maven.surefire.report.plugin.version>
            <maven.compiler.source>11</maven.compiler.source>
            <maven.compiler.target>11</maven.compiler.target>
        </properties>
       
     <dependencies>
    
            <!-- Selenium -->
            <dependency>
                <groupId>org.seleniumhq.selenium</groupId>
                <artifactId>selenium-java</artifactId>
                <version>${selenium.version}</version>
            </dependency>
           
            <!-- JUnit4 -->
            <dependency>
                <groupId>junit</groupId>
                <artifactId>junit</artifactId>
                <version>${junit.version}</version>
                <scope>test</scope>
            </dependency>
           
            <!-- Web Driver Manager -->
            <dependency>
                <groupId>io.github.bonigarcia</groupId>
                <artifactId>webdrivermanager</artifactId>
                <version>${webdrivermanager.version}</version>
            </dependency>
    
        </dependencies>
    
        <build>
            <plugins>
    
                <plugin>
                    <groupId>org.apache.maven.plugins</groupId>
                    <artifactId>maven-site-plugin</artifactId>
                    <version>${maven.site.plugin.version}</version>
                </plugin>
    
                <plugin>
                    <groupId>org.apache.maven.plugins</groupId>
                    <artifactId>maven-surefire-plugin</artifactId>
                    <version>${maven.surefire.plugin.version}</version>
                    <configuration>
                        <testFailureIgnore>true</testFailureIgnore>
                    </configuration>
                </plugin>
              
                <plugin>
                    <groupId>org.apache.maven.plugins</groupId>
                    <artifactId>maven-compiler-plugin</artifactId>
                    <version>${maven.compiler.plugin.version}</version>
                    <configuration>
                        <source>${maven.compiler.source}</source>
                        <target>${maven.compiler.target}</target>
                    </configuration>
                </plugin>
            </plugins>
        </build>
    
        <reporting>
            <plugins>
                <plugin>
                    <groupId>org.apache.maven.plugins</groupId>
                    <artifactId>maven-surefire-report-plugin</artifactId>
                    <version>${maven.surefire.report.plugin.version}</version>
                </plugin>
            </plugins>
        </reporting>
    </project>
    

    Step 2 – Create Pages and Test Code for the pages

    Below is the sample project which uses Selenium and JUnit which is used to generate a JUnit Report.

    This is the BaseClass that contains the PageFactory.initElements. The initElements is a static method of PageFactory class that is used to initialize all the web elements located by @FindBy annotation. 

    import org.openqa.selenium.WebDriver;
    import org.openqa.selenium.support.PageFactory;
    
    public class BasePage {
    	
    	  public WebDriver driver;
    
    	  public BasePage(WebDriver driver) {
    		  this.driver = driver;
    		  PageFactory.initElements(driver,this);
    	}
    
    }


    Below is the code for LoginPage and HomePage.

    LoginPage 

    import org.openqa.selenium.WebDriver;
    import org.openqa.selenium.WebElement;
    import org.openqa.selenium.support.FindBy;
    
    public class LoginPage extends BasePage{
    	
    	 public LoginPage(WebDriver driver) {
    		 super(driver);
    		
        }
    	
    	@FindBy(name = "username")
        public WebElement userName;
     
        @FindBy(name = "password")
        public WebElement password;
        
        @FindBy(xpath = "//*[@id='app']/div[1]/div/div[1]/div/div[2]/div[2]/form/div[1]/div/span")
        public WebElement missingUsernameErrorMessage;
        
        @FindBy(xpath = "//*[@id='app']/div[1]/div/div[1]/div/div[2]/div[2]/form/div[1]/div/span")
        public WebElement missingPasswordErrorMessage;
     
        @FindBy(xpath = "//*[@id='app']/div[1]/div/div[1]/div/div[2]/div[2]/form/div[3]/button")
        public WebElement login;
     
        @FindBy(xpath = "//*[@id='app']/div[1]/div/div[1]/div/div[2]/div[2]/div/div[1]/div[1]/p")
        public  WebElement errorMessage;
    
        
        public void login(String strUserName, String strPassword) {
        	 
        	userName.sendKeys(strUserName);
        	password.sendKeys(strPassword);
        	login.click();
     
        }
      
        public String getMissingUsernameText() {
            return missingUsernameErrorMessage.getText();
        }
    
        public String getMissingPasswordText() {
            return missingPasswordErrorMessage.getText();
        }
       
        public String getErrorMessage() {
            return errorMessage.getText();
        }
     
    }


    HomePage

    import org.openqa.selenium.WebDriver;
    import org.openqa.selenium.WebElement;
    import org.openqa.selenium.support.FindBy;
    
    public class HomePage extends BasePage {
    
    	public HomePage(WebDriver driver) {
    		super(driver);
    
    	}
    	
    	  @FindBy(xpath = "//*[@id='app']/div[1]/div[1]/header/div[1]/div[1]/span/h6")
    	  public  WebElement homePageUserName;
    
    	  public String getHomePageText() {
    	       return homePageUserName.getText();
       }
    
    }


    Here, we have BaseTests Class which contains the common methods needed by other test pages.

    import java.time.Duration;
    import org.junit.After;
    import org.junit.Before;
    import org.openqa.selenium.WebDriver;
    import org.openqa.selenium.chrome.ChromeDriver;
    import io.github.bonigarcia.wdm.WebDriverManager;
    
    public class BaseTests {
    	
    	public static WebDriver driver;
    	public final static int TIMEOUT = 10;    
    
    	@Before
        public void setup() {
        	WebDriverManager.chromedriver().setup();
    	    driver = new ChromeDriver();
    	    driver.manage().window().maximize();
    	    driver.get("https://opensource-demo.orangehrmlive.com/");	    
    	    driver.manage().timeouts().implicitlyWait(Duration.ofSeconds(TIMEOUT));
    
        }
    
        @After
        public void tearDown() {
            driver.quit();
        }
        
    }


    LoginPageTests

    import org.junit.Assert;
    import org.junit.Test;
    
    public class LoginPageTests extends BaseTests{
    
        @Test
        public void invalidCredentials() {
    
            LoginPage objLoginPage = new LoginPage(driver);
            objLoginPage.login("admin$$", "admin123");
    
            // Verify Error Message
            Assert.assertEquals("Invalid credentials",objLoginPage.getErrorMessage());
    
        }
    
        @Test
        public void validLogin() {
    
            LoginPage objLoginPage = new LoginPage(driver);
            objLoginPage.login("Admin", "admin123");
    
            HomePage objHomePage = new HomePage(driver);
    
            // Verify Home Page
            Assert.assertEquals("Dashboard",objHomePage.getHomePageText());
    
        }
        
        @Test
        public void missingUsername() {
    
            LoginPage objLoginPage = new LoginPage(driver);
            objLoginPage.login("", "admin123");
    
            // Verify Error Message
            Assert.assertEquals("Invalid credentials",objLoginPage.getMissingUsernameText());
    
        }
        
    }
    

    Step 3 – Run the tests from the Command Line

    Use the below command to run the tests from the command line

    mvn clean test site
    

    The output of the test execution is

    Step 4 – JUnit Report generation

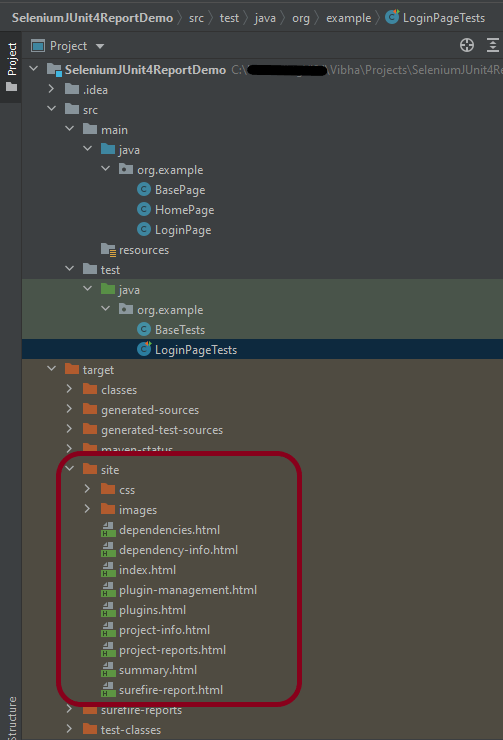
    Maven Site Plugin creates a folder – site under the target directory, and the Maven Surefire Report plugin generates the JUnit Reports in the site folder.

    Right-click on the surefire-report.html and open it in the browser.

    To know about the test failure, go to the Failure Details Section.

    Congratulations on making it through this tutorial and hope you found it useful! Happy Learning!! Cheers!!
    How to install the trends-related plugin in Jenkins?

    HOME

    The previous tutorial explained Build History Metrics in Jenkins. This tutorial explains the trend-related plugin in Jenkins.

    How to install the trends-related plugin in Jenkins?

    To see overall trends in Jenkins, there are plugins available to gather information from within the builds and Jenkins and display them in a graphical format. One example of such a plugin is the ‘global-build-stats plugin’. So let’s go through the steps for this.

    To know more about global build stats, please refer to this documentation.

    Pre-Requisite:

    Jenkins installed and started on the computer

    Implementation Steps

    Step 1: Start the Jenkins server and open the browser and navigate to the localhost and the port in which Jenkins is running

    http://localhost:8080/

    Step 2: Log in to Jenkins UI

    Provide a username and password and click on the Sign-in Button.

    Step 3: Go to Manage Plugins

    Click on the Manage Jenkins. Choose Manage Plugins.

    Step 4: Add the global-build-stats plugin

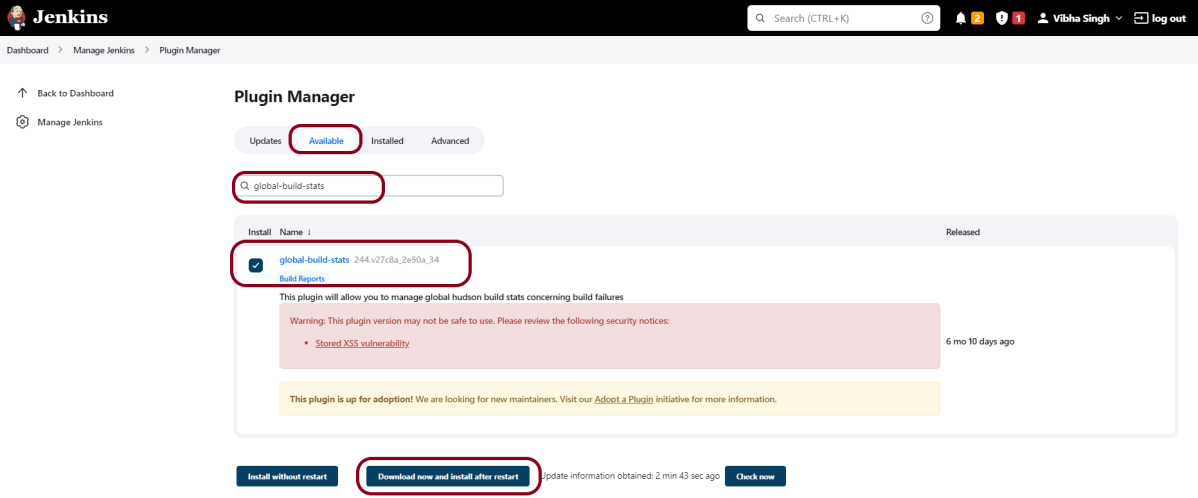
    On the Plugins Page, go to the Available option.

    1. Select the “global-build-stats” Plugin
    2. Click on “Install without restart”. The plugin will take a few moments to finish downloading depending on your internet connection, and will be installed automatically.
    3. You can also select the option “Download now and Install after the restart” button. In which plugin is installed after the restart
    4. You will be shown a “No updates available” message if you already have the TestNG Report plugin installed.

    Click on the checkbox “Restart Jenkins when installation is complete when no jobs are running“.

    Step 5: Verify the global-build-stats plugin

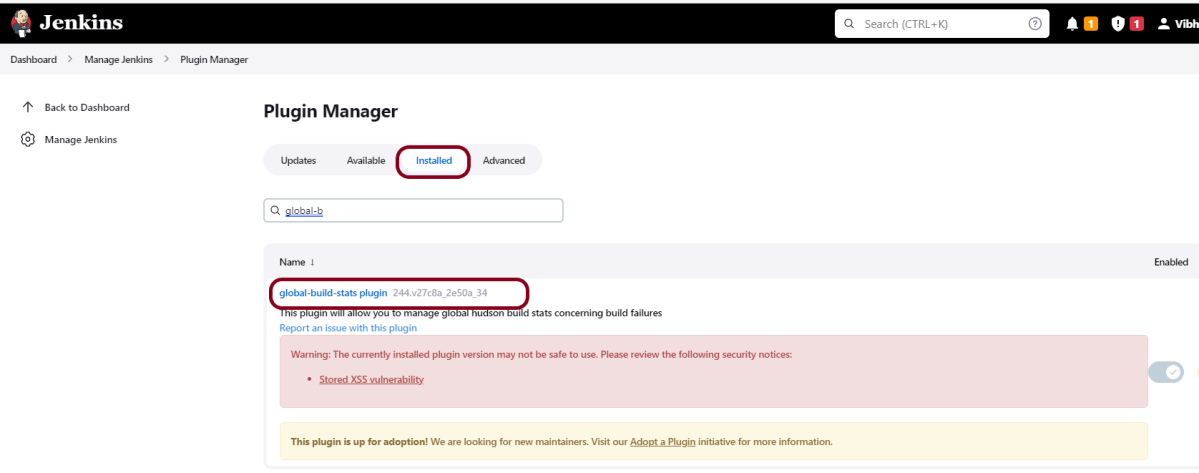
    For verification of the successful installation of the plugin, we can go to the “installed”  tab, and we can see the presence of the build history metrics plugin.

    Step 6 − Generate Global Build Stats metrics

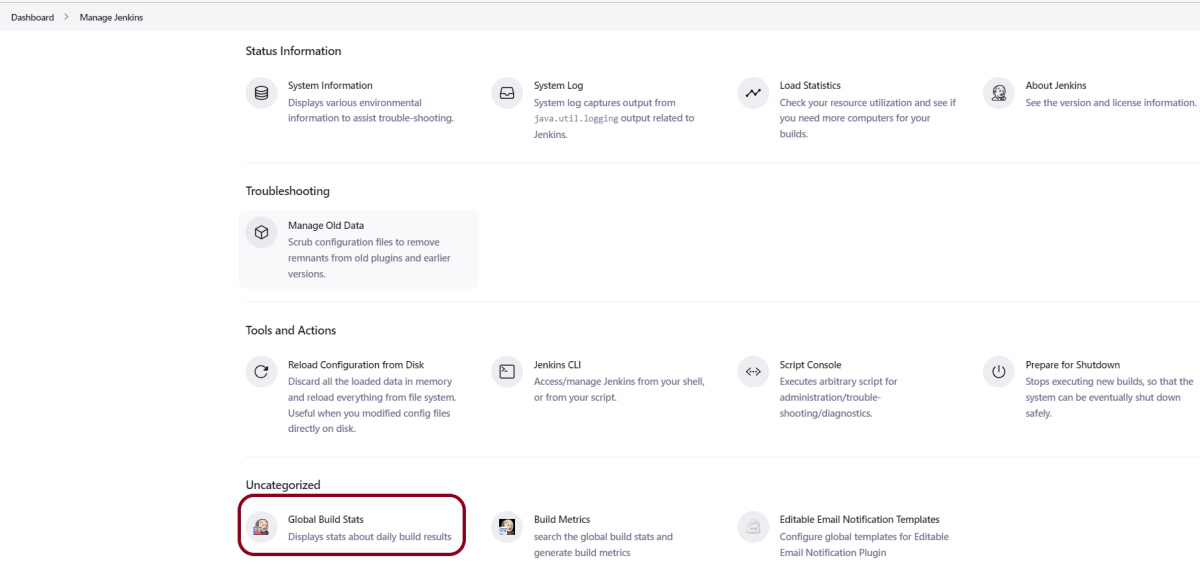
    Go to the Jenkins dashboard and click on Manage Jenkins. In the Manage Jenkins screen, scroll down, and now you will now see an option called “Global Build Stats“. Click on this link.

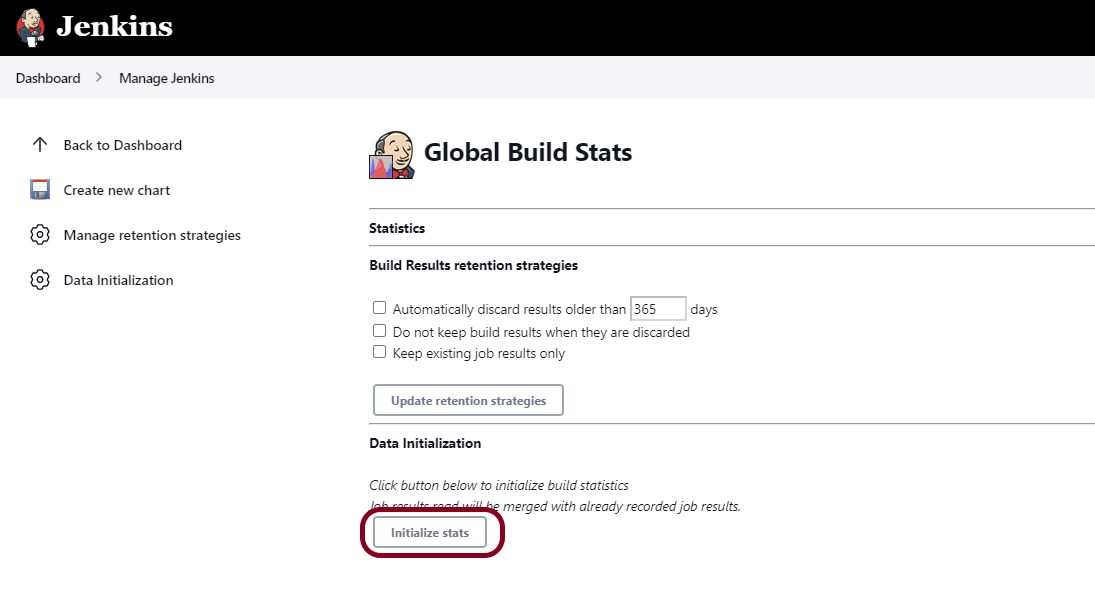
    Click on the button “Initialize stats“. What this does is that it gathers all the existing records for builds that have already been carried out, and charts can be created based on these results.

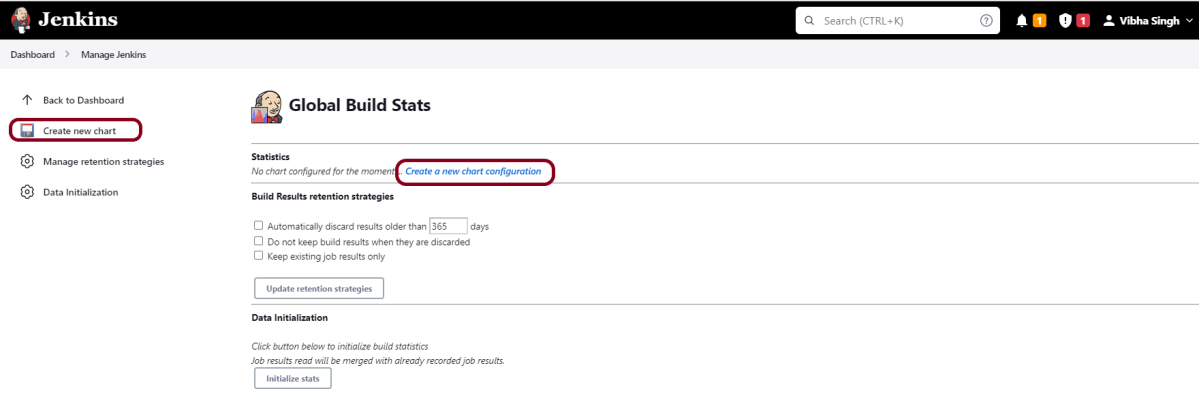
    Once the data has been initialized, it’s time to create a new chart. Click on the “Create new chart” link.

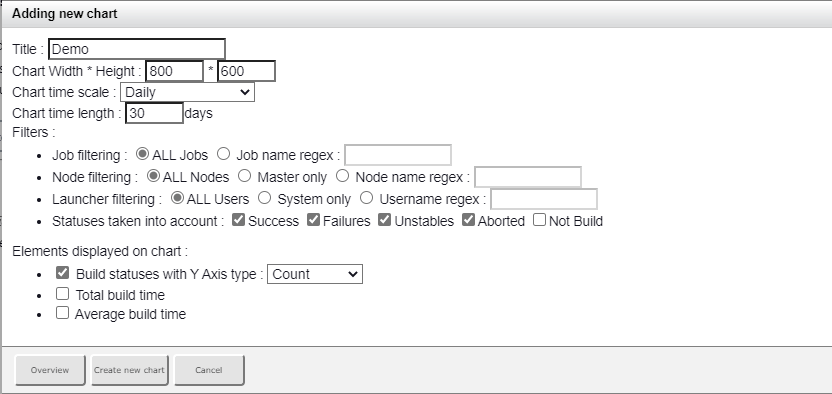
    A pop-up will come to enter the relevant information for the new chart details. Enter the following mandatory information.

    • Title – Any title information, for this example is given as ‘Demo’
    • Chart Width – 800
    • Chart Height – 600
    • Chart time scale – Daily
    • Chart time length – 30 days

    The rest of the information can remain as it is. Once the information is entered, click on Create New chart.

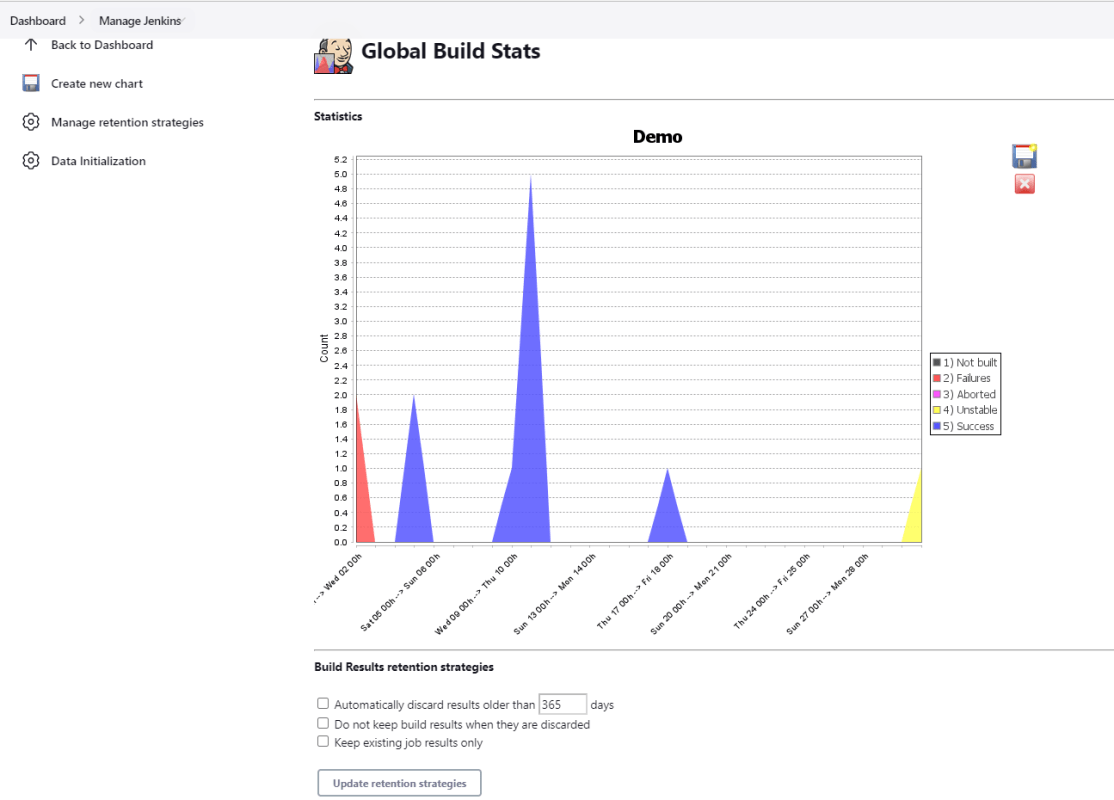
    You will now see the chart which displays the trends of the builds over time.

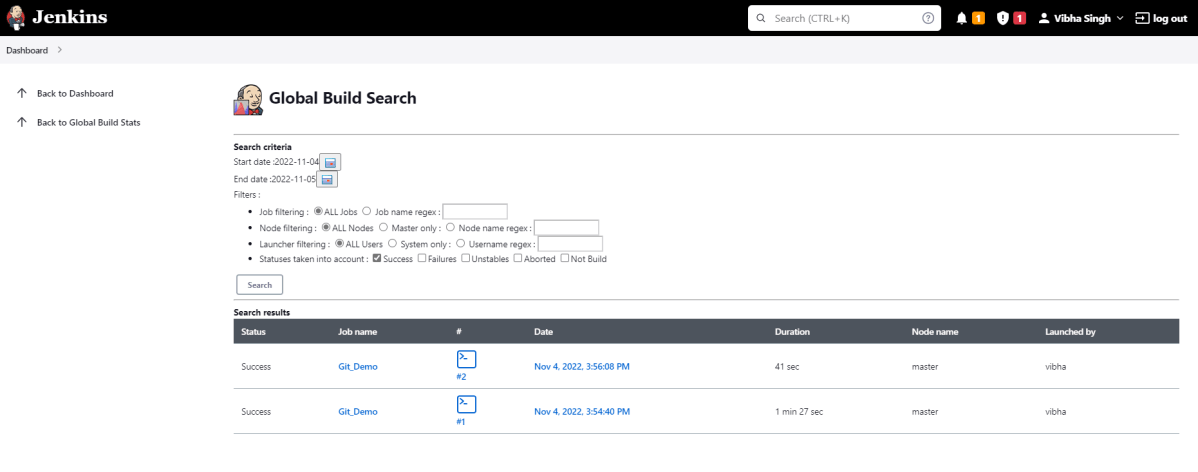
    If you click on any section within the chart, it will give you a drill-down of the details of the job and its builds.

    Congratulations on making it through this tutorial and hope you found it useful! Happy Learning!! Cheers!!

    Build History Metrics in Jenkins

    HOME

    Jenkins includes a number of plugins for displaying metrics for builds that take place over time. These metrics can help you understand your builds and how often they fail/pass over time. Consider the ‘Build History Metrics plugin‘ as an example.

    What is Build History Plugin?

    • Mean Time To Failure (MTTF)
    • Mean Time To Recovery (MTTR)
    • Standard Deviation of Build Times

    The calculated metrics are displayed in a table on each jobs page showing the metric for the last 7 days, last 30 days, and all time.

    How to install the metric-related plugin in Jenkins?

    Implementation Steps

    Step 1: Start the Jenkins server and open the browser and navigate to the localhost and the port in which Jenkins is running

    http://localhost:8080/

    Step 2: Log in to Jenkins UI

    Provide a username and password and click on the Sign-in Button.

    Step 3: Download and Install Build History Metrics Plugin

    Click on the Manage Jenkins. Choose Manage Plugins.

    Step 4: Add the Build History Metrics Plugin

    On the Plugins Page, go to the Available option.

    1. Select the Build History Metrics Plugin
    2. Click on Install without restart. The plugin will take a few moments to finish downloading depending on your internet connection, and will be installed automatically.
    3. You can also select the option Download now and Install after the restart button. In which plugin is installed after the restart
    4. You will be shown a “No updates available” message if you already have the TestNG Report plugin installed.

    Step 5: Restart Jenkins

    Click on the checkbox “Restart Jenkins when installation is complete when no jobs are running“.

     For verification of the successful installation of the plugin, we can go to the “installed”  tab, and we can see the presence of the build history metrics plugin.

    How to view metrics in Jenkins?

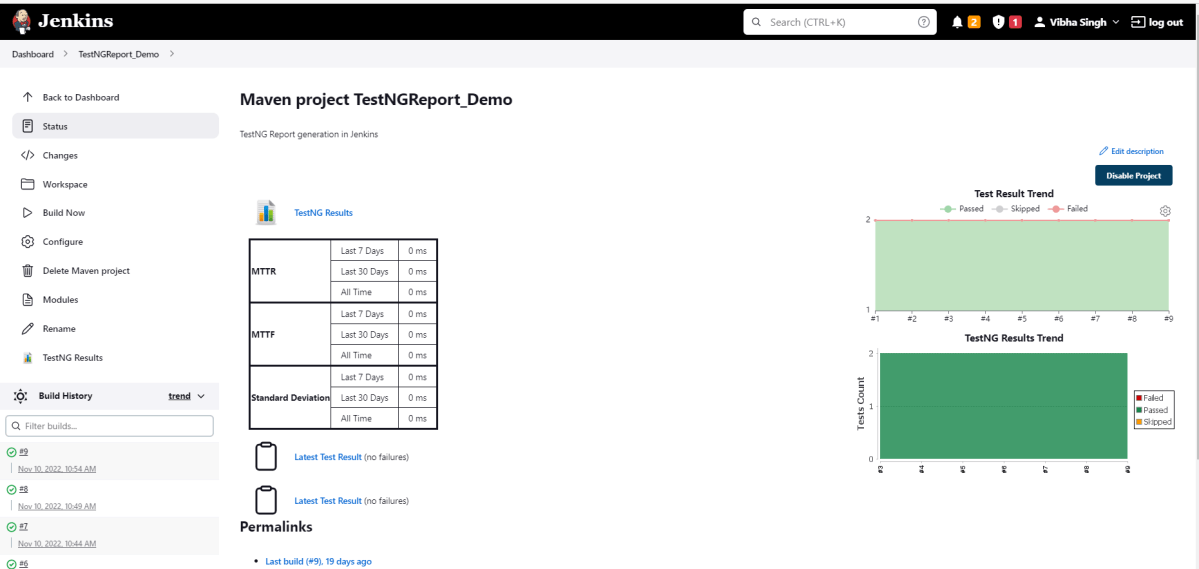
    Step 1: Go to the Jenkins dashboard and click on any job. Here we can see the metrics like MTTR, MTTF, and Standard deviation in the tabular form highlighted below.

    Note: If, after installing the plugin below, the tabular form does not display, then restart Jenkins.

    Metrics are shown for the last 7 days, last 30 days, and all time.

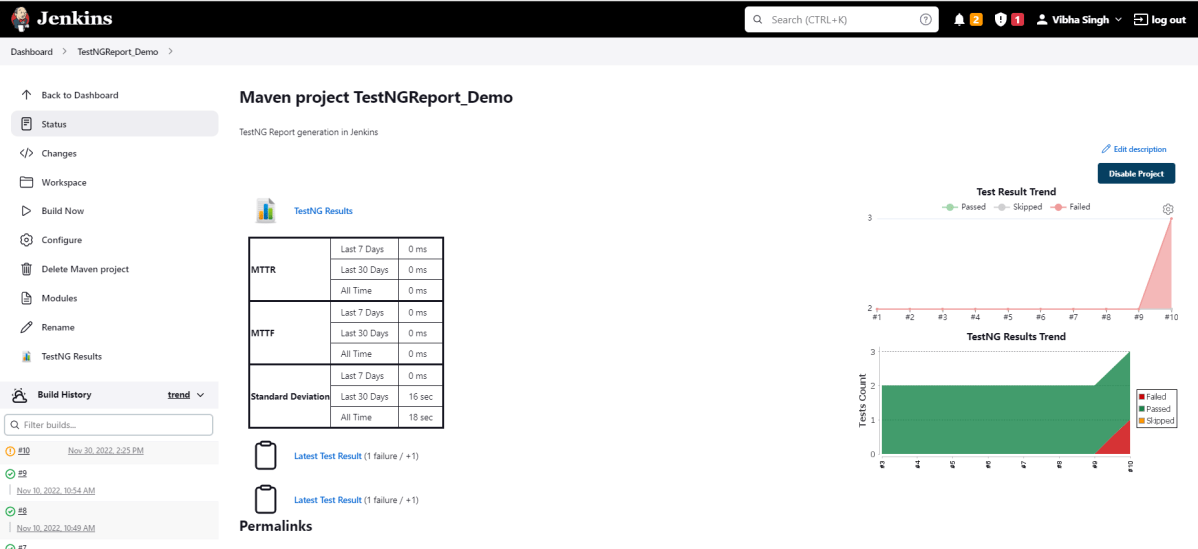
    Step 2: Run any job for which the build is showing as failed status, and then we can see the time for MTTR and MTTF as mentioned in the below image.

    Congratulations on making it through this tutorial and hope you found it useful! Happy Learning!! Cheers!!
    Jenkins GitLab Integration

    HOME

    The previous tutorial has explained how to install it onto a Windows 10 system and create a Maven or Gradle project in Jenkins. Jenkins and GitLab are two powerful tools on their own, but what about using them together? In this tutorial, learn about the benefits of a Jenkins GitLab integration and how to set up the integration on your own.

    What is GitLab?

    GitLab is a web-based Git repository that provides free open and private repositories, issue-following capabilities, and wikis. It is a complete DevOps platform that enables professionals to perform all the tasks in a project—from project planning and source code management to monitoring and security. Additionally, it allows teams to collaborate and build better software.

    What is Jenkins?

    Jenkins is a well-known open-source tool that aids in the implementation of Continuous Integration (CI) and Continuous Deployment/Continuous Delivery (CD) processes by automating parts of the software development pipeline such as building, testing, and deployment.

    Jenkins Version Used – 2.361.2

    In this version of Jenkins, Git Plugin is already installed. If the Git Plugin is not installed, then follow the below steps to add Git Plugin in Jenkins.

    Step 1: Open your dashboard.

    Click on the Manage Jenkins button on your Jenkins dashboard:

    Step 2: Select Manage Plugins.

    Click on the Manage Jenkins. Choose Manage Plugins.

    Step 3:  Add Git Plugin

    On the Plugins Page, go to the Available option.

    1. Select the GIT Plugin
    2. Click on Install without restart. The plugin will take a few moments to finish downloading depending on your internet connection, and will be installed automatically.
    3. You can also select the option Download now and Install after the restart button. In which plugin is installed after the restart
    4. You will be shown a “No updates available” message if you already have the Git plugin installed.

    In my case, Git Plugin is already installed, so you can’t see it in the Available Plugin.

    Step 4: Verify Git Plugin is installed

    Once the plugins have been installed,
    Go to Manage Jenkins on your Jenkins dashboard. You will see your plugins listed among the rest.

    How to Integrate Jenkins With GitLab

    Step 1: Create a new project using the Maven project plugin.

    1. Give the Name of the project.
    2. Click on the Maven project. 
    3. Click on the OK button.

    In the General section, enter the project description in the Description box.

    Click on create new jobs.

    Enter the item name, select the job type, and click OK. We shall create a Maven project as an example.

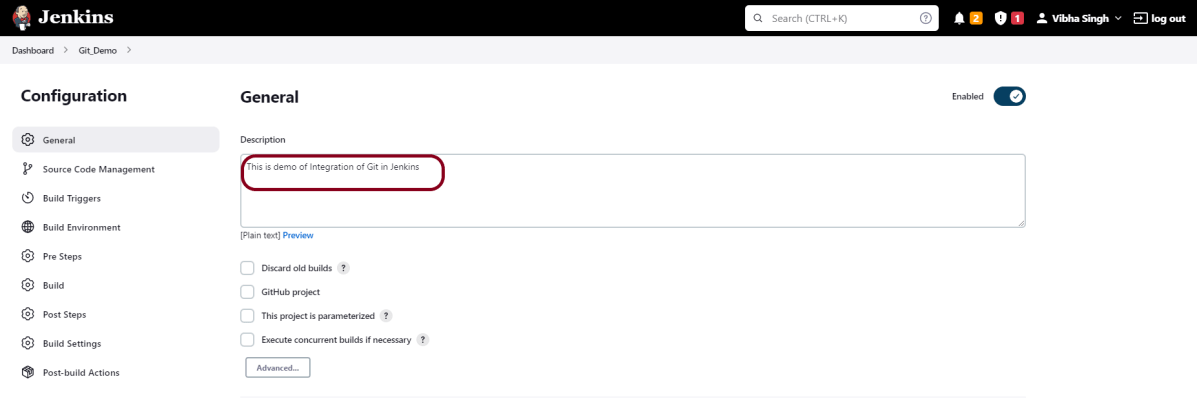
    Step 2: Describe the project in the description section

    In the General section, enter the project description in the Description box.

    Step 3 – Source Code Management section

    You will see a Git option under Source Code Management if your Git plugin has been installed in Jenkins.

    Enter the Git repository URL to pull the code from GitHub. Enter the credentials to log in to GitLab.

    I have already set up the credentials to log in to GitLab. Click on the Add button and select Jenkins.

    Add the username and password used to log in to GitLab. Click on the “Add” button.

    Note:- Please make sure that Git is installed on your local machine. To install Git on your local machine, go to this tutorial – How to install Git on Windows 10.

    Step 4: Build Management

    Go to the Build section of the new job.

    1. In the Root POM textbox, enter pom.xml
    2. In the Goals and options section, enter “clean test“

    Step 5: Select “Publish TestNG Results” from “Post Build Actions“

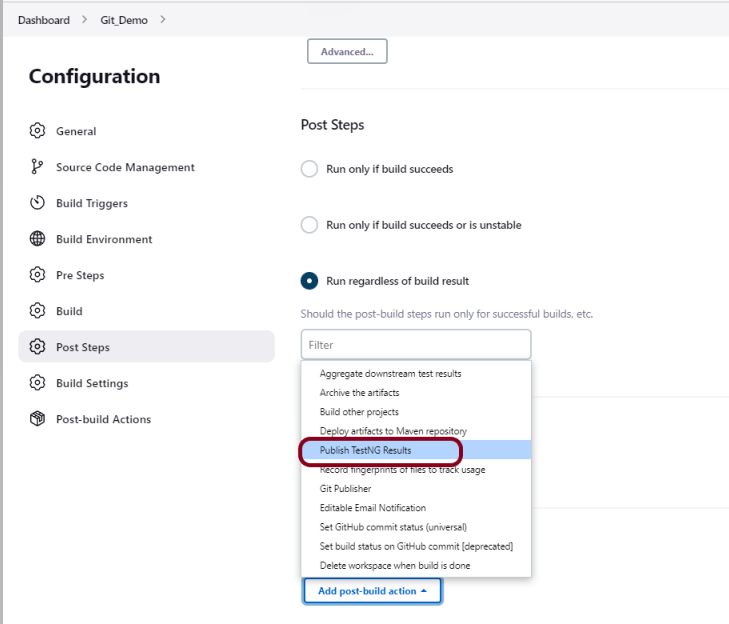
    Scroll down to “Post Build Actions” and click on the “Add Post Build Actions” drop-down list. Select “Publish TestNG Results“. 

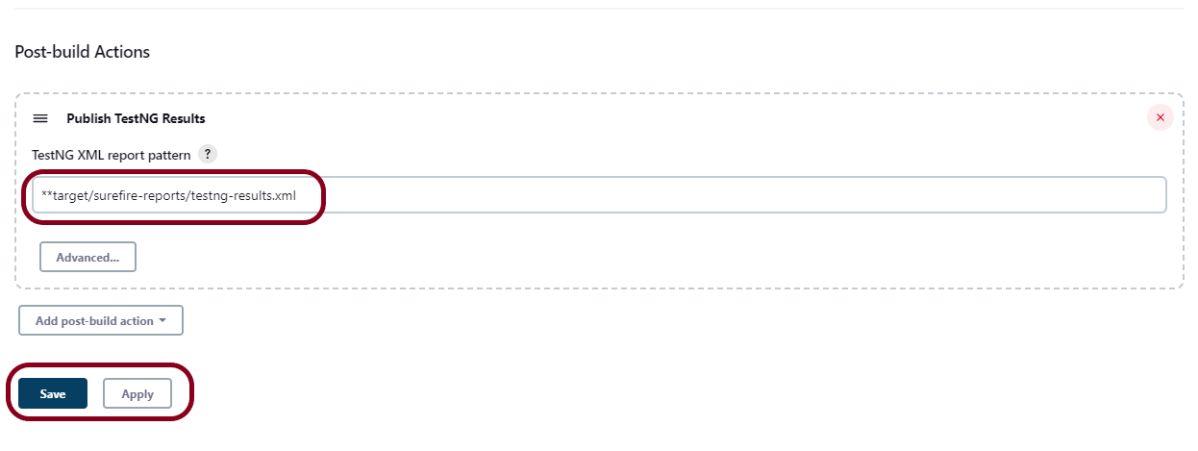
    Enter TestNG XML Report Pattern as “**target/surefire-reports/testng-results.xml” and click on the “Save” button.

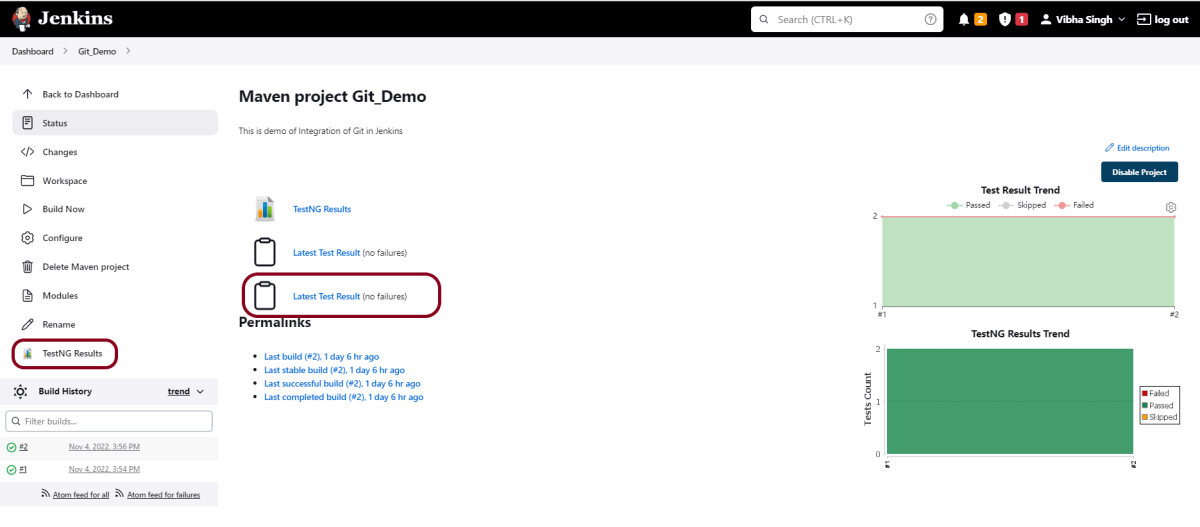
    We have created a new project “Git_Demo” with the configuration to run TestNG Tests and also to generate TestNG Reports after execution using Jenkins.

    Step 6: Execute the tests

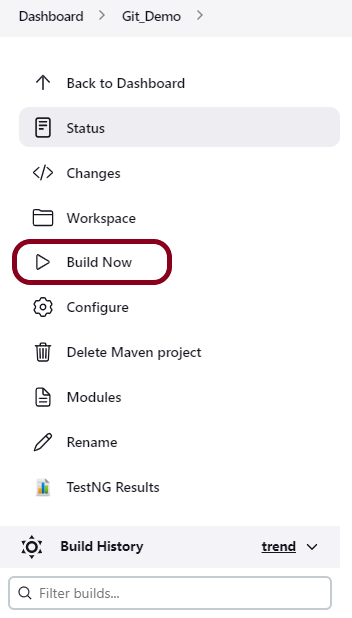
    Let’s execute it now by clicking on the “Build Now” button. 

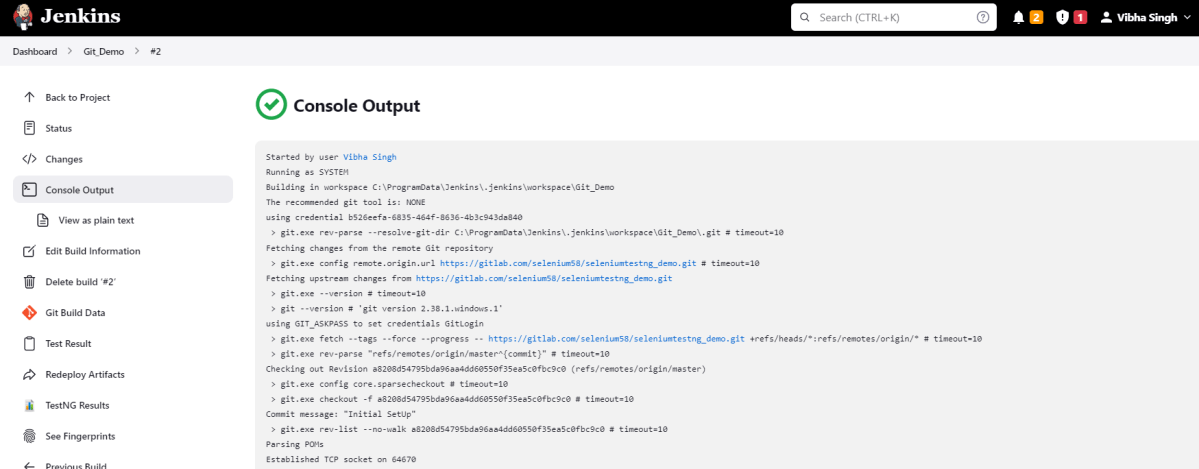
    Right-click on Build Number (here in my case it is #2) and click on Console Output to see the result.

    Step 7: View the TestNG Report

    Once the execution is completed, we could see a link to view “TestNG Results“.

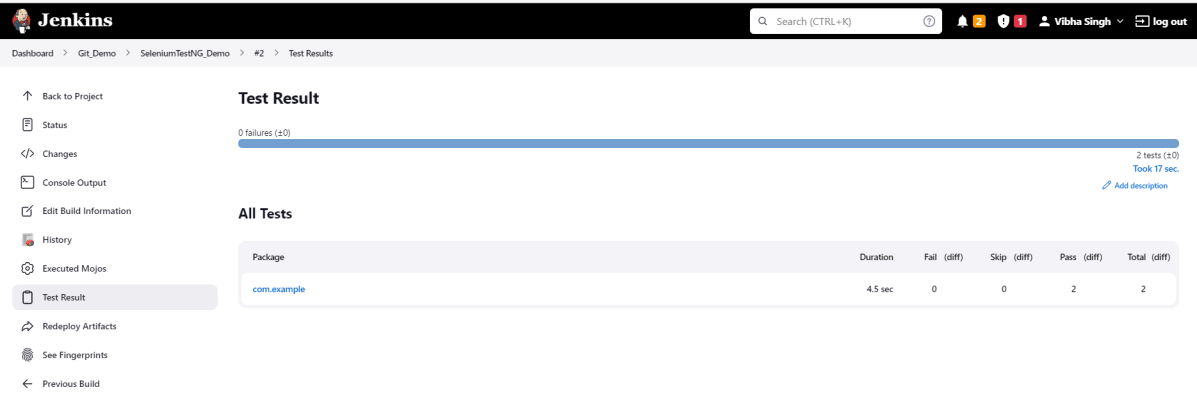
    Click on the TestNG Results. It displays the summary of the tests.

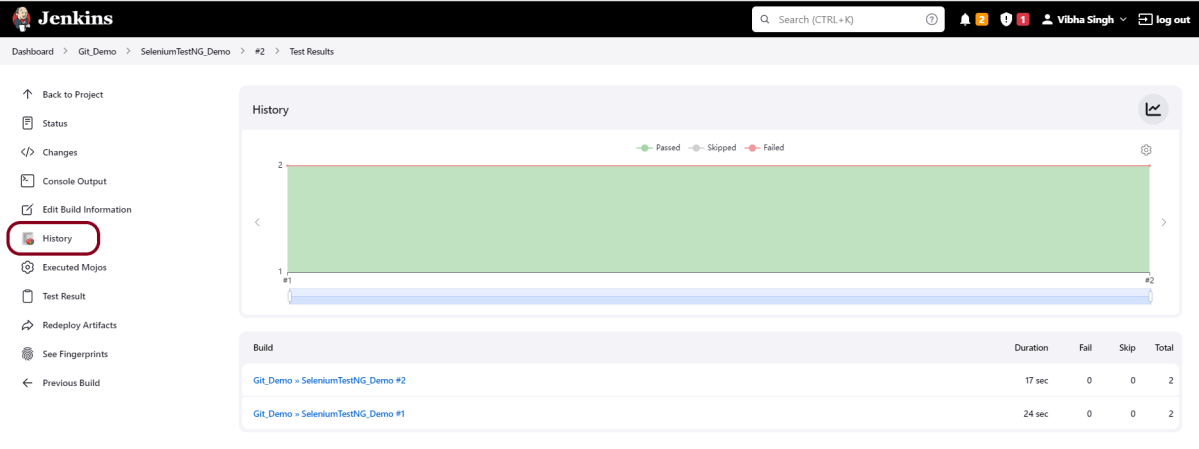
    If you want to check the execution history, then click on the shown link.

    This way, we could integrate Git in Jenkins.

    Congratulations on making it through this tutorial and hope you found it useful! Happy Learning!! Cheers!!
    Implemention of ‘Masterthought’ Reports in Cucumber with JUnit4

    HOME

    Masterthought library provides pretty HTML reports for Cucumber. The cucumber JSON file is used to generate the HTML for the website. This Java report publisher was made particularly with publishing cucumber reports to the Jenkins build server in mind. It releases aesthetically pleasing HTML reports with charts displaying the outcomes of cucumber runs.

    Prerequisite

    1. Java 11 installed
    2. Maven installed
    3. Eclipse or IntelliJ installed

    This framework consists of:

    1. Selenium – 4.3.0
    2. Java 11
    3. Cucumber – 7.6.0
    4. Maven – 3.8.1
    5. JUnit– 4.13.2
    6. Cucumber Reporting Plugin – 5.7.4

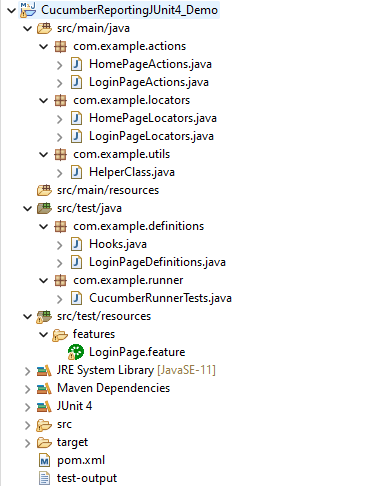
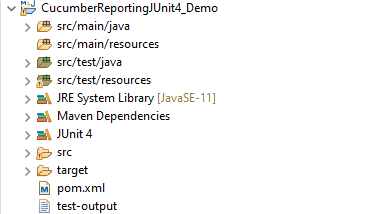
    Project Structure

    Implementation Steps

    1. Download and Install Java on the system
    2. Download and setup Eclipse IDE on the system
    3. Setup Maven
    4. Install Cucumber Eclipse Plugin (For Eclipse IDE)
    5. Create a new Maven Project
    6. Add Selenium, JUnit4, Cucumber, and Masterthought dependencies to the project
    7. Create a feature file under src/test/resources
    8. Create the test code locating the web elements in src/main/java
    9. Create the Step Definition class or Glue Code in src/test/java
    10. Create a JUnit4 Cucumber Runner class in src/test/java
    11. Run the tests from Command Line
    12. Cucumber Report Generation

    Step 1- Download and Install Java

    Cucumber and Selenium need Java to be installed on the system to run the tests. Click here to know How to install Java.

    Step 2 – Download and setup Eclipse IDE on the system

    The Eclipse IDE (integrated development environment) provides strong support for Java developers, which is needed to write Java code. Click here to know How to install Eclipse.

    Step 3 – Setup Maven

    To build a test framework, we need to add a number of dependencies to the project. It is a very tedious and cumbersome process to add each dependency manually. So, to overcome this problem, we use a build management tool. Maven is a build management tool that is used to define project structure, dependencies, build, and test management. Click here to know How to install Maven.

    Step 4 – Install Cucumber Eclipse Plugin (Only for Eclipse IDE)

    The Cucumber Eclipse plugin is a plugin that allows eclipse to understand the Gherkin syntax. The Cucumber Eclipse Plugin highlights the keywords present in Feature File. Click here to know more – Install Cucumber Eclipse Plugin.

    Step 5 – Create a new Maven Project

    Click here to know How to create a Maven project

    Below is the Maven project structure. Here,

    Group Id – com.example
    Artifact Id – CucumberReportingJUnit4_Demo
    Version – 0.0.1-SNAPSHOT
    Package – com. example

    Step 6 – Add Selenium, TestNG, Cucumber, and Masterthought dependencies to the project

    Masterthought Dependency

    <dependency>
                <groupId>net.masterthought</groupId>
                <artifactId>cucumber-reporting</artifactId>
                <version>${maven.cucumber.reporting.version}</version>
    </dependency>
    

    Masterthought Plugin

    <plugin>
            <groupId>net.masterthought</groupId>
            <artifactId>maven-cucumber-reporting</artifactId>
            <version>${maven.cucumber.reporting.version}</version>
     
            <executions>
                <execution>
                    <id>execution</id>
                    <phase>test</phase>
                    <goals>
                        <goal>generate</goal>
                    </goals>
                    <configuration>
                        <projectName>Cucumber Reporting Example With JUnit4</projectName>
                        <outputDirectory>${project.build.directory}/cucumber-report-html</outputDirectory>
                        <inputDirectory>${project.build.directory}</inputDirectory>
                        <jsonFiles>
                            <param>**/*.json</param>
                        </jsonFiles>
                    </configuration>
                </execution>
            </executions>
    </plugin>
    

    The complete POM.xml for the project is shown below:-

    <project xmlns="http://maven.apache.org/POM/4.0.0" xmlns:xsi="http://www.w3.org/2001/XMLSchema-instance" xsi:schemaLocation="http://maven.apache.org/POM/4.0.0 https://maven.apache.org/xsd/maven-4.0.0.xsd">
    	<modelVersion>4.0.0</modelVersion>
    	<groupId>com.example</groupId>
    	<artifactId>CucumberReportingJUnit4_Demo</artifactId>
    	<version>0.0.1-SNAPSHOT</version>
    
    
    	<properties>
    		<project.build.sourceEncoding>UTF-8</project.build.sourceEncoding>
    		<cucumber.version>7.6.0</cucumber.version>
    		<selenium.version>4.3.0</selenium.version>
    		<webdrivermanager.version>5.2.1</webdrivermanager.version>
    		<junit.version>4.13.2</junit.version>
    		<apache.common.version>2.4</apache.common.version>
    		<maven.compiler.plugin.version>3.10.1</maven.compiler.plugin.version>
    		<maven.surefire.plugin.version>3.0.0-M7</maven.surefire.plugin.version>
    		<maven.compiler.source.version>11</maven.compiler.source.version>
    		<maven.compiler.target.version>11</maven.compiler.target.version>
    		<maven.cucumber.reporting.version>5.7.4</maven.cucumber.reporting.version>
    	</properties>
    
    	<dependencies>
    
    		<dependency>
    			<groupId>io.cucumber</groupId>
    			<artifactId>cucumber-java</artifactId>
    			<version>${cucumber.version}</version>
    		</dependency>
    
    		<dependency>
    			<groupId>io.cucumber</groupId>
    			<artifactId>cucumber-junit</artifactId>
    			<version>${cucumber.version}</version>
    			<scope>test</scope>
    		</dependency>
    
    		<!-- Selenium -->
    		<dependency>
    			<groupId>org.seleniumhq.selenium</groupId>
    			<artifactId>selenium-java</artifactId>
    			<version>${selenium.version}</version>
    		</dependency>
    
    		<!-- Web Driver Manager -->
    		<dependency>
    			<groupId>io.github.bonigarcia</groupId>
    			<artifactId>webdrivermanager</artifactId>
    			<version>${webdrivermanager.version}</version>
    		</dependency>
    
    		<!-- JUnit4 -->
    		<dependency>
    			<groupId>junit</groupId>
    			<artifactId>junit</artifactId>
    			<version>${junit.version}</version>
    			<scope>test</scope>
    		</dependency>
    
    		<!-- Apache Common -->
    		<dependency>
    			<groupId>org.apache.directory.studio</groupId>
    			<artifactId>org.apache.commons.io</artifactId>
    			<version>${apache.common.version}</version>
    		</dependency>
    
            <!-- MasterThought -->
    		<dependency>
    			<groupId>net.masterthought</groupId>
    			<artifactId>cucumber-reporting</artifactId>
    			<version>${maven.cucumber.reporting.version}</version>
    		</dependency>
    
    	</dependencies>
    
    	<build>
    		<plugins>
    			<plugin>
    				<groupId>org.apache.maven.plugins</groupId>
    				<artifactId>maven-compiler-plugin</artifactId>
    				<version>${maven.compiler.plugin.version}</version>
    				<configuration>
    					<source>${maven.compiler.source.version}</source>
    					<target>${maven.compiler.target.version}</target>
    				</configuration>
    			</plugin>
    
    			<plugin>
    				<groupId>org.apache.maven.plugins</groupId>
    				<artifactId>maven-surefire-plugin</artifactId>
    				<version>${maven.surefire.plugin.version}</version>
    			</plugin>
    
    			<plugin>
    				<groupId>net.masterthought</groupId>
    				<artifactId>maven-cucumber-reporting</artifactId>
    				<version>${maven.cucumber.reporting.version}</version>
    
    				<executions>
    					<execution>
    						<id>execution</id>
    						<phase>test</phase>
    						<goals>
    							<goal>generate</goal>
    						</goals>
    						<configuration>
    							<projectName>Cucumber Reporting Example With JUnit4</projectName>
    							<outputDirectory>${project.build.directory}/</outputDirectory>
    							<inputDirectory>${project.build.directory}</inputDirectory>
    							<jsonFiles>
    								<param>**/*.json</param>
    							</jsonFiles>
    						</configuration>
    					</execution>
    				</executions>
    			</plugin>
    		</plugins>
    	</build>
    </project>
    

    Step 7 – Create a feature file (LoginPage.feature) containing all the test scenarios under src/test/resources/features

    It is recommended to create a features folder in src/test/resources directory. Create all the feature files in this features folder. Feature file should be saved as an extension of .feature.

    Feature: Login to HRM Application 
    
    Background:
       Given User is on HRMLogin page "https://opensource-demo.orangehrmlive.com/"
     
       @ValidCredentials
       Scenario: Login with valid credentials
           
         When User enters username as "Admin" and password as "admin123"
         Then User should be able to login successfully and new page open
        
      @InvalidCredentials
       Scenario Outline: Login with invalid credentials
         
         When User enters username as "<username>" and password as "<password>"
         Then User should be able to see error message "<errorMessage>"
        
      Examples:
       | username   | password  | errorMessage                      |
       | $$$$$      | ££££££££  | Invalid credentials               |
       | admin      | Admin123  | Invalid credentials               | 
       | Admin123   | admin     | Invalid credentials               |


    Step 8 – Create the test code locating the web elements in src/main/java

    LoginPageLocators

    import org.openqa.selenium.WebElement;
    import org.openqa.selenium.support.FindBy;
    
    public class LoginPageLocators {
    
    	@FindBy(name = "username")
        public WebElement userName;
     
        @FindBy(name = "password")
        public WebElement password;
     
        @FindBy(id = "logInPanelHeading")
        public WebElement titleText;
     
        @FindBy(xpath = "//*[@id='app']/div[1]/div/div[1]/div/div[2]/div[2]/form/div[3]/button")
        public WebElement login;
     
        @FindBy(xpath = "//*[@id='app']/div[1]/div/div[1]/div/div[2]/div[2]/div/div[1]/div[1]/p")
        public  WebElement errorMessage;
            
    }
    

    HomePageLocators

    import org.openqa.selenium.WebElement;
    import org.openqa.selenium.support.FindBy;
    
    public class HomePageLocators {
    
    	@FindBy(xpath = "//*[@id='app']/div[1]/div[1]/header/div[1]/div[1]/span/h6")
    	public  WebElement homePageUserName;
     
    }


    LoginPageActions

    import org.openqa.selenium.support.PageFactory;
    import com.example.locators.LoginPageLocators;
    import com.example.utils.HelperClass;
    
    public class LoginPageActions {
    
    LoginPageLocators loginPageLocators = null; 
    	
        public LoginPageActions() {
    
        	this.loginPageLocators = new LoginPageLocators();
    
    		PageFactory.initElements(HelperClass.getDriver(),loginPageLocators);
    	}
        
        public void login(String strUserName, String strPassword) {
        	 
            // Fill user name
        	loginPageLocators.userName.sendKeys(strUserName);
     
            // Fill password
        	loginPageLocators.password.sendKeys(strPassword);
     
            // Click Login button
        	loginPageLocators.login.click();
     
        }
    
        //Get the title of Login Page")
        public String getLoginTitle() {
            return loginPageLocators.titleText.getText();
        }
         
        // Get the error message of Login Page
        public String getErrorMessage() {
            return loginPageLocators.errorMessage.getText();
        }
    
    }
    

    HomePageActions

    import org.openqa.selenium.support.PageFactory;
    import com.example.locators.HomePageLocators;
    import com.example.utils.HelperClass;
    
    public class HomePageActions {
    
    	HomePageLocators homePageLocators = null;
       
    	public HomePageActions() {
        	
    		this.homePageLocators = new HomePageLocators();
    
    		PageFactory.initElements(HelperClass.getDriver(),homePageLocators);
        }
     
        // Get the User name from Home Page
        public String getHomePageText() {
            return homePageLocators.homePageUserName.getText();
        }
    
    }
    

    HelperClass

    import java.time.Duration;
    import org.openqa.selenium.WebDriver;
    import org.openqa.selenium.chrome.ChromeDriver;
    import io.github.bonigarcia.wdm.WebDriverManager;
    
    public class HelperClass {
    	
    	private static HelperClass helperClass;
    	private static WebDriver driver;
        public final static int TIMEOUT = 10;
    	
    	 private HelperClass() {
    		 
    		WebDriverManager.chromedriver().setup();
    	    driver = new ChromeDriver();
    	    driver.manage().timeouts().implicitlyWait(Duration.ofSeconds(TIMEOUT));
    	    driver.manage().window().maximize();
    
    	 }      	    	
    
        public static void openPage(String url) {
            driver.get(url);
        }
    	
    	public static WebDriver getDriver() {
    		return driver;
    				
    	}
    	
    	public static void setUpDriver() {
    		
    		if (helperClass==null) {
    			
    			helperClass = new HelperClass();
    		}
    	}
    	
    	 public static void tearDown() {
    		 
    		 if(driver!=null) {
    			 driver.close();
    			 driver.quit();
    		 }
    		 
    		 helperClass = null;
    
    	 } 	
    }
    

    Step 9 – Create the Step Definition class or Glue Code in src/test/java

    It is recommended to create a definitions folder in src/test/java directory. The StepDefinition files should be created in this definitions directory. within the folder called definitions.

    LoginPageDefinitions

    import org.junit.Assert;
    import com.example.actions.HomePageActions;
    import com.example.actions.LoginPageActions;
    import com.example.utils.HelperClass;
    import io.cucumber.java.en.Given;
    import io.cucumber.java.en.Then;
    import io.cucumber.java.en.When;
    
    public class LoginPageDefinitions{	
    
    	LoginPageActions objLogin = new LoginPageActions();
        HomePageActions objHomePage = new HomePageActions();
     
        @Given("User is on HRMLogin page {string}")
        public void loginTest(String url) {
        	
        	HelperClass.openPage(url);
     
        }
     
        @When("User enters username as {string} and password as {string}")
        public void goToHomePage(String userName, String passWord) {
     
            // login to application
            objLogin.login(userName, passWord);
     
            // go the next page
            
        }
        
        @Then("User should be able to login successfully and new page open")
        public void verifyLogin() {
     
            // Verify home page
           Assert.assertTrue(objHomePage.getHomePageText().contains("Dashboard"));
     
        }
        
        @Then("User should be able to see error message {string}")
        public void verifyErrorMessage(String expectedErrorMessage) {
     
            // Verify error message
        	Assert.assertEquals(expectedErrorMessage,objLogin.getErrorMessage());
     
        }
        
    }
    

    Hooks

    import org.openqa.selenium.OutputType;
    import org.openqa.selenium.TakesScreenshot;
    import com.example.utils.HelperClass;
    import io.cucumber.java.After;
    import io.cucumber.java.Before;
    import io.cucumber.java.Scenario;
    
    public class Hooks {
    	
    	@Before
        public static void setUp() {
    
           HelperClass.setUpDriver();
        }
    	
    	@After
    	public static void tearDown(Scenario scenario) {
    		//validate if scenario has failed
    		if(scenario.isFailed()) {
    			final byte[] screenshot = ((TakesScreenshot) HelperClass.getDriver()).getScreenshotAs(OutputType.BYTES);
    			scenario.attach(screenshot, "image/png", scenario.getName()); 
    		}	
    	
    		HelperClass.tearDown();
    	}
    }


    Step 10 – Create a JUnit 4 Cucumber Runner class in src/test/java

    import org.junit.runner.RunWith;
    import io.cucumber.junit.Cucumber;
    import io.cucumber.junit.CucumberOptions;
    
    @RunWith(Cucumber.class)
    @CucumberOptions(tags = "", features = "src/test/resources/features/LoginPage.feature", glue = "com.example.definitions",
      plugin= {"pretty", "json:target/cucumber-reports/reports.json",
    "json:target/cucumber-reports/cucumber.runtime.formatter.JSONFormatter"})
     
    public class CucumberRunnerTests  {
     
    }
    

    Step 11 – Run the tests from Command Line

    Use the below command to execute the tests

    mvn clean test
    

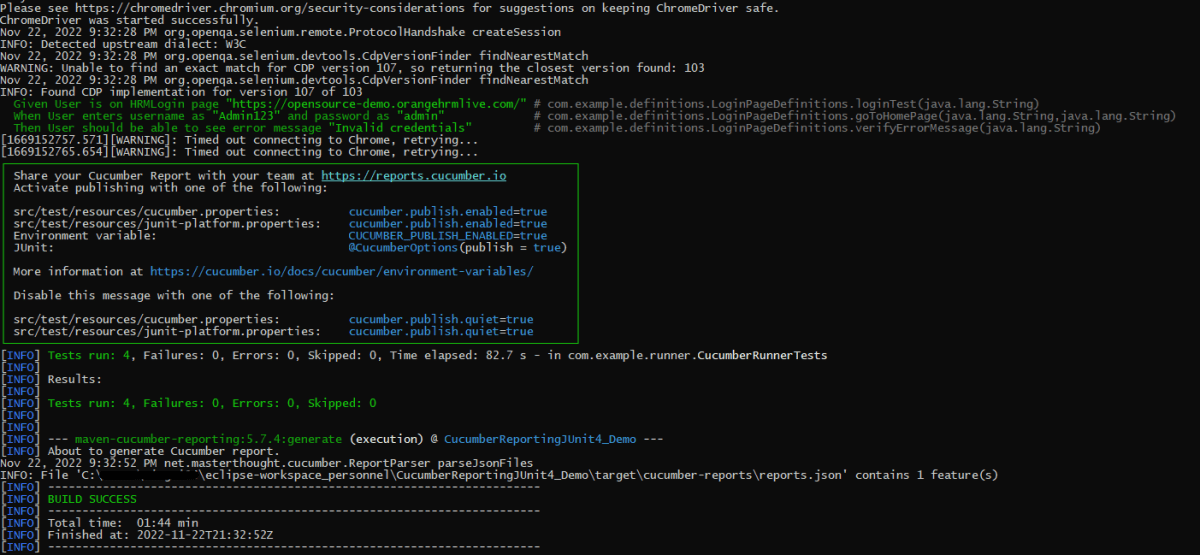
    The output of the above program is

    Step 12 – Cucumber Report Generation

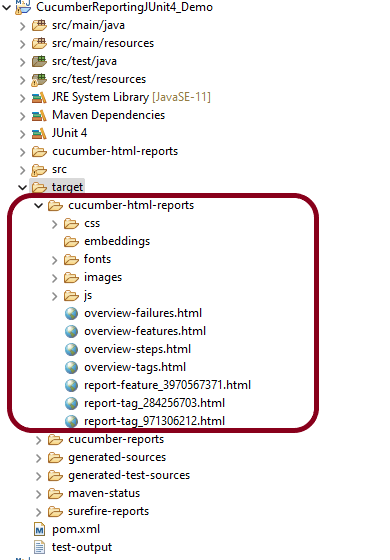
    Refresh your project and check inside \target\cucumber-html-reports that the report generated with name feature-overview.

    There are different types of HTML reports gets generated as a part of the test execution cycle.

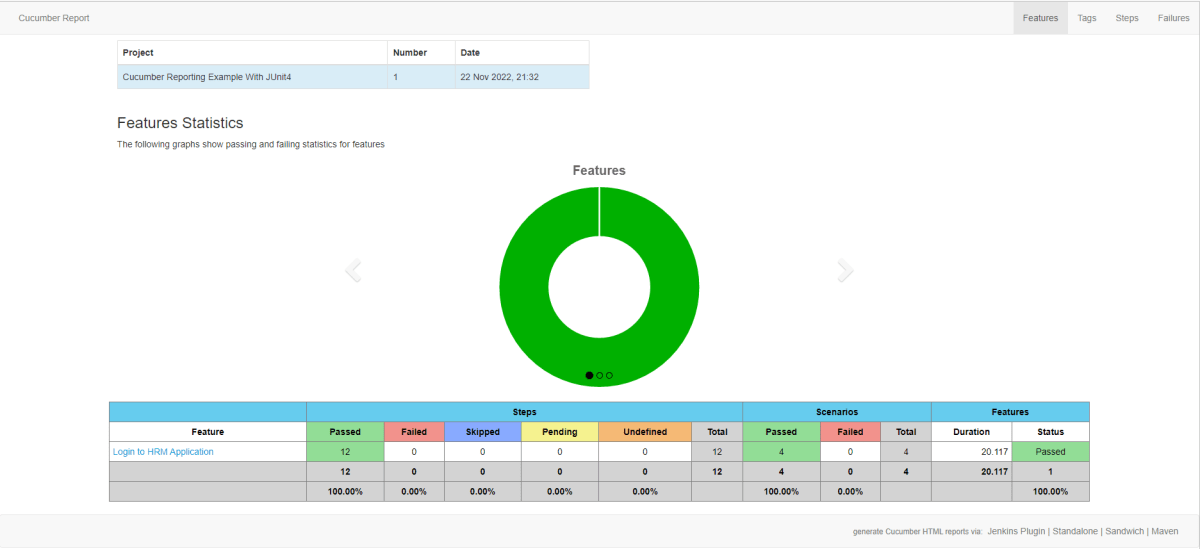
    1. feature-overview – This HTML report gives an overall overview of test execution. Main HTML report which covers all different sections like Features, Tags, Steps, and Failures.

    2. failures-overview – This HTML report gives an overview of all failed tests.

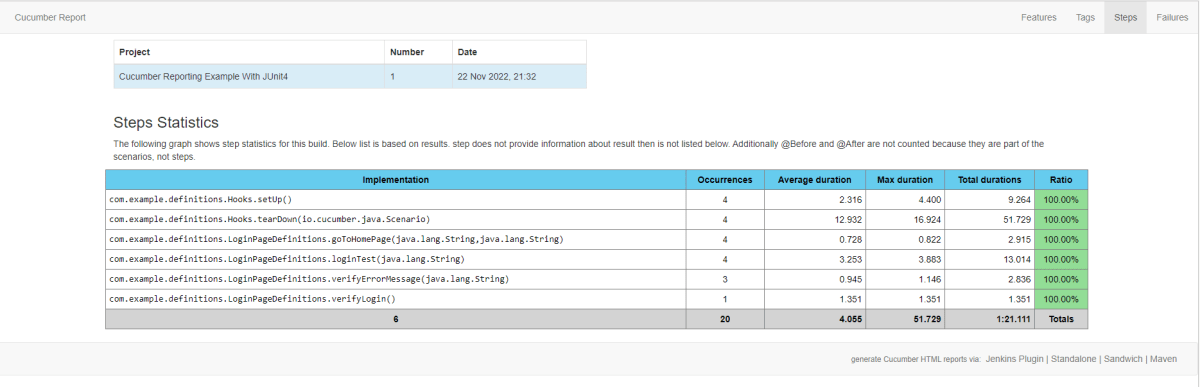
    3. step-overview – This HTML report shows step statistics for the current cycle.

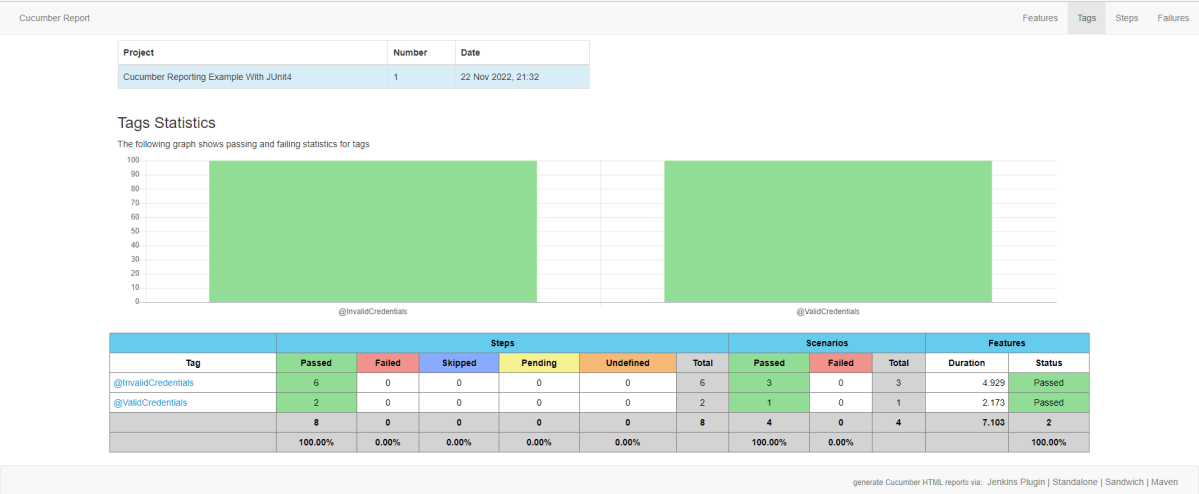
    4. tag-overview – This HTML report shows passing and failing statistics for different tags used in test execution.

    Congratulations on making it through this tutorial and hope you found it useful! Happy Learning!! Cheers!!