When we launch a browser using Selenium WebDriver, by default it is not in its maximized state. In this post, we will see how to maximize and minimize a browser during automation.
Maximize the window
It is recommended to maximize the browser before performing any operation on the browser to make sure that the tests run in a consistent environment, with a known window size. This helps in avoiding issues that might arise due to varying browser window sizes. When the browser window isn’t maximized, certain web elements might be hidden or located outside the visible area. Maximizing the window makes sure these elements become visible and accessible for interaction during automated testing.
driver.manage().window().maximize();
Below is an example to maximize the window.
package org.example;

import org.openqa.selenium.WebDriver;
import org.openqa.selenium.chrome.ChromeDriver;

import java.time.Duration;

public class Maximize_Demo {

    public static void main(String args[])  {

        WebDriver driver = new ChromeDriver();
        driver.manage().window().maximize();
        driver.manage().timeouts().implicitlyWait(Duration.ofSeconds(4));
        driver.get("https://www.bing.com/");
        System.out.println("Page Title :" + driver.getTitle());
        driver.quit();
    }
}
The output of the above program is
Minimize the window
Minimizing the window enables us to carry out background tasks or operations on the machine without disrupting the test execution. This can be especially useful when we need to work on other tasks while the tests are in progress.
Minimizing the window can sometimes reveal behaviors or functionalities that are triggered when the browser window is not in focus or is minimized. This can be valuable for testing scenarios where the application’s behavior under such conditions needs to be verified.
Selenium 4 and above support the below code.
driver.manage().window().minimize();
Below is an example to minimize the window.
package org.example;

import org.openqa.selenium.WebDriver;
import org.openqa.selenium.chrome.ChromeDriver;

import java.time.Duration;

public class Minimize_Demo {

    public static void main(String args[]) {

        WebDriver driver = new ChromeDriver();
        driver.manage().window().minimize();
        driver.manage().timeouts().implicitlyWait(Duration.ofSeconds(4));
        driver.get("https://www.bing.com/");
        System.out.println("Page Title :" + driver.getTitle());
        driver.quit();
    }
}
The output of the above program is
That’s it! Congratulations on making it through this tutorial and hope you found it useful! Happy Learning!!
Gradle is an open-source build automation tool that is designed to be flexible enough to build almost any type of software. Gradle runs on the JVM and you must have a Java Development Kit (JDK) installed to use it. Several major IDEs allow you to import Gradle builds and interact with them: Android Studio, IntelliJ IDEA, Eclipse, and NetBeans.
Cucumber Data Tables can be used to add multiple parameters in Step Definition in a tabular form rather than putting all the parameters in the Gherkin statement. This is much easier to read and multiple rows of data can be passed in the same step. Data tables from Gherkin can be accessed by using the DataTable object as the last parameter in a Step Definition. This conversion can be done either by Cucumber or manually.
Let’s write a simple data table and see how we use it.
1. Table into List of a List of Strings
| firstName | lastName | age |
| Thomas    | Brown | 30 |
| Perry     | Wilson | 26 |
| Ashley    | William | 27 |

java type: List<List<String>>

The natural representation of list of a list of strings is shown below.

[
  [ "firstName", "lastName", "age" ],
  [ "Thomas", "Brown", "30" ],
  [ "Perry", "Wilson", "26" ],
  [ "Ashley", "William", "27" ]
]
2. Table into List of Maps
java type: List<Map<String, String>>
The natural representation of list of maps is shown below.

[
  { "firstName": "Thomas", "lastName": "Brown",  "age": "30" },
  { "firstName": "Perry",  "lastName": "Wilson", "age": "26" },
  { "firstName": "Ashley", "lastName": "William", "age": "27" }
]
3. Table into Single Map
Table where first colum is key as shown below

| IN  | India          |
| IRE | Ireland        |
java type: Map<String, String>

TO convert the table into a single map

{
  "IN": "India",
  "IRE": "Ireland"
}
4. Table into map that uses a list as its value
 A table with multiple column values per key.

 | IN  | India          | 29  |
 | IRE | Ireland        | 8   |

java type: Map<String, List<String>>

{
  "IN":  ["India","29"],
  "IRE": ["Ireland","8"]
}
Now, let us see how we can use DataTable in Cucumber
Cucumber Data Tables Example in Java
Data Table without Header Example
Below is an example of how to implement Data Tables without a Header. For example, we want to test the Login Page of an application. We can either mention all the arguments inside the Gherkin statement or use a table to list all the arguments, as we used below:
Feature: Login to HRM Application

  @ValidCredentials
  Scenario: Login with valid credentials - Data Table without Header

    Given User is on HRMLogin page
    When User enters valid credentials
      | Admin | admin123 |
    Then User should be able to login successfully and new page open
Below is the Step Definition of the above scenario.
import io.cucumber.datatable.DataTable;
import io.cucumber.java.After;
import io.cucumber.java.Before;
import io.cucumber.java.en.Given;
import io.cucumber.java.en.Then;
import io.cucumber.java.en.When;
import org.junit.Assert;
import org.openqa.selenium.By;
import org.openqa.selenium.WebDriver;
import org.openqa.selenium.chrome.ChromeDriver;
import java.util.List;
import java.util.Map;
import java.util.concurrent.TimeUnit;
import static org.hamcrest.CoreMatchers.containsString;
import static org.hamcrest.MatcherAssert.assertThat;
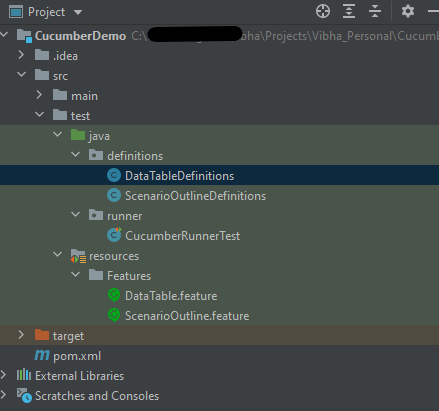
public class DataTableDefinitions {
WebDriver driver;
@Before
public void setup() {
ChromeOptions options = new ChromeOptions();
options.addArguments("--start-maximized");
driver = new ChromeDriver(options);
driver.manage().timeouts().implicitlyWait(Duration.ofSeconds(5));
}
@Given("User is on HRMLogin page")
public void userOnHomePage() {
driver.get("https://opensource-demo.orangehrmlive.com/");
}
@When("User enters valid credentials")
public void entersValidCredential(DataTable dataTable) throws InterruptedException{
System.out.println("Credentials Entered");
List<List<String>> signUpForm = dataTable.asLists(String.class);
String userName = signUpForm.get(0).get(0);
String passWord = signUpForm.get(0).get(1);
driver.findElement(By.name("username")).sendKeys(userName);
driver.findElement(By.name("password")).sendKeys(passWord);
driver.findElement(By.xpath("//*[@class='oxd-form']/div[3]/button")).submit();
}
@Then("User should be able to login successfully and new page open")
public void successfulLogin() throws InterruptedException {
String newPageText = driver.findElement(By.xpath("//*[@class='oxd-topbar-header-breadcrumb']/h6")).getText();
System.out.println("newPageText :" + newPageText);
assertThat(newPageText, containsString("Dashboard"));
}
@After
public void teardown(){
driver.quit();
}
}
To run the Feature file, we need a Cucumber TestRunner.
import io.cucumber.junit.Cucumber;
import io.cucumber.junit.CucumberOptions;
import org.junit.runner.RunWith;

@RunWith(Cucumber.class)
@CucumberOptions(monochrome = true, plugin = "pretty", features = "src/test/resources/Features/DataTable.feature",
        glue = "definitions", tags="@ValidCredentials")

public class CucumberRunnerTest {
}
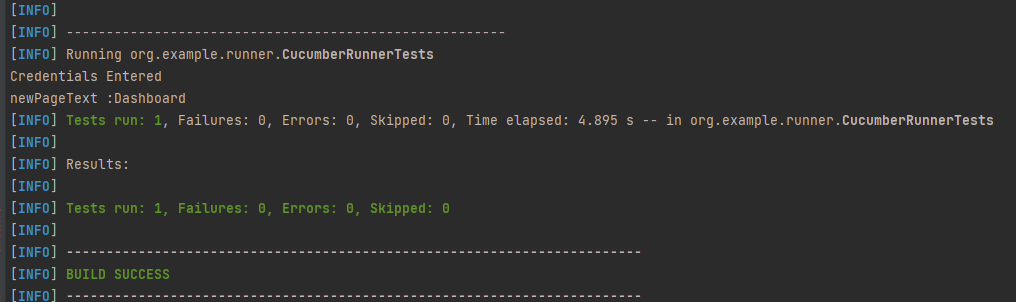
The output of the above program is
In the above example, we don’t have a header. We have just got the List object. We get the values of DataTable starting from 0 index.
Cucumber converts the above table into a list of lists. It treats each row as a list of the column values. We use the asLists method — supplying a String.class argument — to convert the DataTable argument to a List<List<String>>. This Class argument informs the asLists method of what data type we expect each element to be.
Data Table with Header and Single Row Example
Below is a cucumber data tables example with the header.
Adding a header to your table makes it easier to read and maintain.
  @InValidCredential
  Scenario: Login with invalid credential - Header with Single Row

    Given User is on HRMLogin page
    Then User enters invalid credentials and Login will be unsuccessful with error message
      | Username  | Password   | ErrorMessage        |
      | Admin1    | admin123!$ | Invalid credentials |
Below is the Step Definition of the above scenario.
package org.example.definitions;

import io.cucumber.datatable.DataTable;
import io.cucumber.java.After;
import io.cucumber.java.Before;
import io.cucumber.java.en.Given;
import io.cucumber.java.en.Then;
import io.cucumber.java.en.When;
import org.junit.Assert;
import org.openqa.selenium.By;
import org.openqa.selenium.WebDriver;
import org.openqa.selenium.chrome.ChromeDriver;
import org.openqa.selenium.chrome.ChromeOptions;

import java.time.Duration;
import java.util.List;
import java.util.Map;

public class DataTableDefinitions {

    WebDriver driver;

    @Before
    public void setup() {

        ChromeOptions options = new ChromeOptions();
        options.addArguments("--start-maximized");
        driver = new ChromeDriver(options);
        driver.manage().timeouts().implicitlyWait(Duration.ofSeconds(5));

    }

    @Given("User is on HRMLogin page")
    public void userOnHomePage() {

        driver.get("https://opensource-demo.orangehrmlive.com/");
    }

    @Then("User enters invalid credentials and Login will be unsuccessful with error message")
    public void entersInvalidCredential(DataTable userTable) throws InterruptedException {

        System.out.println("Enter Credentials");
        List<Map<String, String>> user = userTable.asMaps(String.class, String.class);

        String userName = user.get(0).get("Username");
        System.out.println("Username :" + userName);
        driver.findElement(By.name("username")).sendKeys(userName);

        String passWord = user.get(0).get("Password");
        System.out.println("Password :" + passWord);
        driver.findElement(By.name("password")).sendKeys(passWord);

        driver.findElement(By.xpath("//*[@class='oxd-form']/div[3]/button")).submit();

        String errorMessage = user.get(0).get("ErrorMessage");
        String actualErrorMessage = driver.findElement(By.xpath("//*[@class='orangehrm-login-error']/div[1]/div[1]/p")).getText();
        System.out.println("Actual Error Message :" + actualErrorMessage);
        Assert.assertTrue(actualErrorMessage.equalsIgnoreCase(errorMessage));

    }

    @After
    public void teardown(){
        driver.quit();
    }

}
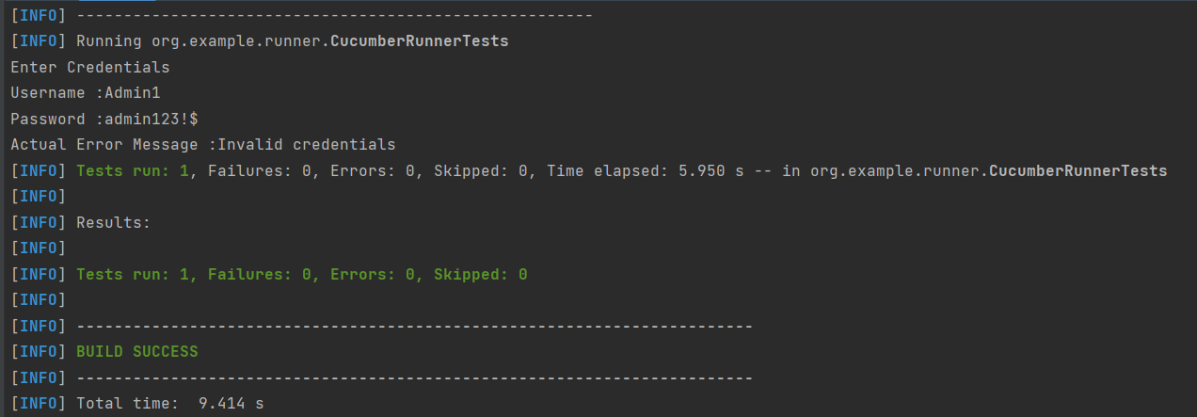
The output of the above program is
In the above example, we have only 1 row with the header, so have used get(0) to retrieve the first row of DataTable. After that, I used get(“HeaderName”) to get the value of the row of DataTable.
Data Table with Header and Multiple Rows Example
Below is a cucumber data table example with multiple rows of data with the header. This is helpful when we want to test multiple combinations of data in a step.
  @Multiple_InValidCredentials
  Scenario: Login with invalid credentials - Data Table with Header and Multiple Rows

    Given User is on HRMLogin page
    Then User enters invalid credentials and Login will be unsuccessful with custom error messages
      | Username    | Password  | ErrorMessage         |
      | Admin1      | admin123! | Invalid credentials  |
      | Admina      | admin123a | Invalid credentials  |
Below is the Step Definition of the above scenario
import io.cucumber.datatable.DataTable;
import io.cucumber.java.After;
import io.cucumber.java.Before;
import io.cucumber.java.en.Given;
import io.cucumber.java.en.Then;
import io.cucumber.java.en.When;
import org.junit.Assert;
import org.openqa.selenium.By;
import org.openqa.selenium.WebDriver;
import org.openqa.selenium.chrome.ChromeDriver;
import java.util.List;
import java.util.Map;
import java.util.concurrent.TimeUnit;
import static org.hamcrest.CoreMatchers.containsString;
import static org.hamcrest.MatcherAssert.assertThat;

public class DataTableDefinitions {

    WebDriver driver;

     @Before
    public void setup() {

        ChromeOptions options = new ChromeOptions();
        options.addArguments("--start-maximized");
        driver = new ChromeDriver(options);
        driver.manage().timeouts().implicitlyWait(Duration.ofSeconds(5));

    }

    @Given("User is on HRMLogin page")
    public void userOnHomePage() {

        driver.get("https://opensource-demo.orangehrmlive.com/");
    }

     @Then("User enters invalid credentials and Login will be unsuccessful with custom error messages")
    public void entersInvalidCredentials(DataTable userTable) throws InterruptedException {

        System.out.println("Enter Credentials");

        List<Map<String, String>> user = userTable.asMaps(String.class, String.class);
        for (Map<String, String> form : user) {

            String userName = form.get("Username");
            System.out.println("Username :" + userName);
            driver.findElement(By.name("username")).sendKeys(userName);

            String passWord = form.get("Password");
            System.out.println("Password :" + passWord);
            driver.findElement(By.name("password")).sendKeys(passWord);

            driver.findElement(By.xpath("//*[@class='oxd-form']/div[3]/button")).submit();

            String errorMessage = form.get("ErrorMessage");
            String actualErrorMessage = driver.findElement(By.xpath("//*[@class='orangehrm-login-error']/div[1]/div[1]/p")).getText();
            System.out.println("Actual Error Message :" + actualErrorMessage);

            Assert.assertTrue(actualErrorMessage.equalsIgnoreCase(errorMessage));

        }
    }

    @After
    public void teardown(){
        driver.quit();
    }

}
The output of the above program is
Cucumber creates a list containing each row, but instead maps the column heading to each column value. Cucumber repeats this process for each subsequent row. We use the asMaps method — supplying two String.class arguments — to convert the DataTable argument to a List<Map<String, String>>.
The first argument denotes the data type of the key (header). The second indicates the data type of each column value. Thus, we supply two String.class arguments because our headers (key) and title and author (values) are all Strings.
Congratulations on making it through this tutorial and hope you found it useful! Happy Learning!! Cheers!!
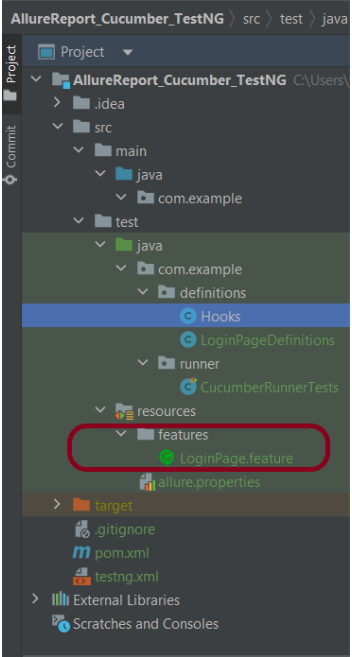
The below example covers the implementation of Allure Reports with Cucumber, Selenium, TestNG, Java, and Maven. Before starting, make sure to install Allure on your machine. Refer to this tutorial to install allure – What is Allure Report?.
Create a folder – features within src/test/resources to create test scenarios in the Feature file.
Feature file should be saved as an extension of .feature. Add the test scenarios in this feature file. I have added sample test scenarios. In this feature file. The test scenarios are written in Gherkinslanguage.
Feature: Login to HRM Application

  Background:
    Given User is on HRMLogin page "https://opensource-demo.orangehrmlive.com/"

  @ValidCredentials
  Scenario: Login with valid credentials

    When User enters username as "Admin" and password as "admin123"
    Then User should be able to login successfully and new page open

  @InvalidCredentials
  Scenario Outline: Login with invalid credentials

    When User enters username as "<username>" and password as "<password>"
    Then User should be able to see error message "<errorMessage>"

    Examples:
      | username   | password  | errorMessage                      |
      | Admin      | admin12$$ | Invalid credentials               |
      | admin$$    | admin123  | Invalid credentials               |
      | abc123     | xyz$$     | Invalid credentials               |
      | 234        | xyz$$     | Invalid credentials!              |
Step 5 – Create the Step Definition class or Glue Code
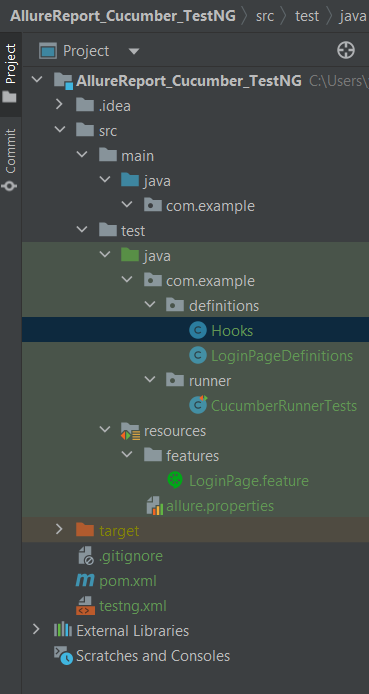
The stepdefinition class is created in src/test/java directory.
Below is the code for the Hooks.
package com.example.definitions;

import io.cucumber.java.After;
import io.cucumber.java.Before;
import io.cucumber.java.Scenario;
import org.openqa.selenium.OutputType;
import org.openqa.selenium.TakesScreenshot;
import org.openqa.selenium.WebDriver;
import org.openqa.selenium.chrome.ChromeDriver;
import org.openqa.selenium.chrome.ChromeOptions;

import java.time.Duration;

public class Hooks {
    protected static WebDriver driver;
    public final static int TIMEOUT = 5;

    @Before
    public void setUp() {

        ChromeOptions options = new ChromeOptions();
        options.addArguments("--start-maximized");
        driver = new ChromeDriver(options);
        driver.manage().timeouts().implicitlyWait(Duration.ofSeconds(TIMEOUT));

    }

    @After
    public void tearDown(Scenario scenario) {
        try {
            String screenshotName = scenario.getName();
            if (scenario.isFailed()) {
                TakesScreenshot ts = (TakesScreenshot) driver;
                byte[] screenshot = ts.getScreenshotAs(OutputType.BYTES);
                scenario.attach(screenshot, "img/png", screenshotName);
            }
        } catch (Exception e) {
            e.printStackTrace();
        }
        driver.quit();
    }

}
LoginPageDefinition
package com.example.definitions;


import io.cucumber.java.en.Given;
import io.cucumber.java.en.Then;
import io.cucumber.java.en.When;

import org.openqa.selenium.By;
import org.testng.Assert;

public class LoginPageDefinitions {

   Hooks hooks;


    @Given("User is on HRMLogin page {string}")
    public void loginTest(String url) {

        hooks.driver.get(url);

    }

    @When("User enters username as {string} and password as {string}")
    public void goToHomePage(String userName, String passWord) {

        // login to application
        hooks.driver.findElement(By.name("username")).sendKeys(userName);
        hooks.driver.findElement(By.name("password")).sendKeys(passWord);
        hooks.driver.findElement(By.xpath("//*[@class='oxd-form']/div[3]/button")).submit();

        // go the next page
    }

    @Then("User should be able to login successfully and new page open")
    public void verifyLogin() {

        String homePageHeading = hooks.driver.findElement(By.xpath("//*[@class='oxd-topbar-header-breadcrumb']/h6")).getText();

        //Verify new page - HomePage
        Assert.assertEquals(homePageHeading,"Dashboard");

    }

    @Then("User should be able to see error message {string}")
    public void verifyErrorMessage(String expectedErrorMessage) {

        String actualErrorMessage = hooks.driver.findElement(By.xpath("//*[@class='orangehrm-login-error']/div[1]/div[1]/p")).getText();

        // Verify Error Message
        Assert.assertEquals(actualErrorMessage, expectedErrorMessage);

    }

}
Step 6 – Create a TestNG Cucumber Runner class
We need to create a class called Runner class to run the tests. This class will use the TestNG annotation @Test, which tells TestNG what is the test runner class.
package com.example.runner;

import org.testng.annotations.Test;
import io.cucumber.testng.AbstractTestNGCucumberTests;
import io.cucumber.testng.CucumberOptions;


@Test
@CucumberOptions(tags = "", features = {"src/test/resources/features"}, glue = {"com.example.definitions"},
        plugin = {"pretty","io.qameta.allure.cucumber7jvm.AllureCucumber7Jvm"})

public class CucumberRunnerTests extends AbstractTestNGCucumberTests{

}
Note:- @Test annotation marks this class as part of the test. So, if we will remove this annotation, the Allure Report executesCucumberRunnerTests as a separate test suite, so there will be duplicate results.
Step 7 – Create testng.xml for the project
<?xml version = "1.0"encoding = "UTF-8"?>
<!DOCTYPE suite SYSTEM "http://testng.org/testng-1.0.dtd">
<suite name = "Suite1">
    <test name = "Test Demo">
        <classes>
            <class name = "com.example.runner.CucumberRunnerTests"/>
        </classes>
    </test>
</suite>
Step 8 – Run the Test and Generate Allure Report
To run the tests, use the below command
mvn clean test
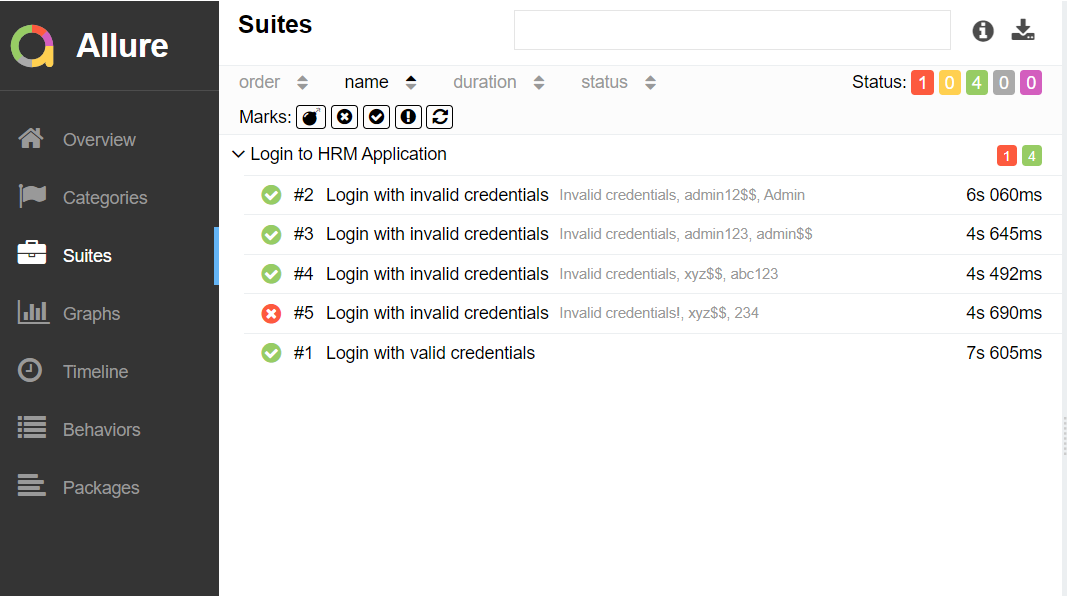
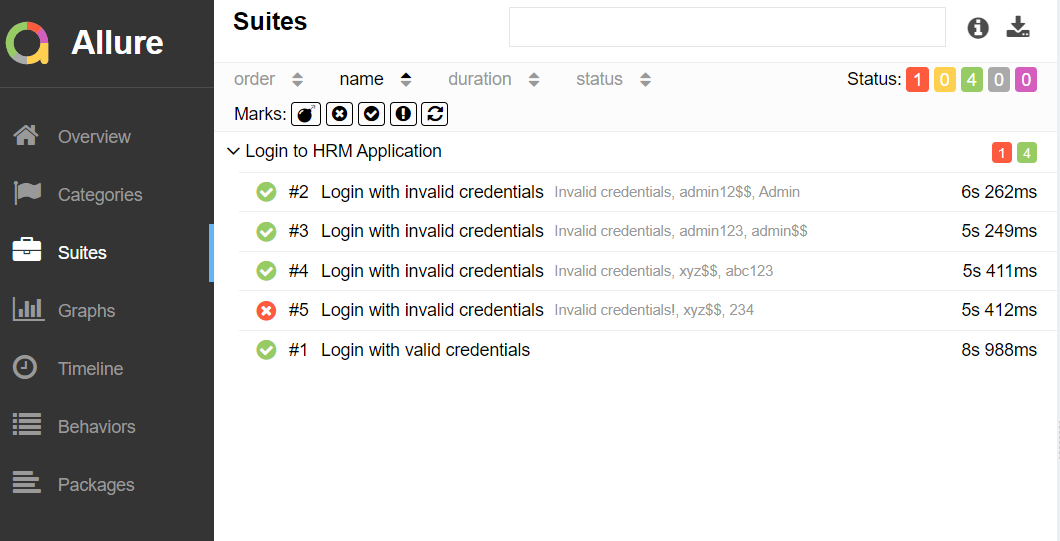
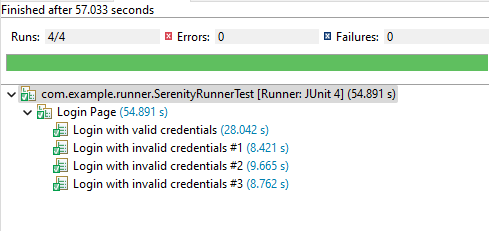
In the below image, we can see that one test failed and four passed out of five tests.
This will create the allure-results folder with all the test reports within target folder. These files will be used to generate Allure Report.
Use the below command to generate the Allure Report
allure serve
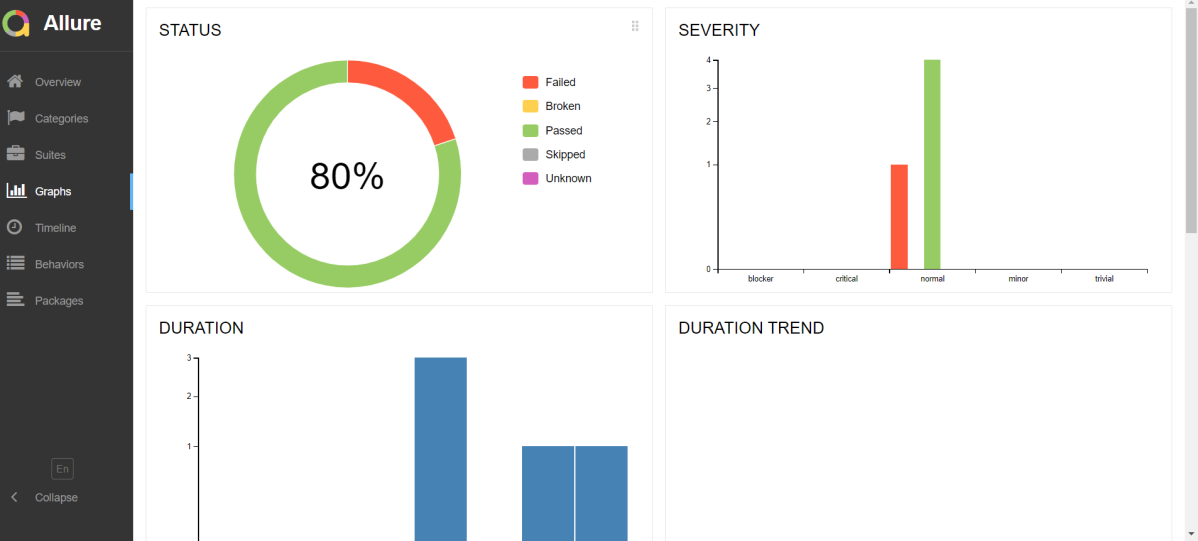
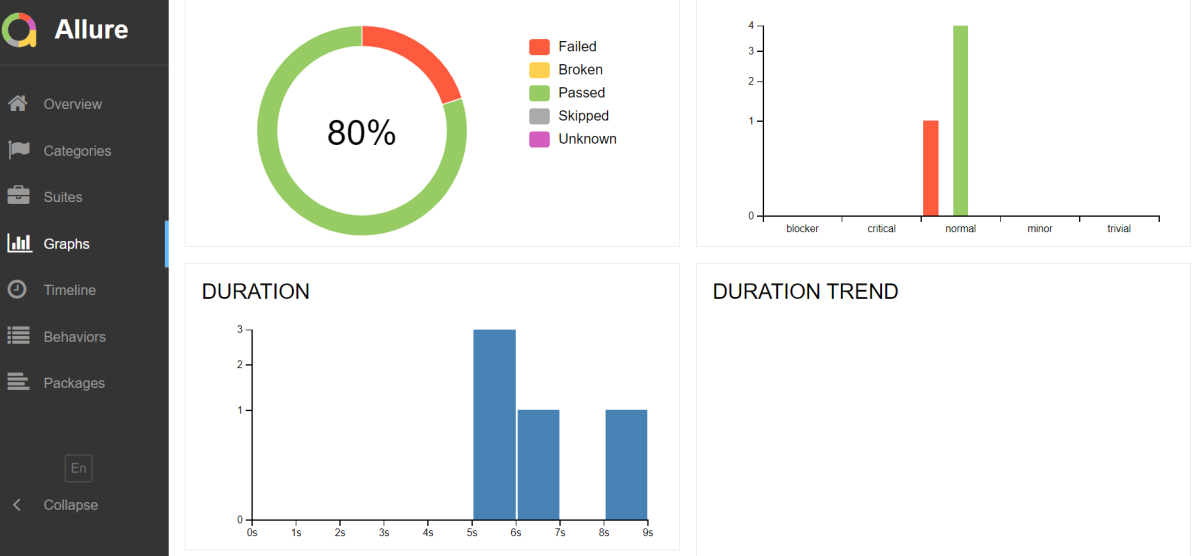
This will generate the beautiful Allure Test Report as shown below.
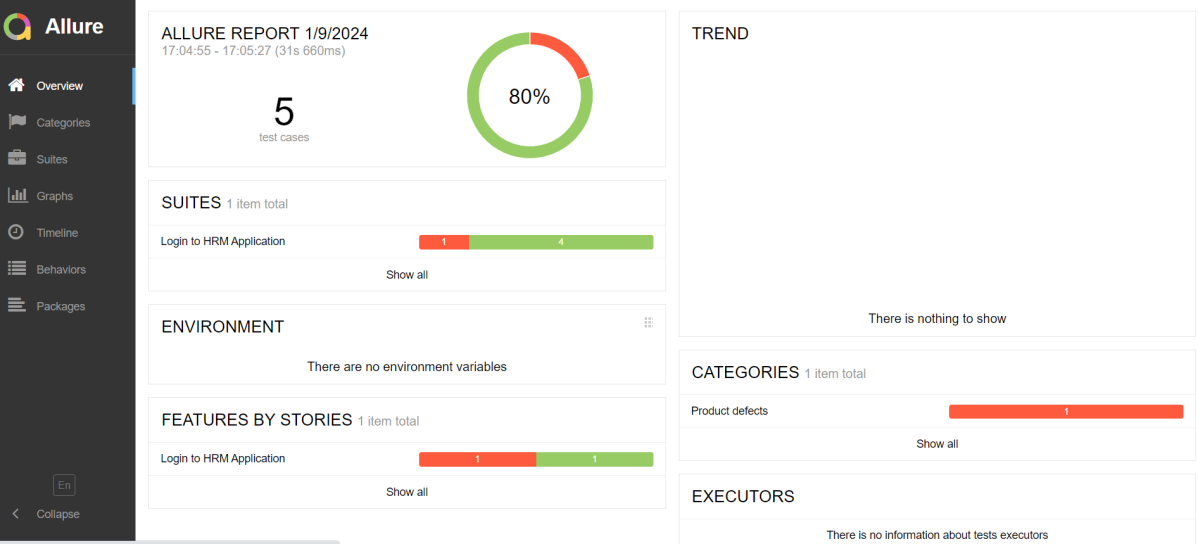
Allure Report Dashboard
Categories in Allure Report
The categories tab gives you a way to create custom defect classifications to apply for test results. There are two categories of defects – Product Defects (failed tests) and Test Defects (broken tests).
Suites in Allure Report
On the Suites tab a standard structural representation of executed tests, grouped by suites and classes can be found. Here, we have 2 suits – Feature and Surefire test. Surefire tests are executed from CucumberRunnerTests.
Graphs in Allure Report
Graphs allow you to see different statistics collected from the test data: status breakdown or severity and duration diagrams.
Timeline in Allure Report
The timeline tab visualizes retrospective test execution, allure adaptors collect precise timings of tests, and here on this tab, they are arranged accordingly to their sequential or parallel timing structure.
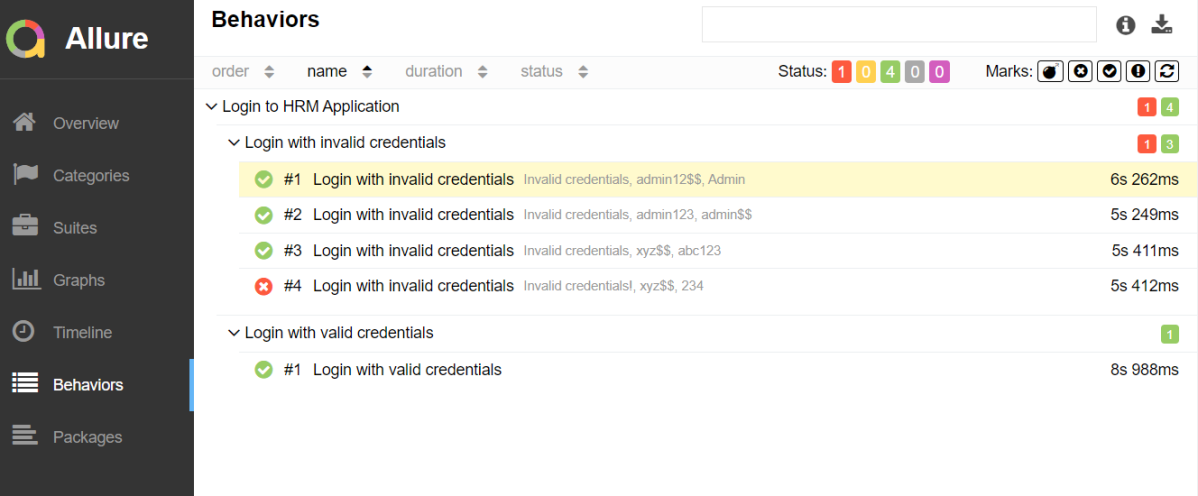
Behaviours of Allure Report
This tab groups test results according to Epic, Feature, and Story tags.
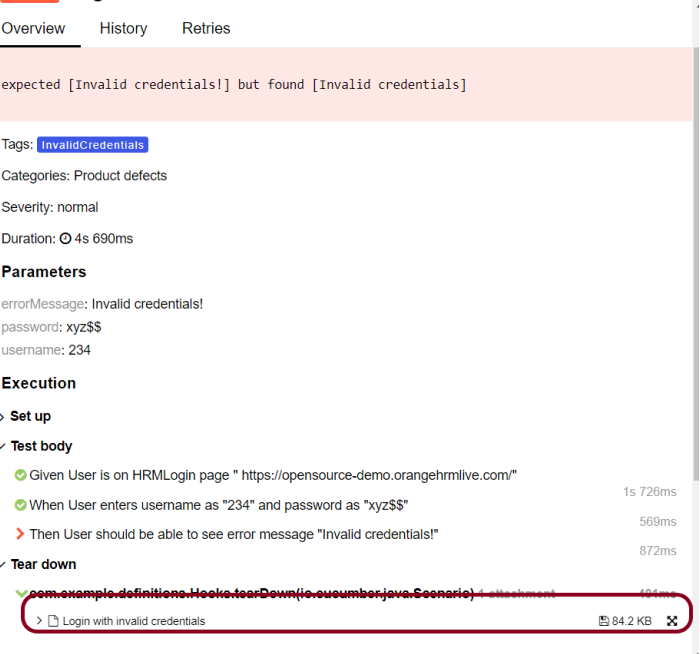
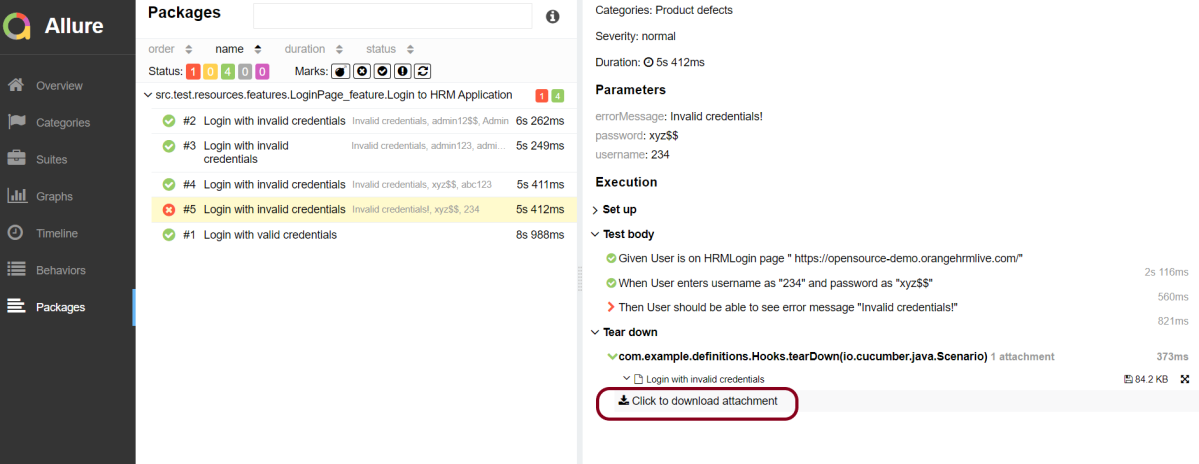
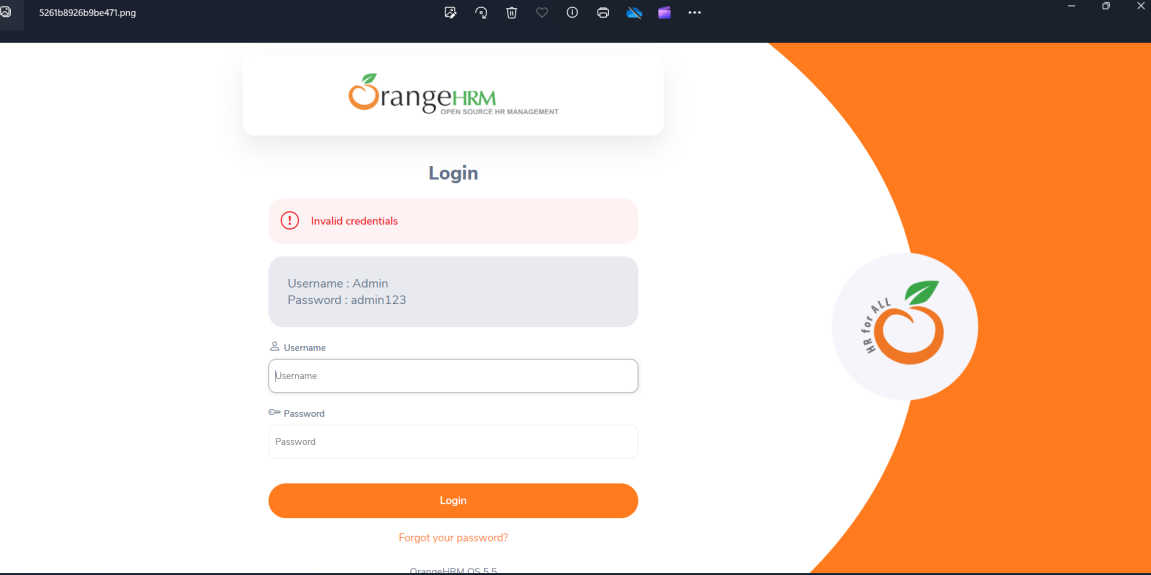
Screenshot attached to the failed test case
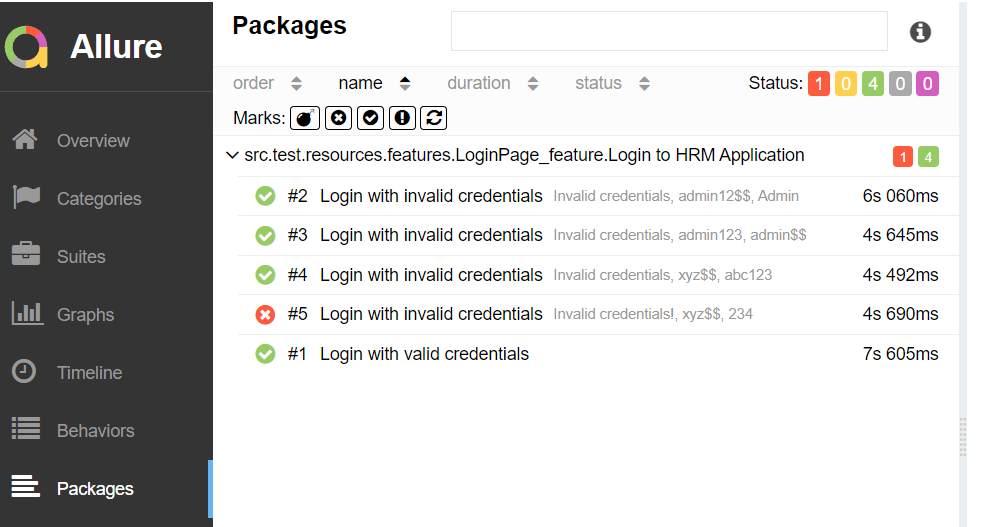
Packages in Allure Report
The packages tab represents a tree-like layout of test results, grouped by different packages.
When we don’t use @Test in CucumberRunnerTests.java, then as mentioned above the Allure report will have duplicate details.
Congratulations!! We have integrated an allure report with Cucumber, Selenium, and TestNG. I hope this tutorial is useful to you.
Step 4 – Create Feature file in src/test/resources
Create source folder – src/test/resources and features folder within src/test/resources to create test scenarios in Feature file. Feature file should be saved as an extension of .feature. Add the test scenarios in this feature file. I have added sample test scenarios. In this feature file, I have created a scenario for successful login and one Scenario Outline for failed login. The test scenarios are written in Gherkins language.
Feature: Login to HRM Application

  Background:
    Given User is on HRMLogin page "https://opensource-demo.orangehrmlive.com/"

  @ValidCredentials
  Scenario: Login with valid credentials

    When User enters username as "Admin" and password as "admin123"
    Then User should be able to login successfully and new page open

  @InvalidCredentials
  Scenario Outline: Login with invalid credentials

    When User enters username as "<username>" and password as "<password>"
    Then User should be able to see error message "<errorMessage>"

    Examples:
      | username   | password    | errorMessage                      |
      | Admin        | admin12$$ | Invalid credentials               |
      | admin$$     | admin123   | Invalid credentials               |
      | abc123       | xyz$$          | Invalid credentials               |
      | 234             | xyz$$         | Invalid credentials!              |
Step 5 – Create the Step Definition class or Glue Code
The stepdefinition class is created in src/test/java.
Below is the code for the LoginDefinition class.
package com.example.definitions;

import io.cucumber.java.en.Given;
import io.cucumber.java.en.Then;
import io.cucumber.java.en.When;
import org.junit.Assert;
import org.openqa.selenium.By;

public class LoginPageDefinitions {

   Hooks hooks;

    @Given("User is on HRMLogin page {string}")
    public void loginTest(String url) {

        hooks.driver.get(url);

    }

    @When("User enters username as {string} and password as {string}")
    public void goToHomePage(String userName, String passWord) {

        // login to application
        hooks.driver.findElement(By.name("username")).sendKeys(userName);
        hooks.driver.findElement(By.name("password")).sendKeys(passWord);
        hooks.driver.findElement(By.xpath("//*[@class='oxd-form']/div[3]/button")).submit();

        // go the next page
    }

    @Then("User should be able to login successfully and new page open")
    public void verifyLogin() {

        String homePageHeading = hooks.driver.findElement(By.xpath("//*[@class='oxd-topbar-header-breadcrumb']/h6")).getText();

        //Verify new page - HomePage
        Assert.assertEquals("Dashboard",homePageHeading);

    }

    @Then("User should be able to see error message {string}")
    public void verifyErrorMessage(String expectedErrorMessage) {

        String actualErrorMessage = hooks.driver.findElement(By.xpath("//*[@class='orangehrm-login-error']/div[1]/div[1]/p")).getText();

        // Verify Error Message
        Assert.assertEquals(expectedErrorMessage,actualErrorMessage);

    }

}
Hook.java
package com.example.definitions;

import io.cucumber.java.After;
import io.cucumber.java.Before;
import io.cucumber.java.Scenario;
import org.openqa.selenium.OutputType;
import org.openqa.selenium.TakesScreenshot;
import org.openqa.selenium.WebDriver;
import org.openqa.selenium.chrome.ChromeDriver;
import org.openqa.selenium.chrome.ChromeOptions;

import java.time.Duration;

public class Hooks {
    protected static WebDriver driver;
    public final static int TIMEOUT = 5;

    @Before
    public void setUp() {

        ChromeOptions options = new ChromeOptions();
        options.addArguments("--start-maximized");
        driver = new ChromeDriver(options);
        driver.manage().timeouts().implicitlyWait(Duration.ofSeconds(TIMEOUT));

    }

    @After
    public void tearDown(Scenario scenario) {
        try {
            String screenshotName = scenario.getName();
            if (scenario.isFailed()) {
                TakesScreenshot ts = (TakesScreenshot) driver;
                byte[] screenshot = ts.getScreenshotAs(OutputType.BYTES);
                scenario.attach(screenshot, "img/png", screenshotName);
            }
        } catch (Exception e) {
            e.printStackTrace();
        }
        driver.quit();
    }
}
Step 6 – Create a Cucumber Runner class
We need to create a class called Runner class to run the tests. This class will use the JUnit annotation @RunWith(), which tells JUnit what is the test runner class.
package com.example.runner;

import org.junit.runner.RunWith;
import io.cucumber.junit.Cucumber;
import io.cucumber.junit.CucumberOptions;

@RunWith(Cucumber.class)
@CucumberOptions(tags = "", features = {"src/test/resources/features"}, glue = {"com.example.definitions"},
        plugin = {"pretty","io.qameta.allure.cucumber7jvm.AllureCucumber7Jvm"})

public class CucumberRunnerTests  {

}
Step 7 – Create allure.properties in src/test/resources
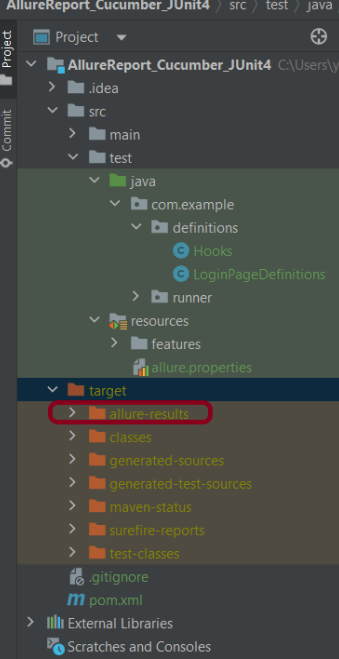
Allure, by default, saves test results in the project’s root directory. However, it is recommended to store your test results in the build output directory. To configure this, create an allure.properties file and place it in the test resources directory of your project, which is typically located at src/test/resources:
allure.results.directory=target/allure-results
Step 8 – Run the Test and Generate Allure Report
To run the tests, use the below command
mvn clean test
In the below image, we can see that one test is failed and four passed out of five tests.
This will create allure-results folder with all the test report. These files will be use to generate Allure Report.
Step 9 – Generate Allure Report
Change current directory to target directory and then use the below command to generate the Allure Report
allure serve
This will generate the beautiful Allure Test Report as shown below.
Allure Report Dashboard
It shows detail of all the test steps and the screenshot of the failed test step also as shown below.
Categories in Allure Report
Categories tab gives you the way to create custom defects classification to apply for test results. There are two categories of defects – Product Defects (failed tests) and Test Defects (broken tests).
Suites in Allure Report
On the Suites tab a standard structural representation of executed tests, grouped by suites and classes can be found.
Graphs in Allure Report
Graphs allow you to see different statistics collected from the test data: statuses breakdown or severity and duration diagrams.
Timeline in Allure Report
Timeline tab visualizes retrospective of tests execution, allure adaptors collect precise timings of tests, and here on this tab they are arranged accordingly to their sequential or parallel timing structure.
Behaviors of Allure Report
This tab groups test results according to Epic, Feature and Story tags.
Packages in Allure Report
Packages tab represents a tree-like layout of test results, grouped by different packages.
That’s it! Congratulations on making it through this tutorial and hope you found it useful! Happy Learning!!
Serenity BDD is an open-source library that aims to make the idea of living documentation a reality.
Serenity BDD helps you write cleaner and more maintainable automated acceptance and regression tests faster. Serenity also uses the test results to produce illustrated, narrative reports that document and describe what your application does and how it works. Serenity tells you not only what tests have been executed, but more importantly, what requirements have been tested.
One key advantage of using Serenity BDD is that you do not have to invest time in building and maintaining your own automation framework.
Serenity BDD provides strong support for different types of automated acceptance testing, including:
Rich built-in support for web testing with Selenium.
REST API testing with Rest Assured.
Highly readable, maintainable, and scalable automated testing with the Screenplay pattern.
Getting started Cucumber 6 with Serenity BDD
Cucumber is a popular tool for automating BDD-style acceptance criteria.
Serenity seamlessly supports Cucumber 2.x, Cucumber 5, and Cucumber 6. However, this flexibility requires a little tweaking in the build dependencies.
If you are using Maven, you need to do the following:
exclude the default cucumber-core dependency from your serenity-core dependency
Add dependencies on the Cucumber 6.x version of cucumber-java and cucumber-junit into your project.
Prerequisite:
Serenity – 4.0.30
JUnit4 – 4.13.2
Serenity Cucumber – 4.0.30
Maven Compiler – 3.12.1
Maven Surefire Plugin – 3.2.3
Java – 17
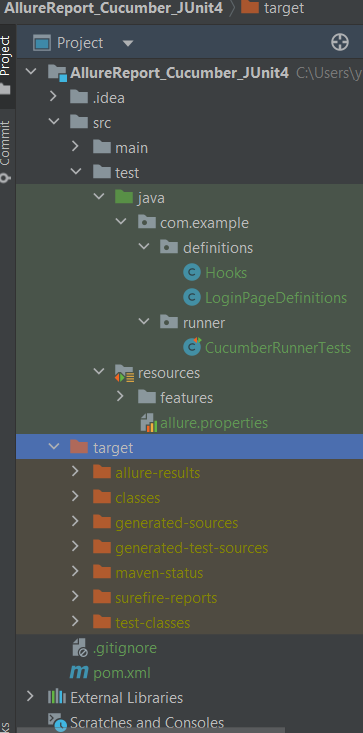
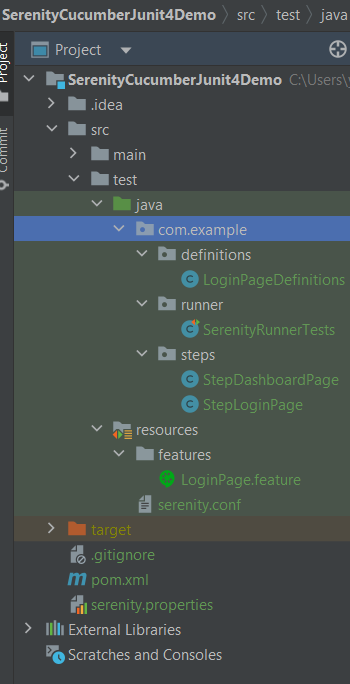
Project Structure
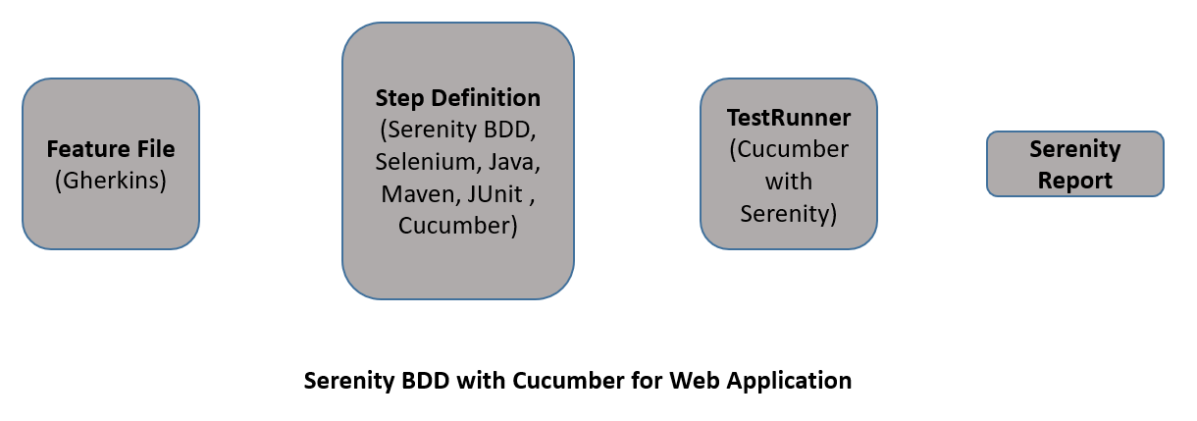
Relationship between Web Application, Serenity BDD, Cucumber, and Selenium
Implementation Steps
Step 1: Add Serenity, Cucumber, and JUnit4 dependencies to the Maven project
The pom.xml will look like something as shown below.
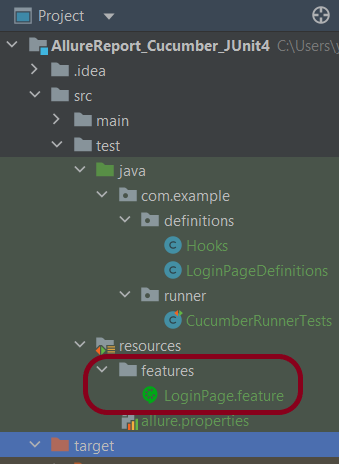
Step 2: Create a Feature File under src/test/resources
A Feature File is an entry point to the Cucumber tests. This is a file where you will describe your tests in Descriptive language (Like English). A feature file can contain a scenario or can contain many scenarios in a single feature file. Below is an example of a Feature file.
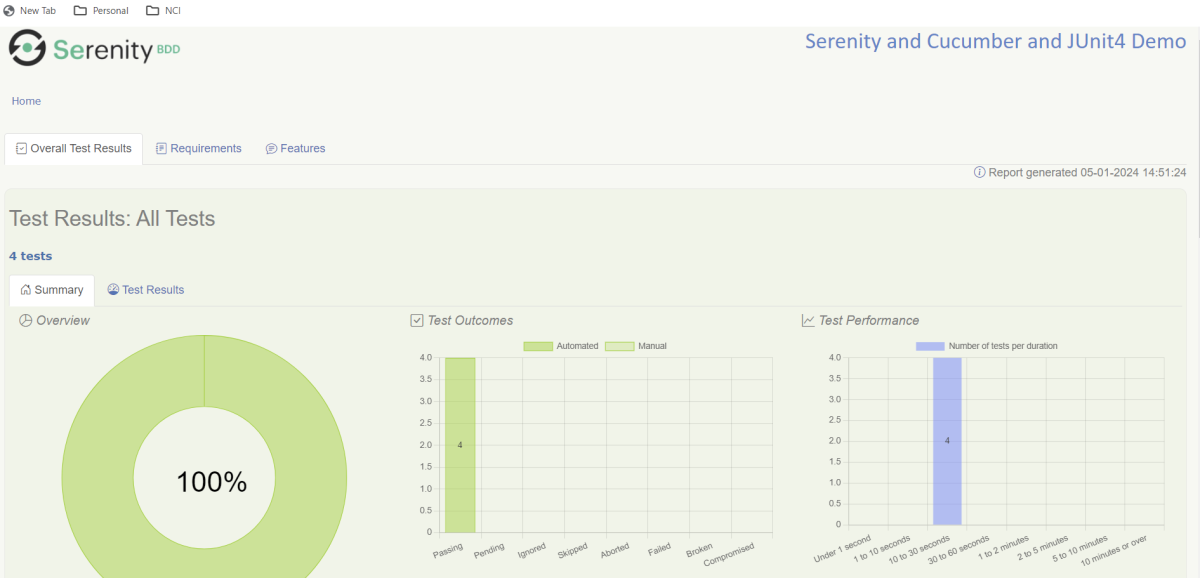
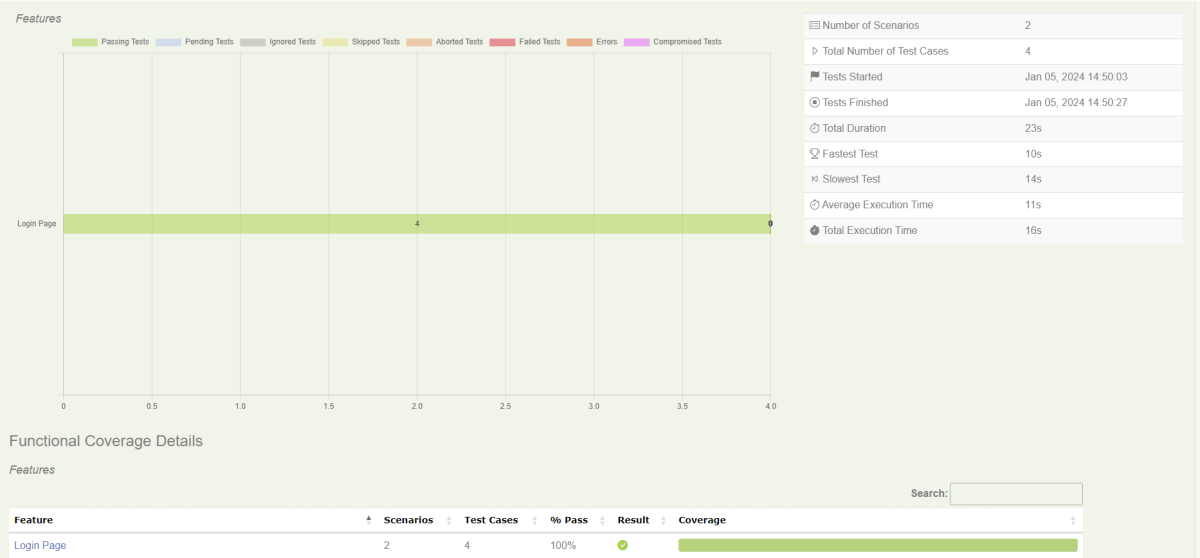
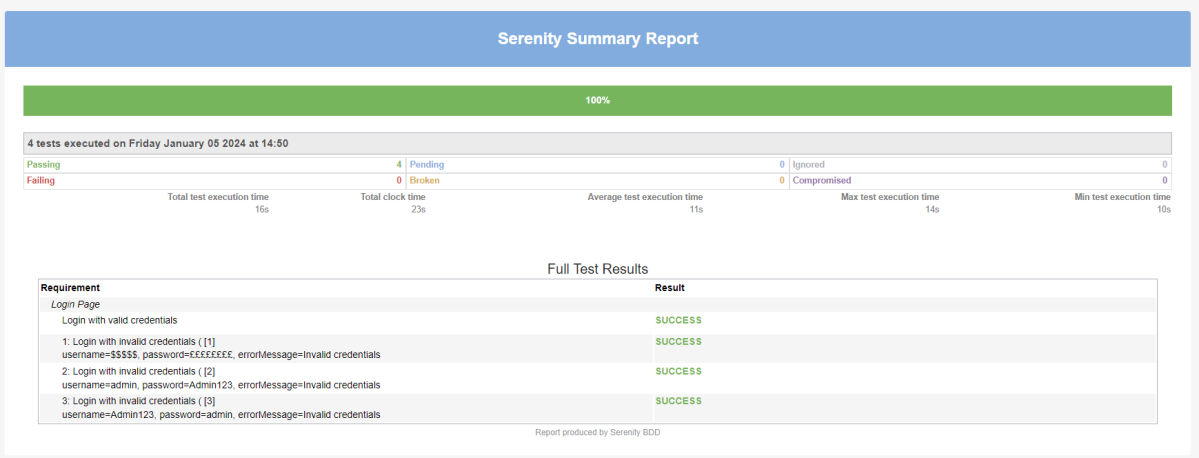
Feature: Login Page

@ValidCredentials
   Scenario: Login with valid credentials

    Given User is on Home page
    When User enters username as "Admin"
    And User enters password as "admin123"
    Then User should be able to login successfully

@InValidCredentials
   Scenario Outline: Login with invalid credentials

    Given User is on Home page
    When User enters username as '<username>'
    And User enters password as '<password>'
    Then User should be able to see error message '<errorMessage>'

  Examples:
   | username   | password  | errorMessage                      |
   | $$$$$      | ££££££££  | Invalid credentials               |
   | admin      | Admin123  | Invalid credentials               |
   | Admin123   | admin     | Invalid credentials               |
Step 3: Create the Step Definition class
The glue code shown below uses Serenity step libraries as action classes to make the tests easier to read and to improve maintainability.
These classes declare using the Serenity @Steps annotation. The @Steps annotation tells Serenity to create a new instance of the class, and inject any other steps or page objects that this instance might need.
Each action class models a particular facet of user behavior: navigating to a particular page, performing a search, or retrieving the results of a search. These classes design to be small and self-contained, which makes them more stable and easier to maintain.
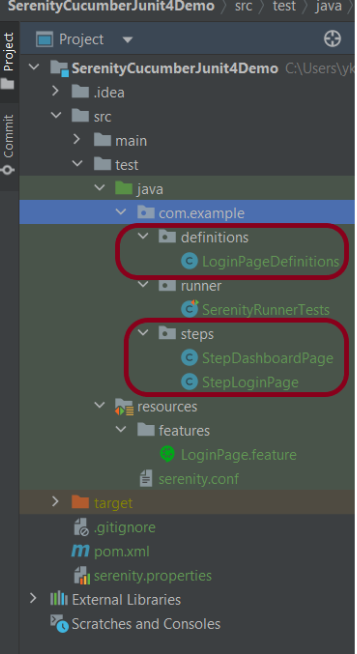
LoginPageDefinitioncontains the steps to open the web browser, enter the username, enter the password and click on the Login Button
package com.example.definitions;

import com.example.steps.StepDashboardPage;
import com.example.steps.StepLoginPage;
import io.cucumber.java.en.Given;
import io.cucumber.java.en.Then;
import io.cucumber.java.en.When;
import net.serenitybdd.annotations.Steps;
import org.junit.Assert;

public class LoginPageDefinitions {

    @Steps
    StepLoginPage loginPage;

    @Steps
    StepDashboardPage dashPage;

    @Given("User is on Home page")
    public void openApplication() {
        loginPage.open();
        System.out.println("Page is opened");
    }

    @When("User enters username as {string}")
    public void enterUsername(String userName) {
        System.out.println("Enter Username");
        loginPage.inputUserName(userName);
    }

    @When("User enters password as {string}")
    public void enterPassword(String passWord) {
        loginPage.inputPassword(passWord);

        loginPage.clickLogin();
    }

    @Then("User should be able to login successfully")
    public void clickOnLoginButton() {
        dashPage.loginVerify();
    }

    @Then("User should be able to see error message {string}")
    public void unsucessfulLogin(String expectedErrorMessage) throws InterruptedException {

        String actualErrorMessage = loginPage.errorMessage();
        Assert.assertEquals(expectedErrorMessage, actualErrorMessage);
    }

}
This annotation lets you define a URL or a set of URLs that work with a particular page.
StepLoginPage is created by extending it from PageObject class. In this class, $() method used below, which locates a web element using a By locator or an XPath or CSS expression. This class is responsible for uniquely locating elements on the page, and it does this by defining locators or occasionally by resolving web elements dynamically.
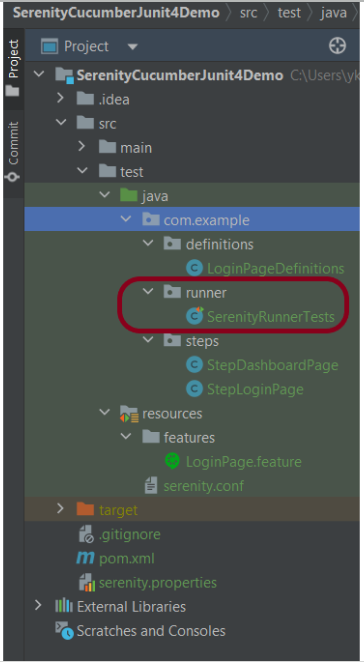
Step 4: Create Serenity Test Runner under src/test/java
We cannot run a Feature file on its own in a cucumber-based framework. We need to create a Java class, which will run the Feature File. It is the starting point for JUnit to start executing the tests. TestRunner class creates under src/test/java. When you run the tests with serenity, you use the CucumberWithSerenity test runner. If the feature files are not in the same package as the test runner class, you also need to use the @CucumberOptions class to provide the root directory where the feature files found.
Below is the code for SerenityRunnerTests.
import io.cucumber.junit.CucumberOptions;
import net.serenitybdd.cucumber.CucumberWithSerenity;
import org.junit.runner.RunWith;

@RunWith(CucumberWithSerenity.class)
@CucumberOptions(plugin = { "pretty" }, features = "src/test/resources/features/LoginPage.feature",
        glue="com.example.definitions")

public class SerenityRunnerTests {}
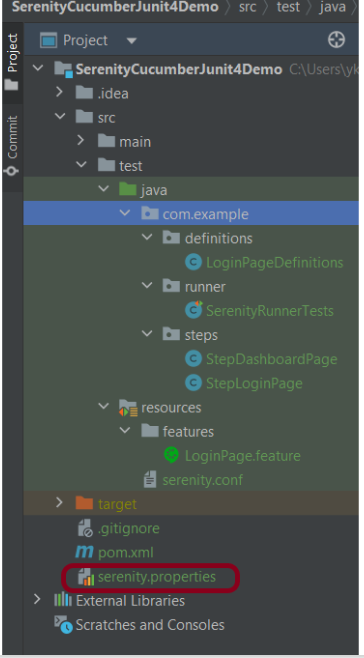
Step 5: Create serenity.conf (Configuration File)
Serenity uses serenity.conf file in thesrc/test/resources directory to configure test execution options. serenity.config can also contain the environment URL and other options like headless mode and soon.
In the previous tutorial, we have discussed about How to install Maven on Windows. In this tutorial, we will see How To Create Selenium Maven Project in Eclipse IDE.
Prerequisite:
Maven Installed on machine
Java installed on machine
Integrated Development Environment (IDE) like IntelliJ IDEA or Eclipse is installed
Steps to follow:
Step 1 – To create a new project – Click on the New and then select – Project option.
Step 2 – Select the Maven Projectand click on the “Next” button.
Step 3 – You can select the default workplace or mention the location where you want to save the project.
Click the “Next“ button.
Step 4 – Select maven-archetype-quickstart option as shown below and click on the “Next” button.
Step 5 – Provide the Group Id, Artifact Id details and click the “Finish” button.
Group Id : com.example
Artifact Id : SeleniumMaven_Demo
Step 6 – The structure of the project looks as shown in the below image.
Step 7 – POM file will look like below image
<?xml version="1.0" encoding="UTF-8"?>

<project xmlns="http://maven.apache.org/POM/4.0.0" xmlns:xsi="http://www.w3.org/2001/XMLSchema-instance"
  xsi:schemaLocation="http://maven.apache.org/POM/4.0.0 http://maven.apache.org/xsd/maven-4.0.0.xsd">
  <modelVersion>4.0.0</modelVersion>

  <groupId>com.example</groupId>
  <artifactId>SeleniumMaven_Demo</artifactId>
  <version>0.0.1-SNAPSHOT</version>

  <name>SeleniumMaven_Demo</name>
  <!-- FIXME change it to the project's website -->
  <url>http://www.example.com</url>

  <properties>
    <project.build.sourceEncoding>UTF-8</project.build.sourceEncoding>
    <maven.compiler.source>1.7</maven.compiler.source>
    <maven.compiler.target>1.7</maven.compiler.target>
  </properties>

  <dependencies>
    <dependency>
      <groupId>junit</groupId>
      <artifactId>junit</artifactId>
      <version>4.11</version>
      <scope>test</scope>
    </dependency>
  </dependencies>

  <build>
    <pluginManagement><!-- lock down plugins versions to avoid using Maven defaults (may be moved to parent pom) -->
      <plugins>
        <!-- clean lifecycle, see https://maven.apache.org/ref/current/maven-core/lifecycles.html#clean_Lifecycle -->
        <plugin>
          <artifactId>maven-clean-plugin</artifactId>
          <version>3.1.0</version>
        </plugin>
        <!-- default lifecycle, jar packaging: see https://maven.apache.org/ref/current/maven-core/default-bindings.html#Plugin_bindings_for_jar_packaging -->
        <plugin>
          <artifactId>maven-resources-plugin</artifactId>
          <version>3.0.2</version>
        </plugin>
        <plugin>
          <artifactId>maven-compiler-plugin</artifactId>
          <version>3.8.0</version>
        </plugin>
        <plugin>
          <artifactId>maven-surefire-plugin</artifactId>
          <version>2.22.1</version>
        </plugin>
        <plugin>
          <artifactId>maven-jar-plugin</artifactId>
          <version>3.0.2</version>
        </plugin>
        <plugin>
          <artifactId>maven-install-plugin</artifactId>
          <version>2.5.2</version>
        </plugin>
        <plugin>
          <artifactId>maven-deploy-plugin</artifactId>
          <version>2.8.2</version>
        </plugin>
        <!-- site lifecycle, see https://maven.apache.org/ref/current/maven-core/lifecycles.html#site_Lifecycle -->
        <plugin>
          <artifactId>maven-site-plugin</artifactId>
          <version>3.7.1</version>
        </plugin>
        <plugin>
          <artifactId>maven-project-info-reports-plugin</artifactId>
          <version>3.0.0</version>
        </plugin>
      </plugins>
    </pluginManagement>
  </build>
</project>
Navigation Commands in Selenium WebDriver are used to open a web page URL, and navigate to other web pages by clicking any element, Back, Forward, or Refresh the web page using the browser’s history. In this blog, we will discuss the below-mentioned commands.
1) Navigate 2) Forward 3) Back 4) Refresh
1) Navigate
This command loads a new web page in the current window as mentioned in the argument. This command accepts a string parameter and returns nothing.
This command performs the same action as the get() command.
Syntax:
to(String arg0):void
Command:
driver.navigate().to(URL);
2) Forward
This command acts as the same as clicking on the Forward button of any web browser. This command does not require any parameter, and void means return nothing.
Syntax:
forward(): void
Command:
driver.navigate().forward();
3) Back
This command acts the same as clicking on the Back button of any web browser. This command does not require any parameter, and void means return nothing.
Syntax:
back(): void
Command:
driver.navigate().back();
4) Refresh
This command refreshes the current page. This command does not require any parameter, and void means return nothing.
Syntax:
refresh(): void
Command:
driver.navigate().refresh();
How to use Navigation Commands in Selenium WebDriver:
I’m using Selenium 4.15.0 for this example.
Create an instance of ChromeDriver() to handle Navigation commands.
import java.time.Duration;
import org.openqa.selenium.By;
import org.openqa.selenium.WebDriver;
import org.openqa.selenium.chrome.ChromeDriver;
import org.openqa.selenium.chrome.ChromeOptions;

public class navigationCommandsDemo {

	public static void main(String[] args) throws InterruptedException {

		ChromeOptions options = new ChromeOptions();
		options.addArguments("--start-maximized");
		options.setImplicitWaitTimeout(Duration.ofSeconds(10));

		WebDriver driver = new ChromeDriver(options);
        driver.navigate().to("https://selenium.dev");

        //Get the Title of web page
        String PageTitle= driver.getTitle();
        System.out.println("Title of Page 1 is : " + PageTitle);

        Thread.sleep(2000);
        System.out.println("Navigate to New Page 2");
        driver.findElement(By.xpath("//*[@id='main_navbar']/ul/li[4]/a/span")).click();

        Thread.sleep(2000);
        System.out.println("Navigate back to Old Page 1");
        driver.navigate().back();

        Thread.sleep(2000);
        System.out.println("Navigate forward to New Page 2");
        driver.navigate().forward();

        Thread.sleep(2000);
        System.out.println("Refresh the existing page");
        driver.navigate().refresh();

        //quit the browser
        driver.quit();
	}

}
A cookie is a small piece of data that is sent from a website and stored on your computer. Cookies are mostly used to recognize the user and load the stored information. Using Selenium WebDriver we can easily pass the cookie to the domain. Each cookie is associated with a name, value, domain, path, expiry, and the status of whether it is secure or not. In order to validate a client, a server parses all of these values in a cookie. Handling cookies during your automated testing is a common task since most websites are using cookies to track and retain specific user information.
Why do I need to handle cookies during automated testing?
Automated test runs may encounter a possible issue. It is possible that the website being tested is using the same cookie to store particular data for several tests.
Let’s take an example where you are adding an item to a shopping cart to test it. If one test adds the item to the cart, data might be saved in a cookie.
It’s possible that the logic in the second test believes the cart is empty. However, the second test fails since the cookie from the previous test is still saved.
In Selenium WebDriver, we can query and interact with cookies with the below built-in methods.
Various cookie operations
Create and add the cookie
The add_cookie() method takes a cookie dictionary as its parameter, focusing on the most important attributes – name and value.
driver.manage().addCookie(arg0);
Get Named Cookie
It returns the serialized cookie data matching the cookie name among all associated cookies.
driver.manage().getCookieNamed(arg0);
Get All Cookies
It returns a ‘successful serialized cookie data’ for the current browsing context. If the browser is no longer available, it returns an error.
driver.manage().getCookies();
Delete specific cookie
It deletes the cookie data matching the provided cookie name.
driver.manage().deleteCookieNamed(arg0);
Delete all cookies
It deletes all the cookies of the current browsing context.
driver.manage().deleteAllCookies();
Let us see an example where we add cookies, get the details of the cookies, delete a particular cookie, and delete all the cookies. I’m using Selenium – 4.15.0.
import org.openqa.selenium.Cookie;
import org.openqa.selenium.chrome.ChromeDriver;
import org.openqa.selenium.chrome.ChromeOptions;
import org.openqa.selenium.firefox.FirefoxDriver;
import java.util.Set;

public class Cookie_Demo {

    public static void main(String[] args) {

        ChromeOptions options = new ChromeOptions();
        options.addArguments("--start-maximize");

        ChromeDriver driver = new ChromeDriver(options);
        String URL = "http://google.com/";
        driver.navigate().to(URL);

        // Add the cookies into current browser context
        driver.manage().addCookie(new Cookie("mycookie1", "123456789123"));
        driver.manage().addCookie(new Cookie("mycookie2", "we34rf125ty6"));
        Cookie cookie1 = new Cookie("mycookie3", "ABCDEFGH");
        driver.manage().addCookie(cookie1);


        // Get All available cookies
        System.out.println("List of Cookies");
        Set<Cookie> cookiesList = driver.manage().getCookies();
        for (Cookie getcookies : cookiesList) {
            System.out.println(getcookies);
        }

        // Get cookie details with named cookie 'foo'
        System.out.println("Get detail of 2nd cookie");
        Cookie cookie2 = driver.manage().getCookieNamed("mycookie2");
        System.out.println(cookie2);

        // delete a cookie with name 'mycookie2'
        System.out.println("Delete 2nd cookie");
        driver.manage().deleteCookieNamed("mycookie2");

        // deletes all cookies
        System.out.println("Delete all cookies");
        driver.manage().deleteAllCookies();

        driver.quit();

    }
}
The output of the above program is
Congratulations on making it through this tutorial and hope you found it useful! Happy Learning!! Cheers!!
If you are planning to learn Selenium WebDriver and if you have completed Basic Selenium tutorial, then you can start Advanced Selenium Tutorials which will talk about different frameworks, tools integration, external data reading from different sources, and so on.