In this tutorial we’re going to talk about parameterizing the REST Assured tests.
What is Parameterization?
Parameterization refers to the process of passing different set of data to the same code. This allows you to verify that the code behaves as expected for various inputs without writing multiple test cases. It enhances the coverage of the test suite by testing the functionality with different data sets and helps identify edge cases or potential bugs that could occur with different input values.
We are using junit4-dataprovider dependency here.
<!-- Data Provider -->
 <dependency>
      <groupId>com.tngtech.junit.dataprovider</groupId>
      <artifactId>junit4-dataprovider</artifactId>
      <version>${junit.dataprovider.version}</version>
      <scope>test</scope>
</dependency>
The first step is to create a test data collection, which is a collection of input and expected outcome values that we want to feed to our test.
@RunWith(DataProviderRunner.class): This annotation tells JUnit to run the tests in this class using the DataProviderRunner, which allows the use of the @DataProvider annotation for parameterized tests
@RunWith(DataProviderRunner.class)
@DataProvider: This annotation marks the method responseData as a provider of test data. The method returns a 2D array of objects (Object[][]), where each inner array represents a set of parameters for a single test run. The responseData method provides four sets of parameters: an ID, a first name, and a last name.
This code defines a parameterized test that verifies the first name and last name of users returned by the API https://reqres.in/api/users/{id} for given user IDs. The test runs multiple times, once for each set of parameters provided by the responseData method. The RestAssured library is used to perform the API requests and assertions.
The output of the above program is
Congratulations on making it through this tutorial and hope you found it useful! Happy Learning!! Cheers!!
In the previous tutorial, I explainedSerenity BDD with Cucumber for Web Application. In this tutorial, I will explain the Integration of Serenity with JUnit4. This tutorial gives an idea of how to set up a new project where we like to use Serenity as BDD Framework and JUnit as a Testing framework.
This project consists of various classes – ApplicationLoginTests (This is the Test Class which is going to contain all the tests). NavigationActions is the Action class that is used to open the webpage or application. StepLoginPage, StepDashboardPage, and StepForgotPasswordPage are the Page Object classes that contain multiple functionalities of that page and that help to keep the code clean.
Implementation Steps
Step 1 – Update the Properties section
Update the Properties section in Maven pom.xml, in case of Maven project.
The Test Class – ApplicationLoginTests is created under src/test/java directory.
package org.example.tests;

import net.serenitybdd.annotations.Pending;
import net.serenitybdd.annotations.Steps;
import net.serenitybdd.annotations.Title;
import net.serenitybdd.core.Serenity;
import net.serenitybdd.junit.runners.SerenityRunner;
import org.example.steps.StepDashBoardPage;
import org.example.steps.StepForgotPasswordPage;
import org.example.steps.StepLoginPage;
import org.junit.Test;
import org.junit.runner.RunWith;

import static org.junit.Assert.assertTrue;

@RunWith(SerenityRunner.class)
public class ApplicationLoginTests {

    @Steps
    NavigateActions navigate;

    @Steps
    StepLoginPage loginPage;

    @Steps
    StepDashBoardPage dashboardPage;

    @Steps
    StepForgotPasswordPage forgetPasswordPage;


    @Test
    @Title("Login to application with invalid credential generates error message")
    public void invalidCredentials() {

        // Given
        navigate.toTheHomePage();

        // When
        loginPage.inputUserName("Admin");
        loginPage.inputPassword("admin");
        loginPage.clickLogin();

        // Then
        Serenity.reportThat("Passing invalid credentials generates error message",
                () -> assertTrue(loginPage.errorMessage().equalsIgnoreCase("Invalid Credentials")));

    }

    @Test
    @Title("Login to application with valid credentials navigates to DashBoard page")
    public void successfulLogin() {

        navigate.toTheHomePage();
        // loginPage.open();

        // When
        loginPage.inputUserName("Admin");
        loginPage.inputPassword("admin123");
        loginPage.clickLogin();

        // Then
        Serenity.reportThat("Passing valid credentials navigates to DashBoard page",
                () -> assertTrue(dashboardPage.getHeading().equalsIgnoreCase("DashBoard")));
    }


    @Test
    @Pending
    @Title("Verify Forgot your password link")
    public void clickForgetPasswordLink() {

        // Given
        navigate.toTheHomePage();

        // When
        loginPage.clickForgetPasswordLink();

        // Then
        Serenity.reportThat("Open Forget Password Page after clicking forget password link",
                () -> assertTrue(forgetPasswordPage.getHeadingForgetPasswordPage().equalsIgnoreCase("Reset Password")));

    }

}
The tests run using the Serenity test runner – @RunWith(SerenityRunner.class).
The @Steps annotation marks a Serenity step library.
Create the test following the Given/When/Then pattern and using step methods from the step library.
The @Title annotation lets you provide your own title for this test in the test reports.
Step 5 – Create the Action class
Create NavigateActions class under src/test/java. This class is used to open a web browser with the URL specified. This class is extended from UIInteractionSteps.
openPageNamed() method opens an environment-specific page defined in the serenity.conf file under the pages section. The value of loginForm is derived from serenity.config:
package org.example.tests;
import net.serenitybdd.annotations.Step;
import net.serenitybdd.core.steps.UIInteractionSteps;
public class NavigateActions extends UIInteractionSteps {
@Step
public void toTheHomePage() {
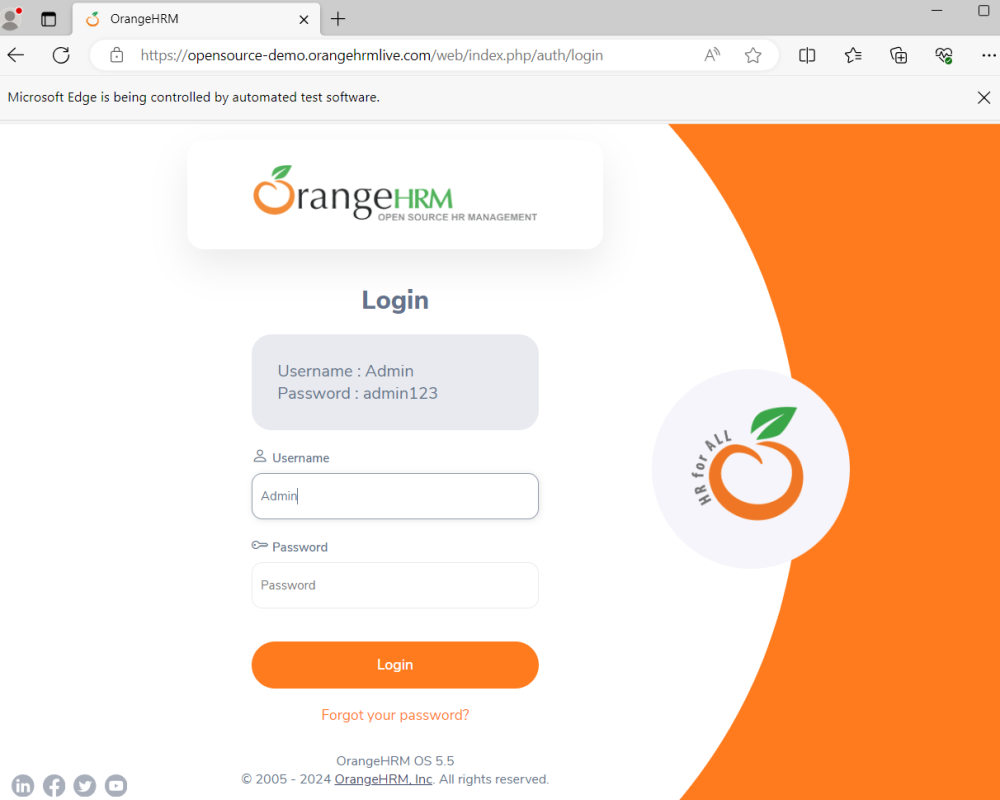
// openUrl("https://opensource-demo.orangehrmlive.com/");
openPageNamed("loginForm");
}
}
The JUnit Serenity integration provides some special support for Serenity Page Objects. In particular, Serenity will automatically instantiate any PageObject fields in the JUnit test. When a field of type StepLoginPage is declared in the test, Serenity instantiates it for you. The page is automatically instantiated and ready to be used.
@Managed
WebDriver driver;
@Managed declares a WebDriver instance that will be managed by Serenity. The WebDriver instance will be initialized automatically.
The driver parameter lets you define what WebDriver driver you want to run these tests in. Possible values include Firefox, chrome, iexplorer, phantomjs, appium, safari, edge, and htmlunit. The default browser in Serenity is Firefox. There are multiple ways to configure webDriver. One of the ways is to mention with @Managed as shown below:
@Managed(driver="chrome")
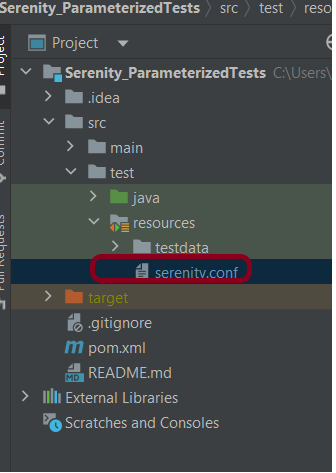
Step 7 – Create the serenity.conf file
Serenity.conf file is used to specify various features like the type of webdriver used, various test environments, run test in headless mode, and many more options. Serenity.conf can also contain settings like start size, disable sandbox, disable gpu, and others that need to be added to chrome.switches setting. Create serenity.conf file under src/test/resources.
The serenity.properties file is created at the root of the project.
serenity.project.name = Serenity and Junit4 Demo
Step 9 – Run the tests through the command
Open the command line and go to the location where the pom.xml of the project is present and type the below command.
mvn clean verify
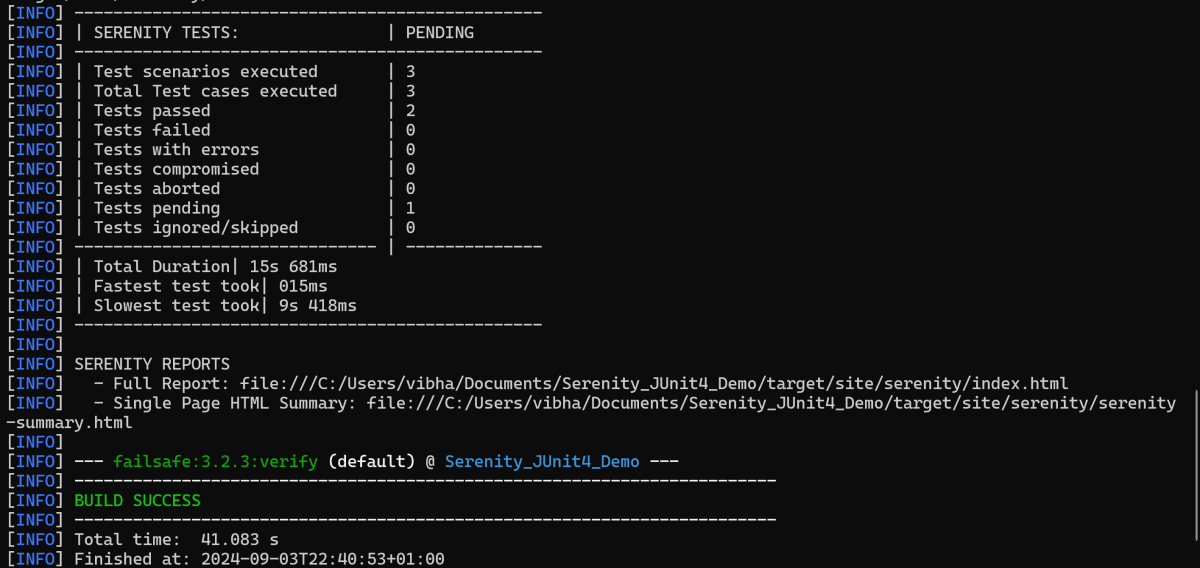
Below is the execution status.
Step 10 – View the Serenity Reports
There are 2 types of reports are generated – Index.htmland Serenity-Summary.html.
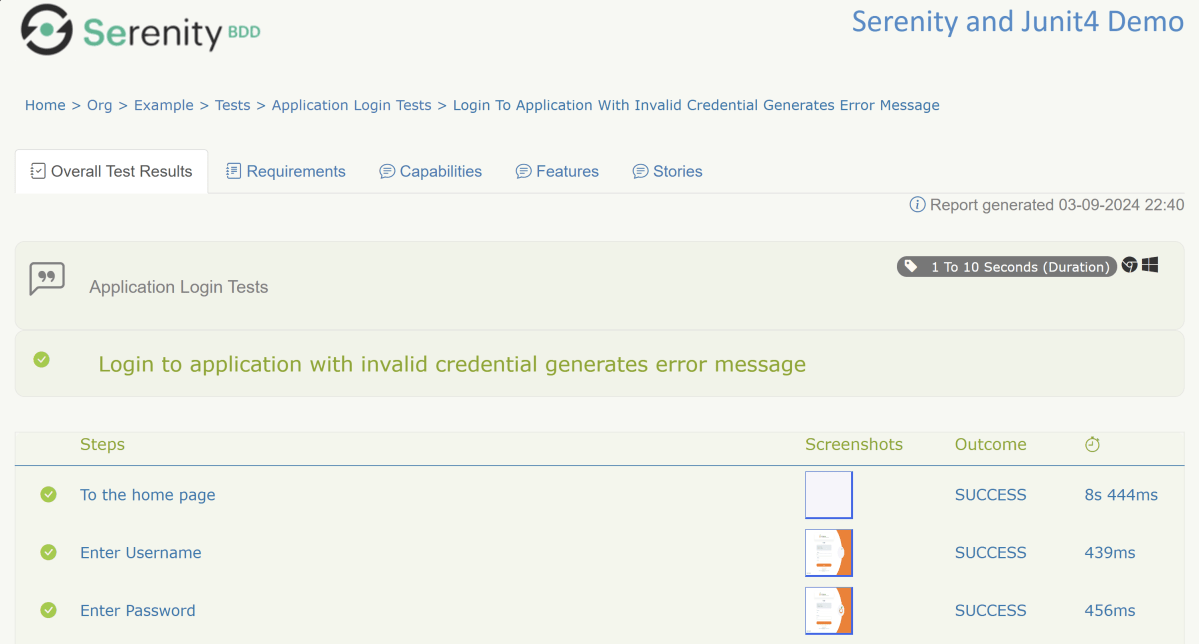
Index.html
We can see the value of the @Title annotation, ‘Login to the application with valid credentials navigates to DashBoard page’, added as the heading. The value of @Step annotation, ‘Enter Username’, and ‘Enter Password’ is added to the Report as various steps.
This report contains a screenshot of each step also.
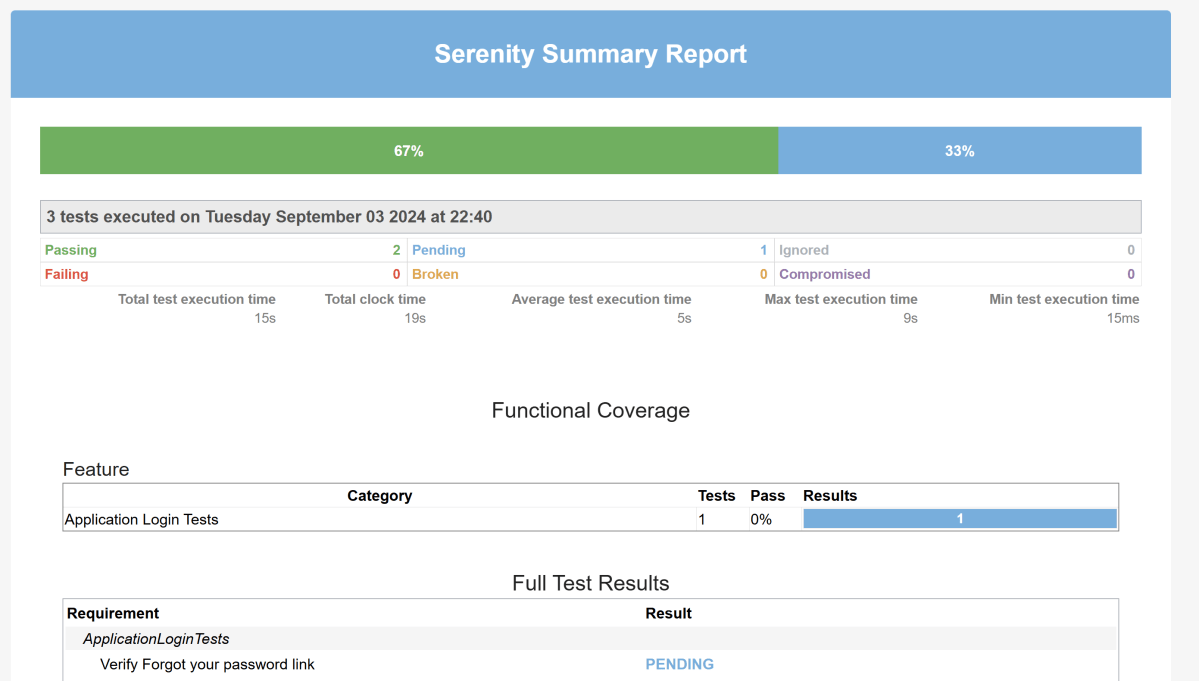
Emailable Report (Serenity-Summary.html)
These reports are present under /target/site/serenity.
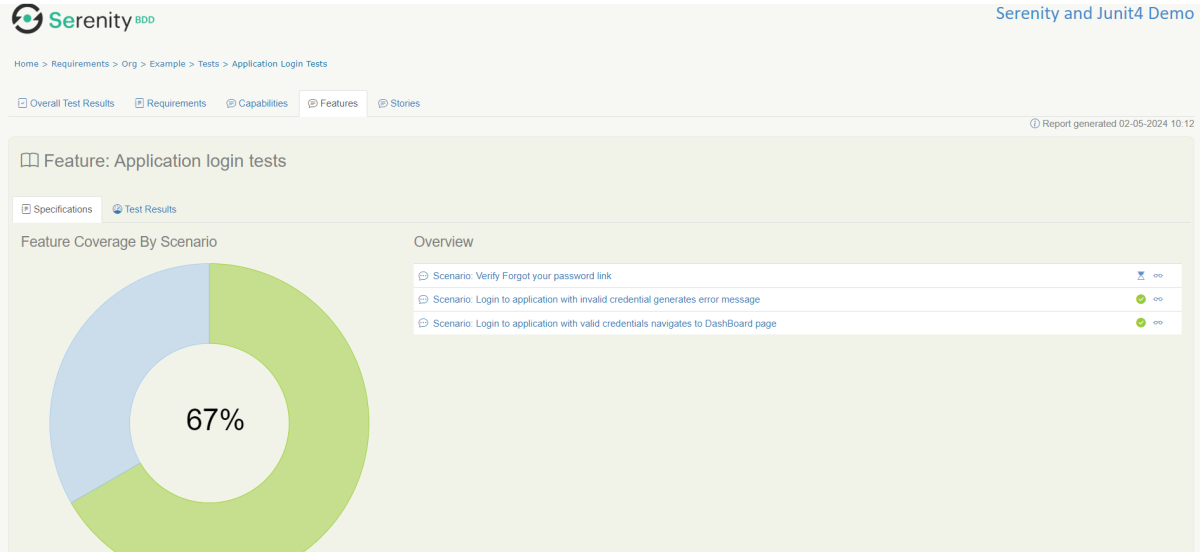
Skipping the tests
In Serenity, you use the @Pending annotation, either for a test or for a @Step-annotated method, to indicate that the scenario is still being implemented and that the results are not available yet. These tests appear as ‘Pending’ (shown in blue) in the test reports.
    @Test
	@Pending
	@Title("Verify Forgot your password link")
	public void clickForgetPasswordLink() {

		// Given
		loginPage.open();

		// When
		loginPage.clickForgetPasswordLink();

		// Then
		Assert.assertTrue(forgetpasswordPage.ForgetPasswordPage());
	}
The output of the above program is
Tests marked with@Ignorewill appear as ‘Ignored’ (from JUnit) and appears as grey in the test reports.
We are done! Congratulations on making it through this tutorial and hope you found it useful! Happy Learning!!
Spring Boot makes it easy to create stand-alone, production-grade Spring based Applications that you can “just run”. We take an opinionated view of the Spring platform and third-party libraries, so you can get started with minimum fuss. Most Spring Boot applications need minimal Spring configuration.
Serenity BDD has strong WebDriver integration and manages WebDriver instances. It is not needed to create or close the WebDriver instance of the Serenity Tests.
Serenity uses a library WebDriver Manager, which manages the driver for us. We don’t need to explicitly download and configure the WebDriver binaries for us.
The simplest way to configure the driver we want to use is in our project’s serenity.config file (which will be present in src/test/resources folder).
Microsoft Edge is a Chromium driver, so the configuration is very similar to Chrome. The main difference is the use of “ms:edgeOptions” instead of “goog:chromeOptions”. A typical configuration is shown below:
There is another way to run the tests in edge browser, use the @Managed annotation.
@Managed annotation in Serenity will manage the WebDriver instance, including opening the appropriate driver at the start of each test, and shutting it down when the test is finished. @Managed provides an option for the user to select the WebDriver driver to the run the tests in it. The possible values are firefox, chrome, iexplorer, phantomjs, appium, safari, edge, and htmlunit. There are multiple ways to manage the WebDriver. One of the way is shown below:
In the below program, the tests are running on the Edge browser. The driver name is mentioned with @Managed annotation.
import net.serenitybdd.annotations.Managed;
import net.serenitybdd.annotations.Steps;
import net.serenitybdd.annotations.Title;
import net.serenitybdd.core.Serenity;
import net.serenitybdd.junit.runners.SerenityRunner;
import org.junit.Test;
import org.junit.runner.RunWith;
import org.openqa.selenium.WebDriver;

import static org.assertj.core.api.Assertions.assertThat;

@RunWith(SerenityRunner.class)
public class EdgeTests {

    private String userName;
    private String passWord;
    private String errorMessage;

    @Managed(driver = "edge")
    WebDriver driver;

    @Steps
    NavigateActions navigate;

    @Steps
    StepLoginPage loginPage;


    @Test
    @Title("Login to application with invalid credential generates error message")
    public void invalidCredentials() {

        // Given
        navigate.toTheHomePage();

        // When
        loginPage.inputUserName("Admin");
        loginPage.inputPassword("admin");
        loginPage.clickLogin();

        // Then
        Serenity.reportThat("Passing invalid credentials generates error message",
                () -> assertThat(assertThat(loginPage.errorMessage()).isEqualToIgnoringCase("Invalid Credentials")));

    }

}
NavigateActions
import net.serenitybdd.annotations.Step;
import net.serenitybdd.core.steps.UIInteractionSteps;

public class NavigateActions extends UIInteractionSteps {

    @Step
    public void toTheHomePage() {
        openPageNamed("loginForm");
    }
}
Gradle is an open-source build automation tool that is designed to be flexible enough to build almost any type of software. Gradle runs on the JVM and you must have a Java Development Kit (JDK) installed to use it. Several major IDEs allow you to import Gradle builds and interact with them: Android Studio, IntelliJ IDEA, Eclipse, and NetBeans.
Step 4 – Create a Test Code for the testing of REST API under src/test/java
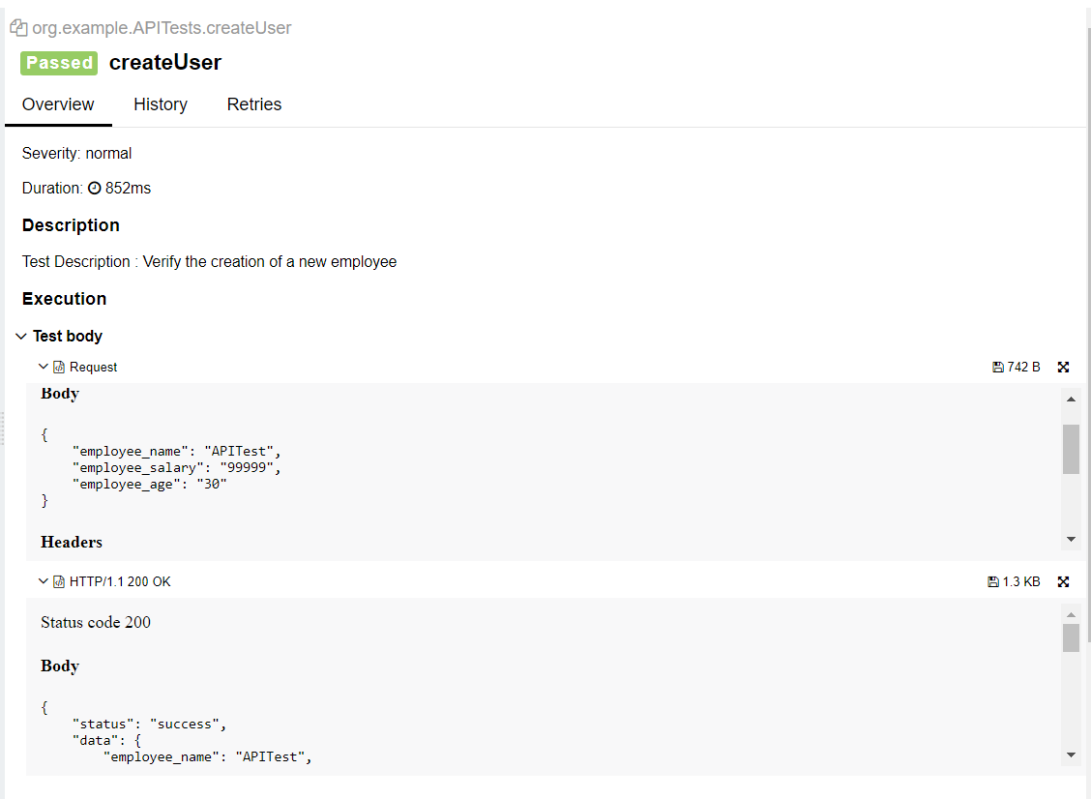
Rest Assured and Allure Report are two popular tools for testing. Rest Assured is used for API testing and Allure Report is used for creating detailed reports about tests. To see our request and response in more detail using these tools, we need to add a line to our Rest Assured tests. This will provide the request and response details in the report.
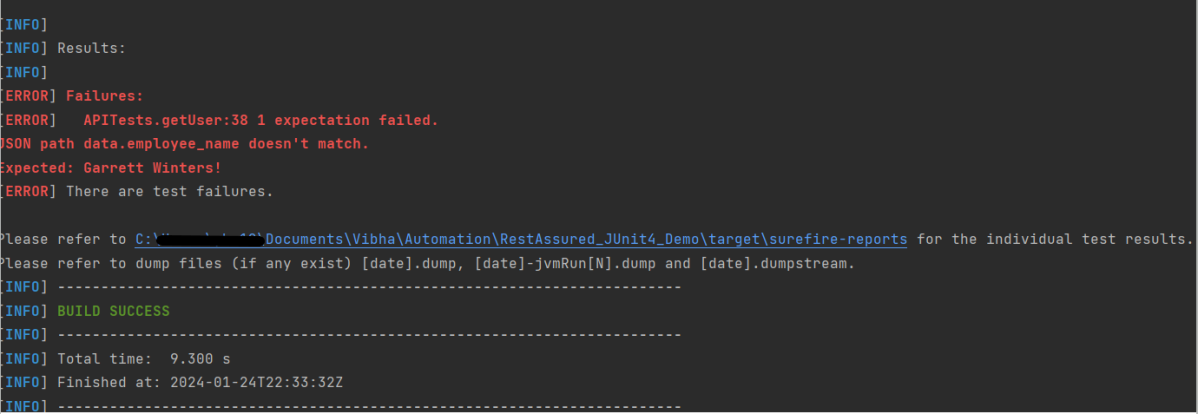
For testing purpose, first test – Get Request one fails.
.filter(new AllureRestAssured())
Below is an example of the tests.
package org.example;

import io.qameta.allure.*;
import io.qameta.allure.restassured.AllureRestAssured;
import io.restassured.http.ContentType;
import org.json.JSONObject;
import org.junit.Test;

import static io.restassured.RestAssured.given;
import static org.hamcrest.core.IsEqual.equalTo;

@Epic("REST API Regression Testing using JUnit4")
@Feature("Verify CRUID Operations on Employee module")
public class APITests {

    String BaseURL = "https://dummy.restapiexample.com/api";


    @Test
    @Story("GET Request")
    @Severity(SeverityLevel.NORMAL)
    @Description("Test Description : Verify the details of employee of id-2")
    public void getUser() {

        // GIVEN
        given()
                .filter(new AllureRestAssured())

                // WHEN
                .when()
                .get(BaseURL + "/v1/employee/2")

                // THEN
                .then()
                .statusCode(200)
                .statusLine("HTTP/1.1 200 OK")
                // To verify booking id at index 2
                .body("data.employee_name", equalTo("Garrett Winters!"))
                .body("message", equalTo("Successfully! Record has been fetched."));

    }

    @Test
    @Story("POST Request")
    @Severity(SeverityLevel.NORMAL)
    @Description("Test Description : Verify the creation of a new employee")
    public void createUser() {

        JSONObject data = new JSONObject();

        data.put("employee_name", "APITest");
        data.put("employee_salary", "99999");
        data.put("employee_age", "30");

        // GIVEN
        given()
                .filter(new AllureRestAssured())
                .contentType(ContentType.JSON)
                .body(data.toString())

                // WHEN
                .when()
                .post(BaseURL + "/v1/create")

                // THEN
                .then()
                .statusCode(200)
                .body("data.employee_name", equalTo("APITest"))
                .body("message", equalTo("Successfully! Record has been added."));

    }
}
Step 5 – Run the Test and Generate Allure Report
To run the tests, use the below command
mvn clean test
The output of the above program is
This will create allure-results folder with all the test reports. These files will be used to generate Allure Report.
To create Allure Report, use the below command
allure serve
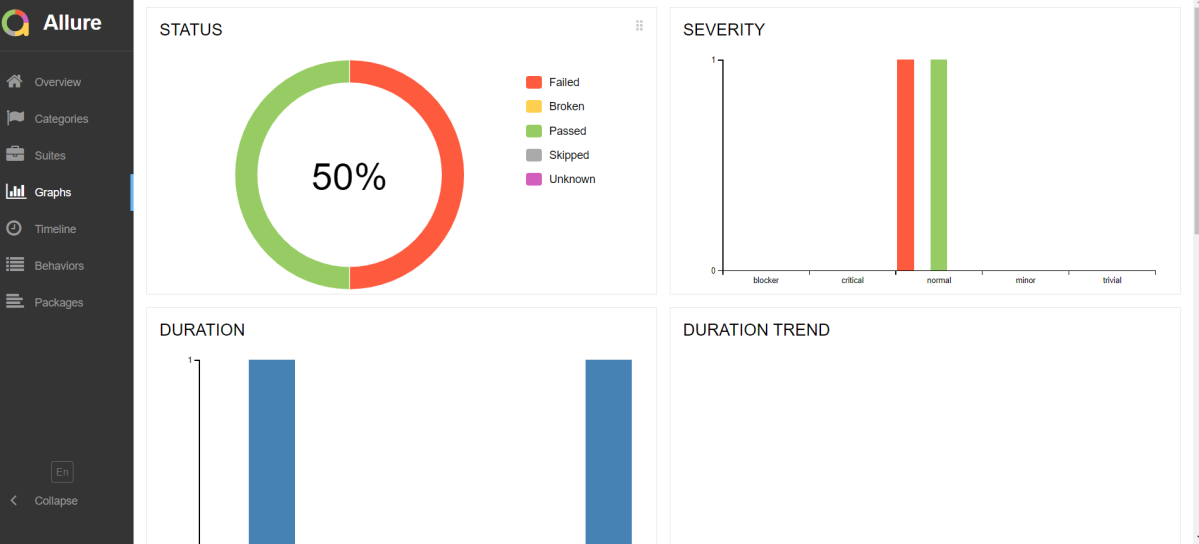
This will generate the beautiful Allure Test Report as shown below.
Allure Report Dashboard
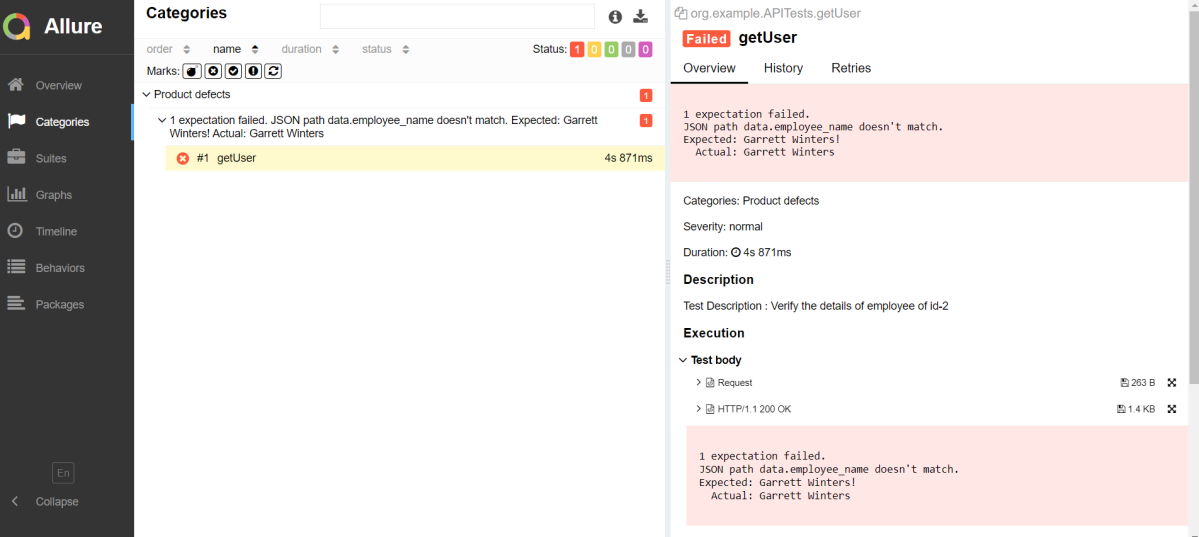
Categories in Allure Report
The categories tab gives you a way to create custom defects classifications to apply for test results. There are two categories of defects – Product Defects (failed tests) and Test Defects (broken tests).
Suites in Allure Report
On the Suites tab a standard structural representation of executed tests, grouped by suites and classes can be found.
View test history
Each time you run the report from the command line with the mvn clean test command, a new result JSON file will get added to the allure-results folder. Allure can use those files to include a historical view of your tests. Let’s give that a try.
To get started, run mvn clean test a few times and watch how the number of files in the allure-reports folder grows.
Now go back to view your report. Select Suites from the left nav, select one of your tests and click Retries in the right pane. You should see the history of test runs for that test:
Graphs in Allure Report
Graphs allow you to see different statistics collected from the test data: status breakdown or severity and duration diagrams.
Timeline in Allure Report
Timeline tab visualizes retrospective of tests execution, allure adaptors collect precise timings of tests, and here on this tab, they are arranged accordingly to their sequential or parallel timing structure.
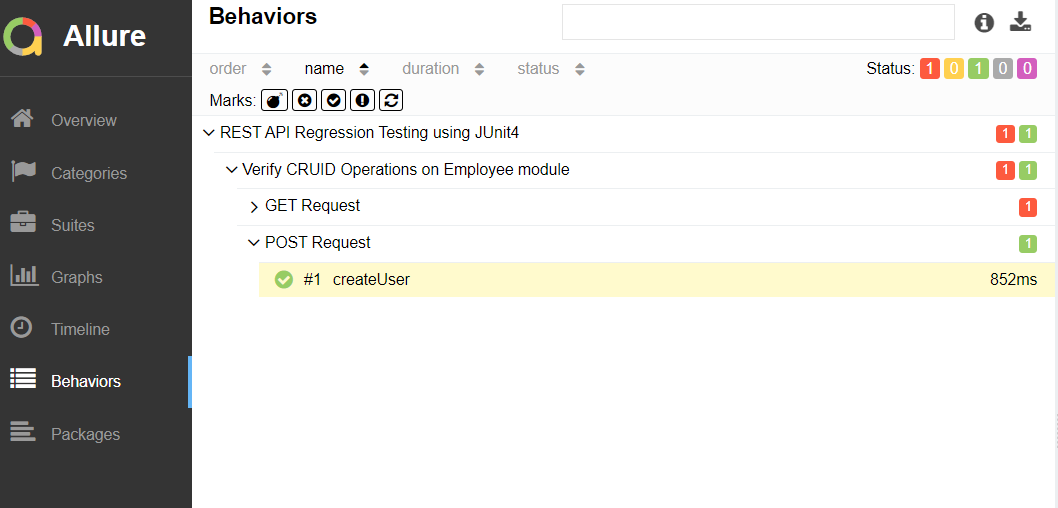
Behaviors of Allure Report
This tab groups test results according to Epic, Feature, and Story tags.
The below image shows the request body sent and the status code of the response, its body, and header provided by API.
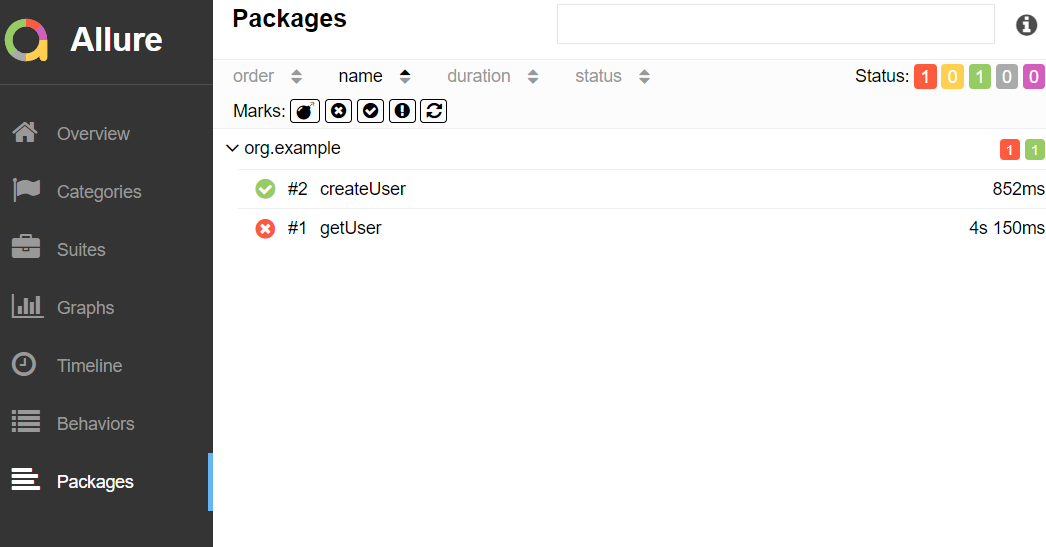
Packages in Allure Report
The packages tab represents a tree-like layout of test results, grouped by different packages.
We are done! Congratulations on making it through this tutorial and hope you found it useful! Happy Learning!!
Rest Assured enables you to test REST APIs using java libraries and integrates well with Maven/Gradle. REST Assured is a Java library that provides a domain-specific language (DSL) for writing powerful, maintainable tests for RESTful APIs.
What is JUnit?
JUnit is a simple framework to write repeatable tests. It is an instance of the xUnit architecture for unit testing frameworks. JUnit 4 is one of the most popular unit testing frameworks which has a significant role in the test-driven development process.
Dependency List:-
REST Assured – 5.4.0
Java 17
JUnit – 4.13.2
Maven – 3.9.6
Detailed Step Description
Step 1- Download and Install Java
Java needs to be present on the system to run the tests. Click here to know How to install Java. To know if Java is installed or not on your machine, type this command in the command line. This command will show the version of Java installed on your machine.
java -version
Step 2 – Download and setup Eclipse IDE on the system
The Eclipse IDE (integrated development environment) provides strong support for Java developers, which is needed to write Java code. Click here to know How to install Eclipse.
Step 3 – Setup Maven
To build a test framework, we need to add a number of dependencies to the project. It is a very tedious and cumbersome process to add each dependency manually. So, to overcome this problem, we use a build management tool. Maven is a build management tool that is used to define project structure, dependencies, build, and test management. Click here to know How to install Maven.
To know if Maven is already installed or not on your machine, type this command in the command line. This command will show the version of Maven installed on your machine.
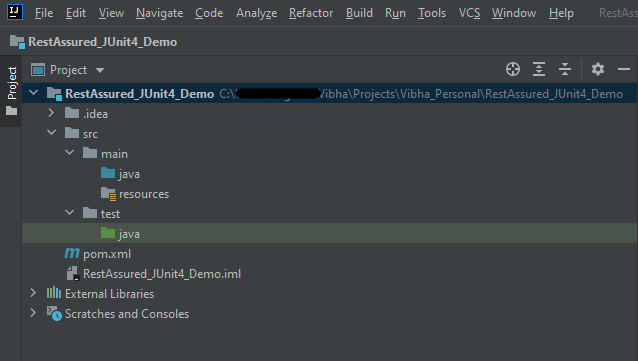
The tests should be written in src/test/java directory. To know how to create a JSON Request body using JSONObject, please refer to this tutorial.
import io.restassured.http.ContentType;
import org.json.JSONObject;
import org.junit.Test;
import static org.hamcrest.Matchers.equalTo;
import static io.restassured.RestAssured.given;

public class APITests {

    String BaseURL = "https://dummy.restapiexample.com/api";


    @Test
    public void createUser() {

        JSONObject data = new JSONObject();

        data.put("employee_name", "NewUser1");
        data.put("employee_salary", "1000");
        data.put("employee_age", "35");

        // GIVEN
        given()
                .contentType(ContentType.JSON)
                .body(data.toString())

                // WHEN
                .when()
                .post(BaseURL + "/v1/create")

                // THEN
                .then()
                .statusCode(200)
                .body("data.employee_name", equalTo("NewUser1"))
                .body("message", equalTo("Successfully! Record has been added."));

    }

}
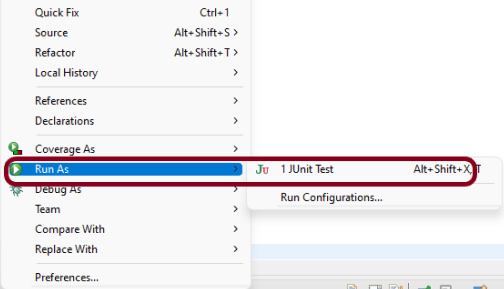
Step 7 – Test Execution through JUnit Test
Go to the Runner class and right-click Run As JUnit Test. The tests will run as JUnit tests. (Eclipse)
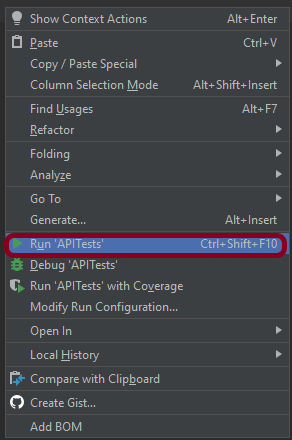
Below is the image to run the tests in IntelliJ.
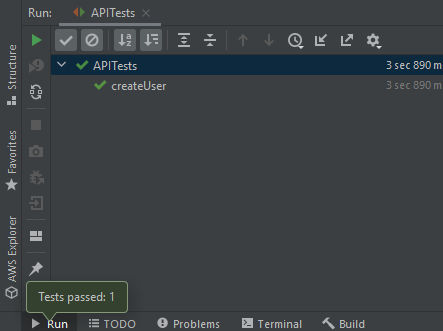
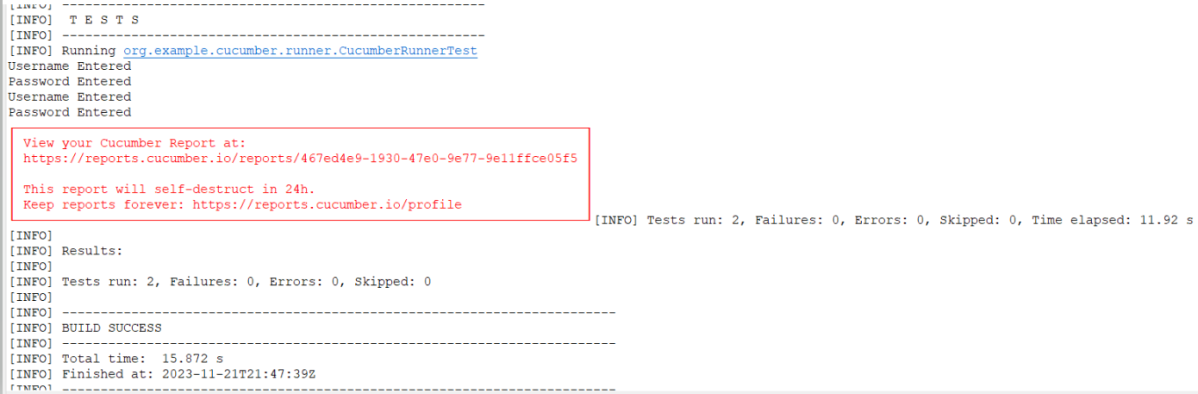
This is how the execution console will look like.
Step 8 – Run the tests from the command line
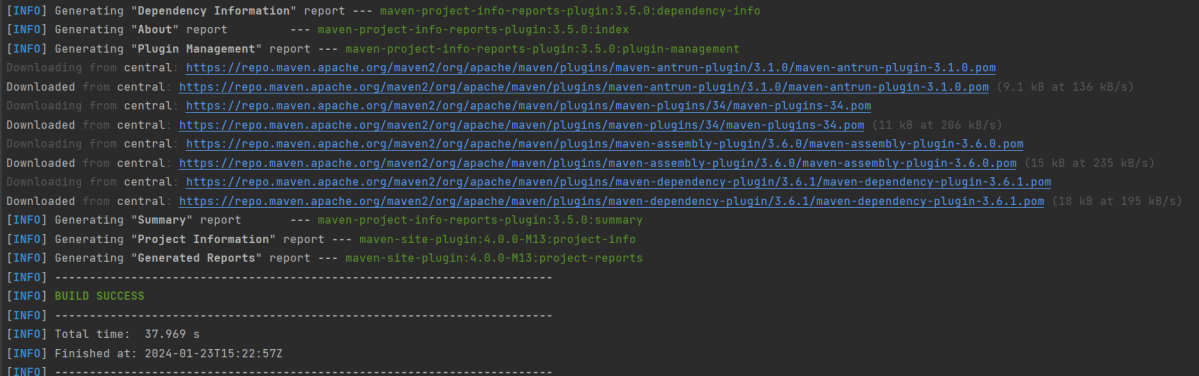
Maven Site Plugin creates a folder – site under the target directory, and the Maven Surefire Report plugin generates the JUnit Reports in the site folder. We need to run the tests through the command line to generate the JUnit Report.
mvn clean test site
The output of the above program is
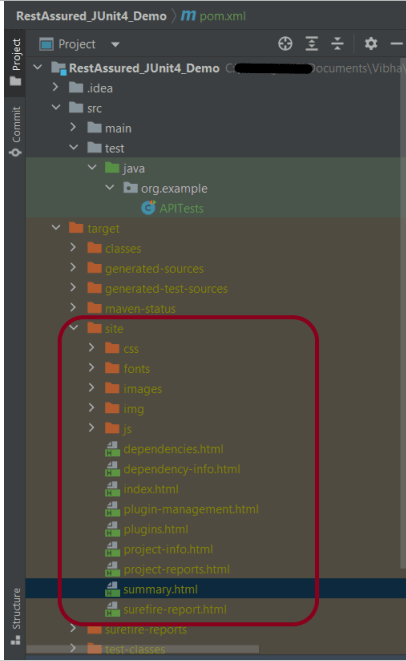
Step 9 – Report Generation
After the test execution, refresh the project, and a new folder with the name site in the target folder will be generated. This folder contains the reports generated by JUnit. The structure of the folder site looks as shown below.
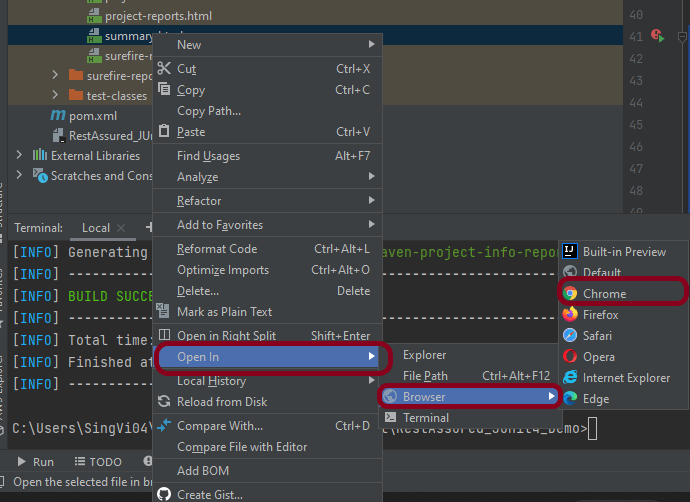
Step 10 – View the Report
Right-click on the summary.html report and select Open In -> Browser ->Chrome.
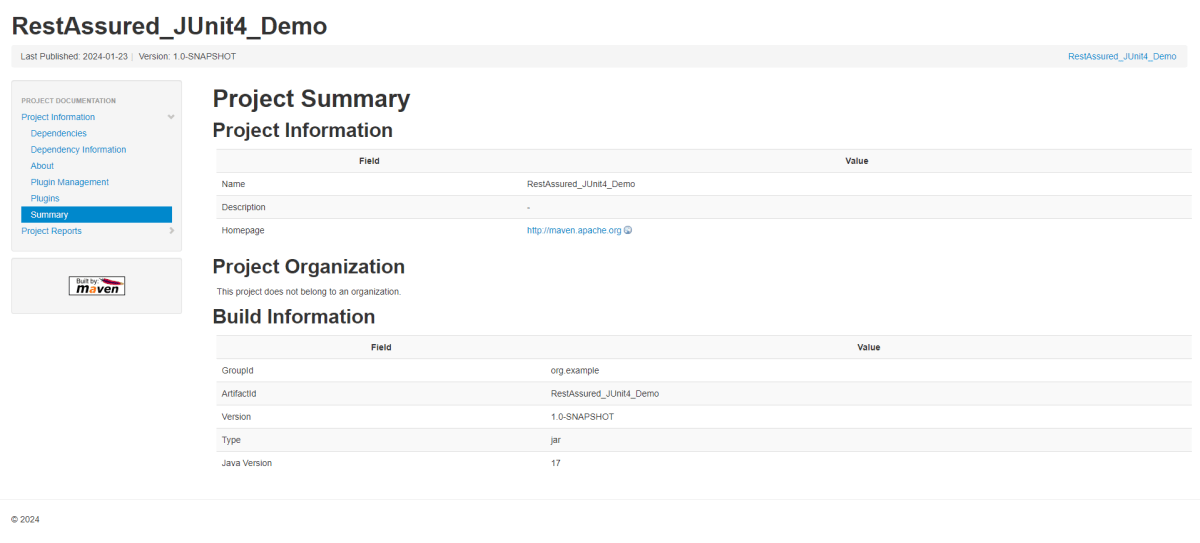
Summary Report
Below is the summary Report.
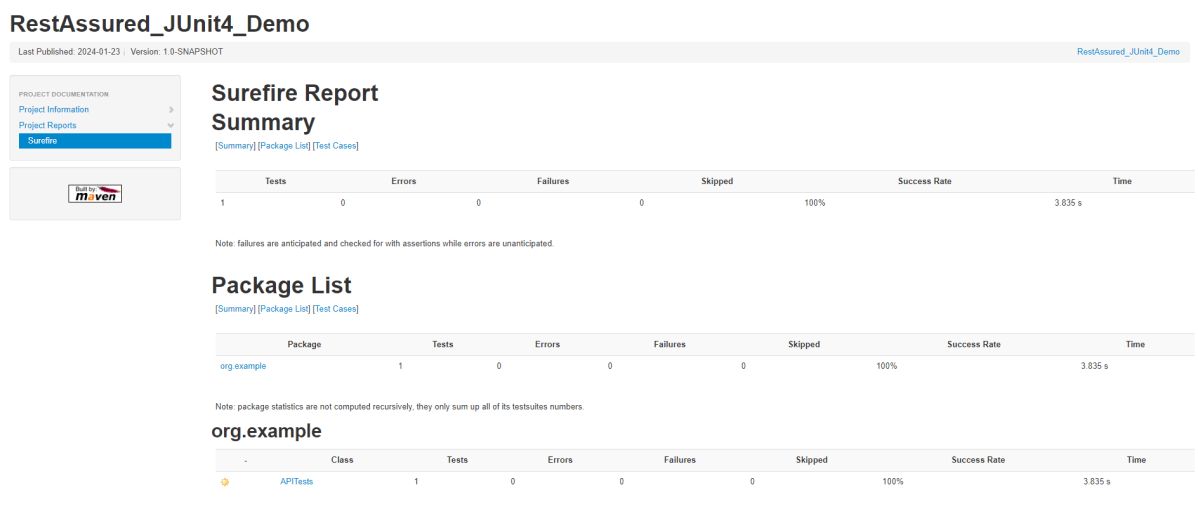
Surefire Report
Below is an example of a Surefire Report. This report contains a summary of the test execution.
We are done! Congratulations on making it through this tutorial and hope you found it useful! Happy Learning!!
As we know, Cucumber is a BDD Tool and Selenium Webdriver is used for the automation of web applications. Imagine we need to build a test framework that can be used by businesses to understand the test scenarios and as well can test the web application. This can be achieved by integrating Cucumber with Selenium.
In this tutorial, I’ll create a BDD Framework for the testing of web applications using Selenium Webdriver.
Cucumber and Selenium need Java to be installed on the system to run the tests. Click here to knowHow to install Java.
Step 2 – Download and setup Eclipse IDE on the system
The Eclipse IDE (integrated development environment) provides strong support for Java developers. The Eclipse IDE for Java Developers distribution is designed to support standard Java development. It includes support for the Maven and Gradle build system and support for the Git version control system. Click here to know How to install Eclipse.
Step 3 – Setup Maven
To build a test framework, we need to add a number of dependencies to the project. It is a very tedious and cumbersome process to add each dependency manually. So, to overcome this problem, we use a build management tool. Maven is a build management tool that is used to define project structure, dependencies, build, and test management. Click here to know How to install Maven.
Step 4 – Install Cucumber Eclipse Plugin (Only for Eclipse)
The cucumber plugin is an Eclipse plugin that allows eclipse to understand the Gherkin syntax. When we are working with cucumber we will write the feature files that contain Feature, Scenario, Given, When, Then, And, But, Tags, Scenario Outline, and Examples. By default, eclipse doesn’t understand these keywords so it doesn’t show any syntax highlighter. Cucumber Eclipse Plugin highlights the keywords present in Feature File. Refer to this tutorial to get more detail – How to setup Cucumber with Eclipse.
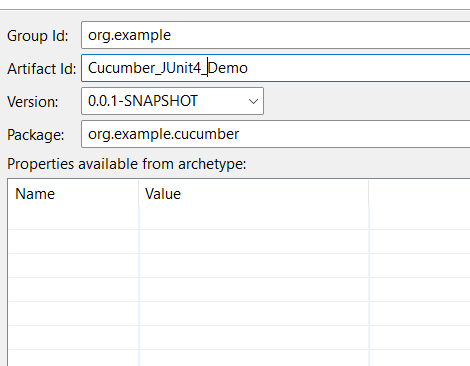
Group Id – org.example Artifact Id – Cucumber_JUnit4_Demo Version – 0.0.1-SNAPSHOT Package – cucumber
Maven Dependency (pom.xml) looks like something shown below for a new Maven project.
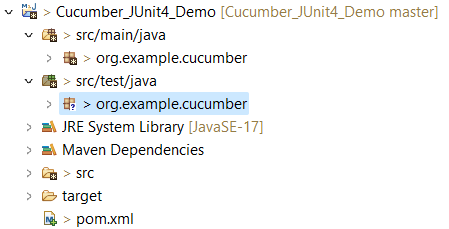
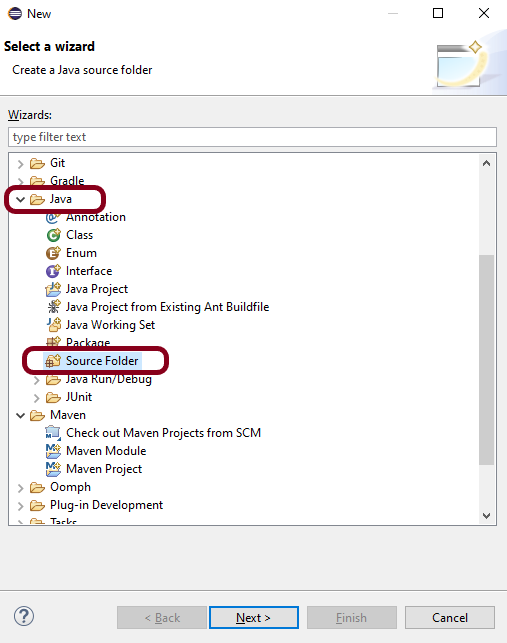
Step 6 – Create source folder src/test/resources
When a new Maven Project is created, it has 2 folders – src/main/java and src/test/java. To create test scenarios, we need a new source folder called – src/test/resources. To create this folder, Right-click on your Maven project ->select New ->Java, and then Source Folder. The Feature file is created in the src/test/resources source folder.
Mention the source folder name as src/test/resources and click the Next button. This will create a source folder under your new Maven project, as shown in the below image.
Step 7 – Add Selenium and Cucumber dependencies to the project
Add the below-mentioned Selenium and Cucumber dependencies to the project.
The compiler plugin is used to compile the source code of a Maven project. This plugin has two goals, which are already bound to specific phases of the default lifecycle:
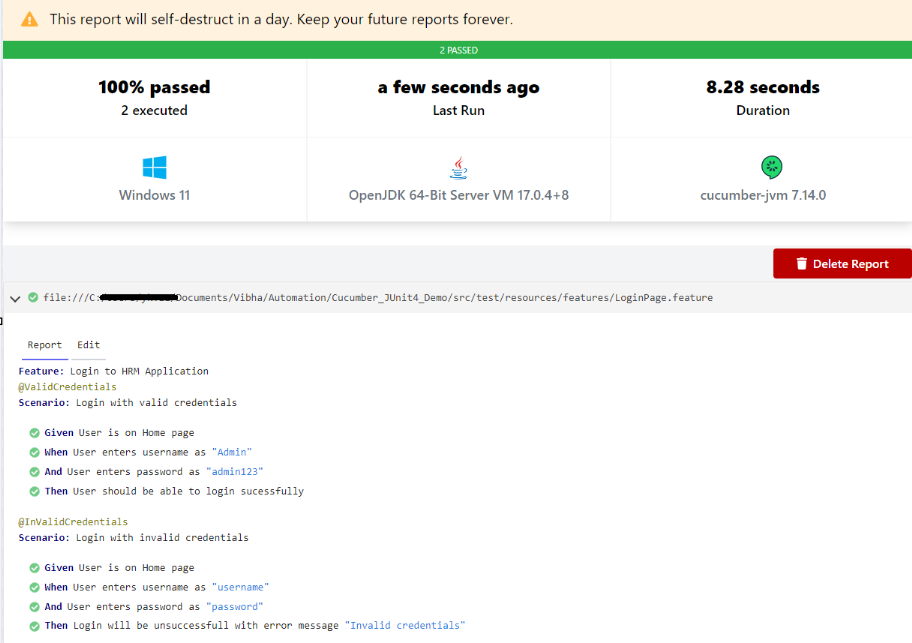
Step 9 – Create a feature file (LoginPage.feature)
Feature file should be saved as an extension of .feature. Add the test scenarios in this feature file. I have added sample test scenarios. In this feature file, I have created a scenario for successful login and another one for a failed login. The test scenarios are written in the Gherkins language. A feature file contains all the test scenarios and is placed in src/test/resources/features.
Feature: Login to HRM Application

   @ValidCredentials
   Scenario: Login with valid credentials

    Given User is on Home page
    When User enters username as "Admin"
    And User enters password as "admin123"
    Then User should be able to login sucessfully

   @InValidCredentials
   Scenario: Login with invalid credentials

    Given User is on Home page
    When User enters username as "username"
    And User enters password as "password"
    Then Login will be unsuccessfull with error message "Invalid credentials"
Step 10 – Create the step definition class
The StepDefinition class is created in src/test/java. The StepDefinition class contains the test code corresponding to the steps of Test Scenario in the Feature File.
It is recommended to create a package with a name such as org.example.cucumber.stepdefinitionsin src/test/java and create the step definition java file corresponding to the feature files in that package
package org.example.definitions;

import java.time.Duration;

import org.junit.Assert;
import org.openqa.selenium.By;
import org.openqa.selenium.WebDriver;
import org.openqa.selenium.chrome.ChromeDriver;
import org.openqa.selenium.chrome.ChromeOptions;

import io.cucumber.java.After;
import io.cucumber.java.Before;
import io.cucumber.java.en.Given;
import io.cucumber.java.en.Then;
import io.cucumber.java.en.When;

public class LoginStepdefinitions {

	WebDriver driver;

	@Before
    public void setUp() {

        ChromeOptions options = new ChromeOptions();
        options.addArguments("--start-maximized");
        driver = new ChromeDriver(options);
        driver.manage().timeouts().implicitlyWait(Duration.ofSeconds(5));

    }

    @Given("User is on Home page")
    public void userOnHomePage() {

        driver.get("https://opensource-demo.orangehrmlive.com/");
    }

    @When("User enters username as {string}")
    public void entersUsername(String userName)  {

        System.out.println("Username Entered");
        driver.findElement(By.name("username")).sendKeys(userName);


    }

    @When("User enters password as {string}")
    public void entersPassword(String passWord)  {

        System.out.println("Password Entered");
        driver.findElement(By.name("password")).sendKeys(passWord);
        driver.findElement(By.xpath("//*[@class='oxd-form']/div[3]/button")).submit();
    }

    @Then("User should be able to login sucessfully")
    public void sucessfullLogin()  {

    	 String homePageHeading = driver.findElement(By.xpath("//*[@class='oxd-topbar-header-breadcrumb']/h6")).getText();

         //Verify new page - HomePage
         Assert.assertEquals("Dashboard",homePageHeading);

    }

    @Then("Login will be unsuccessfull with error message {string}")
    public void unsucessfullLogin(String expectedErrorMessage)  {

    	 String actualErrorMessage = driver.findElement(By.xpath("//*[@class='orangehrm-login-error']/div[1]/div[1]/p")).getText();

         // Verify Error Message
         Assert.assertEquals( expectedErrorMessage, actualErrorMessage);

    }

    @After
    public void teardown() {

        driver.quit();
    }

}
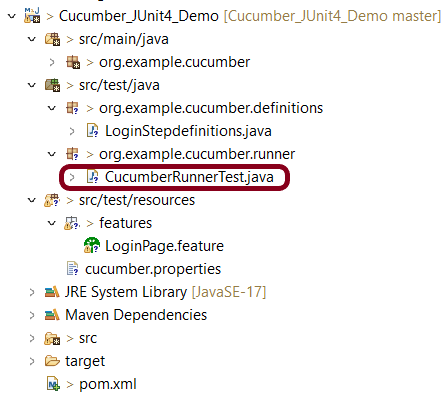
Step 11 – Create a Cucumber Runner classunder src/test/java
It is recommended to create a package with a name such as org.example.cucumber.runner in src/test/java and create the CucumberRunnerTest (Runner) java file corresponding to that package.
We need to create a class called Runner class to run the tests. This class will use the JUnit annotation @RunWith(), which tells JUnit what is the test runner class.
Allure Framework is a lightweight, flexible multi-language test report tool that not only displays a very concise representation of what has been tested in a neat web report form, but also allows everyone involved in the development process to extract the most useful information from everyday test execution.
JUnit 4 has everything bundled into a single jar file whereas JUnit 5 is composed of 3 sub-projects i.e. JUnit Platform, JUnit Jupiter, and JUnit Vintage.
JUnit Platform: It defines the TestEngine API for developing new testing frameworks that run on the platform. JUnit Jupiter: It has all new JUnit annotations and TestEngine implementation to run tests written with these annotations. JUnit Vintage: To support running JUnit 3 and JUnit 4 written tests on the JUnit 5 platform.
JUnit 5 uses the org.JUnit package for its annotations and classes whereas JUnit 5 uses the new org.JUnit.jupiter package for its annotations and classes. For example, org.JUnit.Test becomes org.JUnit.jupiter.api.Test. @Before annotation of JUnit4 is renamed to @BeforeEach in JUnit5 @After annotation of JUnit4 is renamed to @AfterEach in JUnit5 @BeforeClass annotation of JUnit4 is renamed to @BeforeAll in JUnit5 @AfterClass annotation of JUnit4 is renamed to @AfterAll in JUnit5
4. Assertions
JUnit 5 assertions are now in org.JUnit.jupiter.api.Assertions whereas JUnit4 assertions are in org.JUnit.Assert. Most of the common assertions, like assertEquals() and assertNotNull() look the same as before, but there are a few key differences:
The error message is now the last argument, for example, assertEquals(“my message”, 1, 2) would be assertEquals(1, 2, “my message”)
Most assertions now accept a lambda that constructs the error message, which is only called when the assertion fails.
Below is an example of the same.
    @Test
    void nullNegative() {
        String str = "Summer";

        Assertions.assertNull(str, () -> "The string should be null");
    }
The output of the above program is
assertTimeout() and assertTimeoutPreemptively() have replaced the @Timeout annotation (note that there is a @Timeout annotation in JUnit 5, but it works differently than JUnit 4).
There are several new assertions in JUnit5- assertAll(), assertIterableEquals(), assertLinesMatch(), assertThrows() and assertDoesNotThrow(). To know more about assertions in JUnit5, please refer to this tutorial – JUnit5 Assertions Example
5. Assumptions
In Junit 4, org.junit.Assume contains methods for stating assumptions about the conditions in which a test is meaningful. It has the following five methods:
assumeFalse()
assumeNoException()
assumeNotNull()
assumeThat()
assumeTrue()
JUnit5 has the following three methods:
assumeFalse()
assumingThat()
assumeTrue()
Below is an example of assumeThat() annotation in JUnit5.
    @Test
    void assumingThatTest() {
        System.setProperty("ENV", "UAT");
        assumingThat(
                "UAT".equals(System.getProperty("ENV")),
                () -> {
                    // Since the condition is true, this assertion will get executed
                    System.out.println("Assuming that executable executed");
                    assertEquals((num1+num2),num4,"The product of "+ num1 +" and "+ num2 +" is not equal to "+num4);
                });

        System.out.println("Loop outside");
        assertEquals((num5-num2),num6,"The difference of "+ num5 +" and "+num2+" is not equal to " + num6);
    }
The output of the above program is
6. Conditional Test Execution
In JUnit4, @Ignore is used to skip the execution of a test whereas @Disabled or one of the other built-in execution conditions is used to skip the execution of the test in JUnit5. To know more about skipping the tests in JUnit5, please refer to this tutorial – How to disable tests in JUnit5 – @Disabled.
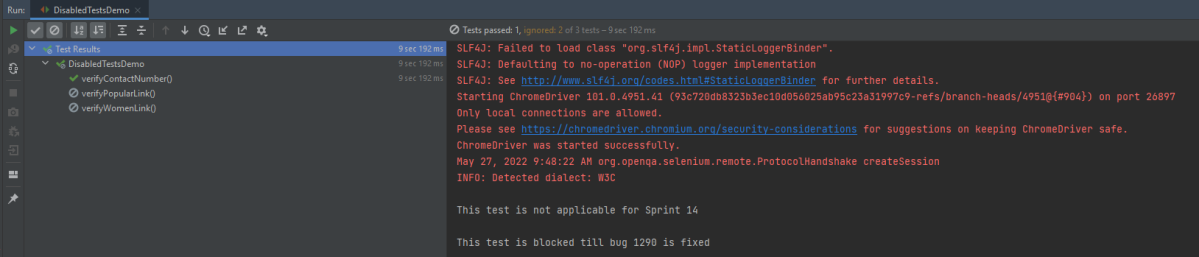
Below is an example of @Disabled in JUnit5.
import io.github.bonigarcia.wdm.WebDriverManager;
import org.junit.jupiter.api.*;
import org.openqa.selenium.By;
import org.openqa.selenium.WebDriver;
import org.openqa.selenium.WebElement;
import org.openqa.selenium.chrome.ChromeDriver;
import org.openqa.selenium.chrome.ChromeOptions;
import static org.junit.jupiter.api.Assertions.*;

class DisabledTestsDemo {

    WebDriver driver;

    @BeforeEach
    public void setUp() {

        WebDriverManager.chromedriver().setup();
        ChromeOptions chromeOptions = new ChromeOptions();
        driver = new ChromeDriver(chromeOptions);
        driver.manage().window().fullscreen();
        driver.get("http://automationpractice.com/index.php");

    }

    @Disabled("This test is not applicable for Sprint 14")
    @Test
    void verifyPopularLink() {

        boolean displayed = driver.findElement(By.xpath("//*[@id='home-page-tabs']/li[1]/a")).isDisplayed();
        assertTrue(displayed);
    }

    @Test
    void verifyContactNumber() {

        String contactDetail = driver.findElement(By.xpath("//span[@class='shop-phone']/strong")).getText();
        assertEquals("0123-456-789", contactDetail);
    }

    @Disabled("This test is blocked till bug 1290 is fixed")
    @Test
    void verifyWomenLink() {

        boolean enabled = driver.findElement(By.xpath("//*[@id='block_top_menu']/ul/li[1]/a")).isEnabled();
        assertTrue(enabled);
    }

    @AfterEach
    public void tearDown() {
        driver.close();
    }
}
The output of the above program is
JUnit 5 provides the ExecutionCondition extension API to enable or disable a test or container (test class) conditionally. This is like using @Disabled on a test but it can define custom conditions. There are multiple built-in conditions, such as:
@EnabledOnOs and @DisabledOnOs: Enables a test only on specified operating systems.
@EnabledOnJre and @DisabledOnJre: Specifies the test should be enabled or disabled for specific versions of Java.
@EnabledIfSystemProperty: Enables a test based on the value of a JVM system property.
@EnabledIf: Uses scripted logic to enable a test if scripted conditions are met.
7. Extending JUnit
@RunWith no longer exists; superseded by @ExtendWith in JUnit5.
In JUnit 4, customizing the framework generally meant using a @RunWith annotation to specify a custom runner. Using multiple runners was problematic, and usually required chaining or using a @Rule. This has been simplified and improved in JUnit 5 using extensions.
import net.serenitybdd.core.Serenity;
import net.serenitybdd.junit5.SerenityJUnit5Extension;
import net.thucydides.core.annotations.Managed;
import net.thucydides.core.annotations.Steps;
import net.thucydides.core.annotations.Title;
import org.junit.jupiter.api.Test;
import org.junit.jupiter.api.extension.ExtendWith;
import org.openqa.selenium.WebDriver;
import static org.assertj.core.api.Assertions.assertThat;

 @ExtendWith(SerenityJUnit5Extension.class)
 class ApplicationLoginJUnit5Tests {

        @Managed
        WebDriver driver;

        @Steps
        NavigateAction navigateAction;

        @Steps
        StepLoginPage loginPage;

        @Test
        @Title("Login to application with valid credentials navigates to DashBoard page")

         void successfulLogin() {

            navigateAction.toTheHomePage();

            // When
            loginPage.inputUserName("Admin");
            loginPage.inputPassword("admin123");
            loginPage.clickLogin();

            // Then
            Serenity.reportThat("Passing valid credentials navigates to DashBoard page",
                    () -> assertThat(dashboardPage.getHeading()).isEqualToIgnoringCase("DashBoard"));
        }
    }
8. Non-public Test Methods are Allowed
JUnit 5 test classes and test methods are not required to be public. We can now make them package protected. JUnit internally uses reflection to find test classes and test methods. Reflection can discover them even if they have limited visibility, so there is no need for them to be public.
9. Repeat Tests
JUnit Jupiter provides the ability to repeat a test a specified number of times by annotating a method with @RepeatedTest and specifying the total number of repetitions desired. To know more about RepestedTest, please refer to this tutorial – How to Retry Test in JUnit5 – @RepeatedTest
Test parameterization existed in JUnit 4 with built-in libraries like JUnit4Parameterized or third-party libraries like JUnitParams. In JUnit 5, parameterized tests are completely built-in and adopt some of the best features from JUnit4Parameterized and JUnitParams. To know more about the parameterized tests in JUnit5, please refer to this tutorial – How to parameterized Tests in JUnit5.
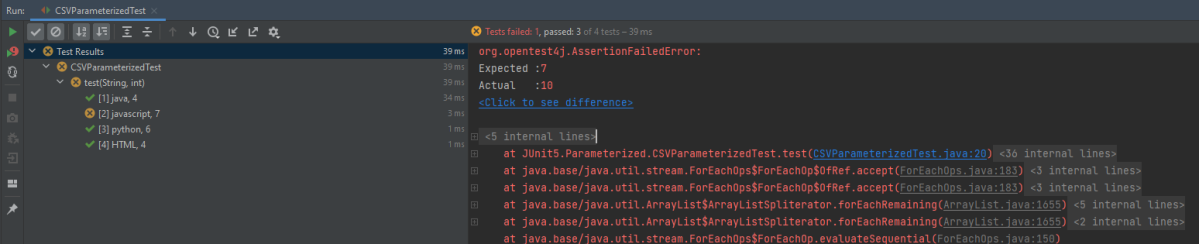
Below is an example of parameterized Test in JUnit5.
public class CSVParameterizedTest {

    @ParameterizedTest
    @CsvSource({
            "java,      4",
            "javascript,   7",
            "python,    6",
            "HTML,    4",
    })


    void test(String str, int length) {
        assertEquals(length, str.length());
    }
}
The output of the above program is
Congratulations. We have gone through the differences between JUnit4 and JUnit5. Happy Learning!!