In the previous tutorial, I explained about creating a new Excel file and writing data in that new Excel file using Java. In this tutorial, I will explain How to open and update existing Excel files in Java.
I’m using Apache POI to write data to the Excel file. To download and install Apache POI, refer here.
If you are using Maven, then you need to add the below dependency in pom.xml.
To know more about various interfaces and classes for managing Excel, pleaserefer to this tutorial.
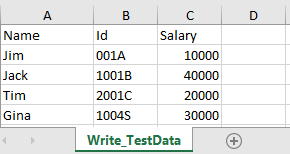
In the below example, I have an existing Excel with the name “EmployeeDetails.xlsx”.
This is Excel which I am going to update. I will add 2 rows below the last row in Excel.
Below is a complete example of updating the data in existing Excel. One thing we need to note here is that we can update the Excel file only when we close it first.
import java.io.File;
import java.io.FileInputStream;
import java.io.FileOutputStream;
import java.io.IOException;
import org.apache.poi.xssf.usermodel.XSSFCell;
import org.apache.poi.xssf.usermodel.XSSFRow;
import org.apache.poi.xssf.usermodel.XSSFSheet;
import org.apache.poi.xssf.usermodel.XSSFWorkbook;
public class ExcelFileUpdateExample {
public static void main(String[] args) {
try {
FileInputStream fis = new FileInputStream(new File("EmployeeDetails.xlsx"));
// Create object of XSSFWorkbook class
XSSFWorkbook workbook = new XSSFWorkbook(fis);
// Create object of XSSFWorkbook class
XSSFSheet sheet = workbook.getSheet("Write_TestData");
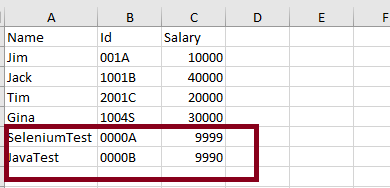
Object[][] bookData = { { "SeleniumTest", "0000A", 9999 }, { "JavaTest", "0000B", 9990 }, };
// Get last row in Sheet
int rowCount = sheet.getLastRowNum();
for (Object[] Book : bookData) {
// Create row for all the new data
XSSFRow row = sheet.createRow(++rowCount);
int columnCount = 0;
// Create new cell for each row
XSSFCell cell = row.createCell(columnCount);
for (Object field : Book) {
cell = row.createCell(columnCount++);
if (field instanceof String) {
cell.setCellValue((String) field);
} else if (field instanceof Integer) {
cell.setCellValue((Integer) field);
}
}
}
fis.close();
// Write the workbook in file system
FileOutputStream outputStream = new FileOutputStream("EmployeeDetails.xlsx");
workbook.write(outputStream);
System.out.println("Excel is updated successfully");
// Close the workbook
workbook.close();
outputStream.close();
} catch (IOException e) {
e.printStackTrace();
}
}
}
The output of the above program is
Below is the updated Excel.
Update a specific cell in the Excel file
In the below example, I will update the value in a specific cell. As you can see in the above image, I will update, 1004S to “Updated Value”. Below is the code snippet for the same.
import java.io.File;
import java.io.FileInputStream;
import java.io.FileOutputStream;
import java.io.IOException;
import org.apache.poi.ss.usermodel.CellType;
import org.apache.poi.xssf.usermodel.XSSFCell;
import org.apache.poi.xssf.usermodel.XSSFSheet;
import org.apache.poi.xssf.usermodel.XSSFWorkbook;
public class UpdateExcelDemo {
public static void main(String[] args) {
try {
// Create an object of FileInputStream class to read excel file
FileInputStream fis = new FileInputStream(new File("EmployeeDetails.xlsx"));
// Create object of XSSFWorkbook class
XSSFWorkbook workbook = new XSSFWorkbook(fis);
// Read excel sheet by sheet name
XSSFSheet sheet = workbook.getSheet("Write_TestData");
// Print data present at row 0 column 2
System.out.println(sheet.getRow(4).getCell(1).getStringCellValue());
// Get the Cell at index 3 from the above row
XSSFCell cell = sheet.getRow(4).getCell(1);

cell.setCellType(CellType.STRING);
cell.setCellValue("Updated Value");
// Write the output to the file
FileOutputStream fileOut = new FileOutputStream(new File("EmployeeDetails.xlsx"));
workbook.write(fileOut);
System.out.println("Id column in Excel is updated successfully");
fileOut.close();
// Closing the workbook
workbook.close();
} catch (IOException e) {
e.printStackTrace();
}
}
}
The output of the above program is
Below is the updated Excel.
That’s it! Well done.
Congratulations on making it through this tutorial and hope you found it useful! Happy Learning!! Cheers!!
Cucumber and Rest-Assured need Java to be installed on the system to run the tests. Click here to learn How to install Java.
Step 2 – Download and setup Eclipse IDE on the system
The Eclipse IDE (integrated development environment) provides strong support for Java developers. Click here to learn How to install Eclipse.
Step 3 – Setup Gradle
To build a test framework, we need to add several dependencies to the project. This can be achieved by any build tool. I have used the Gradle Build Tool. Click here to learn How to install Gradle.
Step 4 – Create a new Gradle Project
To create a new Gradle project, go to the top left side and select File -> New Project -> Gradle -> Gradle project -> Next ->Enter Project Name and Project Location ->Next ->Select Gradle Version ->Next ->Review the Configuration -> Finish.
Step 5 – Add Rest-Assured and Cucumber dependencies to the Gradle project
This syntax is used for Gradle 5.0 and higher.
dependencies {
    // This dependency is exported to consumers, that is to say found on their compile classpath.
    api 'org.apache.commons:commons-math3:3.6.1'

    // This dependency is used internally, and not exposed to consumers on their own compile classpath.
    implementation 'com.google.guava:guava:29.0-jre'

    testImplementation 'io.cucumber:cucumber-java:6.8.1'
    testImplementation 'io.cucumber:cucumber-junit:6.8.1'
    testImplementation 'io.rest-assured:rest-assured:4.3.3'
If you are using Gradle 4.10.3 or older, use the below dependency block to build.gradle.
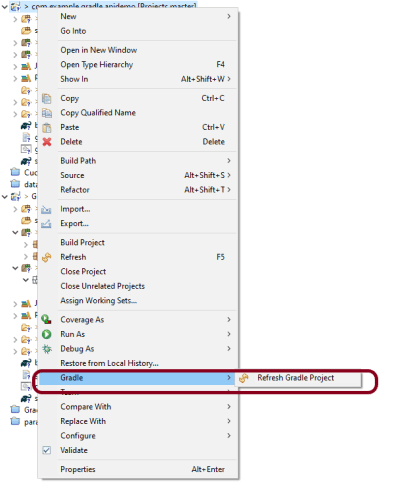
Once you have added dependencies, configurations, and Gradle cucumber task, Right-click on the project, Hover to the Gradle option, and click Refresh Gradle Project. Eclipse does not automatically update the classpath of the build.gradle file is updated. Select GradleRefresh Gradle Project from the context menu of the project or from your build.gradle file for that.
Step 8 – Create a feature file under src/test/resources
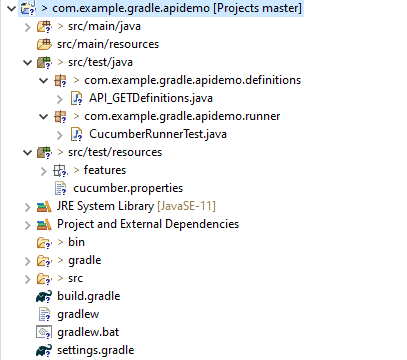
A new Gradle Project is created with 4 folders – src/main/java, src/main/resources, src/test/java and src/test/resources. Features are created under the src/test/resources directory. Create a folder with name features. Now, create the feature file in this folder. The feature file should be saved with the extension .feature. This feature file contains the test scenarios created to test the application. The Test Scenarios are written in Gherkins language in the format of Given, When, Then, And, But.
Below is an example of a Test Scenario where we are using the GET method to get the information from the API.
Feature: Validation of get method

@GetUserDetails
  Scenario Outline: Send a valid Request to get user details

  Given I send a request to the URL to get user details
  Then the response will return status 200 and id <id> and salary <employee_salary> and name "<employee_name>" and age <employee_age> and message "<message>"

Examples:
    |id  |employee_salary|employee_name |employee_age  |message                                  |
    |1   |320800         |Tiger Nixon   |61            |Successfully! Record has been fetched.   |
Step 9 – Create the Step Definition class or Glue Code for the Test Scenario
Step Definition acts as an intermediate to your runner and feature file. It stores the mapping between each step of the scenario in the Feature file. So when you run the scenario, it will scan the step definition file to check the matched glue or test code.
import io.restassured.http.ContentType;

import io.restassured.response.ValidatableResponse;

import static io.restassured.RestAssured.given;
import static org.hamcrest.Matchers.equalTo;

import io.cucumber.java.en.Given;
import io.cucumber.java.en.Then;

public class API_GETDefinitions {


    private ValidatableResponse validatableResponse;

    private String endpoint = "http://dummy.restapiexample.com/api/v1/employee/1";

    @Given("I send a request to the URL to get user details")
    public void sendRequest(){
        validatableResponse = given().contentType(ContentType.JSON)
                .when().get(endpoint).then();

        System.out.println("Response :"+validatableResponse.extract().asPrettyString());
    }


    @Then("the response will return status {int} and id {int} and salary {int} and name {string} and age {int} and message {string}")
    public void verifyStatus(int statusCode, int id, int emp_Salary, String emp_name, int emp_age, String message ){

        validatableResponse.assertThat().statusCode(statusCode);

        validatableResponse.assertThat().body("data.id",equalTo(id));

        validatableResponse.assertThat().body("data.employee_salary",equalTo(emp_Salary));

        validatableResponse.assertThat().body("data.employee_name",equalTo(emp_name));

        validatableResponse.assertThat().body("data.employee_age",equalTo(emp_age));

        validatableResponse.assertThat().body("message",equalTo(message));

    }
}
In order to use REST assured effectively, it’s recommended to statically import methods from the following classes:
A runner will help us to run the feature file and act as an interlink between the feature file and step definition Class. To know more about Runner, refer to this link.
import org.junit.runner.RunWith;

import io.cucumber.junit.Cucumber;
import io.cucumber.junit.CucumberOptions;

@RunWith(Cucumber.class)

@CucumberOptions(plugin ="pretty",features= {"src/test/resources/features/API_GET.feature"}, glue= {"com.example.gradle.apidemo"})

public class CucumberRunnerTest {

}
Step 11 – Run the tests from JUnit
You can execute the test script by right-clicking on the Test Runner class -> Run As JUnit.
Step 12 – Run the tests from the Command Line
Run the following Gradle task from the directory path wherebuild.gradlefile is located. To know more about this report, refer here.
gradle cucumber
Below is the screenshot of the execution of Cucumber tests in Command-Line.
Step 13 – Cucumber Report Generation
To get Cucumber Test Reports, add cucumber.properties under src/test/resources and add the below instruction in the file.
cucumber.publish.enabled=true
Below is the image of the Cucumber Report.
We are done! Congratulations on making it through this tutorial and hope you found it useful! Happy Learning!!
In this tutorial, I will explain Parallel Testing usingCucumber with JUnit4.
Cucumber-JVM allows parallel execution across multiple threads since version 4.0.0. There are several options to incorporate this built-in feature in a Cucumber project. You can do so by using JUnit, TestNG, or CLI.
Cucumber can be executed in parallel using JUnit and Maven test execution plugins.
In JUnit, thefeature files are run in parallel rather than in scenarios, which means all the scenarios in a feature file will be executed by the same thread. You can use either Maven Surefire or Failsafe plugin to execute the runner. In this tutorial, I’m using the Maven Surefire plugin.
Create a Maven project in your favorite IDE using the cucumber-archetype or by adding Cucumber dependencies to the POM as detailed here and Junit dependencies here. To know more about How to set up a Cucumber Maven project with Eclipse, please refer to this tutorial – Cucumber Tutorial – How to setup Cucumber with Eclipse.
Below is the structure of the project.
Step 2 – Update the Properties section in Maven pom.xml
Step 5 – Create a feature folder in src/test/resources
Add 2 feature files – LoginPage.feature and ForgotPasswordPage.feature in the features folder present in src/test/resources.
LoginPage.feature
Feature: Login to HRM Application

  Background:
    Given User is on Home page

  @ValidCredentials
  Scenario: Login with valid credentials - Feature 1, Scenario - 1

    When User enters username as "Admin" and password as "admin123"
    Then User should be able to login successfully

  @InvalidCredentials
  Scenario Outline: Login with invalid credentials - Feature 1, Scenario - 2

    When User enters username as "<username>" and password as "<password>"
    Then User should be able to see error message "<errorMessage>"

    Examples:
      | username    | password   | errorMessage                      |
      | Admin       | admin12$$  | Invalid credentials               |
      | admin$$     | admin123   | Invalid credentials               |
      | abc123      | xyz$$      | Invalid credentials               |
      |             | xyz$$      | Invalid credentials               |
ForgotPasswordPage.feature
Feature: Forgot Password Page

  Background:
    Given User is on Home page

  @BackFunctionality
  Scenario: Validate the cancel functionality - Feature 2, Scenario - 1

    When User clicks on Forgot your password? link
    Then User should be able to navigate to Reset Password page
    And User clicks on Cancel button to go back to Login Page

  @ResetFunctionality
  Scenario: Validate the Reset Password functionality - Feature 2, Scenario - 2

    When User clicks on Forgot your password? link
    Then User should be able to navigate to Reset Password page
    And User clicks on Reset Password button and provide username as "abc1234"
    And Verify the message "Reset Password link sent successfully"
Step 6 – Create the Page Object Model classes of LoginPage and ForgotPasswordPage feature files
Page Object Model class contains all the locators and the actions performed on these locators for the particular class to improve the readability and maintainability of the code.
Below are the Page Object Model classes for these feature files.
LoginPage
import org.openqa.selenium.By;
import org.openqa.selenium.WebDriver;

public class LoginPage {

    public WebDriver driver;

    By userName = By.name("username");
    By passWord = By.name("password");
    By login = By.xpath("//*[@id='app']/div[1]/div/div[1]/div/div[2]/div[2]/form/div[3]/button");
    By errorMessage = By.xpath("//*[@id='app']/div[1]/div/div[1]/div/div[2]/div[2]/div/div[1]/div[1]/p");
    By forgotPasswordLink = By.xpath("//*[@id='app']/div[1]/div/div[1]/div/div[2]/div[2]/form/div[4]/p");
    By loginPageTitle = By.xpath("//*[@id='app']/div[1]/div/div[1]/div/div[2]/h5");

    public LoginPage(WebDriver driver) {
        this.driver = driver;
    }

    public String getErrorMessage() {
        return driver.findElement(errorMessage).getText();
    }

    public void login(String strUserName, String strPassword) {

        // Fill user name
        driver.findElement(userName).sendKeys(strUserName);

        // Fill password
        driver.findElement(passWord).sendKeys(strPassword);

        // Click Login button
        driver.findElement(login).click();

    }

    // Click on Forgot Password link
    public void clickOnForgotPasswordLink() {
        driver.findElement(forgotPasswordLink).click();
    }

    //Get Login Page Title
    public String getLoginPageTitle() {
        return driver.findElement(loginPageTitle).getText();
    }
}
HomePage
import org.openqa.selenium.By;
import org.openqa.selenium.WebDriver;

public class HomePage {

    public WebDriver driver;

    public HomePage(WebDriver driver) {
        this.driver = driver;
    }

    By homePageUserName = By.xpath("//*[@id='app']/div[1]/div[1]/header/div[1]/div[1]/span/h6");

    public String getHomePageText() {
        return driver.findElement(homePageUserName).getText();
    }
}
ForgotPasswordPage
import org.openqa.selenium.By;
import org.openqa.selenium.WebDriver;

public class ForgotPasswordPage {

    WebDriver driver;

     By forgotPasswordPageTitle = By.xpath("//*[@id='app']/div[1]/div[1]/div/form/h6");
     By cancelBtn = By.xpath("//*[@id='app']/div[1]/div[1]/div/form/div[2]/button[1]");
     By resetPasswordBtn = By.xpath("//*[@id='app']/div[1]/div[1]/div/form/div[2]/button[2]");
     By userName = By.name("username");
     By resetMessage = By.xpath("//*[@id='app']/div[1]/div[1]/div/h6");

    public ForgotPasswordPage(WebDriver driver) {
        this.driver = driver;
    }

    // Get the Title of ForgotPage
    public String getForgotPageText() {
        return driver.findElement(forgotPasswordPageTitle).getText();
    }

    // Click Cancel Button
    public void clickOnCancelBtn() {
         driver.findElement(cancelBtn).click();
    }

    // Click ResetPassword Button
    public void clickOnRestPasswordBtn() {
        driver.findElement(resetPasswordBtn).click();
    }

    // Type username in TextBox
    public void TypeOnUsernameTextBox(String username) {
        driver.findElement(userName).sendKeys(username);
    }

    // Get Message
    public String getRestMessage() {
        return driver.findElement(resetMessage).getText();
    }
}
PageObjectManager – This class creates the object of all the above-mentioned Page Object Model classes. This an optional class. If you want you can create the objects in StepDefinition class also.
public class PageObjectManager {

    public LoginPage loginPage;
    public HomePage homePage;
    public ForgotPasswordPage forgotPasswordPage;
    public WebDriver driver;


    public PageObjectManager(WebDriver driver)
    {
        this.driver = driver;
    }

    public LoginPage getLoginPage()
    {

        loginPage= new LoginPage(driver);
        return loginPage;
    }

    public HomePage getHomePage()
    {
        homePage = new HomePage(driver);
        return homePage;
    }

    public ForgotPasswordPage getForgotPasswordPage()
    {
        forgotPasswordPage = new ForgotPasswordPage(driver);
        return forgotPasswordPage;
    }
}
Step 7 – Create the Step Definition classes for both feature files or Glue Code
Below is the Step Definition for LoginPage.feature.
import org.example.pageObjects.HomePage;
import org.example.pageObjects.LoginPage;
import org.example.pageObjects.PageObjectManager;
import org.example.utils.TestSetUp;
import io.cucumber.java.en.Given;
import io.cucumber.java.en.Then;
import io.cucumber.java.en.When;
import org.junit.Assert;

public class LoginPageDefinitions {

    TestSetUp setUp;
    public PageObjectManager pageObjectManager;
    public LoginPage loginPage;
    public HomePage homePage;


    public LoginPageDefinitions(TestSetUp setUp)  {
        this.setUp = setUp;
        this.loginPage = setUp.pageObjectManager.getLoginPage();
        this.homePage= setUp.pageObjectManager.getHomePage();
    }

    @Given("User is on Home page")
    public void loginTest()  {
        setUp.baseTest.WebDriverManager().get("https://opensource-demo.orangehrmlive.com/");

    }

    @When("User enters username as {string} and password as {string}")
    public void goToHomePage(String userName, String passWord) {

        // login to application
        loginPage.login(userName, passWord);

        // go the next page

    }

    @Then("User should be able to login successfully")
    public void verifyLogin() {

        // Verify home page
        Assert.assertTrue(homePage.getHomePageText().contains("Dashboard"));

    }

    @Then("User should be able to see error message {string}")
    public void verifyErrorMessage(String expectedErrorMessage) {

        // Verify home page
        Assert.assertEquals(loginPage.getErrorMessage(),expectedErrorMessage);

    }

}
Below is the Step Definition for ForgotPasswordPage.feature.
import io.cucumber.java.en.Then;
import io.cucumber.java.en.When;
import org.example.pageObjects.ForgotPasswordPage;
import org.example.pageObjects.LoginPage;
import org.example.pageObjects.PageObjectManager;
import org.example.utils.TestSetUp;
import org.junit.Assert;


public class ForgotPasswordPageDefinitions {

    TestSetUp setUp;
    PageObjectManager pageObjectManager;
    public LoginPage loginPage;
    public  ForgotPasswordPage forgotPasswordPage;

    public ForgotPasswordPageDefinitions(TestSetUp setUp) {
        this.setUp = setUp;
        this.loginPage = setUp.pageObjectManager.getLoginPage();
        this.forgotPasswordPage = setUp.pageObjectManager.getForgotPasswordPage();
    }

    @When("User clicks on Forgot your password? link")
    public void forgotPasswordLink() {

        loginPage.clickOnForgotPasswordLink();

    }

    @Then("User should be able to navigate to Reset Password page")
    public void verifyForgotPasswordPage() {

        Assert.assertEquals(forgotPasswordPage.getForgotPageText(),"Reset Password");

    }

    @Then("User clicks on Cancel button to go back to Login Page")
    public void verifyCancelBtn() {

        forgotPasswordPage.clickOnCancelBtn();
        Assert.assertEquals(loginPage.getLoginPageTitle(),"Login");

    }

    @Then("User clicks on Reset Password button and provide username as {string}")
    public void verifyResetPasswordBtn(String username) {

        forgotPasswordPage.TypeOnUsernameTextBox(username);
        forgotPasswordPage.clickOnRestPasswordBtn();

    }

    @Then("Verify the message {string}")
    public void verifyMessage(String message) {

        //  ForgotPasswordPage forgotPasswordPage = setUp.pageObjectManager.getForgotPasswordPage();
        Assert.assertEquals(forgotPasswordPage.getRestMessage(),message);

    }
}
Step 8 – Create the Hook Class and Dependency Injection class (TestSetUp) and BaseTest class
Below is the code for the ApplicationHook Class.
import io.cucumber.java.After;
import io.cucumber.java.AfterStep;
import io.cucumber.java.Scenario;
import org.example.utils.TestSetUp;
import org.openqa.selenium.OutputType;
import org.openqa.selenium.TakesScreenshot;
import org.openqa.selenium.WebDriver;

public class ApplicationHooks {

 public TestSetUp setUp;

    public ApplicationHooks(TestSetUp setUp) {
        this.setUp = setUp;
    }

    @After
    public void tearDown( )  {
        setUp.baseTest.WebDriverManager().quit();
    }

    @AfterStep
    public void addScreenshot(Scenario scenario) {

        WebDriver driver =  setUp.baseTest.WebDriverManager();
        if(scenario.isFailed()) {
            final byte[] screenshot = ((TakesScreenshot) driver).getScreenshotAs(OutputType.BYTES);
            scenario.attach(screenshot, "image/png", "image");
        }

    }

}
Below is the code for the Dependency Injection class. In Cucumber, if we want to share the state between multiple-step definition files, we will need to use dependency injection (DI).
import org.openqa.selenium.WebDriver;
import org.openqa.selenium.WebElement;
import pageObjects.PageObjectManager;

public class TestSetUp {

    public WebElement errorMessage;
    public WebElement homePageUserName;
    public PageObjectManager pageObjectManager;
    public BaseTest baseTest;

    public TestSetUp()  {

        baseTest = new BaseTest();
        pageObjectManager = new PageObjectManager(baseTest.WebDriverManager());

    }
}
BaseTest class is used to initialize the WebDriver.
import io.github.bonigarcia.wdm.WebDriverManager;
import org.openqa.selenium.WebDriver;
import org.openqa.selenium.chrome.ChromeDriver;
import java.time.Duration;

public class BaseTest {

    public WebDriver driver;
    public final static int TIMEOUT = 10;

    public WebDriver WebDriverManager ()  {


        if (driver == null) {

            WebDriverManager.chromedriver().setup();
            driver = new ChromeDriver();
            driver.manage().timeouts().implicitlyWait(Duration.ofSeconds(TIMEOUT));
            driver.manage().window().maximize();
            driver.get(url);

        }
        return driver;
    }
}
Step 9 – Create a Test Runner to run the tests
import io.cucumber.junit.Cucumber;
import io.cucumber.junit.CucumberOptions;
import org.junit.runner.RunWith;

@RunWith(Cucumber.class)
@CucumberOptions(tags = "", features = "src/test/resources/features", glue = "org.example.definitions")

public class CucumberRunnerTests  {

}
Step 10 – Cucumber Report Generation
To get Cucumber Test Reports, add cucumber.properties in src/test/resources and add the below instruction in the file.
cucumber.publish.enabled=true
Step 11 – Execute the tests from the command line
mvn clean test
Below is the execution screen. There are two feature files.
When we invoke the test through Maven, the surefire plugin executes the Feature files parallelly. Here, LoginPage has 5 scenarios and ForgotPasswordPage has 2 scenarios. So, initially when the execution will start 1 scenario from both the tests will be executed parallelly and then again one test from each feature will execute. Later, we will be left with 4 scenarios in the LoginPage feature file, so the scenario will run sequentially of the LoginPage feature file.
All the tests of a particular feature file are executed together as feature files are run in parallel, not scenarios.
Step 12 – Difference between Parallel tests and Non-Parallel Tests
Parallel Tests
Below is the Cucumber Report generated for parallel tests.
When the tests are run as JUnit tests from CucumberRunnerTests, then the tests are executed sequentially.
We are done! Congratulations on making it through this tutorial and hope you found it useful! Happy Learning!!
Step 1- Create a Project Folder and change the directory path to the folder where we want to save the latest files created post creation of the project. Here, I have created a folder – GradleIntelliJDemoFromCMD and changed the directory path.
cd C:\Users\Vibha\Projects\Vibha_Personal\GradleIntelliJDemoFromCMD
Step 2 – Open the Terminal in IntelliJ.
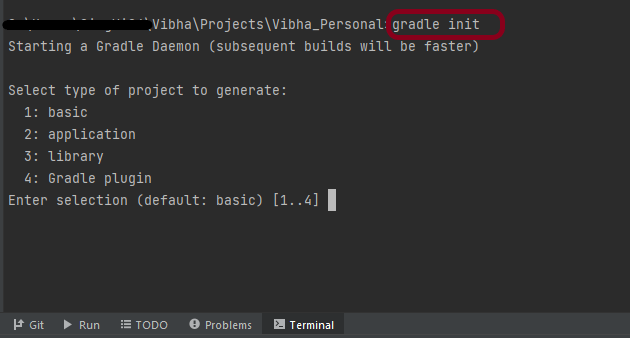
Step 3 – Gradle comes with a built-in task, called init , that initializes a new Gradle project in an empty folder. The init task uses the (also built-in) wrapper task to create a Gradle wrapper script, gradlew. Type the below command and press ENTER.
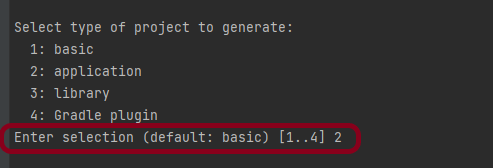
Step 4 – Select the type of project to generate. I’m selecting the application option as if I select basic, it won’t create a src directory. Type 2 and press ENTER.
Step 5 – Select implementation language. This is a Java project, so TYPE 3(Java) and press ENTER.
Step 6 – Select build script DSL (Domain Specific Language) – As in Maven POM.xml (XML) is created to build a script file, here we can use Groovy or Kotlin to build the script file. Type 1 (Groovy) and press ENTER.
Step 7 – Select Test Framework – There are 4 different test frameworks. Depending on your requirement, select an option. I have selected 1 (JUnit 4) and press ENTER.
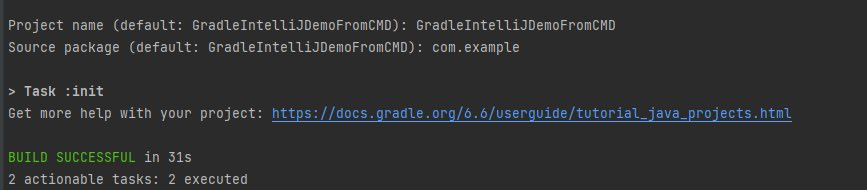
Step 8 – It needs the Project name and Source Package name. If I won’t provide the project name, it will take by default my current folder name which is Gradle_Project. Similarly, if I won’t provide the Source Package name, then it will provide the current project name as Source Package Name.
Project name – GradleIntelliJDemoFromCMD Source Package – com.example
Press ENTER. init script will run and create a Gradle project. You can see as the build is successfull.
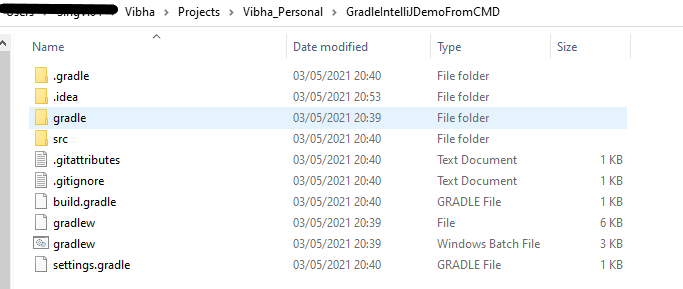
Step 9 – The project is created and placed under the folder GradleIntelliJDemoFromCMD as shown below.
This project structure will have below mentioned files:-
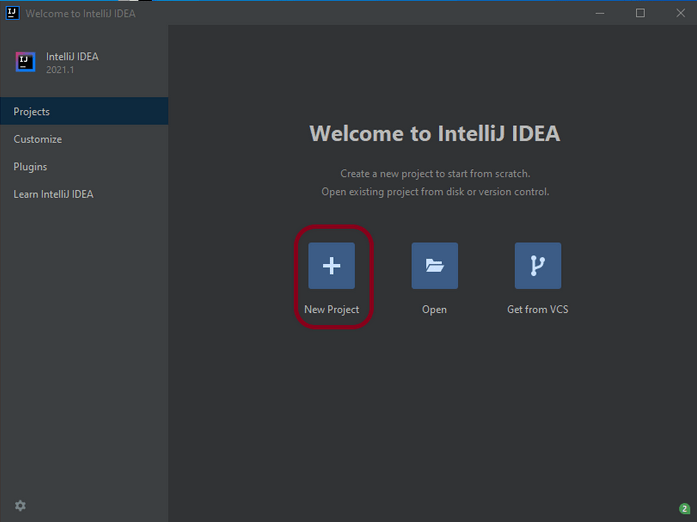
Step 1 – Open the IntelliJ. It will look as shown below. To create a New Project, click on New Project Icon.
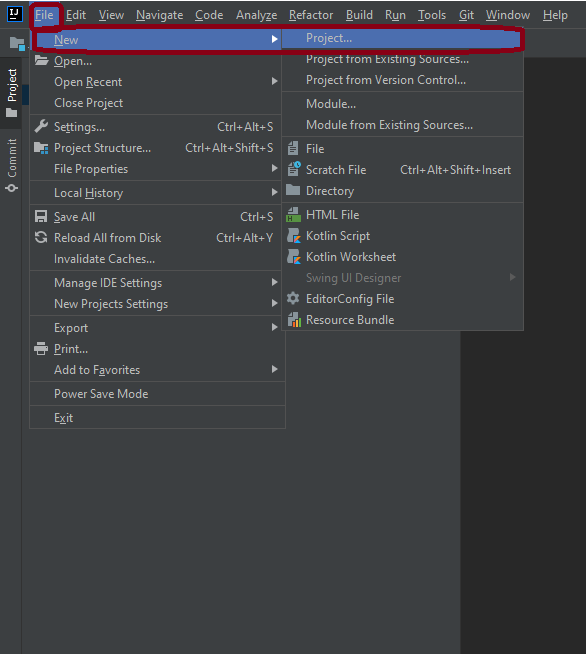
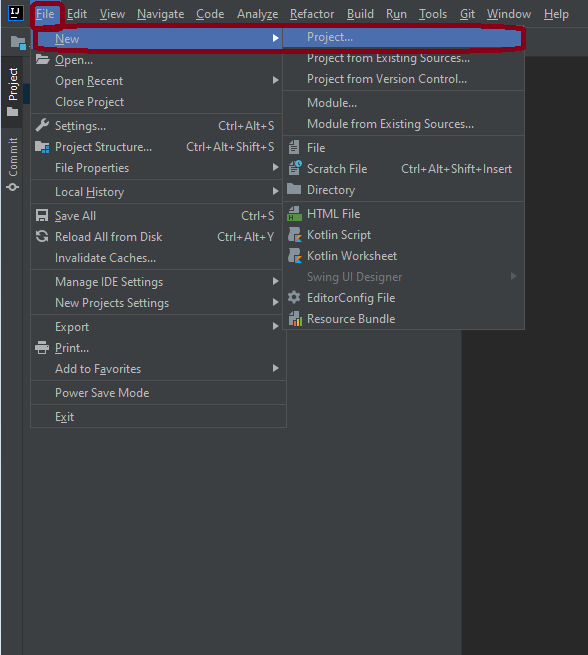
Step 2 – Click on File Option, hover on New Option and click on Project Option as shown below.
Step 3 – Select New Project as Gradle. Project SDK should be current Java version available. Additional Libraries – Java Click on the Next Button.
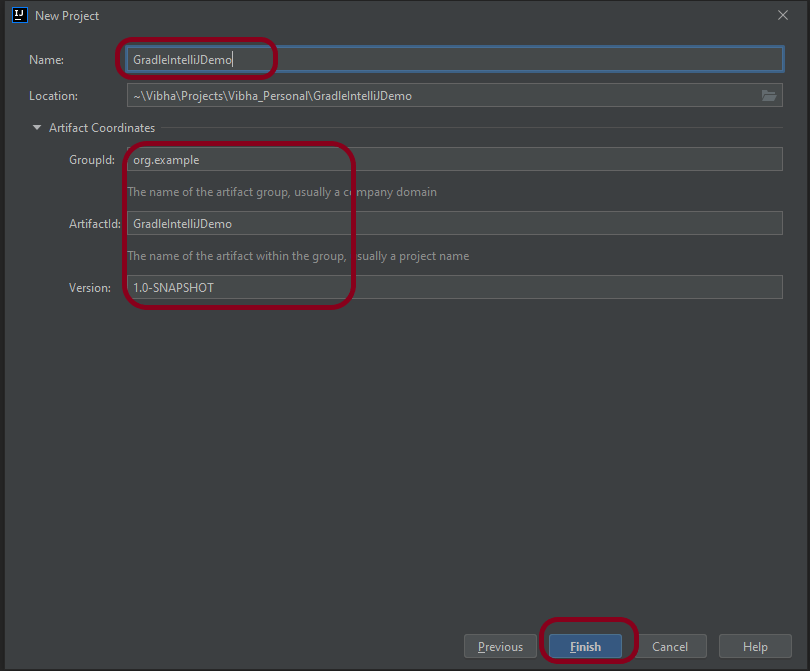
Step 4 – Below screen will appear. Mention the Name, Group Id, Artifact Id and Version . Click the Finish button
Name : GradleIntelliJDemo Group Id : com.example Artifact Id : GradleIntelliJDemo Version : 1.0-SNAPSHOT
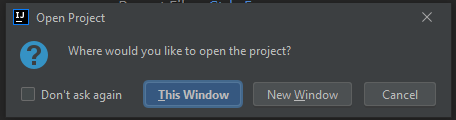
Step 5 – This dialog box will appear on the screen. This provides you the option to open the project in current window or will open a new window with this project. I’m selecting the option – New Window.
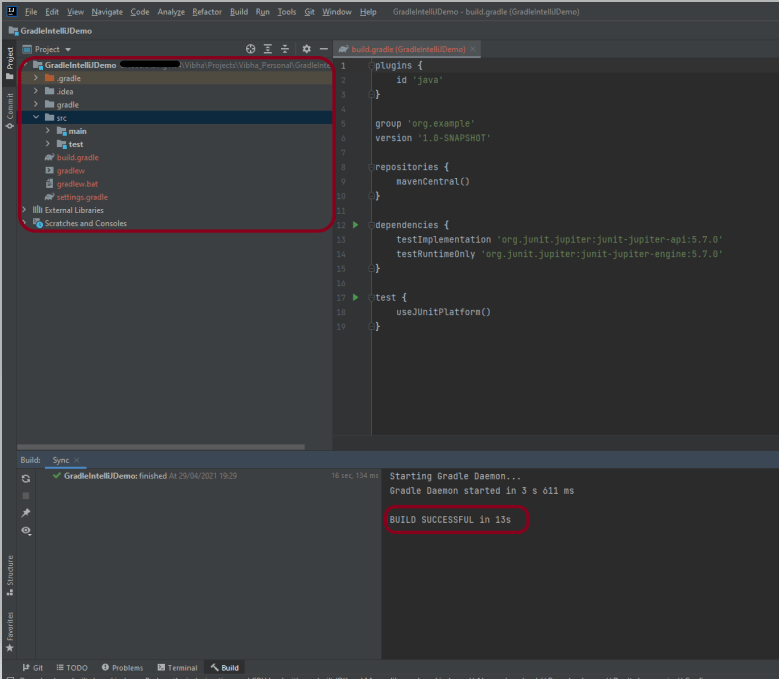
Step 6 – This screen shows the structure of Gradle project as well as build.gradle file.
Step 7 – Project Folder Creation – We can see a folder with the name of project – GradleIntelliJDemo in our Eclipse Workspace.
Step 8 – Right click build.gradle and select Run GradleIntelliJDemo. If the build is successful, below screen appears.
This is how we can create the Gradle project – MavenIntelliJDemo in IntelliJ.
Congratulations on making it through this tutorial and hope you found it useful! Happy Learning!! Cheers!!
Step 1 – Open IntelliJ IDEA IDE. Click on Terminal Button as shown in the below image.
Step 2 – Go to the path where you want to create the project. This can be done by typing command
cd path of folder
Step 3 – This tells Maven to generate a Java project from a Maven template.
mvn archetype:generate
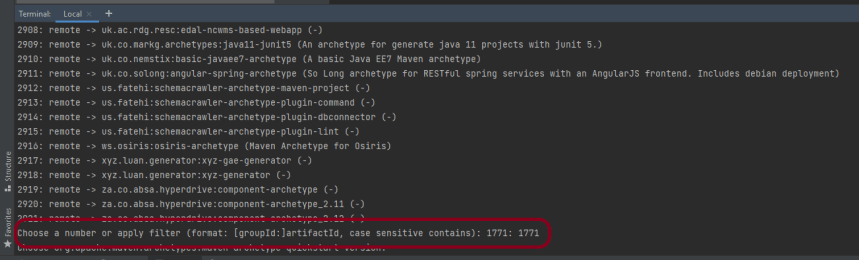
Step 4 – We need to mention the number as displayed on your screen in Command Prompt to proceed further. Like here, Choose a number or apply filter has 1771, so I have also mentioned 1771 in command prompt.
Step 5 – We need to provide again input in command prompt. This time program wants to know which version we want to use. I prefer to use the latest version. Here, it is 8, so I have selected version 8.
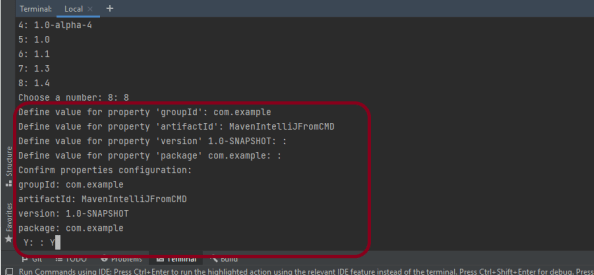
Step 6 – We need to provide 2 input here
A) Value of groupId – This serves as the group identifier of your Maven project, it should be in a form similar to Java packages, such as com.example B) Value of artifactId – This serves as the group-local identifier of my Maven project like MavenIntelliJFromCMD C) Value of Version – The initial version of our project. The default is 1.0-SNAPSHOT D) Value of package – The name of our root package. The default is groupId we have created earlier. We will notice the INFO message about the properties.
If the displayed settings are correct, then just enter Y in :: prompt.
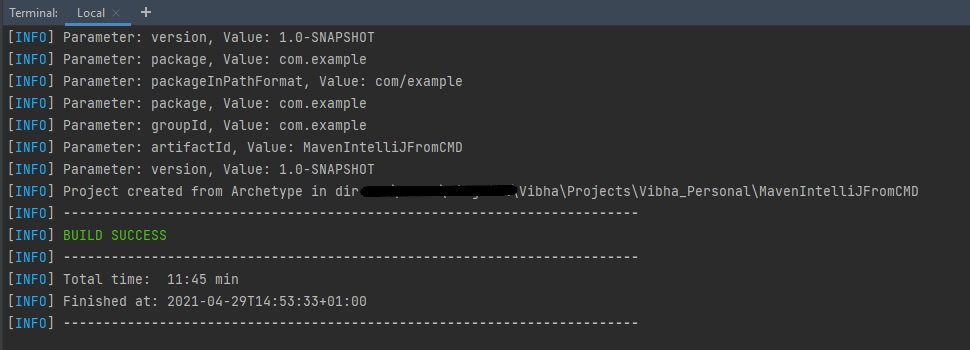
Step 7 –Successful Build – Below screenshot shows that the Maven IntelliJ Project built successfully.
Step 8 –Contents of Project Folder – Open folder MavenIntelliJFromCMD to see the contents of the folder. It should have POM file and src.
This project can be imported in IntelliJ and can be used further. To know how to import Java Maven project in Intellij, click here.
That’s it! We have created a Maven Project in IntelliJ using Command Line.
Congratulations on making it through this tutorial and hope you found it useful! Happy Learning!! Cheers!!
In the previous tutorial, I have explained How to create a Maven Project in IntelliJ. In this tutorail, I will explain how we can import a Java Maven project in IntelliJ IDE.
Step 1 – Open IntelliJ IDEA and Welcome Screen appears. Click Open button present on Welcome Screen.
Step 2 – Navigate to your Maven project and select the top-level folder. Select the project you want to Import. As you can see, I have selected – MavenProjectFromCMD option. Select OK button to proceed to next screen.
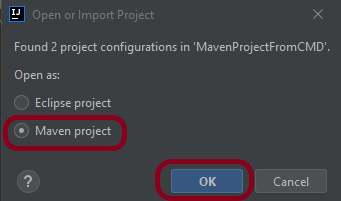
Step 3 – A screen appears to Open or Import project. It will have all the possible configurations for the project. As this is a Maven project, select Mavenproject and click OK Button.
Step 4 – A warning message box will appears. Select Trust Project Button and move forward.
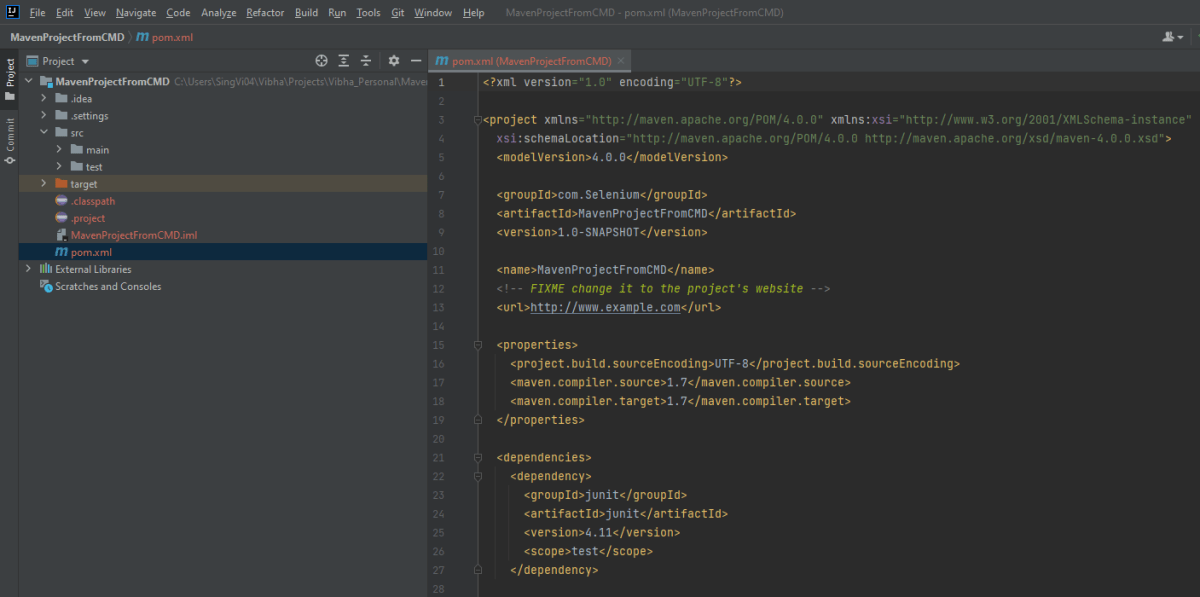
Step 5 -This screens shows that the project is imported.
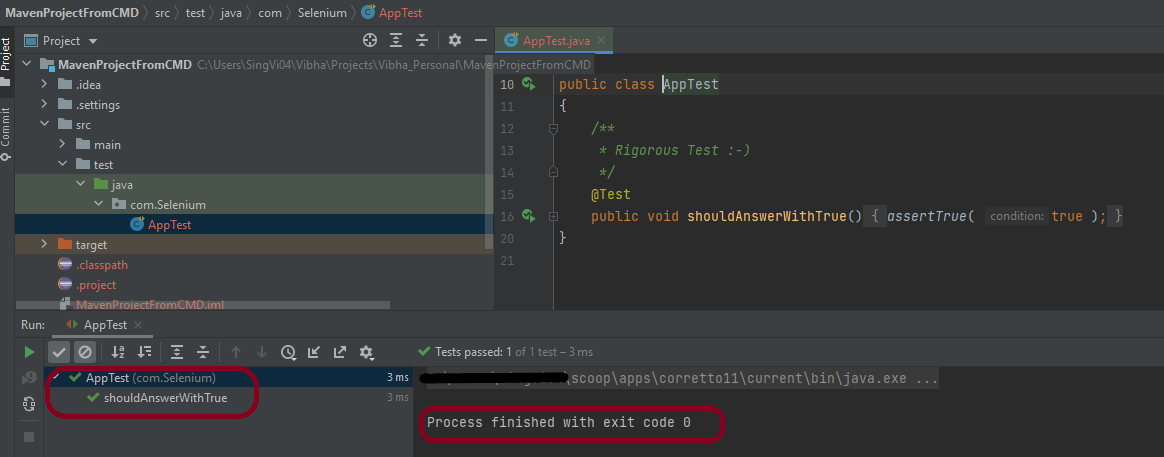
Step 6 – Run the test present in the project. Here, I have run AppTest. Right click on AppTest ->Run ‘AppTest’. Below screen shows that the project is imported successfully.
That’s it! So Simple!!!
Congratulations on making it through this tutorial and hope you found it useful! Happy Learning!!
Step 1 – Open the IntelliJ. It will look as shown below. To create a New Project, click on New Project Icon.
Step 2 – Click on File Option, hover on New Option, and click on Project Option as shown below.
Step 3 – Select New Project as Maven. Project SDKshould be current Java version available. Select option for Create from archetype. This will enable the options to select archetype. Select archetype : maven-archetype-quickstart. Click on the Next Button.
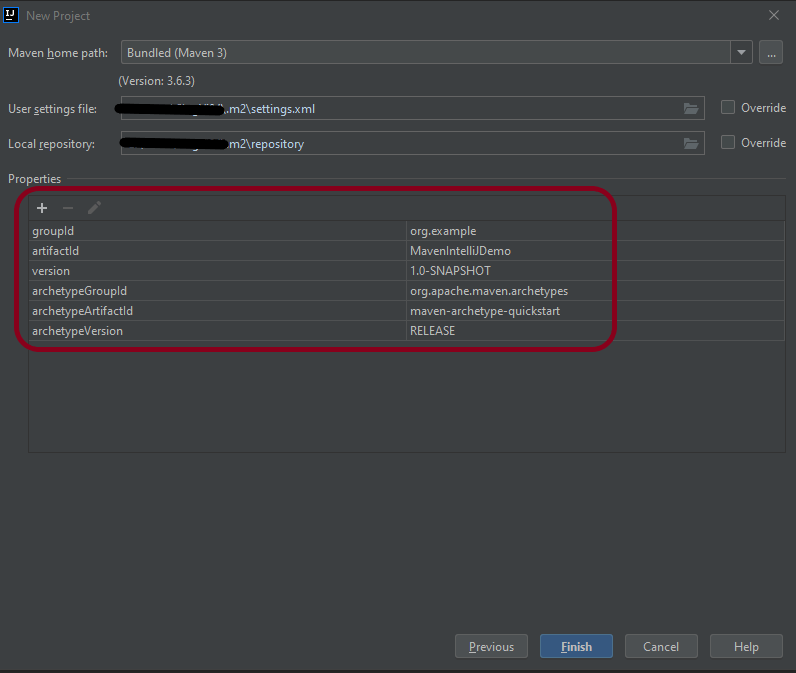
Step 4– Below screen will appear. Mention the Name, Group Id, Artifact Id, and Version. Click the Finish button
Name : MavenIntelliJDemo Group Id : com.example Artifact Id : MavenIntelliJDemo Version : 1.0-SNAPSHOT
Step 5 – Verify the information in the below screen. Click onFinish Button.
Step 6 – This dialog box will appear on the screen. This provides you the option to open the project in the current window or will open a new window with this project. I’m selecting the option – New Window.
Step 7 – This screen shows the structure of the Maven project as well as the POM.xml file.
Step 8 – Project Folder Creation – We can see a folder with the name of the project – MavenIntelliJDemo in our Eclipse Workspace.
This is how we can create the Maven project – MavenIntelliJDemo in IntelliJ.
That’s it! Congratulations on making it through this tutorial and hope you found it useful! Happy Learning!!
In the previous tutorial, I explained how to download and install IntelliJ on Windows. In this tutorial, I will explain how to create a Java project in IntelliJ.
Steps to follow:
Open the IntelliJ. It will look as shown below. To create a New Project, click on the “New Project” Icon.
2. Select Project SDK as the Java version present on your system and select the option as Java. Click on the “Next”button.
3. The next screen provides options to choose Project Template as shown below. Click on the “Next” Button.
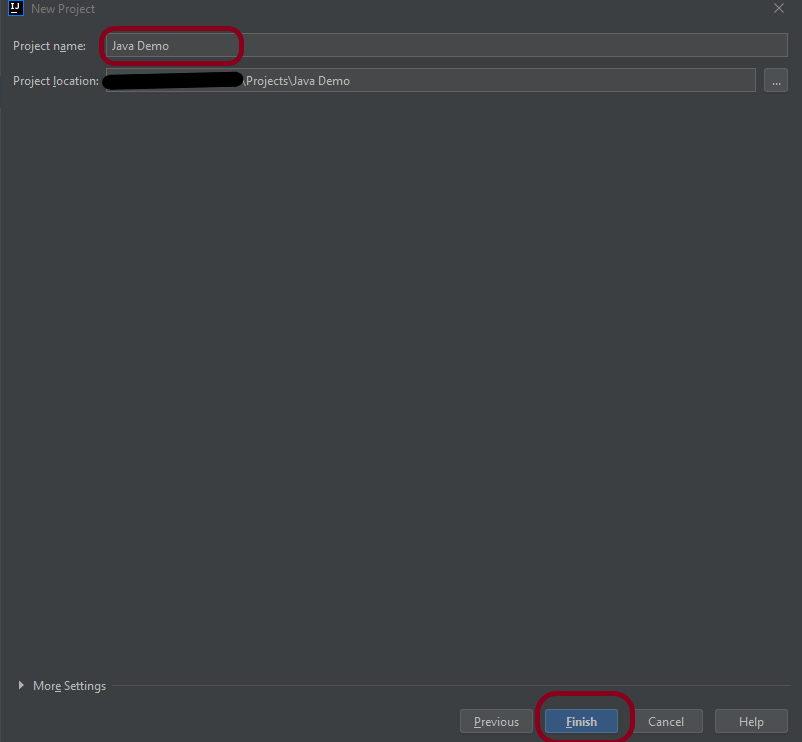
4. I have mentioned the Project Name as Java Demo and thepath where I want to save my project on my computer.
5. Click on the “Finish”Button to create the project. It will also ask to create the directory as shown below.
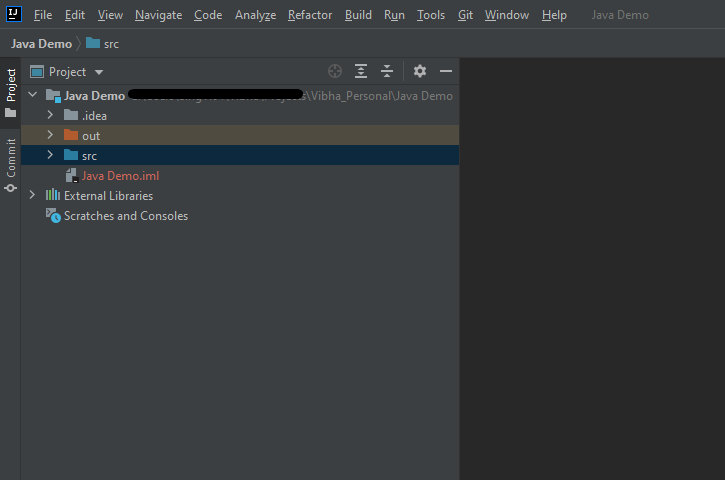
6. Clickthe “Create”button to grant permission. It will launch IDE as shown below.
Now, I have created a new Java Project named Java Demo. Let me create a new Java Class – HelloWorld.
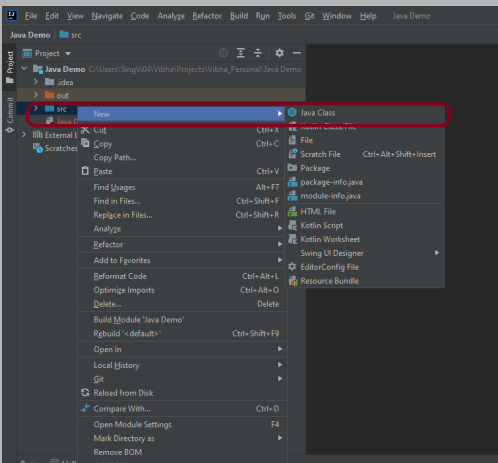
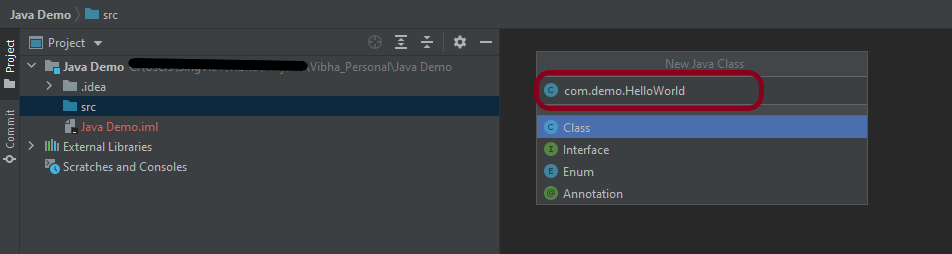
Expand the Project Hello Word and right-click on the src folder, hover on New Option, and click on Java Class Option as shown below.
2. I have provided the Java Filename with the package as shown in the below image. Now press the Enter Key to create the packages and Java file.
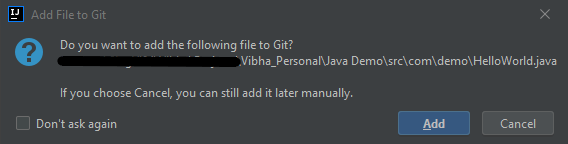
3. It will show a message to Add the File to Git. Depending on your requirement, select Add or Cancel. I don’t want to add the File to Git, so selected Cancel.
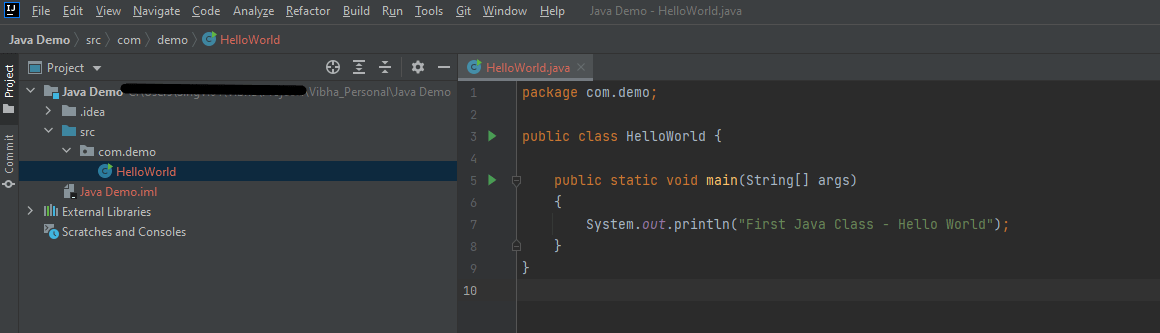
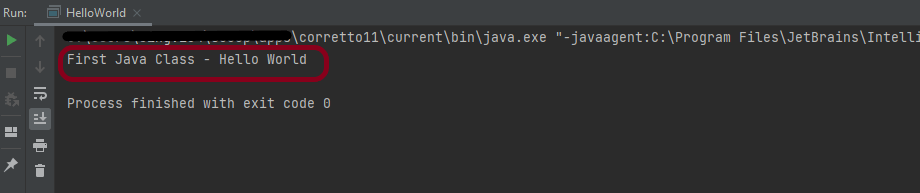
4. I have updated the “HelloWorld” class to print the first Java Class – Hello World on the console, as shown in the below image.
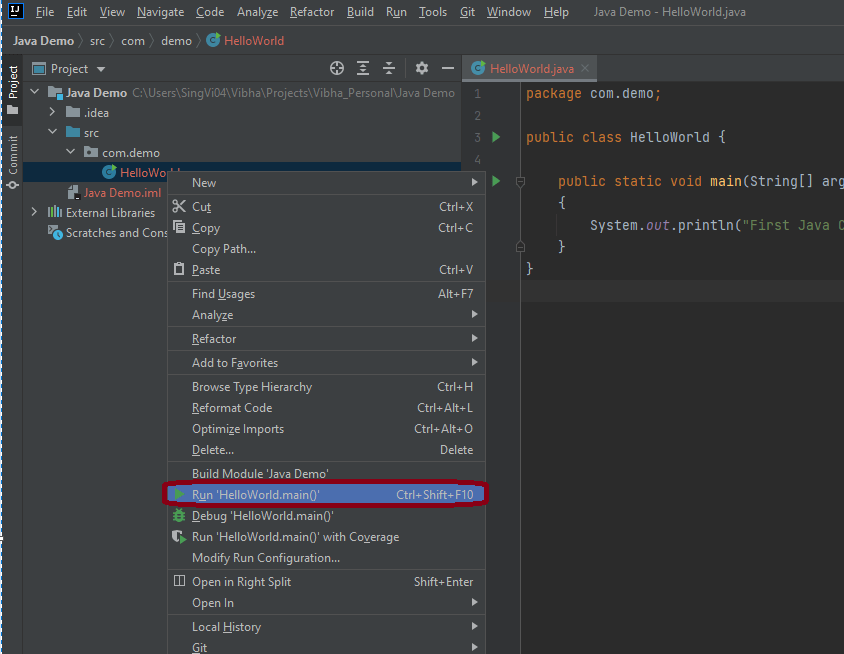
5. Now right-click on the “HelloWorld”class file and choose “Run HelloWorld.main()” Option or press Ctrl + Shift + F10to compile and execute the program as shown in thebelow image. It will also build the project.
6. The final output of the program will be displayed on the console as shown below.
This is how we can create the Java Demo project to execute our first program in Java – HelloWorld.
That’s it! Congratulations on making it through this tutorial and hope you found it useful! Happy Learning!!
IntelliJ IDEA is one of the smartest IDE for Java development. It’s also the base of the official Android IDE i.e. Android Studio used for Android mobile application development. This tutorial provides all the steps required to install IntelliJ Idea on Windows 10 for Java development.
Download IntelliJ on Windows
Click this link to download IntelliJ IDEA on your machine. It will open the download page as shown below. The IntelliJ IDEA provides two different installers i.e. Ultimate and Community. The Ultimate edition is commercial version (which has trial version for 30 days post which you needs license). The Community edition can be used for free. This tutorial shows the steps required to install the Community edition.
2. Download IntelliJ by clicking on Download button and use any one of the option either .exe or .jar. Below image shows IntelliJ.exe on your machine.
Installation of IntelliJ IDEA
To start installation, double click on the idealC-2021.exe (this version can change in future).
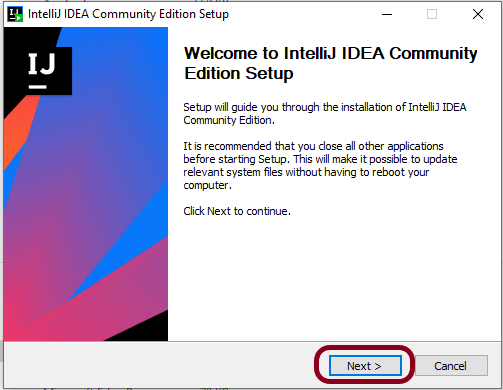
2. It will show the welcome screen as shown below. Click on the Next Button to continue with the installation.
3. It will provide options to choose the installation location as shown in below image. Make sure that you have sufficient space available on the selected drive since it will consume around 1.6 GB storage. Click on the Next Button after choosing the appropriate installation path.
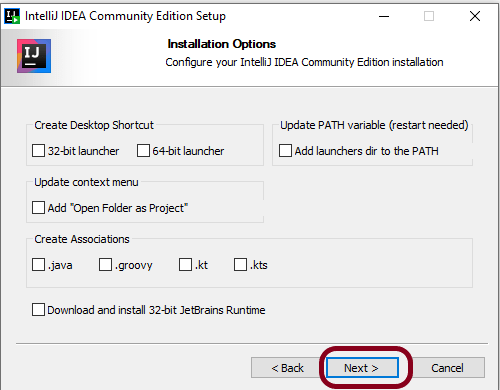
4. It will show the Installation options as shown below to configure system path, create 64-bit desktop launcher icon, Open Folder as Project, and file association for Java, Groovy, and Kotlin files. I have selected the option to create a desktop launcher icon. You may choose the options based on your requirements. Click on the Next Button after choosing the Installation Options.
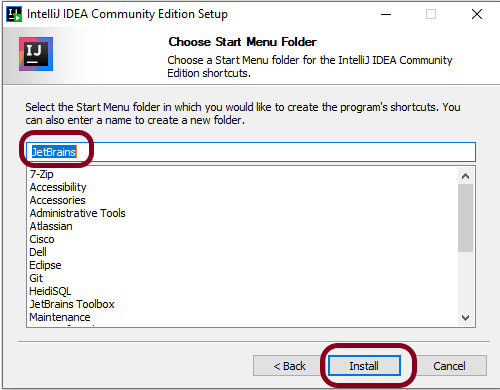
5. After choosing the Installation Options, the next screen shows options to configure the Start Menu Folder as shown below.
6. Click on the Install Button after selecting the Start Menu Folder option. It will show the installation progress as shown below.
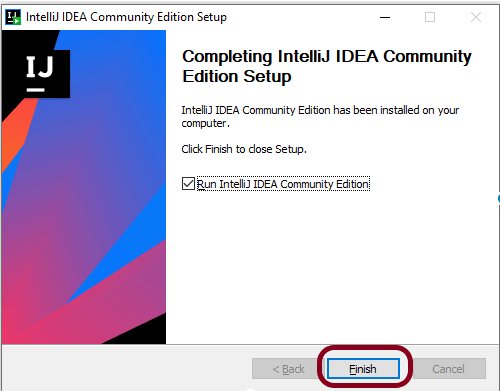
7. It will show the final screen after successfully installing IntelliJ IDEA as shown below.
8. Click on the Finish Button to close the installer. Below image shows that IntelliJ icon is placed at Desktop as we have selected in the previous step.
That’s it! We have downloaded and installed IntelliJ. Congratulations on making it through this tutorial and hope you found it useful! Happy Learning!!
In the next tutorial, I’ll explain how to create a new project in IntelliJ.