Jenkins is a self-contained, open-source automation server that can be used to automate all sorts of tasks related to building, testing, and delivering or deploying software.
Jenkins can be installed through native system packages, Docker, or even run standalone by any machine with a Java Runtime Environment (JRE) installed.
Cucumber is a BDD Tool, and Selenium WebDriver is used for the automation of web applications. Imagine we need to build a test framework. This framework can be used by businesses to understand the test scenarios. It can also test the web application. This can be achieved by integrating Cucumber with Selenium. I’m going to use TestNG as the Test Automation tool for assertions. In the previous tutorial, I used Cucumber with Page Object Model. To know more about this, please refer to this tutorial – Page Object Model with Selenium, Cucumber, and TestNG.
In this tutorial, I’ll create a BDD Framework for the testing of web applications. I will use Cucumber, Selenium WebDriver, Maven and TestNG.
Cucumber and Selenium need Java to be installed on the system to run the tests. Click here to know How to install Java.
Step 2 – Download and setup Eclipse IDE on the system
The Eclipse IDE (integrated development environment) provides strong support for Java developers, which is needed to write Java code. Click here to know How to install Eclipse.
Step 3 – Setup Maven
To build a test framework, we need to add a number of dependencies to the project. It is a very tedious and cumbersome process to add each dependency manually. So, to overcome this problem, we use a build management tool. Maven is a build management tool that is used to define project structure, dependencies, build, and test management. Click here to know How to install Maven.
The Cucumber Eclipse plugin is a plugin that allows eclipse to understand the Gherkin syntax. The Cucumber Eclipse Plugin highlights the keywords present in Feature File. Click here to know more – How to install Cucumber Eclipse Plugin
Group Id – com.example Artifact Id – Cucumber_TestNG_Demo Version – 0.0.1-SNAPSHOT Package – com. example. Cucumber_TestNG_Demo
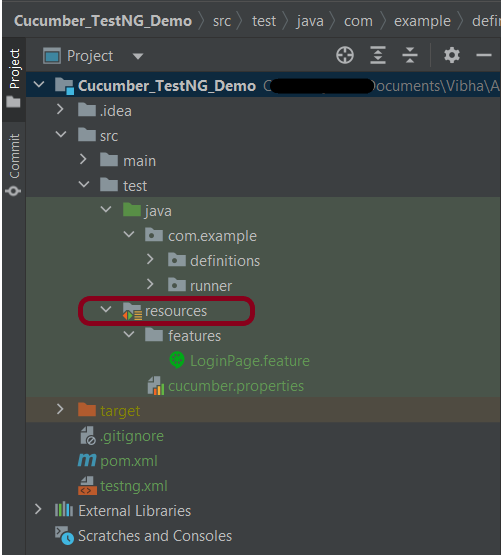
Step 7 – Create source folder src/test/resources to create test scenarios in Feature file
When a new Maven Project is created, it has 2 folders – src/main/java and src/test/java as shown below image. To create test scenarios, we need a new source folder called – src/test/resources. To create this folder, right-click on your maven project ->select New ->Java, and then Source Folder.
Step 8 – Add Selenium, TestNG, and Cucumber dependencies to the project
Add the below-mentioned Selenium, TestNG, and Cucumber dependencies to the project.
Step 9 – Add Maven Compiler Plugin and SureFire Plugin
The compiler plugin is used to compile the source code of a Maven project. This plugin has two goals, which are already bound to specific phases of the default lifecycle:
If you don’t add a compiler plugin to the POM.xml, the build will fail. This happens when you try to run the tests through Maven. Then the build will fail with the below message.
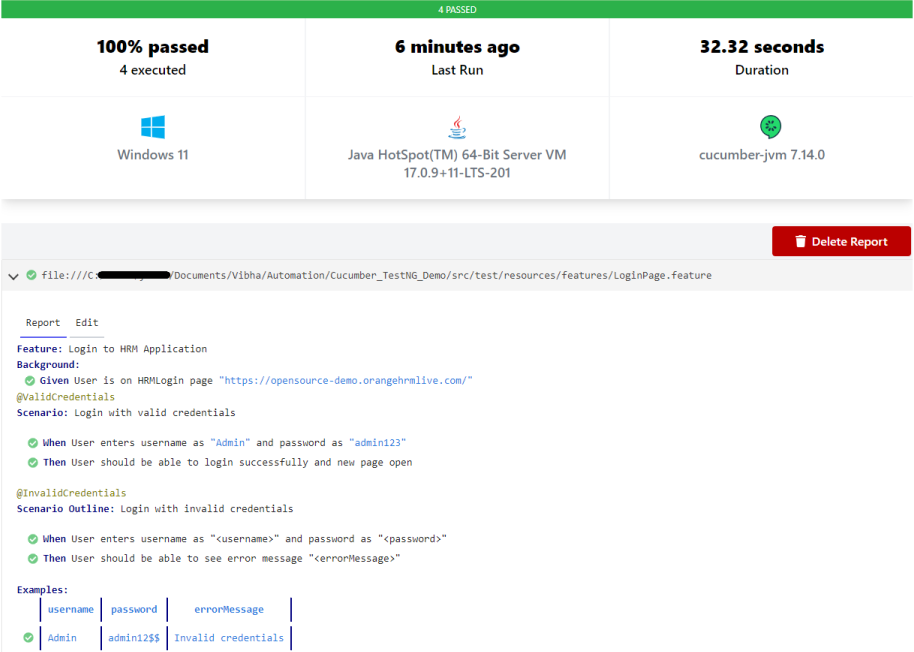
Step 10 – Create a feature file under src/test/resources/features
It is recommended to create a features folder in the src/test/resources directory. Create all the feature files in this features folder. Feature file should be saved as an extension of .feature. The test scenarios in the Feature file are written in Gherkins language. Add the test scenarios in this feature file. I have added sample test scenarios.
Feature: Login to HRM Application

Background:
   Given User is on HRMLogin page "https://opensource-demo.orangehrmlive.com/"

   @ValidCredentials
   Scenario: Login with valid credentials

    When User enters username as "Admin" and password as "admin123"
    Then User should be able to login sucessfully and new page open

   @InvalidCredentials
   Scenario Outline: Login with invalid credentials

    When User enters username as "<username>" and password as "<password>"
    Then User should be able to see error message "<errorMessage>"

  Examples:
   | username   | password     | errorMessage                       |
   | Admin        | admin12$$   | Invalid credentials               |
   | admin$$     | admin123     | Invalid credentials               |
   | abc123        | xyz$$           | Invalid credentials               |
Step 11 – Create the step definition class in src/test/java
Create the step definition class corresponding to the feature file to test the scenarios in the src/test/java directory. The StepDefinition files should be created in this definitionsdirectory within the folder called definitions.
Below is the step definition of the LoginPage feature file.
package com.example.definitions;

import io.cucumber.java.After;
import io.cucumber.java.Before;
import io.cucumber.java.en.Given;
import io.cucumber.java.en.Then;
import io.cucumber.java.en.When;
import io.github.bonigarcia.wdm.WebDriverManager;
import org.openqa.selenium.By;
import org.openqa.selenium.WebDriver;
import org.openqa.selenium.chrome.ChromeDriver;
import org.openqa.selenium.chrome.ChromeOptions;
import org.testng.Assert;
import java.time.Duration;

public class LoginPageDefinitions {
    private static WebDriver driver;
    public final static int TIMEOUT = 5;

    @Before
    public void setUp() {

        ChromeOptions options = new ChromeOptions();
        options.addArguments("--start-maximized");
        driver = new ChromeDriver(options);
        driver.manage().timeouts().implicitlyWait(Duration.ofSeconds(TIMEOUT));

    }

    @Given("User is on HRMLogin page {string}")
    public void loginTest(String url) {

        driver.get(url);

    }

    @When("User enters username as {string} and password as {string}")
    public void goToHomePage(String userName, String passWord) {

        // login to application
        driver.findElement(By.name("username")).sendKeys(userName);
        driver.findElement(By.name("password")).sendKeys(passWord);
        driver.findElement(By.xpath("//*[@class='oxd-form']/div[3]/button")).submit();

    }

    @Then("User should be able to login successfully and new page open")
    public void verifyLogin() {

        String homePageHeading = driver.findElement(By.xpath("//*[@class='oxd-topbar-header-breadcrumb']/h6")).getText();

        //Verify new page - HomePage
        Assert.assertEquals(homePageHeading, "Dashboard");

    }

    @Then("User should be able to see error message {string}")
    public void verifyErrorMessage(String expectedErrorMessage) {

        String actualErrorMessage = driver.findElement(By.xpath("//*[@class='orangehrm-login-error']/div[1]/div[1]/p")).getText();

        // Verify Error Message
        Assert.assertEquals(actualErrorMessage, expectedErrorMessage);

    }

    @After
    public void teardown() {

        driver.quit();
    }

}
assertThat() and containsString are imported from package:-
Step 12 – Create a TestNG Cucumber Runner classin src/test/java
We need to create a class called Runner class to run the tests. This class will use the TestNG annotation @RunWith(), which tells TestNG what is the test runner class. TestRunner should be created under src/test/java within the folder called runner.
Below is the code for the Cucumber Runner Class.
import io.cucumber.testng.AbstractTestNGCucumberTests;
import io.cucumber.testng.CucumberOptions;

@CucumberOptions(tags = "", features = {"src/test/resources/features/LoginPage.feature"}, glue = {"com.example.definitions"},
                 plugin = {})

public class CucumberRunnerTests extends AbstractTestNGCucumberTests {

}
AbstractTestNGCucumberTests – Runs each cucumber scenario found in the features as a separate test.
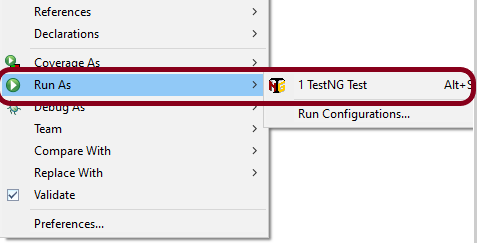
Step 13 – Test Execution through TestNG
Go to the Runner class and right-click “Run As TestNG Test”. The tests will run as TestNG tests. This is for Eclipse.
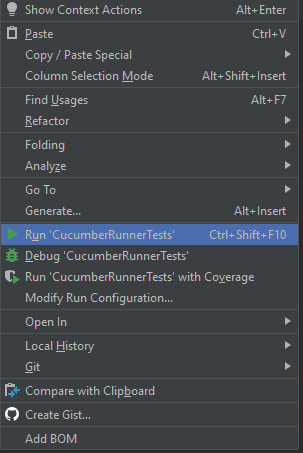
In case you are using IntelliJ, then select “Run CucumberRunner Tests“.
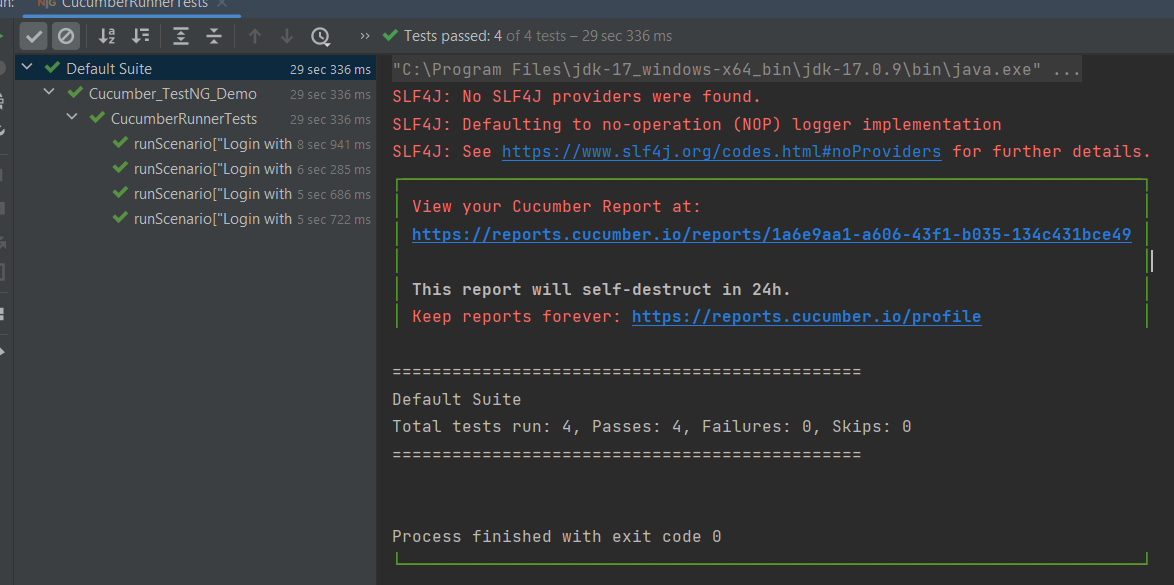
This is what the execution console will look like in Eclipse.
Step 14 – Run the tests from TestNG.xml
Create a TestNG.xml as shown below and run the tests as TestNG.
Below is an example of testng.xml.
<?xml version="1.0" encoding="UTF-8"?>
<!DOCTYPE suite SYSTEM "https://testng.org/testng-1.0.dtd">
<suite name="Suite">
  <test  name="Cucumber with TestNG Test">
    <classes>
      <class name="com.example.runner.CucumberRunnerTests"/>
    </classes>
  </test> <!-- Test -->
</suite> <!-- Suite -->
Step 15 – Run the tests from the Command Line
Run the below command in the command prompt to run the tests and to get the test execution report.
mvn clean test
The execution screen looks like something as shown below.
Step 16 – Cucumber Report Generation
Add cucumber.properties under src/test/resources and add the below instructions in the file.
cucumber.publish.enabled=true
Below is the image of the Cucumber Report generated using the Cucumber Service.
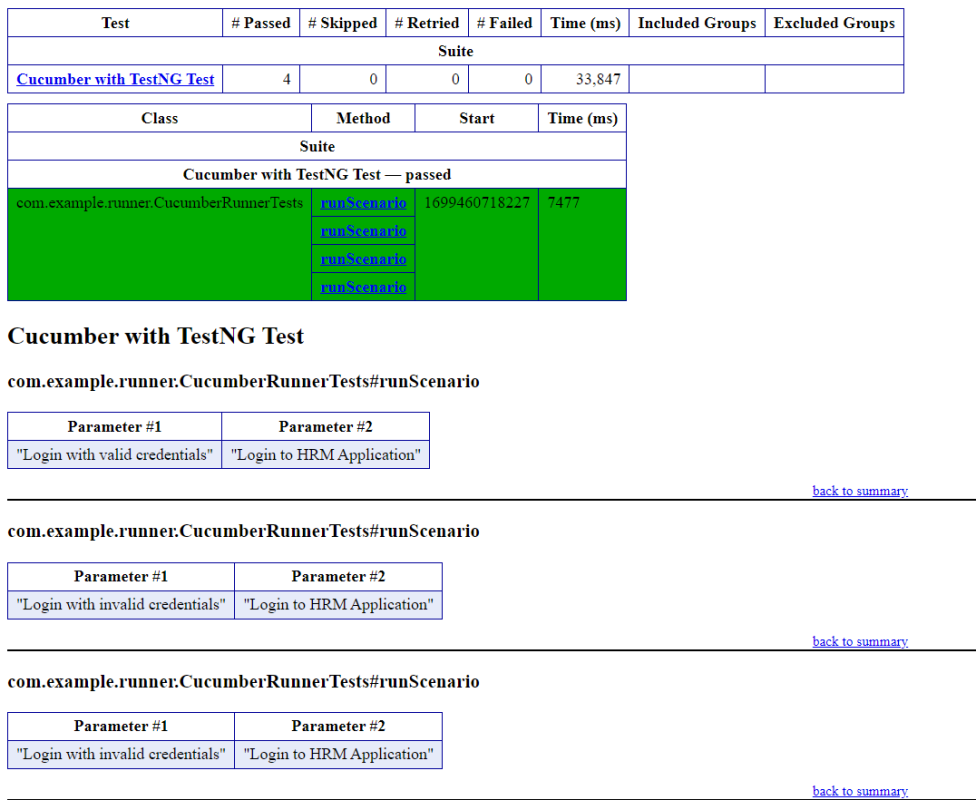
Step 17 – TestNG Report Generation
TestNG generates various types of reports under the test-output or target folder like emailable-report.html, index.html, testng-results.xml.
We are interested in the ‘emailable-report.html’ report. Open “emailable-report.html“, as this is an HTML report, and open it with the browser. The below image shows emailable-report.html.
emailable-report.html
Index.html
TestNG also produces “index.html” report, and it resides under the test-output folder. The below image shows the index.html report.
CI/CD Integration:
Integrating BDD tests with Continuous Integration and Continuous Deployment (CICD) pipelines helps automate the testing process. Tools like Jenkins, GitLab CI, or GitHub Actions can be configured easily. They run BDD tests automatically during the build process. Here’s how:
Configure the CICD Pipeline:Set up the pipeline to build the project, run tests, and create reports.
Run Tests: Ensure the pipeline runs your BDD tests using Maven or Gradle.
Publish Reports: Configure the pipeline to show test results, so you can easily see if there are any issues.
Troubleshooting Tips:
1. Maven Dependencies Not Resolved: The dependencies for Cucumber, Selenium, or TestNG are not resolving in your project. Make sure your pom.xml is correctly configured and the Maven repository has the latest dependencies. Run mvn clean install to force update dependencies. Also, check if you have internet access and the correct settings in your Maven configuration.
2. TestNG XML File Setup: TestNG tests are not running as expected, or the test results are incorrect. Double-check your `testng.xml` configuration to ensure that the correct test classes, packages, or methods are included. Make sure annotations like `@Test` are correctly used in your test classes.
3. Cucumber Features Not Recognized: Cucumber feature files aren’t recognized by your test runner. Verify your `CucumberOptions` in the test runner class points to the correct `features` path and `glue` path for step definitions. Make sure your feature files have the correct `.feature` extension and contain valid Gherkin syntax.
We may quickly validate the steps in your feature using Dry Run in Cucumber, without having to run the code inside the appropriate step definitions, to ensure that every Step has its corresponding Step Definition present in the Step Definition file. A cucumber dry run is used to confirm the compilation faults and compile the Step Definition and Feature files. It is a way to validate the correctness of the Gherkin syntax in the feature files and the mapping of steps defined in the step definitions without executing the actual application code.
The Dry Run option can either be set as true or false. By default, it is false.
Dry Run as true
import io.cucumber.testng.AbstractTestNGCucumberTests;
import io.cucumber.testng.CucumberOptions;

@CucumberOptions(plugin = {"pretty"},
                 features = "src/test/resources/Features",
                 glue = "org.example.stepdefinitions",
                 monochrome=true,
                 dryRun = true)

public class CucumberRunnerTests extends AbstractTestNGCucumberTests {

}
Below is the sample feature file.
Feature: Login to HRM Application

  @ValidCredentials
  Scenario: Login with valid credentials

   Given User is on HRMLogin page "https://opensource-demo.orangehrmlive.com/"
    When User enters username as "Admin" and password as "admin123"
    Then User should be able to login successfully and new page open
In the below snippet of code, I have created the stepdefinitions for the Given and When statements and no stepdefinition for the Then statement.
import io.cucumber.java.After;
import io.cucumber.java.Before;
import io.cucumber.java.en.Given;
import io.cucumber.java.en.Then;
import io.cucumber.java.en.When;
import io.github.bonigarcia.wdm.WebDriverManager;
import org.openqa.selenium.By;
import org.openqa.selenium.WebDriver;
import org.openqa.selenium.chrome.ChromeDriver;
import org.testng.Assert;
import java.time.Duration;

public class LoginPageDefinitions {

	private static WebDriver driver;
    public final static int TIMEOUT = 5;

     @Before
    public void setUp() {

        WebDriverManager.chromedriver().setup();
        ChromeOptions options = new ChromeOptions();
        options.addArguments("--start-maximized");
        driver = new ChromeDriver(options);
        driver.manage().timeouts().implicitlyWait(Duration.ofSeconds(TIMEOUT));
    }


    @Given("User is on HRMLogin page {string}")
    public void loginTest(String url) {

        driver.get(url);

    }

    @When("User enters username as {string} and password as {string}")
    public void goToHomePage(String userName, String passWord) {

        // login to application
        driver.findElement(By.name("username")).sendKeys(userName);
        driver.findElement(By.name("password")).sendKeys(passWord);
        driver.findElement(By.xpath("//*[@id='app']/div[1]/div/div[1]/div/div[2]/div[2]/form/div[3]/button")).submit();

        // go the next page

    }

    @After
    public void teardown() {

        driver.quit();
    }

}
Execute the feature file by right-clicking on the Runner class and selecting – Run As TestNG Test.
In the case of the dry run as true, none of the Steps is executed, but Cucumber has only made sure that every Step has the interconnected method available in the Step Definition file. Take a look at the time duration at the end of every Step. It is extremely less.
The output of the above program is
Dry Run as false
In the below case, dryRun is false.
import io.cucumber.testng.AbstractTestNGCucumberTests;
import io.cucumber.testng.CucumberOptions;

@CucumberOptions(plugin = {"pretty"},
                 features = "src/test/resources/Features",
                 glue = "org.example.stepdefinitions",
                 monochrome=true,
                 dryRun = false)

public class CucumberRunnerTests extends AbstractTestNGCucumberTests {

}
The output of the above program is
In case of dry run as false, the steps 1 and 2 will be executed. The browser will open and all statements inside the step definitions method will execute when set to false. The time taken to complete this test is 0.235 sec.
So, you can set dry run to true to quickly check if any of the step definition is not implemented.
Assertions in TestNG are a way to verify that the expected result and the actual result match not in the test case. A test is considered successful ONLY if it is completed without throwing any exceptions. An example of assertion can be logging into the website, checking the title of the webpage, verifying the functionality of an input box that takes only integers, etc.
If the project is a Maven project, then please add the latest TestNG dependency in the pom.xml.
Hard Assertion throws AssertionError immediately when an Assert Condition fails and moves to the next @Test method
Suppose, there are 2 assertions in a Test and the first assertion fails, then HardAssertion does not execute the second Assertion Condition and declares the test as failed
As you can see in the below example, there are 2 assert conditions under Test – AssertionFailure(). As the first Assert Condition fails, it moved directly to the second test without executing another Assert Condition.
package org.example;

import org.openqa.selenium.By;
import org.openqa.selenium.WebDriver;
import org.openqa.selenium.firefox.FirefoxDriver;
import org.openqa.selenium.firefox.FirefoxOptions;
import org.testng.Assert;
import org.testng.annotations.Test;

public class HardAssertionDemo {

    @Test
    public void AssertionFailure() {

        FirefoxOptions firefoxOptions = new FirefoxOptions();
        WebDriver driver = new FirefoxDriver(firefoxOptions);

        driver.get("https://duckduckgo.com/");
        String expectedTitle = "DuckDuckGo";

        String actualTitle = driver.getTitle();
        String actualText1 = driver.findElement(By.xpath("//*[@class='homepage-cta-section_title__Lovig heading_heading2__oEFPn heading_heading__IiMSV']")).getText();

        /* Hard Assert */
        System.out.println("Verify Title :" + actualTitle);
        Assert.assertEquals(actualTitle, expectedTitle, "Incorrect page title");

        System.out.println("Verify Text :" + actualText1);
        Assert.assertEquals(actualText1, "Privacy Protection For Any Device");

        driver.quit();
    }

    @Test
    public void print() {
        System.out.println("Hard Assertion is displayed");
    }
}
The output of the above program is
What is Soft Assert?
To overcome the above-mentioned problem, there is another type of assertion called Soft Assert.
Soft Assert does not throw an exception when an Assert Condition fails, and continues with the next step after the Assert Condition.
Soft assert does not include by default in TestNG. For this, you need to include the below package :
org.testng.asserts.SoftAssert;
The first step is to create an instance of SoftAssert class.
SoftAssert softAssertion = new SoftAssert();
After this, we can use this softAssert variable instead of hard assert.
Create an object of SoftAssertion to run Assert Conditions
Below is an example of a Soft Assert.
package org.example;

import org.openqa.selenium.By;
import org.openqa.selenium.WebDriver;
import org.openqa.selenium.firefox.FirefoxDriver;
import org.openqa.selenium.firefox.FirefoxOptions;
import org.testng.annotations.Test;
import org.testng.asserts.SoftAssert;

public class SoftAssertionDemo {

    @Test
    public void assertionFailure() {

        SoftAssert softAssertion = new SoftAssert();
        FirefoxOptions firefoxOptions = new FirefoxOptions();
        WebDriver driver = new FirefoxDriver(firefoxOptions);

        driver.manage().window().maximize();
        driver.get("https://duckduckgo.com/");

        String expectedTitle = "DuckDuckGo";

        String actualTitle = driver.getTitle();
        String actualText1 = driver.findElement(By.xpath("//*[@class='homepage-cta-section_title__Lovig heading_heading2__oEFPn heading_heading__IiMSV']")).getText();

        /* Soft Assert */
        System.out.println("Verify Title :" + actualTitle);
        softAssertion.assertEquals(actualTitle, expectedTitle, "Incorrect page title");

        System.out.println("Verify Text :" + actualText1);
        softAssertion.assertEquals(actualText1, "Privacy Protection For Any Device");

        driver.quit();
    }

    @Test
    public void print() {
        System.out.println("Soft Assertion is displayed");
    }

}
The output of the above program is
AssertAll
If there is any exception, and you want to throw it, then you need to use assertAll() method as a last statement in the @Test and test suite again to continue with the next @Test as it is.
package org.example;

import org.openqa.selenium.By;
import org.openqa.selenium.WebDriver;
import org.openqa.selenium.firefox.FirefoxDriver;
import org.openqa.selenium.firefox.FirefoxOptions;
import org.testng.annotations.Test;
import org.testng.asserts.SoftAssert;

public class AssertAllDemo {


    @Test
    public void assertionFailure() {

        SoftAssert softAssertion = new SoftAssert();

        FirefoxOptions firefoxOptions = new FirefoxOptions();
        WebDriver driver = new FirefoxDriver(firefoxOptions);

        driver.manage().window().maximize();
        driver.get("https://duckduckgo.com/");

        String expectedTitle = "DuckDuckGo";

        String actualTitle = driver.getTitle();
        String actualText1 = driver.findElement(By.xpath("//*[@class='homepage-cta-section_title__Lovig heading_heading2__oEFPn heading_heading__IiMSV']")).getText();


        /* AssertAll */
        System.out.println("Verify Title :" + actualTitle);
        softAssertion.assertEquals(actualTitle, expectedTitle, "Incorrect page title");

        System.out.println("Verify Text :" + actualText1);
        softAssertion.assertEquals(actualText1, "Privacy Protection For Any Device");

        softAssertion.assertAll();

        driver.quit();
    }

    @Test
    public void print() {
        System.out.println("Soft Assertion is displayed");
    }

}
The output of the above program is
In the above program, we can see that both assertions of Test – assertionFailure are executed, but as the first assertion has failed, the test – assertionFailure is marked as failed.
Congratulations on making it through this tutorial and hope you found it useful! Happy Learning!! Cheers!!
Google has developed a JSON library for Java called Gson. We can create JSON and translate it into Java objects using Gson. Gson can output JSON in compact format by default. The setPrettyPrinting() function of the GsonBuilder class must be used to set up the Gson instance in order to enable pretty printing. This method tells Gson to produce JSON that fits on a page for pretty printing.
Add the below dependency to POM.xml to use Gson API.
Let us create a table named Employee which contains the data members same as node names in the above JSON payload and their corresponding getter and setter methods.
public class Employee {

	// private data members of POJO class
	private String firstName;
	private String lastName;
	private int age;
	private double salary;
	private String designation;
	private String contactNumber;
	private String emailId;

	// Getter and setter methods
	public String getFirstName() {
		return firstName;
	}

	public void setFirstName(String firstName) {
		this.firstName = firstName;
	}

	public String getLastName() {
		return lastName;
	}

	public void setLastName(String lastName) {
		this.lastName = lastName;
	}

	public int getAge() {
		return age;
	}

	public void setAge(int age) {
		this.age = age;
	}

	public double getSalary() {
		return salary;
	}

	public void setSalary(double salary) {
		this.salary = salary;
	}

	public String getDesignation() {
		return designation;
	}

	public void setDesignation(String designation) {
		this.designation = designation;
	}

	public String getContactNumber() {
		return contactNumber;
	}

	public void setContactNumber(String contactNumber) {
		this.contactNumber = contactNumber;
	}

	public String getEmailId() {
		return emailId;
	}

	public void setEmailId(String emailId) {
		this.emailId = emailId;
	}

}
We will convert a Java Object to a JSON object as a String and also will write it into a .json file. There are many variations for the method toJson().
You can create a Gson instance by invoking a new Gson() if the default configuration is all you need, as shown in the below example.
  @Test
    public void withoutPretty() {

        // Create an object of POJO class
        Employee employee = new Employee();
        employee.setFirstName("Vibha");
        employee.setLastName("Singh");
        employee.setAge(30);
        employee.setSalary(75000);
        employee.setDesignation("Manager");
        employee.setContactNumber("+919999988822");
        employee.setEmailId("abc@test.com");

        Gson gson = new Gson();
        String employeeJsonPayload = gson.toJson(employee);
        System.out.println("Json :" + employeeJsonPayload);

    }
The execution message is shown below.
Syntax
public GsonBuilder setPrettyPrinting()
Below is the program to print the JSON in pretty format.
@Test
    public void withPretty() {
        // Create an object of POJO class
        Employee employee = new Employee();
        employee.setFirstName("Vibha");
        employee.setLastName("Singh");
        employee.setAge(30);
        employee.setSalary(75000);
        employee.setDesignation("Manager");
        employee.setContactNumber("+919999988822");
        employee.setEmailId("abc@test.com");

        Gson gson = new GsonBuilder().setPrettyPrinting().create();

        String json = gson.toJson(employee);

        System.out.println("Pretty Json :" + json);

    }
The output of the above program is
We are done! Congratulations on making it through this tutorial and hope you found it useful! Happy Learning!!
Let us create a table named Employee which contains the data members same as node names in the above JSON payload with @Expose annotation and their corresponding getter and setter methods.
package com.example.gson;

import com.google.gson.annotations.Expose;

import java.math.BigDecimal;
import java.util.List;
import java.util.Map;

public class Employee {

    // private data members of POJO class

    @Expose(serialize = true)
    private String firstName;

    @Expose(serialize = true)
    private String lastName;

    @Expose(serialize = false)
    private int age;

    @Expose(serialize = true)
    private Map<String, BigDecimal> salary;

    @Expose()
    private String designation;

    @Expose(serialize = false)
    private String contactNumber;

    @Expose(serialize = true)
    private List<String> emailId;

    // Getter and setter methods
    public String getFirstName() {
        return firstName;
    }

    public void setFirstName(String firstName) {
        this.firstName = firstName;
    }

    public String getLastName() {
        return lastName;
    }

    public void setLastName(String lastName) {
        this.lastName = lastName;
    }

    public int getAge() {
        return age;
    }

    public void setAge(int age) {
        this.age = age;
    }

    public Map<String, BigDecimal> getSalary() {
        return salary;
    }

    public void setSalary(Map<String, BigDecimal> salary) {
        this.salary = salary;
    }

    public String getDesignation() {
        return designation;
    }

    public void setDesignation(String designation) {
        this.designation = designation;
    }

    public String getContactNumber() {
        return contactNumber;
    }

    public void setContactNumber(String contactNumber) {
        this.contactNumber = contactNumber;
    }

    public List<String> getEmailId() {
        return emailId;
    }

    public void setEmailId(List<String> emailId) {
        this.emailId = emailId;
    }

    @Override
    public String toString() {
        return "(firstName: " + firstName + "," +
                "lastName: " + lastName + "," +
                "age: " + age + ", " +
                "salary: " + salary + "," +
                "designation: " + designation + ", " +
                "contactNumber: " + contactNumber + ", " +
                "emailId: " + emailId + ")";

    }
}
Suppose the attribute age and contactNumber in the Employee class should not serialize because it’s sensitive information. Hence, we must decorate these attributes with the annotation @Expose(serialize=false):
To use @Expose annotation, we must create a Gson instance by using the GsonBuilder class and its excludeFieldsWithoutExposeAnnotation() method.
import com.google.gson.Gson;
import com.google.gson.GsonBuilder;
import org.junit.Test;
import java.math.BigDecimal;
import java.util.Arrays;
import java.util.HashMap;
import java.util.Map;

public class GsonExpose_Demo {

    @Test
    public void gsonExposeTest()  {

        // Create an object of POJO class
        Employee employee = new Employee();
        employee.setFirstName("Vibha");
        employee.setLastName("Singh");
        employee.setAge(30);
        Map<String, BigDecimal> salary = new HashMap() {{
            put("2010", new BigDecimal(10000));
            put("2012", new BigDecimal(12000));
            put("2018", new BigDecimal(14000));
        }};

        employee.setSalary(salary);
        employee.setDesignation("Manager");
        employee.setContactNumber("+919999988822");
        employee.setEmailId(Arrays.asList("abc@test.com","vibha@test.com"));

        Gson gson = new GsonBuilder().setPrettyPrinting().excludeFieldsWithoutExposeAnnotation().create();
        String employeeJsonPayload = gson.toJson(employee);
        System.out.println("Json :" + employeeJsonPayload);

    }
}
The output of the above program is shown below.
We can see here that age and contactNumber are not shown in the JSON body.
We are done! Congratulations on making it through this tutorial and hope you found it useful! Happy Learning!!
In this tutorial, I will explain the use of Hooks in Cucumber.
What is a Hook in Cucumber?
Hooks are blocks of code that can run at various points in the Cucumber execution cycle. They are typically used for setup and teardown of the environment before and after each scenario. These hooks do not impact the scenarios or steps for which they are used. We can declare hooks in any class.
Why do we use Hooks?
There are scenarios where we have to perform some prerequisite steps before executing the test scenarios, like initiating a WebDriver, setting up database connection, setting up Test Data, and setting up browser cookies.
Similarly, there are some conditions that need to be done after completing the execution of test scenarios like killing the web driver, closing database connections, clearing the test data, clearing browser cookies, and so on.
Scenario hooks
Scenario hooks run for every scenario. There are 2 types of Scenario Hooks – @After and @Before
Before Before hooks run before the first step of each scenario.
Syntax:
@Before
	public void setup() {

        System.out.println("------------------Before Executing-------------------------");
        WebDriverManager.chromedriver().setup();
        ChromeOptions chromeOptions = new ChromeOptions();
        chromeOptions.addArguments("--start-maximized");
        driver = new ChromeDriver(chromeOptions);
        driver.manage().timeouts().implicitlyWait(5, TimeUnit.SECONDS);
	}
After After hooks run after the last step of each scenario, even when the step result is failed, undefined, pending, or skipped.
Syntax:
@After
	public void close() {
		driver.close();
		System.out.println("---------------After Executing---------------------------");
	}
Here is an example of Hooks – @Before and @After in a Cucumber program.
import io.cucumber.java.After;
import io.cucumber.java.Before;
import io.cucumber.java.en.Given;
import io.cucumber.java.en.Then;
import io.cucumber.java.en.When;
import io.github.bonigarcia.wdm.WebDriverManager;
import org.openqa.selenium.By;
import org.openqa.selenium.WebDriver;
import org.openqa.selenium.chrome.ChromeDriver;
import org.openqa.selenium.chrome.ChromeOptions;
import java.util.concurrent.TimeUnit;
import static org.hamcrest.CoreMatchers.containsString;
import static org.hamcrest.MatcherAssert.assertThat;

public class LoginPageDefinitions {
    WebDriver driver;

    @Before
    public void setup() {

        System.out.println("------------------Before Executing-------------------------");
        WebDriverManager.chromedriver().setup();
        ChromeOptions chromeOptions = new ChromeOptions();
        chromeOptions.addArguments("--start-maximized");
        driver = new ChromeDriver(chromeOptions);
        driver.manage().timeouts().implicitlyWait(5, TimeUnit.SECONDS);
    }

    @Given("User is on HRMLogin page")
    public void userOnHomePage() {
        System.out.println("Open Website");
        driver.get("https://opensource-demo.orangehrmlive.com/");
    }

    @When("User enters username as {string}")
    public void entersUsername(String userName){
        System.out.println("Enter username");
        driver.findElement(By.name("username")).sendKeys(userName);

    }


    @When("User enters password as {string}")
    public void entersPassword(String passWord) {
        System.out.println("Enter passWord");
        driver.findElement(By.name("password")).sendKeys(passWord);
        driver.findElement(By.xpath("//*[@id='app']/div[1]/div/div[1]/div/div[2]/div[2]/form/div[3]/button")).submit();

    }


    @Then("User should be able to login successfully")
    public void successfulLogin() throws InterruptedException {
        String newPageText = driver.findElement(By.xpath("//span[@class='oxd-topbar-header-breadcrumb']/h6")).getText();
        System.out.println("newPageText:" + newPageText);
        assertThat(newPageText, containsString("Dashboard"));
    }

    @After
    public void close() {
        driver.quit();
        System.out.println("--------------------After Executing-----------------------");
    }
}
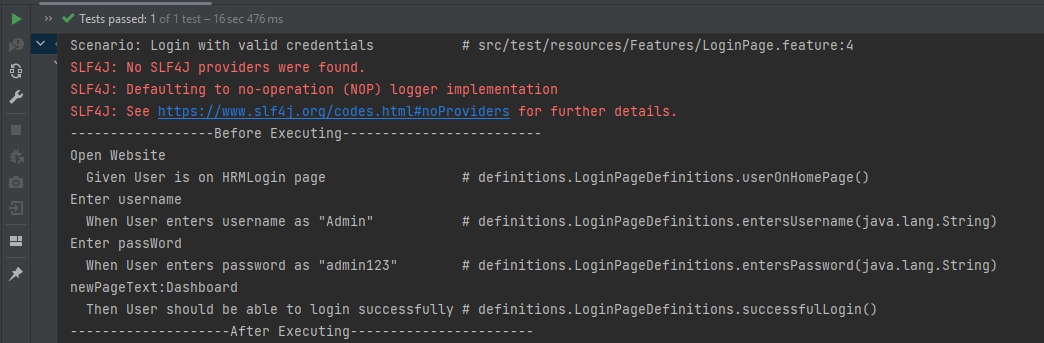
The output of the above program is
At the start of execution, @Before annotation is setting up the web driver to execute the test.
After setting up the web driver, the Given, When, and Then statements will be executed.
Now, at last, @After hook will close the web driver.
Step hooks
Step hooks are invoked before and after a step. The hooks have ‘invoke around’ semantics. This means that if a BeforeStep hook is executed, the AfterStep hooks will also be executed regardless of the result of the step.
@BeforeStep – As the name suggests, it is executed before the execution of each step.
Syntax:
@BeforeStep
	public void beforeStepTest() {
		System.out.println("--------------BeforeStep Executing---------------");
	}
@AfterStep – As the name suggests, it is executed after the successful execution of each step. If a step does not pass, the following step and its hooks will be skipped.
Syntax:
@AfterStep
	public void afterStepTest() {
		System.out.println("--------------------AfterStep Executing---------------------");
	}
The complete program is shown below:
import io.cucumber.java.After;
import io.cucumber.java.AfterStep;
import io.cucumber.java.Before;
import io.cucumber.java.BeforeStep;
import io.cucumber.java.en.Given;
import io.cucumber.java.en.Then;
import io.cucumber.java.en.When;
import io.github.bonigarcia.wdm.WebDriverManager;
import org.openqa.selenium.By;
import org.openqa.selenium.WebDriver;
import org.openqa.selenium.chrome.ChromeDriver;
import org.openqa.selenium.chrome.ChromeOptions;
import java.util.concurrent.TimeUnit;
import static org.hamcrest.CoreMatchers.containsString;
import static org.hamcrest.MatcherAssert.assertThat;

public class LoginPageDefinitions {
    WebDriver driver;

    @Before
    public void setup() {

        System.out.println("------------------Before Executing-------------------------");
        WebDriverManager.chromedriver().setup();
        ChromeOptions chromeOptions = new ChromeOptions();
        chromeOptions.addArguments("--start-maximized");
        driver = new ChromeDriver(chromeOptions);
        driver.manage().timeouts().implicitlyWait(5, TimeUnit.SECONDS);
    }

    @BeforeStep
    public void beforeStepTest() {
        System.out.println("--------------BeforeStep Executing---------------");
    }

    @Given("User is on HRMLogin page")
    public void userOnHomePage() {
        System.out.println("Open Website");
        driver.get("https://opensource-demo.orangehrmlive.com/");
    }

    @When("User enters username as {string}")
    public void entersUsername(String userName){
        System.out.println("Enter username");
        driver.findElement(By.name("username")).sendKeys(userName);

    }

    @When("User enters password as {string}")
    public void entersPassword(String passWord) {
        System.out.println("Enter passWord");
        driver.findElement(By.name("password")).sendKeys(passWord);
        driver.findElement(By.xpath("//*[@id='app']/div[1]/div/div[1]/div/div[2]/div[2]/form/div[3]/button")).submit();

    }

    @Then("User should be able to login successfully")
    public void successfulLogin() throws InterruptedException {
        String newPageText = driver.findElement(By.xpath("//span[@class='oxd-topbar-header-breadcrumb']/h6")).getText();
        System.out.println("newPageText:" + newPageText);
        assertThat(newPageText, containsString("Dashboard"));
    }

    @AfterStep
    public void afterStepTest() {
        System.out.println("--------------------AfterStep Executing---------------------");
    }

    @After
    public void close() {
        driver.quit();
        System.out.println("--------------------After Executing-----------------------");
    }
}
The output of the above program is
At the start of execution, @Before annotation is setting up the web driver to execute the test.
After setting up the web driver, @BeforeStep is executed before executing the first step.
After the execution of the first step (Given), @AfterStep is executed.
Here, it can be seen that there are 4 steps and for each step, there is a combination of @BeforeStep and @AfterStep.
That’s it! Congratulations on making it through this tutorial and hope you found it useful! Happy Learning!! Cheers!!
BDD is a set of practices that helps to reduce the rework caused by misunderstanding or vague requirements, narrow the communication gaps between the development team, testing team, and customers, and promote continuous communication among them. Cucumber is one such open-source tool, which supports Behaviour Driven Development(BDD). In simple words, Cucumber can be defined as a testing framework, driven by plain English. It serves as documentation, automated tests, and a development aid – all in one.
Cucumber Introduction, Installation, and Configuration
InnvocationCount is one of the feature available in TestNG. InvocationCount is used when we want to run the same test multiple times. If we want to run single @Test 10 times at a single thread, then invocationCount can be used. To invoke a method multiple times, the below syntax is used.
@Test(invocationCount = 3)
In this example, the @Test method will execute for 3 times each on a single thread.
In this tutorial, we will illustrate how to get the current invocation count.
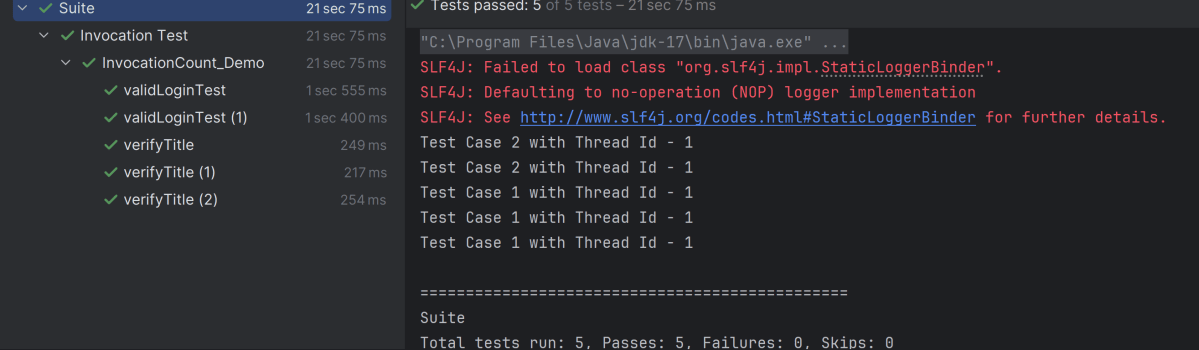
Step 1 − Create a TestNG class, InvocationCount_Demo.
Step 2− Write two @Test methods in the class InvocationCount_Demo as shown in the programming code section below. Add invocationCount=3 to method verifyTitle and 2 to validLoginTest.
Step 3 − Create the testNG.xml as given below to run the TestNG classes.
Step 4− Now, run the testNG.xml or directly TestNG class in IDE or compile and run it using command line.
Step 5 − In the output, the user can see a total of 1 thread running sequentially for all invocations of @Test.
import org.openqa.selenium.By;
import org.openqa.selenium.WebDriver;
import org.openqa.selenium.firefox.FirefoxDriver;
import org.openqa.selenium.firefox.FirefoxOptions;
import org.testng.Assert;
import org.testng.annotations.AfterMethod;
import org.testng.annotations.BeforeMethod;
import org.testng.annotations.Test;

import java.time.Duration;


public class InvocationCount_Demo {

    WebDriver driver;

    @BeforeMethod
    public void setup() throws Exception {

        FirefoxOptions options = new FirefoxOptions();
        driver = new FirefoxDriver(options);
        driver.get("https://opensource-demo.orangehrmlive.com/");
        driver.manage().timeouts().implicitlyWait(Duration.ofSeconds(10));
        driver.manage().window().maximize();
    }

    @Test(invocationCount = 3)
    public void verifyTitle() {

        System.out.println("Test Case 1 with Thread Id - " + Thread.currentThread().getId());
        String expectedTitle = driver.findElement(By.xpath("//*[@class='oxd-text oxd-text--h5 orangehrm-login-title']")).getText();
        Assert.assertEquals(expectedTitle,"Login");
    }

    @Test(invocationCount = 2)
    public void validLoginTest() throws InterruptedException {

        System.out.println("Test Case 2 with Thread Id - "+Thread.currentThread().getId());

        driver.findElement(By.name("username")).sendKeys("Admin");
        driver.findElement(By.name("password")).sendKeys("admin123");
        driver.findElement(By.xpath("//*[@class='oxd-form-actions orangehrm-login-action']/button")).click();
        String expectedTitle = driver.findElement(By.xpath("//*[@class='oxd-topbar-header-breadcrumb']/h6")).getText();
        Assert.assertTrue(expectedTitle.contains("Dashboard"));
    }

    @AfterMethod
    public  void closeBrowser() {

        driver.quit();

    }
}
testng.xml
This is a configuration file that is used to organize and run the TestNG test cases. It is very handy when limited tests are needed to execute rather than the full suite.
<?xml version="1.0" encoding="UTF-8"?>
<!DOCTYPE suite SYSTEM "https://testng.org/testng-1.0.dtd">
<suite name="Suite">
    <test name="Invocation Test">
        <classes>
            <class name="com.example.InvocationCount_Demo"/>
        </classes>
    </test> <!-- Test -->
</suite> <!-- Suite -->
The output of the above program is
We can add threadPoolSize to the @Test.
threadPoolSize – It defines the size of the thread pool for any method. The method will be invoked from multiple threads, as specified by invocationCount.
@Test(invocationCount = 3, threadPoolSize)
Congratulations on making it through this tutorial and hope you found it useful! Happy Learning!! Cheers!!
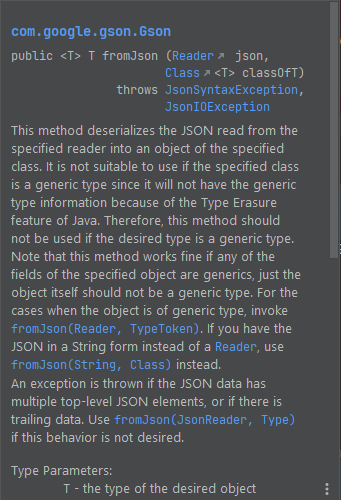
Gson is a Java library that can be used to convert Java Objects into their JSON representation. It can also be used to convert a JSON string to an equivalent Java object. Gson can work with arbitrary Java objects, including pre-existing objects for those you do not have source code.
Provide simple toJson() and fromJson() methods to convert Java objects to JSON and vice versa.
Add the below dependency to POM.xml to use Gson API.
Let us create a table named Employee which contains the data members same as node names in the above JSON payload and their corresponding getter and setter methods.
import java.math.BigDecimal;
import java.util.Map;

public class Employee {

    // private data members of POJO class
    private String firstName;
    private String lastName;
    private int age;
    private Map<String, BigDecimal> salary;
    private String designation;
    private String contactNumber;
    private String emailId;

    // Getter and setter methods
    public String getFirstName() {
        return firstName;
    }

    public void setFirstName(String firstName) {
        this.firstName = firstName;
    }

    public String getLastName() {
        return lastName;
    }

    public void setLastName(String lastName) {
        this.lastName = lastName;
    }

    public int getAge() {
        return age;
    }

    public void setAge(int age) {
        this.age = age;
    }

    public Map<String, BigDecimal> getSalary() {
        return salary;
    }

    public void setSalary(Map<String, BigDecimal> salary) {
        this.salary = salary;
    }

    public String getDesignation() {
        return designation;
    }

    public void setDesignation(String designation) {
        this.designation = designation;
    }

    public String getContactNumber() {
        return contactNumber;
    }

    public void setContactNumber(String contactNumber) {
        this.contactNumber = contactNumber;
    }

    public String getEmailId() {
        return emailId;
    }

    public void setEmailId(String emailId) {
        this.emailId = emailId;
    }

    @Override
    public String toString() {
        return "(firstName: " + firstName + "," +
                "lastName: " + lastName + "," +
                "age: " + age + ", " +
                "salary: " + salary + "," +
                "designation: " + designation + ", " +
                "contactNumber: " + contactNumber + ", " +
                "emailId: " + emailId + ")";

    }
}
We will convert a JSON Object to a Java Object.
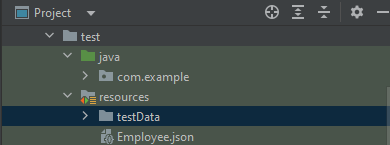
The JSON file – Employee.json is present in src/test/resources.
Below is the image of JSON.
You can create a Gson instance by invoking a new Gson() if the default configuration is all you need, as shown in the below example.


