A cookie is a small piece of data that is sent from a website and stored on your computer. Cookies are mostly used to recognize the user and load the stored information. Using Selenium WebDriver we can easily pass the cookie to the domain. Each cookie is associated with a name, value, domain, path, expiry, and the status of whether it is secure or not. In order to validate a client, a server parses all of these values in a cookie. Handling cookies during your automated testing is a common task since most websites are using cookies to track and retain specific user information.
Why do I need to handle cookies during automated testing?
Automated test runs may encounter a possible issue. It is possible that the website being tested is using the same cookie to store particular data for several tests.
Let’s take an example where you are adding an item to a shopping cart to test it. If one test adds the item to the cart, data might be saved in a cookie.
It’s possible that the logic in the second test believes the cart is empty. However, the second test fails since the cookie from the previous test is still saved.
In Selenium WebDriver, we can query and interact with cookies with the below built-in methods.
Various cookie operations
Create and add the cookie
The add_cookie() method takes a cookie dictionary as its parameter, focusing on the most important attributes – name and value.
driver.manage().addCookie(arg0);
Get Named Cookie
It returns the serialized cookie data matching the cookie name among all associated cookies.
driver.manage().getCookieNamed(arg0);
Get All Cookies
It returns a ‘successful serialized cookie data’ for the current browsing context. If the browser is no longer available, it returns an error.
driver.manage().getCookies();
Delete specific cookie
It deletes the cookie data matching the provided cookie name.
driver.manage().deleteCookieNamed(arg0);
Delete all cookies
It deletes all the cookies of the current browsing context.
driver.manage().deleteAllCookies();
Let us see an example where we add cookies, get the details of the cookies, delete a particular cookie, and delete all the cookies. I’m using Selenium – 4.15.0.
import org.openqa.selenium.Cookie;
import org.openqa.selenium.chrome.ChromeDriver;
import org.openqa.selenium.chrome.ChromeOptions;
import org.openqa.selenium.firefox.FirefoxDriver;
import java.util.Set;

public class Cookie_Demo {

    public static void main(String[] args) {

        ChromeOptions options = new ChromeOptions();
        options.addArguments("--start-maximize");

        ChromeDriver driver = new ChromeDriver(options);
        String URL = "http://google.com/";
        driver.navigate().to(URL);

        // Add the cookies into current browser context
        driver.manage().addCookie(new Cookie("mycookie1", "123456789123"));
        driver.manage().addCookie(new Cookie("mycookie2", "we34rf125ty6"));
        Cookie cookie1 = new Cookie("mycookie3", "ABCDEFGH");
        driver.manage().addCookie(cookie1);


        // Get All available cookies
        System.out.println("List of Cookies");
        Set<Cookie> cookiesList = driver.manage().getCookies();
        for (Cookie getcookies : cookiesList) {
            System.out.println(getcookies);
        }

        // Get cookie details with named cookie 'foo'
        System.out.println("Get detail of 2nd cookie");
        Cookie cookie2 = driver.manage().getCookieNamed("mycookie2");
        System.out.println(cookie2);

        // delete a cookie with name 'mycookie2'
        System.out.println("Delete 2nd cookie");
        driver.manage().deleteCookieNamed("mycookie2");

        // deletes all cookies
        System.out.println("Delete all cookies");
        driver.manage().deleteAllCookies();

        driver.quit();

    }
}
The output of the above program is
Congratulations on making it through this tutorial and hope you found it useful! Happy Learning!! Cheers!!
In this tutorial, we will discuss about Actions class in Selenium – What is Actions class, How to use, when to use and some commonly used methods of Actions class in Selenium. In Selenium, we have Webdriver Element Commands to handle web page interactions like entering text in a text box using sendkeys(), refresh a page using refresh(), etc. Similarly to interact with dropdown, we use Select class with methods like selectbyindex, selectbyvalue, etc. Suppose, we want to perform complex interactions or keyboard and mouse related interactions like right click, Drag and Drop an element, etc. We need advance API methods to implement these interactions, so Action class appears in place.
What is the Actions class in Selenium?
The user-facing API for emulating complex user gestures. Use this class rather than using the Keyboard or Mouse directly. Implements the builder pattern: Builds a Composite Action containing all actions specified by the method calls.
Difference between Action and Actions class in Selenium
Actions is a class that based on a builder design pattern. This is a user-facing API for emulating complex user gestures.
Whereas Action is an Interface that represents a single user-interaction action. It contains one of the most widely used methods perform().
To use Action or Actions class, we need to import below mentioned packages:-
We can create an instance of Actions class simply, by passing current webDriver instance. Now, using the action instance, we can call any of the methods provided in Actions class.
WebDriver driver = new ChromeDriver();
Actions builder = new Actions(driver);
How to see all the supported methods by Actions class?
In order to see all the supported methods by Actions class, press control + space after, Action object (builder)
There is a large number of methods available in Actions class. The below screenshot represents some of those methods
Methods in Actions class of Selenium
There are many methods in this class, which can categorized into four main categories:
1) keyDown(java.lang.CharSequence key)– Performs a modifier key press
2) keyUp(java.lang.CharSequence key) – Performs a modifier key release
3) sendKeys(java.lang.CharSequence… keys) – Sends keys to the active element.
Different Methods for performing Mouse Events:
1) click() – Clicks at the current mouse location.
2) clickAndHold() – Clicks (without releasing) in the middle of the given element.
3) contextClick() – Performs a context-click at middle of the given element.
4) doubleClick() – Performs a double-click at the current mouse location.
5) back Click – There is no convenience method for this, it is just pressing and releasing mouse button 3.
6) forward Click – pressing and releasing mouse button 4.
7) dragAndDrop(WebElement source, WebElement target)– A convenience method that performs click-and-hold at the location of the source element, moves to the location of the target element, then releases the mouse.
8) dragAndDropBy(WebElement source, int xOffset, int yOffset) – A convenience method that performs click-and-hold at the location of the source element, moves by a given offset, then releases the mouse.
9) moveByOffset(int xOffset, int yOffset) – Moves the mouse from its current position or (0,0) by the given offset.
10) MoveToElement(WebElement target) – Moves the mouse to the middle of the element.
Different Methods for performing Pen Events:
A Pen is a type of pointer input that has most of the same behavior as a mouse, but can also have event properties unique to a stylus. Additionally, while a mouse has 5 buttons, a pen has 3 equivalent button states:
Using Pen
Adding Pointer Event Attributes
Different Methods for performing Scroll Wheel Events:
1.Scroll to element – the actions class does not automatically scroll the target element into view, so this method will need to be used if elements are not already inside the viewport.
2. Scroll by given amount – Pass in an delta x and a delta y value for how much to scroll in the right and down directions. Negative values represent left and up, respectively.
3. Scroll from an element by a given amount – This scenario is effectively a combination of the above two methods.
4. Scroll from an element with an offset – This scenario is used when you need to scroll only a portion of the screen, and it is outside the viewport. Or is inside the viewport and the portion of the screen that must be scrolled is a known offset away from a specific element.
5. Scroll from a offset of origin (element) by given amount – The final scenario is used when you need to scroll only a portion of the screen, and it is already inside the viewport.
We are done! Congratulations on making it through this tutorial and hope you found it useful! Happy Learning!!
This is an action performed with a mouse when a user moves (drags) a web element and then places (drops) it into an alternate area.
Below are the methods the Actions class provides for Drag-Drop action: 1. dragAndDrop(WebElementsource, WebElement target) 2. dragAndDropBy(WebElementsource, int xOffset, int yOffset)
A convenience method performs click-and-hold at the location of the source element, moves to the location of the target element, and then releases the mouse.
As you can see, the dragAndDrop(WebElement source, WebElement target) method has two arguments to pass. One is a source web element and another is a target web element. This source web element is any web element that needs to drag. Target web element is any web element on which a dragged object needs to be placed or dropped. Now, when we have got the actions class object and the element as well, just invoke perform the ()method for the drag & drop:
actions.dragAndDrop(source,target).perform();
Let us see this with the help of an example.
import java.time.Duration;
import org.openqa.selenium.By;
import org.openqa.selenium.WebDriver;
import org.openqa.selenium.WebElement;
import org.openqa.selenium.chrome.ChromeDriver;
import org.openqa.selenium.chrome.ChromeOptions;
import org.openqa.selenium.interactions.Actions;

public class dragAndDrop_Demo {

	protected static WebDriver driver;

	public static void main(String[] args) {

       // Create a new instance of the Chrome driver
		ChromeOptions options = new ChromeOptions();
	    options.setImplicitWaitTimeout(Duration.ofSeconds(10));
	    options.addArguments("start-maximized");
	    driver = new ChromeDriver(options);

        // Launch the URL
	    driver.get("https://www.selenium.dev/selenium/web/mouse_interaction.html");

	    WebElement draggable = driver.findElement(By.id("draggable"));
        WebElement droppable = driver.findElement(By.id("droppable"));
        new Actions(driver)
                .dragAndDrop(draggable, droppable)
                .perform();

        System.out.println("Text appeared :" + driver.findElement(By.id("drop-status")).getText());
        driver.close();

    }
}
Image before performing Drag and Drop operation
Image after performing Drag and Drop operation
Drag and Drop using clickAndHold, moveToElement and release Method
1. Hold the source 2. Move the element 3. Release the element
The different methods of Action class we will be using here for Drag and Drop in Selenium: • clickAndHold(WebElement element) – Clicks a web element at the middle(without releasing). • moveToElement(WebElement element)– Moves the mouse pointer to the middle of the web element without clicking. • release(WebElement element)– Releases the left click (which is in the pressed state). • build()– Generates a composite action
Let us understand the use of these methods in a Selenium program
import java.time.Duration;
import org.openqa.selenium.By;
import org.openqa.selenium.WebDriver;
import org.openqa.selenium.WebElement;
import org.openqa.selenium.chrome.ChromeDriver;
import org.openqa.selenium.chrome.ChromeOptions;
import org.openqa.selenium.interactions.Actions;

public class clickAndHold_Demo {

	protected static WebDriver driver;

	public static void main(String[] args) {

		 // Create a new instance of the Chrome driver
		ChromeOptions options = new ChromeOptions();
	    options.setImplicitWaitTimeout(Duration.ofSeconds(10));
	    options.addArguments("start-maximized");
	    driver = new ChromeDriver(options);

        // Launch the URL
	    driver.get("https://www.selenium.dev/selenium/web/mouse_interaction.html");

	    WebElement clickable = driver.findElement(By.id("clickable"));
        new Actions(driver)
                .clickAndHold(clickable)
                .perform();

        System.out.println("Text appeared :" + driver.findElement(By.id("click-status")).getText());

	}

}
The output of the above program is
Drag and Drop using dragAndDropBy and offset method
A convenience method that performs click-and-hold at the location of the source element, moves by a given offset, and then releases the mouse. • Using the dragAndDropBy Method, we drop WebElement on a particular WebPage offset location.
Below is a Selenium program that shows the use of the dragAndDropBy method.
import java.time.Duration;
import org.openqa.selenium.By;
import org.openqa.selenium.WebDriver;
import org.openqa.selenium.WebElement;
import org.openqa.selenium.chrome.ChromeDriver;
import org.openqa.selenium.chrome.ChromeOptions;
import org.openqa.selenium.interactions.Actions;

public class dragAndDropBy_Demo {

	private static WebDriver driver;

	public static void main(String[] args) {

		 // Create a new instance of the Chrome driver
		ChromeOptions options = new ChromeOptions();
	    options.setImplicitWaitTimeout(Duration.ofSeconds(30));
	    options.addArguments("start-maximized");
	    driver = new ChromeDriver(options);

        // Launch the URL
	    driver.get("https://www.selenium.dev/selenium/web/mouse_interaction.html");

	    WebElement draggable = driver.findElement(By.id("draggable"));

        new Actions(driver)
        .dragAndDropBy(draggable, 180,10)
        .perform();

        driver.close();
	}

}
The output of the above program is
Congratulations on making it through this tutorial and hope you found it useful! Happy Learning!! Cheers!!
If you are planning to learn Selenium WebDriver and if you have completed Basic Selenium tutorial, then you can start Advanced Selenium Tutorials which will talk about different frameworks, tools integration, external data reading from different sources, and so on.
Once the Selenium and WebDriverManager folders are downloaded, unzip the folder. Once the zip file is extracted, reference these jar files in the project. For this, navigate to project properties and click Build Path-> Configure Build Path in Eclipse. Click “Add External Jars“. After clicking on “Add External JARs“, selected all the extracted JARs. The JARs files are present in the project.
Add the below dependencies to pom.xml or build.gradle
A headless browser is like any other browser but without a Head/GUI (Graphical User Interface). A headless browser is used to automate the browser without launching the browser. While the tests are running, we could not see the browser, but we can see the test results coming on the console.
We know that to execute Selenium automation scripts on browsers like edge, we must download the binary files of the EDGE driver – msedgedriver. After this, we need to set the path to these binaries in the automation script or add the classpath location. Here, we want to execute Selenium WebDriver automation scripts on the Microsoft Edge browser, then you need first to download msedgedriver.exe and then use the System.setProperty method to set its path as follows:
		// Set the path of EdgeDriver
		System.setProperty("webdriver.edge.driver",
				"C:\\Users\\Vibha\\Software\\edgedriver_win64\\msedgedriver.exe");
The complete program looks like as shown below:
import org.openqa.selenium.edge.EdgeDriver;
import org.openqa.selenium.edge.EdgeOptions;

public class EdgeHeadlessInSelenium4 {

	public static void main(String[] args) {
		// Set the path of EdgeDriver
		System.setProperty("webdriver.edge.driver",
				"C:\\Users\\Vibha\\Software\\edgedriver_win64\\msedgedriver.exe");

		// Create an object of Edge Options class
		EdgeOptions edgeOptions = new EdgeOptions();

		// pass the argument –headless to Edge Options class.
		edgeOptions.addArguments("--headless");

		// Create an object of WebDriver class and pass the Edge Options object as
		// an argument
		WebDriver driver = new EdgeDriver(edgeOptions);

		System.out.println("Executing Edge Driver in Headless mode..");
		driver.get("https://duckduckgo.com/");

		System.out.println("Title of Page :" + driver.getTitle());
		System.out.println("Page URL  : " + driver.getCurrentUrl());

		// Close the driver
		driver.close();

	}

}
The output of the above program is
How to run headless Microsoft Edge Tests in Selenium using WebDriverManager?
WebDriverManager has an automated way to download browser executables(exes) or binaries. It supports different browsers like Chrome, Firefox, Microsoft Edge, Internet Explorer, Opera, or PhantomJS.
WebDriverManager.edgedriver().setup: checks for the latest version of the specified WebDriver binary. If the binaries are not present on the machine, then it will download the WebDriver binaries. Next, it instantiates the Selenium WebDriver instance with the EdgeDriver.
import org.openqa.selenium.edge.EdgeDriver;
import org.openqa.selenium.edge.EdgeOptions;

import io.github.bonigarcia.wdm.WebDriverManager;

public class EdgeHeadlessWithWebDriverManagerInSelenium4 {

	public static void main(String[] args) {

		// Create an object of Edge Options class
		EdgeOptions edgeOptions = new EdgeOptions();

		// pass the argument –headless to Edge Options class.
		edgeOptions.addArguments("--headless");

		// Create an object of WebDriver class and pass the Edge Options object as
		// an argument
		WebDriver driver = new EdgeDriver(edgeOptions);

		System.out.println("Executing Edge Driver in Headless mode..");

		driver.get("https://www.bing.com/");
		System.out.println("Title of Page :" + driver.getTitle());
		System.out.println("Page URL : " + driver.getCurrentUrl());

		// Close the driver
		driver.close();

	}
}
The output of the above program is
Congratulations on making it through this tutorial and hope you found it useful! Happy Learning!! Cheers!!
Selenium is an open-source tool. It is not a single automation tool like QTP. Instead, it is a suite of software or a set of JAR files. These tools automate web browsers across various browsers. Selenium is used by many companies, but a few to mention are Netflix, Google, HubSpot, Fitbit, Accenture, IBM, and more.
Selenium – Introduction, Installation, Test Script
In this tutorial, we will go through what are Locators and different type of locators in Selenium. The prerequisite of any automation tool is to locate the web elements on a web page. Buy WHY?
One of the example is that suppose you want to login to gmail using any automation tool. Therefore, in this case you need to enter your email or phone and click on Next button. Here, Email Textbox and Next button are web elements.
Find the link element with partial matching visible text
Syntax
driver.findElement(By.partialLinkText("Forgot "))
7) XPath
Full form of XPath is XML Path. It is used to locate a web element on a web page using HTML DOM structure
Syntax
By.xpath("//tagname[@Attribute = ‘value’]")
//: select the current node. tagname: name of the tag of a particular node. @: to select attribute. Attribute: name of the attribute of the node. Value: value of the attribute
There are 2 types of Xpath:-
1) Absolute Path 2) Relative Path
Absolute Path – It is the direct way to find any element. But as name suggest, it needs to be absolute. Any change made in the path will fail the xpath, result tool will not be able to locate the we element on the page.
Relative Path –Relative XPath begins from the current location and is prefixed with a “//”. It starts from the middle of the DOM structure. To know more about XPath, click here
Syntax
By.xpath("//input[@name='identifier']")
8) CSS Selectors
CSS Selectors are string patterns used to identify an element based on a combination of HTML tag, id, class, and attributes. Locating by CSS Selector is more complicated than the previous methods, but it is the most common locating strategy of advanced Selenium users because it can access even those elements that have no ID or name. To know more about CSS, click here
Below is an example that shows how to use different locators. In this example, we have used Id, name, className, tagName, partialLinkText and LinkText locators.
package org.example;

import org.openqa.selenium.By;
import org.openqa.selenium.WebDriver;
import org.openqa.selenium.WebElement;
import org.openqa.selenium.chrome.ChromeDriver;
import org.openqa.selenium.chrome.ChromeOptions;

import java.time.Duration;
import java.util.List;

public class Automation_Practice_Form {

    protected static WebDriver driver;
    public static void main(String[] args) {

        ChromeOptions options = new ChromeOptions();
        options.addArguments("--start-maximized");
        driver = new ChromeDriver(options);
        driver.manage().timeouts().implicitlyWait(Duration.ofSeconds(2));
        driver.get("https://opensource-demo.orangehrmlive.com/");
        driver.manage().window().maximize();

        // Locate link by partialLinkText
        String PartialLinkText_Text = driver.findElement(By.partialLinkText("Orange")).getText();
        System.out.println("Text of PartialLinkText Locator is ->" + PartialLinkText_Text);

        // Locate FirstName by name
        driver.findElement(By.name("username")).sendKeys("Admin");

        // Locate LastName by id
        driver.findElement(By.name("password")).sendKeys("admin123");

        // Locate options of DropDown by tagName
        List<WebElement> linkName = driver.findElements(By.tagName("a"));
        System.out.println("List of Links:");
        for (WebElement link : linkName) {
            System.out.println(link.getText() + " - " +link.getAttribute("href"));
        }
        driver.close();
    }
}
The output of the above program is
That’s it! Congratulations on making it through this tutorial and hope you found it useful! Happy Learning!!
In this tutorial, I’ll create a Framework for the testing of web applications using Selenium Webdriver with TestNG.
We integrate Selenium with TestNG because Selenium does not have any inbuilt reporting feature. TestNG generates detailed HTML reports of test executions. It is easy to manage dependencies between test methods in TestNG which is quite difficult in Selenium.
Selenium needs Java to be installed on the system to run the tests. Click here to learn How to install Java.
Step 2 – Download and setup Eclipse IDE on the system
The Eclipse IDE (integrated development environment) provides strong support for Java developers, which is needed to write Java code. Click here to learn How to install Eclipse.
Step 3 – Setup Maven
To build a test framework, we need to add a number of dependencies to the project. It is a very tedious and cumbersome process to add each dependency manually. So, to overcome this problem, we use a build management tool. Maven is a build management tool that is used to define project structure, dependencies, build, and test management. Click here to learn How to install Maven.
After the addition of dependencies in pom.xml, the Maven Dependencies folder will be updated automatically with all the JAR file related to the dependencies.
Step 6 – Create a Test file under src/test/java
@BeforeMethod – This annotated method will be run before each test method i.e say there are three test methods (i.e test cases), then @BeforeMethod annotated method will be called thrice before each test method.
@AfterMethod– methods under this annotation will be executed after each Test method.
@Test – The annotated method is part of a test case.
Description– You can describe your test case under the description, stating what it does.
description = "This test validates title of login functionality"
Priority– You can prioritize the order of your test methods by defining a priority. Based on the defined priority, the test shall execute in that order.
priority = 0
Below is an example of Selenium Tests with TestNG.
BaseTests
import org.openqa.selenium.WebDriver;
import org.openqa.selenium.chrome.ChromeDriver;
import org.openqa.selenium.chrome.ChromeOptions;
import org.testng.annotations.AfterMethod;
import org.testng.annotations.BeforeMethod;

import java.time.Duration;

public class BaseTests {

    public static WebDriver driver;
    public final static int TIMEOUT = 10;

    @BeforeMethod
    public void setup() {

        ChromeOptions options = new ChromeOptions();
        options.addArguments("--remote-allow-origins=*");
        options.addArguments("--no-sandbox");
        options.addArguments("--disable-dev-shm-usage");
        options.addArguments("--headless");
        driver = new ChromeDriver(options);
        driver.manage().window().maximize();
        driver.get("https://opensource-demo.orangehrmlive.com/");
        driver.manage().timeouts().implicitlyWait(Duration.ofSeconds(TIMEOUT));

    }

    @AfterMethod
    public void tearDown() {
        driver.quit();
    }

}
LoginTests
import org.testng.Assert;
import org.testng.annotations.Test;

public class LoginPageTests extends BaseTests{

    @Test
    public void invalidCredentials() {

	    LoginPage objLoginPage = new LoginPage(driver);
    	objLoginPage.login("admin$$", "admin123");

    	// Verify Error Message
    	 Assert.assertEquals("Invalid credentials",objLoginPage.getErrorMessage());

    }

    @Test
    public void validLogin() {

	    LoginPage objLoginPage = new LoginPage(driver);
    	objLoginPage.login("Admin", "admin123");

    	HomePage objHomePage = new HomePage(driver);

    	// Verify Home Page
    	Assert.assertEquals("Dashboard",objHomePage.getHomePageText());

    }

}
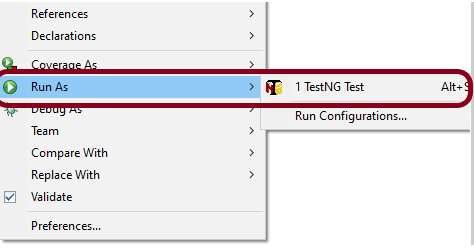
Step 7 – Test Execution through TestNG
Go to the Runner class and right-click Run As TestNG Test. The tests will run as TestNG tests (in Eclipse).
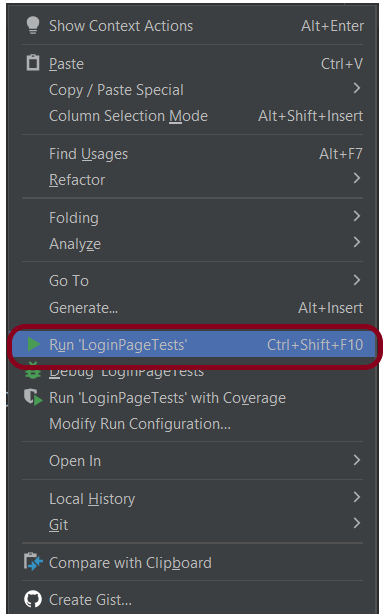
Intellij
Step 8 – Run the tests from TestNG.xml
Create a TestNG.xml as shown below and run the tests as TestNG.
<?xml version = "1.0"encoding = "UTF-8"?>
<!DOCTYPE suite SYSTEM "http://testng.org/testng-1.0.dtd">
<suite name = "Suite1">
  <test name = "TestNG Demo">
    <classes>
          <class name = "com.example.Selenium_TestNGDemo.TestNG_Demo"/>
     </classes>
   </test>
</suite>
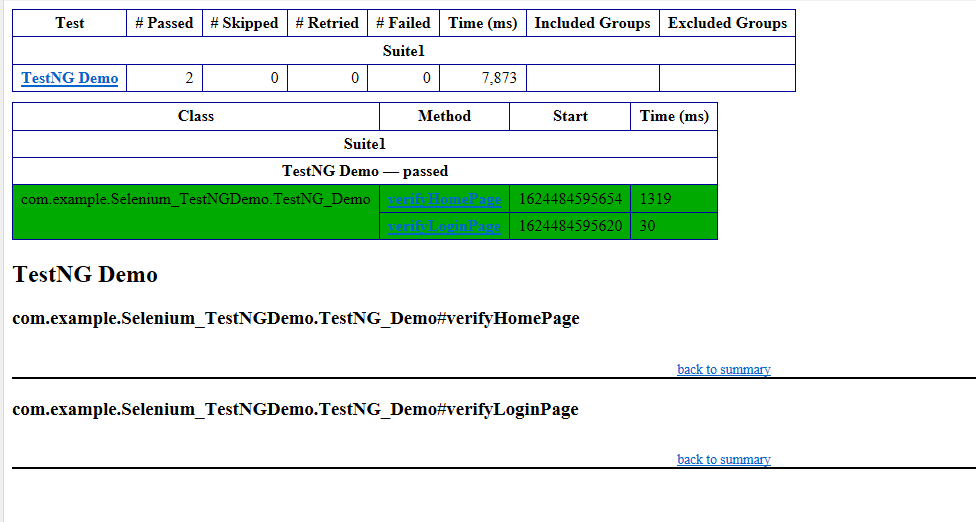
Step 9 – TestNG Report Generation
TestNG generates various types of reports under test-output folder like emailable-report.html, index.html, testng-results.xml.
We are interested in the “emailable-report.html” report. Open “emailable-report.html“, as this is an HTML report, and open it with the browser. The below image shows emailable-report.html.
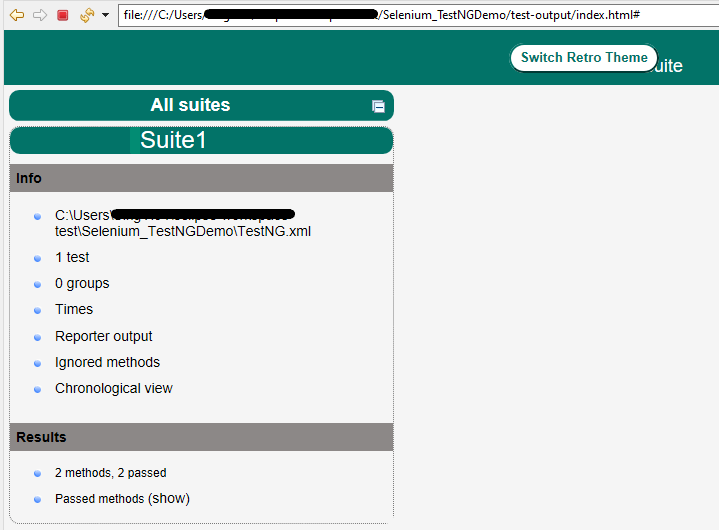
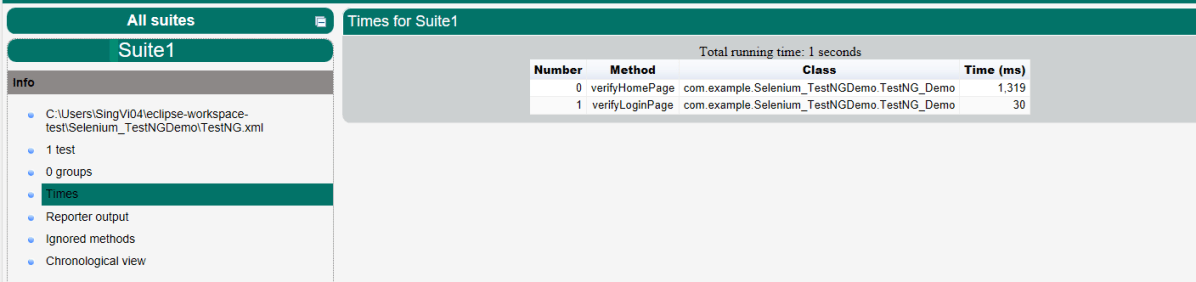
TestNG also produces an “index.html” report, and it resides under the test-output folder. The below image shows the index.html report. This is the latest theme of the report.
The links present on the left side are clickable. I have clicked the Times link, and you can see the details on the right side.
That’s it! Congratulations on making it through this tutorial and hope you found it useful! Happy Learning!!
Cross-browser testing is a software testing practice that involves evaluating the compatibility and functionality of a website or web application across different web browsers. The goal of cross-browser testing is to ensure that the website or application works consistently and as expected on various browsers, operating systems, and devices.
Since different web browsers (such as Google Chrome, Mozilla Firefox, Microsoft Edge, Safari, etc.) may interpret and render HTML, CSS, and JavaScript code differently, cross-browser testing helps identify and address any discrepancies or issues that might arise. These differences can affect the visual appearance, layout, performance, and functionality of a website or application.
What is Selenium Grid?
Selenium Grid enables the execution of WebDriver scripts on remote machines (virtual or physical) by routing client commands to remote browser instances. Selenium Grid is a component of the Selenium testing framework that allows you to distribute and run tests across multiple browsers, operating systems, and machines simultaneously. It is particularly useful for performing parallel testing and cross-browser testing, helping to speed up the testing process and ensure consistent behavior across different environments.
What is new in Selenium Grid 4?
Grid 4 makes use of a variety of new technologies to enable scaling while allowing for local execution.
Selenium Grid 4 is a new implementation that does not share the previous version’s codebase.
I like how noVNC is packaged with Selenium Grid. In the dashboard, there is a Sessions tab that, when clicked, displays the links to the browser sessions that are now active, along with a video icon. When you click the video icon, you will be prompted to enter the password (“secret”), following which you will be taken to the current browser session where you can view the test live.
If we wanted to observe what was going on inside the browser session, we had to explicitly configure the grid for noVNC viewer in the prior version. From the grid, we just saw the browser icons highlighted, letting us know that the tests were being run in this or that browser.
What is Docker?
Docker is an open platform for developing, shipping, and running applications inside the containers. Containers are lightweight, portable, and self-sufficient units that package an application and its dependencies (such as libraries, frameworks, and runtime environments) together. Docker provides a consistent environment for running applications across different systems, making it easier to ensure that an application behaves the same way in development, testing, and production environments.
CLI Options for Docker
What is Docker Compose?
Docker Compose is a tool provided by Docker that allows you to define and manage multi-container Docker applications. It uses a simple and declarative YAML file to define the services, networks, and volumes that make up your application stack.
Project Structure
How to perform cross browser testing with Selenium Grid and Docker
Docker Desktop does not start automatically after installation. To start Docker Desktop, search for Docker, and select Docker Desktop in the search results. When the whale icon in the status bar stays steady, Docker Desktop is up-and-running, and is accessible from any terminal window.
Creating an instance of the Remote WebDriver and passing the selenium endpoint and chrome options defined in it.
To run a Remote WebDriver client, we first need to connect to the RemoteWebDriver. We do this by pointing the URL to the address of the server running our tests. In order to customize our configuration, we set desired capabilities.
BaseTests
import org.openqa.selenium.WebDriver;
import org.openqa.selenium.chrome.ChromeOptions;
import org.openqa.selenium.edge.EdgeOptions;
import org.openqa.selenium.firefox.FirefoxOptions;
import org.openqa.selenium.remote.RemoteWebDriver;
import org.testng.annotations.AfterMethod;
import org.testng.annotations.BeforeMethod;
import org.testng.annotations.Parameters;
import java.net.URL;
import java.time.Duration;

public class BaseTests {
    protected static ThreadLocal<RemoteWebDriver> driver = new ThreadLocal<RemoteWebDriver>();
    public static String remote_url = "http://localhost:4444";
    public final static int TIMEOUT = 5;

    @BeforeMethod
    @Parameters("browser")
    public void setUp(String browser) throws Exception {
        if(browser.equalsIgnoreCase("chrome")) {

            ChromeOptions options = new ChromeOptions();
            options.addArguments("--start-maximized");
            options.addArguments("--headless=new");
            options.addArguments("--remote-allow-origins=*");
            driver.set(new RemoteWebDriver(new URL(remote_url), options));
            System.out.println("Browser Started :"+ browser);

        } else if (browser.equalsIgnoreCase("firefox")) {
            FirefoxOptions options = new FirefoxOptions();
            options.addArguments("--start-maximized");
            options.addArguments("-headless");
            driver.set(new RemoteWebDriver(new URL(remote_url), options));
            System.out.println("Browser Started :"+ browser);

        } else if (browser.equalsIgnoreCase("edge")) {
            EdgeOptions options = new EdgeOptions();
            options.addArguments("--start-maximized");
            options.addArguments("--headless=new");
            driver.set(new RemoteWebDriver(new URL(remote_url), options));
            System.out.println("Browser Started :"+ browser);

        } else {
            throw new Exception ("Browser is not correct");
        }

        driver.get().get("https://opensource-demo.orangehrmlive.com/");
        driver.get().manage().timeouts().implicitlyWait(Duration.ofSeconds(5));
    }

    public WebDriver getDriver() {
        return driver.get();
    }

    @AfterMethod
    public  void closeBrowser() {
        driver.get().quit();
        driver.remove();
    }

}
LoginPageTests
import org.openqa.selenium.By;
import org.testng.annotations.Test;
import static org.testng.Assert.assertEquals;

public class LoginPageTests extends BaseTests {

    By userName = By.name("username");

    By passWord = By.name("password");

    By loginBtn = By.xpath("//*[@id='app']/div[1]/div/div[1]/div/div[2]/div[2]/form/div[3]/button");

    By errorMessage = By.xpath("//*[@id='app']/div[1]/div/div[1]/div/div[2]/div[2]/div/div[1]/div[1]/p");

    By blankUsername = By.xpath("//*[@id='app']/div[1]/div/div[1]/div/div[2]/div[2]/form/div[1]/div/span");

    By dashboardPage = By.xpath("//*[@id='app']/div[1]/div[1]/header/div[1]/div[1]/span/h6");

    @Test
    public void invalidCredentials()  {

        getDriver().findElement(userName).sendKeys("1234");
        getDriver().findElement(passWord).sendKeys("12342");
        getDriver().findElement(loginBtn).click();
        String actualErrorMessage = getDriver().findElement(errorMessage).getText();
        System.out.println("Actual ErrorMessage :" + actualErrorMessage);
        assertEquals(actualErrorMessage,"Invalid credentials");

    }

    @Test
    public void blankUsername()  {

        getDriver().findElement(userName).sendKeys("");
        getDriver().findElement(passWord).sendKeys("12342");
        getDriver().findElement(loginBtn).click();
        String actualErrorMessage = getDriver().findElement(blankUsername).getText();
        System.out.println("Actual ErrorMessage :" + actualErrorMessage);
        assertEquals(actualErrorMessage,"Required");

    }

    @Test
    public void successfulLogin()  {

        getDriver().findElement(userName).sendKeys("Admin");
        getDriver().findElement(passWord).sendKeys("admin123");
        getDriver().findElement(loginBtn).click();
        String actualMessage = getDriver().findElement(dashboardPage).getText();
        System.out.println("Message :" + actualMessage);
        assertEquals(actualMessage,"Dashboard");

    }
}
6. Create a testng.xml
It is very easy to create testng.xml in the case of Eclipse. Right-click on the project, and select TestNG -> Convert to TestNG. It will create a basic testng.xml structure. In case of IntelliJ, create a new file with the name of testng.xml and copy the code from here. Here, we are running the tests parallelly also.
<?xml version="1.0" encoding="UTF-8"?>
<!DOCTYPE suite SYSTEM "https://testng.org/testng-1.0.dtd">
<suite name="Suite" parallel="tests" thread-count="3">
    <test name="Chrome Test">
        <parameter name="browser" value="chrome"></parameter>
        <classes>
            <class name="com.example.tests.LoginPageTests"/>
        </classes>
    </test> <!-- Test -->

   <test name="Firefox Test">
        <parameter name="browser" value="firefox"></parameter>
        <classes>
            <class name="com.example.tests.LoginPageTests"/>
        </classes>
    </test> <!-- Test -->

    <test name="Edge Test">
        <parameter name="browser" value="edge"></parameter>
        <classes>
            <class name="com.example.tests.LoginPageTests"/>
        </classes>
    </test> <!-- Test -->
</suite> <!-- Suite -->
version: 3. It is the latest version of the docker-compose files.
services(containers): This contains the list of the images and their configurations.
image: It defines which image will be used to spin up container.
ports: Published ports with host:container format.
container_name: You can give name to your containers.
depends_on: This defines the required dependency before spinning up the container. In our docker-compose.yml file, containers Chrome and Firefox are dependent upon container hub to spin up.
SE_NODE_MAX_INSTANCES: This defines how many instances of same version of browser can run over the Remote System.
SE_NODE_MAX_SESSIONS: This defines maximum number of concurrent sessions that will be allowed.
8. Start the Selenium Grid
We have the docker compose file ready with all the configurations required to start the selenium grid.
To start the grid we need to navigate to the folder where our docker compose file is located and run the following command:
docker-compose up
Once the grid is up and running, we can navigate to http://localhost:4444and checkout the instances which are up and running as per the configurations we gave in the docker compose file.
9. Execute the tests
Go to the command line and execute the tests using the below command:
mvn clean test
The output of the above program is shown below:
Checkout the image below, this is how the selenium grid dashboard looks when the tests execution gets started
As mentioned earlier, in selenium grid 4, we have the sessions overview as well. So, when we click on the Session Tab we can see the execution happening live and there are other details as well displayed in the Dashboard like Capabilities, Start time, Duration and Node URI which are useful metrics from the test automation reporting.
We need to click on the video icon beside the browser session to watch the session live and it will ask for password here. The password is “secret”
This is how the test execution in Chrome looks like and its actually executing the tests.
10. View the Reports
TestNG generate the reports. Go to target/surefire-reports as shown in the below image.
Emailable-Report.html
Index.html
11. Stop the Selenium Grid
Once the execution of the tests are finished, it is advisable to stop the Grid. To stop the grid, we can press ctrl+c in the command prompt/terminal and it will instantly stop the containers. To Stop and remove containers, networks, volumes, and images created by docker we can use the following command:
docker-compose down
Congratulations!!. The above steps allow running Selenium tests in Docker seamlessly. Happy Learning.
Selenium Grid enables the execution of WebDriver scripts on remote machines (virtual or physical) by routing client commands to remote browser instances. Its goal is to make it simple to perform tests on numerous machines in parallel.
Selenium Grid enables us to run tests on multiple computers in parallel and to manage different browser versions and browser configurations centrally (rather than in each individual test).
What is new in Selenium Grid 4?
Grid 4 makes use of a variety of new technologies to enable scaling while allowing for local execution.
Selenium Grid 4 is a new implementation that does not share the previous version’s codebase.
I like how noVNC is packaged with Selenium Grid. In the dashboard, there is a Sessions tab that, when clicked, displays the links to the browser sessions that are now active, along with a video icon. When you click the video icon, you will be prompted to enter the password (“secret”), following which you will be taken to the current browser session where you can view the test live.
If we wanted to observe what was going on inside the browser session, we had to explicitly configure the grid for noVNC viewer in the prior version. From the grid, we just saw the browser icons highlighted, letting us know that the tests were being run in this or that browser.
What is Docker?
Docker is an open platform for developing, shipping, and running applications. Docker enables you to separate your applications from your infrastructure so you can deliver software quickly. With Docker, you can manage your infrastructure in the same ways you manage your applications.
CLI Options for Docker
What is Docker Compose?
Docker Compose is a tool that helps you define and share multi-container applications. With Compose, you can create a YAML file to define the services and with a single command, you can spin everything up or tear it all down.
Docker Desktop does not start automatically after installation. To start Docker Desktop, search for Docker, and select Docker Desktop in the search results. When the whale icon in the status bar stays steady, Docker Desktop is up-and-running, and is accessible from any terminal window.
Creating an instance of the Remote WebDriver and passing the selenium endpoint and chrome options defined in it.
To run a Remote WebDriver client, we first need to connect to the RemoteWebDriver. We do this by pointing the URL to the address of the server running our tests. In order to customize our configuration, we set desired capabilities.
BaseTests
import org.openqa.selenium.WebDriver;
import org.openqa.selenium.chrome.ChromeOptions;
import org.openqa.selenium.remote.RemoteWebDriver;
import org.testng.annotations.AfterMethod;
import org.testng.annotations.BeforeMethod;
import java.net.URL;
import java.time.Duration;

public class BaseTests {
    protected static ThreadLocal<RemoteWebDriver> driver = new ThreadLocal<RemoteWebDriver>();
    public static String remote_url = "http://localhost:4444";
    public final static int TIMEOUT = 5;

    @BeforeMethod
    public void setUp() throws Exception {

        ChromeOptions options = new ChromeOptions();
        options.addArguments("--start-maximized");
        driver.set(new RemoteWebDriver(new URL(remote_url), options));
        System.out.println("Browser Started : Chrome");

        driver.get().get("https://opensource-demo.orangehrmlive.com/");
        driver.get().manage().timeouts().implicitlyWait(Duration.ofSeconds(TIMEOUT));
        }


    public WebDriver getDriver() {
        return driver.get();
    }

    @AfterMethod
    public  void closeBrowser() {
        driver.get().quit();
        driver.remove();
    }

}
LoginPageTests
import org.openqa.selenium.By;
import org.testng.annotations.Test;
import static org.testng.Assert.assertEquals;

public class LoginPageTests extends BaseTests {

    By userName = By.name("username");
    By passWord = By.name("password");
    By loginBtn = By.xpath("//*[@id='app']/div[1]/div/div[1]/div/div[2]/div[2]/form/div[3]/button");
    By errorMessage = By.xpath("//*[@id='app']/div[1]/div/div[1]/div/div[2]/div[2]/div/div[1]/div[1]/p");
    By blankUsername = By.xpath("//*[@id='app']/div[1]/div/div[1]/div/div[2]/div[2]/form/div[1]/div/span");

   @Test
    public void invalidCredentials() {

        getDriver().findElement(userName).sendKeys("1234");
        getDriver().findElement(passWord).sendKeys("12342");
        getDriver().findElement(loginBtn).click();
        String actualErrorMessage = getDriver().findElement(errorMessage).getText();
        System.out.println("Actual ErrorMessage :" + actualErrorMessage);
        assertEquals(actualErrorMessage,"Invalid credentials");

    }

    @Test
    public void blankUsername() {

        getDriver().findElement(userName).sendKeys("");
        getDriver().findElement(passWord).sendKeys("12342");
        getDriver().findElement(loginBtn).click();
        String actualErrorMessage = getDriver().findElement(blankUsername).getText();
        System.out.println("Actual ErrorMessage :" + actualErrorMessage);
        assertEquals(actualErrorMessage,"Required");

    }
}
6. Create a testng.xml
It is very easy to create testng.xml in the case of Eclipse. Right-click on the project, and select TestNG -> Convert to TestNG. It will create a basic testng.xml structure. In case of IntelliJ, create a new file with the name of testng.xml and copy the code from here.
<?xml version="1.0" encoding="UTF-8"?>
<!DOCTYPE suite SYSTEM "https://testng.org/testng-1.0.dtd">
<suite name="Suite" parallel="none" thread-count="1">
    <test name="Chrome Test">
        <parameter name="browser" value="chrome"></parameter>
        <classes>
            <class name="com.example.tests.LoginPageTests"/>
        </classes>
    </test> <!-- Test -->

</suite> <!-- Suite -->
version: 3. It is the latest version of the docker-compose files.
services(containers): This contains the list of the images and their configurations.
image: It defines which image will be used to spin up container.
ports: Published ports with host:container format.
container_name: You can give name to your containers.
depends_on: This defines the required dependency before spinning up the container. In our docker-compose.yml file, containers Chrome and Firefox are dependent upon container hub to spin up.
SE_NODE_MAX_INSTANCES: This defines how many instances of same version of browser can run over the Remote System.
SE_NODE_MAX_SESSIONS: This defines maximum number of concurrent sessions that will be allowed.
8. Start the Selenium Grid
We have the docker compose file ready with all the configurations required to start the selenium grid.
To start the grid we need to navigate to the folder where our docker compose file is located and run the following command:
docker-compose up
Once the grid is up and running, we can navigate to http://localhost:4444. We can then check out the instances. They are up and running as per the configurations we gave in the docker compose file.
9. Execute the tests
Go to the command line and execute the tests using the below command:
mvn clean test
The output of the above program is shown below
Checkout the image below, this is how the selenium grid dashboard looks when the tests execution gets started
As mentioned earlier, in selenium grid 4, we have the sessions overview as well. So, when we click on the Session Tab we can see the execution happening live and there are other details as well displayed in the Dashboard like Capabilities, Start time, Duration and Node URI which are useful metrics from the test automation reporting.
We need to click on the video icon beside the browser session to watch the session live and it will ask for password here. The password is “secret”
This is how the test execution in Chrome looks like and its actually executing the tests.
10. View the Reports
TestNG generate the reports. Go to target/surefire-reports as shown in the below image.
Emailable-Report.html
Index.html
Congratulations!!. The above steps allow running Selenium tests in Docker seamlessly. Happy Learning.