Robot Framework Features – Settings, Libraries, Variables, Keywords, Resources, Reports, Logs

HOME

The previous tutorial has explained What is Robot Framework and its advantages. This tutorial will explain the various features available in this framework.

1. Settings

The Setting section is used to import libraries, resource files, and variable files and to define metadata for test suites and test cases. It can be included in test case files and resources.

The most commonly used are:

NameDescription
LibraryUsed for importing libraries.
ResourceUsed for taking resource files into use.
DocumentationUsed for specifying a test suite or resource file documentation.
VariablesUsed for taking variable files into use.
MetadataUsed for setting free test suite metadata.
Test SetupUsed for specifying a default test setup.
Test TeardownUsed for specifying a default test teardown.
Test TemplateUsed for specifying a default template keyword for test cases.

Example of Setting:

*** Settings ***
Documentation    To validate the Login Form
Library     SeleniumLibrary
Test Teardown    Close Browser

2. Test Cases

The settings in the Test Case section are always specific to the test case for which they are defined. Some of these settings override the default values defined in the Settings section.

Example of Test Case:

*** Test Cases ***
Validate Unsuccessful Login
    Open the Browser with URL
    Fill the login form
    Verify error message is correct

3. Keywords

The Keyword section settings are unique to the user keyword for which they are defined. The robot architecture includes built-in keywords as well as keywords from libraries such as the Selenium Library. (open browser, close browser, maximize browser, etc.). We can also make user-defined keywords out of other user-defined keywords or built-in or library keywords. We can also give arguments to those keywords, which turns them into functions that can be reused.

Example of Keywords:

*** Keywords ***
Open the Browser with URL
    Create Webdriver    Chrome  executable_path=/Vibha_Personal/RobotFramework/drivers/chromedriver_linux64
    Go To    https://opensource-demo.orangehrmlive.com/web/index.php/auth/login
    Maximize Browser Window
    Set Selenium Implicit Wait    5

4. Libraries

Many external libraries, such as SeleniumLibrary, Database Library, FTP Library, and HTTP Library, are supported by the Robot architecture. SeleniumLibrary is mostly used to communicate with browsers and aid in web application and UI testing. Robot framework also includes its own libraries for strings, dates, integers, and so on.

Normally, test libraries are imported by selecting the Library option in the Setting section and entering the library name in the following column. The collection name, unlike most other data, is case and space sensitive. If a library is part of a package, use the complete name, including the package name.

Example of Libraries:

Library     SeleniumLibrary
Library     String

5. Variables

Variables which are defined in the *** Variables *** section are available in all test cases and keywords in the same file.
Variables defined in the *** Variables *** section are suite variables.
If a .resource or a .robot file with a *** Variables *** section is imported into a test suite, and the variables there also become suite variables.

Example of Variables:

 ${result}=  Get Text    CSS:.oxd-alert-content-text

6. Resources

Resource files are imported using the Resource setting in the Settings section so that the path to the resource file is given as an argument to the setting.  The robot framework also allows the import of robot files with keywords externally to be used with test cases. Resources are very easy to use and are of great help when we need to use some keywords already written for other test projects.

Example of Resource File:

*** Settings ***
Documentation
Library     SeleniumLibrary

*** Variables ***
${valid_username}     Admin
${valid_password}       admin123
${invalid_username}     1234
${invalid_password}     45678
${url}      https://opensource-demo.orangehrmlive.com/web/index.php/auth/login

*** Keywords ***

Open the Browser with URL
    Create Webdriver    Chrome  executable_path=/Vibha_Personal/RobotFramework/drivers/chromedriver_linux64
    Go To       ${url}
    Maximize Browser Window
    Set Selenium Implicit Wait    5

Close Browser Session
    Close Browser

7. Reports and Logs

The robot framework provides all test suite and test case execution details in the shape of reports and logs. The log file contains all the test case’s execution information. Details such as whether the test case failed or passed, the time required for execution, and the steps needed to run the test case are provided.

Report

Log

That’s it! Congratulations on making it through this tutorial and hope you found it useful! Happy Learning!!
Robot Framework – Working With Browsers Using Selenium Library

HOME

In this tutorial, we will create a project in PyCharms and create a test case in Robot Framework using Selenium WebDriver.

Prerequisite:

  1. Install Python
  2. Install PIP
  3. Install Robot Framework
  4. Install Robot framework Selenium Library
  5. Install PyCharm IDE

Please refer to this tutorial to install Robot Framework – How to install and setup Robot Framework for Python.

Implementation Steps:

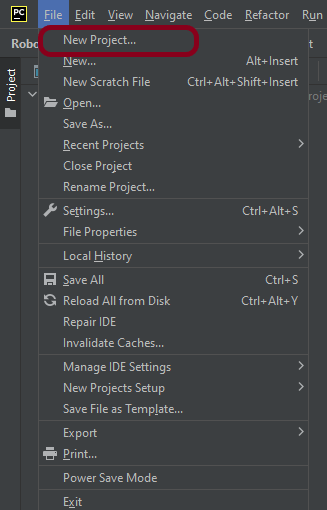
Step 1 – Open PyCharm and create a new project. Go to File and select “New Project” from the main menu.

Step 2 – Choose the project location. Click the “Browse” button next to the Location field and specify the directory for your project.

Deselect the Create a main.py welcome script checkbox because you will create a new Python file for this tutorial.

Python best practice is to create a virtualenv for each project. In most cases, PyCharm creates a new virtual environment automatically, and you don’t need to configure anything. But, in this case, we need to create a Base Interpreter that has the robot framework already installed. This is explained in this tutorial – How to install and setup Robot Framework for Python. To preview and modify the venv options. Expand the Python Interpreter: New Virtualenv Environment node and select a tool used to create a new virtual environment. Let’s choose Virtualenv tool, and specify the location of the environment and the base Python interpreter used for the new virtual environment.

Click on the “Create” Button.

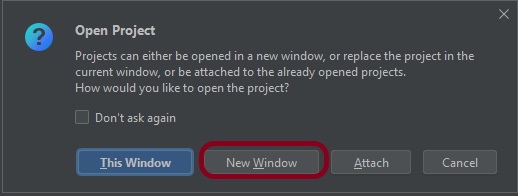
Step 3 – A new dialog will appear asking to Open the project using any one of the given options. I have selected New Window as I like to have separate windows for each project.

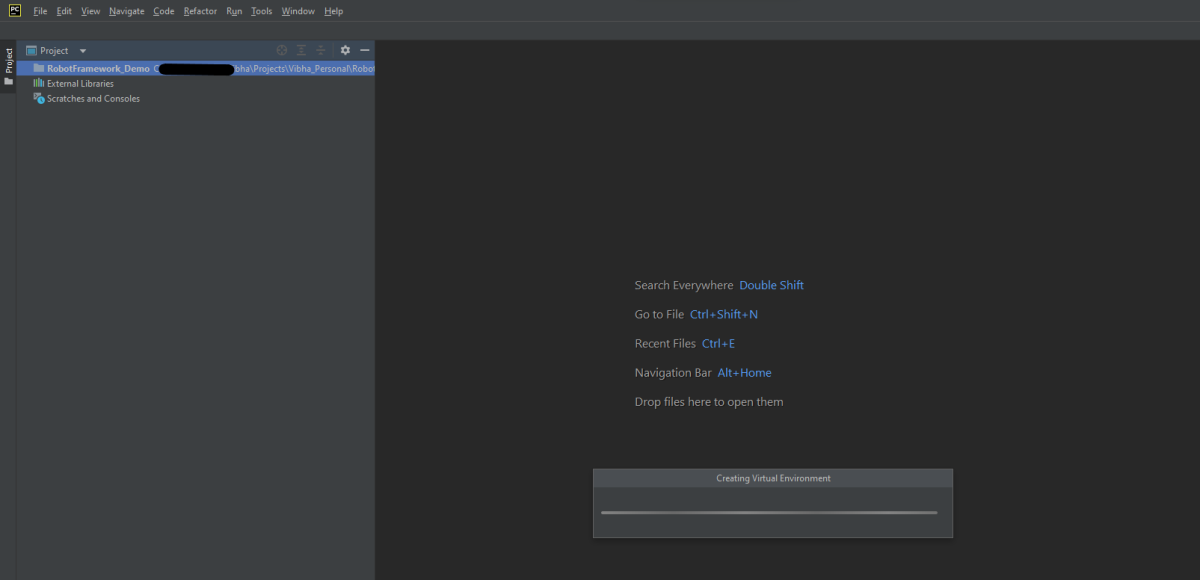
Below is the image of the new project created in PyCharms.

How to create a Selenium test in Robot Framework?

Step 1 – Create a new directory in the new project

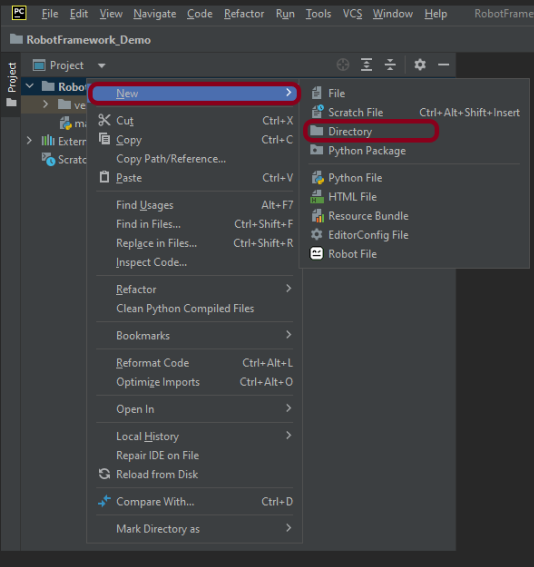
Right-Click on the project, select New->Directory and provide name as Tests

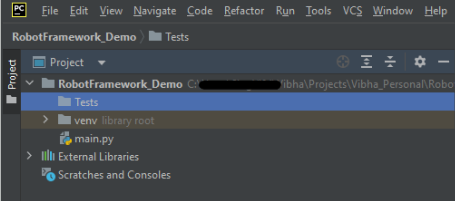
Below is the image of the new directory.

Right-click on the new directory and select New File and provide the name as Test_Demo.robot as shown below:

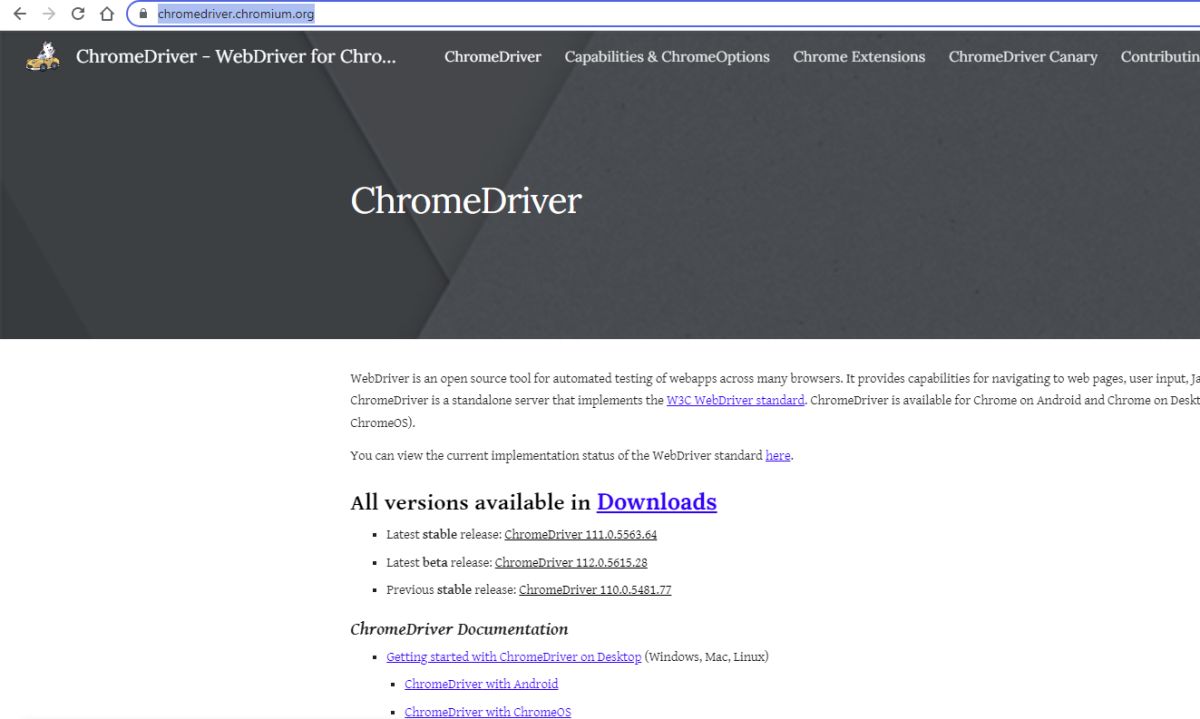
Step 2 – Download ChromeBinaries from the below location

The tests are going to use the Chrome browser, so we need to download the ChromeBinaries to open a blank browser in Chrome.

https://chromedriver.chromium.org/

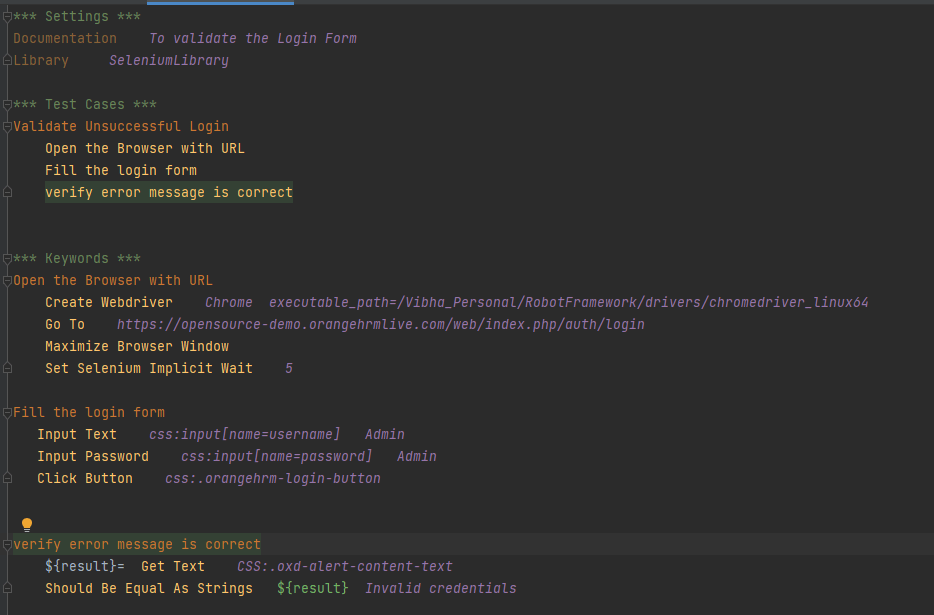
Step 3 – Create a simple Selenium Test

*** Settings ***
Documentation    To validate the Login Form
Library     SeleniumLibrary

*** Test Cases ***
Validate Unsuccessful Login
    Open the Browser with URL
    Fill the login form
    Verify error message is correct


*** Keywords ***
Open the Browser with URL
    Create Webdriver    Chrome  executable_path=/Vibha_Personal/RobotFramework_Demo/drivers/chromedriver_linux64
    Go To    https://opensource-demo.orangehrmlive.com/web/index.php/auth/login
    Maximize Browser Window
    Set Selenium Implicit Wait    5

Fill the login form
   Input Text    css:input[name=username]   Admin
   Input Password    css:input[name=password]   Admin
   Click Button    css:.orangehrm-login-button


Verify error message is correct
    ${result}=  Get Text    CSS:.oxd-alert-content-text
    Should Be Equal As Strings   ${result}  Invalid credentials

The chromedriver is placed in a folder name drivers in RobotFramework_Demo project.

I will explain the terms Settings, Test Cases, Keywords in the next tutorial.

To run this script, go to the command line and go to directory tests.

We need the below command to run the Robot Framework script.

robot Test_Demo.robot

The output of the above program is

We have the test case passed. The Robot Framework generates log.html, output.xml, and report.html by default.

Let us now see the report and log details.

Report

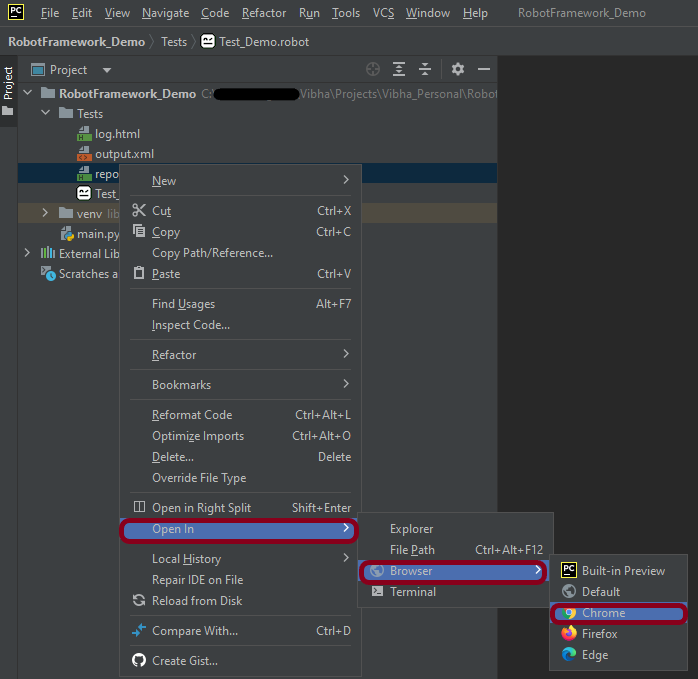
Right-click on report.html. Select Open In->Browser->Chrome(any browser of your wish).

The Report generated by the framework is shown below:

Log

Robot Framework has multiple log levels that control what is shown in the automatically generated log file. The default Robot Framework log level is INFO.

Right-click on log.html. Select Open In->Browser->Chrome(any browser of your wish).

That’s it! Congratulations on making it through this tutorial and hope you found it useful! Happy Learning!!
How to install and setup Robot Framework for Python

HOME

In the previous tutorial, we discussed how the Robot framework actually works. Now we will discuss the Robot framework setup.

To set up the Robot framework, we need multiple components, plugins, etc. Below steps, we need to follow to proceed with the Robot framework.

Implementation Steps

1. Install Python

We are going to use Python for Robot Framework. So, we need to install Python on the system. Please refer to this tutorial to install Python – How to Install Python on Windows 11

Use the below command to verify the presence of Python on the machine.

python --version

2. Install PIP

PIP is a package manager to install modules for python.

PIP gets installed along with python, and you can check the same in the command line as follows:

pip --version

3. Install Robot Framework

We will now use pip – python package manager to install the robot framework and the command for it is as follows:

pip install robotframework

Once the installation is done, you can check the version of the robot framework installed as shown below

robot --version

4. Install Robot framework Selenium Library

Once you have installed robotframework library, you need to install robotframework-seleniumlibrary. To install, you need to use the below command:

pip install robotframework-seleniumlibrary 

5. Install PyCharm IDE

After Python Installation is complete, we need to install one IDE to write the scripting language. Here we will take PyCharm as IDE. Please refer to this tutorial to install PyCharm in your system – How to install PyCharms on Windows 11.

Once PyChram IDE is downloaded, then open the IDE. Create a new project as shown below.

As of now, PyCharm IDE does not contain the robotframework installed in Python. We need to select Robot Python Interpreter.

Go to File ->Settings -> Project: RobotFramework -> Python Interpreter and select the Python Interpreter which has Robot Framework installed.

You can see that once the particular interpreter is selected, it lists all the packages present in it like robotframework, robotframework-seleniumlibrary, selenium, robotframework-pythonlibcore, and so on.

How to add Robot Framework to Python Interpreter?

Click on Add Interpreter and select Virtualenv Environment and select Environment as New. Provide the Location and Base interpreter and click on the “OK” button.

How to install Plugin in PyCharms IDE?

It is suggested to install Hyper RobotFramework Support plugin. This is a Robot Framework plugin for PyCharm. It will highlight the syntax, helps in code completion, explains keyword usage, and many more functionalities.

Go to File ->Settings -> Plugins and type Hyper R and you will see this plugin. Click on the “Install” button to install this plugin.

Now we have understood how to set up the Robot framework in our system environment. Let us run a sample test case in the next tutorial.

Robot Framework Tutorials

HOME

Robot Framework is a generic open-source automation framework. It can be used for test automation and robotic process automation (RPA). RPA is extensively used for Web Application Automation, API Automation, RPA, and Database Testing.

Robot Framework has an easy syntax, utilizing human-readable keywords. Its capabilities can be extended by libraries implemented with Python, Java, or many other programming languages.

Chapter 1 Robot Framework Features – Settings, Libraries, Variables, Keywords, Resources, Reports, Logs
Chapter 2 What are variables in Robot Framework?
Chapter 3 How to handle text box in Robot Framework
Chapter 4 How to handle radio buttons in Robot Framework
Chapter 5 How to handle checkbox in Robot Framework
Chapter 6 How to handle dropdowns in Robot Framework
Chapter 7 How to handle multiple windows in Robot Framework
Chapter 8 How to handle alerts in Robot Framework
Chapter 9 What is Resource File in Robot Framework 
Chapter 10 How to run all the tests from the folder in Robot Framework
Chapter 11 How to implement tagging in Robot Framework
Chapter 12 How to rerun failed tests in Robot Framework
Chapter 13 How to use Drag and Drop in Robot Framework?
Chapter 14 How to set variable values from Runtime command in Robot Framework
Chapter 15 Page Object Model in Robot Framework with Selenium and Python
Chapter 16 Parallel Testing in Robot Framework
Chapter 17 How to write tests in Robot Framework in BDD Format

Data-Driven Testing

Chapter 1 Data-Driven Testing in Robot Framework 
Chapter 2 How to load data from CSV files in the Robot Framework?

API Testing

Chapter 1 How to perform API Testing in Robot Framework using RequestLibrary
Chapter 2 How to Implement Basic Auth in Robot Framework – NEW
Chapter 3 How to pass authorization token in header in Robot Framework – NEW
Chapter 4 Verifying Status Code and Status Line in Robot Framework – NEW

CI/CD

Chapter 1 Run Robot Framework Tests in GitLab CI/CD
Chapter 2 How to run Robot Framework in GitHub Actions

Jenkins

Chapter 1 How to integrate Robot Framework with Jenkins
Chapter 2 How to run parameterized Robot Framework tests in Jenkins

What is Robot Framework

HOME

Robot Framework is an open-source, test automation framework for Acceptance Testing and Acceptance Test-driven development.
The Framework uses the keyword-driven approach where small understandable words (either pre-defined or user-defined) are used for writing the scripts.

RPA is extensively used for Web Application Automation, API Automation, RPA, and Database Testing.

This framework consists of all the industry standard Framework features with minimal coding.

Robot Framework has an easy syntax, utilizing human-readable keywords. Its capabilities can be extended by libraries implemented with Python, Java, or many other programming languages.

Robot Framework is used by Juniper Networks, Cisco, Axon, US Naval Research Laboratory, ZYMR, Zilogic, Testmo, Rocla, and many more.

Robot Framework’s test cases are written in text files using a syntax that is similar to natural language. This makes it easy for non-technical stakeholders to understand and review the tests, and for technical users to maintain and extend them over time. The framework also provides detailed test reports and logs, which help you to quickly identify issues and debug your tests.

How to write automated test scripts?

You can easily create automated test scripts with Robot Framework. Keywords are used not only to carry out actions but also to provide assertion mechanisms. They can be subjected to arguments in order to condition their behaviour.

“Open Browser” and “Title Should Be” are two obvious examples of this. There are many test libraries that provide the necessary bits of automation as keywords, so you don’t have to code in Python/Java.

*** Settings ***
Documentation    To validate the Login Form
Library     SeleniumLibrary

*** Test Cases ***
Validate Unsuccessful Login
    Open the Browser with URL
    Fill the login form
    Verify error message is correct


*** Keywords ***
Open the Browser with URL
    Create Webdriver    Chrome  executable_path=/Vibha_Personal/RobotFramework/drivers/chromedriver_linux64
    Go To    https://opensource-demo.orangehrmlive.com/web/index.php/auth/login
    Maximize Browser Window
    Set Selenium Implicit Wait    5

Fill the login form
   Input Text    css:input[name=username]   Admin
   Input Password    css:input[name=password]   Admin
   Click Button    css:.orangehrm-login-button


Verify error message is correct
    ${result}=  Get Text    CSS:.oxd-alert-content-text
    Should Be Equal As Strings   ${result}  Invalid credentials

Features of Robot Framework

  1. Easy-to-read syntax – Robot Framework uses a simple and easy-to-read syntax that is based on keywords and tables, making it easy for both technical and non-technical users to read and write tests.
  2. Cross-platform support – Robot Framework is cross-platform and can be used to test applications on Windows, macOS, and Linux.
  3. Test cases are written using keywords (pre-defined or user-defined) in a tabular format.
  4. Built-in libraries – Robot Framework provides a rich set of built-in libraries for common testing tasks, such as file system operations, database testing, and HTTP requests.
  5. It supports the use of Variables, resource files, and Variable files
  6. Easy integration – Robot Framework can be easily integrated with other tools and libraries, including Selenium, Appium, and REST APIs.
  7. It allows tagging of test cases that come in handy while trying to run either of the Smoke Test Cases, Regression Test Cases, System Test Cases, etc.
  8. Excellent HTML Report – It provides detailed reports and logs of the script’s execution status, which is very useful if the script fails.
  9. Complete Logging of the Test Execution – The elaborate reports and logs are generated after every build execution.
  10. It supports parallel Execution of tests with Thread Safe
  11. Continuous Integration (CI) support – Robot Framework can be easily integrated with CI tools like Jenkins, making it easy to automate the testing process as part of a larger software development lifecycle.

Robot Framework vs. Cucumber

1. The Robot Framework is based on the premise that you can write test cases without having to code because there are numerous libraries available that provide reusable keywords and their underlying code. So, we do need not write code for the business requirements whereas, in the case of Cucumber, we need to write the code for the requirements.

2. Robot covers RPA (Robotic Process Automation); Cucumber doesn’t support.

3. Robot Framework has inbuilt extensive logging, which is missing in Cucumber. Cucumber can use a third-party library like Log4J to implement logging.

Run Cucumber7 with JUnit5 Tests from Maven Command Line

HOME

The previous tutorial will have explained to run Cucumber tests with JUnit4 or TestNG from Command-Line. Cucumber7 with JUnit5 has a lot of new configuration options. This tutorial will cover all the possible options.

To setup a framework with Cusumber7 and JUnit5, please refer to this tutorial – Integration of Cucumber7 with Selenium and JUnit5.

Below is the sample CucumberRunnerTests class for JUnit5.

import static io.cucumber.junit.platform.engine.Constants.GLUE_PROPERTY_NAME;
import org.junit.platform.suite.api.ConfigurationParameter;
import org.junit.platform.suite.api.SelectClasspathResource;
import org.junit.platform.suite.api.Suite;

@Suite
@IncludeEngines("cucumber")
@SelectClasspathResource("com/example")
@SelectClasspathResource("/features")
@ConfigurationParameter(key = GLUE_PROPERTY_NAME, value = "com.example")

public class CucumberRunnerTests  {

}

Run Test from Command Line

1. Open the command prompt and change the directory to the project location where pom.xml is present.

cd C:\Users\Vibha\eclipse-workspace_personnel\Cucumber7JUnit5_Demo

2. All feature files should be in src/test/resources and create the Cucumber Runner class as CucumberRunnerTest.
Note:- The Runner class name should end with Test to execute the tests from Command Line
Run the following command in the command prompt:

mvn clean test

mvn clean test runs Cucumber Features using Cucumber’s JUnit Runner.

3. The below screenshot shows the build success output.

Overriding Cucumber Options

Cucumber provides several options that can be passed to on the command line.

1. Running Scenarios using Tags from Command Line

If you are using Maven and want to run a subset of scenarios tagged with @ValidCredentials.

mvn clean test -Dcucumber.filter.tags="@ValidCredentials"

2. Running a Feature file from Command Line

Suppose you want to run a single Feature File from the command line, then use the below syntax

mvn clean test -Dcucumber.features=src/test/resources/features/LoginPage.feature

3. Passing plugin from Command Line

If we want to pass a plugin, please use the below-specified command:

mvn clean test -Dcucumber.plugin=html:target/cucumber-reports/cucumberReport.html

You can see that the cucumberReport.html is generated by the plugin.

4. Passing multiple Parameter from Command Line

If we want to pass more than one parameter, then we can use the following command

mvn clean test -Dcucumber.features=src/test/resources/features/LoginPage.feature -Dcucumber.filter.tags="@ValidCredentials"

You can see that only 1 test is executed and rest 4 tests are skipped out of total 5 tests as shown in the Report.

5. Running a Scenario without a tag from Command Line

If we want to run a single Scenario from the command line and no tag is assigned to that scenario, this is how we specify

mvn clean test -Dcucumber.features=src/test/resources/features/LoginPage.feature:11

6. Ignoring a subset of scenarios

If we do not want to run any Scenario from the command line, this is how we specify

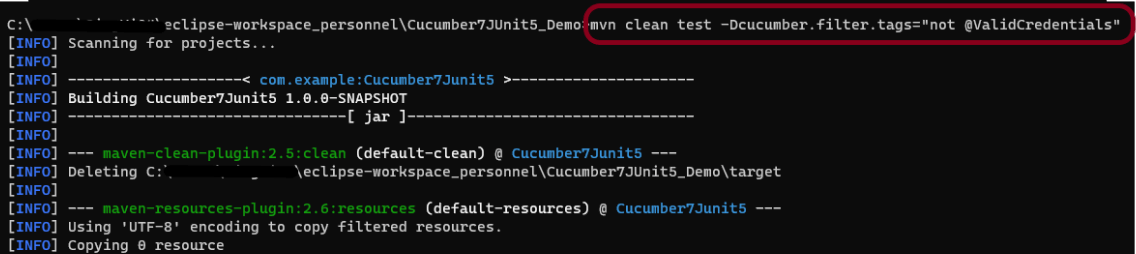
mvn clean test -Dcucumber.filter.tags="not @ValidCredentials"

There is a total of 5 tests, but only 4 will be executed and 1 will be skipped. The output of the above program is shown below:

7. Pass glue code through command line

If we want to pass glue code from the command line, this is how we specify

mvn clean test -Dcucumber.glue=com.example

8. Pass dry run value through command line

dry-run option can either be set as true or false. If it is set as true, it means that Cucumber will only check that every step mentioned in the Feature File has corresponding code written in the Step Definition file or not. By default, dry-run is False.

mvn clean test -Dcucumber.execution.dry-run=true

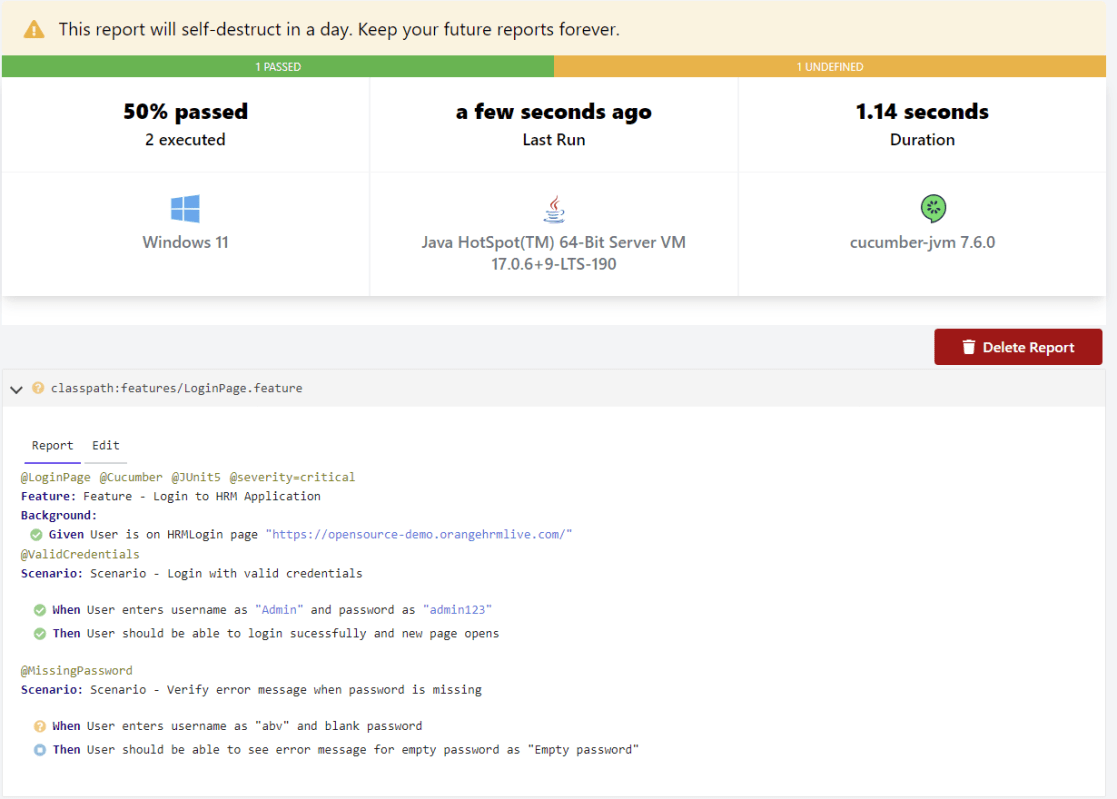
This image shows the steps in the feature file that does not have step definitions.

The cucumber report shows that out of 2 tests, 1 is executed and another one is undefined.

9. Pass snippet type value through command line

The default option for snippets is UNDERSCORE. This settings can be used to specify the way code snippets will be created by Cucumber.

mvn clean test -Dcucumber.snippet-type=camelcase

You can see that the code snippet is in camelCase. In the previous example, it underscored.

That’s it! Congratulations on making it through this tutorial and hope you found it useful! Happy Learning!!
Testing of Gradle SpringBoot Application with Serenity and JUnit5

HOME

In the previous tutorial, I explained about  Testing of Gradle SpringBoot Application with Serenity, Cucumber and JUnit4. In this tutorial, I will explain the Testing of the SpringBoot Application with Serenity and JUnit5.

Prerequisite:

Spring Boot 3.0.4 requires Java 17 and is compatible with and including Java 19. Spring Framework 6.0.6 or above is also required.

Explicit build support is provided for the following build tools:

  1. Maven – 3.5+
  2. Gradle – 7.x (7.5 or later) and 8.x

This framework consists of

  1. SpringBoot Starter Parent – 3.1.0
  2. Serenity Rest Assured – 3.6.12
  3. Spring
  4. Java 17
  5. Gradle – 7.6.1
  6. JUnit Jupiter API – 5.9.2
  7. JUnit Jupiter Engine – 5.9.2
  8. Serenity JUnit5 – 3.6.12

What is SpringBoot Application?

 Spring Boot is an open-source micro-framework that provides Java developers with a platform to get started with an auto-configurable production-grade Spring application. 

  • Comes with embedded HTTP servers like Tomcat or Jetty to test web applications.
  • Adds many plugins that developers can use to work with embedded and in-memory databases easily. Spring allows you to easily connect with database and queue services like Oracle, PostgreSQL, MySQL, MongoDB, Redis, Solr, ElasticSearch, Rabbit MQ, and others.

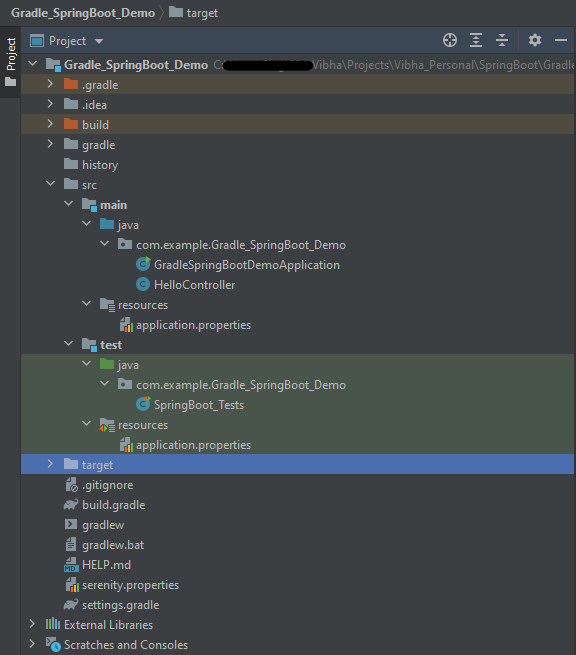
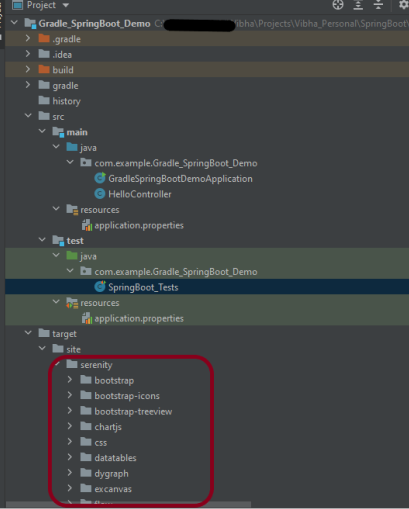
Project Directory Structure

Implementation Steps

  1. Create a source folder – src/test/resources to create properties file
  2. Add SpringBootTest, Serenity Rest Assured, and Serenity-JUnit5 dependencies to the project
  3. Create the Test classes.
  4. Create an application.properties file in src/test/resources
  5. Run the tests from JUnit5
  6. Run the tests from Command Line
  7. Serenity Report Generation

Step 1 – Create a source folder – src/test/resources to create test scenarios in the Feature file

Right-click on the test directory and select New->Directory and select resources (Maven Source Directories).

Step 2 – Add SpringBootTest, Rest Assured, and allure dependencies to the project

We have added SpringBootTest, SpringBoot Web, Tomcat, Spring Web, Rest Assured, and Serenity-JUnit5 dependencies to the build.gradle.

plugins {
	id 'java'
	id 'org.springframework.boot' version '3.1.0-SNAPSHOT'
	id 'io.spring.dependency-management' version '1.1.0'
	id 'net.serenity-bdd.serenity-gradle-plugin' version '3.6.7'
}

group = 'com.example'
version = '0.0.1-SNAPSHOT'
sourceCompatibility = '17'

repositories {
	mavenCentral()
	maven { url 'https://repo.spring.io/milestone' }
	maven { url 'https://repo.spring.io/snapshot' }
}

dependencies {

	implementation 'org.springframework.boot:spring-boot-starter'
	implementation 'org.springframework.boot:spring-boot-starter-web'
	implementation 'org.springframework.boot:spring-boot-starter-tomcat'
	implementation 'org.springframework:spring-web'

	testImplementation 'org.springframework.boot:spring-boot-starter-test'
	testImplementation 'net.serenity-bdd:serenity-junit5:3.6.12'
	testImplementation 'org.junit.jupiter:junit-jupiter-api:5.9.2'
	testImplementation 'org.junit.jupiter:junit-jupiter-engine:5.9.2'
	testImplementation 'net.serenity-bdd:serenity-core:3.6.12'
	testImplementation 'net.serenity-bdd:serenity-rest-assured:3.6.12'
	testImplementation 'net.serenity-bdd:serenity-spring:3.6.12'
}

tasks.named('test') {
	useJUnitPlatform() {}
	testLogging {
		showStandardStreams = true
	}
	systemProperties System.getProperties()
}

gradle.startParameter.continueOnFailure = true

test.finalizedBy(aggregate)

Step 3 – Create the Test classes

  • uses @SpringBootTest annotation which loads the actual application context.
  • uses WebEnvironment.RANDOM_PORT to create and run the application at some random server port.
  • @LocalServerPort gets the reference of the port where the server has started. It helps in building the actual request URIs to mimic real client interactions.

Below is the Test Class, created in the src/test/java directory.

import io.restassured.response.ValidatableResponse;
import net.serenitybdd.junit5.SerenityJUnit5Extension;
import org.junit.jupiter.api.Assertions;
import org.junit.jupiter.api.Test;
import org.junit.jupiter.api.extension.ExtendWith;
import org.springframework.beans.factory.annotation.Value;
import org.springframework.boot.test.context.SpringBootTest;
import org.springframework.boot.test.web.server.LocalServerPort;
import static io.restassured.RestAssured.given;

@ExtendWith(SerenityJUnit5Extension.class)
@SpringBootTest(webEnvironment = SpringBootTest.WebEnvironment.RANDOM_PORT)
public class SpringBootDemoDefinitions {

    private final static String BASE_URI = "http://localhost:";

    @LocalServerPort
    private int port;

    @Value("${server.servlet.context-path}")
    private String basePath;
    
   private ValidatableResponse response;

    @Test
    public void verifyController1() throws Exception  {
        response = given().contentType("application/json")
                .header("Content-Type", "application/json")
                .when().get(BASE_URI + port + basePath+ "/").then().statusCode(200);

        String Actual = response.extract().asString();
        System.out.println("Result :"+Actual);
        Assertions.assertEquals("Hello World, Spring Boot!", Actual);
    }

    @Test
    public void verifyController2() throws Exception  {
        response = given().contentType("application/json")
                .header("Content-Type", "application/json")
                .when().get(BASE_URI + port + basePath+ "/qaautomation").then().statusCode(200);

        String Actual = response.extract().asString();
        System.out.println("Result :"+Actual);
        Assertions.assertEquals("Hello QA Automation!", Actual);
    }
}

This class sends the request and receives a response after performing the GET operation. Here, the validation of the response also takes place by asserting the expected and actual response

Step 4 – Create an application.properties file in src/test/resources

Application.properties is created under src/ test/java. 

spring.profiles.active=test
server.port=9091
server.servlet.context-path=/demo

spring.profiles.active – property to specify which profiles are active. The default profile is always active.
server.port – By default, the embedded server starts on port 8080. Now the server will start on port 8090
server.servlet.context-path – the context path in Spring Boot can be changed by setting a property, server.servlet.context-path.

Step 5 – Run the tests from JUnit5

Right-click on the Test class and select Run ‘SpringBoot_Tests’.

The output of the above program is

This image shows that the profile name is “test”. Application is started on port – “65221” and the context path is “/demo”.

Step 6 – Run the tests from Command Line

Run the tests from the command line by using the below command

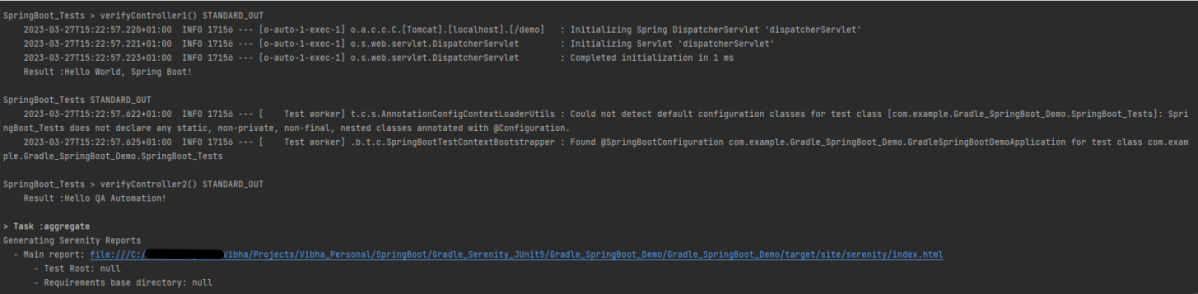
gradle clean test

The output of the above program is

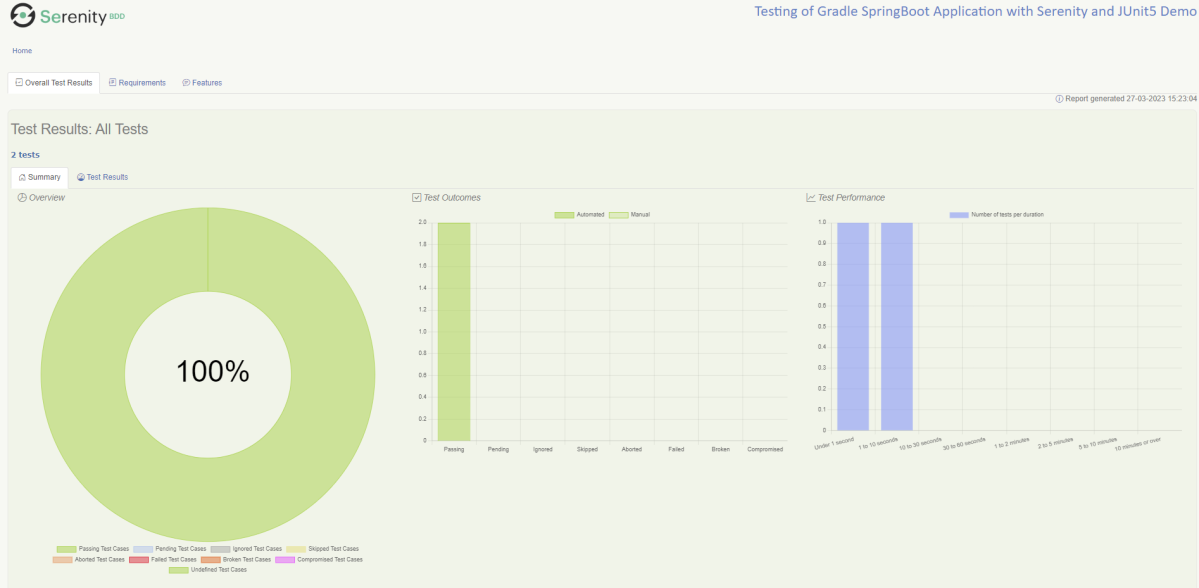
Step 7 – Serenity Report Generation

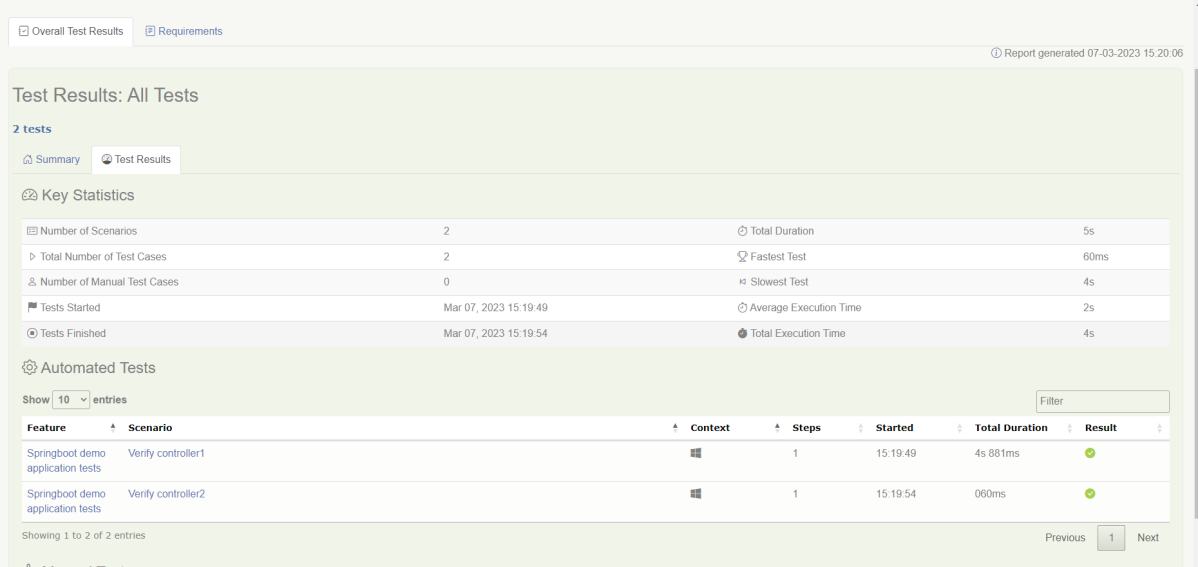
The best part about Serenity is the report generation by it. The Reports contain all possible type of information, you can think of with minimal extra effort. There is multiple types of reports are generated. We are interested in index.html .

Below is the new Serenity Report.

We are done! Congratulations on making it through this tutorial and hope you found it useful! Happy Learning!!
How to install PyCharms on Windows 11

HOME

This tutorial will explain the step-by-step process to download and install PyCharm on Windows.

Prerequisite:

Python is already installed on the machine.

You can refer to this tutorial to install Python on Windows 11.

Installation Steps

Step 1 –  To download PyCharm visit the website https://www.jetbrains.com/pycharm/download/, and it will give you two options: Professional or Community. The professional edition of PyCharm requires a subscription, while the community edition is free. Click the “DOWNLOAD” button under the Community Section.

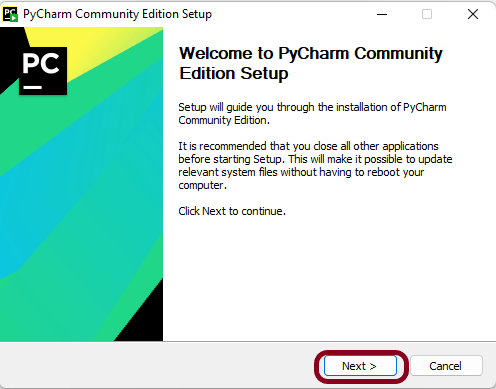
Step 2 – Once the download is complete, run the exe to install PyCharm. The setup wizard should have started. Click the “Next” button.

Step 3 – On the next screen, Change the installation path if required. Click the “Next” button.

Step 4 –  On the next screen, you can create a desktop shortcut if you want, Add Open Folder as Project, Create Associations, Update PATH variable (restart needed), and click on the “Next” button.

Step 5 – Choose the start menu folder. Keep selecting JetBrains and click on the “Install” button.


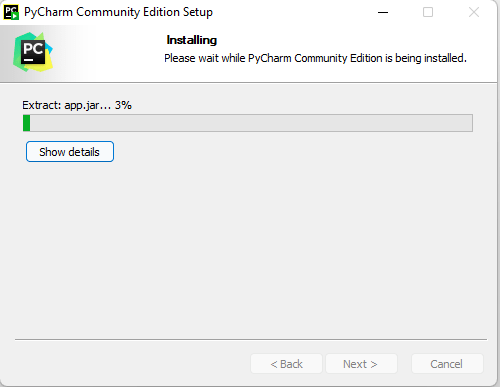
Step 6 – Wait for the installation to finish.


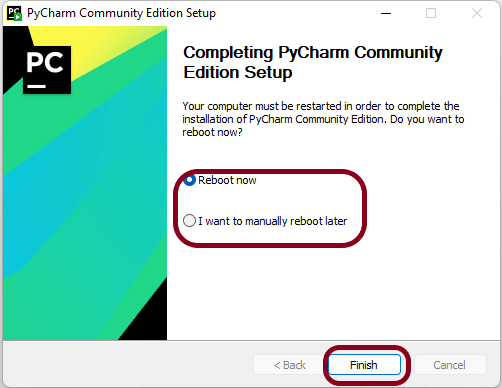
Step 7 – Once the installation is finished, you should receive a message screen that PyCharm is installed. You can select either of the options – Reboot now or I want to manually reboot later and click the “Finish” button.

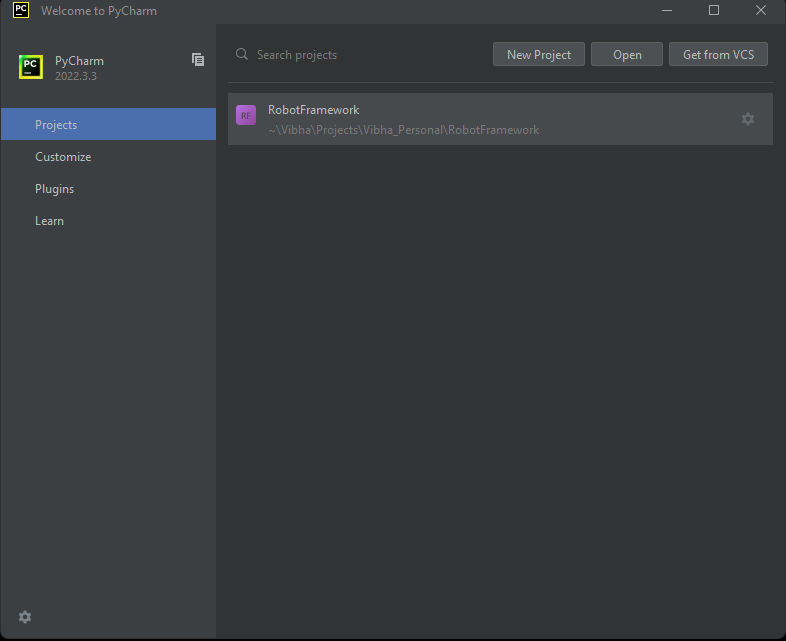
Step 8 – After you click on the “Finish” button, the following screen will appear. I already have created a new project, so you can see the RobotFramework project here.

Testing of SpringBoot Application with Serenity and JUnit5

HOME

In the previous tutorial, I explained about Integration Testing of SpringBoot Application with Serenity BDD, Cucumber and JUnit4. In this tutorial, I will explain the Testing of the SpringBoot Application with Serenity and JUnit5.

This framework consists of

  1. SpringBoot Starter Parent – 3.1.0
  2. Serenity – 3.6.12
  3. Serenity JUnit5 – 3.6.12
  4. Serenity Rest Assured – 3.6.12
  5. Serenity Spring – 3.6.12
  6. JUnit Platform – 1.9.2
  7. Java 17
  8. Maven – 3.8.6

What is SpringBoot Application?

 Spring Boot is an open-source micro-framework that provides Java developers with a platform to get started with an auto-configurable production-grade Spring application. 

  • Comes with embedded HTTP servers like Tomcat or Jetty to test web applications.
  • Adds many plugins that developers can use to work with embedded and in-memory databases easily. Spring allows you to easily connect with database and queue services like Oracle, PostgreSQL, MySQL, MongoDB, Redis, Solr, ElasticSearch, Rabbit MQ, and others.

Project Directory Structure

What is RestController?

HTTP requests are handled by a controller in Spring’s approach to building RESTful web services. The @RestController annotation identifies these components, and the GreetingController shown below (from src/main/java/com/example/springboot_demo/HelloController.java) handles GET requests for / and /qaautomation by returning a new instance of the Greeting class. Spring RestController takes care of mapping request data to the request-defined handles method.

import org.springframework.web.bind.annotation.GetMapping;
import org.springframework.web.bind.annotation.RestController;
 
@RestController
public class HelloController {
     
    @GetMapping(path="/")
    String hello() {
        return "Hello World, Spring Boot!";
    }
     
     
    @GetMapping(path="/qaautomation")
    String qaautomation() {
        return "Hello QA Automation!";
    }
 
}

Implementation Steps

  1. Create a source folder – src/test/resources to create properties file
  2. Add SpringBootTest, Serenity and JUnit5 dependencies to the project
  3. Create the Test and Helper classes.
  4. Create an application.properties file in src/test/resources
  5. Create serenity.properties at the root of the project
  6. Run the tests from JUnit5
  7. Run the tests from Command Line
  8. Serenity Report Generation

Step 1 – Create a source folder – src/test/resources to create test scenarios in the Feature file

Right-click on the test directory and select New->Directory and select resources (Maven Source Directories).

Step 2 – Add SpringBootTest, Serenity, and JUnit5 dependencies to the project

We have added SpringBootTest, Serenity, Rest Assured, and JUnit5 dependencies to pom.xml.

<?xml version="1.0" encoding="UTF-8"?>
<project xmlns="http://maven.apache.org/POM/4.0.0" xmlns:xsi="http://www.w3.org/2001/XMLSchema-instance"
	xsi:schemaLocation="http://maven.apache.org/POM/4.0.0 https://maven.apache.org/xsd/maven-4.0.0.xsd">
	<modelVersion>4.0.0</modelVersion>
	<parent>
		<groupId>org.springframework.boot</groupId>
		<artifactId>spring-boot-starter-parent</artifactId>
		<version>3.1.0-SNAPSHOT</version>
		<relativePath/> <!-- lookup parent from repository -->
	</parent>

	<groupId>com.example</groupId>
	<artifactId>springboot_demo</artifactId>
	<version>0.0.1-SNAPSHOT</version>
	<name>springboot_demo</name>
	<description>Demo project for Spring Boot</description>

	<properties>
		<java.version>17</java.version>
		<serenity.version>3.6.12</serenity.version>
		<junit.platform.version>1.9.2</junit.platform.version>
		<maven.surefire.plugin.version>3.0.0-M9</maven.surefire.plugin.version>
		<maven.failsafe.plugin.version>3.0.0-M9</maven.failsafe.plugin.version>
		<maven.compiler.plugin.version>3.10.1</maven.compiler.plugin.version>
		<maven.compiler.source.version>17</maven.compiler.source.version>
		<maven.compiler.target.version>17</maven.compiler.target.version>
		<spring.maven.plugin.version>3.0.4</spring.maven.plugin.version>
		<tags></tags>
	</properties>

	<dependencies>
		<dependency>
			<groupId>org.springframework.boot</groupId>
			<artifactId>spring-boot-starter</artifactId>
		</dependency>

		<dependency>
			<groupId>org.springframework.boot</groupId>
			<artifactId>spring-boot-starter-test</artifactId>
			<scope>test</scope>
			<exclusions>
				<exclusion>
					<groupId>junit</groupId>
					<artifactId>junit</artifactId>
				</exclusion>
			</exclusions>
		</dependency>

		<dependency>
			<groupId>org.springframework.boot</groupId>
			<artifactId>spring-boot-starter-web</artifactId>
		</dependency>

		<dependency>
			<groupId>org.springframework.boot</groupId>
			<artifactId>spring-boot-starter-tomcat</artifactId>
			<scope>provided</scope>
		</dependency>

		<dependency>
			<groupId>org.springframework</groupId>
			<artifactId>spring-web</artifactId>
		</dependency>

		<dependency>
			<groupId>net.serenity-bdd</groupId>
			<artifactId>serenity-core</artifactId>
			<version>${serenity.version}</version>
			<scope>test</scope>
		</dependency>

		<!--  Serenity with JUnit5 -->
		<dependency>
			<groupId>net.serenity-bdd</groupId>
			<artifactId>serenity-junit5</artifactId>
			<version>${serenity.version}</version>
		</dependency>

		<!--  Serenity with Rest Assured -->
		<dependency>
			<groupId>net.serenity-bdd</groupId>
			<artifactId>serenity-rest-assured</artifactId>
			<version>3.6.12</version>
		</dependency>

		<!--  Serenity with Spring -->
		<dependency>
			<groupId>net.serenity-bdd</groupId>
			<artifactId>serenity-spring</artifactId>
			<version>3.6.12</version>
			<scope>test</scope>
		</dependency>

		<dependency>
			<groupId>org.junit.platform</groupId>
			<artifactId>junit-platform-suite</artifactId>
			<version>${junit.platform.version}</version>
			<scope>test</scope>
		</dependency>
	</dependencies>


	<build>
		<plugins>
			<plugin>
				<groupId>org.springframework.boot</groupId>
				<artifactId>spring-boot-maven-plugin</artifactId>
				<version>${spring.maven.plugin.version}</version>
			</plugin>

			<plugin>
				<groupId>org.apache.maven.plugins</groupId>
				<artifactId>maven-surefire-plugin</artifactId>
				<version>${maven.surefire.plugin.version}</version>
				<configuration>
					<skip>true</skip>
				</configuration>
			</plugin>

			<plugin>
				<groupId>org.apache.maven.plugins</groupId>
				<artifactId>maven-failsafe-plugin</artifactId>
				<version>${maven.failsafe.plugin.version}</version>
				<configuration>
					<includes>
						<include>**.java</include>
						<include>**/Tests.java</include>
					</includes>
				</configuration>
				<executions>
					<execution>
						<goals>
							<goal>integration-test</goal>
							<goal>verify</goal>
						</goals>
					</execution>
				</executions>
			</plugin>
			<plugin>
				<groupId>org.apache.maven.plugins</groupId>
				<artifactId>maven-compiler-plugin</artifactId>
				<version>${maven.compiler.plugin.version}</version>
				<configuration>
					<source>${maven.compiler.source.version}</source>
					<target>${maven.compiler.target.version}</target>
				</configuration>
			</plugin>

			<plugin>
				<groupId>net.serenity-bdd.maven.plugins</groupId>
				<artifactId>serenity-maven-plugin</artifactId>
				<version>${serenity.version}</version>
				<dependencies>
					<dependency>
						<groupId>net.serenity-bdd</groupId>
						<artifactId>serenity-single-page-report</artifactId>
						<version>${serenity.version}</version>
					</dependency>
				</dependencies>
				<configuration>
					<reports>single-page-html</reports>
				</configuration>
				<executions>
					<execution>
						<id>serenity-reports</id>
						<phase>post-integration-test</phase>
						<goals>
							<goal>aggregate</goal>
						</goals>
					</execution>
				</executions>
			</plugin>
		</plugins>
	</build>

	<repositories>
		<repository>
			<id>spring-milestones</id>
			<name>Spring Milestones</name>
			<url>https://repo.spring.io/milestone</url>
			<snapshots>
				<enabled>false</enabled>
			</snapshots>
		</repository>
		<repository>
			<id>spring-snapshots</id>
			<name>Spring Snapshots</name>
			<url>https://repo.spring.io/snapshot</url>
			<releases>
				<enabled>false</enabled>
			</releases>
		</repository>
	</repositories>
	<pluginRepositories>
		<pluginRepository>
			<id>spring-milestones</id>
			<name>Spring Milestones</name>
			<url>https://repo.spring.io/milestone</url>
			<snapshots>
				<enabled>false</enabled>
			</snapshots>
		</pluginRepository>
		<pluginRepository>
			<id>spring-snapshots</id>
			<name>Spring Snapshots</name>
			<url>https://repo.spring.io/snapshot</url>
			<releases>
				<enabled>false</enabled>
			</releases>
		</pluginRepository>
	</pluginRepositories>

</project>

Step 3 – Create the Test classes

  • uses @SpringBootTest annotation which loads the actual application context.
  • uses WebEnvironment.RANDOM_PORT to create and run the application at some random server port.
  • @LocalServerPort gets the reference of the port where the server has started. It helps in building the actual request URIs to mimic real client interactions.

Below is the code of the StepDefinition and Helper class. These classes are created in the src/test/java directory.

AbstractRestAssuredHelper

import io.restassured.RestAssured;
import io.restassured.specification.RequestSpecification;
import net.serenitybdd.rest.SerenityRest;
import org.springframework.beans.factory.annotation.Value;
import org.springframework.boot.test.context.SpringBootTest;
import org.springframework.boot.test.web.server.LocalServerPort;

@SpringBootTest(webEnvironment = SpringBootTest.WebEnvironment.RANDOM_PORT)
public abstract class AbstractRestAssuredHelper {
    private final static String BASE_URI = "http://localhost";

    @LocalServerPort
    private int port;

    @Value("${server.servlet.context-path}")
    private String basePath;

    protected void configureRestAssured() {
        RestAssured.baseURI = BASE_URI;
        RestAssured.port = port;
        RestAssured.basePath = basePath;

    }

    protected RequestSpecification getAnonymousRequest() {
        configureRestAssured();
        return SerenityRest.given();
    }
}

This class sends the request and receives a response after performing the GET operation. Here, the validation of the response also takes place by asserting the expected and actual response

import io.restassured.response.ValidatableResponse;
import net.serenitybdd.junit5.SerenityJUnit5Extension;
import net.thucydides.core.annotations.Steps;
import org.junit.jupiter.api.Assertions;
import org.junit.jupiter.api.Test;
import org.junit.jupiter.api.extension.ExtendWith;

@ExtendWith(SerenityJUnit5Extension.class)
class SpringbootDemoApplicationTests {

	@Steps
	AbstractRestAssuredHelper helper;

	private ValidatableResponse response;


	@Test
	public void verifyController1()  {
		response = helper.getAnonymousRequest()
				.header("Content-Type", "application/json")
				.when().get("/").then().statusCode(200);

		String Actual = response.extract().asString();
		System.out.println("Result :"+Actual);
		Assertions.assertEquals("Hello World, Spring Boot!", Actual);
	}

	@Test
	public void verifyController2()   {
		response =  helper.getAnonymousRequest()
				.header("Content-Type", "application/json")
				.when().get("/qaautomation").then().statusCode(200);

		String Actual = response.extract().asString();
		System.out.println("Result :"+Actual);
		Assertions.assertEquals("Hello QA Automation!", Actual);
	}
}

Step 4 – Create an application.properties file in src/test/resources

Application.properties is created under src/test/resources for the test profile. If you want to run the SpringBootApplication from DEV profile, then create application.properties file in src/main/resources.

spring.profiles.active=test
server.port=8090
server.servlet.context-path=/demo

spring.profiles.active – property to specify which profiles are active. The default profile is always active.
server.port – By default, the embedded server starts on port 8080. Now the server will start on port 8090
server.servlet.context-path – the context path in Spring Boot can be changed by setting a property, server.servlet.context-path.

Step 5 – Create serenity.properties at the root of the project

serenity.project.name = Testing of SpringBoot Application with Serenity and JUnit5 Demo

Step 6 – Run the tests from JUnit5

Right-click on the Test class and select Run ‘SpringBootDemoApplicationTests’.

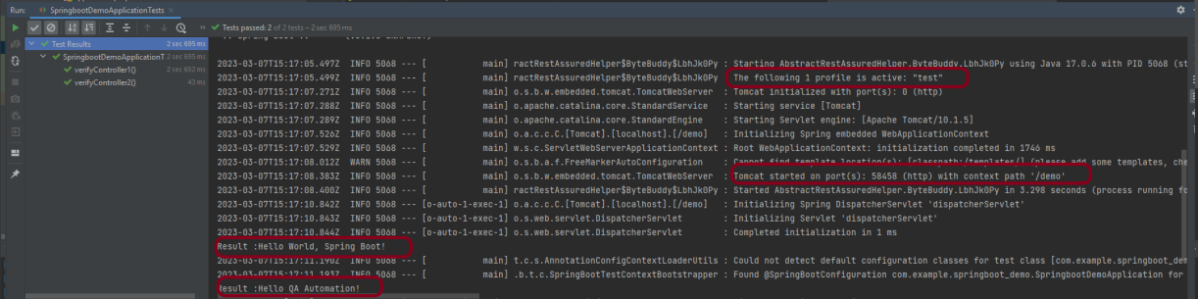
The output of the above program is

This image shows that the profile name is “test”. Application is started on port – “58458” and the context path is “/demo”.

Step 7 – Run the tests from Command Line

Run the tests from the command line by using the below command

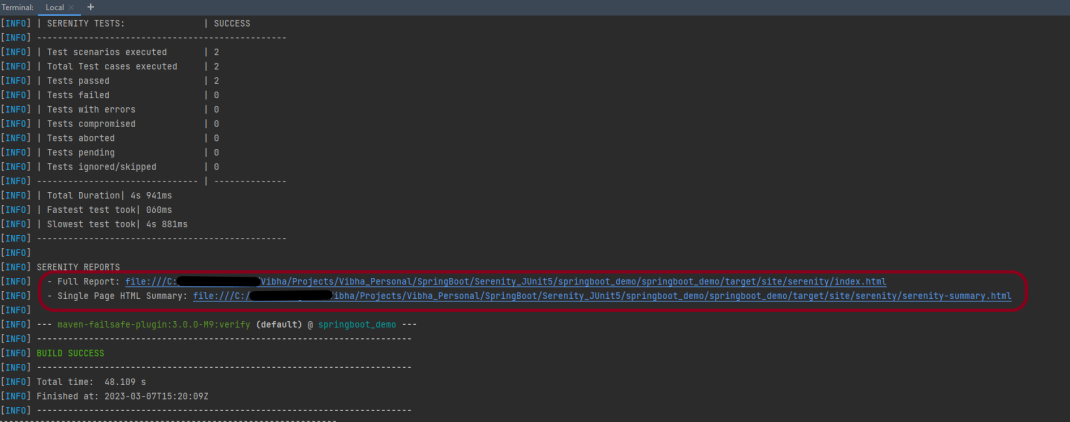
mvn clean verify

The output of the above program is

Step 8 – Serenity Report Generation

The serenity test reports are generated under target/site/serenity.

Below is the sample Index.html Report.

Go to Test Results, present at the top left of the index.html page.

Serenity-Summary.html

If you want to have Springboot Application in Gradle and you want to use Serenity and JUnit5. Please refer to this tutorial – Testing of Gradle SpringBoot Application with Serenity and JUnit5.

We are done! Congratulations on making it through this tutorial and hope you found it useful! Happy Learning!!
How to Install Python on Windows 11

HOME

Python is becoming a popular programming language for both new and experienced developers. Python is a flexible and versatile programming language with strengths in scripting, automation, data analysis, machine learning, and back-end development.

In this tutorial, we’ll install Python on Windows 11 using the Python installer for Windows.

Prerequisites

You’ll need a computer running Windows 11 with administrative privileges and an internet connection.

Installation Steps

Step 1 – Download the Python Installer

Go to the official website of Python – Python download page for Windows.

Click on the latest version of Python for Windows. Click the appropriate link for your system to download the executable file: Windows installer (64-bit) or Windows installer (32-bit). In this case, I have selected – Python 3.11.2

Step 2 – Running the Executable Installer

After the installer is downloaded, double-click the .exe file, for example, “python-3.11.2-amd64 .exe“, to run the Python installer.

If you want to save the installation file in a different location, click on Customize installation; otherwise, continue with Install Now.

Once the installation is complete, the below pop-up box will appear: Setup was successful.

Step 3 – Adding Python to the Environment Variables 

Go to Start and enter View advanced system settings in the search bar. Click on View advanced system settings.

In the System Properties dialog, click the Advanced tab and then click Environment Variables.

Depending on your installation:

  • If you selected Install for all users during installation, select Path from the list of System Variables and click Edit.
  • If you didn’t select Install for all users during installation, select Path from the list of User Variables and click Edit.

Click the “New” button and enter the Python directory path, then click the “OK” button until all the dialogs are closed.

Step 4 – Verify the Python Installation

You can verify whether the Python installation is successful either through the command line or through the Integrated Development Environment (IDLE) application if you chose to install it.

Go to Start and enter cmd in the search bar. Click Command Prompt.

Enter the following command in the command prompt:

python --version

PIP gets installed along with python, and you can check the same in the command line as follows.

pip --version

We can also check the version of Python by opening the IDLE application.

Go to Start and search for Python. You can see Python 3.11 (64-bit) and IDLE. Let’s open IDLE, which is the short form for Integrated Development Environment, and run a simple print statement.

Congratulations!! We are able to install Python on Windows 11.