Selenium Version – 4.8.3 has implemented the fix for Chrome Version 111. As per the below changelog, we don’t need to add “–remote-allow-origins=*”, if we are using Selenium Version – 4.8.3.
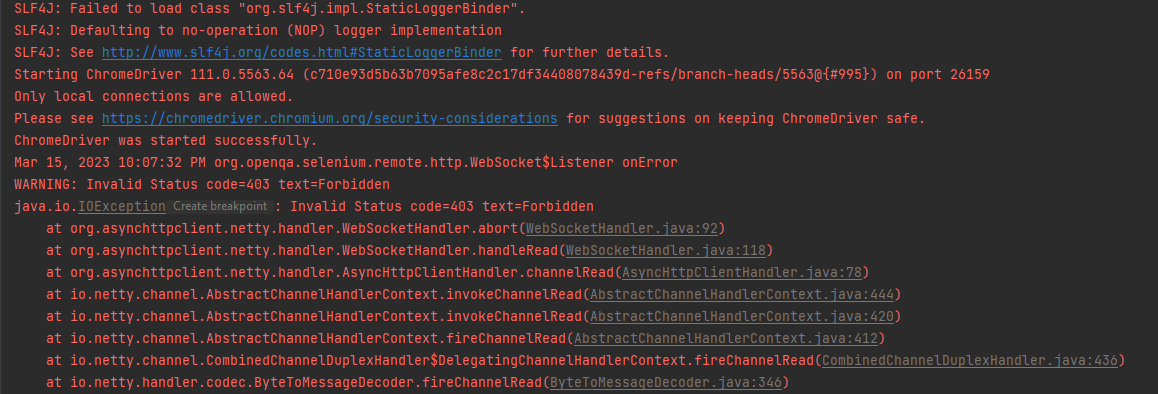
Chrome Version 111 is recently released that has broken the Selenium Tests. In the current scenario, I’m using Selenium 4.8.0. You can see a simple Selenium test where we want to open a Chrome Browser and open Google.com failed.
import io.github.bonigarcia.wdm.WebDriverManager;
import org.openqa.selenium.WebDriver;
import org.openqa.selenium.chrome.ChromeDriver;
import java.time.Duration;

public class ChromeTests {

    public static void main(String[] args) {

        WebDriverManager.chromedriver().setup();
        WebDriver driver = new ChromeDriver();
        driver.manage().timeouts().implicitlyWait(Duration.ofSeconds(20));
        driver.get("https://www.google.com/");
        String PageTiltle = driver.getTitle();
        System.out.println("Page Title :"+PageTiltle);
        driver.close();
    }
}
The output of the above program is
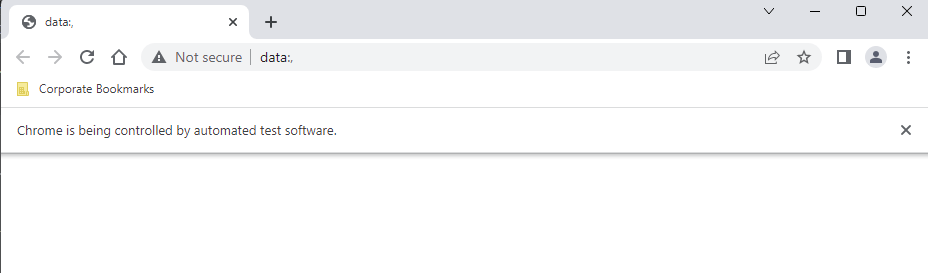
Below is the screenshot of the Chrome Browser trying to open Google.com.
One of the solutions is to add “–remote-allow-origins=*” to ChromeOptions. The sample code is shown below:
import io.github.bonigarcia.wdm.WebDriverManager;
import org.openqa.selenium.WebDriver;
import org.openqa.selenium.chrome.ChromeDriver;
import org.openqa.selenium.chrome.ChromeOptions;
import java.time.Duration;

public class ChromeTests {

    public static void main(String[] args) {

        ChromeOptions options = new ChromeOptions();
        options.addArguments("--remote-allow-origins=*");
        WebDriver driver = new ChromeDriver(options);
        driver.manage().timeouts().implicitlyWait(Duration.ofSeconds(20));
        driver.get("https://www.google.com/");
        String PageTiltle = driver.getTitle();
        System.out.println("Page Title :"+PageTiltle);
        driver.close();
    }
}
By default, Selenium 4 is compatible with Chrome v75 and greater.
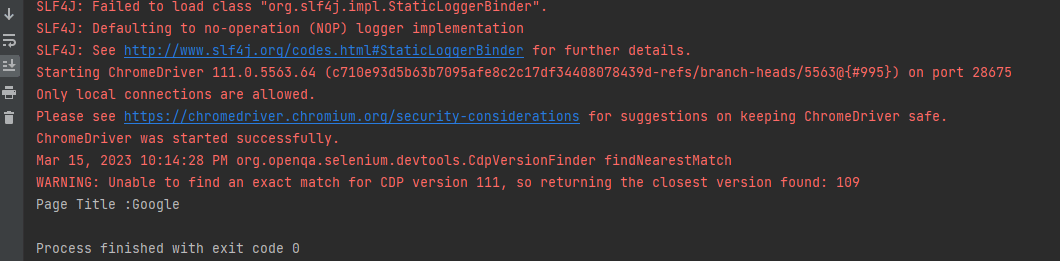
The output of the above program is
Hopefully, this trick will help you in your automation journey.
Spring Boot 3.0.4 requires Java 17 and is compatible with and including Java 19. Spring Framework 6.0.6 or above is also required.
Explicit build support is provided for the following build tools:
Maven – 3.5+
Gradle – 7.x (7.5 or later) and 8.x
This framework consists of
SpringBoot Starter Parent – 3.1.0
Serenity – 3.6.12
Serenity Cucumber – 3.6.12
Serenity JUnit4 – 3.6.12
Serenity Rest Assured – 3.6.12
Spring
Java 17
Gradle – 7.6.1
What is SpringBoot Application?
Spring Boot is an open-source micro-framework that provides Java developers with a platform to get started with an auto-configurable production-grade Spring application.
Comes with embedded HTTP servers like Tomcat orJetty to test web applications.
Adds many plugins that developers can use to work with embedded and in-memory databases easily. Spring allows you to easily connect with database and queue services like Oracle, PostgreSQL, MySQL, MongoDB, Redis, Solr, ElasticSearch, Rabbit MQ, and others.
What is RestController?
HTTP requests are handled by a controller in Spring’s approach to building RESTful web services. The @RestController annotation identifies these components, and the HelloController shown below (from src/main/java/com/example/springboot_demo/HelloController.java) handles GET requests for / and /qaautomation by returning a new instance of the Greeting class. Spring RestController takes care of mapping request data to the request-defined handles method.
import org.springframework.web.bind.annotation.GetMapping;
import org.springframework.web.bind.annotation.RestController;

@RestController
public class HelloController {

    @GetMapping(path="/")
    String hello() {
        return "Hello World, Spring Boot!";
    }


    @GetMapping(path="/qaautomation")
    String qaautomation() {
        return "Hello QA Automation!";
    }

}
Project Directory Structure
Implementation Steps
Create a source folder – src/test/resources to create properties file
AddSpringBootTest,Rest Assured, and JUnit4 dependencies to the project
Create a feature file in src/test/resources
Create the StepDefinition and Helper classes.
Create a Serenity Runner class in the src/test/java directory
Create an application.properties file in src/test/resources
Create a serenity.properties at the root level of the project
Run the tests from Command Line
Serenity Report Generation
CucumberReport Generation
Step 1 – Create a source folder – src/test/resources to create test scenarios in the Feature file
Right-click on the test directory and select New->Directory and select resources (Maven Source Directories).
Step 2 – Add SpringBootTest,Rest Assured, and other dependencies to the project
We have added SpringBootTest, SpringBoot Web, Tomcat, Spring Web, Rest Assured, and JUnit4 dependencies to the build.gradle.
plugins {
	id 'java'
	id 'org.springframework.boot' version '3.1.0-SNAPSHOT'
	id 'io.spring.dependency-management' version '1.1.0'
	id "net.serenity-bdd.serenity-gradle-plugin" version "3.6.7"
}

group = 'com.example'
version = '0.0.1-SNAPSHOT'
sourceCompatibility = '17'

repositories {
	mavenCentral()
	maven { url 'https://repo.spring.io/milestone' }
	maven { url 'https://repo.spring.io/snapshot' }
}


dependencies {

	implementation 'org.springframework.boot:spring-boot-starter'
	implementation 'org.springframework.boot:spring-boot-starter-web'
	implementation 'org.springframework.boot:spring-boot-starter-tomcat'
	implementation 'org.springframework:spring-web'

	testImplementation 'org.springframework.boot:spring-boot-starter-test'
	testImplementation 'net.serenity-bdd:serenity-core:3.6.12'
	testImplementation 'net.serenity-bdd:serenity-cucumber:3.6.12'
	testImplementation 'net.serenity-bdd:serenity-rest-assured:3.6.12'
	testImplementation 'net.serenity-bdd:serenity-spring:3.6.12'
	testImplementation 'net.serenity-bdd:serenity-junit:3.6.12'
	testImplementation 'org.junit.vintage:junit-vintage-engine'

}

tasks.named('test') {
	useJUnit() {}
	testLogging {
		showStandardStreams = true
	}
	systemProperties System.getProperties()
}

gradle.startParameter.continueOnFailure = true

test.finalizedBy(aggregate)
Step 3 – Create a feature file in src/test/resources
Below is an example of a feature file that shows a sample test scenario. Feature file should end with .feature. It contains the test scenarios in the form of simple English using the terms Given, When, Then, And.
Feature: SpringBoot Request

@ReceiveCorrectResponse

   Scenario Outline: Send a valid Request to get correct response
    Given I send a request to the URL "<url>"
    Then the response will return "<response>"

   Examples:
   | url             | response                   |
   | /               | Hello World, Spring Boot!  |
   | /qaautomation   | Hello QA Automation!       |
Step 4 – Create the StepDefinition and Helper classes.
Below is the code of the StepDefinition and Helper class. These classes are created in the src/test/java directory.
uses @SpringBootTest annotation which loads the actual application context.
uses WebEnvironment.RANDOM_PORT to create and run the application at some random server port.
@LocalServerPort gets the reference of the port where the server has started. It helps in building the actual request URIs to mimic real client interactions.
This class sends the request and receives a response after performing the GET operation. Here, the validation of the response also takes place by asserting the expected and actual response
import io.cucumber.java.en.Given;
import io.cucumber.java.en.Then;
import io.restassured.response.Response;
import net.serenitybdd.rest.SerenityRest;
import net.thucydides.core.annotations.Steps;
import org.junit.Assert;

public class SpringBootDemoDefinitions {

	@Steps
    AbstractRestAssuredHelper helper;
    private Response response;

    @Given("I send a request to the URL {string}")
    public void iSendARequest(String endpoint) throws Exception  {
         response = helper.getAnonymousRequest()
                    .header("Content-Type", "application/json").when().get(endpoint);
    }

    @Then("the response will return {string}")
    public void extractResponse(String Expected ) {
          SerenityRest.restAssuredThat(response -> response.statusCode(200));
          String Actual = response.asString();
          System.out.println("Result :"+Actual);
          Assert.assertEquals(Expected, Actual);
    }
}
Step 5 – Create a Serenity Runner class in the src/test/java directory
We cannot run a Feature file on its own in cucumber-based framework. We need to create a Java class that will run the Feature File. It is the starting point for JUnit to start executing the tests. TestRunner class is created under src/test/java. When you run the tests with serenity, you use the CucumberWithSerenitytest runner.
spring.profiles.active – property to specify which profiles are active. The default profile is always active. server.port – By default, the embedded server starts on port 8080. Now the server will start on port 8090 server.servlet.context-path – the context path in Spring Boot can be changed by setting a property, server.servlet.context-path.
Step 7 – Create a serenity.properties at the root level of the project
serenity.project.name = Testing of Gradle SpringBoot Application with Serenity and JUnit4 Demo
Step 8 – Run the tests from Command Line
Run the tests from the command line by using the below command
gradle clean test
The output of the above program is
This image shows that the profile name is “dev”. Application is started on port – “54462” and the context path is “/demo”.
Step 9 – Serenity Report Generation
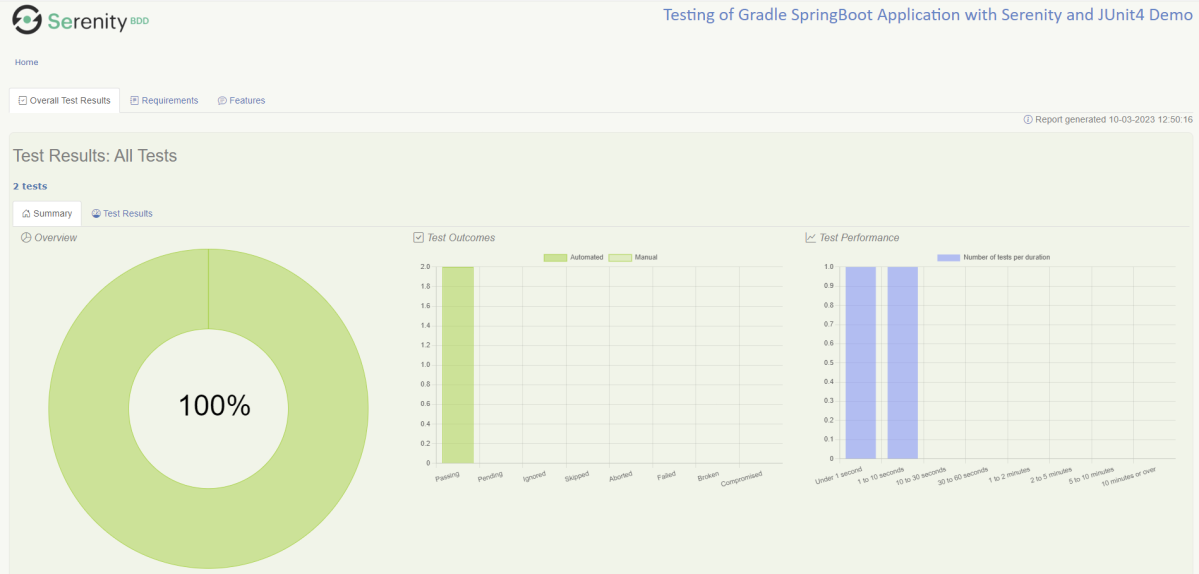
By default, the test report generated by Serenity is placed under target/site/serenity/index.html. Below is the sample Serenity Report.
Below is the sample Serenity Report.
Step 10 – CucumberReport Generation
A Cucumber Report can be generated by adding publish=true in SpringRunnerTests as shown in the above example. Click on the link provided in the execution status.
Cucumber Report
Congratulations on making it through this tutorial and hope you found it useful! Happy Learning!! Cheers!!
In the previous tutorial, I explained about Integration Testing of SpringBoot Application with Serenity BDD, Cucumber and JUnit4. This one provides a comprehensive tutorial on integration testing of a SpringBoot application using SpringBoot Test and TestNG. It covers essential topics like SpringBoot application, RestController, prerequisites, dependency list, project directory structure, and detailed test implementation steps.
Spring Boot is an open-source micro-framework that provides Java developers with a platform to get started with an auto-configurable production-grade Spring application.
Comes with embedded HTTP servers like Tomcat orJetty to test web applications.
Adds many plugins that developers can use to work with embedded and in-memory databases easily. Spring allows you to easily connect with database and queue services like Oracle, PostgreSQL, MySQL, MongoDB, Redis, Solr, ElasticSearch, Rabbit MQ, and others.
What is RestController?
HTTP requests are handled by a controller in Spring’s approach to building RESTful web services. The @RestController annotation identifies these components, and the GreetingController shown below (from src/main/java/com/example/HelloController.java) handles GET requests for / and /qaautomation by returning a new instance of the Greeting class. Spring RestController takes care of mapping request data to the request-defined handles method.
import org.springframework.web.bind.annotation.GetMapping;
import org.springframework.web.bind.annotation.RestController;

@RestController
public class HelloController {

    @GetMapping(path="/")
    String hello() {
        return "Hello World, Spring Boot!";
    }


    @GetMapping(path="/qaautomation")
    String qaautomation() {
        return "Hello QA Automation!";
    }

}
In this tutorial, I will explain the IntegrationTesting of the SpringBoot Application using SpringBoot Test and TestNG.
Prerequisite
Spring Boot 3.0.4 requires Java 17 and is compatible with and including Java 19. Spring Framework 6.0.6 or above is also required.
Explicit build support is provided for the following build tools:
Maven – 3.5+
Gradle – 7.x (7.5 or later) and 8.x
Dependency List
SpringBoot Starter Parent – 3.2.5
TestNG – 7.10.2
Rest Assured – 5.4.0
Java 17
Maven – 3.9.6
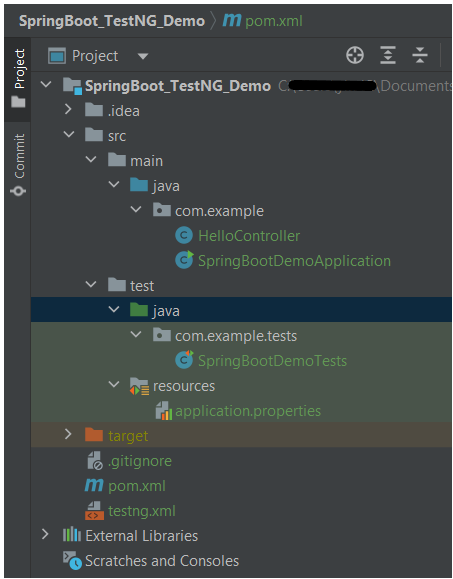
Project Directory Structure
Test Implementation Steps
Step 1 – Create a source folder – src/test/resources
Create a source folder – src/test/resources to properties file in it.
Right-click on the test directory and select New->Directory and select resources (Maven Source Directories).
Step 2 – Add dependencies to the project
We have added SpringBootTest, SpringBoot Tomcat, SpringBoot Web, Spring Web, Rest Assured, and TestNG dependencies to the pom.xml.
uses @SpringBootTest annotation which loads the actual application context.
uses WebEnvironment.RANDOM_PORT to create and run the application at some random server port.
@LocalServerPort gets the reference of the port where the server has started. It helps in building the actual request URIs to mimic real client interactions.
Below is the code of the sample Test class. These classes are created in the src/test/java directory.
import io.restassured.response.ValidatableResponse;
import org.springframework.beans.factory.annotation.Value;
import org.springframework.boot.test.context.SpringBootTest;
import org.springframework.boot.test.web.server.LocalServerPort;
import org.springframework.test.context.testng.AbstractTestNGSpringContextTests;
import org.testng.Assert;
import org.testng.annotations.Test;
import static io.restassured.RestAssured.given;

@SpringBootTest(webEnvironment = SpringBootTest.WebEnvironment.RANDOM_PORT)
public class SpringBootDemoTests extends AbstractTestNGSpringContextTests {

    private final static String BASE_URI = "http://localhost:";

    @LocalServerPort
    private int port;

    @Value("${server.servlet.context-path}")
    private String basePath;

    private ValidatableResponse response;

    @Test
    public void verifyController1()  {
         response = given().contentType("application/json")
                    .header("Content-Type", "application/json")
                 .when().get(BASE_URI + port + basePath + "/").then().statusCode(200);

         String Actual = response.extract().asString();
          System.out.println("Result :"+Actual);
          Assert.assertEquals("Hello World, Spring Boot!", Actual);
    }

    @Test
    public void verifyController2()   {
        response = given().contentType("application/json")
                .header("Content-Type", "application/json")
                .when().get(BASE_URI + port + basePath + "/qaautomation").then().statusCode(200);

        String Actual = response.extract().asString();
        System.out.println("Result :"+Actual);
        Assert.assertEquals("Hello QA Automation!", Actual);
    }
}
The AbstractTestNGSpringContextTests is an abstract base class having the ApplicationContext supported in the testNG explicitly.
This class sends the request and receives a response after performing the GET operation. Here, the validation of the response also takes place by asserting the expected and actual response.
Step 4 – Create an application.properties file in src/test/resources
Application.properties is created under src/ test/java.
spring.profiles.active – property to specify which profiles are active. The default profile is always active. server.port – By default, the embedded server starts on port 8080. Now the server will start on port 8089 server.servlet.context-path – the context path in Spring Boot can be changed by setting a property, server.servlet.context-path.
Step 5 – Run the tests from Test Class
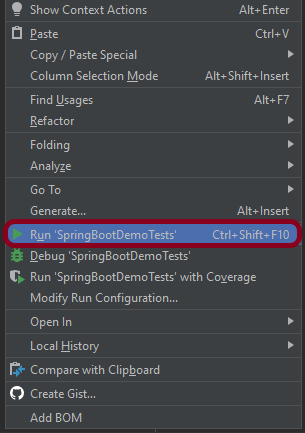
Right-click on the Test class and select Run ‘SpringBootDemoTests’.
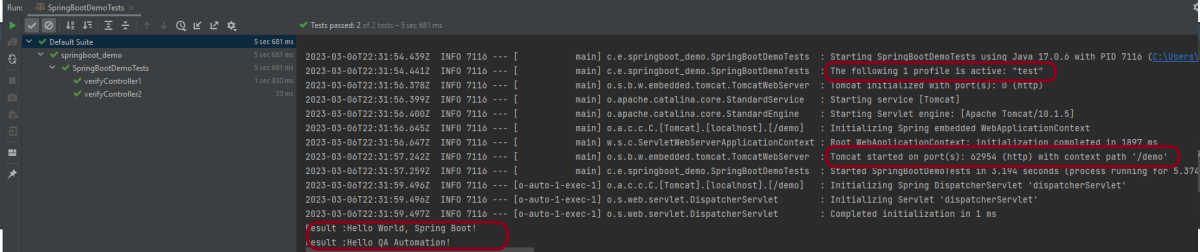
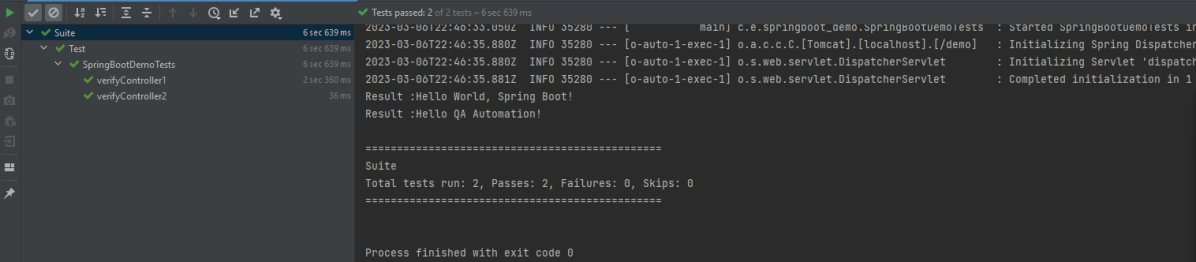
The output of the above program is
This image shows that the profile name is “test”. Application is started on port – “62954” and the context path is “/demo”.
Step 6 – Run the tests from testng.xml
First, we need to create a testng.xml at the root of the project.
<?xml version = "1.0"encoding = "UTF-8"?>
<!DOCTYPE suite SYSTEM "http://testng.org/testng-1.0.dtd">
<suite name = "Suite1">
    <test name = "TestNG Demo">
        <classes>
            <class name = "com.example.tests.SpringBootDemoTests"/>
        </classes>
    </test>
</suite>
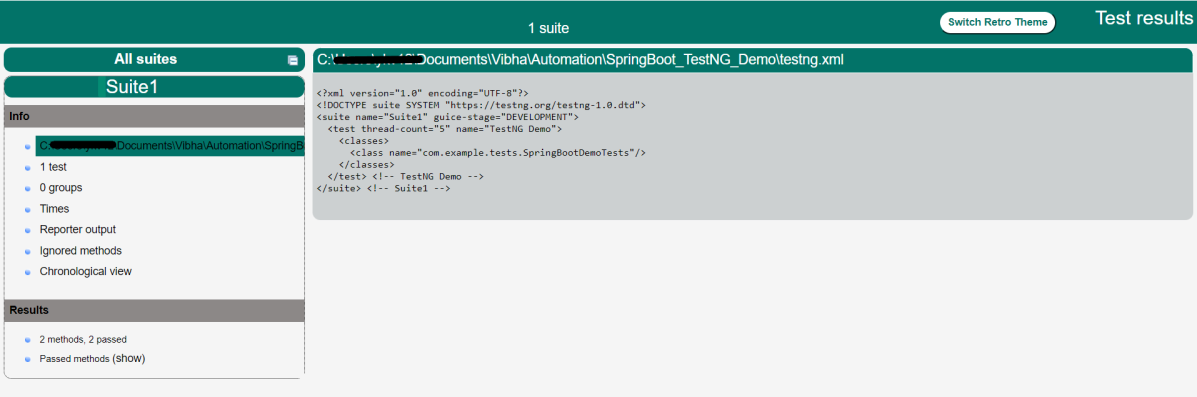
Right-click on testng.xml and select Run ‘…\testng.xml’.
The output of the above program is
Step 7 – TestNG Report Generation
The test report generated by TestNG is placed under test-output/index.html.
Index.html
TestNG produces an “index.html” report, and it resides under the test-output folder. The below image shows index.html report. This report contains a high-level summary of the tests.
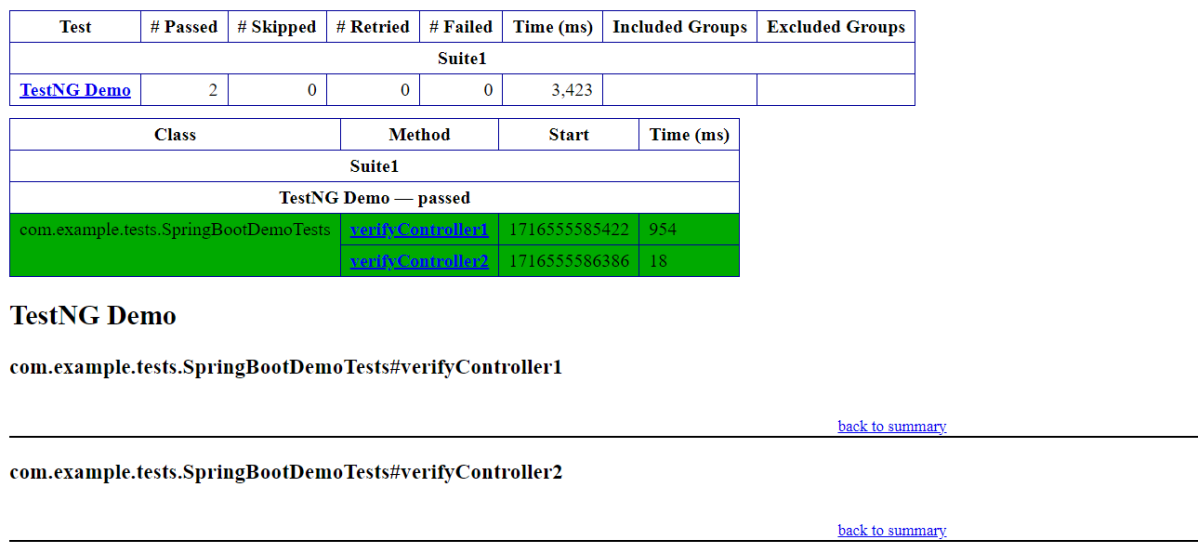
Emailable-Report.html
Test-Output folder also contains Emailable-Report.html. Open “emailable-report.html“, as this is an HTML report open it with the browser. The below image shows emailable-report.html.
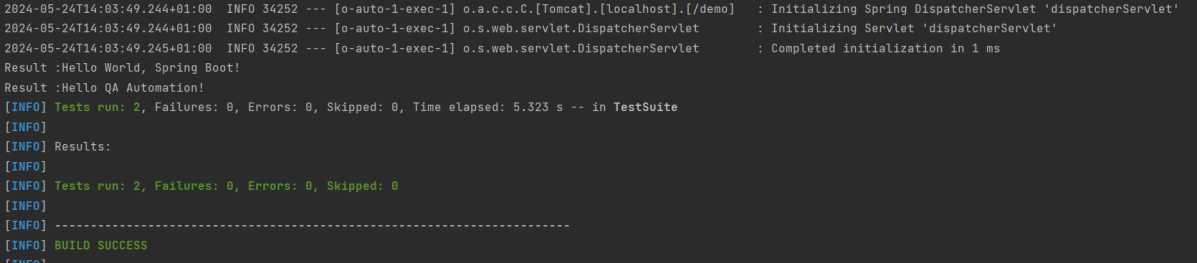
Step 8 – Run the tests through Maven Command Line
Starting from SpringBoot 3.1.0 version, we need to add the below dependency to the surefire plugin to run the tests through Maven Command Line.
The previous tutorial explained the steps to run the Selenium tests in the GitHub pipeline (Maven project). This tutorial explains the steps to run the Gradle project in the GitHub pipeline.
Important points to keep in mind:
1. We don’t need to think about the Chromedriver.exe we are using WebDriver Manager to handle that instead of adding it to our project like the following:
WebDriverManager.chromedriver().setup();
2. The Selenium tests need to run in the headless mode. As we are using Chrome browser, use the below code:
ChromeOptions options = new ChromeOptions();
options.addArguments("--no-sandbox");
options.addArguments("--disable-dev-shm-usage");
options.addArguments("--headless");
driver = new ChromeDriver(options);
3. Install Chrome browser in ubuntu. Use the below code:
I have a repository available on GitHub – Gradle_Selenium_TestNG_Demo as shown in the below image. Go to the Actions tab. Click on the “Actions” tab.
Step 2 – Select the type of Actions
You will see that GitHub recommends Actions depending on the project. In our case, it is recommending actions suitable for a Java project. I have selected the “Publish Java Package with Gradle” option.
Step 3 – Generation of Sample pipeline
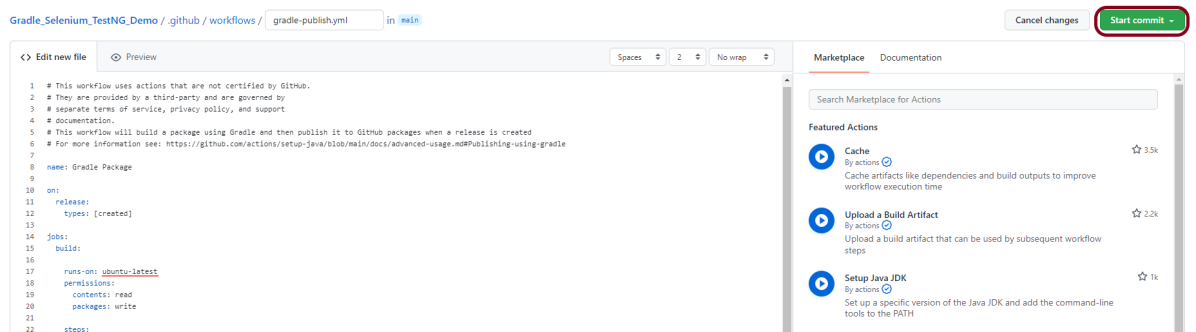
If you choose an existing option, it will automatically generate a .yaml for the project as shown below.
We will replace the current workflow with the following yml file as shown below:
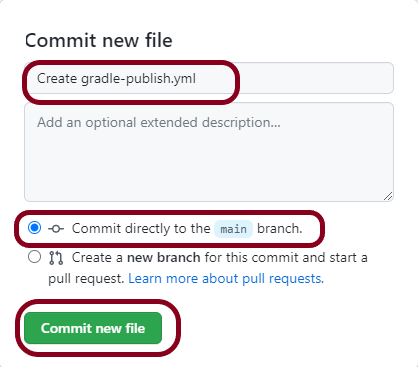
This will give the option to add a description for the commit. It will also enable the user to commit either to the main branch or commit to any other branch that exists in the project. Click on the “Commit new file” button to set up the workflow file.
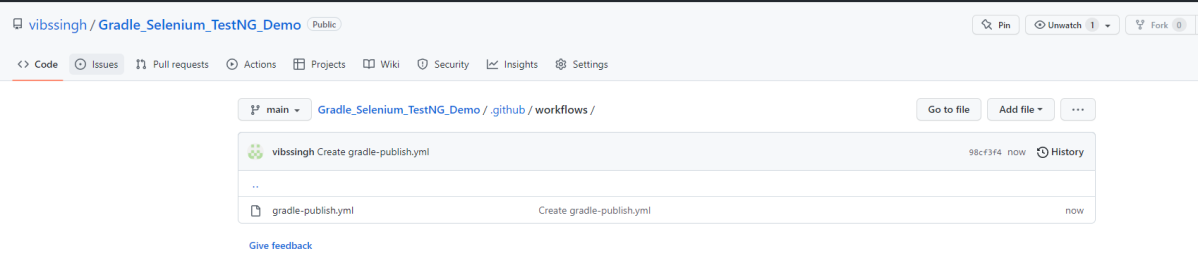
A folder with the name .github/workflows will be created that will contain a gradle-publish.yml file as shown below:
Step 5 – Verify that the workflow is running
Next, head over to the “Actions” tab, and you will see your YAML workflow file present under the tab. The yellow sign represents that the job is in the queue.
In Progress – When the job starts building and running, you will see the status change from “Queued” to “in progress”.
Passed –If the build is successful, you will see a green tick mark.
Click on the workflow and the below screen is displayed. It shows the status of the run of the workflow, the total time taken to run the workflow, and the name of the .yml file.
Failed – In case the build has failed which in this case any of the tests is failed, then there will be a red cross mark.
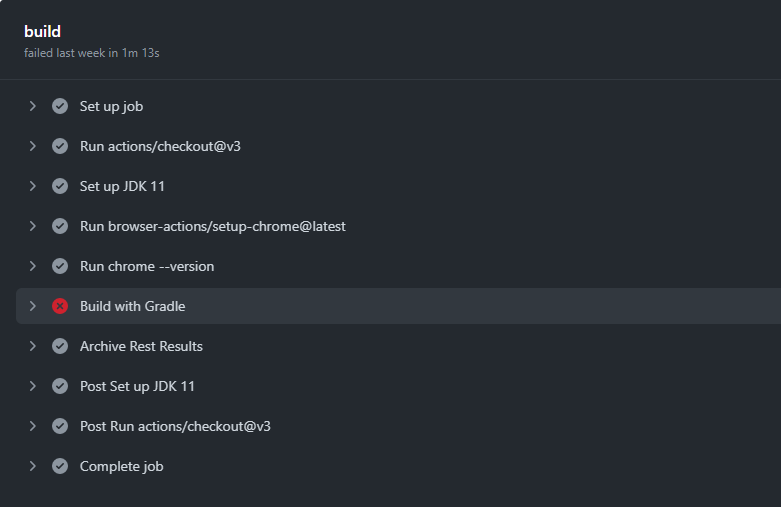
Below shows all the steps of the workflow.
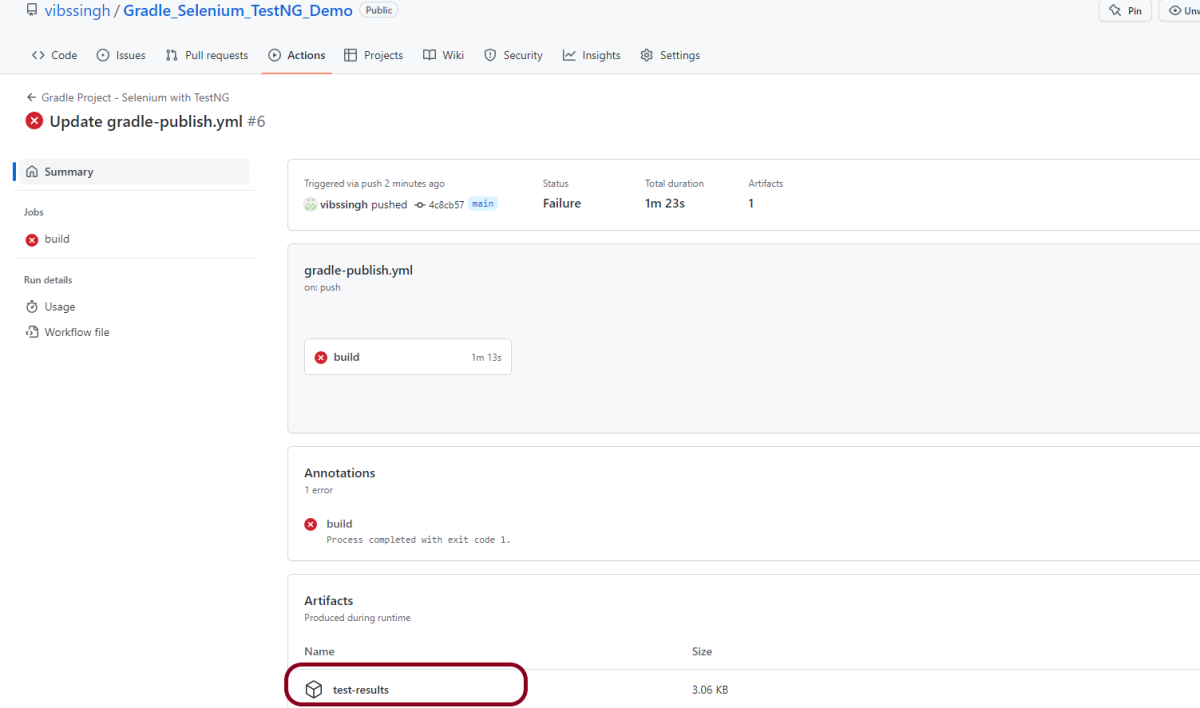
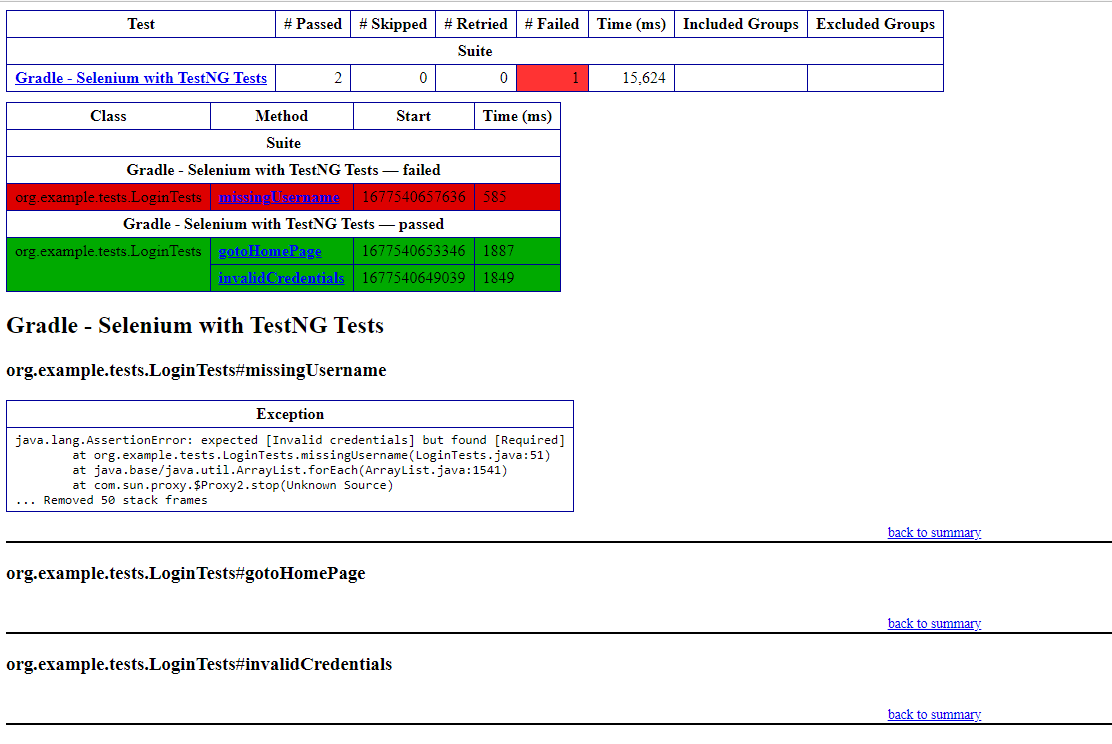
Build with Gradle steps failed because out of 2 tests, one of the tests failed. So, it appears in red colour. I personally love this feature because it gives an idea about the test execution status immediately if all the tests are passed or anything is failed.
Published artifacts on GitHub
Once the pipeline run, a test-results folder will be generated as shown in the below image:
When we click on the folder test-results, a zipped file will be downloaded, and we can extract it to see all the files contained within it.
When a GitHub Actions workflow completes a build successfully, artifacts such as zip files, compiled code, Java JAR files, and other assembled components are created. Once the workflow is completed, the Docker container on which the GitHub Actions artifacts are created vanishes. However, it is not difficult for a developer to request that GitHub archive those artifacts and make them available as a downloadable link.
The flexible aspects of Selenium WebDrivers and GitHub Actionsenable users to create powerful, fast, and efficient automated testing workflows in CI/CD environments.
CI/CD pipelines have contributed to the success of the DevOps cycle in all software development projects. This is a holistic process that bridges development and operations. Continuous integration helps development teams deploy code efficiently, and continuous delivery automates code deployment.
Important points
1. We don’t need to think about the Chromedriver.exe we are using WebDriver Manager to handle that instead of adding it to our project like the example:
WebDriverManager.chromedriver().setup();
From Selenium 4.6.0 onwards, we don’t need to add WebDriverManager dependency explicitly to the project, because Selenium has added an inbuilt tool to handle the drivers.
2. The Selenium tests need to run in the headless mode. As we are using Chrome browser, use the below code:
ChromeOptions options = new ChromeOptions();
options.addArguments("--no-sandbox");
options.addArguments("--disable-dev-shm-usage");
options.addArguments("--headless");
driver = new ChromeDriver(options);
3. Install Chrome browser in ubuntu. Use the below code:
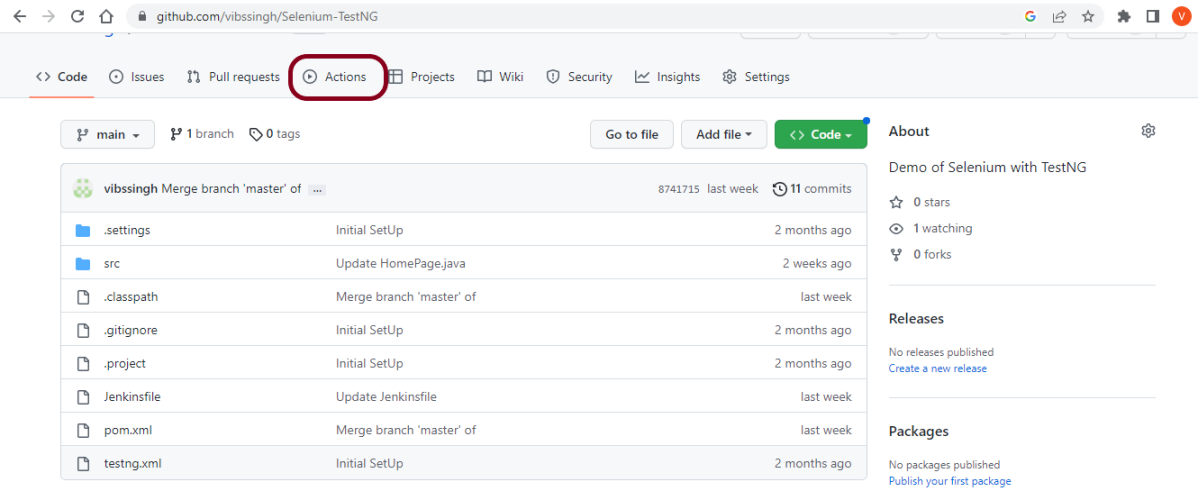
I have a repository available in GitHub – Selenium-TestNG as shown in the below image. Go to the “Actions” tab. Click on the “Actions” tab.
Step 2 – Select the type of Actions
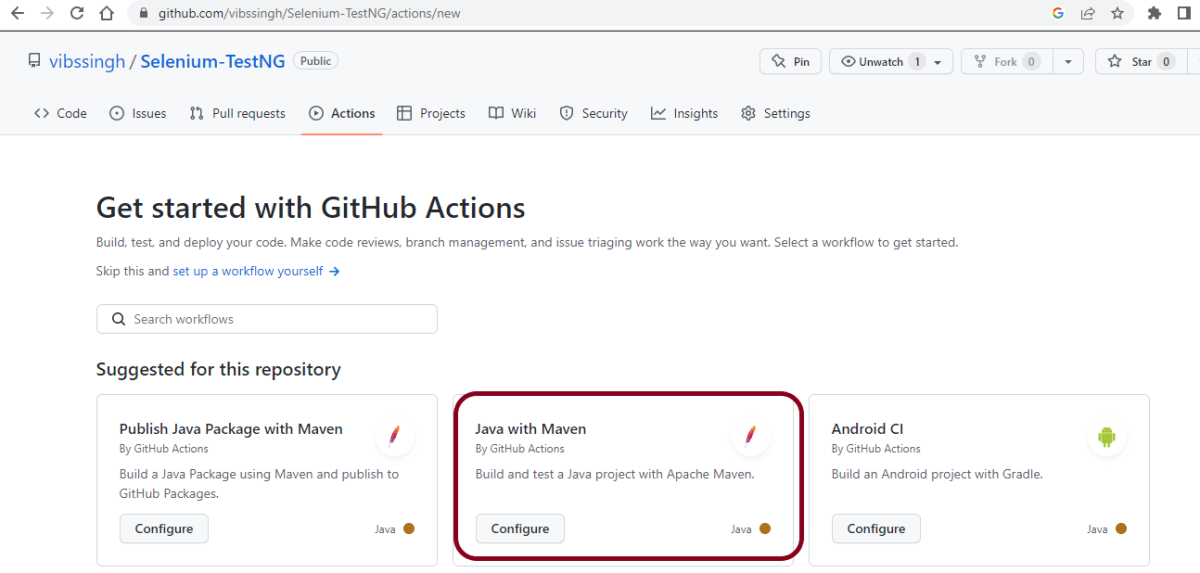
You will see that GitHub recommends Actions depending on the project. In our case, it is recommending actions suitable for a Java project. I have selected the “Java with Maven” option as my project is built in Maven.
Step 3 – Generation of Sample pipeline
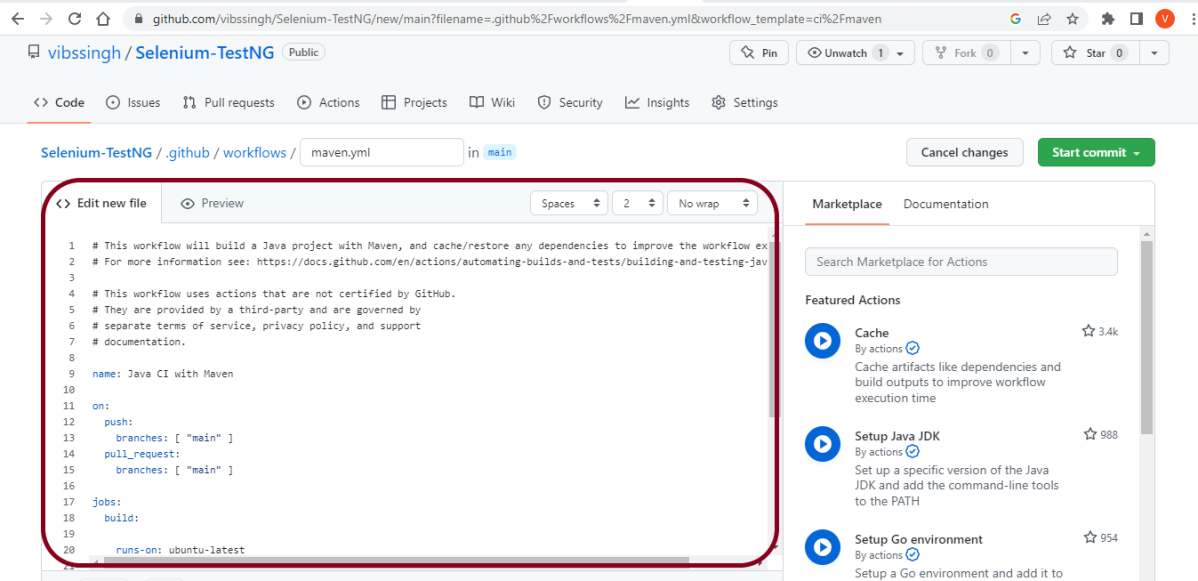
If you choose an existing option, it will automatically generate a .yaml for the project as shown below.
We will replace the current workflow with the next yml file as shown below:
name: Selenium with TestNG - CI
on:
push:
branches: [ "main" ]
pull_request:
branches: [ "main" ]
jobs:
build:
runs-on: ubuntu-latest
steps:
- uses: actions/checkout@v3
- name: Set up JDK 17
uses: actions/setup-java@v3
with:
java-version: '17'
distribution: 'temurin'
cache: maven
- uses: browser-actions/setup-chrome@latest
- run: chrome --version
- name: Build with Maven
run: mvn -B clean test
The workflow file usually consists of the below attributes:
name: Java CI with Maven
Name of workflow: This is an optional attribute.The name of the workflow is denoted by the keyword “name”. If you wish to include multiple CI jobs in your project, it is recommended to name each one appropriately.
on: [push] :
On attribute – This attribute is mandatory and specifies the trigger for this workflow. There are several actions you can include such as push, pull request, release, etc. for more information on the events, check the official guide here.
jobs:
Under the jobs attribute, groups together all the jobs that run in the workflow.
runs-on: ubuntu-latest
Configures the job to run on the latest version of an Ubuntu Linux runner. This means that the job will execute on a fresh virtual machine hosted by GitHub
steps:
Under this option, the actions used by the particular workflow, and the multiple jobs that would run under the workflow are mentioned. These jobs run in parallel. If you want to run the jobs in the order in the CI pipelines, you must add the “needs” attribute. It is crucial to ensure that every workflow has at least one job. In our sample workflow, we only have one job as shown in image above.
uses: actions/checkout@v3
The uses keyword specifies that this step will run v3 of the actions/checkout action. This is an action that checks out your repository onto the runner, allowing you to run scripts or other actions against your code (such as build and test tools). You should use the checkout action any time your workflow will run against the repository’s code.
This step uses the actions/setup-java@v3 action to install the specified version of the Java (this example uses v17).
Step 4 – Commit the changes
After the changes, hit the “Start Commit” button.
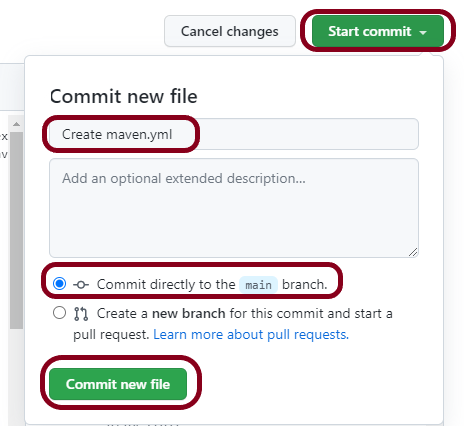
This will give the choice to add a description for the commit. It will also allow the user to commit either to the main branch or commit to any other branch that exists in the project. Click on the “Commit new file” button to set up the workflow file.
Step 5 – Verify that the workflow is running
Next, head over to the “Actions” tab, and you will see your YAML workflow file available under the tab. The yellow sign represents that the job is in the queue.
In Progress – When the job starts building and running, you will see the status change from “Queued” to “in progress”.
Passed – If the build is successful, you will see a green tick mark.
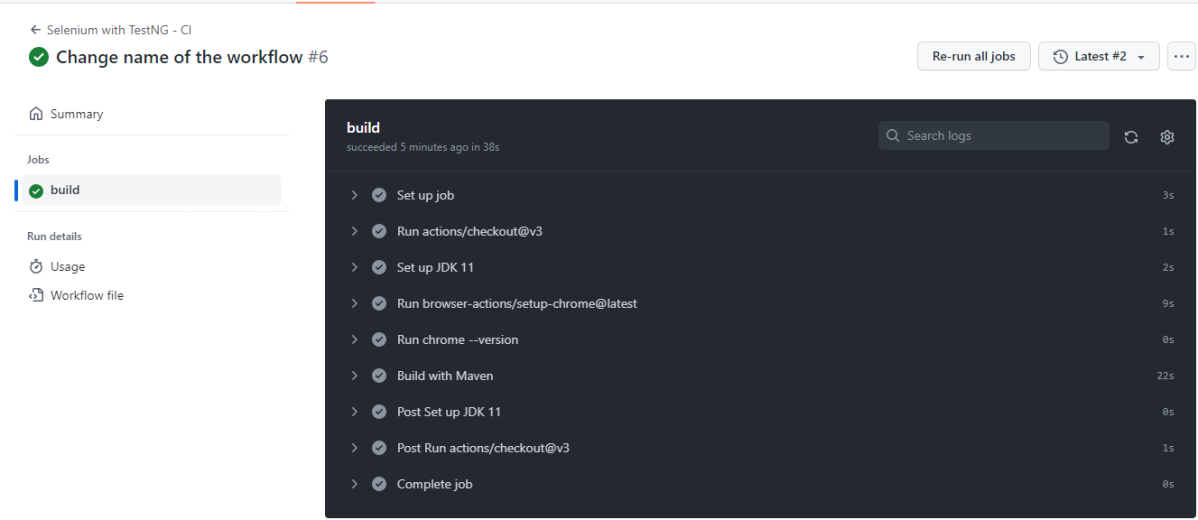
Click on the workflow and the below screen is displayed. It shows the status of the run of the workflow, the total time taken to run the workflow, and the name of the .yml file.
Below are all the steps of the workflow.
Failed – In case the build has failed, then there will be a red cross mark.
GitHub Importer is a tool that quickly imports source code repositories, including commits and revision history, from Subversion, Mercurial, Team Foundation Version Control (TFVC), or another Git repository to GitHub for you.
During an import, depending on the version control system you’re importing from, you can authenticate with your remote repository, update commit author attribution, and import repositories with large files (or remove large files if you don’t want to use Git Large File Storage).
Code Transfer from GitLab to GitHub
Implementation Steps
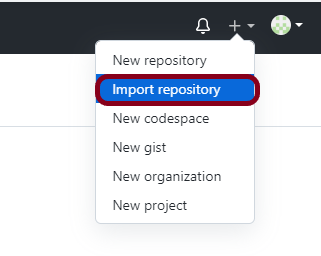
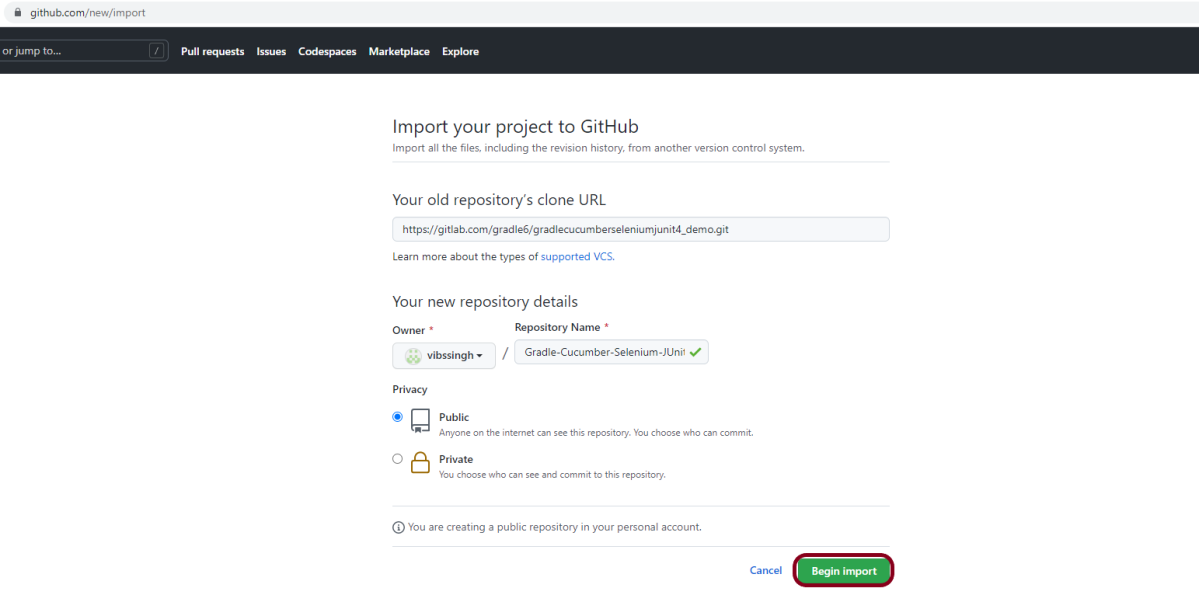
Step 1 – n the upper-right corner of any page, click +, and then click Import repository.
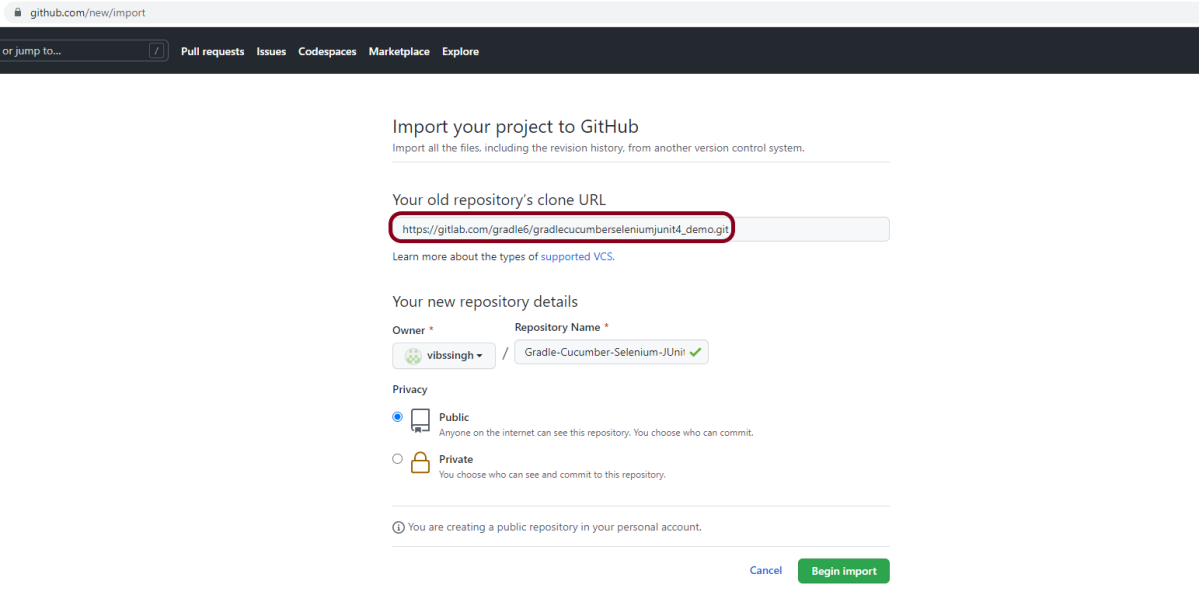
Step 2 – Under “Your old repository’s clone URL”, type the URL of the project you want to import. Here, I have mentioned the url of a project in GitLab.
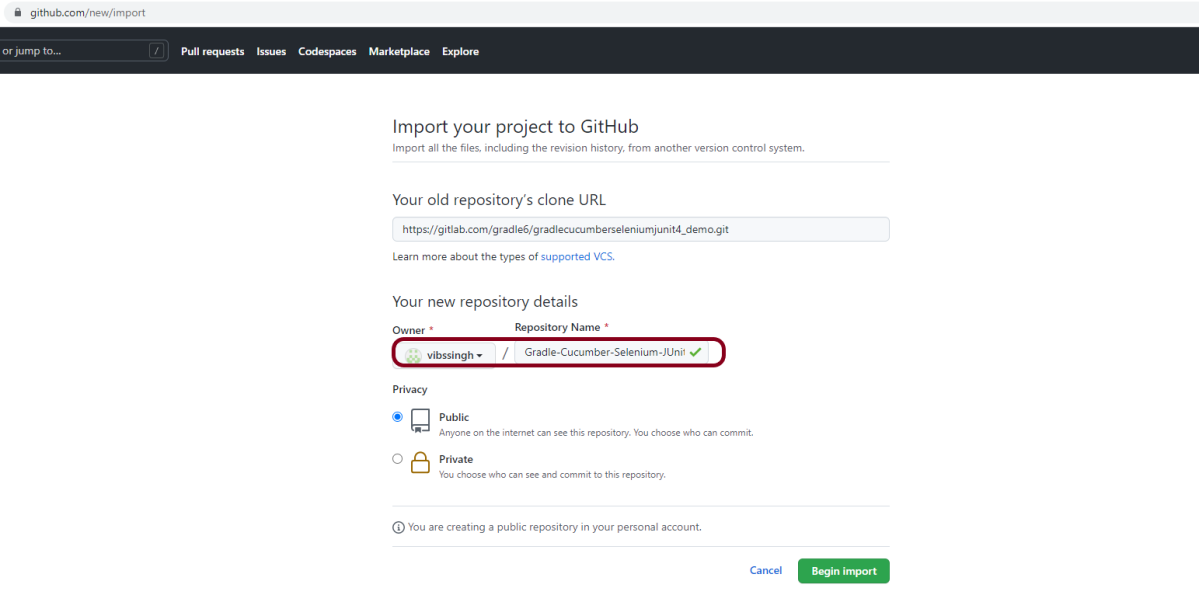
Step 3 – Choose your personal account or an organization to own the repository, then type a name for the repository on GitHub.
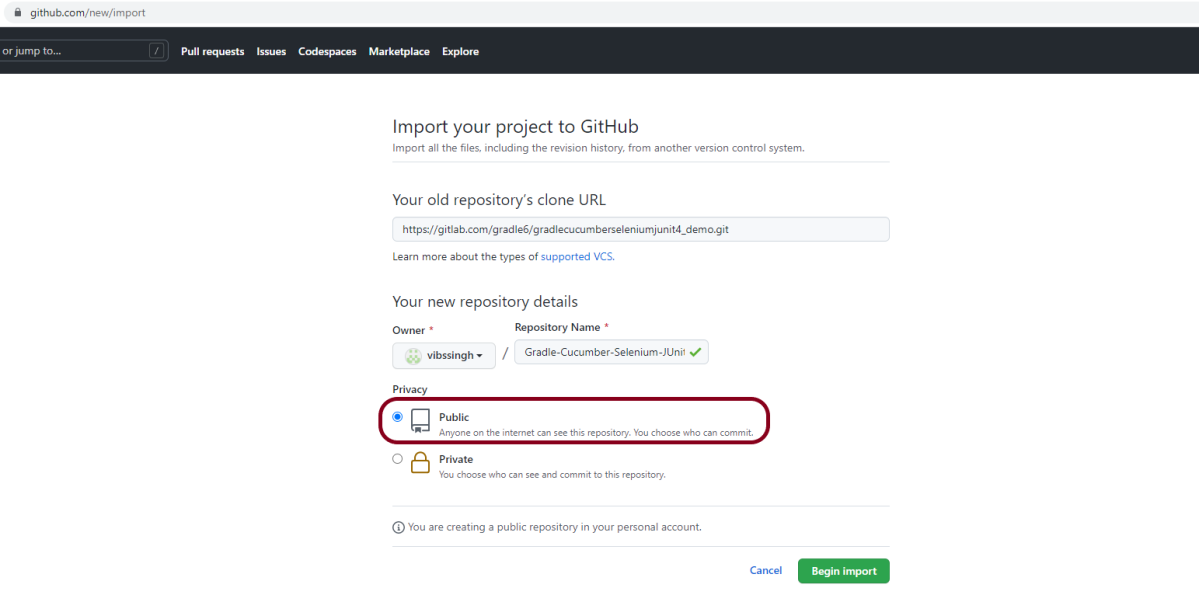
Step 4 – Specify whether the new repository should be public or private. I have selected the public option.
Step 5 – Review the information you entered, then click Begin import.
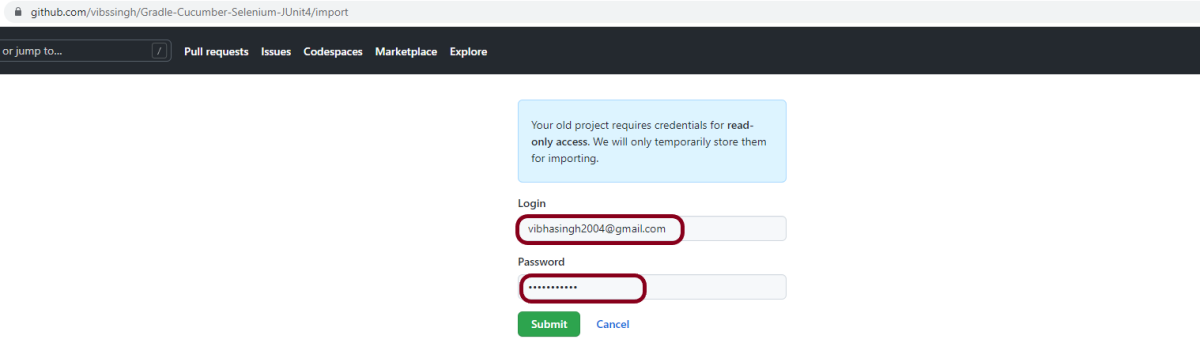
Step 6 – If your old project requires credentials, type your login information for that project, then click Submit. If SAML SSO or 2FA are enabled for your user account on the old project, enter a personal access token with repository read permissions in the “Password” field instead of your password.
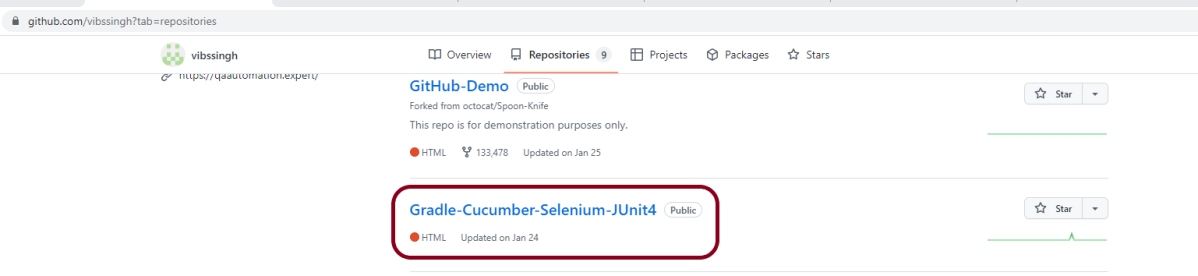
We can see that this project is now imported to GitHub.
Congratulations on making it through this tutorial and hope you found it useful! Happy Learning!! Cheers!!
Pull requests let others know about changes you’ve pushed to a branch ofyour repository on GitHub. When a pull request is opened, you can discuss and review potential changes with collaborators and add follow-up commits before the changes are merged into the base branch.
Prerequisite:
GIT is installed on the machine
Valid account on GitHub
Implementation Steps
If you want to create a new branch for your pull request and do not have write permissions to the repository, you can fork the repository first.
1. Fork the repository
By clicking the fork button at the top of the page, you can fork the repository. This will make a copy of the entire repository in your account. To know more about Forking, please refer to this tutorial – How to Fork a GitHub repository.
2. Clone the repository
Once the repository has been added to your account, you can clone it to your machine to work with it locally.
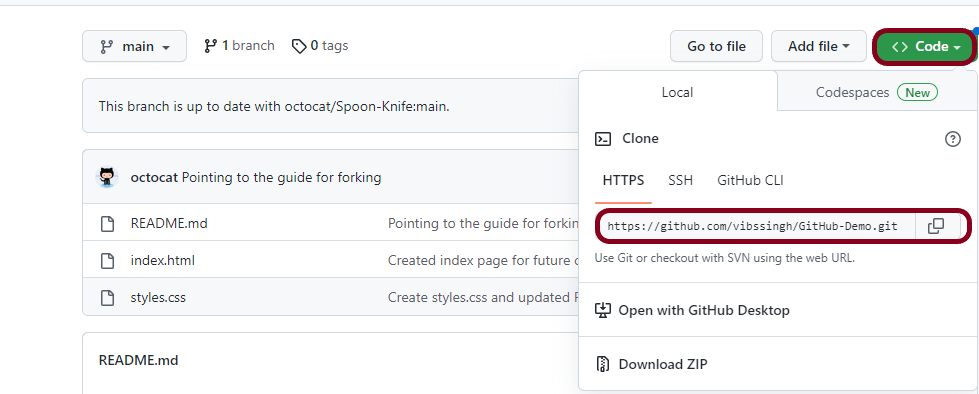
Clone by clicking the clone button and copying the link as shown below.
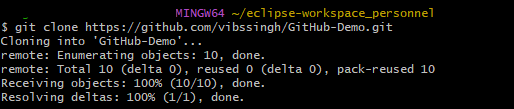
Open the terminal (GitBash) and run the following command. It will clone the repository locally.
Now we have set up a copy of the master branch from the main online project repository.
We need to go to that cloned directory by running this command:
$ cd GitHub-Demo
3. Create a new branch
When working with repositories, whether it’s a small project or contributing to the work of a group, it’s the best practice to create a new branch.
The branch name should be short and reflect the work we are doing.
Now, use the below command to create a branch:
$ git checkout -B first_merge
4. Make changes and commit the changes
Make essential changes to the project and save it.
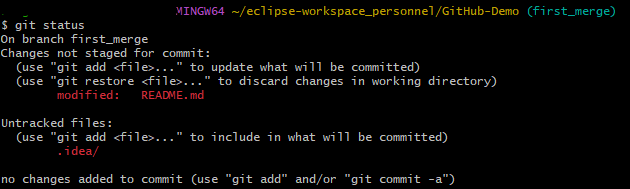
Then execute git status, and you’ll see the changes.
$ git status
Add those changes to the branch you just created using the below command:
$ git add .
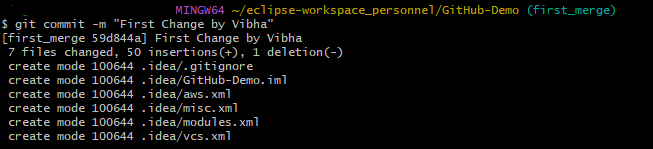
Now commit those changes using the git commit command:
$ git commit -m "First Change by Vibha"
5. Push changes to GitHub
In order to push the changes to GitHub, we need to identify the remote’s name.
$ git remote
For this repository, the remote’s name is “origin”.
After identifying the remote’s name we can safely push those changes to GitHub.
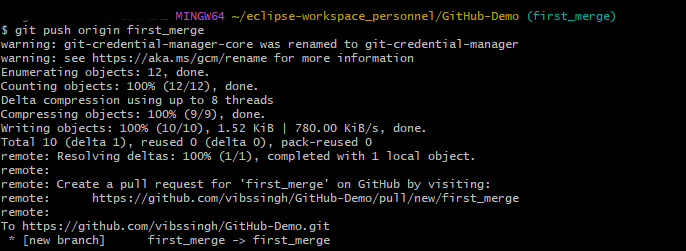
$ git push origin first_merge
6. Create pull request
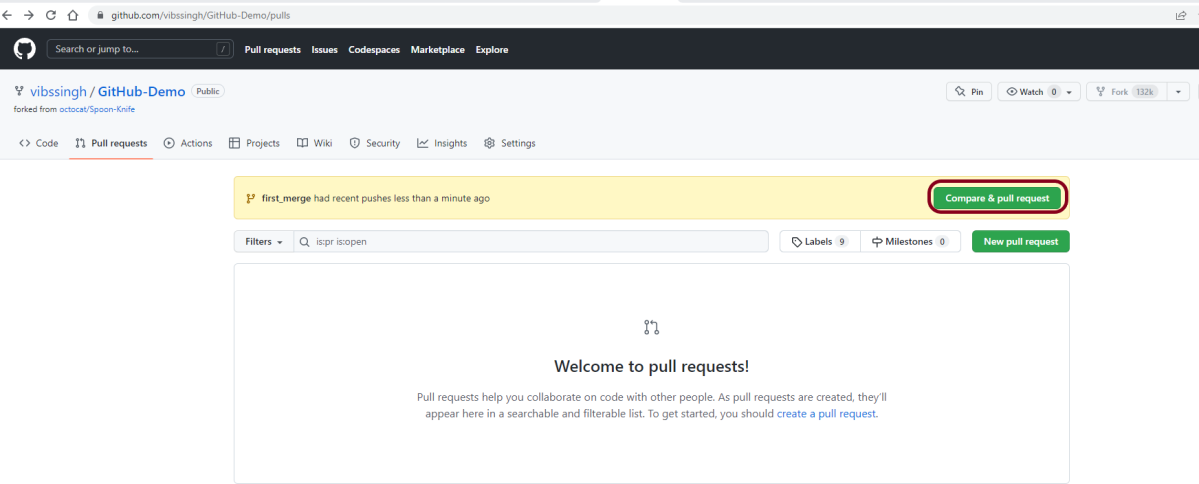
Go to your repository on GitHub, and you’ll see a button “Compare & pull request” click it.
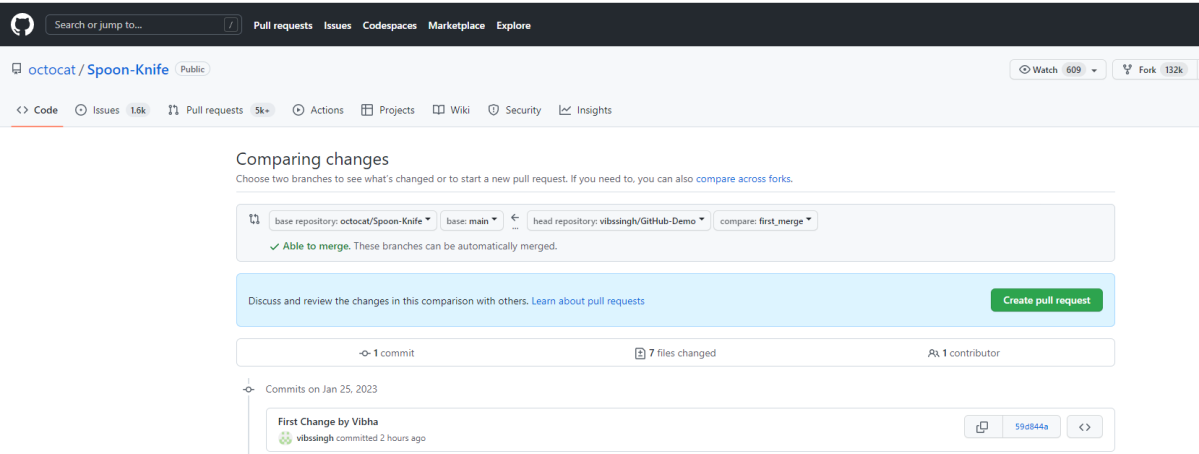
Please provide the necessary details on what you’ve done (You can reference issues using “#”). Now submit the pull request.
7. Update the Local Repository
Before submitting any pull requests to the original repository, you must first sync your repository with it.
While working on a project with other contributors, keep your local repository up to date with the project because you don’t want to make a pull request for code that will automatically cause conflicts (though in collaborative code projects, conflicts are bound to occur). You’ll need to sync changes to keep your local copy of the code base up to date.
To update/sync those changes to your master branch, follow these steps:
1. First, check which branch you are in.
$ git remote
It’ll list all branches and indicates the current or active branch in green.
2. Switch to the master branch
git checkout main
3. Add the original repository as an upstream repository
In order to pull the changes from the original repository into your forked version, you need to add the original Git repository as an upstream repository.
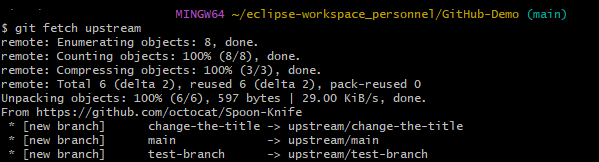
Fetch all the changes from the original repository. Commits to the original repository will be stored in a local branch called upstream/master.
$ git fetch upstream
5. Merge the changes
Merge the changes from the upstream/master into your local master branch. This will bring your fork’s master branch into sync with the upstream repository without losing your local changes.
$ git merge upstream/main
6. Push changes to GitHub
At this point, your local branch is synced to the original repository’s master branch. If you want to update the GitHub repository, you need to push your changes.
$ git push origin main
Congratulations! You’ve made your first pull request.
GitHub is a for-profit organization that provides cloud-based Git repository hosting. It simplifies the use of Git for version control and collaboration by individuals and teams. The GitHub interface is simple enough that even inexperienced coders can use it. Without GitHub, using Git generally necessitates a bit more technical know-how and command-line proficiency.
Furthermore, anyone can sign up for and host a public code repository for free, making GitHub particularly popular with open-source projects.
In this tutorial, I will explain how we can clone a project from GitLab in Eclipse.
Implementation Steps
Clone the Project
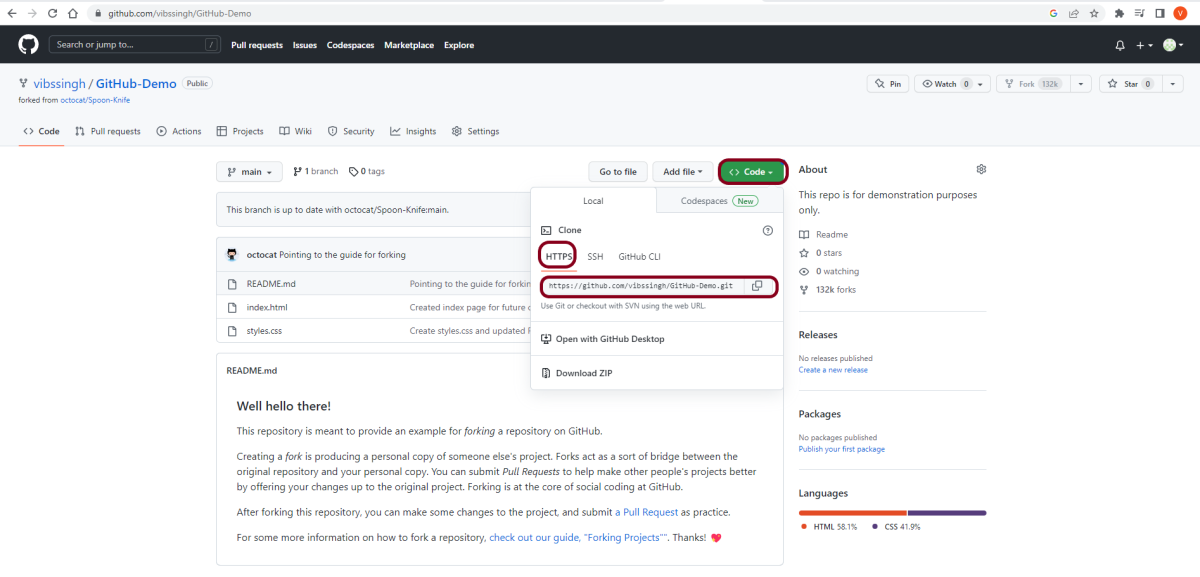
Step 1 – Go to GitHub and select the project which you want to clone. Click on the green colour “Code” button, then copy the hyperlink as shown in the image. You can either Clone with HTTPS, SSH, or GitHub CLI.
Import the project in Eclipse
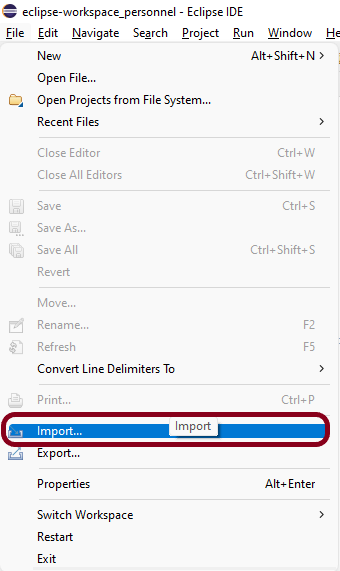
Step 2 – Open Eclipse and go to File > Import in eclipse as shown in the image.
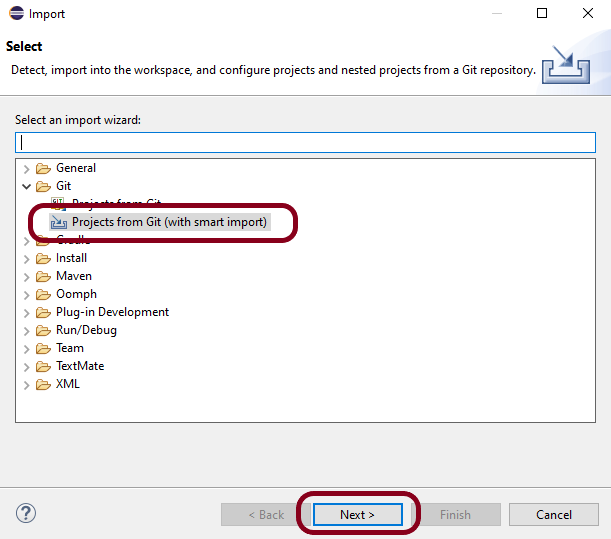
Step 3– A window will pop up in which select Git Folder. Under the Git folder, select the option – Projects from Git (with smart import)as shown in the image.
Click on the NEXT button.
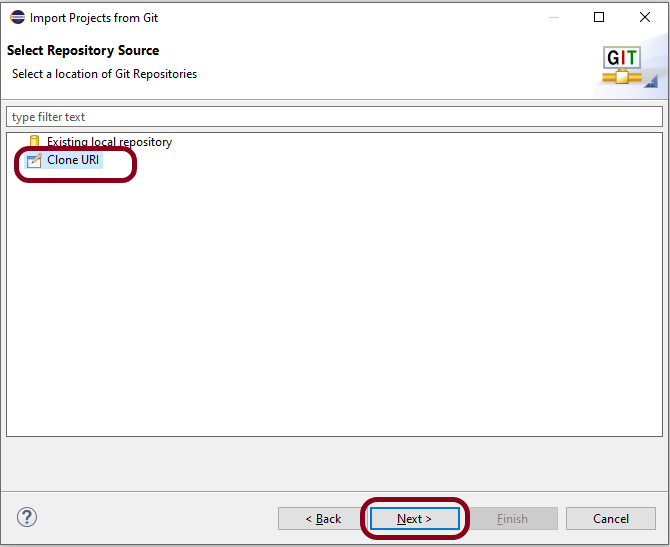
Step 4 – A new window will pop up in which select the option –Clone URI as shown in the image.
Click on the NEXT button.
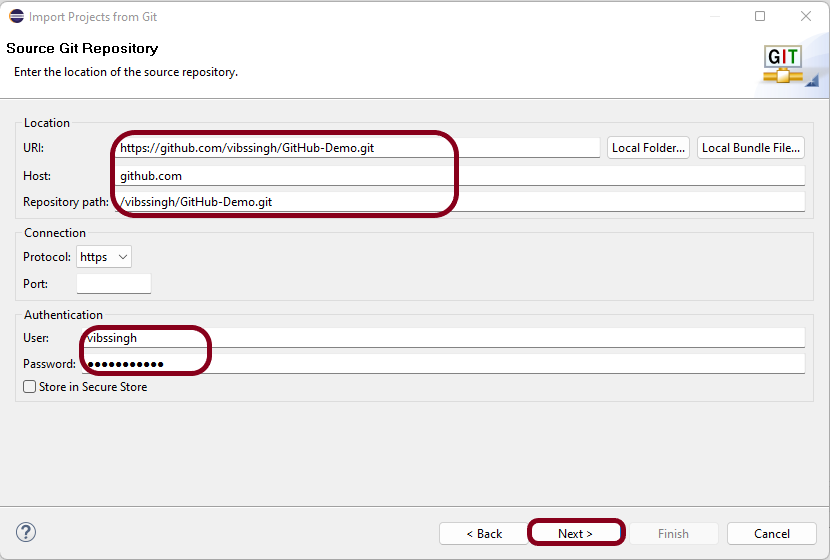
Step 5 – Another window will pop up in which you have to paste theGitHub Repository URL and alsoGitHub User ID and Passwordand click on the “Next” button.
URI – This is the URL that we have cloned from GitHub in Step 1. Host – github.com Repository path – Path of the project in GitHub (This is auto-populated after entering URI)
Authentication User – Username of GitHub Password – Password of GitHub
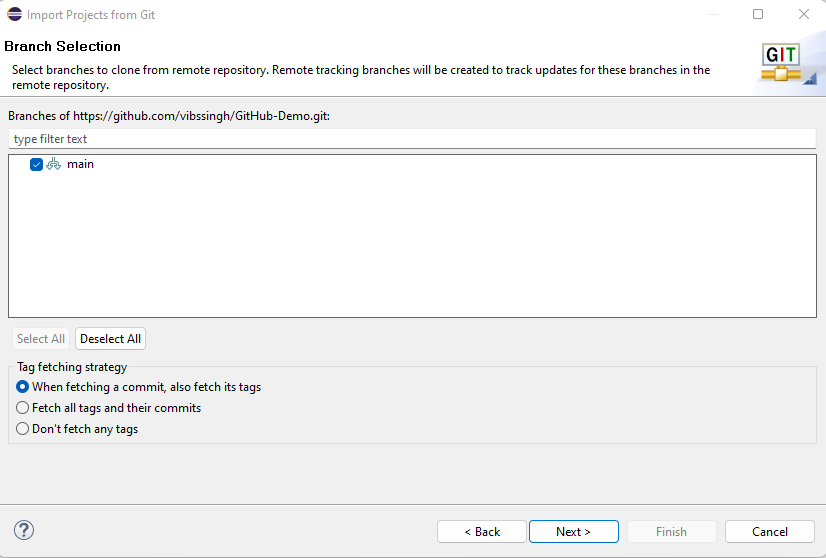
Step 6– Select main and select “When fetching a commit, also fetch its tags“.
Click on the “Next” button.
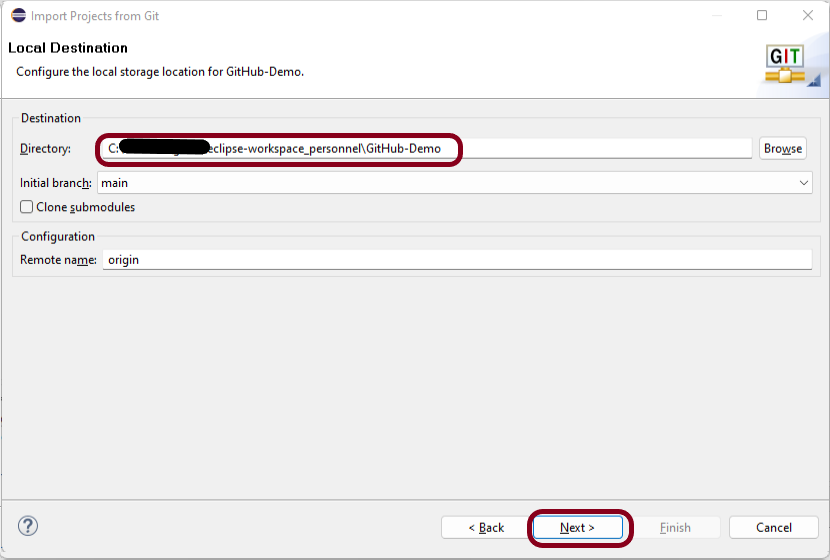
Step 7– Select the Folder directory in which you want to import the repository.
Click on the Next button.
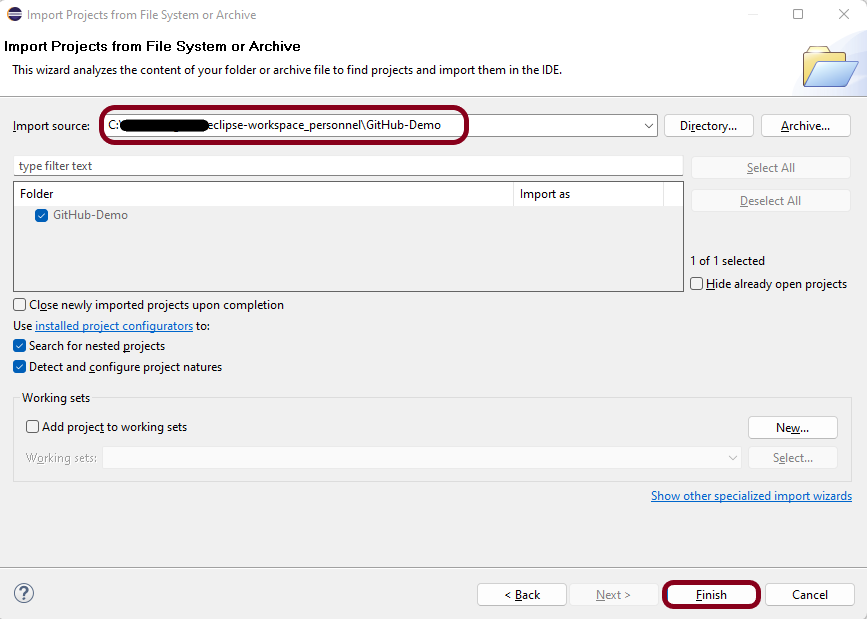
Step 8 – Select the Import Source, this is auto-generated. This wizard analyzes the content of the folder to find the project and import them into the IDE.
Click on the Finish button.
Step 9 – We have successfully imported the GitHub Repository as shown in the below image.
Congratulations on making it through this tutorial and hope you found it useful! Happy Learning!! Cheers!!
A fork is a new repository that shares the original “upstream” repository’s code and visibility settings. Forks are frequently used in open-source projects or when a user does not have write access to the upstream repository to iterate on ideas or changes before they are proposed back to the upstream repository.
What is GitHub Repository Forking?
Assume you enjoy working on a specific framework or library. You discover a way to improve the functionality of this framework yourself one day.
The source code is available as a public repository on GitHub, so you can fork it to make a local copy.
Once you have a local copy of the code, you can make the necessary changes and request that the community review them.
Following a review of your code changes, the community may approve them or request additional changes. They are most likely to accept your code changes after they have been approved.
Prerequisites:
Set up Git and authentication with GitHub.com from Git
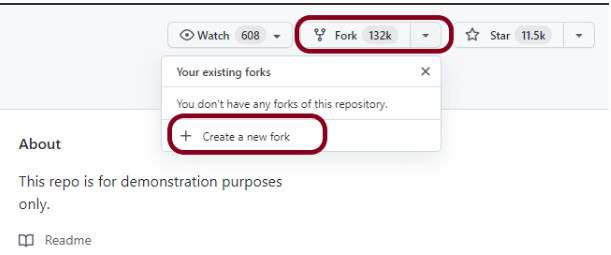
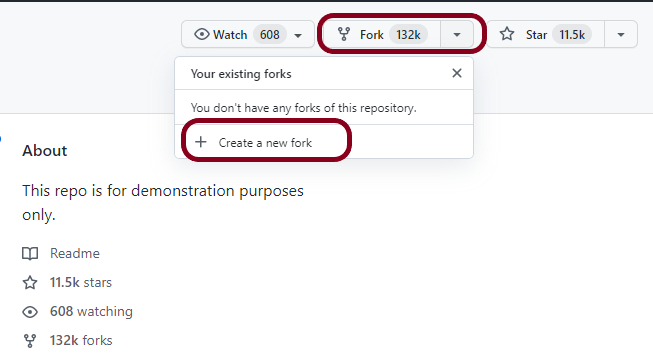
Step 2 – In the top-right corner of the page, click Fork.
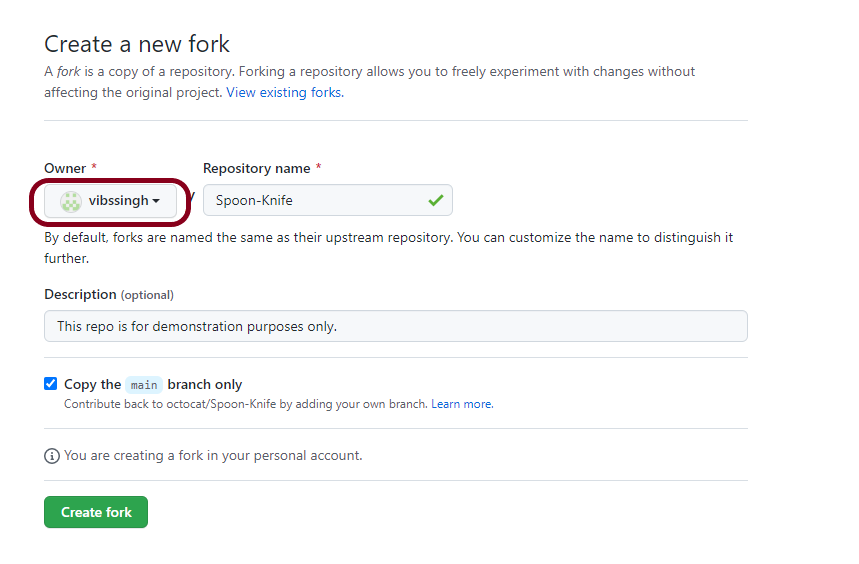
Step 3 – Select an owner for the forked repository. Here, the owner is vibssingh (as this is my username that is used to login).
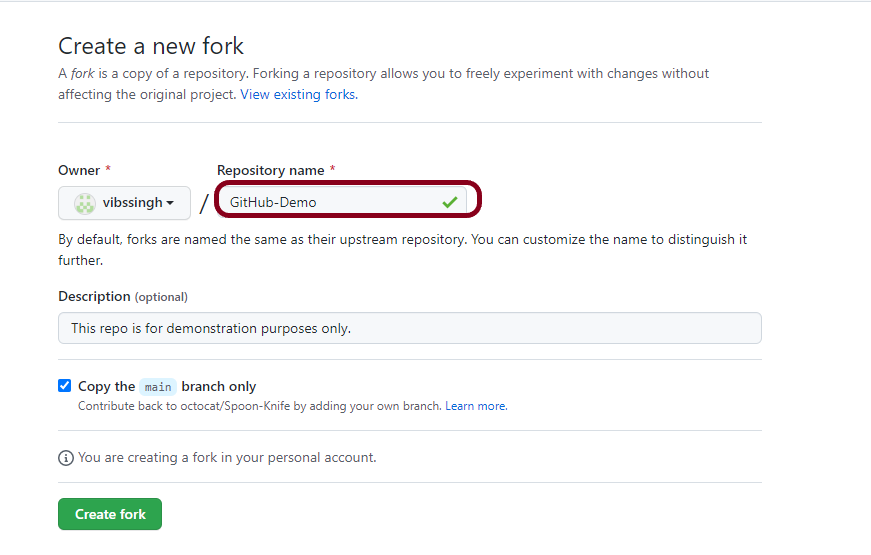
Step 4 – By default, forks are named the same as their upstream repositories. You can change the name of the fork to distinguish it further.
Optionally, add a description of your fork.
Here, the new name is GitHub-Demo.
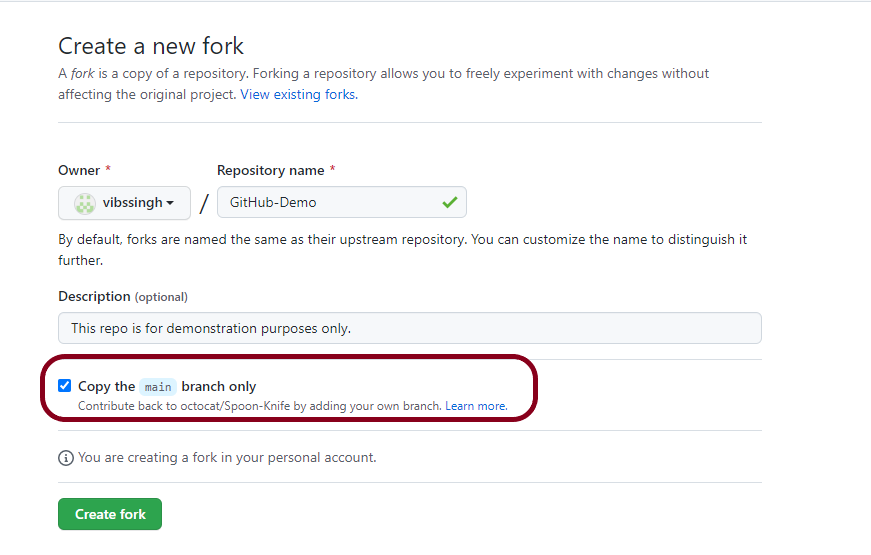
Step 5 – Choose whether to copy only the default branch or all branches to the new fork. For many forking scenarios, such as contributing to open-source projects, you only need to copy the default branch. By default, only the default branch is copied.
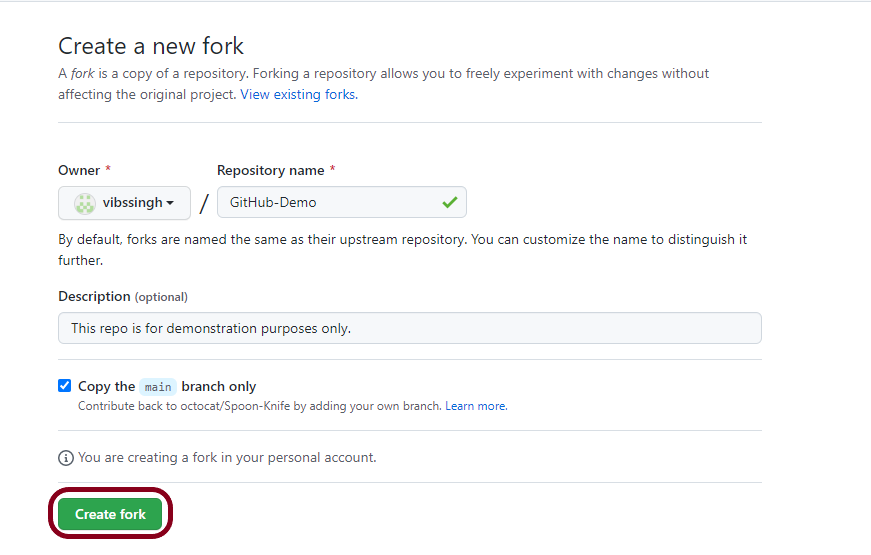
Step 6 – Click Create fork button.
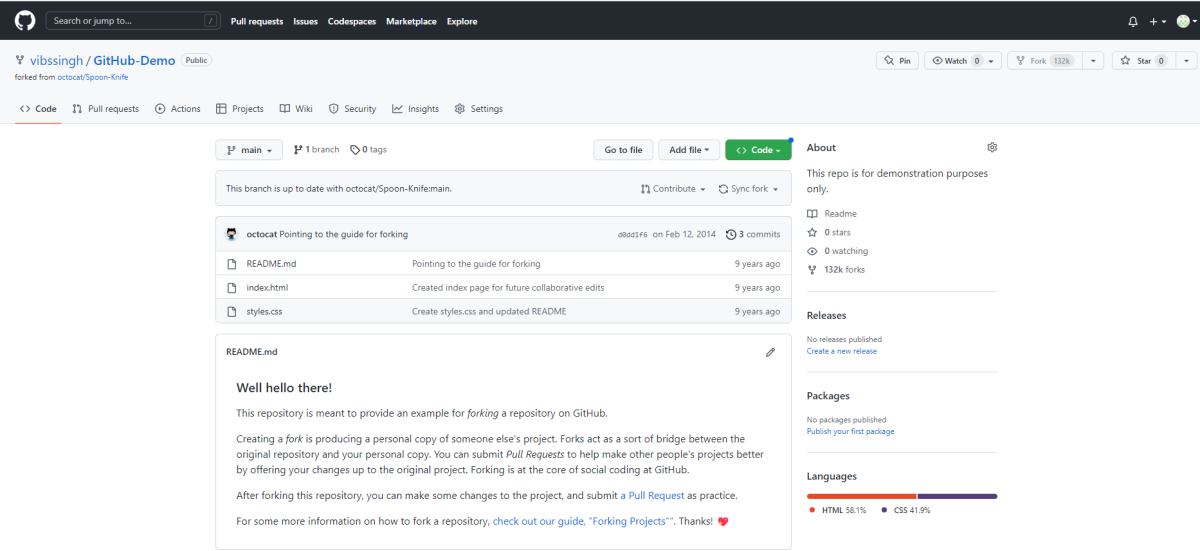
This image shows that the GitHub repo is forked and present in your personal GitHub workspace.
We have successfully forked a repository in GitHub. I hope you have enjoyed this tutorial. Happy Learning!!