In this tutorial, we will convert a Java list into a JSON Object. Most of the times, the JSONs built in the organizations are complex. It contains string, int, list, arrays and soon.
In this tutorial, we will use the below mentioned dependency.
We can create a JSON Object using a Map in Java. A JSON Object is a key-value pair and can be easily created using a Java Map. A Map in Java also represents a collection of key-value pairs.
To create a request body using JSON Object using HashMap, we need to add a Maven dependency.
I have created a simple Java map and filled it with the values that represent JSON properties.
import io.restassured.RestAssured;
import io.restassured.http.ContentType;
import org.junit.Test;
import java.util.HashMap;
import java.util.Map;
import static org.hamcrest.Matchers.equalTo;

public class Json_Demo {

    @Test
    public void passBodyAsMap() {
        Map<String, String> map = new HashMap<String, String>();
        map.put("employee_name", "MapTest");
        map.put("employee_salary", "99999");
        map.put("employee_age", "30");
        map.put("profile_image", "test.png");
        RestAssured.given()
                .contentType(ContentType.JSON)
                .body(map)
                .log().all()

                .when()
                .post("https://dummy.restapiexample.com/api/v1/create")

                .then()
                .assertThat().statusCode(200)
                .body("data.employee_name", equalTo("MapTest"))
                .body("data.employee_age", equalTo("30"))
                .body("data.employee_salary", equalTo("99999"))
                .body("message", equalTo("Successfully! Record has been added.")).log().all();
    }
}
The request body as well as the response body will look as shown below:-
Above one is a simple JSON Request Body. Let us take an example of a Complex Request Body or nested Request Body as shown below.
Let us create a Java program to understand this:
import io.restassured.RestAssured;
import io.restassured.http.ContentType;
import org.junit.Test;
import java.util.HashMap;
import java.util.Map;
import static org.hamcrest.Matchers.equalTo;

public class Json_Demo {

    @Test
    public void passBodyAsMultipleMap() {

        // First JSON Object using Hash Map
        Map<String, Object> data = new HashMap<String, Object>();
        data.put("employee_name", "MapTest");
        data.put("profile_image", "test.png");

        // Second JSON Object using Hash Map
        Map<String, String> msg = new HashMap<String, String>();
        msg.put("updated_message", "Details of New Resource");
        msg.put("employee_age", "30");
        data.put("details", msg);
        data.put("employee_salary", "99999");
        RestAssured.given().contentType(ContentType.JSON).body(data).log().all()
                // WHEN
                .when().post("https://dummy.restapiexample.com/api/v1/create")
                // THEN
                .then().assertThat().statusCode(200).body("data.employee_name", equalTo("MapTest"))
                .body("data.details.updated_message", equalTo("Details of New Resource"))
                .body("data.details.employee_age", equalTo("30")).body("data.employee_salary", equalTo("99999"))
                .body("message", equalTo("Successfully! Record has been added.")).log().all();
    }
}
The request body as well as the response body will look as shown below image. The first part is the body of the request and the second part is the response provided by the API.
Congratulations on making it through this tutorial and hope you found it useful! Happy Learning!!
Google has developed a JSON library for Java called Gson. We can create JSON and translate it into Java objects using Gson. Gson can output JSON in compact format by default. The setPrettyPrinting() function of the GsonBuilder class must be used to set up the Gson instance in order to enable pretty printing. This method tells Gson to produce JSON that fits on a page for pretty printing.
Add the below dependency to POM.xml to use Gson API.
Let us create a table named Employee which contains the data members same as node names in the above JSON payload and their corresponding getter and setter methods.
public class Employee {

	// private data members of POJO class
	private String firstName;
	private String lastName;
	private int age;
	private double salary;
	private String designation;
	private String contactNumber;
	private String emailId;

	// Getter and setter methods
	public String getFirstName() {
		return firstName;
	}

	public void setFirstName(String firstName) {
		this.firstName = firstName;
	}

	public String getLastName() {
		return lastName;
	}

	public void setLastName(String lastName) {
		this.lastName = lastName;
	}

	public int getAge() {
		return age;
	}

	public void setAge(int age) {
		this.age = age;
	}

	public double getSalary() {
		return salary;
	}

	public void setSalary(double salary) {
		this.salary = salary;
	}

	public String getDesignation() {
		return designation;
	}

	public void setDesignation(String designation) {
		this.designation = designation;
	}

	public String getContactNumber() {
		return contactNumber;
	}

	public void setContactNumber(String contactNumber) {
		this.contactNumber = contactNumber;
	}

	public String getEmailId() {
		return emailId;
	}

	public void setEmailId(String emailId) {
		this.emailId = emailId;
	}

}
We will convert a Java Object to a JSON object as a String and also will write it into a .json file. There are many variations for the method toJson().
You can create a Gson instance by invoking a new Gson() if the default configuration is all you need, as shown in the below example.
  @Test
    public void withoutPretty() {

        // Create an object of POJO class
        Employee employee = new Employee();
        employee.setFirstName("Vibha");
        employee.setLastName("Singh");
        employee.setAge(30);
        employee.setSalary(75000);
        employee.setDesignation("Manager");
        employee.setContactNumber("+919999988822");
        employee.setEmailId("abc@test.com");

        Gson gson = new Gson();
        String employeeJsonPayload = gson.toJson(employee);
        System.out.println("Json :" + employeeJsonPayload);

    }
The execution message is shown below.
Syntax
public GsonBuilder setPrettyPrinting()
Below is the program to print the JSON in pretty format.
@Test
    public void withPretty() {
        // Create an object of POJO class
        Employee employee = new Employee();
        employee.setFirstName("Vibha");
        employee.setLastName("Singh");
        employee.setAge(30);
        employee.setSalary(75000);
        employee.setDesignation("Manager");
        employee.setContactNumber("+919999988822");
        employee.setEmailId("abc@test.com");

        Gson gson = new GsonBuilder().setPrettyPrinting().create();

        String json = gson.toJson(employee);

        System.out.println("Pretty Json :" + json);

    }
The output of the above program is
We are done! Congratulations on making it through this tutorial and hope you found it useful! Happy Learning!!
Serenity BDD is an open-source library that aims to make the idea of living documentation a reality. Serenity BDD helps you write cleaner and more maintainable automated acceptance and regression tests faster. Serenity also uses the test results to produce illustrated, narrative reports that document and describe what your application does and how it works. Serenity tells you not only what tests have been executed, but more importantly, what requirements have been tested
Let us create a table named Employee which contains the data members same as node names in the above JSON payload with @Expose annotation and their corresponding getter and setter methods.
package com.example.gson;

import com.google.gson.annotations.Expose;

import java.math.BigDecimal;
import java.util.List;
import java.util.Map;

public class Employee {

    // private data members of POJO class

    @Expose(serialize = true)
    private String firstName;

    @Expose(serialize = true)
    private String lastName;

    @Expose(serialize = false)
    private int age;

    @Expose(serialize = true)
    private Map<String, BigDecimal> salary;

    @Expose()
    private String designation;

    @Expose(serialize = false)
    private String contactNumber;

    @Expose(serialize = true)
    private List<String> emailId;

    // Getter and setter methods
    public String getFirstName() {
        return firstName;
    }

    public void setFirstName(String firstName) {
        this.firstName = firstName;
    }

    public String getLastName() {
        return lastName;
    }

    public void setLastName(String lastName) {
        this.lastName = lastName;
    }

    public int getAge() {
        return age;
    }

    public void setAge(int age) {
        this.age = age;
    }

    public Map<String, BigDecimal> getSalary() {
        return salary;
    }

    public void setSalary(Map<String, BigDecimal> salary) {
        this.salary = salary;
    }

    public String getDesignation() {
        return designation;
    }

    public void setDesignation(String designation) {
        this.designation = designation;
    }

    public String getContactNumber() {
        return contactNumber;
    }

    public void setContactNumber(String contactNumber) {
        this.contactNumber = contactNumber;
    }

    public List<String> getEmailId() {
        return emailId;
    }

    public void setEmailId(List<String> emailId) {
        this.emailId = emailId;
    }

    @Override
    public String toString() {
        return "(firstName: " + firstName + "," +
                "lastName: " + lastName + "," +
                "age: " + age + ", " +
                "salary: " + salary + "," +
                "designation: " + designation + ", " +
                "contactNumber: " + contactNumber + ", " +
                "emailId: " + emailId + ")";

    }
}
Suppose the attribute age and contactNumber in the Employee class should not serialize because it’s sensitive information. Hence, we must decorate these attributes with the annotation @Expose(serialize=false):
To use @Expose annotation, we must create a Gson instance by using the GsonBuilder class and its excludeFieldsWithoutExposeAnnotation() method.
import com.google.gson.Gson;
import com.google.gson.GsonBuilder;
import org.junit.Test;
import java.math.BigDecimal;
import java.util.Arrays;
import java.util.HashMap;
import java.util.Map;

public class GsonExpose_Demo {

    @Test
    public void gsonExposeTest()  {

        // Create an object of POJO class
        Employee employee = new Employee();
        employee.setFirstName("Vibha");
        employee.setLastName("Singh");
        employee.setAge(30);
        Map<String, BigDecimal> salary = new HashMap() {{
            put("2010", new BigDecimal(10000));
            put("2012", new BigDecimal(12000));
            put("2018", new BigDecimal(14000));
        }};

        employee.setSalary(salary);
        employee.setDesignation("Manager");
        employee.setContactNumber("+919999988822");
        employee.setEmailId(Arrays.asList("abc@test.com","vibha@test.com"));

        Gson gson = new GsonBuilder().setPrettyPrinting().excludeFieldsWithoutExposeAnnotation().create();
        String employeeJsonPayload = gson.toJson(employee);
        System.out.println("Json :" + employeeJsonPayload);

    }
}
The output of the above program is shown below.
We can see here that age and contactNumber are not shown in the JSON body.
We are done! Congratulations on making it through this tutorial and hope you found it useful! Happy Learning!!
BDD is a set of practices that helps to reduce the rework caused by misunderstanding or vague requirements, narrow the communication gaps between the development team, testing team, and customers, and promote continuous communication among them. Cucumber is one such open-source tool, which supports Behaviour Driven Development(BDD). In simple words, Cucumber can be defined as a testing framework, driven by plain English. It serves as documentation, automated tests, and a development aid – all in one.
Cucumber Introduction, Installation, and Configuration
Gson is a Java library that can be used to convert Java Objects into their JSON representation. It can also be used to convert a JSON string to an equivalent Java object. Gson can work with arbitrary Java objects, including pre-existing objects for those you do not have source code.
Provide simple toJson() and fromJson() methods to convert Java objects to JSON and vice versa.
Add the below dependency to POM.xml to use Gson API.
Let us create a table named Employee which contains the data members same as node names in the above JSON payload and their corresponding getter and setter methods.
import java.math.BigDecimal;
import java.util.Map;

public class Employee {

    // private data members of POJO class
    private String firstName;
    private String lastName;
    private int age;
    private Map<String, BigDecimal> salary;
    private String designation;
    private String contactNumber;
    private String emailId;

    // Getter and setter methods
    public String getFirstName() {
        return firstName;
    }

    public void setFirstName(String firstName) {
        this.firstName = firstName;
    }

    public String getLastName() {
        return lastName;
    }

    public void setLastName(String lastName) {
        this.lastName = lastName;
    }

    public int getAge() {
        return age;
    }

    public void setAge(int age) {
        this.age = age;
    }

    public Map<String, BigDecimal> getSalary() {
        return salary;
    }

    public void setSalary(Map<String, BigDecimal> salary) {
        this.salary = salary;
    }

    public String getDesignation() {
        return designation;
    }

    public void setDesignation(String designation) {
        this.designation = designation;
    }

    public String getContactNumber() {
        return contactNumber;
    }

    public void setContactNumber(String contactNumber) {
        this.contactNumber = contactNumber;
    }

    public String getEmailId() {
        return emailId;
    }

    public void setEmailId(String emailId) {
        this.emailId = emailId;
    }

    @Override
    public String toString() {
        return "(firstName: " + firstName + "," +
                "lastName: " + lastName + "," +
                "age: " + age + ", " +
                "salary: " + salary + "," +
                "designation: " + designation + ", " +
                "contactNumber: " + contactNumber + ", " +
                "emailId: " + emailId + ")";

    }
}
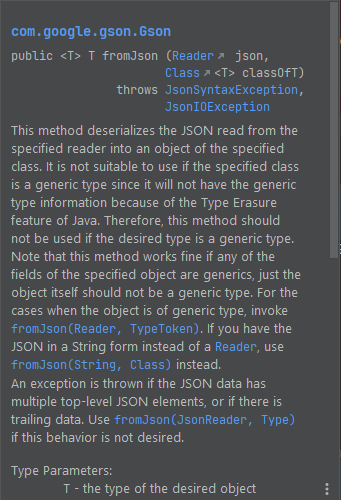
We will convert a JSON Object to a Java Object.
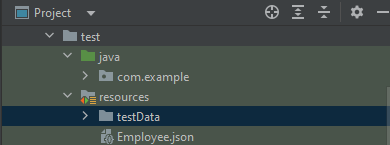
The JSON file – Employee.json is present in src/test/resources.
Below is the image of JSON.
You can create a Gson instance by invoking a new Gson() if the default configuration is all you need, as shown in the below example.
Gson is a Java library that can be used to convert Java Objects into their JSON representation. It can also be used to convert a JSON string to an equivalent Java object. Gson can work with arbitrary Java objects, including pre-existing objects those you do not have source code.
Provide simple toJson() and fromJson() methods to convert Java objects to JSON and vice versa.
Allow pre-existing unmodifiable objects to be converted to and from JSON.
Extensive support of Java Generics.
Allow custom representations for objects.
Support arbitrarily complex objects (with deep inheritance hierarchies and extensive use of generic types).
Add the below dependency to POM.xml to use Gson API.
Let us create a table named Employee which contains the data members same as node names in the above JSON payload and their corresponding getter and setter methods.
public class Employee {

	// private data members of POJO class
	private String firstName;
	private String lastName;
	private int age;
	private double salary;
	private String designation;
	private String contactNumber;
	private String emailId;

	// Getter and setter methods
	public String getFirstName() {
		return firstName;
	}

	public void setFirstName(String firstName) {
		this.firstName = firstName;
	}

	public String getLastName() {
		return lastName;
	}

	public void setLastName(String lastName) {
		this.lastName = lastName;
	}

	public int getAge() {
		return age;
	}

	public void setAge(int age) {
		this.age = age;
	}

	public double getSalary() {
		return salary;
	}

	public void setSalary(double salary) {
		this.salary = salary;
	}

	public String getDesignation() {
		return designation;
	}

	public void setDesignation(String designation) {
		this.designation = designation;
	}

	public String getContactNumber() {
		return contactNumber;
	}

	public void setContactNumber(String contactNumber) {
		this.contactNumber = contactNumber;
	}

	public String getEmailId() {
		return emailId;
	}

	public void setEmailId(String emailId) {
		this.emailId = emailId;
	}

}
We will convert a Java Object to a JSON object as a String and also will write it into a .json file. There are many variations for the method toJson().
You can create a Gson instance by invoking a new Gson() if the default configuration is all you need, as shown in the below example.
You can also use GsonBuilder to build a Gson instance with various configuration options such as versioning support, pretty-printing, custom JsonSerializer, JsonDeserializer.
Gson is a Java library that can be used to convert Java Objects into their JSON representation. It can also be used to convert a JSON string to an equivalent Java object. Gson can work with arbitrary Java objects, including pre-existing objects those you do not have source code.
Provide simple toJson() and fromJson() methods to convert Java objects to JSON and vice-versa.
Allow pre-existing unmodifiable objects to be converted to and from JSON.
Extensive support of Java Generics.
Allow custom representations for objects.
Support arbitrarily complex objects (with deep inheritance hierarchies and extensive use of generic types).
Add the below dependency to POM.xml to use Gson API.
Let us create a table named Employee which contains the data members same as node names in the above JSON payload and their corresponding getter and setter methods.
public class Employee {

	// private data members of POJO class
	private String firstName;
	private String lastName;
	private int age;
	private double salary;
	private String designation;
	private String contactNumber;
	private String emailId;

	// Getter and setter methods
	public String getFirstName() {
		return firstName;
	}

	public void setFirstName(String firstName) {
		this.firstName = firstName;
	}

	public String getLastName() {
		return lastName;
	}

	public void setLastName(String lastName) {
		this.lastName = lastName;
	}

	public int getAge() {
		return age;
	}

	public void setAge(int age) {
		this.age = age;
	}

	public double getSalary() {
		return salary;
	}

	public void setSalary(double salary) {
		this.salary = salary;
	}

	public String getDesignation() {
		return designation;
	}

	public void setDesignation(String designation) {
		this.designation = designation;
	}

	public String getContactNumber() {
		return contactNumber;
	}

	public void setContactNumber(String contactNumber) {
		this.contactNumber = contactNumber;
	}

	public String getEmailId() {
		return emailId;
	}

	public void setEmailId(String emailId) {
		this.emailId = emailId;
	}

}
We will convert a Java Object to a JSON object as a String and also will write it into a .json file. There are many variations for the method toJson().
You can create a Gson instance by invoking a new Gson() if the default configuration is all you need, as shown in the below example.
You can also use GsonBuilder to build a Gson instance with various configuration options such as versioning support, pretty-printing, custom JsonSerializer, JsonDeserializer.
import com.google.gson.Gson;
import com.google.gson.GsonBuilder;
import org.junit.Test;

public class EmployeeGsonTest {

    @Test
    public void gsonSerializationTest()  {

        // Create an object of POJO class
        Employee employee = new Employee();
        employee.setFirstName("Vibha");
        employee.setLastName("Singh");
        employee.setAge(30);
        employee.setSalary(75000);
        employee.setDesignation("Manager");
        employee.setContactNumber("+919999988822");
        employee.setEmailId("abc@test.com");

        Gson gson = new Gson();
        String employeeJsonPayload = gson.toJson(employee);
        System.out.println("Json :" + employeeJsonPayload);

        Gson builder = new GsonBuilder().setPrettyPrinting().create();
        String employeePrettyJsonPayload = builder.toJson(employee);
        System.out.println("Pretty Json :" + employeePrettyJsonPayload);

    }
}
The execution message is shown below.
We are done! Congratulations on making it through this tutorial and hope you found it useful! Happy Learning!!
Serenity BDD is an open-source library that aims to make the idea of living documentation a reality.
Serenity BDD helps you write cleaner and more maintainable automated acceptance and regression tests faster. Serenity also uses the test results to produce illustrated, narrative reports that document and describe what your application does and how it works. Serenity tells you not only what tests have been executed, but more importantly, what requirements have been tested.
What is SpringBoot Application?
Spring Boot is an open-source micro framework that provides Java developers with a platform to get started with an auto-configurable production-grade Spring application.
Comes with embedded HTTP servers like Tomcat orJetty to test web applications.
Adds many plugins that developers can use to work with embedded and in-memory databases easily. Spring allows you to easily connect with database and queue services like Oracle, PostgreSQL, MySQL, MongoDB, Redis, Solr, ElasticSearch, Rabbit MQ, and others.
Prerequisite
Serenity seamlessly supports Cucumber 6 and Cucumber 7. However, this flexibility requires a little tweaking in the build dependencies. For the Maven project, you need to do the following:
Add serenity-cucumber dependency
Add Springboottest dependency to start up an application context to be used in a test.
Add Junit-Vintage dependency as it is needed for spring boot application of version 2.4 and above with JUnit4.
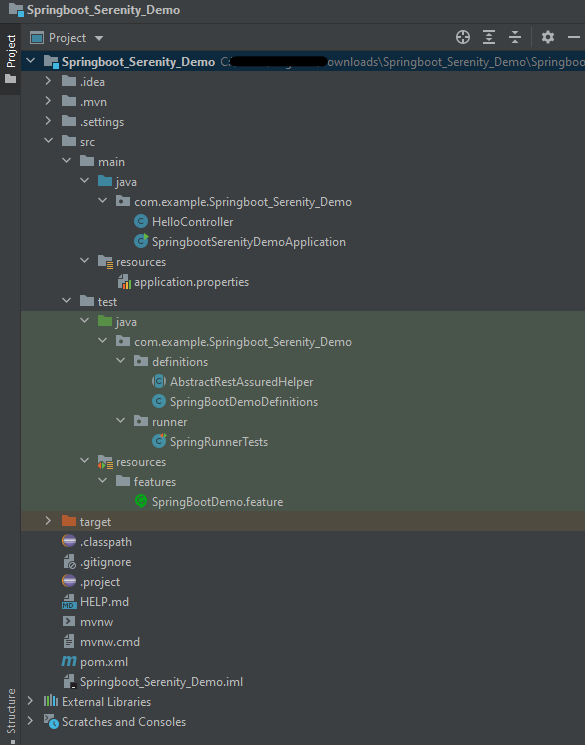
Project Directory Structure
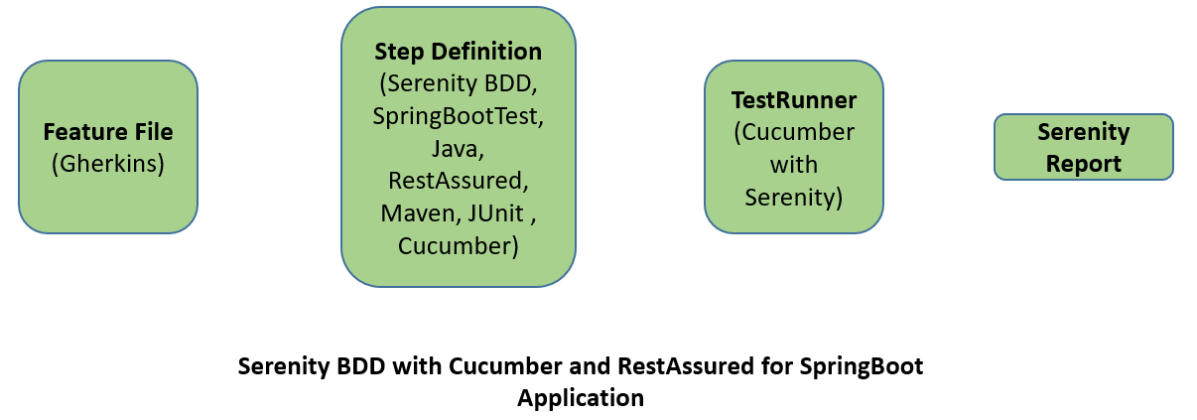
Relationship between SpringBoot, Serenity BDD, Cucumber and Rest Assured
Implementation Steps
Create a source folder – src/test/resources to create test scenarios in the Feature file
AddSpringBoot, Serenity, Cucumber,and JUnit4 dependencies to the project
Create a feature file under src/test/resources
Create the StepDefinition and Helper classes.
Create a Serenity Runner class in the src/test/java directory
Run the tests from JUnit
Run the tests from Command Line
Serenity Report Generation
CucumberReport Generation
Step 1 – Create a source folder – src/test/resources
Right-click on the test directory and select New->Directory and select resources (Maven Source Directories). Create a source folder – src/test/resources to create test scenarios in the Feature file
Step 2 – Add SpringBoot, Serenity, Cucumber, and JUnit4 dependencies to the project
We have added SpringBootTest, Serenity, Cucumber, JUnit4, and JUnit Vintage.
Step 3 – Create a feature file under src/test/resources
Below is an example of a feature file which shows a sample test scenario.
Feature: SpringBoot Request

@ReceiveCorrectResponse

   Scenario Outline: Send a valid Request to get correct response
    Given I send a request to the URL "<url>"
    Then the response will return "<response>"

   Examples:
   | url             | response                   |
   | /               | Hello World, Spring Boot!  |
   | /qaautomation   | Hello QA Automation!       |
The test class mentioned below (AbstractRestAssuredHelper) contains integration tests for the spring boot rest controller mentioned. This test class:
uses @SpringBootTest annotation which loads the actual application context.
uses WebEnvironment.RANDOM_PORT to create and run the application at some random server port.
@LocalServerPort gets the reference of the port where the server has started. It helps in building the actual request URIs to mimic real client interactions.
Step 4 – Create the StepDefinition and Helper classes
Below is the code of the StepDefinition and Helper class. These classes are created in the src/test/java directory.
This class sends the request and receives a response after performing the GET operation. Here, the validation of the response also takes place by asserting the expected and actual response
To use Rest-assured, Serenity provides the class SerenityRest
import org.junit.Assert;
import io.cucumber.java.en.Given;
import io.cucumber.java.en.Then;
import io.restassured.response.Response;
import net.serenitybdd.rest.SerenityRest;
import net.thucydides.core.annotations.Steps;

public class SpringBootDemoDefinitions {

	@Steps
    AbstractRestAssuredHelper helper;
    private Response response;

    @Given("I send a request to the URL {string}")
    public void iSendARequest(String endpoint) throws Exception  {
         response = helper.getAnonymousRequest().contentType("application/json")
                    .header("Content-Type", "application/json").when().get(endpoint);
    }

    @Then("the response will return {string}")
    public void extractResponse(String Expected ) {
          SerenityRest.restAssuredThat(response -> response.statusCode(200));
          String Actual = response.asString();
          Assert.assertEquals(Expected, Actual);
    }
}
Step 5 – Create a Serenity Runner class in the src/test/java directory
We cannot run a Feature file on its own in cucumber-based framework. We need to create a Java class that will run the Feature File. It is the starting point for JUnit to start executing the tests. TestRunner class is created under src/ test/java. When you run the tests with serenity, you use the CucumberWithSerenitytest runner. If the feature files are not in the same package as the test runner class, you also need to use the @CucumberOptionsclass to provide the root directory where the feature files can be found.
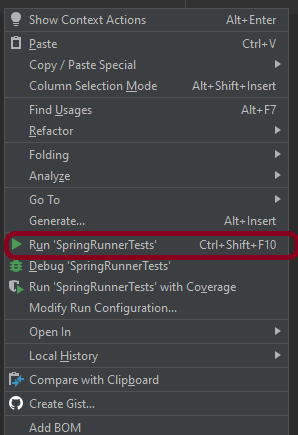
You can run the tests from SpringRunnerTests class. Right-click on the class and select Run ‘SpringRunnerTests’.
Step 7 – Run the tests from Command Line
Run the tests from the command line by using the below command
mvn clean verify
The output of the above program is
The test execution status is shown below:
Step 8 – Serenity Report Generation
By default, the test report generated by Serenity is placed under target/site/serenity/index.html. Below is the sample Serenity Report.
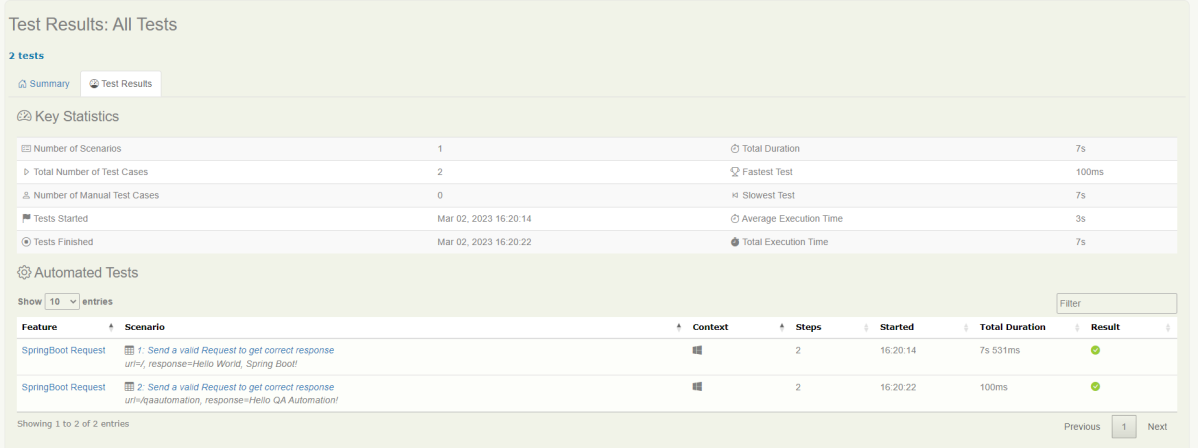
Go to the Test Results tab and we can see all the test scenarios.
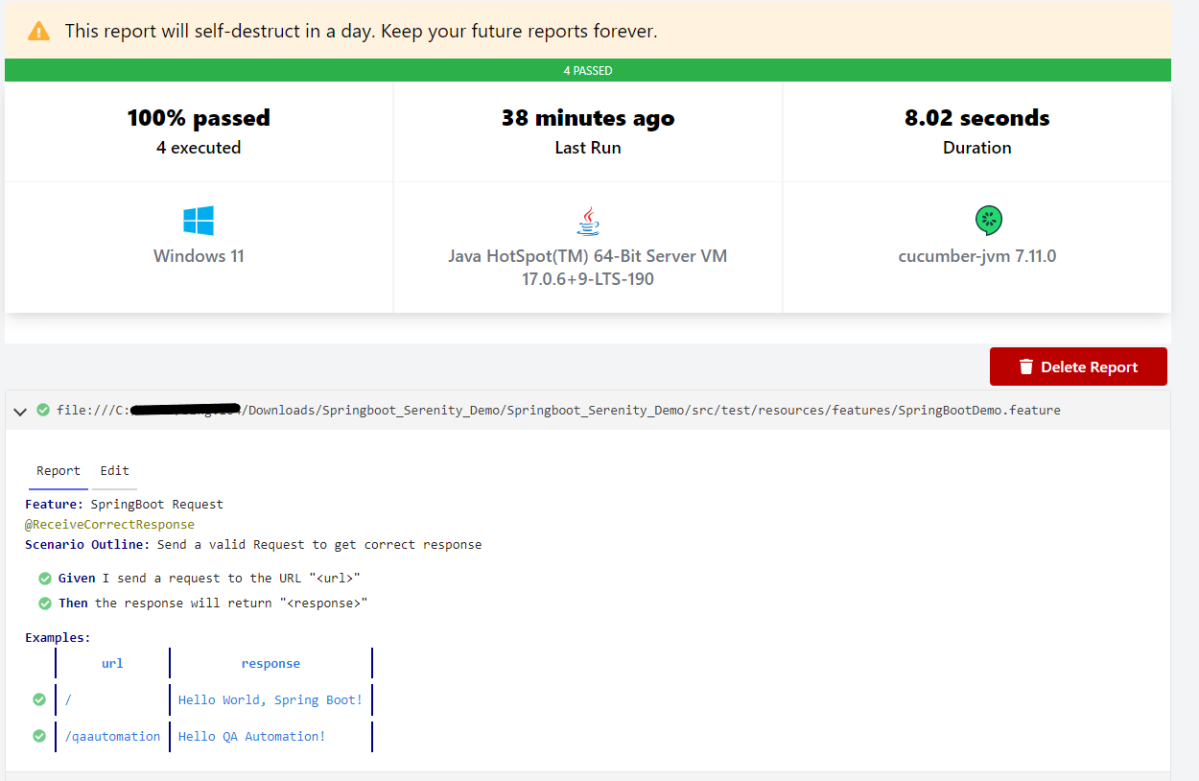
Step 9 – CucumberReport Generation
Cucumber Report can be generated by adding publish=true in SpringRunnerTests as shown in the above example. Click on the link provided in the execution status.