GitHub serves as a collaborative platform that supports version control, code collaboration, automated testing, and issue tracking, all of which are crucial elements in the software testing process. It promotes transparency, collaboration, and efficiency in the development and testing workflows.
CI/CD pipelines have contributed to the success of the DevOps cycle in all software development projects. This is a holistic process that bridges development and operations. Continuous integration helps development teams deploy code efficiently, and continuous delivery automates code deployment.
Implementation Steps
Step 1 – Create GitHub Actions and Workflows
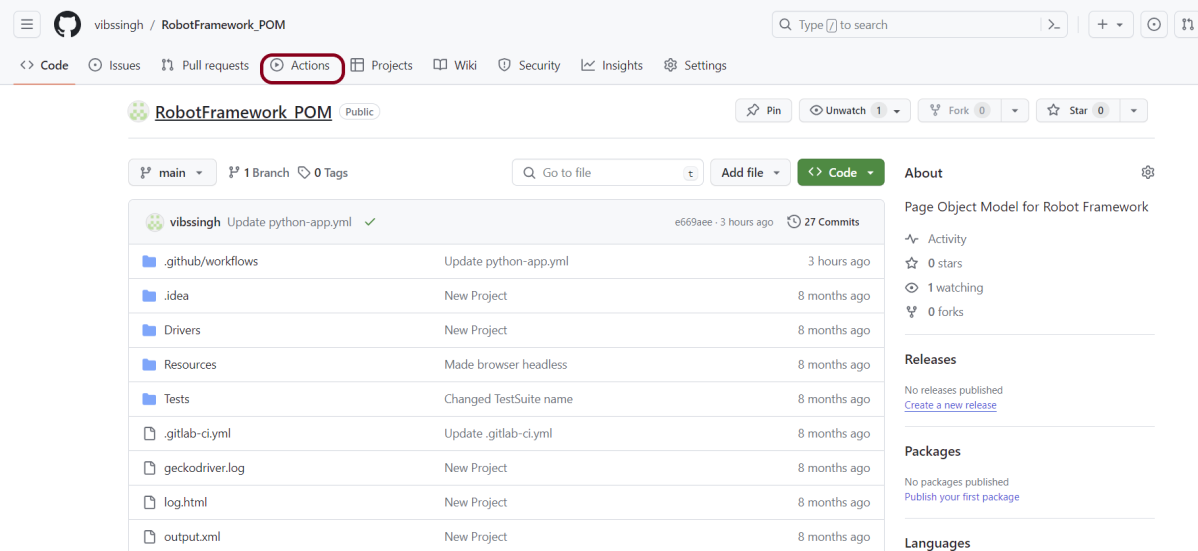
I have a repository available in GitHub – RobotFramework_POM as shown in the below image. Go to the “Actions” tab. Click on the “Actions” tab.
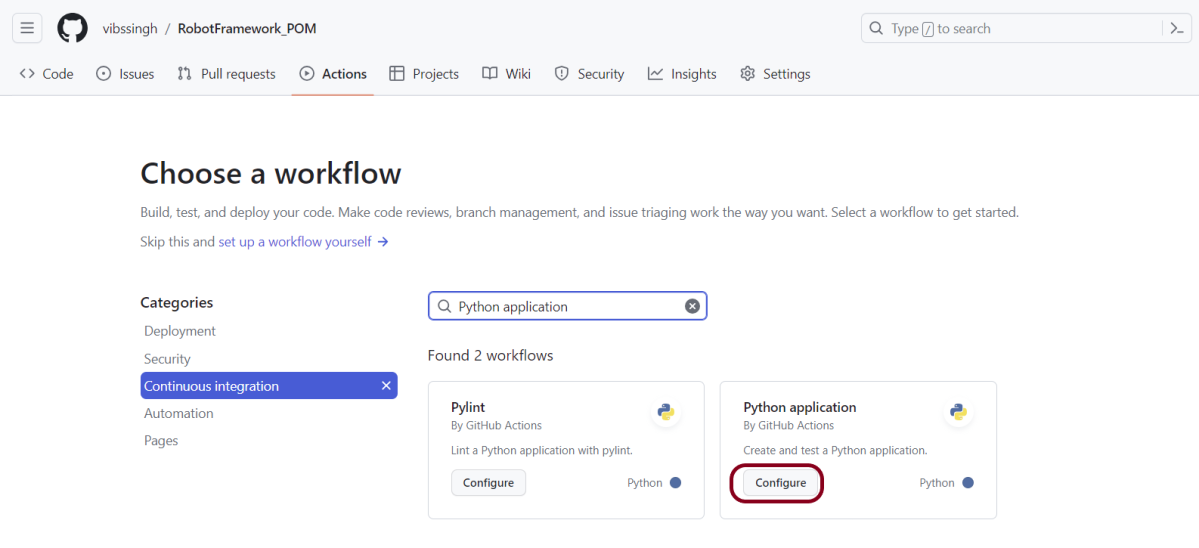
Step 2 – Select the type of Actions
You will see that GitHub recommends Actions depending on the project. In our case, it is recommending actions suitable for a Java project. I have selected the “Python application” option as my project is built in Maven.
Step 3 – Generation of Sample pipeline
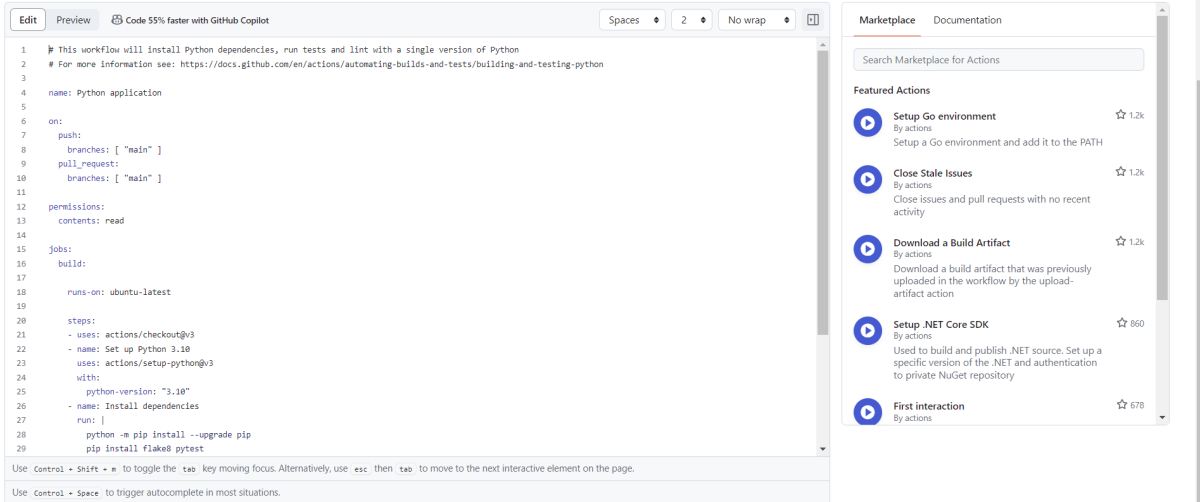
If you choose an existing option, it will automatically generate a .yaml for the project as shown below.
We will replace the current workflow with the following yml file as shown below:
name: Robot Framework - Python
on:
  push:
    branches: [ "main" ]
  pull_request:
    branches: [ "main" ]

permissions:
  contents: read

jobs:
  test:
    runs-on: ubuntu-latest

    steps:
      - uses: actions/checkout@v3
      - name: Set up Python 3.12.1
        uses: actions/setup-python@v3
        with:
          python-version: 3.12.1

      - name: Install dependencies
        run: |
          python -m pip install --upgrade pip
          pip install robotframework
          pip install robotframework-seleniumlibrary

      - name: Test with RobotFramework
        run: robot .

      - name: Test Report Generation
        uses: actions/upload-artifact@v4
        if: success() || failure()
        with:
          name: Report                # Name of the folder
          path: report.html           # Path to test results
This command will update the Python’s Pip version to the latest available.
python -m pip install --upgrade pip
As we need robotframework and seleniumlibrary to execute the tests, we have installed them also using the below command:
This will give the option to add a description for the commit. It will also enable the user to commit either to the main branch or commit to any other branch that exists in the project. Click on the “Commit new file” button to set up the workflow file.
It will create a python-app.yml file as shown below in the project.
Step 5 – Verify that the workflow is running
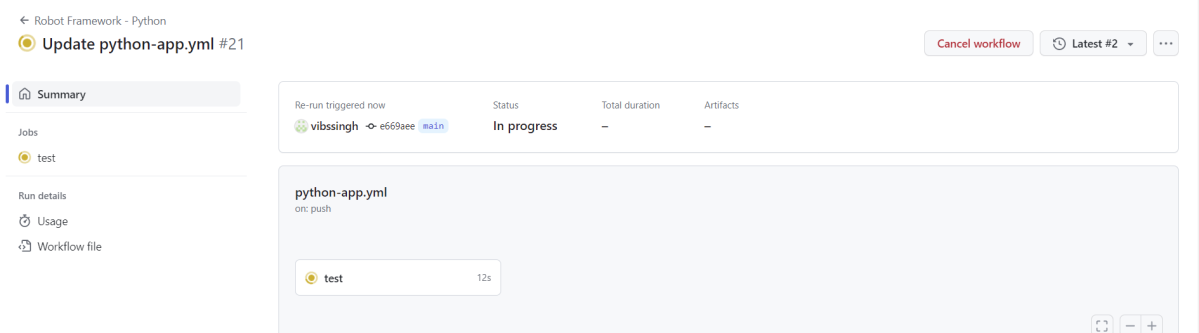
Next, head over to the “Actions” tab, and you will see your YAML workflow file present under the tab. The yellow sign represents that the job is in the queue.
In Progress – When the job starts building and running, you will see the status change from “Queued” to “In progress”.
Passed – If the build is successful, you will see a green tick mark.
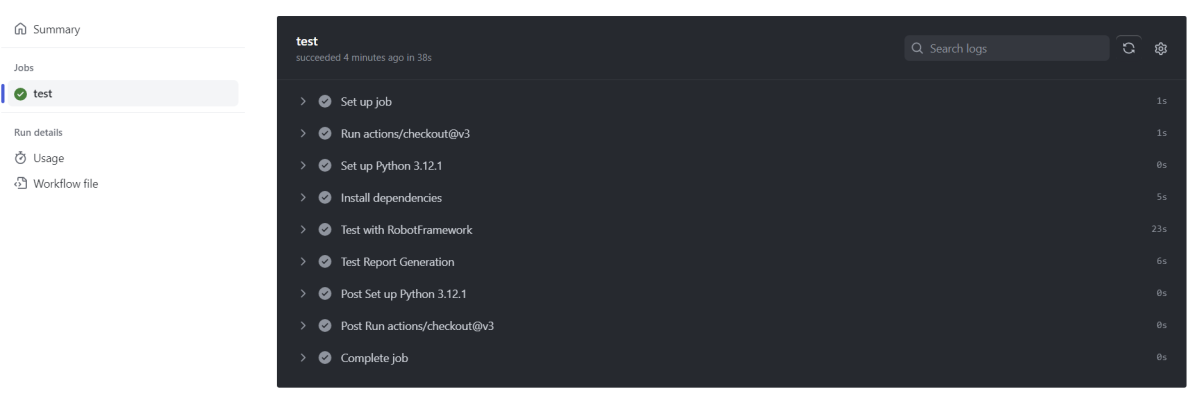
Below is the execution log. Go to “Test with RobotFramework” phase.
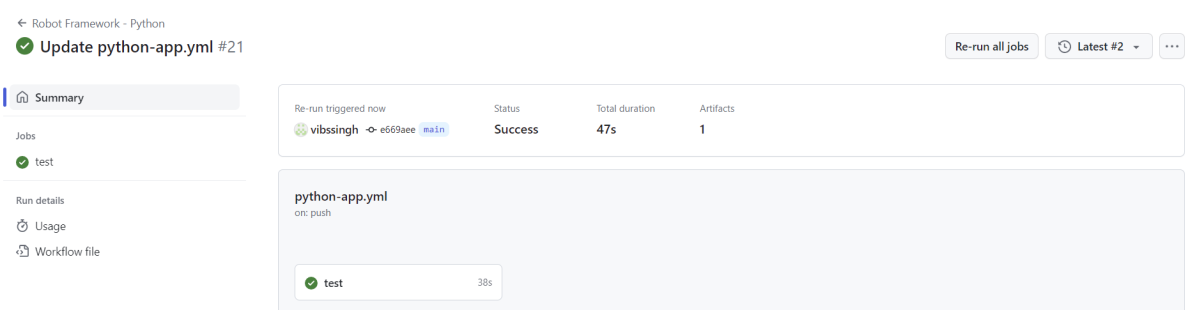
Click on the workflow and the below screen is displayed. It shows the status of the run of the workflow, the total time taken to run the workflow, and the name of the .yml file.
Below shows all the steps of the workflow.
Step 6 – Published Test Report on GitHub
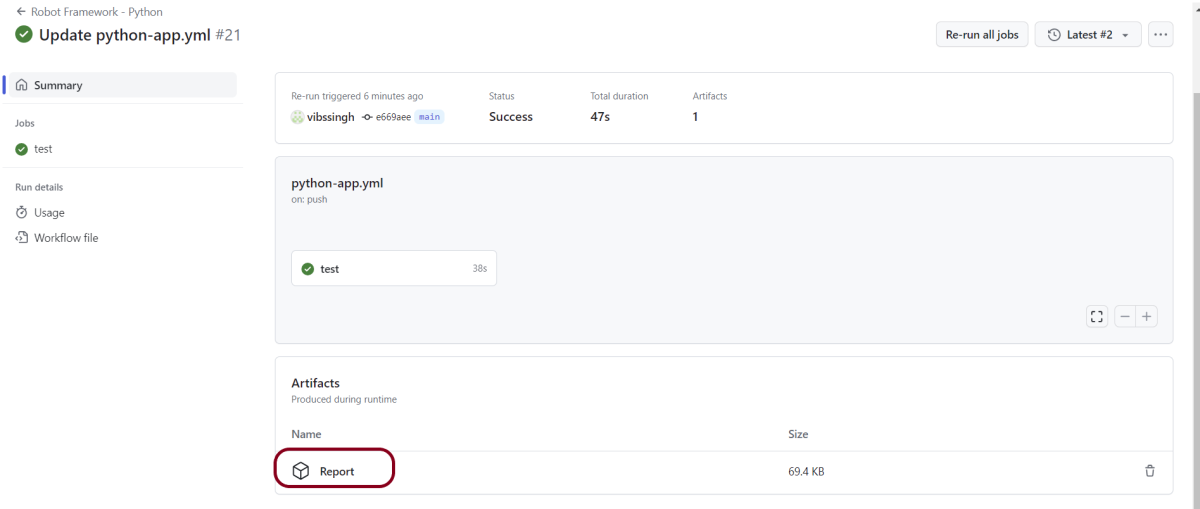
From the logs of the Workflow, you can see that the Test Report step was executed successfully.
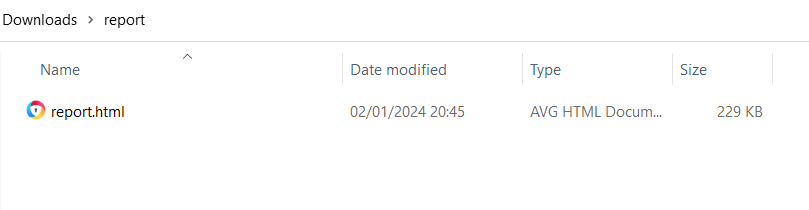
Once the pipeline run, a Report folder will be generated as shown in the below image:
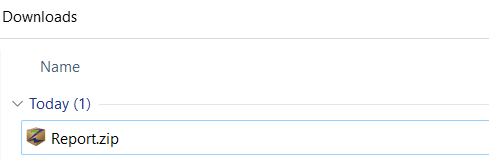
When we click on the folder Report, a zipped file will be downloaded, and we can extract it to see all the files contained within it.
Jenkins is a self-contained, open-source automation server that can be used to automate all sorts of tasks related to building, testing, and delivering or deploying software.
Jenkins can be installed through native system packages, Docker, or even run standalone by any machine with a Java Runtime Environment (JRE) installed.
In this tutorial, we will set the variable values from the Run time command argument in Robot Framework using Selenium WebDriver and Python.
Variables can be changed from the command line using the –variable (-v) option or a variable file using the –variablefile (-V) option. Variables set from the command line are universally accessible for all executed test data files, and they override any variables with the same names in the Variable section and variable files imported into the test data.
Individual variables are established using the syntax –variable name:value, where name is the variable’s name without the $ symbol and value is its value. This option can be used multiple times to define multiple variables. This syntax can only be used to establish scalar variables, and they can only receive string values.
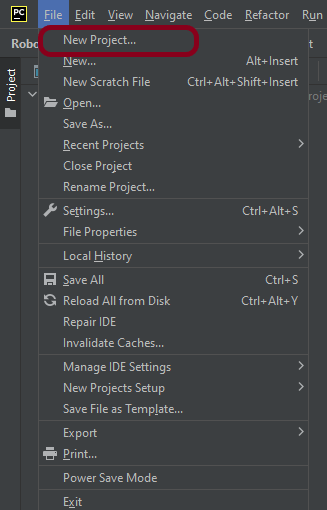
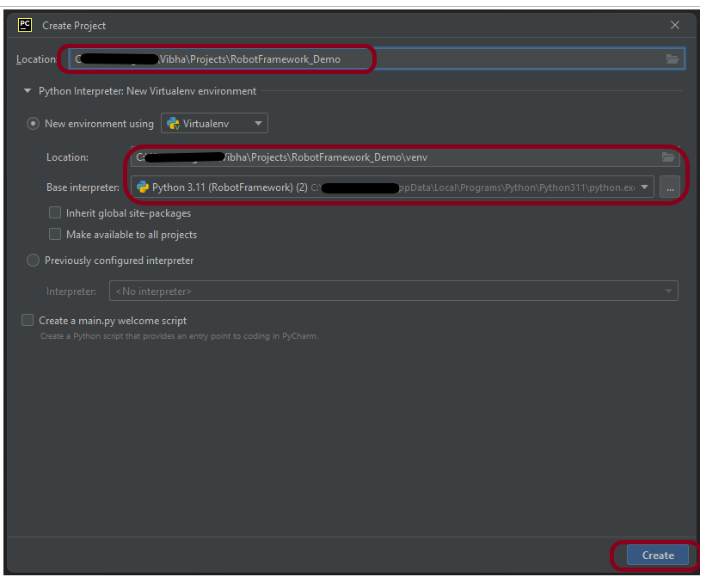
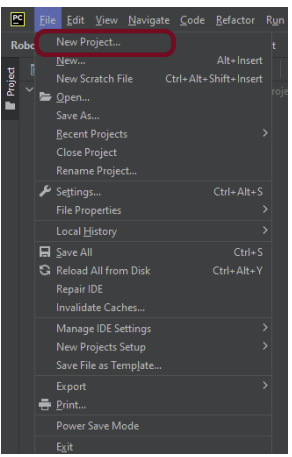
Step 1.1 – Open PyCharm and create a new project. Go to File and select “New Project” from the main menu.
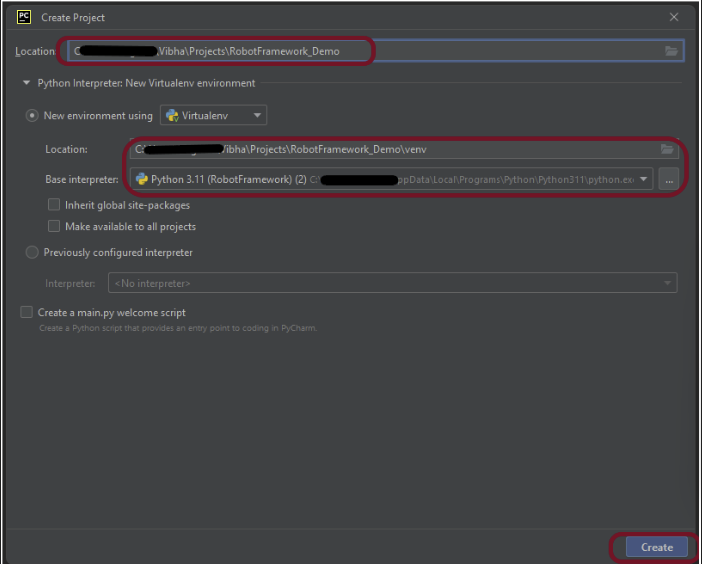
Step 1.2 – Choose the project location. Click the “Browse” button next to the Location field and specify the directory for your project.
Deselect the Create a main.py welcome script checkbox because you will create a new Python file for this tutorial.
Click on the “Create” Button.
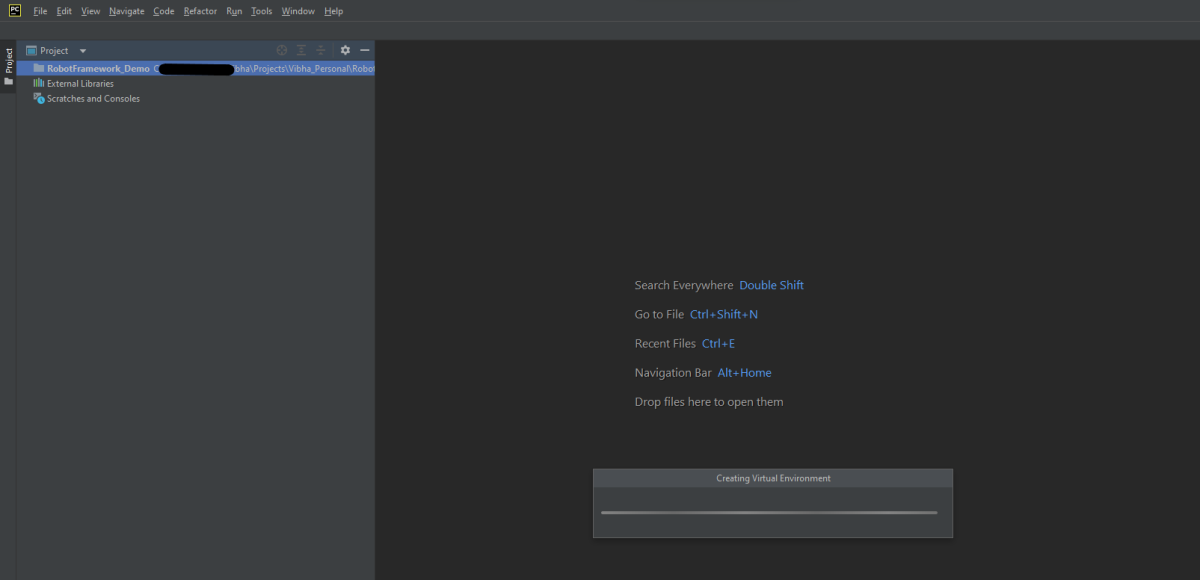
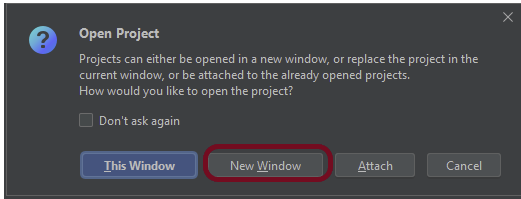
Step 1.3 – A new dialog will appear asking to Open the project using any one of the given options. I have selected New Window as I like to have separate windows for each project.
Below is the image of the new project created in PyCharms.
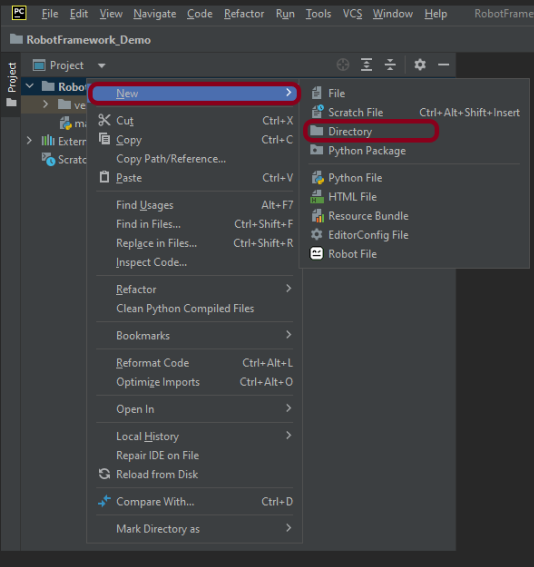
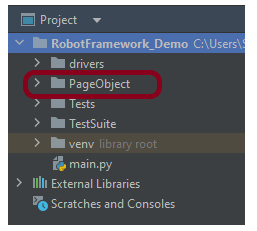
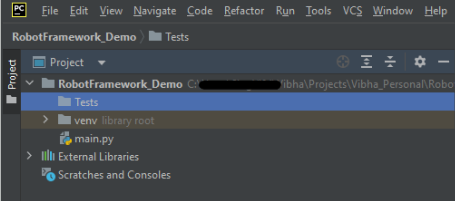
Step 2 – Create a new directory in the new project
Right-Click on the project, select New->Directory and provide name as PageObject
Below is the image of the new directory.
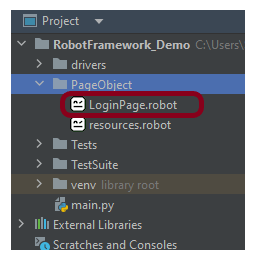
Right-click on the new directory select New File and provide the name LoginPage.robot as shown below:
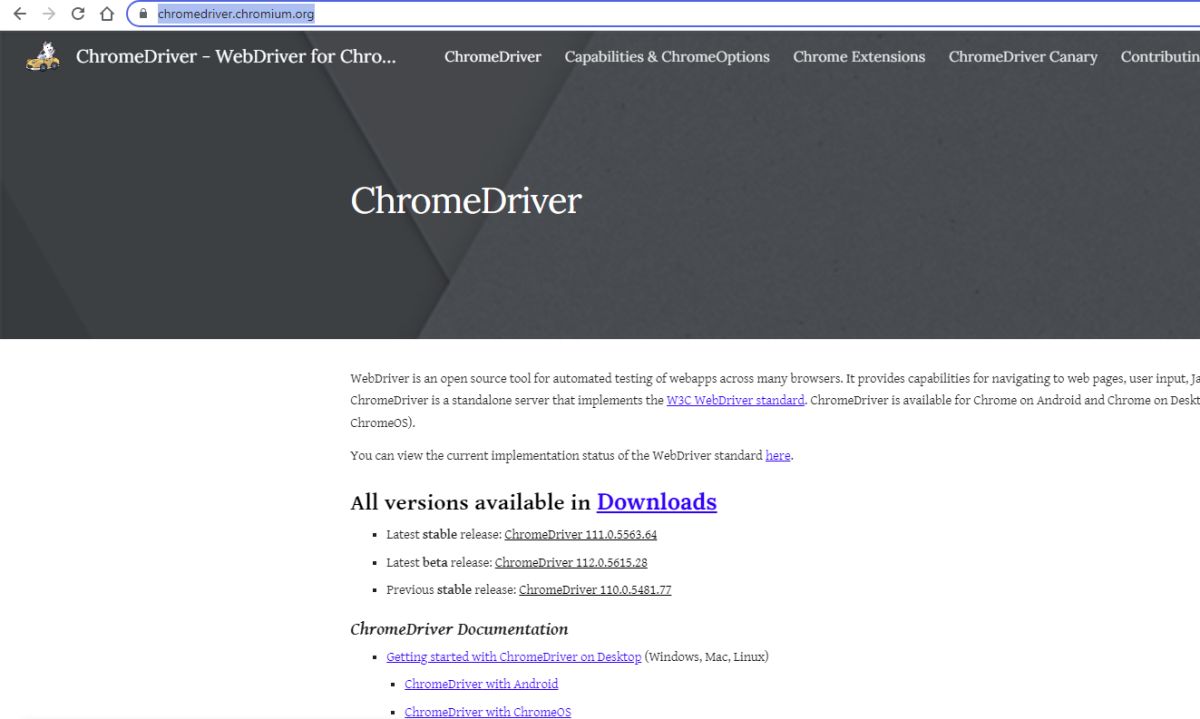
Step 3 – Download ChromeBinaries from the below location
The tests are going to use the Chrome browser, so we need to download the ChromeBinaries to open a blank browser in Chrome.
The chromedriver and geckodriver are placed in a folder name drivers in the RobotFramework_Demo project. I have renamed chromedriver to chrome and geckodriver to firefox.
Step 4 – Create a simple Selenium Test
*** Settings ***
Documentation       Tests to login to Login Page
Library     SeleniumLibrary

*** Variables ***
${valid_username}     Admin
${valid_password}       admin123
${invalid_username}     1234
${invalid_password}     45678
${blank_username}
${blank_password}
${url}      https://opensource-demo.orangehrmlive.com/web/index.php/auth/login
${browser_name}      Chrome
${login_error_message}      css:.oxd-alert-content--error
${dashboard_title}       css:.oxd-topbar-header-breadcrumb-module
${missing_username_error_message}    xpath://*[@class='oxd-form']/div[1]/div/span
${missing_password_error_message}   xpath://*[@class='oxd-form']/div[2]/div/span


*** Test Cases ***

Validate Unsuccessful Login using invalid credentials
    [Tags]    SMOKE
    Open the Browser with URL
    Fill the login form     ${valid_username}       ${invalid_password}
    Verify the error message is correct
    Close Browser Session

Validate Unsuccessful Login for blank username
    [Tags]    REGRESSION
    Open the Browser with URL
    Fill the login form     ${blank_username}       ${valid_password}
    Verify the error message is displayed for username
    Close Browser Session

Validate Unsuccessful Login for blank password
    [Tags]    SMOKE     REGRESSION
    Open the Browser with URL
    Fill the login form     ${valid_username}       ${blank_password}
    Verify the error message is displayed for password
    Close Browser Session

Validate successful Login
    [Tags]    UAT
    Open the Browser with URL
    Fill the login form     ${valid_username}       ${valid_password}
    Verify Dashboard page opens
    Close Browser Session

*** Keywords ***

Open the Browser with URL
    Create Webdriver    ${browser_name}  executable_path=/Vibha_Personal/RobotFramework_Demo/drivers/${browser_name}
    Go To       ${url}
    Maximize Browser Window
    Set Selenium Implicit Wait    5

Fill the login form
   [Arguments]    ${username}      ${password}
   Input Text    css:input[name=username]   ${username}
   Input Password    css:input[name=password]   ${password}
   Click Button    css:.orangehrm-login-button

Verify the error message is correct
    Element Text Should Be    ${login_error_message}    Invalid credentials

Verify Dashboard page opens
    Element Text Should Be    ${dashboard_title}      Dashboard

Verify the error message is displayed for username
     Element Text Should Be    ${missing_username_error_message}      Required

Verify the error message is displayed for password
      Element Text Should Be    ${missing_password_error_message}      Required

Close Browser Session
    Close Browser
Step 5 – Set Variable values from the Runtime command
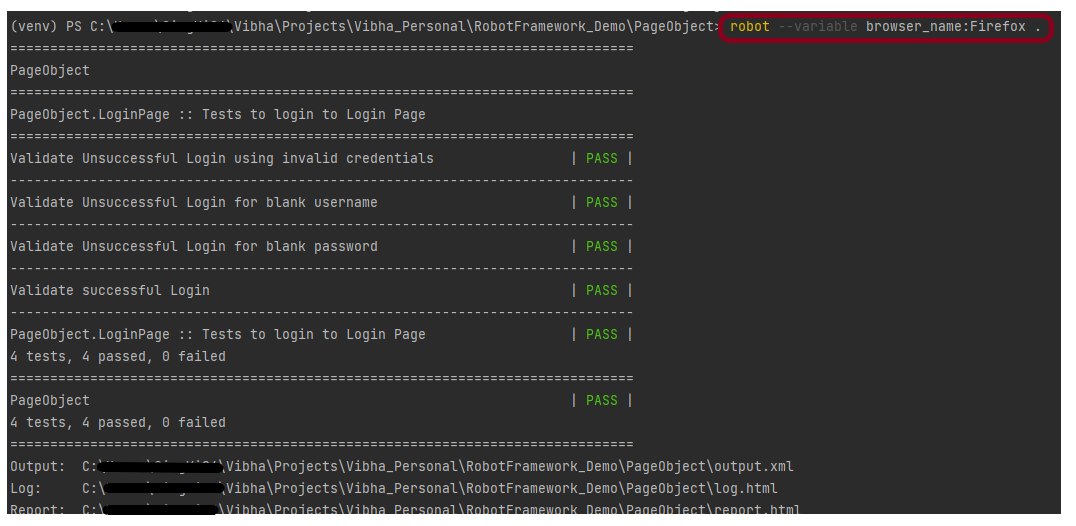
In the above example, we are using the Chrome browser to run the tests. I want to run the tests on the Firefox browser, but without making any changes to the existing code. How this can be achieved? We can pass variable
robot --variable browser_name:Firefox .
The output of the above program is
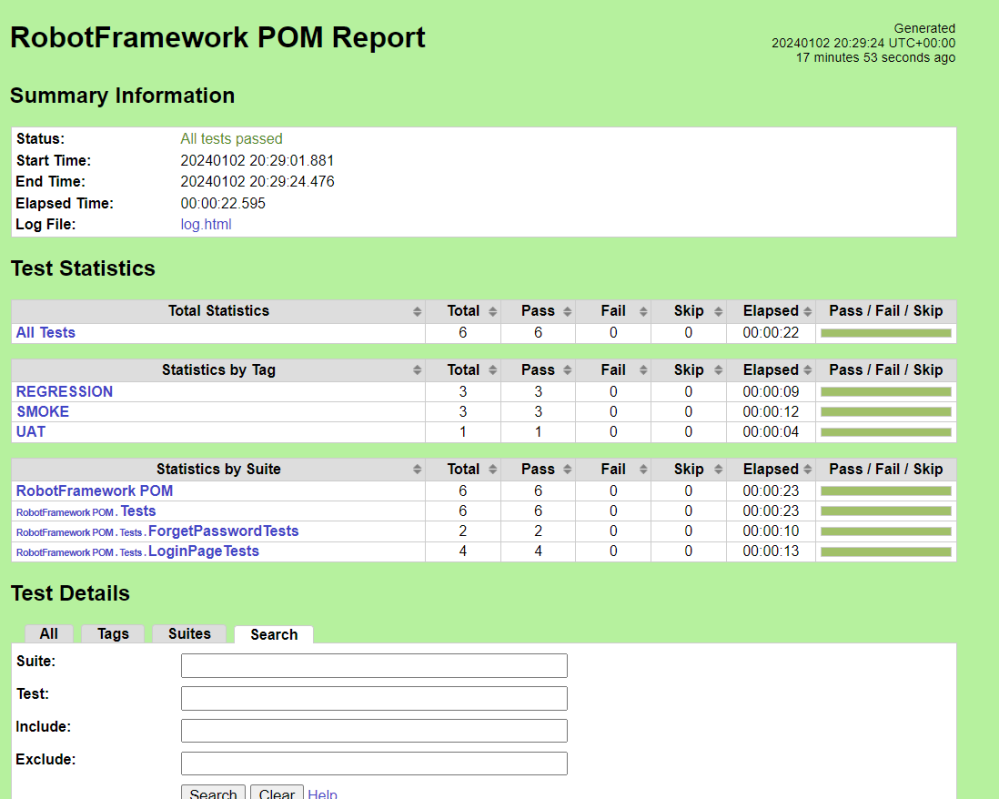
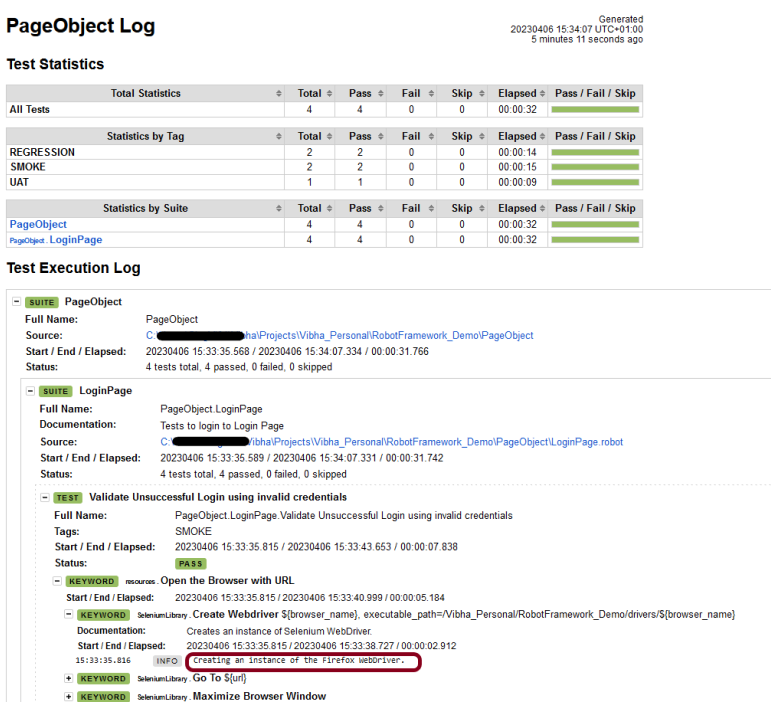
We have the test case passed. The Robot Framework generates log.html, output.xml, and report.html by default.
Let us now see the report and log details.
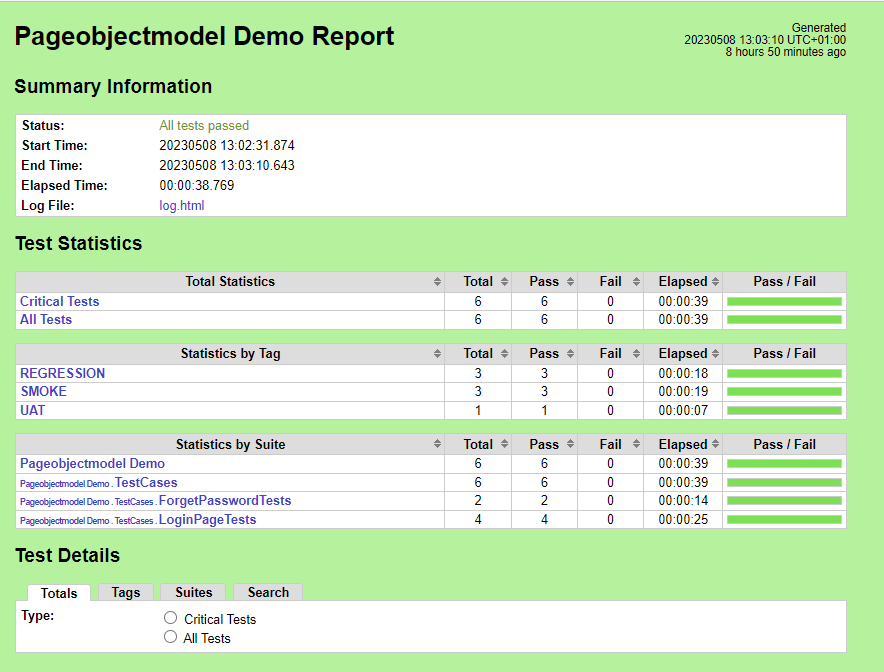
Report
Right-click on report.html. Select Open In->Browser->Firefox (any browser of your wish).
The Report generated by the framework is shown below:
Log
Robot Framework has multiple log levels that control what is shown in the automatically generated log file. The default Robot Framework log level is INFO.
Right-click on log.html. Select Open In->Browser->Firefox (any browser of your wish).
Variables with Tags
If you want to execute only test scenario tagged with UAT using firefox browser, it can be done using the below command:
Step 1.1 – Open PyCharm and create a new project. Go to File and select New Project from the main menu.
Step 1.2 – Choose the project location. Click the “Browse” button next to the Location field and specify the directory for your project.
Deselect the Create a main.py welcome script checkbox because you will create a new Python file for this tutorial.
Click on the “Create” Button.
Step 1.3 – A new dialog appears asking to open the project using any one of the given options. I have selected New Window as I like to have separate windows for each project.
Below is the image of the new project created in PyCharms.
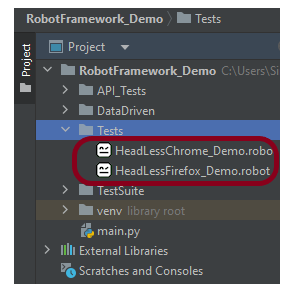
Step 2 – Create a new directory in the new project
Right-Click on the project, select New->Directory and provide name as Tests
Below is the image of the new directory.
Right-click on the new directory and select New File and provide the name as HeadlessChrome_Demo.robot and Headlessas shown below:
Step 3 – Execute tests in headless mode
We are now going to write test cases. The test case details will be as follows −
Below is an example of executing Chrome tests in headless mode.
*** Settings ***
Documentation    To validate the Login Form
Library     SeleniumLibrary

*** Test Cases ***
Validate Unsuccessful Login
    Open the Browser with URL
    Fill the login form
    verify error message is correct


*** Keywords ***
Open the Browser with URL
    Open Browser   https://opensource-demo.orangehrmlive.com/web/index.php/auth/login    headlesschrome
    Maximize Browser Window
    Set Selenium Implicit Wait    5

Fill the login form
   Input Text    css:input[name=username]   Admin
   Input Password    css:input[name=password]   Admin
   Click Button    css:.orangehrm-login-button


verify error message is correct
    ${result}=  Get Text    CSS:.oxd-alert-content-text
    Should Be Equal As Strings   ${result}  Invalid credentials
Below is an example of executing Firefox tests in headless mode.
*** Settings ***
Documentation    To validate the Login Form
Library     SeleniumLibrary

*** Test Cases ***
Validate Unsuccessful Login
    Open the Browser with URL
    Fill the login form
    verify error message is correct


*** Keywords ***
Open the Browser with URL
    Open Browser   https://opensource-demo.orangehrmlive.com/web/index.php/auth/login    headlessfirefox
    Maximize Browser Window
    Set Selenium Implicit Wait    5

Fill the login form
   Input Text    css:input[name=username]   Admin
   Input Password    css:input[name=password]   Admin
   Click Button    css:.orangehrm-login-button


verify error message is correct
    ${result}=  Get Text    CSS:.oxd-alert-content-text
    Should Be Equal As Strings   ${result}  Invalid credentials
All the below-mentioned keywords are derived from SeleniumLibrary except the last one. The functionality of keywords mentioned above:
1. Open Browser − The keyword opens a new browser instance to the optional URL.
2. Maximize Browser Window – This keyword maximizes the current browser window.
3. Set Selenium Implicit Wait – This keyword sets the implicit wait value used by Selenium.
4. Input Text − This keyword is used to type the given text in the specified textbox identified by the locator name:username.
5. Input Password – This keyword is used to type the given text in the specified password identified by the locator name:password.
The difference compared to Input Text is that this keyword does not log the given password on the INFO level.
6. Click button – This keyword is used to click on the button with location css:.orangehrm-login-button.
7. ${result} – This is a variable that holds the text value of the error message that is located by css:.oxd-alert-content-text
8. Get Text – This keyword returns the text value of the element identified by located by css:.oxd-alert-content-text.
9. Should Be Equal As Strings – This keyword is used from builtIn keyword. This keyword returns false if objects are unequal after converting them to strings.
To run this script, go to the command line and go to directory tests.
Step 4 – Execute the tests
We need the below command to run the Robot Framework script.
robot .
The output of the above program is
Step 5 – View Report and Log
We have the test case passed. The Robot Framework generates log.html, output.xml, and report.html by default.
Let us now see the report and log details.
Report
Right-click on report.html. Select Open In->Browser->Chrome(any browser of your wish).
The Report generated by the framework is shown below:
Log
Robot Framework has multiple log levels that control what is shown in the automatically generated log file. The default Robot Framework log level is INFO.
Right-click on log.html. Select Open In->Browser->Chrome(any browser of your wish).
That’s it! Congratulations on making it through this tutorial and hope you found it useful! Happy Learning!!
Step 1.1 – Open PyCharm and create a new project. Go to File and select New Project from the main menu.
Step 1.2 – Choose the project location. Click the “Browse” button next to the Location field and specify the directory for your project.
Deselect the Create a main.py welcome script checkbox because you will create a new Python file for this tutorial.
Click on the “Create” Button.
Step 1.3 – A new dialog appears asking to open the project using any one of the given options. I have selected New Window as I like to have separate windows for each project.
Below is the image of the new project created in PyCharms.
Step 2 – Create a new directory in the new project
Right-Click on the project, select New->Directory, and provide the name as Tests
Below is the image of the new directory.
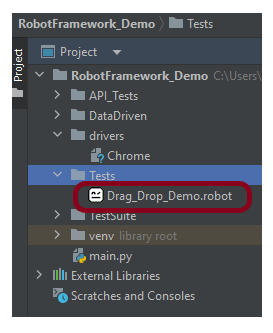
Right-click on the new directory, select New File and provide the name as Drag_And_Drop_Demo.robot as shown below:
Step 3 – Download ChromeBinaries from the below location
The tests are going to use the Chrome browser, so we need to download the ChromeBinaries to open a blank browser in Chrome.
The chromedriver and geckodriver are placed in a folder named drivers in the RobotFramework_Demo project. I have renamed chromedriver to Chrome and geckodriver to Firefox.
Step 4 – Automate the drag and drop option
We are now going to write test cases. The test case details will be as follows −
Open the Browser with the URL
Verify element Text before drag
Drag the element and drop
Verify element Text after drag
To work with the Radio Button, we need a locator. A locator is an identifier for the textbox like id, name, class, xpath, css selector, etc.
To know more about locators, refer to these Selenium Tutorials:
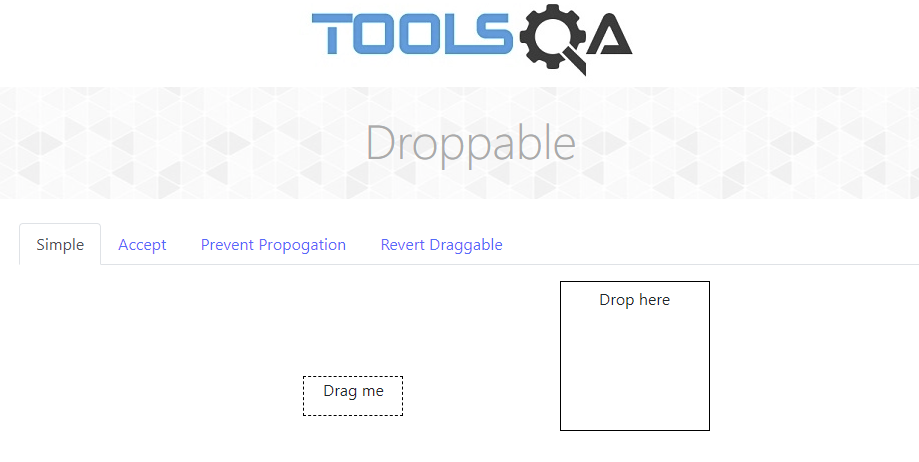
Let us inspect the locator of the drag and drop option.
Below is an example of a drag and drop option.
*** Settings ***
Documentation To drag the box
Library SeleniumLibrary
*** Test Cases ***
Verify that the user can drag and drop elements
[documentation] This test case verifies that a user can drag and drop an element from source to destination
Open the Browser with URL
Verify element Text before drag
Drag the element and drop
Verify element Text after drag
*** Keywords ***
Open the Browser with URL
Create Webdriver Chrome executable_path=/Vibha_Personal/RobotFramework_Demo/drivers/Chrome
Go To https://demoqa.com/droppable
Maximize Browser Window
Set Selenium Implicit Wait 5
Verify element Text before drag
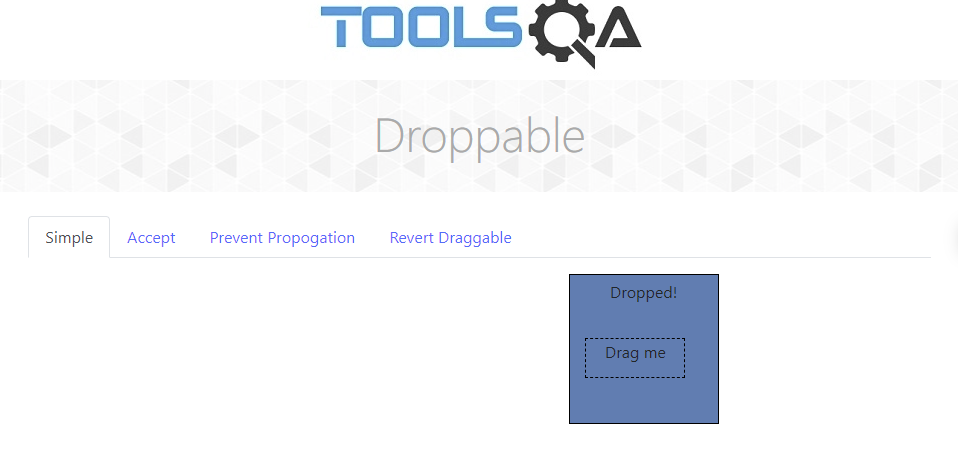
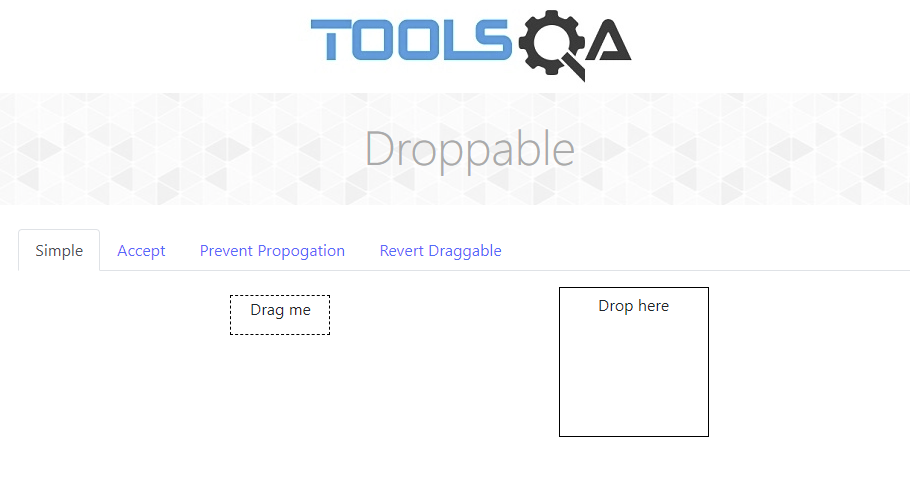
Element Text Should Be id:droppable Drop here timeout=5 #Before Drag and Drop
Drag the element and drop
Drag And Drop id:draggable id:droppable
Verify element Text after drag
Element Text Should Be id:droppable Dropped! timeout=5 #After Drag and Drop
All the below-mentioned keywords are derived from SeleniumLibrary except the last one. The functionality of keywords mentioned above:
1. Create Webdriver − The keyword creates an instance of Selenium WebDriver.
2. Go To – This keyword navigates the current browser window to the provided URL – https://demoqa.com/droppable.
3. Maximize Browser Window – This keyword maximizes the current browser window.
4. Set Selenium Implicit Wait – This keyword sets the implicit wait value used by Selenium.
5. Element Text Should Be – This keyword is used to verify that the current page contains the exact text identified by the locator.
6. Drag And Drop – Drags the element identified by the locator into the target element. The locator argument is the locator of the dragged element and the target is the locator of the target.
7. Drag And Drop By Offset – Drags the element identified with locator by xoffset/yoffset. The element will be moved by xoffset and yoffset, each of which is a negative or positive number specifying the offset.
Step 5 – Automate the Drag and Drop by Offset option
Drag And Drop By Offset – Drags the element identified with the locator by xoffset/yoffset.
*** Settings ***
Documentation    To drag the box
Library     SeleniumLibrary
Test Teardown    Close Browser

*** Test Cases ***

Verify that the user can drag and drop element by offset
    [documentation]  This test case verifies that a user can drag and drop an element by offset
    Open the Browser with URL
    Verify element Text before drag
    Drag the element and drop locator by xoffset/yoffset
    Verify no change in Text


*** Keywords ***
Open the Browser with URL
    Create Webdriver    Chrome  executable_path=/Vibha_Personal/RobotFramework_Demo/drivers/Chrome
    Go To    https://demoqa.com/droppable
    Maximize Browser Window
    Set Selenium Implicit Wait    5

Verify element Text before drag
    Element Text Should Be      id:droppable  Drop here  timeout=5  #Before Drag and Drop

Drag the element and drop locator by xoffset/yoffset
     Drag And Drop By Offset  id:draggable  50  70

Verify no change in Text
     Element Text Should Be  id:droppable  Drop here  timeout=5  #After Drag and Drop
Before
After
Step 6 – Execute the tests
We need the below command to run the Robot Framework script.
robot Drag_Drop_Demo.robot
The output of the above program is
Step 7 – View Report and Log
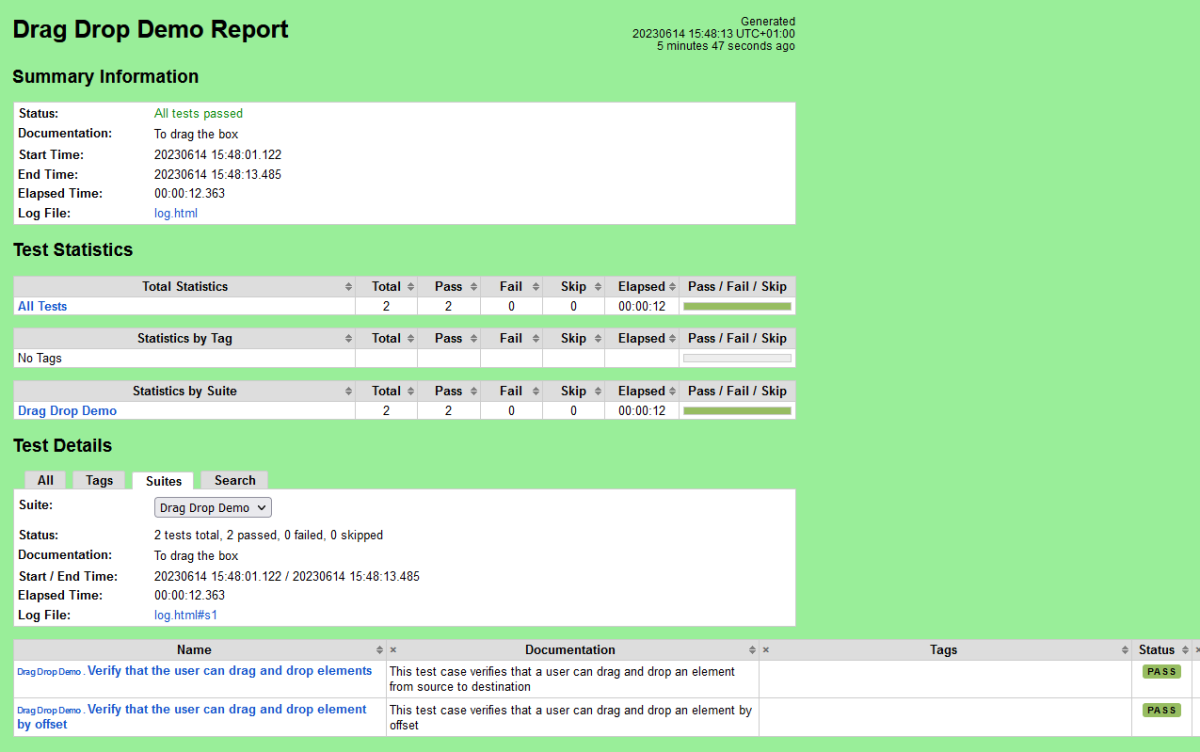
We have the test case passed. The Robot Framework generates log.html, output.xml, and report.html by default.
Let us now see the report and log details.
Report
Right-click on report.html. Select Open In->Browser->Chrome (any browser of your wish).
The Report generated by the framework is shown below:
Log
Robot Framework has multiple log levels that control what is shown in the automatically generated log file. The default Robot Framework log level is INFO.
Right-click on log.html. Select Open In->Browser->Chrome (any browser of your wish).
That’s it! Congratulations on making it through this tutorial and hope you found it useful! Happy Learning!!
In this tutorial, we will run the tests in the BDD format in Robot Framework.
What is BDD?
BDD is an Agile software development process in which an application is documented and designed around the behaviour that a user expects to see when interacting with it. BDD helps to avoid bloat, excessive code, unnecessary features, and lack of focus by encouraging developers to focus only on the requested behaviours of an app or program. This methodology combines, augments, and refines test-driven development (TDD) and acceptance testing practices.
The Given-When-Then syntax is a commonly used structure for writing user stories and acceptance criteria in a behaviour-driven development (BDD). It is used to describe the desired behaviour of a system in a clear, concise, and consistent manner.
The structure is broken down into three parts:
Given: This section describes the initial state or context of the system. It sets the scene for the scenario being tested.
When: This section describes the action or event that occurs. It specifies the trigger for the scenario being tested.
Then: This section describes the expected outcome or result of the scenario. It defines the acceptance criteria for the scenario being tested.
Step 1.1 – Open PyCharm and create a new project. Go to File and select New Project from the main menu.
Step 1.2 – Choose the project location. Click the “Browse” button next to the Location field and specify the directory for your project.
Deselect the Create a main.py welcome script checkbox because you will create a new Python file for this tutorial.
Click on the “Create” Button.
Step 1.3 – A new dialog appears asking to open the project using any one of the given options. I have selected New Window as I like to have separate windows for each project.
Below is the image of the new project created in PyCharms.
How to run tests in BDD format in Robot Framework?
Step 2 – Create a new directory in the new project
Right-Click on the project, select New->Directory and provide name as Tests
Below is the image of the new directory.
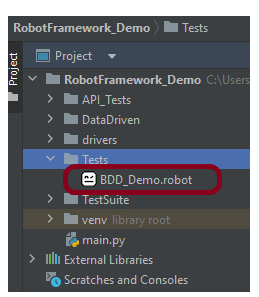
Right-click on the new directory and select New File and provide the name as BDD_Demo.robot as shown below:
Step 3 – Execute the tests
We are now going to write test cases. The test case details will be as follows −
*** Settings ***
Documentation       Tests to login to Login Page
Library     SeleniumLibrary

*** Variables ***
${valid_username}     Admin
${valid_password}       admin123
${invalid_password}     45678
${url}      https://opensource-demo.orangehrmlive.com/web/index.php/auth/login
${browser_name}      Chrome
${login_error_message}      css:.oxd-alert-content--error
${dashboard_title}       css:.oxd-topbar-header-breadcrumb-module


*** Test Cases ***

Validate Unsuccessful Login using invalid credentials
    [Tags]    SMOKE
    Given I open the Browser with URL
    When I fill the login form     ${valid_username}       ${invalid_password}
    Then I verify the error message is correct
    And Close Browser Session

Validate successful Login
    [Tags]    UAT
    Given I open the Browser with URL
    When I fill the login form     ${valid_username}       ${valid_password}
    Then I verify Dashboard page opens
    And Close Browser Session

*** Keywords ***

Given I open the Browser with URL
    Create Webdriver    ${browser_name}  executable_path=/Vibha_Personal/RobotFramework_Demo/drivers/${browser_name}
    Go To       ${url}
    Maximize Browser Window
    Set Selenium Implicit Wait    5

When I fill the login form
   [Arguments]    ${username}      ${password}
   Input Text    css:input[name=username]   ${username}
   Input Password    css:input[name=password]   ${password}
   Click Button    css:.orangehrm-login-button

Then I verify the error message is correct
    Element Text Should Be    ${login_error_message}    Invalid credentials

Then I verify Dashboard page opens
    Element Text Should Be    ${dashboard_title}      Dashboard


And Close Browser Session
    Close Browser
All the below-mentioned keywords are derived from SeleniumLibrary except the last one. The functionality of keywords mentioned above:
1. Open Browser − The keyword opens a new browser instance to the optional URL.
2. Maximize Browser Window – This keyword maximizes the current browser window.
3. Set Selenium Implicit Wait – This keyword sets the implicit wait value used by Selenium.
4. Input Text − This keyword is used to type the given text in the specified textbox identified by the locator name:username.
5. Input Password – This keyword is used to type the given text in the specified password identified by the locator name:password.
The difference compared to Input Text is that this keyword does not log the given password on the INFO level.
6. Click button – This keyword is used to click on the button with location css:.orangehrm-login-button.
7. ${result} – This is a variable that holds the text value of the error message that is located by css:.oxd-alert-content-text
8. Element Text Should Be– This keyword is used to verify that the element locator contains exact the text expected.
To run this script, go to the command line and go to directory tests.
Step 4 – Execute the tests
We need the below command to run the Robot Framework script.
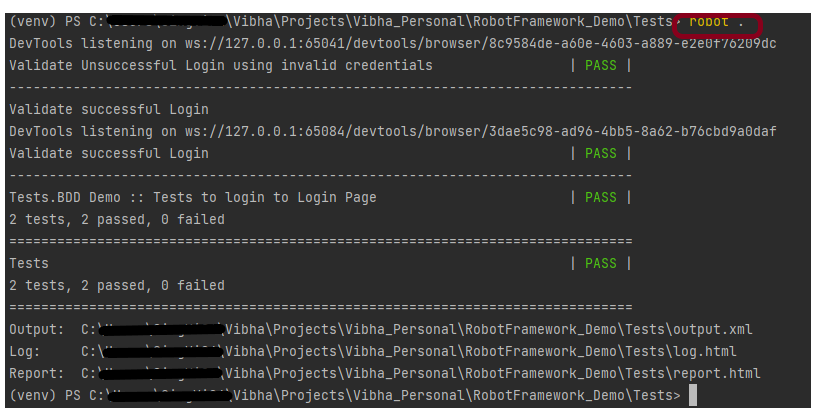
robot .
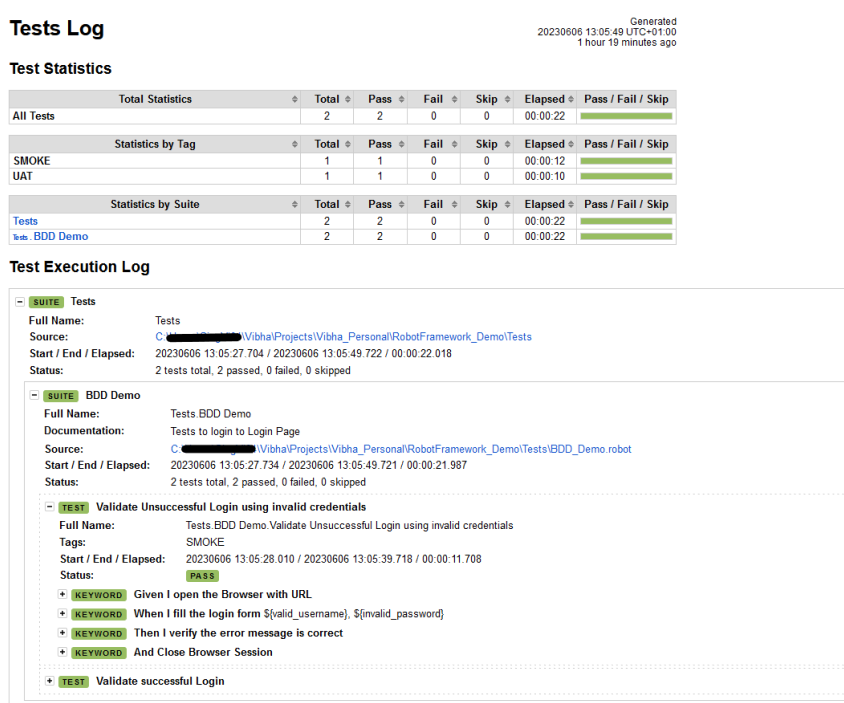
The output of the above program is
Step 5 – View Report and Log
We have the test case passed. The Robot Framework generates log.html, output.xml, and report.html by default.
Let us now see the report and log details.
Report
Right-click on report.html. Select Open In->Browser->Chrome(any browser of your wish).
The Report generated by the framework is shown below:
Log
Robot Framework has multiple log levels that control what is shown in the automatically generated log file. The default Robot Framework log level is INFO.
Right-click on log.html. Select Open In->Browser->Chrome(any browser of your wish).
That’s it! Congratulations on making it through this tutorial and hope you found it useful! Happy Learning!!
Allure Framework is a flexible lightweight multi-language test report tool that not only shows a very concise representation of what has been tested in a neat web report form but allows everyone participating in the development process to extract maximum useful information from everyday execution of tests.
From the dev/qa perspective, Allure reports shorten common defect lifecycle: test failures can be divided into bugs and broken tests, also logs, steps, fixtures, attachments, timings, history, and integrations with TMS and bug-tracking systems can be configured, so the responsible developers and testers will have all information at hand.
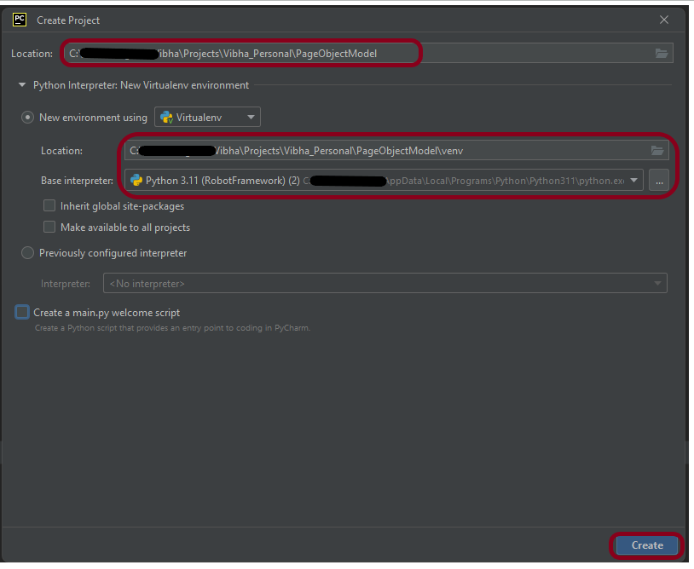
Step 1.1 – Open PyCharm and create a new project. Go to File and select New Project from the main menu.
Step 1.2 – Choose the project location. Click the “Browse” button next to the Location field and specify the directory for your project.
Deselect the Create a main.py welcome script checkbox because you will create a new Python file for this tutorial.
Click on the “Create” Button.
Step 1.3 – A new dialog appears asking to open the project using any one of the given options. I have selected New Window as I like to have separate windows for each project.
Below is the image of the new project created in PyCharms.
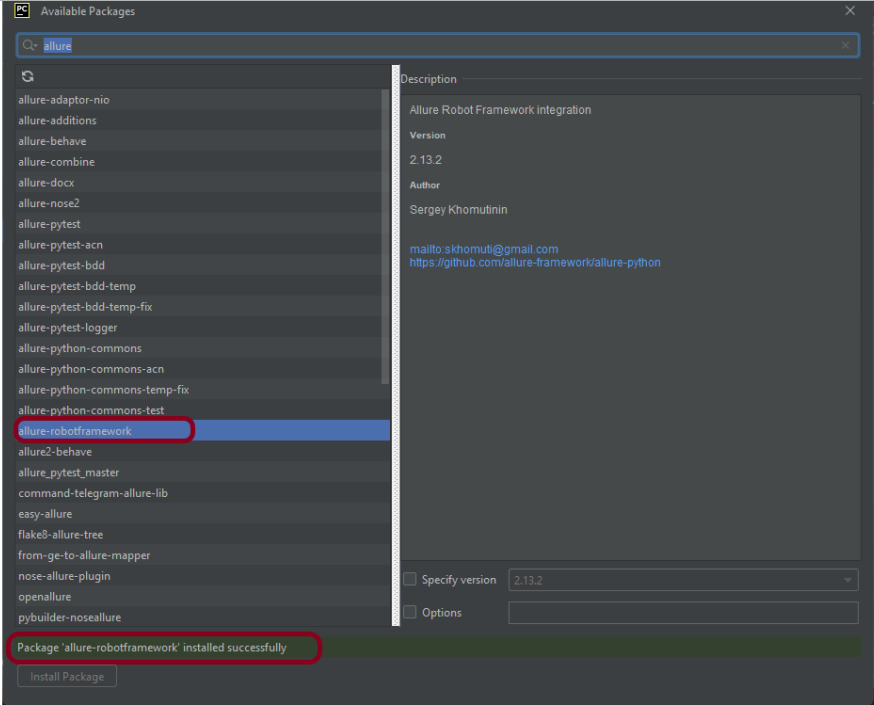
Step 2 – Install allure-robotframework plugin
Go to the command prompt and run the below-mentioned command to download the plugin:
pip install allure-robotframework
The below image shows that the plugin is installed successfully.
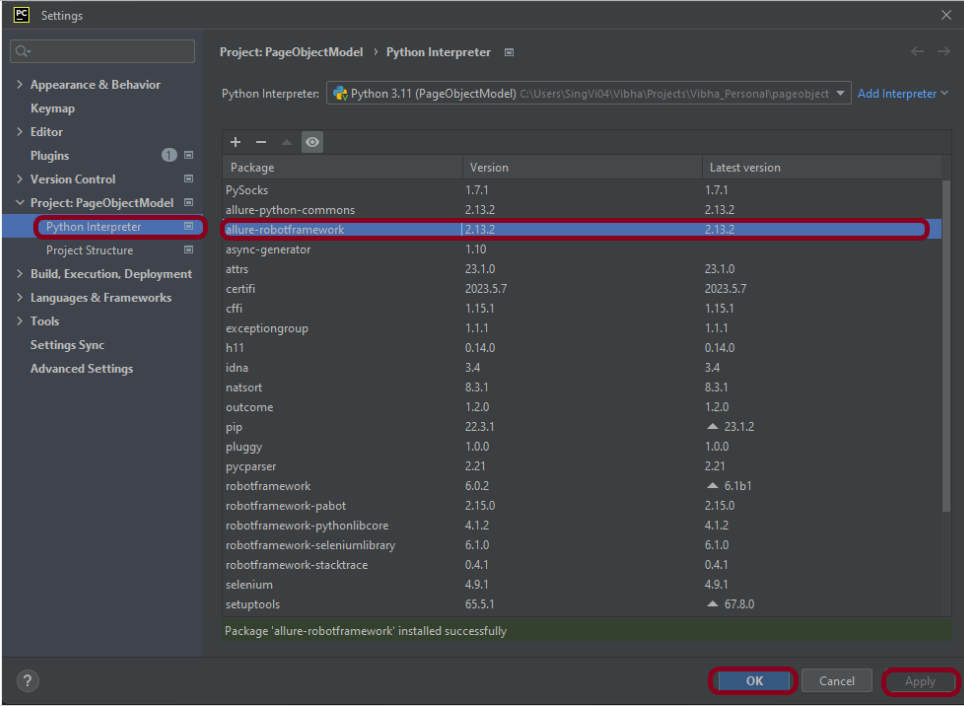
Step 3 – Add allure-robotframework package to the PyCharms
Go to File->Settings ->Project:RobotFramework_Demo ->Python Interpreter.
Click on the “+” sign and enter allure-r in the search bar. It will show a list of packages. Select the “allure-robotframework” package and click on the “Install Package”.
Once the package is installed, we will see the message that the package is installed successfully.
Once the package is installed, it can be seen under the package list as shown below:
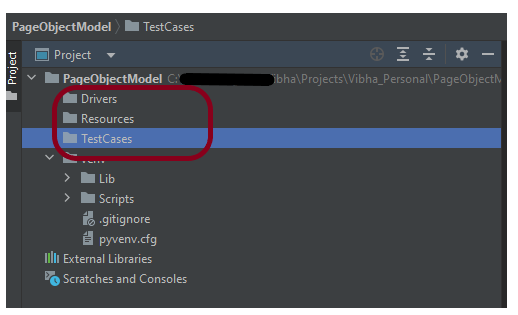
Step 4 – Create 3 new directories in the new project
Right-Click on the project, select New->Directory and provide the name as TestCases, Drivers, and Resources
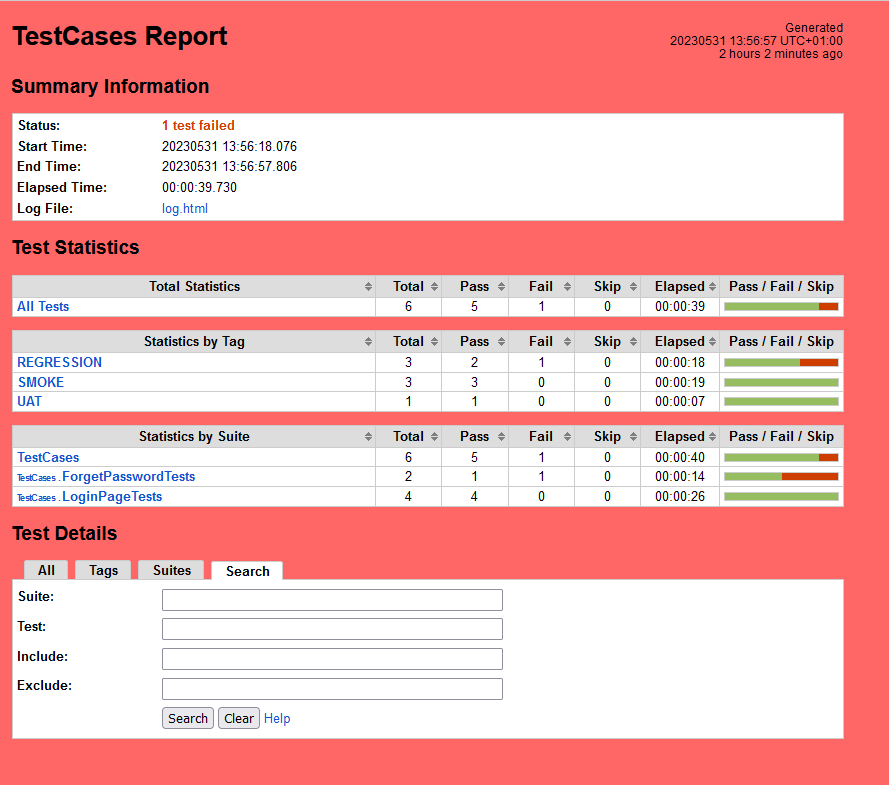
We have the test case passed. The Robot Framework generates log.html, output.xml, and report.html by default.
These reports are generated in the output/robot folder as I have provided –outputdir ./output/robot in the command line.
Let us now see the report and log details.
Report
Right-click on report.html. Select Open In->Browser->Chrome(any browser of your wish).
As one of the tests purposefully failed to demonstrate how the report would look in the event of a failure, we can see that it is now a Red report. The framework generated the following report:
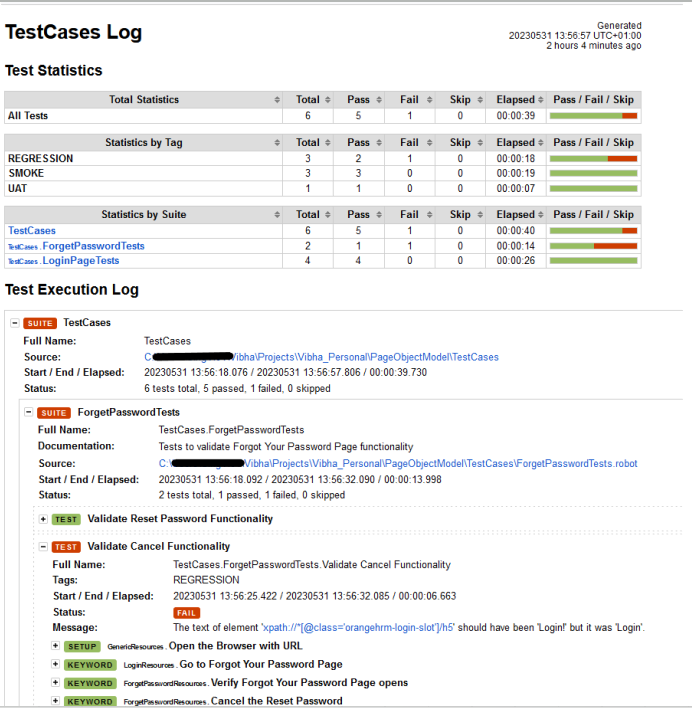
Log
Robot Framework has multiple log levels that control what is shown in the automatically generated log file. The default Robot Framework log level is INFO.
Right-click on log.html. Select Open In->Browser->Chrome(any browser of your wish).
Step 8 – Generate the Allure Report
To create Allure Report, use the below command
allure serve ./output/allure
This will generate the beautiful Allure Test Report as shown below.
Step 9 – Allure Report Dashboard
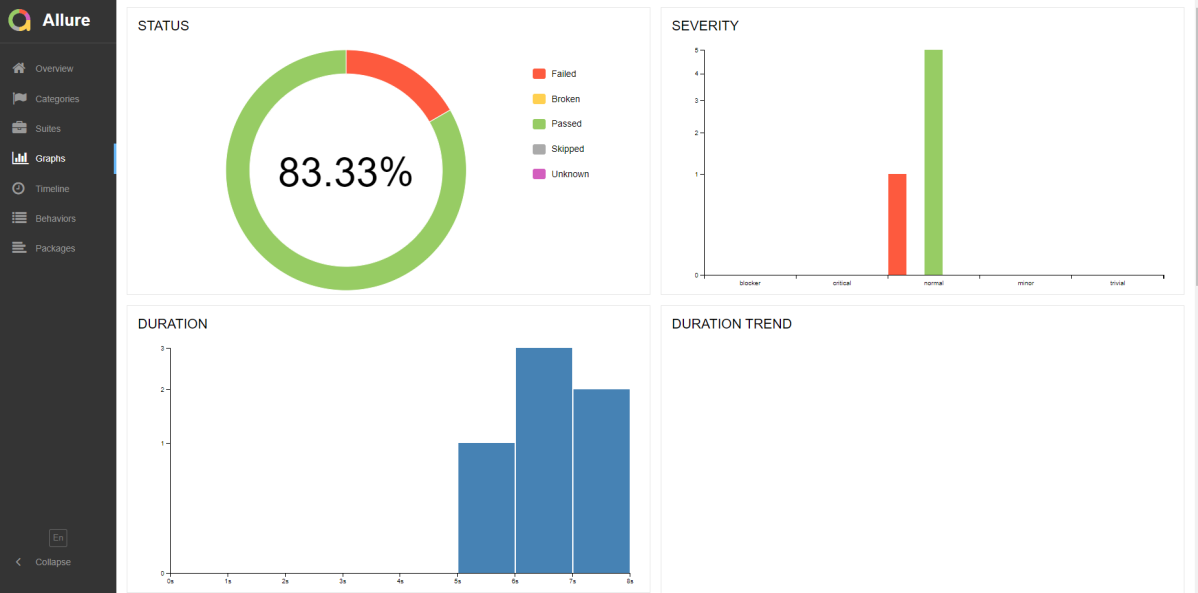
The overview page hosts several default widgets representing the basic characteristics of your project and test environment.
Statistics – overall report statistics.
Launches – if this report represents several test launches, statistics per launch will be shown here.
Behaviours – information on results aggregated according to stories and features.
Executors – information on test executors that were used to run the tests.
History Trend – if tests accumulated some historical data, it’s trend will be calculated and shown on the graph.
Environment – information on the test environment.
Categories in Allure Report
The categories tab gives you a way to create custom defect classifications to apply for test results. There are two categories of defects – Product Defects (failed tests) and Test Defects (broken tests).
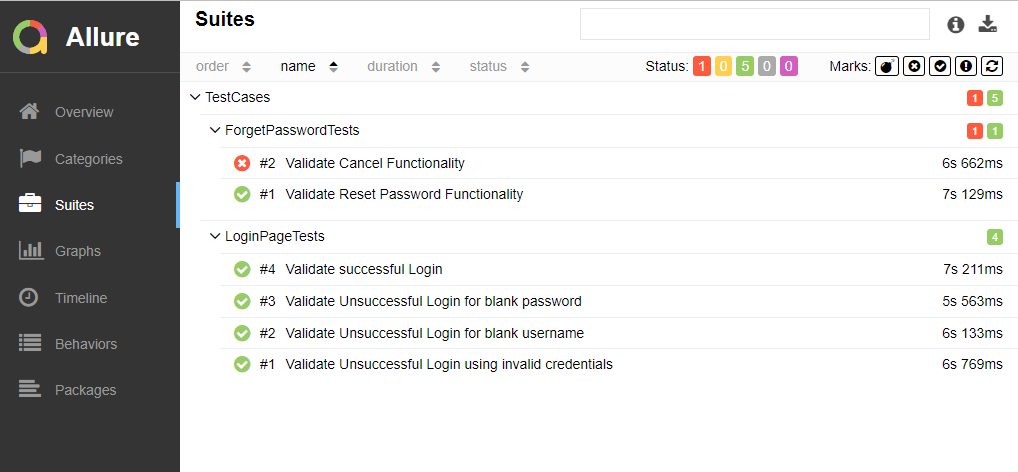
Suites in Allure Report
On the Suites tab a standard structural representation of executed tests, grouped by suites and classes can be found.
Graphs in Allure Report
Graphs allow you to see different statistics collected from the test data: statuses breakdown or severity and duration diagrams.
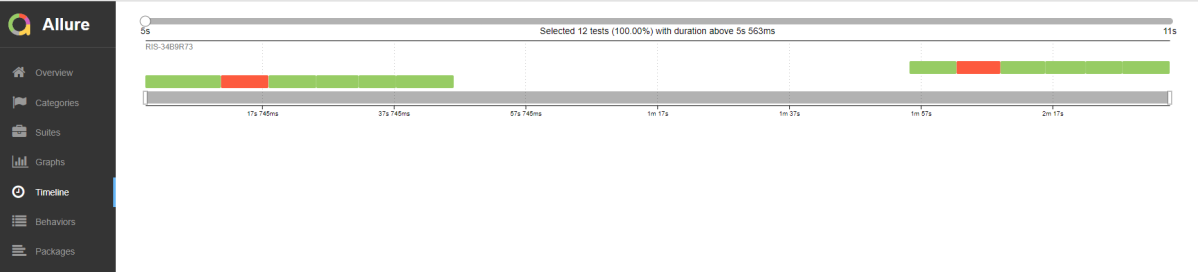
Timeline in Allure Report
The timeline tab visualizes retrospective of tests execution, allure adaptors collect precise timings of tests, and here on this tab, they are arranged accordingly to their sequential or parallel timing structure.
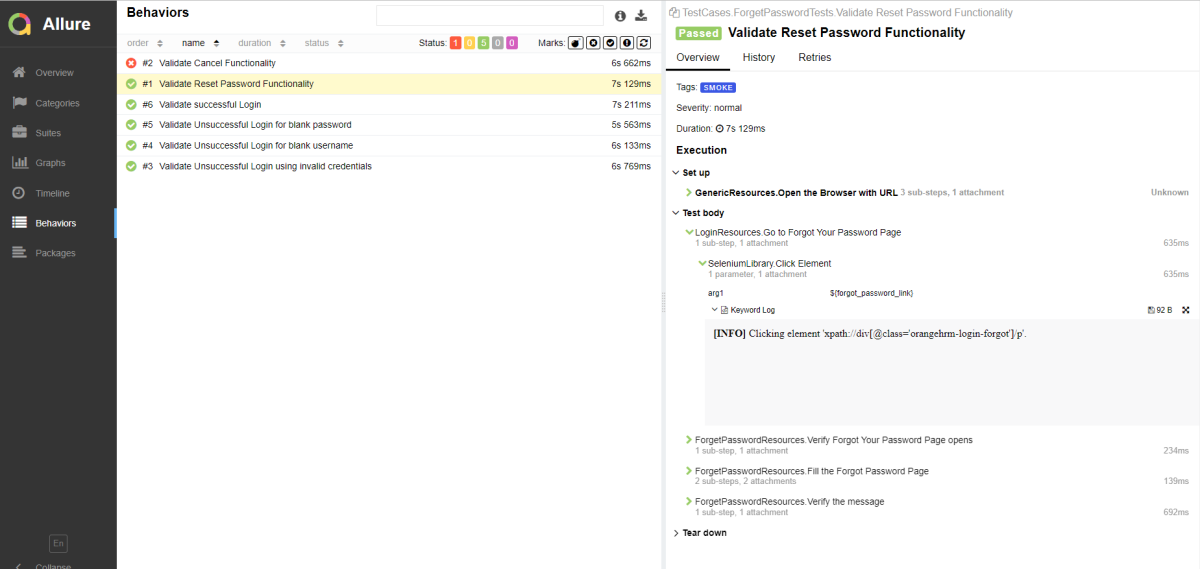
Behaviours of Allure Report
This tab groups test results according to Epic, Feature, and Story tags.
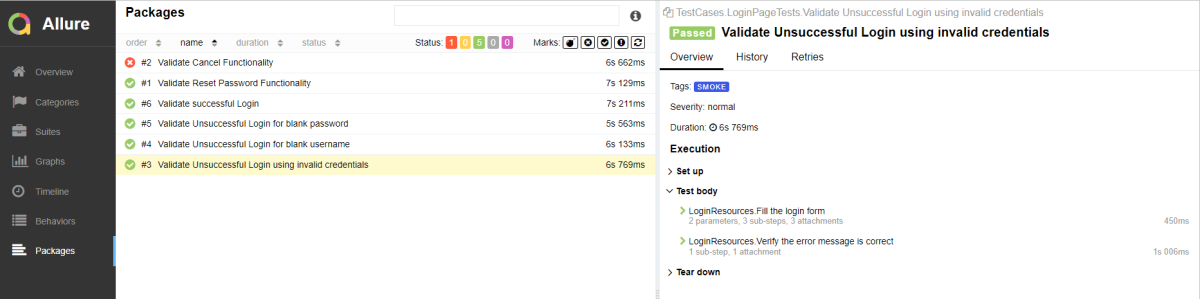
Packages in Allure Report
The packages tab represents a tree-like layout of test results, grouped by different packages.
That’s it! Congratulations on making it through this tutorial and hope you found it useful! Happy Learning!!
This tutorial walks you through the process of running Robot Framework tests in GitLab pipelines. This is a very important step in achieving CI/CD. Ideally, tests should be run after each change (minor/major) before the latest change ismergedinto the master branch. Let’sassumethat100 changes are merged into the master branch a day and tests are run every time before deployment. In this case, there is no QA manuallystarting100tests a day. Now, what should be done to overcome this problem. Nowaddatest to your GitLab pipeline. Adding a test stage to your pipeline automatically runs the tests when you run the pipeline.
Once the proposed changes are built, then push the commits to a feature branch in a remote repository that’s hosted in GitLab. The push triggers the CI/CD pipeline for your project. Then, GitLab CI/CD runs automated scripts (sequentially or in parallel) to build as well as to test the application. After a successful run of the test scripts, GitLab CI/CD deploys your changes automatically to any environment (DEV/QA/UAT/PROD). But if the test stage is failed in the pipeline, then the deployment is stopped.
To use GitLab CI/CD, we need to keep 2 things in mind:
a) Make sure a runner is available in GitLab to run the jobs. If there is no runner, install GitLab Runner and register a runnerfor your instance, project, or group.
b) Create a .gitlab-ci.yml file at the root of the repository. This file is where CI/CD jobs are defined.
The Selenium tests run on a headless browser in the pipeline.
What is a headless browser?
A headless browser is like any other browser but without a Head/GUI (Graphical User Interface). A headless browser is used to automate the browser without launching the browser. While the tests are running, we could not see the browser, but we can see the test results coming on the console.
Prerequisite
Install Python
Install PIP
Install Robot Framework
Install Robot framework Selenium Library
Install PyCharm IDE
GitLab Account
Implementation Steps:
Step 1 – Create a new Project
Step 1.1 – Open PyCharm and create a new project. Go to File and select New Project from the main menu.
Step 1.2 – Choose the project location. Click the Browse button next to the Location field and specify the directory for your project.
Deselect the Create a main.py welcome script checkbox because you will create a new Python file for this tutorial.
Click on the Create Button.
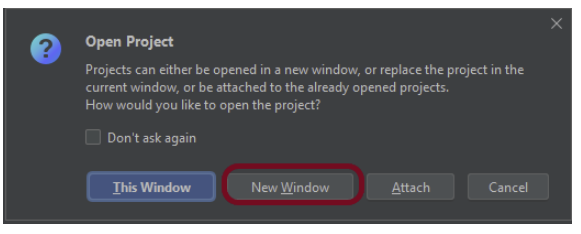
Step 1.3 – A new dialog will appear asking to Open the project using any one of the given options. I have selected New Window as I like to have separate windows for each project.
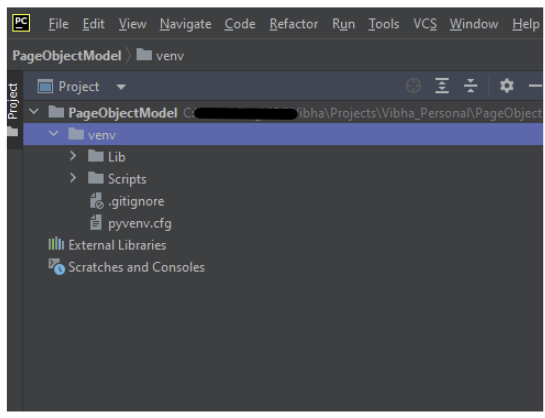
Below is the image of the new project created in PyCharms.
Step 2 – Create 2 new directories in the new project
Right-Click on the project, select New->Directory, and provide the name as TestCases and Resources
Step 3 – Create Test Files
This directory contains multiple test case files consisting of test steps.
Right-click on the new directory select New File and provide the name LoginPageTests.robot and ForgetPasswordTests.robot as shown below:
Below is the code for LoginPageTests.robot
*** Settings ***
Documentation       Tests to login to Login Page
Library     SeleniumLibrary
Test Setup      Open the Browser with URL
Test Teardown   Close Browser Session
Resource       ../Resources/GenericResources.robot
Resource       ../Resources/LoginResources.robot
Resource      ../Resources/DashboardResources.robot

*** Test Cases ***

Validate Unsuccessful Login using invalid credentials

    LoginResources.Fill the login form     ${valid_username}       ${invalid_password}
    LoginResources.Verify the error message is correct


Validate Unsuccessful Login for blank username

     LoginResources.Fill the login form     ${blank_username}       ${valid_password}
     LoginResources.Verify the error message is displayed for username


Validate Unsuccessful Login for blank password

     LoginResources.Fill the login form     ${valid_username}       ${blank_password}
     LoginResources.Verify the error message is displayed for password


Validate successful Login

    LoginResources.Fill the login form     ${valid_username}       ${valid_password}
    DashboardResources.Verify Dashboard page opens
Below is the code for ForgetPasswordTests.robot
*** Settings ***
Documentation       Tests to validate Forgot Your Password Page functionality
Library     SeleniumLibrary
Test Setup      Open the Browser with URL
Test Teardown   Close Browser Session
Resource       ../Resources/GenericResources.robot
Resource       ../Resources/LoginResources.robot
Resource      ../Resources/ForgetPasswordResources.robot


*** Test Cases ***

Validate Reset Password Functionality

    LoginResources.Go to Forgot Your Password Page
    ForgetPasswordResources.Verify Forgot Your Password Page opens
    ForgetPasswordResources.Fill the Forgot Password Page
    ForgetPasswordResources.Verify the message

Validate Cancel Functionality

    LoginResources.Go to Forgot Your Password Page
    ForgetPasswordResources.Verify Forgot Your Password Page opens
    ForgetPasswordResources.Cancel the Reset Password
    ForgetPasswordResources.Verify that Login Page is displayed
Step 4 – Create a Resource file for each page
It maintains the files which contain page elements as well as corresponding keywords.
Right-click on the new directory select New File and provide the name as LoginResources.robot, DashboardResources.robot, GenericResources.robot, and ForgetPasswordResources.robot as shown below:
GenericResources.robot contains the keywords that are common to all the tests, like opening of the browser or closing of the browser.
*** Settings ***
Documentation    A resource file with reusable keywords and variables.
Library     SeleniumLibrary

*** Variables ***
${valid_username}     Admin
${valid_password}       admin123
${invalid_username}     1234
${invalid_password}     45678
${blank_username}
${blank_password}
${url}      https://opensource-demo.orangehrmlive.com/web/index.php/auth/login
${browser_name}      Chrome

*** Keywords ***

Open the Browser with URL
    Open Browser   ${url}    headlesschrome
    Maximize Browser Window
    Set Selenium Implicit Wait    5

Close Browser Session
    Close Browser
Below is the code for LoginResources.robot
*** Settings ***
Documentation        All the page objects and keywords of landing page
Library     SeleniumLibrary

*** Variables ***
${login_error_message}      css:.oxd-alert-content--error
${dashboard_title}       css:.oxd-topbar-header-breadcrumb-module
${missing_username_error_message}    xpath://*[@class='oxd-form']/div[1]/div/span
${missing_password_error_message}   xpath://*[@class='oxd-form']/div[2]/div/span
${forgot_password_link}   xpath://div[@class='orangehrm-login-forgot']/p

*** Keywords ***

Fill the login form
    [Arguments]    ${username}      ${password}
   Input Text    css:input[name=username]   ${username}
   Input Password    css:input[name=password]   ${password}
   Click Button    css:.orangehrm-login-button


Verify the error message is correct
    Element Text Should Be    ${login_error_message}    Invalid credentials


Verify the error message is displayed for username
     Element Text Should Be    ${missing_username_error_message}      Required

Verify the error message is displayed for password
      Element Text Should Be    ${missing_password_error_message}      Required

Go to Forgot Your Password Page
    Click Element      ${forgot_password_link}
Below is the code for DashboardResources.robot
*** Settings ***
Documentation        All the page objects and keywords of Dashboard page
Library     SeleniumLibrary

*** Variables ***
${dashboard_title}       css:.oxd-topbar-header-breadcrumb-module

*** Keywords ***

Verify Dashboard page opens
    Element Text Should Be    ${dashboard_title}      Dashboard
Below is the code for ForgetPasswordResources.robot
*** Settings ***
Documentation       All the page objects and keywords of Forget Password page
Library     SeleniumLibrary

*** Variables ***
${forgot_page_title}       css:.orangehrm-forgot-password-title
${username}     css:.oxd-input--active
${reset_btn}     css:.orangehrm-forgot-password-button--reset
${cancel_btn}    css:.orangehrm-forgot-password-button--cancel
${reset_message}      xpath://div[@class='orangehrm-card-container']/h6
${login_page_title}   xpath://*[@class='orangehrm-login-slot']/h5

*** Keywords ***

Verify Forgot Your Password Page opens
    Element Text Should Be    ${forgot_page_title}      Reset Password

Fill the Forgot Password Page
   Input Text        ${username}     abc@gmail.com
   Click Button    ${reset_btn}

Verify the message
    Element Text Should Be    ${reset_message}      Reset Password link sent successfully

Cancel the Reset Password
    Click Button    ${cancel_btn}

Verify that Login Page is displayed
    Element Text Should Be    ${login_page_title}       Login
All the below-mentioned keywords are derived from SeleniumLibrary. The functionality of keywords mentioned above:
1. Create Webdriver − The keyword creates an instance of Selenium WebDriver.
2. Go To – This keyword navigates the current browser window to the provided url.
3. Maximize Browser Window – This keyword maximizes the current browser window.
4. Set Selenium Implicit Wait – This keyword sets the implicit wait value used by Selenium.
5. Input Text − This keyword is used to type the given text in the specified textbox identified by the locator name:username.
6. Input Password – This keyword is used to type the given text in the specified password identified by the locator name:password.
The difference compared to Input Text is that this keyword does not log the given password on the INFO level.
7. Click button – This keyword is used to click the button identified by the locator. In this case, it is “Login” button.
8. Element Text Should Be – This keyword is used to verify that the current page contains the exact text identified by the locator. Here, we are checking the exact text “Invalid Credentials”.
To run this script, go to the command line and go to directory tests.
Step 5 – Execute the tests
We need the below command to run the Robot Framework script.
robot .
The output of the above program is
GitLab Section
Step 6 – Create a blank project in GitLab
To know, how to create a blank new project in GitLab, please refer tothis tutorial.
Step 7 – Push the project from the local repository to the Gitlab Repository
To know, how to push the changes in GitLab, please refer to this tutorial.
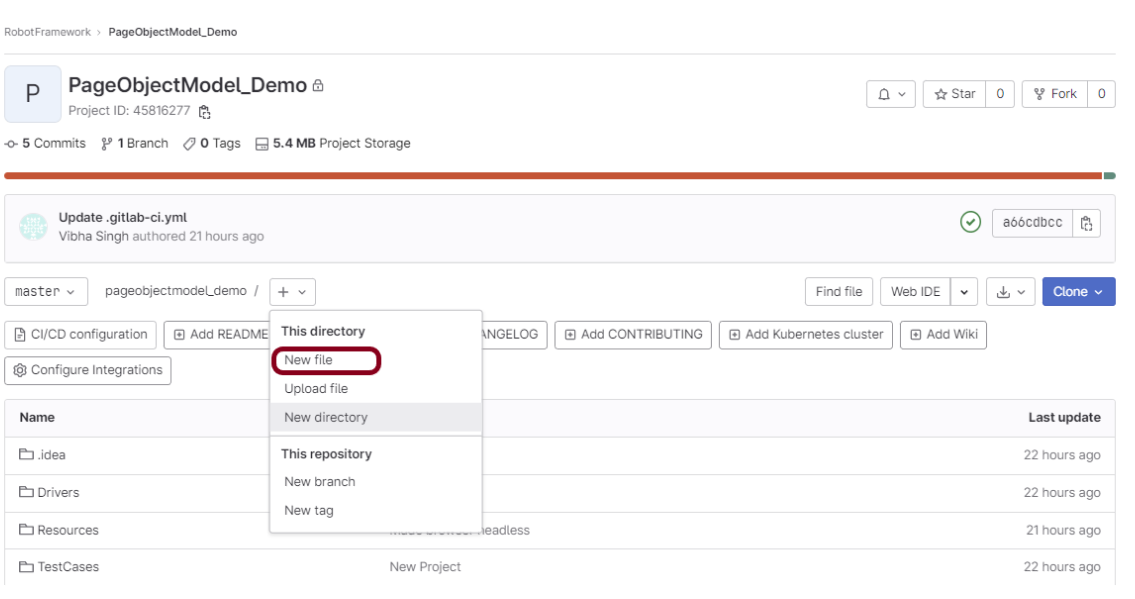
Step 8 – Create a .gitlab-ci.yml file in the project in GitLab
There are many ways to create a new file in GitLab. One of the ways is to create a file as shown in the below image.
It is a YAML file where you configure specific instructions for GitLab CI/CD. In the .gitlab-ci.yml, we can define:
The scripts you want to run.
Other configuration files and templates you want to include.
Dependencies and caches.
The commands you want to run in sequence and those you want to run in parallel.
The location to deploy your application to.
Whether you want to run the scripts automatically or trigger any of them manually.
Below is the sample pipeline.
stages:
  - test

image: ppandiyan/robotframework

run-tests:
  stage: test
  script:
    - robot --outputdir testOutput .
  artifacts:
    paths:
      - testOutput
    expire_in: 1 day
Image – ppandiyan/robotframework is used in this test. This docker file contains headlesschrome, headlessfirefox and Python2.7.
This gitlab-ci.yml has only 1 stage – a test that contains the command to run the tests as well as also create an artifact that contains all the surefire reports which can be saved as Test Evidence.
Step 9 – Run the tests in the GitLab pipeline
Now, when a new change is committed, a pipeline kicks off and it runs all the tests.
Step 10 – Check the status of the pipeline
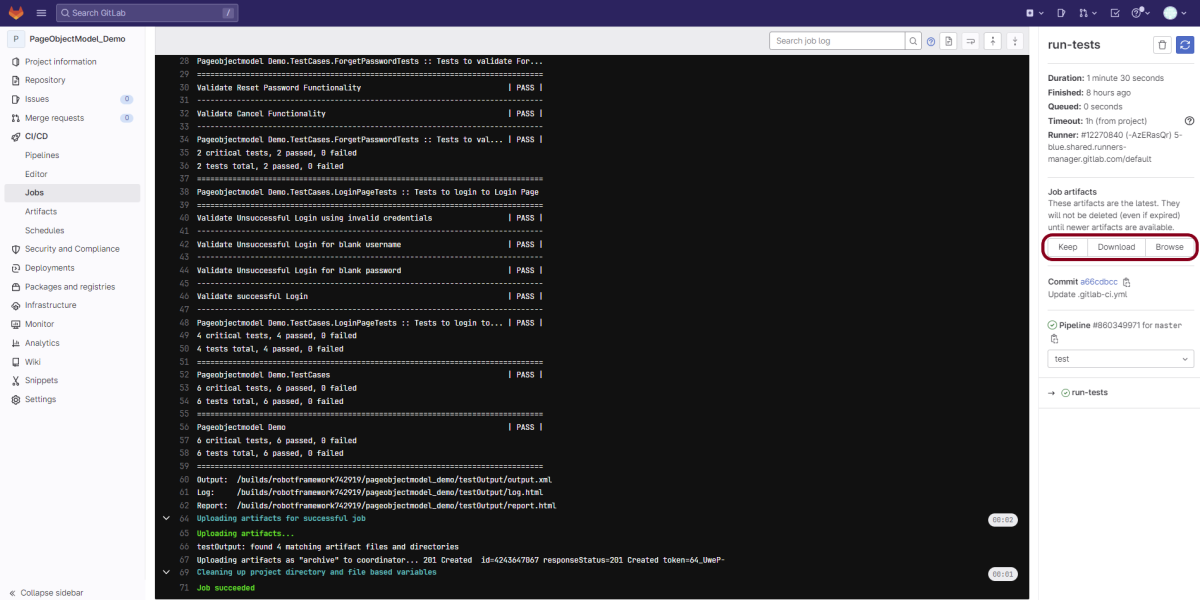
Once the Status of the pipeline changes to either failed or passed that means the tests are already executed.
Let us see the logs of the execution it shows that all the tests are passed here.
As I have added an artifact also in the gitalb-ci.yml, which is highlighted in the image. This artifact creates a folder with the name “testOutput” and the folder contains reports, logs as well as output files. This artifact gives us the option to download the reports or browse the report. This report will be available for 1 day only as mentioned in the gitlab-ci.yml.
Step 11 – Download the report
Once, will click on the download button, it will download “report.zip”. Unzip the folder and it looks like something as shown below:
Example of Report.html
Example of Log.html
Congratulations. This tutorial has explained the steps to run Robot Framework tests in GitLab CI/CD. Happy Learning!!
RequestLibrary is a Robot Framework library aimed to provide HTTP API testing functionalities by wrapping the well-known Python Requests Library.
Implementation Steps:
Step 1 – Create a new project
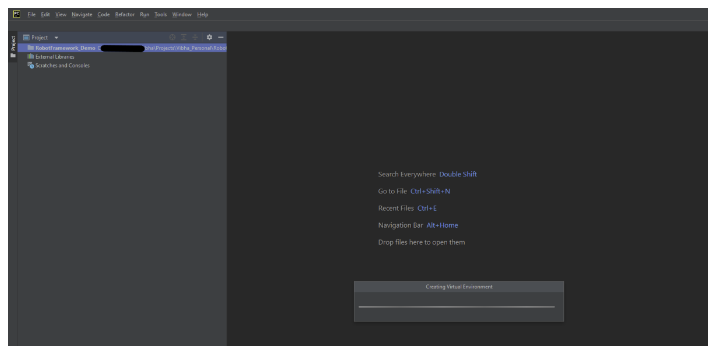
Step 1.1 – Open PyCharm and create a new project. Go to File and select New Project from the main menu.
Step 1.2 – Choose the project location. Click the “Browse” button next to the Location field and specify the directory for your project.
Deselect the Create a main.py welcome script checkbox because you will create a new Python file for this tutorial.
Click on the “Create” Button.
Step 1.3 – A new dialog appears asking to open the project using any one of the given options. I have selected New Window as I like to have separate windows for each project.
Below is the image of the new project created in PyCharms.
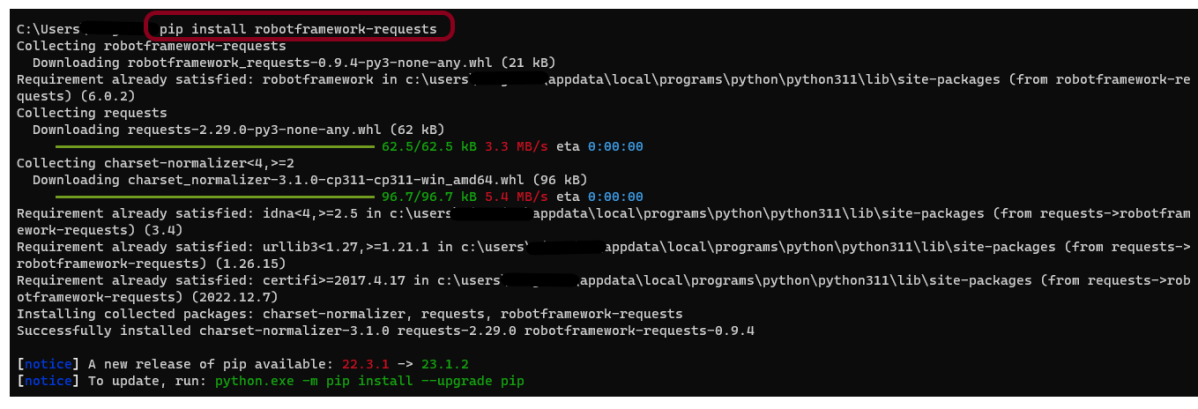
Step 2 – Install RequestLibrary
To install RequestLibrary, you need to use the below command:
pip install robotframework-requests
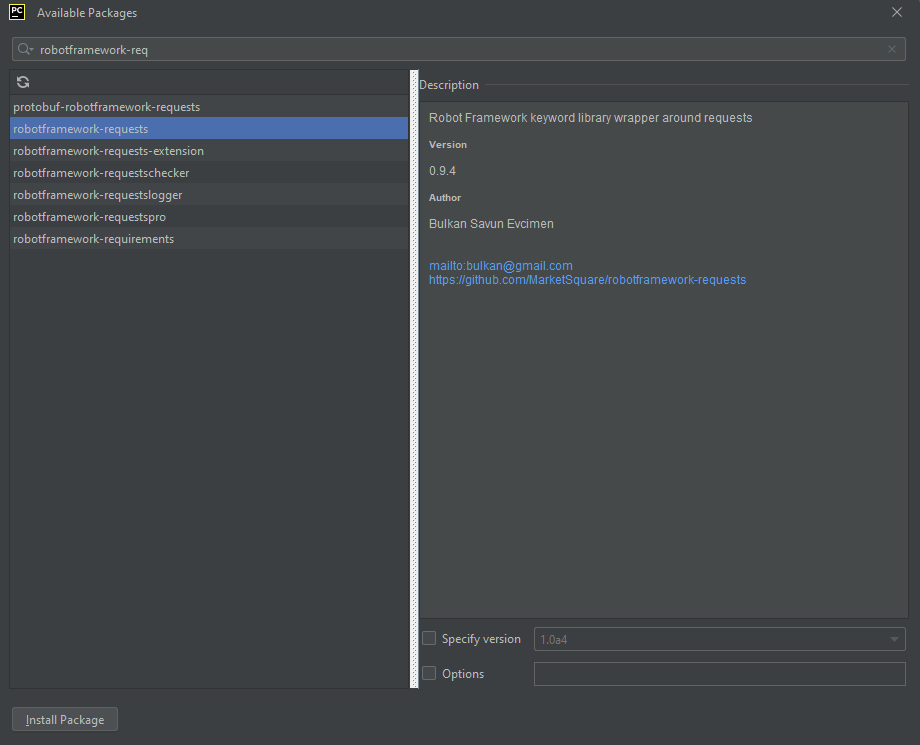
Step 3 – Add robotframework-requests package to the PyCharms
Go to File->Settings ->Project:RobotFramework_Demo ->Python Interpreter.
Click on the “+” sign and enter pabot in the search bar. It will show a list of packages. Select the “robotframework-requests” package and click on the “Install Package”.
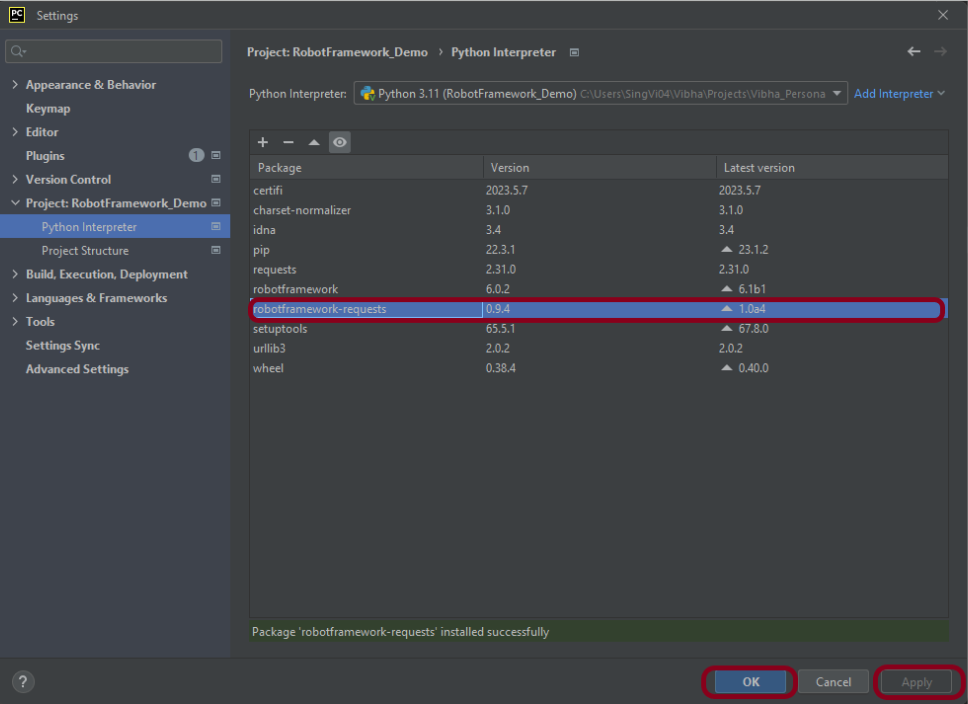
Once the package is installed, we will see the message that the package is installed successfully.
Once the package is installed, it can be seen under the package list as shown below:
Step 4 – Create a new directory in the new project
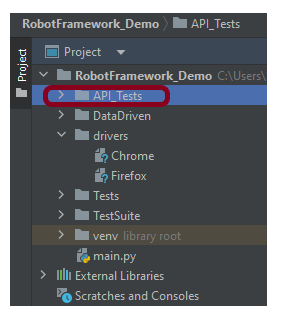
Right-Click on the project, select New->Directory, and provide the name as API_Tests
Below is the image of the new directory.
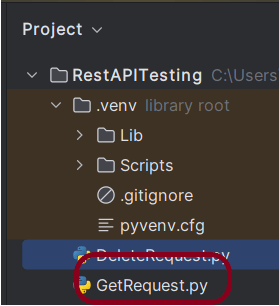
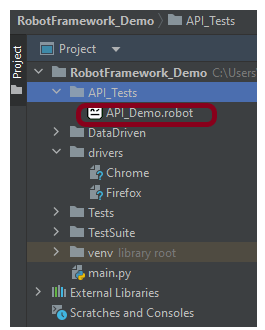
Right-click on the new directory and select New File and provide the name as API_Demo.robot as shown below:
Step 5 – Create API tests in Robot Framework
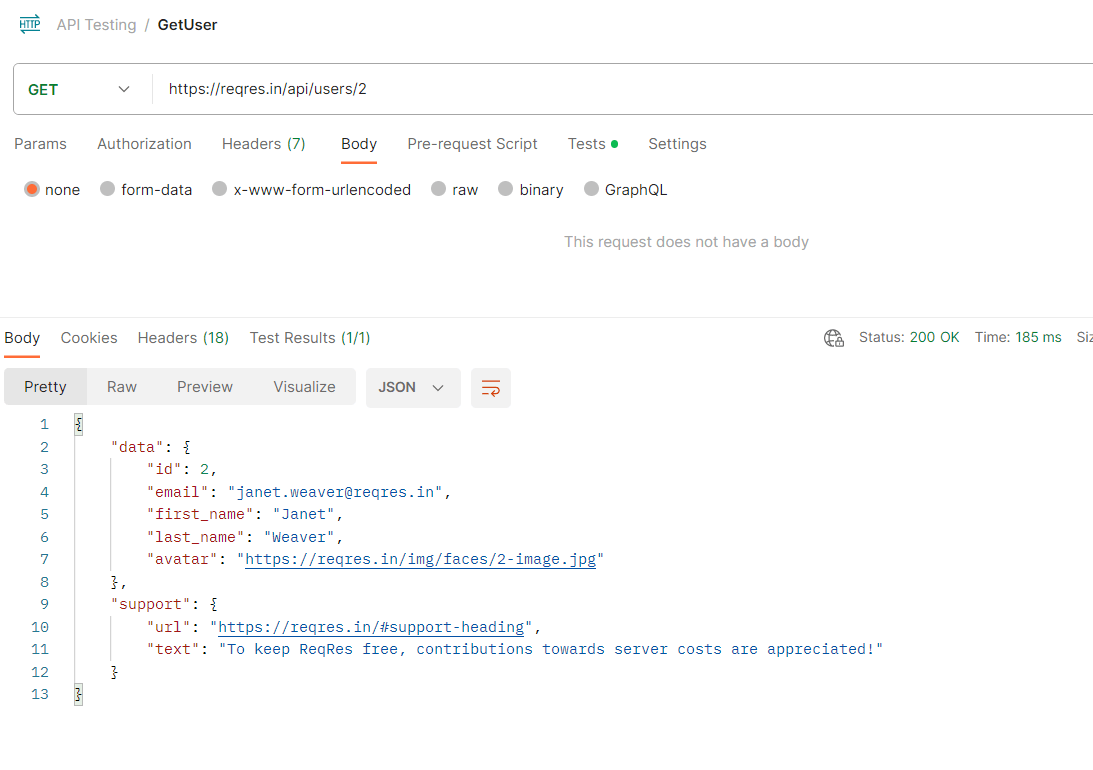
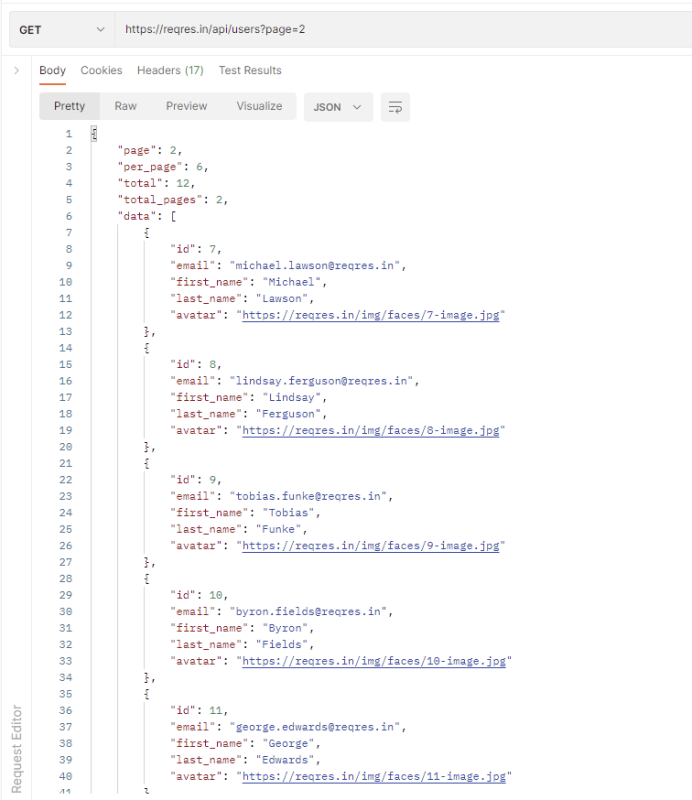
GET Request
The corresponding API Test in Robot Framework.
*** Settings ***
Library     RequestsLibrary
Library     Collections


*** Variables ***
${base_url}         https://reqres.in/api/users
${page_id}          2


*** Test Cases ***

Quick Get Request Test
    ${response}=    GET      ${base_url}     params=page=${page_id}   expected_status=200
    log    ${response.json()}
    Should Be Equal As Strings    6  ${response.json()}[per_page]
    Should Be Equal As Strings    12  ${response.json()}[total]
    Should Be Equal As Strings    7  ${response.json()}[data][0][id]
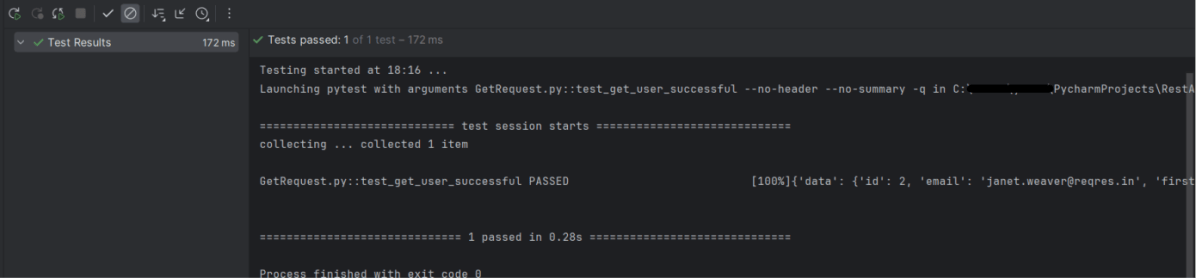
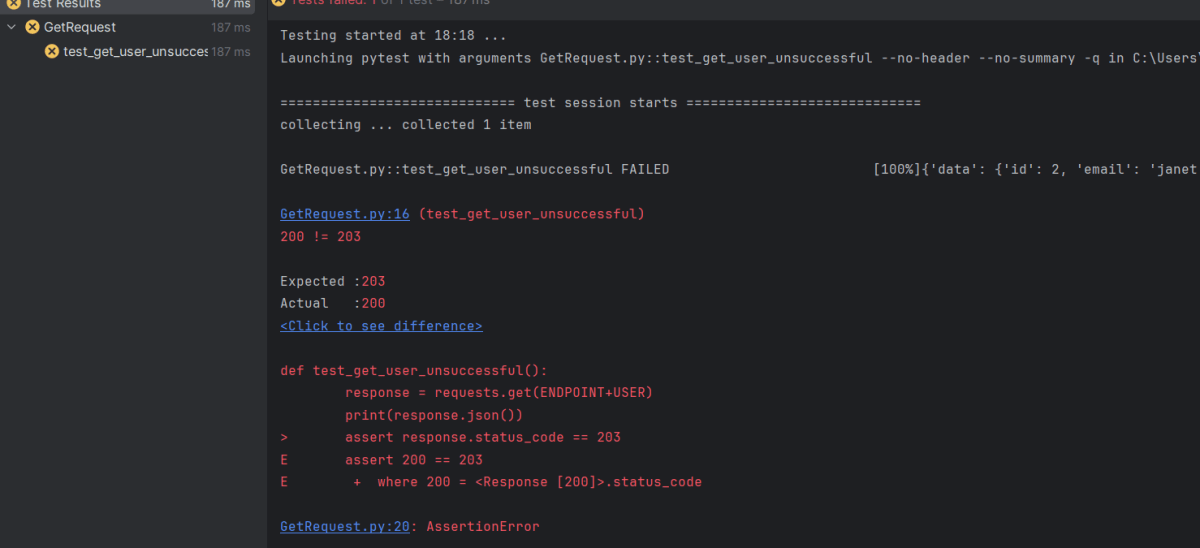
The corresponding log of this request is
${response}= We are saving the response of the GET operation in the ${response} variable.
The response is logged in the log by using the below command:
log ${response.json()}
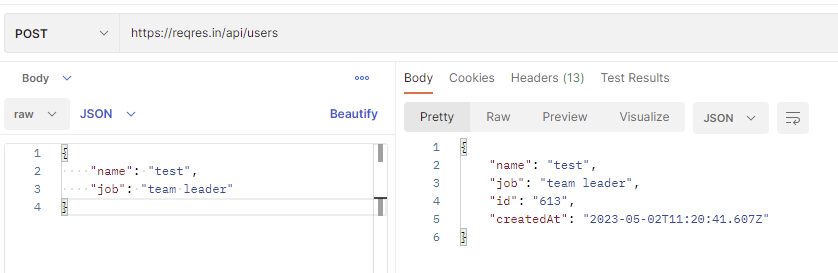
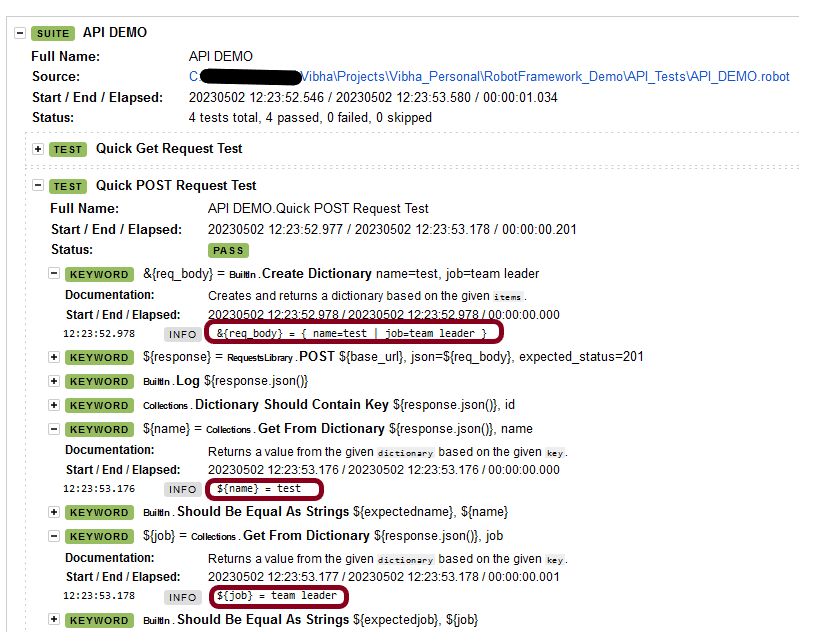
POST Request
The corresponding API Test in Robot Framework.
*** Settings ***
Library     RequestsLibrary
Library     Collections


*** Variables ***
${base_url}         https://reqres.in/api/users
${page_id}          2
${expectedname}     test
${expectedjob}      team leader


*** Test Cases ***

Quick POST Request Test
    &{req_body}=  Create Dictionary    name=test        job=team leader
    ${response}=     POST        ${base_url}     json=${req_body}    expected_status=201
    log      ${response.json()}
    Dictionary Should Contain Key     ${response.json()}     id
    ${name}=    Get From Dictionary     ${response.json()}    name
    Should Be Equal As Strings    ${expectedname}   ${name}

    ${job}=    Get From Dictionary     ${response.json()}    job
    Should Be Equal As Strings    ${expectedjob}    ${job}
The corresponding log of this request is
1.Create Dictionary – This keyword is used from BuiltIn Library. It creates and returns a dictionary based on the given Items. Items are typically given using the key=value syntax.
2. Dictionary should contain key – This keyword is used from Collections library. It is used to verify if the specified key is present in the dictionary.
3. Get From Dictionary – This keyword is used from the Collections library. It is used to return a value from the given dictionary based on the given key. Here, it is used to check the values of the key name and job.
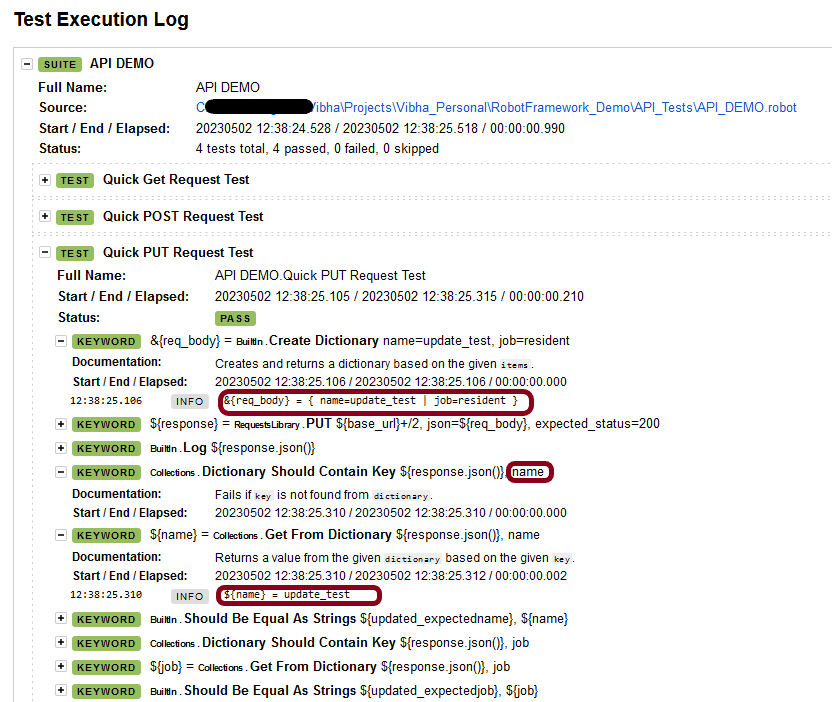
PUT Request
The corresponding API Test in Robot Framework.
*** Settings ***
Library     RequestsLibrary
Library     Collections


*** Variables ***
${base_url}         https://reqres.in/api/users
${updated_expectedname}     update_test
${updated_expectedjob}      resident


*** Test Cases ***

Quick PUT Request Test
    &{req_body}=  Create Dictionary    name=update_test        job=resident
    ${response}=     PUT        ${base_url}+/2     json=${req_body}    expected_status=200
    log      ${response.json()}

    Dictionary Should Contain Key     ${response.json()}     name
    ${name}=    Get From Dictionary     ${response.json()}    name
    Should Be Equal As Strings    ${updated_expectedname}    ${name}

    Dictionary Should Contain Key     ${response.json()}     job
    ${job}=    Get From Dictionary     ${response.json()}    job
    Should Be Equal As Strings    ${updated_expectedjob}    ${job}
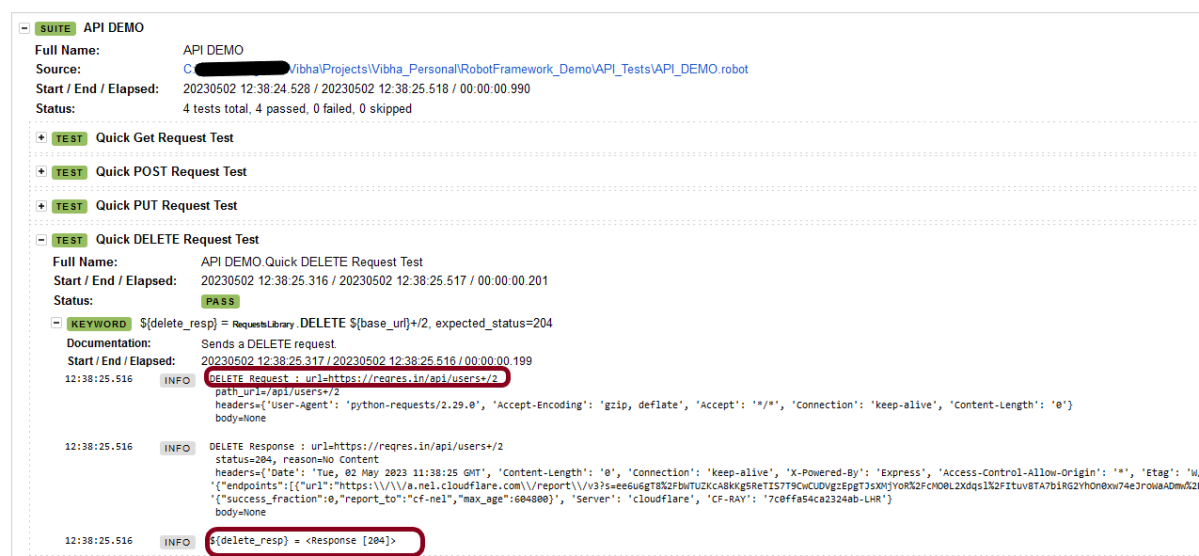
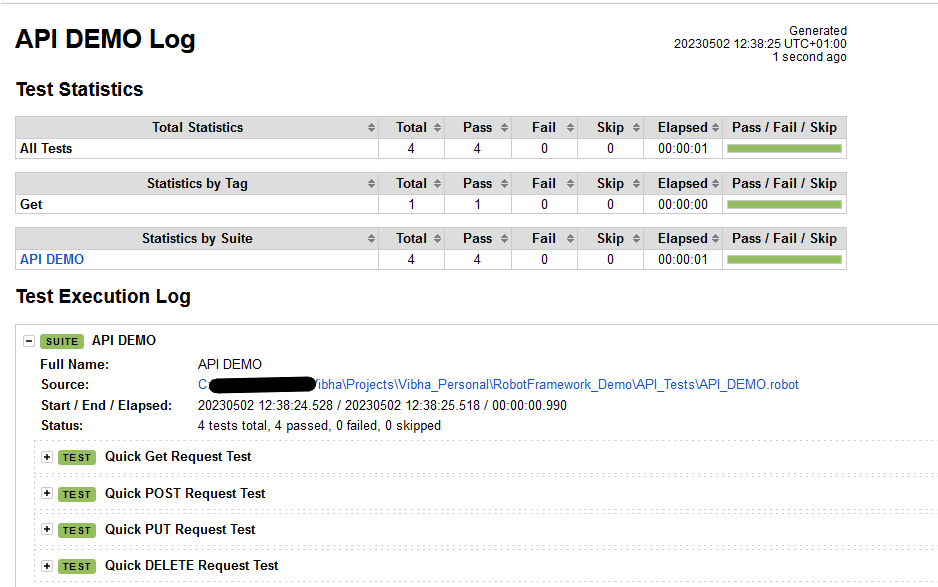
We need the below command to run the Robot Framework script.
robot API_DEMO.robot
The output of the above program is
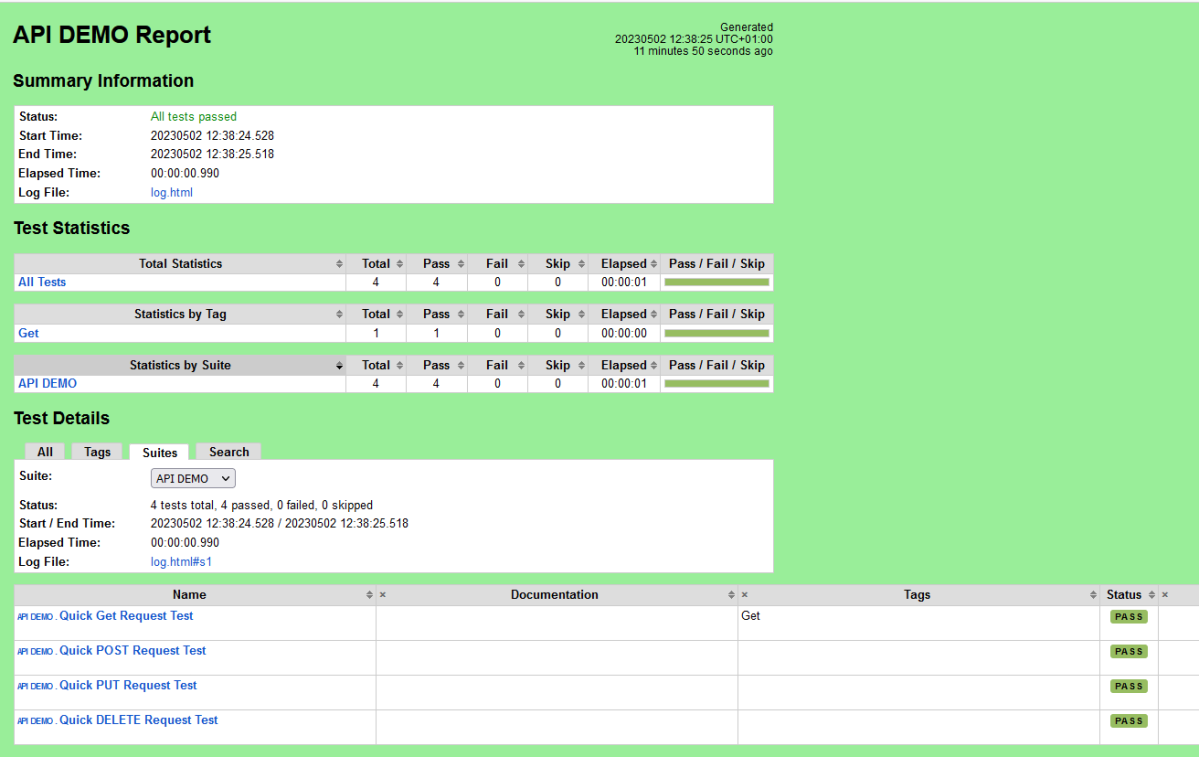
Step 7 – View Report and Log
We have the test case passed. The Robot Framework generates log.html, output.xml, and report.html by default.
Let us now see the report and log details.
Report
Right-click on report.html. Select Open In->Browser->Chrome(any browser of your wish).
The Report generated by the framework is shown below:
Log
Robot Framework has multiple log levels that control what is shown in the automatically generated log file. The default Robot Framework log level is INFO.
Right-click on log.html. Select Open In->Browser->Chrome(any browser of your wish).
That’s it! Congratulations on making it through this tutorial and hope you found it useful! Happy Learning!!