The previous tutorial will have explained to run Cucumber tests with JUnit4 or TestNG from Command-Line. Cucumber7 with JUnit5 has a lot of new configuration options. This tutorial will cover all the possible options.
Below is the sample CucumberRunnerTests class for JUnit5.
import static io.cucumber.junit.platform.engine.Constants.GLUE_PROPERTY_NAME;
import org.junit.platform.suite.api.ConfigurationParameter;
import org.junit.platform.suite.api.SelectClasspathResource;
import org.junit.platform.suite.api.Suite;

@Suite
@IncludeEngines("cucumber")
@SelectClasspathResource("com/example")
@SelectClasspathResource("/features")
@ConfigurationParameter(key = GLUE_PROPERTY_NAME, value = "com.example")

public class CucumberRunnerTests  {

}
Run Test from Command Line
1. Open the command prompt and change the directory to the project location where pom.xml is present.
cd C:\Users\Vibha\eclipse-workspace_personnel\Cucumber7JUnit5_Demo
2. All feature files should be in src/test/resources and create the Cucumber Runner class as CucumberRunnerTest. Note:- The Runner class name should end with Test to execute the tests from Command Line Run the following command in the command prompt:
mvn clean test
mvn clean test runs Cucumber Features using Cucumber’s JUnit Runner.
3. The below screenshot shows the build success output.
Overriding Cucumber Options
Cucumber provides several options that can be passed to on the command line.
1. Running Scenarios using Tags from Command Line
If you are using Maven and want to run a subset of scenarios tagged with @ValidCredentials.
mvn clean test -Dcucumber.filter.tags="@ValidCredentials"
2. Running a Feature file from Command Line
Suppose you want to run a single Feature File from the command line, then use the below syntax
mvn clean test -Dcucumber.features=src/test/resources/features/LoginPage.feature
3. Passing plugin from Command Line
If we want to pass a plugin, please use the below-specified command:
mvn clean test -Dcucumber.plugin=html:target/cucumber-reports/cucumberReport.html
You can see that the cucumberReport.html is generated by the plugin.
4. Passing multiple Parameter from Command Line
If we want to pass more than one parameter, then we can use the following command
mvn clean test -Dcucumber.features=src/test/resources/features/LoginPage.feature -Dcucumber.filter.tags="@ValidCredentials"
You can see that only 1 test is executed and rest 4 tests are skipped out of total 5 tests as shown in the Report.
5. Running a Scenario without a tag from Command Line
If we want to run a single Scenario from the command line and no tag is assigned to that scenario, this is how we specify
mvn clean test -Dcucumber.features=src/test/resources/features/LoginPage.feature:11
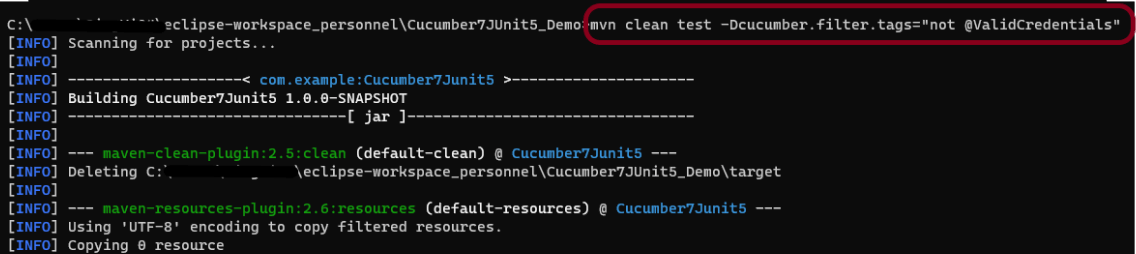
6. Ignoring a subset of scenarios
If we do not want to run any Scenario from the command line, this is how we specify
mvn clean test -Dcucumber.filter.tags="not @ValidCredentials"
There is a total of 5 tests, but only 4 will be executed and 1 will be skipped. The output of the above program is shown below:
7. Pass glue code through command line
If we want to pass glue code from the command line, this is how we specify
mvn clean test -Dcucumber.glue=com.example
8. Pass dry run value through command line
dry-run option can either be set as trueor false. If it is set as true, it means that Cucumber will only check that every step mentioned in the Feature File has corresponding code written in the Step Definition file or not. By default, dry-run is False.
mvn clean test -Dcucumber.execution.dry-run=true
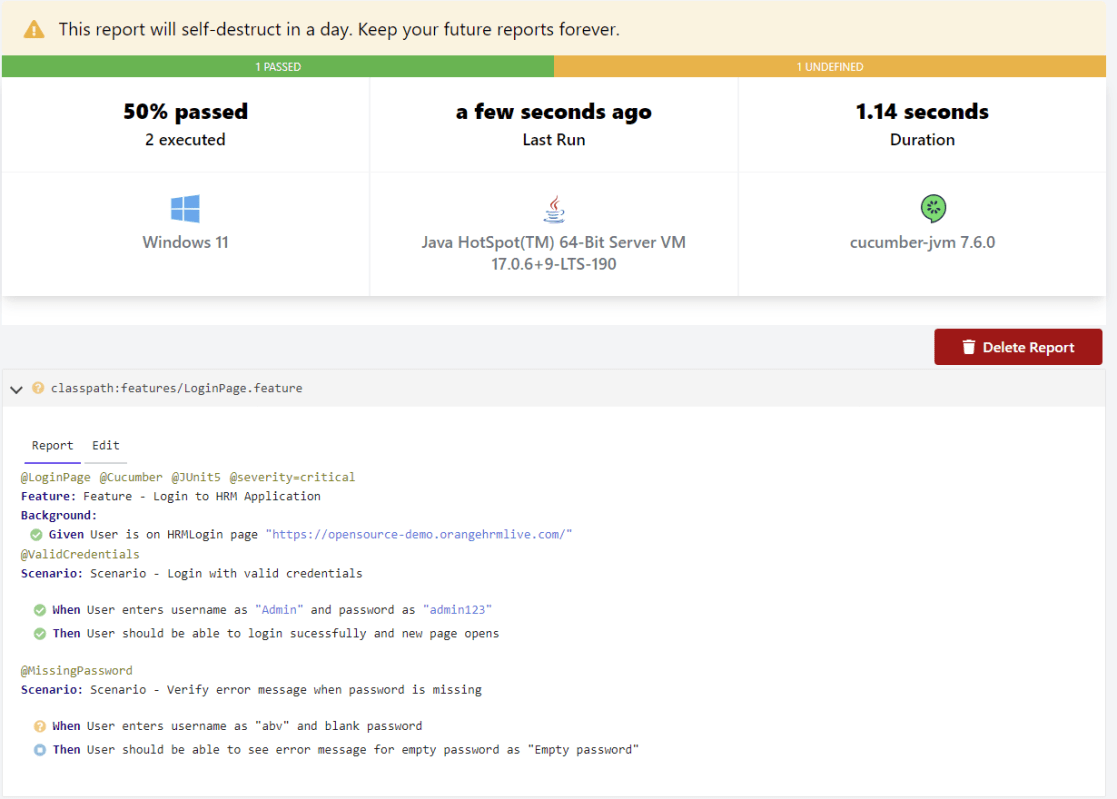
This image shows the steps in the feature file that does not have step definitions.
The cucumber report shows that out of 2 tests, 1 is executed and another one is undefined.
9. Pass snippet type value through command line
The default option for snippets is UNDERSCORE. This settings can be used to specify the way code snippets will be created by Cucumber.
mvn clean test -Dcucumber.snippet-type=camelcase
You can see that the code snippet is in camelCase. In the previous example, it underscored.
That’s it! Congratulations on making it through this tutorial and hope you found it useful! Happy Learning!!
Spring Boot 3.0.4 requires Java 17 and is compatible with and including Java 19. Spring Framework 6.0.6 or above is also required.
Explicit build support is provided for the following build tools:
Maven – 3.5+
Gradle – 7.x (7.5 or later) and 8.x
This framework consists of
SpringBoot Starter Parent – 3.1.0
Serenity Rest Assured – 3.6.12
Spring
Java 17
Gradle – 7.6.1
JUnit Jupiter API – 5.9.2
JUnit Jupiter Engine – 5.9.2
Serenity JUnit5 – 3.6.12
What is SpringBoot Application?
Spring Boot is an open-source micro-framework that provides Java developers with a platform to get started with an auto-configurable production-grade Spring application.
Comes with embedded HTTP servers like Tomcat orJetty to test web applications.
Adds many plugins that developers can use to work with embedded and in-memory databases easily. Spring allows you to easily connect with database and queue services like Oracle, PostgreSQL, MySQL, MongoDB, Redis, Solr, ElasticSearch, Rabbit MQ, and others.
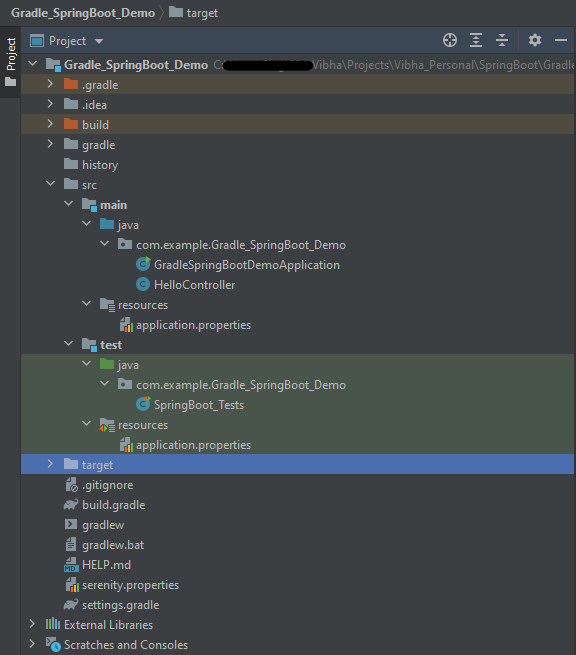
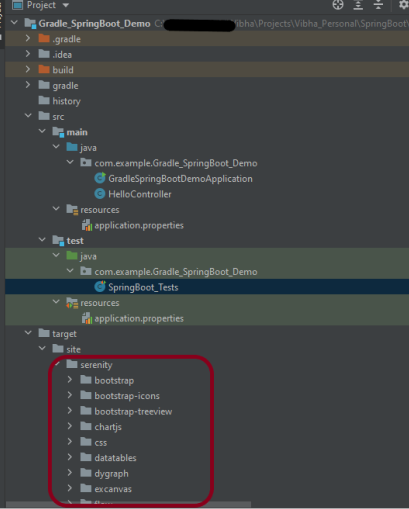
Project Directory Structure
Implementation Steps
Create a source folder – src/test/resources to create properties file
AddSpringBootTest, SerenityRest Assured, and Serenity-JUnit5 dependencies to the project
Create the Test classes.
Create an application.properties file in src/test/resources
Run the tests from JUnit5
Run the tests from Command Line
Serenity Report Generation
Step 1 – Create a source folder – src/test/resources to create test scenarios in the Feature file
Right-click on the test directory and select New->Directory and select resources (Maven Source Directories).
Step 2 – Add SpringBootTest,Rest Assured, and allure dependencies to the project
We have added SpringBootTest, SpringBoot Web, Tomcat, Spring Web, Rest Assured, and Serenity-JUnit5 dependencies to the build.gradle.
plugins {
	id 'java'
	id 'org.springframework.boot' version '3.1.0-SNAPSHOT'
	id 'io.spring.dependency-management' version '1.1.0'
	id 'net.serenity-bdd.serenity-gradle-plugin' version '3.6.7'
}

group = 'com.example'
version = '0.0.1-SNAPSHOT'
sourceCompatibility = '17'

repositories {
	mavenCentral()
	maven { url 'https://repo.spring.io/milestone' }
	maven { url 'https://repo.spring.io/snapshot' }
}

dependencies {

	implementation 'org.springframework.boot:spring-boot-starter'
	implementation 'org.springframework.boot:spring-boot-starter-web'
	implementation 'org.springframework.boot:spring-boot-starter-tomcat'
	implementation 'org.springframework:spring-web'

	testImplementation 'org.springframework.boot:spring-boot-starter-test'
	testImplementation 'net.serenity-bdd:serenity-junit5:3.6.12'
	testImplementation 'org.junit.jupiter:junit-jupiter-api:5.9.2'
	testImplementation 'org.junit.jupiter:junit-jupiter-engine:5.9.2'
	testImplementation 'net.serenity-bdd:serenity-core:3.6.12'
	testImplementation 'net.serenity-bdd:serenity-rest-assured:3.6.12'
	testImplementation 'net.serenity-bdd:serenity-spring:3.6.12'
}

tasks.named('test') {
	useJUnitPlatform() {}
	testLogging {
		showStandardStreams = true
	}
	systemProperties System.getProperties()
}

gradle.startParameter.continueOnFailure = true

test.finalizedBy(aggregate)
Step 3 – Create the Test classes
uses @SpringBootTest annotation which loads the actual application context.
uses WebEnvironment.RANDOM_PORT to create and run the application at some random server port.
@LocalServerPort gets the reference of the port where the server has started. It helps in building the actual request URIs to mimic real client interactions.
Below is the Test Class, created in the src/test/java directory.
import io.restassured.response.ValidatableResponse;
import net.serenitybdd.junit5.SerenityJUnit5Extension;
import org.junit.jupiter.api.Assertions;
import org.junit.jupiter.api.Test;
import org.junit.jupiter.api.extension.ExtendWith;
import org.springframework.beans.factory.annotation.Value;
import org.springframework.boot.test.context.SpringBootTest;
import org.springframework.boot.test.web.server.LocalServerPort;
import static io.restassured.RestAssured.given;

@ExtendWith(SerenityJUnit5Extension.class)
@SpringBootTest(webEnvironment = SpringBootTest.WebEnvironment.RANDOM_PORT)
public class SpringBootDemoDefinitions {

    private final static String BASE_URI = "http://localhost:";

    @LocalServerPort
    private int port;

    @Value("${server.servlet.context-path}")
    private String basePath;

   private ValidatableResponse response;

    @Test
    public void verifyController1() throws Exception  {
        response = given().contentType("application/json")
                .header("Content-Type", "application/json")
                .when().get(BASE_URI + port + basePath+ "/").then().statusCode(200);

        String Actual = response.extract().asString();
        System.out.println("Result :"+Actual);
        Assertions.assertEquals("Hello World, Spring Boot!", Actual);
    }

    @Test
    public void verifyController2() throws Exception  {
        response = given().contentType("application/json")
                .header("Content-Type", "application/json")
                .when().get(BASE_URI + port + basePath+ "/qaautomation").then().statusCode(200);

        String Actual = response.extract().asString();
        System.out.println("Result :"+Actual);
        Assertions.assertEquals("Hello QA Automation!", Actual);
    }
}
This class sends the request and receives a response after performing the GET operation. Here, the validation of the response also takes place by asserting the expected and actual response
Step 4 – Create an application.properties file in src/test/resources
Application.properties is created under src/ test/java.
spring.profiles.active – property to specify which profiles are active. The default profile is always active. server.port – By default, the embedded server starts on port 8080. Now the server will start on port 8090 server.servlet.context-path – the context path in Spring Boot can be changed by setting a property, server.servlet.context-path.
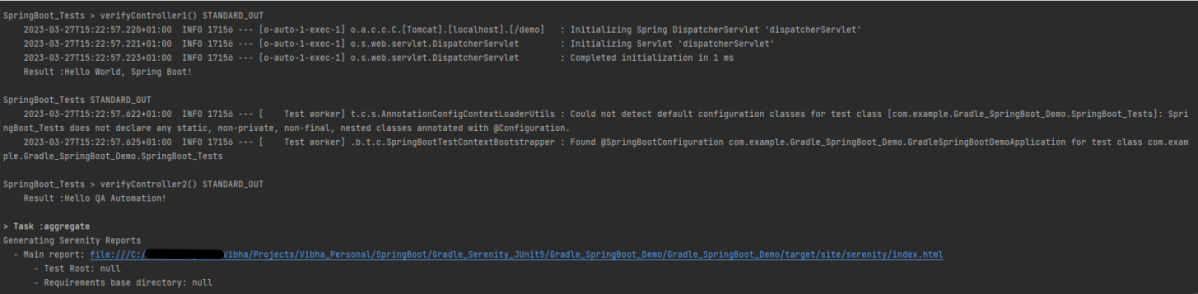
Step 5 – Run the tests from JUnit5
Right-click on the Test class and select Run ‘SpringBoot_Tests’.
The output of the above program is
This image shows that the profile name is “test”. Application is started on port – “65221” and the context path is “/demo”.
Step 6 – Run the tests from Command Line
Run the tests from the command line by using the below command
gradle clean test
The output of the above program is
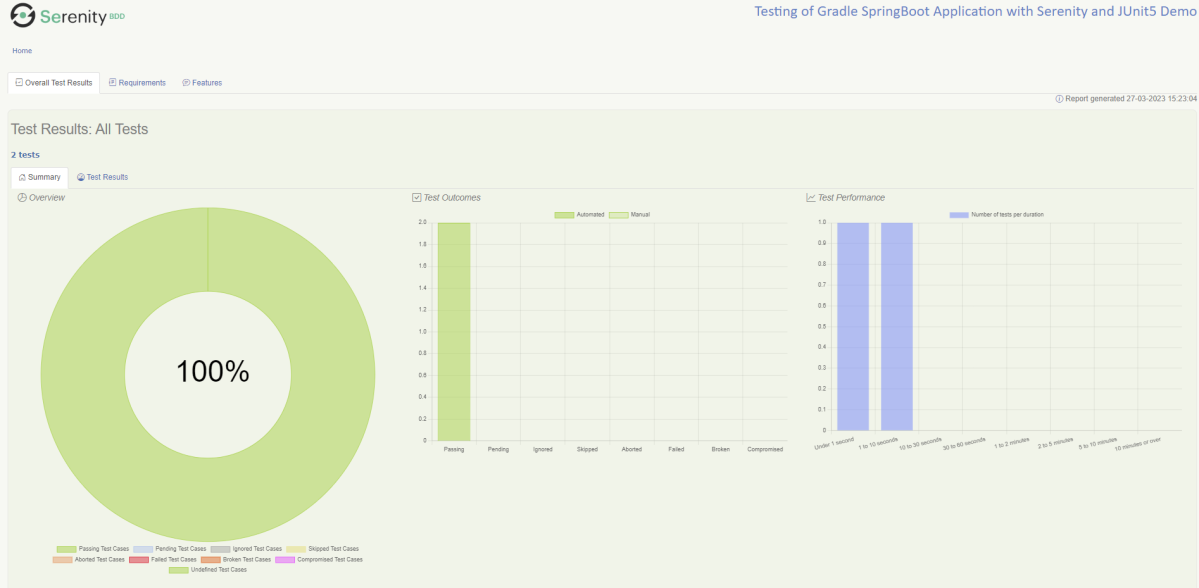
Step 7 – Serenity Report Generation
The best part about Serenity is the report generation by it. The Reports contain all possible type of information, you can think of with minimal extra effort. There is multiple types of reports are generated. We are interested in index.html .
Below is the new Serenity Report.
We are done! Congratulations on making it through this tutorial and hope you found it useful! Happy Learning!!
Spring Boot is an open-source micro-framework that provides Java developers with a platform to get started with an auto-configurable production-grade Spring application.
Comes with embedded HTTP servers like Tomcat orJetty to test web applications.
Adds many plugins that developers can use to work with embedded and in-memory databases easily. Spring allows you to easily connect with database and queue services like Oracle, PostgreSQL, MySQL, MongoDB, Redis, Solr, ElasticSearch, Rabbit MQ, and others.
Project Directory Structure
What is RestController?
HTTP requests are handled by a controller in Spring’s approach to building RESTful web services. The @RestController annotation identifies these components, and the GreetingController shown below (from src/main/java/com/example/springboot_demo/HelloController.java) handles GET requests for / and /qaautomation by returning a new instance of the Greeting class. Spring RestController takes care of mapping request data to the request-defined handles method.
import org.springframework.web.bind.annotation.GetMapping;
import org.springframework.web.bind.annotation.RestController;

@RestController
public class HelloController {

    @GetMapping(path="/")
    String hello() {
        return "Hello World, Spring Boot!";
    }


    @GetMapping(path="/qaautomation")
    String qaautomation() {
        return "Hello QA Automation!";
    }

}
Implementation Steps
Create a source folder – src/test/resources to create properties file
AddSpringBootTest, Serenity and JUnit5 dependencies to the project
Create the Test and Helper classes.
Create an application.properties file in src/test/resources
Create serenity.properties at the root of the project
Run the tests from JUnit5
Run the tests from Command Line
Serenity Report Generation
Step 1 – Create a source folder – src/test/resources to create test scenarios in the Feature file
Right-click on the test directory and select New->Directory and select resources (Maven Source Directories).
Step 2 – Add SpringBootTest, Serenity, and JUnit5 dependencies to the project
We have added SpringBootTest, Serenity, Rest Assured, and JUnit5 dependencies to pom.xml.
uses @SpringBootTest annotation which loads the actual application context.
uses WebEnvironment.RANDOM_PORT to create and run the application at some random server port.
@LocalServerPort gets the reference of the port where the server has started. It helps in building the actual request URIs to mimic real client interactions.
Below is the code of the StepDefinition and Helper class. These classes are created in the src/test/java directory.
This class sends the request and receives a response after performing the GET operation. Here, the validation of the response also takes place by asserting the expected and actual response
Step 4 – Create an application.properties file in src/test/resources
Application.properties is created under src/test/resources for the test profile. If you want to run the SpringBootApplication from DEV profile, then create application.properties file in src/main/resources.
spring.profiles.active – property to specify which profiles are active. The default profile is always active. server.port – By default, the embedded server starts on port 8080. Now the server will start on port 8090 server.servlet.context-path – the context path in Spring Boot can be changed by setting a property, server.servlet.context-path.
Step 5 – Create serenity.properties at the root of the project
serenity.project.name = Testing of SpringBoot Application with Serenity and JUnit5 Demo
Step 6 – Run the tests from JUnit5
Right-click on the Test class and select Run ‘SpringBootDemoApplicationTests’.
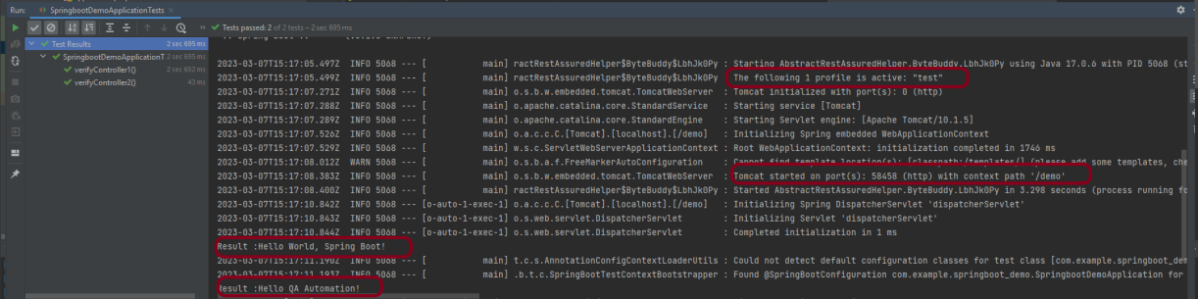
The output of the above program is
This image shows that the profile name is “test”. Application is started on port – “58458” and the context path is “/demo”.
Step 7 – Run the tests from Command Line
Run the tests from the command line by using the below command
mvn clean verify
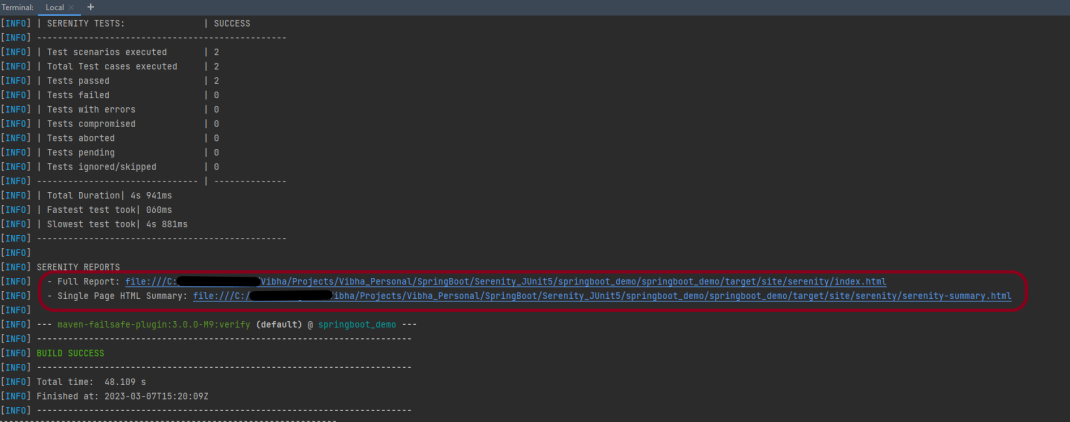
The output of the above program is
Step 8 – Serenity Report Generation
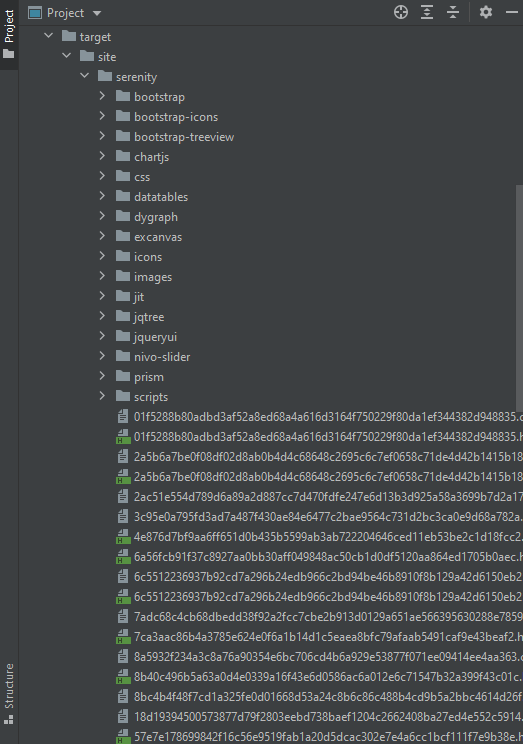
The serenity test reports are generated under target/site/serenity.
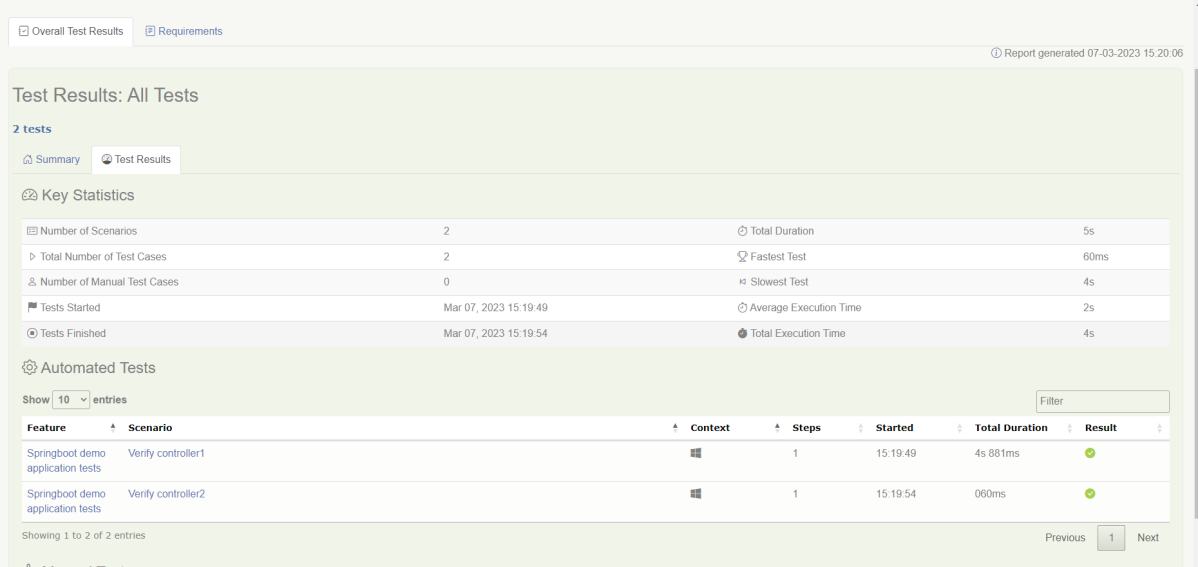
Below is the sample Index.html Report.
Go to Test Results, present at the top left of the index.html page.
Spring Boot 3.0.4 requires Java 17 and is compatible with and including Java 19. Spring Framework 6.0.6 or above is also required.
Explicit build support is provided for the following build tools:
Maven – 3.5+
Gradle – 7.x (7.5 or later) and 8.x
This framework consists of
SpringBoot Starter Parent – 3.1.0
Serenity – 3.6.12
Serenity Cucumber – 3.6.12
Serenity JUnit4 – 3.6.12
Serenity Rest Assured – 3.6.12
Spring
Java 17
Gradle – 7.6.1
What is SpringBoot Application?
Spring Boot is an open-source micro-framework that provides Java developers with a platform to get started with an auto-configurable production-grade Spring application.
Comes with embedded HTTP servers like Tomcat orJetty to test web applications.
Adds many plugins that developers can use to work with embedded and in-memory databases easily. Spring allows you to easily connect with database and queue services like Oracle, PostgreSQL, MySQL, MongoDB, Redis, Solr, ElasticSearch, Rabbit MQ, and others.
What is RestController?
HTTP requests are handled by a controller in Spring’s approach to building RESTful web services. The @RestController annotation identifies these components, and the HelloController shown below (from src/main/java/com/example/springboot_demo/HelloController.java) handles GET requests for / and /qaautomation by returning a new instance of the Greeting class. Spring RestController takes care of mapping request data to the request-defined handles method.
import org.springframework.web.bind.annotation.GetMapping;
import org.springframework.web.bind.annotation.RestController;

@RestController
public class HelloController {

    @GetMapping(path="/")
    String hello() {
        return "Hello World, Spring Boot!";
    }


    @GetMapping(path="/qaautomation")
    String qaautomation() {
        return "Hello QA Automation!";
    }

}
Project Directory Structure
Implementation Steps
Create a source folder – src/test/resources to create properties file
AddSpringBootTest,Rest Assured, and JUnit4 dependencies to the project
Create a feature file in src/test/resources
Create the StepDefinition and Helper classes.
Create a Serenity Runner class in the src/test/java directory
Create an application.properties file in src/test/resources
Create a serenity.properties at the root level of the project
Run the tests from Command Line
Serenity Report Generation
CucumberReport Generation
Step 1 – Create a source folder – src/test/resources to create test scenarios in the Feature file
Right-click on the test directory and select New->Directory and select resources (Maven Source Directories).
Step 2 – Add SpringBootTest,Rest Assured, and other dependencies to the project
We have added SpringBootTest, SpringBoot Web, Tomcat, Spring Web, Rest Assured, and JUnit4 dependencies to the build.gradle.
plugins {
	id 'java'
	id 'org.springframework.boot' version '3.1.0-SNAPSHOT'
	id 'io.spring.dependency-management' version '1.1.0'
	id "net.serenity-bdd.serenity-gradle-plugin" version "3.6.7"
}

group = 'com.example'
version = '0.0.1-SNAPSHOT'
sourceCompatibility = '17'

repositories {
	mavenCentral()
	maven { url 'https://repo.spring.io/milestone' }
	maven { url 'https://repo.spring.io/snapshot' }
}


dependencies {

	implementation 'org.springframework.boot:spring-boot-starter'
	implementation 'org.springframework.boot:spring-boot-starter-web'
	implementation 'org.springframework.boot:spring-boot-starter-tomcat'
	implementation 'org.springframework:spring-web'

	testImplementation 'org.springframework.boot:spring-boot-starter-test'
	testImplementation 'net.serenity-bdd:serenity-core:3.6.12'
	testImplementation 'net.serenity-bdd:serenity-cucumber:3.6.12'
	testImplementation 'net.serenity-bdd:serenity-rest-assured:3.6.12'
	testImplementation 'net.serenity-bdd:serenity-spring:3.6.12'
	testImplementation 'net.serenity-bdd:serenity-junit:3.6.12'
	testImplementation 'org.junit.vintage:junit-vintage-engine'

}

tasks.named('test') {
	useJUnit() {}
	testLogging {
		showStandardStreams = true
	}
	systemProperties System.getProperties()
}

gradle.startParameter.continueOnFailure = true

test.finalizedBy(aggregate)
Step 3 – Create a feature file in src/test/resources
Below is an example of a feature file that shows a sample test scenario. Feature file should end with .feature. It contains the test scenarios in the form of simple English using the terms Given, When, Then, And.
Feature: SpringBoot Request

@ReceiveCorrectResponse

   Scenario Outline: Send a valid Request to get correct response
    Given I send a request to the URL "<url>"
    Then the response will return "<response>"

   Examples:
   | url             | response                   |
   | /               | Hello World, Spring Boot!  |
   | /qaautomation   | Hello QA Automation!       |
Step 4 – Create the StepDefinition and Helper classes.
Below is the code of the StepDefinition and Helper class. These classes are created in the src/test/java directory.
uses @SpringBootTest annotation which loads the actual application context.
uses WebEnvironment.RANDOM_PORT to create and run the application at some random server port.
@LocalServerPort gets the reference of the port where the server has started. It helps in building the actual request URIs to mimic real client interactions.
This class sends the request and receives a response after performing the GET operation. Here, the validation of the response also takes place by asserting the expected and actual response
import io.cucumber.java.en.Given;
import io.cucumber.java.en.Then;
import io.restassured.response.Response;
import net.serenitybdd.rest.SerenityRest;
import net.thucydides.core.annotations.Steps;
import org.junit.Assert;

public class SpringBootDemoDefinitions {

	@Steps
    AbstractRestAssuredHelper helper;
    private Response response;

    @Given("I send a request to the URL {string}")
    public void iSendARequest(String endpoint) throws Exception  {
         response = helper.getAnonymousRequest()
                    .header("Content-Type", "application/json").when().get(endpoint);
    }

    @Then("the response will return {string}")
    public void extractResponse(String Expected ) {
          SerenityRest.restAssuredThat(response -> response.statusCode(200));
          String Actual = response.asString();
          System.out.println("Result :"+Actual);
          Assert.assertEquals(Expected, Actual);
    }
}
Step 5 – Create a Serenity Runner class in the src/test/java directory
We cannot run a Feature file on its own in cucumber-based framework. We need to create a Java class that will run the Feature File. It is the starting point for JUnit to start executing the tests. TestRunner class is created under src/test/java. When you run the tests with serenity, you use the CucumberWithSerenitytest runner.
spring.profiles.active – property to specify which profiles are active. The default profile is always active. server.port – By default, the embedded server starts on port 8080. Now the server will start on port 8090 server.servlet.context-path – the context path in Spring Boot can be changed by setting a property, server.servlet.context-path.
Step 7 – Create a serenity.properties at the root level of the project
serenity.project.name = Testing of Gradle SpringBoot Application with Serenity and JUnit4 Demo
Step 8 – Run the tests from Command Line
Run the tests from the command line by using the below command
gradle clean test
The output of the above program is
This image shows that the profile name is “dev”. Application is started on port – “54462” and the context path is “/demo”.
Step 9 – Serenity Report Generation
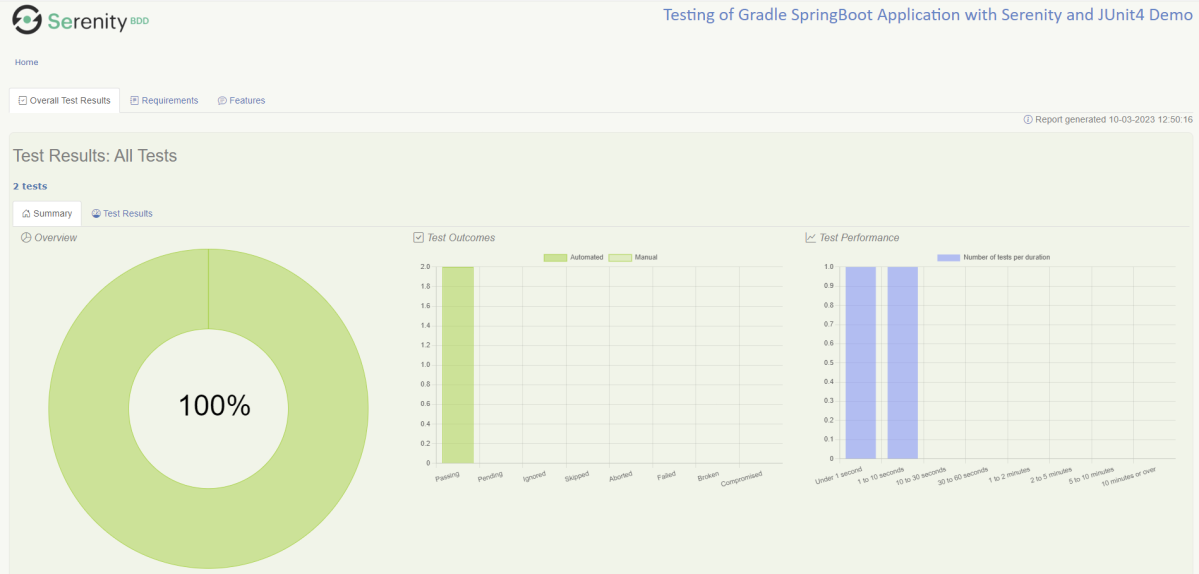
By default, the test report generated by Serenity is placed under target/site/serenity/index.html. Below is the sample Serenity Report.
Below is the sample Serenity Report.
Step 10 – CucumberReport Generation
A Cucumber Report can be generated by adding publish=true in SpringRunnerTests as shown in the above example. Click on the link provided in the execution status.
Cucumber Report
Congratulations on making it through this tutorial and hope you found it useful! Happy Learning!! Cheers!!
In the previous tutorial, I explained about Integration Testing of SpringBoot Application with Serenity BDD, Cucumber and JUnit4. This one provides a comprehensive tutorial on integration testing of a SpringBoot application using SpringBoot Test and TestNG. It covers essential topics like SpringBoot application, RestController, prerequisites, dependency list, project directory structure, and detailed test implementation steps.
Spring Boot is an open-source micro-framework that provides Java developers with a platform to get started with an auto-configurable production-grade Spring application.
Comes with embedded HTTP servers like Tomcat orJetty to test web applications.
Adds many plugins that developers can use to work with embedded and in-memory databases easily. Spring allows you to easily connect with database and queue services like Oracle, PostgreSQL, MySQL, MongoDB, Redis, Solr, ElasticSearch, Rabbit MQ, and others.
What is RestController?
HTTP requests are handled by a controller in Spring’s approach to building RESTful web services. The @RestController annotation identifies these components, and the GreetingController shown below (from src/main/java/com/example/HelloController.java) handles GET requests for / and /qaautomation by returning a new instance of the Greeting class. Spring RestController takes care of mapping request data to the request-defined handles method.
import org.springframework.web.bind.annotation.GetMapping;
import org.springframework.web.bind.annotation.RestController;

@RestController
public class HelloController {

    @GetMapping(path="/")
    String hello() {
        return "Hello World, Spring Boot!";
    }


    @GetMapping(path="/qaautomation")
    String qaautomation() {
        return "Hello QA Automation!";
    }

}
In this tutorial, I will explain the IntegrationTesting of the SpringBoot Application using SpringBoot Test and TestNG.
Prerequisite
Spring Boot 3.0.4 requires Java 17 and is compatible with and including Java 19. Spring Framework 6.0.6 or above is also required.
Explicit build support is provided for the following build tools:
Maven – 3.5+
Gradle – 7.x (7.5 or later) and 8.x
Dependency List
SpringBoot Starter Parent – 3.2.5
TestNG – 7.10.2
Rest Assured – 5.4.0
Java 17
Maven – 3.9.6
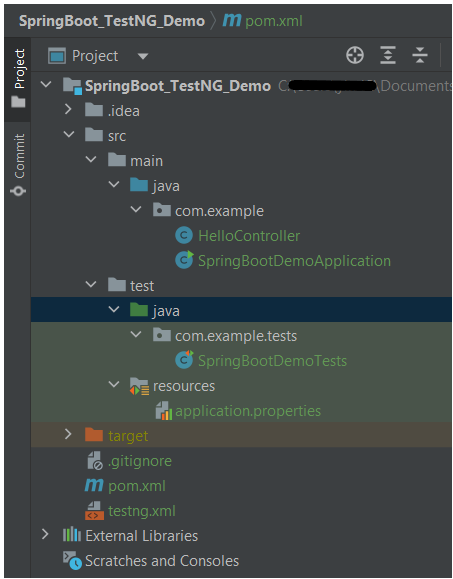
Project Directory Structure
Test Implementation Steps
Step 1 – Create a source folder – src/test/resources
Create a source folder – src/test/resources to properties file in it.
Right-click on the test directory and select New->Directory and select resources (Maven Source Directories).
Step 2 – Add dependencies to the project
We have added SpringBootTest, SpringBoot Tomcat, SpringBoot Web, Spring Web, Rest Assured, and TestNG dependencies to the pom.xml.
uses @SpringBootTest annotation which loads the actual application context.
uses WebEnvironment.RANDOM_PORT to create and run the application at some random server port.
@LocalServerPort gets the reference of the port where the server has started. It helps in building the actual request URIs to mimic real client interactions.
Below is the code of the sample Test class. These classes are created in the src/test/java directory.
import io.restassured.response.ValidatableResponse;
import org.springframework.beans.factory.annotation.Value;
import org.springframework.boot.test.context.SpringBootTest;
import org.springframework.boot.test.web.server.LocalServerPort;
import org.springframework.test.context.testng.AbstractTestNGSpringContextTests;
import org.testng.Assert;
import org.testng.annotations.Test;
import static io.restassured.RestAssured.given;

@SpringBootTest(webEnvironment = SpringBootTest.WebEnvironment.RANDOM_PORT)
public class SpringBootDemoTests extends AbstractTestNGSpringContextTests {

    private final static String BASE_URI = "http://localhost:";

    @LocalServerPort
    private int port;

    @Value("${server.servlet.context-path}")
    private String basePath;

    private ValidatableResponse response;

    @Test
    public void verifyController1()  {
         response = given().contentType("application/json")
                    .header("Content-Type", "application/json")
                 .when().get(BASE_URI + port + basePath + "/").then().statusCode(200);

         String Actual = response.extract().asString();
          System.out.println("Result :"+Actual);
          Assert.assertEquals("Hello World, Spring Boot!", Actual);
    }

    @Test
    public void verifyController2()   {
        response = given().contentType("application/json")
                .header("Content-Type", "application/json")
                .when().get(BASE_URI + port + basePath + "/qaautomation").then().statusCode(200);

        String Actual = response.extract().asString();
        System.out.println("Result :"+Actual);
        Assert.assertEquals("Hello QA Automation!", Actual);
    }
}
The AbstractTestNGSpringContextTests is an abstract base class having the ApplicationContext supported in the testNG explicitly.
This class sends the request and receives a response after performing the GET operation. Here, the validation of the response also takes place by asserting the expected and actual response.
Step 4 – Create an application.properties file in src/test/resources
Application.properties is created under src/ test/java.
spring.profiles.active – property to specify which profiles are active. The default profile is always active. server.port – By default, the embedded server starts on port 8080. Now the server will start on port 8089 server.servlet.context-path – the context path in Spring Boot can be changed by setting a property, server.servlet.context-path.
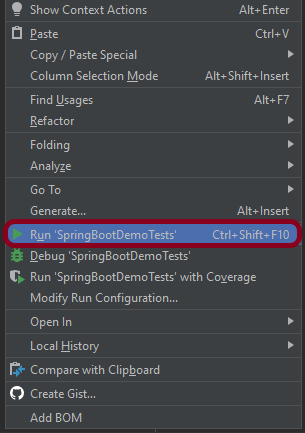
Step 5 – Run the tests from Test Class
Right-click on the Test class and select Run ‘SpringBootDemoTests’.
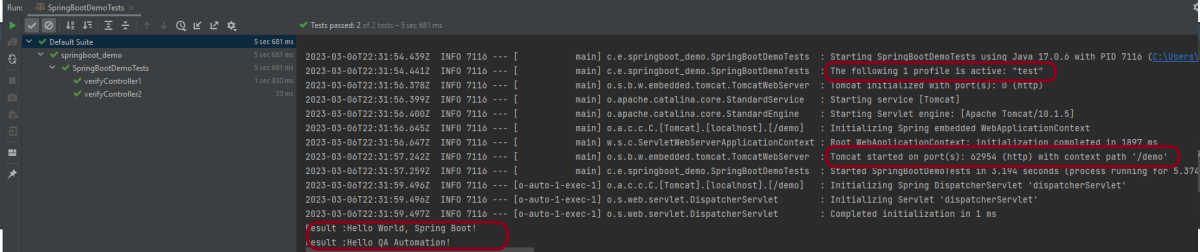
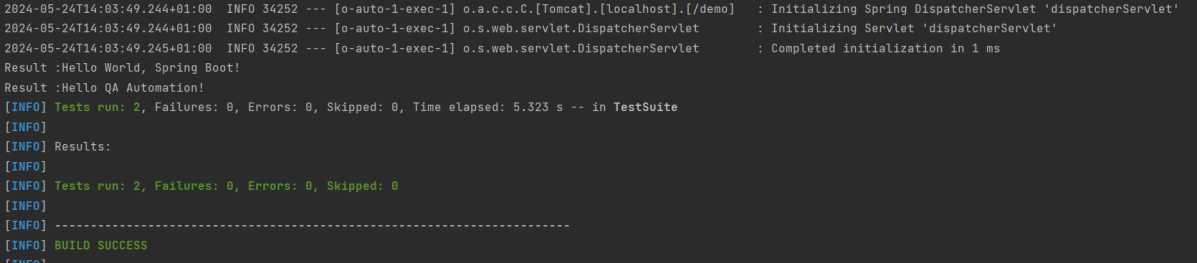
The output of the above program is
This image shows that the profile name is “test”. Application is started on port – “62954” and the context path is “/demo”.
Step 6 – Run the tests from testng.xml
First, we need to create a testng.xml at the root of the project.
<?xml version = "1.0"encoding = "UTF-8"?>
<!DOCTYPE suite SYSTEM "http://testng.org/testng-1.0.dtd">
<suite name = "Suite1">
    <test name = "TestNG Demo">
        <classes>
            <class name = "com.example.tests.SpringBootDemoTests"/>
        </classes>
    </test>
</suite>
Right-click on testng.xml and select Run ‘…\testng.xml’.
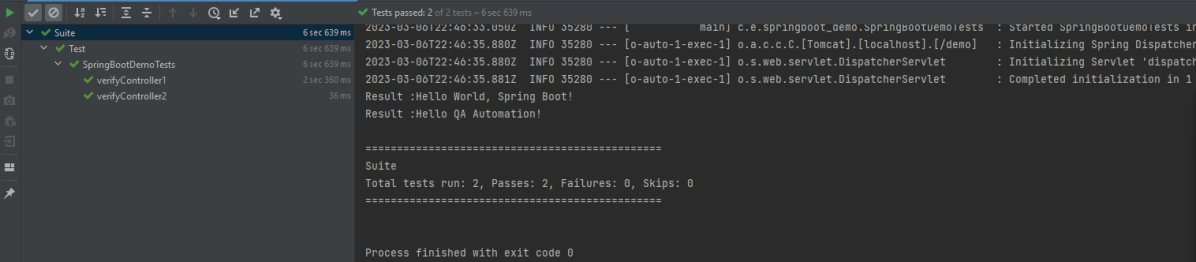
The output of the above program is
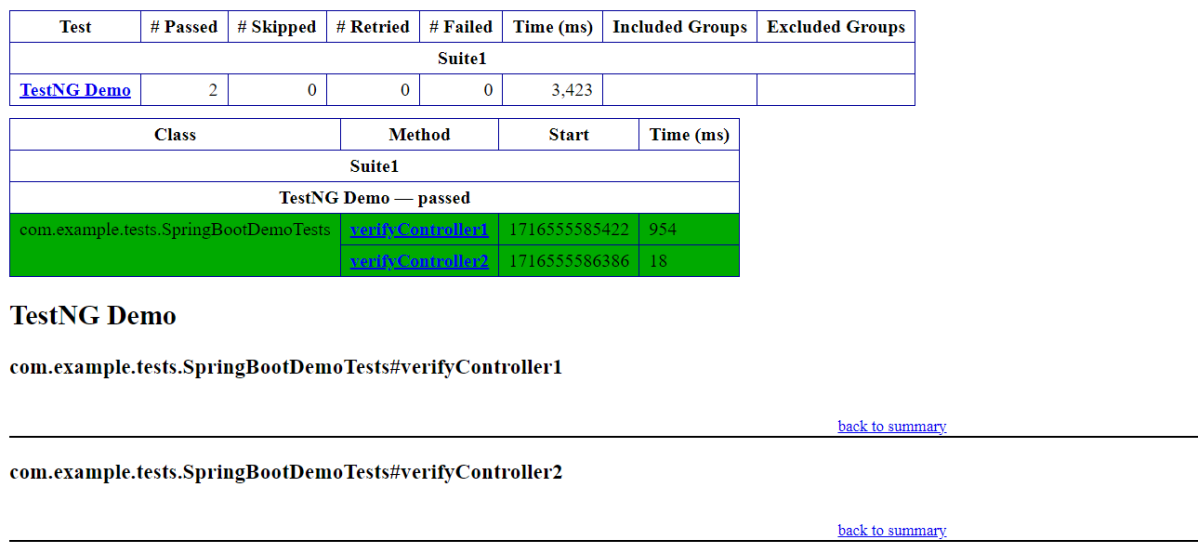
Step 7 – TestNG Report Generation
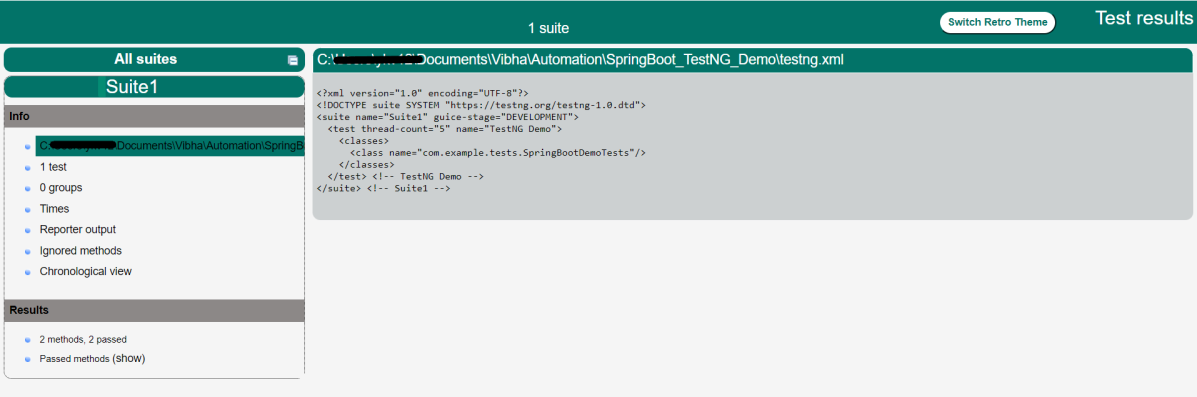
The test report generated by TestNG is placed under test-output/index.html.
Index.html
TestNG produces an “index.html” report, and it resides under the test-output folder. The below image shows index.html report. This report contains a high-level summary of the tests.
Emailable-Report.html
Test-Output folder also contains Emailable-Report.html. Open “emailable-report.html“, as this is an HTML report open it with the browser. The below image shows emailable-report.html.
Step 8 – Run the tests through Maven Command Line
Starting from SpringBoot 3.1.0 version, we need to add the below dependency to the surefire plugin to run the tests through Maven Command Line.
GitHub is a for-profit organization that provides cloud-based Git repository hosting. It simplifies the use of Git for version control and collaboration by individuals and teams. The GitHub interface is simple enough that even inexperienced coders can use it. Without GitHub, using Git generally necessitates a bit more technical know-how and command-line proficiency.
Furthermore, anyone can sign up for and host a public code repository for free, making GitHub particularly popular with open-source projects.
In this tutorial, I will explain how we can clone a project from GitLab in Eclipse.
Implementation Steps
Clone the Project
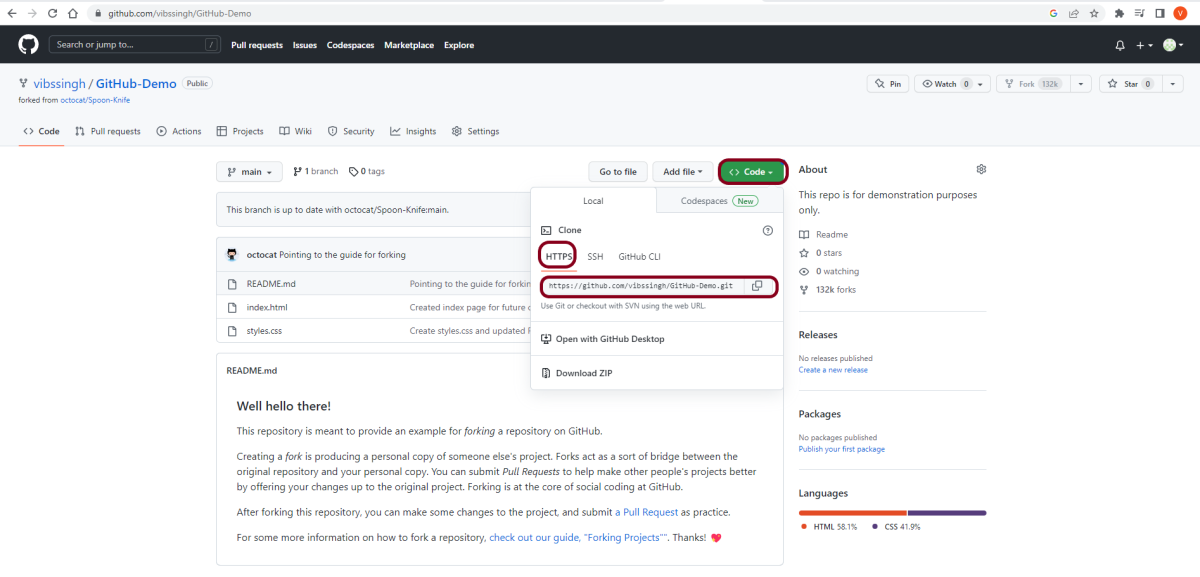
Step 1 – Go to GitHub and select the project which you want to clone. Click on the green colour “Code” button, then copy the hyperlink as shown in the image. You can either Clone with HTTPS, SSH, or GitHub CLI.
Import the project in Eclipse
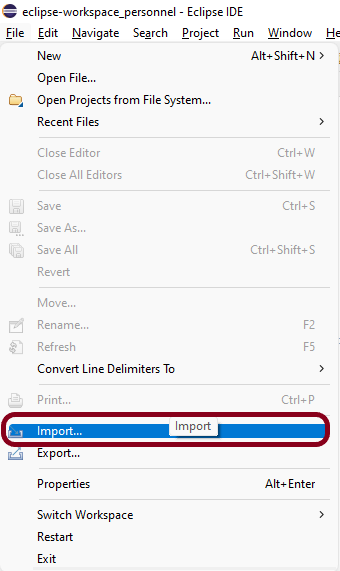
Step 2 – Open Eclipse and go to File > Import in eclipse as shown in the image.
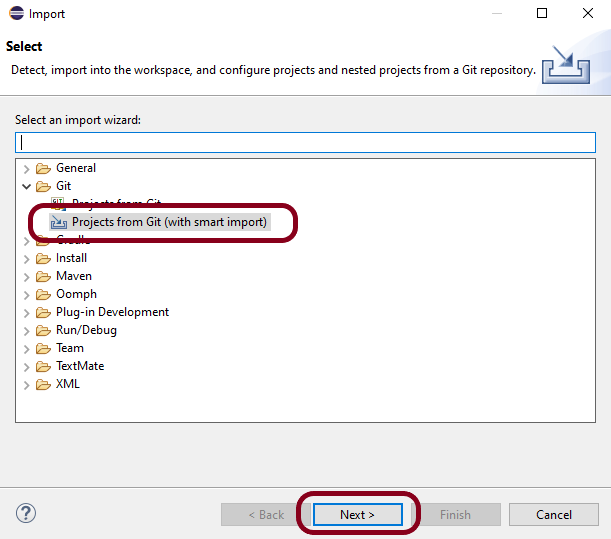
Step 3– A window will pop up in which select Git Folder. Under the Git folder, select the option – Projects from Git (with smart import)as shown in the image.
Click on the NEXT button.
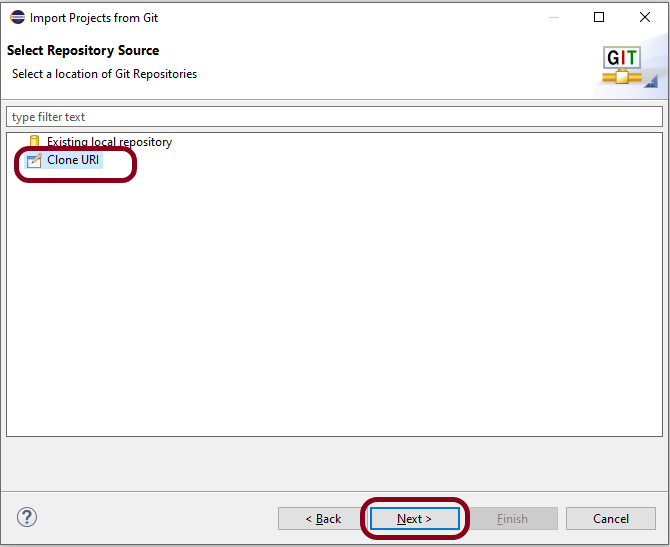
Step 4 – A new window will pop up in which select the option –Clone URI as shown in the image.
Click on the NEXT button.
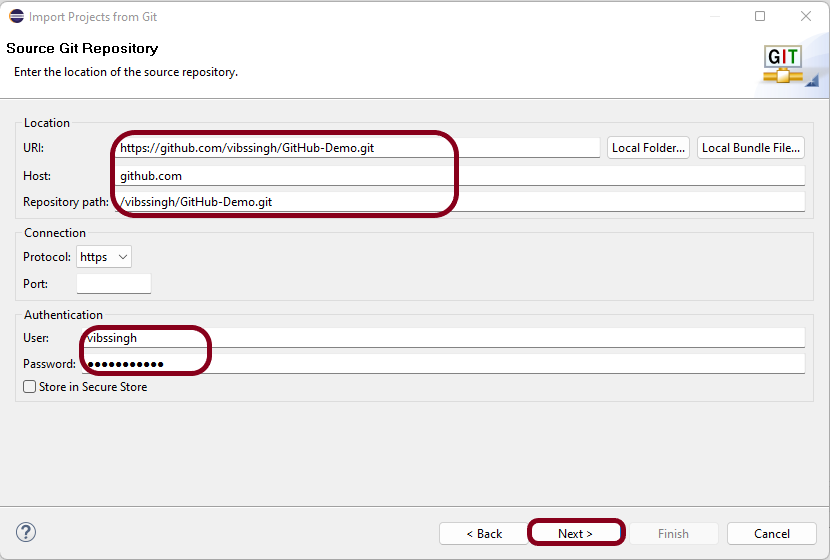
Step 5 – Another window will pop up in which you have to paste theGitHub Repository URL and alsoGitHub User ID and Passwordand click on the “Next” button.
URI – This is the URL that we have cloned from GitHub in Step 1. Host – github.com Repository path – Path of the project in GitHub (This is auto-populated after entering URI)
Authentication User – Username of GitHub Password – Password of GitHub
Step 6– Select main and select “When fetching a commit, also fetch its tags“.
Click on the “Next” button.
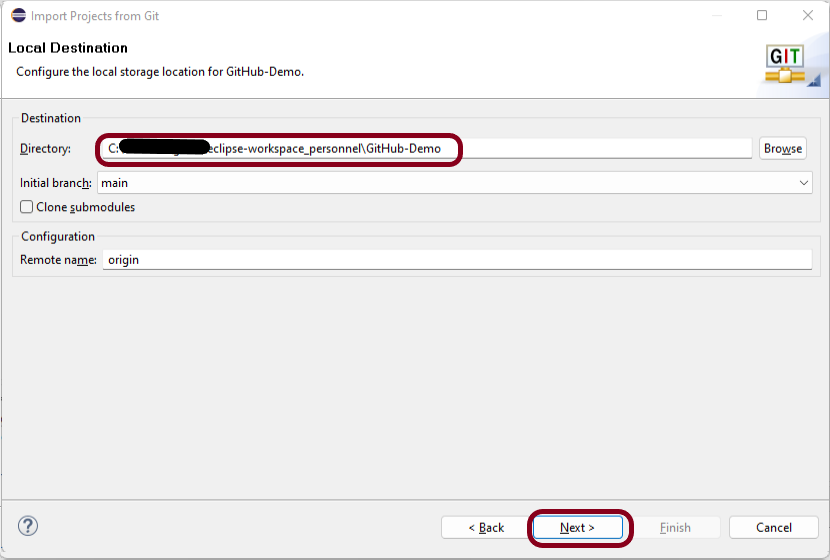
Step 7– Select the Folder directory in which you want to import the repository.
Click on the Next button.
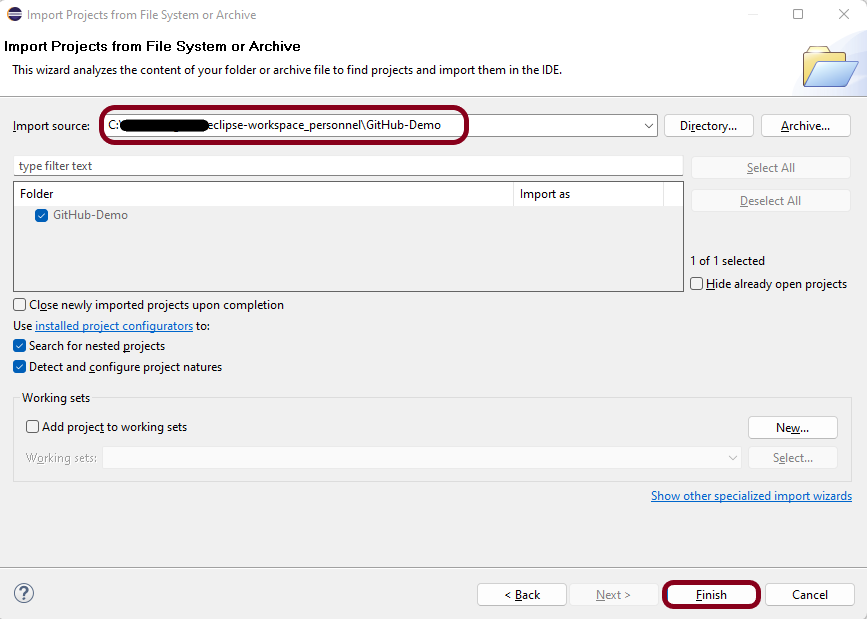
Step 8 – Select the Import Source, this is auto-generated. This wizard analyzes the content of the folder to find the project and import them into the IDE.
Click on the Finish button.
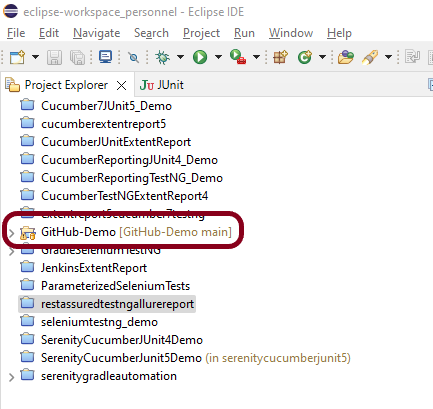
Step 9 – We have successfully imported the GitHub Repository as shown in the below image.
Congratulations on making it through this tutorial and hope you found it useful! Happy Learning!! Cheers!!
Masterthought library provides pretty HTML reports for Cucumber. The cucumber JSON file is used to generate the HTML for the website. This Java report publisher was made particularly with publishing cucumber reports to the Jenkins build server in mind. It releases aesthetically pleasing HTML reports with charts displaying the outcomes of cucumber runs.
Cucumber lacks a sophisticated reporting feature. Cucumber generates a number of simple reports as part of the BDD framework; using the output from these same reports, we can use the Masterthought reporting plugin to produce more extensive HTML reports. Masterthoughtreporting plugin generates not only fancy reports but also detailed ones by reading a default report ‘cucumber.json’ generated by cucumber.
Add Selenium, TestNG, Cucumber, and Masterthought dependencies to the project
Create a feature file under src/test/resources
Create the test code locating the web elements in src/main/java
Create the Step Definition class or Glue Code in src/test/java
Create a TestNG Cucumber Runner class in src/test/java
Create testng.xml
Run the tests from Command Line
Cucumber Report Generation
Step 1- Download and Install Java
Cucumber and Selenium need Java to be installed on the system to run the tests. Click here to know How to install Java.
Step 2 – Download and setup Eclipse IDE on the system
The Eclipse IDE (integrated development environment) provides strong support for Java developers, which is needed to write Java code. Click here to know How to install Eclipse.
Step 3 – Setup Maven
To build a test framework, we need to add a number of dependencies to the project. It is a very tedious and cumbersome process to add each dependency manually. So, to overcome this problem, we use a build management tool. Maven is a build management tool that is used to define project structure, dependencies, build, and test management. Click here to know How to install Maven.
The Cucumber Eclipse plugin is a plugin that allows eclipse to understand the Gherkin syntax. The Cucumber Eclipse Plugin highlights the keywords present in Feature File. Click here to know more – Install Cucumber Eclipse Plugin.
Step 7 – Create a feature file (LoginPage.feature) containing all the test scenarios under src/test/resources/features
It is recommended to create a features folder in src/test/resources directory. Create all the feature files in this features folder. Featurefile should be saved as an extension of .feature.
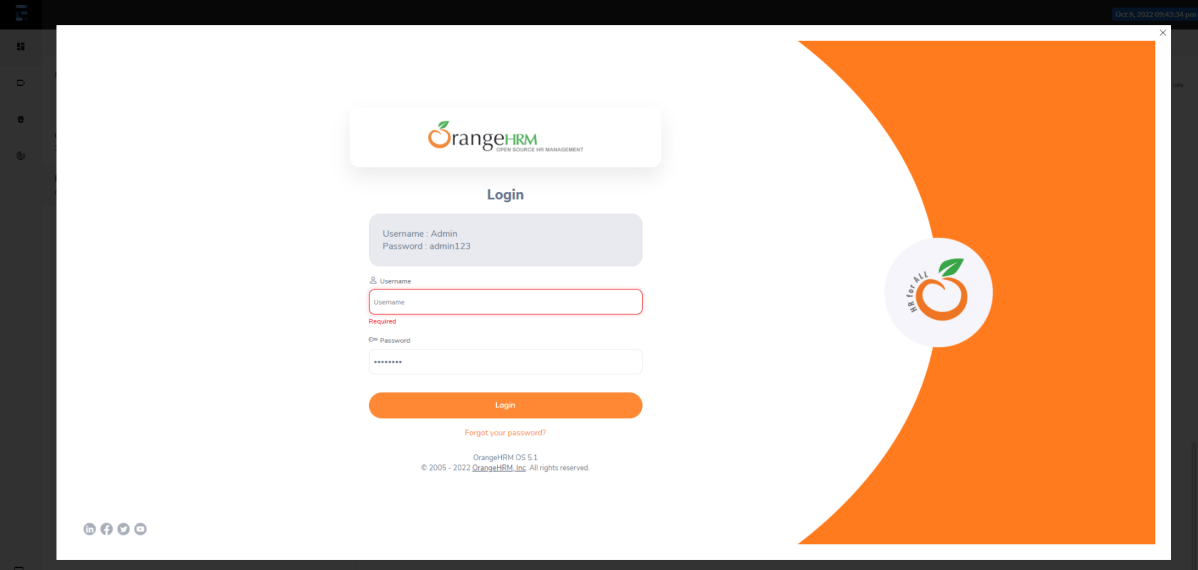
Feature: Login to HRM Application

Background:
    Given User is on HRMLogin page "https://opensource-demo.orangehrmlive.com/"

   @ValidCredentials
   Scenario: Login with valid credentials

    When User enters username as "Admin" and password as "admin123"
    Then User should be able to login successfully and new page open

   @InvalidCredentials
   Scenario Outline: Login with invalid credentials

    When User enters username as "<username>" and password as "<password>"
    Then User should be able to see error message "<errorMessage>"

  Examples:
   | username   | password  | errorMessage                       |
   | $$$$$        | ££££££££  | Invalid credentials               |
   | admin        | Admin123  | Invalid credentials              |
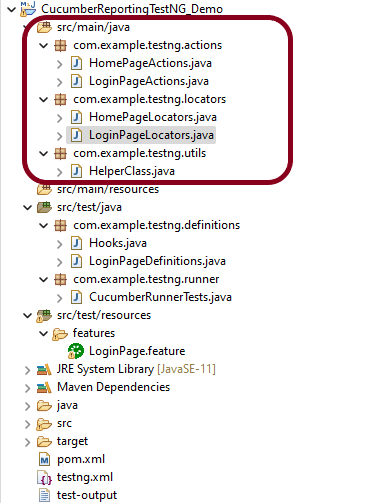
Step 8 – Create the test code locating the web elements in src/main/java
LoginPageLocators
import org.openqa.selenium.WebElement;
import org.openqa.selenium.support.FindBy;

public class LoginPageLocators {

	@FindBy(name = "username")
    public WebElement userName;

    @FindBy(name = "password")
    public WebElement password;

    @FindBy(id = "logInPanelHeading")
    public WebElement titleText;

    @FindBy(xpath = "//*[@id='app']/div[1]/div/div[1]/div/div[2]/div[2]/form/div[3]/button")
    public WebElement login;

    @FindBy(xpath = "//*[@id='app']/div[1]/div/div[1]/div/div[2]/div[2]/div/div[1]/div[1]/p")
    public  WebElement errorMessage;

    @FindBy(xpath = "//*[@href='https://www.facebook.com/OrangeHRM/mycompany']") //Invalid Xpath
    public  WebElement faceBookIcon;

    @FindBy(xpath = "//*[@id='app']/div[1]/div/div[1]/div/div[2]/div[2]/form/div[1]/div/span")
    public WebElement missingUsernameErrorMessage;
}
HomePageLocators
import org.openqa.selenium.WebElement;
import org.openqa.selenium.support.FindBy;

public class HomePageLocators {

	@FindBy(xpath = "//*[@id='app']/div[1]/div[1]/header/div[1]/div[1]/span/h6")
	public  WebElement homePageUserName;

}
LoginPageActions
import org.openqa.selenium.support.PageFactory;
import com.example.testng.locators.LoginPageLocators;
import com.example.testng.utils.HelperClass;

public class LoginPageActions {

LoginPageLocators loginPageLocators = null;

    public LoginPageActions() {

    	this.loginPageLocators = new LoginPageLocators();

		PageFactory.initElements(HelperClass.getDriver(),loginPageLocators);
	}

    public void login(String strUserName, String strPassword) {

        // Fill user name
    	loginPageLocators.userName.sendKeys(strUserName);

        // Fill password
    	loginPageLocators.password.sendKeys(strPassword);

        // Click Login button
    	loginPageLocators.login.click();

    }

    //Get the title of Login Page")
    public String getLoginTitle() {
        return loginPageLocators.titleText.getText();
    }

    // Get the error message of Login Page
    public String getErrorMessage() {
        return loginPageLocators.errorMessage.getText();
    }

}
HomePageActions
import org.openqa.selenium.support.PageFactory;
import com.example.testng.locators.HomePageLocators;
import com.example.testng.utils.HelperClass;

public class HomePageActions {

	HomePageLocators homePageLocators = null;

	public HomePageActions() {

		this.homePageLocators = new HomePageLocators();

		PageFactory.initElements(HelperClass.getDriver(),homePageLocators);
    }

    // Get the User name from Home Page
    public String getHomePageText() {
        return homePageLocators.homePageUserName.getText();
    }

}
HelperClass
import java.time.Duration;
import org.openqa.selenium.WebDriver;
import org.openqa.selenium.chrome.ChromeDriver;
import io.github.bonigarcia.wdm.WebDriverManager;

public class HelperClass {

	private static HelperClass helperClass;

	private static WebDriver driver;
    public final static int TIMEOUT = 10;

	 private HelperClass() {

			WebDriverManager.chromedriver().setup();
	    	driver = new ChromeDriver();
	    	driver.manage().timeouts().implicitlyWait(Duration.ofSeconds(TIMEOUT));
	        driver.manage().window().maximize();

	 }

    public static void openPage(String url) {
        driver.get(url);
    }

	public static WebDriver getDriver() {
		return driver;

	}

	public static void setUpDriver() {

		if (helperClass==null) {

			helperClass = new HelperClass();
		}
	}

	 public static void tearDown() {

		 if(driver!=null) {
			 driver.close();
			 driver.quit();
		 }

		 helperClass = null;

	 }

}
Step 9 – Create the Step Definition class or Glue Code in src/test/java
It is recommended to create a definitions folder in src/test/java directory. The StepDefinition files should be created in this definitionsdirectory. within the folder called definitions.
LoginPageDefinitions
import org.junit.Assert;
import com.example.junit.actions.ForgetPasswordPageActions;
import com.example.junit.actions.HomePageActions;
import com.example.junit.actions.LoginPageActions;
import com.example.junit.utils.HelperClass;
import io.cucumber.java.en.Given;
import io.cucumber.java.en.Then;
import io.cucumber.java.en.When;

public class LoginPageDefinitions{

	LoginPageActions objLogin = new LoginPageActions();
    HomePageActions objHomePage = new HomePageActions();
    ForgetPasswordPageActions objForgotPasswordPage = new ForgetPasswordPageActions();


    @Given("User is on HRMLogin page {string}")
    public void loginTest(String url) {

    	HelperClass.openPage(url);

    }

    @When("User enters username as {string} and password as {string}")
    public void goToHomePage(String userName, String passWord) {

        // login to application
        objLogin.login(userName, passWord);

        // go the next page

    }

    @Then("User should be able to login successfully and new page open")
    public void verifyLogin() {

        // Verify home page
        Assert.assertTrue(objHomePage.getHomePageText().contains("Dashboard"));

    }

    @Then("User should be able to see error message {string}")
    public void verifyErrorMessage(String expectedErrorMessage) {

        // Verify home page
        Assert.assertEquals(objLogin.getErrorMessage(),expectedErrorMessage);

    }

}
Hooks
import com.example.junit.utils.HelperClass;
import io.cucumber.java.After;
import io.cucumber.java.Before;

public class Hooks {

	@Before
    public static void setUp() {

       HelperClass.setUpDriver();
    }

	@After
	public static void tearDown() {

		HelperClass.tearDown();
	}
}
Step 10 – Create a TestNG Cucumber Runner class in src/test/java
We need to create a class called Runner class to run the tests. This class will use the TestNG annotation @RunWith(), which tells TestNG what is the test runner class. TestRunner should be created under src/test/java within the folder called runner.
AbstractTestNGCucumberTests – Runs each cucumber scenario found in the features as a separate test.
import io.cucumber.testng.AbstractTestNGCucumberTests;
import io.cucumber.testng.CucumberOptions;

@CucumberOptions(tags = "", features = "src/test/resources/features/LoginPage.feature", glue = "com.example.testng.definitions",
    plugin= {"pretty", "html:test-output","json:target/cucumber/cucumber.json", "html:target/cucumber-html-report"})

public class CucumberRunnerTests extends AbstractTestNGCucumberTests {

}
Step 11 – Create testng.xml
TestNG.xml is used to run multiple tests in a single execution.
<?xml version="1.0" encoding="UTF-8"?>
<!DOCTYPE suite SYSTEM "https://testng.org/testng-1.0.dtd">
<suite name="Suite">
  <test name="Cucumber Reporting">

  <classes>
  <class name = "com.example.testng.runner.CucumberRunnerTests"/>
  </classes>
  </test> <!-- Test -->
</suite> <!-- Suite -->
Step 12 – Run the tests from Command Line
Use the below command to execute the tests.
mvn clean test
The output of the above program is
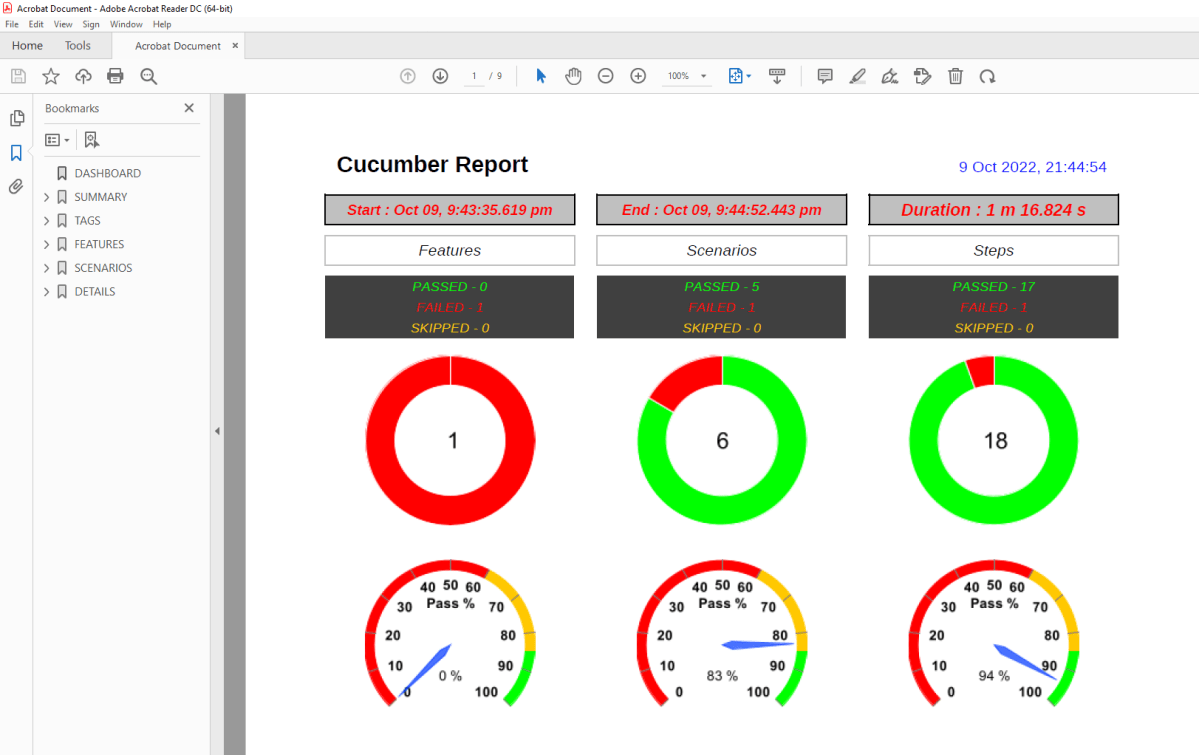
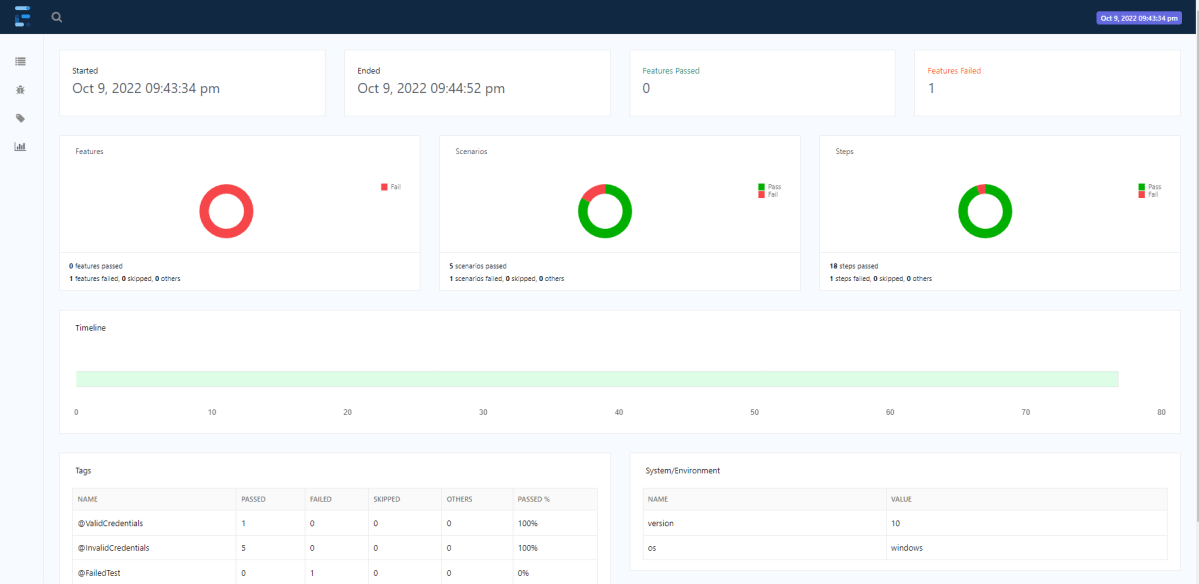
Step 13 – Cucumber Report Generation
Refresh your project and check inside \target\cucumber-html-reports that the report generated with name feature-overview.
There are different types of HTML reports gets generated as a part of the test execution cycle.
1. feature-overview – This HTML report gives an overall overview of test execution. Main HTML report which covers all different sections like Features, Tags, Steps, and Failures.
2. failures-overview – This HTML report gives an overview of all failed tests.
3. step-overview – This HTML report shows step statistics for the current cycle.
4. tag-overview – This HTML report shows passing and failing statistics for different tags used in test execution.
Congratulations on making it through this tutorial and hope you found it useful! Happy Learning!! Cheers!!
Sharing Cucumber test results with your colleagues is not easy. To make things easier, the Cucumber team has created a free, cloud-based service for sharing reports across the organization. The Cucumber Reports service, which is currently in early beta, allows you to configure Cucumber (currently only in Ruby or Java flavours) to upload the results of a Cucumber run to the cloud. You can then access them through your browser, which will render them using the same HTML formatter as on the desktop.
The introduction of the Global Tool Configuration section in Jenkins 2 is a wise decision. This section contains all the major configurations for external tools, their locations, and automatic installer tools.
Open Jenkins and go to Jenkins Dashboard. After that, click on the Manage Jenkins link as shown below:
When we click on the “Manage Jenkins” link, we are redirected to the Manage Jenkins page, where we can see various types of options, including the “Global Tool Configuration” option.
We need to set the JDK path in Jenkinsas shown below.
Click on the Add JDK button. By default, “Install Automatically” will be checked, so since we are going to use the JDK installed in our local machine, “Install automatically” will install the latest version of JDK, and you will also need to provide credentials to download the relevant JDK.
Provide the JDK’s name as we gave as JDK 11 because that is what is currently installed on my machine and also provide the path of JDK in the JAVA_HOMEtextbox.
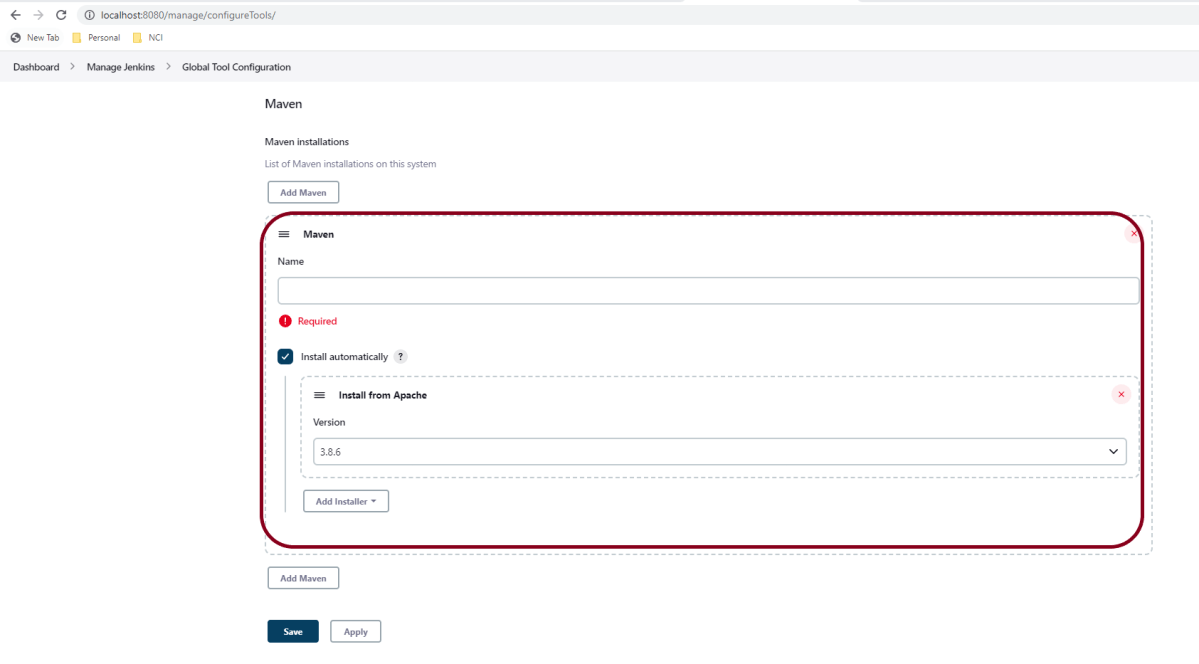
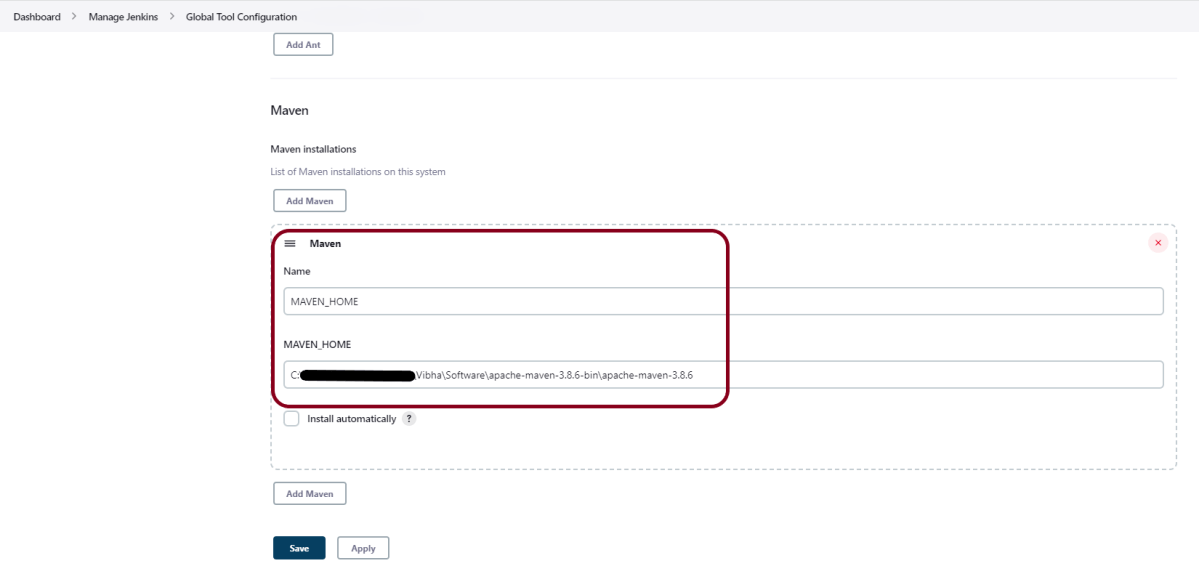
Configuring Maven
As mentioned above, go to Global Tool Configuration and scroll down to see the Maven option.
Click on the “Add Maven”button. Kindly note that by default, “Install Automatically”will be checked, so since we are going to use the Maven installed on our local machine, “Install automatically” will install the latest version of Maven, and you will also need to provide credentials to download relevant Maven.
Provide the Maven’s name as we gave as Maven 3.8.6 because that is what is currently installed on my machine, and also provide the path of Maven in the MAVEN_HOME textbox.
Click on the Apply and Save buttons.
Congratulations!!. The above steps configured Java and Maven to Jenkins. Happy Learning
The previous tutorial explained the generation of ExtentReports Version 5 for Cucumber 7 and TestNG in a Maven project. In this tutorial, I will explain the steps to create an Extent Report Version 5 for Cucumber, Selenium, and Junit4 in a Gradle project.
Pre Requisite:
Java 8 or above installed
Eclipse or IntelliJ IDE installed
Gradle Installed
Environment variable JAVA_HOME and GRADLE_HOME correctly configured
In this tutorial, I’ll create a BDD Framework for the testing of web applications using Cucumber, Selenium WebDriver with JUnit4. This framework consists of:-
Cucumber Java- 7.6.0
Cucumber JUnit – 7.6.0
Java 11
JUnit – 4.13.2
Gradle – 7.5.1
Selenium – 4.3.0
ExtentReport – 5.0.9
GrassHopper Cucumber Adapter – 1.7.0
Implementation Steps
Add ExtentReport dependency to the build.gradle
Add ExtentCucumberAdapter plugin to task cucumber
Add Cucumber, Selenium and JUnit4 , and dependencies in build.gradle
Create Locator and Action classes and Step Definition corresponding to the feature file
Create extent.properties file in resources folder and paste the below code
Step 3 – Add Cucumber, Selenium and JUnit4, and dependencies in build.gradle
dependencies {
testImplementation 'io.cucumber:cucumber-java:7.6.0'
testImplementation 'io.cucumber:cucumber-junit:7.6.0'
// Use JUnit test framework.
testImplementation 'junit:junit:4.13.2'
//ExtentReport
implementation 'tech.grasshopper:extentreports-cucumber7-adapter:1.7.0'
implementation 'com.aventstack:extentreports:5.0.9'
// This dependency is used by the application.
implementation 'com.google.guava:guava:30.1.1-jre'
implementation 'org.seleniumhq.selenium:selenium-java:4.4.0'
implementation 'io.github.bonigarcia:webdrivermanager:5.3.0'
}
The complete build.gradle is shown below:
/*
* This file was generated by the Gradle 'init' task.
*
*/
plugins {
// Apply the application plugin to add support for building a CLI application in Java.
id 'application'
}
repositories {
// Use Maven Central for resolving dependencies.
mavenCentral()
}
java {
sourceCompatibility = 11
targetCompatibility = 11
}
dependencies {

    testImplementation 'io.cucumber:cucumber-java:7.6.0'
    testImplementation 'io.cucumber:cucumber-junit:7.6.0'

    // Use JUnit test framework.
    testImplementation 'junit:junit:4.13.2'

    //ExtentReport
    implementation 'tech.grasshopper:extentreports-cucumber7-adapter:1.7.0'
    implementation 'com.aventstack:extentreports:5.0.9'

    // This dependency is used by the application.
    implementation 'com.google.guava:guava:30.1.1-jre'
    implementation 'org.seleniumhq.selenium:selenium-java:4.4.0'
    implementation 'io.github.bonigarcia:webdrivermanager:5.3.0'
}
application {
// Define the main class for the application.
mainClass = 'com.example.App'
}
configurations {
cucumberRuntime {
extendsFrom testImplementation
}
}
task cucumber() {
dependsOn assemble, testClasses
doLast {
javaexec {
main = "io.cucumber.core.cli.Main"
classpath = configurations.cucumberRuntime + sourceSets.main.output + sourceSets.test.output
args = ['--plugin', 'pretty',
'--plugin', 'io.qameta.allure.cucumber7jvm.AllureCucumber7Jvm',
'--plugin', 'com.aventstack.extentreports.cucumber.adapter.ExtentCucumberAdapter:',
'--glue', 'com.example.definitions', 'src/test/resources']
}
}
}
Step 4 – Create Locator and Action classes and Step Definition corresponding to the feature file
As mentioned above, there is another tutorial that explains the project structure as well as the feature file and corresponding Step Definitions, please refer to this tutorial – Gradle Project with Cucumber, Selenium and JUnit4.
Step 5 – Create extent.properties file in resources folder and paste the below code
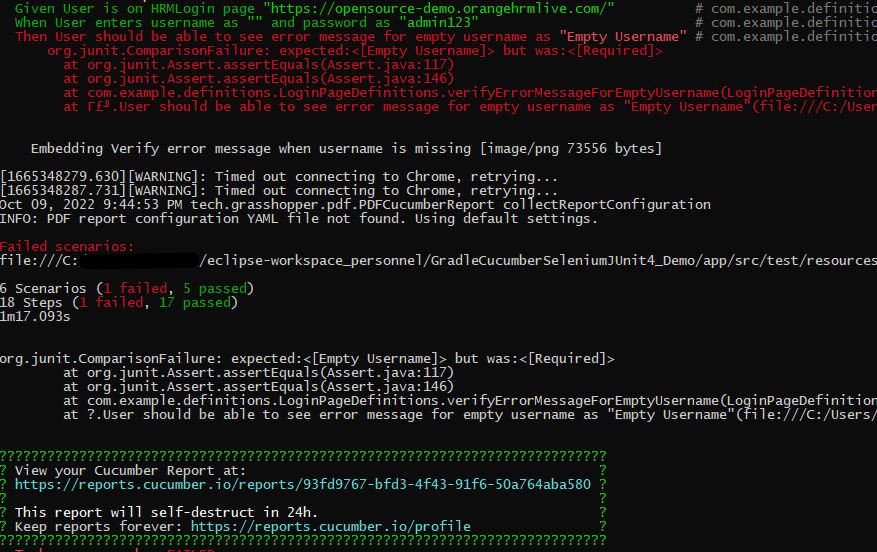
Go to the app project and run the tests, using the below command
gradle cucumber
The output of the above program is
Step 7: View the ExtentReports
Refresh the project and will see a new folder – SparkReport_ which further contains 4 folders –HtmlReport, PdfReport, Reports, and Screenshots.
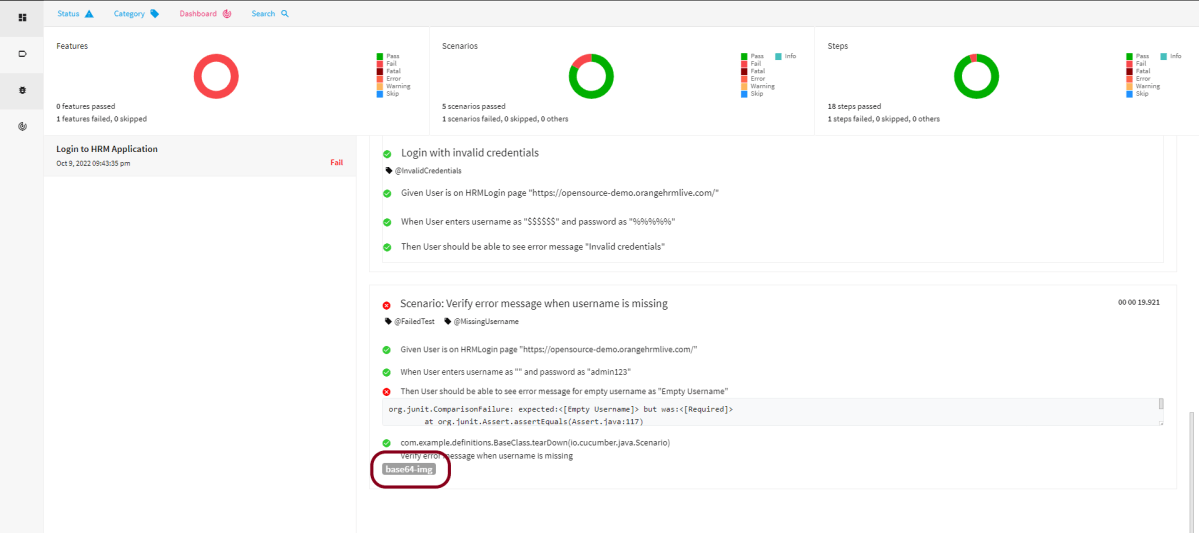
The ExtentReport will be present in the Report’s folder with the name Spark.html. PDF Report is present in the PdfReport folder and HTML Report is present in the HtmlReport folder. We can see that the Screenshots’ folder is empty because we have used base64imagesrc feature which resulted in no physical screenshots. The screenshots are embedded in the reports.
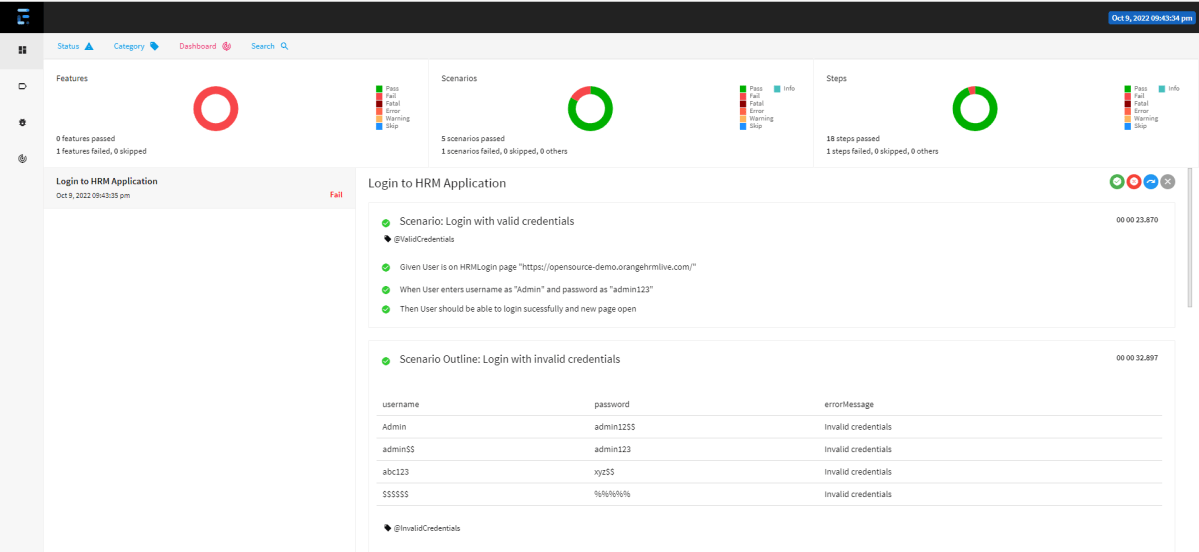
Right-click and open the ExtentHtml.html report with the Web Browser. The report also has a summary section that displays the summary of the execution. The summary includes the overview of the pass/fail using a pictogram, start time, end time, and pass/fail details of features as shown in the image below.
ExtentHtml.html
The failed test has screenshot embedded in it. Double click on mase64image and it will open the screenshot in full screen.