In this tutorial, I will explain Tags in Cucumber.
Table of Contents
What are Tags?
Tags are a great way to organize Features and Scenarios.
By default, Cucumber executes all the scenarios present in a Feature File. If you want to run a specific scenario from the feature file, then a tag can be used. It allow flexible execution of scenarios or features based on specific tags.
Tags can be declared as below:-
 @TagName
   Scenario: Test the scenario
Here,
@: It is a symbol used to declare a tag.
TagName: It is the name of a specific test.
In the below example, there are 2 feature files – LoginPage.feature and DashboardPage.feature. LoginPage.feature contains 4 different scenarios with different tags, whereas DashboardPage.feature contains 3 different scenarios.
LoginPage.feature
Feature: Login to HRM Application

  Background:
    Given User is on Login page

  @ValidCredentials
  Scenario: Login with valid credentials

    When User enters username as "Admin"
    And User enters password as "admin123"
    Then User should be able to login successfully

  @InValidCredentials
  Scenario: Login with invalid credentials

    When User enters username as "Admin123"
    And User enters password as "admin123"
    Then User should see an error message "Invalid credentials"

  @InValidCredentials
  Scenario: Login with invalid username and valid password

    When User enters username as "1234"
    And User enters password as "admin123"
    Then User should see an error message "Invalid credentials"

  @InValidCredentials @SpecialCharacters
  Scenario: Login with special characters

    When User enters username as "$$$$"
    And User enters password as "%%%%%"
    Then User should see an error message "Invalid credentials"
DashboardPage.feature
Feature: Dashboard page validation

  Background:
    Given User is on Login page
    When User enters username as "Admin"
    And User enters password as "admin123"
    Then User should be able to login successfully

  @ValidQuickLaunch
  Scenario Outline: Login with valid credentials to check QuickLanuch options

    Then there are valid QuickLaunch options '<options>'

    Examples:
      | options                  |
      | Assign Leave             |
      | Leave List               |
      | Timesheets               |
Running a single Cucumber Tag
import io.cucumber.junit.Cucumber;
import io.cucumber.junit.CucumberOptions;
import org.junit.runner.RunWith;
@RunWith(Cucumber.class)
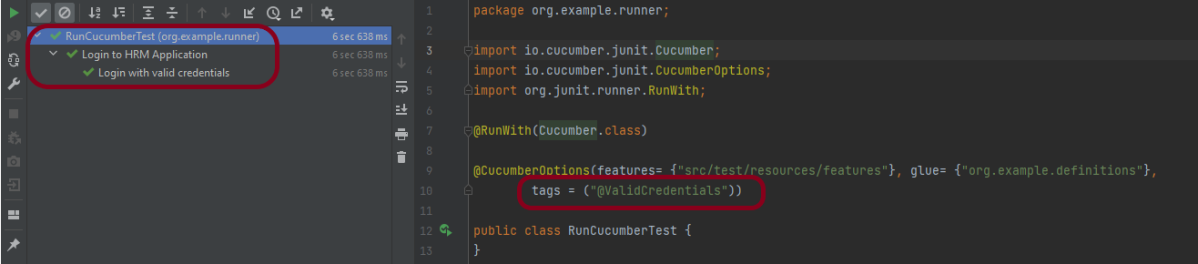
@CucumberOptions(features= {"src/test/resources/features"},
glue= {"org.example.definitions"},
tags = ("@ValidCredentials"))
public class RunCucumberTest {
}
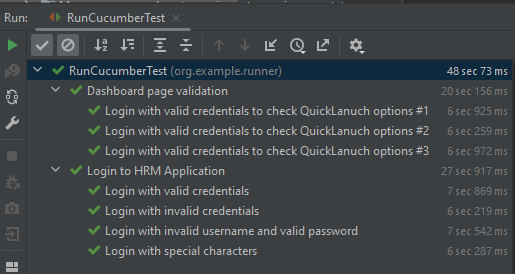
In the above example, only 1 scenario is tagged as @ValidCredentials in both the feature file, so it is executed.
The output of the above program is
Tags can be placed above Feature, Scenario, Scenario Outline, and Examples.
A feature or Scenario can have as many tags. However, each tag should be separated by a blank space.
How to execute Cucumber Tag that runs multiple scenarios
Let us consider a situation where a tag (@InValidCredentials) has multiple test scenarios, and you use this tag in the Runner class, then all the test scenarios associated with this tag will execute.
import io.cucumber.junit.Cucumber;
import io.cucumber.junit.CucumberOptions;
import org.junit.runner.RunWith;
@RunWith(Cucumber.class)
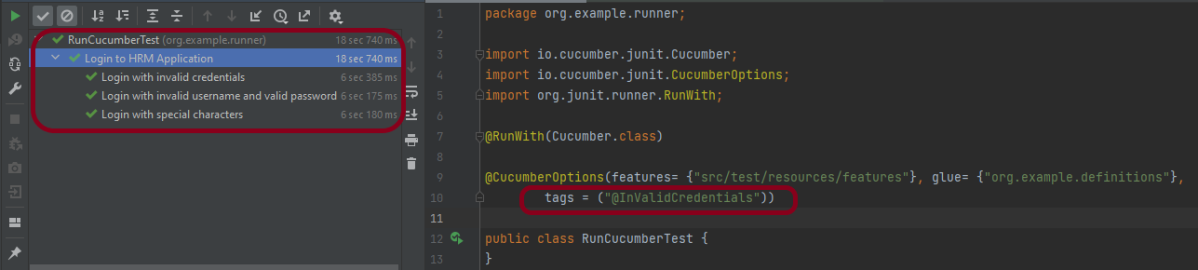
@CucumberOptions(features= {"src/test/resources/features"},
glue= {"org.example.definitions"},
tags = ("@InValidCredentials"))
public class RunCucumberTest {
}
The output of the above program is
How to execute Multiple Cucumber Tags
The testing through multiple tags can be done by using two operators:
- OR operator
- AND operator
OR operator
OR means scenarios that are tagged either with @BlankCredentials or @InvalidCredentials will execute. The syntax is mentioned below:
import io.cucumber.junit.Cucumber;
import io.cucumber.junit.CucumberOptions;
import org.junit.runner.RunWith;
@RunWith(Cucumber.class)
@CucumberOptions(features= {"src/test/resources/features"},
glue= {"org.example.definitions"},
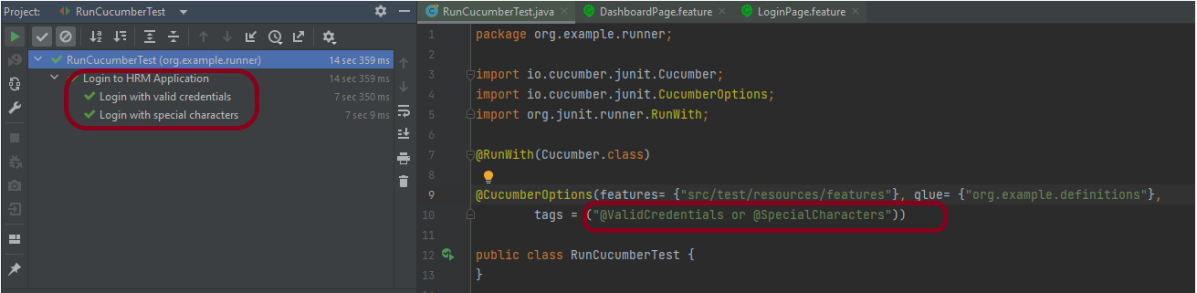
tags = ("@ValidCredentials or @SpecialCharacters"))
public class RunCucumberTest {
}
In the above example, we have 1 scenario that is tagged as @ValidCredentials whereas another one tagged as @SpecialCharacters. So, a total of 2 scenarios are executed.
The output of the above program is
AND operator
Suppose you want to test an application with multiple test cases and if the first test case is failed in the application, we do not want to test the second test case. The syntax is mentioned below:
@CucumberOptions(features = { "src/test/resources/features/CucumberTagsExample.feature" },
        glue = {"com.cucumber.demo.definitions" },
        tags = ("@BlankCredentials and @InValidCredentials"))
The output of the above program is
How to ignore Tags in Cucumber?
To skip a specific test scenario, use not keyword.
@CucumberOptions(features= {"src/test/resources/features/LoginPage.feature"},
glue= {"org.example.definitions"},
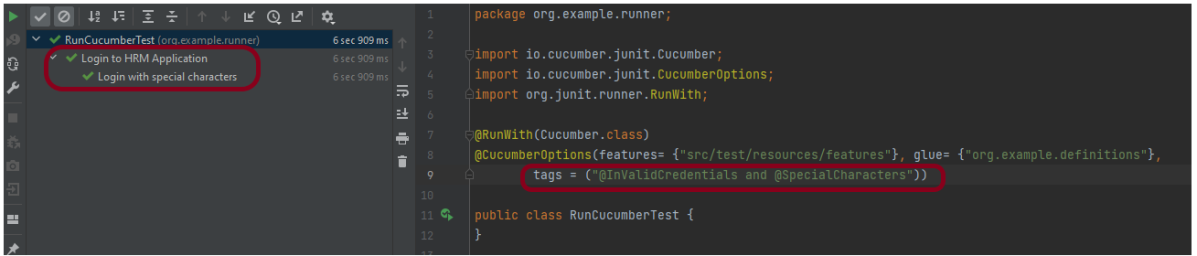
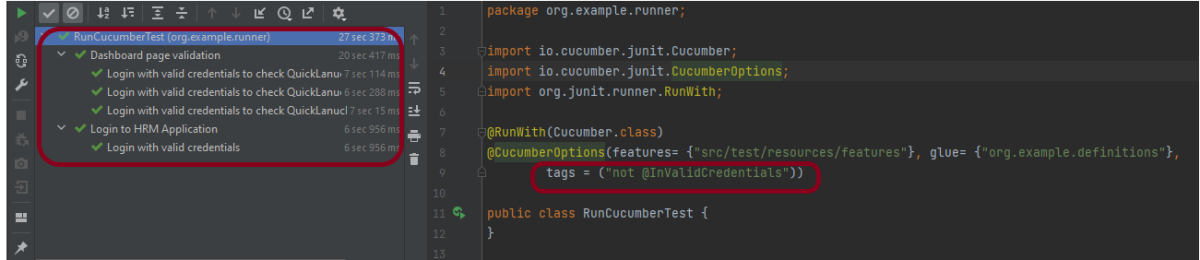
tags = ("not @InValidCredentials"))
The output of the above program is
All these syntaxes are valid for Cucumber Version – 6.8.1
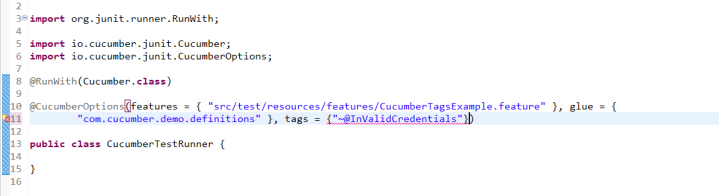
The below-mentioned syntax is not valid for Cucumber Version – 6.8.1 and above
AND - {"@BlankCredentials , @InValidCredentials"}
OR - {"@BlankCredentials" , "@InValidCredentials"}
NOT - {"~@InValidCredentials"}
How to run multiple feature files
To run multiple feature files, we can use the below syntax:
@CucumberOptions(features= {"src/test/resources/features/LoginPage.feature","src/test/resources/features/DashboardPage.feature"},
glue= {"org.example.definitions"})
I have mentioned the path of 2 feature files separated by a comma.
We are done! Congratulations on making it through this tutorial and hope you found it useful! Happy Learning!!
Additional Tutorials