How to create Python Allure Report for Rest API

HOME

pip install -U requests

pip install -U pytest

pip install allure-pytest

import allure
import requests

ENDPOINT = 'https://reqres.in/api/users'


@allure.description("This tests validates that the response returns status code 201")
@allure.severity(allure.severity_level.BLOCKER)
@allure.label("Owner", "Vibha Singh")
def test_create_user():
    request_body = {
        "name": "Vibha",
        "Job": "CEO"
    }

    response = requests.post(ENDPOINT, request_body)
    response_body = response.json()
    print("Request :", request_body)
    print("Response :", response_body)
    assert response.status_code == 201


@allure.description("This tests validates that the id in the response")
@allure.severity(allure.severity_level.NORMAL)
@allure.label("Owner", "Vibha Singh")
def test_response():
    request_body = {
        "name": "Vibha",
        "Job": "CEO"
    }

    response = requests.post(ENDPOINT, request_body)
    assert response.status_code == 201
    response_body = response.json()
    print("Request :", request_body)
    print("Response :", response_body)

    id = response_body["id"]
    if "id" in response_body:
        print("Value of id :", id)
    else:
        print("id not found")


@allure.description("This tests validates that the header in the response")
@allure.severity(allure.severity_level.NORMAL)
@allure.label("Owner", "Vibha Singh")
def test_header_in_request():
    request_body = {
        "name": "Vibha",
        "Job": "CEO"
    }

    headers = {'Content-Type': 'application/json; charset=utf-8'}
    response = requests.post(ENDPOINT, request_body, headers)
    print("Request :", request_body)
    print("Response :", response.json())
    print("Headers :", response.headers)
    assert response.headers["Content-Type"] == "application/json; charset=utf-8"


@allure.description("This tests validates that the name in the response - FAIL")
@allure.severity(allure.severity_level.NORMAL)
@allure.label("Owner", "Vibha Singh")
def test_verify_name():
    request_body = {
        "name": "Vibha",
        "Job": "CEO"
    }

    header = {"Content-Type":  "application/json; charset=utf-8"}
    response = requests.post(ENDPOINT, request_body, header)
    response_body = response.json()
    print("Response :", response_body)
    print("Request Header :", response.request.headers)
    assert response_body["name"] == "Test"

pytest --alluredir=<path to report directory> test.py

pytest --alluredir=C:\Users\Documents\Vibha\Automation\Python\AllureReport_Python\AllureReport Requests.py

allure serve <path to report directory>
allure serve C:\User\Documents\Vibha\Automation\Python\AllureReport_Python\AllureReport

How to pass authorization token in header in Rest assured?

HOME

 <dependencies>

       <!-- Rest Assured Dependency -->
      <dependency>
         <groupId>io.rest-assured</groupId>
        <artifactId>rest-assured</artifactId>
        <version>5.4.0</version>
        <scope>test</scope>
      </dependency>

        <!-- TestNG Dependency-->
      <dependency>
          <groupId>org.testng</groupId>
         <artifactId>testng</artifactId>
         <version>7.8.0</version>
         <scope>test</scope>
       </dependency>

</dependencies>

import io.restassured.http.ContentType;
import io.restassured.response.Response;
import org.testng.Assert;
import org.testng.annotations.Test;
import static io.restassured.RestAssured.given;

public class BasicAuth_Demo {


    @Test
    public void createUser() {
        Response response = given()
                .auth()
                .preemptive()
                .header("Authorization", "Token")
                .header("Accept", "application/json")
                .contentType(ContentType.JSON)
                .body(validRequest)
                .when()
                .post("http://localhost:8080/users")
                .then()
                .extract()
                .response();

        int statusCode = response.getStatusCode();

        Assert.assertEquals(statusCode,200);
    }
}

package org.example;

import io.restassured.http.ContentType;
import io.restassured.response.Response;
import org.junit.Before;
import org.junit.Test;

import static io.restassured.RestAssured.given;
import static org.hamcrest.MatcherAssert.assertThat;
import static org.hamcrest.Matchers.equalTo;

public class BasicAuth_Demo {

    private static final String BASE_URL = "https://httpbin.org/basic-auth/user/pass";
    private static final String TOKEN = "Basic dXNlcjpwYXNz";

    @Before
    public void setup() {
        given().baseUri(BASE_URL);
    }

    @Test
    public void validateToken() {

        Response response = given()
                .header("Accept", "application/json")
                .header("Authorization",TOKEN)
                .contentType(ContentType.JSON)
                .when()
                .get("https://httpbin.org/basic-auth/user/pass")
                .then()
                .log().all()
                .extract()
                .response();

        assertThat(response.getStatusCode(),equalTo(200));

    }

}

How To Send A JSON/XML File As Payload To Request using Rest Assured

HOME

In this tutorial, I will explain to pass a JSON or XML file as a payload to the request. This is needed when the payload is static or there is minimal change in the request payload. This can be done by using the body() method, which accepts “File” as an argument. This is elaborated in Javadoc.

RequestSpecification body(File body)

This specifies file content that’ll be sent with the request. This only works for the POST, PATCH and PUT HTTP methods. Trying to do this for the other HTTP methods will cause an exception to be thrown.

<dependency>
    <groupId>io.rest-assured</groupId>
    <artifactId>rest-assured</artifactId>
    <version>5.5.1</version>
    <scope>test</scope>
</dependency>

Pass JSON file as payload

Step 1 – Create a .json file and write the payload in that. Keep the file in the “src/test/resources” folder.

Step 2 – Create a File in Java using the “File” and pass it to body() method.

import static io.restassured.RestAssured.given;
import static org.hamcrest.Matchers.equalTo;
import java.io.File;
import org.junit.Test;
import io.restassured.http.ContentType;

public class passJsonAsPayload {


    @Test
    public void createUser() {

        // Creating a File instance
        File jsonData = new File("src/test/resources/Payloads/jsondemo.json");

        // GIVEN
        given()
                .baseUri("https://reqres.in")
                .contentType(ContentType.JSON)
                .body(jsonData)

                // WHEN
                .when()
                .post("/api/users")

                // THEN
                .then()
                .assertThat()
                .statusCode(201)
                .body("name", equalTo("Json_Test"))
                .body("job", equalTo("Leader"))
                .log().all();

    }
}

The output of the above program is

Similarly, we can pass an XML as a payload to request. The file passed within the body() method should be of type .xml.

<?xml version="1.0" encoding="utf-8"?>
<soap:Envelope xmlns:soap="http://schemas.xmlsoap.org/soap/envelope/">
    <soap:Body>
        <NumberToWords xmlns="http://www.dataaccess.com/webservicesserver/">
            <ubiNum>500</ubiNum>
        </NumberToWords>
    </soap:Body>
</soap:Envelope>
@Test
    public void getNumber() {

        // Creating a File instance
        File xmlData = new File("src/test/resources/Payloads/xmlDemo.xml");

        // GIVEN
         RestAssured.given()
                .baseUri("https://www.dataaccess.com")
                .header("Content-Type", "text/xml")
                .body(xmlData)

                // WHEN
                .when()
                .post("/webservicesserver/NumberConversion.wso")

                // THEN
                .then()
                .assertThat()
                .statusCode(200)
                 .body("Envelope.Body.NumberToWordsResponse.NumberToWordsResult", equalToCompressingWhiteSpace("five hundred"))
                .log().all();

    }

Congrats. You have learned how to pass a JSON as a payload to the request. Happy Learning !!

How to run Python Rest API tests with GitHub Actions

Last Updated On

HOME

This tutorial explains the steps to create a GitHub Action for the Rest API tests built in Python and execute the tests in that workflow.

Table of Contents

Why GitHub?

Implementation Steps

Step 1 – Create GitHub Actions and Workflows

I have a repository available in GitHub – RestAPITesting_Python as shown in the below image. Go to the “Actions” tab.  Click on the “Actions” tab.

Step 2 – Select the type of Actions

You will see that GitHub recommends Actions depending on the project. In our case, it is recommending actions suitable for a Python project. I have selected the “Python application” option.

Step 3 – Generation of Sample pipeline

If you choose an existing option, it will automatically generate a .yaml for the project as shown below.

We will replace the current workflow with the following yml file as shown below:

# This workflow will install Python dependencies, run tests and lint with a single version of Python
# For more information see: https://docs.github.com/en/actions/automating-builds-and-tests/building-and-testing-python

name: Python application

on:
  push:
    branches: [ "main" ]
  pull_request:
    branches: [ "main" ]

permissions:
  contents: read

jobs:
  build:

    runs-on: ubuntu-latest

    steps:
    - uses: actions/checkout@v3
    - name: Set up Python 3.12.1
      uses: actions/setup-python@v3
      with:
        python-version: "3.12.1"
   
    - name: Install dependencies
      run: |
        python -m pip install --upgrade pip
        pip install pytest
        pip install requests
       
    - name: Test with pytest
      run: |
        cd TestCases
        pytest  --verbose --capture=no

Step 4 – Commit the changes

After the changes, hit the “Start Commit” button.

This will give the option to add a description for the commit. It will also enable the user to commit either to the main branch or commit to any other branch that exists in the project. Click on the “Commit new file” button to set up the workflow file.

Step 5 – Verify that the workflow is running

Next, head over to the “Actions” tab, and you will see your YAML workflow file present under the tab. The yellow sign represents that the job is in the queue.

In Progress – When the job starts building and running, you will see the status change from “Queued” to “in progress”.

Passed – If the build is successful, you will see a green tick mark. 

Click on the workflow and the below screen is displayed. It shows the status of the run of the workflow, the total time taken to run the workflow, and the name of the .yml file.

Below shows all the steps of the workflow.

The complete code can be found here on GitHub – vibssingh/RestAPITesting_Python.

Congratulations! We just created our CI workflow for running our Rest API test cases for Python.

Gradle Tutorials

Last Updated On

HOME

Gradle is an open-source build automation tool that is designed to be flexible enough to build almost any type of software.
Gradle runs on the JVM and you must have a Java Development Kit (JDK) installed to use it.
Several major IDEs allow you to import Gradle builds and interact with them: Android Studio, IntelliJ IDEA, Eclipse, and NetBeans.

Installation of Gradle

Chapter 1 How to install Gradle on Windows

Creation of Gradle project

Chapter 1 How to create Java Gradle project in Eclipse
Chapter 2 How to create a Java Gradle project using Command Line
Chapter 3 How to create Gradle project in IntelliJ
Chapter 4 How to create Gradle Java project in IntelliJ using Command Line

Importing of Gradle Project

Chapter 1 How to import Java Gradle project in Eclipse
Chapter 2 How to import Java Gradle project in IntelliJ

Gradle Project in Cucumber

Chapter 1 How To Create Gradle Project with Cucumber to test Rest API
Chapter 2 Run Gradle Cucumber Tests from Command Line
Chapter 3 Gradle Project with Cucumber, Selenium and TestNG
Chapter 4 Gradle Project with Cucumber, Selenium and JUnit4

Gradle Project in Serenity

Chapter 1 Serenity BDD with Gradle and Cucumber for Web Application
Chapter 2 Serenity BDD with Cucumber and Rest Assured in Gradle
Chapter 3 Serenity Emailable Report in Gradle

Gradle Project with Selenium

Chapter 1 How to create Gradle project with Selenium and TestNG
Chapter 2 How to create Gradle project with Selenium and JUnit4
Chapter 3 Gradle – Integration of Selenium and JUnit5

Gradle Project in Rest API

Chapter 1 Setup Basic REST Assured Gradle Project In Eclipse IDE

Allure Reports for Gradle Project

Chapter 1 Gradle – Allure Report for Selenium and TestNG
Chapter 2 Gradle – Allure Report for Selenium and JUnit4
Chapter 3 Gradle – Allure Report for Cucumber, Selenium and TestNG

Extent Reports for Gradle Project

Chapter 1 Gradle – Extent Report Version 5 for Cucumber, Selenium, and TestNG

Gradle with Jenkins

Chapter 1 Integrate Gradle project with Jenkins
Chapter 2 How to create Jenkins pipeline for Gradle project

How to pass basic authentication token in Python Requests

HOME

 headers = {'Authorization': 'Basic dXNlcjpwYXNz'}

import requests

endpoint = 'https://httpbin.org/basic-auth/user/pass'
token = 'Basic dXNlcjpwYXNz'


def test_auth_token():

    headers = {'Authorization': token}

    response = requests.get(endpoint, headers=headers)
    response_body = response.json()
    print(response_body)
    assert response.status_code == 200
    assert response_body["authenticated"] == True
    assert response_body["user"] == "user"

pytest Authentication_test.py -s

Integration of Allure Report with Rest Assured and JUnit4

HOME

In the previous tutorial, I explained the Allure Report with Cucumber, Selenium and JUnit4. In this tutorial, I will explain how to Integrate Allure Report with Rest Assured and JUnit4.

The below example covers the implementation of Allure Report for Rest API using Rest Assured, JUnit4, Java, and Maven.

Prerequisite

  1. Java 11 or above installed
  2. Maven installed
  3. Eclipse or IntelliJ installed
  4. Allure installed

Dependency List:

  1. Java 17
  2. Maven – 3.9.6
  3. Allure Maven – 2.12.0
  4. Rest Assured – 5.3.4
  5. Allure Rest Assured – 2.25.0
  6. Allure JUnit4 – 2.25.0
  7. Aspectj – 1.9.21
  8. JUnit – 4.13.2

Implementation Steps

Step 1 – Update Properties section in Maven pom.xml

<properties>
        <rest-assured.version>5.4.0</rest-assured.version>
        <junit.version>4.13.2</junit.version>
        <json.version>20231013</json.version>
        <hamcrest.version>1.3</hamcrest.version>
        <allure.maven.version>2.12.0</allure.maven.version>
        <allure.junit.version>2.25.0</allure.junit.version>
        <allure.rest.assured.version>2.25.0</allure.rest.assured.version>
        <maven.compiler.plugin.version>3.12.1</maven.compiler.plugin.version>
        <maven.surefire.plugin.version>3.2.3</maven.surefire.plugin.version>
        <maven.compiler.source>17</maven.compiler.source>
        <maven.compiler.target>17</maven.compiler.target>
        <aspectj.version>1.9.21</aspectj.version>
</properties>

Step 2 – Add the Allure-Rest Assured dependency

<!--Allure Reporting Dependency-->   
<dependency>
    <groupId>io.qameta.allure</groupId>
    <artifactId>allure-rest-assured</artifactId>
    <version>${allure.rest-assured.version}</version>
</dependency>

Add other dependencies like Rest Assured and Allure-JUnit4 dependencies in POM.xml

<dependencies>

        <!-- Rest-Assured Dependency -->
        <dependency>
            <groupId>io.rest-assured</groupId>
            <artifactId>rest-assured</artifactId>
            <version>${rest-assured.version}</version>
            <scope>test</scope>
        </dependency>

        <!-- JUnit4 Dependency -->
        <dependency>
            <groupId>junit</groupId>
            <artifactId>junit</artifactId>
            <version>${junit.version}</version>
            <scope>test</scope>
        </dependency>

        <!-- JSON Dependency -->
        <dependency>
            <groupId>org.json</groupId>
            <artifactId>json</artifactId>
            <version>${json.version}</version>
        </dependency>

        <!-- Allure JUnit Dependency -->
        <dependency>
            <groupId>io.qameta.allure</groupId>
            <artifactId>allure-junit4</artifactId>
            <version>${allure.junit.version}</version>
        </dependency>

        <!-- Allure Rest-assured Dependency-->
        <dependency>
            <groupId>io.qameta.allure</groupId>
            <artifactId>allure-rest-assured</artifactId>
            <version>${allure.rest.assured.version}</version>
        </dependency>

    </dependencies>

Step 3 – Update the Build Section of pom.xml in Allure Report Project

<build>
        <plugins>

            <plugin>
                <groupId>org.apache.maven.plugins</groupId>
                <artifactId>maven-compiler-plugin</artifactId>
                <version>${maven.compiler.plugin.version}</version>
                <configuration>
                    <source>${maven.compiler.source}</source>
                    <target>${maven.compiler.target}</target>
                </configuration>
            </plugin>

            <plugin>
                <groupId>org.apache.maven.plugins</groupId>
                <artifactId>maven-surefire-plugin</artifactId>
                <version>${maven.surefire.plugin.version}</version>
                <configuration>
                    <testFailureIgnore>true</testFailureIgnore>
                    <argLine>
                        -javaagent:"${settings.localRepository}/org/aspectj/aspectjweaver/${aspectj.version}/aspectjweaver-${aspectj.version}.jar"
                    </argLine>
                    <properties>
                        <property>
                            <name>listener</name>
                            <value>io.qameta.allure.junit4.AllureJunit4</value>
                        </property>
                    </properties>
                </configuration>
                <dependencies>
                    <dependency>
                        <groupId>org.aspectj</groupId>
                        <artifactId>aspectjweaver</artifactId>
                        <version>${aspectj.version}</version>
                    </dependency>
                </dependencies>
            </plugin>

            <plugin>
                <groupId>io.qameta.allure</groupId>
                <artifactId>allure-maven</artifactId>
                <version>${allure.maven.version}</version>
                <configuration>
                    <reportVersion>${allure.maven.version}</reportVersion>
                </configuration>
            </plugin>
        </plugins>
    </build>
</project>

Step 4 – Create a Test Code for the testing of REST API under src/test/java

Rest Assured and Allure Report are two popular tools for testing. Rest Assured is used for API testing and Allure Report is used for creating detailed reports about tests. To see our request and response in more detail using these tools, we need to add a line to our Rest Assured tests. This will provide the request and response details in the report.

.filter(new AllureRestAssured())

package org.example;

import io.qameta.allure.*;
import io.qameta.allure.restassured.AllureRestAssured;
import io.restassured.http.ContentType;
import org.json.JSONObject;
import org.junit.Test;

import static io.restassured.RestAssured.given;
import static org.hamcrest.core.IsEqual.equalTo;

@Epic("REST API Regression Testing using JUnit4")
@Feature("Verify CRUID Operations on Employee module")
public class APITests {

    String BaseURL = "https://dummy.restapiexample.com/api";


    @Test
    @Story("GET Request")
    @Severity(SeverityLevel.NORMAL)
    @Description("Test Description : Verify the details of employee of id-2")
    public void getUser() {

        // GIVEN
        given()
                .filter(new AllureRestAssured())

                // WHEN
                .when()
                .get(BaseURL + "/v1/employee/2")

                // THEN
                .then()
                .statusCode(200)
                .statusLine("HTTP/1.1 200 OK")
                // To verify booking id at index 2
                .body("data.employee_name", equalTo("Garrett Winters!"))
                .body("message", equalTo("Successfully! Record has been fetched."));

    }

    @Test
    @Story("POST Request")
    @Severity(SeverityLevel.NORMAL)
    @Description("Test Description : Verify the creation of a new employee")
    public void createUser() {

        JSONObject data = new JSONObject();

        data.put("employee_name", "APITest");
        data.put("employee_salary", "99999");
        data.put("employee_age", "30");

        // GIVEN
        given()
                .filter(new AllureRestAssured())
                .contentType(ContentType.JSON)
                .body(data.toString())

                // WHEN
                .when()
                .post(BaseURL + "/v1/create")

                // THEN
                .then()
                .statusCode(200)
                .body("data.employee_name", equalTo("APITest"))
                .body("message", equalTo("Successfully! Record has been added."));

    }
}

Step 5 – Run the Test and Generate Allure Report

To run the tests, use the below command

mvn clean test

The output of the above program is

This will create allure-results folder with all the test reports. These files will be used to generate Allure Report.

To create Allure Report, use the below command

allure serve

This will generate the beautiful Allure Test Report as shown below.

Allure Report Dashboard

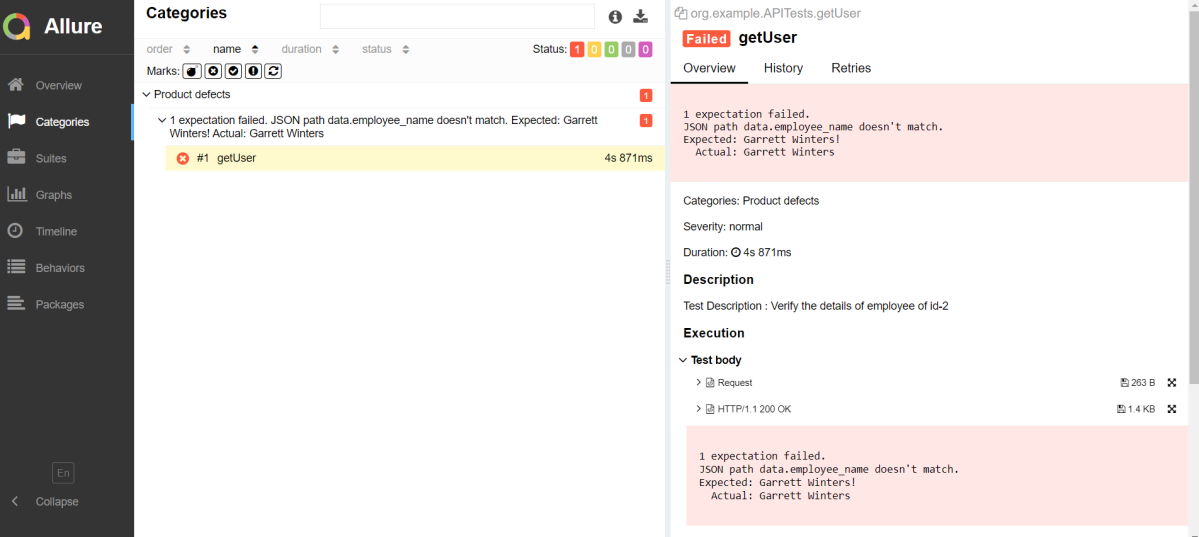
Categories in Allure Report

The categories tab gives you a way to create custom defects classifications to apply for test results. There are two categories of defects – Product Defects (failed tests) and Test Defects (broken tests).

Suites in Allure Report

On the Suites tab a standard structural representation of executed tests, grouped by suites and classes can be found.

View test history

Each time you run the report from the command line with the mvn clean test command, a new result JSON file will get added to the allure-results folder. Allure can use those files to include a historical view of your tests. Let’s give that a try.

To get started, run mvn clean test a few times and watch how the number of files in the allure-reports folder grows.

Now go back to view your report. Select Suites from the left nav, select one of your tests and click Retries in the right pane. You should see the history of test runs for that test:

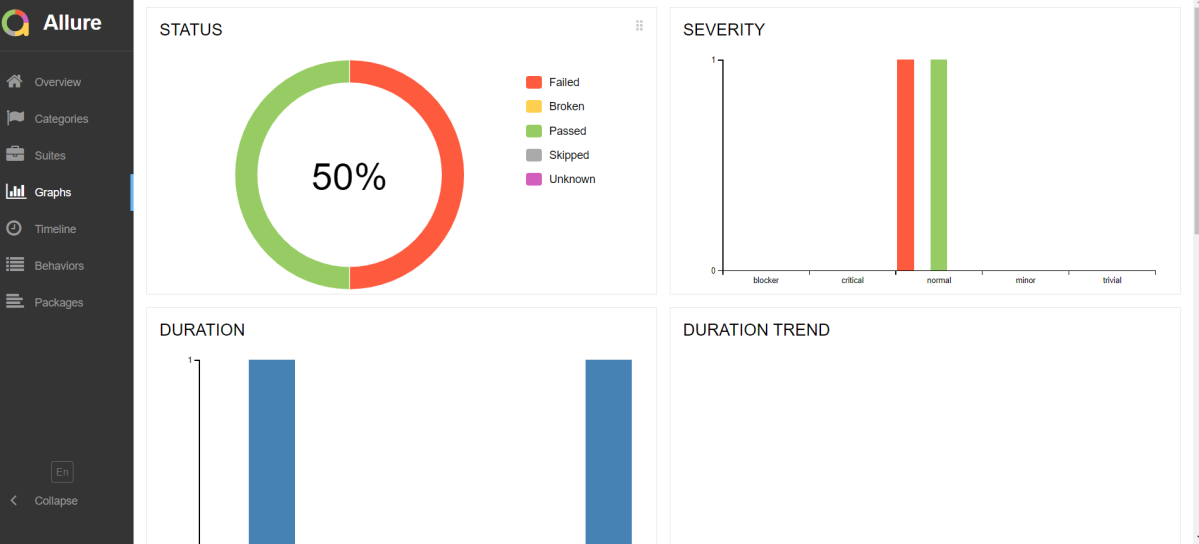
Graphs in Allure Report

Graphs allow you to see different statistics collected from the test data: status breakdown or severity and duration diagrams.

Timeline in Allure Report

Timeline tab visualizes retrospective of tests execution, allure adaptors collect precise timings of tests, and here on this tab, they are arranged accordingly to their sequential or parallel timing structure.
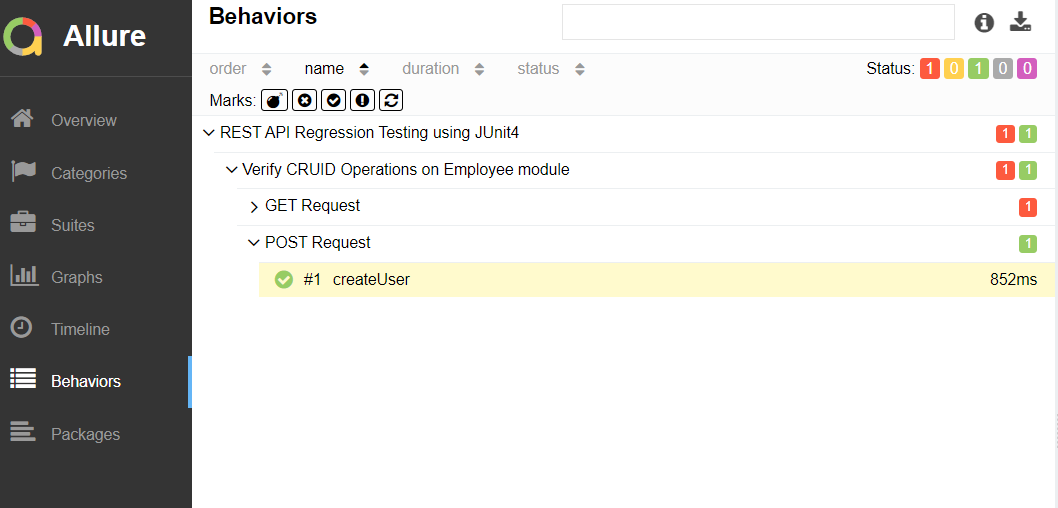
Behaviors of Allure Report

This tab groups test results according to Epic, Feature, and Story tags.

The below image shows the request body sent and the status code of the response, its body, and header provided by API.

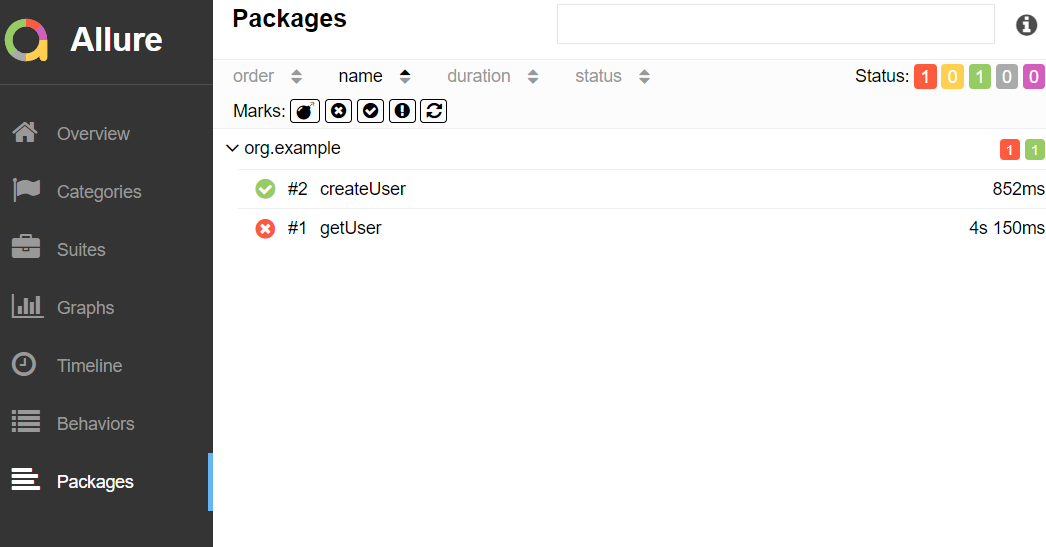
Packages in Allure Report

The packages tab represents a tree-like layout of test results, grouped by different packages.

We are done! Congratulations on making it through this tutorial and hope you found it useful! Happy Learning!!

How to pass basic authentication credentials in Python Requests

HOME

response = requests.get(endpoint, auth=(username, password))

import requests

endpoint = 'https://httpbin.org/basic-auth/user/pass'
credentials = ('user', 'pass')


def test_basic_auth():

    response = requests.get(endpoint, auth=credentials)
    response_body = response.json()
    print(response_body)
    assert response.status_code == 200
    assert response_body["authenticated"] == True
    assert response_body["user"] == "user"

pytest BasicAuth_test.py -s

Integration of REST Assured with JUnit4

HOME

In this tutorial, I’ll create a Test Framework for the testing of REST API using REST Assured and JUnit4 as the test framework.

What is Rest Assured?

Rest Assured enables you to test REST APIs using java libraries and integrates well with Maven/Gradle. REST Assured is a Java library that provides a domain-specific language (DSL) for writing powerful, maintainable tests for RESTful APIs.

What is JUnit?

JUnit is a simple framework to write repeatable tests. It is an instance of the xUnit architecture for unit testing frameworks. JUnit 4 is one of the most popular unit testing frameworks which has a significant role in the test-driven development process.

Dependency List:-

  1. REST Assured – 5.4.0
  2. Java 17
  3. JUnit – 4.13.2
  4. Maven – 3.9.6

Detailed Step Description

Step 1- Download and Install Java

Java needs to be present on the system to run the tests. Click here to know How to install Java. To know if Java is installed or not on your machine, type this command in the command line. This command will show the version of Java installed on your machine.

java -version

Step 2 – Download and setup Eclipse IDE on the system

The Eclipse IDE (integrated development environment) provides strong support for Java developers, which is needed to write Java code. Click here to know How to install Eclipse.

Step 3 – Setup Maven

To build a test framework, we need to add a number of dependencies to the project. It is a very tedious and cumbersome process to add each dependency manually. So, to overcome this problem, we use a build management tool. Maven is a build management tool that is used to define project structure, dependencies, build, and test management. Click here to know How to install Maven.

To know if Maven is already installed or not on your machine, type this command in the command line. This command will show the version of Maven installed on your machine.

mvn -version

Step 4 – Create a new Maven Project

Click here to know How to create a Maven project

Below is the Maven project structure. Here,

Group Id – com.example
Artifact Id – RestAssured_JUnit4_Demo
Version – 0.0.1-SNAPSHOT
Package – com. example.RestAssured_JUnit4_Demo

Step 5 – Add REST Assured and JUnit4 dependencies to the project

Add the below-mentioned dependencies to the project.

<project xmlns="http://maven.apache.org/POM/4.0.0" xmlns:xsi="http://www.w3.org/2001/XMLSchema-instance"
  xsi:schemaLocation="http://maven.apache.org/POM/4.0.0 http://maven.apache.org/xsd/maven-4.0.0.xsd">
  <modelVersion>4.0.0</modelVersion>

  <groupId>org.example</groupId>
  <artifactId>RestAssured_JUnit4_Demo</artifactId>
  <version>1.0-SNAPSHOT</version>
  <packaging>jar</packaging>

  <name>RestAssured_JUnit4_Demo</name>
  <url>http://maven.apache.org</url>

  <properties>
    <rest-assured.version>5.4.0</rest-assured.version>
    <junit.version>4.13.2</junit.version>
    <json.version>20231013</json.version>
    <hamcrest.version>1.3</hamcrest.version>
    <maven.site.plugin.version>4.0.0-M13</maven.site.plugin.version>
    <maven.compiler.plugin.version>3.12.1</maven.compiler.plugin.version>
    <maven.surefire.plugin.version>3.2.3</maven.surefire.plugin.version>
    <maven.surefire.report.plugin.version>3.2.5</maven.surefire.report.plugin.version>
    <maven.compiler.source>17</maven.compiler.source>
    <maven.compiler.target>17</maven.compiler.target>
  </properties>

  <dependencies>

    <!-- Rest-Assured Dependency -->
    <dependency>
      <groupId>io.rest-assured</groupId>
      <artifactId>rest-assured</artifactId>
      <version>${rest-assured.version}</version>
      <scope>test</scope>
    </dependency>

    <!-- JUnit4 Dependency -->
    <dependency>
      <groupId>junit</groupId>
      <artifactId>junit</artifactId>
      <version>${junit.version}</version>
      <scope>test</scope>
    </dependency>

    <!-- JSON Dependency -->
    <dependency>
      <groupId>org.json</groupId>
      <artifactId>json</artifactId>
      <version>${json.version}</version>
    </dependency>

    <!-- Hamcrest Dependency -->
    <dependency>
      <groupId>org.hamcrest</groupId>
      <artifactId>hamcrest-all</artifactId>
      <version>${hamcrest.version}</version>
      <scope>test</scope>
    </dependency>

  </dependencies>

  <build>
    <plugins>

      <plugin>
        <groupId>org.apache.maven.plugins</groupId>
        <artifactId>maven-site-plugin</artifactId>
        <version>${maven.site.plugin.version}</version>
      </plugin>

      <plugin>
        <groupId>org.apache.maven.plugins</groupId>
        <artifactId>maven-surefire-plugin</artifactId>
        <version>${maven.surefire.plugin.version}</version>
        <configuration>
          <testFailureIgnore>true</testFailureIgnore>
        </configuration>
      </plugin>

      <plugin>
        <groupId>org.apache.maven.plugins</groupId>
        <artifactId>maven-compiler-plugin</artifactId>
        <version>${maven.compiler.plugin.version}</version>
        <configuration>
          <source>${maven.compiler.source}</source>
          <target>${maven.compiler.target}</target>
        </configuration>
      </plugin>
    </plugins>
  </build>

  <reporting>
    <plugins>
      <plugin>
        <groupId>org.apache.maven.plugins</groupId>
        <artifactId>maven-surefire-report-plugin</artifactId>
        <version>${maven.surefire.report.plugin.version}</version>
      </plugin>
    </plugins>
  </reporting>
</project>

Step 6 – Create the TEST file

The tests should be written in src/test/java directory. To know how to create a JSON Request body using JSONObject, please refer to this tutorial.

import io.restassured.http.ContentType;
import org.json.JSONObject;
import org.junit.Test;
import static org.hamcrest.Matchers.equalTo;
import static io.restassured.RestAssured.given;

public class APITests {

    String BaseURL = "https://dummy.restapiexample.com/api";


    @Test
    public void createUser() {

        JSONObject data = new JSONObject();

        data.put("employee_name", "NewUser1");
        data.put("employee_salary", "1000");
        data.put("employee_age", "35");

        // GIVEN
        given()
                .contentType(ContentType.JSON)
                .body(data.toString())

                // WHEN
                .when()
                .post(BaseURL + "/v1/create")

                // THEN
                .then()
                .statusCode(200)
                .body("data.employee_name", equalTo("NewUser1"))
                .body("message", equalTo("Successfully! Record has been added."));

    }

}

Step 7 – Test Execution through JUnit Test

Go to the Runner class and right-click Run As JUnit Test. The tests will run as JUnit tests. (Eclipse)

Below is the image to run the tests in IntelliJ.

This is how the execution console will look like.

Step 8 – Run the tests from the command line

Maven Site Plugin creates a folder – site under the target directory, and the Maven Surefire Report plugin generates the JUnit Reports in the site folder. We need to run the tests through the command line to generate the JUnit Report.

mvn clean test site

The output of the above program is

Step 9 – Report Generation

After the test execution, refresh the project, and a new folder with the name site in the target folder will be generated. This folder contains the reports generated by JUnit. The structure of the folder site looks as shown below.

Step 10 – View the Report

Right-click on the summary.html report and select Open In -> Browser ->Chrome.

Summary Report

Below is the summary Report.

Surefire Report

Below is an example of a Surefire Report. This report contains a summary of the test execution.

We are done! Congratulations on making it through this tutorial and hope you found it useful! Happy Learning!!

How to test response time in Request using Python Requests

HOME

import requests

endpoint = 'https://reqres.in/api/users'


def test_response():
    payload = {
        "name": "Vibha",
        "Job": "CEO"
    }

    response = requests.post(endpoint, payload)
    response_body = response.json()
    print("Response :", response_body)
    assert response.status_code == 201
    print("Elapsed Time :", response.elapsed.total_seconds())

pytest ResponseTime_test.py -s