In this tutorial, we will understand the use of Fixtures in the PyTest Framework.
What is a Fixture?
Fixtures define the steps and data that constitute the arranged phase of a test. In PyTest, they are functions we define that serve this purpose. They can also be used to define a test’s act phase; this is a powerful technique for designing more complex tests.
Fixture can be used to set up and tear down resources, such as establishing database connections, creating temporary files, initializing objects, or any other operations needed to prepare the environment for your tests.
Fixtures in pytest are created using the @pytest.fixture decorator.
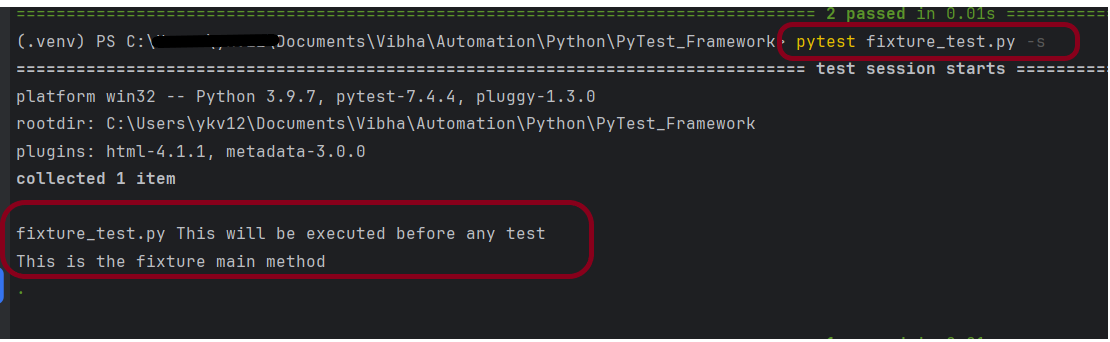
Below is an example of a fixture.
import pytest

@pytest.fixture()
def setup():
    print("This will be executed before any test")


def test_fixture(setup):
    print("This is the fixture main method")
In this example, the setup fixture is defined using the @pytest.fixture decorator. It will be executed before any test. The test function (test_fixture) use this fixture as an argument.
The output of the above program is
What is yield in PyTest?
The yield statement is used in fixtures to create a setup and teardown mechanism for test resources. When a fixture contains a yield statement, the code before the yield acts as the setup code (code executed before the test), and the code after the yield acts as the teardown code (code executed after the test).
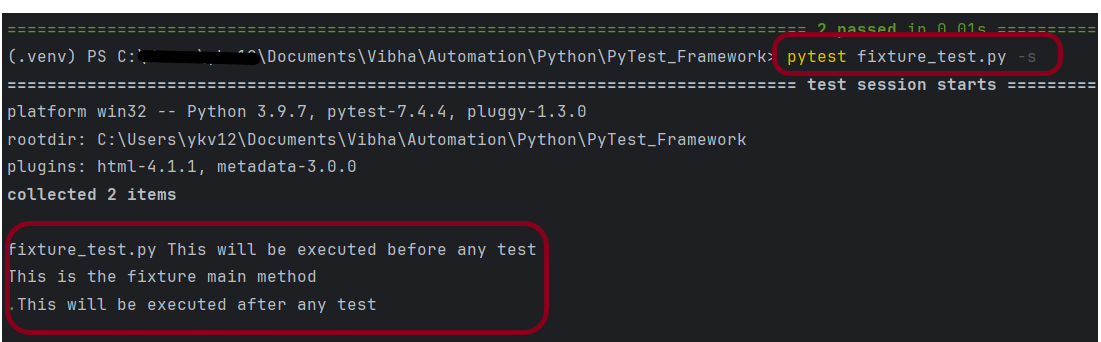
Below is an example of yield.
import pytest


@pytest.fixture()
def setup():
    print("This will be executed before any test")
    yield
    print("This will be executed after any test")


def test_fixture(setup):
    print("This is the fixture main method")
The output of the above program is
That’s it! Congratulations on making it through this tutorial and hope you found it useful! Happy Learning!!
PyTest is a testing framework that allows users to write test codes using Python programming language. PyTest is a mature, full-featured Python testing tool that helps you write better programs.
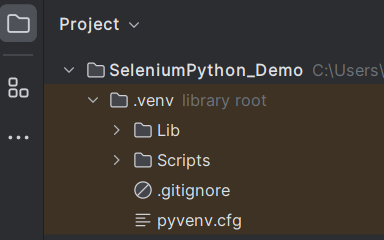
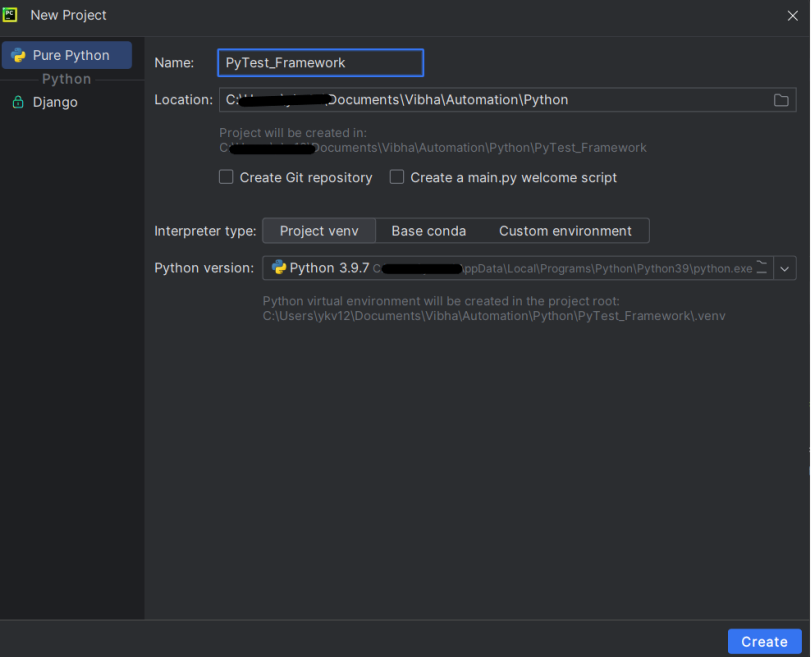
Create a new project and open it in PyCharm – SeleniumPython_Demo.
Step 5 – Create a new directory
Create a new directory – TestCases that will contain all the tests.
Step 6 – Create a test file
Create a new Python file, naming it “LoginTest.py”.
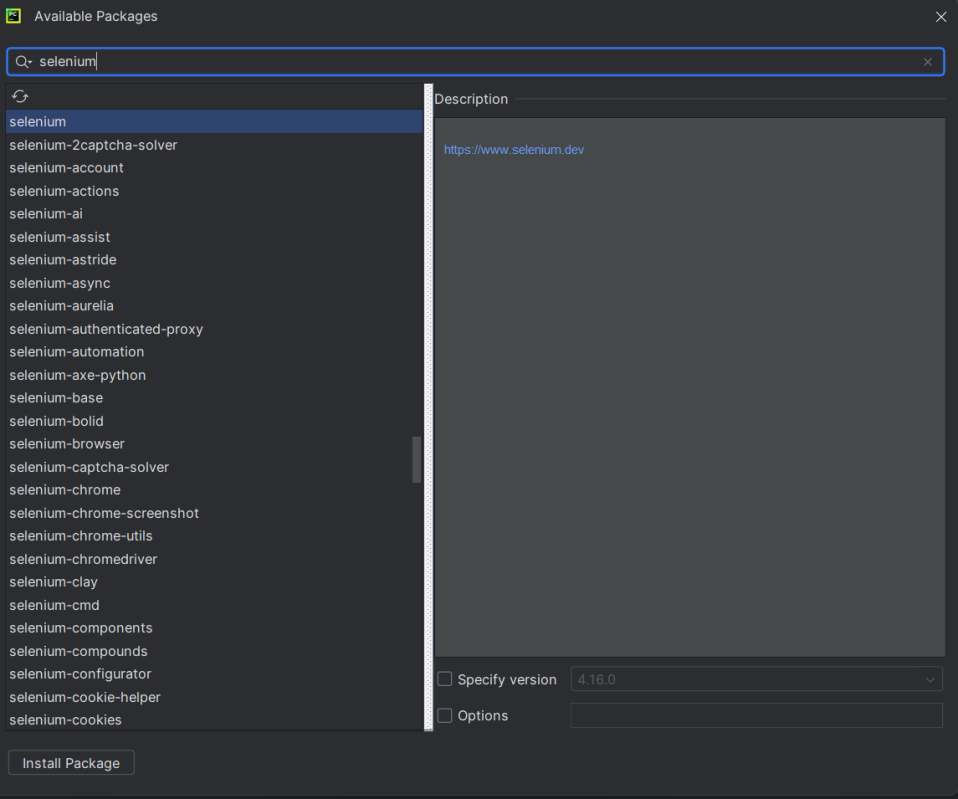
Step 7 – Add the Selenium package to the PyCharm
Go to File->Settings ->Project:SeleniumPython_Demo ->Python Interpreter.
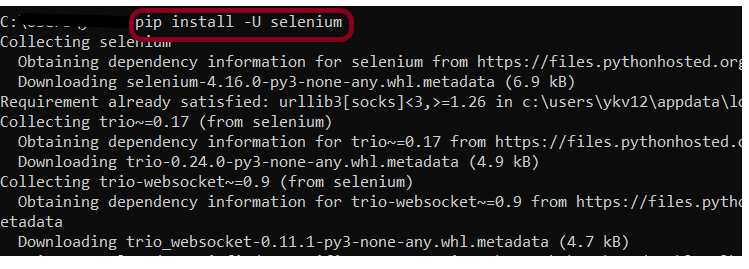
Click on the “+” sign and enter selenium in the search bar. It will show a list of packages. Select the “selenium” package and click on the “Install Package”.
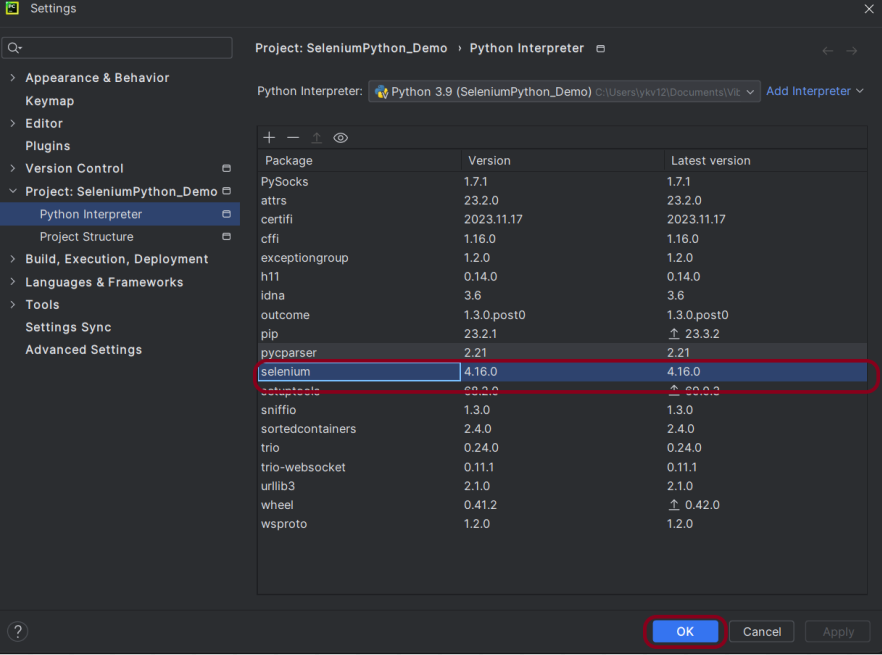
Once the package is installed, it can be seen under the package list as shown below:
Step 8 – Create the test
from selenium import webdriver
from selenium.webdriver.common.by import By
driver = webdriver.Chrome()
driver.maximize_window()
driver.implicitly_wait(2)
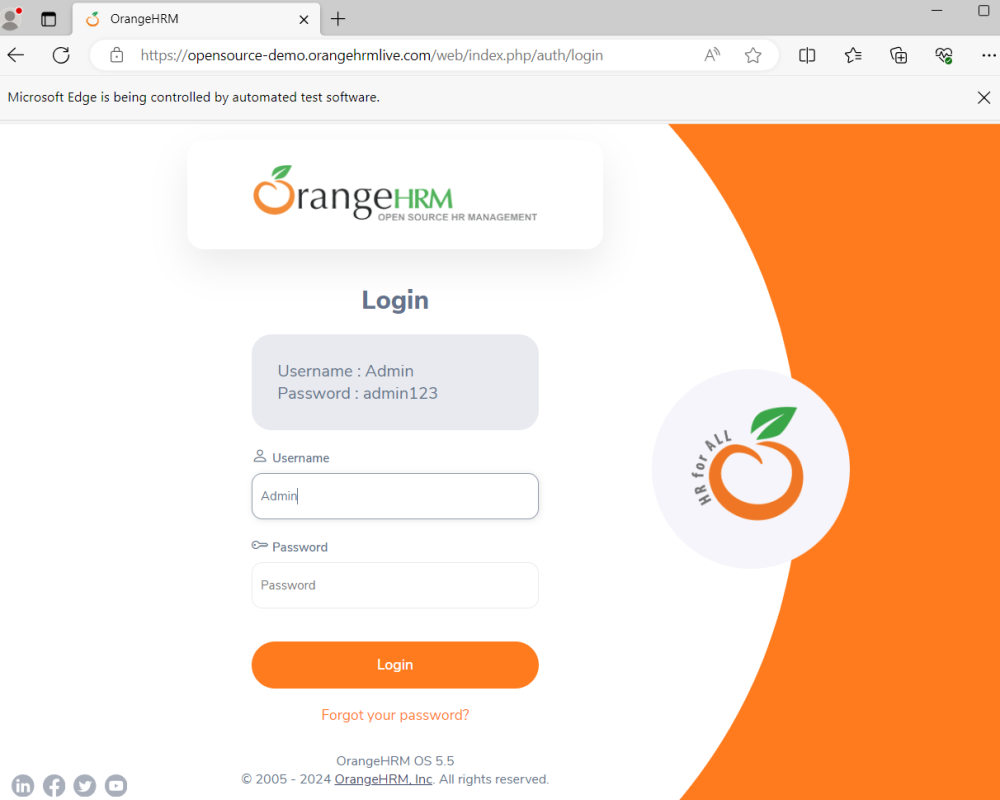
driver.get("https://opensource-demo.orangehrmlive.com/")
driver.find_element(By.NAME, "username").send_keys("Admin")
driver.find_element(By.NAME, "password").send_keys("admin123")
driver.find_element(By.XPATH, "//*[@class='oxd-form']/div[3]/button").click()
homePageTitle = driver.find_element(By.XPATH,"//*[@class='oxd-topbar-header-breadcrumb']/h6").text
print("Heading of DashBoard Page: ", homePageTitle)
driver.quit()
Importing necessary modules:
from selenium import webdriver
from selenium.webdriver.common.by import By
webdriver is used to automate the web browser. By is imported to specify the mechanism used to locate elements on a web page.
Setting up the web driver:
driver = webdriver.Chrome()
This line creates an instance of the Chrome WebDriver, which will be used to automate the Chrome browser.
Maximizing the browser window:
driver.maximize_window()
This line maximizes the browser window.
Implicitly waiting for elements:
driver.implicitly_wait(2)
This sets an implicit wait, meaning the WebDriver will wait up to 2 seconds for elements to be located before throwing an exception.
In the method mentioned above, we can inspect and find the HTML element with which you want to interact. The script locates the username and password input fields on the page by their names and enters the credentials. The script locates the login button using an XPath expression and clicks it.
Fetching and printing the heading of the dashboard page:
homePageTitle = driver.find_element(By.XPATH,"//*[@class='oxd-topbar-header-breadcrumb']/h6").text
print("Heading of DashBoard Page: ", homePageTitle)
The script locates an element on the dashboard page (specifically an h6 element within a breadcrumb) and prints its text, which is assumed to be the heading of the dashboard page.
Quitting the browser:
driver.quit()
Finally, the script closes the browser window and ends the WebDriver session.
Step 9 – Execute the Tests
We need to move to the folder where the Python Tests are placed. In this case, we need to go to the TestCases folder.
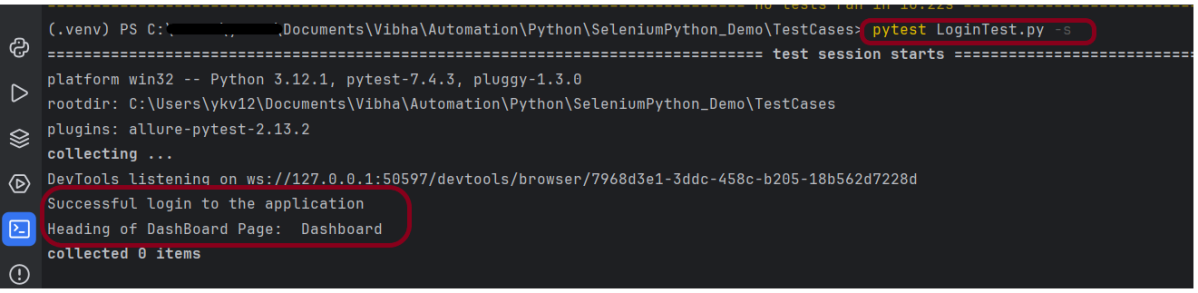
To run the tests, use the below command:
pytest LoginTest.py -s
The output of the above program is
We are done! Congratulations on making it through this tutorial and hope you found it useful! Happy Learning!!
PyTest is a popular testing framework for Python. It is widely used for writing and executing unit tests, functional tests, and even complex functional testing scenarios.
pytest requires: Python 3.7+ or PyPy3.
Key features of PyTest include:
1. Fixture Support: pytest supports fixtures, which are functions that can set up and tear down resources needed for testing. This makes it easy to share setup code among multiple tests.
2. Powerful Test Discovery:pytest automatically discovers and runs test functions based on naming conventions. We don’t need to explicitly list your tests; instead, the framework discovers and executes them.
3. Parameterized Testing: We can easily perform parameterized testing using pytest, allowing us to run the same test logic with multiple sets of input data.
4. Integration with Other Tools:pytest integrates well with other tools and libraries, such as Selenium for web testing, Django for web application testing, integrate report generation and more.
5. Assertions:pytest allows us to use the standard Python assert for verifying expectations and values in Python tests.
6. Advanced Test Execution:pytest provides rich features for executing tests, including parallel test execution, selective test execution, and rerunning failed tests.
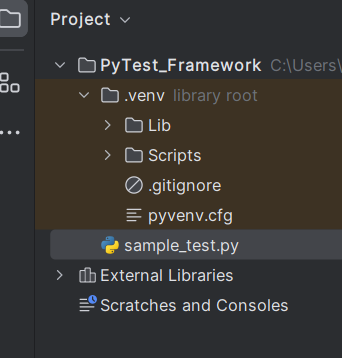
Create a new project folder and open it in PyCharm.
Go to the project folder and Create a new Python file, name it “sample_test.py”.
Create tests in the Python file.
def test_addition():
a = 6
b = 5
c = 11
assert a + b == 11, "Sum is not 11"
assert a + b == c, "Sum of a and b is not equal to c"
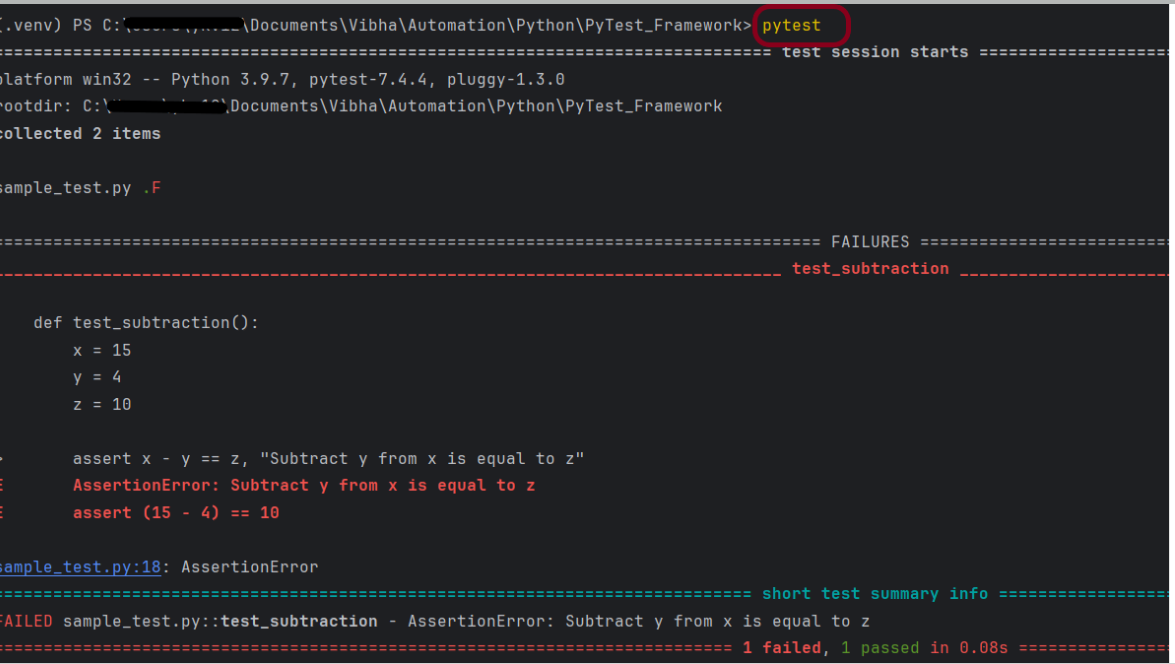
def test_subtraction():
x = 15
y = 4
z = 18
assert x - y == z, "Subtract y from x is equal to z"
To run the tests, use the below command:
pytest
This command will run all the test file which has *test* in its name. Here, we have 1 Python file named as Sample_test.py. This file has 2 test, one of the test passes and another one fails. In the failures section, we can see the failed method(s) and the line of failure. Here x-y=z means 15-4=10 which is false.
The output of the above execution is
How PyTest Identifies the Test Files and Test Methods
By default pytest only identifies the file names starting with test_ or ending with _test as the test files. We can explicitly mention other filenames though (explained later). Pytest requires the test method names to start with “test.” All other method names will be ignored even if we explicitly ask to run those methods.
See some examples of valid and invalid pytest file names
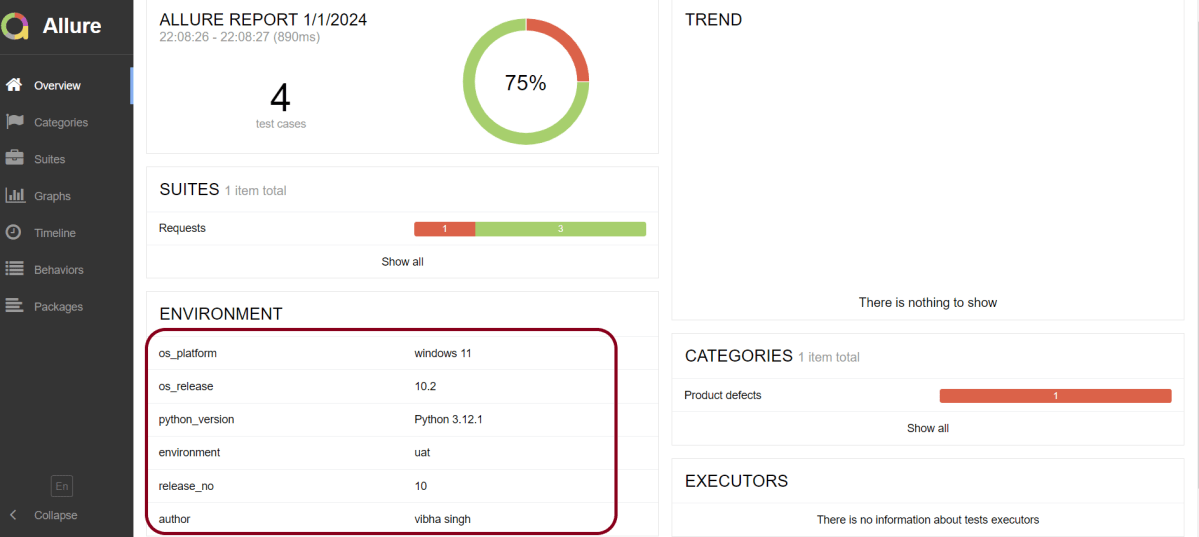
For the main page of the report, you can collect various information about the environment in which the tests were executed.
For example, it is a good idea to use this to remember the OS version and Python version. This may help the future reader investigate bugs that are reproducible only in some environments.
Serenity BDD has strong WebDriver integration and manages WebDriver instances. It is not needed to create or close the WebDriver instance of the Serenity Tests.
Serenity uses a library WebDriver Manager, which manages the driver for us. We don’t need to explicitly download and configure the WebDriver binaries for us.
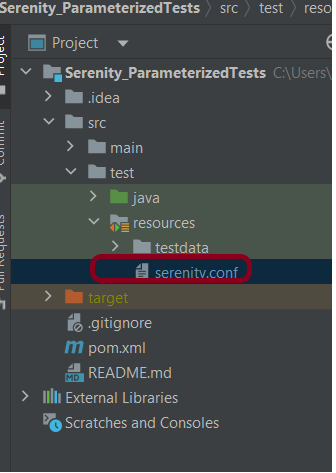
The simplest way to configure the driver we want to use is in our project’s serenity.config file (which will be present in src/test/resources folder).
Microsoft Edge is a Chromium driver, so the configuration is very similar to Chrome. The main difference is the use of “ms:edgeOptions” instead of “goog:chromeOptions”. A typical configuration is shown below:
There is another way to run the tests in edge browser, use the @Managed annotation.
@Managed annotation in Serenity will manage the WebDriver instance, including opening the appropriate driver at the start of each test, and shutting it down when the test is finished. @Managed provides an option for the user to select the WebDriver driver to the run the tests in it. The possible values are firefox, chrome, iexplorer, phantomjs, appium, safari, edge, and htmlunit. There are multiple ways to manage the WebDriver. One of the way is shown below:
In the below program, the tests are running on the Edge browser. The driver name is mentioned with @Managed annotation.
import net.serenitybdd.annotations.Managed;
import net.serenitybdd.annotations.Steps;
import net.serenitybdd.annotations.Title;
import net.serenitybdd.core.Serenity;
import net.serenitybdd.junit.runners.SerenityRunner;
import org.junit.Test;
import org.junit.runner.RunWith;
import org.openqa.selenium.WebDriver;

import static org.assertj.core.api.Assertions.assertThat;

@RunWith(SerenityRunner.class)
public class EdgeTests {

    private String userName;
    private String passWord;
    private String errorMessage;

    @Managed(driver = "edge")
    WebDriver driver;

    @Steps
    NavigateActions navigate;

    @Steps
    StepLoginPage loginPage;


    @Test
    @Title("Login to application with invalid credential generates error message")
    public void invalidCredentials() {

        // Given
        navigate.toTheHomePage();

        // When
        loginPage.inputUserName("Admin");
        loginPage.inputPassword("admin");
        loginPage.clickLogin();

        // Then
        Serenity.reportThat("Passing invalid credentials generates error message",
                () -> assertThat(assertThat(loginPage.errorMessage()).isEqualToIgnoringCase("Invalid Credentials")));

    }

}
NavigateActions
import net.serenitybdd.annotations.Step;
import net.serenitybdd.core.steps.UIInteractionSteps;

public class NavigateActions extends UIInteractionSteps {

    @Step
    public void toTheHomePage() {
        openPageNamed("loginForm");
    }
}
Step 1 – We are using PyCharm IDE, so we need to install the Request library. Use the below command using pip.
pip install -U requests
Step 2 – Install Pytest
pip install -U pytest
Step 3 – Install Allure Report for Python
pip install allure-pytest
Step 4 – Create a new project folder and open it in PyCharm.
Step 5 – Go to the project folder and Create a new directory – tests.
Step 6 – Add allure-pytest package to the PyCharms
Go to File->Settings ->Project: AllureReport_Python->Python Interpreter.
Click on the “+” sign and enter allure-r in the search bar. It will show a list of packages. Select the “allure-pytest” package and click on the “Install Package”.
Once the package is installed, we will see the message that the package is installed successfully.
Step 7 – Create the test.
Create a file – Requests.py and create the tests in that file.
import allure
import requests

ENDPOINT = 'https://reqres.in/api/users'


@allure.description("This tests validates that the response returns status code 201")
@allure.severity(allure.severity_level.BLOCKER)
@allure.label("Owner", "Vibha Singh")
def test_create_user():
    request_body = {
        "name": "Vibha",
        "Job": "CEO"
    }

    response = requests.post(ENDPOINT, request_body)
    response_body = response.json()
    print("Request :", request_body)
    print("Response :", response_body)
    assert response.status_code == 201


@allure.description("This tests validates that the id in the response")
@allure.severity(allure.severity_level.NORMAL)
@allure.label("Owner", "Vibha Singh")
def test_response():
    request_body = {
        "name": "Vibha",
        "Job": "CEO"
    }

    response = requests.post(ENDPOINT, request_body)
    assert response.status_code == 201
    response_body = response.json()
    print("Request :", request_body)
    print("Response :", response_body)

    id = response_body["id"]
    if "id" in response_body:
        print("Value of id :", id)
    else:
        print("id not found")


@allure.description("This tests validates that the header in the response")
@allure.severity(allure.severity_level.NORMAL)
@allure.label("Owner", "Vibha Singh")
def test_header_in_request():
    request_body = {
        "name": "Vibha",
        "Job": "CEO"
    }

    headers = {'Content-Type': 'application/json; charset=utf-8'}
    response = requests.post(ENDPOINT, request_body, headers)
    print("Request :", request_body)
    print("Response :", response.json())
    print("Headers :", response.headers)
    assert response.headers["Content-Type"] == "application/json; charset=utf-8"


@allure.description("This tests validates that the name in the response - FAIL")
@allure.severity(allure.severity_level.NORMAL)
@allure.label("Owner", "Vibha Singh")
def test_verify_name():
    request_body = {
        "name": "Vibha",
        "Job": "CEO"
    }

    header = {"Content-Type":  "application/json; charset=utf-8"}
    response = requests.post(ENDPOINT, request_body, header)
    response_body = response.json()
    print("Response :", response_body)
    print("Request Header :", response.request.headers)
    assert response_body["name"] == "Test"
Step 8 – To run this test, use the below command:
pytest --alluredir=<path to report directory> test.py
In my case, I want the allure files to be generated in AllureReport folder as shown below:
Below is the command we use to run the tests. This will generate a directory to the specified path with some files in JSON format.
It will start a jetty server within a few seconds and the report will be visible inside your browser.
The overview page hosts several default widgets representing the basic characteristics of your project and test environment.
Statistics – overall report statistics.
Launches – if this report represents several test launches, statistics per launch will be shown here.
Behaviours – information on results aggregated according to stories and features.
Executors – information on test executors that were used to run the tests.
History Trend – if tests accumulated some historical data, it’s trend will be calculated and shown on the graph.
Environment – information on the test environment.
Categories in Allure Report
The categories tab gives you a way to create custom defect classifications to apply for test results. There are two categories of defects – Product Defects (failed tests) and Test Defects (broken tests).
Suites in Allure Report
On the Suites tab a standard structural representation of executed tests, grouped by suites and classes can be found.
Graphs in Allure Report
Graphs allow you to see different statistics collected from the test data: statuses breakdown or severity and duration diagrams.
Timeline in Allure Report
The timeline tab visualizes retrospective of tests execution, allure adaptors collect precise timings of tests, and here on this tab, they are arranged accordingly to their sequential or parallel timing structure.
Behaviours of Allure Report
This tab groups test results according to Epic, Feature, and Story tags.
Packages in Allure Report
The packages tab represents a tree-like layout of test results, grouped by different packages.
That’s it! Congratulations on making it through this tutorial and hope you found it useful! Happy Learning!!
When you are doing API testing, sometimes the APIs or endpoints are protected. This means you need to be authenticated and authorized to perform certain actions. REST assured supports several authentication schemes, for example, OAuth, digest, certificate, form, and pre-emptive basic authentication.
In this post, we’ll look at how to pass the authorization token in the header in REST Assured.
What is an authorization token?
An authorization token, often referred to as an access token, is a piece of data or credential that is used to authenticate and authorize access to protected resources or operations in a system.
Add the below-mentioned dependencies to the Maven project.
In this tutorial, I will explain to pass a JSON or XML file as a payload to the request. This is needed when the payload is static or there is minimal change in the request payload. This can be done by using the body() method, which accepts “File” as an argument. This is elaborated in Javadoc.
RequestSpecification body(File body)
This specifies file content that’ll be sent with the request. This only works for the POST, PATCH and PUT HTTP methods. Trying to do this for the other HTTP methods will cause an exception to be thrown.
Add Rest Assured dependency to the project. Use the latest version from here.
GitHub Actions are automated tasks, or workflows, that you can set up in your repository to build, test, package, release, and deploy any project on GitHub. With GitHub Actions, you can orchestrate any workflow, based on nearly any event, while GitHub manages the execution, provides rich feedback, and secures every step along the way.
Why should you care? Well, imagine merging your code into the main branch, only to realize later that it broke your build. With GitHub Actions, you can automate your unit tests to run on every push or pull request, thereby catching bugs before they creep into your production code. This means less time debugging and more time developing!
Implementation Steps
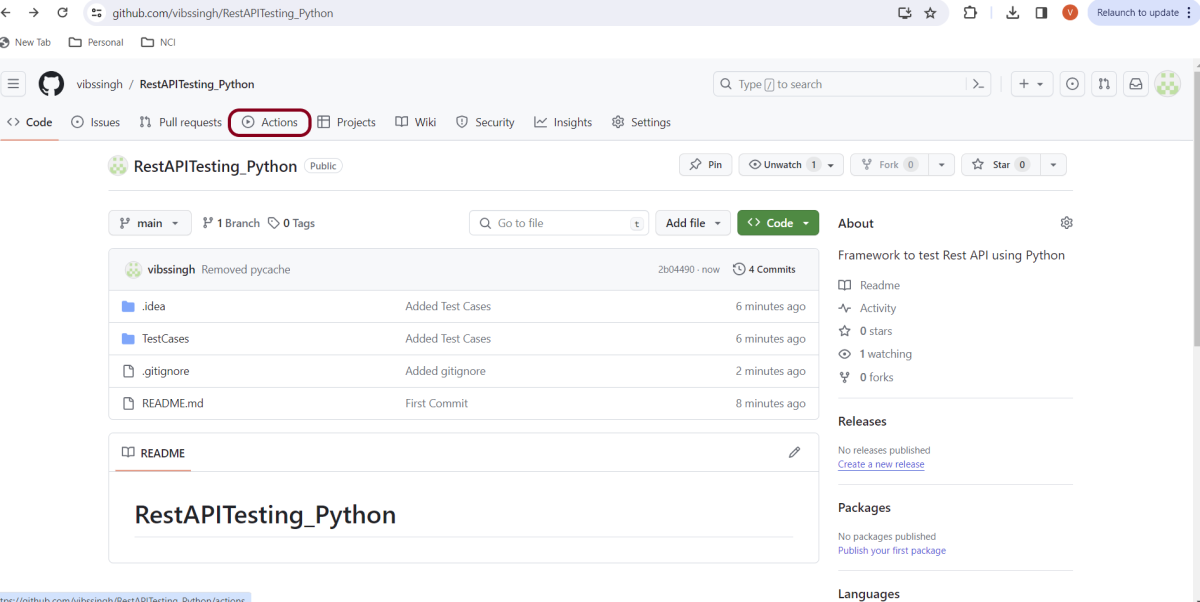
Step 1 – Create GitHub Actions and Workflows
I have a repository available in GitHub – RestAPITesting_Python as shown in the below image. Go to the “Actions” tab. Click on the “Actions” tab.
Step 2 – Select the type of Actions
You will see that GitHub recommends Actions depending on the project. In our case, it is recommending actions suitable for a Python project. I have selected the “Python application” option.
Step 3 – Generation of Sample pipeline
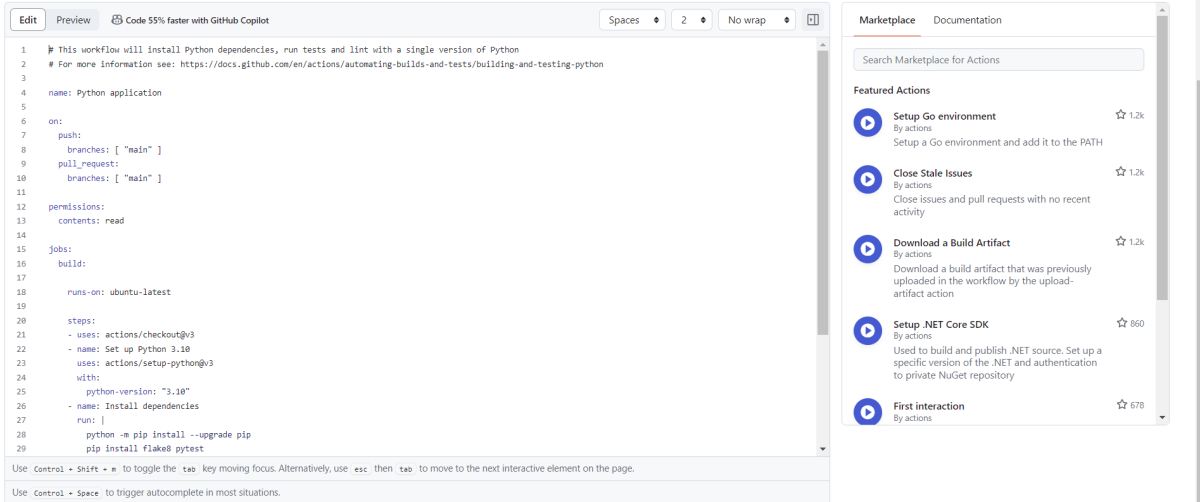
If you choose an existing option, it will automatically generate a .yaml for the project as shown below.
We will replace the current workflow with the following yml file as shown below:
# This workflow will install Python dependencies, run tests and lint with a single version of Python
# For more information see: https://docs.github.com/en/actions/automating-builds-and-tests/building-and-testing-python

name: Python application

on:
  push:
    branches: [ "main" ]
  pull_request:
    branches: [ "main" ]

permissions:
  contents: read

jobs:
  build:

    runs-on: ubuntu-latest

    steps:
    - uses: actions/checkout@v3
    - name: Set up Python 3.12.1
      uses: actions/setup-python@v3
      with:
        python-version: "3.12.1"

    - name: Install dependencies
      run: |
        python -m pip install --upgrade pip
        pip install pytest
        pip install requests

    - name: Test with pytest
      run: |
        cd TestCases
        pytest  --verbose --capture=no
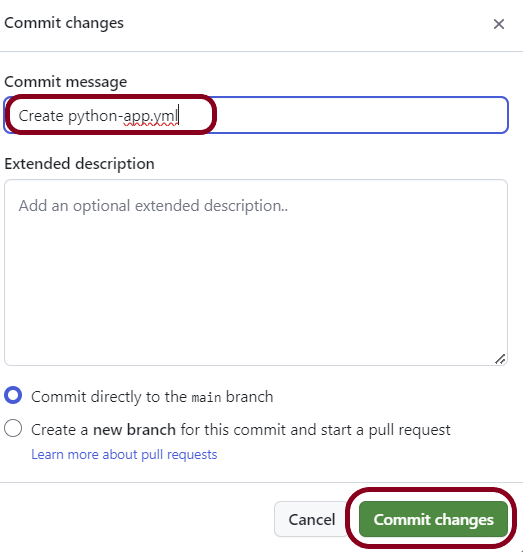
Step 4 – Commit the changes
After the changes, hit the “Start Commit” button.
This will give the option to add a description for the commit. It will also enable the user to commit either to the main branch or commit to any other branch that exists in the project. Click on the “Commit new file” button to set up the workflow file.
It will create a python-app.yml file as shown below in the project.
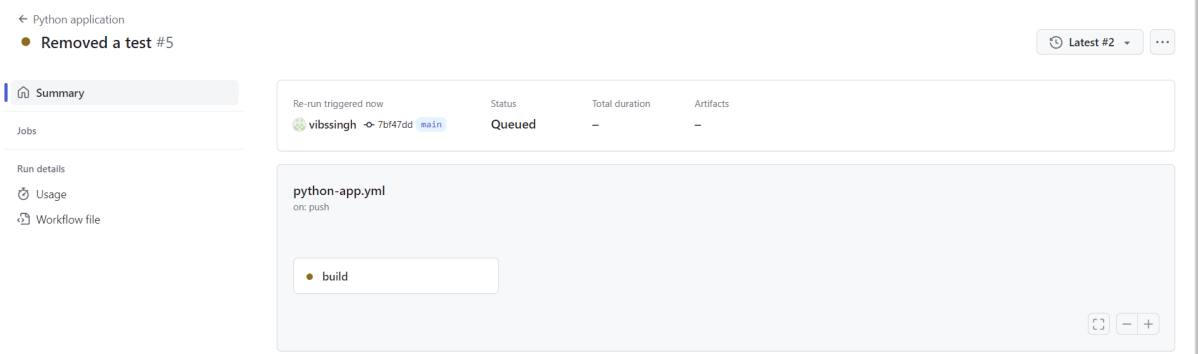
Step 5 – Verify that the workflow is running
Next, head over to the “Actions” tab, and you will see your YAML workflow file present under the tab. The yellow sign represents that the job is in the queue.
In Progress – When the job starts building and running, you will see the status change from “Queued” to “in progress”.
Passed – If the build is successful, you will see a green tick mark.
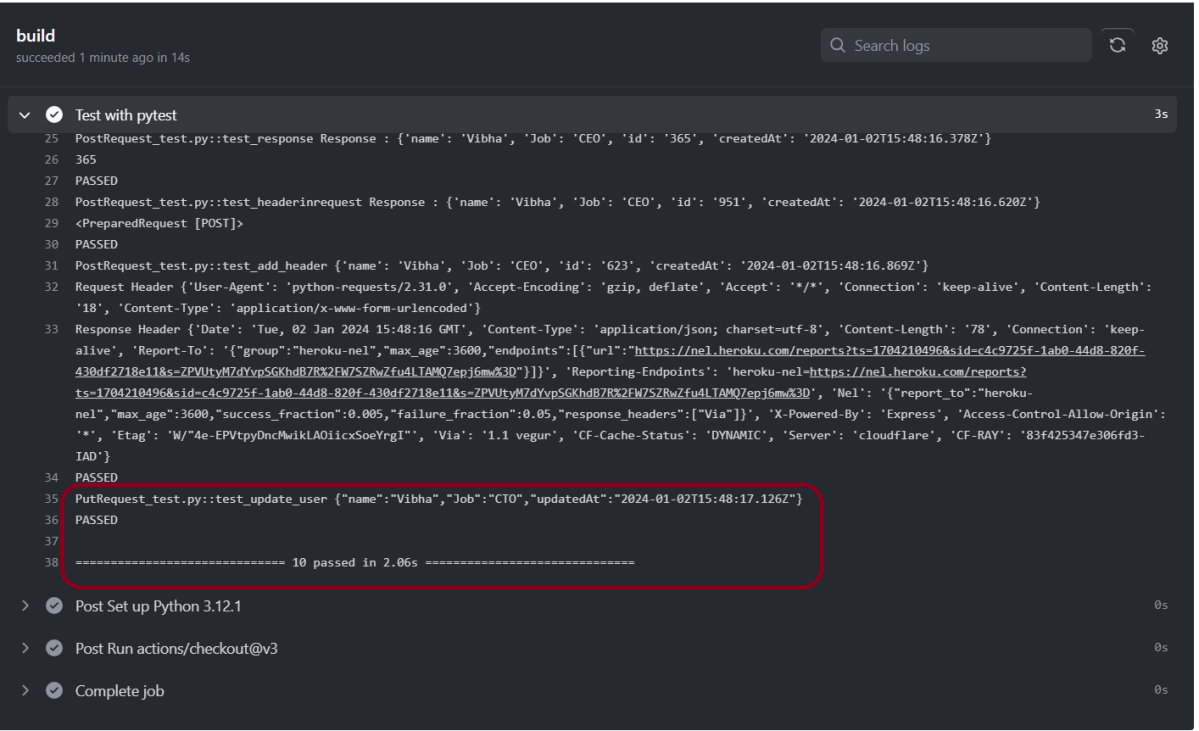
Step 6 – Verify the execution status
Below is the execution log.
Click on the workflow and the below screen is displayed. It shows the status of the run of the workflow, the total time taken to run the workflow, and the name of the .yml file.