Spring Boot makes it easy to create stand-alone, production-grade Spring based Applications that you can “just run”. We take an opinionated view of the Spring platform and third-party libraries, so you can get started with minimum fuss. Most Spring Boot applications need minimal Spring configuration.
In this tutorial, I will explain the creation of JSON Object Payload with the help of POJO (Plain Old Java Object).
What is POJO?
POJO stands for Plain Old Java Object. It is a very simple object, and it has no bounds or we can say that it has no restrictions other than the Java language specification. Also, it does not require any classpath.
A big advantage of POJO is it increases the readability and reusability of our project code and developers find it easy when understanding the code. Also, POJO is easy to write and anyone can understand them easily.
Now let’s deep dive into some technical terms about the POJO. Below are a few points about the POJO are:
A POJO should not have to extend prespecified classes.
Secondly, a POJO should not have implemented any prespecified interface.
Lastly, POJO should not contain prespecified annotations
A POJO class can follow some rules for better usability. These rules are:-
Each variable should be declared as private just to restrict direct access.
Each variable that needs to be accessed outside class may have a getter, a setter, or both methods. If the value of a field is stored after some calculations, then we must not have any setter method for that.
It Should have a default public constructor.
Can override toString(), hashcode, and equals() methods.
POJO classes are extensively used for creating JSON and XML payloads for API.
In the below example, let me create a simple JSON with some nodes which is actually a 1:1 mapping i.e. each key has a single value, and the type of values is mixed.
Let us create variables in the POJO class now for the above JSON. Now, a class name Employee will be created with the private data members as mentioned in the above JSON. Since we have created all variables as private, then there should be a way to manipulate or retrieve these data. So we create the corresponding getter and setter methods for these data members.
It is very tedious to create getter and setter methods for all the data members for big JSON strings. Every IDE gives you a shortcut to generate getter and setter methods. Here, I am using Eclipse and creating these getter and setter methods.
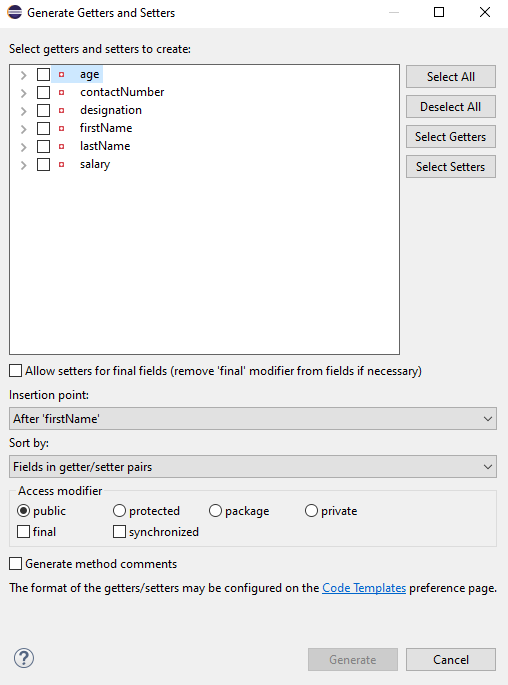
Select all the data members and Right-clickon the page. Then select Source and then select Generate Getter and Setter methods.
This opens a new screen as shown below.
You can select the data member for which you want to create the getter and setter method. I want to create the getter and setter methods for all the data members, so click on Select All and then click on the Generate Button. This will generate the getter and setter methods for all the data members.
Below is the sample code of the Employee table, which contains the data members needed for Employee JSON and their corresponding getter and setter methods.
public class Employee {

	// private variables or data members of POJO class
	private String firstName;
	private String lastName;
	private int age;
	private double salary;
	private String designation;
	private String contactNumber;
	private String emailId;

	// Getter and setter methods
	public String getFirstName() {
		return firstName;
	}

	public void setFirstName(String firstName) {
		this.firstName = firstName;
	}

	public String getLastName() {
		return lastName;
	}

	public void setLastName(String lastName) {
		this.lastName = lastName;
	}

	public int getAge() {
		return age;
	}

	public void setAge(int age) {
		this.age = age;
	}

	public double getSalary() {
		return salary;
	}

	public void setSalary(double salary) {
		this.salary = salary;
	}

	public String getDesignation() {
		return designation;
	}

	public void setDesignation(String designation) {
		this.designation = designation;
	}

	public String getContactNumber() {
		return contactNumber;
	}

	public void setContactNumber(String contactNumber) {
		this.contactNumber = contactNumber;
	}

	public String getEmailId() {
		return emailId;
	}

	public void setEmailId(String emailId) {
		this.emailId = emailId;
	}

}
Using the above POJO class, you can create any number of custom Employee objects and each object can be converted into a JSON Object and Each JSON object can be parsed into Employee POJO.
We will create a JSON object from POJO and vice versa now, which is generally called serialization and deserialization using Jackson APIs.
Serialization – Serialization is a process where you convert an Instance of a Class (Object of a class) into a Byte Stream. Here, we are converting Employee class object to JSON representation or Object
Deserialization – It is the reverse of serializing. In this process, we will read the Serialized byte stream from the file and convert it back into the Class instance representation. Here, we are converting a JSON Object to an Employee class object.
We are using Jackson API for Serialization and Deserialization. So, add the Jackson dependency to the project.
ObjectMapper provides functionality for reading and writing JSON, either to and from basic POJOs (Plain Old Java Objects), or to and from a general-purpose JSON Tree Model (JsonNode), as well as related functionality for performing conversions. It is also highly customizable to work both with different styles of JSON content and to support more advanced object concepts such as polymorphism and object identity.
Now, let us create a Test Class to show Serialization.
public class EmployeeTest {

	@Test
	public void serializationTest()  {

		Employee employee = new Employee();
		employee.setFirstName("Vibha");
		employee.setLastName("Singh");
		employee.setAge(30);
		employee.setSalary(75000);
		employee.setDesignation("Manager");

		// Converting a Java class object to a JSON payload as string
		ObjectMapper mapper = new ObjectMapper();
		String employeeJson = mapper.writeValueAsString(employee);
		String employeePrettyJson = mapper.writerWithDefaultPrettyPrinter().writeValueAsString(employee);
		System.out.println(employeeJson);
		System.out.println(employeePrettyJson);
   }
}try {
			String employeeJson = mapper.writeValueAsString(employee);
			System.out.println(employeeJson);
			String employeePrettyJson = mapper.writerWithDefaultPrettyPrinter().writeValueAsString(employee);
			System.out.println(employeePrettyJson);
		} catch (JsonProcessingException e) {
			e.printStackTrace();
		}
	}
The output of the above program is
Here, ObjectMapper from fasterxml.jackson.databind is used for Serialization.
writeValueAsString() is a method that can be used to serialize any Java value as a String.
writerWithDefaultPrettyPrinter() is used to pretty-print the JSON output. It is a Factory method for constructing ObjectWriter that will serialize objects using the default pretty printer for indentation.
I hope this has helped to clear your doubts regarding POJO and how to create JSON objects using POJO.
We are done! Congratulations on making it through this tutorial and hope you found it useful! Happy Learning!!
In certain situations, rather than running the entire test suite, we might need to execute only a specific test. In such cases, we can use tags to filter and select the desired scenarios for execution. pytest-bdd also supports tagging through options like -k or -m for filtering tests based on tags.
Below are 2 feature files.
Login.feature
@Login
Feature: Login Page

    @ValidCredentials
    Scenario: Successful Application Login
        Given User is on login page
        When User enter username "Admin" and password "admin123"
        Then User should be able to login successfully and new page open "Dashboard"
ScenarioOutline.feature
@ScenarioOutline
Feature: Scenario Outline Example

    @InvalidCredentials
    Scenario Outline: Invalid credentials generate error message
        Given User is on OrangeHome page
        When User enters username as "<username>" and password as "<password>"
        Then User should be able to see error message as "Invalid credentials"

      Examples:
       | username | password    |
       | admin    | admin12345  |
       | Admin123 | admin       |
       | 123      | admin       |


    @MissingUsername
    Scenario: Missing Username generates error
        Given User is on OrangeHome page
        When User enters username as " " and password as "admin123"
        Then User should be able to see error message as "Required" below the username field
Run Test from Command Line
1. Running all the tests
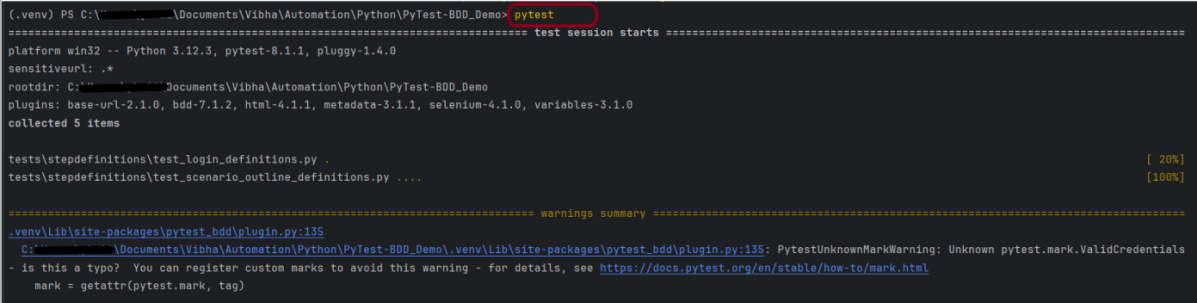
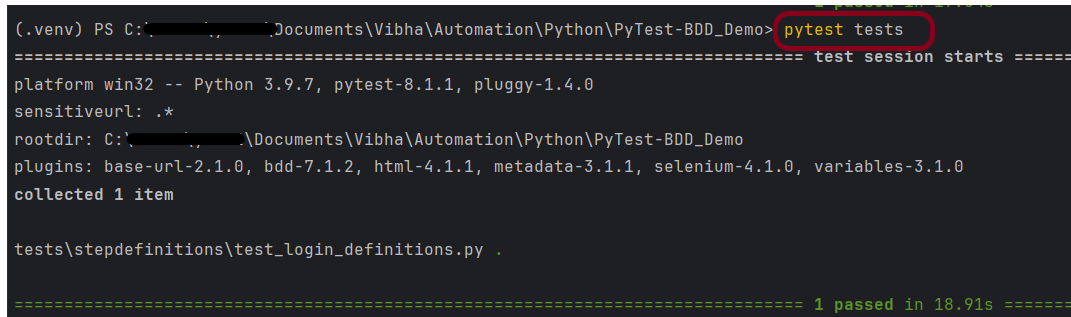
To run all the scenarios, we can open the command prompt and use the below command:-
pytest
This command will execute all the scenarios present in all the feature files. We can see that there are warning summaries like PytestUnknownMarkWarning: Unknown pytest.mark.ValidCredentials – is this a type? You can register custom marks to avoid this warning. To know more about this, you can refer to this document – How to mark test functions with attributes.
To avoid these types of warnings, I suggest you create a pytest.ini file and save it in the project. We need to mention all the markers and their description in this file.
[pytest]
markers =
    Login: mark all tests as login
    ValidCredentials: mark a test as a valid credentials (deselect with '-m "not ValidCredentials"')
	ScenarioOutline: mark all tests as ScenarioOutline
	InvalidCredentials: mark test as invalid credentials (deselect with '-m "not InvalidCredentials"')
	MissingUsername: mark test as missing username (deselect with '-m "not MissingUsername"')
2. Running Scenarios using Tags
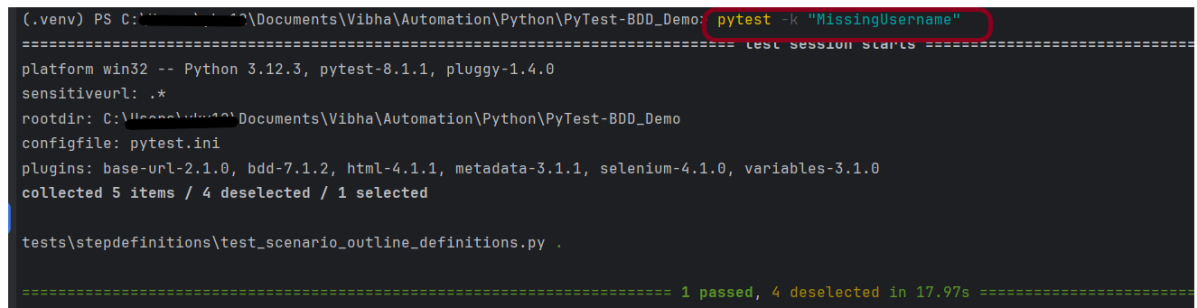
If you want to run a subset of scenarios tagged with @MissingUsername. In this case, we want to run a specific scenario – @MissingUsername.
pytest -k "MissingUsername"
The output of the above program is
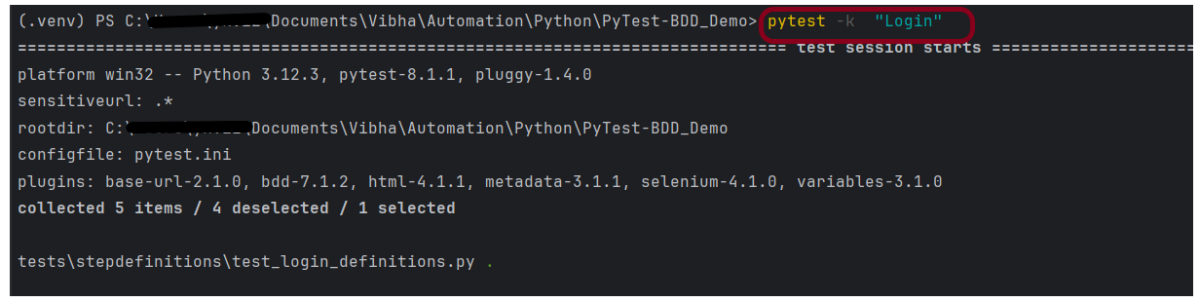
3. Running a Feature file
Suppose you want to run a single Feature File from the command line, then use the below syntax
pytest -k "Login"
The output of the above program is
4. Passing multiple Parameters
If we want to pass more than one parameter, then we can use the following command. In this case, we are using the “and” command.
pytest -m "ScenarioOutline and MissingUsername"
The output of the above program is
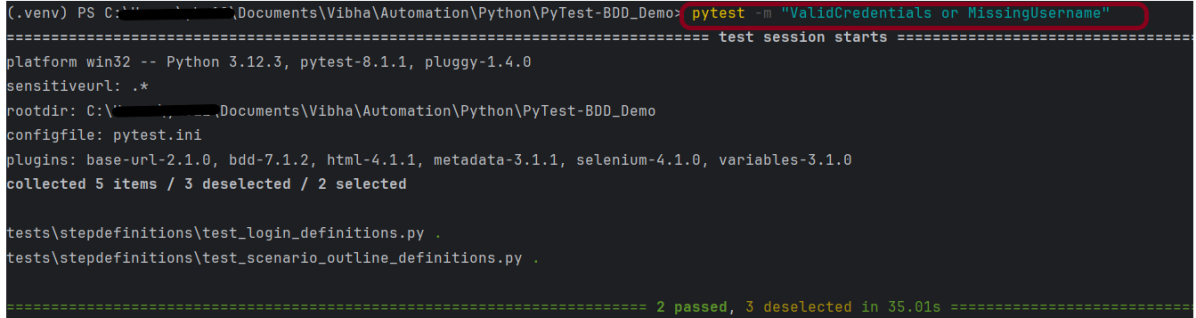
OR Command
Imagine you want to execute any one of the scenarios, then we can use the “OR” command.
pytest -m "ValidCredentials or MissingUsername"
The output of the above program is
5. Negative Command
Here, we have a total of 5 tests, and we will execute 2 tests as I have used “@InvalidCredentials” which has 3 tests. So, not using this tag means rest 2 tests will be executed.
pytest -m "not InvalidCredentials"
The output of the above program is
These are some commonly used tags in PyTest.
That’s it! Congratulations on making it through this tutorial and hope you found it useful! Happy Learning!!
Scenarios can be parametrized to cover multiple cases. These are called Scenario Outlines in Gherkin, and the variable templates are written using angular brackets (e.g. <name>). It allows us to define a scenario template with placeholders for parameters, and then specify multiple examples of that scenario using different values for those parameters.
Here’s an example of a Scenario Outline:
In this Scenario Outline:
<username> and <password> are placeholders for parameters. The Examples section provides multiple sets of values for these parameters. Each set of values represents a different example of the scenario.
How to implement Scenario Outline in PyTest – BDD?
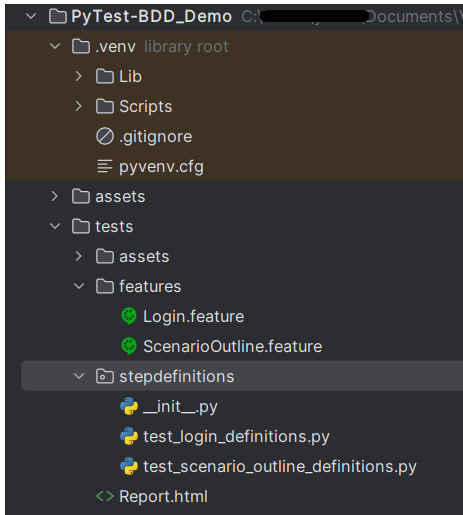
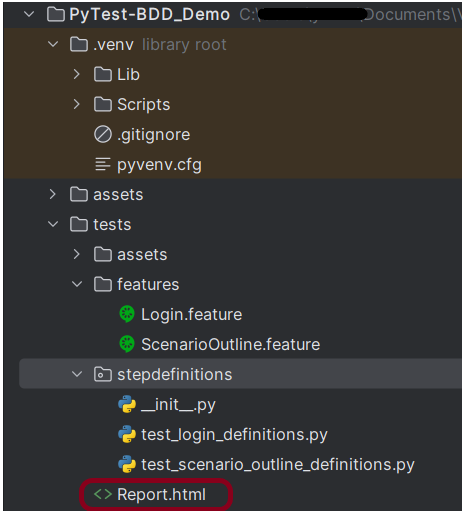
Project Structure
Implementation Steps
Step 1 – Install pytest
Use the below command to install PyTest on your machine.
Create a new project folder and open it in PyCharm.
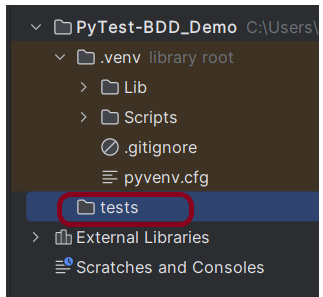
Step 3 – Create a new directory
Go to the project folder and create a new directory – tests.
Step 4 – Create python directories
Go to the test directory and create a new directory within it – features and another Python directory – stepdefinitions.
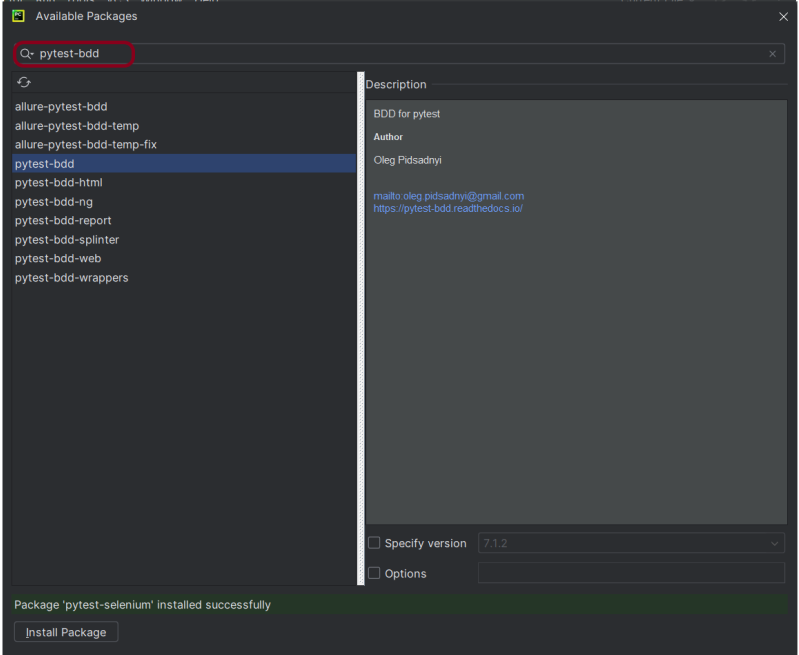
Step 5 – Add pytest-selenium and pytest-bdd packages to the PyCharms
Go to File->Settings ->Project: PyTest-BDD_Demo->Python Interpreter.
Click on the “+” sign and enter allure-r in the search bar. It will show a list of packages. Select the “pytest-selenium” package and click on the “Install Package”.
Once the package is installed, we will see the message that the package is installed successfully.
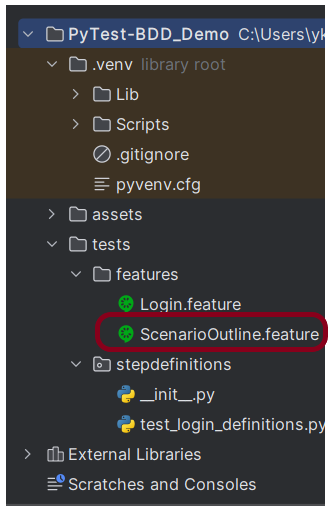
Step 6 – Create a feature file
Create a feature file – ScenarioOutline.feature in the features directory.
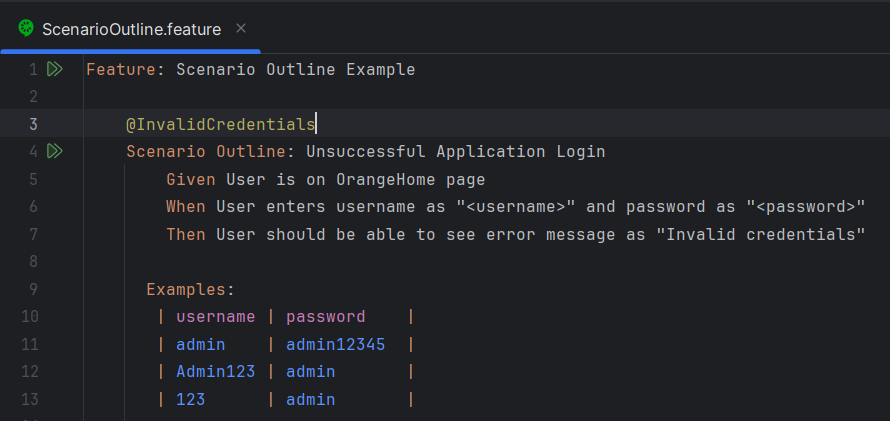
Below is the sample feature file that contains Scenario Outline.
Feature: Scenario Outline Example

    @InvalidCredentials
    Scenario Outline: Unsuccessful Application Login
        Given User is on OrangeHome page
        When User enters username as "<username>" and password as "<password>"
        Then User should be able to see error message as "Invalid credentials"

      Examples:
       | username | password    |
       | admin    | admin12345  |
       | Admin123 | admin       |
       | 123      | admin       |
Step 7 – Create the test code in stepdefinitions directory
The stepdefinition of the ScenarioOutline.feature file is created in stepdefinitions directory – test_scenario_outline_definitions.py.
Below is the sample code.
import pytest

from pytest_bdd import scenarios, given, when, then, parsers
from selenium import webdriver
from selenium.webdriver.common.by import By


# Constants
TIMEOUT = 5
URL = 'https://opensource-demo.orangehrmlive.com/'


# Scenarios
scenarios('../features/ScenarioOutline.feature')


# Fixtures
@pytest.fixture
def driver():
    driver = webdriver.Firefox()
    driver.implicitly_wait(TIMEOUT)
    driver.maximize_window()
    yield driver
    driver.quit()


# Given Steps
@given('User is on OrangeHome page')
def open_browser(driver):
    driver.get(URL)


# When Steps
@when(parsers.parse('User enters username as "{username}" and password as "{password}"'))
def search_phrase(driver, username, password):
    driver.find_element(By.NAME, "username").send_keys(username)
    driver.find_element(By.NAME, "password").send_keys(password)
    driver.find_element(By.XPATH, "//*[@class='oxd-form']/div[3]/button").click()


# Then Steps
@then(parsers.parse('User should be able to see error message as "{expected_error_message}"'))
def search_results(driver, expected_error_message):
    actual_error_message = driver.find_element(By.XPATH, "//*[@id='app']/div[1]/div/div[1]/div/div[2]/div[2]/div/div[1]/div[1]/p").text
    assert actual_error_message == expected_error_message
To bind all scenarios found in the ScenarioOutline.feature, we need to use the below syntax:
scenarios('../features/ScenarioOutline.feature')
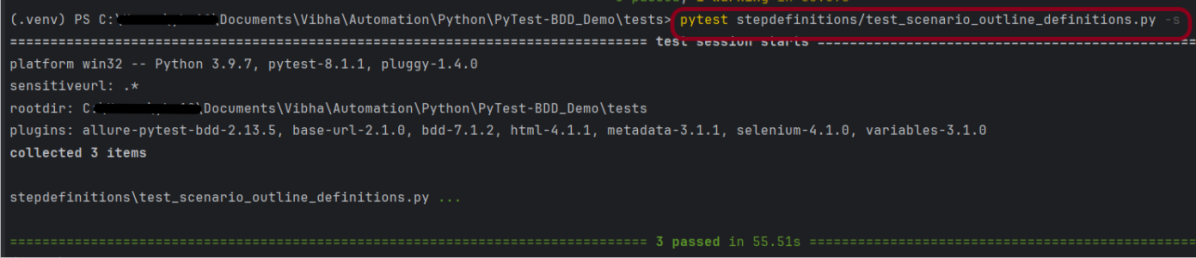
Step 8 – Execute the tests
As we know that the stepdefinitions file is present in the tests directory, so to run this test, use the below command:
Pytest BDD is a behaviour-driven development (BDD) framework for writing tests in Python using the pytest testing framework. It combines the simplicity and power of the pytest framework with the expressive syntax of the Gherkin language used in BDD.
pytest-bdd is a pytest plugin that allows you to write behaviour-driven development (BDD) style tests using the Gherkin syntax. Unlike many other BDD tools, it does not require a separate runner and benefits from the power and flexibility of pytest. It enables unifying unit and functional tests, reduces the burden of continuous integration server configuration, and allows the reuse of test setups.
Project Structure
Implementation Steps
Step 1 – Install pytest
Use the below command to install PyTest on your machine.
pip install pytest
Step 2 – Install pytest-bdd
Use the below command to install PyTest on your machine.
pip install pytest-bdd
Step 3 – Install pytest-selenium
Use the below command to install pytest-selenium plugin on your machine.
pip install pytest-selenium
Step 4 – Create a new project in PyCharm
Create a new project folder and open it in PyCharm.
Step 5 – Create a new directory
Go to the project folder and create a new directory – tests.
Step 6 – Create python directories
Go to the test directory and create a new directory within it – features and another Python directory – stepdefinitions.
Step 7 – Add pytest-selenium and pytest-bdd packages to the PyCharms
Go to File->Settings ->Project: PyTest-BDD_Demo->Python Interpreter.
Click on the “+” sign and enter allure-r in the search bar. It will show a list of packages. Select the “pytest-selenium” package and click on the “Install Package”.
Once the package is installed, we will see the message that the package is installed successfully.
Step 8 – Create a feature file
Create a feature file – Login.feature in the features directory.
Below is the sample feature file.
Feature: Login Page

    Scenario: Successful Application Login
        Given User is on login page
        When User enter username "Admin" and password "admin123"
        Then User should be able to login successfully and new page open "Dashboard"
Step 9 – Create the test code in stepdefinitions directory
The step definition of the Login.feature file is created in the stepdefinitions directory – test_login_definitions.py.
Below is the sample code.
import pytest

from pytest_bdd import scenarios, given, when, then, parsers
from selenium import webdriver
from selenium.webdriver.common.by import By

# Constants
TIMEOUT = 4
URL = 'https://opensource-demo.orangehrmlive.com/'


# Scenarios
scenarios('../features/Login.feature')


# Fixtures
@pytest.fixture
def driver():
    driver = webdriver.Firefox()
    driver.implicitly_wait(TIMEOUT)
    driver.maximize_window()
    yield driver
    driver.quit()


# Given Steps
@given('User is on login page')
def open_browser(driver):
    driver.get(URL)


# When Steps
@when(parsers.parse('User enter username "{username}" and password "{password}"'))
def search_phrase(driver, username, password):
    driver.find_element(By.NAME, "username").send_keys(username)
    driver.find_element(By.NAME, "password").send_keys(password)
    driver.find_element(By.XPATH, "//*[@class='oxd-form']/div[3]/button").click()


# Then Steps
@then(parsers.parse('User should be able to login successfully and new page open "{heading}"'))
def search_results(driver, heading):
    homepage_title = driver.find_element(By.XPATH, "//*[@class='oxd-topbar-header-breadcrumb']/h6").text
    assert homepage_title == heading
To bind all scenarios found in the Login.feature, we need to use the below syntax:
scenarios('../features/Login.feature')
Step 10 – Execute the tests
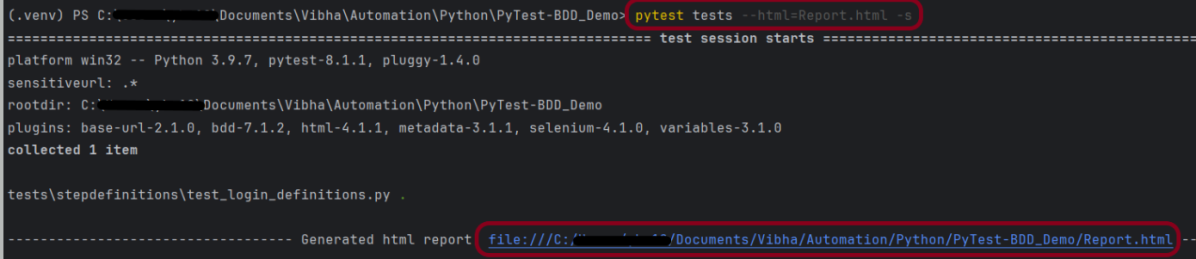
As we know the stepdefinitions file is present in the tests directory, so to run this test, use the below command:
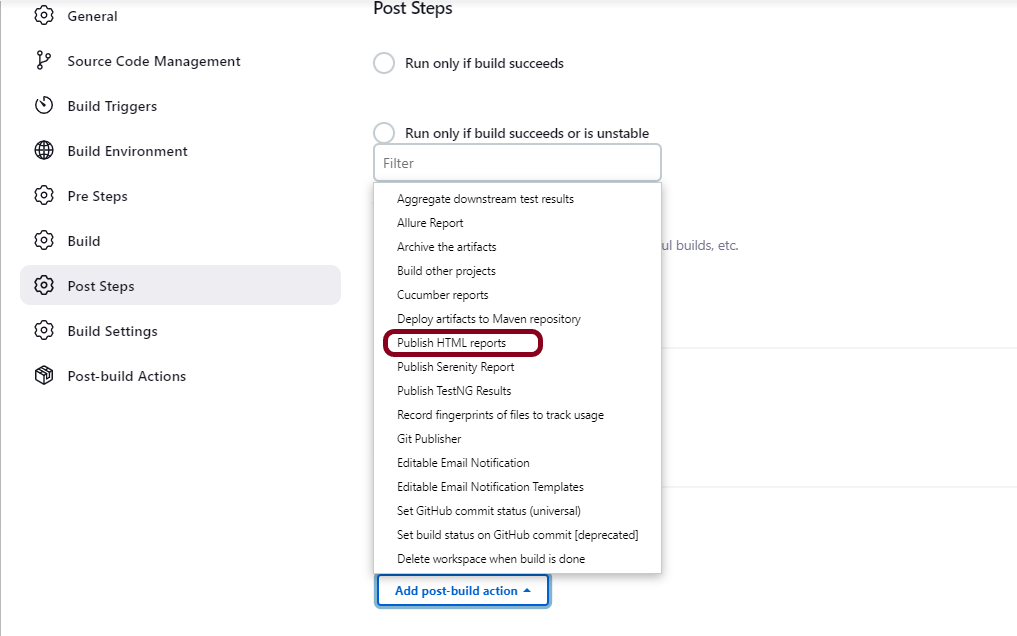
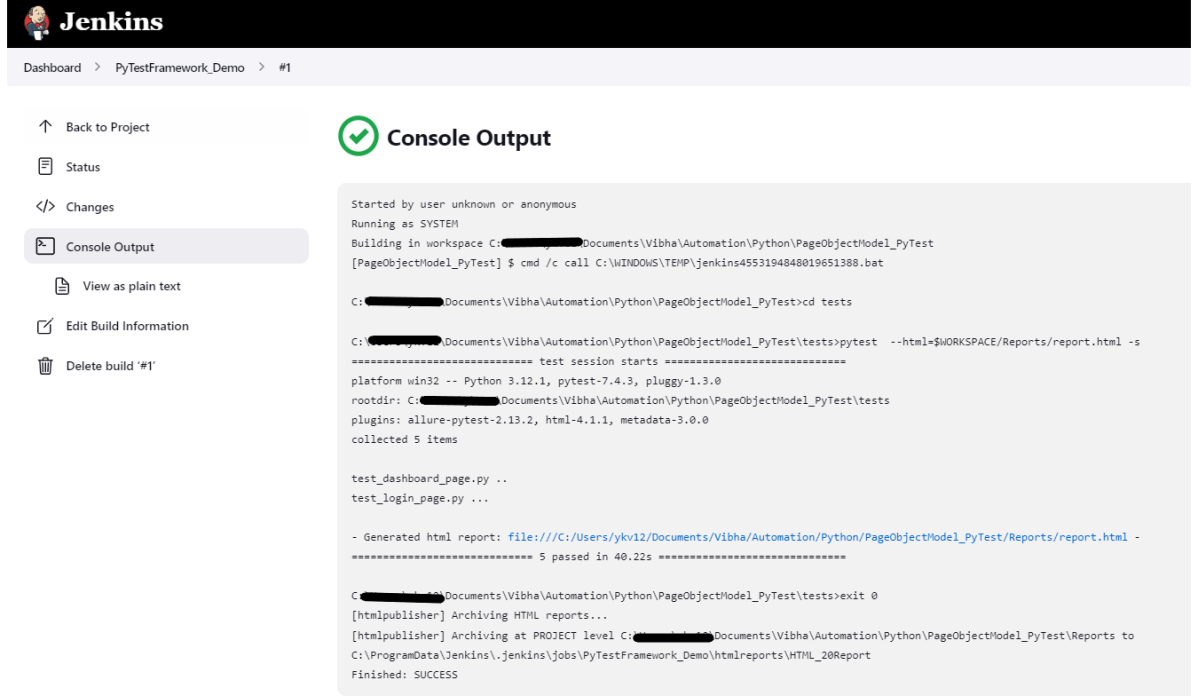
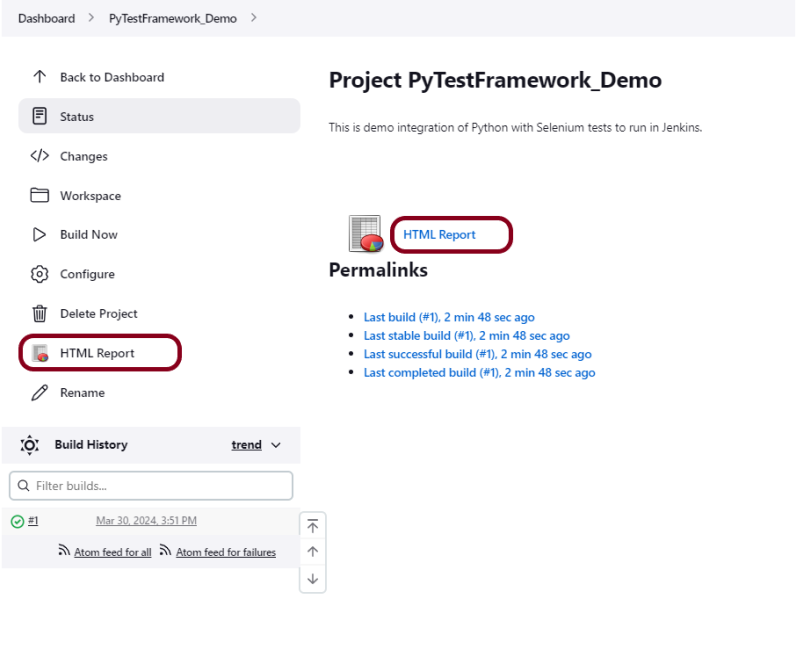
In the previous tutorial, we have seen the How to generate HTML Reports in Jenkins. In this tutorial, we show you how to integrate PyTest tests with Jenkins.
Jenkin’s installed and started on the computer. The current Jenkins version is – 2.361.2
Implementation Steps
To generate HTML Report in Jenkins, we need to download HTML Publisher Plugin. Please refer to this tutorial to install the plugin – How to install Plugins in Jenkins.
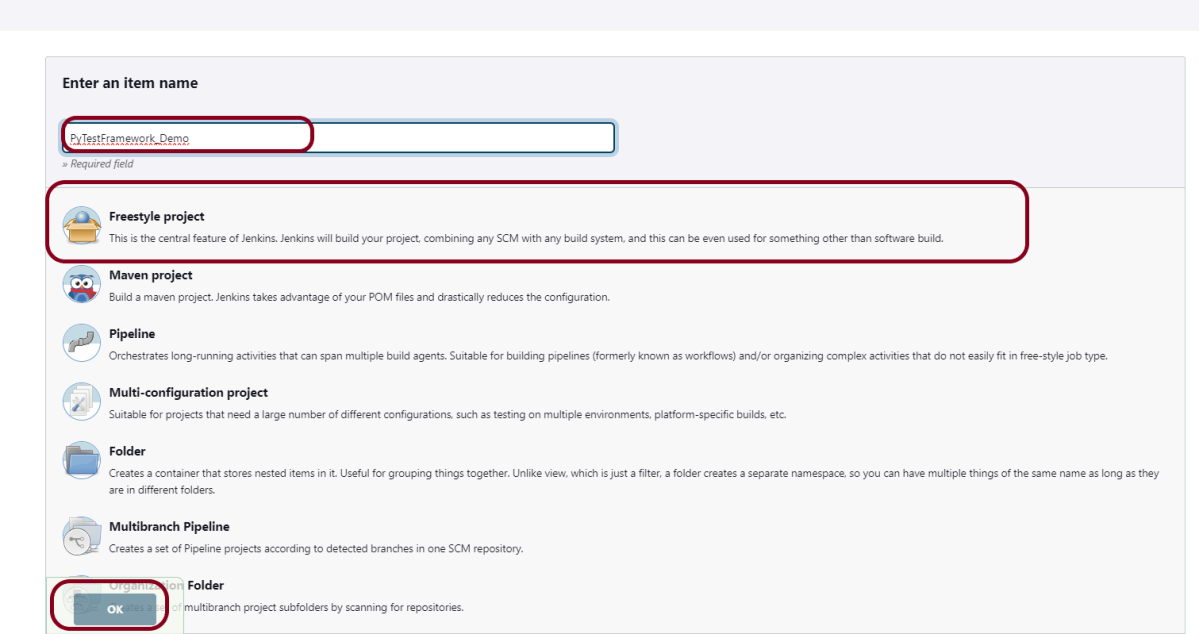
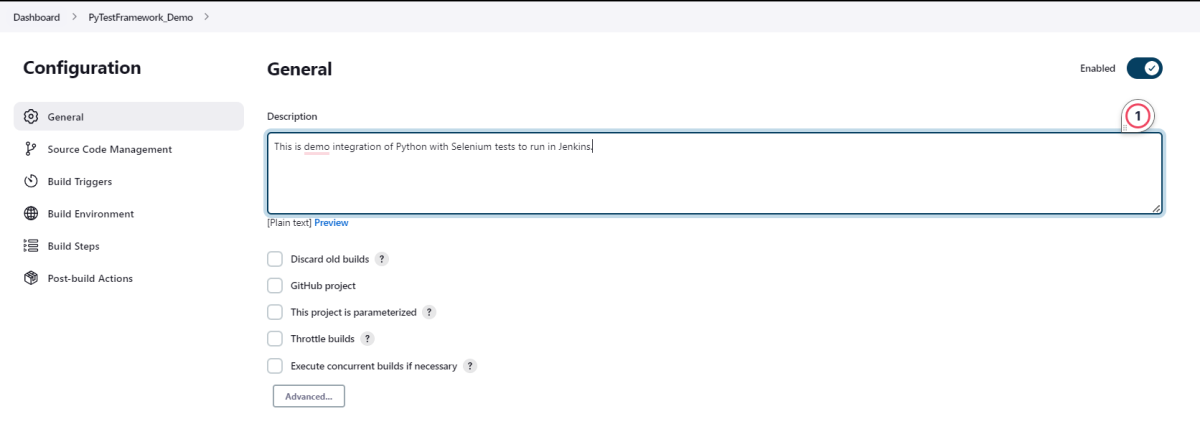
Step 1: Create a new FreeStyle project
Give the Name of the project – PyTestFramework_Demo
Click on the Freestyle project.
Click on the OK button.
In the General section, enter the project description in the Description box – This is demo integration of Python with Selenium tests to run in Jenkins.
Step 2: Select a custom workspace
Mention the full path of the project in the Use custom workspace.
Select Source Code Management as None if the project is locally present on the machine.
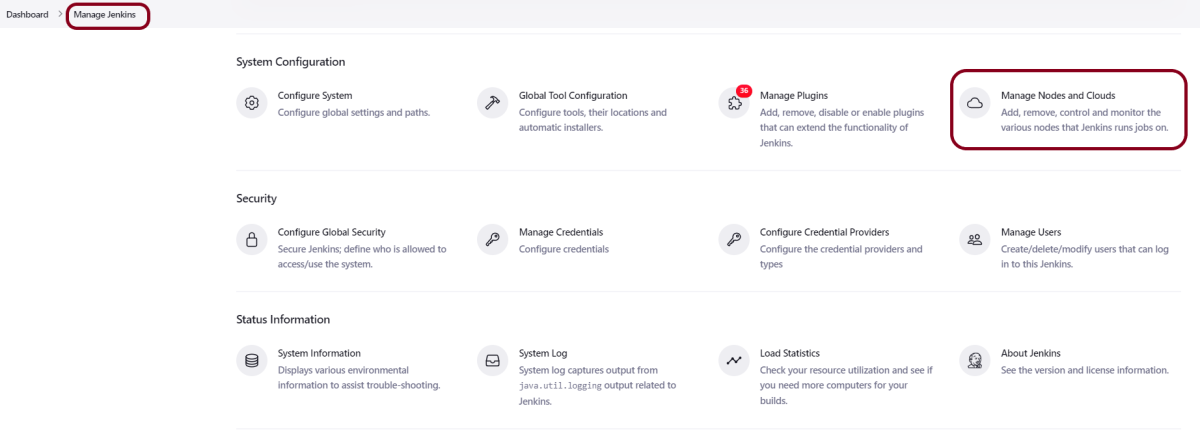
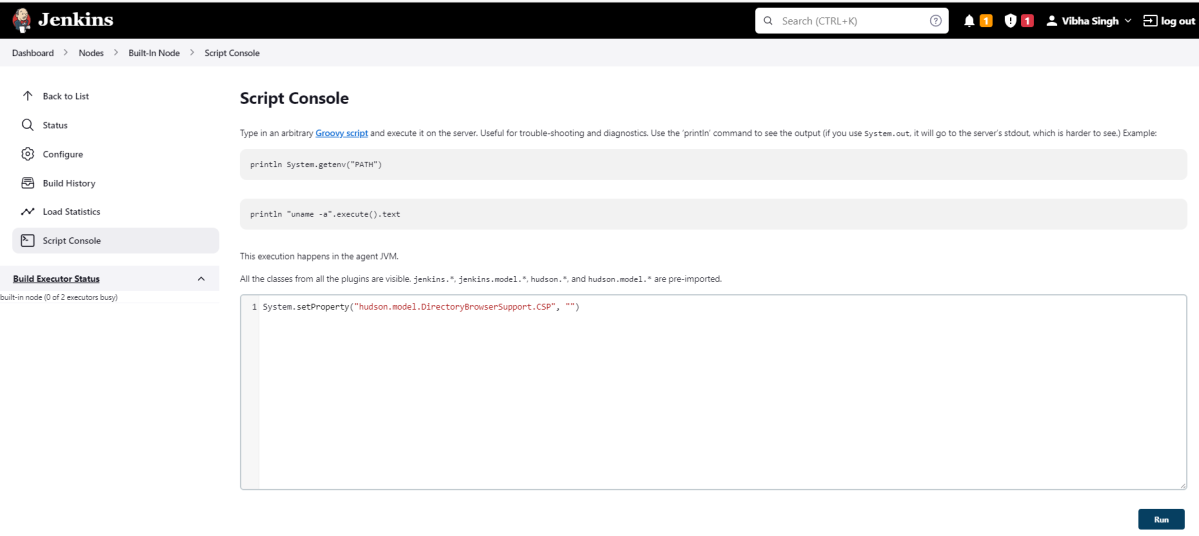
We can customize Content Security Policy in Jenkins. But keep in mind that it should be done after checking with the Security team in your organization. This is a workaround solution. I can’t emphasize enough that this is not a standard practice.
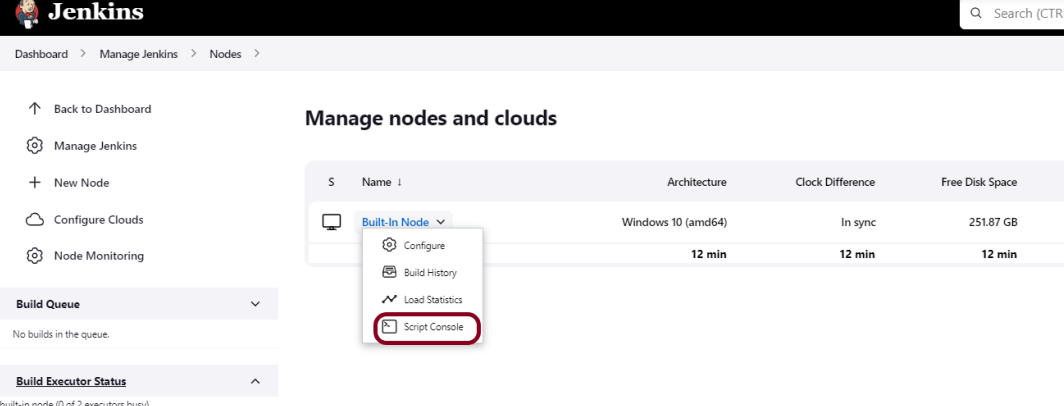
Go to Manage Jenkins -> Manage Nodes and Clouds.
Click on the Script Console option.
Type in the following command and Press Run. If you see the output as ‘Result:’ then the protection is disabled. Re-Run your build and you can see that the new HTML files archived will have the CSS enabled.
The Page Object Model (POM) is a design pattern used in test automation, particularly in web application testing. It aims to enhance the test automation framework’s maintainability, readability, and reusability by encapsulating the behavior of web pages or user interfaces into separate classes or modules called Page Objects.
In essence, the Page Object Model represents web pages or user interfaces as objects in the test automation code. Each page or UI element is associated with a Page Object, which contains all the actions that can be performed on that page and the elements present on it.
To implement the Page Object Model (POM) in PyTest, we will organize the test cases and page objects in a way that promotes reusability, readability, and maintainability.
Create Page Objects: Define a separate class for each page of your web application. Each class should encapsulate the elements and actions of the corresponding page.
Write Test Cases: Implement your test cases as pytest test functions or methods. These test functions should interact with the page objects to perform actions and assertions.
Use Fixtures for Setup and Teardown: Utilize pytest fixtures for setup and teardown operations such as initializing the browser, navigating to URLs, and closing the browser.
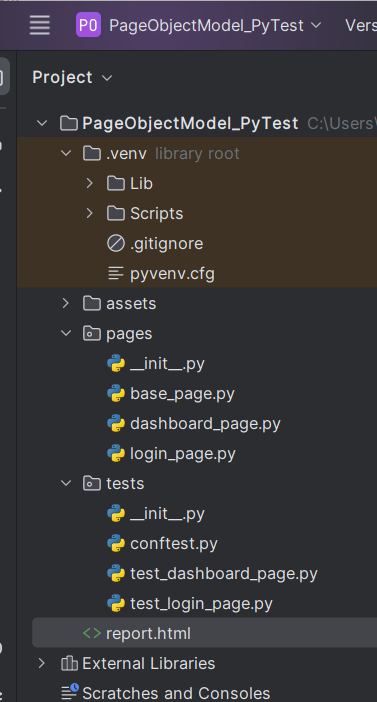
Project Structure
Implementation Steps
Step 1 – Install pytest
Use the below command to install PyTest on your machine.
pip install -U pytest
Step 2 – Create a new project in PyCharm
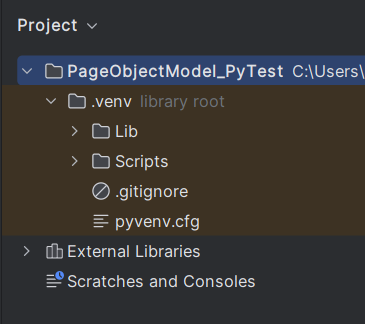
Create a new project folder and open it in PyCharm.
Step 3 – Create python directories
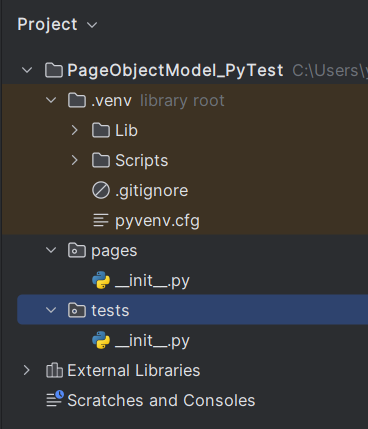
Go to the project folder and create 2 new python directories for pages and tests respectively.
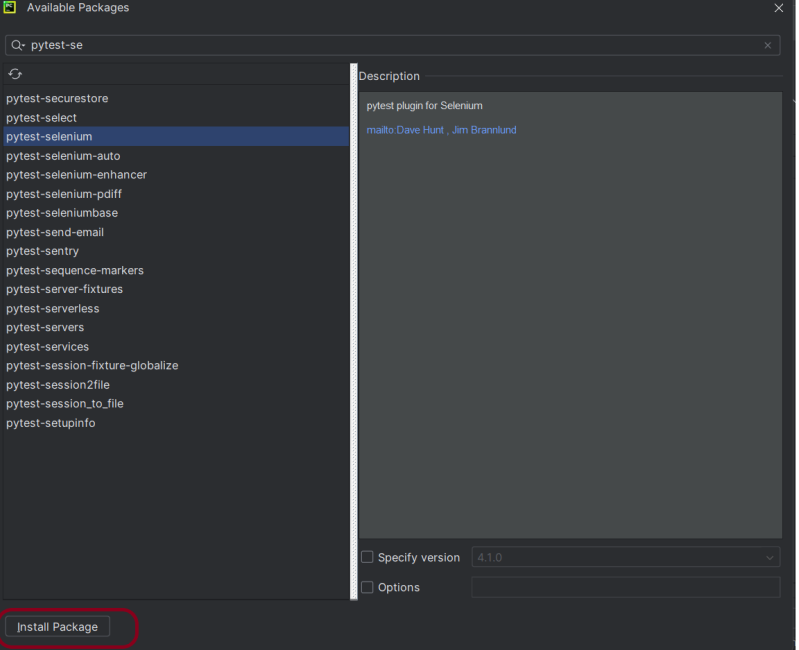
Step 4 – Add pytest-selenium package to the PyCharms
Go to File->Settings ->Project: PageObjectModel_PyTest->Python Interpreter.
Click on the “+” sign and enter allure-r in the search bar. It will show a list of packages. Select the “pytest-selenium” package and click on the “Install Package”.
Once the package is installed, we will see the message that the package is installed successfully.
Step 5 – Create the test code and corresponding helper classes
First we will create BasePage class that contains all the generic methods that will be used throughout the framework, like driver method, locator method and soon.
from selenium.webdriver import ActionChains
from selenium.webdriver.support.wait import WebDriverWait
from selenium.webdriver.support import expected_conditions as ec


class BasePage:

    def __init__(self, driver):
        self._driver = driver
        self._wait = WebDriverWait(self._driver, 10)
        self._action = ActionChains(self._driver)

    def find(self, locator):
        return self._driver.find_element(*locator)
Now, we will create the page object class of each page.
LoginPage.py
from selenium.webdriver.common.by import By

from pages.base_page import BasePage


class LoginPage(BasePage):
    username = (By.NAME, "username")
    password = (By.NAME, "password")
    submit_button = (By.XPATH, "//*[@class='oxd-form']/div[3]/button")
    error_message = (By.XPATH, "//*[@class='orangehrm-login-error']/div[1]/div[1]/p")

    def execute_login(self, username: str, password: str):
        self.find(self.username).send_keys(username)
        self.find(self.password).send_keys(password)
        self.find(self.submit_button).click()

    def actual_error(self):
        return self.find(self.error_message).text
DashboardPage.py
from selenium.webdriver.common.by import By

from pages.base_page import BasePage


class DashboardPage(BasePage):
    heading = (By.XPATH, "//*[@class='oxd-topbar-header-breadcrumb']/h6")
    assign_leave_option = (By.XPATH, "//*[@title='Assign Leave']")
    time_at_work_option = (By.XPATH, "//*[@title='Time at Work']")

    def actual_heading(self):
        return self.find(self.heading).text

    def assign_leave_displayed(self):
        return self.find(self.assign_leave_option).is_displayed()

    def time_at_work_displayed(self):
        return self.find(self.assign_leave_option).is_displayed()
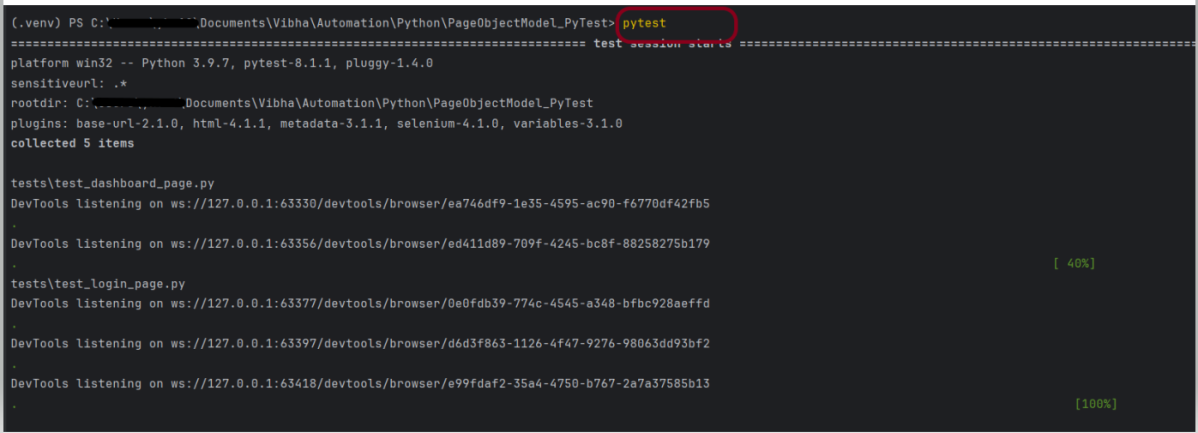
Now, we will create a conftest.py class that contains the initialization of the browser.
Logging function is used as a method for monitoring events in order to identify software issues as they occur.
While Pytest excels at executing tests, it doesn’t inherently showcase the results of print statements or logs, posing a challenge when diagnosing test failures.
So, what’s the remedy? How can we effectively log and observe events in real-time during our unit testing?
The solution lies in PyTest logging, offering the capability to generate and even modify log handlers within PyTest.
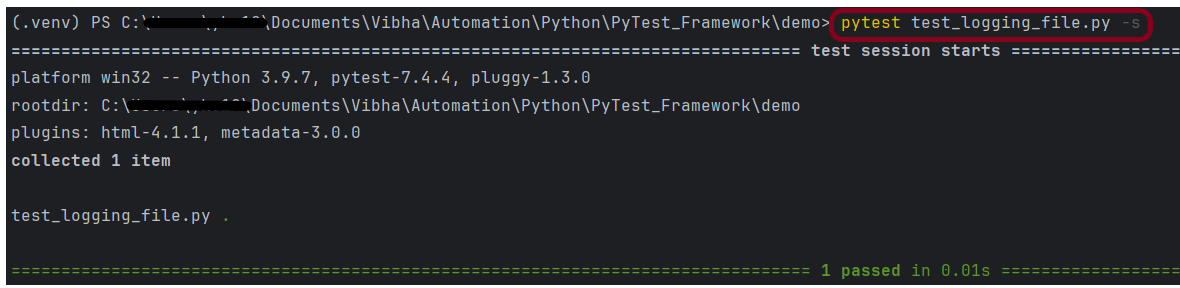
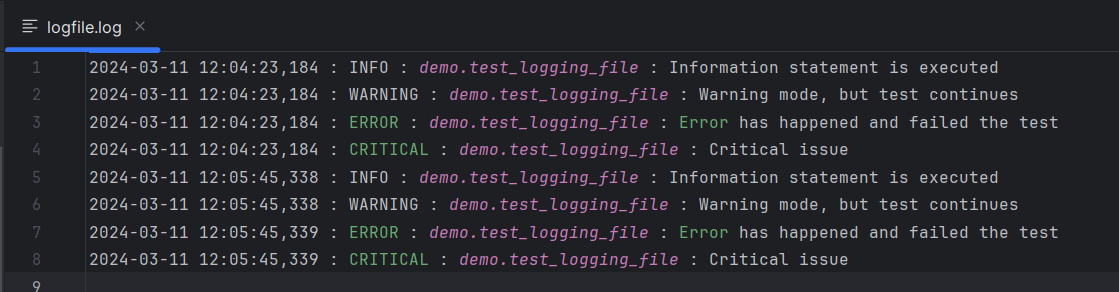
The file logger utilizes logging.FileHandler() to direct logs to a specified file. It’s also set to the INFO level, ensuring uniformity of logged information across the console and file outputs.
Below is an example of File Logger.
import logging
def test_logging_file():
# Create a named logger
logger = logging.getLogger(__name__)
# Create a file handler
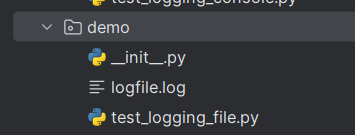
filehandler = logging.FileHandler('logfile.log')
# Set the formatter for the file handler
formatter = logging.Formatter("%(asctime)s : %(levelname)s : %(name)s : %(message)s")
filehandler.setFormatter(formatter)
# Add the file handler to the logger
logger.addHandler(filehandler)
logger.setLevel(logging.INFO)
logger.debug("Debug statement is executed")
logger.info("Information statement is executed")
logger.warning("Warning mode, but test continues")
logger.error("Error has happened and failed the test")
logger.critical("Critical issue")
By default each captured log message shows the module, line number, log level and message.
If desired the log and date format can be specified to anything that the logging module supports by passing specific formatting options:
Logging function is used as a method for monitoring events in order to identify software issues as they occur.
While Pytest excels at executing tests, it doesn’t inherently showcase the results of print statements or logs, posing a challenge when diagnosing test failures.
So, what’s the remedy? How can we effectively log and observe events in real-time during our unit testing?
The solution lies in Pytest logging, offering the capability to generate and even modify log handlers within Pytest.
The Python built-in logging module offers five standard levels that signify the severity of events:
NOTSET (0): This level captures all messages, irrespective of their severity.
DEBUG (10): Used for information aiding in identifying potential issues, such as variable values or program execution steps.
INFO (20): Confirms that operations are proceeding as intended.
WARNING (30): Indicates an unexpected event or potential issue in the near future (e.g., low disk space), but the software continues to function normally.
ERROR (40): Signifies a significant problem that has hindered the software from executing a specific function.
CRITICAL (50): Denotes an extremely severe error that could halt the program’s execution entirely.
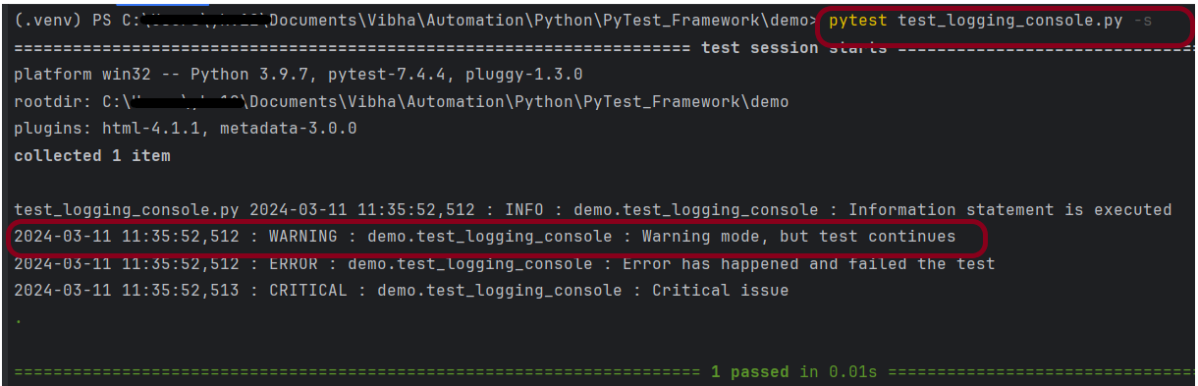
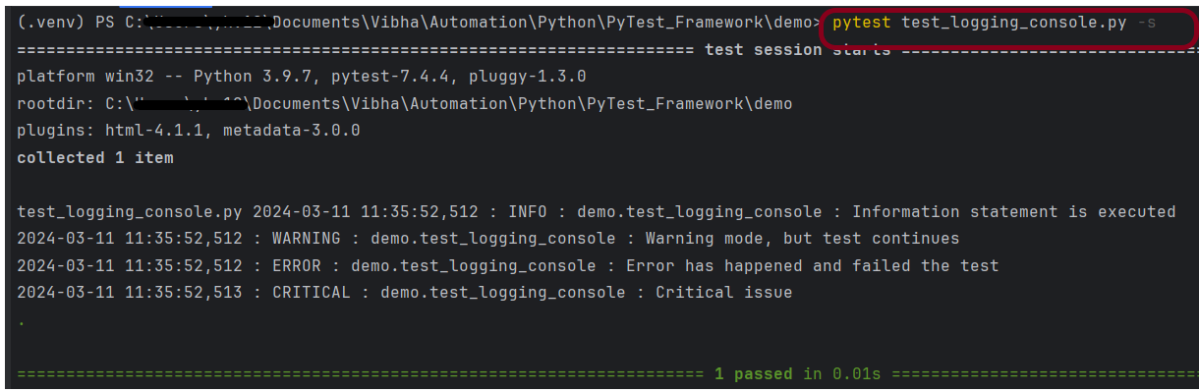
Console Logger
The console logger leverages logging.StreamHandler() to output logs to the console (stdout). The logger’s level is set to INFO, meaning it will handle all log messages with a severity of INFO and above.
Below is an example of Console Logger.
import logging


def test_logging_console():
    logger = logging.getLogger(__name__)

    # Create a console handler
    console_handler = logging.StreamHandler()

    # Set the formatter for the console handler
    formatter = logging.Formatter("%(asctime)s : %(levelname)s : %(name)s : %(message)s")
    console_handler.setFormatter(formatter)

    # Add the console handler to the logger
    logger.addHandler(console_handler)
    logger.setLevel(logging.INFO)

    logger.debug("Debug statement is executed")
    logger.info("Information statement is executed")
    logger.warning("Warning mode, but test continues")
    logger.error("Error has happened and failed the test")
    logger.critical("Critical issue")
By default each captured log message shows the module, line number, log level and message.
If desired the log and date format can be specified to anything that the logging module supports by passing specific formatting options:
Parameterized tests allow a developer to run the same test over and over again on different values. For example, we want to test the login page or process, with multiple input values for e.g. say 10 different username and password conditions.
Parameterization using Fixtures
It allows us to run the same test function with different sets of inputs, often by defining those inputs as fixtures.
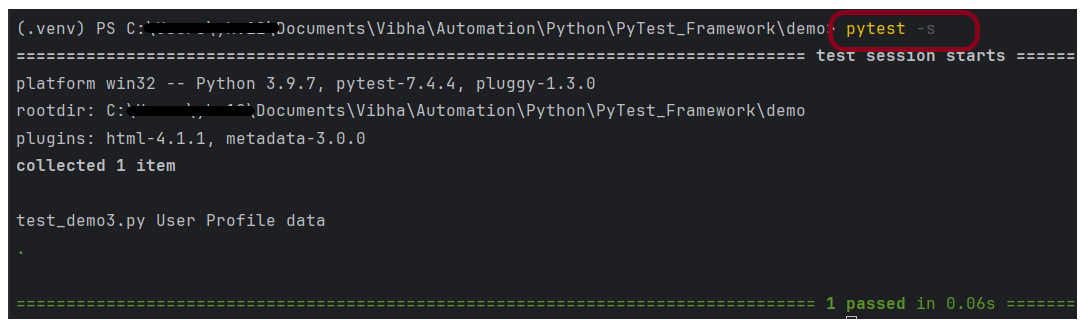
In the below example, let us create a conftest.py file.
import pytest
@pytest.mark.usefixtures("dataload")
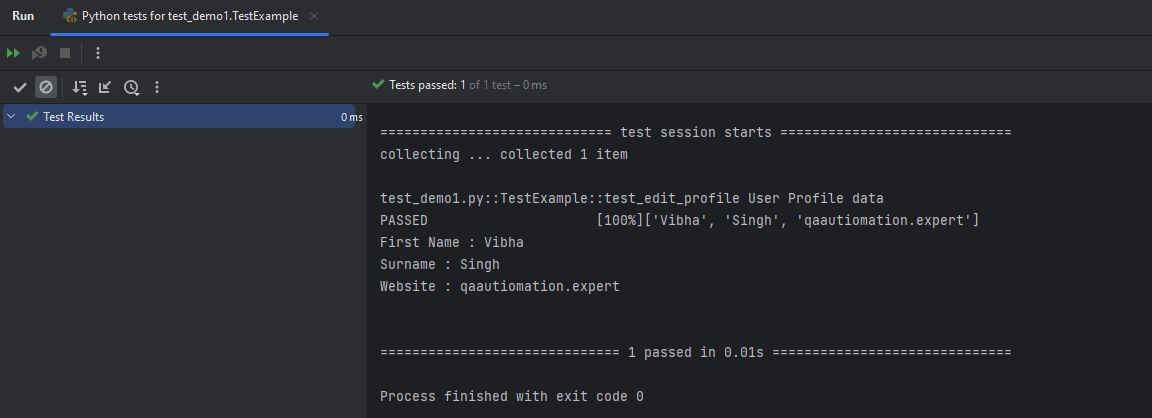
class TestExample:
def test_edit_profile(self, dataload):
print(dataload)
print("First Name :", dataload[0])
print("Surname :", dataload[1])
print("Website :", dataload[2])
The output of the above program is
In the above example, the test_edit_profile function is parameterized using @pytest.mark.usefixtures(“dataload”). It allows you to run the same test with different input values by providing a list of tuples specifying the parameters and expected values. In this case, the test will be executed three times, each time with different values for Vibha, Singh, and qaautomation.expert.
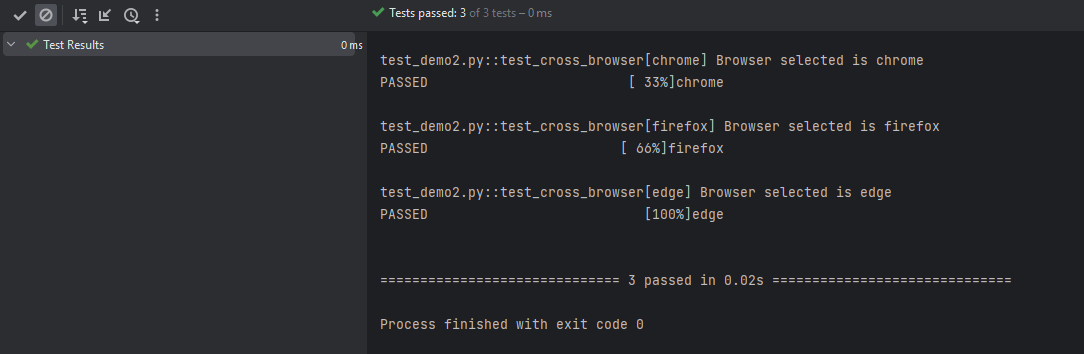
In the example below, Chrome, Firefox and edge are used as parameters to the fixture functions with the scope as class i.e. @pytest.fixture(params=[“chrome”, “firefox”,”edge”])
In the below example, let us create a fixture in conftest.py file.
import pytest


@pytest.fixture(params=["chrome", "firefox", "edge"])
def cross_browser(request):
    if request.param == "chrome":
        print ("Browser selected is chrome")
    elif request.param == "firefox":
        print("Browser selected is firefox")
    elif request.param == "edge":
        print("Browser selected is edge")

    return request.param
Now, let us create a method in a new file – test_demo2.py.
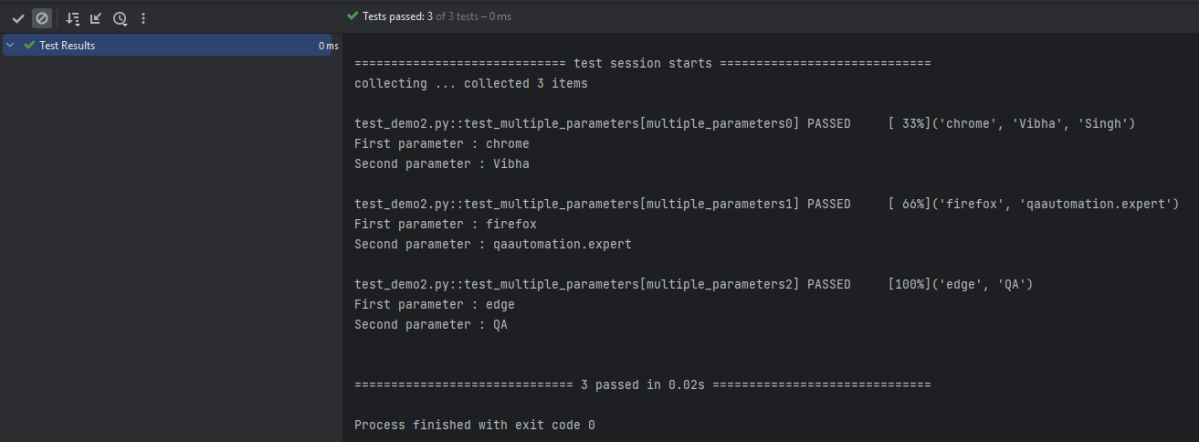
How to pass multiple parameters in a method using Fixtures
In the below example, we will pass multiple parameters for a run. We can see that for the first run, the parameters used are “chrome”, “Vibha”, “Singh”, the parameters used for the second run are “firefox”, “qaautomation.expert” whereas, for the third run, it is “edge”, “QA”.
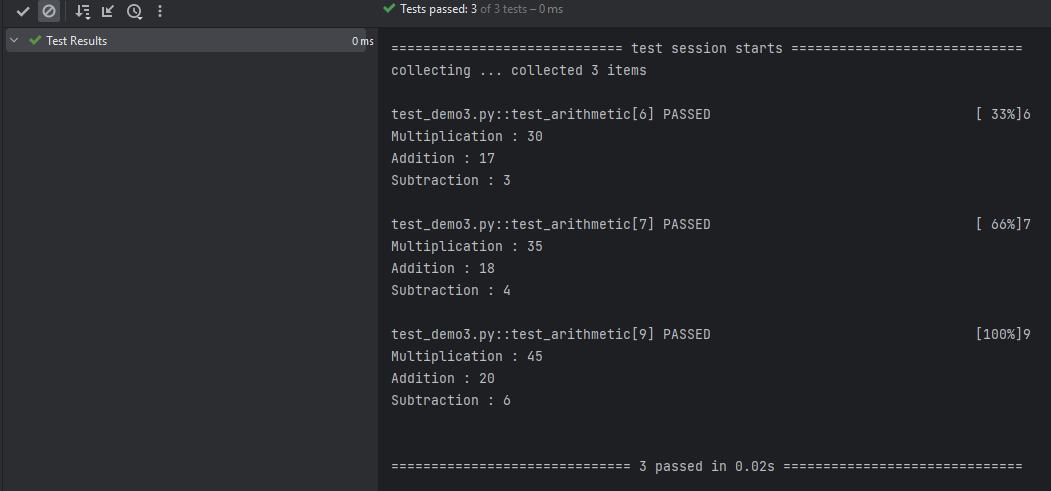
Here, the @parameterize decorator defines three different (arithmetic_fixture) tuples so that the test_arithmetic function will run three times using them in turn.